JSON REST Web Services Connector
Introduction
Description
This connector allows the integration with any Web Service able to consume and generate JSON documents through REST communication.
Managed System
Every commercial product or custom web application allows REST communication with JSON documents.
There are a lot of products that use this standard, for instance:
- JIRA.
- Oracle Field Service Cloud (OFSC).
- Office 365.
- AWS.
- Google Cloud.
If your system is not in the previous list, it's possible to include it easily!
For more information to check if your system may be synchronized with this connector you do not hesitate to contact us through our Contact form
Prerequisites
It is needed a user with access and permissions to the endpoints and operations required in the scope of the integration.
Also, the documentation, specification, or tutorial of the implementation of the JSON REST Web Service is required to apply the mapping configuration.
Download and Install
This addon is located in the Connectors section and its name is REST (json) plugin.
You can visit the Addons Getting started page for more information about the installation process.
Agent Configuration
Basic
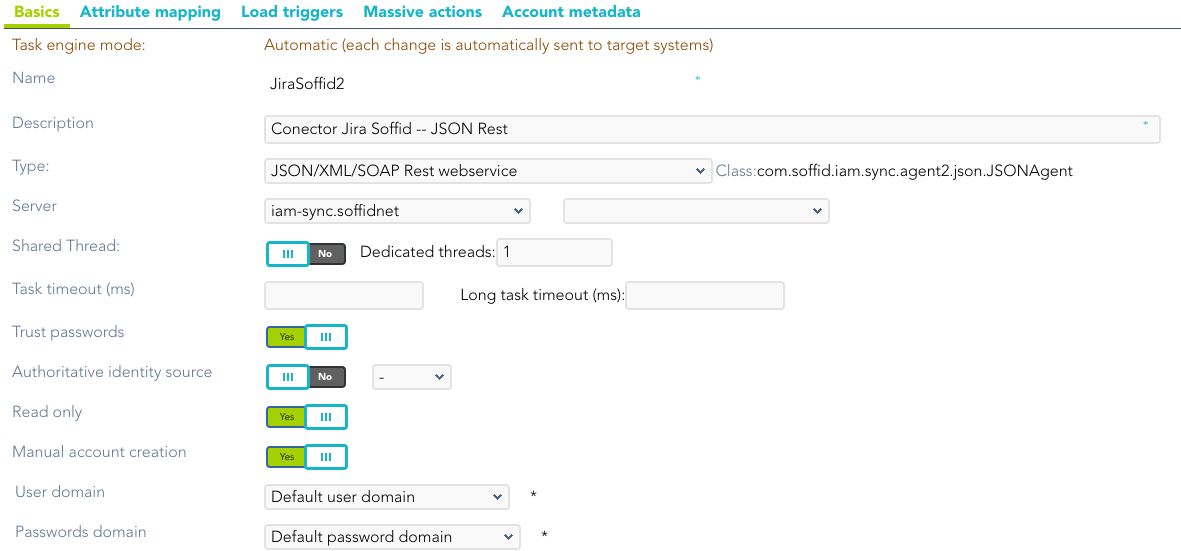
Generic parameters
After the installation of the addon, you may create and configure agent instances.
To configure this JSON REST Web Service Connector you must select "JSON Rest Webservice" in the attribute "Type" of the generic parameters section in the agents' page configuration.
For more information about how you may configure the generic parameters of the agent, see the following link: Agents configuration
Custom parameters
Below there are the specific parameters for this agent implementation:
|
Parameter
|
Description
|
|---|---|
|
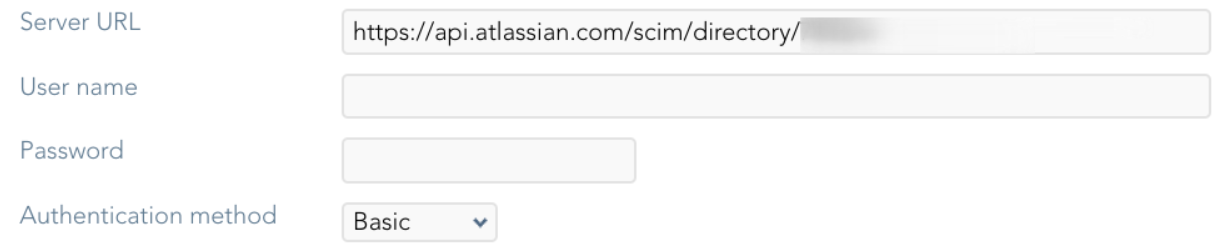
Server URL |
URL of the REST web service. Base URL for making calls. |
|
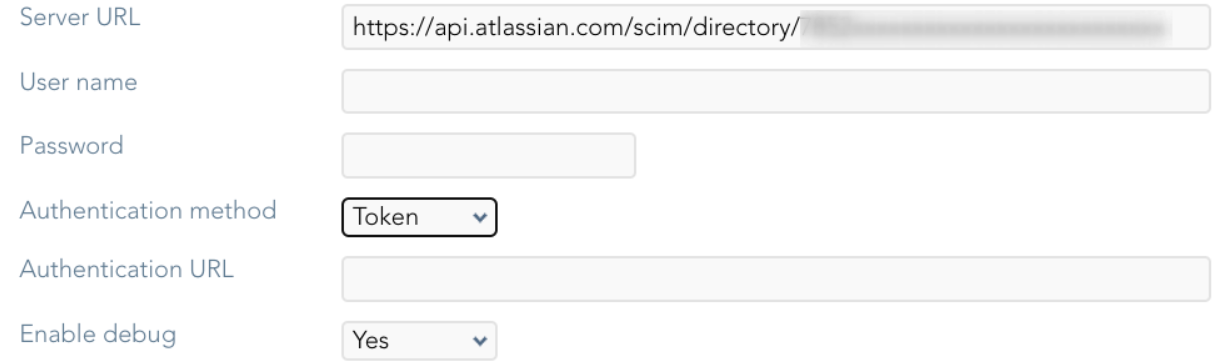
Authentication method |
Available options:
(*) You can find more information in the Authentication method section. |
|
Enable debug |
Two options: "Yes", "No": it enables or not more log traces in the Synchronization Server log |
| Proxy host |
Only when the proxy is needed. |
| Proxy port |
Only when the proxy is needed. |
| XML Templates |
Allows you to add new XML templates with SOAP requests and then configure them at attribute mappings. |
Authentication method
None: no authentication is needed. There are no parameters to configure.

Basic: the username and password are sent with each request.
- User Name: user to authenticate.
- Password: the password of the user to authenticate.
Bearer token (Simple token in Soffid $)
- Bearer token (Token in Soffid 4): this token is provided by the application to which we are going to connect.

Token (Token got from user and password in Soffid 4): calls the authentication URL with the POST method and with the username and password, and the response will be the token. It is no longer used.
- User Name: user to authenticate.
- Password: the password of the user to authenticate.
- Authentication URL: URL to retrieve the token for the server's authentication (for the "Token" method).
Token oAuth Client Credentials
- Authentication URL: URL to retrieve the token for the server's authentication (for the "Token" method).
- Token attr. output: the value is always access_token.
- Request parameters:
- Client ID: it is like the user.
- Client secret: it is the password.
- Scope: it is the permissions.

Token oAuth Password Grant
- User Name: user to authenticate.
- Password: the password of the user to authenticate.
- Authentication URL: URL to retrieve the token for the server's authentication (for the "Token" method).
- Token attr. output: the value is always access_token.
- Request parameters:
- Client ID: it is like the user.
- Client secret: it is the password.
- Scope: it is the permissions.

Attribute mapping
This connector can manage users, accounts, roles, groups, and grants.
Note that any changes made to the methods will affect the properties and vice versa.
Methods
This agent allows you to define methods to be called using the defined properties. There are some default methods, but you can customize your own methods.
Default methods:
- load
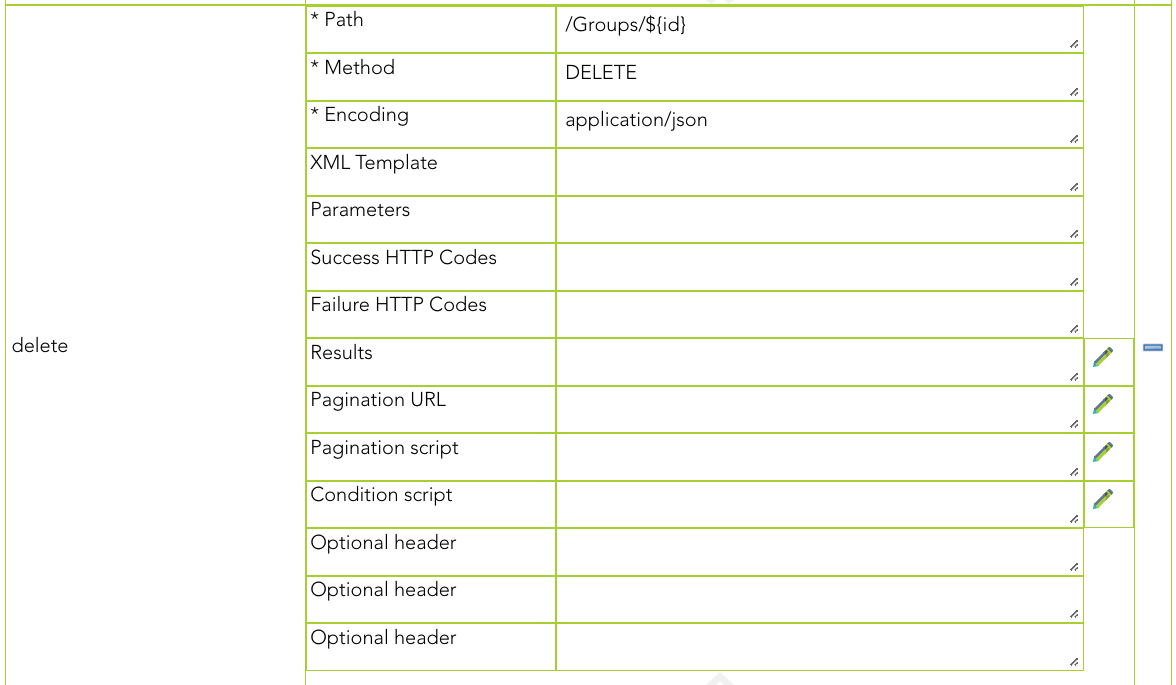
- delete
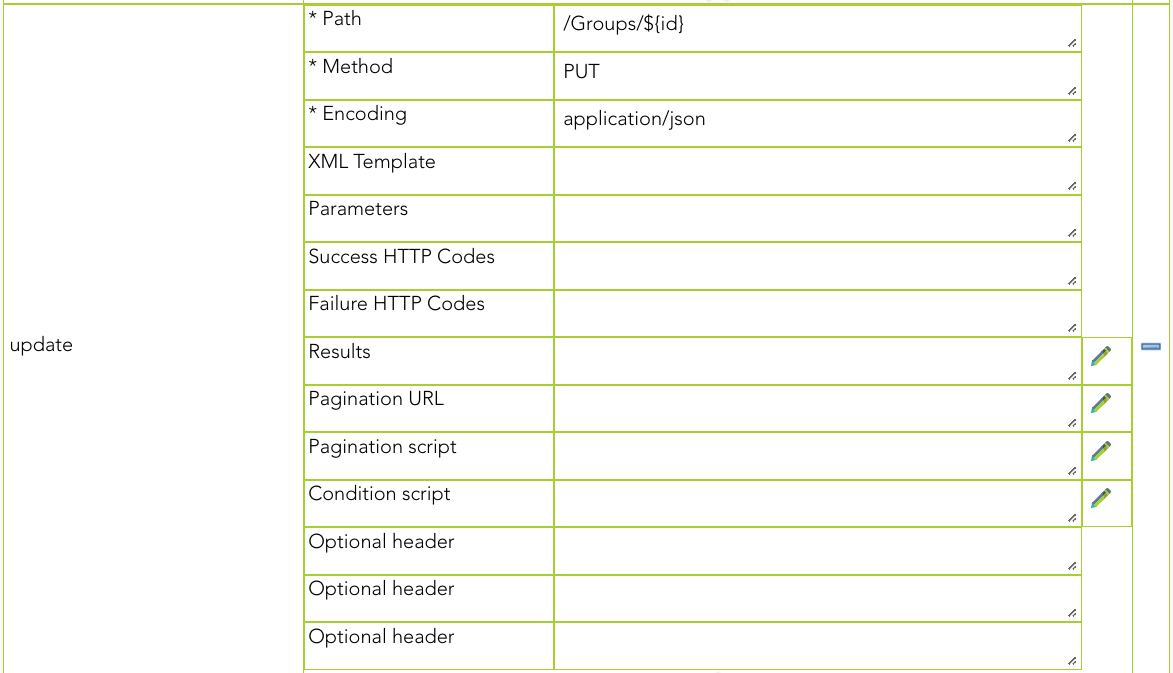
- update
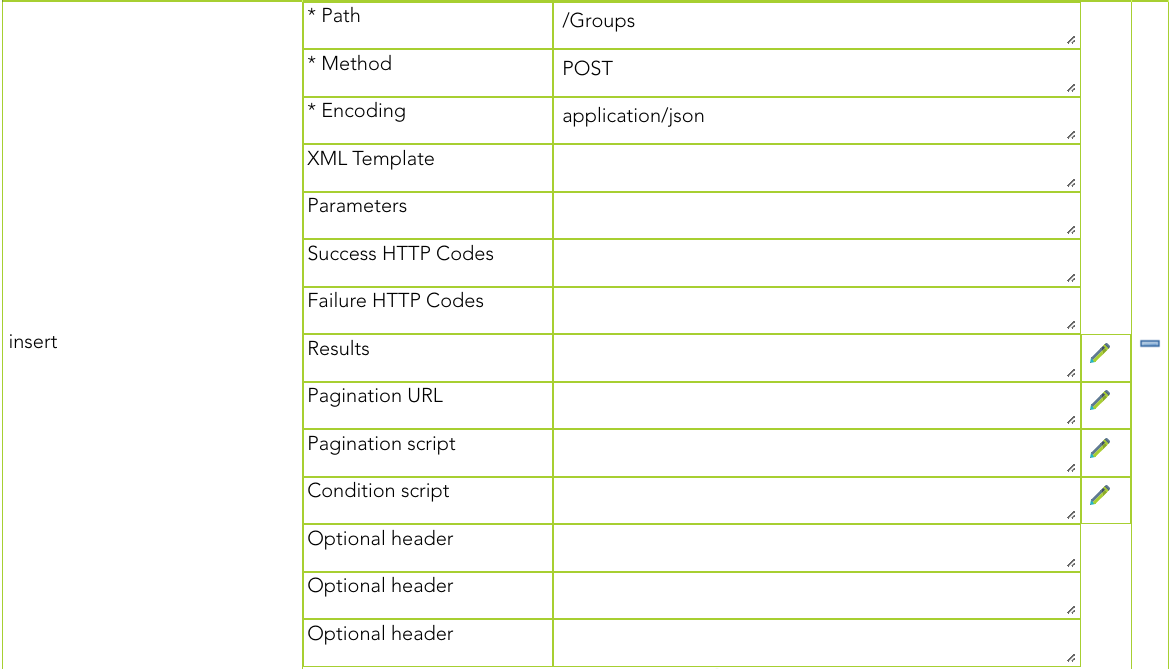
- insert
- select
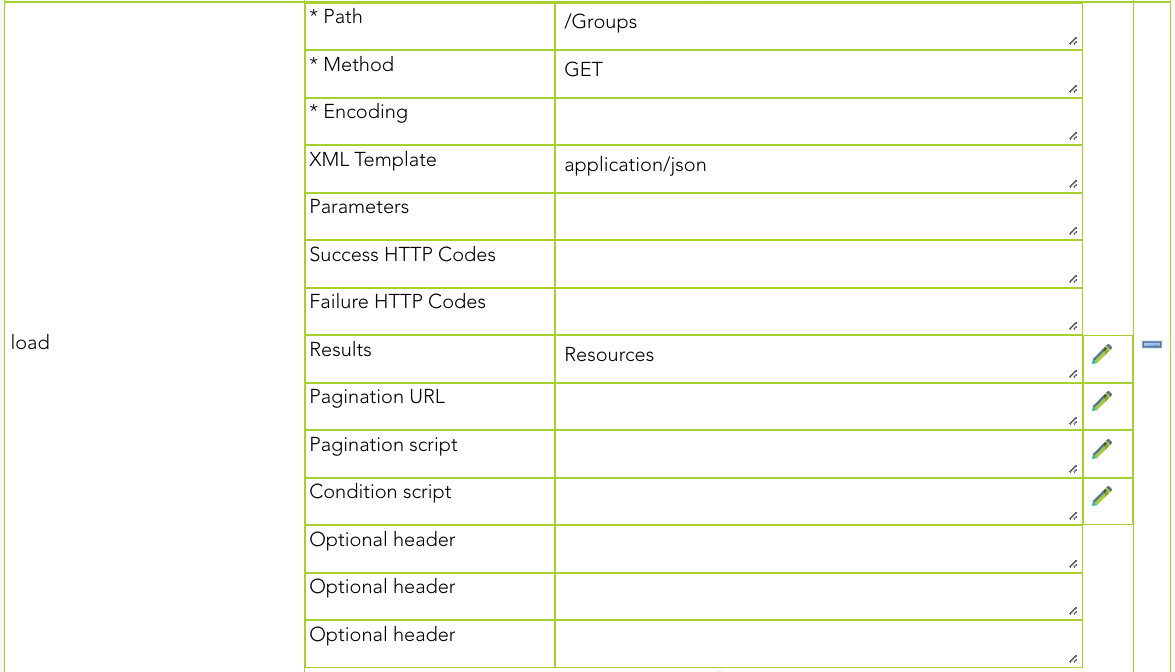
For each method, the properties to set up are as follows:
|
Properties
|
Description
|
|---|---|
| Path | A valid URL to call. This path must be the continuation of the Server URL for making calls. |
| Method | Available methods to call a Rest API (GET, POST, PUT, DELETE, PATCH) |
| Encoding |
The specific type of encoded data that will be used. There are three supported types:
|
| XML Template | Applies only if it is text/xml. You need to write the name of the corresponding template defined on the XML Templates. |
| Parameters |
Applies with application/x-www-form-urlencoded and application/json
|
| Success HTTP Codes |
HTTP codes that should be interpreted as OK. If no code is entered, Soffid will take as valid codes the following: 200, 201, 204 and 404. If you type the Success HTTP codes, it will be not necessary to type the Failure HTTP codes. You can use blanks or commas to separate the codes. |
| Failure HTTP Codes |
Soffid will take by default as failure all codes not indicated in Success HTTP Codes. If you type the Failure HTTP codes, it will be not necessary to type the Success HTTP codes. You can use blanks or commas to separate the codes. |
| Results |
Gets the object or object list from the response received. You need to indicate a JSON attribute name to check and get the data. If this element is not present, or empty, the connector will conclude the user does not exist yet. You can type simple attribute names or even complex scripts. |
| Pagination URL |
Often, the response from the API Rest service does not contain all the data because the data is too large. In these cases, you can use the paging options to request the data in blocks. When the response gives us the URL of the next page to fetch, you must type the tag name of this attribute. You have to choose one of the paging methods, using both is not compatible. |
| Pagination script |
Often, the response from the API Rest service does not contain all the data because the data is too large. In these cases, you can use the paging options to request the data in blocks. You can type a complex script to get the next call that has to be done. There are two available objects:
You have to choose one of the paging methods, using both is not compatible. |
| Condition script | Return false if you want to prevent a call. |
| Optional header |
Use this property to send HTTP header(s). |
Load
Select

Insert
Update
Delete
Properties
In this agent, the configuration of the properties attributes is very important due to they define the functionality of the integration:
This agent has five families of properties:
|
Family
|
Description
|
|---|---|
| Load | Used to retrieve all the objects in the target system |
| Select | Used to retrieve an object in the target system |
| Insert | Used to create an object in the target system |
| Update | Used to update an object in the target system |
| Delete | Used to remove an object in the target system |
These families are involved in the following processes:
|
Process
|
Families
|
|---|---|
| Reconcile automatic task | Load + select |
| Authoritative automatic task | Load + select |
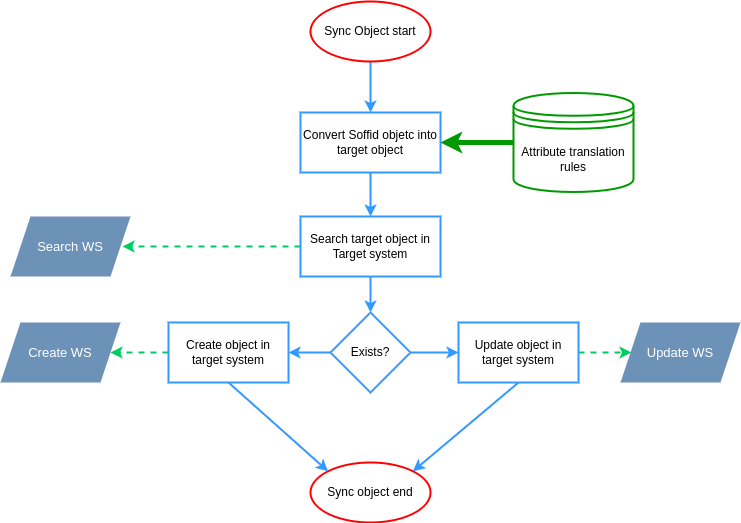
| Sync new object | Select + Insert |
| Sync updated object | Select + Update |
| Sync deleted object | Select + Delete |
These are the pictures of the mechanisms used to synchronize objects:
Sync object
Remove object
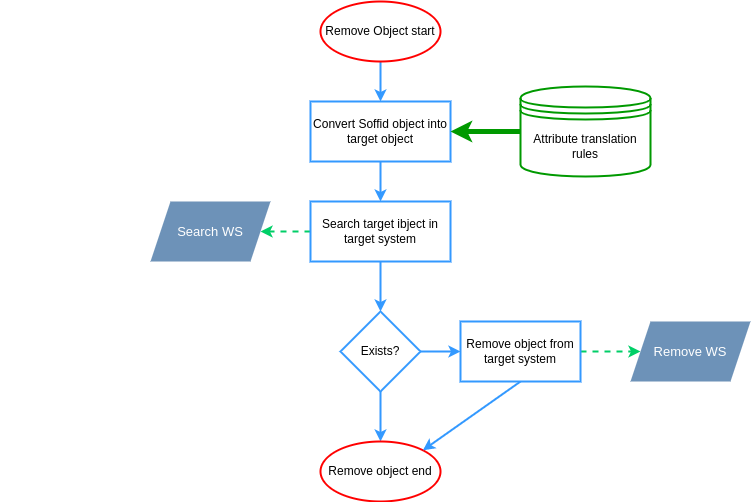
You can find more information by visiting the Properties attributes page.
Attributes
You can customize attribute mappings, you only need to select system objects and the Soffid objects related, manage their attributes, and make either inbound and outbound attribute mappings.
You may map the attributes of the target system with the Soffid available attributes.
- For the target system attributes is required to be access to its specification.
- For the Soffid attributes, you may follow the next link.
For more information about how you may configure attribute mapping, see the following link: Soffid Attribute Mapping Reference
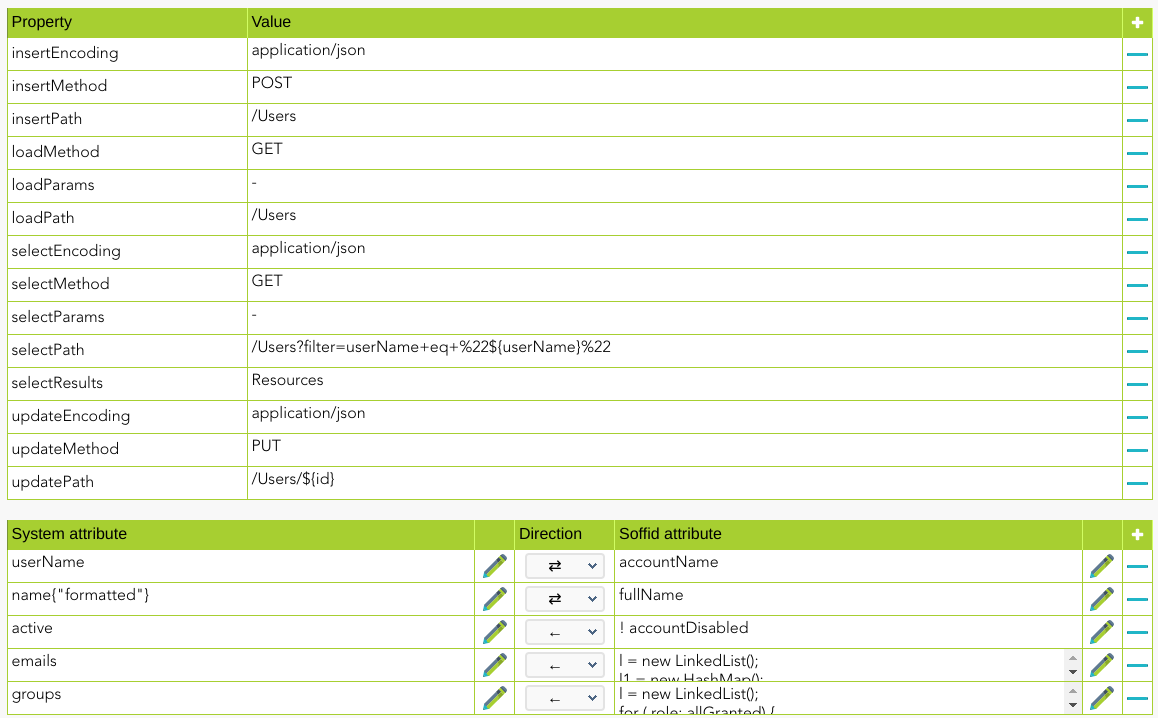
For instance:
As an example, below is how JSON connector will look like in order to manage JIRA accounts:
Triggers
You can define BeanShell scripts that will be triggered when data is loaded into the target system (outgoing triggers). The trigger result will be a boolean value, true to continue or false to stop.
Triggers can be used to validate or perform a specific action just before performing an operation or just after performing an operation on target objects.
To view some examples, visit the Outgoing triggers examples page.