SQL Integration flows - Update user
Update user
Introduction
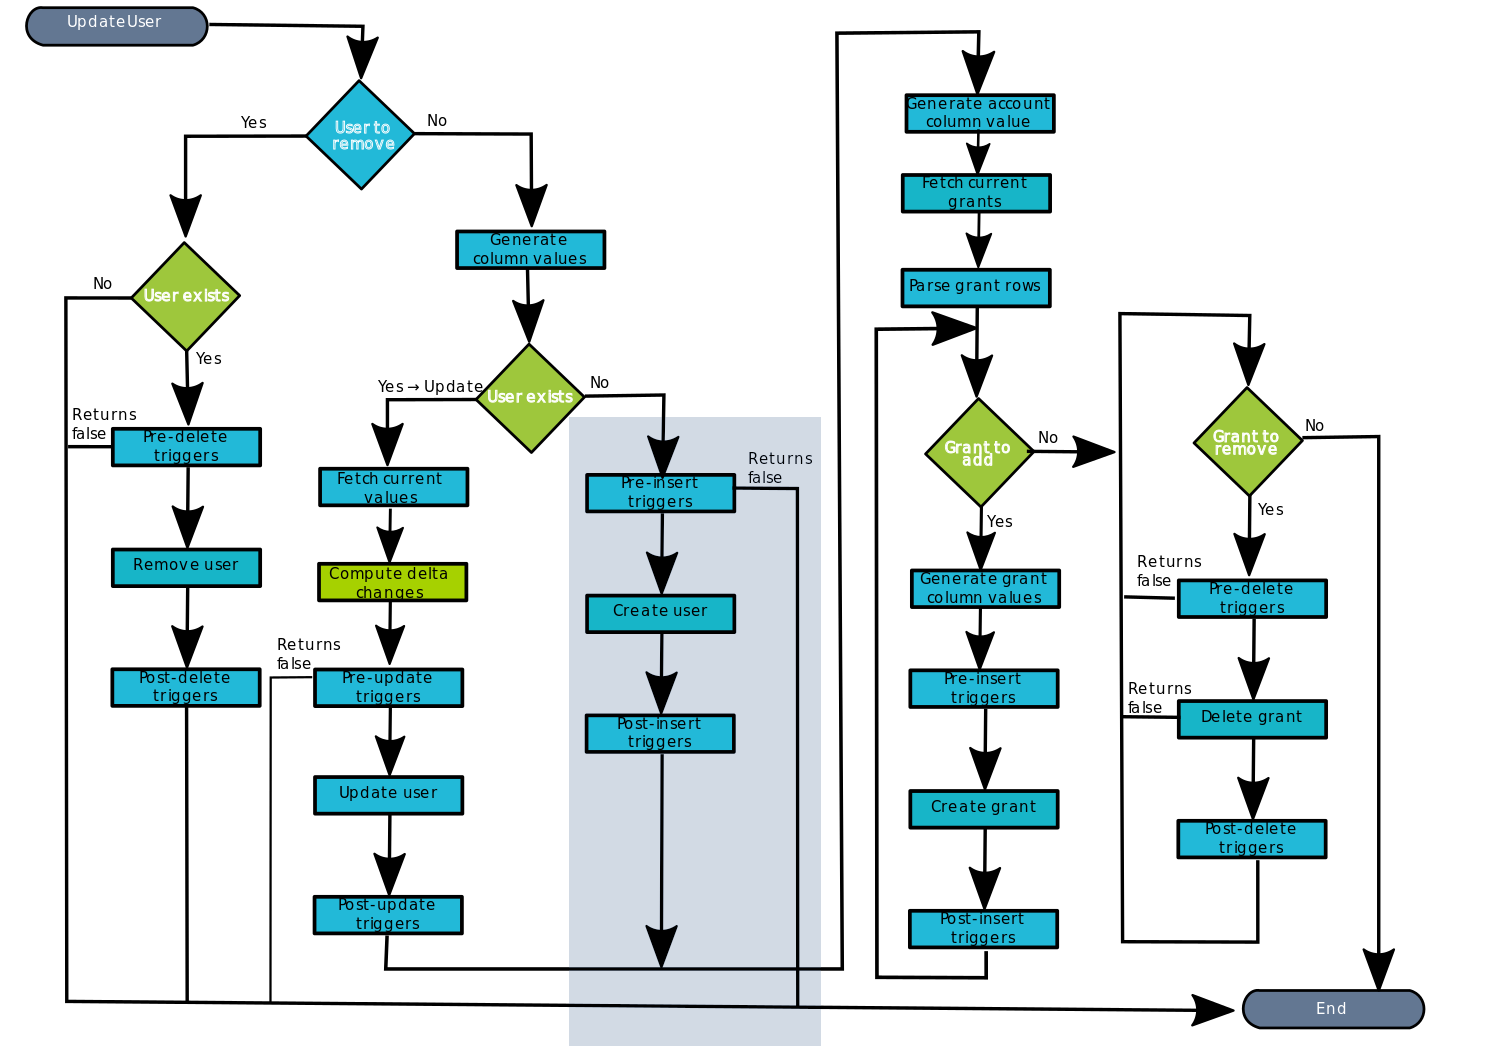
Soffid provides a workflow to create, modify, and delete a user in the final system. One can see the steps of the process in the following diagram.
This process only applies to account type single users.
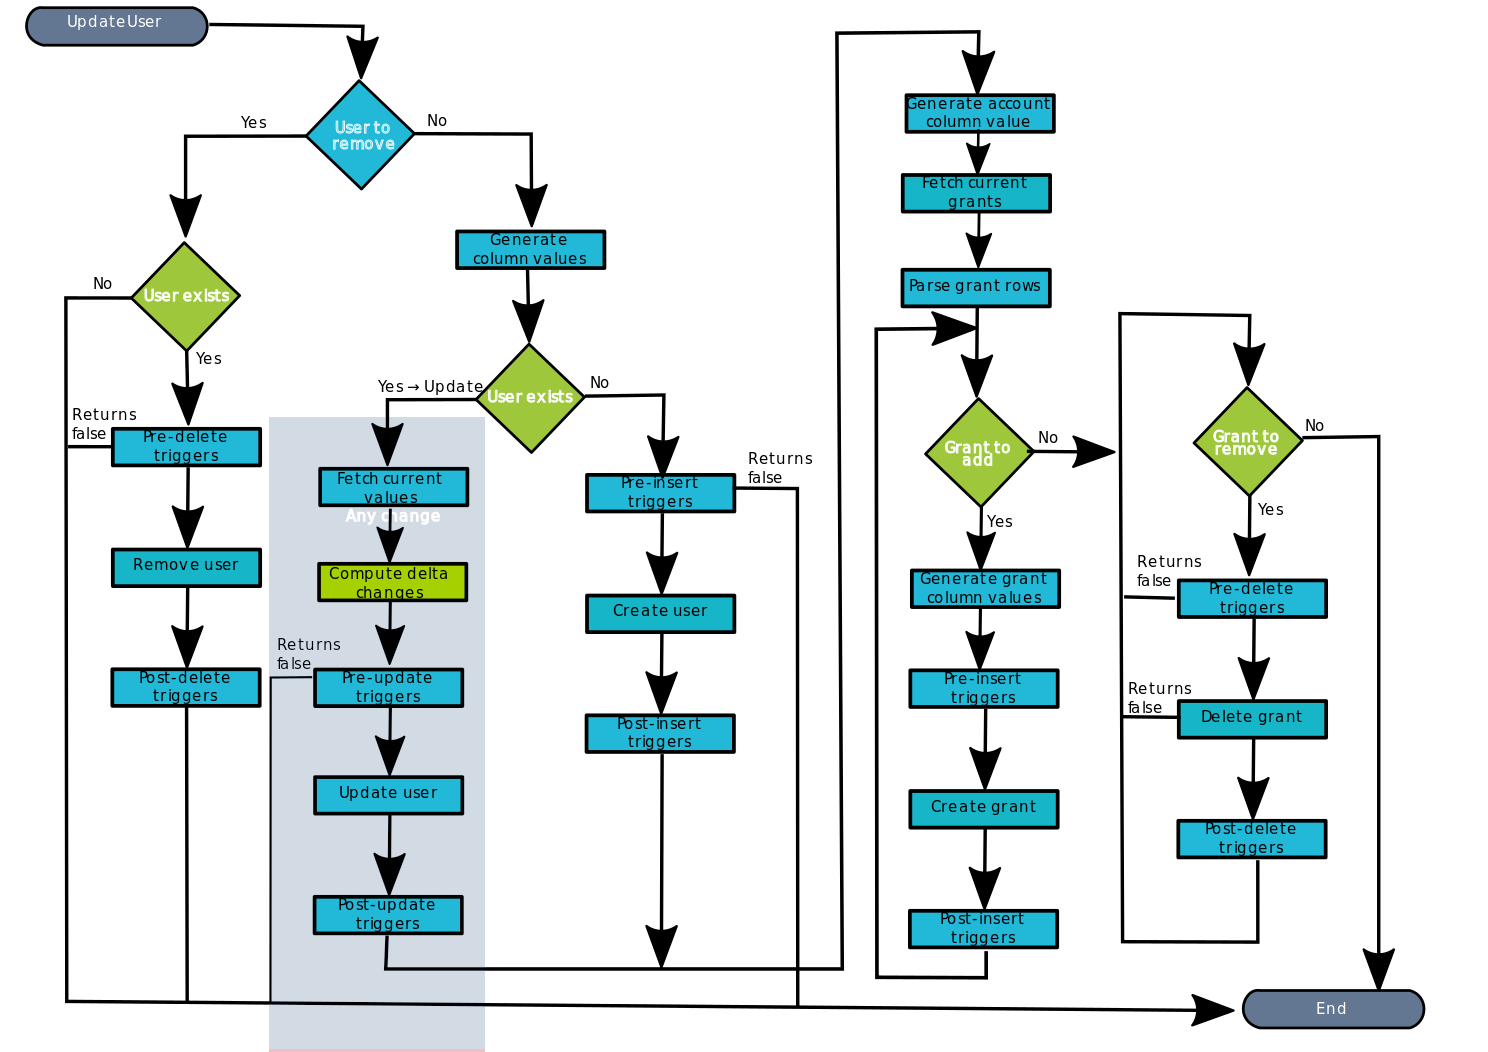
Diagram

Step by Step
In this document, we will explain the process that Soffid performs to modify a user for the SQL connector.
1. Initial step
First of all, Soffid checks if the user exists in Soffid and then checks the operation to perform, update or delete.
1.1. If the user does not exist in Soffid, then Soffid asks to delete the user in the target System.
❓ Warning message
1.1.1. Yes: If the answer is Yes, the process follows through the Yes branch, [3. Delete branch].
1.1.2. No: If the answer is Yes, the process finishes [10. End].
1.2. If the user exists in Soffid, the process continues through [2. User to remove?]. to check if the
2. User to remove?
📌 By clicking on the User to remove? step,...
You can configure all the properties related to the user object for this step. 
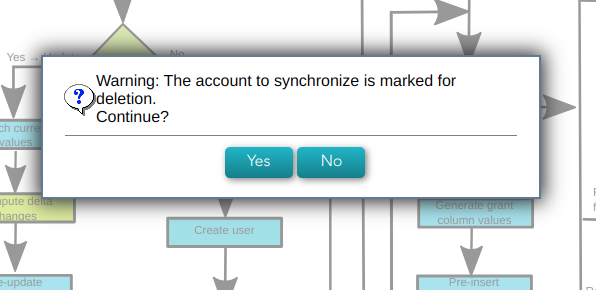
2.1. If the user is marked for Deletion, Soffid will ask for user consent to continue with the process or to cancel it. If the answer is Yes, the process follows through the Yes branch, [3. Delete branch].
❓ Warning message
2.2. If the user is marked for Update, it continues with the flow following through the No branch, [4. Insert or Update branch].
3. Delete branch
📊 Diagram

3.1. When the operation to perform is to delete a user, first of all, Soffid has to check if the user exists in the target system. To do this, Soffid executes the property check of the User object. This property executes the SQL command to check if the user exists or not.
📌 By clicking on the User exists? step,...
You can configure all the properties related to the user object for this step.

3.1.1. If the user does not exist, there are no actions to perform in the target system, so the process finishes [10. End].
3.1.2. If the user exists, the flow continues executing the pre-delete triggers if there is anyone configured. More than one script can be configured. These scripts are executed just before the main action, user delete, and the result (true or false) determines if the main action will be performed or not.
3.1.2.1. False: if the result is false for one or more of these triggers, the process finishes [10. End].
3.1.2.2.True: if the result is true for all of these triggers, Soffid continues to the next step.
📌 By clicking on the Pre-delete triggers step,...
You can configure all the pre-delete triggers related to the user object for this step.

3.1.3. Soffid removes the user. To do that, Soffid executes the property delete of the User object.
📌 By clicking on the Remove user step,...
You can configure the properties related to the user object for this step.

3.1.3. Then Soffid executes the post-delete triggers if any. These triggers can be used to perform a specific action just after performing the remove user operation on the target object.
📌 By clicking on the Post-delete triggers step,...
You can configure the post-delete triggers related to the user object for this step.

3.1.3. Then the process finishes [10. End].
4. Insert or Update branch
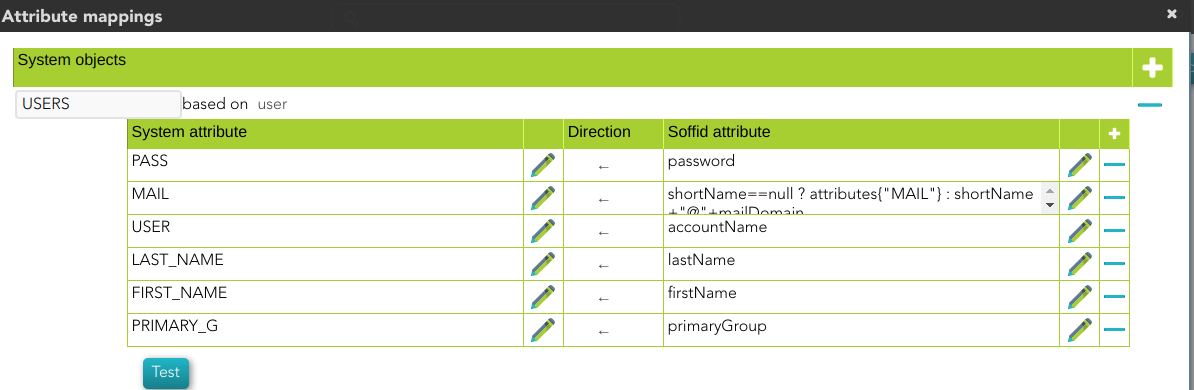
4.1. When the operation to perform is to update a user, first of all, Soffid generates the columns values. That is, Soffid calculates the values of the columns from the original values of Soffid.
📌 By clicking on the generate column values step,...
You can configure the attributes related to the user object for this step.
4.2.Then Soffid asks if the user exists in the target system to decide the action to execute, this action can be an update or an insert. Soffid executes the property check of the User object.
4.2.1. If the user does not exist in the target system, the process continues through [5. Insert user branch].
4.2.2. If the user exists in the target system, the process continues through [6. Update user branch].
📌 By clicking on the User exists? step,...
You can configure the properties related to the user object for this step.

5. Insert user branch
📊 Diagram
5.1. Soffid executes the pre-insert triggers if there is anyone configured. More than one script can be configured. These scripts are executed just before the main action, user create, and the result (true or false) determines if the main action will be performed or not.
5.1.1. False: if the response is false for one or more of these triggers, the process finishes [10. End] and the user is not created.
5.1.2. True: if the response is true for all of these triggers, Soffid continues to the next step.
5.2. Soffid creates the user. To do that, Soffid executes the property insert of the User object.
📌 By clicking on the Create user step,...
You can configure the properties related to the user object for this step.

5.3. Then Soffid executes post-insert triggers if any. These triggers can be used to perform a specific action just after performing the create user operation on the target object.
📌 By clicking on the Post-insert triggers step,...
You can configure the Post-insert triggers related to the user object for this step.

5.4. Then the process continues through [7. Grants].
6. Update user branch
📊 Diagram
6.1. Soffid fetches the current values of the user. Soffid executes the property selectByAccountName of the User object.
&&TODO&& IMAGEN
6.2. Then compute delta changes, if the property Synchronization method selected is Full Synchronization, then Soffid has to keep the columns values of the last update. If there was any change in the target system:
- There is no conflict, then Soffid only updates the values of the attributes that have changed in Soffid.
- There is conflict, Soffid values prevail over the target system values, so, Soffid updates all the attributes that have changed in Soffid.
&&TODO&& IMAGEN
6.3. And finally execute the pre-update triggers if there is anyone configured. More than one script can be configured. These scripts are executed just before the main action, user update, and the result (true or false) determines if the main action will be performed or not.
6.3.1. False: if the response is false for one or more of these triggers, the process finishes [10. End] and the user is not updated
6.3.2. True: if the response is true for all of these triggers, Soffid continues to the next step.
📌 By clicking on the Pre-update triggers step,...
You can configure the Pre-update triggers related to the user object for this step.

6.4. Soffid updates the user. To do that, Soffid executes the property update of the or User object.
📌 By clicking on the update user step,...
You can configure the properties related to the user object for this step.

6.5. Then Soffid executes the post-update triggers if any. These triggers can be used to perform a specific action just after performing the update user operation on the target object.
📌 By clicking on the Post-update triggers step,...
You can configure the Post-update triggers related to the user object for this step.
6.6. Then the process continues through [7. Grants].
7. Grants
At this point, soffid runs the actions relative to the grants
7.1. Once the process arrives at this step, Soffid generates account column values. That is, Soffid creates a dummy object with only the account name, this object will be used later.
📌 By clicking on the generates account columns values step,...
You can configure the attribute mappings related to the grant object for this step.
7.2. Then, Soffid fetches the current grants for the user. Soffid executes the property selectByAccount of the grant object with the values of the previous step
📌 By clicking on the fetch current grants step,...
You can configure the properties related to the grant object for this step.

7.3. Finally, Soffid parses grant rows, that is Soffid makes the mappings defined
📌 By clicking on the parse grant rows step,...
You can configure the attribute mappings related to the grant object for this step.

7.3. Then the process continues through [8. Grant to add].
8. Grant to add
This is a loop while there are grants to add. This grants list comes from the previous step [7. Grants].
📊 Diagram
8.1. If there are No grants to add, the process goes to [9. Grant to Remove].
8.2. Yes, there are grants to add:
8.2.1. Soffid generates grant column values and Soffid checks if the grant exists in the target system, Soffid executes the property check of the grant object.
📌 By clicking on the generate grant column values step,...
You can configure the attribute mappings related to the grant object for this step.

8.2.2. Soffid executes the pre-insert triggers if there is anyone configured. More than one script can be configured. These scripts are executed just before the main action, a grant create, and the result (true or false) determines if the main action will be performed or not.
8.2.2.1. False: if the response is false for one or more of these triggers, the process goes to [8. Grant to add] and the grant is not created.
8.2.2.2. True: if the response is true for all of these triggers, Soffid continues to the next step.
📌 By clicking on the Pre-insert triggers step,...
You can configure the Pre-insert triggers related to the grant object for this step.

8.2.3. If the result of the triggers is true, then Soffid creates the grant. To do that, Soffid executes the property insert of the grant object.
📌 By clicking on the create grant step,...
You can configure the properties related to the grant object for this step.

8.2.4. Then Soffid executes the post-insert triggers if any. These triggers can be used to perform a specific action just after performing the create grant operation on the target object.
📌 By clicking on the Post-insert triggers column values step,...
You can configure the Post-Update related to the grant object for this step.

8.2.5. Then the process continues through [8. Grant to add].
9. Grant to remove
📊 Diagram
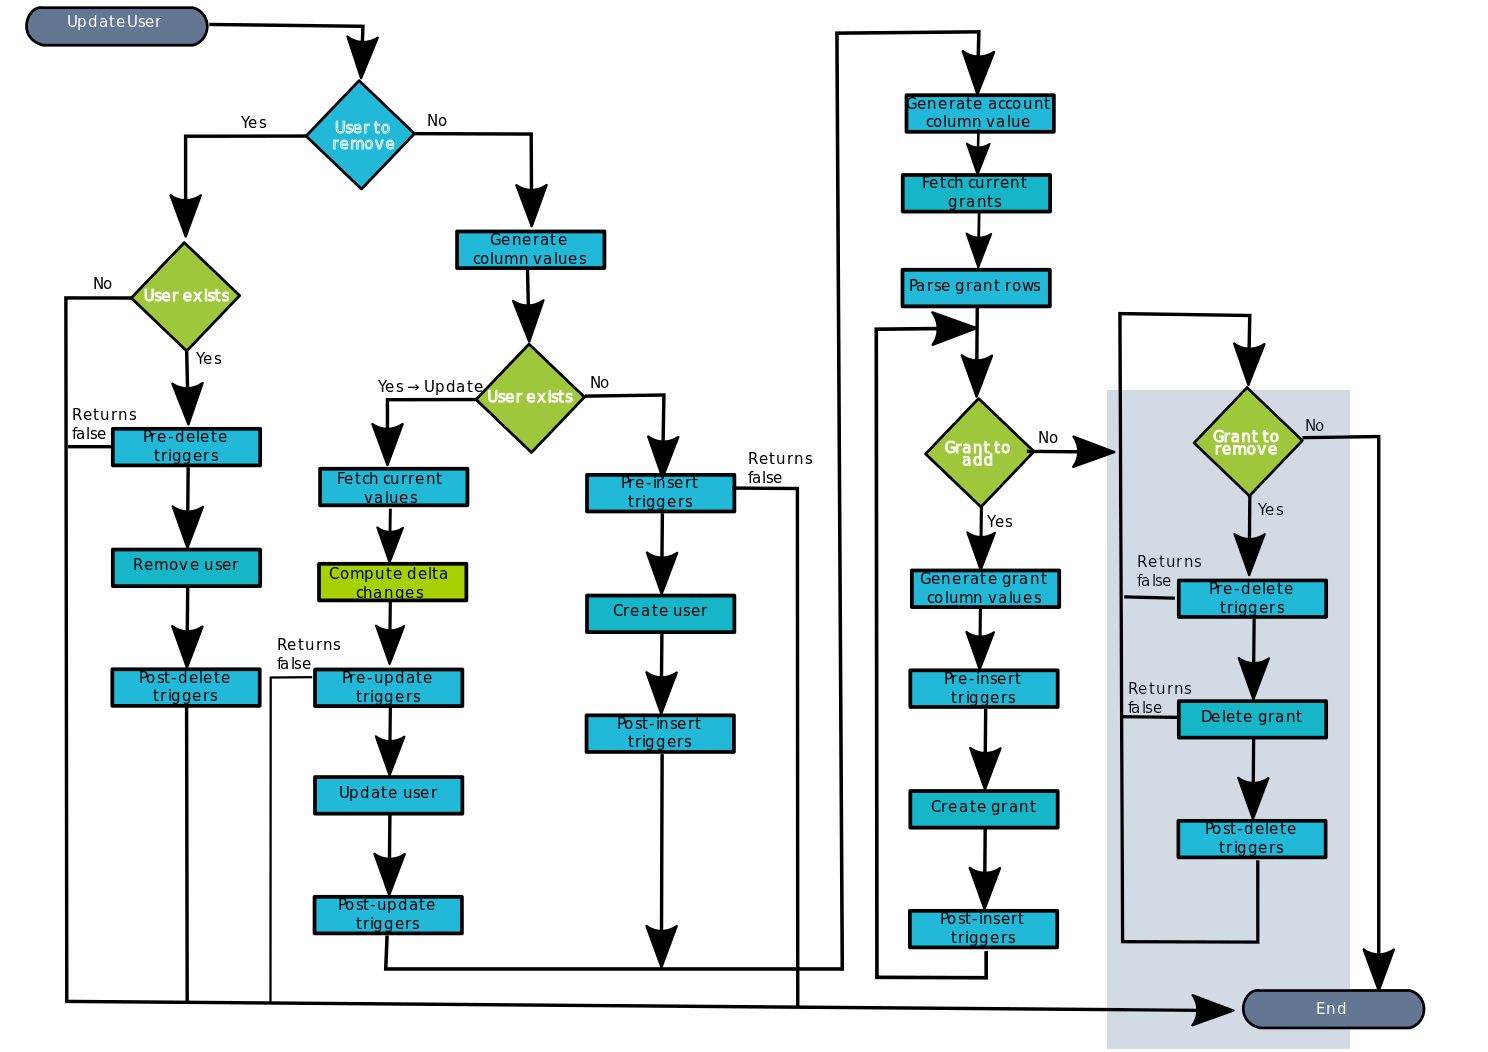
This is a loop while there are grants to remove. This grants list comes from the previous step [7. Grants].
9.1 No: If there are No grants to add, the process goes to [10. End].
9.2. Yes, there are grants to remove:
9.2.1. Soffid executes the pre-delete triggers if there is anyone configured. More than one script can be configured. These scripts are executed just before the main action, a grant delete, and the result (true or false) determines if the main action will be performed or not.
9.2.1.1. False: if the response is false for one or more of these triggers, the process finishes [10. End] and the grant is not deleted.
9.2.1.2. True: if the response is true for all of these triggers, Soffid continues to the next step.
📌 By clicking on the pre-delete trigger step,...
You can configure the Pre-delete triggers related to the grant object for this step.

9.2.2. If the result of the triggers is true, then Soffid deletes the grant. To do that, Soffid executes the property delete of the grant object. This operation can return a true or false result.
9.2.2.1. False: the delete action could not be performed and the process check for another grant [9. Grant to remove].
9.2.2.2. True: the delete action could be performed properly. Soffid continues to the next step.
📌 By clicking on the delete grant step,...
You can configure the properties related to the grant object for this step.

9.2.3. Then Soffid executes the post-delete triggers if any. These triggers can be used to perform a specific action just after performing the delete grant operation on the target object.
📌 By clicking on the post-delete trigger step,...
You can configure the Post-delete triggers related to the grant object for this step.

9.2.4. Then the process continues through [9. Grant to remove].
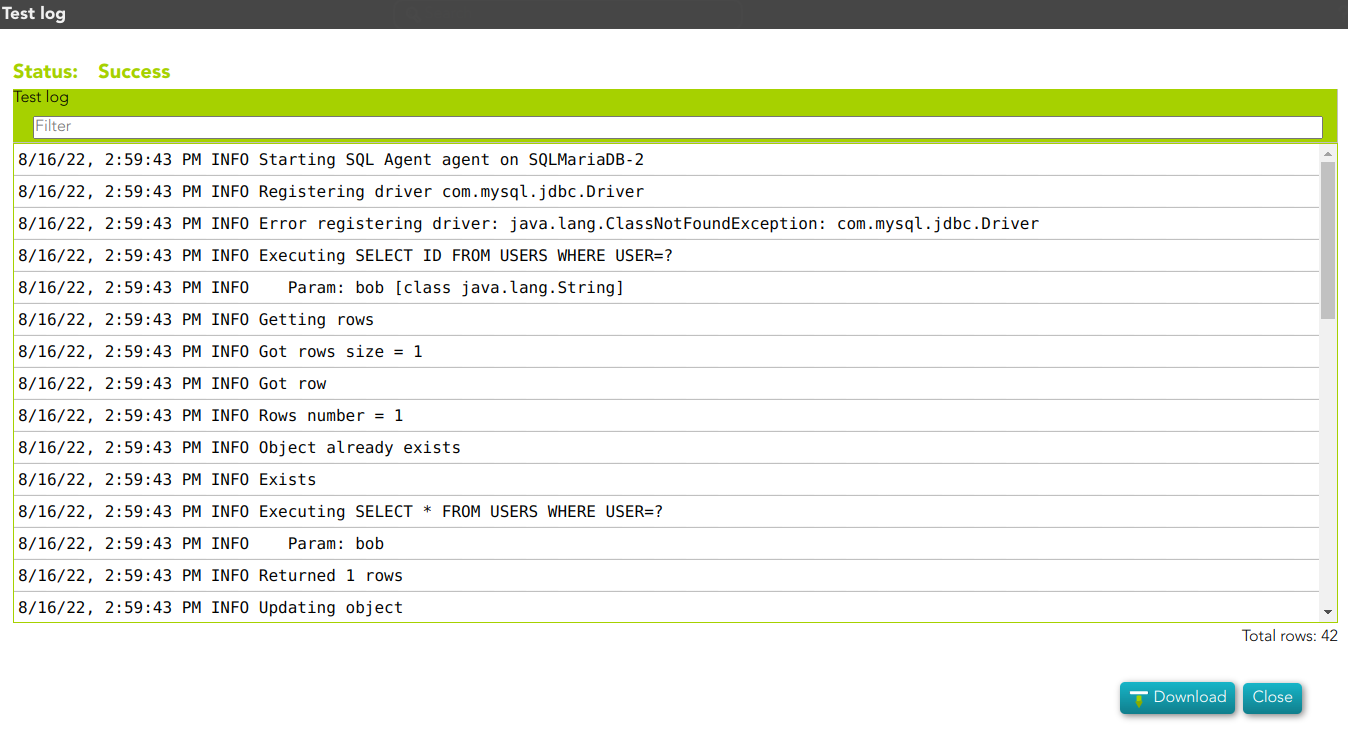
10. End
The process finishes and the log is displayed, and you can download it by clicking the Download button.
📑 Log detail