Step 6.1. Create User type
How to create a new User type. That will be mandatory to create a new Password policy.
Step-by-step
1. First of all, you must access the User types page, the path to access is the following:
2. Once you are located on the User types page, you must click the button with the add symbol (+) to add a new User type. Then Soffid will display a new empty page to fill in the data.
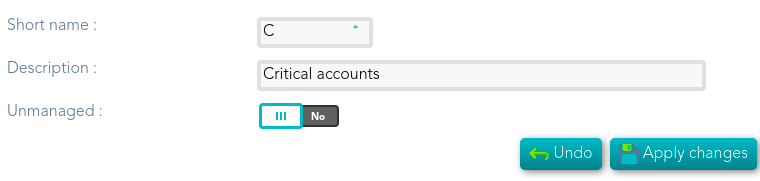
You must fill, at least the required fields (fields with an asterisk) to create a user type.
- The short name should be an identificative name, that will be a unique user type name (no spaces and no symbols).
Other fields you could configure
- The Description should be a brief description about the user type.
- If you check the Unmanaged field (Yes), the accounts that belong to this category will not be propagated to the target system.
3. Once you have filled in all those fields, you must apply changes, by clicking on the "Apply changes" button to create the new user type.
4. When you apply changes:
4.1. If all the required information is correct, Soffid will save the new user type, close the page and show the user types list with all the user types created on the system, including the last one created.
4.2. If the information filled in is not correct, Soffid will show an alert on the fields which have errors. You must correct the errors and save the user type again.
Screen overview