PAM Jump Server Installation
The purpose of this tutorial is to show how to install Jump servers and configure PAM using Docker compose, to use critical resources without knowing the password required.
Jump Server
A jump server, jump host or jump box is a system on a network used to access and manage devices in a separate security zone. A jump server is a hardened and monitored device that spans two dissimilar security zones and provides a controlled means of access between them. (*)
Installation
1. Execute the Store YAML
version: '3.8'

services:
  pam-store:
    image: soffid/pam-store:1.4.48
    environment:
      JAVA_KEYSTORE: /opt/soffid/tomee/certificates/YOUR_soffid-pam-store.jks
      KEYSTORE_PASS: YOUR_KEYSTORE
    ports:
      - "8081:8443"
    networks:
      - network
    volumes:
      - store-trustedcerts:/opt/soffid/tomee/trustedcerts
      - store-certificates:/opt/soffid/tomee/certificates
      - store-data:/opt/soffid/tomee/data

networks:
  network:
    name: YOUR_NETWORK
    driver: bridge

volumes:
  store-trustedcerts:
    name: soffid-pam-store-trustedcerts
  store-certificates:
    name: soffid-pam-certificates
  store-data:
    name: soffid-pam-store
Execute:
sudo docker compose up -d2. Create a user in the Store to use it in the Launcher
Once, we are connected to the Store, we need to run a script to create the user. This script has two parameters, the user name, and the role. We have to type launcher in the role parameter.
docker exec YOUR_pam-store_CONTAINER /opt/soffid/tomee/bin/add-user.sh user-launcher launcherResult:
/bin/bash: warning: setlocale: LC_ALL: cannot change locale (en_US.UTF-8)
Password: cccccc/Qul9NFIqQnDU73gYccccVHThyew7Qt8Hqpf0rEzVq1Ft7azccccccc
As a result of the script, we receive the password for the created user. This password will be needed later when we create the launcher container.
3. Create a user in the Store to use it in the Console
Once, we are connected to the Store, we need to run a script to create the user. This script has two parameters, the user name, and the role. We have to type console in the role parameter.
docker exec YOUR_pam-store_CONTAINER /opt/soffid/tomee/bin/add-user.sh user-console consoleResult:
/bin/bash: warning: setlocale: LC_ALL: cannot change locale (en_US.UTF-8)
Password: asdadadasdads/Qul9NFIqQnDU73gYccccVHThyew7Qt8Hqpf0rEzVq1Ft7aadadadasd
As a result of the script, we receive the password for the created user. This password will be needed later when we configure PAM in the Soffid Console.
4. Execute the Launcher YAML
YAML example to create the Launcher using traefik as Ingress Controller
version: '3.8'

services:
  pam-launcher:
    image: soffid/pam-launcher:1.4.36
    environment:
      JAVA_KEYSTORE: /opt/soffid/tomee/certificates/YOUR_soffid-pam-launcher.jks
      KEYSTORE_PASS: YOUR_KESYSTORE
      STORE_SERVER: https://YOUR_pam-store_CONTAINER:8443
      STORE_USER: user-launcher
      STORE_PASSWORD: cccccc/Qul9NFIqQnDU73gYccccVHThyew7Qt8Hqpf0rEzVq1Ft7azccccccc
    ports:
      - "8082:8443"
    networks:
      - network
    volumes:
      - launcher-trustedcerts:/opt/soffid/tomee/trustedcerts
      - launcher-certificates:/opt/soffid/tomee/certificates
      - launcher-data:/opt/soffid/tomee/launcher
      - /var/run/docker.sock:/var/run/docker.sock
networks:
  network:
    name: YOUR_NETWORK
    driver: bridge

volumes:
  launcher-trustedcerts:
    name: soffid-pam-launcher-trustedcerts
  launcher-certificates:
    name: soffid-pam-certificates
  launcher-data:
    name: soffid-pam-launcher
Execute:
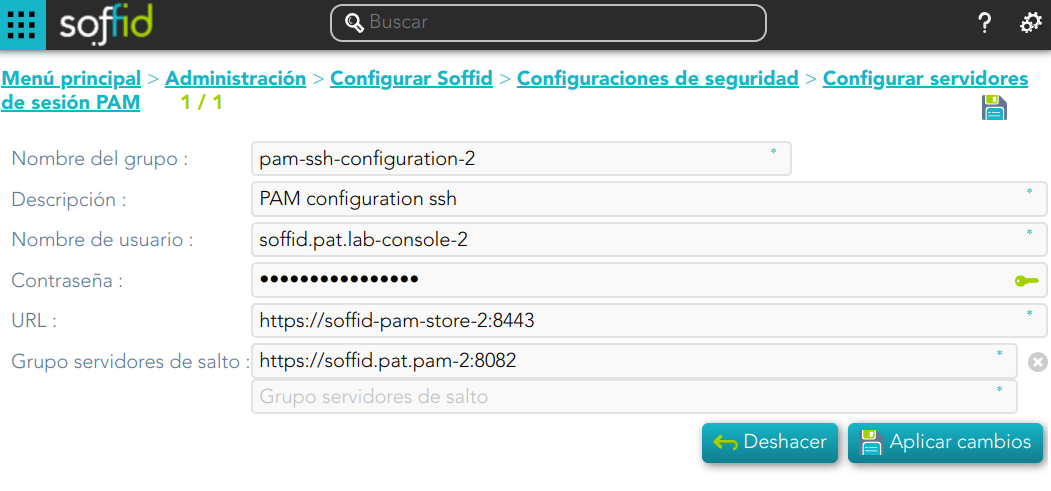
sudo docker compose up -d5. Configure the Console
Privileged Account Session Recording
Be in mind that you need to download the latest image of the required Privileged Account Session Recording that you need depending on the protocol.
- soffid-pasr-ssh
- soffid-pasr-rdp
- soffid-pasr-jdbc
- soffid-pasr-http
- soffid-pasr-https
- soffid-pasr-tn5250
- soffid-pasr-kube
Examples
Linux
docker pull soffid/soffid-pasr-sshWindows
docker pull soffid/soffid-pasr-rdpTo save a Web session you will need to add some parameters to the launcher system.properties (/opt/soffid/tomee/conf/system.properties)
Parameters to add:
SOFFID_PAM_PARAMS_http=--shm-size=1024m  --privileged -eVNCSERVER=yes
SOFFID_PAM_PARAMS_https=--shm-size=1024m  --privileged -eVNCSERVER=yes