PAM Jump Server Installation
The purpose of this tutorial is to show how to install Jump servers and configure PAM using Dockers, to use critical resources without knowing the password required.
Jump Server
A jump server, jump host or jump box is a system on a network used to access and manage devices in a separate security zone. A jump server is a hardened and monitored device that spans two dissimilar security zones and provides a controlled means of access between them. (*)
From version 1.4.36 and higher, Soffid PAM Launcher and Store installs allowing only TLSv1.3 protocol.
Prerequisites
Prerequisites to install PAM using Dockers:
1. Install docker ( https://docs.docker.com/install/ )
2. Create a Docker network(*), that network allows you to connect containers to the same bridge network to communicate:
sudo docker network create -d bridge NETWORKNAME* You can use the same network defined in the Console and Sync Server installation to avoid visibility problems.
Screen overview
Installation
The steps required to install PAM are:
- Create the storage server container.
- Create the launcher container.
- Register storage server in Soffid console.
Fast path to create storage server and launcher containers
1. To create both containers, you can download the following script: install-pam.sh
2. Before installing, you have to edit the file and set the name of the new network you have created, and the latest versions of the store and launcher
.........
docker create \
  --network soffid \
  -v soffid-pam-store:/opt/soffid/tomee/data \
  -p 8081:8080 \
  --name soffid-pam-store \
  soffid/pam-store:1.3.0 >/dev/null

......
......
docker create \
--network soffid \
-v soffid-pam-launcher:/opt/soffid/tomee/launcher \
-v /var/run/docker.sock:/var/run/docker.sock \
-p 8082:8080 \
-e STORE_SERVER="http://$PUBLIC_IP:8081/" \
-e STORE_USER="$userid" \
-e STORE_PASSWORD="$pass" \
--name soffid-pam-launcher \
soffid/pam-launcher:1.3.0 >/dev/null
......3. Finally, you can execute the script
~/Downloads$ bash ./install-pam.shA brief description of the script
1. Creates two volumes, one for the storage and the other for the launcher.
2. Creates a storage server container:
2.1. In that container the files and videos recorded will be saved.
2.2. All the data will be saved using a key.
2.3. By default, it will use the 8081 port.
3. Starts the storage container.
4. Generates the user and password to connect the launcher.
5. Creates a launcher server container:
5.1. That container will be in charge of recording and sending the recording files to the storage.
5.2. Soffid allows you to configure some environment variables:
| Variable | Description |
| STORE_SERVER | Store URL |
| STORE_USER | Store user |
| STORE_PASSWORD | Store password |
| JAVA_KEYSTORE | (optional) Key store path that contains the key SSL |
| KEYSTORE_PASS | (optional) SSL key |
| NETWORK_ID | (optional) Network ID for docker services |
5.3. By default, it will use the 8082 port.
6. Starts the launcher container.
7. Generates the encryption key to be used to store the recordings.
8. Generates the user and password that have to be registered on Soffid Console.
You will get something similar to this. When the process is complete, two docker containers should be created: soffid-pam-store and soffid-pam-launcher.
~/Downloads$ bash ./install-pam.sh
=====================
Creating store server
=====================
Waiting for store server
Creating launch server
=============================================================
Process completed
Notice: You must register the store server in Soffid console:
User name: bubu-thinkpad
Password : DRFoeOsD02yph7DERNcAZB8jp3b67bO3D/Ax3uS4PbzuBnPbQLhR1lyAu9PFqRJ0
~/Downloads$ docker ps
CONTAINER ID IMAGE COMMAND CREATED STATUS PORTS NAMES
854d7aff5c0a soffid/pam-launcher "/bin/sh -c /opt/sof…" 4 minutes ago Up 4 minutes 0.0.0.0:8082->8080/tcp soffid-pam-launcher
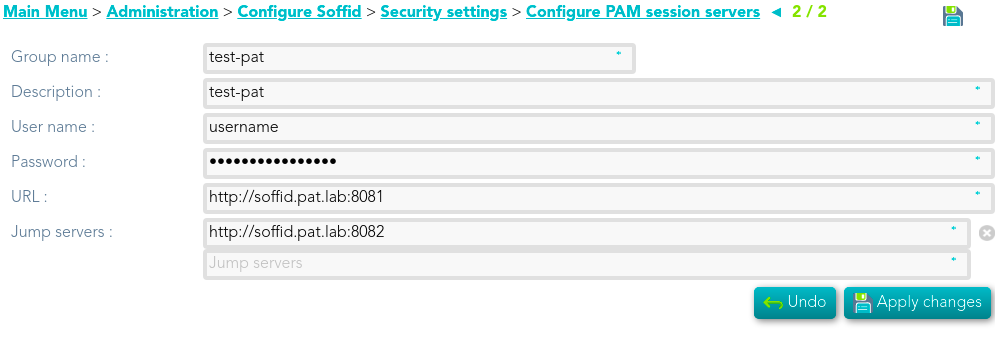
7d66a3d3cfa1 soffid/pam-store "/bin/sh -c /opt/sof…" 4 minutes ago Up 4 minutes 0.0.0.0:8081->8080/tcp soffid-pam-storeNext, you must open the Jump Server page in the Soffid console. On this page, you must register the store and launcher servers, using the user name and password displayed in the previous step. Visit the Configure PAM session servers on Soffid Console to finish the installation process.
Privileged Account Session Recording
Be in mind that you need to download the latest image of the required Privileged Account Session Recording that you need depending on the protocol.
- soffid-pasr-ssh
- soffid-pasr-rdp
- soffid-pasr-jdbc
- soffid-pasr-http
- soffid-pasr-https
- soffid-pasr-tn5250
- soffid-pasr-kube
Examples
Linux
docker pull soffid/soffid-pasr-sshWindows
docker pull soffid/soffid-pasr-rdpTo save a Web session you will need to add some parameters to the launcher system.properties (/opt/soffid/tomee/conf/system.properties)
Parameters to add:
SOFFID_PAM_PARAMS_http=--shm-size=1024m  --privileged -eVNCSERVER=yes
SOFFID_PAM_PARAMS_https=--shm-size=1024m  --privileged -eVNCSERVER=yes
(*) https://en.wikipedia.org/wiki/Jump_server