PAM Jump Server Installation
The purpose of this tutorial is to show how to install Jump servers and configure PAM using Kubernetes, to use critical resources without knowing the password required.
Jump Server
A jump server, jump host or jump box is a system on a network used to access and manage devices in a separate security zone. A jump server is a hardened and monitored device that spans two dissimilar security zones and provides a controlled means of access between them. (*)
Installation
1. Execute the Store YAML
apiVersion: v1
kind: PersistentVolumeClaim
metadata:
  namespace: iam
  name: pam-storage
spec:
  accessModes:
    - ReadWriteOnce
  resources:
    requests:
      storage: 10Gi
---
apiVersion: apps/v1
kind: Deployment
metadata:
  name: pam-store
  namespace: iam
  labels:
    app: pam-store
spec:
  strategy:
    rollingUpdate:
      maxSurge: 0
      maxUnavailable: 1
    type: RollingUpdate
  replicas: 1
  selector:
    matchLabels:
      app: pam-store
  template:
    metadata:
      labels:
        app: pam-store
    spec:
      restartPolicy: Always
      containers:
        - name: pam-store
          image: soffid/pam-store:1.4.31
          volumeMounts:
          - name: data
            mountPath: /opt/soffid/tomee/data
          ports:
          - containerPort: 8080
      volumes:
        - name: data
          persistentVolumeClaim:
            claimName: pam-storage
      imagePullSecrets:
      - name: regcred
---
kind: Service
apiVersion: v1
metadata:
  name: pam-store-service
  namespace: iam
spec:
  selector:
    app: pam-store
  ports:
    - name: http
      port: 8080
      protocol: TCP
2. Create a user in the Store to use it in the Launcher
Once, we are connected to the Store, we need to run a script to create the user. This script has two parameters, the user name, and the role. We have to type launcher in the role parameter.
root@soffid-pam-store:/# /opt/soffid/tomee/bin/add-user.sh launcher001 launcher
Password: xxxxxx+JJnLlRtcBIGj+qQGyNHYR4zhkl7HucBsxxxx04zQ7ccccc3333
root@soffid-pam-store:/#
As a result of the script, we receive the password for the created user. This password will be needed later when we create the launcher container.
3. Create a user in the Store to use it in the Console
Once, we are connected to the Store, we need to run a script to create the user. This script has two parameters, the user name, and the role. We have to type console in the role parameter.
root@soffid-pam-store:/# /opt/soffid/tomee/bin/add-user.sh userconsole console
Password: dddddd+JJnLlRtcBIGj+qQGyNHYR4zhkl7HucBsxxxx04zQ7cccaaaawwwww
root@soffid-pam-store:/#
As a result of the script, we receive the password for the created user. This password will be needed later when we configure PAM in the Soffid Console.
4. Execute the Launcher YAML
YAML example to create the Launcher using traefik as Ingress Controller
apiVersion: v1
kind: ServiceAccount
metadata:
  namespace: iam
  name: pam-launcher
---
kind: Role
apiVersion: rbac.authorization.k8s.io/v1
metadata:
  name: pam-launcher
  namespace: iam
rules:
  - verbs:
      - get
      - update
      - create
      - delete
      - list
      - watch
    apiGroups:
      - ''
    resources:
      - pods/attach
      - pods/log
      - pods/exec
      - pods
---
kind: RoleBinding
apiVersion: rbac.authorization.k8s.io/v1
metadata:
  name: pam-launcher
  namespace: iam
subjects:
  - kind: ServiceAccount
    name: pam-launcher
roleRef:
  apiGroup: rbac.authorization.k8s.io
  kind: Role
  name: pam-launcher
---
apiVersion: apps/v1
kind: Deployment
metadata:
  name: pam-launcher
  namespace: iam
  labels:
    role: pam-launcher
spec:
  strategy:
    rollingUpdate:
      maxSurge: 0
      maxUnavailable: 1
    type: RollingUpdate
  replicas: 1
  selector:
    matchLabels:
      role: pam-launcher
  template:
    metadata:
      labels:
        role: pam-launcher
    spec:
      serviceAccountName: pam-launcher
      restartPolicy: Always
      containers:
        - name: pam-launcher
          image: soffid/pam-launcher:latest
          imagePullPolicy: Always
          volumeMounts:
          - name: data
            mountPath: /opt/soffid/tomee/launcher
          ports:
          - containerPort: 8080
          env:
          - name: STORE_SERVER
            value: http://pam-store-service:8080
          - name: STORE_USER
            value: userLauncher
          - name: STORE_PASSWORD
            value: dddddddGf14+JJnLlRtcBIGj+ddddddddd4zhkl7HucBs9eVU6wQg044444444
      volumes:
        - name: data
          nfs:
           # URL for the NFS server service
            server: "YOUR_SERVER_IP"
            path: /pam-launcher
      imagePullSecrets:
      - name: regcred
---
kind: Service
apiVersion: v1
metadata:
  name: pam-launcher
  namespace: iam
spec:
  selector:
    role: pam-launcher
  ports:
    # Open the ports required by the NFS server
    # Port 2049 for TCP
    - name: http
      port: 8080
      protocol: TCP
---
apiVersion: traefik.containo.us/v1alpha1
kind: IngressRoute
metadata:
  name: launcher
  namespace: iam
spec:
  entryPoints:                      # [1]
    - https
  routes:                           # [2]
  - kind: Rule
    match: Host("pam-launcher.deployment.com")
    priority: 10                    # [4]
    services:                       # [8]
    - kind: Service
      name: pam-launcher
      namespace: iam
      passHostHeader: true
      port: 8080                      # [9]
      responseForwarding:
        flushInterval: 1ms
      scheme: http
      sticky:
        cookie:
          httpOnly: true
          name: srvrid
          secure: true
          sameSite: none
      strategy: RoundRobin
      weight: 10
  tls:
    secretName: SECRET_NAME
---
# Service to locate PASR containers
apiVersion: v1
kind: Service
metadata:
  name: pasr
  namespace: iam
spec:
  selector:
    type: pasr
  clusterIP: None
  ports:
  - name: vnc # Actually, no port is needed.
    port: 5900
    targetPort: 5900
---
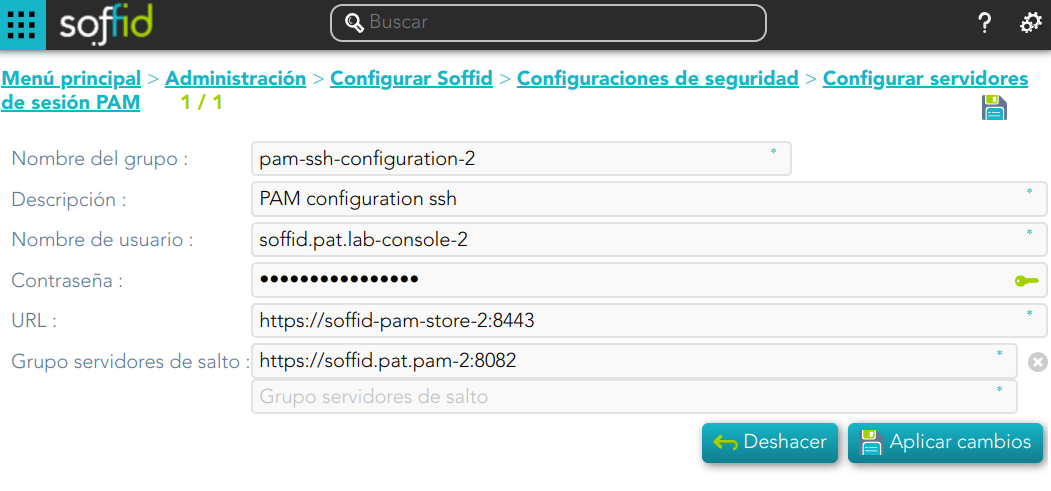
5. Configure the Console
Privileged Account Session Recording
Be in mind that you need to download the latest image of the required Privileged Account Session Recording that you need depending on the protocol.
- soffid-pasr-ssh
- soffid-pasr-rdp
- soffid-pasr-jdbc
- soffid-pasr-http
- soffid-pasr-https
- soffid-pasr-tn5250
- soffid-pasr-kube
To save a Web session you will need to add some parameters to the launcher system.properties (/opt/soffid/tomee/conf/system.properties)
Parameters to add:
SOFFID_PAM_PARAMS_http=--shm-size=1024m  --privileged -eVNCSERVER=yes
SOFFID_PAM_PARAMS_https=--shm-size=1024m  --privileged -eVNCSERVER=yes