SQL Connector
Introduction
Description
The SQL connector allows an easy way to configure and manage relational databases.
Managed System
There are a lot of relational databases, currently, these are the currently supported databases.
- MySQL
- MariaDB
- PostgreSQL
- Oracle
- Microsoft SQL Server
- Informix
- IBM DB2/400
- Sybase
- ODBC
For more information: List of relational databases
If your system is not in the previous list, it's possible to include it easily!
For more information to check if your system may be synchronized with this connector you do not hesitate to contact us through our Contact form
Prerequisites
It is needed a user with access and permissions to the schemes and tables required in the scope of the integration.
To configure DB2/400 or Sybase it is mandatory to install the drivers in the lib directory of the Sync Server.
The Java-ODBC bridge is deprecated in Java, and the support will be removed shortly.
Download and Install
The SQL is part of the default connectors, you do not need to install it, but you can upgrade it from the download management section.
You can visit the Connector Getting started page for more information about the installation process.
Agent Configuration
Basic
Generic parameters
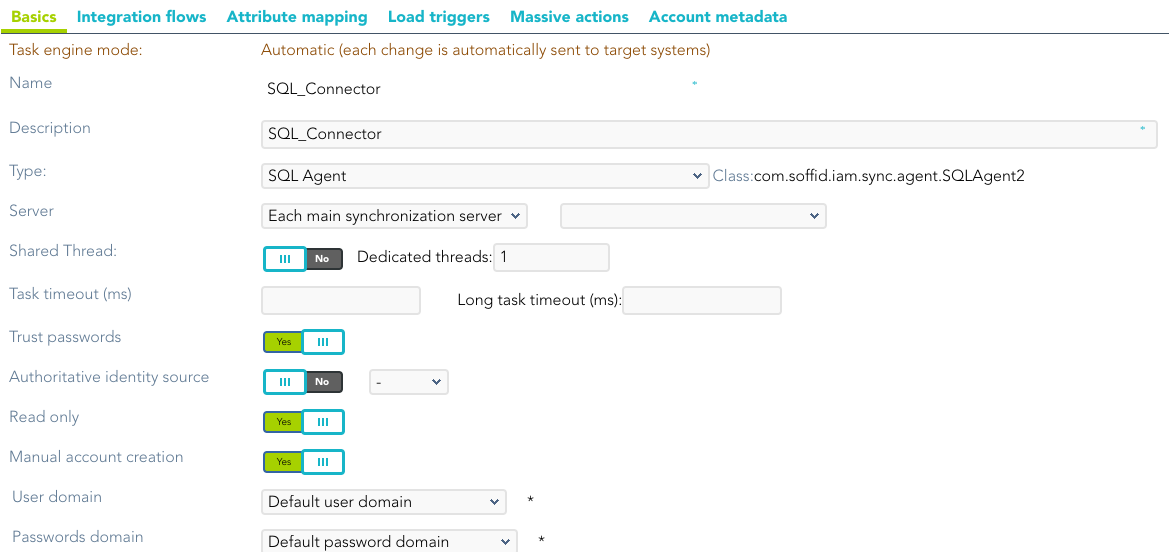
After the installation of the addon, you may create and configure agent instances.
To configure this SQL connector you must select "Customizable SQL agent" in the attribute "Type" of the generic parameters section in the agent's page configuration.
For more information about how you may configure the generic parameters of the agent, see the following link: Agents configuration
Custom parameters
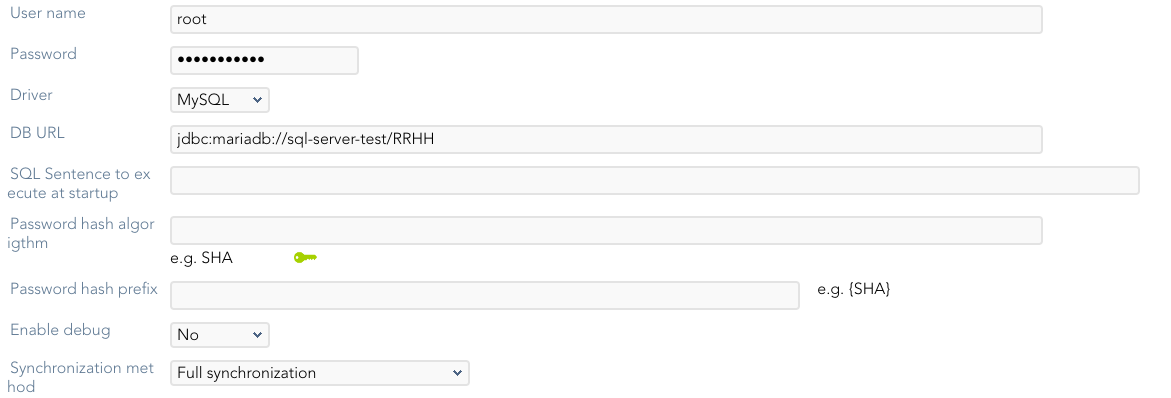
Below there are the specific parameters for this agent implementation:
|
Parameter |
Description |
|---|---|
|
User name |
Database user name to authenticate |
|
Password |
The password of the database user |
|
Driver |
Identifies the driver of the relational database to use. Currently, these are the supported databases: MySQL (& MariaDB), PostgreSQL, Oracle, MS SQL Server, Informix, DB2/400, DB2 Universal, Sybase, ODBC |
|
DB URL |
URL that identifies the connection properties. Please refer to the specific database vendor documentation to build this URL. Ejemplos de cada URL y enlace a la pagina de referencia REVISAR (*) More documentation about the DB URL |
|
SQL Sentence to execute at startup |
Each time the connection to the agent is established, this SQL statement will be executed. |
|
Password hash algorithm |
The algorithm is used to encrypt the password. For instance SHA1, SHA256, MD5, etc |
|
Password hash prefix |
Prefix to add it to the password. |
|
Enable debug |
Two options: Yes, and No. It enables or not more log traces in the Synchronization Server log |
|
Synchronization method |
(**) |
Attribute mapping
This connector can manage users, accounts, roles, groups, and grants.
Properties
Some agents require to configure some custom attributes, you will use the properties section to do that.
Any SQL sentence gets its parameters in three step process:
- The synchronization engine creates the Soffid object.
- The Soffid object is translated into a managed system object, using the attribute translation rules.
- Soffid parser looks for any identifier preceded by a colon (:) symbol. For any symbol found, the symbol is replaced by a parameter whose value is the managed system attribute with the replaced identifier.
Once the SQL sentence has been executed, in the case of SELECT clauses, the column names are used to generate a virtual managed system object. The last step is to apply the attribute translation to generate the Soffid object to be populated.
These are the properties required to map every object of the mapping:
|
Property |
Value |
|---|---|
|
selectAll |
SQL sentence that needs to be executed to retrieve all the objects that currently exist on the database.
You can use this property with the following objects: user, account, role, and authoritative change. |
|
check |
SQL sentence that will return when a single object already exists on the database. You can use this property with all the Soffid objects. |
|
insert |
SQL sentence to create a new object. You can use this property with all the Soffid objects. |
|
update |
SQL sentence to update an existing object. You can use this property with all the Soffid objects. |
|
delete |
SQL sentence to remove (or disable) an existing object. You can use this property with all the Soffid objects. |
|
selectByAccountName |
SQL sentence to get user data based on the account name (for single account information). cuando hacemos el default mapping aparece ???? |
|
selectByAccount |
SQL sentence to retrieve all the role grants made to an account (for single account information). You can use this property with the following objects: grant. |
|
selectByName |
SQL sentence to fetch role information based on its name (for single role information). You can use this property with the following objects: role. |
|
updatePassword |
SQL sentence to update the user password. You can use this property with the following objects: user and account. |
|
validatePassword |
SQL sentence to check the user password. You can use this property with the following objects: user and account. |
Attributes
You can customize attribute mappings, you only need to select system objects and the Soffid objects related, manage their attributes, and make either inbound or outbound attribute mappings.
You may map the attributes of the target system with the Soffid available attributes.
- For the target system attributes are required to be accessible to its specification
- For the Soffid attributes, you may follow the next link
For more information about how you may configure attribute mapping, see the following link: Soffid Attribute Mapping Reference
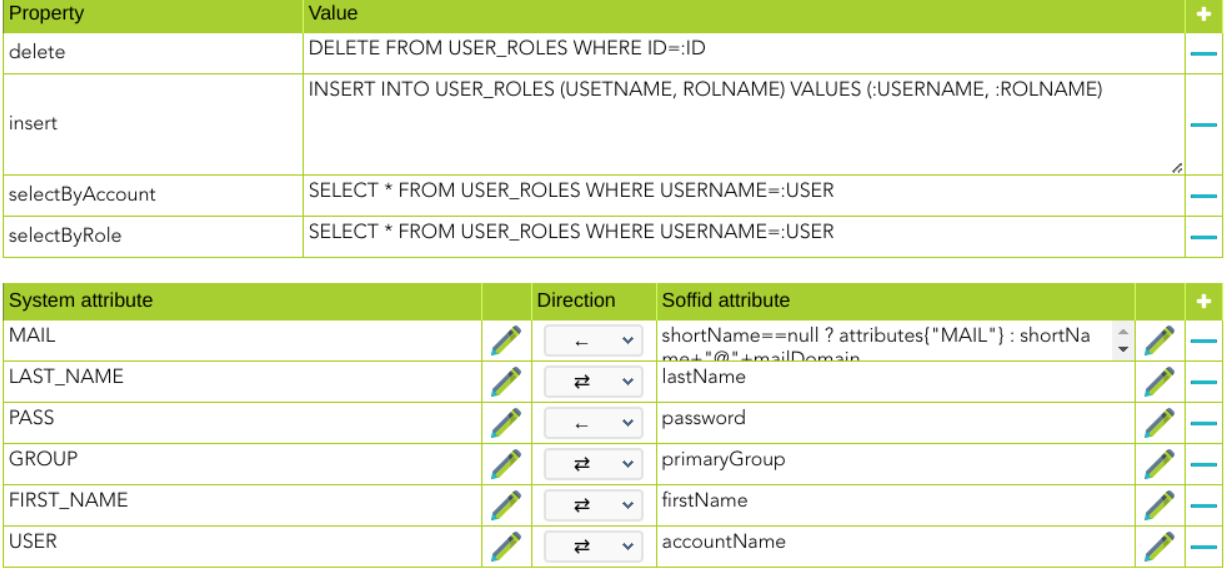
Example for roles:
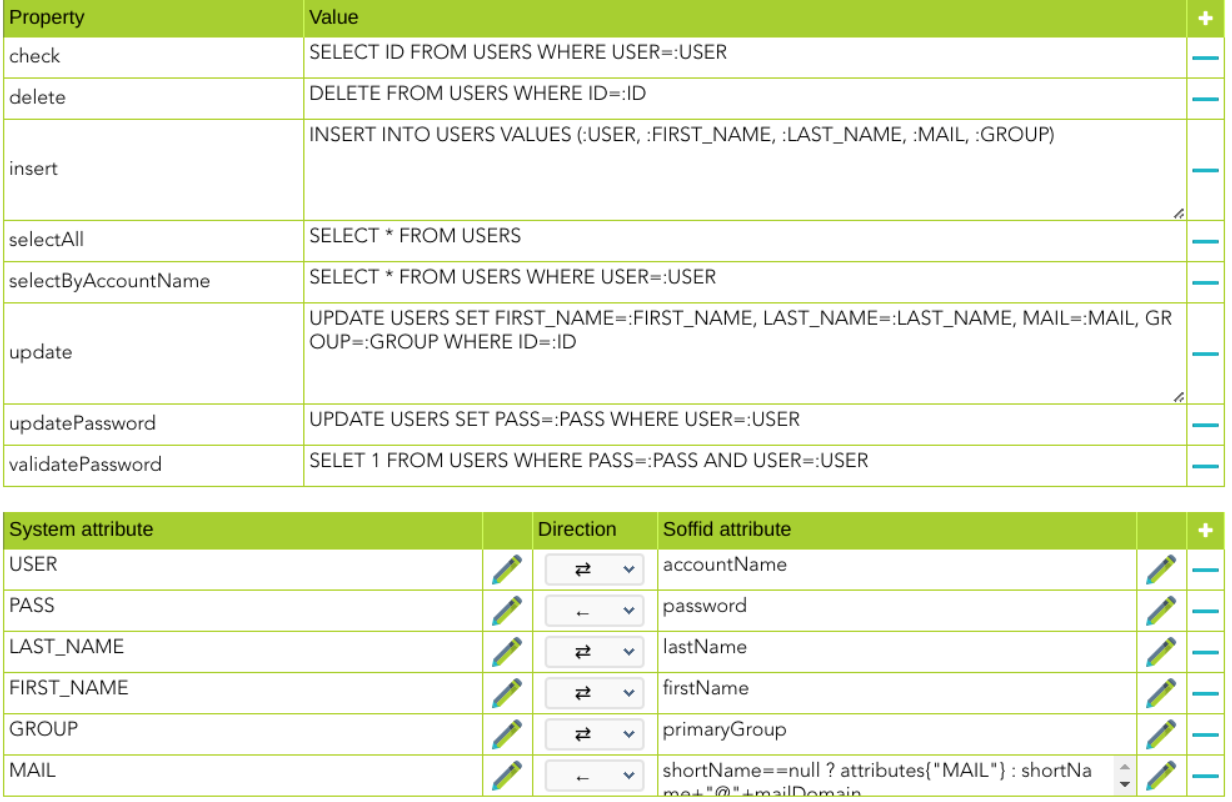
Example for accounts:
Triggers
You can define BeanShell scripts that will be triggered when data is loaded into the target system (outgoing triggers). The trigger result will be a boolean value, true to continue or false to stop.
Triggers can be used to validate or perform a specific action just before performing an operation or just after performing an operation on target objects.
To view some examples, visit the Outgoing triggers examples page.
Integration flows
Update user
Introduction
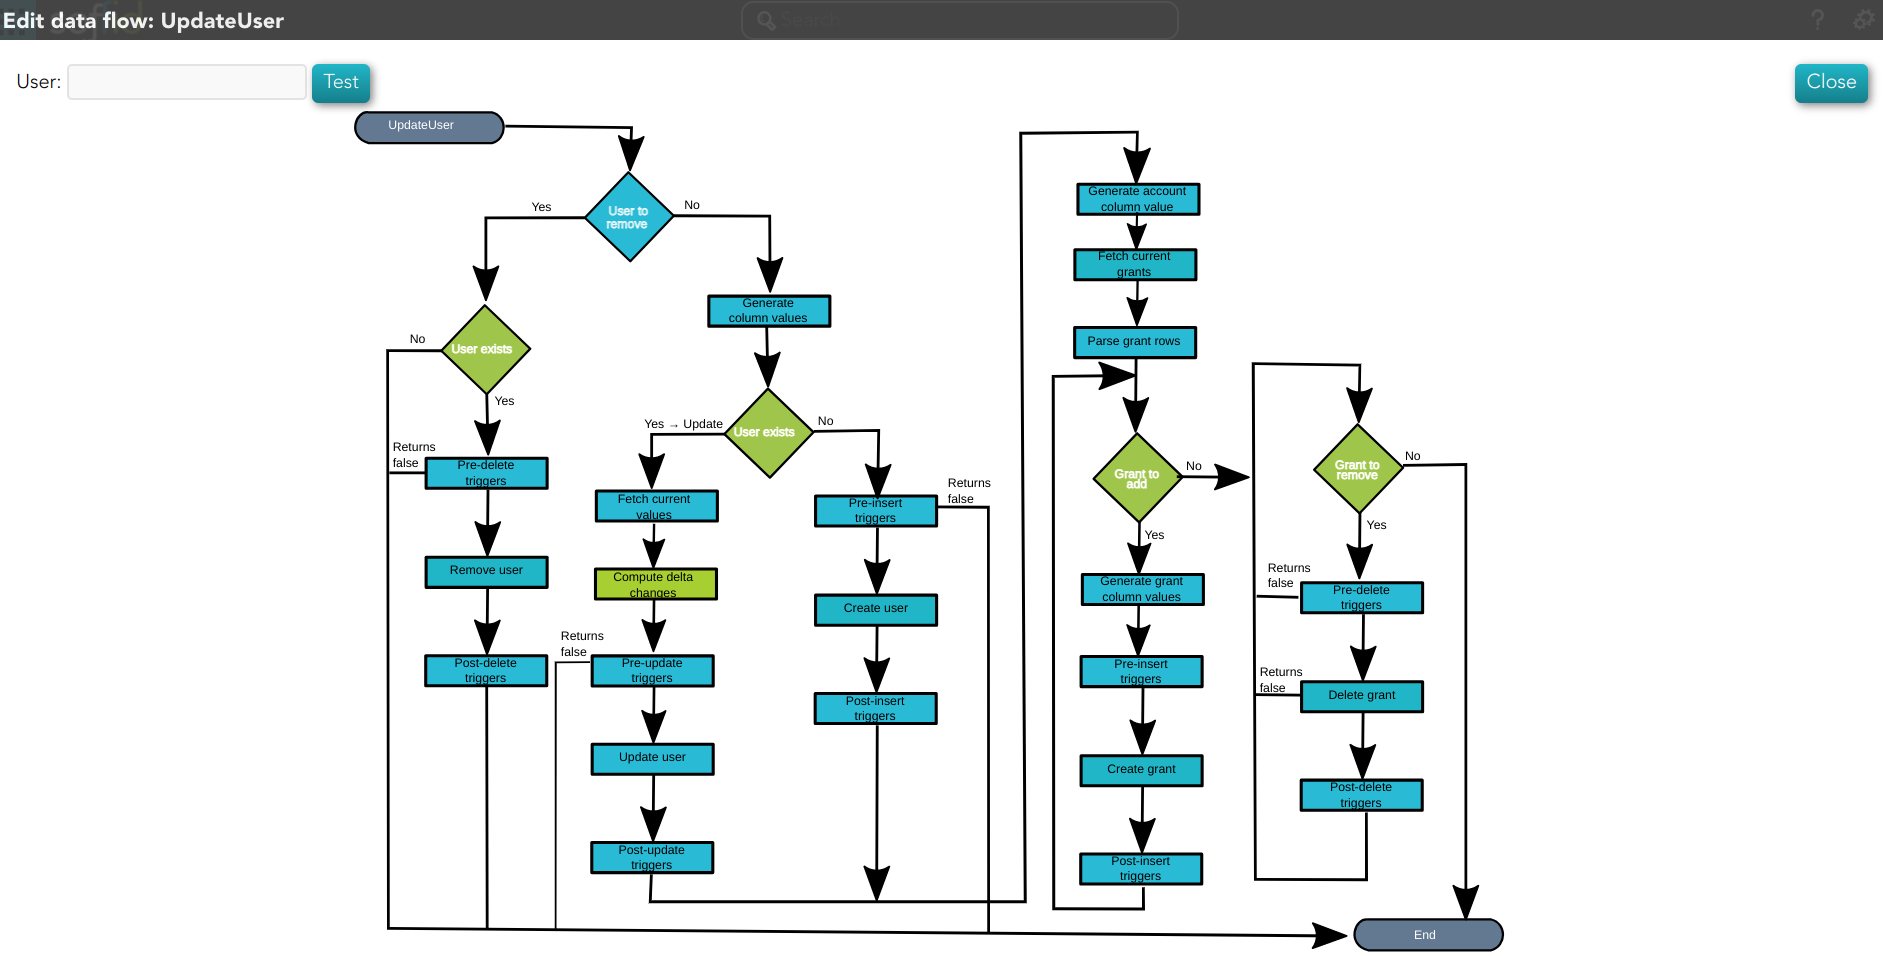
Soffid provides a workflow to create, modify, and delete a user in the final system. One can see the steps of the process in the following diagram.
This process only applies to account type single users.
Diagram
Step by Step
In this document, we will explain the process that Soffid performs to modify a user for the SQL connector.
1. Initial step
First of all, Soffid checks if the user exists in Soffid and then checks the operation to perform, update or delete.
1.1. If the user does not exist in Soffid, then Soffid asks to delete the user in the target System.
❓ Warning message
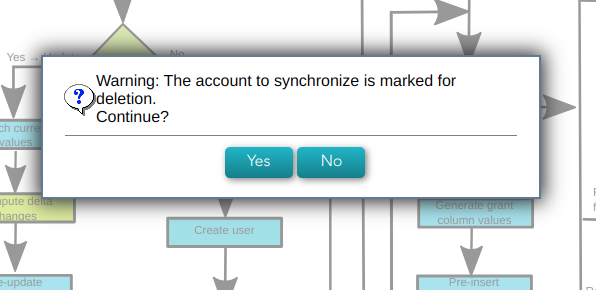
1.1.1. Yes: If the answer is Yes, the process follows through the Yes branch, [3. Delete branch].
1.1.2. No: If the answer is Yes, the process finishes [10. End].
1.2. If the user exists in Soffid, the process continues through [2. User to remove?]. to check if the
2. User to remove?
📌 By clicking on the User to remove? step,...
You can configure all the properties related to the user object for this step. 
2.1. If the user is marked for Deletion, Soffid will ask for user consent to continue with the process or to cancel it. If the answer is Yes, the process follows through the Yes branch, [3. Delete branch].
❓ Warning message

2.2. If the user is marked for Update, it continues with the flow following through the No branch, [4. Insert or Update branch].
3. Delete branch
📊 Diagram
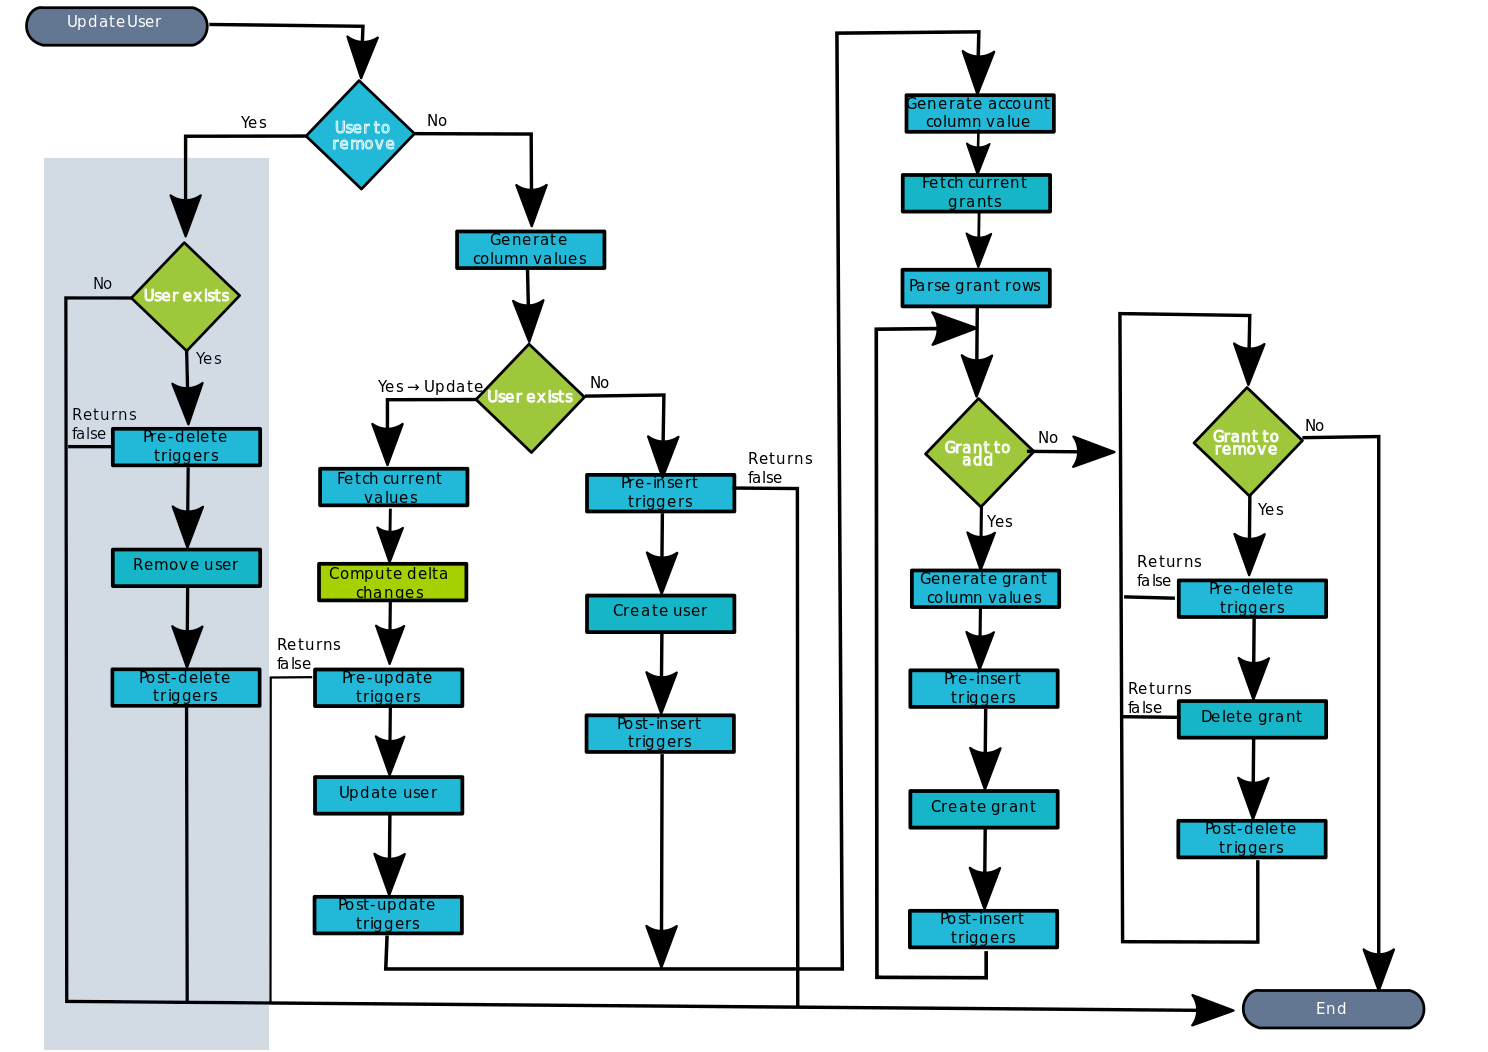
3.1. When the operation to perform is to delete a user, first of all, Soffid has to check if the user exists in the target system. To do this, Soffid executes the property check of the User object. This property executes the SQL command to check if the user exists or not.
📌 By clicking on the User exists? step,...
You can configure all the properties related to the user object for this step.
3.1.1. If the user does not exist, there are no actions to perform in the target system, so the process finishes [10. End].
3.1.2. If the user exists, the flow continues executing the pre-delete triggers if there is anyone configured. More than one script can be configured. These scripts are executed just before the main action, user delete, and the result (true or false) determines if the main action will be performed or not.
3.1.2.1. False: if the result is false for one or more of these triggers, the process finishes [10. End].
3.1.2.2.True: if the result is true for all of these triggers, Soffid continues to the next step.
📌 By clicking on the Pre-delete triggers step,...
You can configure all the pre-delete triggers related to the user object for this step.
3.1.3. Soffid removes the user. To do that, Soffid executes the property delete of the User object.
📌 By clicking on the Remove user step,...
You can configure the properties related to the user object for this step.
3.1.3. Then Soffid executes the post-delete triggers if any. These triggers can be used to perform a specific action just after performing the remove user operation on the target object.
📌 By clicking on the Post-delete triggers step,...
You can configure the post-delete triggers related to the user object for this step.

3.1.3. Then the process finishes [10. End].
4. Insert or Update branch
4.1. When the operation to perform is to update a user, first of all, Soffid generates the columns values. That is, Soffid calculates the values of the columns from the original values of Soffid.
📌 By clicking on the generate column values step,...
You can configure the attributes related to the user object for this step.

4.2.Then Soffid asks if the user exists in the target system to decide the action to execute, this action can be an update or an insert. Soffid executes the property check of the User object.
4.2.1. If the user does not exist in the target system, the process continues through [5. Insert user branch].
4.2.2. If the user exists in the target system, the process continues through [6. Update user branch].
📌 By clicking on the User exists? step,...
You can configure the properties related to the user object for this step.

5. Insert user branch
📊 Diagram
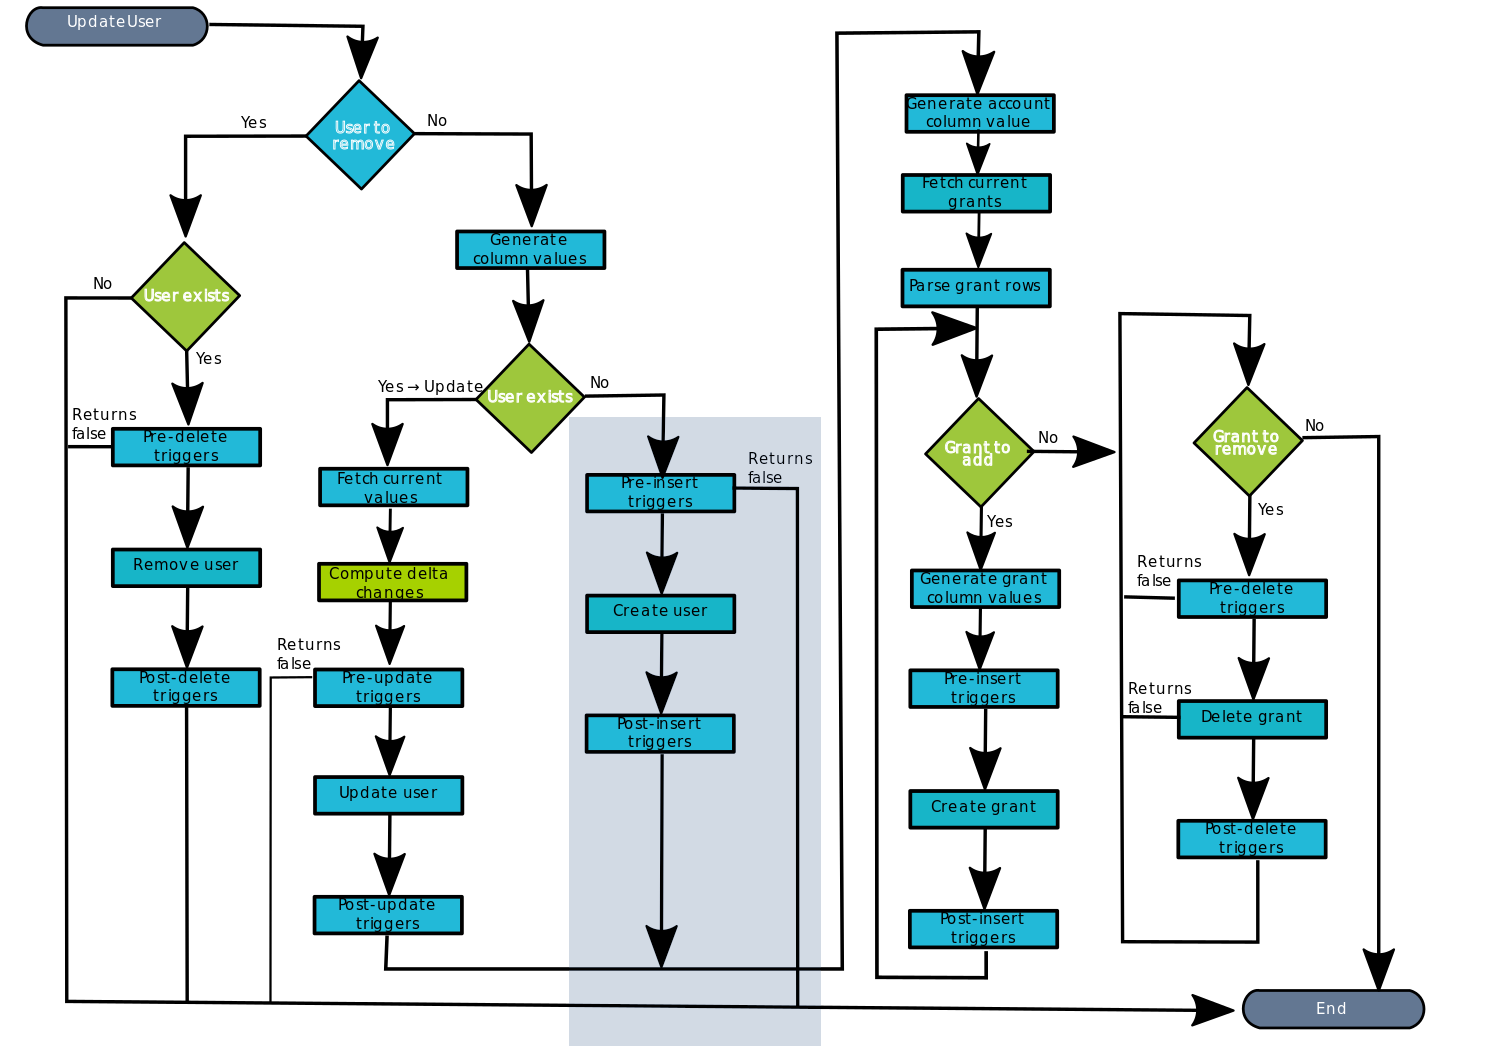
5.1. Soffid executes the pre-insert triggers if there is anyone configured. More than one script can be configured. These scripts are executed just before the main action, user create, and the result (true or false) determines if the main action will be performed or not.
5.1.1. False: if the response is false for one or more of these triggers, the process finishes [10. End] and the user is not created.
5.1.2. True: if the response is true for all of these triggers, Soffid continues to the next step.
5.2. Soffid creates the user. To do that, Soffid executes the property insert of the User object.
📌 By clicking on the Create user step,...
You can configure the properties related to the user object for this step.

5.3. Then Soffid executes post-insert triggers if any. These triggers can be used to perform a specific action just after performing the create user operation on the target object.
📌 By clicking on the Post-insert triggers step,...
You can configure the Post-insert triggers related to the user object for this step.
5.4. Then the process continues through [7. Grants].
6. Update user branch
📊 Diagram
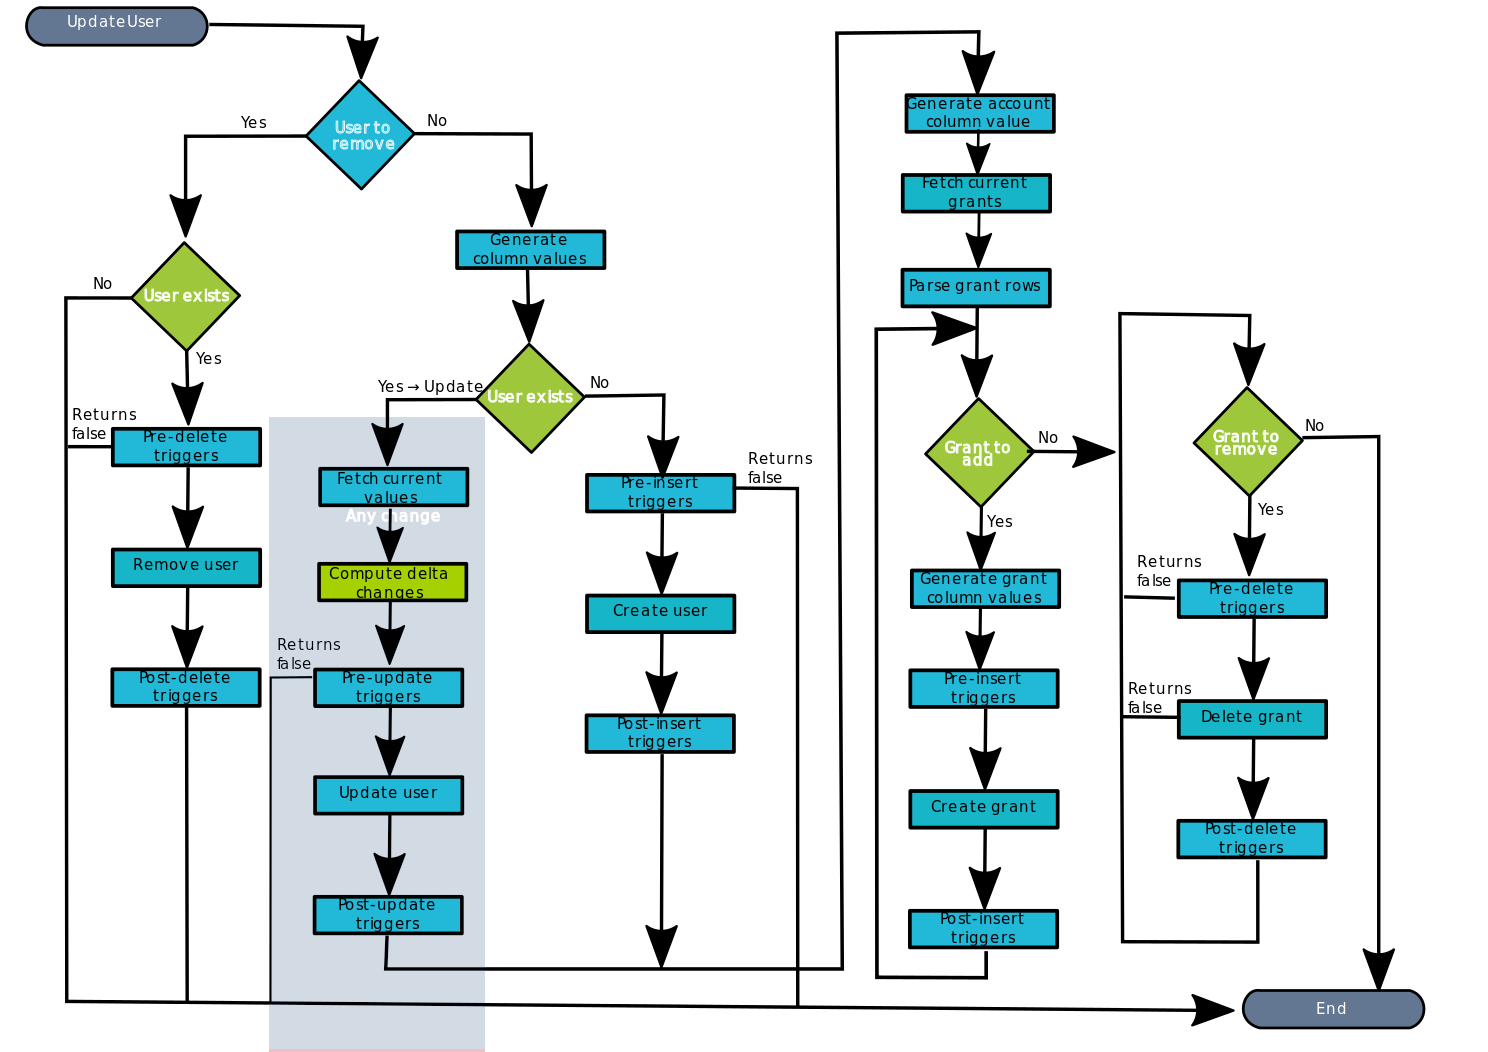
6.1. Soffid fetches the current values of the user. Soffid executes the property selectByAccountName of the User object.
&&TODO&& IMAGEN
6.2. Then compute delta changes, if the property Synchronization method selected is Full Synchronization, then Soffid has to keep the columns values of the last update. If there was any change in the target system:
- There is no conflict, then Soffid only updates the values of the attributes that have changed in Soffid.
- There is conflict, Soffid values prevail over the target system values, so, Soffid updates all the attributes that have changed in Soffid.
&&TODO&& IMAGEN
6.3. And finally execute the pre-update triggers if there is anyone configured. More than one script can be configured. These scripts are executed just before the main action, user update, and the result (true or false) determines if the main action will be performed or not.
6.3.1. False: if the response is false for one or more of these triggers, the process finishes [10. End] and the user is not updated
6.3.2. True: if the response is true for all of these triggers, Soffid continues to the next step.
📌 By clicking on the Pre-update triggers step,...
You can configure the Pre-update triggers related to the user object for this step.
6.4. Soffid updates the user. To do that, Soffid executes the property update of the or User object.
📌 By clicking on the update user step,...
You can configure the properties related to the user object for this step.
6.5. Then Soffid executes the post-update triggers if any. These triggers can be used to perform a specific action just after performing the update user operation on the target object.
📌 By clicking on the Post-update triggers step,...
You can configure the Post-update triggers related to the user object for this step.
6.6. Then the process continues through [7. Grants].
7. Grants
At this point, soffid runs the actions relative to the grants
7.1. Once the process arrives at this step, Soffid generates account column values. That is, Soffid creates a dummy object with only the account name, this object will be used later.
📌 By clicking on the generates account columns values step,...
You can configure the attribute mappings related to the grant object for this step.
7.2. Then, Soffid fetches the current grants for the user. Soffid executes the property selectByAccount of the grant object with the values of the previous step
📌 By clicking on the fetch current grants step,...
You can configure the properties related to the grant object for this step.
7.3. Finally, Soffid parses grant rows, that is Soffid makes the mappings defined
📌 By clicking on the parse grant rows step,...
You can configure the attribute mappings related to the grant object for this step.
7.3. Then the process continues through [8. Grant to add].
8. Grant to add
This is a loop while there are grants to add. This grants list comes from the previous step [7. Grants].
📊 Diagram
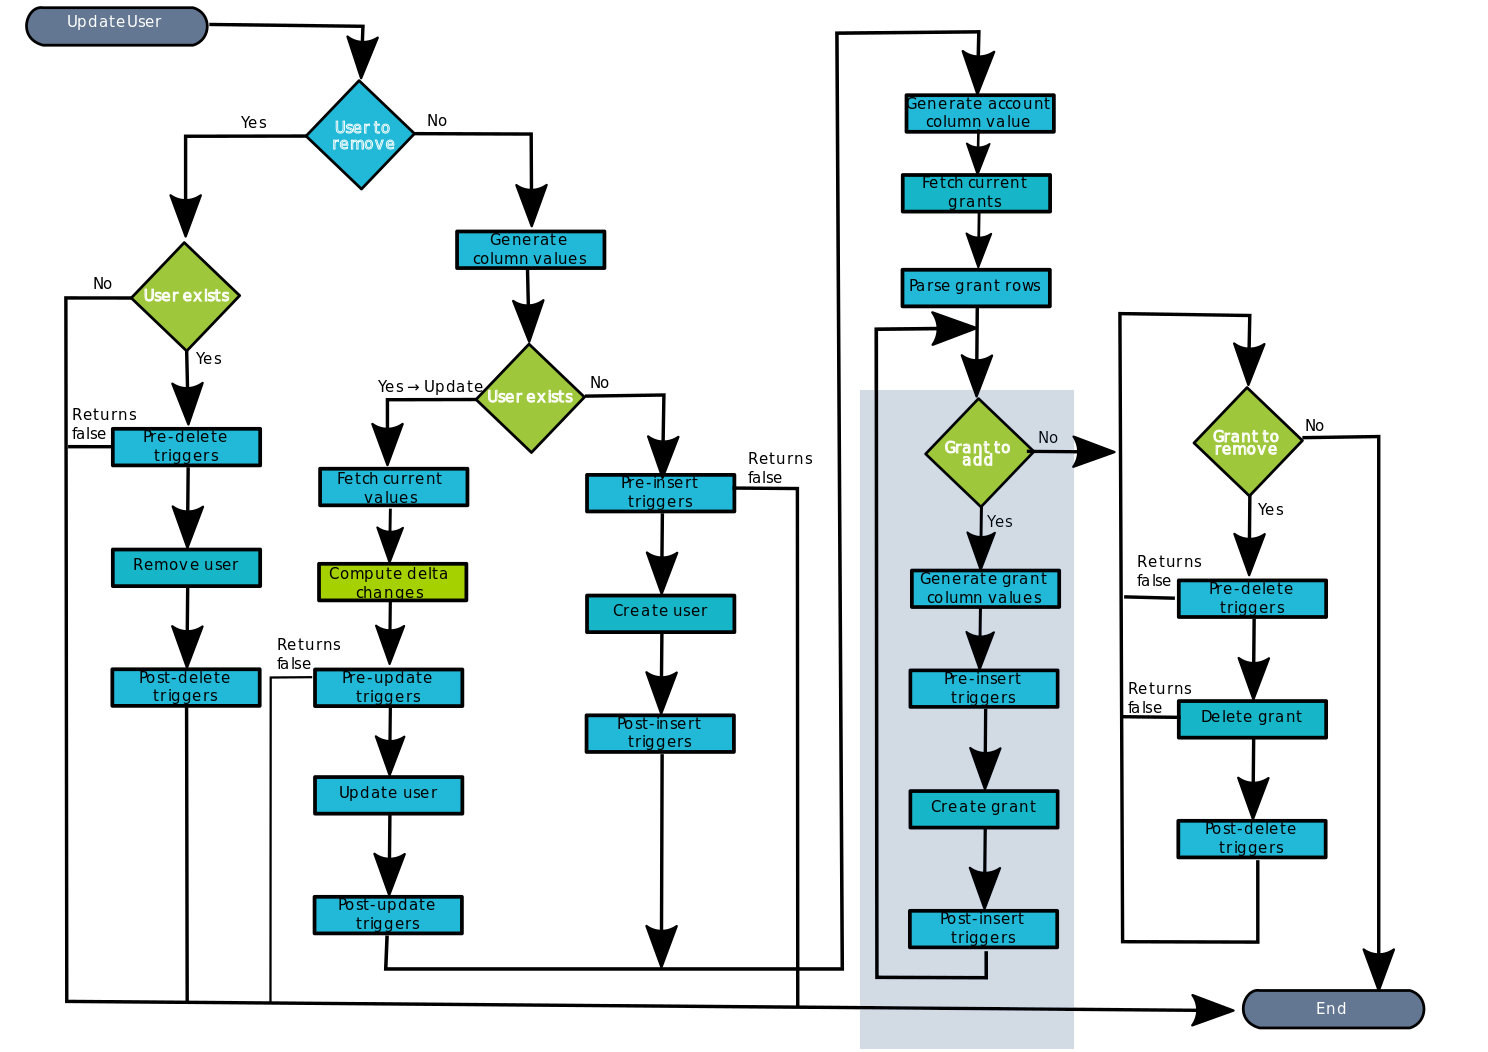
8.1. If there are No grants to add, the process goes to [9. Grant to Remove].
8.2. Yes, there are grants to add:
8.2.1. Soffid generates grant column values and Soffid checks if the grant exists in the target system, Soffid executes the property check of the grant object.
📌 By clicking on the generate grant column values step,...
You can configure the attribute mappings related to the grant object for this step.
8.2.2. Soffid executes the pre-insert triggers if there is anyone configured. More than one script can be configured. These scripts are executed just before the main action, a grant create, and the result (true or false) determines if the main action will be performed or not.
8.2.2.1. False: if the response is false for one or more of these triggers, the process goes to [8. Grant to add] and the grant is not created.
8.2.2.2. True: if the response is true for all of these triggers, Soffid continues to the next step.
📌 By clicking on the Pre-insert triggers step,...
You can configure the Pre-insert triggers related to the grant object for this step.
8.2.3. If the result of the triggers is true, then Soffid creates the grant. To do that, Soffid executes the property insert of the grant object.
📌 By clicking on the create grant step,...
You can configure the properties related to the grant object for this step.
8.2.4. Then Soffid executes the post-insert triggers if any. These triggers can be used to perform a specific action just after performing the create grant operation on the target object.
📌 By clicking on the Post-insert triggers column values step,...
You can configure the Post-Update related to the grant object for this step.
8.2.5. Then the process continues through [8. Grant to add].
9. Grant to remove
📊 Diagram
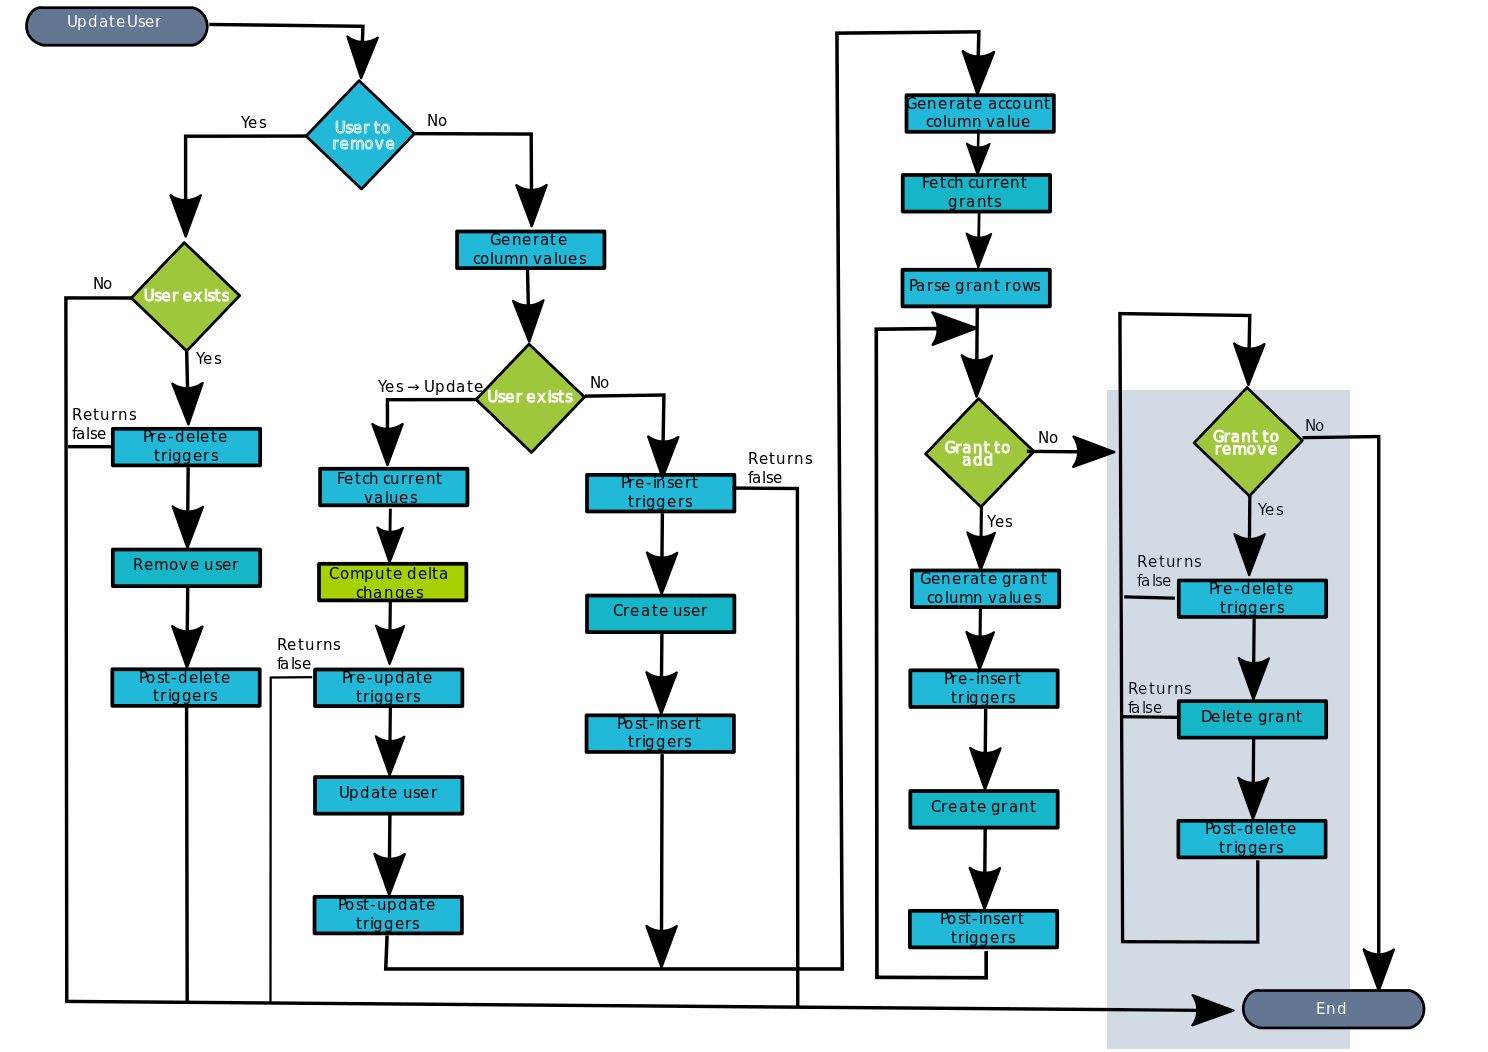
This is a loop while there are grants to remove. This grants list comes from the previous step [7. Grants].
9.1 No: If there are No grants to add, the process goes to [10. End].
9.2. Yes, there are grants to remove:
9.2.1. Soffid executes the pre-delete triggers if there is anyone configured. More than one script can be configured. These scripts are executed just before the main action, a grant delete, and the result (true or false) determines if the main action will be performed or not.
9.2.1.1. False: if the response is false for one or more of these triggers, the process finishes [10. End] and the grant is not deleted.
9.2.1.2. True: if the response is true for all of these triggers, Soffid continues to the next step.
📌 By clicking on the pre-delete trigger step,...
You can configure the Pre-delete triggers related to the grant object for this step.
9.2.2. If the result of the triggers is true, then Soffid deletes the grant. To do that, Soffid executes the property delete of the grant object. This operation can return a true or false result.
9.2.2.1. False: the delete action could not be performed and the process check for another grant [9. Grant to remove].
9.2.2.2. True: the delete action could be performed properly. Soffid continues to the next step.
📌 By clicking on the delete grant step,...
You can configure the properties related to the grant object for this step.
9.2.3. Then Soffid executes the post-delete triggers if any. These triggers can be used to perform a specific action just after performing the delete grant operation on the target object.
📌 By clicking on the post-delete trigger step,...
You can configure the Post-delete triggers related to the grant object for this step.
9.2.4. Then the process continues through [9. Grant to remove].
10. End
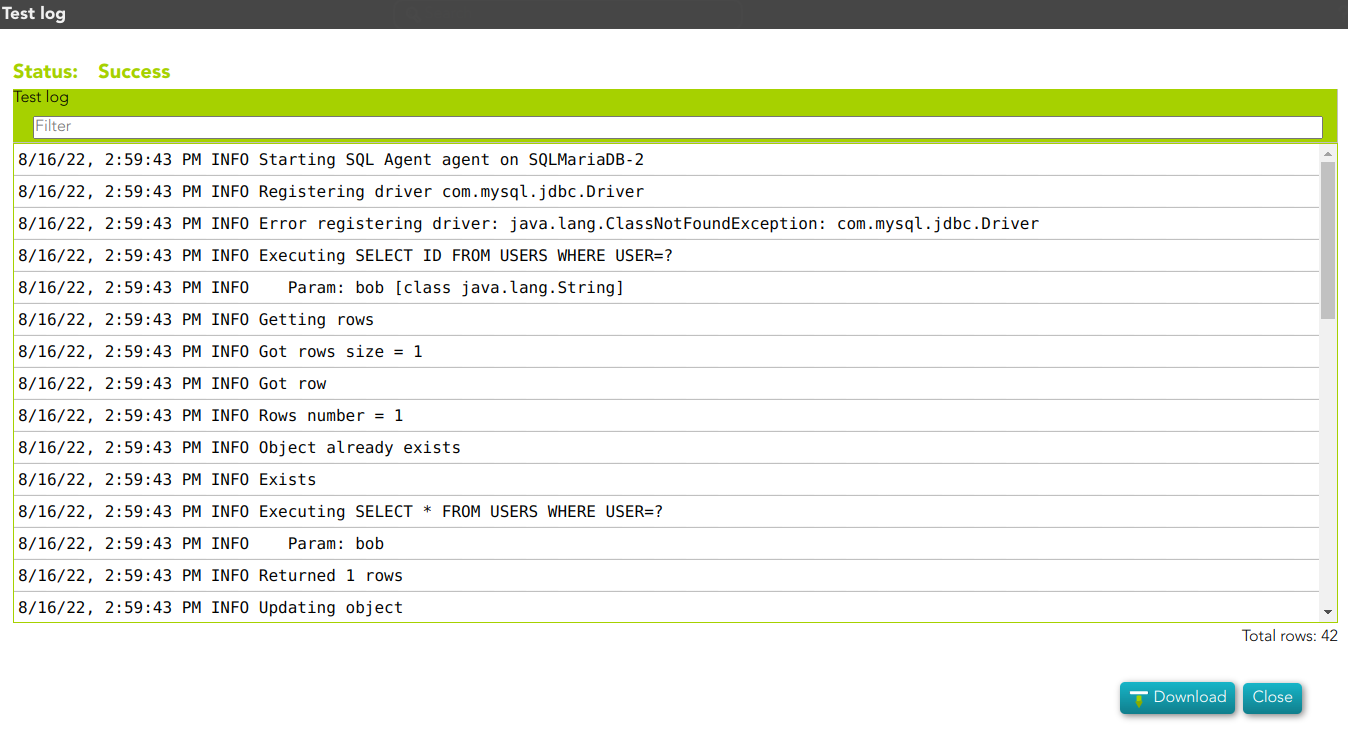
The process finishes and the log is displayed, and you can download it by clicking the Download button.
📑 Log detail
(*)
https://mariadb.com/kb/en/about-mariadb-connector-j/
https://docs.microsoft.com/es-es/sql/connect/jdbc/building-the-connection-url?view=sql-server-ver16
(**) Soffid provides two synchronization types:
- Full synchronization
- Incremental synchronization
The first type, the full synchronization method, persists the changes made in Soffid, regardless of the possible changes made in the target system.
For the second type, the incremental synchronization method, Soffid has developed a synchronization system, using custom internal attributes, to check what changes have been made to the different attributes of an object. Thus, it tries to avoid losing the changes that have been made in the target system. First, Soffid's changes will be propagated to the target system, and then the changes on the target system will be made in the Soffid system. If the changes are in the same attribute, the Soffid value is the one that will persist.

