Connecting your custom applications
Introduction
SAML 2.0 is a complex and not easy to implement standard. There are some libraries that can help somewhat, but a correct implementation needs a deep knowledge of SAML protocol, and is always hard to test and debug.
To make it easier, Soffid provides some JSON rest web services, that can help any application to correctly implement the SAML service provider part of the protocol.
Data flow
The following diagram, shows the resulting data flow between the end user, your application, the identity provider and Soffid web services:
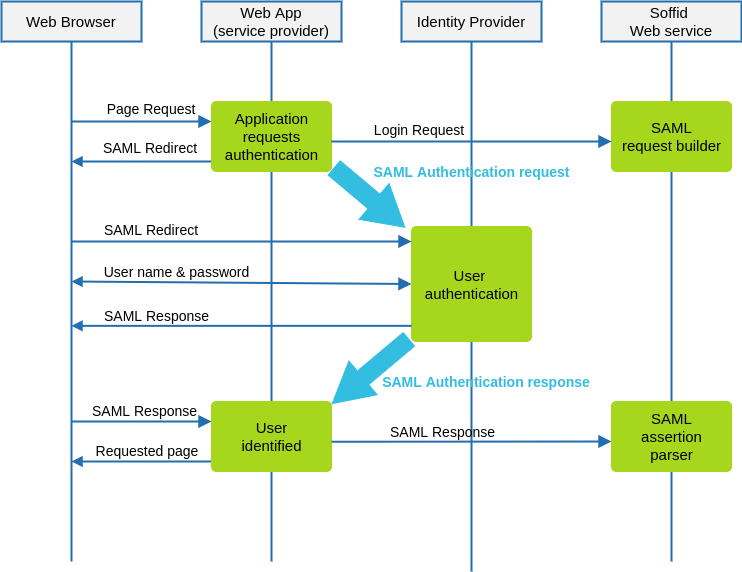
Data flow steps
1. The end-user requests access to a protected page
2. The custom application can check the user identity looking up a session variable. By the time being, the user is not authenticated.
3. The custom application issues a JSON request to Soffid web service. In turn, Soffid web service builds, signs and maybe encrypts a SAML request
4. Then custom application taks the JSON request and builds an HTTP Redirect response with the received data.
5. The identity provider identifies the user as usual.
6. The custom application receives the SAML response. At this point, the application packs and forwards the received data to Soffid Web Service.
7. Soffid Web Service decrypts and checks SAML response integrity and correctnes, and returns a JSON document specifying the success or failure status, and the underlying identity attributes. If needed, Soffid web service can provision a new identity in target systems on the fly.
8. The custom application gets the identity data, stores it in a session variable and provides the protected resource to the end user.
In order to get it, will be necessary:
- Declare the custom application as an internal service provider in the federation page.
- Create a Soffid application account for the custom application.
- Implement the protection filters.
- Implement the endpoint where the SAML response must be sent.
Example
1. Creating an internal service provider
&&TODO&&
.Once the checkbox is marked, some additional fields will be required:
• Organization (or company)
• Techincal contact (email)
• Host Name and Port. Use of SSL is higly recommended, but not required.
• Assertion path. This is the endpoint where your application expects to receive the SAML
response from the identity provider
• Certificate chain and public/private key. Soffid will generate a secret key and a self service
certificate for you click on the "Generate private / public key" button. Anyway, you can upload
you own keys and certificates at any time.
• UID script is usually left blank. It can be used to customize the value for the principal name. If
you leave it blank, the identity userName will be used.
This information will be enough to build the SAML metadata for this server. Mind that it will take some
minutes until every federation member is aware of the new service provider.
2. SAML Request generator
After deploying Soffid SAML addon, a web service to generate SAML request will be automatically deployed. This web service requires an account with the federation:serviceProvider authorization.
The endpoint will be locate in Soffid Console:
http://your.soffid.console:8080/webservice/federation/rest/generate-saml-request
Method:
POST
Headers to include in the request:
Accept = “application/json”Content-Type = “application/json”
Request: Send a JSON decument with following fields:
user → suggested user to authenticate (optional)identityProvider → identity provider public ID. Must match the public ID of anyidentity provider registered in Soffid federation.serviceProviderName → service provider which requests the userauthentication. Must match the public ID of an internal service providersessionSeconds → max time for the user session inactivity
Response:
method → Method to use: urn:oasis:names:tc:SAML:2.0:bindings:HTTP-POSTinstructs the application to build a HTML Form that automatically submits thefollowing parameters. Value urn:oasis:names:tc:SAML:2.0:bindings:HTTP-Redirectinstructs the application to perform a redirect (Location HTTP header) with theURL and parameters specifiedparameters → every parameter included must be submited to the identityprovider. Usually, these two will be present:RelayState → identifier of the ticket of the SAML requestSAMLRequest → encoded SAML requesturl → identity provider endpoint.
Request sample:
|
{ "user" : "myuser@soffid.poc", } |
Response sample:
|
{ |
3.
4.