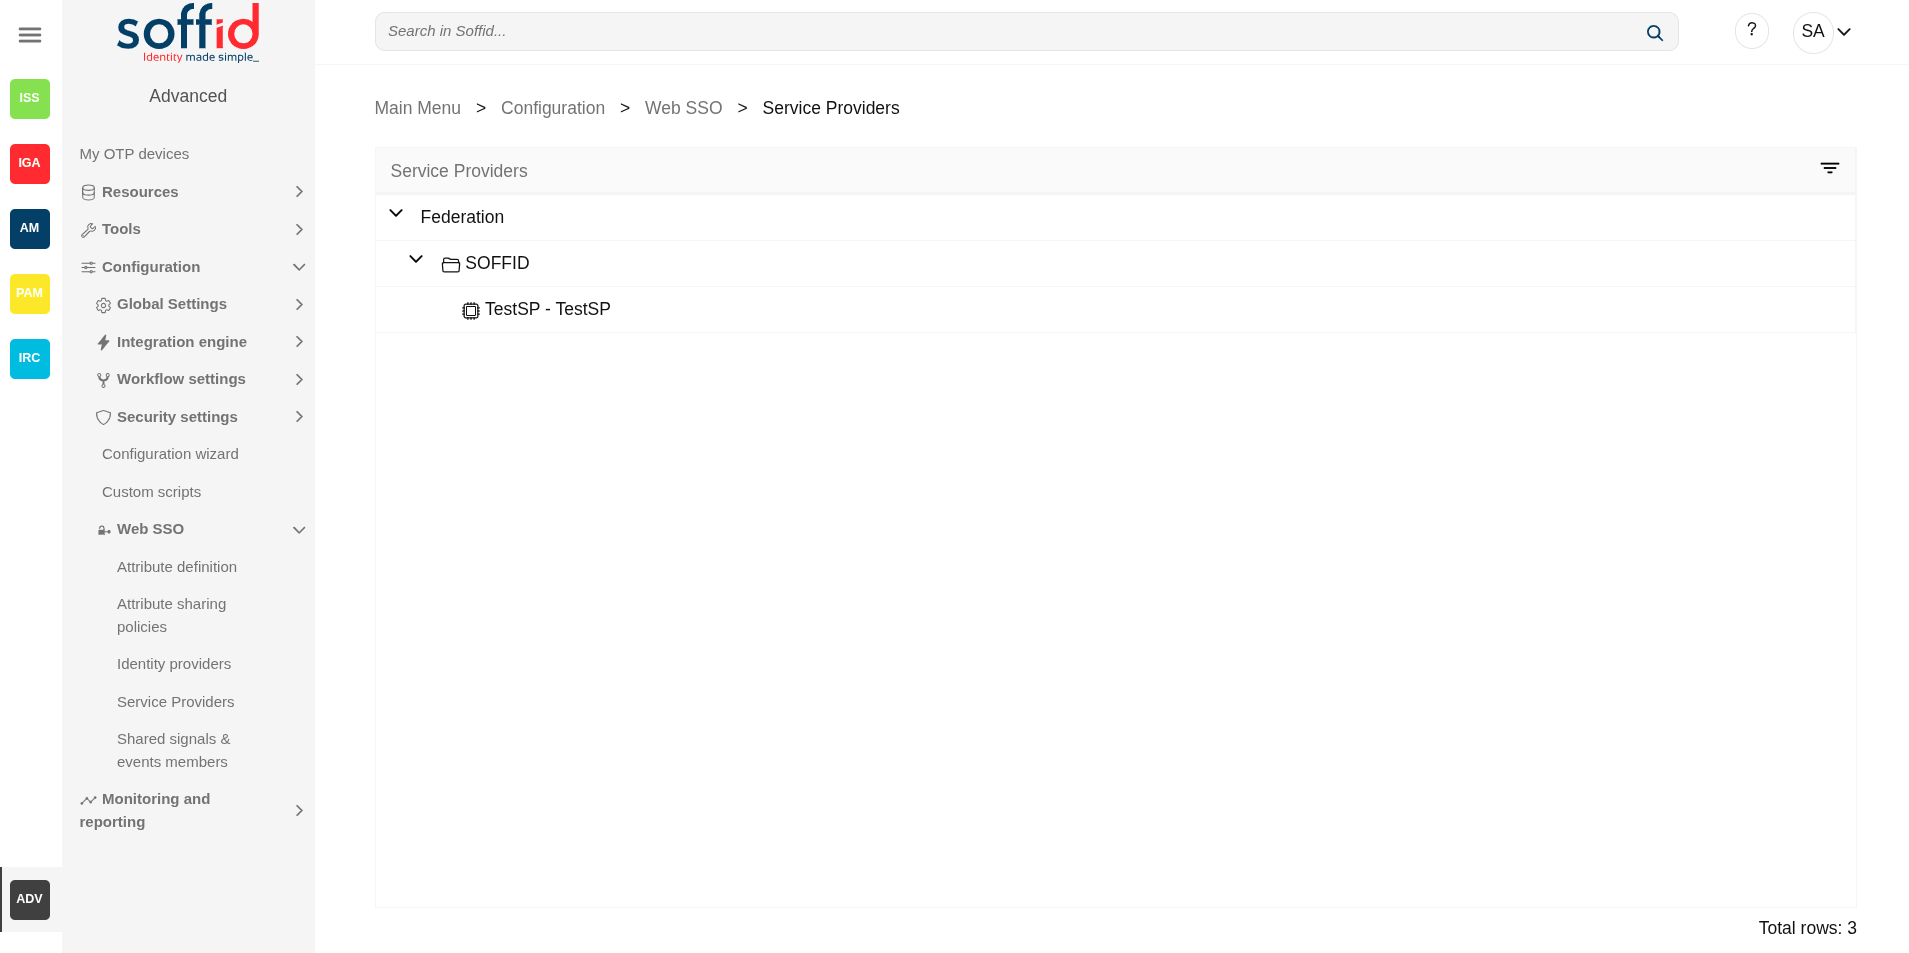
Service Providers (addon federation)
Description
This screen allows you to define the applications that will belong to the federation. These applications are named service providers and must be configured correctly to delegate the user authentication to the identity provider that is responsible for them by configuration.
The main supported standard is SAML. SAML allows to completely detach the identification process from web applications, known as Service Providers. With SAML, identification is performed by specialized servers known as Identity Providers. Additionaly, some other, less secure, but some times convenient protocols like OAuth (Open Authorization) and OpenID-Connect protocols are supported. Elder protocols like Openid (do not confuse with OpenID-Connect) are deprecated and no longer supported.
Remember that after validating the user's login, the identity provider will send a set of attributes to the service provider that will have been previously defined in Soffid in the attribute definition page and shared attribute policy screens.
You can visit the Introduction page to find more information about the federation.
Please note that this screen is available in the federation addon.
Screen overview
Related objects
- Attribute definition : where the list of possible attributes to be returned in the IdP response is defined
- Attribute sharing policies : where policies are defined with the attributes to be sent according to the authenticated service provider
- Identity providers : configuration of the identity providers
- Service providers : configuration of the service providers
- Metadata : where user attributes are defined
Standard attributes
SAML
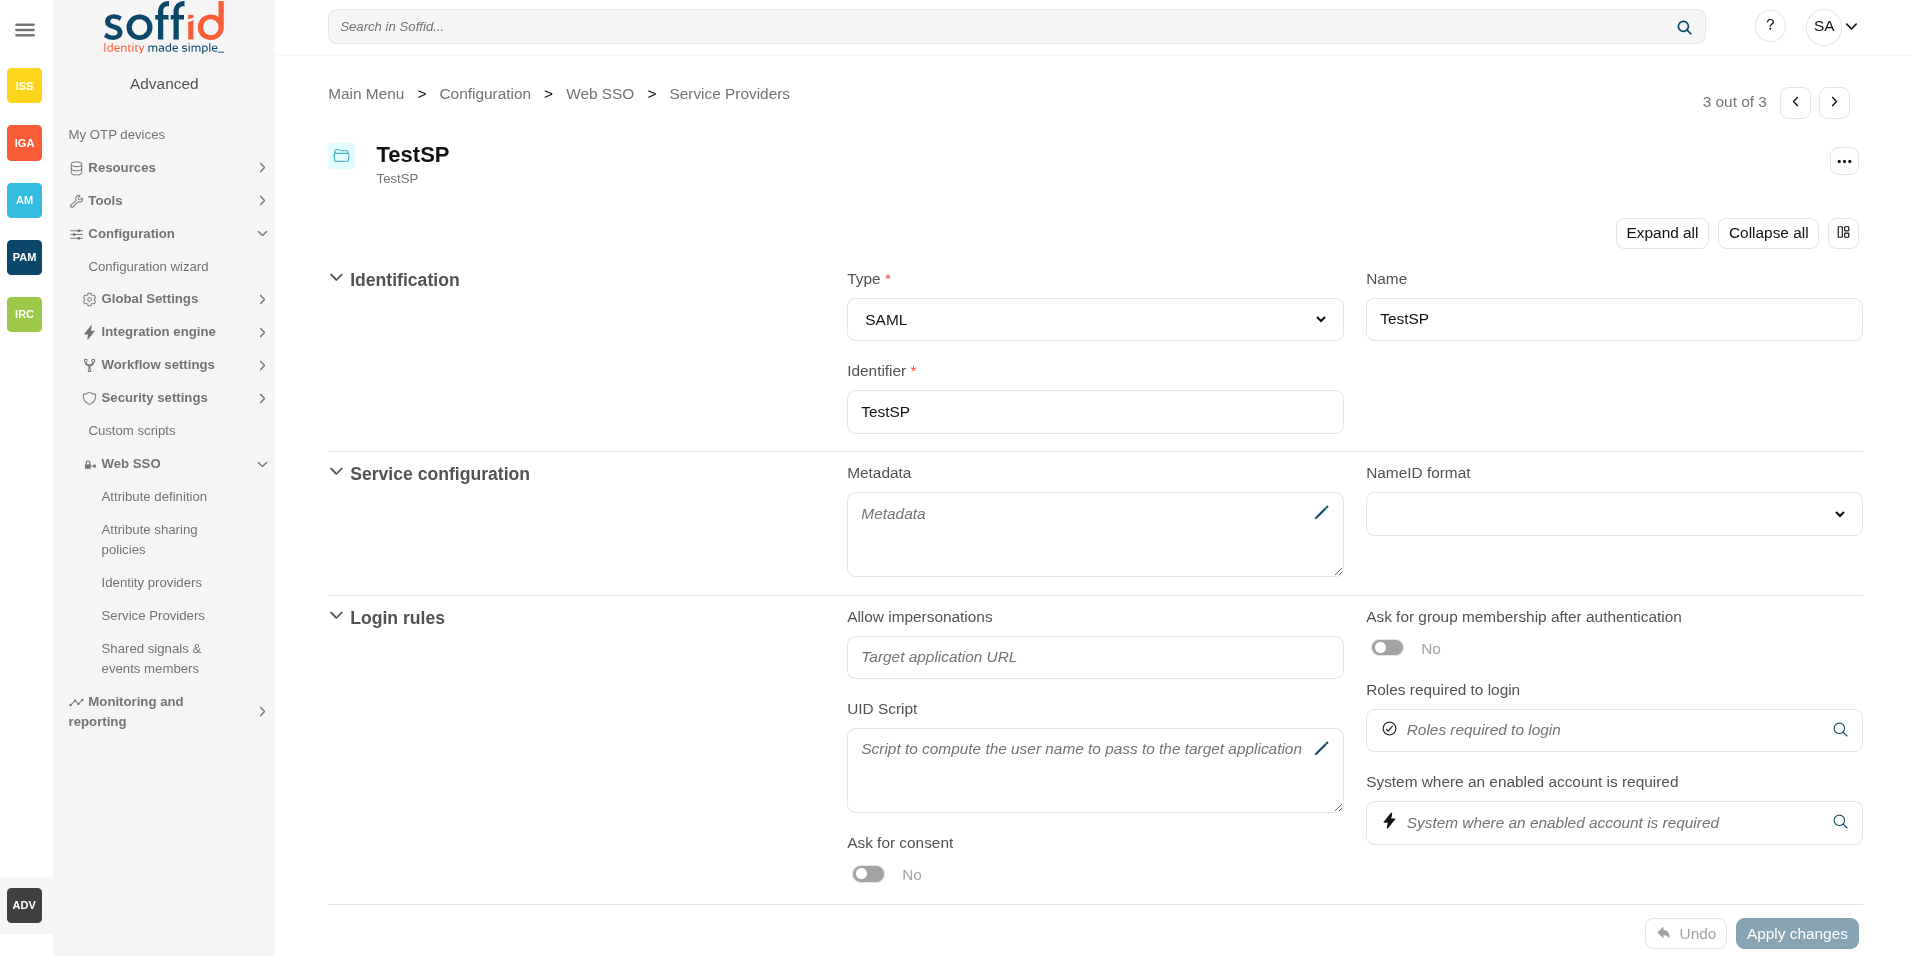
Identification
- Type: SAML (this option must be selected)
- Identifier: public name of the service provider. It must be unique
- Name: friendly user name or brief description.
Service configuration
- Metadata: you must provide the identity provider metadata. You can either copy it from the Soffid Identity Provider page, or instruct the service provider to download the federation metadata by itself.
- NameID format:
- Persistent
- Unspecified
- Transient
To publish the federation members' metadata, the main sync server exports the member's metadata at the path /SAML/metadata.xml. Thus, if your sync server is listening at soffid1.your.domain, you can get the whole federation metadata document from:
https://soffid1.your.domain:760/SAML/metadata.xml
After some seconds, up to five minutes, every federation member will notice any change.
Login rules
- Allow impersonations: Soffid allows a service provider to connect to another service provider in a controlled manner. Here you can write the target application URL.
- UID Script: script to compute the user name to pass to the target application
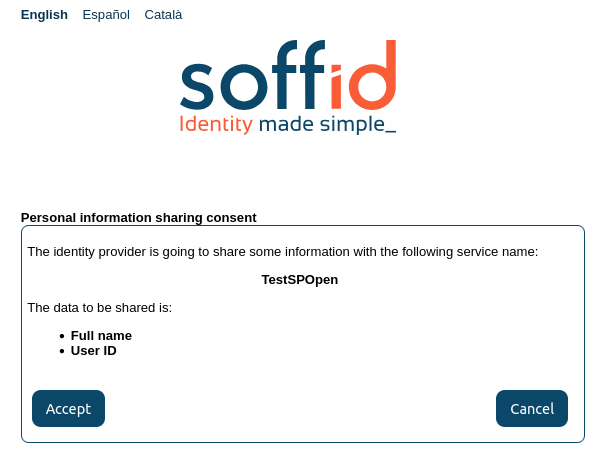
- Ask for consent: enable a new screen for the user to consent to their data being shared in the service provider login.
- Ask for group membership after authentication: enables a new screen for selecting the user's holder group after authentication. To learn how to configure it, check the holder groups configuration book.
- Roles required to login: roles that the user must have to be able to connect to the system
- System where an enabled account is required: System where it will be necessary for the user to have an account in order to log in.
You can visit the Openid-connect to SAML interoperability page for more detailed information.
SAML API client
Identification
- Type: SAML API client (this option must be selected)
- Identifier: public name of the service provider. It must be unique
- Name: friendly user name or brief description.
- Organization: company name of the external IdP.
- Contact: email address of the external IdP.
Service configuration
- Metadata
- NameID format:
- Persistent
- Unspecified
- Transient
Leave it blank as Soffid IdP will fulfill it for you.
The metadata will be created when the network data and SAML Security data.
Login rules
- Allow impersonations: Soffid allows a service provider to connect to another service provider in a controlled manner. Here you can write the target application URL.
- UID Script: script to compute the user name to pass to the target application.
- Ask for consent: enable a new screen for the user to consent to their data being shared in the service provider login.
- Ask for group membership after authentication: enables a new screen for selecting the user's holder group after authentication. To learn how to configure it, check the holder groups configuration book.
- Roles required to login: roles that the user must have to be able to connect to the system
- System where an enabled account is required: System where it will be necessary for the user to have an account in order to log in.
You can visit the Openid-connect to SAML interoperability page for more detailed information.
Network
- Host name: public application host name that wants to be a service provider. A fully qualified name should be used.
- Standard port: public application port number.
- Disable SSL: check it, selected value Yes, if you want to use plain TCP connections. In another case, it will be needed to comply with additional fields:
- Assertion path: URL to receive the response.
SAML Security
- PublicKey:
- Clicking on the Generates public / private key button, a new private key pair will be generated. Once the private key pair is generated, you could generate a certificate request file, also known as PKC#10 or CSR file. The certificate authority will be able to create a certificate for you using this certificate request. Once you have created the public/private key, you could run other new functions:
- Change public/private key: this allows you to change the public/private key generated previously.
- Delete public/private key: this allows you to delete the public/private key generated previously.
- Generate PKCS10: generates a PKCS10 file (Certification request standard).
- Clicking on the Upload PKCS12 file button it will be able to upload a PKCS#12 file. That file must contain the private and public keys and the server certificate as well. Mind that PKCS#12 file use to be protected by a PIN.
- Clicking on the Generates public / private key button, a new private key pair will be generated. Once the private key pair is generated, you could generate a certificate request file, also known as PKC#10 or CSR file. The certificate authority will be able to create a certificate for you using this certificate request. Once you have created the public/private key, you could run other new functions:
- Certificate chain: text certificate chain created with one of the previous options.
OpenID Connect
Identification
- Type: OpenID Connect (this option must be selected)
- Identifier: public name of the service provider. It must be unique.
- Name: friendly user name or brief description.
Login rules
- Allow impersonations: Soffid allows a service provider to connect to another service provider in a controlled manner. Here you can write the target application URL.
- UID Script: script to compute the user name to pass to the target application.
- Ask for consent: enable a new screen for the user to consent to their data being shared in the service provider login.
Image
- Ask for group membership after authentication: enables a new screen for selecting the user's holder group after authentication. To learn how to configure it, check the holder groups configuration book.
- Roles required to login: roles that the user must have to be able to connect to the system
- System where an enabled account is required: System where it will be necessary for the user to have an account in order to log in.
You can visit the Openid-connect to SAML interoperability page for more detailed information.
OpenID authorization flow
-
Implicit: application server redirects the end user to the IdP, that in turn, returns the oAuth token along with the OpenID token.
- Authorization code: application server redirects the user to the IdP, which in turn, returns an authorization code that can be used to retrieve the token and the OpenID token from the token endpoint.
- User's password: the server access directly to the token endpoint, sending the username and password, to retrieve the oAuth and OpenID token. This mechanism is highly insecure, as allows unauthenticated clients to impersonate end users
- User's password + Client credential: it is a secure version of the previous one, requiring the client to use its client secret.
- Client id: the identifier used by the application server.
- Client secret: password used by the application server. It is used in the Authorization code flow as well as “User’s password + Client credentials” flow.
- Sector identifier URI: sector identifier URI
- Response URL: set the URL to return the control after authenticating a user.
- RP-Initiated logout response URL's
- Front-channel logout endpoint
- Back-channel logout endpoint
- oAuth Session timeout (secs): time in seconds that will take the oAuth session. The oAuth has its own life cycle, regardless of the session timeout.
- Allowed scopes: you can define a scope list with the proper scopes that users will need to interact with the final system.
- openid: default scope.
- custom scopes: you can add the custom scopes that can be requested by the service provider.
- *: the scope * means that any scope requested by the service provider will be granted.
OpenID Dynamic Register
Identification
- Type: OpenID Dynamic Register (this option must be selected)
- Identifier: public name of the service provider. It must be unique
- Name: friendly user name or brief description.
Login rules
- UID Script: script to compute the user name to pass to the target application.
- Ask for consent: enable a new screen for the user to consent to their data being shared in the service provider login.
- Roles required to login: roles that the user must have to be able to connect to the system.
- System where an enabled account is required: System where it will be necessary for the user to have an account in order to log in.
OpenID authorization flow
-
Implicit: application server redirects the end user to the IdP, that in turn, returns the oAuth token along with the OpenID token.
- Authorization code: application server redirects the user to the IdP, which in turn, returns an authorization code that can be used to retrieve the token and the OpenID token from the token endpoint.
- User's password: the server access directly to the token endpoint, sending the username and password, to retrieve the oAuth and OpenID token. This mechanism is highly insecure, as allows unauthenticated clients to impersonate end users
- User's password + Client credential: it is a secure version of the previous one, requiring the client to use its client secret.
- Sector identifier URI
- Allowed scopes: you can define a scope list with the proper scopes that users will need to interact with the final system.
- openid: default scope.
- custom scopes: you can add the custom scopes that can be requested by the service provider.
- *: the scope * means that any scope requested by the service provider will be granted.
Registration token
- Token: unique identifier
- Valid until: maximum validity date
- Allowed servers: maximum number of servers that can be registered
Radius client
Identification
- Type: Radius client (this option must be selected)
- Identifier: public name of the service provider. It must be unique.
- Name: friendly user name or brief description.
Login rules
- Roles required to login: roles that the user must have to be able to connect to the system.
- System where an enabled account is required: System where it will be necessary for the user to have an account in order to log in.
Radius configuration
- Source IPs: origin IP or origin IP range.
- Radius secret: password.
- Client certificate: client certificate.
- Free radius agent: enable this option when Soffid allows anonymous users to access from different locations.
CAS client
Identification
- Type: CAS client (this option must be selected)
- Identifier: public name of the service provider. It must be unique.
- Name: friendly user name or brief description.
Login rules
- Allow impersonations: Soffid allows a service provider to connect to another service provider in a controlled manner. Here you can write the target application URL.
- UID Script: script to compute the user name to pass to the target application.
- Ask for consent: enable a new screen for the user to consent to their data being shared in the service provider login.
- Ask for group membership after authentication: enables a new screen for selecting the user's holder group after authentication. To learn how to configure it, check the holder groups configuration book.
- Roles required to login: roles that the user must have to be able to connect to the system
- System where an enabled account is required: System where it will be necessary for the user to have an account in order to log in.
CAS configuration
- Response URL: set the URL to return the control after authenticating a user.
- Logout response URL
Radius client
Identification
Type:Radius client (this option must be selected)Identifier: public name ofset theservice provider. It must be unique.Name: friendly user name or brief description.
Login rules
UID Script: scriptURL tocomputereturn theusercontrolnameaftertologoutpassato the target application.Roles required to loginSystem where an enabled account is required
Radius configuration
Source IPs: origin IP or origin IP range.Radius secret: passworduser.
Tacacs+
Identification
- Type: Tacacs+ (this option must be selected)
- Identifier: public name of the service provider. It must be unique.
- Name: friendly user name or brief description.
Login rules
- Roles required to login: roles that the user must have to be able to connect to the system
- System where an enabled account is required: System where it will be necessary for the user to have an account in order to log in.
Tacacs+ configuration
- Source IPs: origin IP or origin IP range.
- Tacacs+ secret: password.
- Authorization rules: allows you to add additional authorization rules to elevate privileges. Available context variables:
- user: remote user name
- priv_level: privilege level
- remote_address: remote address
- port: port
- optionalArguments: modifiable map of optional attributes.
- mandatoryArguments: modifiable map of mandatory attributes.
- return true if the action is authorized.
WS-Federation
Identification
- Type: WSW-Federation (this option must be selected)
- Identifier: public name of the service provider. It must be unique.
- Name: friendly user name or brief description.
Login rules
- Allow impersonations: Soffid allows a service provider to connect to another service provider in a controlled manner. Here you can write the target application URL.
- UID Script: script to compute the user name to pass to the target application.
- Ask for consent: enable a new screen for the user to consent to their data being shared in the service provider login.
- Ask for group membership after authentication: enables a new screen for selecting the user's holder group after authentication. To learn how to configure it, check the holder groups configuration book.
- Roles required to login: roles that the user must have to be able to connect to the system
- System where an enabled account is required: System where it will be necessary for the user to have an account in order to log in.
WS-Federation
- Response URL: set the URL to return the control after authenticating a user.
Actions
Federation tree
|
Add group |
Allows you to create a new entity group. You can choose that option by clicking on the "Add group" button in the tree, then Soffid will display a new window with the fields to fullfil. To add a new entity group it will be mandatory to fill in the required fields and save or apply changes. |
|
Add service provider |
Allows you to add a new service provider. You must click the "Add service provider" button, under the proper Entity Group and "Identity Provider" label, then Soffid will display a new window with the data to fulfill for new service Provider. To add a new service provider it will be mandatory to fill in the required fields and save or apply changes. |
Entity group detail
|
Apply changes (disk button) |
Allows you to save the data of a new entity group or to update the data of a specific entity group. To save the data it will be mandatory to fill in the required fields. |
|
Delete |
Allows you to remove the entity group. You can find this option in the "three points" menu by clicking on the "Delete" button. To perform that action, Soffid will ask you for confirmation, you could confirm or cancel the operation. |
|
Undo |
Allows you to quit without applying any changes. |
|
Apply changes |
Allows you to save the data of a new entity group or to update the data of a specific entity group. Once you apply changes, the plugin details page will be closed. |
Service provider detail
| Save |
Allows you to save the data of a new service provider or to update the data of a specific service provider. To save the data it will be mandatory to fill in the required fields. |
|
Delete service provider |
Allows you to delete the service provider. To delete a service provider you can click on the "three points" icon and then click the delete button. Soffid will ask you for confirmation to perform that action, you could confirm or cancel the operation. |
|
Undo |
Allows you to quit without applying any changes made. |
|
Apply changes |
Allows you to save the data of a new service provider or to update the data of a specific service provider and quit. To save the data it will be mandatory to fill in the required fields. |