New features
- 2026-05-08 New feature: set password when enabling an account
- 2026-05-19 New feature: filter holder groups at the IdP login
- 2026-05-21 New feature: CSV connector in Soffid 4
- 2026-05-31 New feature: new authorization for the SCIM webservice
- 2026-05-31 New feature: hidden stack tracers
- 2026-06-02 New feature: syslog with new protocols
- 2026-07-08 New feature: geolocation service available by default
- 2026-06-13 New feature: select images for Soffid Authenticator
2026-05-08 New feature: set password when enabling an account
The new feature
Now, when an account is disabled, its password is deleted. Afterwards, if the user changes his password, the disabled account will still have no password. If the disabled account is enabled, the agent of the account will set the password of the password domain to the account and send it to the target system.
Bear in mind
Please note the following points:
- The user's password domain will have value once at least one password has been assigned.
- The account must be a single-user account; these are the ones that can be viewed in a user’s accounts tab.
How to configure it?
The following components must be installed:
- Console 4.0.57 (or higher)
- Syncserver 4.0.35 (or higher)
- SAP plugin 4.0.2 (or higher)
Let's look at an example
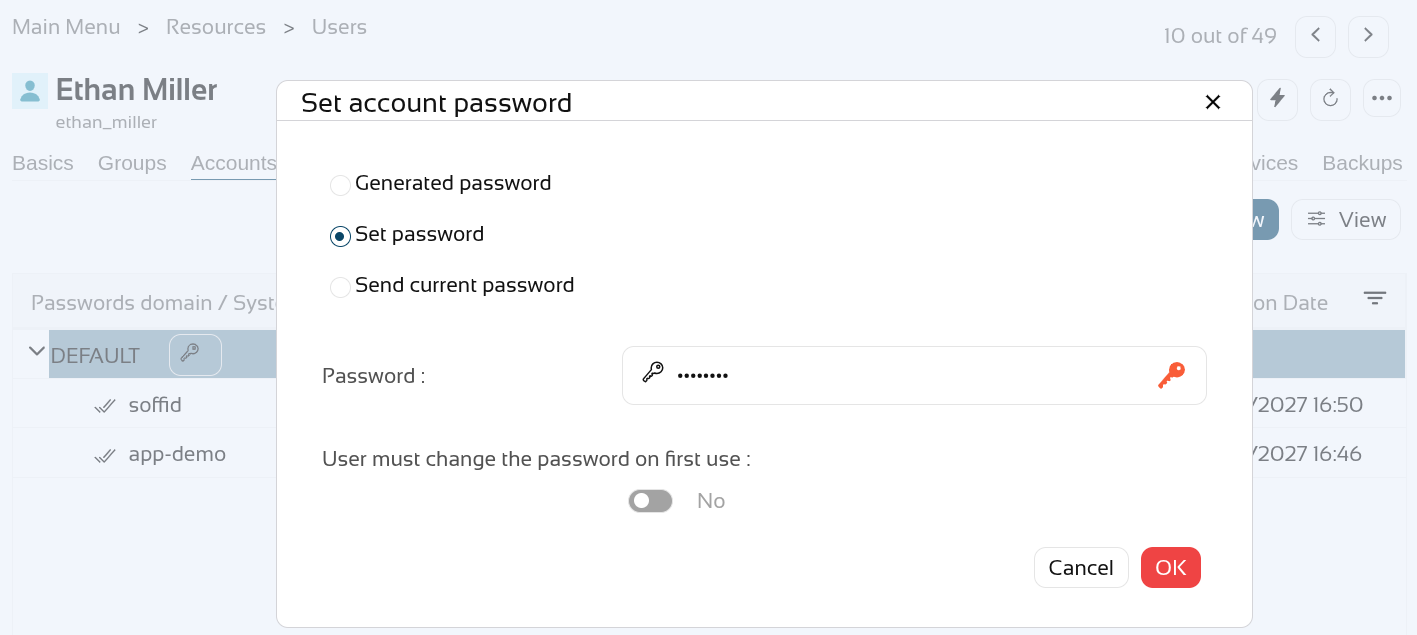
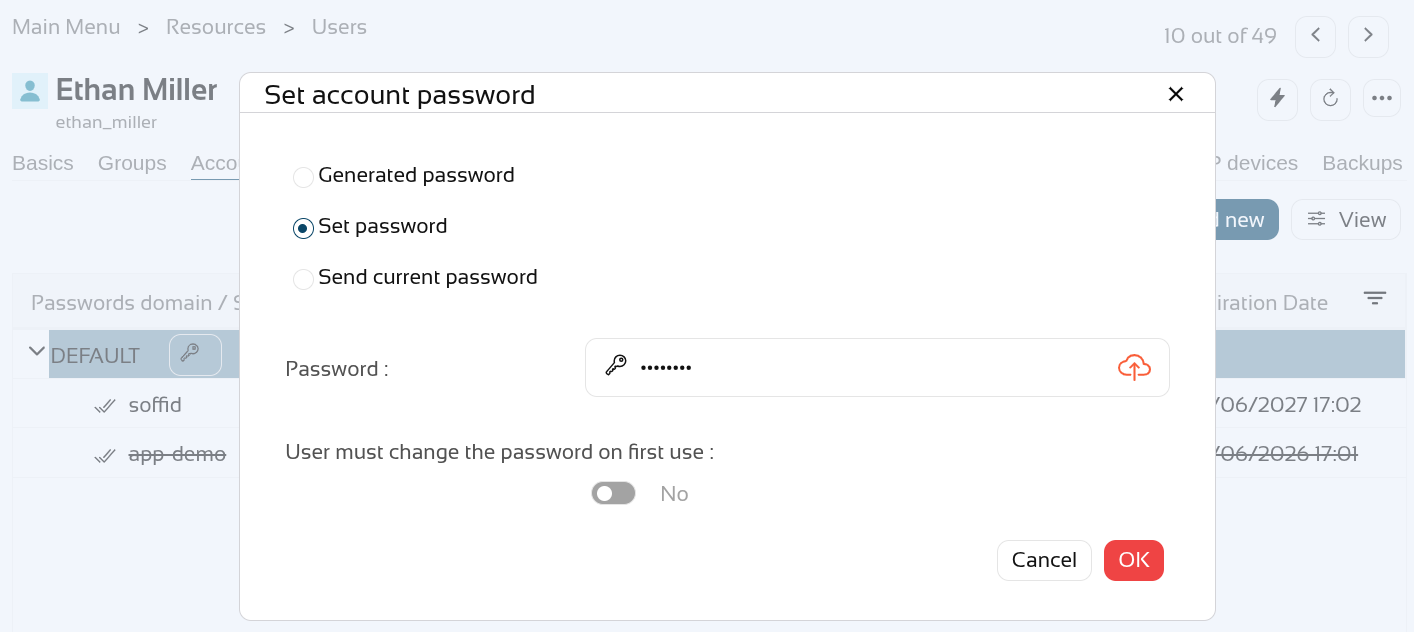
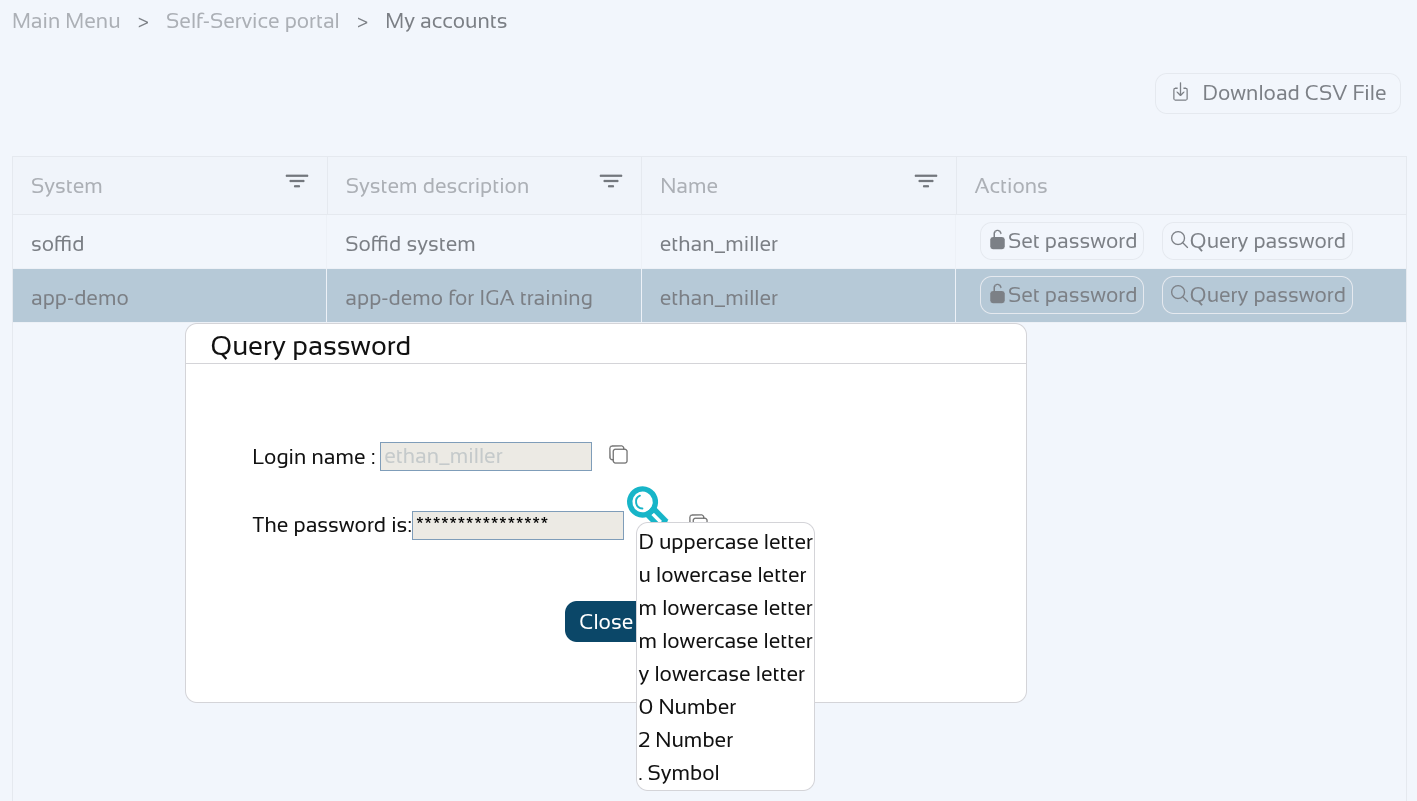
Let’s look at an example, here we have the user "ethan_miller" to whom we are going to assign the password "Dummy01.".
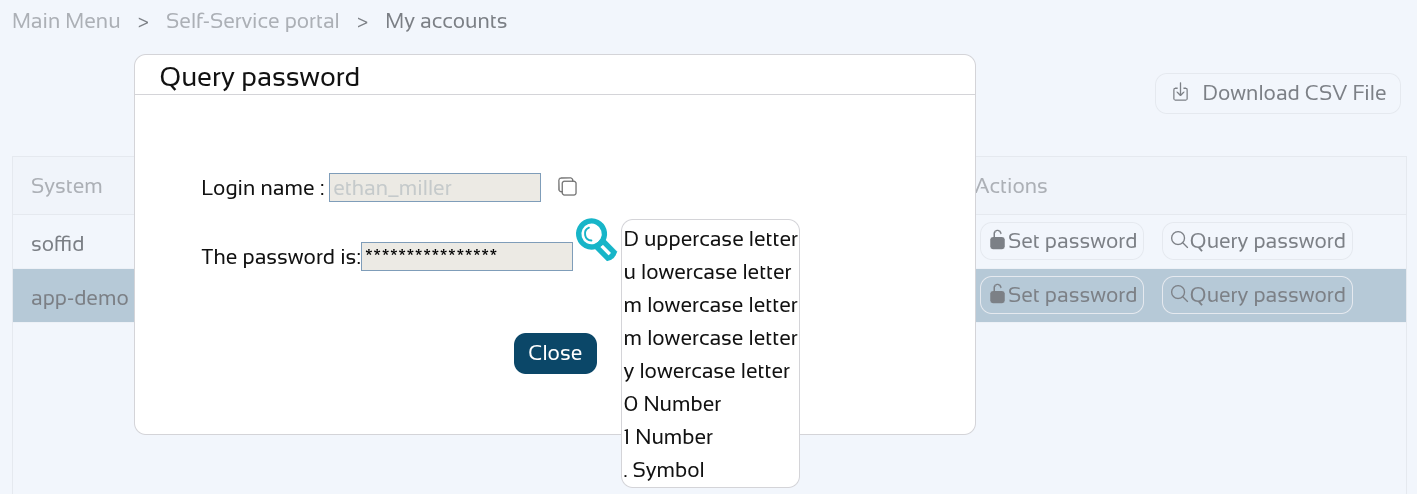
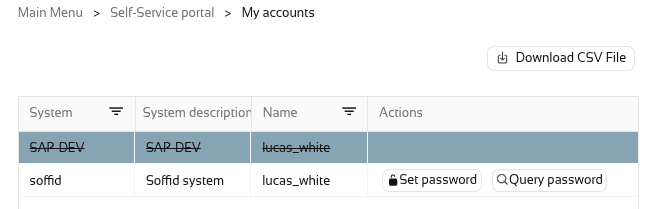
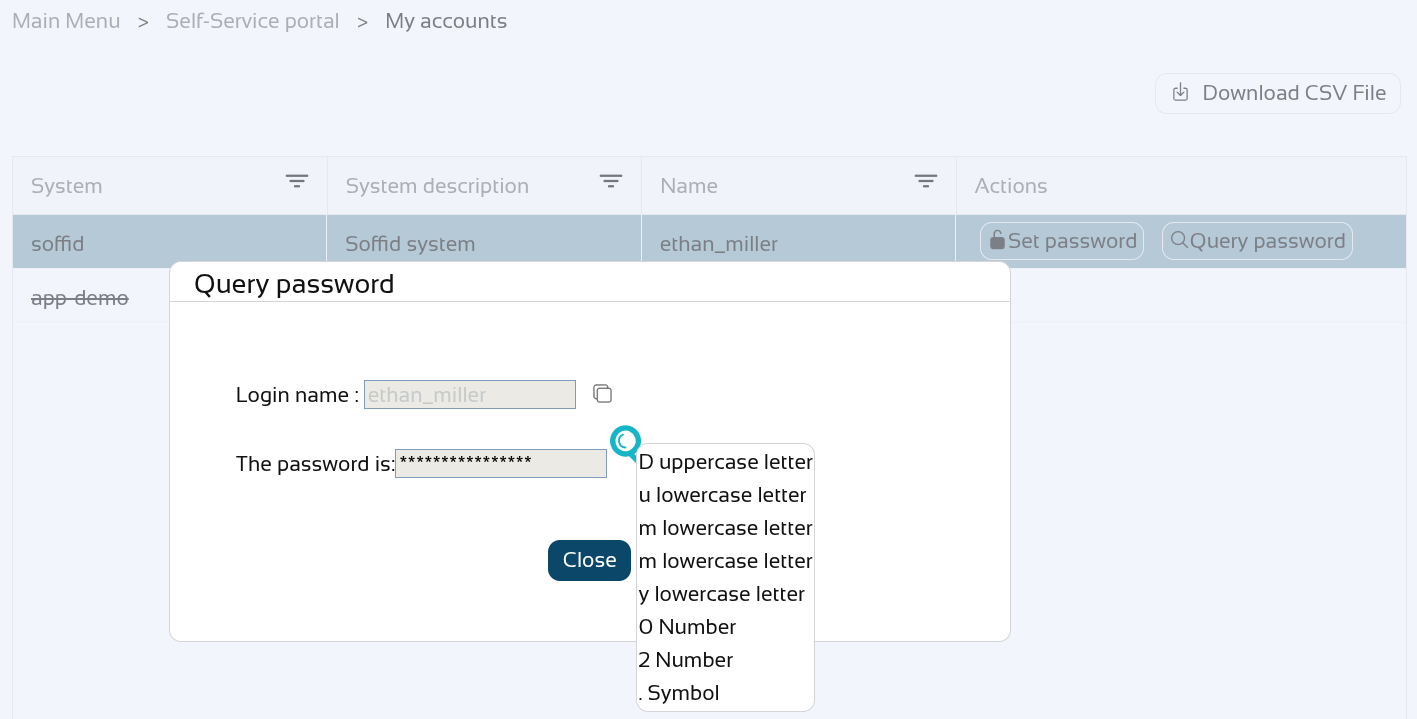
You can check your password on the "My accounts" page, click on the "View password" of the "app-demo" account.
Now let's disable the "app-demo" account.
Check the password again, it must be empty.
We are going to assign a new password "Dummy02.".
The other account has the new password.
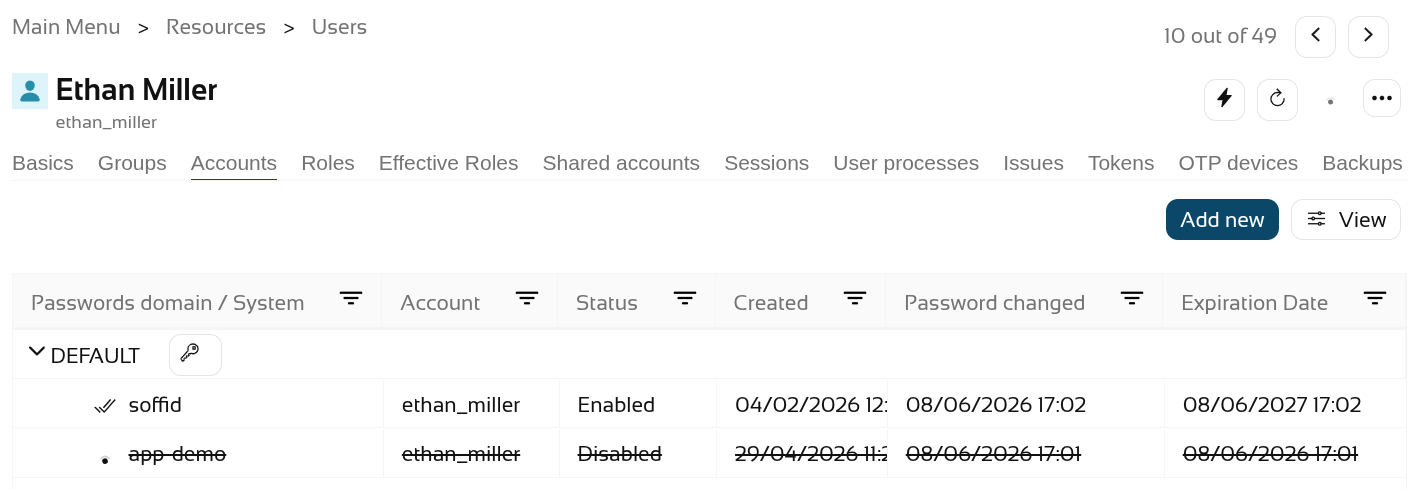
Enable the "app-demo" account.
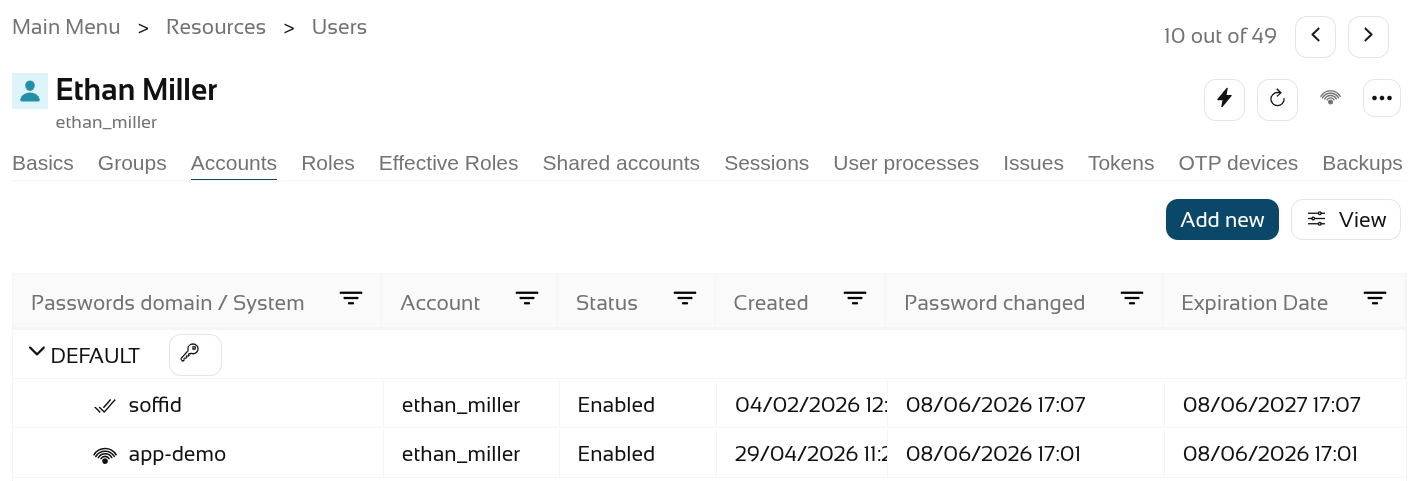
Check the account with the new password.
2026-05-19 New feature: filter holder groups at the IdP login
The new feature
From now on, the service providers who have selected the “Ask for group membership after authentication” option will be able to filter which of these should be selectable with the attribute "Script to filter out group memberships".
Bear in mind
Please note the following points:
-
The holder groups must be correctly configured in Soffid.
-
If there is only one possible holder group, it is selected automatically and is not displayed to the user.
How to configure it?
The following components must be installed:
- Addon federation 4.0.25 (or higher)
Let's look at an example
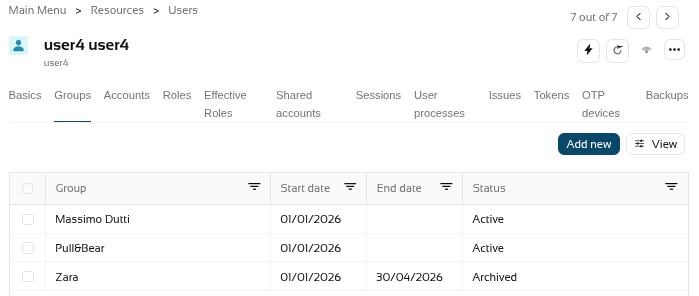
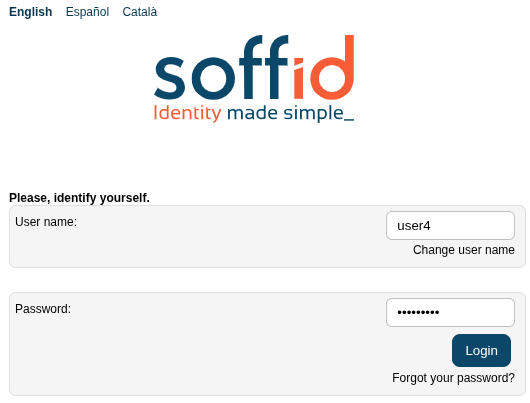
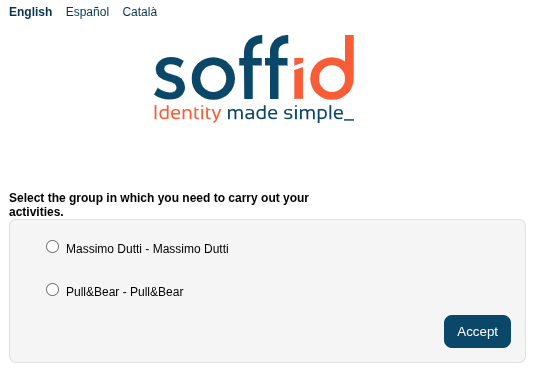
Let’s look at an example, here we have the user "user4" who has already set up the holder groups.
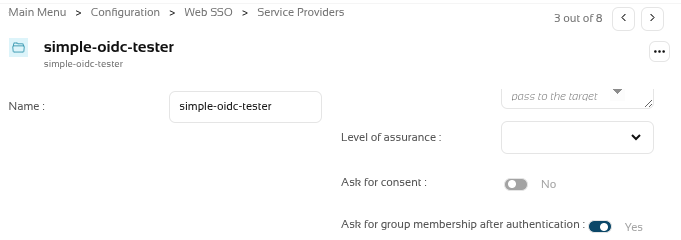
We had a service provider that was already selected the option "Ask for group membership after authentication".
The holder groups have several custom attributes (startDate, endDate and status).
We now want to filter the holder groups with the attibute status with the Active value.

So we're going to create a script in the "Script to filter out group memberships" of the service provider.
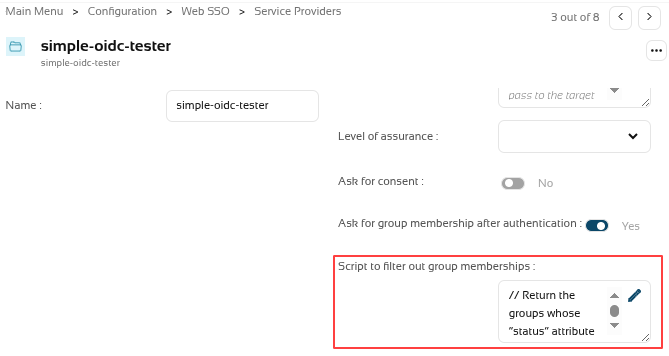
This is the script.
// Return the groups whose “status” attribute has the value "Active"
//
l = new java.util.ArrayList();
lug = serviceLocator.getGroupService().findUsersGroupByUserName(user.userName);
for (i=0; i<lug.size(); i++) {
ug = lug.get(i);
if (ug.attributes!=null &&
ug.attributes.get("status")!=null &&
"Active"===ug.attributes.get("status"))
{
l.add(ug.group);
}
}
return l;Please note that if the script fails or is not configured correctly, the holder groups page will not be displayed.
Now, to test it, we’ll log in to the application (the service provider), and these are the IdP’s login pages
2026-05-21 New feature: CSV connector in Soffid 4
The new feature
The first version of the "CSV connector" has been released in Soffid 4. This connector only includes the “Customisable CSV file” agent. In this version, this agent is used to generate a CSV file as part of the Soffid synchronisation engine.
Bear in mind
Please note the following points:
- The "Customisable CSV file" agent is used to synchronice, not for load authoritative o reconcile.
- Users who need to be created in the CSV file must have an account with that agent.
- Please note the location where the file will be created; its configuration will depend on the operating system and the type of Soffid architecture/installation
How to configure it?
The following components must be installed:
- CSV plugin 4.0.0 (or higher)
Let's look at an example
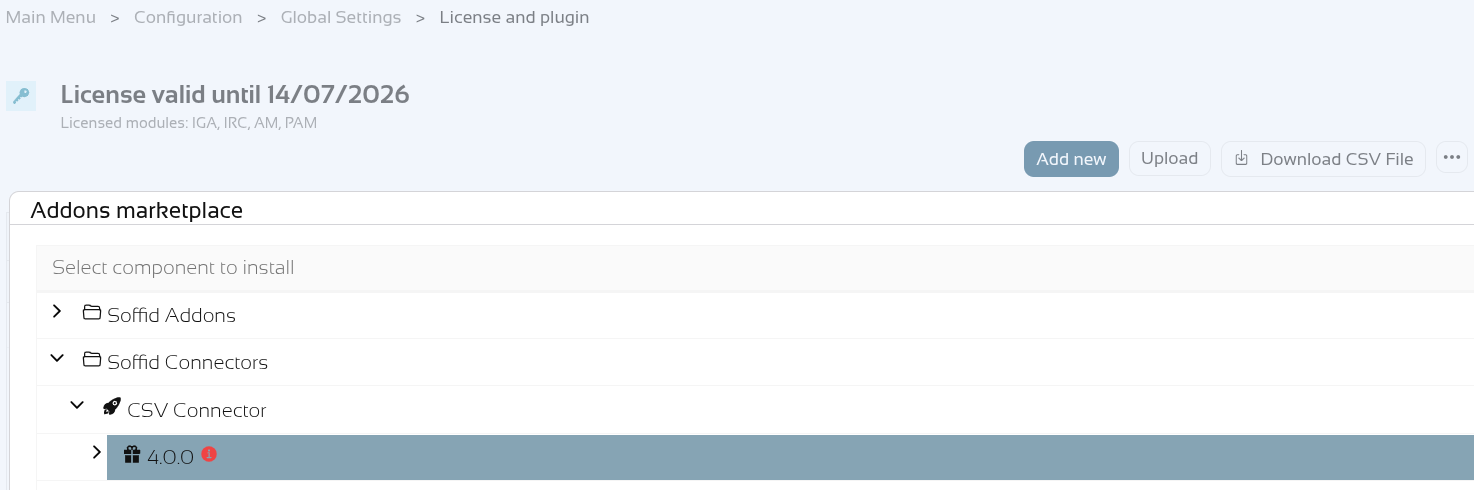
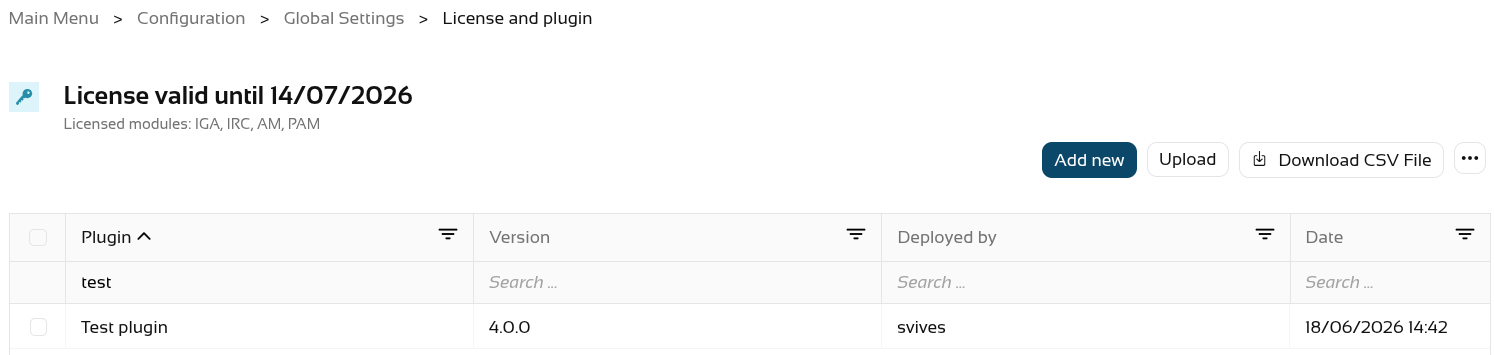
Step 1: install the CSV plugin from the marketplace (Add new button) in the License and plugin page. The name of the connector is "Test plugin".
Step 2: create an agent of the "Customisable CSV file" type.
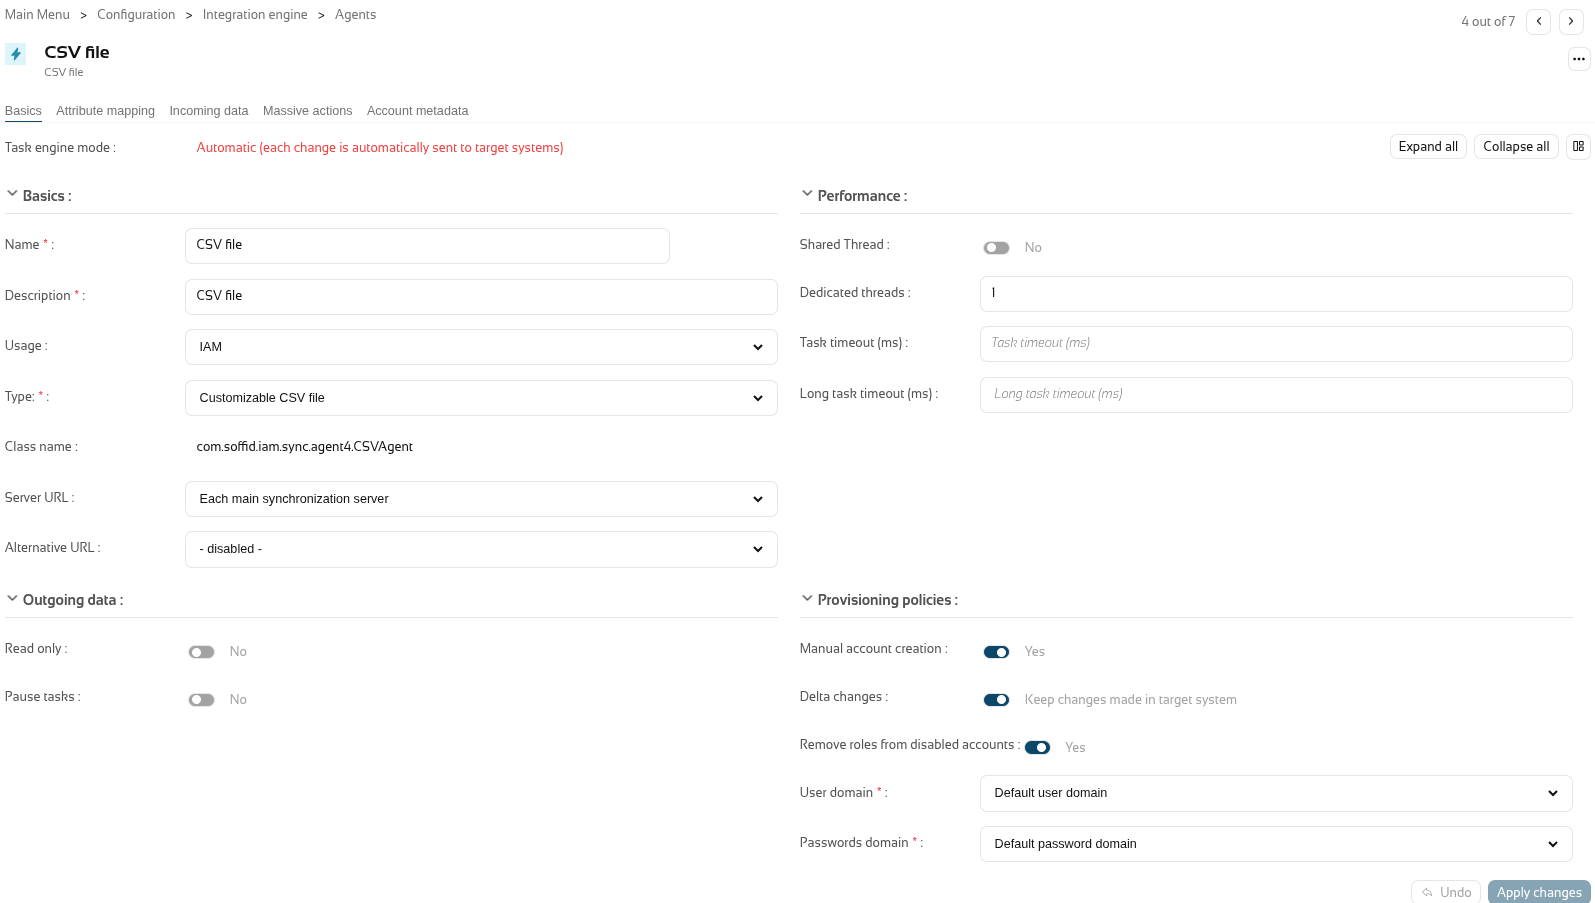
Step 3: configure the agent with the mappins you need (in the "Attribute mapping" tab).
For further information on how to configure this agent, please refer to the CSV connector in Soffid 4 page.

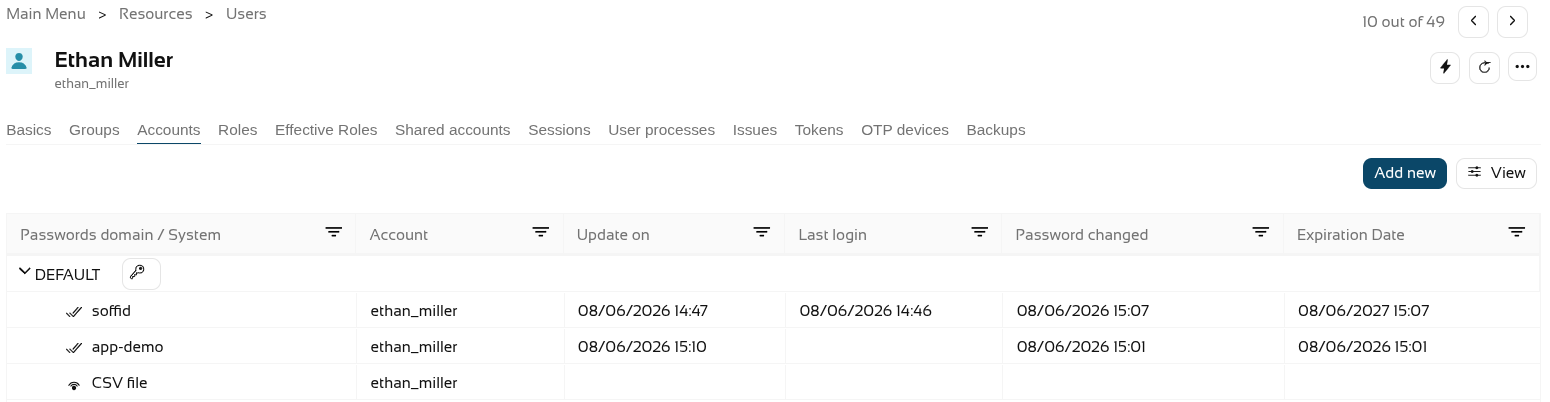
Step 4. Create CSV accounts for users.
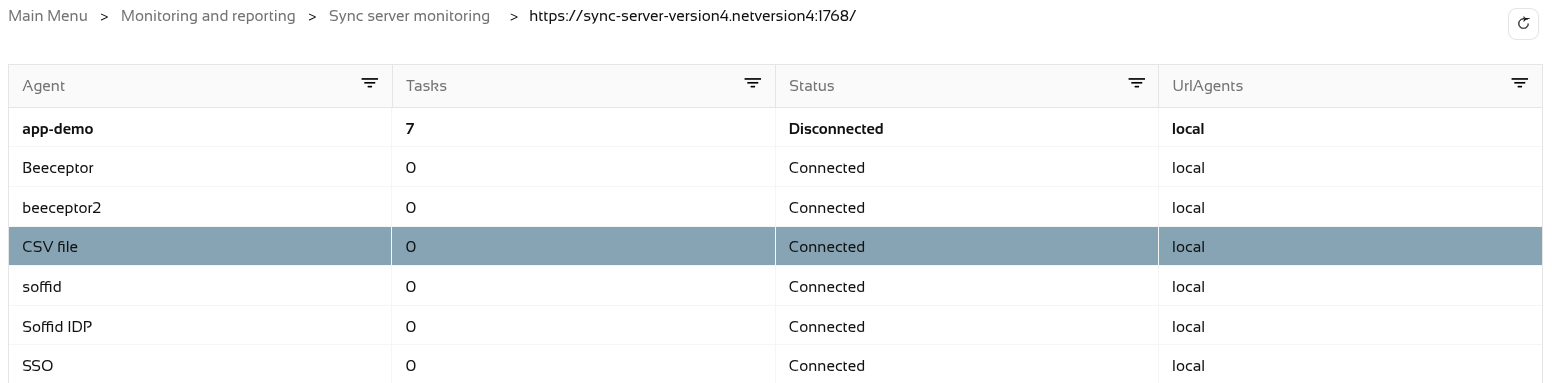
Step 5. The accounts created will have synchronised automatically as the engine is set to automatic and the agent is in write mode, and it is active in the monitoring.
The accounts.

The engine.

The agent.
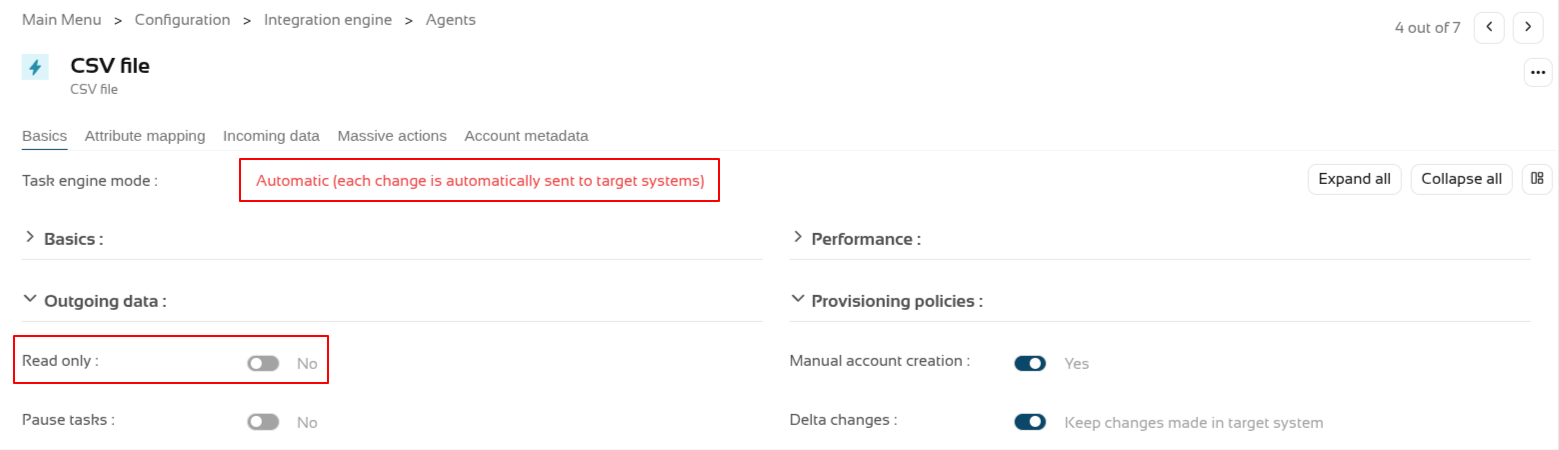
And the monitoring.
Step 6. Now let’s check the CSV file. It was configured in the "/tmp/users.csv" path of the container.

2026-05-31 New feature: new authorization for the SCIM webservice
The new feature
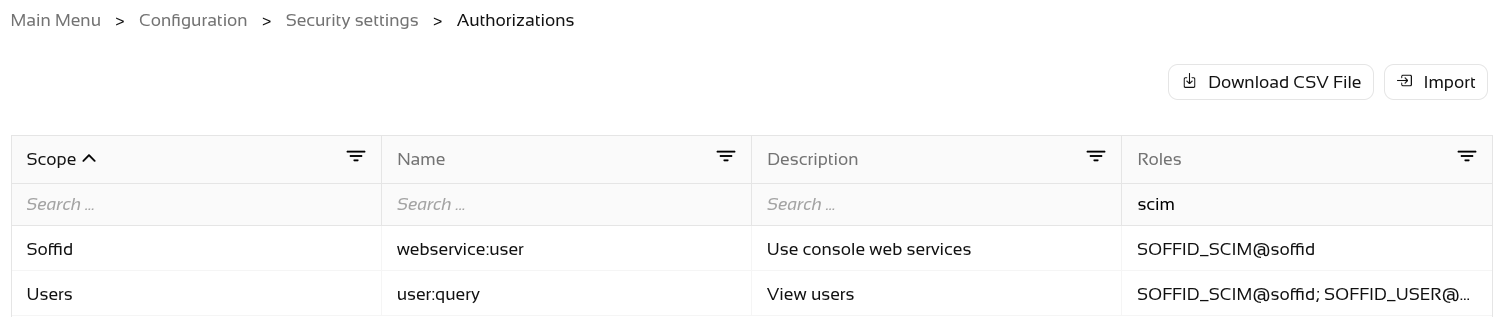
From now on, all users used to access the SCIM webservice will require the new "webservice:user" authorisation.
Bear in mind
Please note the following points:
- Users with the SOFFID_ADMIN role already have this authorisation inherited by inheritance.
- After updating Soffid, you will need to grant this authorisation to users who are not administrators and who are already using the SCIM web service.
How to configure it?
The following components must be installed:
- Console 4.0.58 (or higher)
Let's look at an example
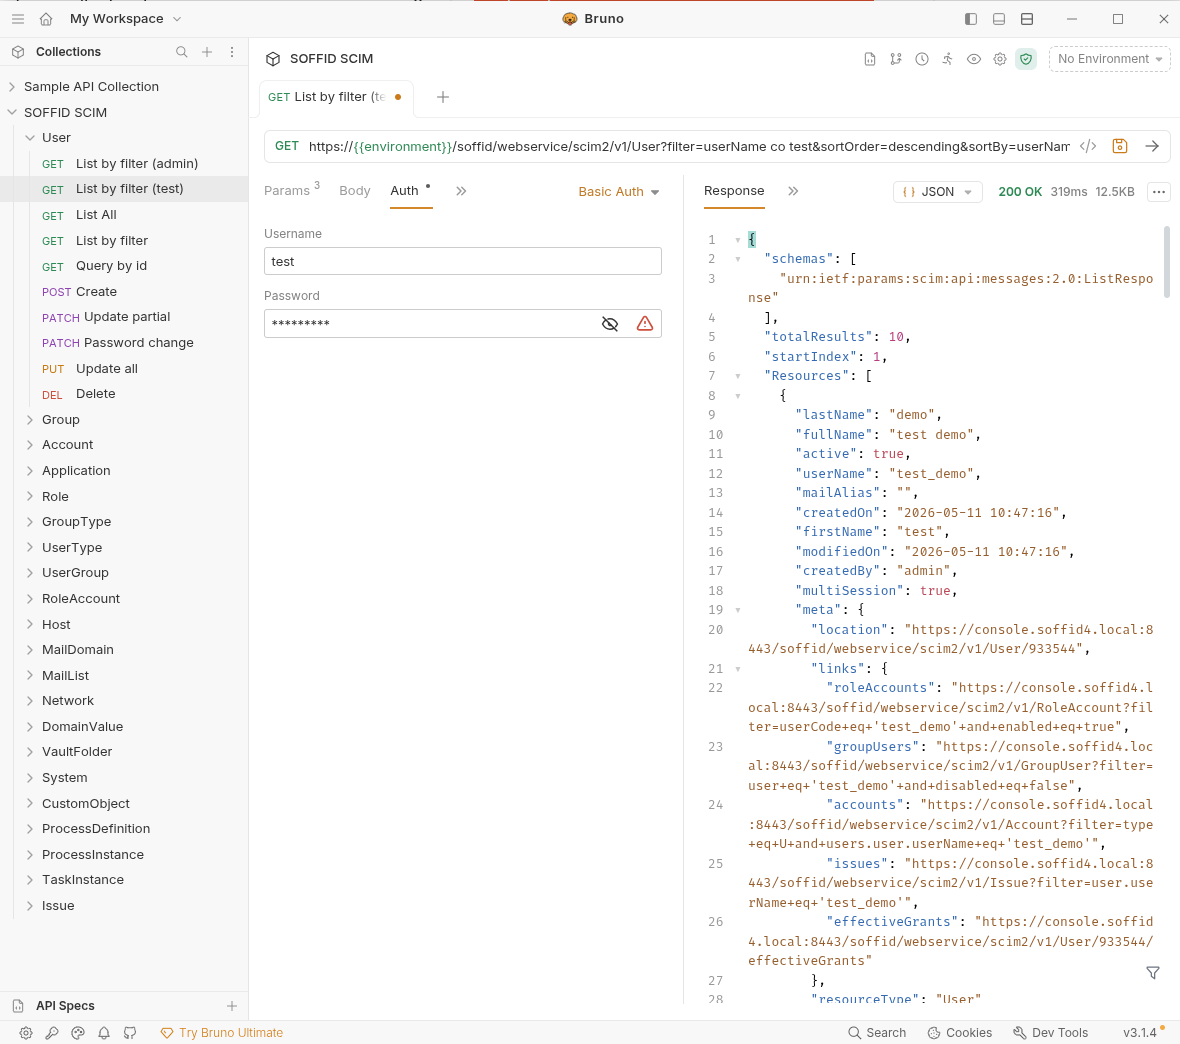
For this example, we will be using the Bruno application; for further information, please see this page Testing Tool.
First, let’s check that the "Test" user we were using in the SCIM web service no longer has access, see the "401 Unauthorized" error.

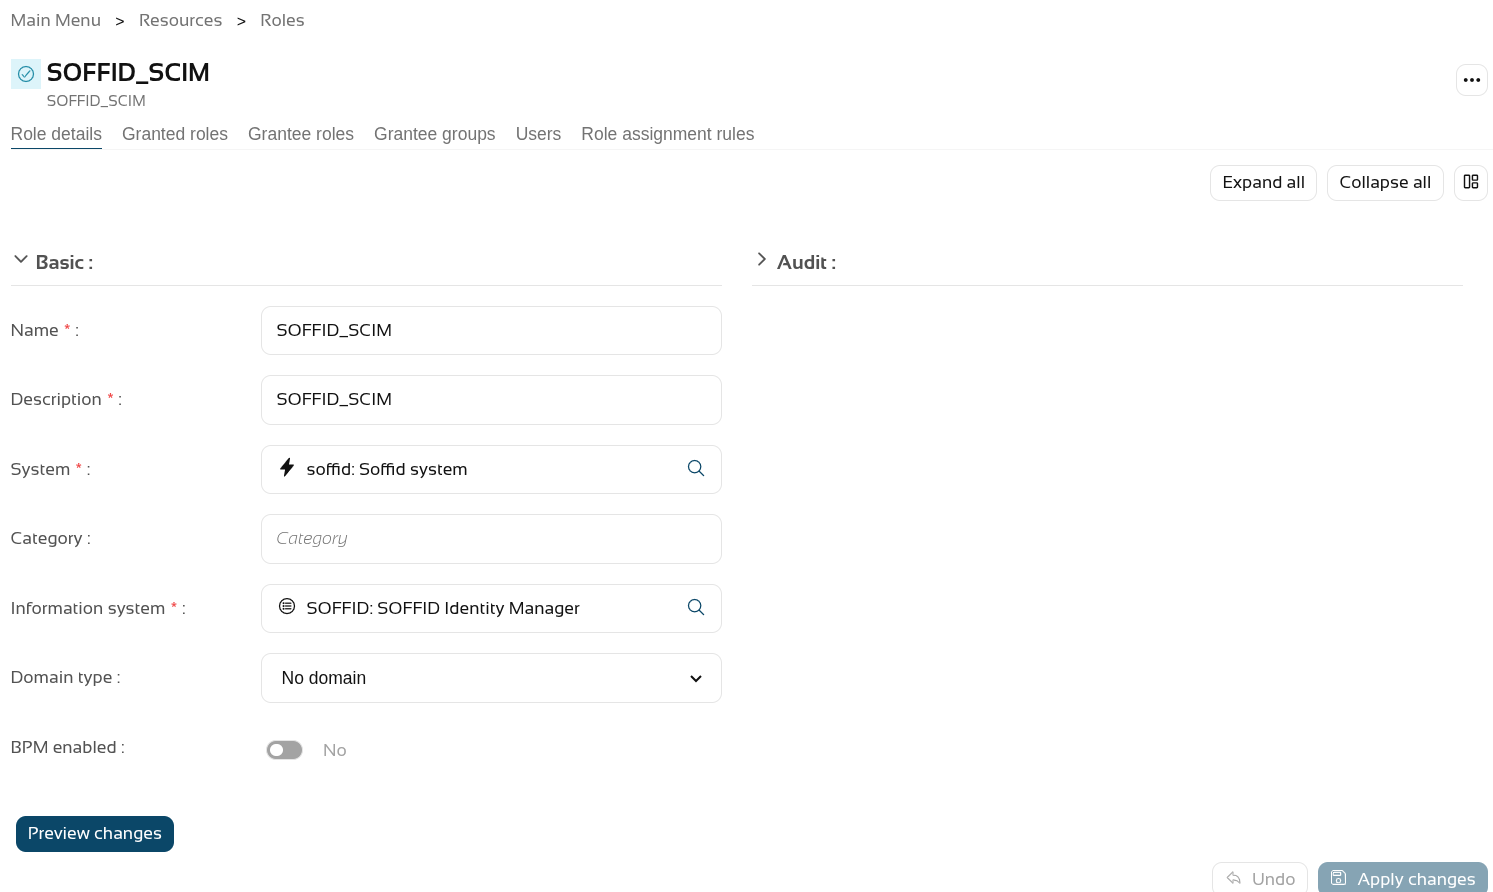
On the Roles page, we are going to create a new role, "SOFFID_SCIM", and then assign the new authorisation to it.
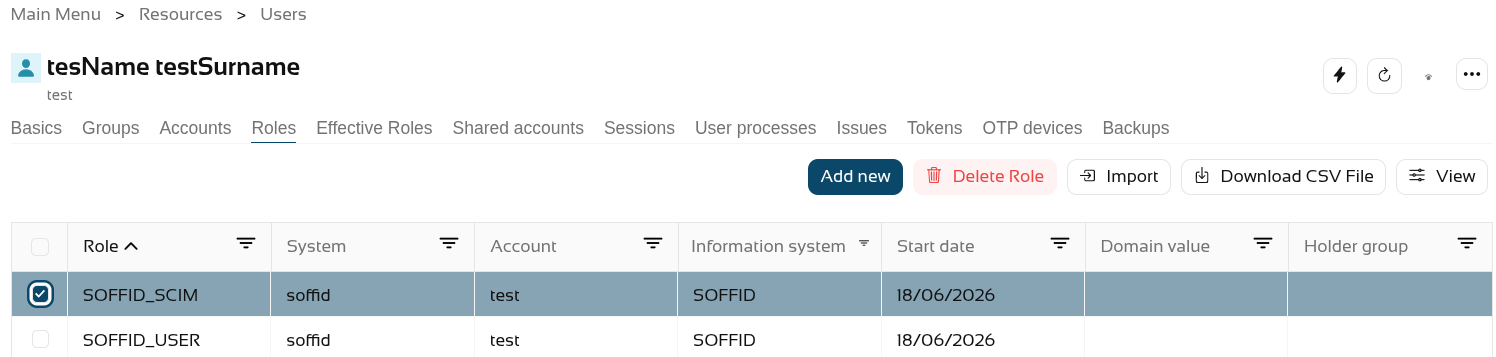
The final step is to grant the SOFFID_SCIM role to the user.
Now, when we query the web service, it returns results.
2026-05-31 New feature: hidden stack tracers
The new feature
Users who do not have the SOFFID_ADMIN role will no longer see the details of errors in the Console; instead, an identifier will be displayed so that administrators can look it up in the Console log.
Bear in mind
Please note the following points:
- Users with the SOFFID_ADMIN role will be able to view the error log.
- End users will see an identifier which they must share with the administrator.
How to configure it?
The following components must be installed:
- Console 4.0.58 (or higher) -> recommended Console 4.0.62 (or higher)
Let's look at an example
Let’s follow these steps.
- Open the Console.
- Next, go to the Identity Self Service module.
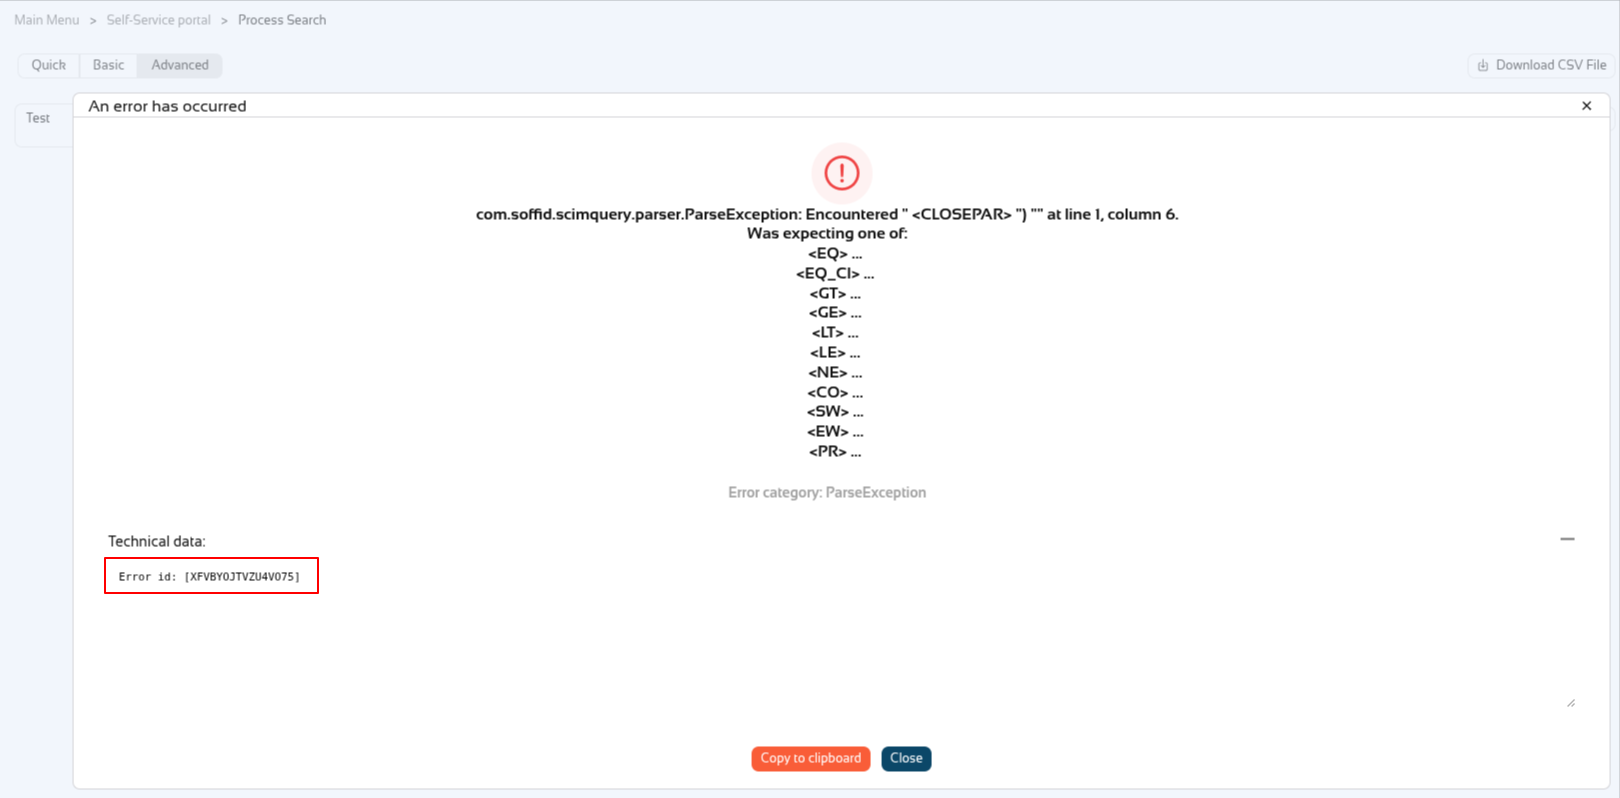
- Select the Process Search page.
- In the search bar, select the Advanced option.
- Type in any text, for example "Test".
- Then click on the magnifying glass to search.
- In the pop-up window displaying the error, click on the "+" icon to the right of the text "‘Technical data".
- You can now see the identifier.
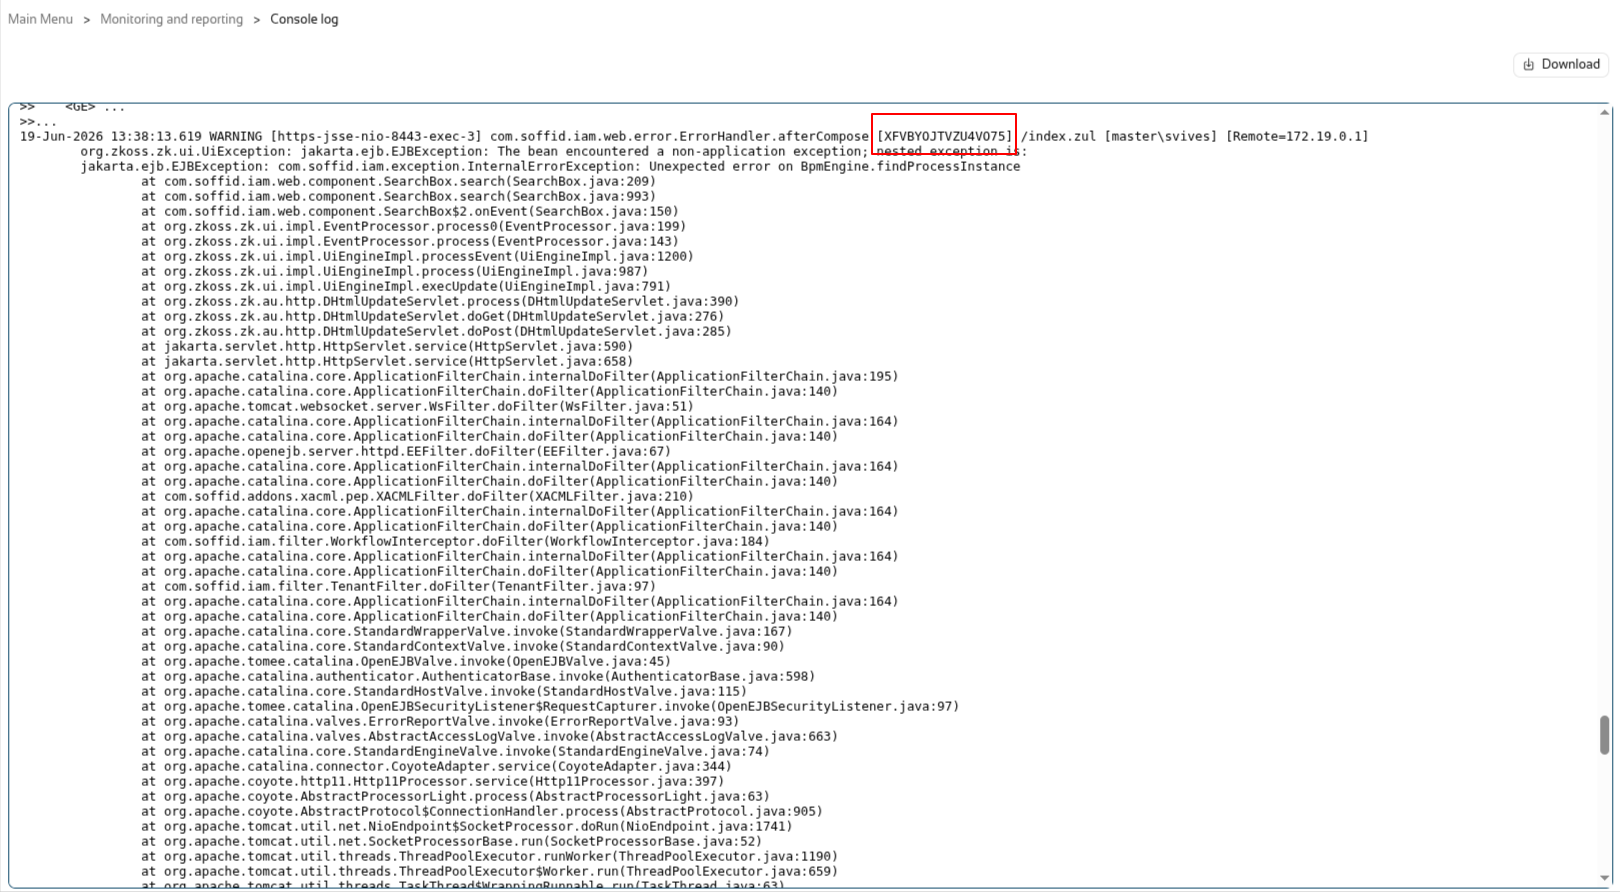
Now the user has to share the id with the Soffid administrator, in this exemple XFVBYOJTVZU4VO75.
Soffid administrators can look up the id in the "Console log" page.
2026-06-02 New feature: syslog with new protocols
The new feature
Until now, when we enabled the sending of logs via syslog to a SIEM tool, the only protocol available was UDP on port 514; now, TCP and SSL protocols have been added, and we also allow you to configure the port instead of using the default settings.
Bear in mind
Please note the following points:
- Customers who have already configured syslog will continue to use it as before.
- Configuration is done through parameters; you can check them on the Soffid Parameters page.
- Once you have created/modified/removed the parameters, there is no need to restart.
How to configure it?
The following components must be installed:
- Console 4.0.62 (or higher)
Let's look at an example
Let’s follow these steps.
- Open the Console.
- Next, go to the Soffid parameters page.
- Create the next parameters:

2026-07-08 New feature: geolocation service available by default
The new feature
From now on, the geolocation service and the use of AI service will be enabled by default if the AM or IRC modules have been activated. Consequently, the Network Intelligence page has been removed
Bear in mind
Please note the following points:
- This feature is only enabled if the licence includes the AM or IRC module.
- The geolocation service requires that the service be available on a public internet machine.
- The AI service is available on the Soffid chat-bot page and in all script-type attributes that may appear on any page in the Console.
How to configure it?
The following components must be installed:
- Console 4.0.64 (or higher)
- Syncserver 4.0.39 (or higher)
- Addon federation 4.0.36 (or higher)
Let's look at an example
First of all, the Network Intelligence screen no longer exists.

We have the necessary modules in our Soffid system.
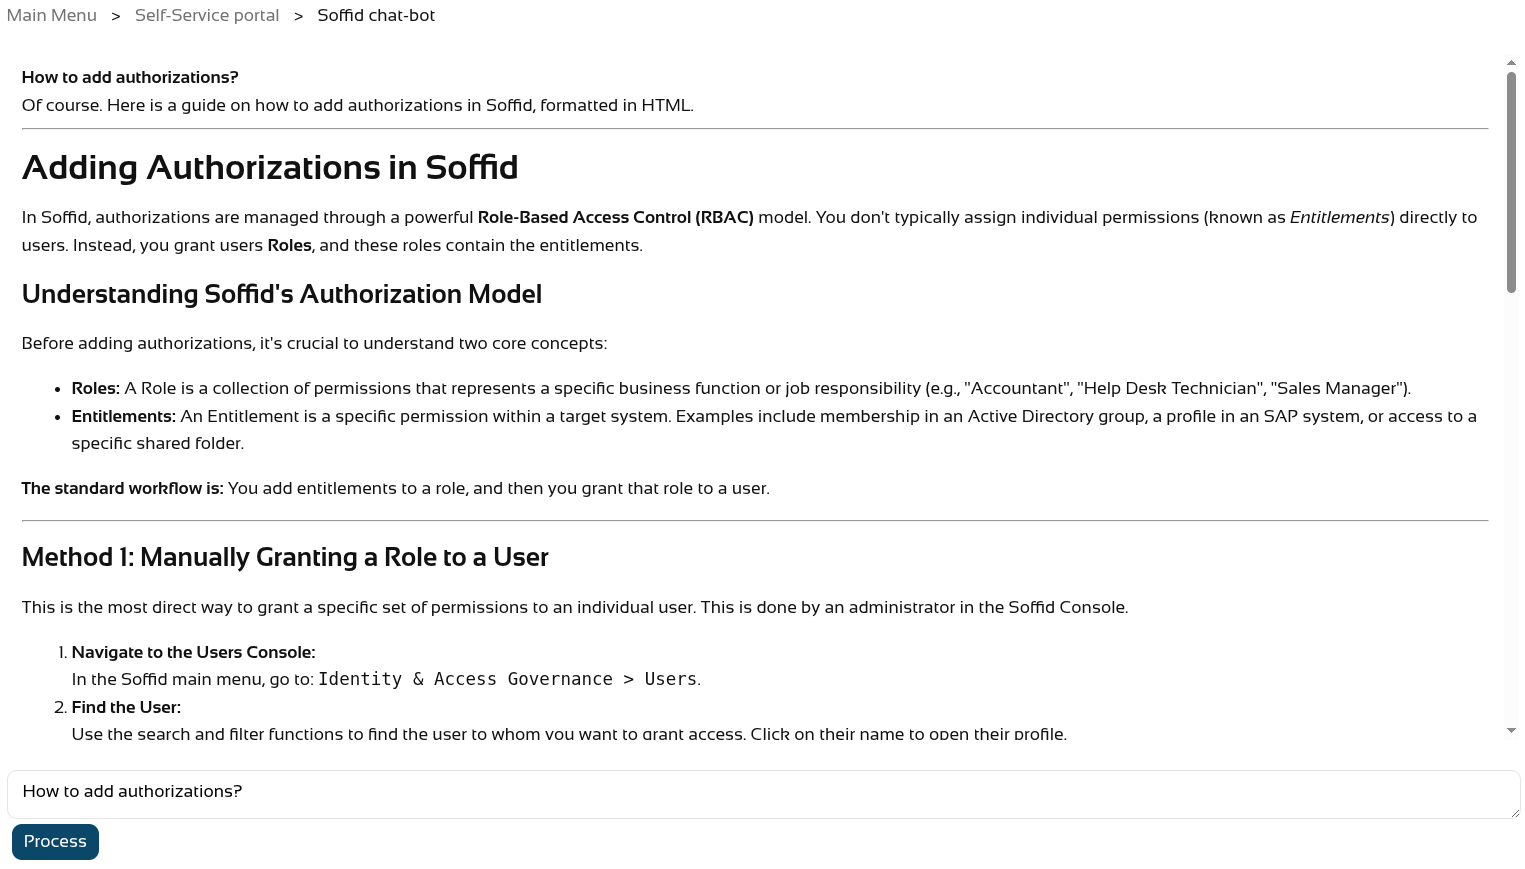
First, let’s ask the Soffid chat-bot.
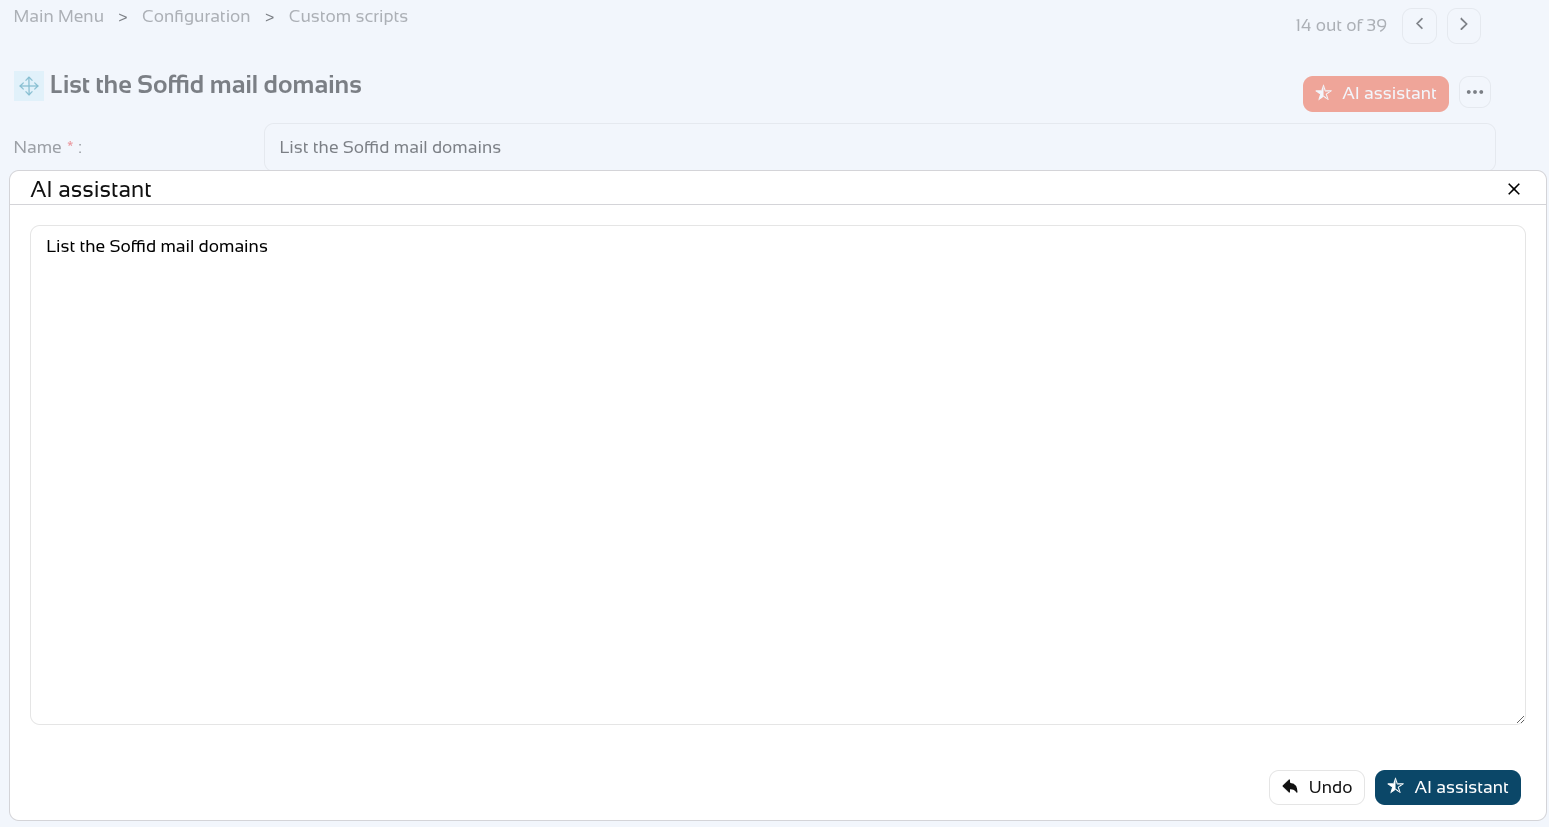
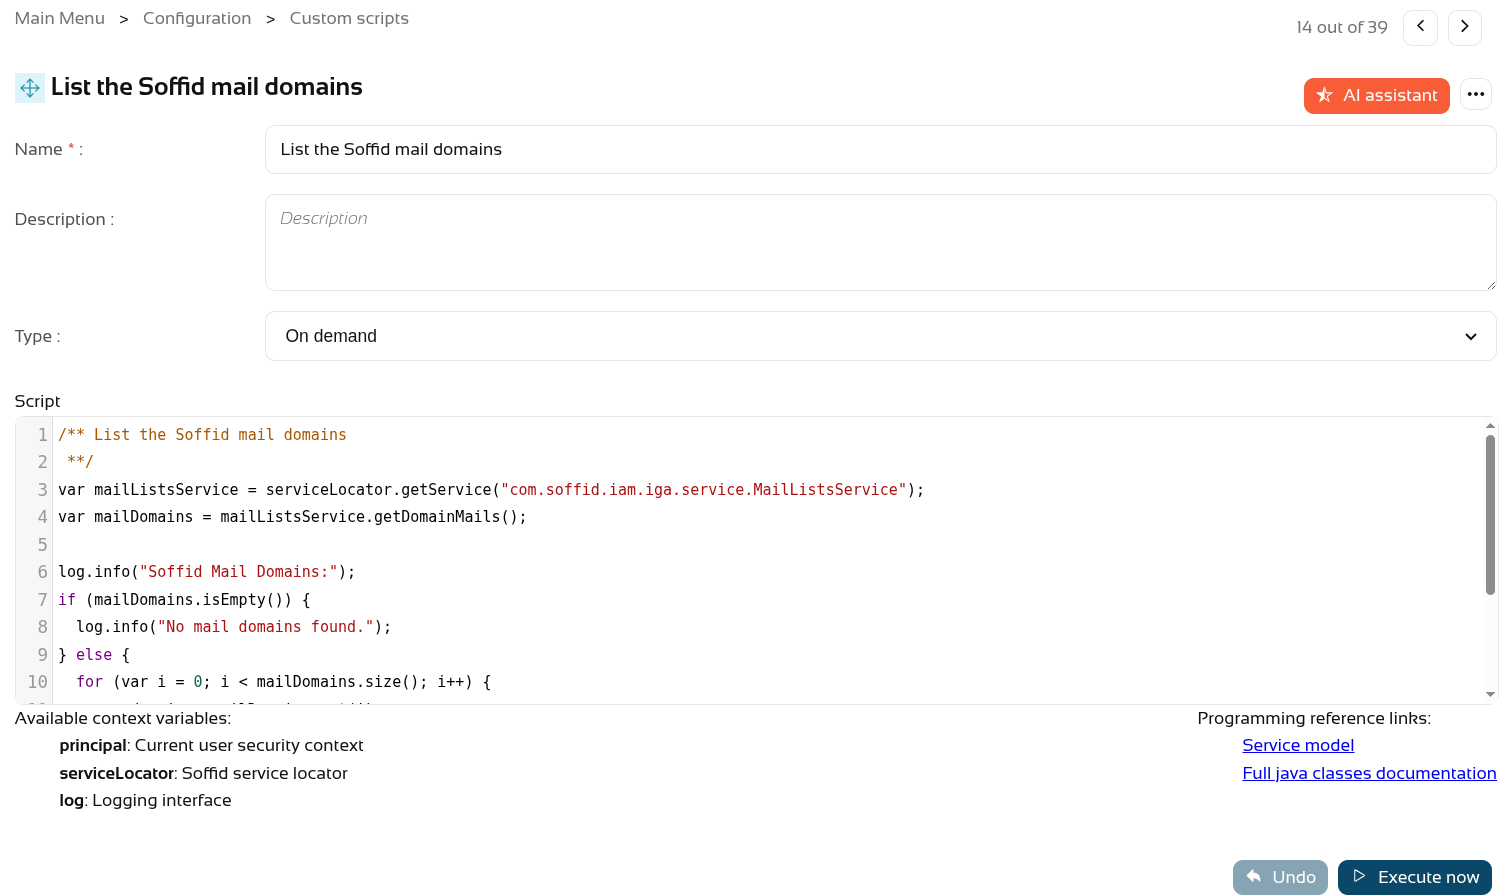
And also create a new script on the Custom scripts page.
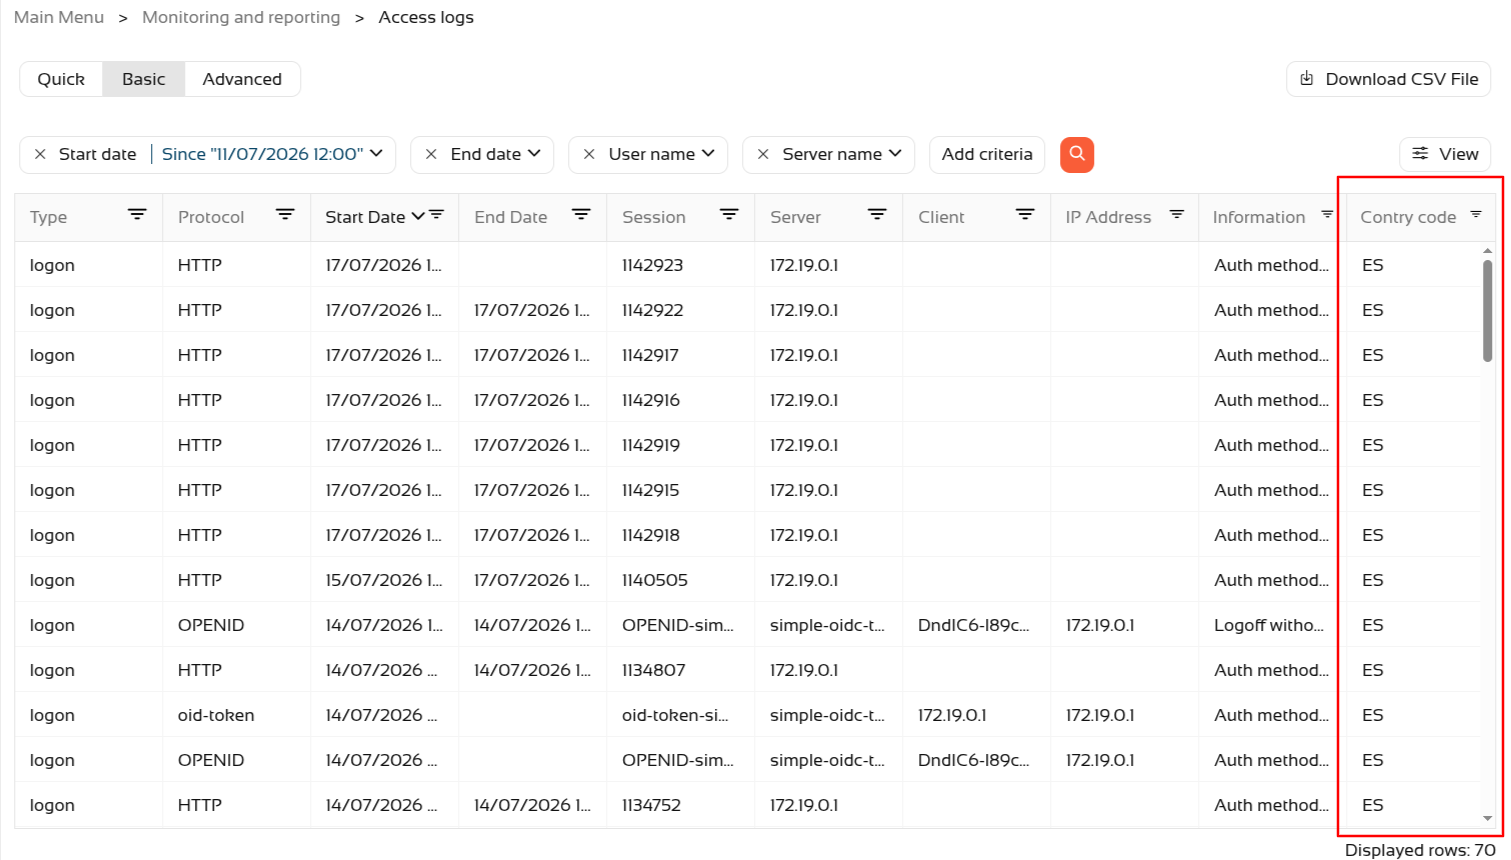
Regarding geolocation, if Soffid is installed in a public location, you can check new accesses via the Access logs page.
- Go to Access logs page (in Monitoring and reporting folder).
- Use the magnifying glass button to search.
- Sort the list by Start Date in descending order.
- Click the View button
- Add the Country Code attribute.
- The country should then appear in the most recent accesses.
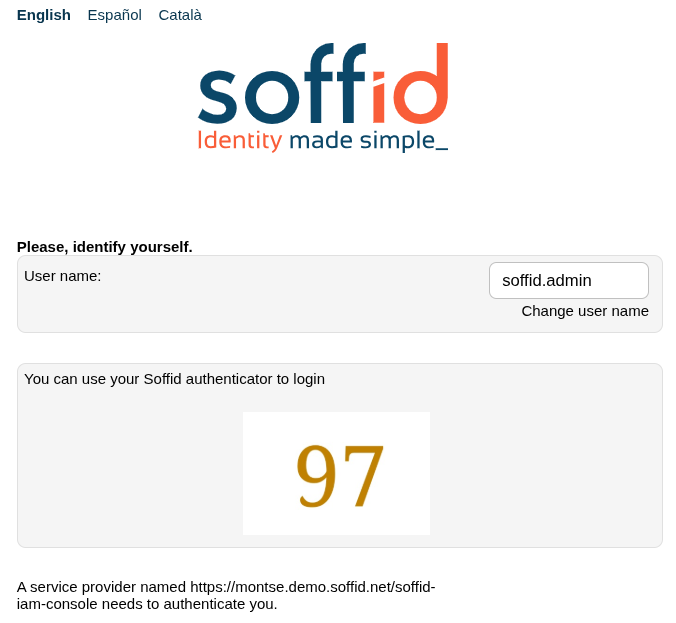
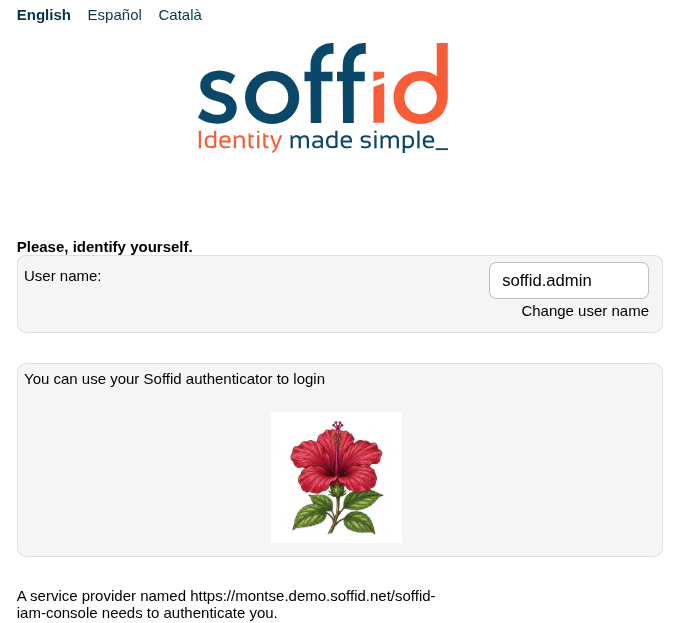
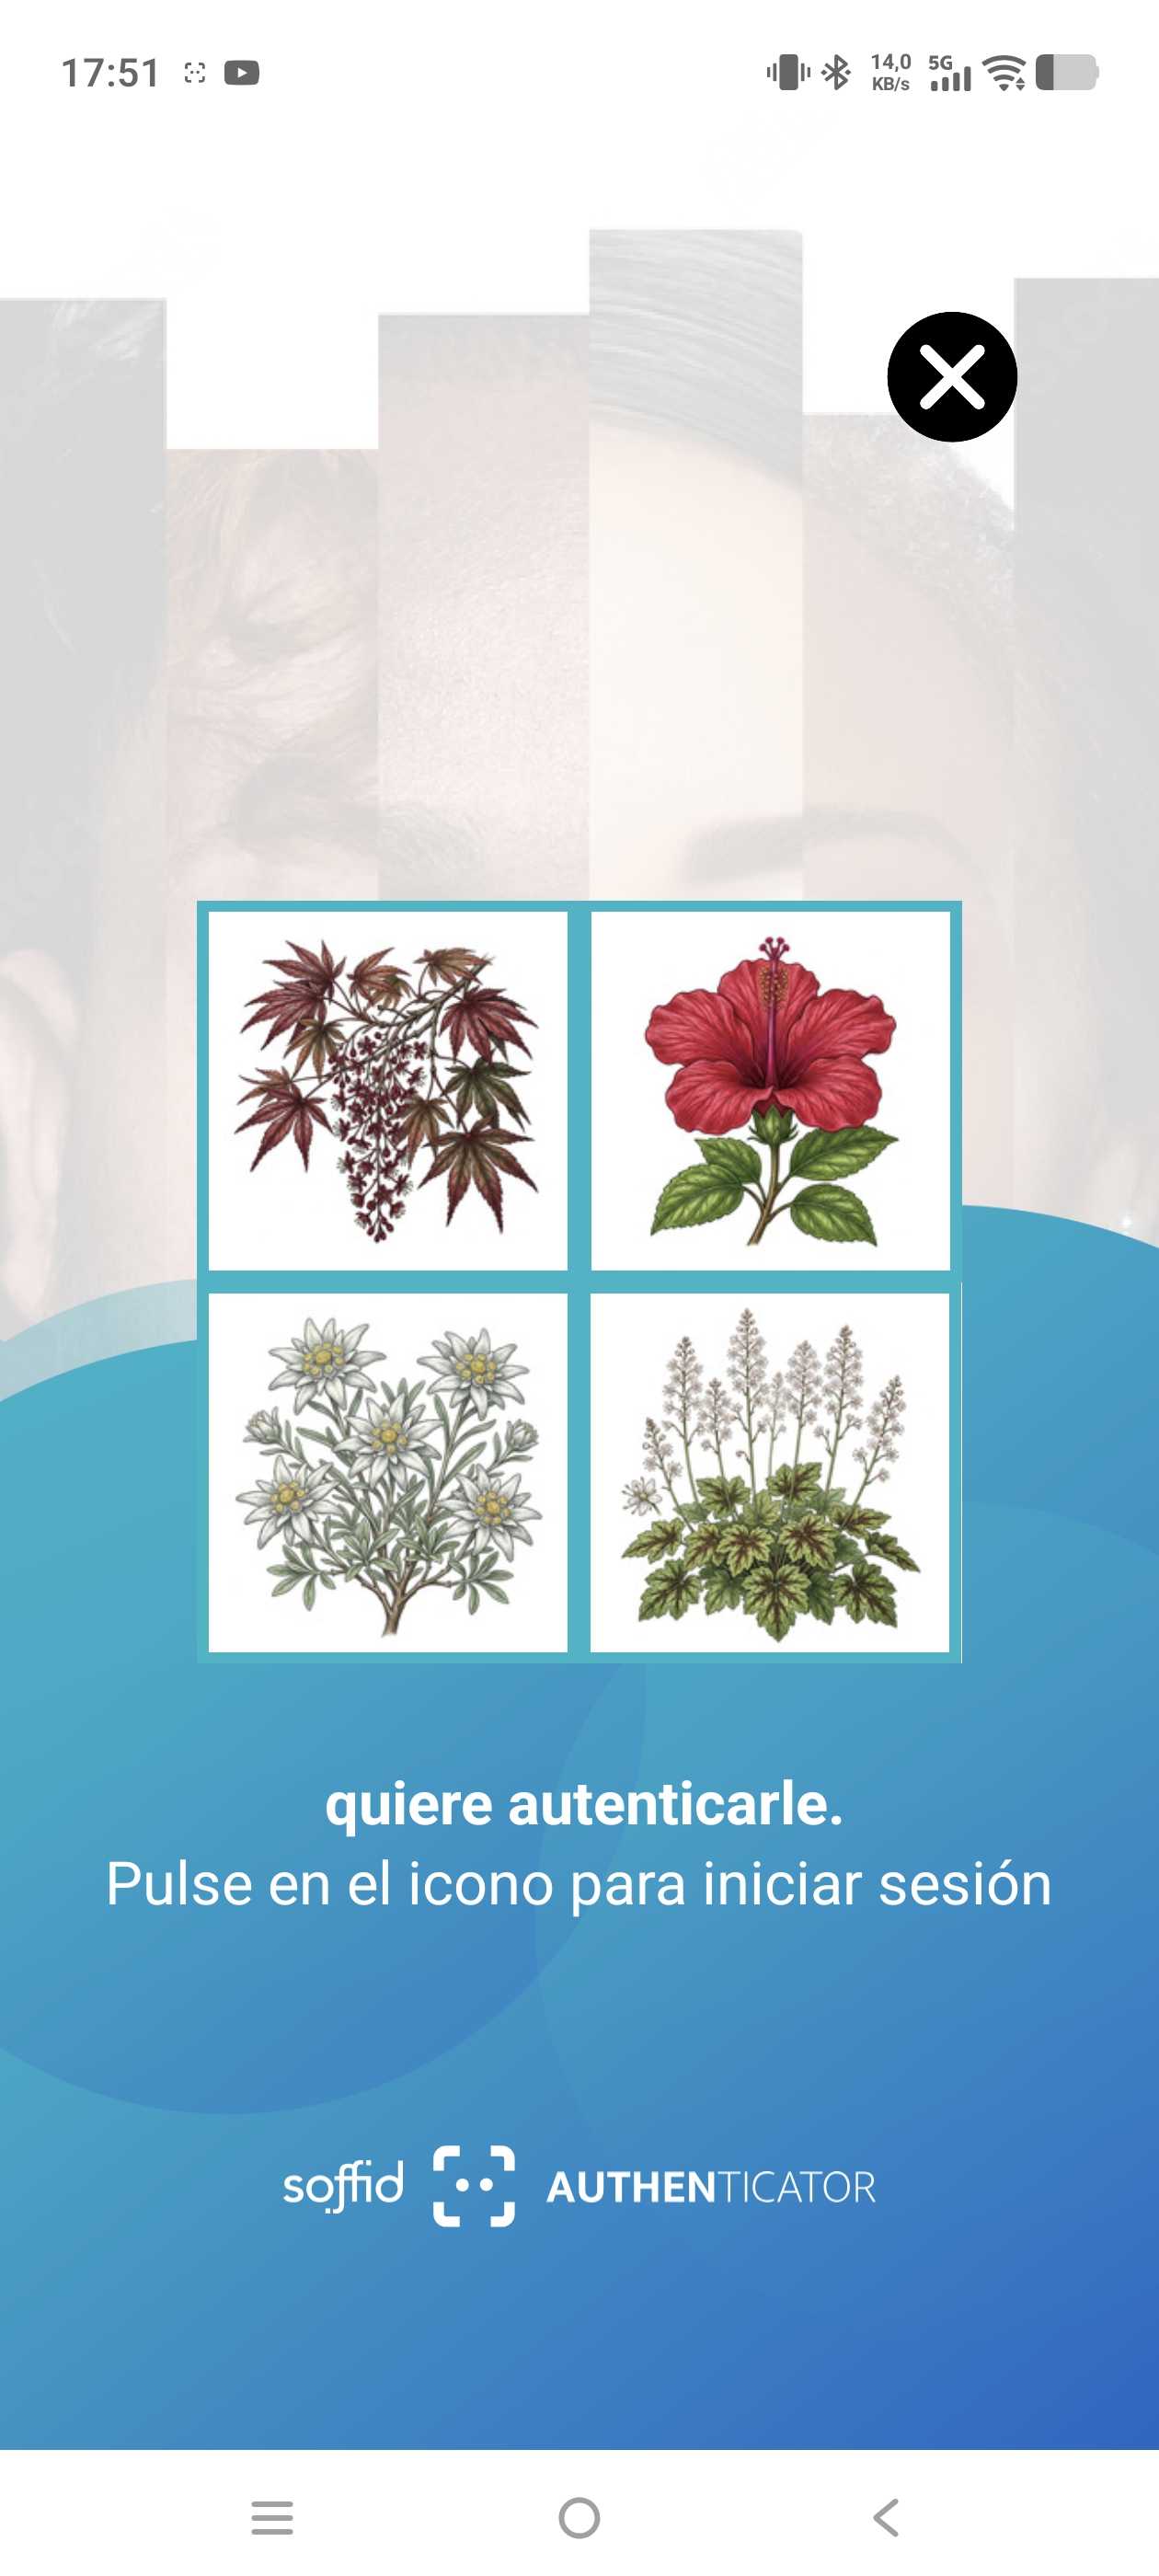
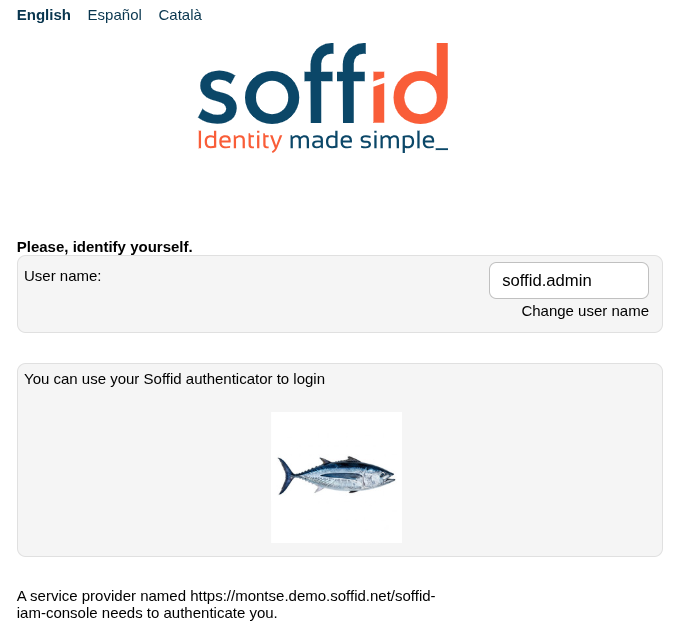
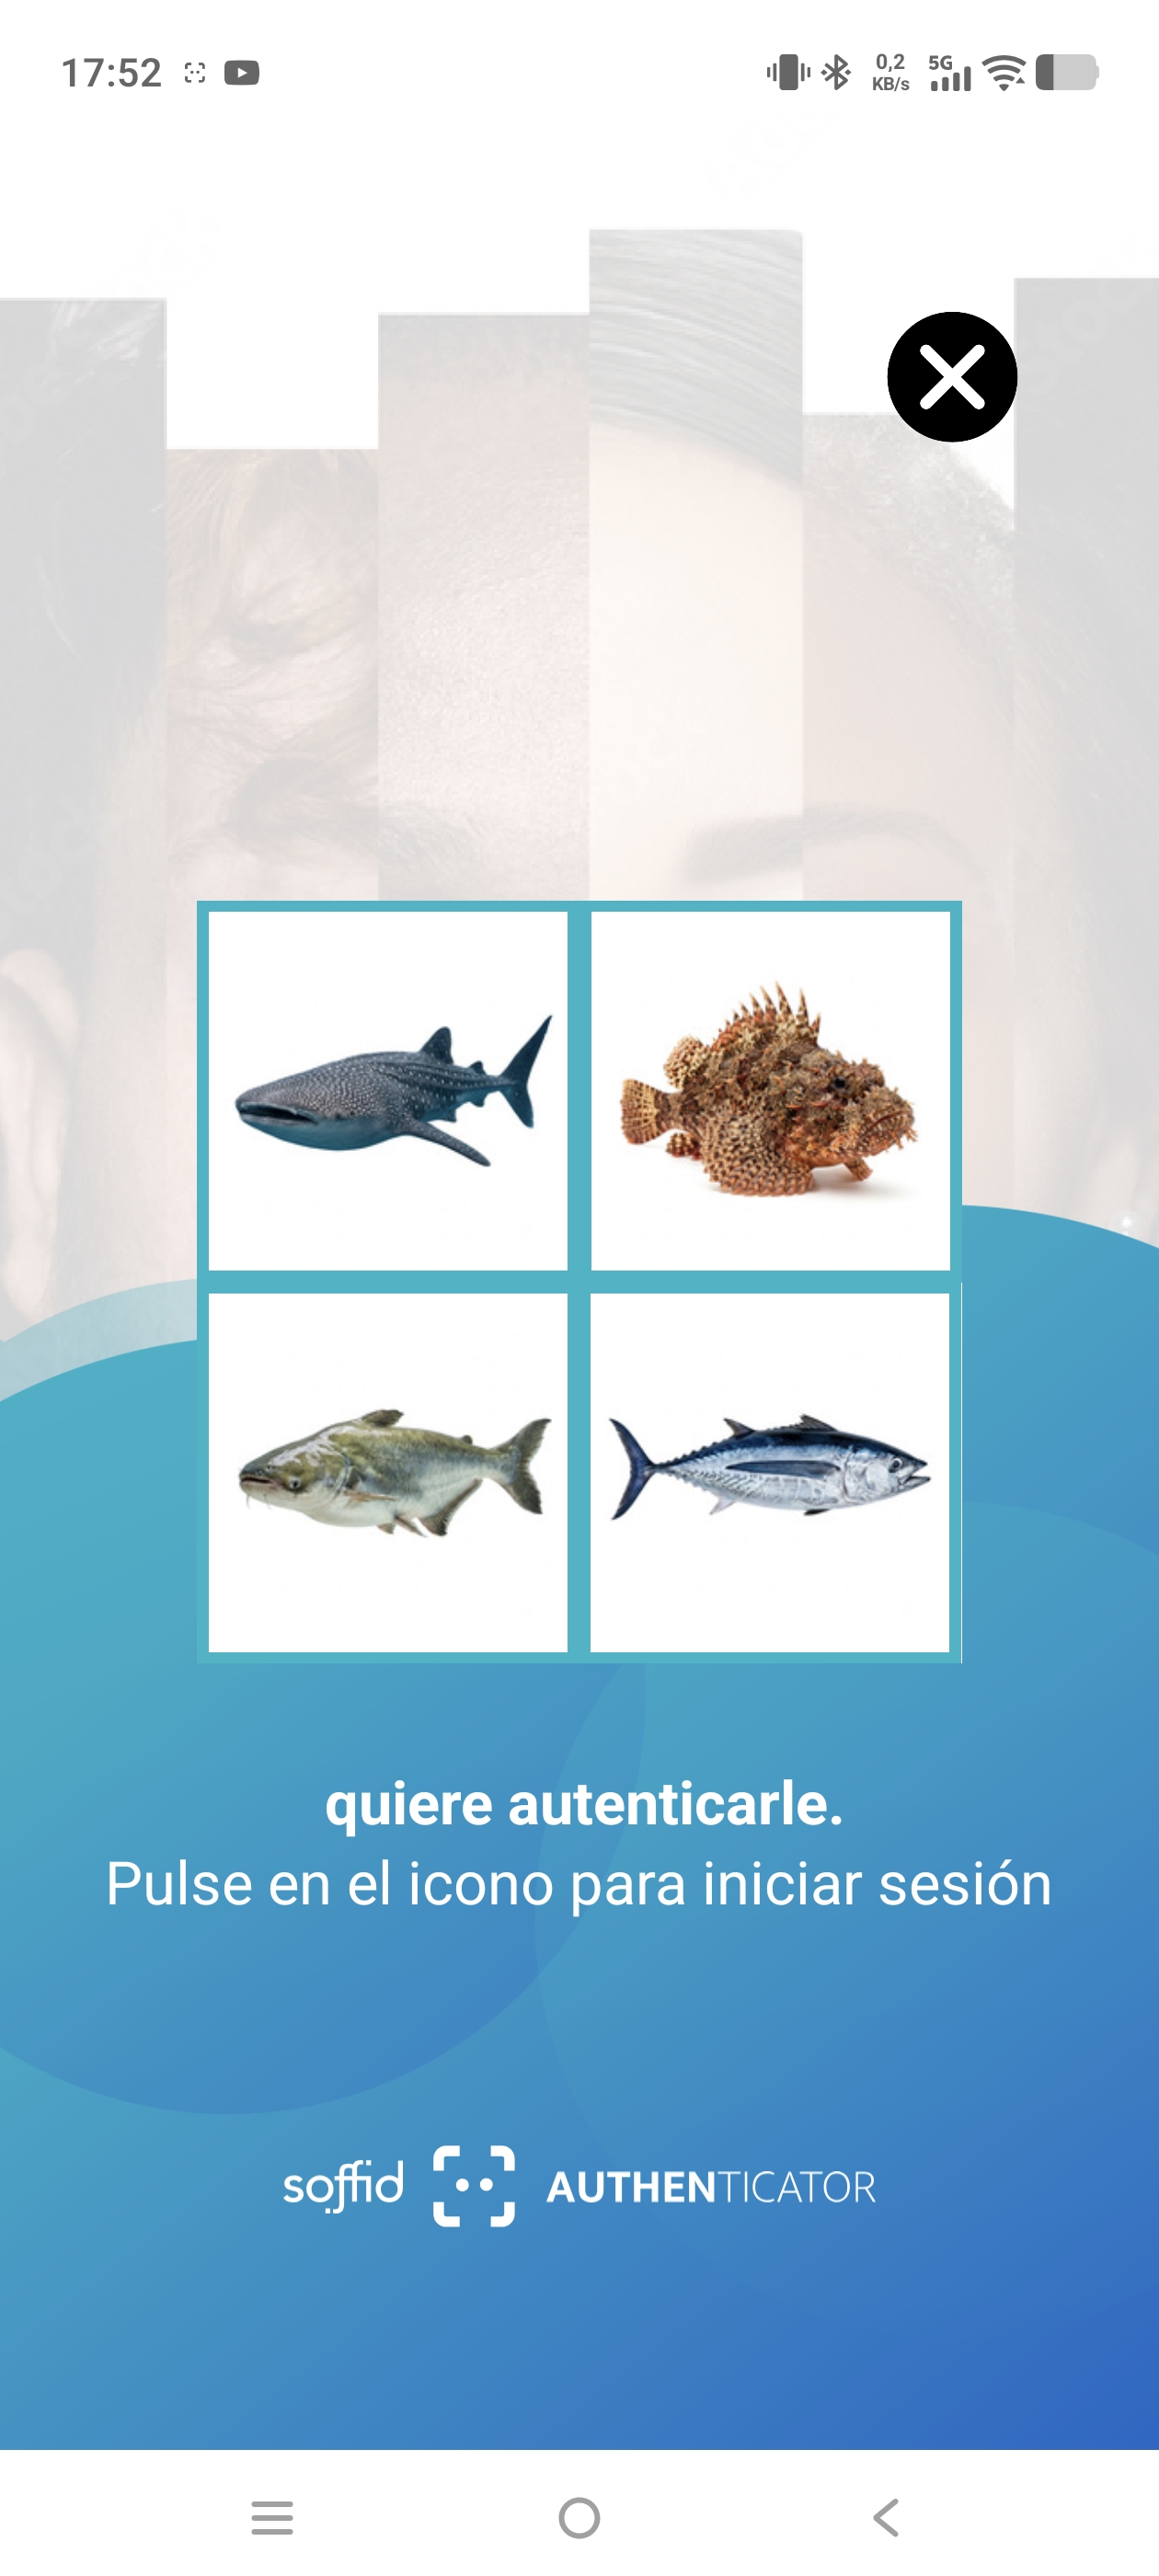
2026-06-13 New feature: select images for Soffid Authenticator
The new feature
The Soffid Authenticator app now has four different sets of images, and you can now select the set of images using the "soffid.push.images" parameter.
Bear in mind
Please note the following points:
-
A Soffid type Identity Provider must be set up, and the Soffid Authenticator (push option) must be added as the first or second factor.
-
Users are required to install the Soffid Authenticator on their phones.
The details of the parameter can be found on the Soffid parameters page, Soffid Autenticator section..
How to configure it?
The following components must be installed:
- Addon federation 4.0.36 (or higher)
Let's look at an example
Do you need a Soffid IdP.
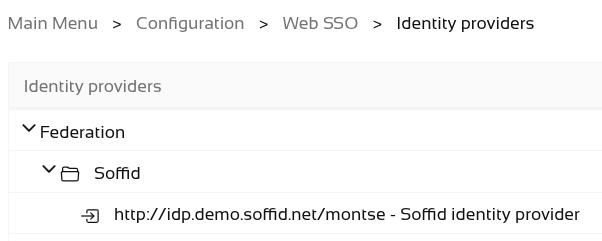
Add Soffid Authenticator as a first or second factor.
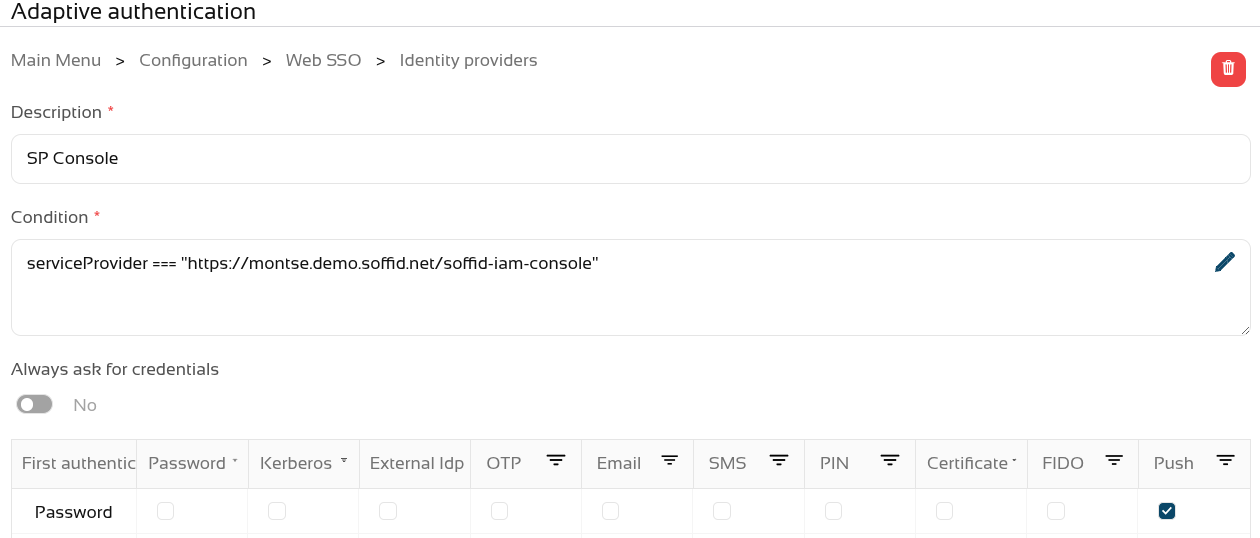
- Go to Soffid IdP.
- Go to Default authentication methods or Adaptive authentication (used this option in the example)
- Add the Soffid Authenticator (Push option) as first or second factor used this option in the example)
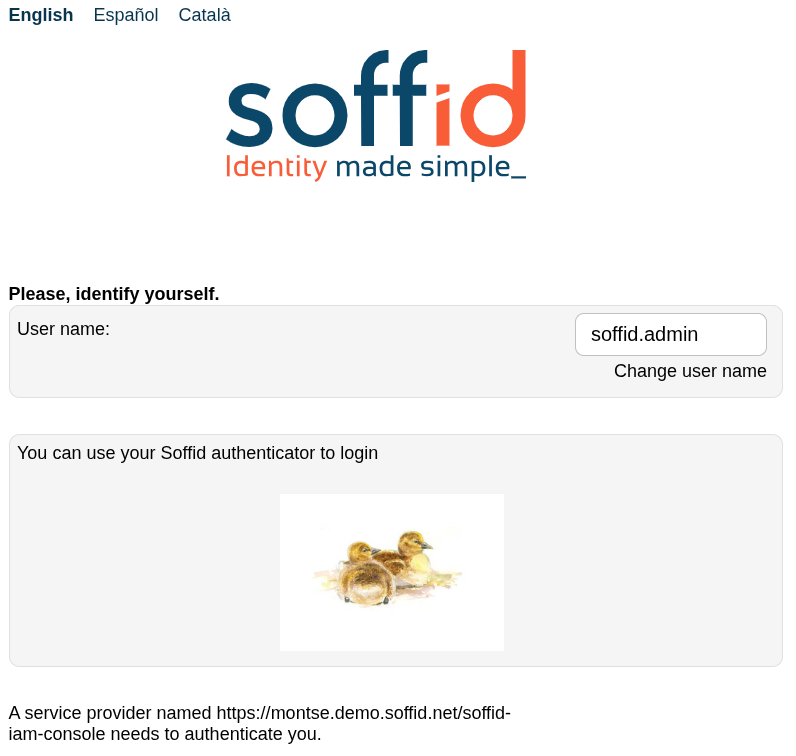
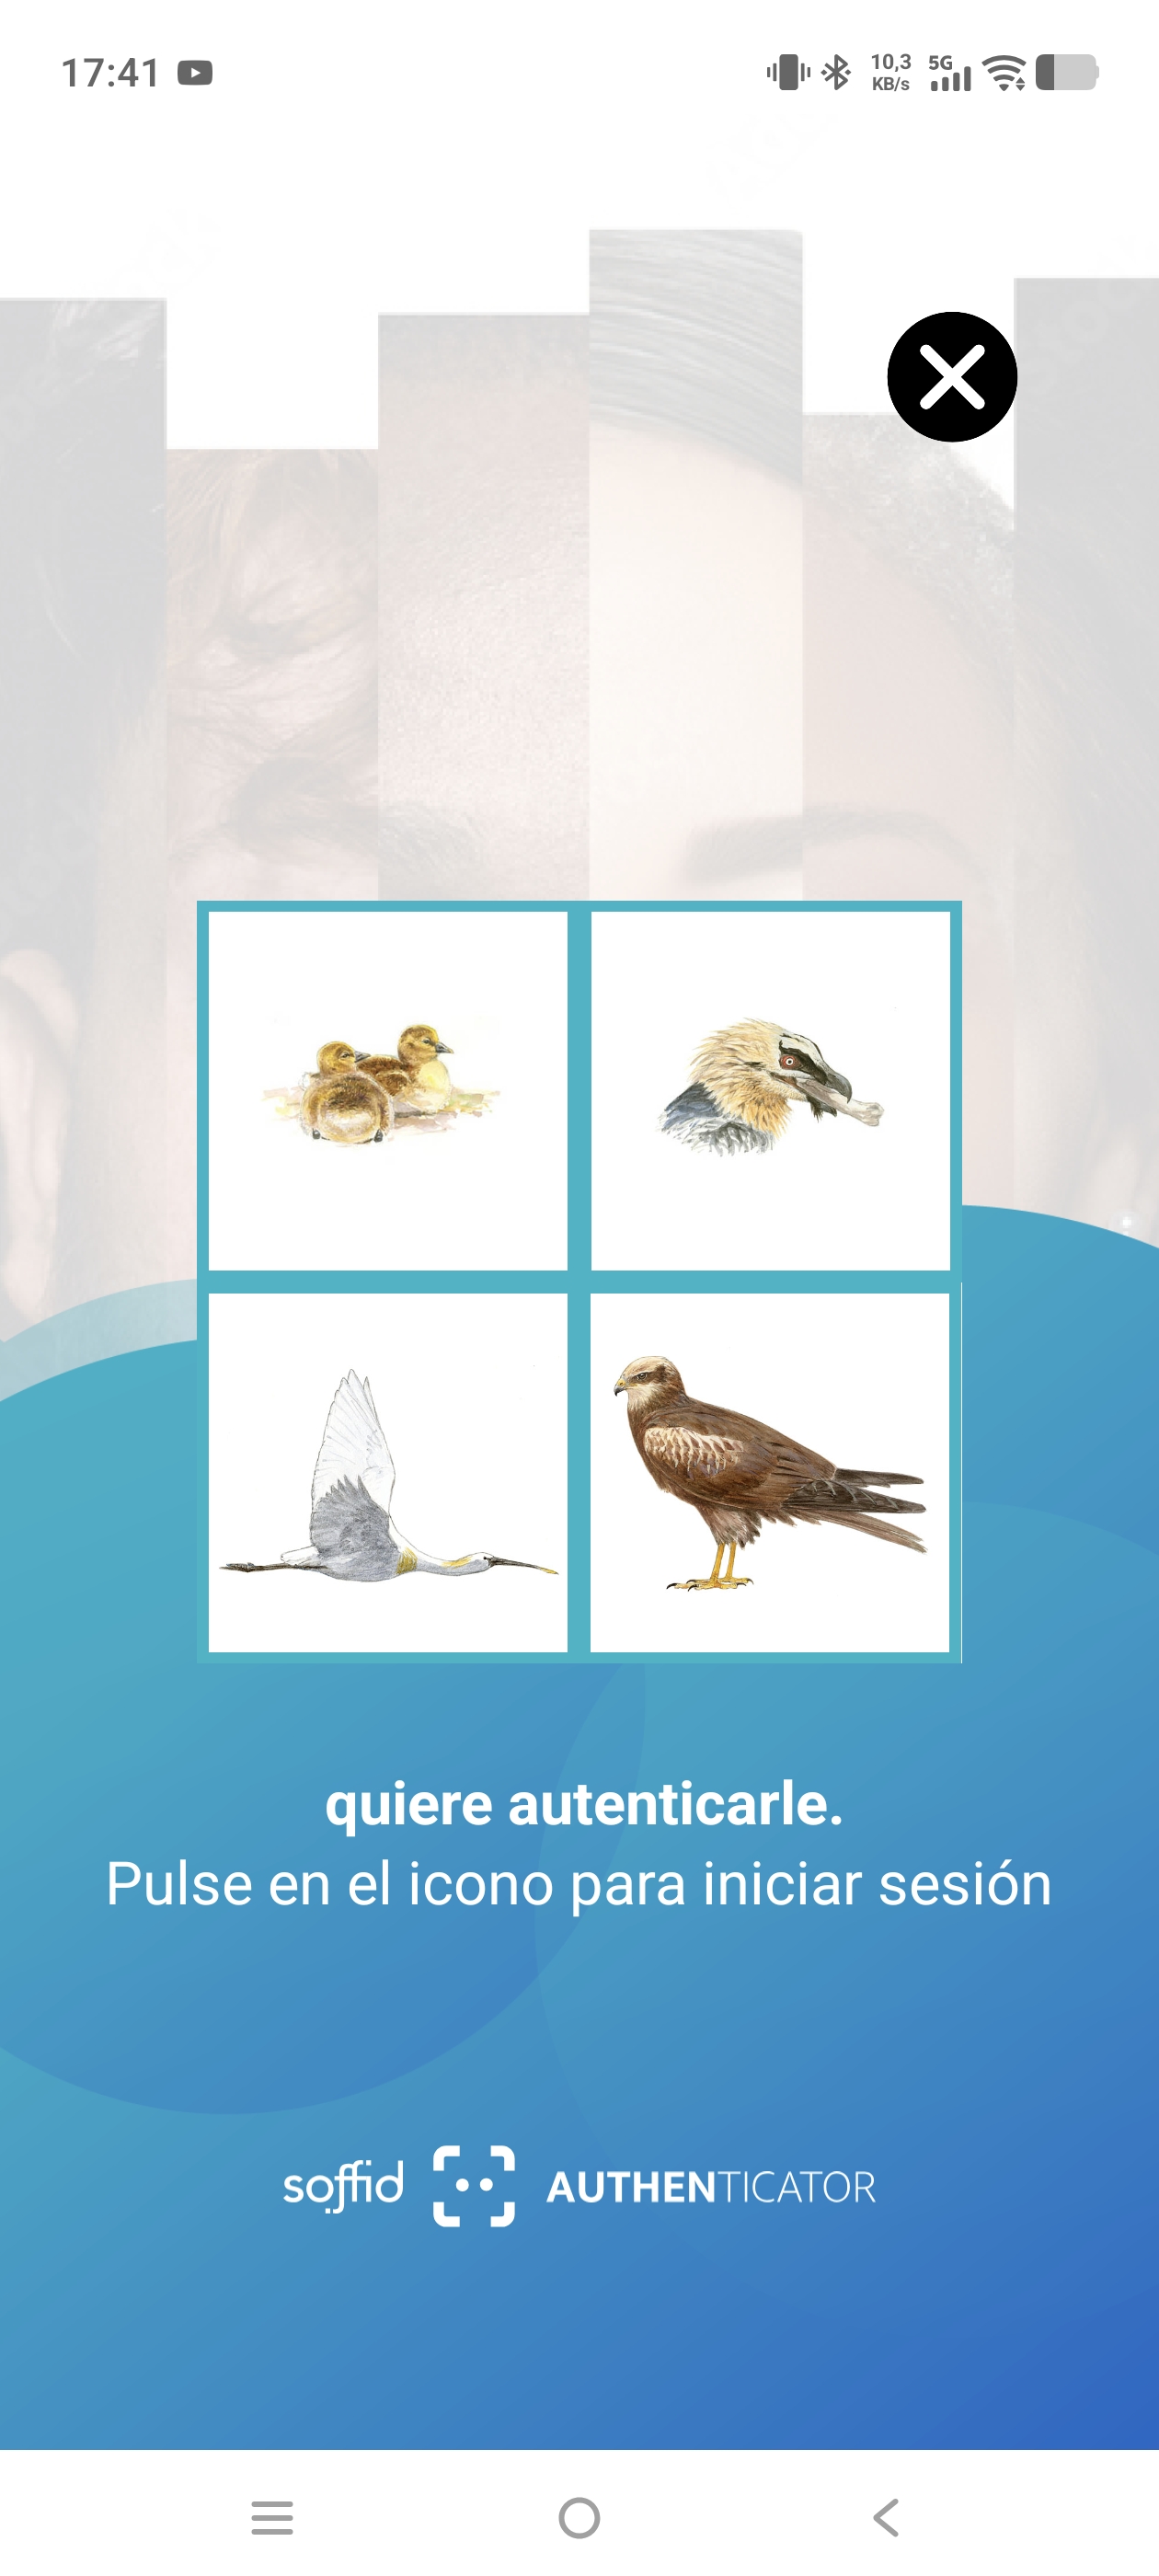
We can now use the parameter "soffid.push.images" to view the different sets of images.

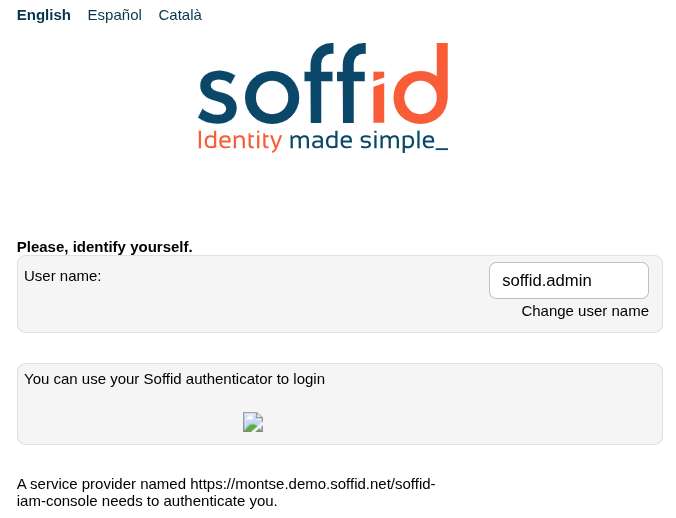
Let’s take a look at the four examples of logins!
No soffid.push.images parameter or soffid.push.images=birds
soffid.push.images=numbers

soffid.push.images=flowers
soffid.push.images=fishes
Please note that if you enter an incorrect value for the parameter, this error will appear.