Step 2. Configure network discovery
Once the network has been created, theThe second step will be to configure the network with the proper parameter to allow you to run the discovery process.
Step-by-step
1. First of all, you must access the network discovery page in he following path:
2. Once you have accessed the network discovery page, Soffid will display all the networks created on Soffid using list format.
3. You must select the network you want to scan to discover all its hosts.
4. Then, Soffid will display detailed information about the network. All that information will be a read-only data.
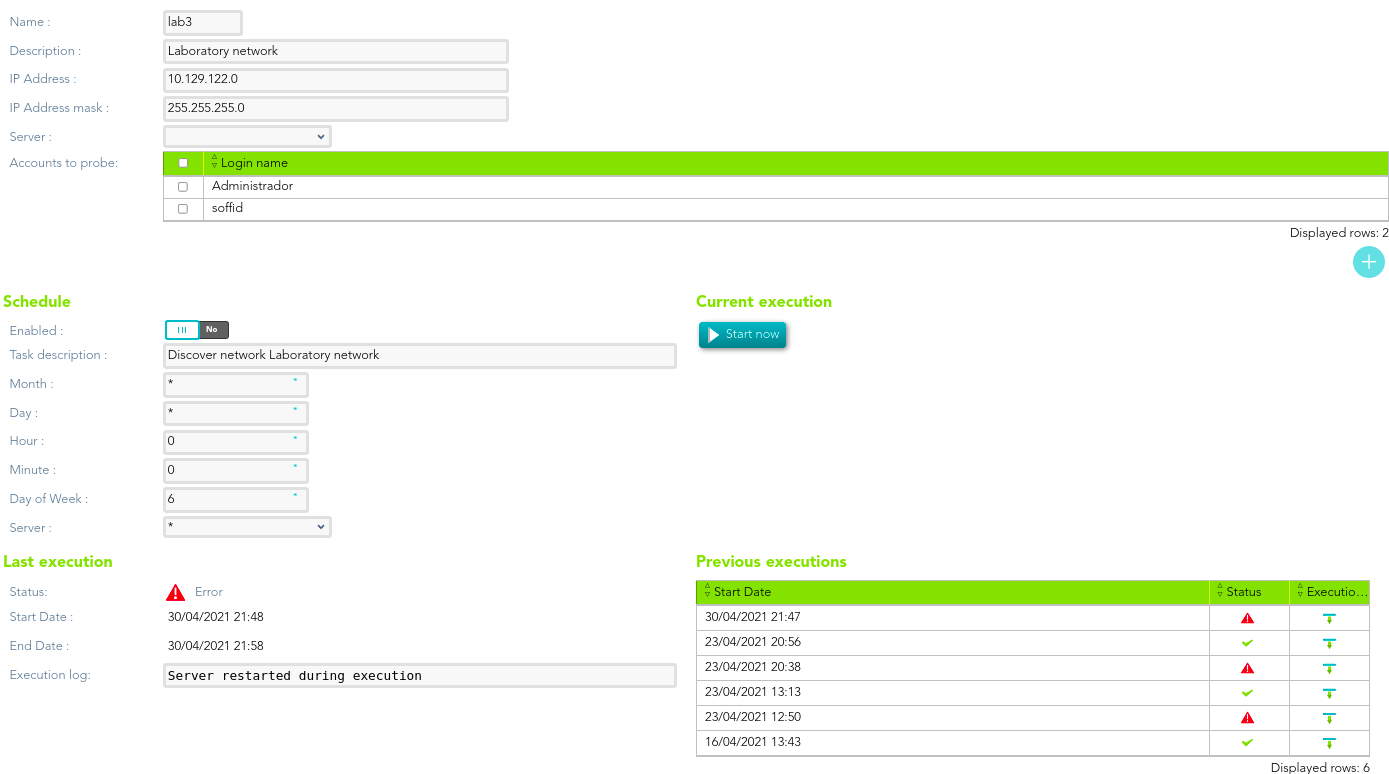
5. You must click the "Enabled discovery" button to display new configuration fields, server, accounts to probe, schedule, and current execution.
6. The first of one, Server (from now on the discovery proxy server) the selected server will be used to try to connect the detected hosts using the accounts defined on the accounts to probe list. If none server are selected the server selected in the task definition will be used.
7. The second, Accounts to probe allows you to add accounts fpr trying to connect to the network hosts discovered.
7.1. You must clic the add button (+) to add a new account.
7.2. You must select to create a new account or add an existing account.
7.2.1. To register a new account you must select the "Register a new account" option and fill in the login name and the password.
7.2.2. To use an existing account, you must select the "Use an exising account" option and select the chossen account. You have two options:
span style="color: #a6d100; font-weight: bold; font-size: 18px;">7.2.2.1. Writing the account name on the text field, Soffid helps you with predictive search. Then you must click the "Apply changes" to save the data and Soffid will add the account to the accounts to probe list.
7.2.2.2. Clicking the user icon, Soffid will show you search account window. Once you search and find the proper account, you need to click on the account row.Then soffid will add the account to the accounts to probe list.
8. The third, Schedule: you can enable that option to schedule the execution of the task. If you enable that option, a task will be created and configured to be performed on the schedule defined.
8.1. You can update the schedule to be performed, the available fields are the following:
-
-
-
- Month: number of the month (1-12) when the task will be performed.
- Day: number of the day (1-31) when the task will be performed.
- Hour: hour (0-23) when the task will be performed.
- Minute: minute (0-59) when the task will be performed.
- Day of week: number of the day (0-7 where 0 means Sunday) of the week when the task will be performed.
- Server: (from now on discovery manager) primary sync server that will execute the Nmap process to discover hosts of the network. If no server is selected, Soffid will use one of the primary sync servers.
-
-
All those fields are mandatory to schedule the task.
For each value of month, day, hour, minute or day of the week:
-
-
-
- * means any month, day, hour, minute or day of week. e.g. */5 to schedule each five minutes.
- A single number specifies that unit value: 3
- Some comma separated numbers: 1,3,5,7
- A range of values: 1-5
-
-
8.2. If you update the schedule data, you will need to "Apply changes" to save the updated. If there is any error, that will display and the data will not save; you must correct the data and apply changes again.
9. The fourth, the Current execution option allows you to fire the task execution at the current moment.
10. The Last execution section displays the information about the last execution of the discover network process, the start and end date and time, and the execution log.
11. The last one, Previous executions, will display a list with the information about the previous executions. That option will be shown when the task executions were run and finished at least one time.
Soffid will display a list with the information about the previous executions, the date and time when the task started, the status and also will allow you to download the log file. To download the log file you must click on the proper "Execution log" cell, then a txt file will be downloaded on your computer and you could check it.
Screen overview

