Configuration > Security settings
Configuration > Security settings
- Authorizations
- Authentication
- Password policies
- Configure PAM session servers
- PAM policies
- PAM rules
- Issue policies
- Digital certificates (addon federation)
- OTP settings (addon otp)
- Password recovery configuration (addon recovery)
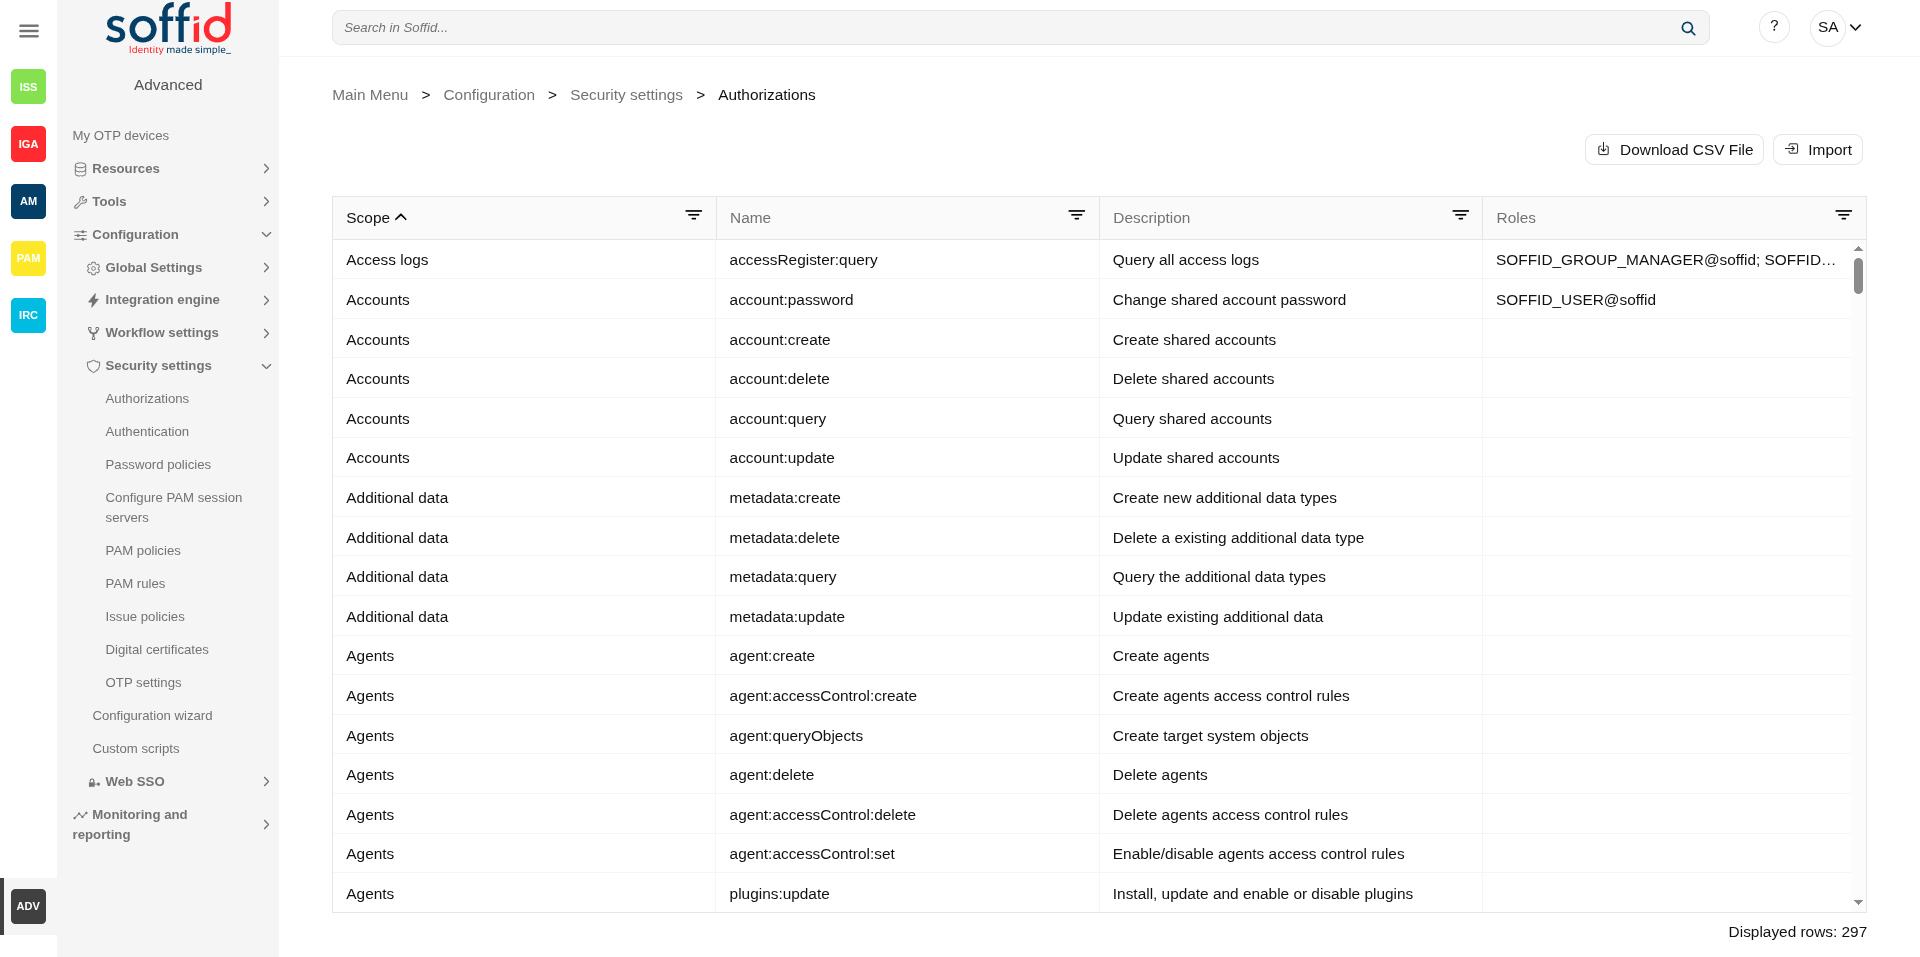
Authorizations
Definition
Soffid console provides a granular access control system. That granular control system allows the administrator user to assign granular permissions to roles. Be in mind that some permissions may inherit some other permissions.
You cannot assign permissions directly to users. Instead, permissions are assigned to roles and roles are assign to users, either directly or through grant inheritance.
The roles may be created into Soffid application system, but could also be included in any other application system.
Permissions are grouped into permission scopes. Most scopes are Soffid object types, but there are one special scope named Soffid, that applies to Soffid console web pages.
Addons can create their own authorizations that automatically will appear at this screen. When a new addon has been installed and applied, the first thing to do use to be assign permissions for this new addon. In fact, administrators won't be able to manage the addon unless the log out and log in to get the newly created permissions.
The permissions given to roles and the roles given to users are cached by Soffid. In order to reapply permissions, the user should close its session and log-in again
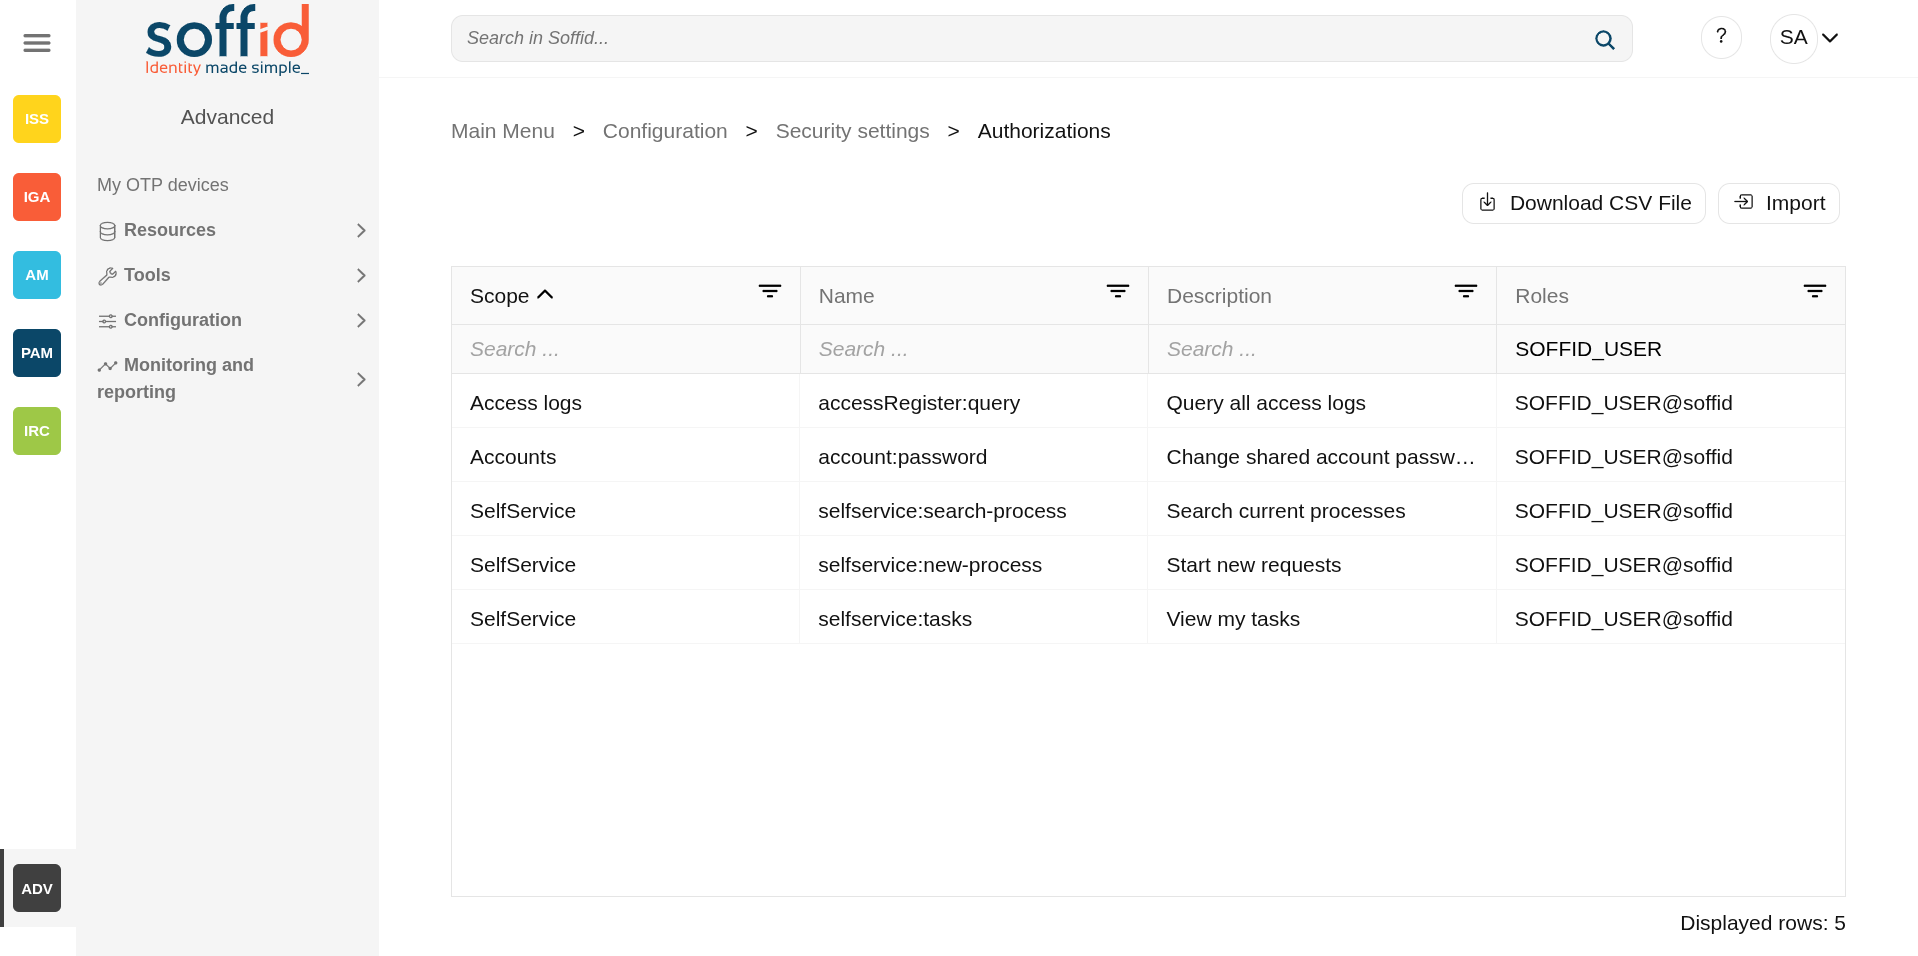
Screen overview
Related objects
Standard attributes
Table attributes
- Scope: scope of application.
- Name: name of the granular permission.
- Description: brief description of the granular permission.
- Roles: role list assigned to that granular permission.
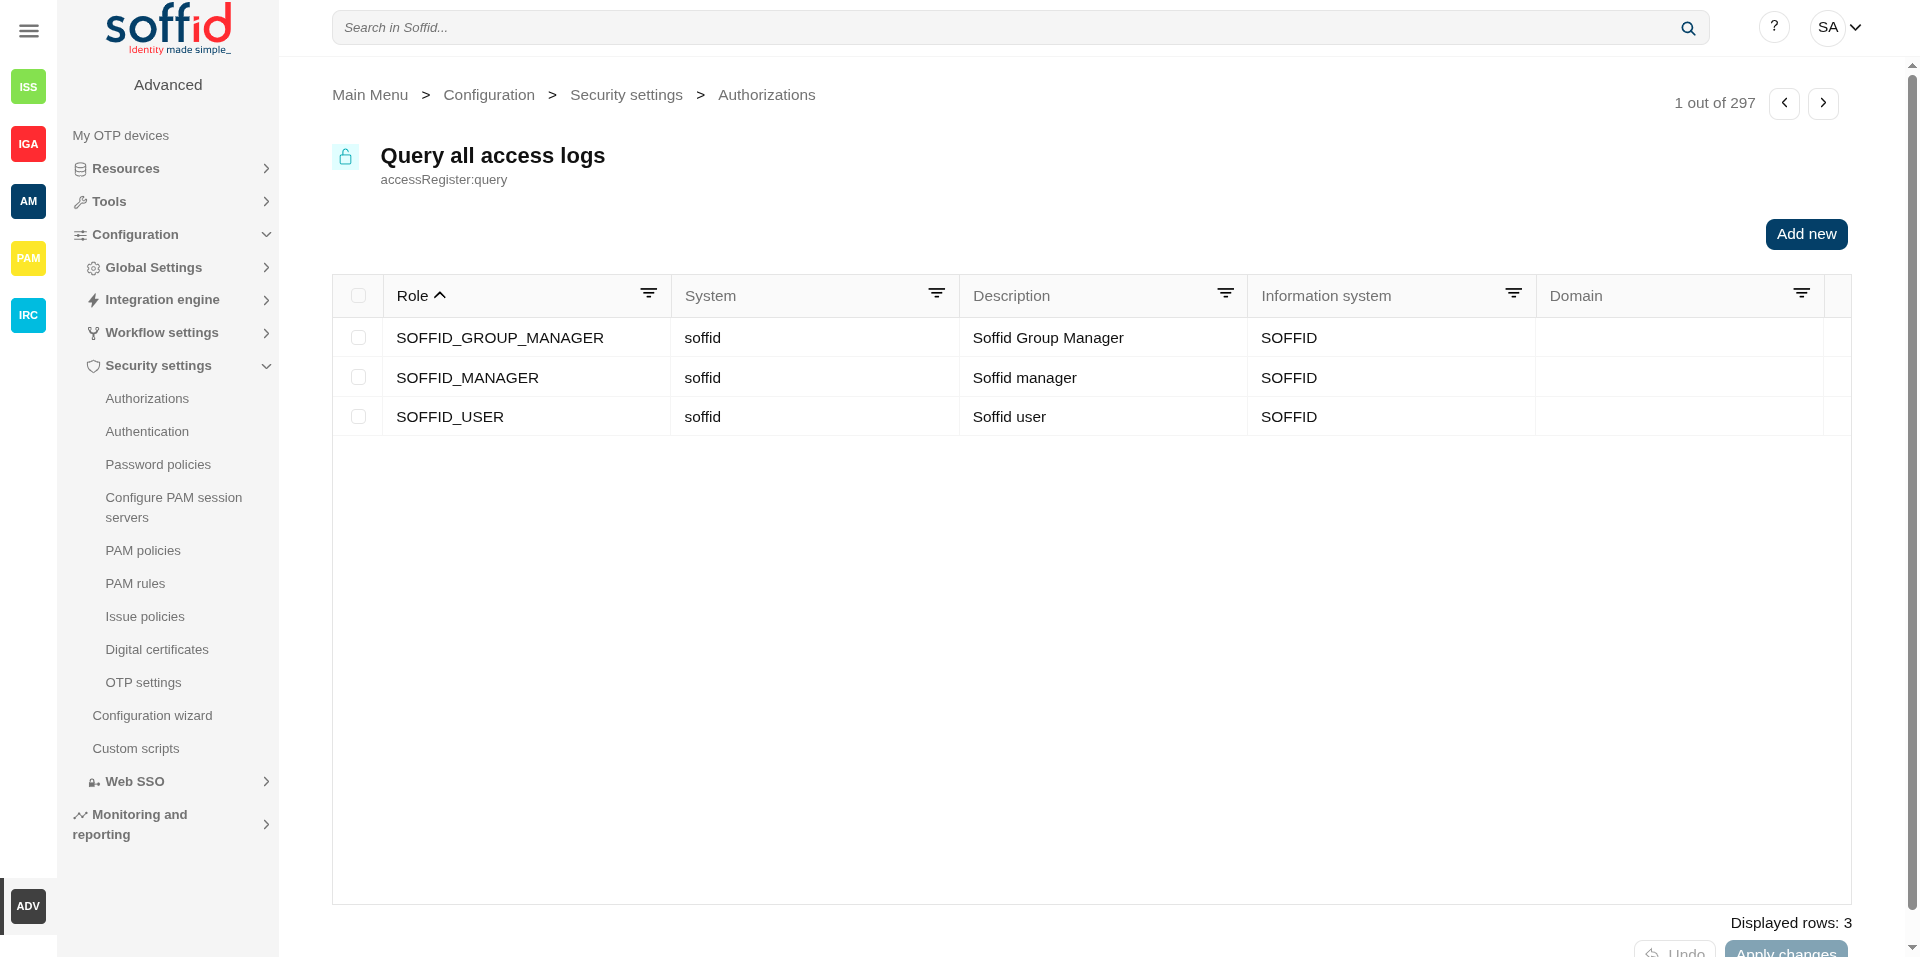
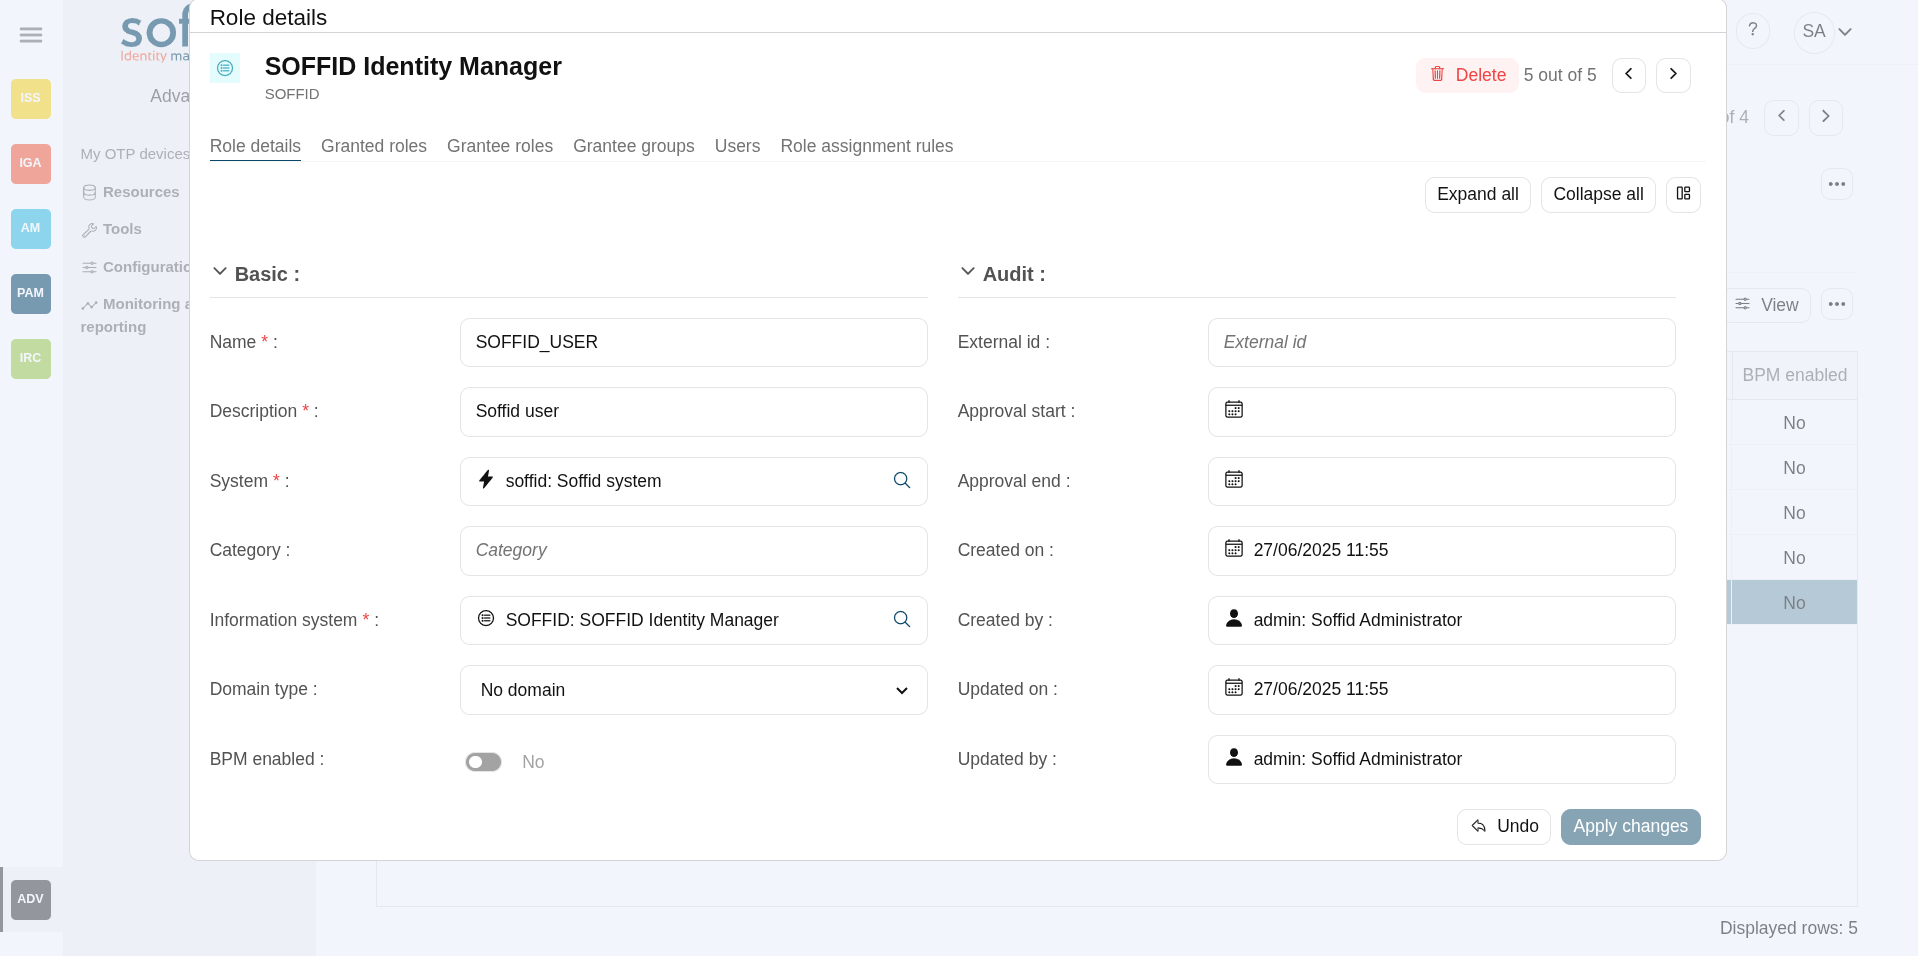
Authorization attributes
- Role: role name.
- System: target system name.
- Description: role description.
- Information system: asset or application, from a functional point of view.
- Domain: the role is limited to that scope.
Actions
Table actions
| Download CSV file | Allows you to download a CSV file with the authorization data. |
| Import |
Allows you to upload a CSV file with the authorization data to add or to update the granular control system. If they exist, the values of the CSV file will prevail. First, you need to pick up a CSV file, that CSV has to contain a specific configuration. Then you need to check the contents. And finally, you need to select the mappings for each column of the CSV file to import the data correctly and to click the Import button. |
Authorization actions
| Add new |
Allows you to add a new role to the authorization. First, you need to search a role writing the role name on the field, and Soffid will show the values related. Second, you can select one or more roles and accept. And finally, you need to apply changes to save the roles added. If you cancel that action, no role will be assigned. |
| Delete |
Allows you to delete one or more roles from an authorization. To delete one role, you need to click the subtraction symbol (-), located at the end of the row, of the role which you want to delete and then apply changes. To delete more than one role, you can select the roles which you want to delete and there click the subtraction symbol (-) and then apply changes. It is mandatory apply changes to save the roles deleted. Soffid will ask you for confirmation to perform that action, you could confirm or cancel the operation. |
| Undo | Allows you to quit without applying any changes. |
| Apply changes | Allows you to update the changes made on the authorization. |
Select role actions
|
Undo |
Allows you to quit without applying any changes. |
| Apply now | Allows you to add the role or roles to the authorization. |
Others
Most common authorizations
| Page | Code/s | Role |
| Password vault | sso:manageAccounts agent:query metadata:query |
SOFFID_PAM_ADMIN |
Examples
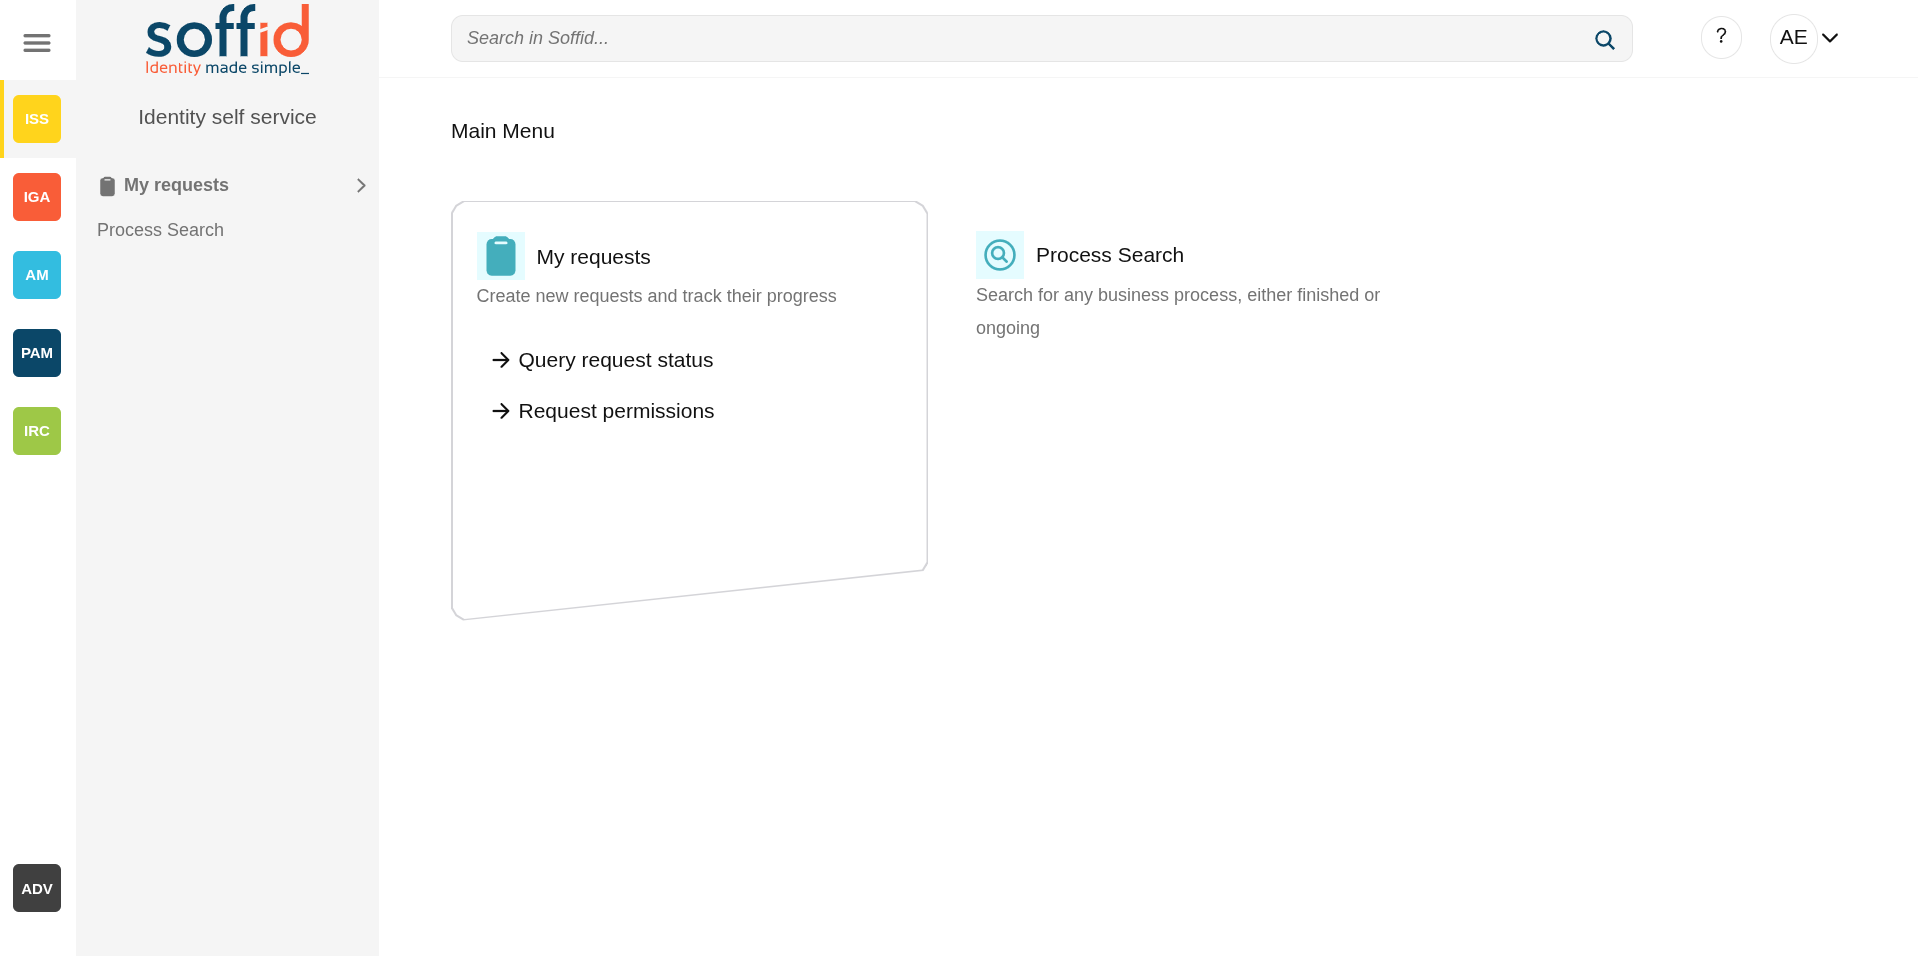
End user for identity self service.
A Soffid role is created for this functionality.
This role is assigned to the authorisations we require.
The role is assigned to a user.

The user will only be able to access the pages and actions permitted by their authorisations.
Authentication
Definition
This page gathers different types of settings that may affect user authentication in the Soffid Console.
Soffid could use different kinds of external authentication sources. These mechanisms could be selectively enabled or disabled.
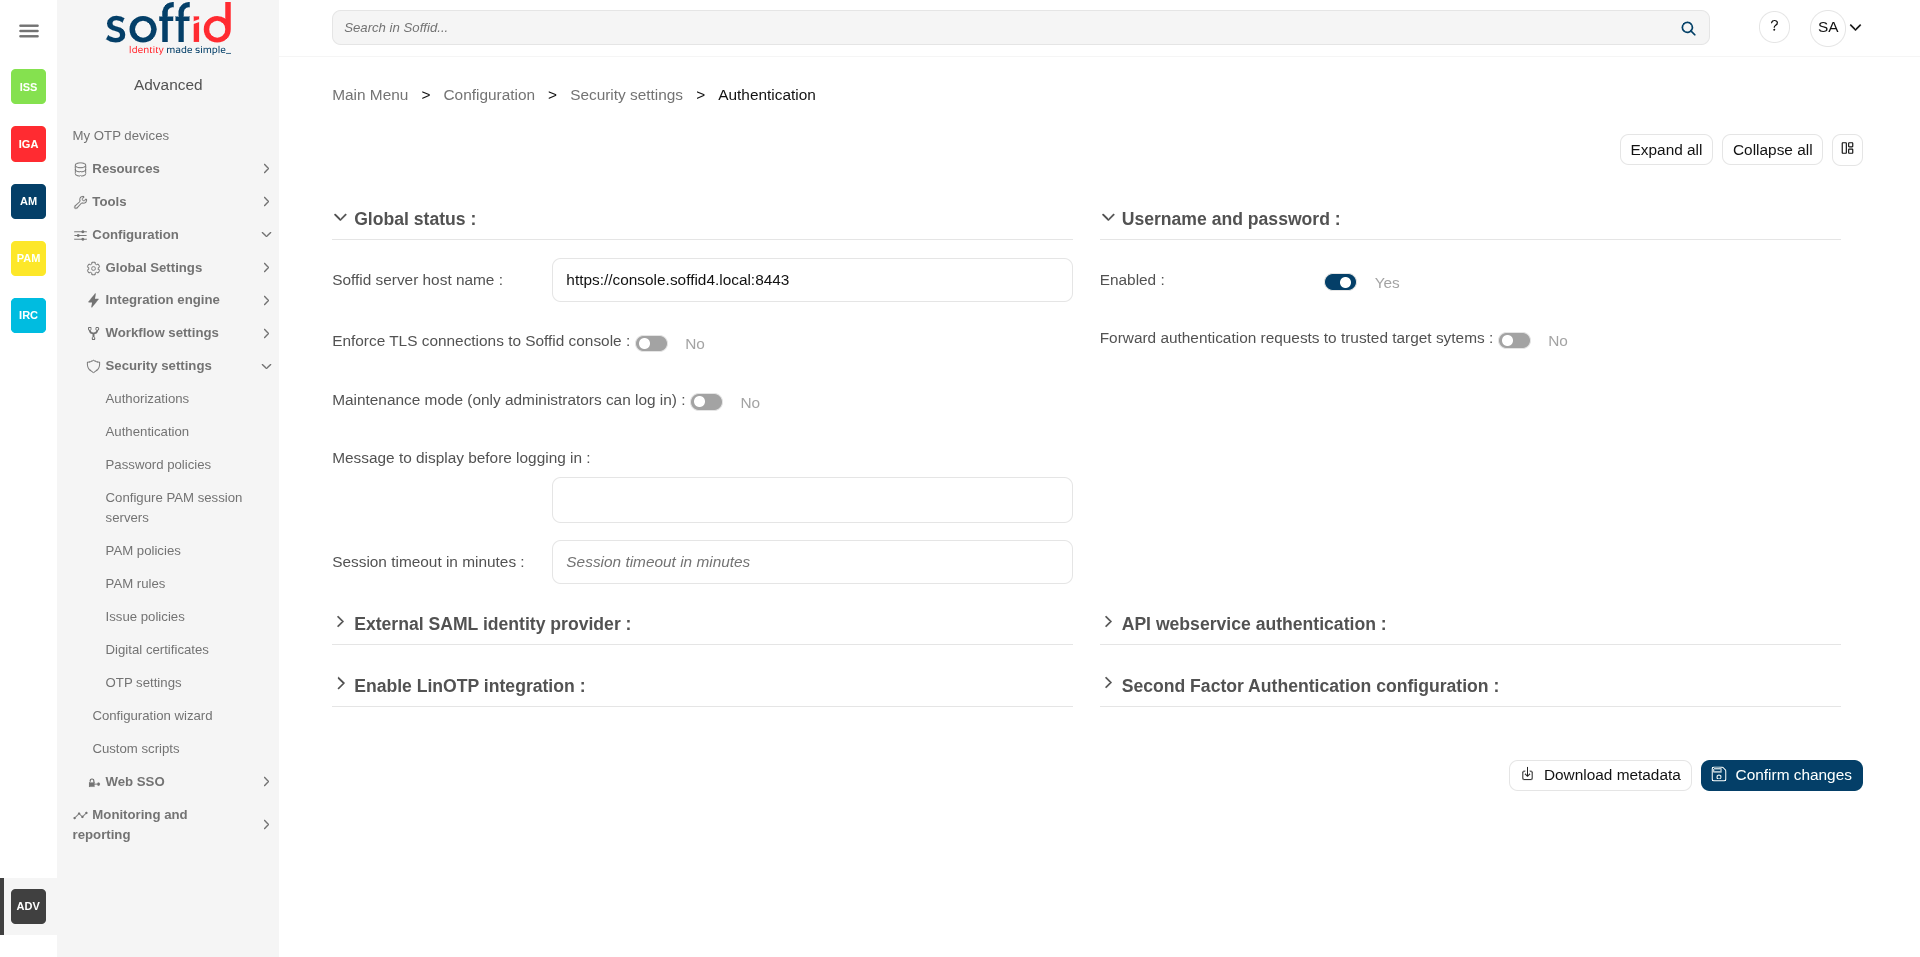
Screen overview
Related objects
- Users : users must have a enabled Soffid account.
- Identity provider : users could log in with the Soffid idp or another external idp.
- Console log : to check the console logs
- Account naming rules : to configure the LinOTP service
Standard attributes
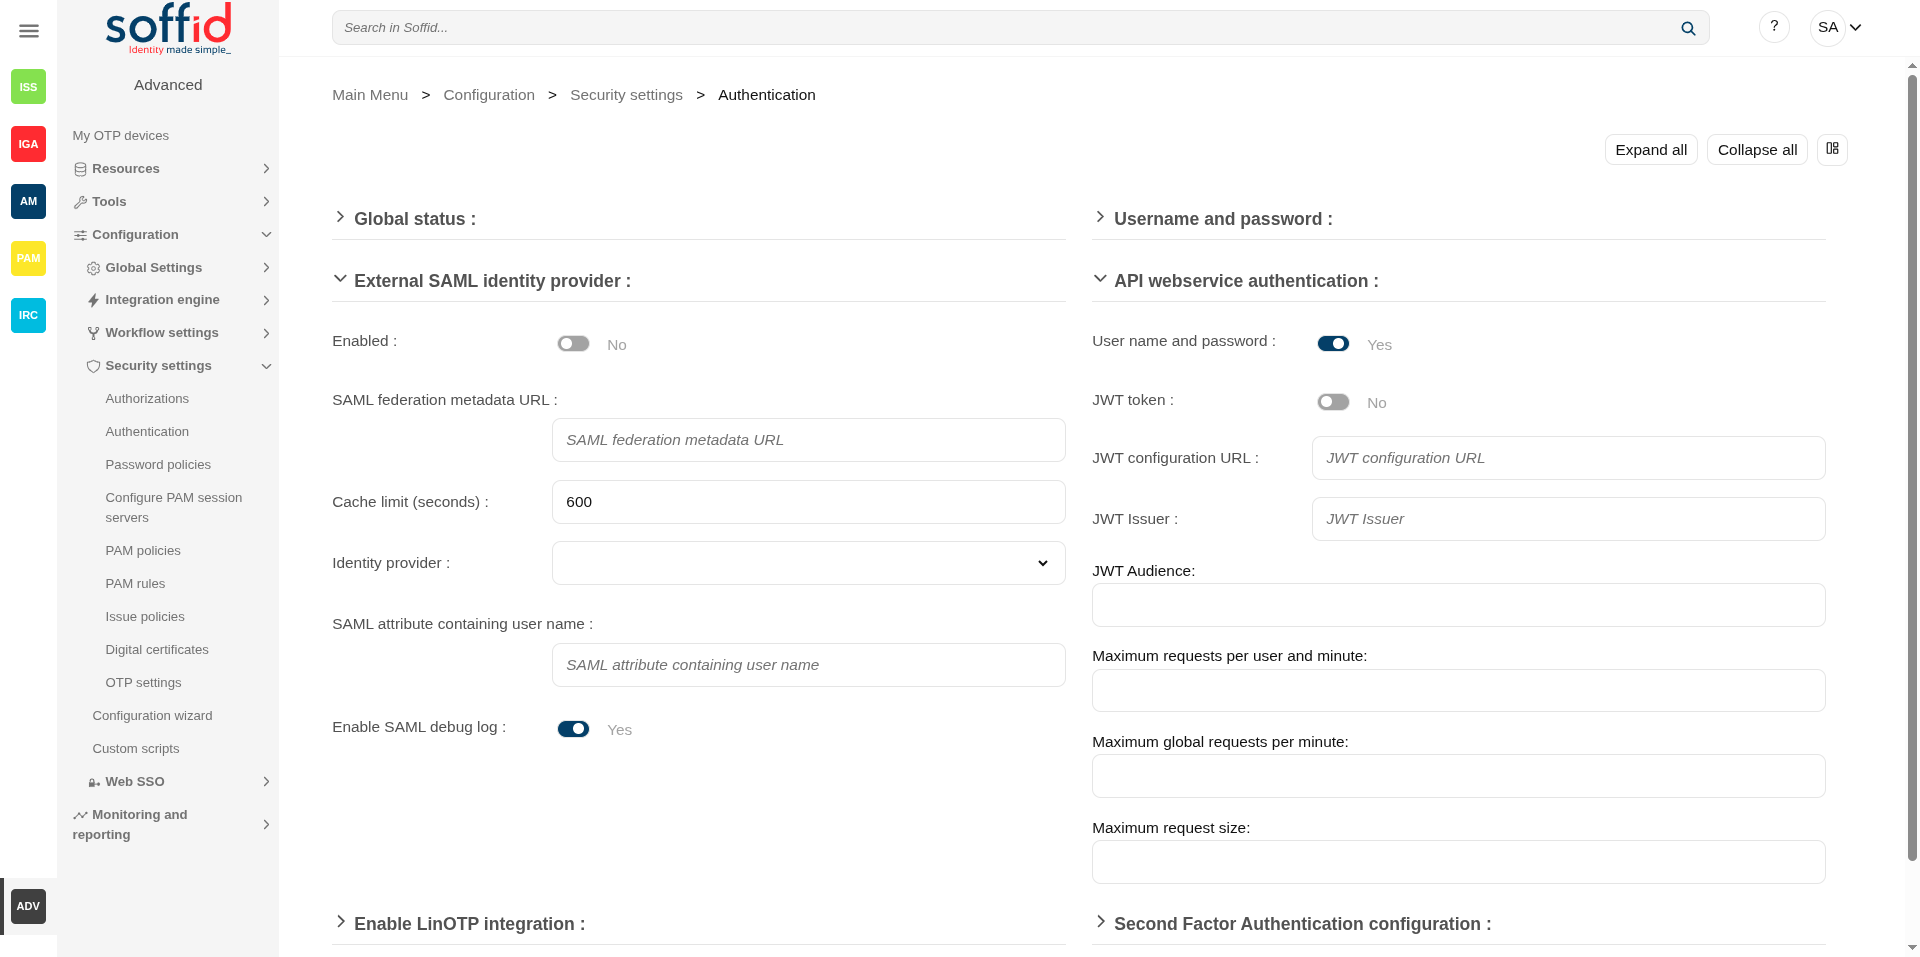
Global status
- Soffid server host name: URL generated in the installation configuration.
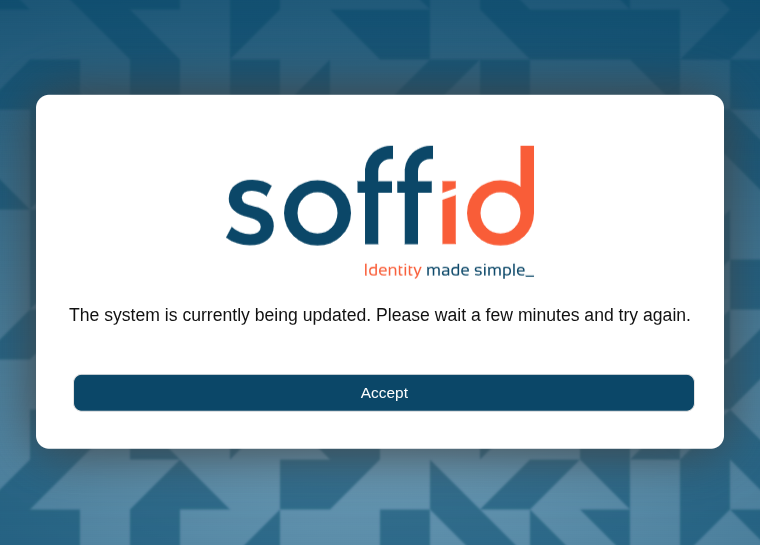
- Enforce TLS connections to Soffid console: If you check this option, it will be is mandatory to restart the Soffid Console.
Once you check the Enforce TLS connections to Soffid Console option, there are no easy way to come back. You should use this option only en Production environments.
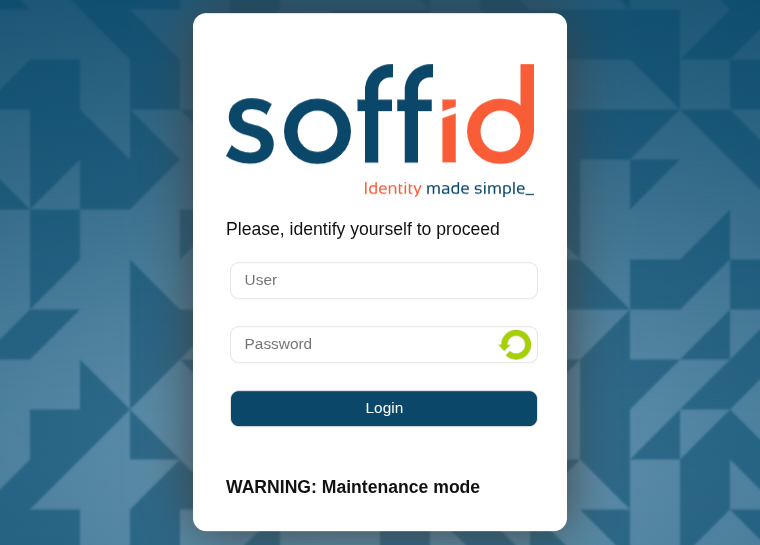
- Maintenance mode (only administrators can log in): if this option is checked (value is Yes), only the administrators could connect to Soffid Console.
💻 Image
- Message to display before logging in: administrators can configure a banner that will be displayed before the user logging in. This banner will display security advice.
💻 Image
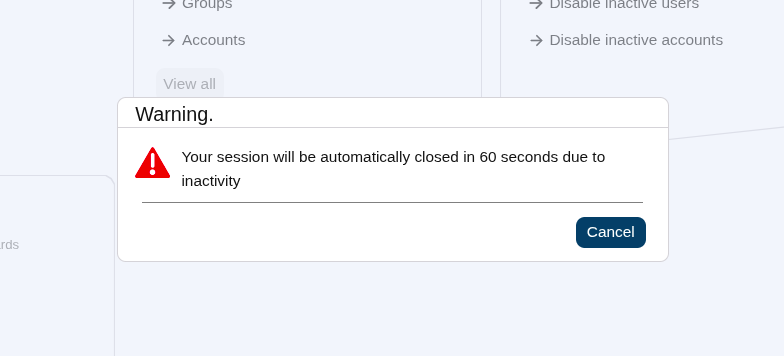
- Session timeout in minutes: time in minutes it takes for the console to display the message indicating that the session is being closed. If nothing is indicated, the session does not expire.
💻 Image
Username and password
- Enabled: the only attribute enabled by default in the installation of Soffid. It is the internal username and password authentication mechanism. Therefore, the authentication is made with the username and password of the soffid account.
- Forward authentication requests to trusted target systems: to use external username and password sources. Therefore, the authentication is made with the username and password of an account of an external system.
This authentication is applies only to agents that have checked "Trust password" in the agent. For more information about agents please visit the Agents page.
If the password entered by the user does not match with the Soffid account (if the attribute "Enabled" is checked), the Soffid core will issue a "ValidatePassword" task for each trusted target system (with checked "Trust password"). If any of the trusted target systems accepts the password, it will be hashed and stored in Soffid tables and login will be accepted.
Be aware that this password change in Soffid will affect all systems that share the same password domain (defined in the password policies).
External SAML identity provider
It should be noted this feature does not depend on the federation addon. That is a feature included by default in the Soffid smart engine to allow you to include in the authentication flow a mechanism to use a third-party SAML system.
Soffid's own identity provider can also be used.
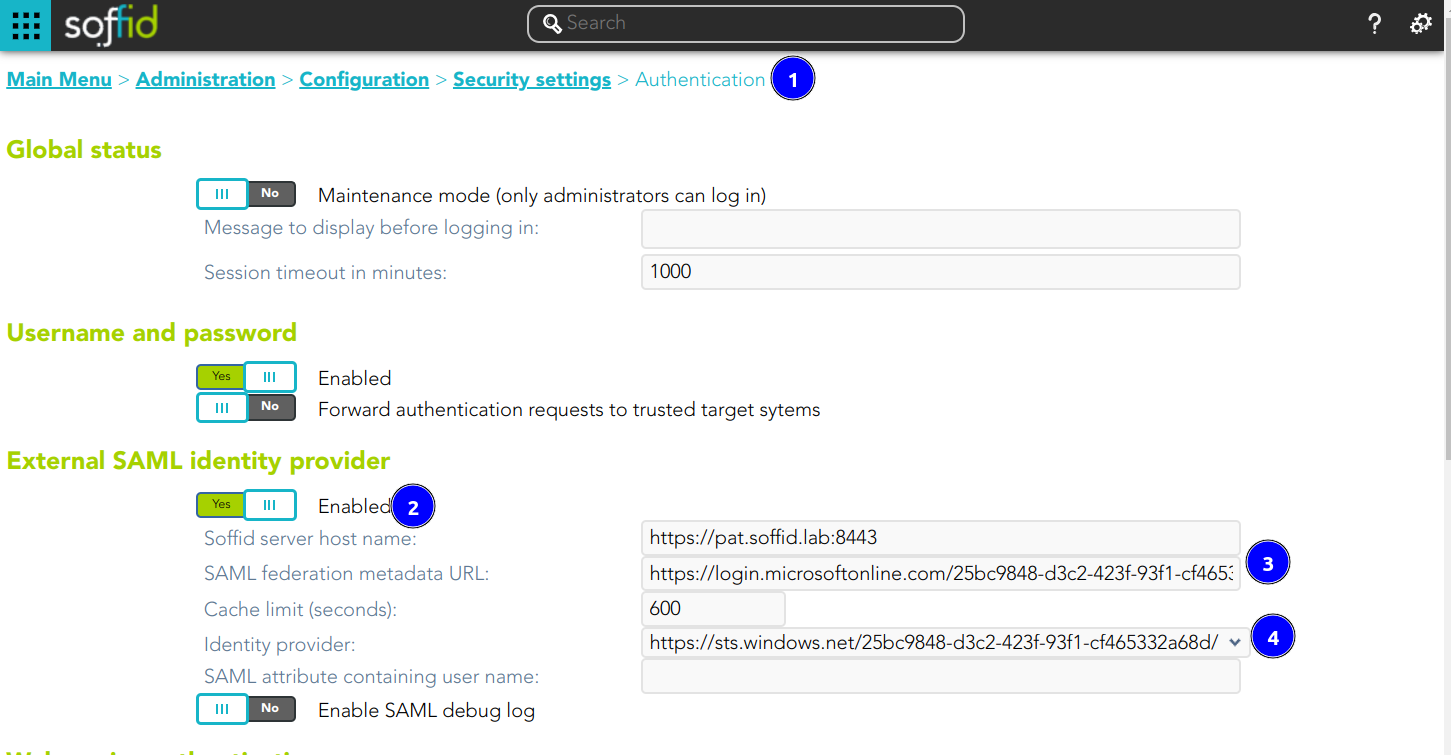
- Enable: check it (select value Yes) to use an external SAML Identity Provider.
- Soffid Server host name: the URL that will be used by external IdP. This URL will be resolved by end user's browser in order to send the SAML assertion.
- SAML federation metadata URL: the URL where federation information can be found. If the Soffid console can fetch federation metadata, the Identity provider drop-down will be filled in with any identity provider found in the federation metadata URL.
- Cache limit (seconds): how often the federation information will be refreshed. By default, 10 minutes will be taken.
- Identity provider: Identity Provider to use for authentication.
- Enable SAML debug log: it displays more trace in the Console log files
Finally, download the Soffid Console and load it into your SAML Identity Provider federation.
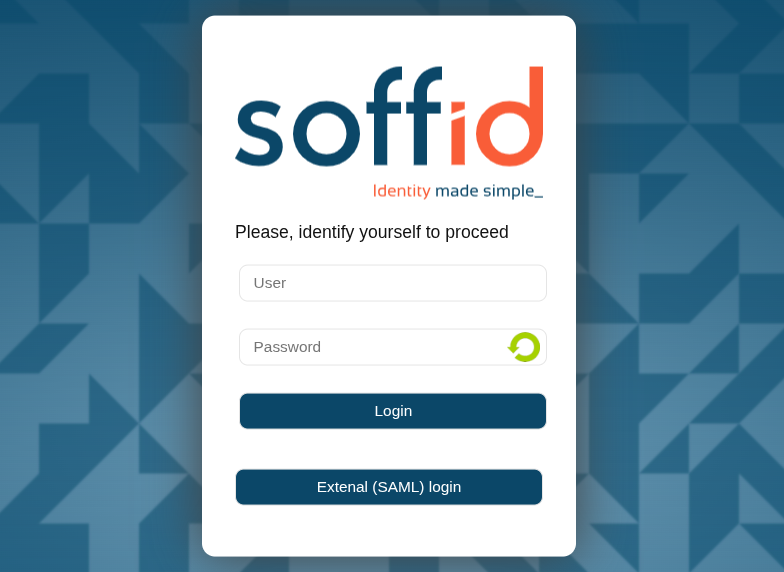
If SAML Identity Provider is enabled, as well as username and password, the user will have the chance to select the preferred authentication method. Otherwise, if only SAML is enabled, the user will be automatically redirected to SAML Identity Provider.
💻 Image
💻 Office 365 as External SAML identity provider
Introduction
Steps to configure Office 365 as External SAML identity provider.
Step-by-Step
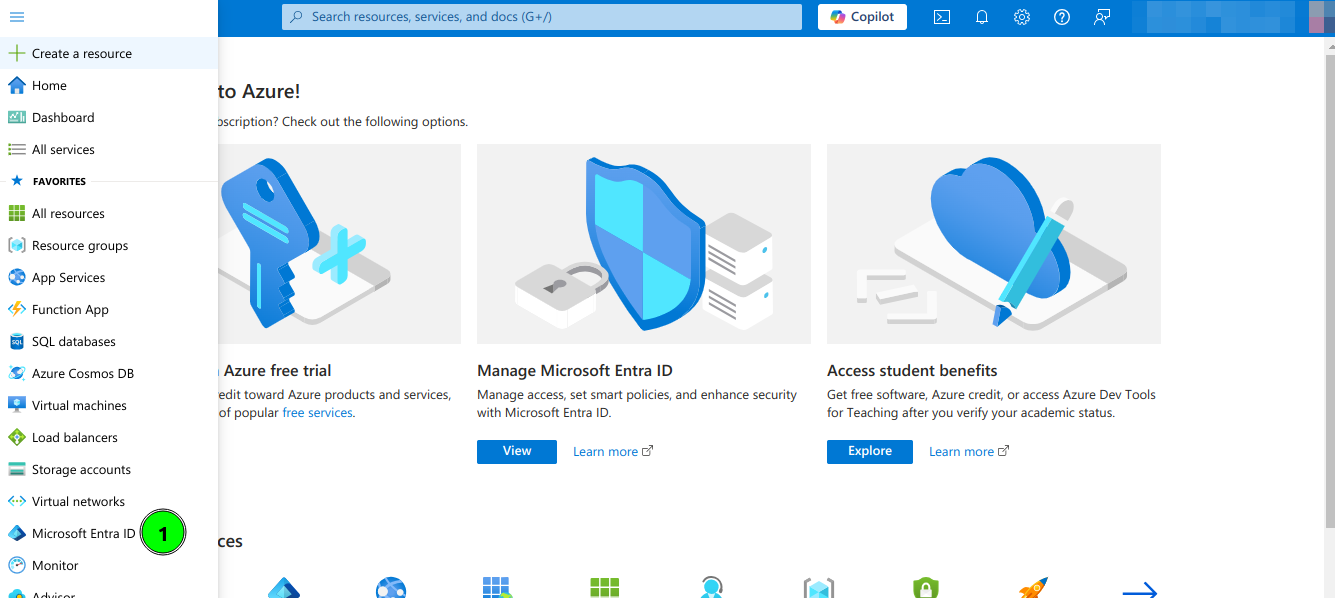
1. Open a https://portal.azure.com
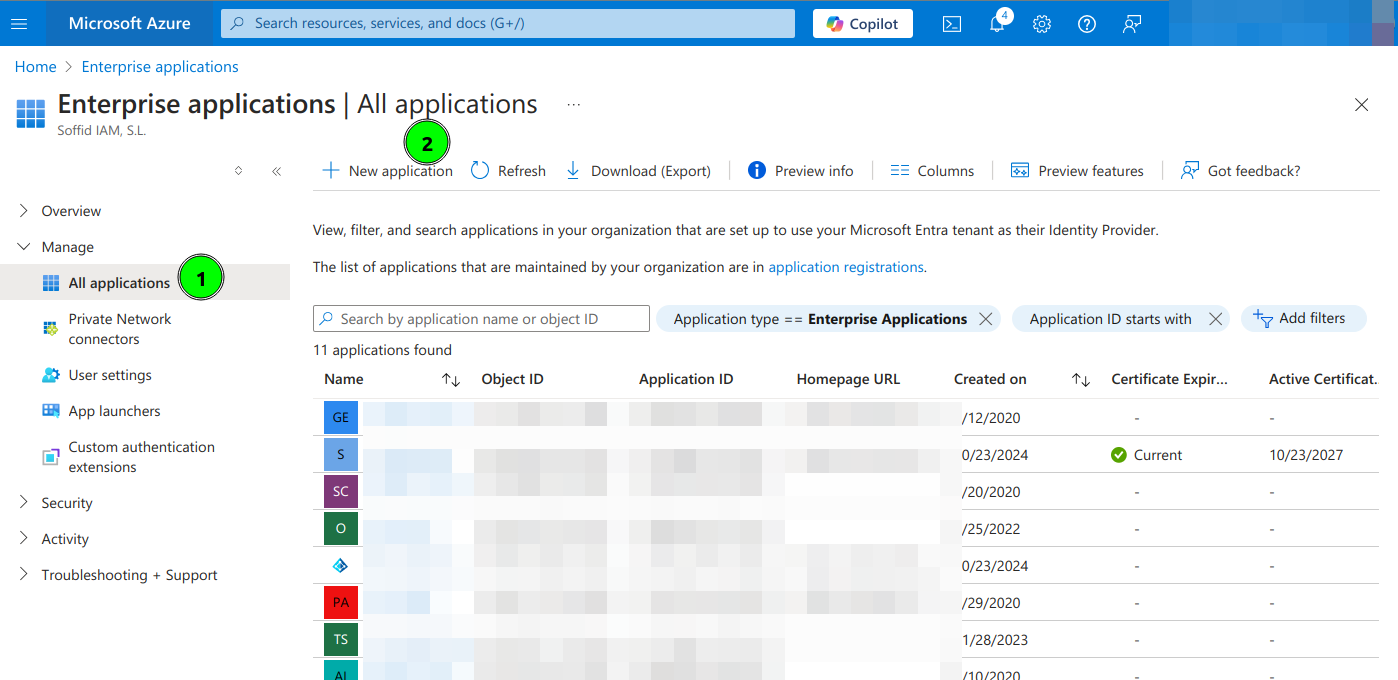
2. Open Microsoft Entra ID and then select Enterprise applications option
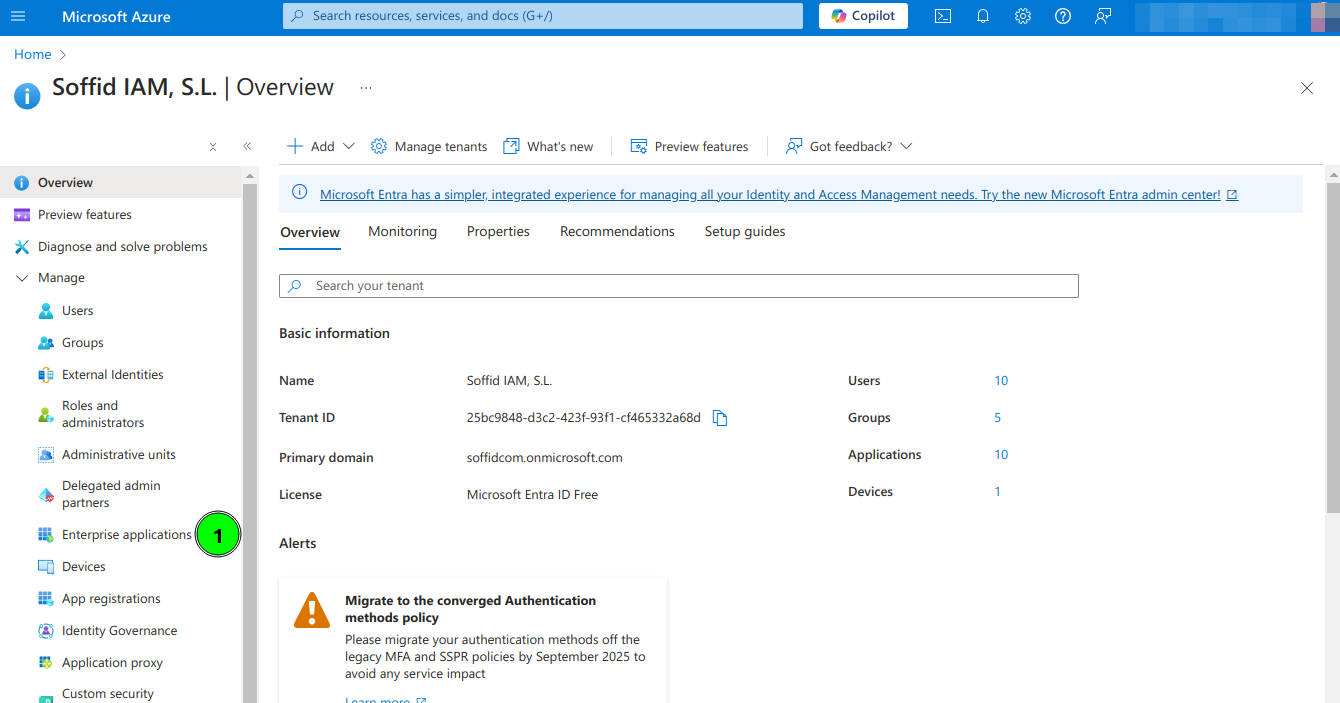
3. Select All applications and click New Application
4. Select Create your own application
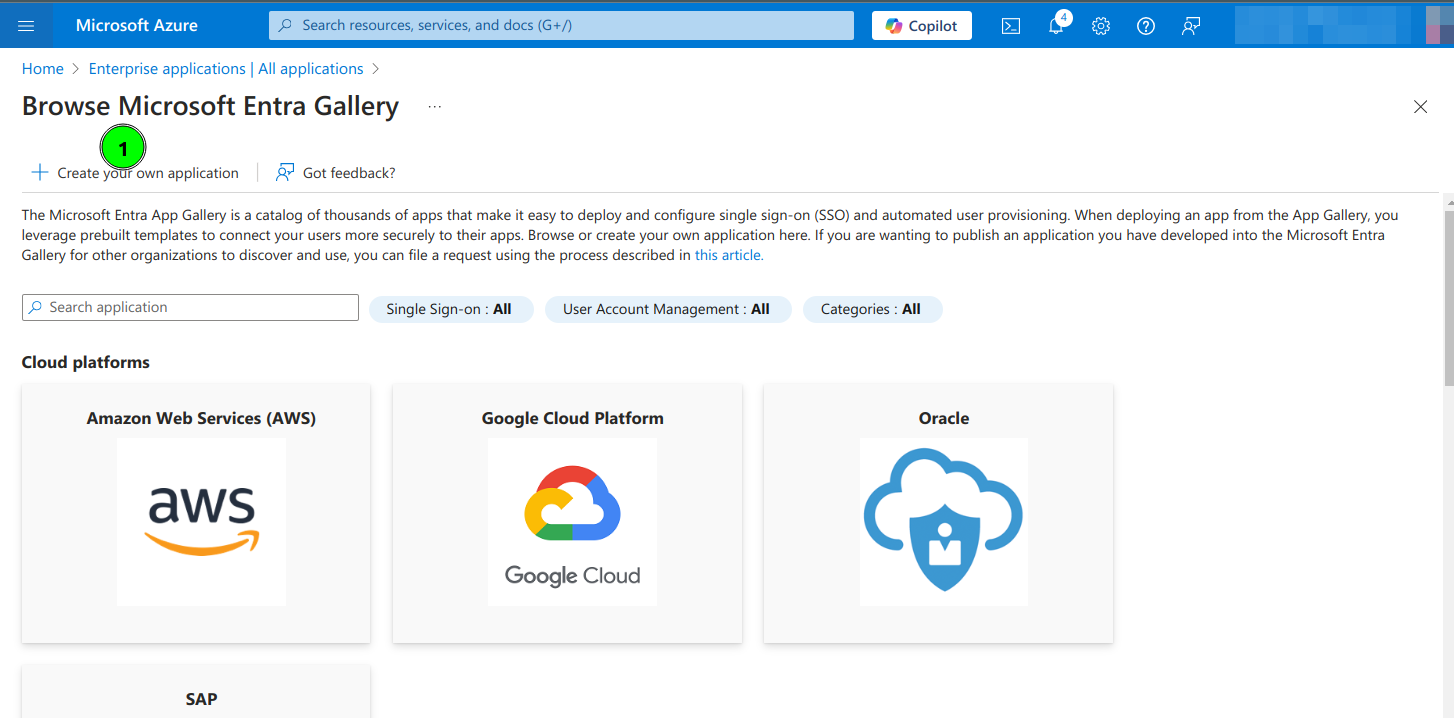
5. Type the name of your app and select the "Integrate any other application you don't find in the gallery (Non-gallery)" option

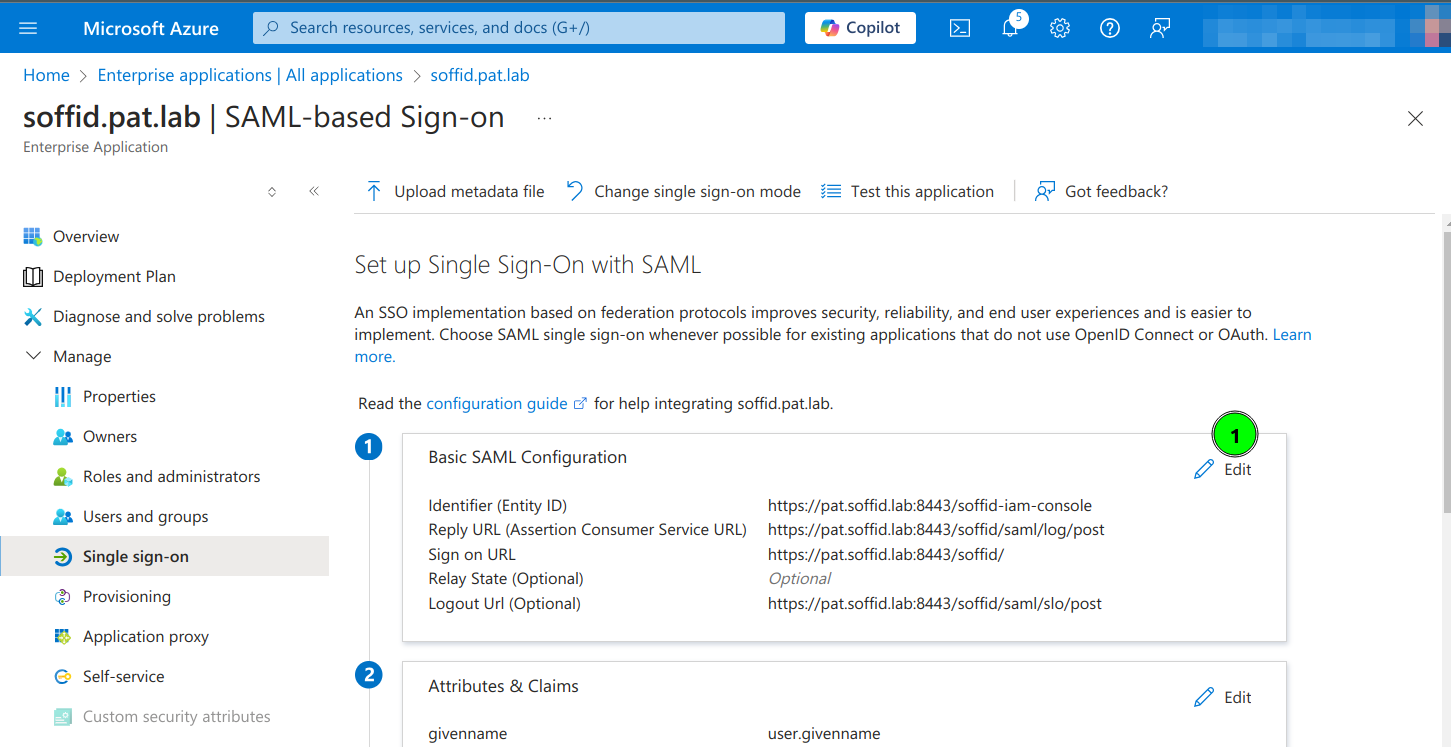
6. Click on Set up single sign on

7. Click the SAML option

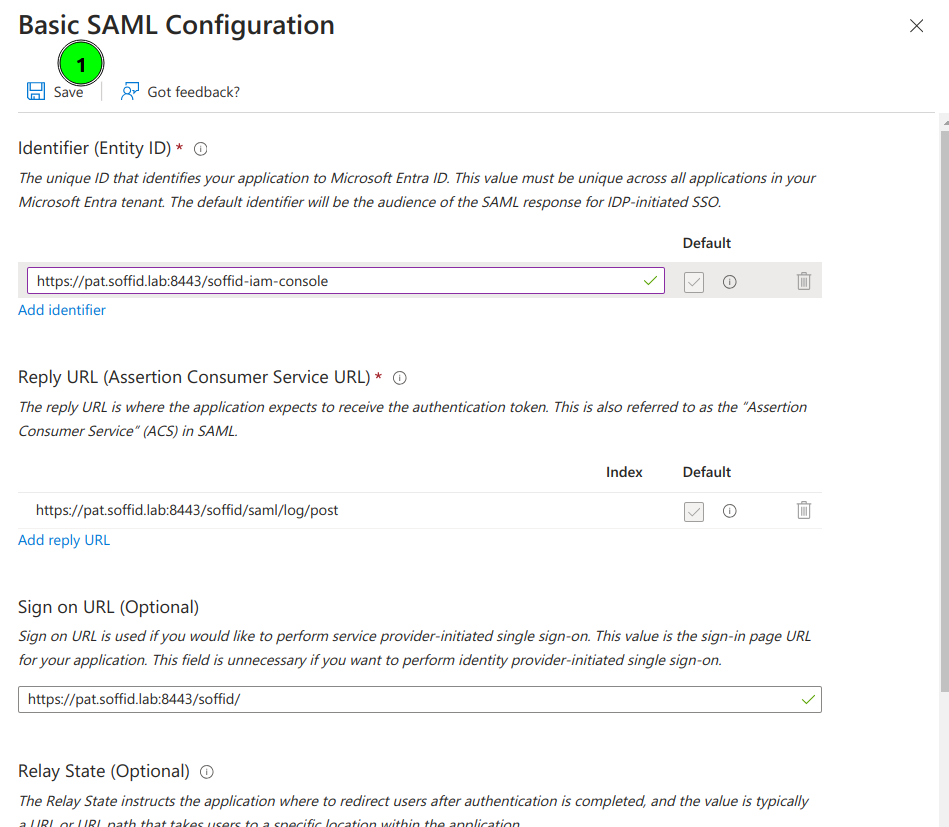
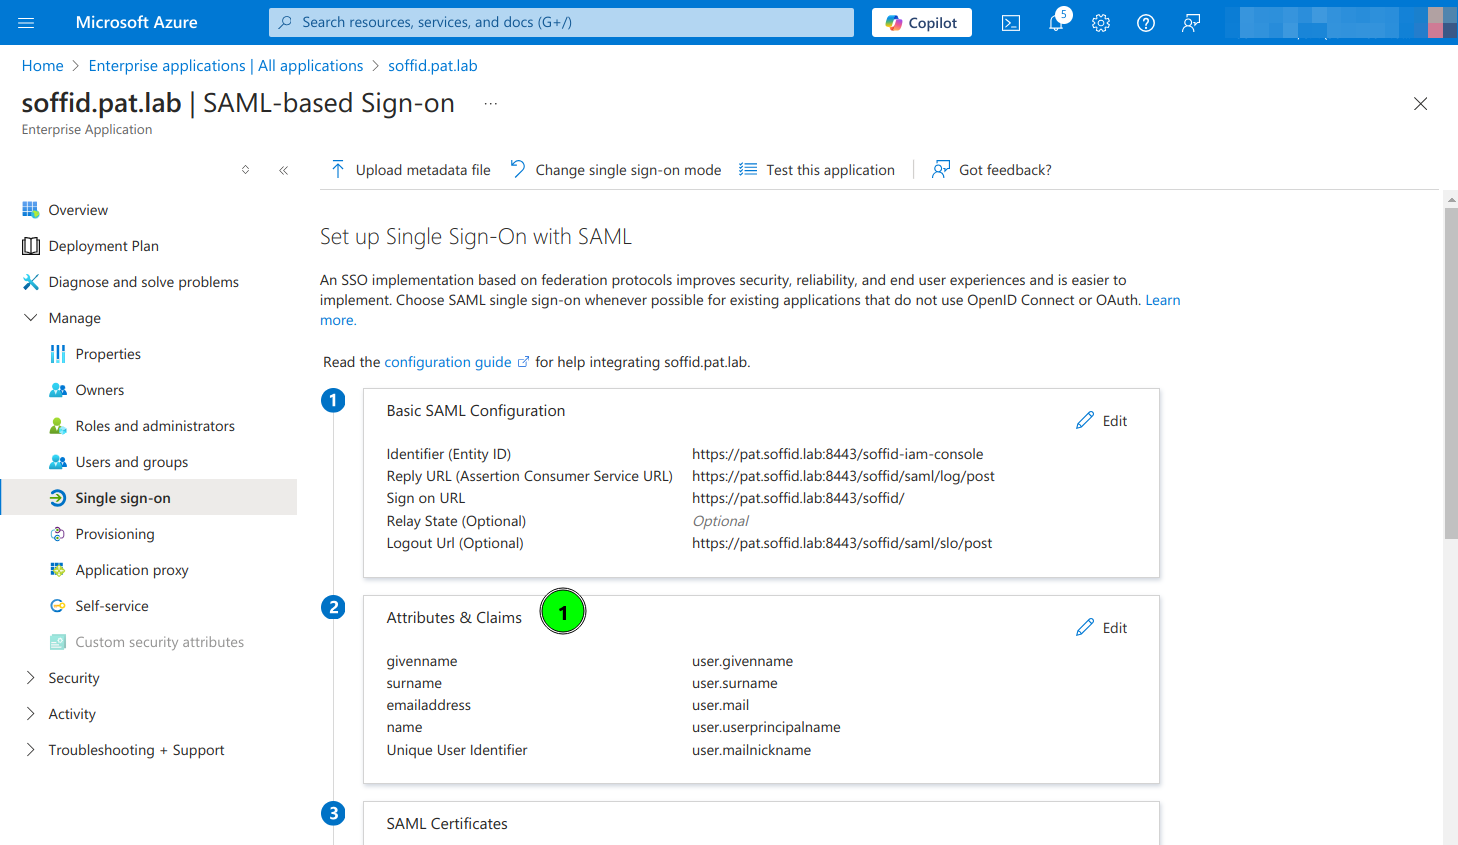
8. Enter the Basic SAML Configuration and Save:
- Identifier: https://<YOUR-SERVER>/soffid-iam-console
- Reply URL: https://<YOUR-SERVER>/soffid/saml/log/post
- Sign on URL: https://<YOUR-SERVER>/soffid/
- Logout URL: https://<YOUR-SERVER>/soffid/saml/slo/post
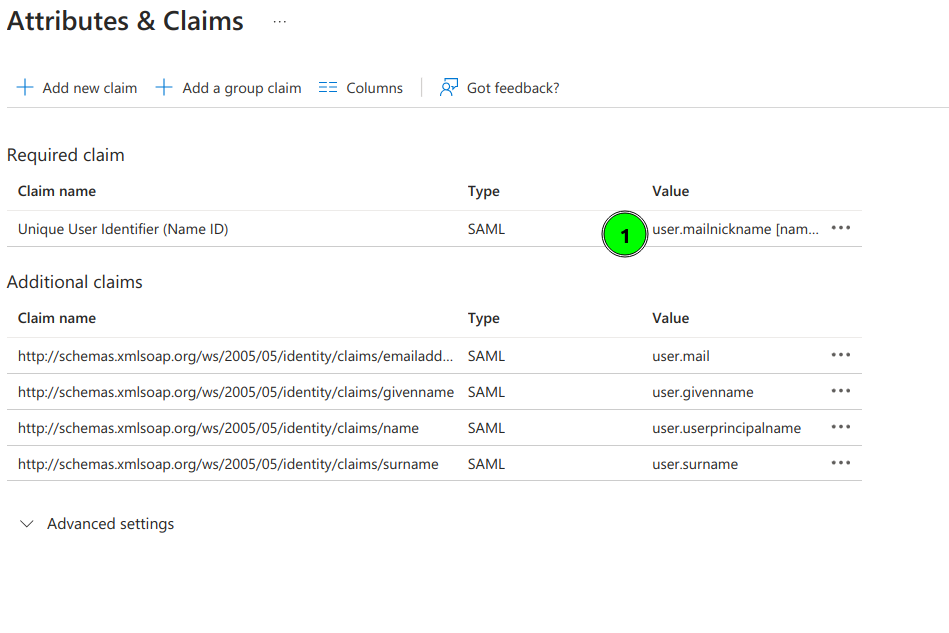
9. Configure Attributes & Claims and change the attributes and claims to send the mailnickname as the user identifier (nameid)
10. Copy the App Federation Metadata Url

11. Configure the External SAML identity Provider in the Soffid Console Authentication page
12. Optional, enable any user to login

API webservice authentication
Soffid allows you to configure the way to verify the identity of a user or system accesing to the Soffid Web Service, to ensure that only authorized entities can interact with the service.
This webservice is included in the addon SCIM, it must be installed previously.
- User name and password: allows you to use user and password to access to the Soffid Web Service.
- JWT token: allows you to use JWT token to access to the Soffid Web Service.
- JWT configuration URL: URL where the jwks.json are available to download.
- JWT issuer: identifies the principal that issued the JWT.
- JWT audience: identifies the recipients that the JWT is intended for.
- Maximum requests per user and minute: maximum requests per user and minute.
- Maximum global requests per minute: maximum global requests per minute.
- Maximum request size: maximum request size.
Bear in mind that the Identity Provider needs to have enabled the OpenID profile.
Also, the Identity Provider cert must be in the Console cacerts.
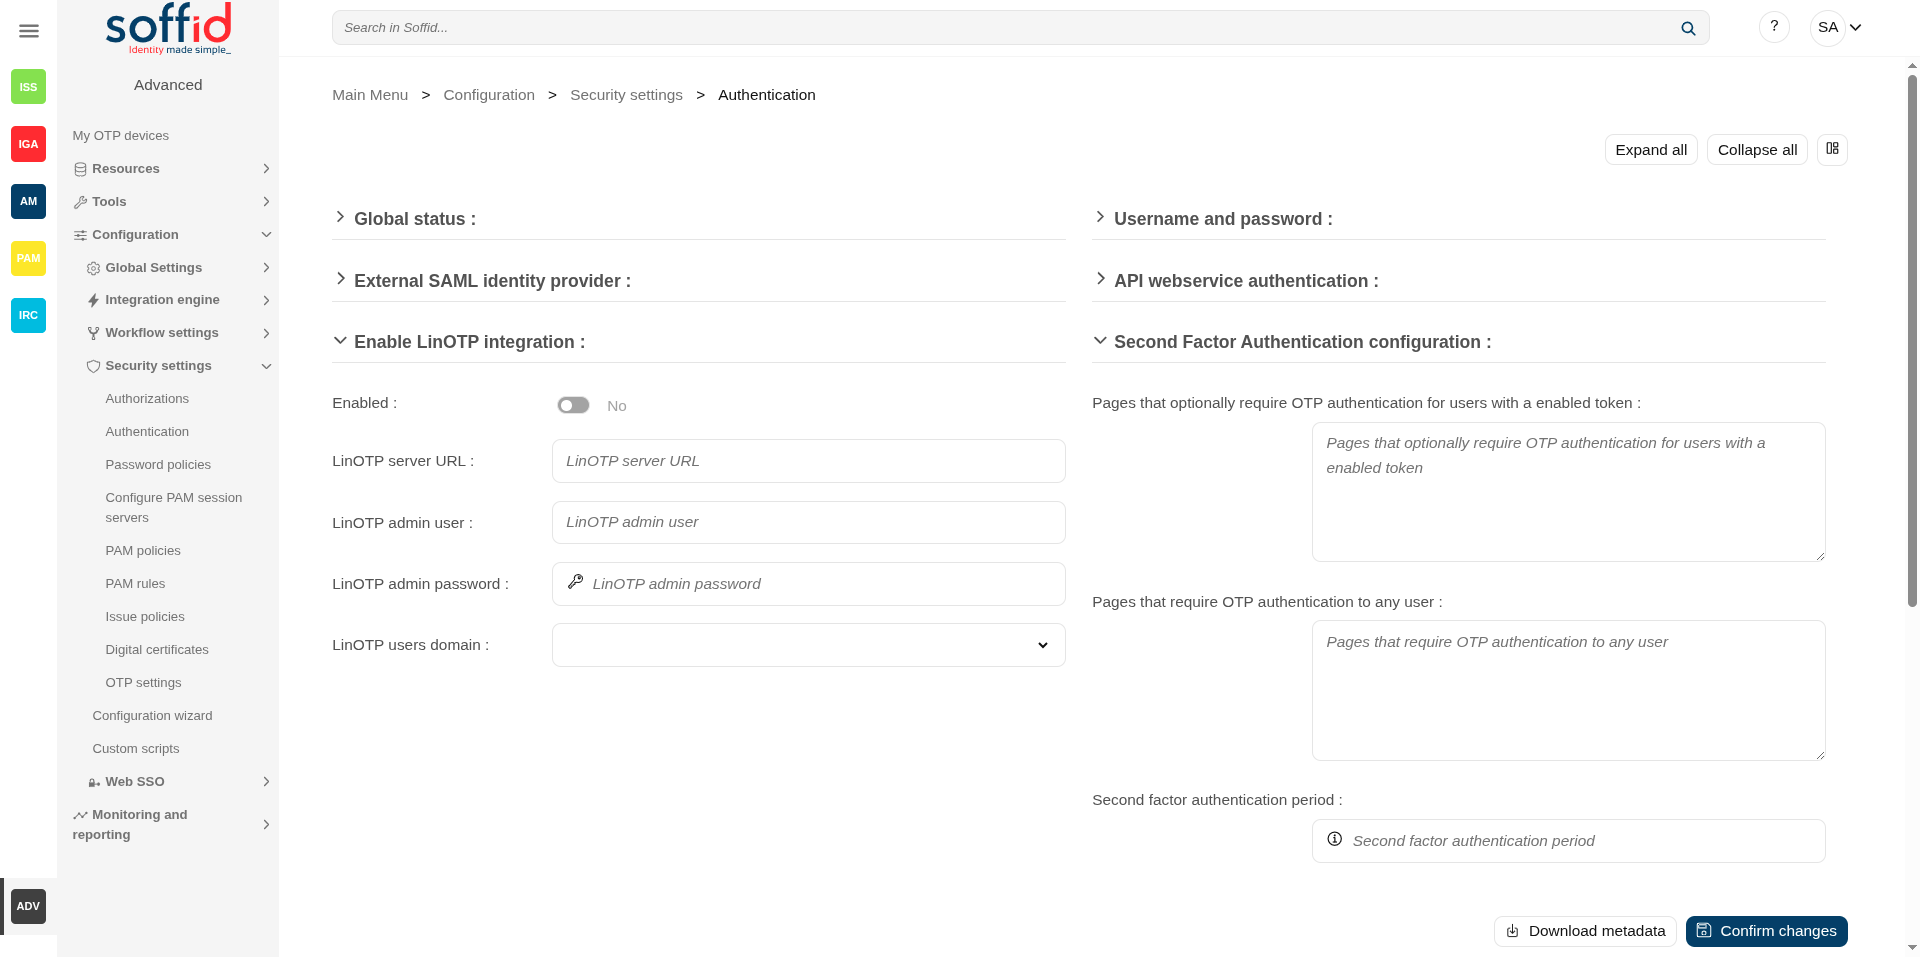
Enable LinOTP integration
Soffid allows you to use an external OTP, LinOTP in this case. If you decide to use LinOTP, Soffid could be configured to request the user to authenticate using a second factor authentication to perform certain actions. In another case, you can use the Soffid OTP.
- Enabled: check it (select value Yes) to use an external SAML Identity Provider.
- LinOTP server URL: URL of your LINOTP service.
- LinOTP admin username: username of the admin account used by Soffid.
- LinOTP admin password: password of the admin account used by Soffid.
- LinOTP users domain: the user's domain for LinOTP authentication. The selected user domain will guess the LinOTP username for any Soffid identity. It is extremely important when LinOTP users do not match Soffid usernames. Please visit the Account naming rules page for more information
If you want to configure the Soffid OTP you could visit Two factor authentication (2FA) chapter.
Second Factor Authentication configuration
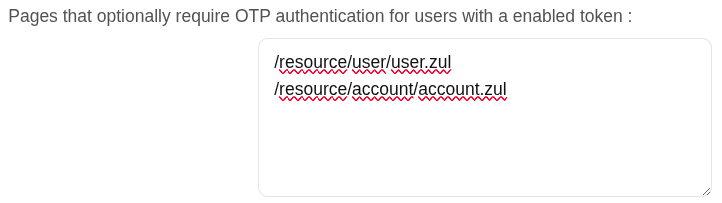
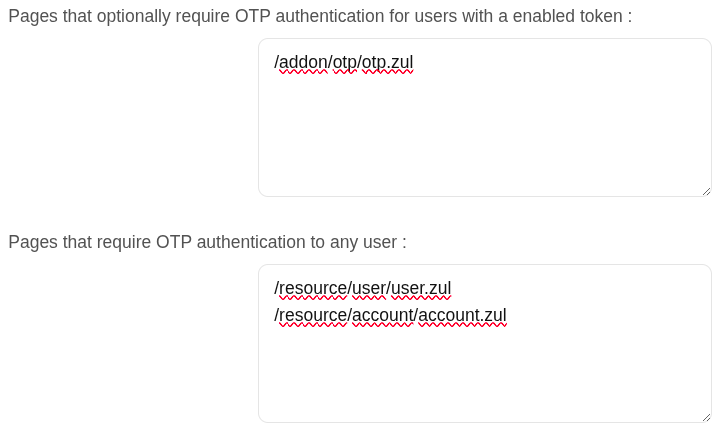
- Pages that optionally require OTP authentication for users with an enabled token: (Optional) If a URL optionally requires OTP authentication, and the user does not have any OTP token, access will be granted. Otherwise, if the user has an OTP token, the OTP value will be required, and no access will be allowed until the user provides the right token value.
- You can include the list of pages to include the two factors only for the users with the token.
💻 Example
Request only the OTP for these pages:
-
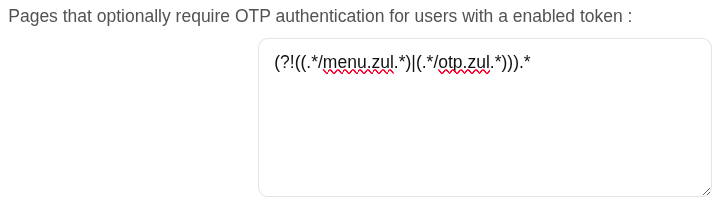
- You can add a regular expression to determine the list of pages to always include the second factor to the users with the token
💻 Example
Request OTP for all pages except those containing menu.zul or otp.zul:
- Pages that require OTP authentication to any user: (Mandatory) You should include the list of pages to always include the second factor to the users with the token. Therefore, if a URL strictly requires OTP authentication, users with no token won't be allowed to use them.
💻 Example
- Second factor authentication period: number of seconds after that, a new OTP value will be required.
In both configurations, if OTP is required by the user, a popup requesting the token value is raised to write the OTP value.
Actions
| Expand all | Displays all the attributes of the different blocks. |
| Collapse all | Hide all attributes of the different blocks. |
| "Types of views" | Change the view type: Classic view, Modern view, Compact design. |
| Download metada | Allows you to download an XML file with metadata to load it into your SAML Identity Provider federation when you use an External SAML identity provider |
| Confirm changes | Allows you to save the changes made in the Authentication setup. |
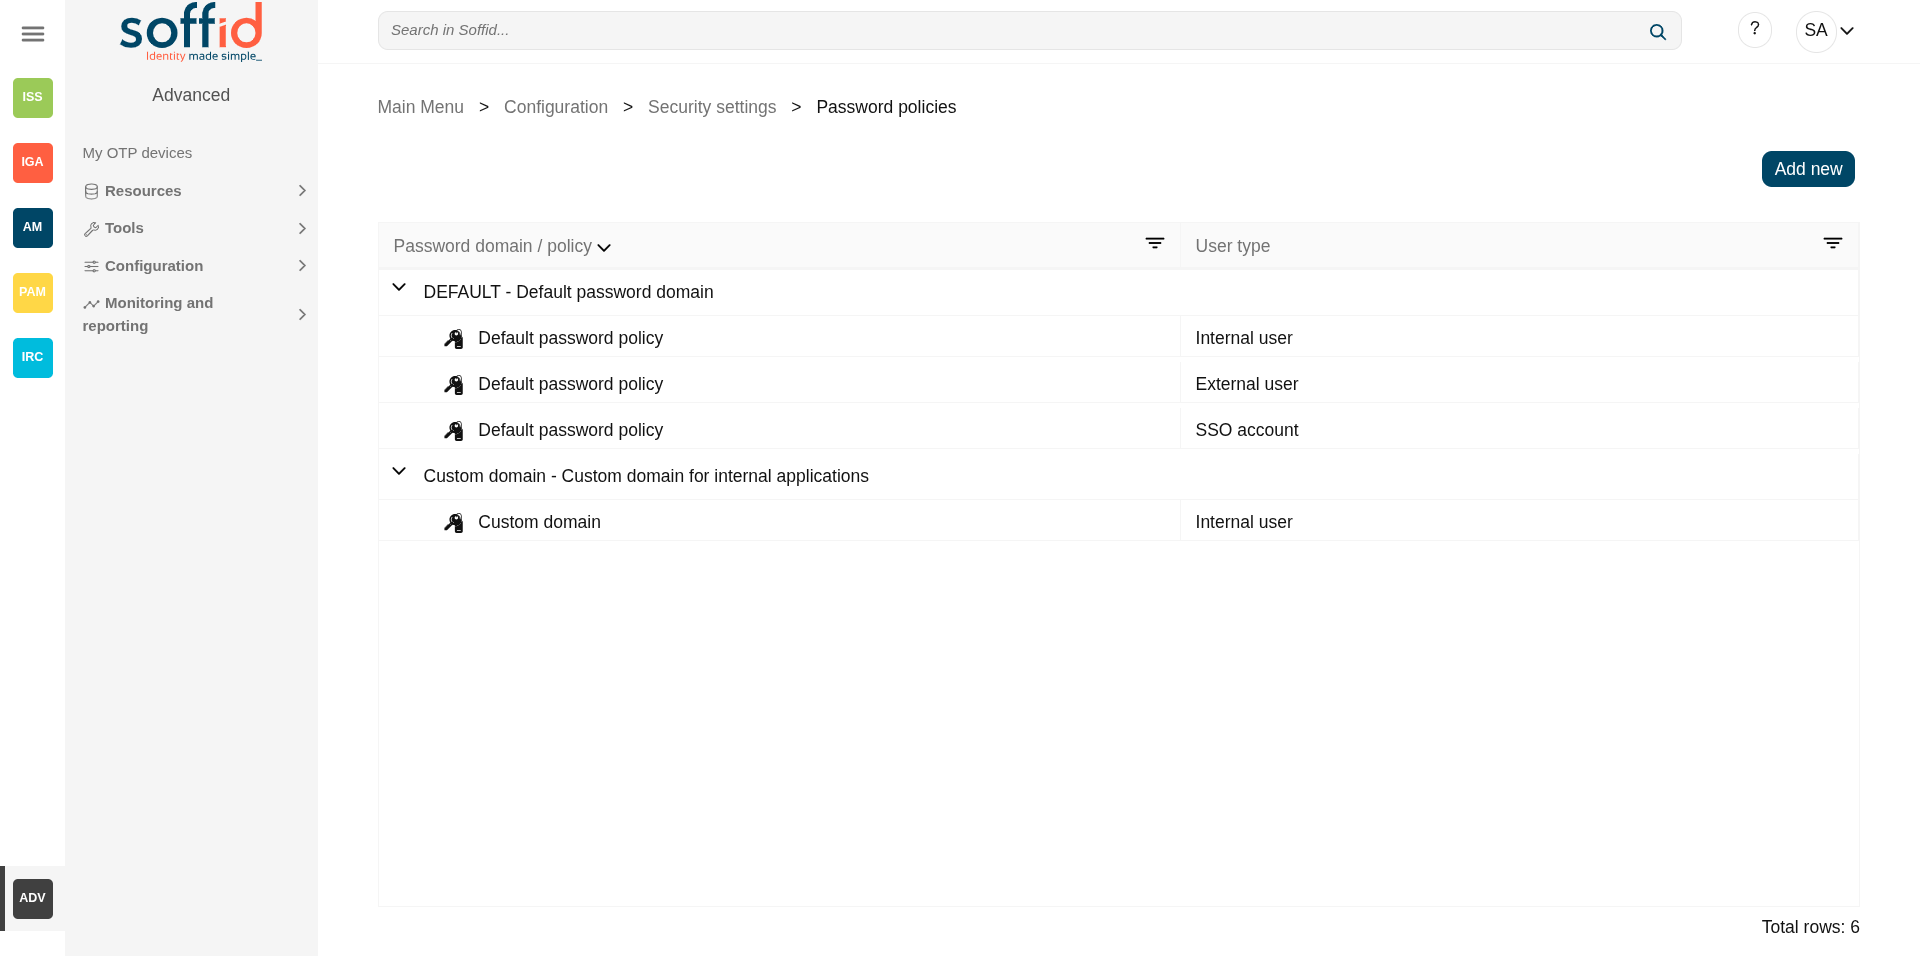
Password policies
Definition
On this page, you can configure the password policies that will be applied when assigning a new password, always depending on the password domain selected by that system and the type of user selected.
Therefore, the two main components of this page are password management and password policies.
Password domain
Is a logical way of grouping managed systems that are sharing the same password for each account.
If the administrator chooses to have the same password for every system, only one password domain should exist. If the administrator chooses to assign a different password for each system, then a password domain should be created for each managed system.
Password policies
Password policies allow you to define custom rules that passwords must comply with to enhance system security.
For each password domain, Soffid allows you to create different password policies related to user type. It is only possible to define a single password policy for one password domain and one user type.
There are two kinds of password policies.
- The first one is for user selected passwords. That is the default behavior.
- The second one is system generated passwords. These policies are useful for shared accounts when using Enterprise Single Sign-on.
A password policy will also define how often the password needs to be changed and how many days are allowed to change it.
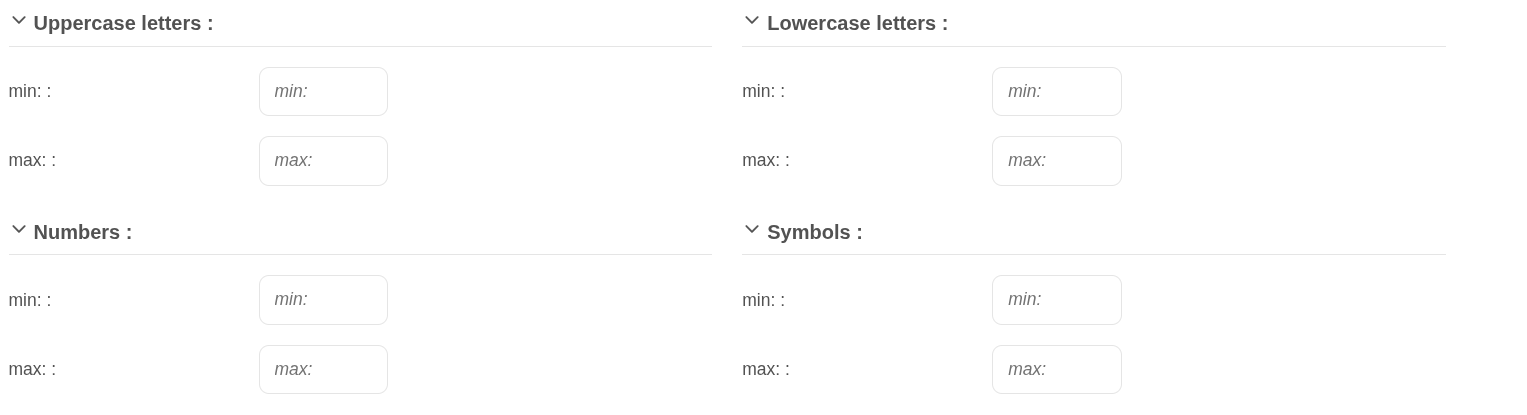
Regarding password complexity, you can specify the minimum and the maximum number of lowercase letters, uppercase letters, numbers, and symbols, as well as password length.
The administrator users can define a regular expression that must match each password. This can be used, for instance, to ensure that the first password is not numeric.
It is allowed to create a list of forbidden words that cannot be used as passwords.
Screen overview
Related objects
- User type : can be a user type for password policy and password domain
- Agents : where the password domain is selected
- Users : where a new password can be set
- Accounts : where a new password can be set
- My accounts : where a new password can be set or to query the password already set
- Network intelligence : to enable the "Check breached password" a valid token must be applied
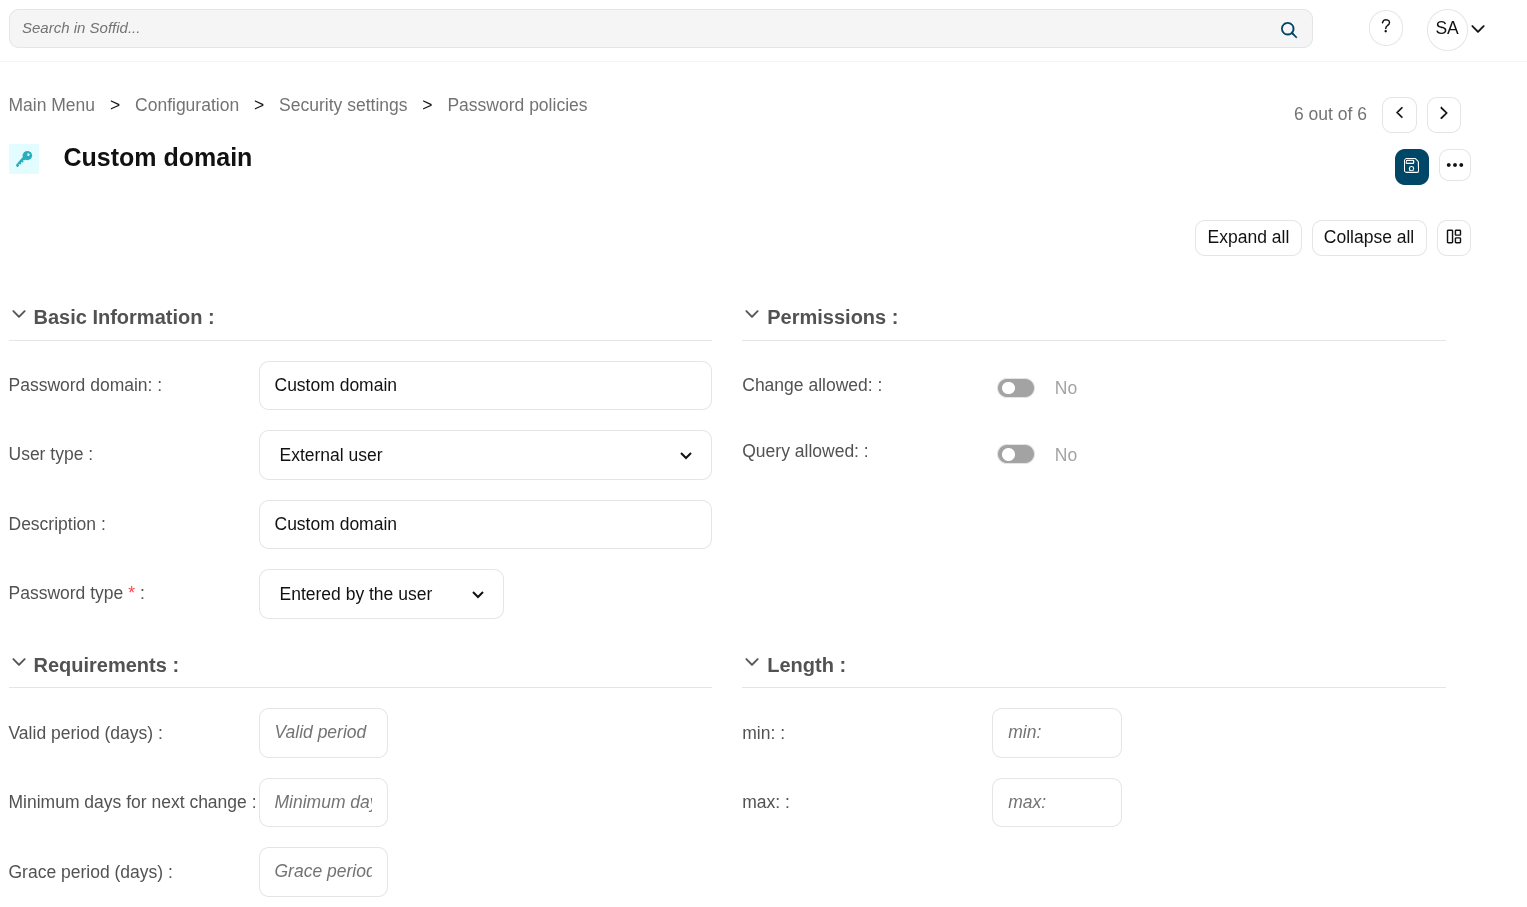
Standard attributes
Password domain attributes
- Code: password domain identifier code.
- Description: a brief description of the password domain.
Password policies attributes
- Password domain: the password policy belongs to that password domain.
- User type: specific user type for which the password policy is created.
- Description: a brief description of the password policy.
- Password type: the king of policies password:
- Entered by the user: that is the default behavior.
- Automatically generated: these policies are useful for shared accounts when using Enterprise Single Sign-on.
- Change allowed: if it is checked, the user could change automatically generated passwords.
- Query allowed: if is checked, the user can view the current password.
- Valid period (days): the change of the password will be asked in that number of days. That option is available when you select the "Entered by the user" option.
- Minimum days for next change: number of days during which you are not permitted to change your password again
- Grace period (days): additional days allowed to the valid period, for changing the password. That option is available when you select the "Entered by the user" option.
- Renewal Time: added number of days to change the password. That option is available when you select the "Automatically generated" option.
- Length (min & max): added the number of days to change the password.
- Uppercase letters (min & max): min and max number of uppercase letters that be included on the password.
- Lowercase letters (min & max): min and max number of lowercase letters that be included on the password.
- Numbers (min & max): min and max number of numbers that be included on the password.
- Symbols (min & max): min and max number of symbols that are included on the password.
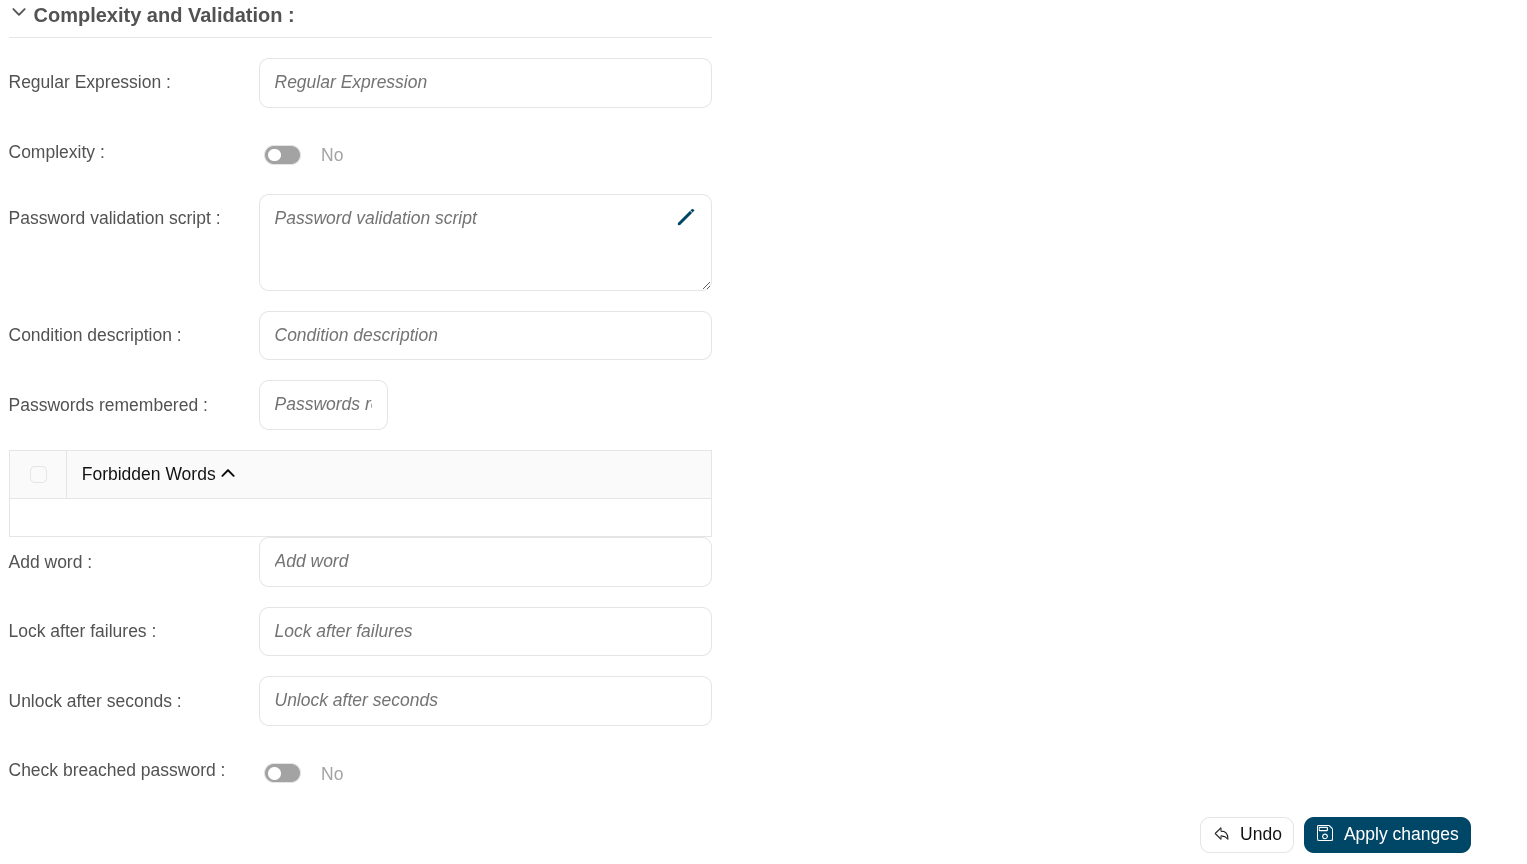
- Regular expression: the password must comply with that regular expression.
- Complexity: Similar operation to the same option in Active Directory. It is mandatory to use three different types of characters (uppercase, lowercase, numbers, and symbols), it is not allowed to use the user code, name, or surname.
- Password validation script: script to validate additional password conditions. The result must be true or false.
- Condition description: description of the validation script. This condition will be displayed in the Password policy field when the user try to change the password from My Profile.
- Passwords remembered: the number of passwords the system will remember.
- Forbidden words: list of forbidden words that may not be used to create a password if they are selected. It will be case insensitive. For instance, there will be no distinction between "Soffid", "SOFFID", or "soffid".
- Lock after failures: the number of login attempts before blocking an account.
- Unlock after seconds: the number of seconds an account is blocked.
- Check breached password: If you have a valid token in the network intelligence, Soffid will verify that the password is valid and that there have been no security breaches.
Actions
Table actions
| Add new | Allows you to create a new password domain. To add a new password domain it will be mandatory to fill in the required fields |
| Add password policy | Allows you to create a new password policy on a specific password domain. Below the father password domain, you can find the button [+] to perform that action. To add a new password policy it will be mandatory to fill in the required fields. |
Password domain detail actions
| Apply changes (dick button) | Allows you to save a new password domain or to update the password domain changes. To save the data it will be mandatory to fill in the required fields. |
| Delete |
Allows you to delete a password domain. To delete a password domain you can click on the "three points" icon and then click the delete button. Soffid will ask you for confirmation to perform that action, you could confirm or cancel the operation. |
| Undo | Allows you to quit without applying any changes. |
Password policies detail actions
| Apply changes (dick button) | Allows you to create a new password policy or to update password policy changes. To save the data it will be mandatory to fill in the required fields. |
| Delete |
Allows you to delete a password policy. To delete a password policy you can click on the "three points" icon and then click the delete button. Soffid will ask you for confirmation to perform that action, you could confirm or cancel the operation. |
| Undo | Allows you to quit without applying any changes. |
Others
Examples
Password validation script example:
codi3 = user.userName.substring(0, 3);
codi3 = codi3.toLowerCase();
if (passwordT != null)
if(codi3.equals(passwordT.substring(0,3)))
return false;
return true;Configure PAM session servers
Definition
Soffid provides the functionality that allows you to configure the Jump servers.
To configure that functionality is mandatory to install PAM following the instructions of the PAM installation page.
A Jump server is the control point that forces users to log into that system first, then, they could traverse to other servers without having to log in again. The purpose of a jump server is to be the only gateway for access to your infrastructure reducing the size of any potential attack surface.
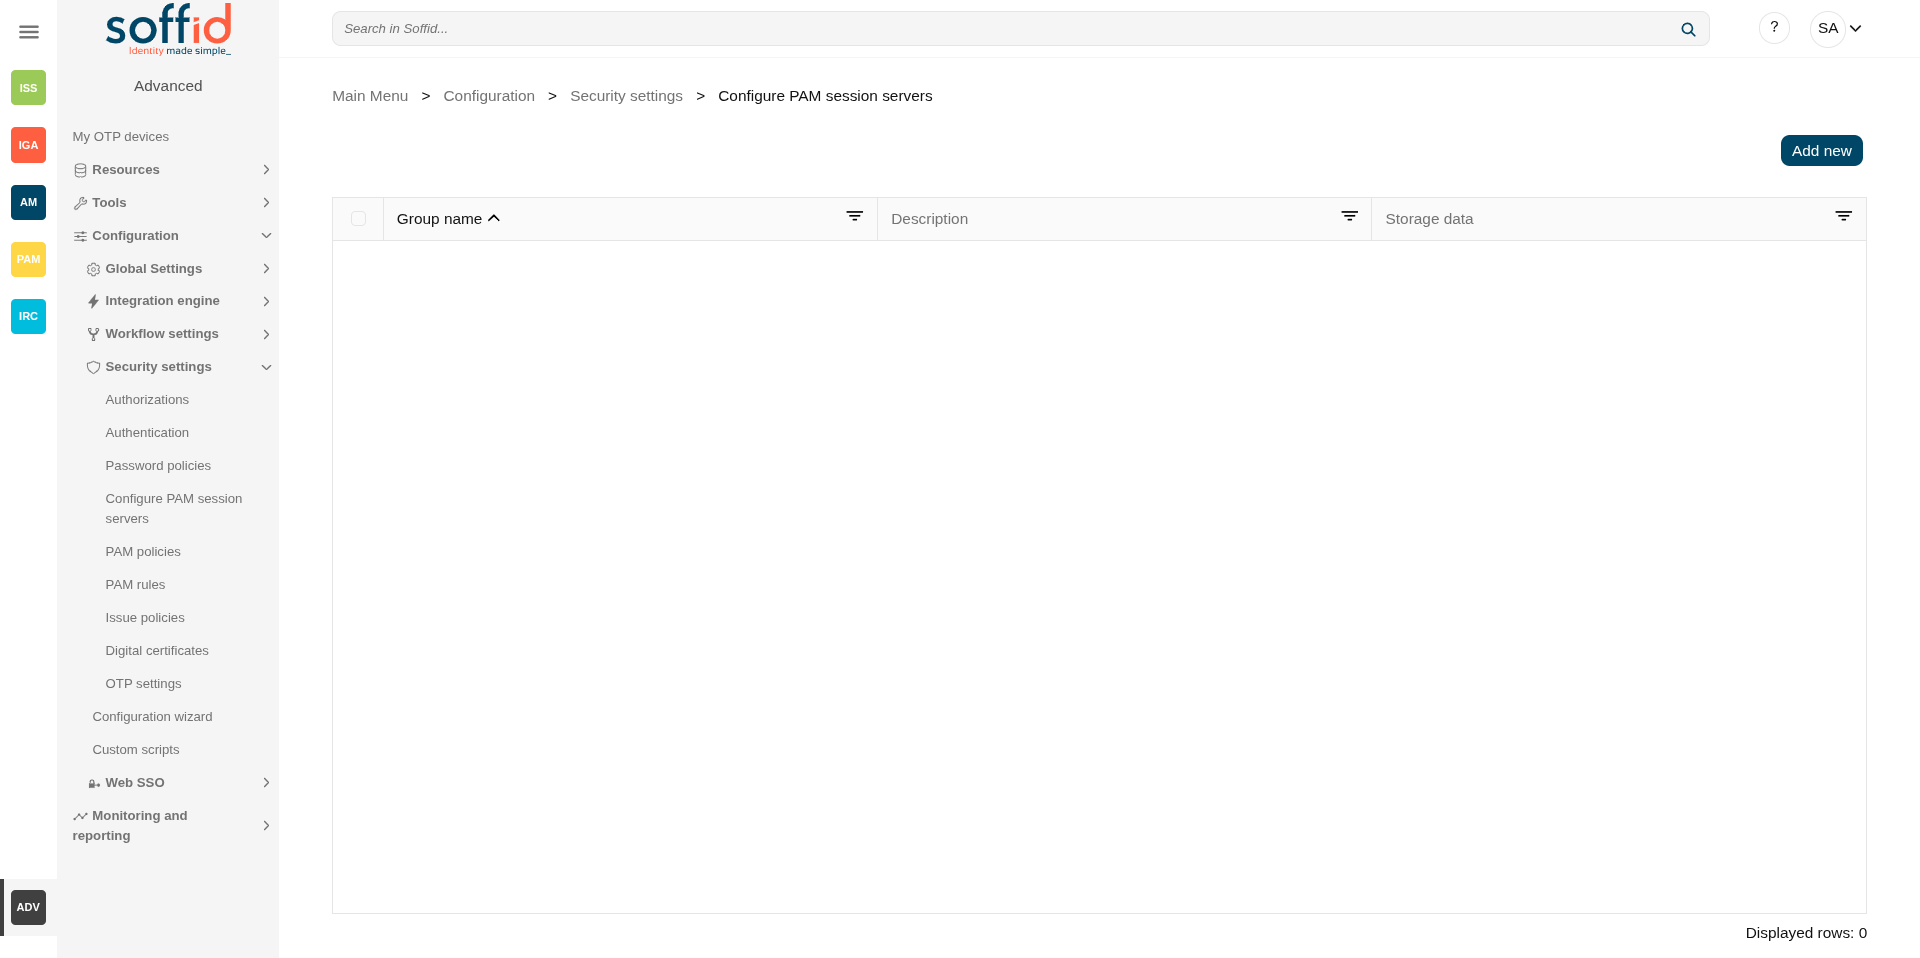
For correct configuration, you must first create a PAM server group and then publish the store service and any available jump servers within it.
Screen overview
Related objects
- Network discovery : when the servers are discovered and created in Soffid
- Agents : each server will have its own agent
- Password vault : account published in PAM
- PAM policies : the PAM policies contains and configure the PAM rules
- PAM rules : PAM rules used in the PAM policies
- Search in PAM recordings : to search and watch recorded sessions
- Access logs : to search and watch recorded sessions
- Configure PAM session servers : where the PAM servers are configured
Standard attributes
Table attributes
- Group name: name to identify the configuration.
- Description: a brief description.
- Storage data: URL of the storage service.
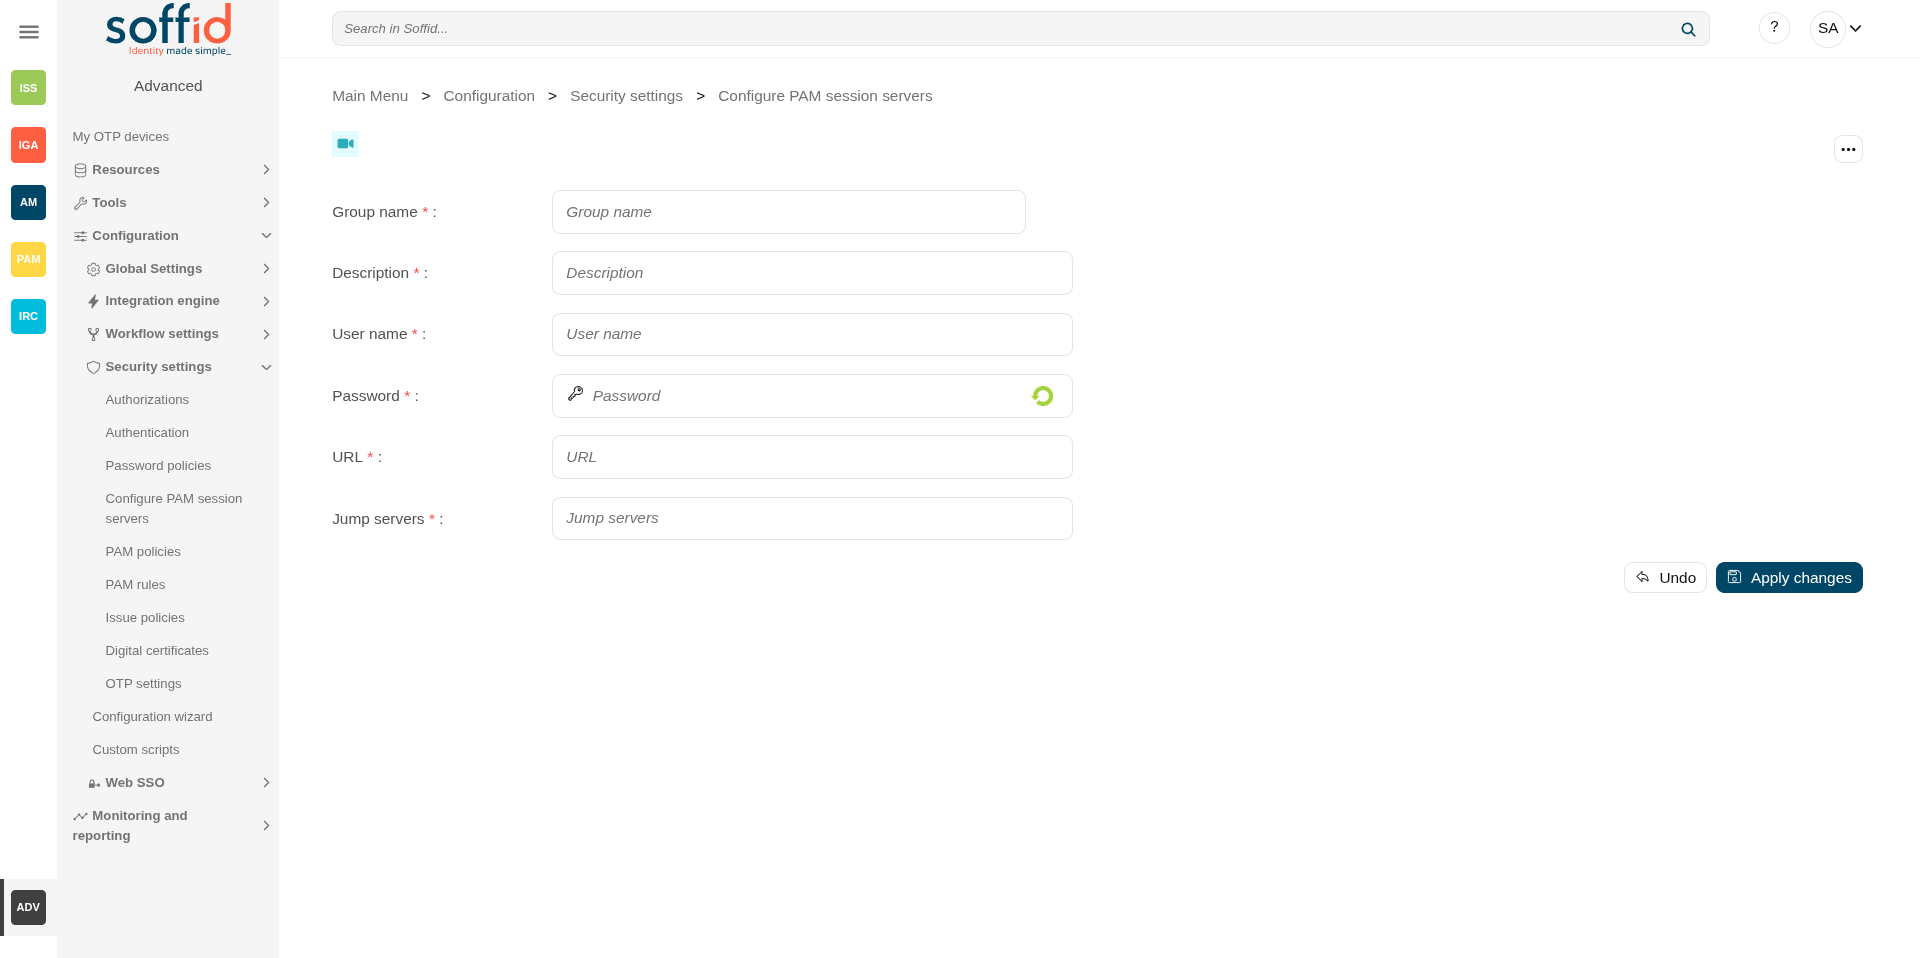
Details atributes
- Group name: name to identify the configuration.
- Description: a brief description.
- User name: user name given at installation of PAM.
- Password: password given at installation of PAM.
- URL: URL of the storage service.
- Jump servers: list of URL jump servers.
Actions
Table actions
|
Add new |
Allows you to add a new configuration PAM server group. You must fill in all the attributes to save a new configuration. |
Detail actions
|
Apply changes (disk button) |
Allows you to create a new configuration PAM or to update an existing one. You must fill in all the attributes to save a new configuration. |
|
Delete PAM server group |
Allows you to delete the PAM server group. To perform that action, Soffid will ask you for confirmation, you could confirm or cancel the operation. |
|
Undo |
Allows you to quit without applying any changes made. |
|
Apply changes |
Allows you to create a new configuration PAM or to update an existing one. To save the data it will be mandatory to fill in the required fields. |
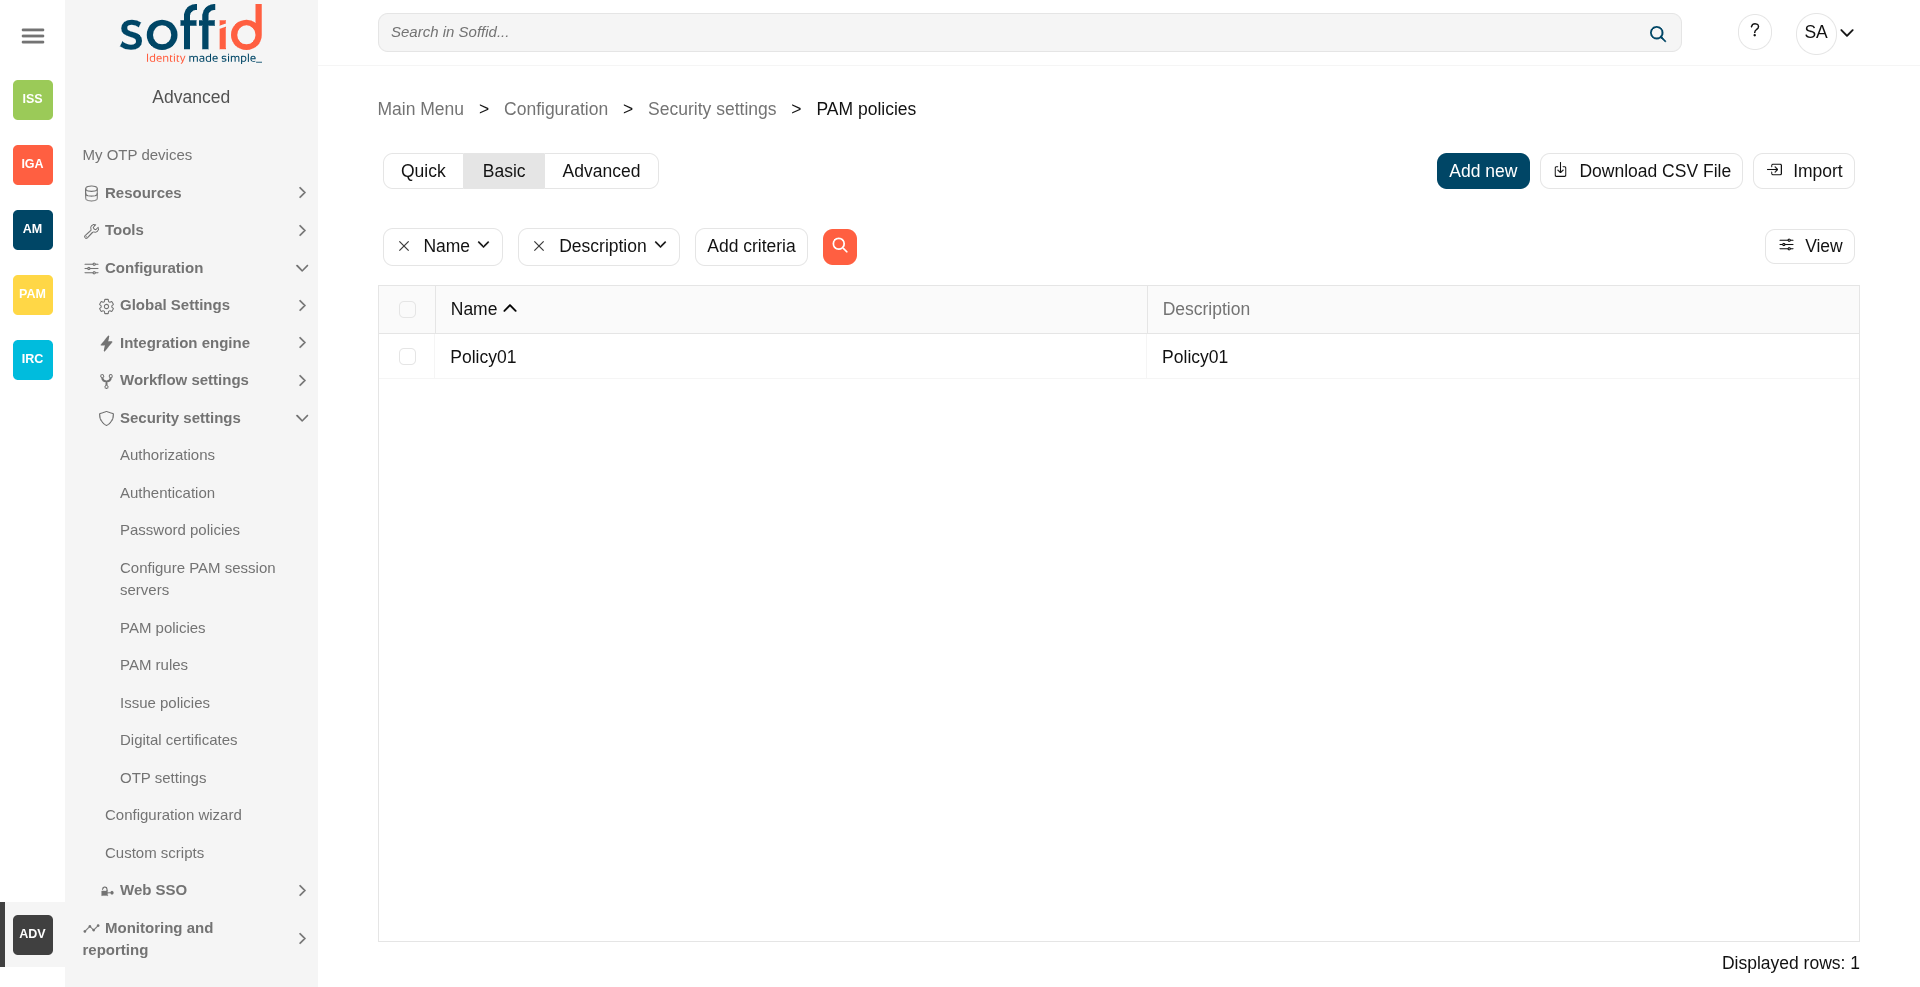
PAM policies
Definition
Privileged Access Management (PAM) policies are a set of guidelines and controls that dictate how privileged access is granted, managed, and audited within an organization.
Soffid allows you to define policies, those policies can be made up of several rules. For each rule, you could select the action to perform when Soffid detects that rule is accomplished.
To use those policies you need to define how policies will be used by each folder in the password vault. For more information, you can visit the Password Vault page.
Screen overview
Related objects
- PAM policies : the PAM policies contains and configure the PAM rules
- PAM rules : PAM rules used in the PAM policies
- Password vault : to configure PAM policies in vault folders.
- Issue policies : to configure the pam-violation issue policy
Standard attributes
Table attributes
- Name: name to identify the policy.
- Description: a brief description of the policy.
- Priority: priority between the different PAM policies configured. This field must have a value for the policy to be applied.
- Modified by: user who modified that rule.
- Modified on: the date and time of the update.
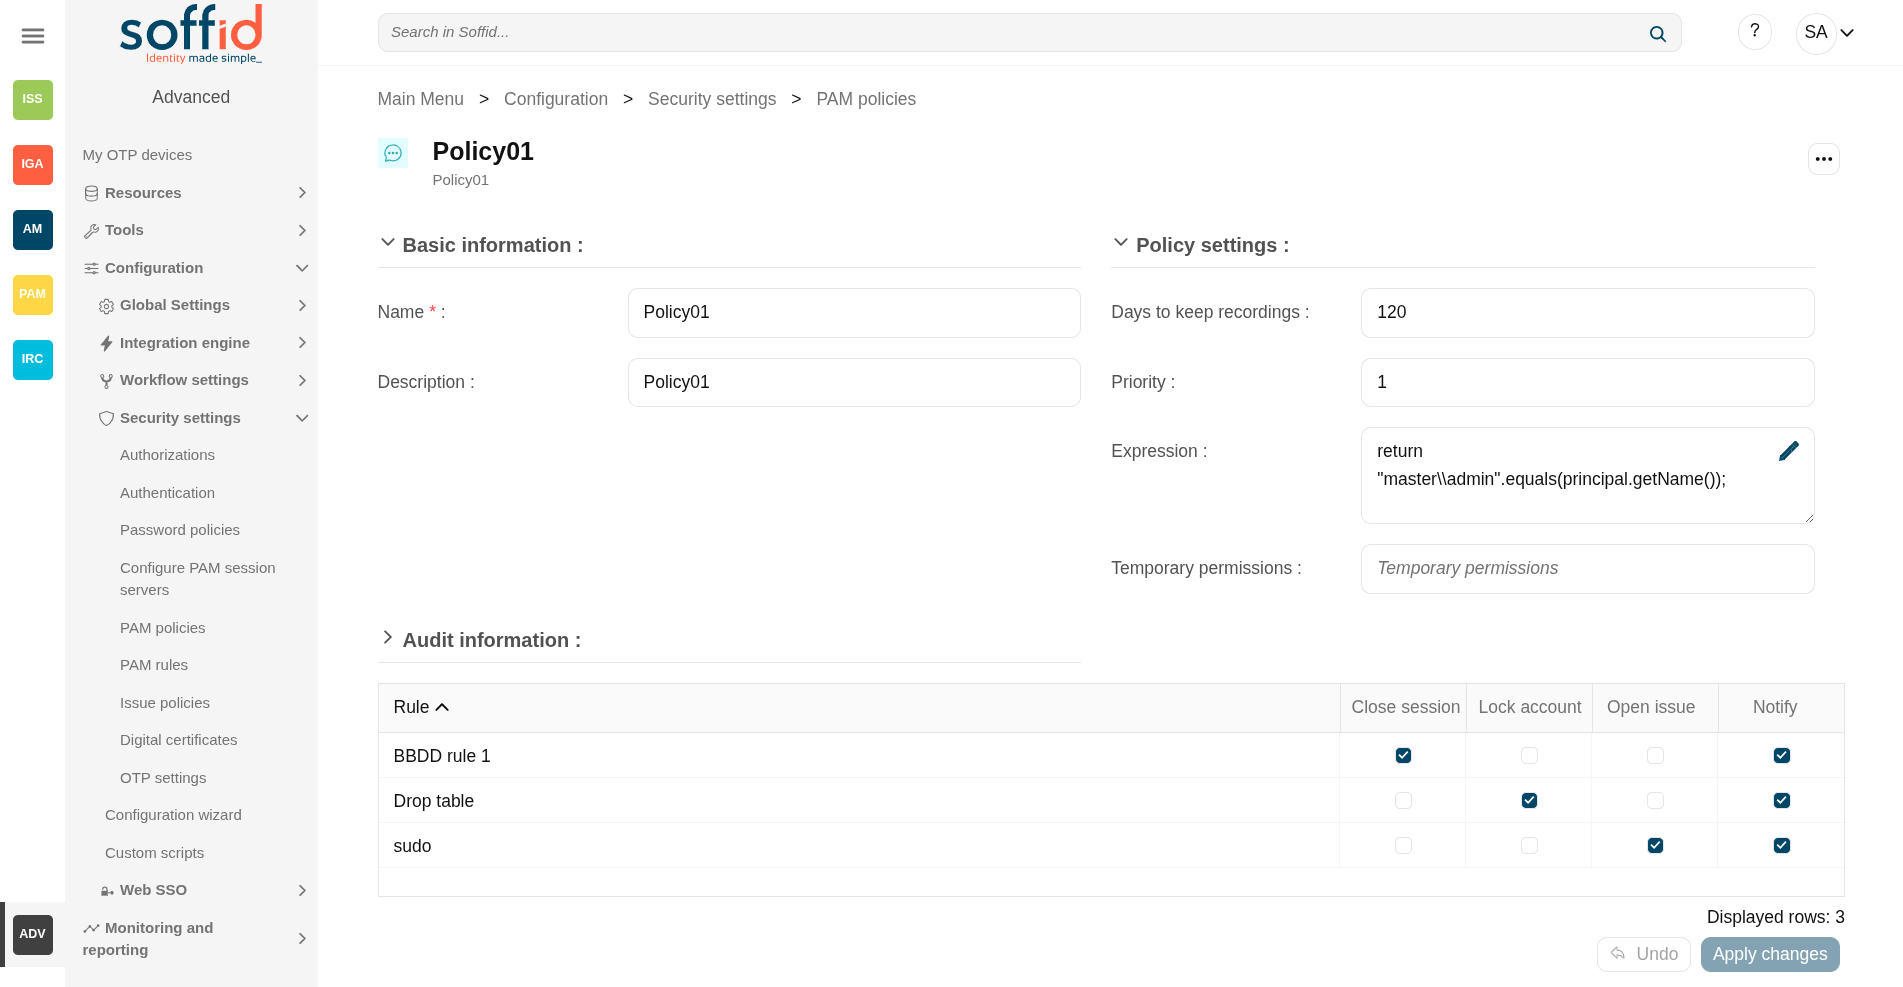
Policy attributes
- Name: name to identify the policy.
- Description: a brief description of the policy.
- Days to keep recordings: number of days that recordings will be kept.
- Priority: allows you to set the priority between the different PAM policies configured. When there are several policies, the policy to be applied is evaluated according to priority and expression. This field must have a value for the policy to be applied.
- Expression: this expression is evaluated to determine the priority of the policy to be applied. When there are several policies, the policy to be applied is evaluated according to priority and expression.
- Temporary permissions: these permissions will be assigned to the user's account on the target system. The permissions will be maintained for the duration of the session. Once the session is over, the permissions will be revoked. The account must be a managed account.
- Modified by: user who modified that rule.
- Modified on: the date and time of the update.
When you save the standard attributes of a PAM policy and edit the policy again, the rule list will be shown. Here you can customize the policy depending on the existing rules.
Rules attributes
Show a list of the PAM rules defined. You can check/uncheck the available options. You can choose zero, one, or several:
- Rule: name of the rule
- Close session: when the rule is met, Soffid will close the session.
- Lock account: when the rule is met, Soffid will lock the account.
- Open issue: when the rule is met, Soffid will open a new issue (*).
- Notify: when the rule is met, Soffid will send a notification about the action.
💻 Image

Actions
Table actions
|
"Query search" |
Allows you to query PAM policies through different search systems, Quick, Basic and Advanced. |
|
Add new |
Allows you to create a new PAM policy. To add a new PAM policy it will be mandatory to fill in the required fields. |
|
Delete PAM policy |
Allows you to remove one or more PAM policies by selecting one or more records and next clicking this button. To perform that action, Soffid will ask you for confirmation, you could confirm or cancel the operation. |
|
Download CSV file |
Allows you to download a CSV file with the PAM policies information. |
|
Import |
Allows you to upload a CSV file with the PAM policies list to add or update PAM policies to Soffid. First, you need to pick up a CSV file, that CSV has to contain a specific configuration. Then you need to check the content to be loaded, it is allowed to choose if you want or not to load a specific attribute. Finally, you need to select the mappings for each column of the CSV file to import the data correctly and click the Import button. |
|
View |
Allows you to show and hide columns in the table. You can also set the order in which the columns will be displayed. |
Policy actions
|
Apply changes (dick button) |
Allows you to create a new configuration PAM policy or to update an existing one. To save the data it will be mandatory to fill in the required fields. |
|
Delete |
Allows you to delete a PAM policy. To delete a PAM policy you can click on the "three points" icon and then click the delete button. To perform that action, Soffid will ask you for confirmation, you could confirm or cancel the operation. |
|
Undo |
Allows you to quit without applying any changes made. |
|
Apply changes |
Allows you to create a new configuration PAM policy or to update an existing one. To save the data it will be mandatory to fill in the required fields. Once the change has been applied, you will return to the main screen. |
Others
Sample expression
| Apply policy based on account name and connection URL | if (account.name === "test" && url === "protocol://url") { return true; } return false; |
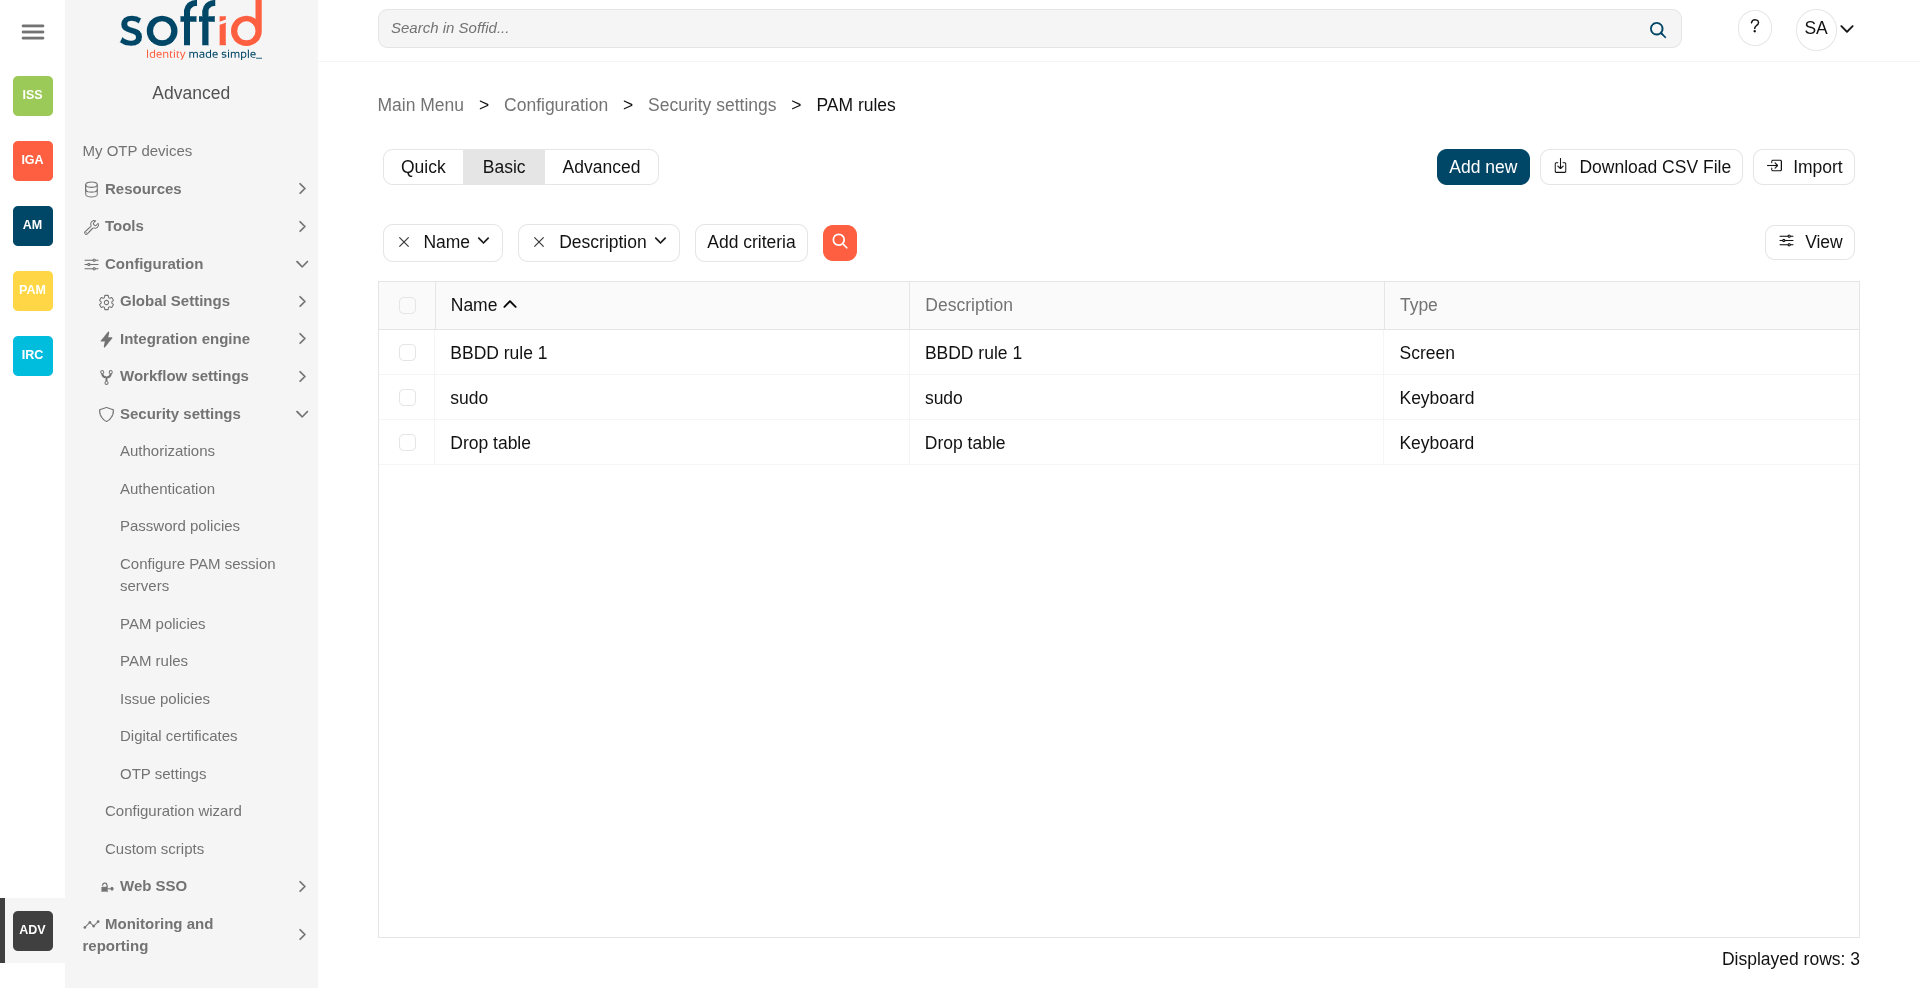
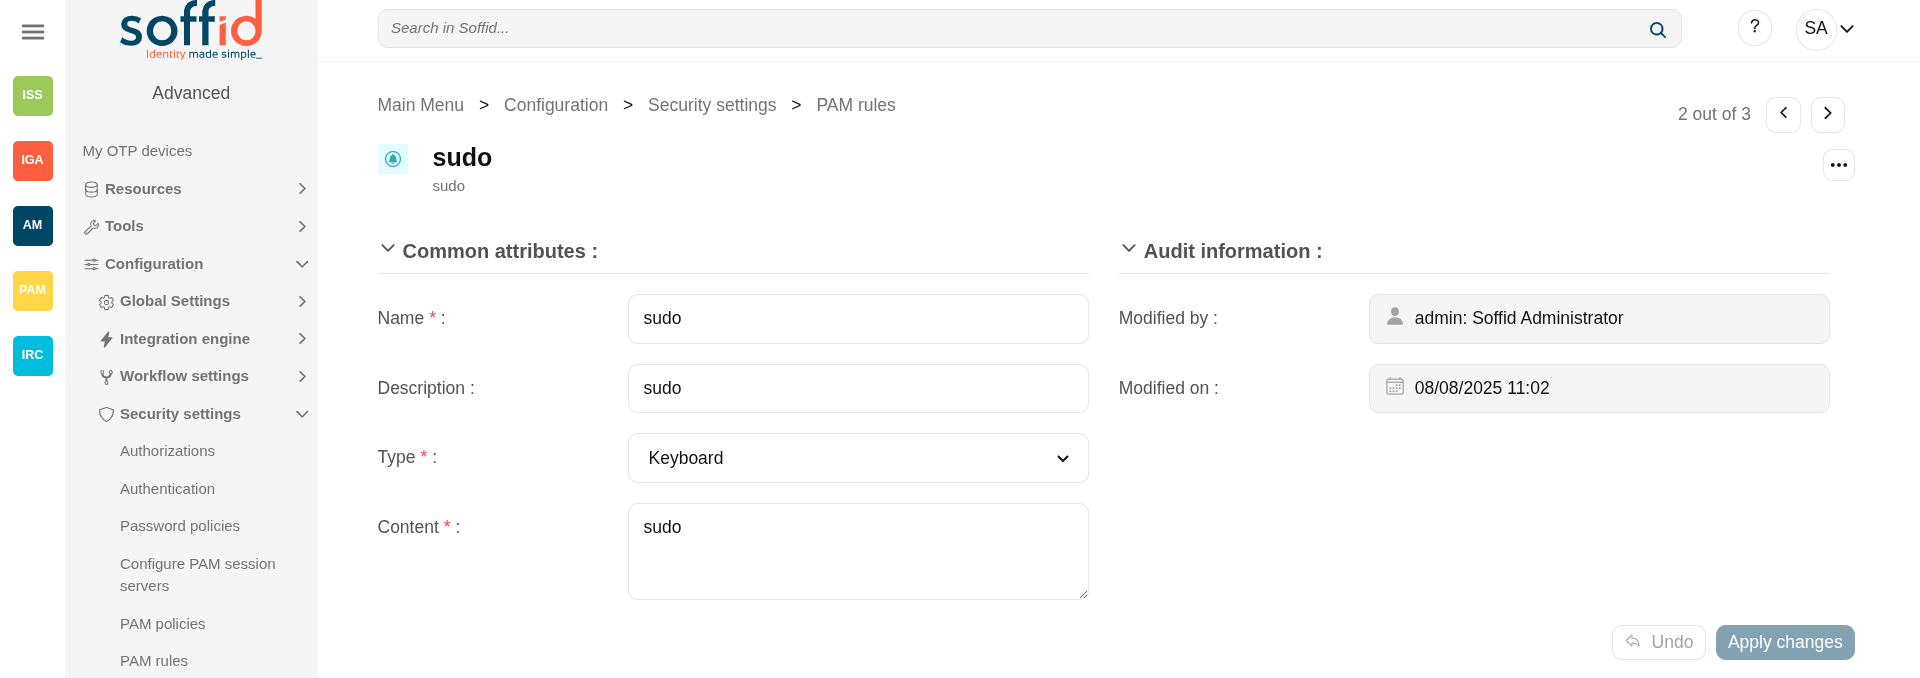
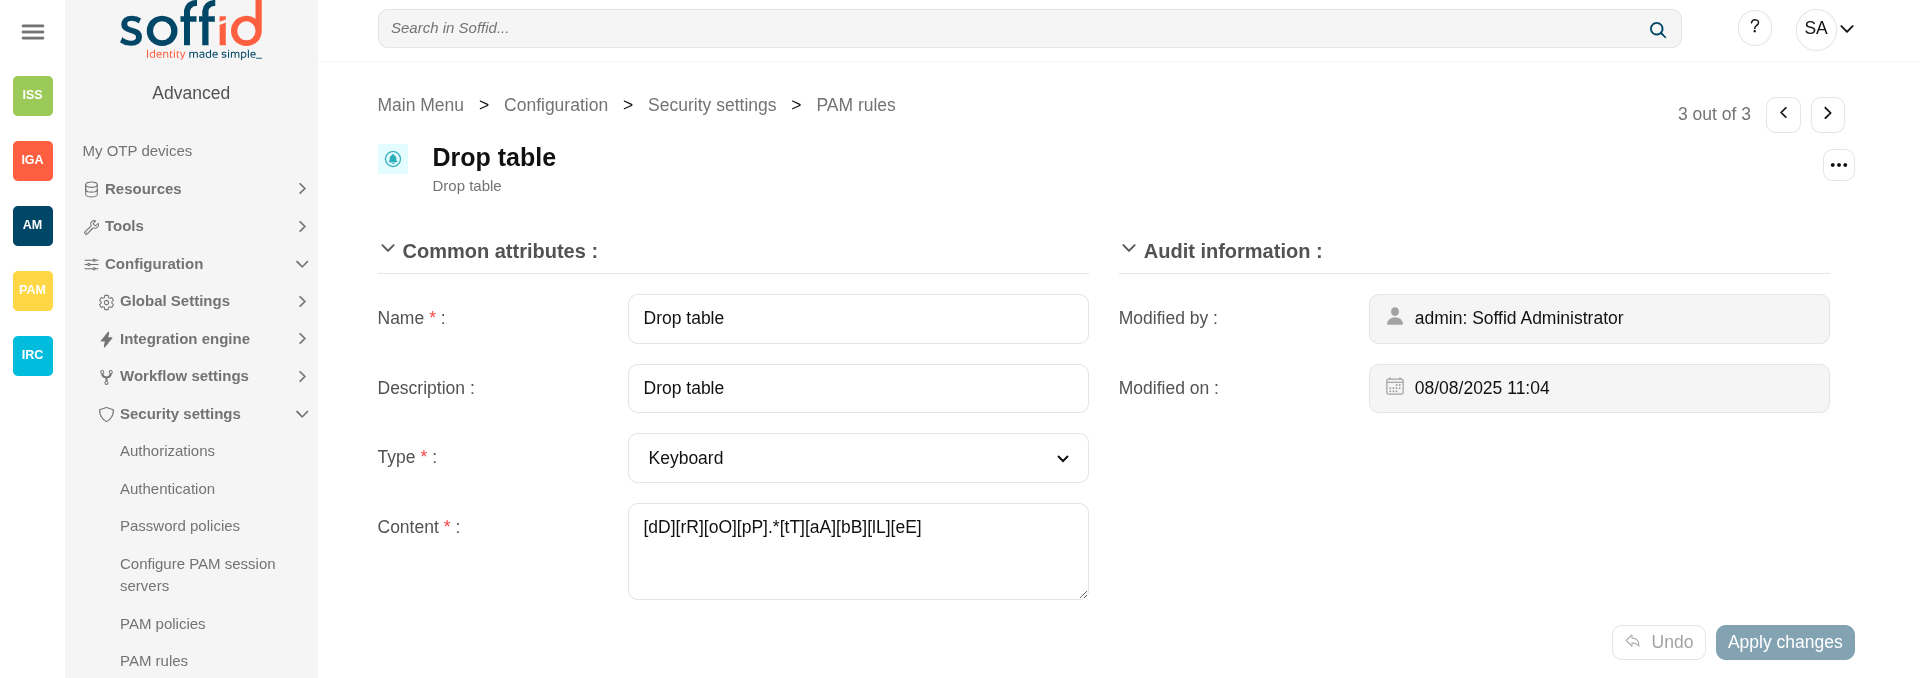
PAM rules
Definition
Soffid allows you to define rules to detect commands executed on a server. When a user launches a command defined on a rule, Soffid will detect it.
To use those rules you need to define the PAM policies. For more information, you can visit the PAM policies page.
Screen overview
Screen example
Keyboard example
Keyboard example
Related objects
- PAM policies : the PAM policies contains and configure the PAM rules
- PAM rules : PAM rules used in the PAM policies
- Password vault : to configure PAM policies in vault folders.
- Issue policies : to configure the pam-violation issue policy
Standard attributes
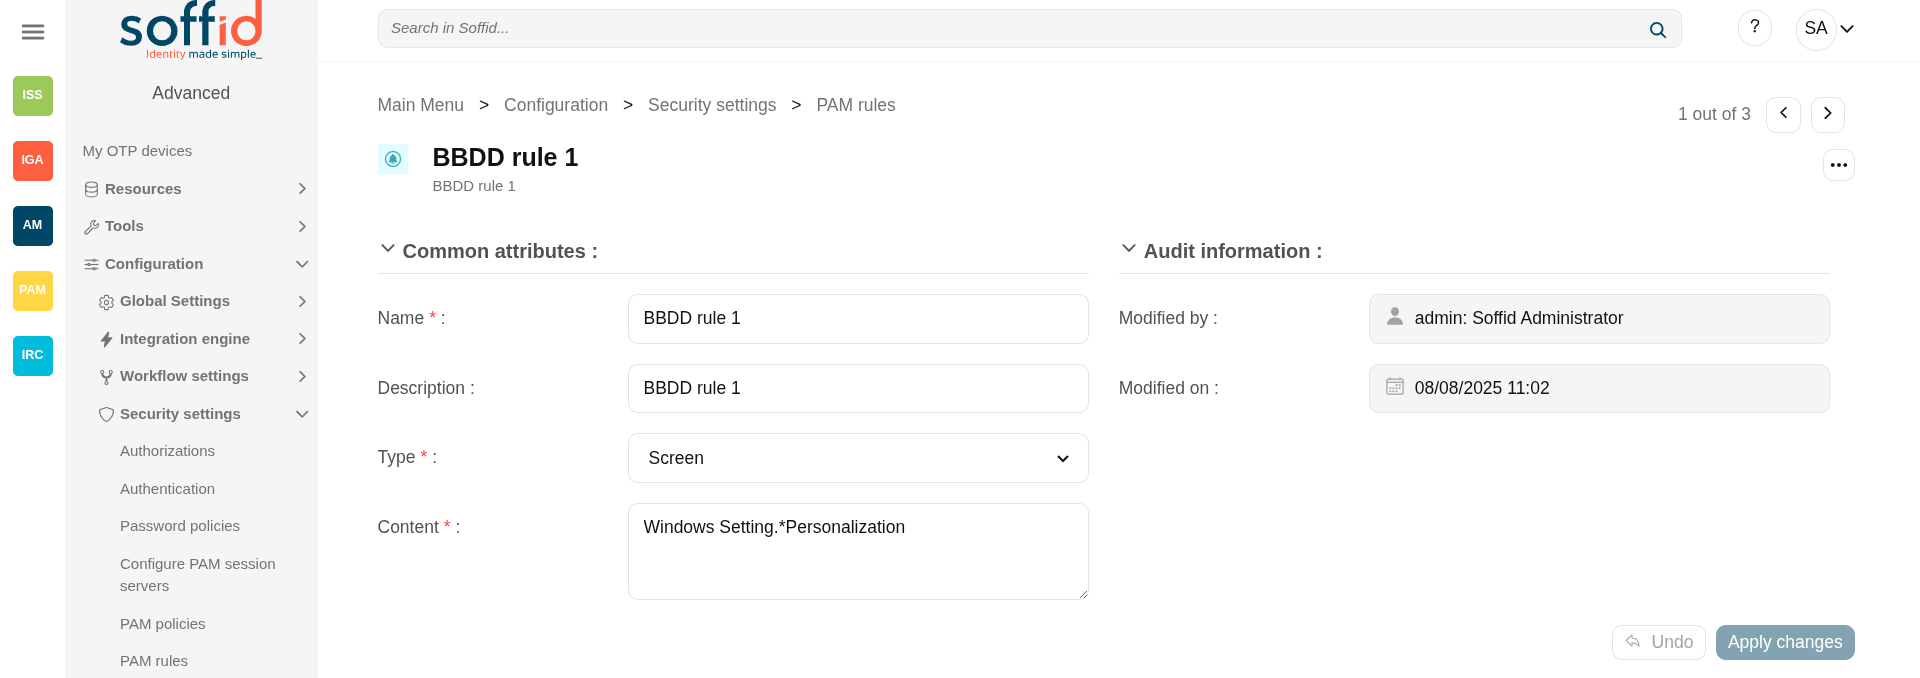
Table attributes & rule attributes
- Name: name to identify the rule.
- Description: a brief description of the rule.
- Type: rule type.
- Keyboard: Indicate the command typed in the terminal that you want to control.
- Screen: Indicate the text displayed in the screen that you want to control.
- Content: the content of the rule that Soffid will detect. Be in mind, that Soffid will consider blanks, returns, and all characters you type.
- For keyboard type, text that the user cannot enter.
- For screen type, text that must be found anywhere on the screen.
- For keyboard type, text that the user cannot enter.
- Modified by: user who modified that rule.
- Modified on: the date and time of the update.
Actions
Table actions
|
"Query search" |
Allows you to query PAM rules through different search systems, Quick, Basic and Advanced. |
|
Add new |
Allows you to create a new PAM rule. You can choose that option on the hamburger menu or click the add button (+). To add a new PAM rule it will be mandatory to fill in the required fields. |
|
Delete PAM rule |
Allows you to remove one or more PAM rules by selecting one or more records and next clicking this button. To perform that action, Soffid will ask you for confirmation, you could confirm or cancel the operation. |
|
Download CSV file |
Allows you to download a CSV file with the PAM rules information. |
|
Import |
Allows you to upload a CSV file with the PAM rules list to add or update PAM rules to Soffid. First, you need to pick up a CSV file, that CSV has to contain a specific configuration. Then you need to check the content to be loaded, it is allowed to choose if you want or not to load a specific attribute. And finally, you need to select the mappings for each column of the CSV file to import the data correctly and click the Import button. |
|
View |
Allows you to show and hide columns in the table. You can also set the order in which the columns will be displayed. |
Rule actions
|
Apply changes (disk button) |
Allows you to create a new configuration PAM rule or to update an existing one. To save the data it will be mandatory to fill in the required fields. |
|
Delete |
Allows you to delete a PAM rule. To delete a PAM rule you can click on the "three points" icon and then click the delete button. To perform that action, Soffid will ask you for confirmation, you could confirm or cancel the operation. |
|
Undo |
Allows you to quit without applying any changes made. |
|
Apply changes |
Allows you to create a new configuration PAM rule or to update an existing one. To save the data it will be mandatory to fill in the required fields. Once the change has been applied, you will return to the main screen. |
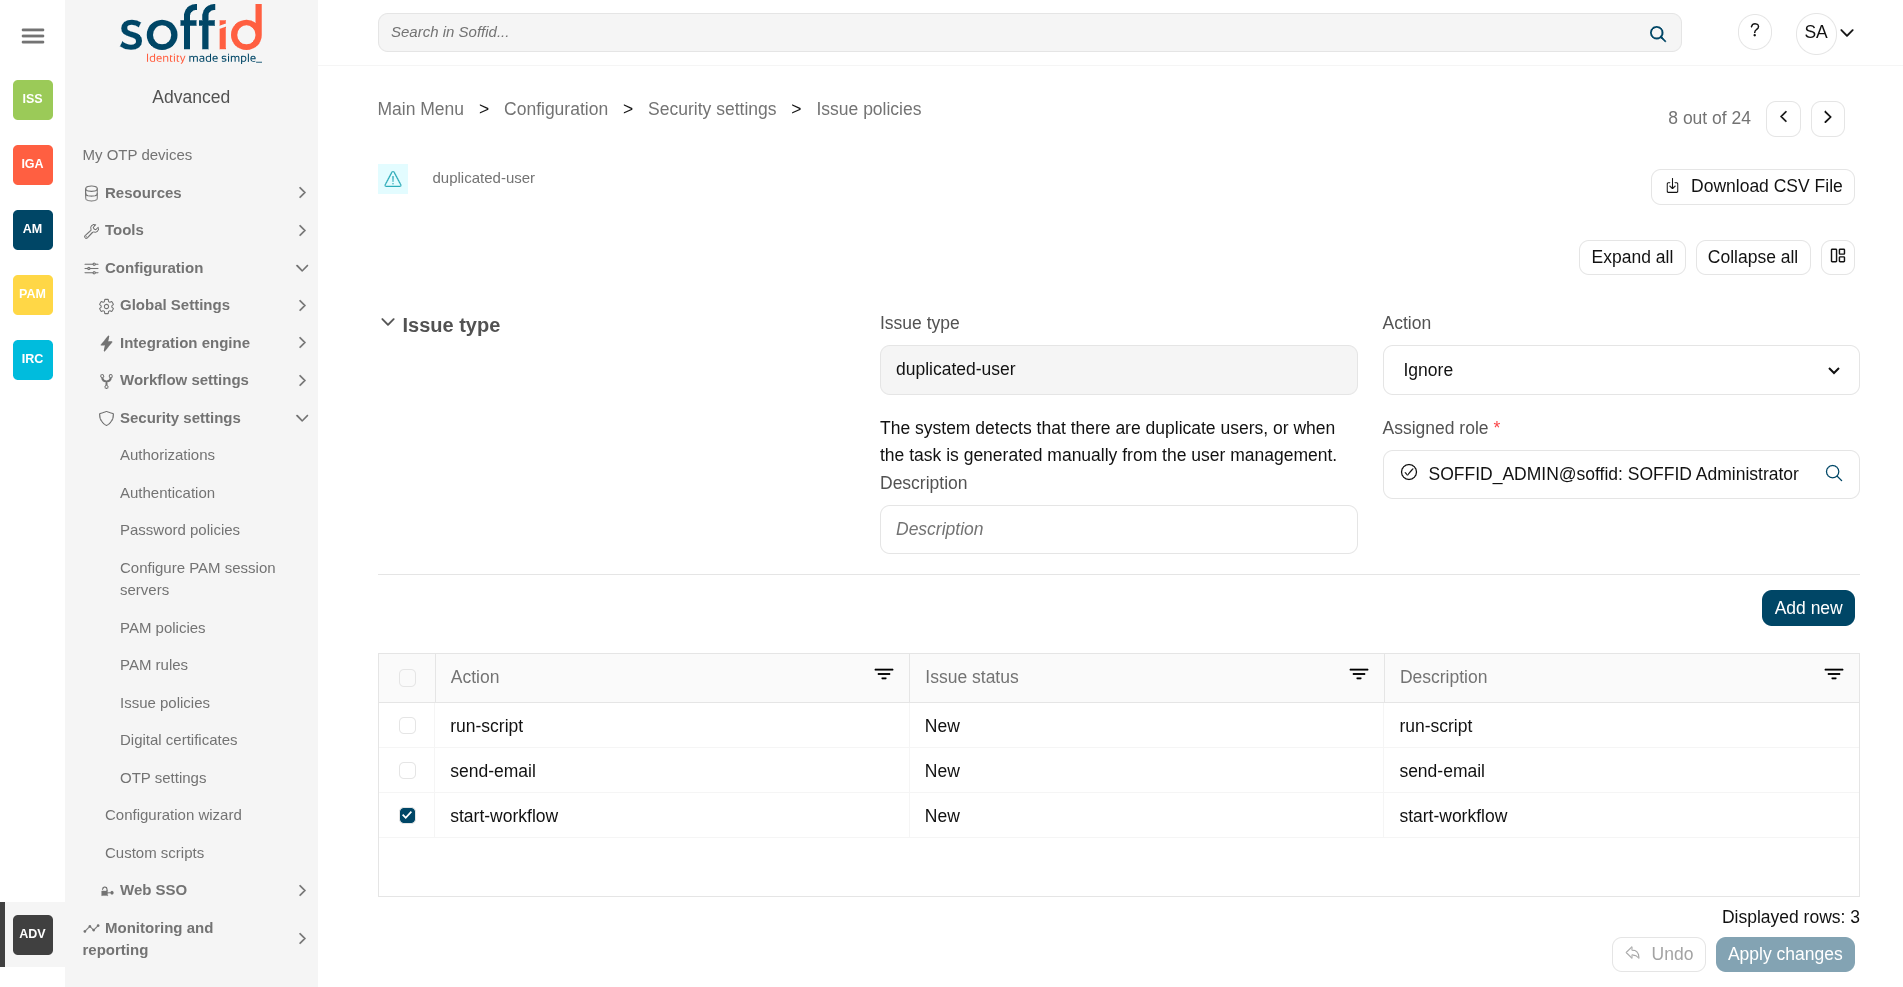
Issue policies
Definition
Soffid has defined automatic events by default. For each of these events, it is possible to define the tasks to be performed and configure them.
Once the necessary issues have been configured, there are other screens for viewing and managing them.
Issue types
Below is a list of the issue types available in Soffid.
| Issue Type | Description |
| account-created |
This issue is created when the Sync Server detects when a new account is created. This may occur after the Reconciliation process has been executed. |
| breached-account-password |
This issue is created when a password change for an account has been rejected because the password has been detected as breached. Be aware you must have enabled the "Network intelligence" feature with a valid token. |
| breached-email |
This issue is created when the "Network intelligence verify domains" process is launched and it is detected that a user's email has been breached. An issue is created for each system in which that email is found. Be aware that to enable the process, you must have enabled the "Network intelligence" feature with a valid token. |
| breached-password |
This issue is created when a password change for a user has been rejected because the password has been detected as breached. Be aware you must have enabled the "Network intelligence" feature with a valid token. |
| disconnected-system | This issue is created when the Sync Server detects that some target system is offline. |
| discovered-host |
This issue is created when the Sync Server detects a new host in the network. This only occurs after the Network Discovery process has been executed. |
| discovered-system |
This issue is created when the Sync Server detects a new system in a host. This only occurs after the Network Discovery process has been executed. |
| duplicated-user |
This issue is created the system detects that there are duplicate users, or when the task is generated manually from the user management. |
| enabled-account-on-disabled-user | This issue is created when an enabled account is detected on a disabled user. This may occur after the reconciliation process has been executed. |
| expired-breached-password |
During login, when everything has gone well, the system also checks whether a password has been compromised. This is checked asynchronously, allowing the user to log in to Soffid without affecting performance. If the password has been compromised, the password and account are marked as expired and an issue is created. The next time the user logs in, they will be asked to create a new password. |
| failed-job |
This issue is created when the system detects job failures. This may occur by running any scheduled task. |
| global-failed-login | This issue is created when the number of session start failures exceeds the threshold of 0.8. |
| integration-errors | This issue is created when the Sync Server detects an integration error between Soffid and an end system. You can check the task in the Monitoring & Reporting. |
| locked-account |
This issue is created when an account has been blocked for exceeding the maximum number of login attempts. You can configure the property Lock after failures in the Password policies settings. Even if it is temporarily locked, the incident will be generated. |
| login-different-country |
This issue is created when Soffid detects a new login from a different country. It only works with the Identity Provider and it is necessary to have the geolocation database updated. |
| login-from-new-device |
This issue is created when Soffid detects a new login from a new device. It only works with the Identity Provider. |
| login-not-recognized | This issue is created when Soffid detects a login not recognized (disabled user or user does not exist) in the Soffid Console or in Soffid as an Identity Provider. |
| otp-failures | This issue is created when an OTP is blocked for exceeding the number of attempts. Currently blocked with 10 unsuccessful attempts. |
| pam-violation | This issue is created when any of the rules of the PAM are violated. You can define the PAM rules and the PAM policies. Be in mind, that you must check the "Open issue" option in the PAM policies you wish to control. |
| password-changed |
This issue is created when a Password change is detected. These changes come from the end system (Active Directory or Soffid OpenLDAP) and Soffid has been notified. The issue is not created if it is the operator or a script that changes the password in Soffid. |
| permissions-granted |
This issue is created when it is detected that permissions have been given to a user on the end system. This may occur after the reconciliation process has been executed. |
| risk-increase | This issue is created when it is detected the risk level of a user is increased. You can configure the risks in the Segregation of Duties option. |
| robot-login | This issue is created when it is detected is detected that someone who has not passed the CAPTCHA is trying to log in to the Identity Provider. |
| security-exception | This issue is created when unauthorized access to the console via WebService or admin console occurs. |
Screen overview

Related Objects
- Issue policies : where the issues are configured
- Issues : list all issues
- My issues : issues started by a user or the user has pending an acction
- Pages related to the different issues:
Standard attributes
- Issue type: by default, some issues type are defined in Soffid Console.
- Description: a brief description of the issue.
- Action:
- Ignore: the action will be ignored, and no additional actions will be run.
- Record: the action will be recorded and an issue with the status Acknowledged will be created. The actions configured for the Acknowledged status will be run.
- Manage: a new issue will be created in the New status and the action configured for this status will be run.
- Assigned role: the role who will be the owner of the created issues.
- Actions list: list of actions to be taken when this issue occurs. You can choose one or more actions from the list and configure them:
- Issue status: it is used to determine the point when the action will be launched.
- New.
- Acknowledged.
- Solved.
- Solved - Not a duplicate.
- Actions:
- Notify affected user: this allows you to configure an email that will be sent to the affected users.
- Send custom email: this allows you to configure a custom email that will be sent to specific users.
- Run script: allows you to type a script that will be performed
- Look affected accounts: allows you to configure an email that will be sent to the owner user.
- Look affected host.
- Notify issue owner by email.
- Acknowledge.
- Start new process.: allows you to configure the workflow that will be run.
- Description: a brief description of the action you are defining.
- Issue status: it is used to determine the point when the action will be launched.
Note that it will be necessary to restart the Sync Server when changing the action of an issue.
Actions
Table actions
| "Query search" | Allows you to query issue types through different search systems, Quick, Basic and Advanced. |
| Download CSV file | Allows you to download a CSV file with the issue policies data. |
Issue actions
|
Apply changes (dick button) |
Allows you save a issue policy. To save the data it will be mandatory to fill in the required fields. |
| Download CSV file | Allows you to download a CSV file with the issue policies data. |
| Expand all | Displays all the attributes of the different blocks. |
| Collapse all | Hide all attributes of the different blocks. |
| "Types of views" | Change the view type: Classic view, Modern view, Compact design. |
| Add new |
Allows you to add a new action to the issue policy. You can choose the action from the action list. Depending on the selected action, you must fill in different information. Once the information will be filled in, you need to close the window and Apply the changes. |
| Delete |
Allows you to delete one or more actions from the actions list. |
| Undo | Allows you to quit without applying any changes. |
| Apply changes | Allows you to update the changes made to the issue policy. |
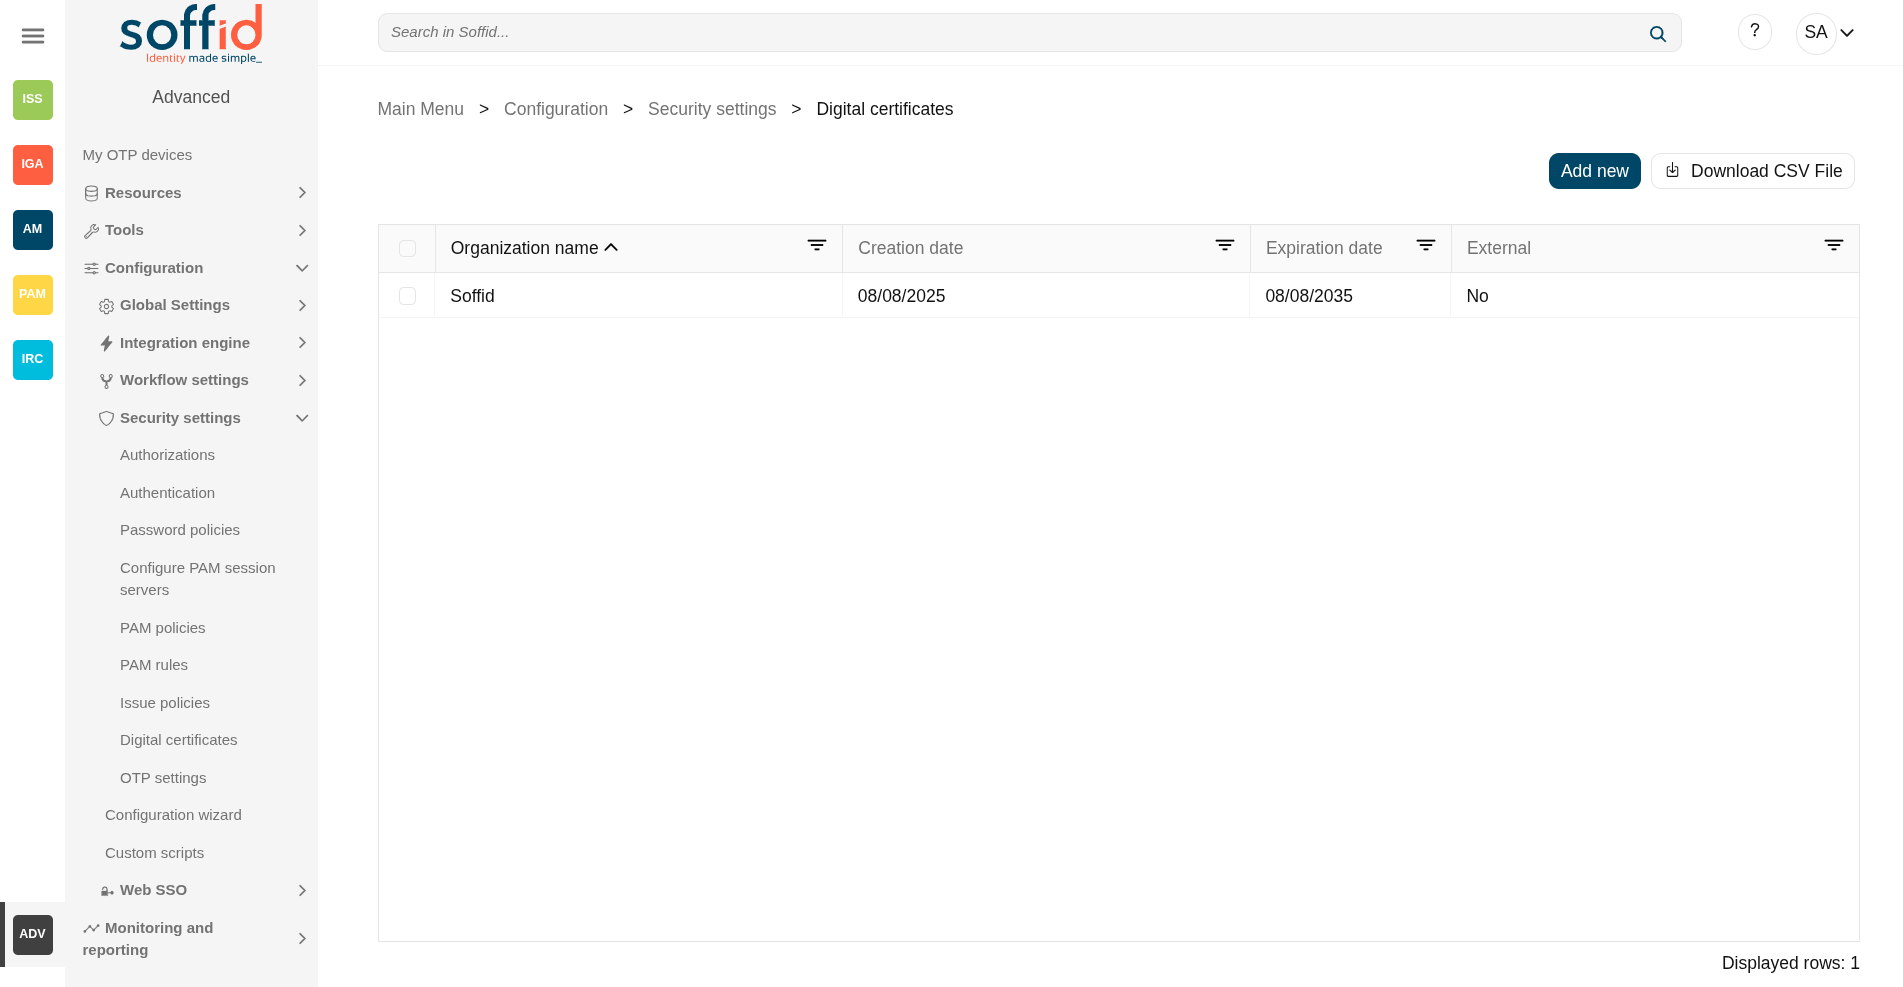
Digital certificates (addon federation)
Definition
Soffid includes Digital certificate functionality as a security enhancement. You could add new Digital certificates, internal or external.
If you select the external certificate, you could add a valid certificate to Soffid; If you select the internal certificate, Soffidl will generate a valid certificate.
Screen overview
Related objects
- Identity providers: certificates can be used as two-factor authentication
Standard attributes
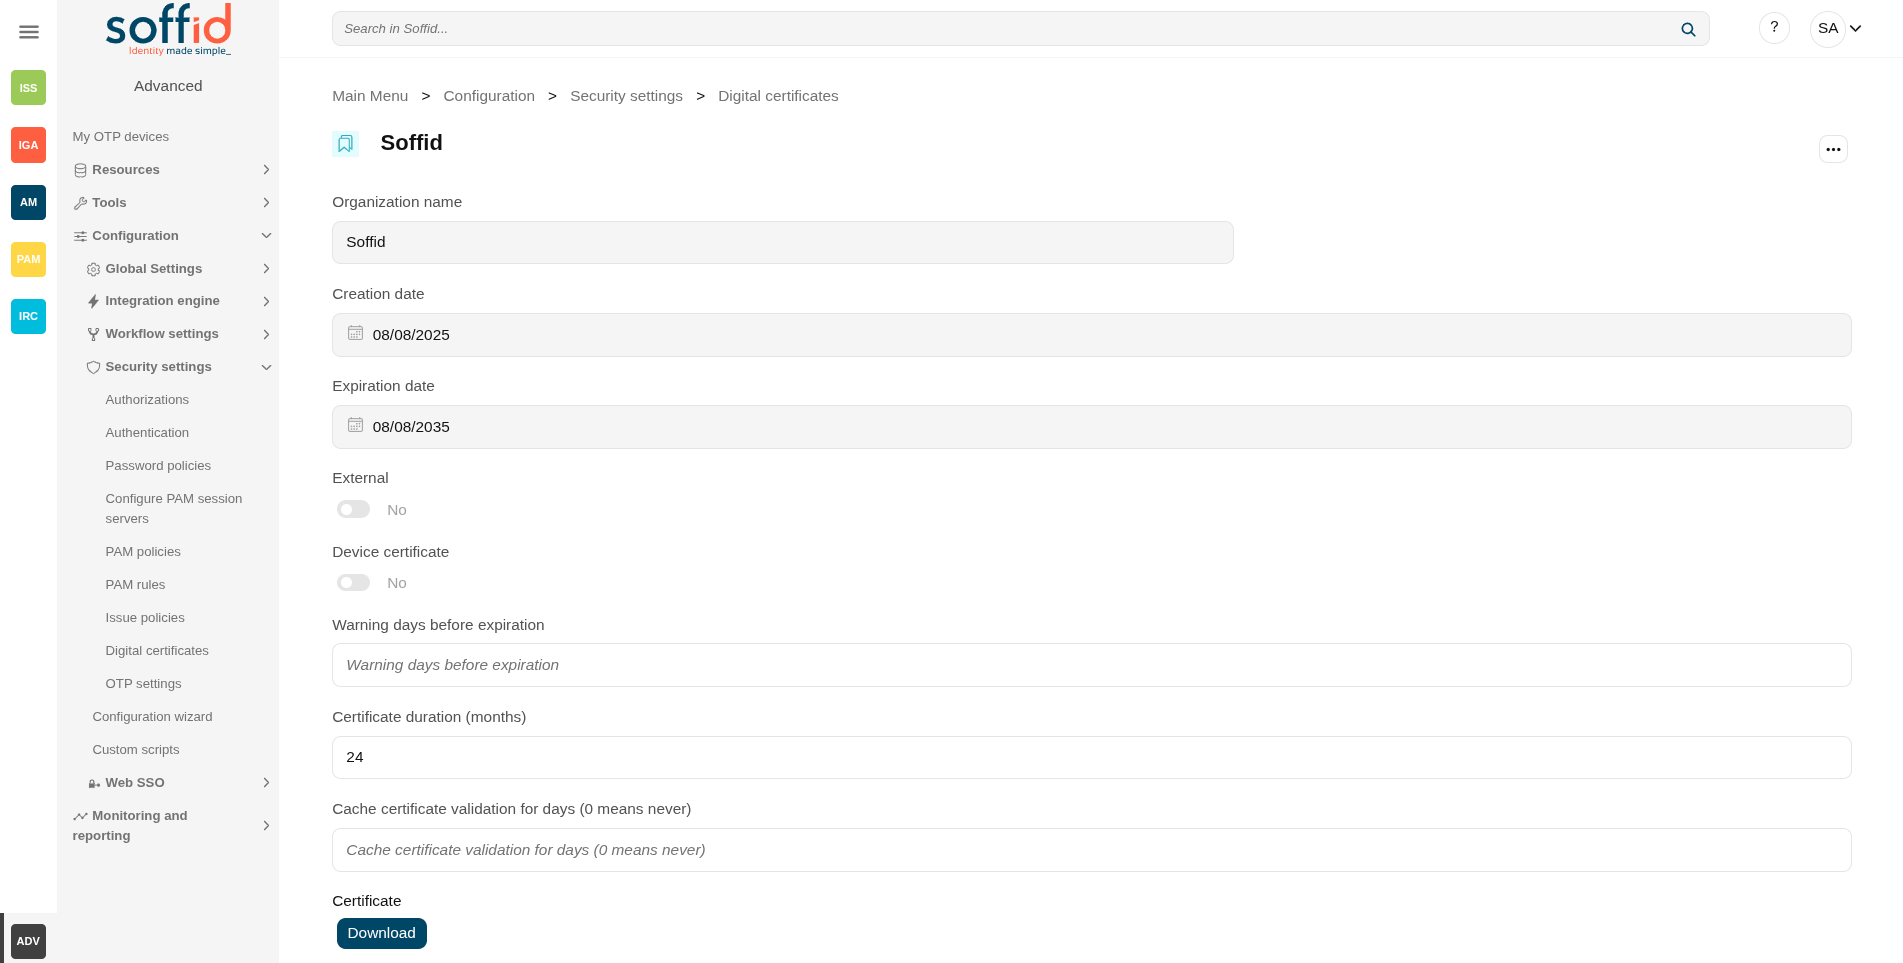
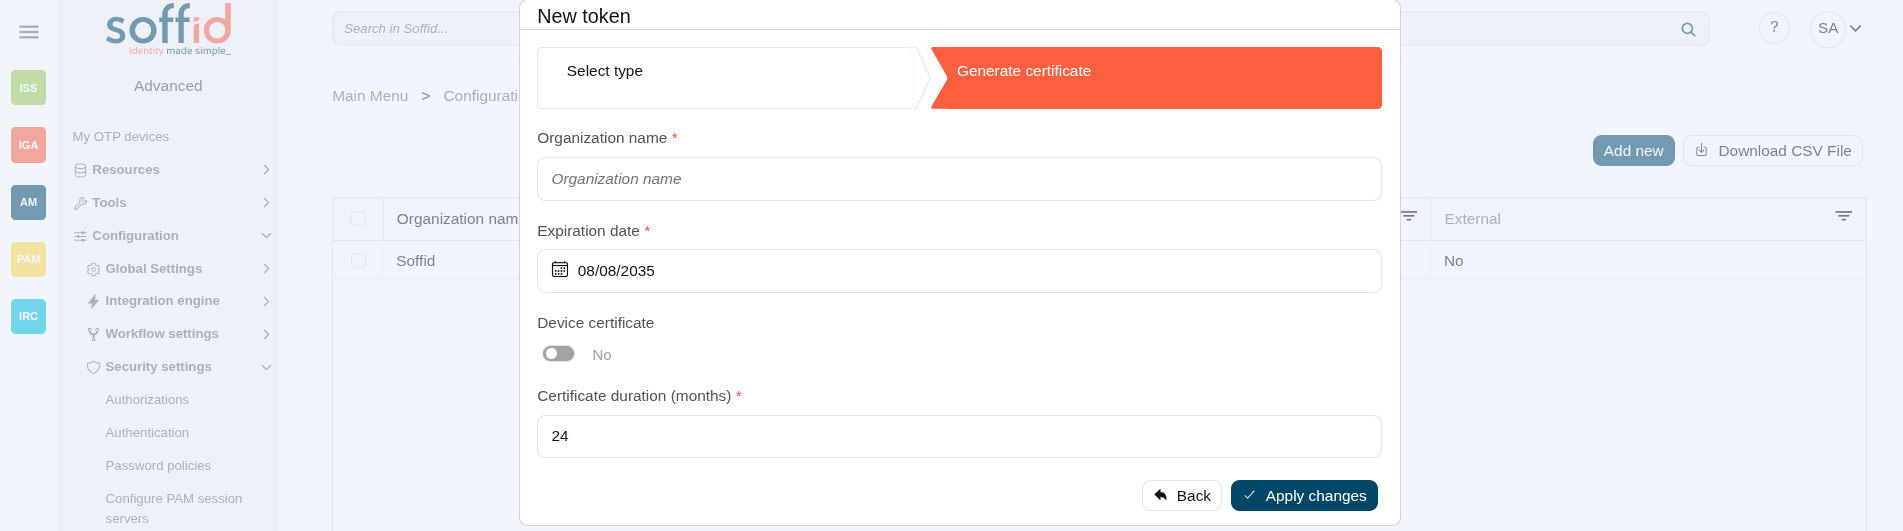
Internal
- Organization name: organization name
- Expiration date: referring to the root certificate.
- Device certificate: Indicates if the certificate is for a device
- Certificate duration (months): Referring to users' certificates.
Image

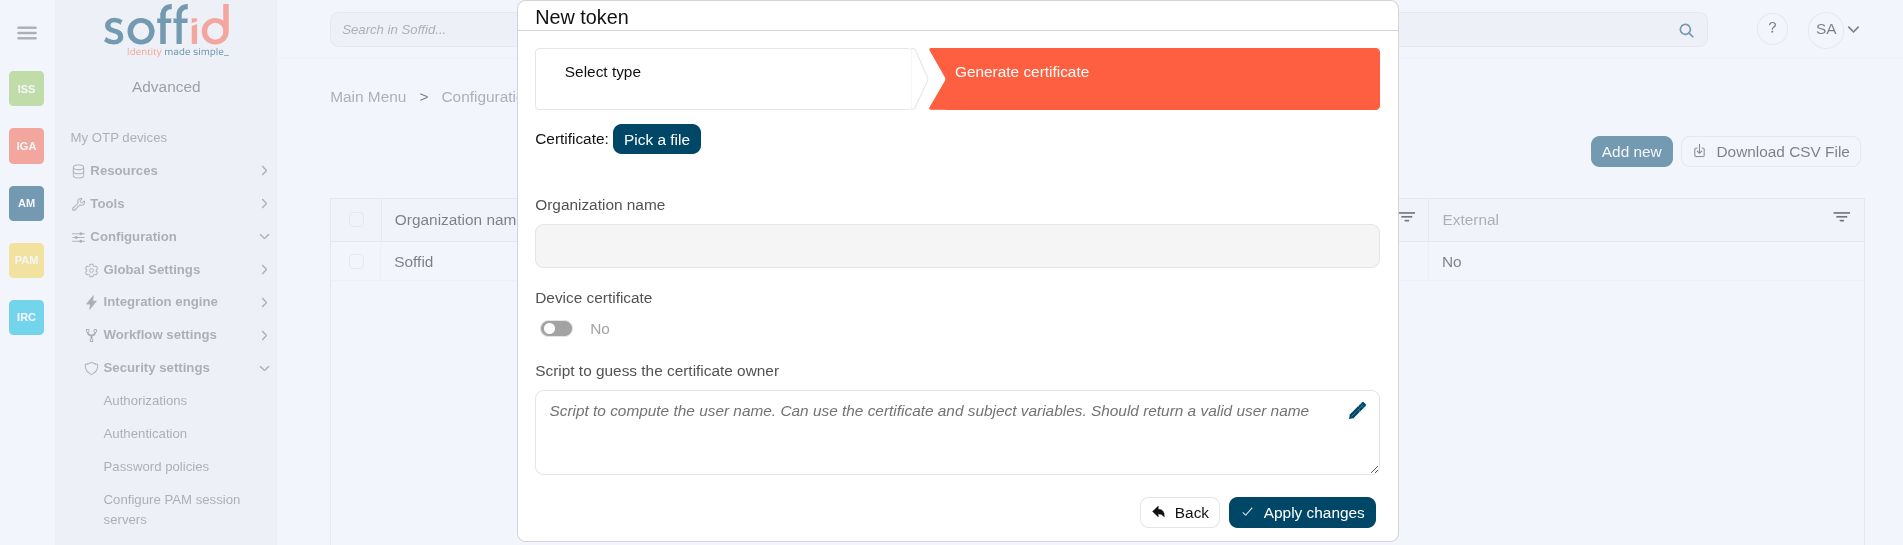
External
- Certificate: root of the certification authority (pem file).
- Organization name: organization name (retrieved from the certificate).
- Device certificate: indicates if the certificate is for a device.
- Script to guess the certificate owner: script to compute the user name. Can use the certificate and subject variables. Should return a valid user name.
Image

Actions
Table actions
| Add new |
Allows you to add a new certificate. To add a new certificate it will be mandatory to fill in the required fields. |
| Delete |
Allows you to remove one or more certificates by selecting one or more records and next clicking this button. To perform that action, Soffid will ask you for confirmation, you could confirm or cancel the operation. |
| Download CSV file |
Allows you to download a CSV file with the digital certificates data. |
New token
|
Undo |
Allows you to quit without applying any changes. |
|
Next |
Allows you to browse the wizard to create a new certificate. |
|
Back |
Go to theprevious step. |
|
Apply changes |
Allows you to save the data of a new certificate or to update the data of a specific certificate. To save the data it will be mandatory to fill in the required fields |
OTP settings (addon otp)
Definition
The OTP settings allow the administrator users to configure the available OTP options. Soffid provides six different OTP implementations.
This page is available if you have previously installed the Soffid OTP add-on.
Configure these options as a second authentication factor in the Soffid identity provider. Remember that this functionality is found in the federation add-on.
Screen overview

Related objects
- My certificates and FIDO tokens : to autoconfigure certificates and FIDO tokens
- My OTP devices : to autoconfigure certificates and FIDO tokens
- Authentication : OTP settings for Console
- Identity providers : to enable OTP options as second factors of authentication
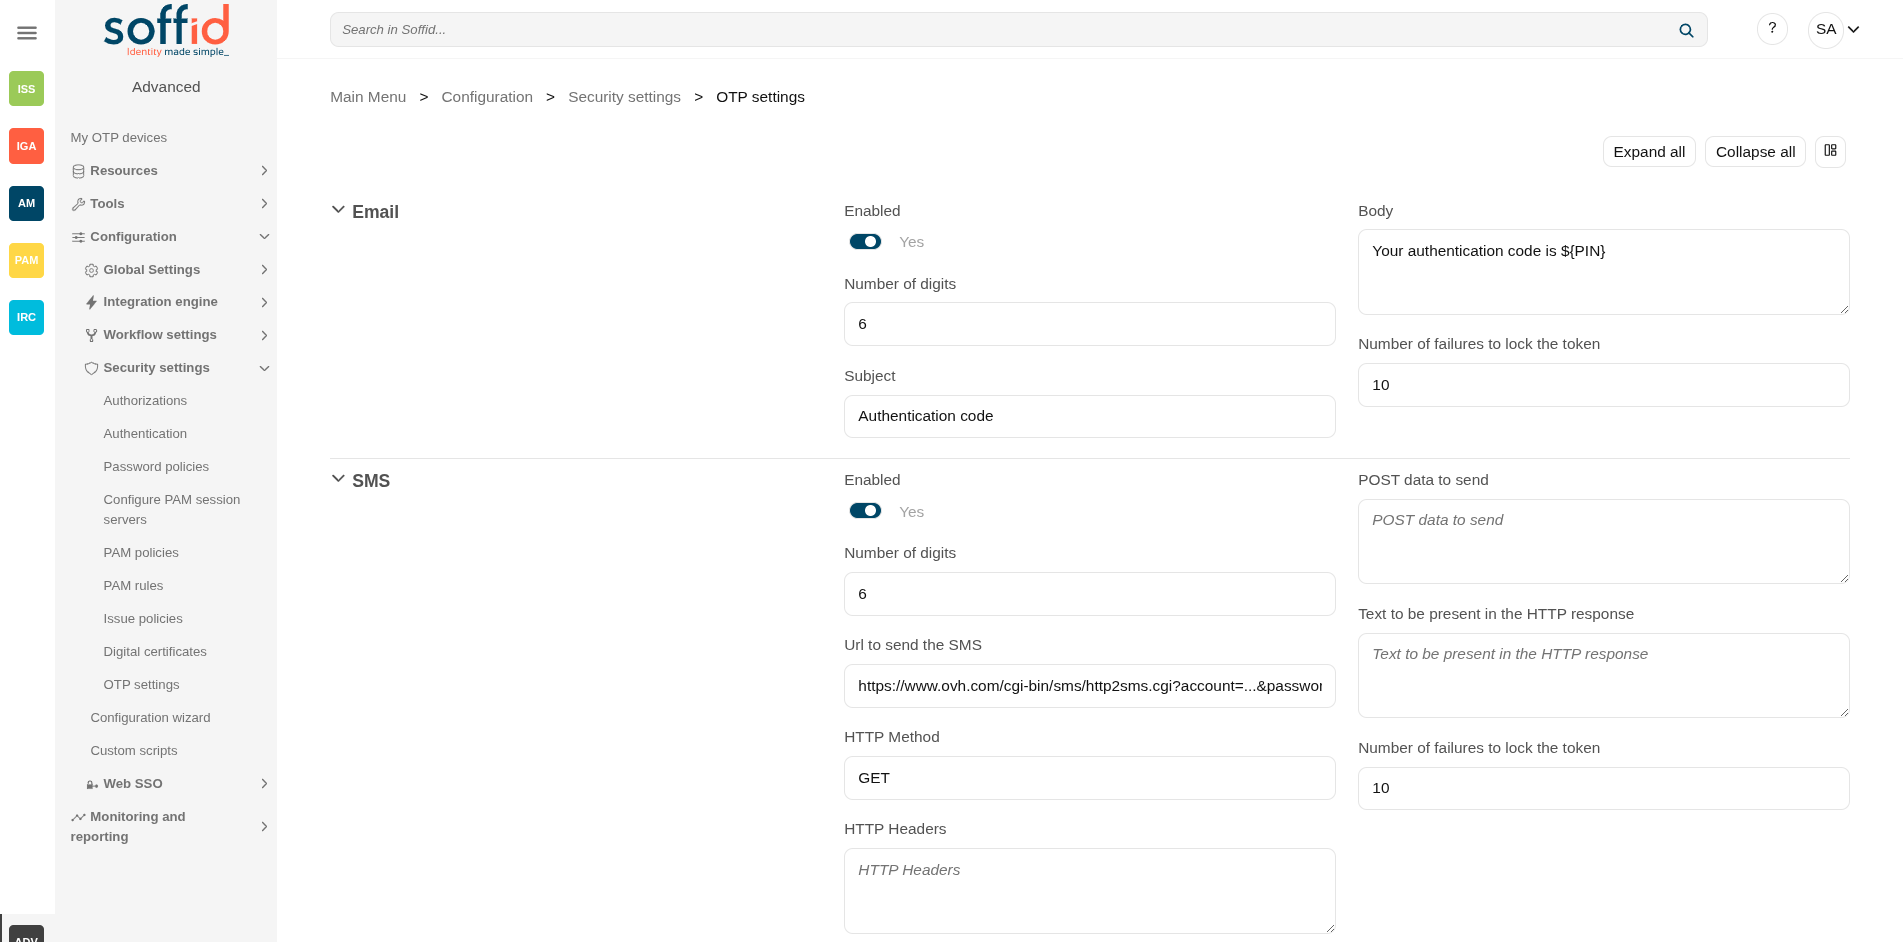
Standard attributes
- Enabled: allows you to enable or disable a PIN sent by the Email implementation.
- Number of digits: number of digits of the PIN code that will be generated.
- Subject: subject of the email
- Body: body of the email
- Number of failures to lock the token: upon reaching the configured number of failures, the token will no longer be usable.
To send an email, you must register a mail server. To this purpose, Soffid has a set of parameters that you can find on the Soffid parameters page.
SMS
- Enabled: allows you to enable or disable a PIN sent by the SMS implementation.
- Number of digits: number of digits of the PIN code that will be generated.
- URL to send the SMS: enter the URL of your SMS provider rest service
https://www.xxxxxxx.com/cgi-bin/sms/http2sms.cgi?account=sms-bg490971-1&password=XXXXXXt&login=user&from=SOFFID&to=${PHONE}&message=This is your access PIN: ${PIN}&noStop&contentType=application/json&class=0- HTTP Method: enter POST or GET depending on your provider documentation
- HTTP Header: optionally, you can add any HTTY header, including Basic or Bearer authentication tokens. The header must include the header name and header value. For instance:
Authorization: Basic dXNlcjpwYXNzd29yZA== - POST data to send Enter the body of the HTTP request
- Text to be present in the HTTP response: Soffid will check the response from your SMS Provider contains this text
"status":100- Number of failures to lock the token: upon reaching the configured number of failures, the token will no longer be usable.
The URL and POST data to be sent, the administrator can use some tags that will be replaced by some target user attributes:
- ${PHONE}: The target phone number
- ${PIN}: The one-time password to be entered by the user
- ${userAttribute}: Any of the standard or custom user attributes, like ${fullName} or ${userName}
Soffid does not offer any SMS services, this service must be provided by the customer.
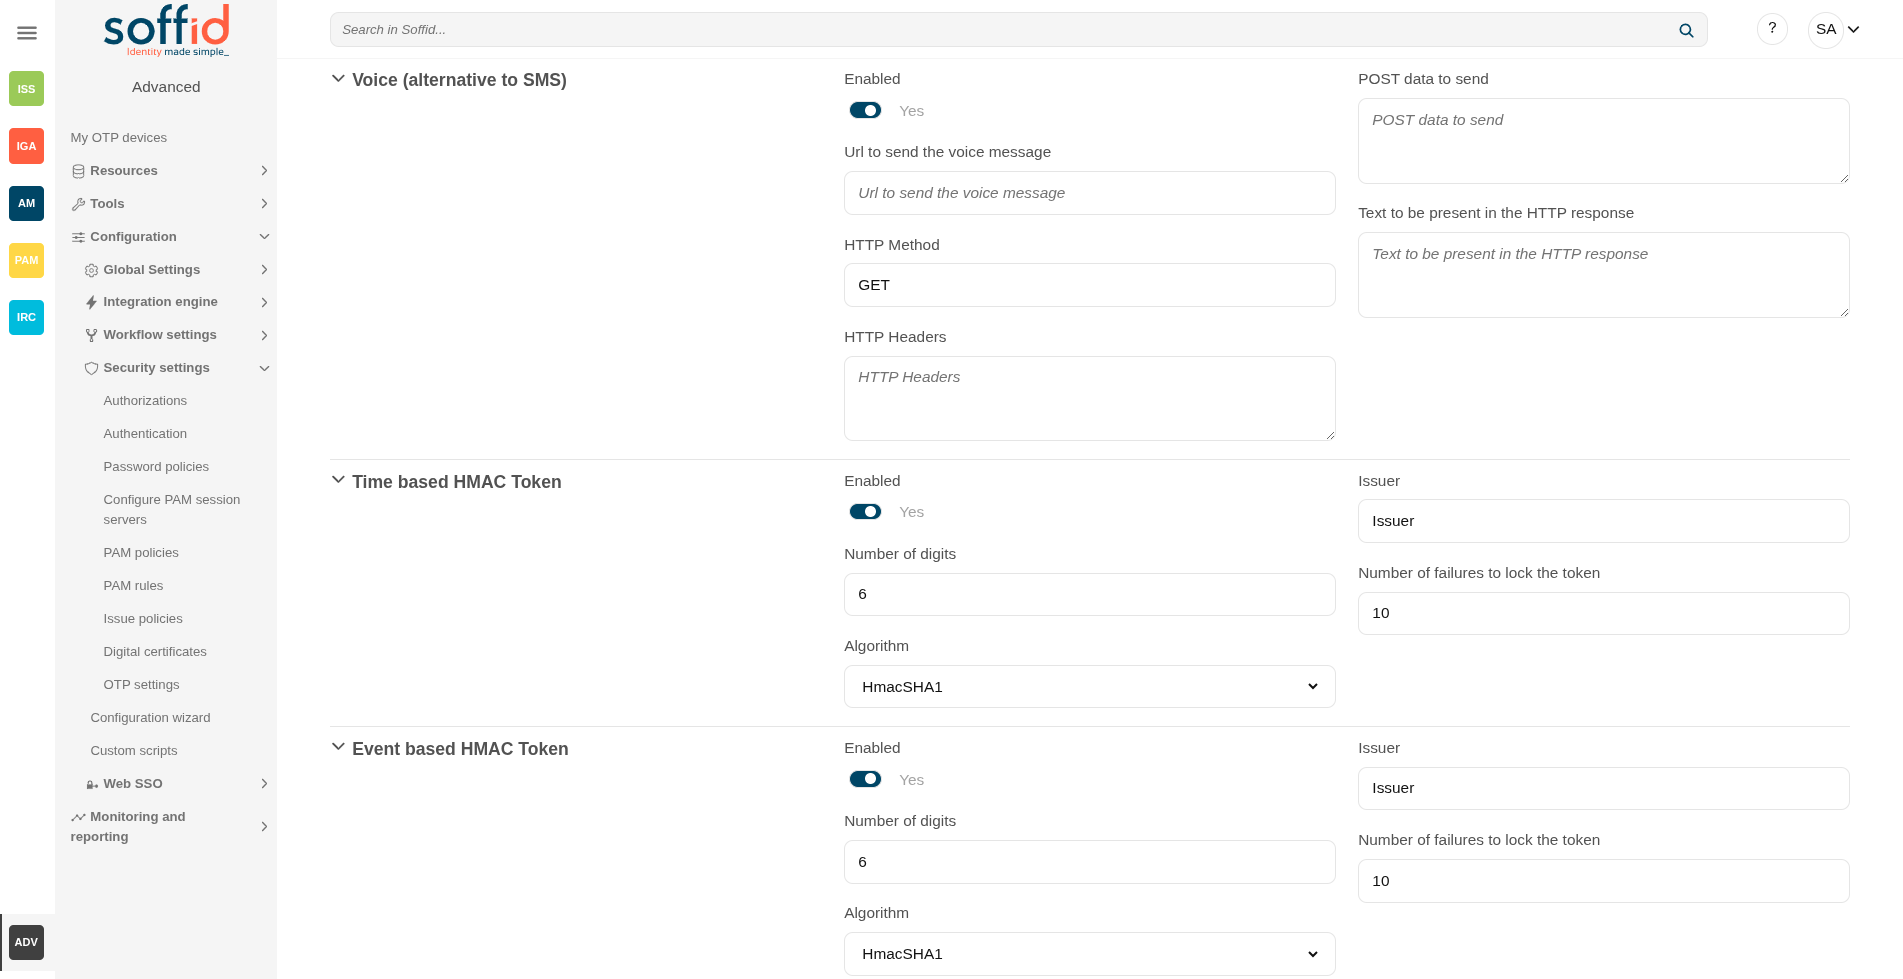
Voice (alternative to SMS)
- Enabled: allows you to enable or disable a PIN sent by the voice implementation.
- URL to send the SMS: enter the URL of your voice call provider rest service
- HTTP Method: enter POST or GET depending on your provider's documentation
- HTTP Header: optionally, you can add any HTTY header, including Basic or Bearer authentication tokens. The header must include the header name and header value. For instance:
Authorization: Basic xxxxxxxxxxxxxxOUVCRS1DMzE0LTI3MzAtQkY0Qy05RDgwRTMyQUQ4OUY= Content-Type: application/json Accept: application/json - POST data to send Enter the body of the HTTP request.
Text to be present in the HTTP response: Soffid will check the response from your SMS Provider contains this text- Text to be present in the HTTP response: Soffid will check the response from your SMS Provider contains this text
"status":100The POST data to be sent, the administrator can use some tags that will be replaced by some target user attributes:
-
- ${PHONE}: The target phone number
- ${PIN}: The one-time password to be entered by the user
Soffid does not offer any voice service, this service must be provided by the customer.
Time based HMAC Token
- Enabled: allows you to enable or disable an OTP Time based HMAC Token implementation.
- Number of digits: number of digits of the PIN code that will be generated.
- Algorithm: allows you to select an HMAC algorithm.
- Issuer: name of the issuer of the PIN.
- Number of failures to lock the token
An additional application is required to load the OTP generation settings. You may use any of the following: Google Authenticator, Microsoft Authenticator, FreeOTP Authenticator.
Event based HMAC Token
- Enabled: allows you to enable or disable an OTP Event based HMAC Token implementation.
- Number of digits: number of digits of the PIN code that will be generated.
- Algorithm: allows you to select an HMAC algorithm.
- Issuer: name of the issuer of the PIN.
- Number of failures to lock the token: upon reaching the configured number of failures, the token will no longer be usable.
An additional application is required to load the OTP generation settings. You may use any of the following: Google Authenticator, Microsoft Authenticator, FreeOTP Authenticator.
Security PIN
- Enabled: allows you to enable or disable the Security PIN implementation.
- Minimum PIN length: minimum number of digits that the PIN has to have.
- Number of digits from the PIN to ask: number of digits that Soffil will ask to verify the identity.
- Number of failures to lock the token: upon reaching the configured number of failures, the token will no longer be usable.
Actions
| Expand all | Displays all the attributes of the different blocks. |
| Collapse all | Hide all attributes of the different blocks. |
| "Types of views" | Change the view type: Classic view, Modern view, Compact design. |
| Confirm changes |
Allows you to save the updates and quit the page. |
Password recovery configuration (addon recovery)
Description
Soffid provides you the functionality that allows to the users recover their passwords.
To do this, the administrator user, or a user with the proper roles/authorizations, must first config the password recovery settings.
This setting can be used in the Console login and in the Federation login if enabled in the Identity Provider.
There are several sending method configuration options, use the one that best suits your organization.
Screen Overview
Related objects
- Soffid parameters : must provide a mail server to use mails
- Identity providers : to enable this opcion in federation
Standard attributes
Password recovery questions tab
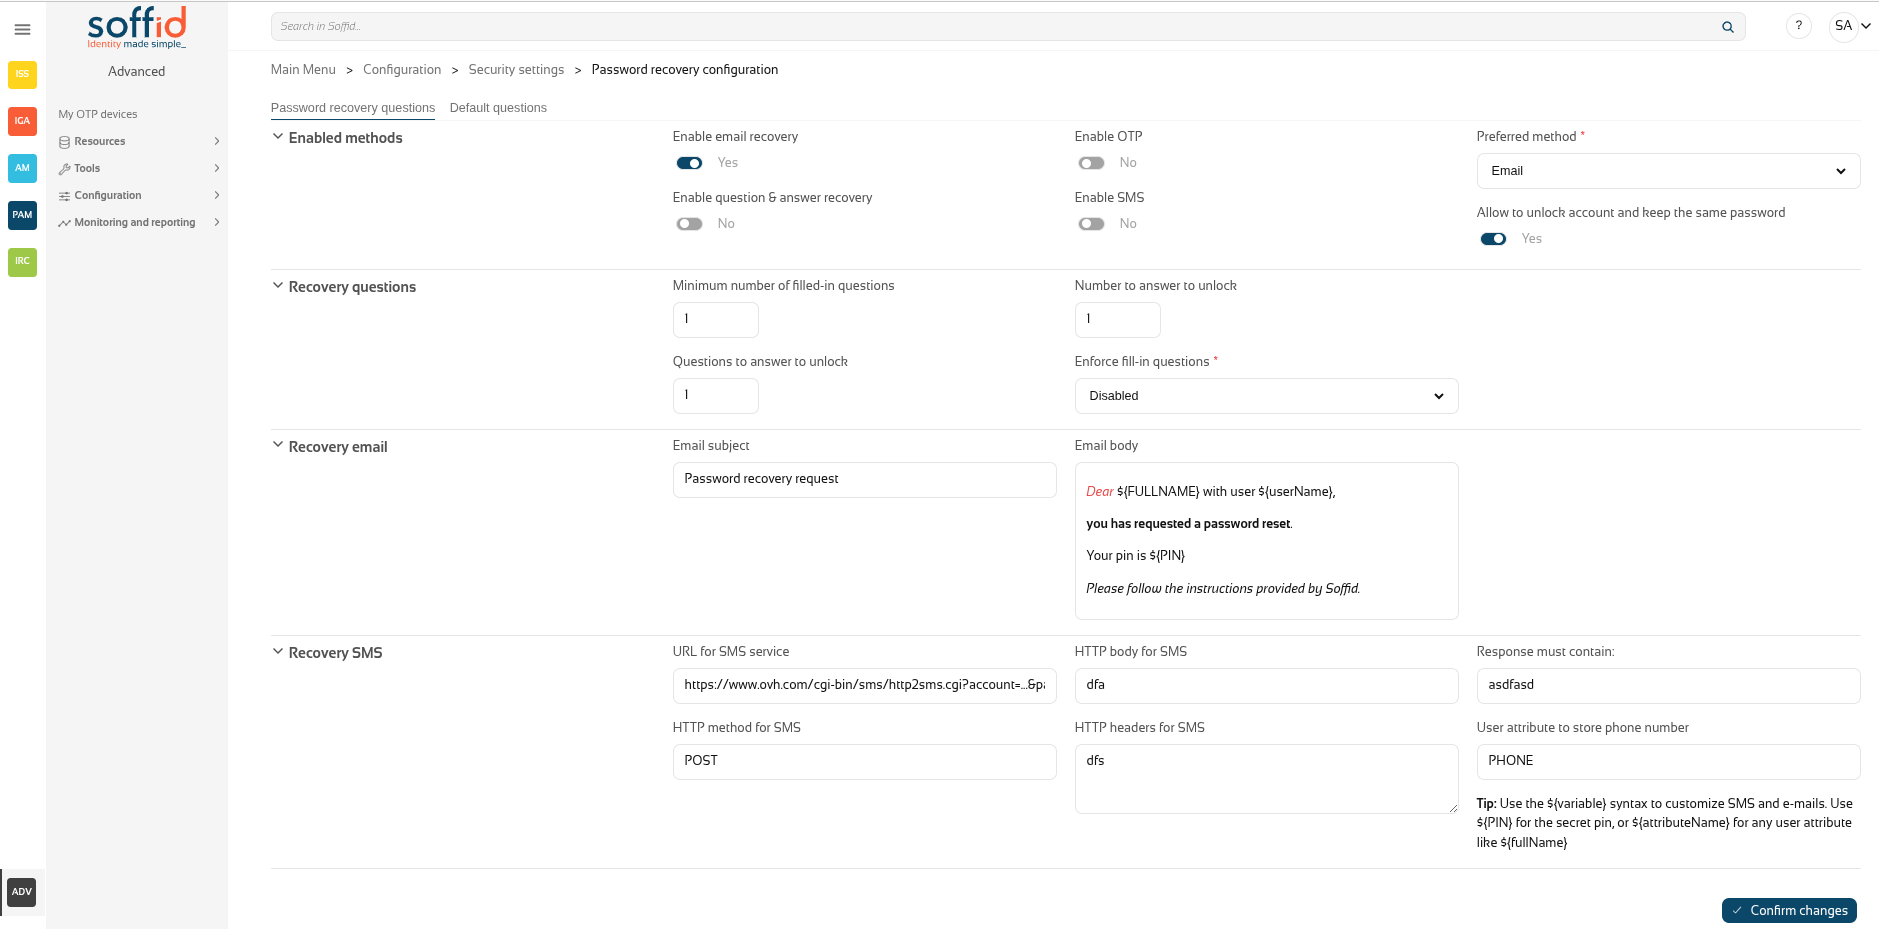
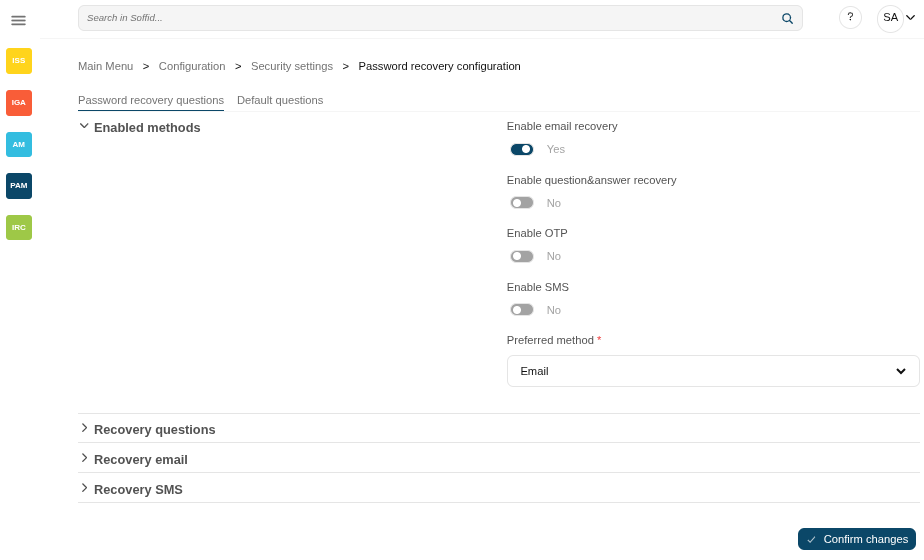
Enabled methods
- Enable email recovery: if Yes is selected, it will allow password recovery through an e-mail sent to an authorized mailbox.
- Enable question&answer recovery: if Yes is selected, a question and control response will be requested.
- Enable OTP: if Yes is selected, an OTP will be required to recover the password. That OTP depends on the OTP settings configured into the Soffid Console and the OTP devices configured for the end-user.
- Enable SMS: if Yes is selected, an SMS will be send to recover the password.
- Preferred method: in case you select two or more previous options, this drop-drown will allow you to priorize one option over the others.
- Questions
- SMS
- OTP
- Allow to unlock account and keep the same password: Allows the user to unlock his account using the last stored password.
Recovery questions
- Minimum number of filled-in questions: indicates the minimum number of user questions that must be have answered in the end-user's profile to can use this recover password method.
- Questions to answer to unlock: indicates the number of questions that must be formulated to the end-user to reset his password.
- Numer to answer to unlock: indicates the number of answers that must be answered by the end-user to reset his password.
- Enforce fill-in questions: allow on each access Soffid to check if the questions are answered. In case the questions have not been not answered, Soffid will display a window with the questions to answer or to config to the end-user depending on that value.
- Disabled: allows you to disable that functionality.
- Required: if this option is selected, the system will check if the user questions are answered correctly.
If the user have not a required number of questions defined or he have not answered all his questions, the system will show the retrieve password questions page. - Optional: when this option is selected, the system will check the user questions but it will not show the retrieve password questions page if the user questions does not meet the configuration parameters.
Recovery email
- Email subject: the text of the subject sent in the email, you can use variables
- Email body: the text of the body sent in the email, this could be HTML stylel, you can use variables
Tip: Use the ${variable} syntax to customize SMS and e-mails. Use ${PIN} for the secret pin, or ${attributeName} for any user attributes like ${fullName}.
Recovery SMS
- URL for SMS service: URL for SMS service
- HTTP method for SMS: HTTP method for SMS, for example GET
- HTTP body for SMS: the text of the boy sent in the SMS, you can use variables
- HTTP headers for SMS: headers used in the HTTP request
- Response must contain: a text in the response to confirm the successful sending
- User attribute to store phone number: user object attribute defined on the Metadata page to save the phone number.
Tip: Use the ${variable} syntax to customize SMS and e-mails. Use ${PIN} for the secret pin, or ${attributeName} for any user attributes like ${fullName}.
Default questions tab
This Default questions tab is where you enter the questions that the end user will have to answer in order to recover their password.
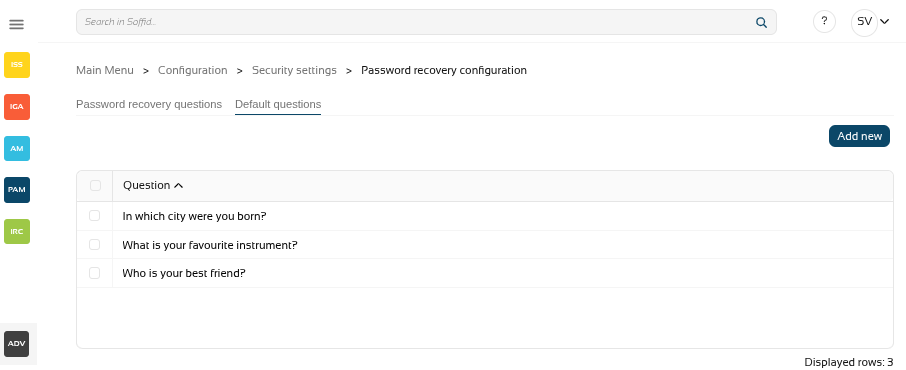
Table:
- Question: questions for the end user
Actions:
|
Add new |
Add a new row to the table to allow the administrator to write the question. |
|
Delete |
After selecting one or more questions, the "Delete" will be displayed and you could delete the question/s. |
For more information on how to activate and configure the question and answer feature, please review the page How to configure questions?
Actions
Password recovery questions tab
|
Confirm changes |
Allows you to save the data of password recovery configuration. To save the data it will be mandatory to fill in the required fields. |
Default questions tab
|
Add new |
Allows you to add a new question to the questions list |
Others
Login in console
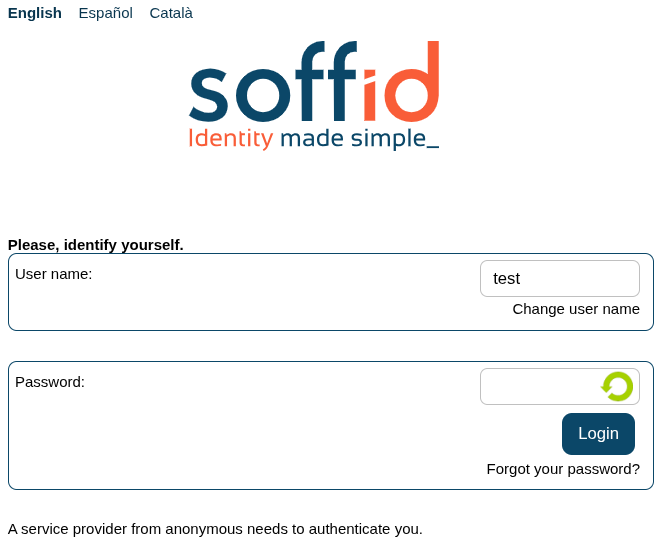
First, activate one of the available methods, in this case email.
Sedond, when you log in to the console, you will see the option ‘Recover password’.
Image
Login in federation
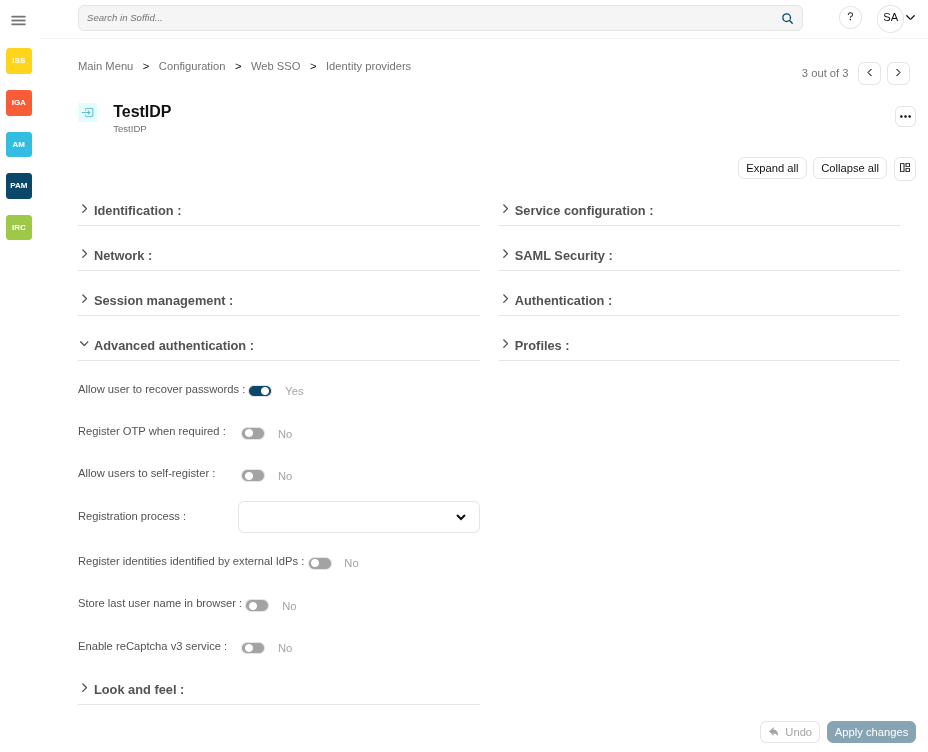
First, enable "Allow user to recover password" in the "Advanced authentication" section.
Second, when you log in to the federation, after entering the user, you will see the option "Forgot your password?".
Image