Web Single Sign-on for legacy apps
Web Single Sign-on for legacy apps
- Introduction to WSSO for legacy applications
- How to install WSSO for legacy app
- How web single sign-on works
- Configuring Soffid WSSO
- Shibboleth Installation notes
- WSSO configuration
- WSSO scripting language
- Sample configurations
Introduction to WSSO for legacy applications
What is WSSO for legacy applications?
Nowadays, it's very common to have a mix of different technologies and products to deliver information to customers, providers or internal users.
With Soffid IAM you can get the same user and password for every application, but the user still needs to identify itself each time a context switch is done. This can be leveraged by using Enterprise Single Sign-On technologies just like Soffid ESSO, but Enterprise Single Sign-On technologies requires to have a big degree of control onto the devices that are likely to use those services.
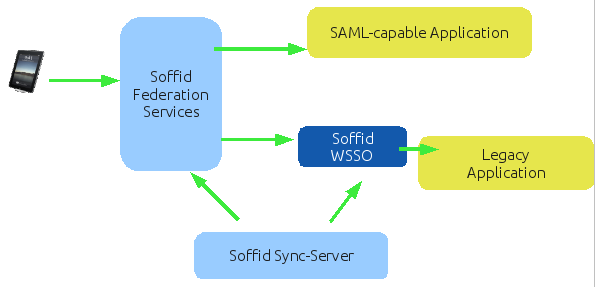
While this is suitable for internal users, this requirement cannot be met on customers and usually providers.
In order to achieve this single sign on behaviour, Soffid Federatoin Services can offer identify do this job. On your application side, the application server must be ready to act as a SAML service provider.
Unfortunately, most applications don't support SAML. Soffid Web Single Sign On (from now on WSSO) is a new layer of extra security that can be put over your legacy applications that don't support SAML authentication protocol, and can act as a credential broker in order to authenticate the user to the legacy application based on a SAML token
How to install WSSO for legacy app
Installation
In order to install Web Single Sign on, the following components must be installed and running
-
Soffid IAM Console version 1.2.1 or later
-
Soffid IAM Synchronization server 1.2.1 or later
-
Soffid SAML Identity Provider version 1.0.0 or later
-
An Apache server with Shibboleth Service Provider version 2.4 or later. The supported platforms are:
-
Red Hat 6.1
-
Ubuntu 12.04
-
On RedHat
Copy the library file wsso-mod-apache.so to modules directory /usr/lib64/httpd/modules
Add the following line to /etc/httpd/conf/httpd.conf
LoadModule soffid_module modules/mod_soffid_wsso.soOn Ubuntu
Copy the library file wsso-mod-apache.so to modules directory /usr/lib/apache/modules
Create the file /etc/apache2/mods-enabled/soffid-wsso.load
LoadModule soffid_module /usr/lib/apache2/modules/mod_soffid_wsso.soExecute:
restorecon -Rv mod_soffidwsso.so How web single sign-on works
Web Single Sign On acts introducing credentials to the underlying web application on behalf of the user. To perform its job, WSSO can:
-
Identify the user when needed
-
Modify pages generated by the web application in order to adapt them to the single sign on context.
- Pass credentials required to the web application.
- Close the web single sign on the session.
Phase 1. Page request
The user agent (actually the web browser), asks Apache for a web page.
If the ShibRequireSession tag is present at the web page location, Shibboleth will redirect the request to the configured Soffid SAML Identity Provider.
Phase 2. SAML Authentication
Soffid SAML Identity Provider will ask the user to identify itself. Depending on the federation configuration, the user will be allowed to:
-
Use certificate login
-
Enter username and password
-
Register itself
-
Recover the password.
Configuring Soffid WSSO
The system is configured using Apache configuration files, plus some ECMA script files that can be located anywhere you want.
If you are using Ubuntu Server, it is necessary remove apache_mpm_worker module and install apache_mpm_prefork one.
In general, Soffid WSSO acts intercepting and modifying any request made to Apache. This request can be processed by Apache itself or forwarded to another web or application server using ProxyPass module.
Shibboleth Installation notes
Soffid Federation is based on shibboleth open source project. Actually the installation is a mixed procedure between Shibboleth installation and Soffid configuration. In the future Shibboleth installation will be integrated on Soffid installation in order to assume better integration level.
This guides help administrators to streamline shibboleth installation process, but it does not replace the oficial shibboleth documentation in any way.
Install shibboleth
On ubuntu
sudo apt-get install shibboleth-sp2-schemas libshibsp-dev
sudo apt-get install libshibsp-doc libapache2-mod-shib2 opensaml2-tools
sudo apt-get install libapr-memcache-dev libapr-memcache0 policycoreutils
On RedHat
Follow Installing via Yum instructions on shibboleth wiki: https://wiki.shibboleth.net/confluence/display/SHIB2/NativeSPLinuxRPMInstall
On Windows Server
Follow installing via Windows Server instructions on Shibboleth wiki: https://wiki.shibboleth.net/confluence/display/SHIB2/NativeSPWindowsInstall
Configure SELinux (if needed)
create shibd.te file with this content:
module httpd_shibd 1.0;
require {
        type tmp_t;
        type var_run_t;
        type httpd_t;
        type initrc_t;
        class sock_file write;
        class unix_stream_socket connectto;
}
#============= httpd_t ==============
allow httpd_t initrc_t:unix_stream_socket connectto;
allow httpd_t var_run_t:sock_file write;
Execute
sudo checkmodule -M -m -o shibd.mod shibd.te
sudo semodule_package -o shibd.pp -m shibd.mod
sudo semodule -i shibd.pp
sudo setsebool -P httpd_can_network_connect 1
Create service provider Shibboleth keys & metadata
Execute
sudo shib-keygen -h HOSTNAME -e https://HOSTNAME/shibbolethVerify the permissions of the generated key.
At this point, verify the hostname specified matches the ServerName directive at Apache config file, including scheme and port.
Edit configuration file
Update shibboleth2.xml in order to download the federation data from Soffid master or backup Synchronization Server. You will need to specify the Identity Provider public ID, as it is created on Soffid SAML Federation
<ApplicationDefaults entityID="https://HOSTNAME/shibboleth"
                         REMOTE_USER="eppn persistent-id targeted-id">
...
    <Sessions>
        <SSO entityID="SOFFID-IDP-public ID">
           SAML2 SAML1
        </SSO>
        <Logout>SAML2 Local</Logout>
...
    </Sessions>
...
    <MetadataProvider type="XML" uri="https://SYNCSERVER:760/SAML/metadata.xml" handlerSSL="true"
              backingFilePath="federation-metadata.xml" reloadInterval="7200">
    </MetadataProvider>
...
</ApplicationDefaults>
Finally, uncomment the required attributes on attribute-map.xml. You must also add the following ones:
    <Attribute name="urn:oid:0.9.2342.19200300.100.1.1" id="uid"/>
    <Attribute name="urn:oid:1.3.6.1.4.1.22896.3.1.1" id="sessionId"/>
    <Attribute name="urn:oid:1.3.6.1.4.1.22896.3.1.2" id="soffidSecrets"/>
    <Attribute name="urn:oid:1.3.6.1.4.1.22896.3.1.4" id="userType"/>
    <Attribute name="urn:oid:1.3.6.1.4.1.22896.3.1.5" id="givenNames"/>
Enable Single Logout back-channel
It's advisable to use single logout back-channel while using non SAML-aware applications.
To do this, add a new Logout intitator configuration at shibboleth2.xml file:
 <!-- LogoutInitiators enable SP-initiated local or global/single logout of sessions. -->
            <LogoutInitiator type="Chaining" Location="/Logout">
                <LogoutInitiator type="SAML2"
                        template="bindingTemplate.html"/>
                <LogoutInitiator type="Local"/>
            </LogoutInitiator>
            <!-- Logout inititator to be used by WebSSO -->
            <LogoutInitiator type="Chaining" Location="/SOAPLogout">
                <LogoutInitiator type="SAML2"
                        outgoingBindings="urn:oasis:names:tc:SAML:2.0:bindings:SOAP"
                        template="bindingTemplate.html"/>
                <LogoutInitiator type="Local"/>
            </LogoutInitiator>


           <!-- md:SingleLogoutService locations handle single logout (SLO) protocol messages. -->
            <md:SingleLogoutService Location="/SLO/SOAP"
                Binding="urn:oasis:names:tc:SAML:2.0:bindings:SOAP"/>
            <md:SingleLogoutService Location="/SLO/Redirect" conf:template="bindingTemplate.html"
                Binding="urn:oasis:names:tc:SAML:2.0:bindings:HTTP-Redirect"/>
            <md:SingleLogoutService Location="/SLO/POST" conf:template="bindingTemplate.html"
                Binding="urn:oasis:names:tc:SAML:2.0:bindings:HTTP-POST"/>
            <md:SingleLogoutService Location="/SLO/Artifact" conf:template="bindingTemplate.html"
                Binding="urn:oasis:names:tc:SAML:2.0:bindings:HTTP-Artifact"/>
For security reasons, you should at the signing parameter at the application defaults tag in order to enable logout message signature:
<ApplicationDefaults entityID="..."
                         signing="true"
                         REMOTE_USER="eppn persistent-id targeted-id">
..
Finally
Restart services:
sudo service apache2 start
sudo service shibd start
WSSO configuration
Configuring Soffid WSSO
The system is configured using Apache configuration files, plus some ECMA script files that can be located anywhere you want.
In general, Soffid WSSO acts intercepting and modifying any request made to Apache. This request can be processed by Apache itself or forwarded to another web or application server using ProxyPass module.
SoffidPostData directive
Syntax:
SoffidPostData [path-regex] [system=...] [account=...] [password=....] [contains=....] [flags]SoffidPostData [path-regex] [system=...] [account=] [post= "DataToBePosted"] [replace | append | prepend | merge] [contains=...] [flags]When the user agent performs a POST request to a path that matches the specified regular expression, Soffid WSSO will intercept it. Mind the path is missing any host, protocol or port qualifier.
If the requested file matches the regular expression, and the user agent is using the POST method, Soffid WSSO will modify the posted content. Optionally you can specify a regular expression that must match the original content of the sent message.
The first step performed by Soffid WSSO is to parse the posted data to get the user account sent. The user account sent will be the one whose name matches the account parameter of the SoffidPostData directive. If SoffidPostData directive lacks “account=...” the default (j_user) parameter name will be used.
The next step is to retrieve the password that belongs to the specified account on the system set at SoffidPostData directive.
The final step is to add or change the password sent. The name of the password parameter should be set by the SoffidPostData directive. If none is specified, the default (j_password) parameter name will be used.
For more sophisticated applications, the full content of the post data can be specified the syntax post="DataToBePosted.". On this data to be posted, the administrator can specify some expressions that will be replaced by the proper value:
- ${secret.xxx} where xxx names for a secret stored at the user secrets vault.
- ${account} will be resplaced by the used account.
- ${password} will be replace by the account password.
The data sent by the browser will be combined with the new posted data in four different ways:
- replace: the data sent by the browser is completely ignored.
- append: the new data will be appended to the original one.
- prepend: the new data will precede the original one.
- merge: each parameter of the original request will keep its position despite its value is to be changed. New parameters will be appended after the original ones.
Additionally, the following flags are allowed:
- force: By default, the password will be injected only when no password is sent, or it's empty. If you'd like to overwrite the password sent by the user agent, this flag must be specified.
- requiresAccount: If specified, Soffid WSSO will not try to guess the account to use if it is not send by the user agent.
Example:
SoffidPostData .* /j_security_check system=soffid account=j_user "j_user=${account}&j_password=${password}"SoffidPostData .* /j_security_check system=soffid account=j_user password=j_passwordSoffidBasicAuthorization directive
Syntax:
SoffidBasicAuthorization [path-regex] systemThis Appache directive allows WSSO to inject user name & password on web applications using HTTP BASIC authentication scheme. If the path being accessed matches the regular expression, Soffid WSSO will inject the “Authorization: Basic” header as stated at RFC 2617.
The system must match a managed system, also named Agent, listed at Soffid IAM Console.
Example:
ProxyBasicAuthorization ^/secure/.*$ "soffid"SoffidOnLoadScript directive
Syntax:
SoffidOnLoadScript [path-regex] content-regex maxSize scriptFile
To improve the user experience it's necessary to hide the underlying application-specific user authentication form. In order to do this, the web pages generated by the applications can be modified in order to skip unnecessary forms or to request a global login authentication.
ProxyOnLoadScript directive triggers the execution of an ECMA script that is able to modify the page generated by the application server. As long as the script execution is a rather heavy task, WSSO must accurately detect which pages must trigger the script execution. Currently, the script execution can be triggered by contents and by page path.
Allowed parameters:
|
path-regex |
Regular expression that will be matched against the page path, excluding any trailing parameter, sent after a question mark. |
|
content-regex |
Regular expression that will be matched against the page contents. |
|
maxSize |
Maximum page size that will be handled. Whether the page size exceeds this limit, it will be sent to the user agent. |
|
scriptFile |
File containing the script to be executed. Note the script must be UTF-8 encoded. |
Regards this directive could potentially manage any kind of media generated by a web server, it is designed to managed XML or HTML files. Anyway, image resources will never trigger the script execution.
SoffidCookieName directive
Syntax:
SoffidCookieName cookie-nameSets the name of the cookie used by Soffid WSSO to track the single sign on session
SoffidCookieName directive
Syntax:
SoffidCookieDomain domain-nameSets the domain of the cookie used by Soffid WSSO to track the single sign on session. By default, the cookie is attached to the virtual server name
SoffidCookiePassthrough directive
Syntax:
SoffidCookieDomain domain-nameBy default the WSSO engine will hide actual cookies to the browser, and only the Soffid cookie will be sent. In order to share the cookie names and values with the browser, one can add a regular expression to match the cookies to unhide.
SoffidCookiePassthrough .*WSSO scripting language
Scripting language
The scripting language is fully compatible with ECMAScript 3rd edition plus a small set of new objects and methods.
Before running the script, Soffid WSSO will create some global variables referring to the request of the user agent and content generated by the application server.
Here are the functions and classes implemented:
Global Functions
|
debug |
text: string |
Sends a message to the apache log file |
|
env |
text: string returns string |
Gets the value of an environment variable |
|
logout |
|
Log out of Web Single Sign on session. Any further access to a protected resource will ask the user for credentials. |
Global objects
|
request |
Contains a Request object referring the request made by the user agent. |
|
response |
Contains a Response object referring the data generated by the application server |
|
secretStore |
Contains the secrets of the user, including account names and passwords. |
|
document |
Contains a Document object referring the generated page. |
secretStore object
The object is available from authenticated requests and provides access to the secrets of the user. Any usage of secretStore object on an anonymous request will produce an undefined value
|
getSecret |
text: string returns string |
Gets the value of a secret |
|
getAccounts |
system: string return: array |
Returns the list of accounts that the user is allowed to use on a particular system |
|
getAccounts |
system: string returns string |
Returns the first account that the user is allowed to use on a particular system. |
|
getPassword |
system: string account: string returns string |
Returns the actual password for the specifieds account and system. |
Request class
The Request class encapsulates the request made by the browser and forwarded to the application server.
Attributes
|
method |
string |
Used method (POST, GET or others) |
|
url |
string |
Contains the requested URL, including scheme, host and port |
|
headers |
Array |
Headers sent with the request. |
|
content |
String |
Data posted by the user agent on POST requests. Due to memory usage limits, its content may not be complete. |
|
params |
Array |
Array containing the request parameters. |
Methods
|
clone |
returns Request |
Create a new request from the current. The current response will be canceled and a new request will be processed |
Response class
The class encapsulates the request response sent by the server application.
Attributes
|
document |
Document |
Document generated by the server |
|
headers |
Array |
Vector header with the request |
Document class
Contains the page generated by the application server. Thus, scripts can access the website and its DOM tree in runtime. The document object implements a subset of the standard DOM HtmlDocument.
Attributes
|
url |
string |
Full URL of the document. |
|
title |
string |
Title of document. |
|
cookie |
string |
Contains the cookies sent by the user agent |
|
anchors |
Collection |
Contains elements with tag A. |
|
forms |
Collection |
Contains elements with tag FORM. |
|
images |
Collection |
Contains elements with tag IMG. |
|
links |
Collection |
Contains elements with tags A and AREA. |
|
documentElement |
Item |
Contains the root element, usually and HTML tag element. |
|
content |
string |
Full content of the document in string format |
Methods
|
getElementById |
id: string Element returns |
Find the first element with the specified ID |
|
getElementsByTagName |
tag: string returns Collection |
Find all elements with the specified tag |
Element class
Obtained from the document object, implements a subset of the DOM class HtmlElement.
Attributes
|
childNodes |
Collection |
The vector containing children elements |
|
disabled |
boolean |
Indicator of whether the element is disabled or not |
|
id |
string |
The id attribute of the element |
|
tagName |
string |
Tag of the element |
|
parentNode |
Item |
Parent element |
Methods
|
getAttribute |
name: string returns string |
Returns the value of the specified attribute name. |
|
setAttribute |
name: string value: string |
Ses the value of the specified attribute. |
|
removeAttribute |
name: string |
Remove the specified attribute |
|
setText |
value: string |
Changes the inner content of the element |
|
getText |
returns string |
Gets the element inner content. |
|
getElementsByTagName |
tag: string returns Collection |
Find all children's elements with the specified tag |
|
addChild |
tag: string before: element (opt) returns element |
Creates a new item with the specified tag. If a node is specified, the new element will be ordered just before the specified item in the child list |
|
remove |
|
Removes the node from the document |
Collection class
The document object implements a subset of the standard DOM HTMLCollection
Attributes
|
length |
Long |
Number of items in the collection |
Methods
|
item |
id: long returns Element |
Gets the n-position element within the collection. The first element is numbered as 0. |
|
namedItem |
id: string returns Element |
Search for an item with the given name. First, search for an element with a matching id attribute. If none is found, search for an element with a matching name attribute. |
Sample configurations
Sample configurations
WebSSO configuration for Drupal
Add the following settings to Apache:
<Location />
 ShibRequireSession off
 ShibRequestSetting applicationId drupal
 AuthType shibboleth
 Require shibboleth
</Location>
 SoffidOnLoadScript .* .* 60000 /etc/apache2/soffid/drupal-login.js
 SoffidPostData /?q=user system=ldap account=name password=pass
Finally, next is the login script
debug ("***********************************************************************");
debug ("****************** LOGIN ON DRUPAL *************************");
debug ("***********************************************************************");
debug (document.url);
user = document.getElementById("edit-name");
pass = document.getElementById("edit-pass");
debug ("***********************************************************************");
if (user != undefined && pass != undefined)
{
    account = secretStore.getAccount("ldap");
    found = false; // Any error message found
    if (account != undefined)
    {
         user.setAttribute("value", account);
    } else {
         user.setAttribute("value", "AUTO-LOGIN");
         found = true;
    }
    user.setAttribute("readonly", true);
    pass.parentNode.setAttribute("style", "display:none");
    errors = document.getElementsByTagName("div");
    for (i = 0 ; ! found && i < errors.length; i++)
    {
        if (errors.item(i).getAttribute("class") == "messages error")
        found = true;
    }
    if (! found)
    {
        body=document.getElementsByTagName("body").item(0);
        div = body.addChild("div");
        div.setAttribute("style", "width: 90%; height: 90%; position: absolute; top: 5%; left: 5%; z-index: +10; background-color: #7F9FC2; color: white; opacity: 0.9; display: table-cell; text-align: center; vertical-align: middle; line-height: 90px; font-size: 250%; ");
        div2 = div.addChild("div");
        div2.setAttribute("style", "width: 100%; height: 40%;");
        div.addChild("span").setText ("Logging in. Please wait ....");
        body.setAttribute("onLoad", "document.getElementById('edit-submit').click();");
    }
    document.getElementById("edit-submit").setAttribute("style", "display:none");
}
// Change login / logout button
anchors = document.getElementsByTagName("a");
for (i = 0 ; i < anchors.length; i++)
{
    if (anchors.item(i).getAttribute("href") == "/?q=user/logout")
        anchors.item(i).setAttribute("href", "/Shibboleth.sso/Logout?return=http://www.soffid.org/");
    if (anchors.item(i).getAttribute("href") == "http://drupal.soffid.org/user")
    {
        anchors.item(i).setAttribute("href", "/Shibboleth.sso/LocalLogout?return=http://www.soffid.org/Shibboleth.sso/Login%3ftarget=http://www.soffid.org/%3fq=user");
        anchors.item(i).setText("Login / Register");
    }
    // Remove link to change user attributes
    if (anchors.item(i).getAttribute("href") == "/?q=user/59/edit")
        anchors.item(i).setAttribute("href", "/");
}WebSSO configuration for PHPBB
The following attributes must be added to apache configuration
<Location />
        ShibRequestSetting applicationId forum
        ShibRequireSession off
        AuthType shibboleth
        Require shibboleth
</Location>
<Location /ucp.php>
        ShibRequireSession on
        ShibRequestSetting requireSession true
        AuthType shibboleth
        Require valid-user
</Location>
SoffidOnLoadScript 'index.php$' .* 20000 /etc/apache2/soffid/forum-front.js
SoffidOnLoadScript '/ucp.php$' .* 20000 /etc/apache2/soffid/forum-ucp.js
SoffidOnLoadScript '/posting.php$' .* 20000 /etc/apache2/soffid/forum-posting.js
SoffidPostData '/ucp.php\?mode=login' system=ldap account=username password=password
Now, the following scripts must be added:
| forum-front.js |
|
| forum-ucp.js |
|
| forum-posting.js |
|