Soffid 3 reference guide
Soffid 3 reference guide
- 🔎 Overview
- Self service portal
- Introduction to Self Service Portal
- My tasks
- My issues
- My applications
- My requests
- Process Search
- My accounts
- My OTP devices
- My certificates and FIDO tokens
- My Profile
- Global settings
- Tenants
- Plugins
- Look & feel
- Soffid parameters
- User Type
- Group Type
- Metadata
- User backup configure & restore
- Configuration wizard
- Export settings and objects
- Import settings and objects
- Security settings
- Authorizations
- Authentication
- Password policies
- Configure PAM session servers
- PAM Rules
- PAM Policies
- Password recovery configuration
- OTP settings
- XACML Policy Management
- XACML PEP configuration
- Digital certificates
- Recertification policies
- Issue policies
- Break-glass recovery configuration
- Resources Management
- Users
- Groups
- Accounts
- Roles
- Information systems
- Role assignment rules
- Segregation of Duties (SoD)
- Networks
- Hosts
- Printers
- Mail Domains
- Mail List
- Application access tree
- Password vault
- Custom objects
- Integration Engine
- Smart engine settings
- Agents
- Synchronization servers
- Account naming rules
- Attribute translation tables
- Soffid Objects
- Sample scripts
- Utility classes
- Network discovery
- Tools
- Monitoring and reporting
- Sync server monitoring
- Scheduled tasks
- Scheduled jobs
- Audit
- Access logs
- Sessions
- Console log
- Privileged accounts dashboard
- Search in PAM recordings
- Issues
- Common actions
- Textual Index
- Use Case
- Releases Soffid 3
- 2025 september
- 2025 octubre
- 2025 november
- 2025 december
- 2026 january
- 2026 february
- 2026 march
- 2026 april
- 2026 may
- New features
🔎 Overview
Introduction
The Soffid 3 reference guide wants to present all the functionality contained in version 3 of the Soffid Console, explaining the functionality of all the screens and the functionality of each of them.
The documentation is organized as the options menu of Soffid Console, to try to facilitate access and comprehension of the information.
For each screen we try to define the following attributes:
- Description: a brief description of the screen functionality.
- Screen overview: an overview of the functionality.
- Related objects: list of the related objects and a link to view the object documentation.
- Custom attributes: attributes of the screen and the associated functionality.
- Actions: operations that the users could perform on the page.
Functionality
Self-service portal
Soffid Console provides the Self-Service Portal, where the end-users can consult or change their credentials, request new permissions or access to applications, manage their profile, or launch applications. All from a single point of entry.
Another purpose of the Self-Service Portal is to reduce the workload of the IT department, as well as improve the overall security of the IT system.
Global settings
Global settings refer to configuration options or preferences that apply to the entire system. These settings are typically established by administrators or developers and are used to define the behavior and functionality of the system.
Security settings
Resources management
Integration engine
Monitoring and reporting
Self service portal
Introduction to Self Service Portal
What is Self-Service Portal?
Soffid Console provides the Self-Service Portal, where the end-users can consult or change their credentials, request new permissions or access to applications, manage their profile, or launch applications. All from a single point of entry.
Another purpose of the Self-Service Portal is to reduce the workload of the IT department, as well as improve the overall security of the IT system.
Soffid allows administrator users to configure access to the different options depending on the end-users roles defined to use Soffid. In this way, end-users will be able to access the Self-Service Portal to manage their own requirements always depending on the defined business processes.
Screen overview

Brief description of each option
My tasks
My tasks display all the tasks in which the user is involved, like a supervisor, manager, o person how has to approve or deny that task.
For more information, visit My Task page
My issues
My issues display all the issues that the user will be able to check, and the option allows the user to manage this issues.
For more information, visit My Issues page
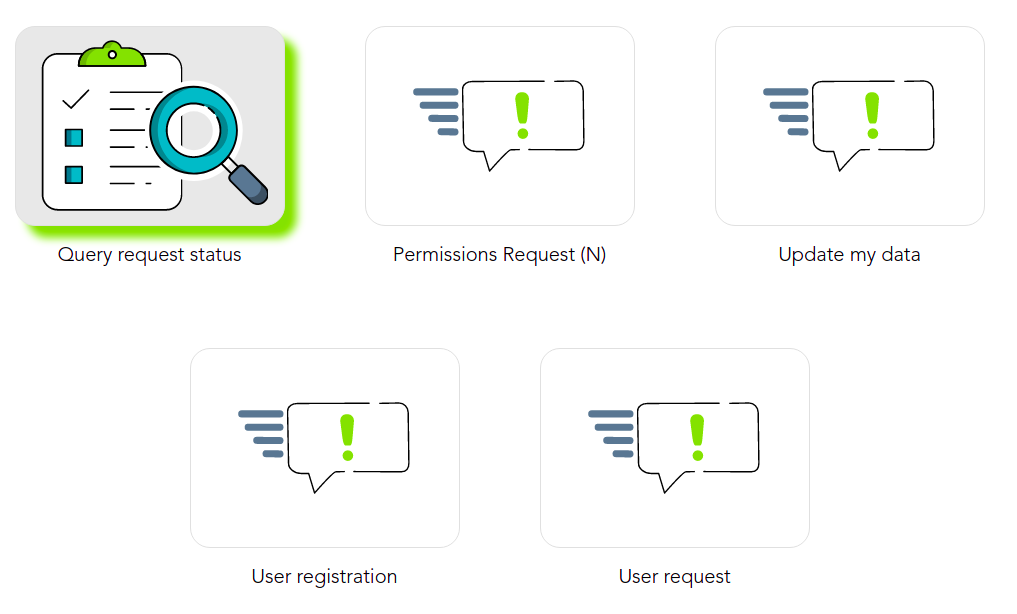
My request
My requests display all the processes or workflows that the user will be able to run, and the option allows the user to consult the status of the requests.
The Query request status displays all the processes that the user has initiated and allows the user to consult all the information about the workflow.
For more information, visit My Request page
Process Search
That functionality allows to users search for processes initiated or requested by themselves. Here the users will be able to consult all the information related to the processes and their status and if there are any pending tasks to be completed. If there are pending tasks, the user will be able to browse the task and manage it.
Administrator users will be able to consult all the information about all the processes which have been executed by any user.
For more information, visit the Process search page
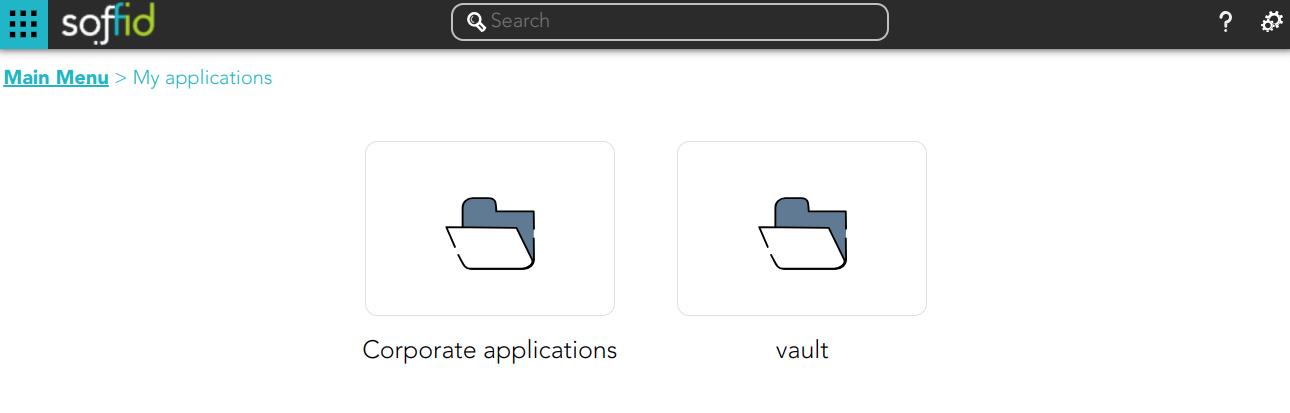
My Applications
My applications display all the corporate applications and third-party applications as well to which the user has permission to connect. Those applications have to be configured into Soffid Console
The password vault folder will be displayed as well. In this folder, the users will be able to find the shared accounts on the Soffid vault folder and will be able to save their personal accounts.
For more information, visit My Applications page
My Accounts
My Accounts display all the personal user accounts registered into Soffid Console and with which the user will log into the target system.
My authentication
My OTP devices
My OTP devices display all the OTP devices configured by the user and allow to the user config new ones.
For more information, visit My OTP devices page
My certificates and FIDO tokens
My certificates and FIDO token display all the configured certificates and allow to the user config new ones.
For more information, visit My certificates and FIDO tokens page
My Profile
My Profile allows to end-users config their own profile, update the user info and preferences, change the password, and recovery questions.
For more information, visit My Profile page
My tasks
Description
Displays the task in which the user is involved like a supervisor, manager, o person how has to approve or deny that tasks.
My task provides information about the process, the task, the start and due date and the asigned user. By clicking a record, it will be shown de task details and to perform actions will be allowed.
Manual tasks are assigned to named users, groups or roles. Whatever strategy is followed, each one of the assigned users will see that task at their tasks page.
You can differentiate tasks by their highlighted style:
- Normal: started task
- Highlighted Blue: due task
- Highlighted Bold: new task
The purpose of My tasks as a part of Self Service Portal is to reduce the workload of IT department, as well as improve overall security of IT system. Soffid console is concerned about task delegation and workflow management.
Screen overview
Custom attributes
My Task List
- Process ID: unique process identifier in the system.
- Process: generic process name.
- Task: generic task name.
- Start Date: date and time when the process was started.
- Due Date: date and time when the process will finish.
- Assigned: user to whom the task is assigned
Task detail
Task
Shows information about the job done in this task. This information depends on the process launched.
Action Logs
The action logs tab shows basic information about the process and a list with the summary of all the successive phases through which the task has passed.
- Start date: date and time the task starts
- Last task date: date of last task update.
- End date: date and time the process ends.
- Status: shows the point of the task (pending, on going or End/Completed)
- Approve pending permissions: Summary of all the successive phases through which the task has passed, providing information on the start date and time of the phase, the user assigned, and the action that was done.
Attachments
Displays the documents attached to the task, in some cases, files are attached to the tasks.
Allows you to download those documents and to verify any digital signature attached to them. Some tasks even allow the user to upload documents.
Comments
Displays the comments list added during the business process execution. Displays the comments list added during the task execution providing information about the user who wrote the comment, the date and time of that writing, and the comment that was writed.
Actions
My task query actions
|
Reload |
This action reload the task list with the current data. |
|
Download CSV File |
This action allows you to download a csv file with the list of all tasks. You can open the hamburger icon and Download CSV File. |
|
Open task |
By clicking on a record, the task detail will be shown. |
My task detail actions
|
Close |
Allows you to closes the task window, you can add new comments and those will be saved. |
|
Take ownership |
Enables the user to self-assign the task to authorize or deny it. |
|
Schedule |
Allows you to schedule the task execution. |
|
Delegate |
Allows you to to reassign the task to another user, who will must approve or deny it. |
|
Approve |
Allows you to authorize the task. When you authorize a task all defined operations for this task will be performed. |
|
Reject |
Allows you to deny the task. When you deny a task none defined operations for this task will be performed. |
My issues
Description
Soffid provides a tool to manage all issues and allows you to perform the operations available for each type of task. The actions to be performed will depend on each kind of task.
Screen overview
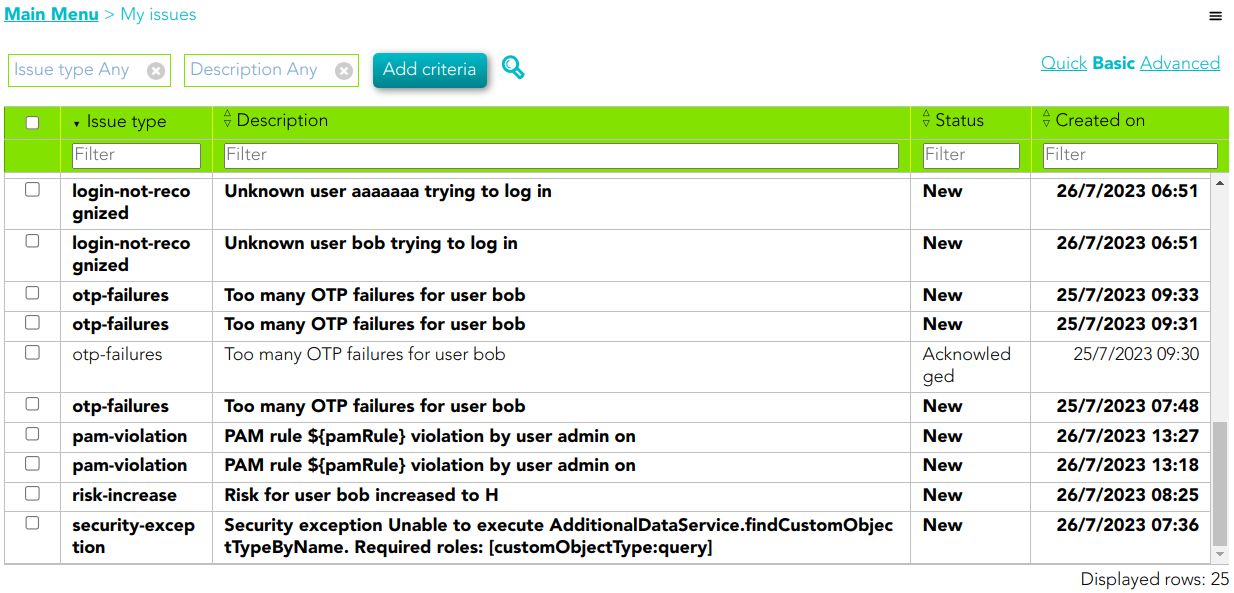
Standard attributes
- Issue type: issue list defined by Soffid.
- Description: a brief description of the issue.
- Status: possible task status. There are three available statuses:
- New
- Acknowledged
- Solved
- Created on: date of creation
Actions
Issues query action
| Download CSV file | Allows you to download a CSV file with the issue data. |
|
Add or remove columns |
Allows you to show and hide columns in the table. You can also set the order in which the columns will be displayed. The selected columns and order will be saved for the next time Soffid displays the page. |
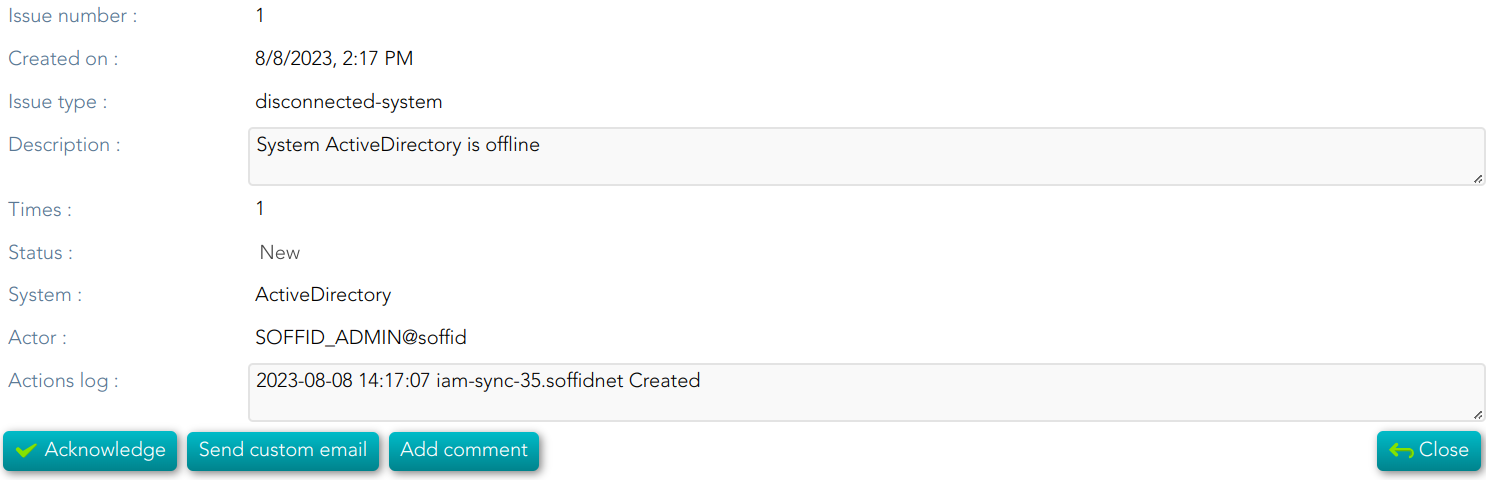
Issue detail
| Close | Allows you to quit without applying any changes. |
| Acknowledge |
Allows you to check as Acknowledged |
| Solve issue |
Allows you to mark as solved the issue. |
| Send custom email | Allows you to send a custom email to one recipient. |
| Add Comments | Allows you to add comments to the Action logs. |
account-created
💻 Image

| Unlock account | If you click this option, Soffil will unlock the account. |
|
Look affected accounts |
If you click this option, Soffil will lock affected accounts. |
|
Disable user |
If you click this option, Soffid will disable the user. |
disconnected-system
💻 Image
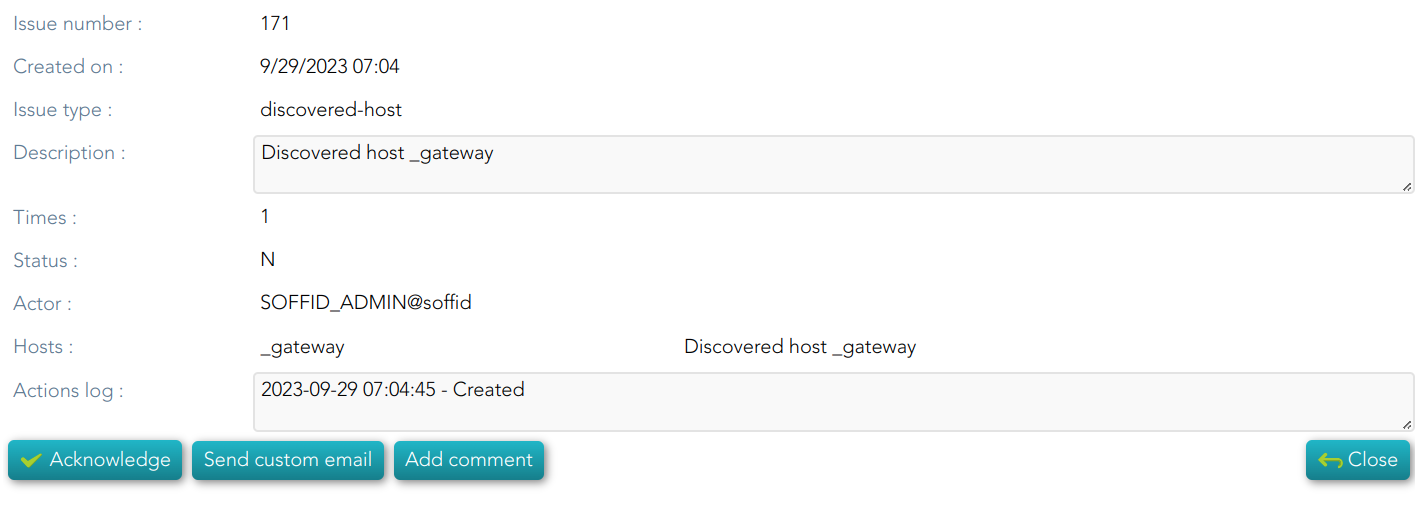
discovered-host
💻 Image
discovered-system
💻 Image
duplicated-user
💻 Image
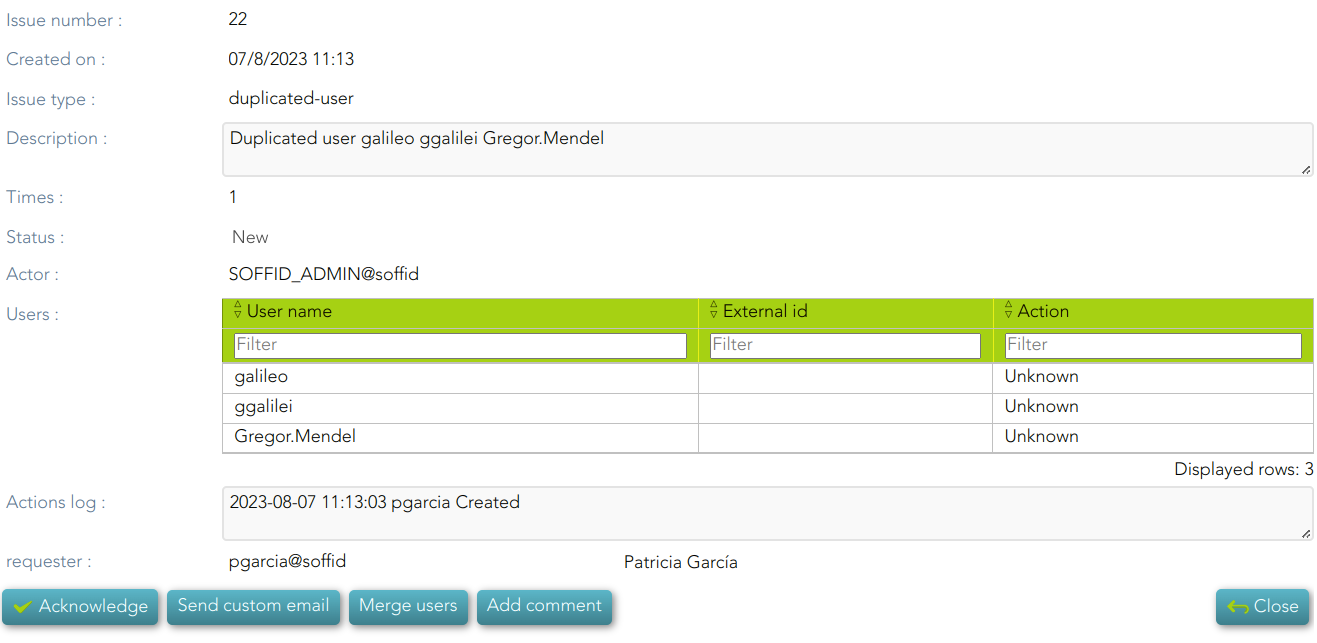
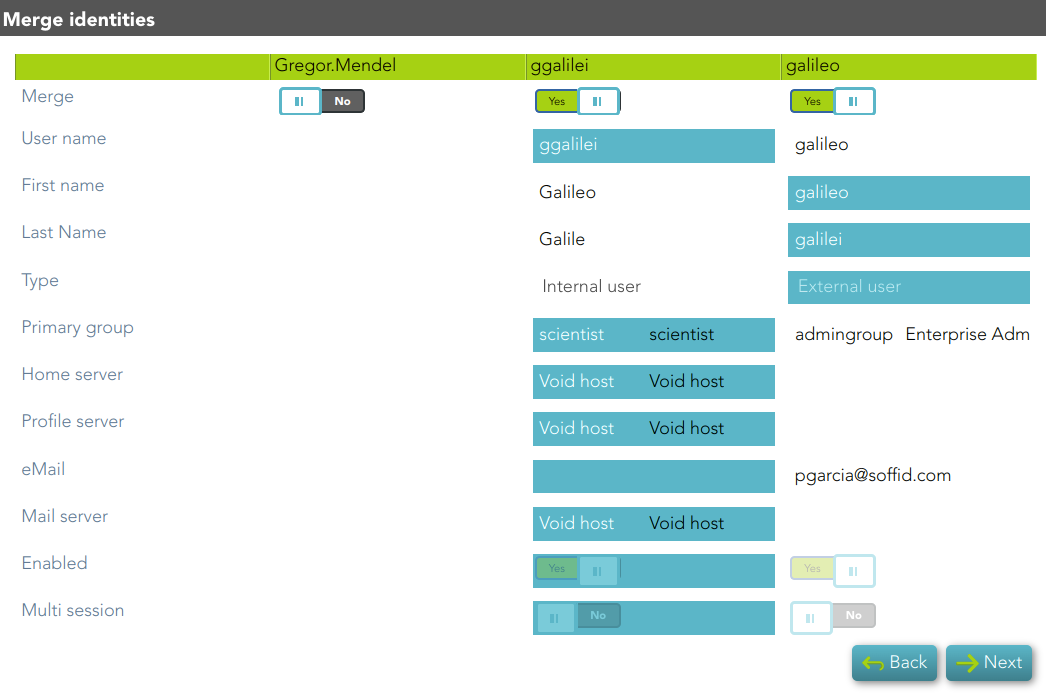
|
Mege users |
If you click this option, Soffid will allow you to merge the identities by selecting the data of each of them. 💻 Image
|
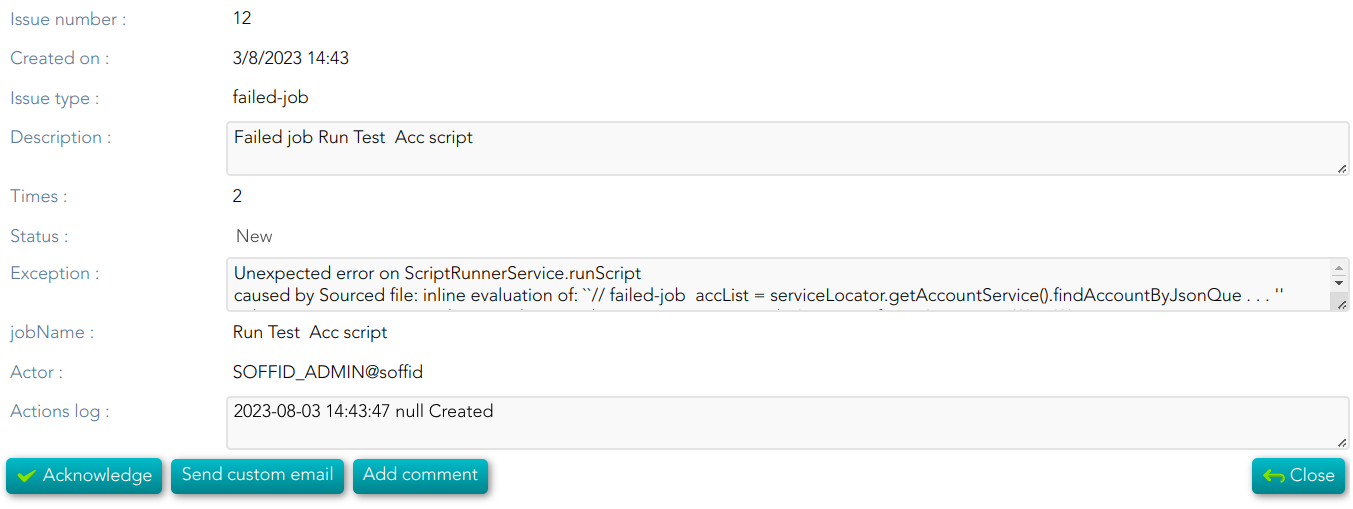
failed-job
💻 Image
enabled-account-on-disabled-user
💻 Image
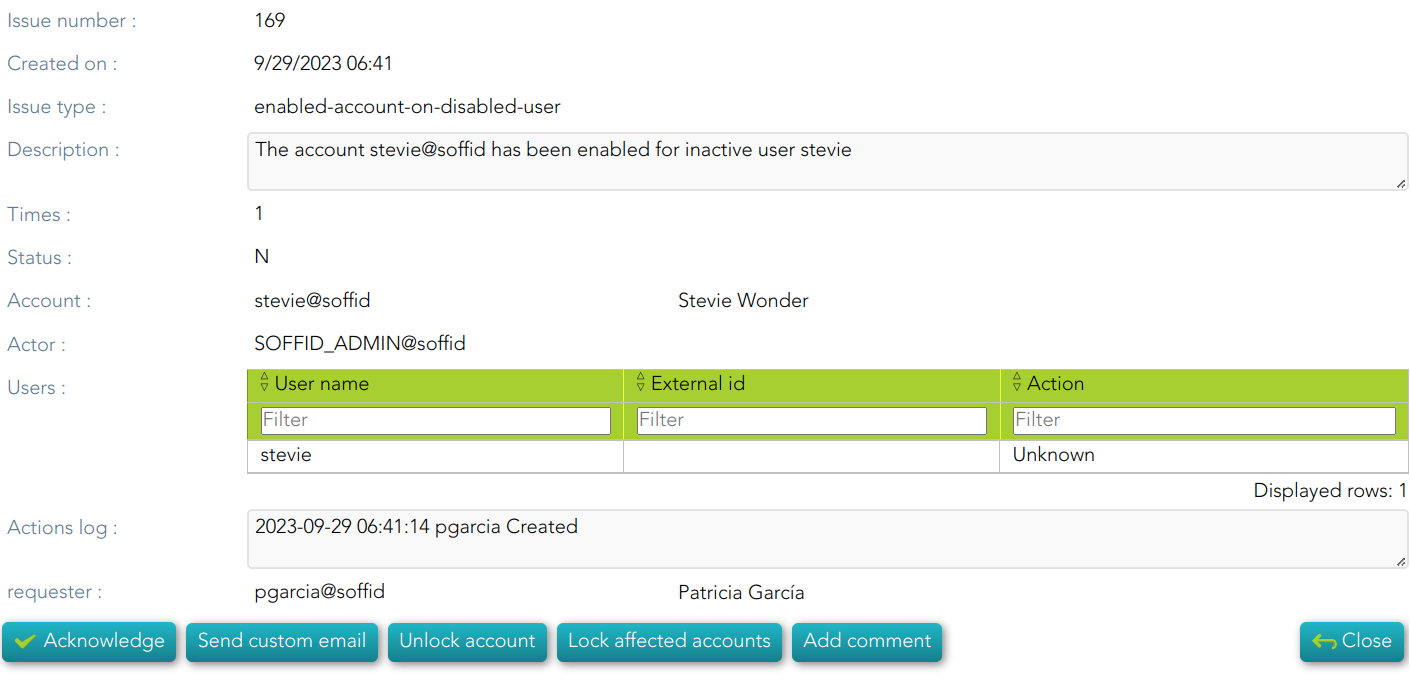
| Unlock account | If you click this option, Soffil will unlock the account. |
|
Look affected accounts |
If you click this option, Soffil will lock affected accounts. |
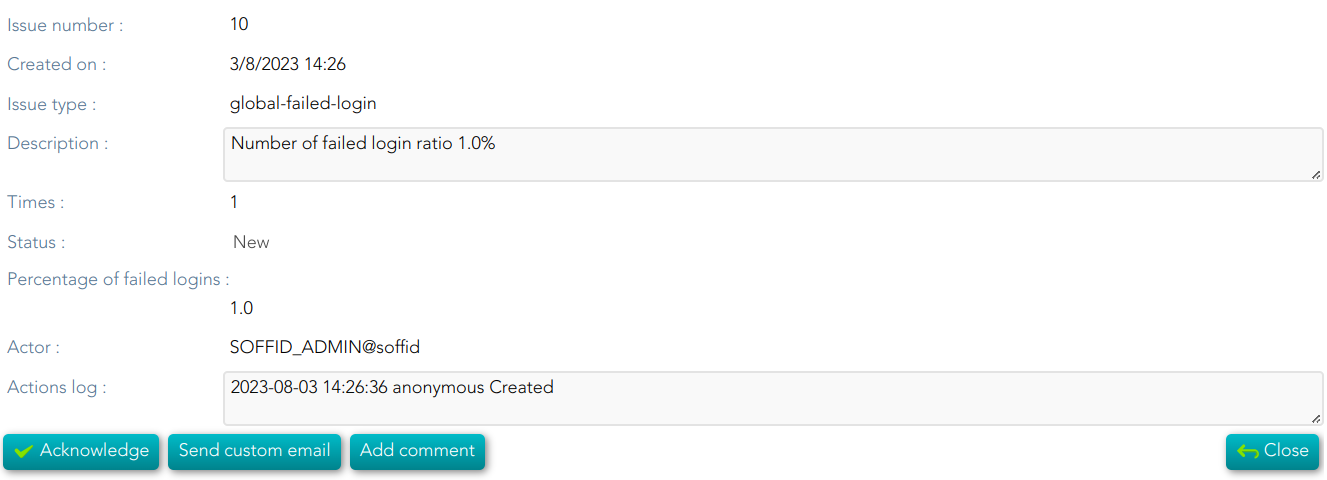
global-failed-login
💻 Image
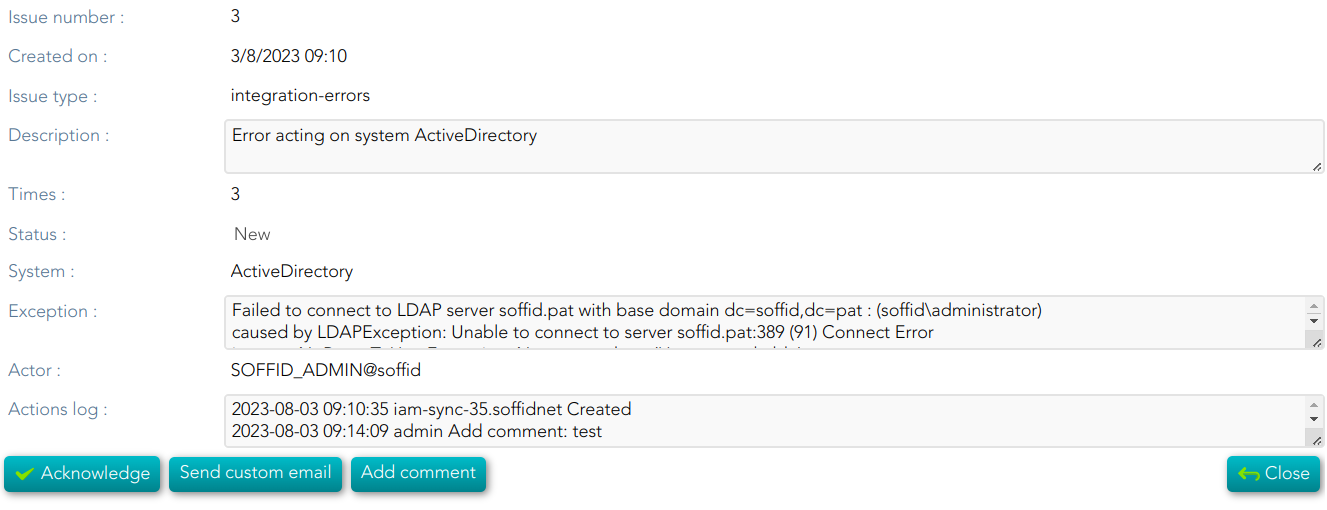
integration-errors
💻 Image
locked-account
💻 Image

| Unlock account | If you click this option, Soffil will unlock the account. |
|
Look affected accounts |
If you click this option, Soffil will lock affected accounts. |
|
Disable user |
If you click this option, Soffid will disable the user. |
|
Lock affected host |
If you click this option, Soffid will lock the affected host. |
|
Unlock host |
If you click this option, Soffid will unlock the host. |
login-different-country
💻 Image
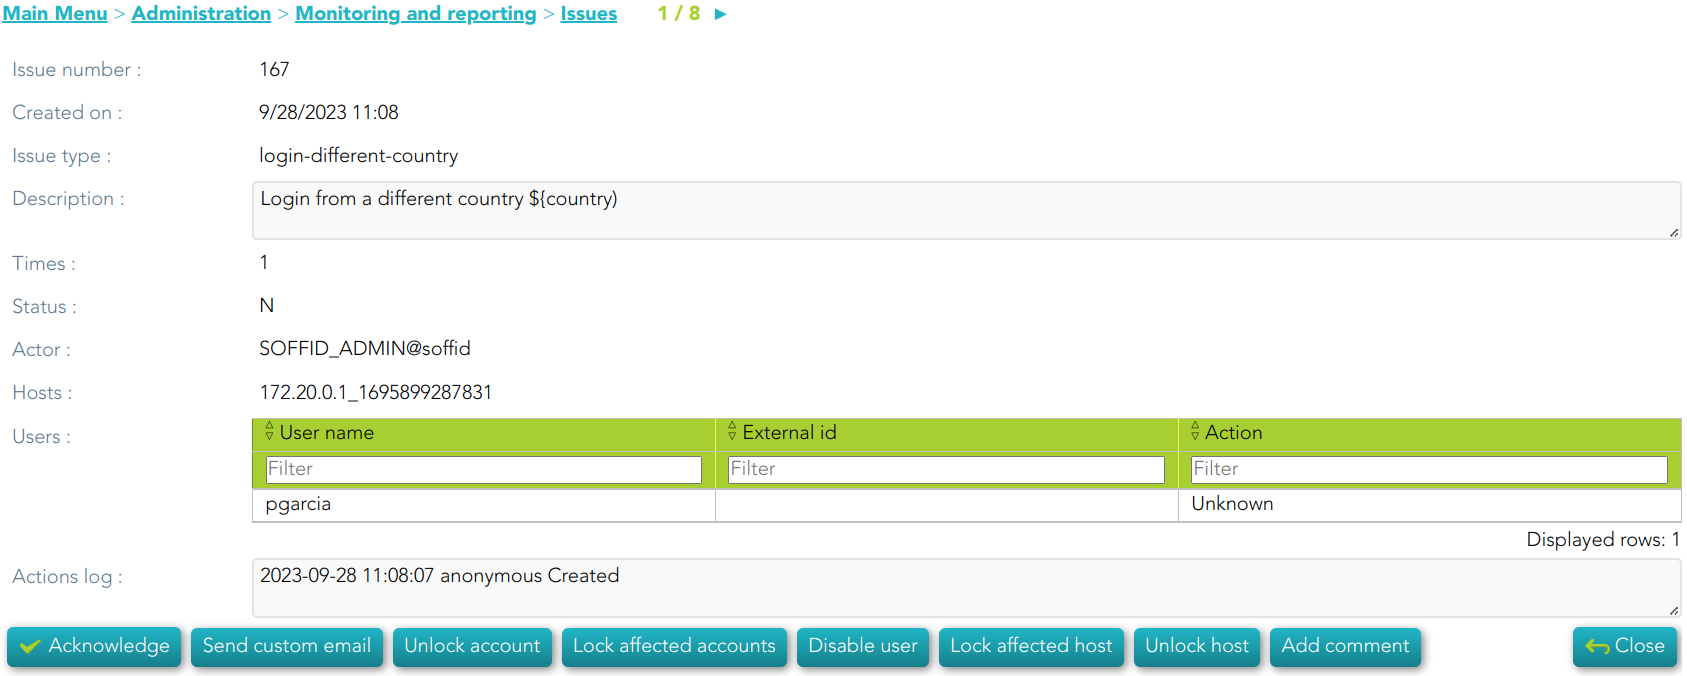
| Unlock account | If you click this option, Soffil will unlock the account. |
|
Look affected accounts |
If you click this option, Soffil will lock affected accounts. |
|
Disable user |
If you click this option, Soffid will disable the user. |
|
Lock affected host |
If you click this option, Soffid will lock the affected host. |
|
Unlock host |
If you click this option, Soffid will unlock the host. |
login-from-new-device
💻 Image
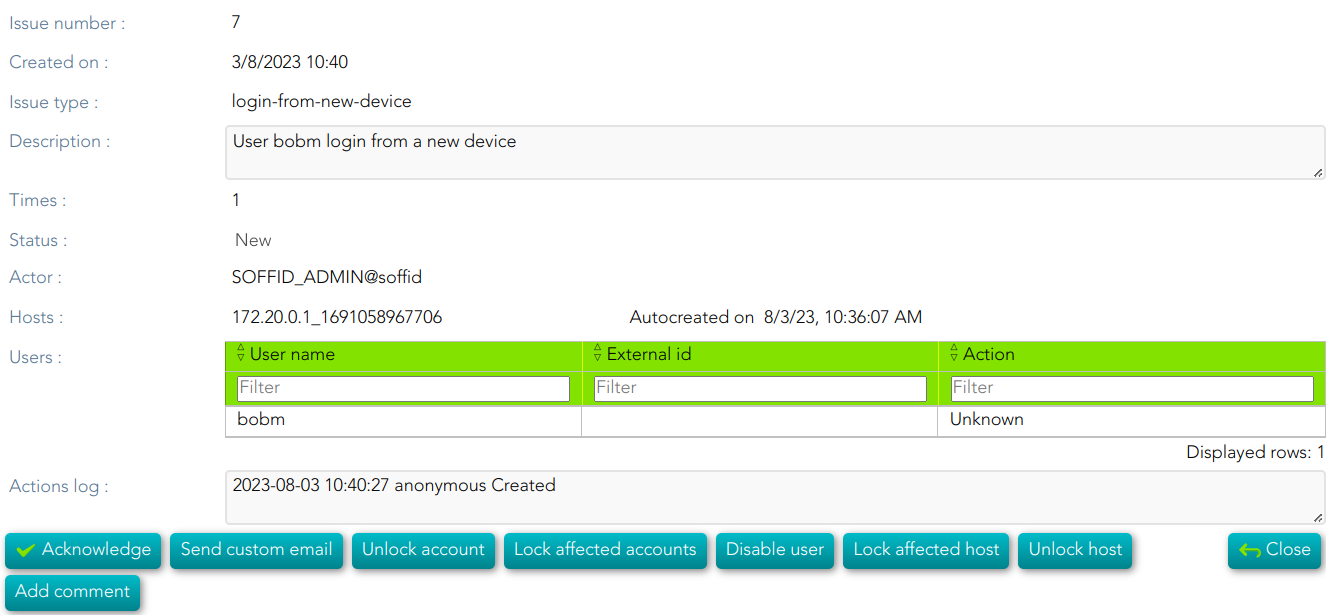
| Unlock account | If you click this option, Soffil will unlock the account. |
|
Look affected accounts |
If you click this option, Soffil will lock affected accounts. |
|
Disable user |
If you click this option, Soffid will disable the user. |
|
Lock affected host |
If you click this option, Soffid will lock the affected host. |
|
Unlock host |
If you click this option, Soffid will unlock the host. |
login-not-recognized
💻 Image
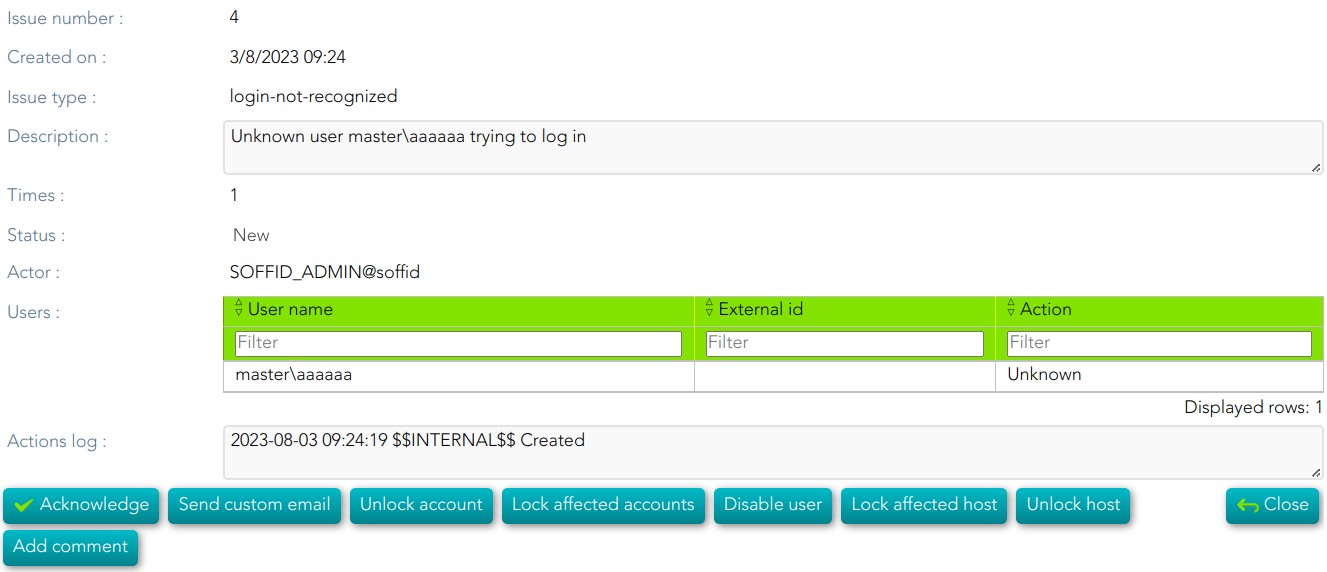
| Unlock account | If you click this option, Soffil will unlock the account. |
|
Look affected accounts |
If you click this option, Soffil will lock affected accounts. |
|
Disable user |
If you click this option, Soffid will disable the user. |
|
Lock affected host |
If you click this option, Soffid will lock the affected host. |
|
Unlock host |
If you click this option, Soffid will unlock the host. |
otp-failures
💻 Image
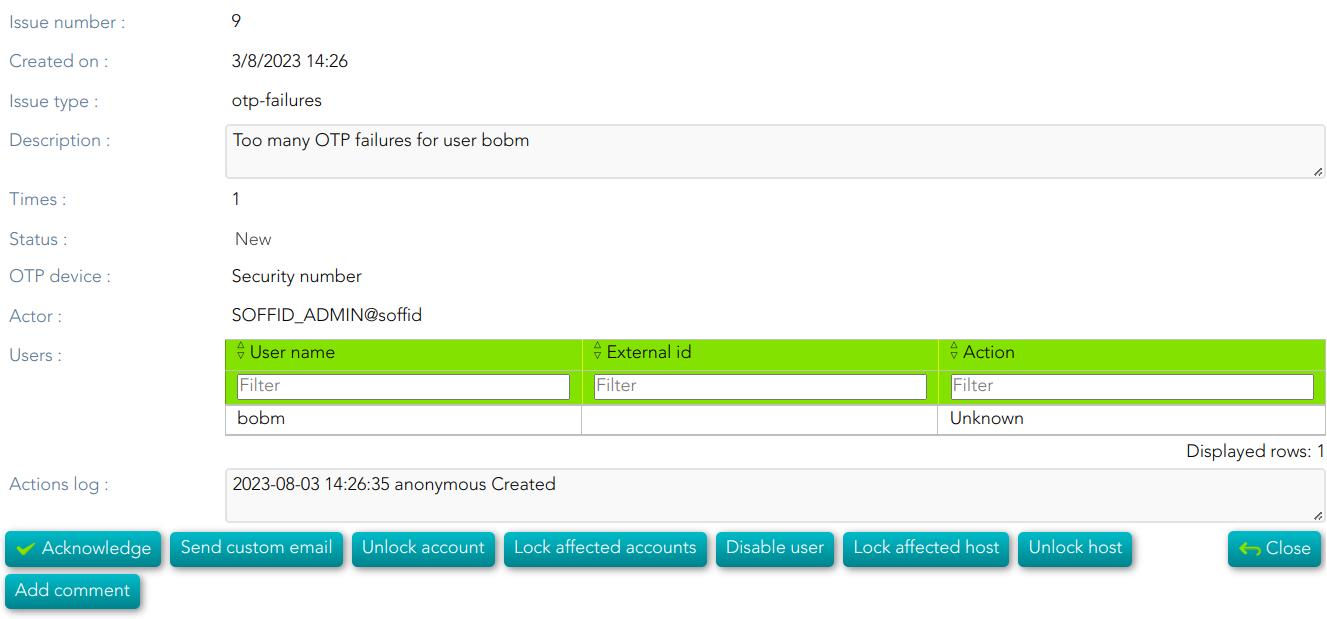
| Unlock account | If you click this option, Soffil will unlock the account. |
|
Look affected accounts |
If you click this option, Soffil will lock affected accounts. |
|
Disable user |
If you click this option, Soffid will disable the user. |
|
Lock affected host |
If you click this option, Soffid will lock the affected host. |
|
Unlock host |
If you click this option, Soffid will unlock the host. |
pam-violation
💻 Image
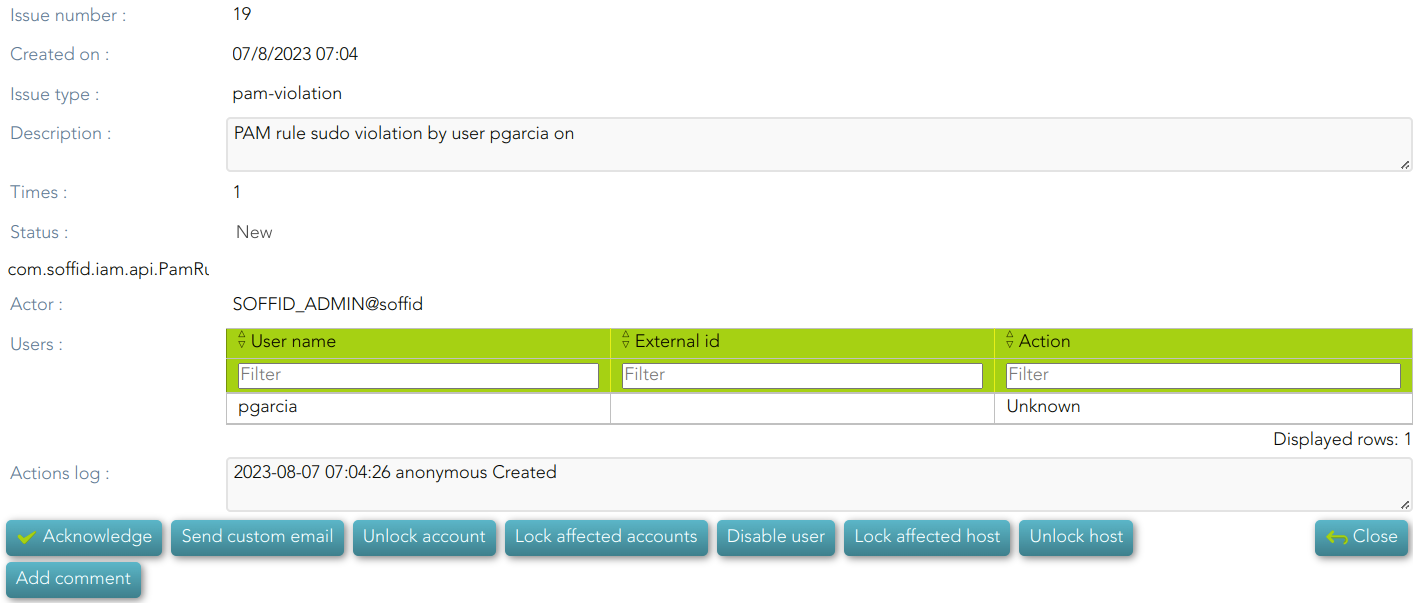
| Unlock account | If you click this option, Soffil will unlock the account. |
|
Look affected accounts |
If you click this option, Soffil will lock affected accounts. |
|
Disable user |
If you click this option, Soffid will disable the user. |
|
Lock affected host |
If you click this option, Soffid will lock the affected host. |
|
Unlock host |
If you click this option, Soffid will unlock the host. |
password-changed
💻 Image
permissions-granted
💻 Image
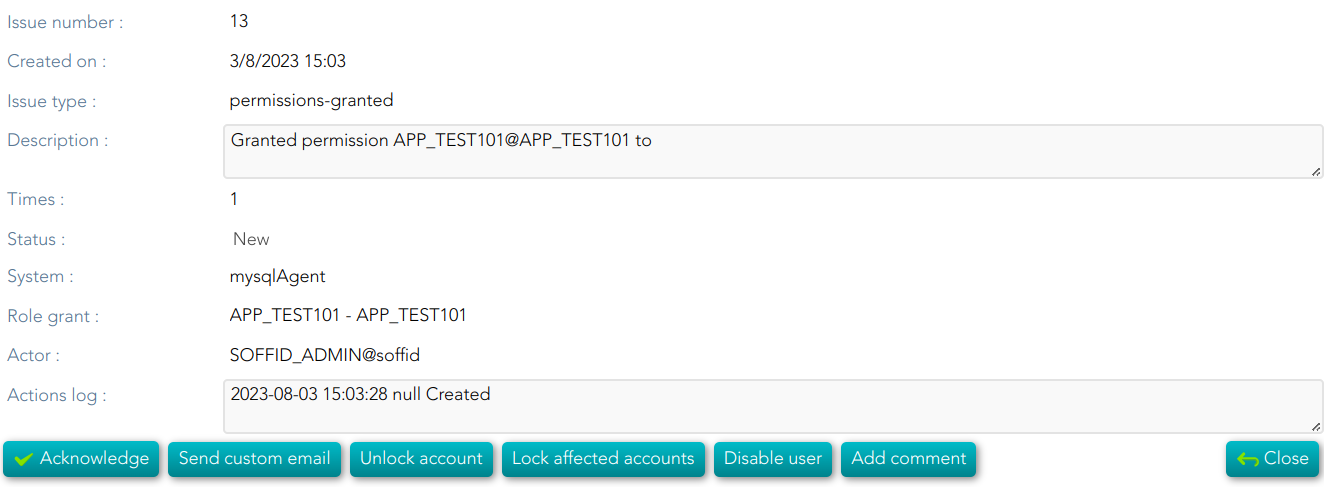
| Unlock account | If you click this option, Soffil will unlock the account. |
|
Look affected accounts |
If you click this option, Soffil will lock affected accounts. |
|
Disable user |
If you click this option, Soffid will disable the user. |
risk-increase
💻 Image
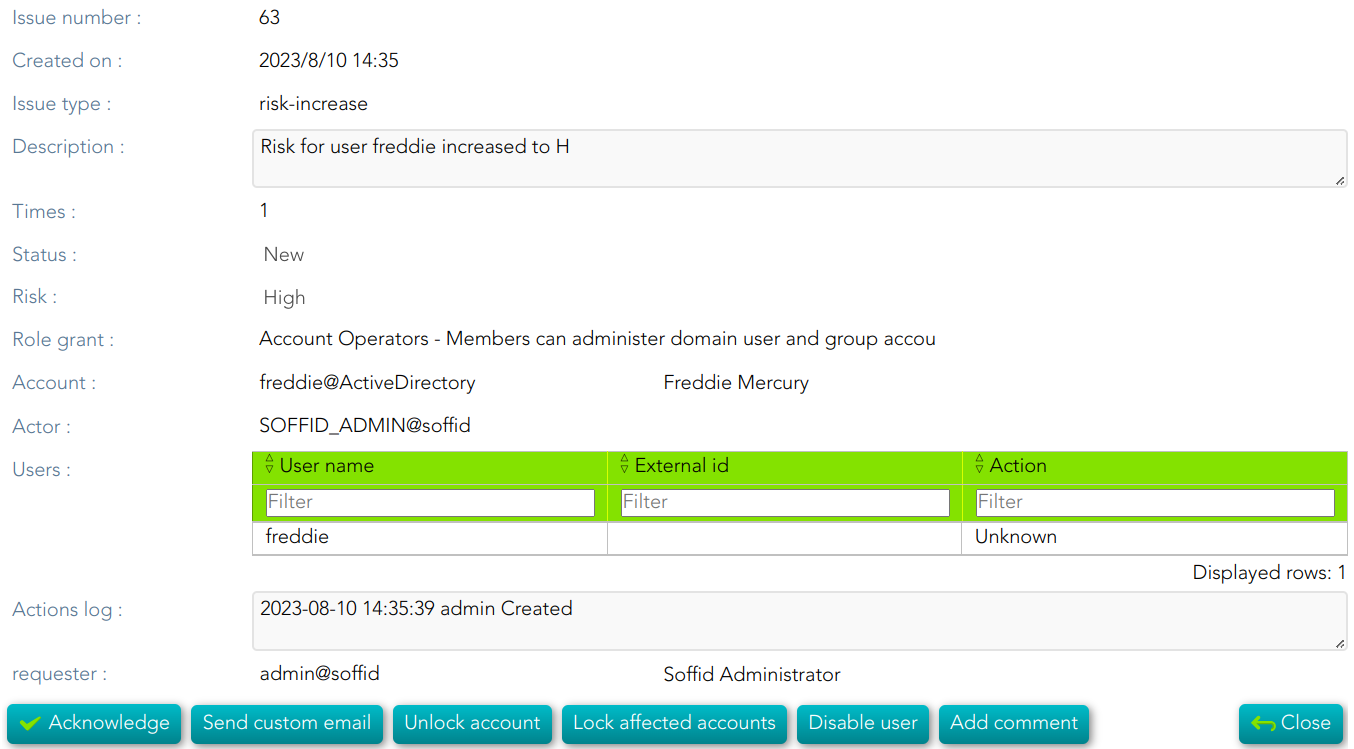
| Unlock account | If you click this option, Soffil will unlock the account. |
|
Look affected accounts |
If you click this option, Soffil will lock affected accounts. |
|
Disable user |
If you click this option, Soffid will disable the user. |
robot-login
💻 Image

| Unlock account | If you click this option, Soffil will unlock the account. |
|
Look affected accounts |
If you click this option, Soffil will lock affected accounts. |
|
Disable user |
If you click this option, Soffid will disable the user. |
|
Lock affected host |
If you click this option, Soffid will lock the affected host. |
|
Unlock host |
If you click this option, Soffid will unlock the host. |
security-exception
💻 Image
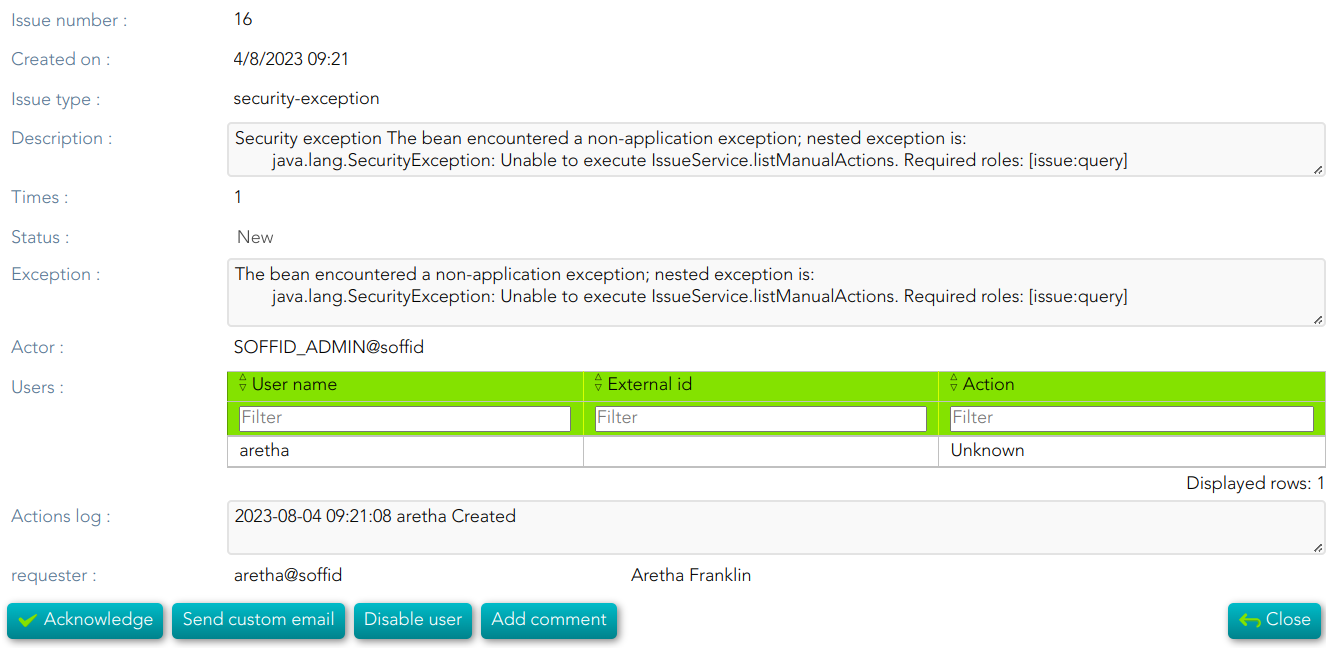
|
Disable user |
If you click this option, Soffid will disable the user. |
My applications
Description
My application is a part of a Soffid Self-service portal that allows end-users to start corporate applications and third party applications. Also, the end-user can view and use the shared accounts available for the user defined on the Password vault.
Applications
That option shows to each user, all the Corporate and Third party Applications to which the user can connect and the applications with public access. These applications have to be configured on the Application Access Tree option by an administrator user.
For more information you can visit the Application access tree page.
Password Vault
My Applications option shows the PasswordVault folder. On the vault folder you can find two kind of folders, one a personal folder and other a shared folder.
Inside the personal folder, you can create your own accounts, those accounts will not be shared with any other user. The shared folders could be used or managed by the owner/manager/SSO users.
For more information you can visit the Password vault page.
Screen overview
My requests
Description
Soffid provides a complete workflow engine that allows you to incorporate business processes or define new business processes as needed. End-users with the appropriate permissions will be able to request these processes. You can visit Self service portal examples page for more information.
My request screen allows to users: on the one hand, consult the processes they have executed and view the process details and status, Query request status; on the other hand, they will be able to execute the processes for which they have been assigned the proper permissions.
More information about process and workflows on BPM Editor Book
Screen overview
Query request status
Description
Displays a table with all the processes performed by the end-user. The end-user can consult processes detail and perform actions depending on the user permissions. You can visit Self service portal examples page for more information.
Custom attributes
- Process ID: unique process identifier in the system.
- Process Name: generic process name
- Status: displays the point in progress on the defined process diagram. Depend on the process status, you could perform some operations or others.
- Start date: date and time the process starts
- End date: date and time the process ends. A process without end date it is a process in progress
To view all the attributes of one process, you can access Process attributes to consult the custom attributes. Be in mind, the processes have custom attributes depending on the business process definition.
Actions
The operations to be performed depend on the user permission and the business processes defined with the workflow engine.
You can find documentation about the business processes on BPM Editor Book.
Query request status actions
|
Reload |
Allows you to reload the processes list with updated data. |
|
Download CSV file |
Allows you to download a CSV file with all the information of the processes list. |
|
Query Filters |
Allows you to filter data in each column of the table. |
Process actions
The actions to perform to each process, depend on the business process definition and the user permissions.
You can find more information about the most commons process actions if you go to Process detail actions
Process Search
Description
A process is a series of actions, connected by transitions. An action could be either an automatic action or a manual task.
Soffid console is concerned about task delegation and workflow management. Any user is able to create new processes or any user can be assigned as an actor for a task belonging to a process.
Process Search page allows users to search process by different criteria, to view the process details and to perform the proper actions depending on the user roles.
In order to view a task, a security constraint must be accomplished. The user must have granted the observer or administrator role on the specific project version or has been assigned as a potential actor of it at some time.
Screen overview
Custom attributes
Search attributes
The search can be performed by setting certain parameters, which are as follows:
- Search text: search by a certain text, as user name or application, etc.
- Process ID: all the processes have an assigned an identifier ID.
- Start date: allows you to establish a date range when the process was started.
- Include completed: by default, tasks that have not yet been completed are displayed. By marking this flag, those who have concluded will also be shown. If you marck this flag, you could select a date range about the End date.
- End date of the process. These filters will be available if you check the Include completed option.
Process attributes
Each process has commons attributes and specific attributes depending on the business process definition.
You can find documentation about the business processes on BPM Editor Book
Commons process attributes
- Proces Id: each proces has an unique identifier.
- Name: shows process name and the versión of the addon you are using.
Other process information
- Specific process attributes: these attributes depend on the process definition.
- Work in progress: details the specific point in which the process and associated tasks are. You can find information about the process ID, the job description for each one of them, the start date and time, and the current status. The users with the proper roles could view the task details, browse and perform actions by clicking on it.
- Actions log: summary of all the successive phases through which the process has passed, providing information on the start date and time of the phase, the user (task manager) assigned, and the action that was done.Also when it is defined, the diagram of the workflow is diplayed.
- Attachments: in some cases, for example in massive user upload processes using a CSV file, files are attached to the process so that it can be executed. These files can be consulted, by downloading or opening them directly, from this page. Additionally, if needed, it is possible to see the certificates used by the process owner.
- Comments: displays the comments added by the user who initializes or performs actions on the process.
Actions
Process query actions
Actions to be performed on the process list:
|
Search |
Allows you to query the processes with the indicated parameters. |
|
Download CSV file |
Allows you to download a CSV file with the list of processes. You can open the hamburger icon and Download CSV File. |
|
Table Filters |
Allows you to filter data in each column of the table. |
Process detail actions
Each process has a specific action defined on the business process definition.
You can find documentation about the business processes on BPM Editor Book
The most commons actions are below:
|
Close |
Allows you to close the process detail page and return to the previous page. |
|
Reload |
Allows you to reload all process data with the updated data. |
|
Take ownership |
Allows you to take the ownership to approve o deny the process. |
|
Approve |
Allows you to approve the process and perform the actions defined for that process. |
|
Deny |
Allows you to reject the process. |
Work in progress actions
|
Edit task |
Allows you to edit a task by clicking on the record. When you click the task, you will browse to the task detail and it will be allowed to perform actions defined to users with the proper permissions. |
Attachments
|
Download |
Allows you to download the available attached files. |
My accounts
Description
My Account is a part of Soffid's self-service portal that allows end-users to access and manage their personal accounts. That option displays to each user, all their personal accounts and allows to set and query the password of each account.
Screen overview
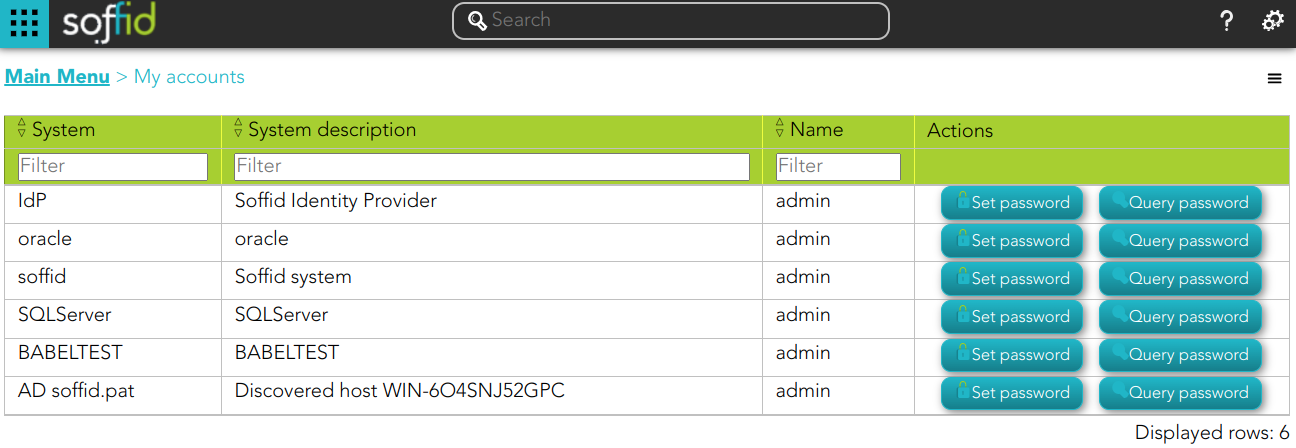
Standard user attributes
- System: target sistem for which this account has been created
- System description: a brief description of the system.
- Name: user account name.
- Actions: available actions.
Actions
|
Set password |
Allows you to set a new password for this account. That change will apply to different target systems. The new password must comply with the password policies definied. |
|
Query password |
Allows you to query and copy the password and the user name. |
|
Download CSV file |
Allows you to download a CSV file with all the information about your accounts. |
My OTP devices
Description
My OTP devices are part of a Soffid Self-service portal that allows end-users to access their OTP devices configured.
That option display to each user, all their OTP devices and also allows you to manage those and add new OTP devices.
Soffid Administrator user can configure the available OTP types. For more information, you can visit the OTP settings page.
This option will only be available if the OTP addon is installed in the Soffid console. Visit the Two factor authentication book for more information
Screen overview
Standard attributes
- Name: automatic name assigned to the OTP device
- Created: created date and time.
- Last use: last used date and time.
- Status
- Created
- Enabled
- Locked
- Disabled
Actions
|
Add |
Allows you to add a new OTP device. To add new OTP devices you need to click the add button (+), then Soffid will display a new wizard to config the OTP devices. First of all, you need to select the OTP device Type, once the type is selected, you need to fill in the required fields, which depend on the Type selected. If you select an Event-based or Time-based HMAC Token, you will need to scan the QR code and write the PIN. Finally, you must Apply changes. |
|
Delete |
Allows you to delete one or more OTP devices. To delete OTP devices first select the devices, then click on the subtract button (-), then Soffid will ask you to confirm or cancel the operation. |
My certificates and FIDO tokens
Description
My certificates and FIDO tokens are part of a Soffid Self-service portal that allows end-users to access their OTP devices configured.
That option displays to each user, all their certificates and FIDO tokens and allows also to manage those and add new certificates and FIDO tokens.
Screen overview
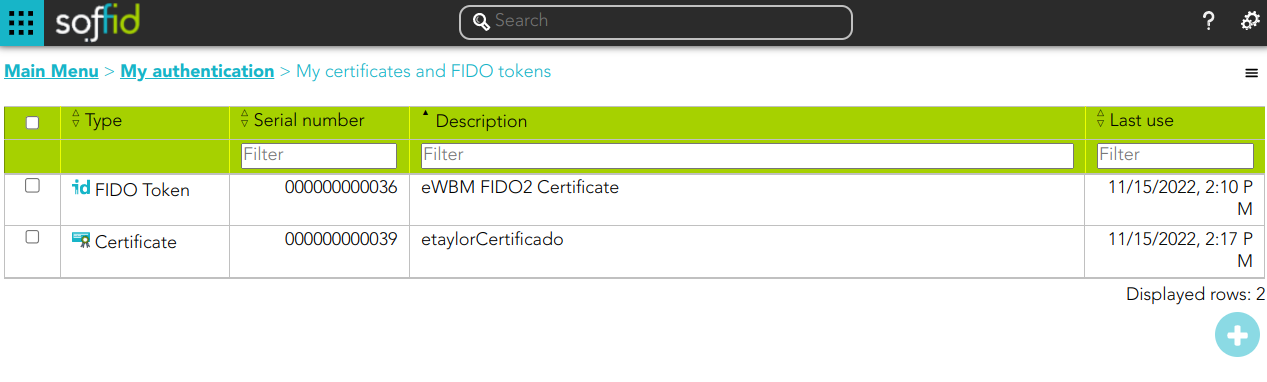
Standard attributes
- Type: there are two available options:
- Certificate.
- FIDO token.
- Soffid Authenticator
Actions
|
Add |
Allows you to add new certificates and FIDO tokens. To add new ones you need to click the add button (+), and then Soffid will display a new wizard to configure the certificates and FIDO tokens. First of all, you need to select the Type, once the type is selected, you need to follow the required steps which depend on the Type selected. |
|
Delete |
Allows you to delete one or more certificates and FIDO tokens. To delete certificates or FIDO tokens first you must select the certificate or FIDO token, then click on the subtract button (-), then Soffid will ask you to confirm or cancel the operation. |
My Profile
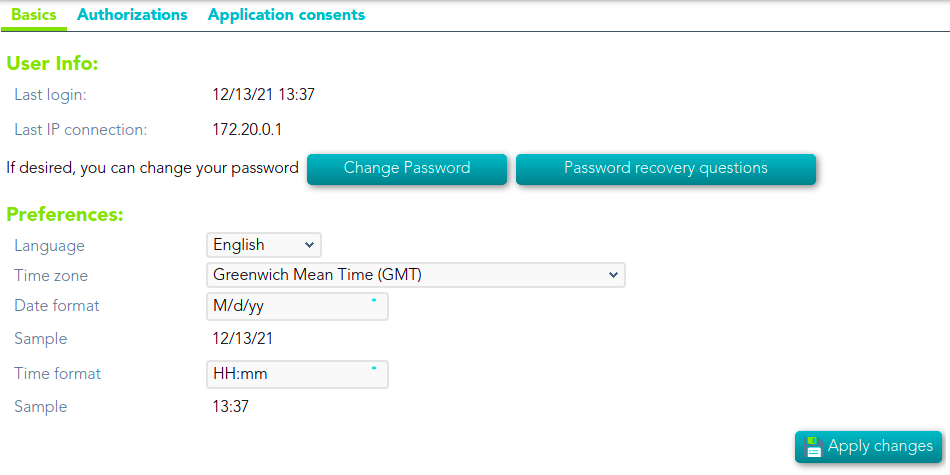
Description
My Profile is a part of a Soffid Self-service portal that allows to end-users config their own profile, update the user info and preferences, change their password, and recover questions.
To display My Profile page you need to click on the config icon and then click My Profile on the options menu. Then Soffid displays a new window that will allow end users to configure their profiles.
Screen overview
Basic tab
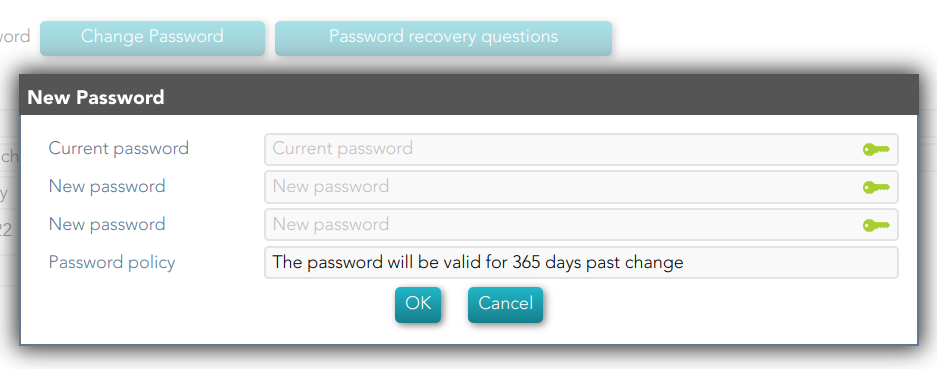
Change password
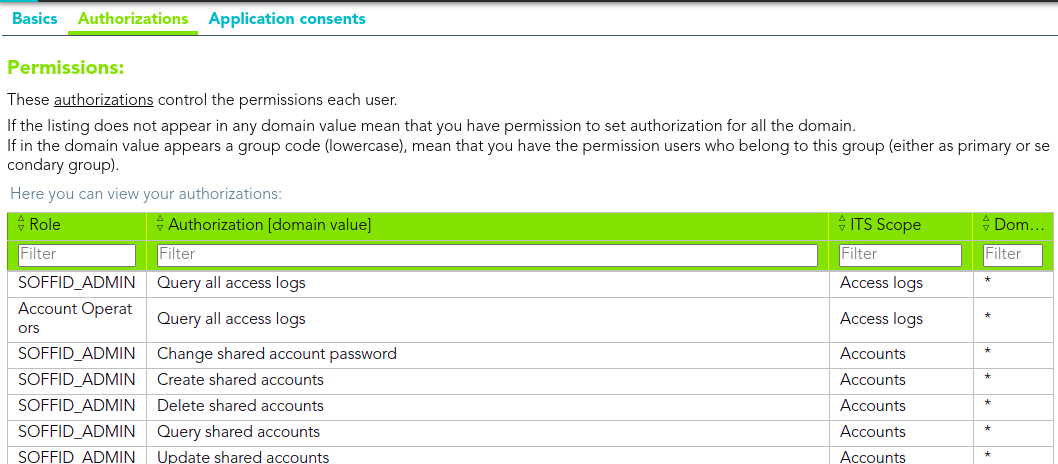
Authorizations tab
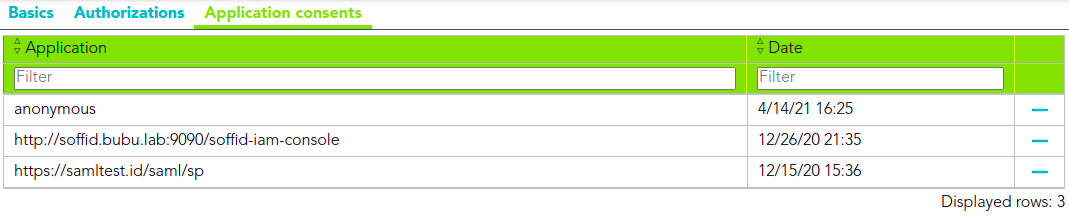
Application consents tab
Standard attributes
Basic
User Info
- Last login: date and time of the user's last login.
- Last IP connection: IP of the user's last login.
- Change password: allows end-users to change their password.
- Password recovery questions: allows end-users to config their own questions to recover their passwords.
For more info about password recovery, you can visit the Password recovery questions page.
Preferences
- Language: allows end-users to select their preferred language.
- Time Zone: allows end-users to select their time zone.
- Date format: allows end-users to select the format date.
- Sample: displays how the date will be displayed in Soffid Console
- Time format: allows end-users to select the format time
- Sample: displays how the time will be displayed in Soffid Console
Authorizations
Display a list with the user authorizations.
Application consents
Displays a list of all the user's consents given, and the user can see all of them. Users can remove the consent at any time as well.
When the user connects to a new application, the IdP will indicate which data will be shared with this application. That information is defined in the Attribute sharing policies page of the Federation.
For more info about password recovery, you can visit the Attribute sharing policies page.
Global settings
Tenants
Definition
Soffid 3 is multi tenant. This means that one can configure many differente tenants to manage disjoints groups of identities and applications.
Each Soffid object, including applications, systems, roles, users, and accounts are bound to a single tenant.
Of course, there is a special tenant named master. Master tenant administrators can jump to any other tenant with administration privileges.
Soffid recommends connecting directly to the specific tenant to configure it correctly. You have more information about this topic in the Tenant access section.
Screen overview
Tenant properties
- Name: Set a short name for the tenant.
- Description: Enter a long description for the tenant
- Enabled: Usually set to yes. If it's set to NO, no user will be able to log in to that tenant, and no provisioning or automated task will be ran on that tenant.
- Disabled permissions: By default, tenant administrator permissions are restricted, so they are not able to bypass tenant borders and access to other tenant information. To achive this, the following permissions are disabled by default, but some others can be added:
- Open the tenants management page
- Use the tenant micro-service
- Manage sync servers
- Assigned sync servers: By default, the new tenant will not be able to use any sync server unless it is authorized to. So, one can create a sync server for a specific tenant that cannot be used by any other tenant.
Actions
The following actions can be performed on tenants:
|
Export a tenant |
The process will generate a compressed file with all the information contained in the Tenant. It includes even the connectors configurations, mappings and global settings. |
|
Import a tenant |
The user can upload the previously exported tenant. The process will restore all the information contained in the Tenant, including connectors configurations, mappings and global settings.If the Tenant already exists, the process will not replace it. A new tenant will be created with a new name. If you want to replace the existing tenant, remove it before uploading the tenant export file. |
|
Log into a tenant |
If you have permission to log into a different tenant, you can use this option to access to it. This option is not intended for normal usage, but for administrative purposes |
Tenant access
Option 1
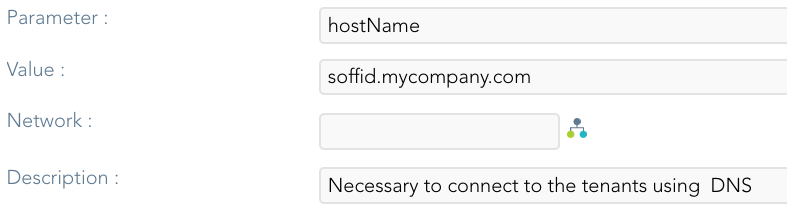
When users are connecting to Soffid console, the master tenant is displayed by default. In order to directly connect to any tenant, a DNS entry with the tenant name must be added to your DNS server.
For instance, if you have deployed a Soffid console with the DNS name soffid.mycompany.com, the DNS name test1.soffid.mycompany.com will be used to access to the test1 tenant.
Note that you must configure the hostName Soffid parameter in the master with your DNS name
Option 2
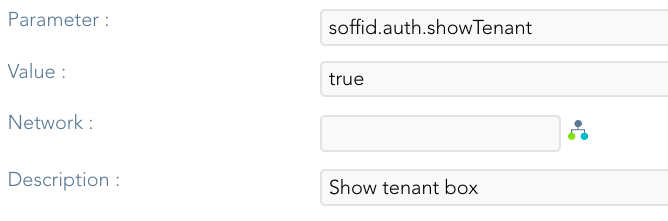
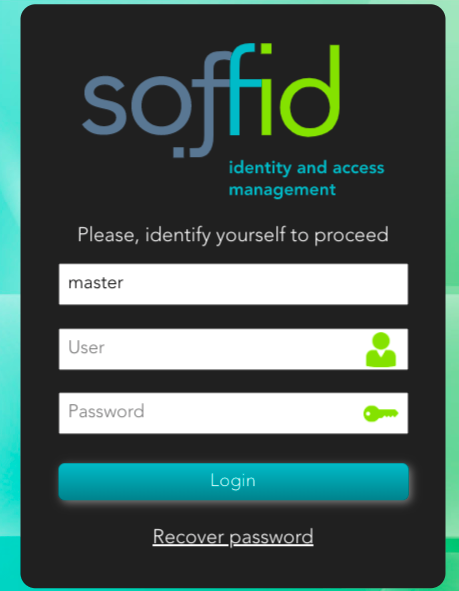
You can also configure the login page using the soffid.auth.showTenant Soffid parameter. If the parameter value is true, Soffid will display a new box in the login page to write the tenant name to login.
Plugins
Definition
Soffid provides you additional functionality that allows installing addons and server plugins. There are two main types of addons: system connectors and console addons.
You can download existing addons and plugins developed by Soffid by visiting http://download.soffid.com/download or http://download.soffid.com/download/enterprise if you have a Soffid user with authorization.
Addons and plugins can be developed using Addon Development Guide.
An addon or plugin, must be upload into a Master tenant, the other tenant will inherit these installed addons and plugins.
System connectors
Also referred as plugins, there are little pieces of software able to manage identities on some type of systems. They can be generic plugins (SQL or LDAP plugins) or custom specific plugins.
The system connector is configured when the administrator creates an agent. An agent can be viewed as a configured instance of a plugin.
In order to upgrade existing (running) plugins, the synchronization server that hosts this plugin must be restarted from the system monitoring screen.
Console addons
Add important features to Soffid console. A console addon can contain common classes, data models, transactional services, web services, and web interfaces.
In order to apply addon changes, the console must be restarted. It can be restarted from this page by clicking on the restart console button.
From the addon management screen, you will be able to upload and upgrade server plugins, as well and enable or disable them.
Screen overview
Related objects
Standard attributes
- Plugin: identified name of the plugin or addon deployed.
- Version: version of the plugin or addon.
- Deployed by: user that deployed the addon or plugin.
- Date: date and time of the deployment.
- Enabled: if enabled is Yes, the plugin or addon will be available to use it.
- Components: component list that make up the plugin or addon.
Actions
Plugins query actions
|
Add new |
Allows you to upload and install a new plugin or addon. You can choose that option on the hamburger menu or click the add button (+). You must pick a file, that file has to be a valid add-on or plugin. Once the file is selected, it will be uploaded automatically. Then, you must restart the Sync server or Console depending on the uploaded plugin |
|
Delete |
Allows you to delete one or more plugins or addons, you must select one or more records from the list and click the button with the subtraction symbol (-). To perform that action, Soffid will ask you for confirmation, you could confirm or cancel the operation. |
|
Restart Console |
Allows you to restart the console to apply addon changes. That operation will be mandatory when you load an addon. |
|
Download CSV file |
Allows you to download a CSV file with all the information about plugins and addons. |
Plugins detail actions
| Apply changes | Allows you to update the plugin. Only Enabled attribute can be modified. Once you apply changes, the plugin details page will be closed. |
| Save | Allows you to update the plugin. Only Enabled attribute can be modified. |
| Delete |
Allows you to delete and desinstall a specific plugin. To delete a plugin, you can click on the hamburger icon and then click the delete button (trash icon). Soffid will ask you for confirmation to perform that action, you could confirm or cancel the operation. |
| Undo | Allows you to undo any changes. |
Look & feel
Definition
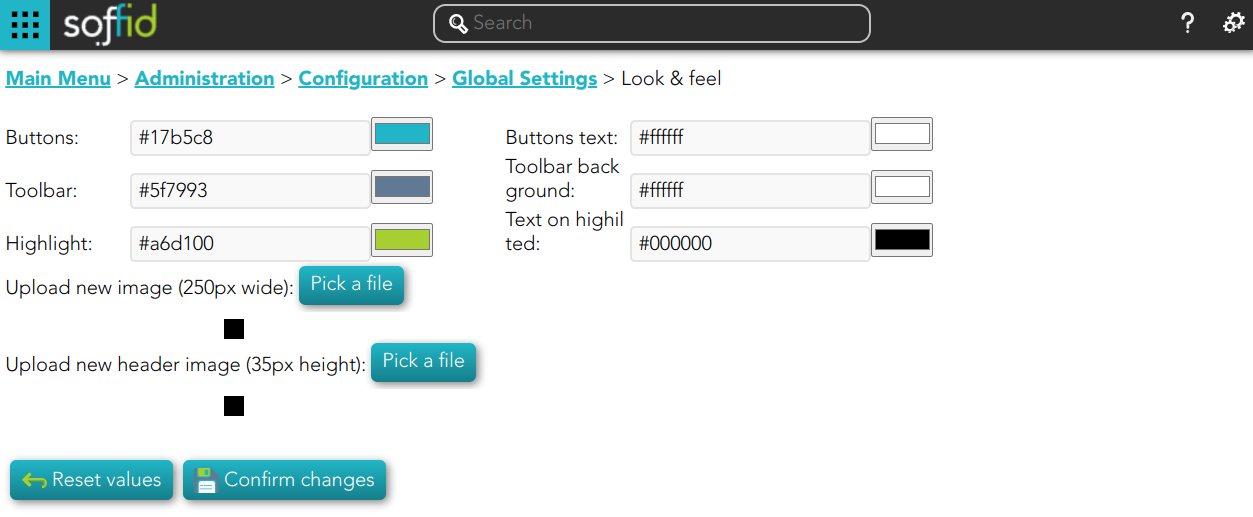
Soffid's Look & feel page allows you to adjust the Console styles to your organization.
In this configuration page, the customization of three sections is allowed:
- You can change the colors of the Soffid components and text.
- You can change the image of the logo that appears on the login page.
- You can change the image of the logo that appears in the header.
- Changes made on this page affect the entire Console.
Some changes may require updating the browser several times because some items are in the browser's cache.
Overview
Actions
|
Reset values |
Allows you to return to the default Soffid values. |
|
Confirm changes |
Allows you to apply the changes made. |
|
Pick a file |
Allows you to pick a file to load. The file must have a specific configuration |
Soffid parameters
Definition
Soffid allows you to customize the configuration of some attributes of the Console, Syncserver, connectors and add-ons.
There are several types of parameters.
- Informative parameters, such as the versions of internal components of Soffid.
- Parameters used as attributes in Soffid screens, such as the values of the look & feel fields.
- There are also parameters that can be modified, such as some configuration data for the synchronization server.
- There are new attributes that can be included to expand the functionality of Soffid, such as mail server data.
If you want to know the Soffid console version check the component.iam-core.version parameter.
Screen overview
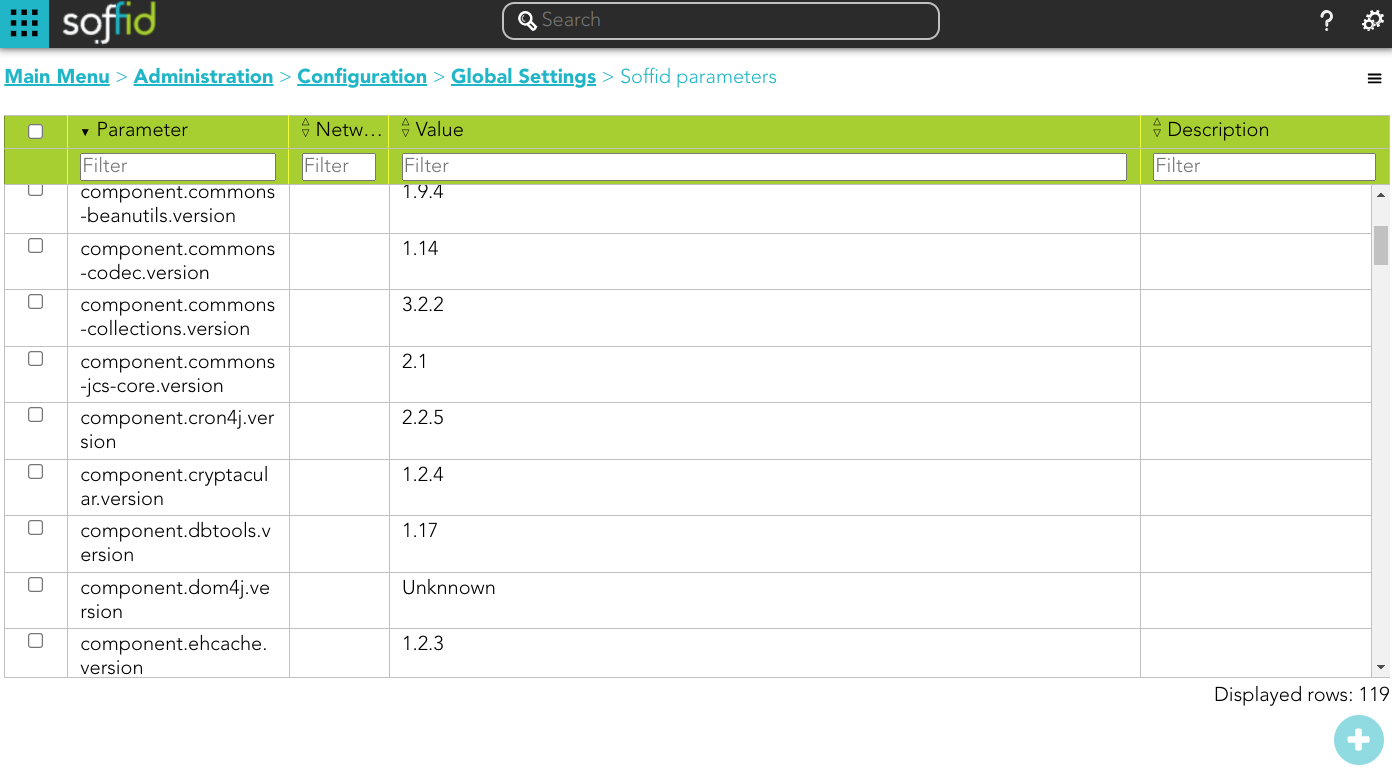
Standard attributes
- Name: code used to identify the parameter.
- Value: parameter value.
- Network (optional): network to which this parameter would be assigned.
- Description (optional): a brief description of the parameter.
Actions
Soffid parameters query actions
|
Add new |
Allows you to add a new Soffid parameter. You can choose that option on the hamburger menu or clicking the add button (+). To add a new parameter it will be mandatory to fill in the required fields. |
|
Delete |
Allows you to delete one or more Soffid parameters by selecting one or more records and next clicking the button with the subtraction symbol (-). To perform that action, Soffid will ask you for confirmation, you could confirm or cancel the operation. |
|
Import |
Allows you to upload a CSV file with the parameter list to add, update or delete parameters to Soffid. First, you need to pick up a CSV file, that CSV has to contain a specific configuration. Then you need to check the content to be loaded, it is allowed to choose if you want or not to load a specific attribute. And finally, you need to select the mappings for each column of the CSV file to import the data correctly and to click the Import button. To delete a parameter, the values of the parameter have to be empty |
|
Download CSV file |
Allows you to download a csv file with the basic information of all Soffid parameters. |
Soffid parameters detail actions
|
Apply changes |
Allows you to save the data of a new parameter or to update the data of a specific parameter. To save the data it will be mandatory to fill in the required fields. |
|
Delete |
Allows you to delete a specific Soffid parameter. To delete a host you can click on the hamburger icon and then click the delete button (trash icon). Soffid will ask you for confirmation to perform that action, you could confirm or cancel the operation. |
|
Undo |
Allows you to quit without applying any changes. |
List of parameters sorted by functionality
Console
|
Parameter
|
Description
|
|---|---|
|
soffid.auth.system |
Select the managed system where the account name will be searched on the user login. Defaults to soffid. |
|
soffid.auth.trustedLogin |
Set to true to enable the Soffid console to validate passwords on trusted systems. Setting it to false, the password will be validated against internal tables only. |
|
soffid.delegation.disable |
Set to true to prevent users to delegate permissions from self service page. |
|
soffid.entitlement.group.holder |
Set to optional enables the operator to set a group as the group holder for any entitlement assignment. Set to always enforce that any entitlement assignment must be bound to a holder group. Set to none to disable this feature. This parameter affects to role holder |
|
soffid.language |
Enforce user interface language. |
|
soffid.language.default |
Default user interface language (en). |
|
soffid.network.internet |
Sets the name for a generic subnet that will hold any host not included on any listed network. |
|
soffid.proxy.trustedIps |
Set the IP address of any reverse proxy in front of Soffid servers. This parameter can take a list of IP addresses, separated by commas, like the following ones:
To allow a range of network IPS, one can use the wildcard(*) symbol, as in the following example:
Starting with Soffid console 3.3.0, the network-address/bits notation is allowed, as in the following example:
|
|
soffid.propagate.timeout |
Timeout in seconds to retry the password validation needed to propagate a managed system notified password change (requires syncserver 1.5.4). |
|
soffid.server.sharedThreads |
Number of shared dispatcher threads per synchronization servers (by default 1) |
|
soffid.syslog.server |
Hostname or IP address of server hosts SIEM. The SIEM will receive audit information using the syslog protocol. |
|
soffid.task.limit |
The maximum number of tasks allowed per transaction. If a simple or complex transaction generates more tasks than specified, these tasks will be kept on hold. Administrators can release them through the monitoring page. (version 2.0+) |
|
soffid.ui.docPath |
The path where to store report and workflow documents. |
|
soffid.ui.docServer |
URL where is the server to store the files. |
|
soffid.ui.docStrategy |
Class responsible for managing report and workflow documents. |
|
soffid.ui.docTempPath |
The path where to store temporary files |
|
soffid.ui.docUsername |
Username of the doc server. |
|
soffid.ui.docUserPassword |
The password of the doc server. |
|
soffid.ui.maxrows |
The maximum number of rows to display in searches. The default value is 200 but you can change it. |
|
soffid.ui.timeout |
Max time (in milliseconds) a query can take to complete (version 2.0 +). |
|
soffid.ui.wildcarts |
Setting the auto value enables the user interface to add wildcards on user queries. Setting it to off disables this feature. |
|
soffid.externalURL |
External URL to access to Soffid console. |
|
soffid.kerberos.agent |
The name of the Windows server agent so that any incoming Kerberos packets will be authenticated against that domain. |
|
soffid.pam.search.recordings.timeout |
Timeout reached in the query, use the parameter to specify a longer timeout in milliseconds. By default, if you don't config this parameter is 60000 milliseconds. (version 3.5.18+) |
|
soffid.nameformat |
Parameter to configure how to display the users full name. Where:
For instance: |
|
soffid.issue.next |
Allows you to initialize the parameter to indicate what will be the ID of the next issue. 1 will be the default value. |
|
soffid.upload.maxsize |
Allows you to set a maximum value in bytes for uploading files to Soffid. |
Syncserver
|
Parameter
|
Description
|
|---|---|
| SSOServer | This parameter indicates which server acts on the workstations that run SSO. This parameter can have different values for any subnet. So you can define ESSO servers allowed for any subnet. |
| seycon.https.port | Port where synchronization server connects to. This parameter is used by ESSO clients to connect to synchronization servers. |
| seycon.server.list | Shows where Syncserver and SyncServer backup is installed. When installing the first server synchronization, this parameter is automatically updated. If you want to install a synchronization server backup you must update this parameter manually. Note that proxy synchronization servers are not on this list. See the Soffid installation guide. |
| soffid.sync.engine.threads |
This parameter allows you to configure the number of threads available to run the tasks. If you do not fill this parameter, Soffid will run 1 thread for every 50 systems, but never more than twice the number of CPUs of the server. The value of the parameter must be equal or greater than 1. (Available in Sync Server version 3.5.15+) |
Mail server
|
Parameter |
Description |
|---|---|
|
mail.host |
Host to send electronic mail messages. |
|
mail.from |
Recipient address that will be set as the email sender. |
|
mail.transport.protocol |
Set to SMTPS to get secure mail. Default value "SMTP" to use plain SMTP protocol. |
|
mail.auth |
Set to true if your mail server requires user authentication. |
|
mail.user |
Set your email user name if your mail server requires user authentication. |
|
mail.password |
Set your email password if your mail server requires user authentication. |
|
mail.port |
25 by default, with this parameter a new port can be set. |
|
mail.smtp.sasl.enable |
Set to true to enable SASL. |
Job notifications
|
Parameter |
Description |
|---|---|
|
soffid.scheduler.error.notify |
Users to notify when a scheduled task fails. |
|
soffid.bpm.error.notify |
Users to notify when a BPM task fails. |
|
soffid.bpm.error.retry |
Set to true to always retry any failed BPM task. |
Syncserver provisioning
|
Parameter
|
Description
|
|---|---|
| soffid.server.register |
Set to direct value to bypass standard workflow needed for a syncserver to join the syncservers security network. Otherwise, the standard approval workflow will be required(Since syncserver 2.6.0). You also can set it to no-direct |
Addons
Federation
|
Parameter
|
Description
|
|---|---|
| addon.federation.essoidp |
Set the Identity Provider identifier to indicate that this will be the authentication provider. For more information, you can visit the How to add to ESSO a second factor of authentication page. |
Exclude menu options
To exclude default menu options for all users of the Sofid console, the following steps can be followed
1. To exclude some menu options from your Soffid console, you must edit the system.properties file of this console. You can find this file in the following path: /opt/soffid/iam-console-3/conf/
2. Add the soffid.menu.hidden parameter to the system.properties file. The value of this parameter can be the menu options name that you can find in the console.yaml file.
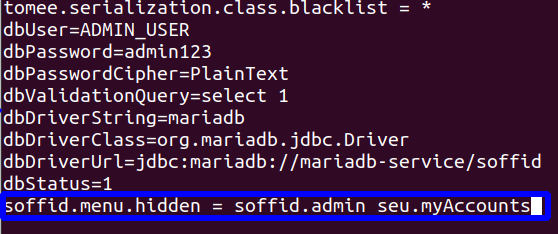
3. Restart the Soffid console.
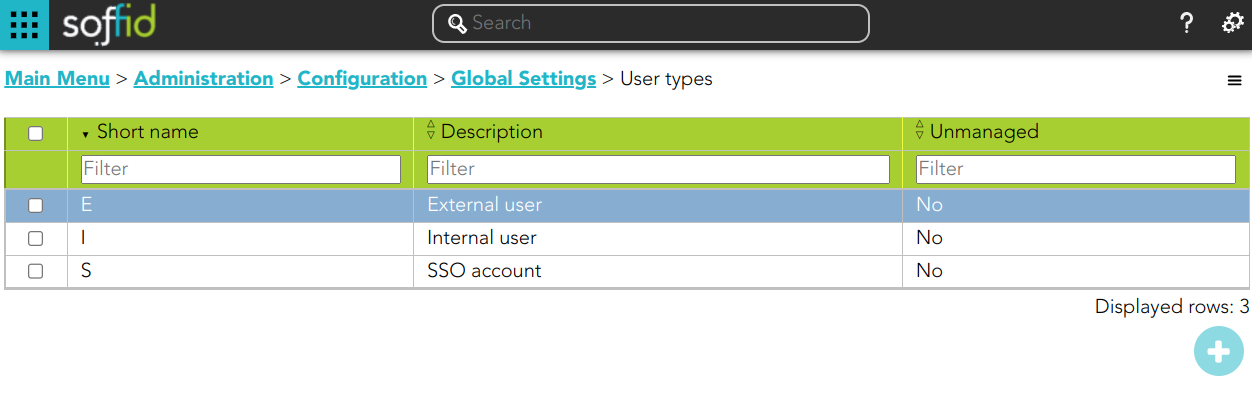
User Type
Description
User type is the way to categorize users and allows configuring different password policies. Those policies can be more or less restrictive depending on the user's risk. For instance, internal users (automatically created) are different from external ones.
Therefore, this field is very useful for the following cases:
- Sort or list the users on the user's page or in the reports
- Apply different password policies
- Apply restrictions on the synchronization of Soffid to the target systems
- Ease configuration in automatic rules or custom scripts
Be in mind that a user always must belong to a User Type.
Overview
Related objects
- User: each user must be assigned a user type.
- Account: the shared or privileged accounts also require having selected a user type to associate it with a password policy
Standard attributes
- Short name: internal code used to identify the user type.
- Description: brief description of the user type.
- Unmanaged: (yes|no) if unmanaged is Yes, users belonging to this category will not be propagated to final systems. You must use it when you are developing a PoC.
Actions
User type query
|
Add new |
Allows you to create a new User type. You can choose that option on the hamburger menu or clicking the add button (+). To add a new User type it will be mandatory to fill in the required fields |
|
Delete |
Allows you to remove one or more User type by selecting one or more records and next clicking the button with the subtraction symbol (-). To perform that action, Soffid will ask you for confirmation, you could confirm or cancel the operation. |
|
Import |
Allows you to upload a CSV file with the User type list to add or update User types to Soffid. First, you need to pick up a CSV file, that CSV has to contain a specific configuration. Then you need to check the content to be loaded, it is allowed to choose if you want or not to load a specific attribute. And finally, you need to select the mappings for each column of the CSV file to import the data correctly and to click the Import button. |
|
Download CSV file |
Allows you to download a csv file with the basic information of all user types. |
User type detail
|
Apply changes |
Allows you to save the data of a new User type or to update the data of a specific User type. To save the data it will be mandatory to fill in the required fields. |
|
Delete |
Allows you to delete the User type. To delete a host you can click on the hamburger icon and then click the delete button (trash icon). Soffid will ask you for confirmation to perform that action, you could confirm or cancel the operation. |
|
Undo |
Allows you to undo any changes made. |
Group Type
Description
Companies are organized in different business units, departments or workgroups. In Soffid, they all are named as groups. These group can be categorized by a group type.
Group types can be used in the definition of Holder Groups. Some roles can be assigned to a user only through a group enabled for it. When a user no longer belongs to a group, it is not allow assign that role to the user.
A user always belongs to a user type, but groups do not necessarily have to belong a group type.
Related objects
Standard attributes
- Name: name (or code) of the organizational unit.
- Description: description of the organizational unit.
- Role holder: (yes|no), when this attribute is active (yes), all the groups of this type of organizational unit could be assigned to a user as a domain of a role.
Role holder (and holder group)
In some organizations is necessary to assign roles that affect only a part of the structure, for instance, a department, a division or a country. A Holder Group can be defined as a collection of entities (referred to as "holders") that share similar characteristics, roles, permissions, or access requirements. The concept of a Holder Group simplifies the management of identities by enabling administrators to apply policies, assign roles, and manage permissions at the group level rather than individually.
The role holder is the role that requires to be assigned to a group, and the holder group is the group that can be assigned role permission.
To configure correctly this functionality you have to apply the next steps:
- Create at least one organizational unit (Group Type) with the role holder attribute active (yes).
- Assign groups to the organizational unit (with the attribute type of the group).
- Also, you can include new custom attributes to this membership relation, go to Metadata page and select the GroupUser to add these attributes.
- In the soffid parameters page, create a new parameter named soffid.entitlement.group.holder. It can have one of these three values:
- Set to optional enables the operator to set a group as the group holder for any entitlement assignment.
- Set to always to enforce that any entitlement assignment must be bound to a holder group.
- Set to none to disable this feature
Now you can start to apply this configuration to the users:
- In the Users page, select a user.
- In the Groups tab, add a new group.
- In the Roles tab, add a new role and select the holder group in the optional scope.
- If the holder group column is hidden, you can add with the option Add or remove columns.
Actions
Group type query
|
Add new |
Allows you to create a new Group type. You can choose that option on the hamburger menu or clicking the add button (+). To add a new Group type it will be mandatory to fill in the required fields |
|
Delete |
Allows you to remove one or more Group types by selecting one or more records and next clicking the button with the subtraction symbol (-). To perform that action, Soffid will ask you for confirmation, you could confirm or cancel the operation. |
|
Import |
Allows you to upload a CSV file with the Group type list to add or update Group types to Soffid. First, you need to pick up a CSV file, that CSV has to contain a specific configuration. Then you need to check the content to be loaded, it is allowed to choose if you want or not to load a specific attribute. And finally, you need to select the mappings for each column of the CSV file to import the data correctly and to click the Import button. |
|
Download CSV file |
Allows you to download a csv file with the basic information of all groups types. |
Group type detail
|
Apply changes |
Allows you to save the data of a new Group type or to update the data of a specific Group type. To save the data it will be mandatory to fill in the required fields. |
|
Delete |
Allows you to delete the Group type. To delete a host you can click on the hamburger icon and then click the delete button (trash icon). Soffid will ask you for confirmation to perform that action, you could confirm or cancel the operation. |
|
Undo |
Allows you to undo any changes made. |
Metadata
Description
The Metadata functionality allows expanding the Soffid objects, their attributes, and their data types. Also, it allows expanding custom objects.
By default, there is a list of built-in objects, but it is possible to create new custom objects and add new custom attributes to each of them.
It is usual to add custom attributes in the User built-in object to hold additional information.
Each attribute has a data type, it may be a basic type as a String (simple text), integer value, date, or something more complex as a reference to a custom object, or a popup to select a manager. In this way, one can build relationships between objects.
Screen overview
Related objects
Basically, there are two types of metadata objects. The built-in objects are part of the Soffid core and the custom objects as new objects.
built-in objects
The built-in objects are the objects that are part of the Soffid core. It can not be removed, but more custom attributes can be added.
The following objects are Soffid well-known objects that can be customized by means of this screen. All of them are tagged as Built-in objects.
Custom objects
The custom objects are the objects created by the administrator to extend the Soffid underlying data model. All of them are marked as Built-in type No.
Each custom object type created by the administrator is displayed at the custom objects menu options. Unfortunately, all custom object types share the same icon.
Custom object attributes
- Name: name of the custom object. This field is mandatory.
- Description: a brief description of the custom object. This field is mandatory.
- Public object: if you select the Yes option, the object will be visible to all the users with the proper permissions. If you select the No option, you must indicate what roles can Read and what roles can Write this object.
- Write access: allows you to select the proper roles with permissions to write. This field is only displayed when the Public object value is No
- Read access: allows you to select the proper roles with permissions to read. This field is only displayed when the Public object value is No
For more information, you can visit the Custom Objects page.
Standard attributes
Object attributes
- Object type
- Description: a brief description of the object.
- Use textual index: allows you to check the Yes option if you want to use the Textual index for searching data in this object.
For more information, you can visit the Textual index page.
Attribute metadata
- Code: short name used by scripts and connectors to access the underlying information. It is suggested to use short names without blanks or special characters to make it easier to use.
- Label: text displayed just beside the attribute value. It is advised to use short descriptions in order to keep the screen cleaner.
- Data type: The attributes can have different data types
- Basics
-
- String
- Numeric
- Password: a text that will be stored encrypted in the database. This field will never be displayed to the end user.
- Binary: raw information, probably images or documents.
- Boolean
- Photo: an image that is displayed as a small image.
- Date: a date with a calendar popup.
- Date and time: a date and time with a calendar popup.
- E-mail: a text with email format.
- HTML: rich text.
- Separator: a separator is a label to group attributes according to some criteria
- SSO HTML input: used primarily for the web SSO engine includes an input field and a value.
-
- Extensible built-in objects
-
- User
- Account
- Role
- Group
- Information System
- Host
-
- Other built-in objects
-
- Group Type
- User Type
- Network
- Mail domain
- Mail list
- Operating system
-
- Custom objects: any other custom object created by the administrator.
- Basics
- Description: text field to write a brief description of the attribute.
- Required: enabling this box will enforce the user to enter a value for this attribute at any object. Set no to allow objects without value.
- Include in quick search: the system will find any object that contains all the words included in the text search at any of the most relevant attributes. For instance, a quick search of "John Joe" will find users named "Joe Johnson" or "Johnathan Joel" as the first and last marked to be included in the quick search. If you enable the quick search for any new attribute, the same query will find a user named "Joe Williams" whose new attribute value is "John".
- Prevent duplicated values: mark this field as a unique key for the object type. There is no chance of two objects with the same attribute value. Soffid smart engine will avoid the creation of duplicated objects.
- Multiple values: some attributes can contain multiple values for the same object. For instance, an attribute containing the languages a user can speak can be multi-valued, as a user can speak multiple languages.
- Maximum number of rows to display: when an attribute is multivalued, the screen size can grow a lot. To prevent such a big form, the system will only display a maximum number of values, and a scroll bar will appear to browse through the attribute values.
- Size: primarily for string attributes, specify the maximum length in characters of the attribute value.
- Values: primarily, for attributes of data type String, you can specify the allowed values for the attribute. Then, the text box to the data type String is replaced by a drop-down list. Also, you can define a "code:label" for the value, the "code" is used internally and the "label" is displayed in the drop-down list, e.g. "ESP:Spain".
- Administrator visibility: sets the maximum visibility level for administrators. If the visibility level is set to read-only, the administrator will not be allowed to modify it. If the visibility is set to hidden, the administrator will not be able to query it. A user is considered as administrator when has the role SOFFID_ADMIN.
This field is only used in the user object.
- Operator visibility: sets the maximum visibility level for operators. If the visibility level is set to read-only, the operator will not be allowed to modify it. If the visibility is set to hidden, the operator will not be able to query it. A user is considered as an operator when has permission to open the users management page but lacks the role SOFFID_ADMIN.
This field is only used in the user object.
- User visibility: sets the maximum visibility level for end-users. If the visibility level is set to read-only, the user will not be allowed to modify it. If the visibility is set to hidden, the user will not be able to query it. Mind that even an administrator is considered to be a user rather than an administrator or operator when accessing their own identity.
This field is only used in the user object.
- Visibility expression: write an optional BeanShell expression to check if the field should be displayed or not. The expression should return true or false. The following variables are exposed to the expression:
-
ownerObject: current object owning the attribute.
-
value: current attribute value.
-
requestContext: tip about the screen using the attribute.
-
inputField: the ZK input object (ZK Framework).
-
inputFields: a map to get access to any other ZK input object (ZK Framework).
-
serviceLocator: locator to use any Soffid engine microservice.
-
// Sample to enable company name attribute only when the user is of type E (external)
return "E".equals(object{"userType"});- Validation expression: write an optional BeanShell expression to check if the field value is acceptable or not. The expression should return true if the value is acceptable. If the expression returns false or any other object, a warning message will be displayed. When the expression returns a string value, the return value will be considered the warning message to present to the end-user.
The following variables are exposed to the expression:
- ownerObject: current object owning the attribute
- value: current value to evaluate.
- requestContext: tip about the screen using the attribute
- inputField: the ZK input object (ZK Framework).
- inputFields: a map to get access to any other ZK input object (ZK Framework).
- serviceLocator: locator to use any Soffid engine microservice.
// Sample for checking birthDate is greater than 18 years old
c = java.util.Calendar.getInstance();
c.add(-18, c.YEAR);
if (birthDate == null || birthDate.before(c.getTime()) return true;
else return "Birth date should be before "+ new java.text.SimpleDateFormat().format(c.getTime());
- onLoad trigger: write an optional BeanShell expression that will be executed just after preparing the user interface. The script can modify in any way the inputField object before it is displayed, but cannot modify other input fields.
The following variables are exposed to the expression:
- ownerObject: current object owning the attribute
- value: current value to evaluate.
- requestContext: tip about the screen using the attribute
- inputField: the ZK input object (ZK Framework).
- inputFields: a map to get access to any other ZK input object (ZK Framework).
- serviceLocator: locator to use any Soffid engine microservice.
// Sample to set contract number attribute to read only if the attribute company is empty
// Place as an on-load trigger in the contract number field
if (ownerObject.attributes.get("company") == null || ownerObject.attributes.get("company").trim().isEmpty())
inputField.setReadonly(true);
else
inputField.setReadonly(false);- onChange trigger: write an optional BeanShell expression that will be executed just after the user has changed the object value. The script can modify in any way the inputField object or any other input fields.
The following variables are exposed to the expression:
- ownerObject: current object owning the attribute.
- value: current value to evaluate.
- requestContext: tip about the screen using the attribute.
- inputField: the ZK input object (ZK Framework).
- inputFields: a map to get access to any other ZK input object (ZK Framework).
- serviceLocator: locator to use any Soffid engine microservice.
// Sample trigger to set contract number attribute to read only when the company attribute gets empty
// Place as an on-change trigger in the contract field
contractField = inputFields.get("contractNumber");
if (value == null || value.trim().isEmpty())
contractField.setReadonly(true);
else
contractField.setReadonly(false);
contractField.invalidate(); // Redraw contract number field
......
inputFields.get("contractNumber").getValue();- You can add a SCIM expression: exclusive for Soffid objects (users, groups, roles...). Write an optional SCIM query using the SCIM standard to filter valid results for a specific field.
You can access to SCIM Chapter for more information
Actions
Metadata query
|
Add or remove columns |
Allows you to show and hide columns in the table. You can also set the order in which the columns will be displayed. The selected columns and order will be saved for the next time Soffid displays the page. |
|
Add new |
Allows you to add a new metadata object in the system. You can choose that option on the hamburger menu or by clicking the add button (+). To add a new it is necessary to fill in the required fields. By default, it will has have two mandatory attributes, name and description. |
|
Delete |
Allows you to remove one or more metadata objects by selecting one or more records and next clicking the button with the subtraction symbol (-). To perform that action, Soffid will ask you for confirmation, you could confirm or cancel the operation. |
|
Download CSV file |
Allows you to download a CSV file with the basic information of all metadata. |
Metadata object detail
|
Add new |
Allows you to add a new attribute metadata. You can choose that option by clicking the add button (+). |
|
Add or remove columns |
Allows you to show and hide columns in the table. You can also set the order in which the columns will be displayed. The selected columns and order will be saved for the next time Soffid displays the page. |
|
Delete |
Allows you to delete the metadata object. To delete a host you can click on the hamburger icon and then click the delete button (trash icon). Soffid will ask you for confirmation to perform that action, you could confirm or cancel the operation. |
|
Set to default |
Allows you to set the factory setting. Sometimes, usually after an upgrade, it is advisable to reset the built-in attributes of a built-in object. In that case, the properties of the attribute will be changed to the factory setting ones. |
|
Import |
Allows you to upload a CSV file with the attribute metadata to add or update attribute metadata to Soffid. First, you need to pick up a CSV file, that CSV has to contain a specific configuration. Then you need to check the content to be loaded, it is allowed to choose if you want or not to load a specific attribute. And finally, you need to select the mappings for each column of the CSV file to import the data correctly and click the Import button. |
|
Download CSV file |
Allows you to download a CSV file with the basic information of the metadata object. |
Attribute metadata
|
Delete |
Allows you to delete the metadata object. To delete a host you can click on the hamburger icon and then click the delete button (trash icon). Soffid will ask you for confirmation to perform that action, you could confirm or cancel the operation. |
|
Undo |
Allows you to quit without applying any changes made. |
|
Apply changes |
Allows you to save the data of a new Metadata object or to update the data of a specific Metadata object. To save the data it will be mandatory to fill in the required fields. |
User backup configure & restore
Description
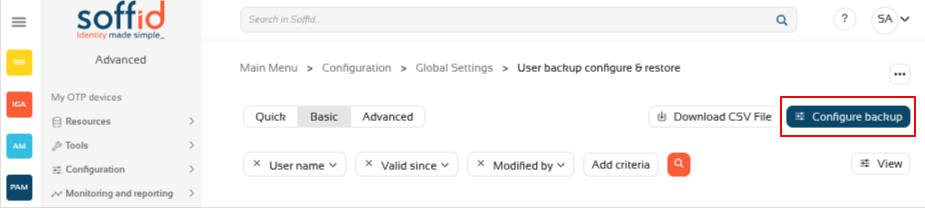
On the User backup configure & restore page, you could search, check and restore the user's snapshots.
Also on this screen, you can also configure the frequency and number of backups to be performed.
Screen overview

Related objects
- Users: new Backups tab in the Users page, user object has backups
- Groups: user assignments to groups have backup
- Accounts: user's accounts have backup
- Roles: user's roles (grants) have backup
- Mail lists: user's mail lists have backup
Standard attributes
- User Name: userName of a user
- Valid since: date and time when this backup started
- Valid until: if it is not the last backup, date and time when this backup finished
- Download: XML file with the user snapshot info.
Actions
Table actions
|
Query |
Allows you to query users through different search systems, Basic and Advanced. |
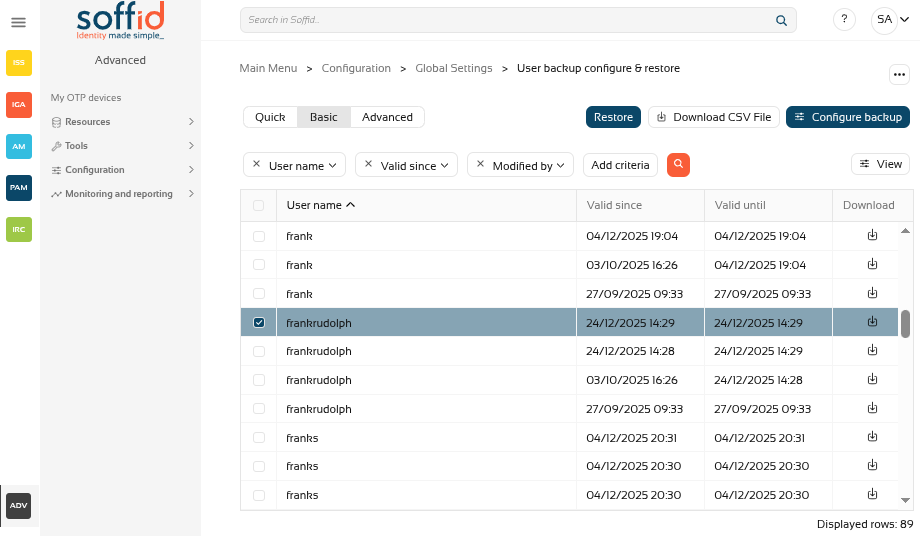
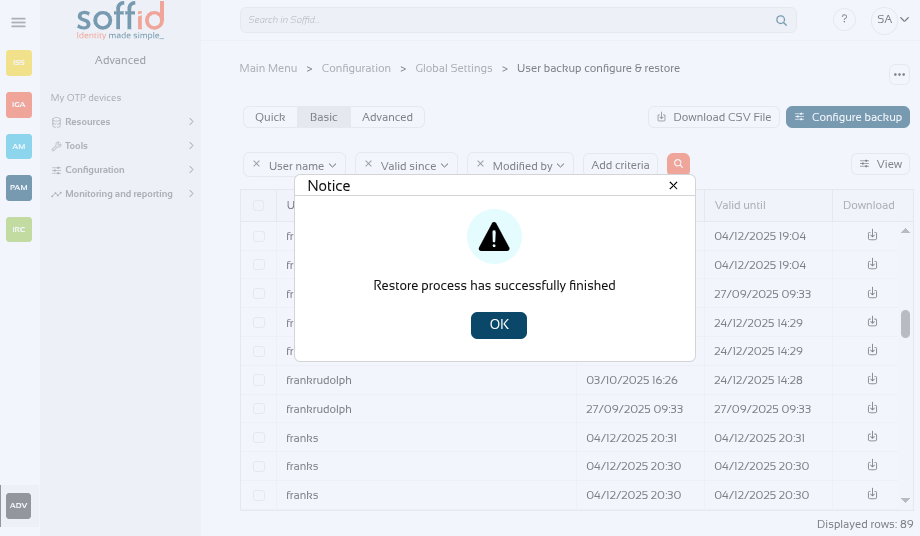
|
Restore |
Allows you to restore one or more user's snapshots. First of all, you need select one or more snapshots. Second, you need to click the "Restore" button. Then Soffid will run the restore process.
Image
|
|
Download CSV File |
Allows you to download a CSV file with the basic information of all backups, with the same columns as displayed in the table. |
|
Configure backup |
Allows you to configure the backup parameters. |
| View |
Allows you to show and hide columns in the table. You can also set the order in which the columns will be displayed. |
|
Download |
Allows you to download an XML file with the user. You only need to click on the download icon of one of the records and save the file on your computer. |
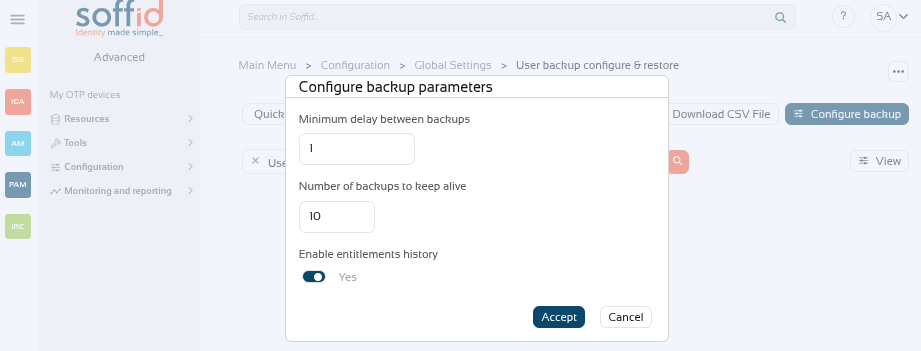
Configure backup button
With the "Configure backup" button, you can configure the frequency and number of backups. These are the available parameters:
- Minimum delay between backups: if the value is 1, when a backup is created, the system will not create a new backup until 1 day later, even if there has been more than one change during that period.
-
Number of backups to keep alive: if the value is 10, when 10 backups are reached, the oldest backup will be deleted when the next one is created.
-
Enable entitlements history: enable the history of roles assigned to users.
Image
Others
Backup tab on user's page
On the users screen, when you select a user, this addon enables the Backups tab.
Image

This tab displays the user's backups.
Image
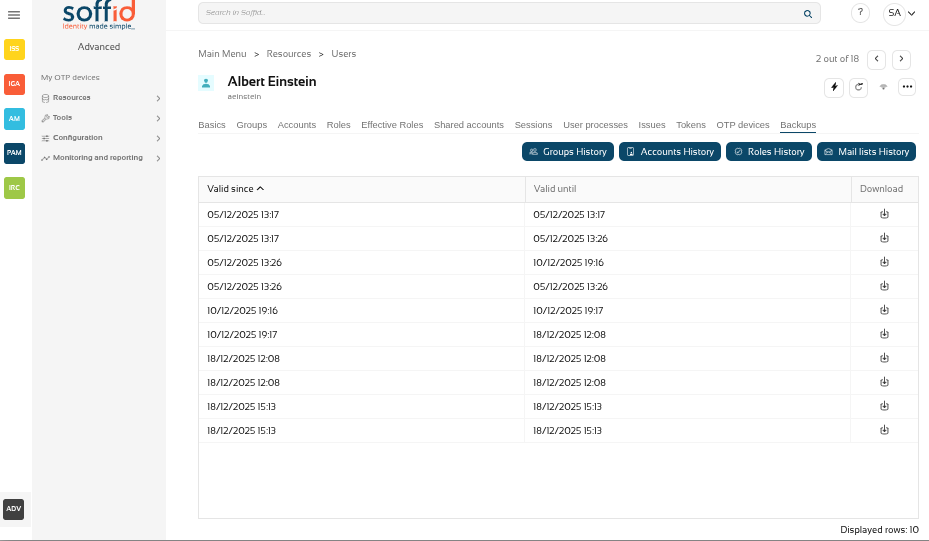
There are also several buttons with the rest of the items that can have backup.
Image

These are the buttons:
- Groups History: user assignments to groups have backup
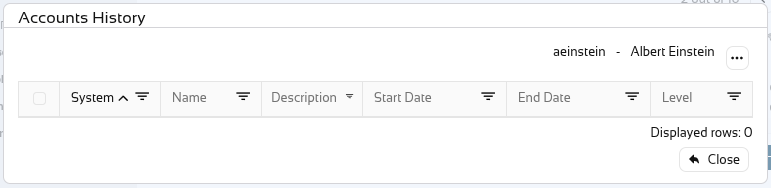
- Accounts History: user's accounts have backup
- Roles History: user's roles (grants) have backup
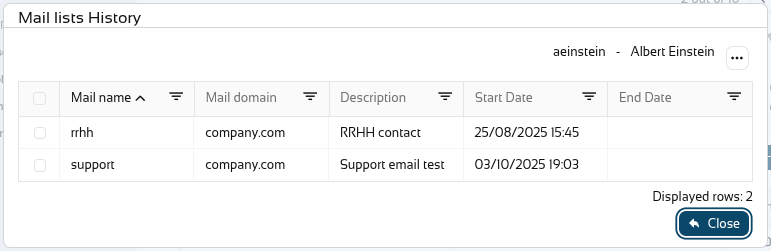
- Mail lists History: user's mail lists have backup
Image
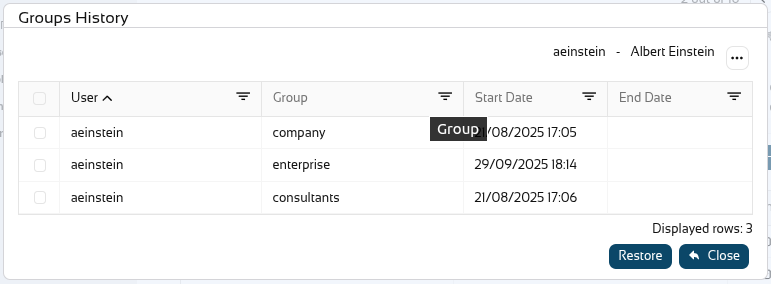
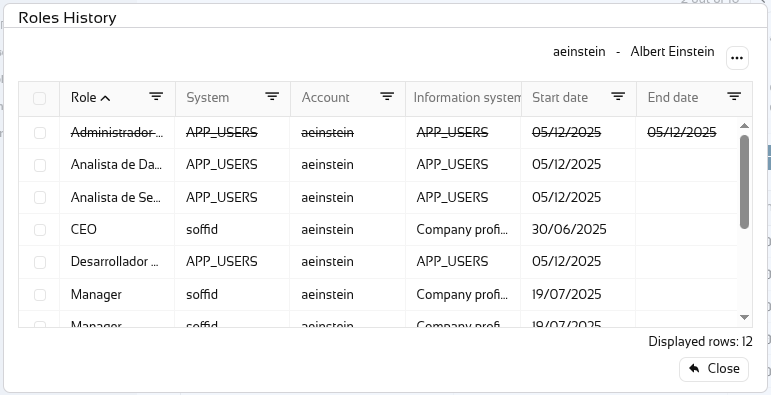
In any of the four options, when selecting an old record, the ‘Restore’ button will appear and this object can be restored to the user.
Image

Configuration wizard
For more information, you can visit the Configuration wizard book
Introduction
Soffid provides you a 360° perspective of the identities of your organization employees, providers and customers:
- Identity governance to manage the identities life-cycle
- Access management identifies your users accessing applications, including multi-factor authentication
- Privileged access management tracks usage and access of service and system management accounts
- Identity risk and compliance
Screen overview
For more information, you can visit the Configuration wizard book
Export settings and objects
Description
Soffid has the functionality that allows you to export configuration, Soffid objects, and objects from target systems in a ZIP file. Every object or configuration will be downloaded into the ZIP in a binary file. This ZIP file could be imported into another Soffid tenant to be used.
For more information, you can visit the Import settings and objects page.
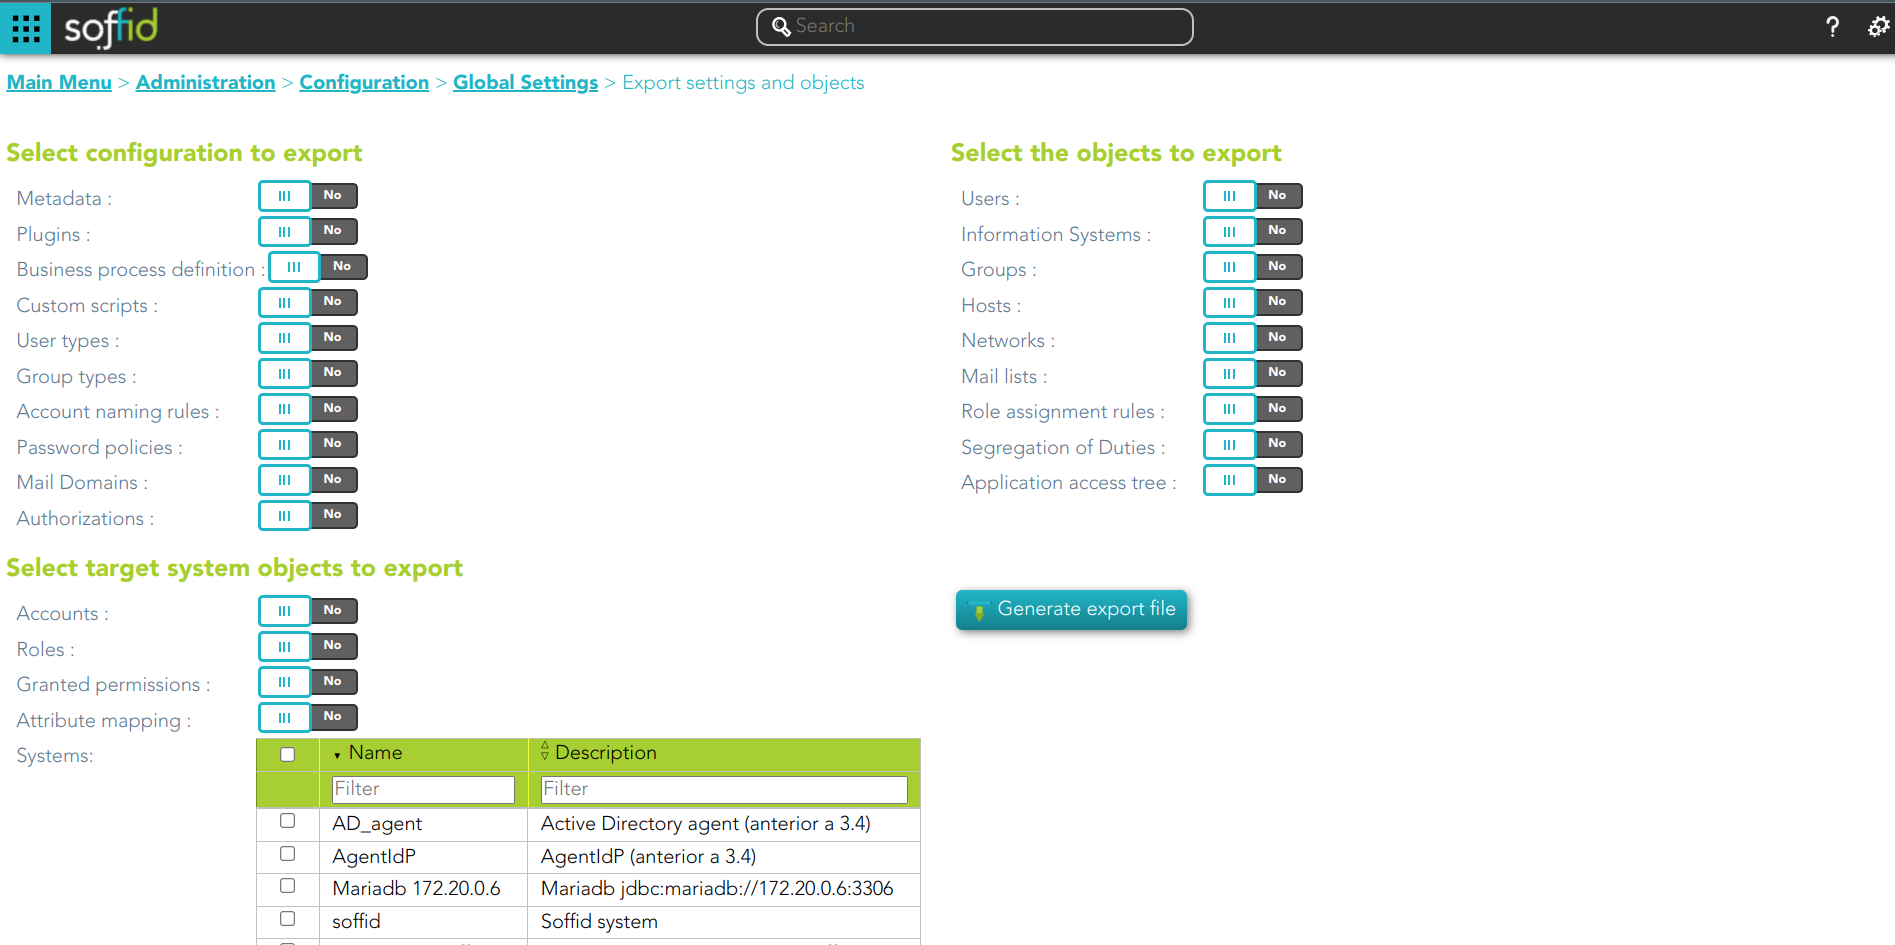
Once you open the Export settings and objects, you must select the configuration, objects, and target system objects you want to export. Then you only need to click the Generate export file button to download the ZIP that will contain all the previous information selected.
It is not allowed to export the basic configuration and configuration parameters of an agent for security reasons. You must create them manually and make sure you put the same names as in the source system if you are going to import accounts.
Overview
Related objects
Configuration
- Metadata
- Plugins
- Business process definition
- Custom Scripts
- User types
- Group types
- Account naming rules
- Password policies
- Mail Domains
- Authorizations
Objects
- Users
- Information Systems
- Groups
- Hosts
- Networks
- Mail lists
- Role assignment rules
- Segregation of Duties
- Application access tree
- Custom objects
Target system objects
- Accounts
- Roles
- Granted permissions
- Attribute mappings
- Systems: if you select and target system object, you must also select the system.
Actions
|
Generate export file |
By clicking this button, Soffid will generate a ZIP file with the objects and configuration that you have selected and will download it to your computer. |
Import settings and objects
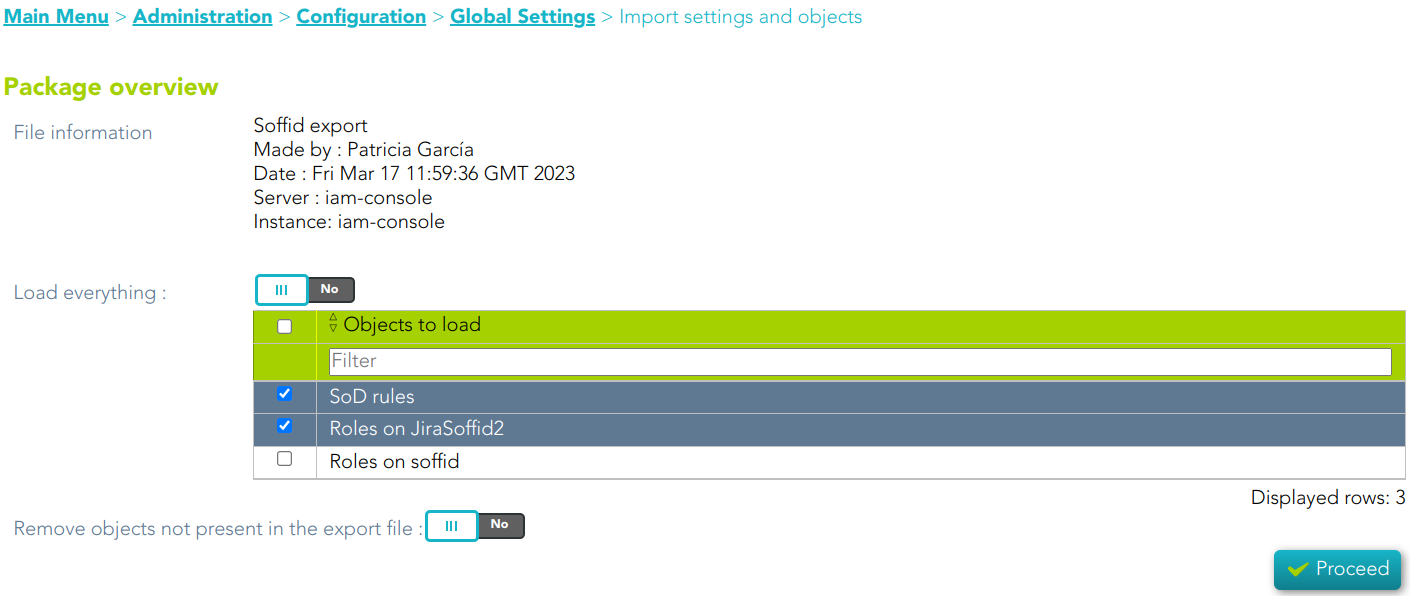
Description
Soffid has the functionality that allows you to import configuration, Soffid objects, and objects from target systems from a ZIP file. This ZIP file must be generated by the export action from another Soffid tenant.
For more information, you can visit the Export settings and objects page.
Once you pick the file to import, Soffid will display all the objects and configurations that you can load. You must select the proper objects and settings to import or enable the Load everything option. And finally, you must click the Proceed buttons to launch the import process. Once the process is finished, Soffid will display the result and allows you to download the log file.
It is not allowed to import the basic configuration and configuration parameters of an agent for security reasons. You must create them manually and make sure you put the same names as in the source system if you are going to import accounts.
Overview
Related objects
Configuration
- Metadata
- Plugins
- Business process definition
- Custom Scripts
- User types
- Group types
- Account naming rules
- Password policies
- Mail Domains
- Authorizations
Objects
- Users
- Information Systems
- Groups
- Hosts
- Networks
- Mail lists
- Role assignment rules
- Segregation of Duties
- Application access tree
- Custom objects
Target system objects
- Accounts
- Roles
- Granted permissions
- Attribute mappings
- Systems: if you select and target system object, you must also select the system.
Actions
|
Proceed |
Allows you to start the import process. |
Security settings
Authorizations
Definition
Soffid console provides a granular access control system. That granular control system allows the administrator user to assign granular permissions to roles. Be in mind that some permissions may inherit some other permissions.
You cannot assign permissions directly to users. Instead, permissions are assigned to roles and roles are assign to users, either directly or through grant inheritance.
The roles may be created into Soffid application system, but could also be included in any other application system.
Permissions are grouped into permission scopes. Most scopes are Soffid object types, but there are one special scope named Soffid, that applies to Soffid console web pages.
Addons can create their own authorizations that automatically will appear at this screen. When a new addon has been installed and applied, the first thing to do use to be assign permissions for this new addon. In fact, administrators won't be able to manage the addon unless the log out and log in to get the newly created permissions.
The permissions given to roles and the roles given to users are cached by Soffid. In order to reapply permissions, the user should close its session and log-in again
Screen overview
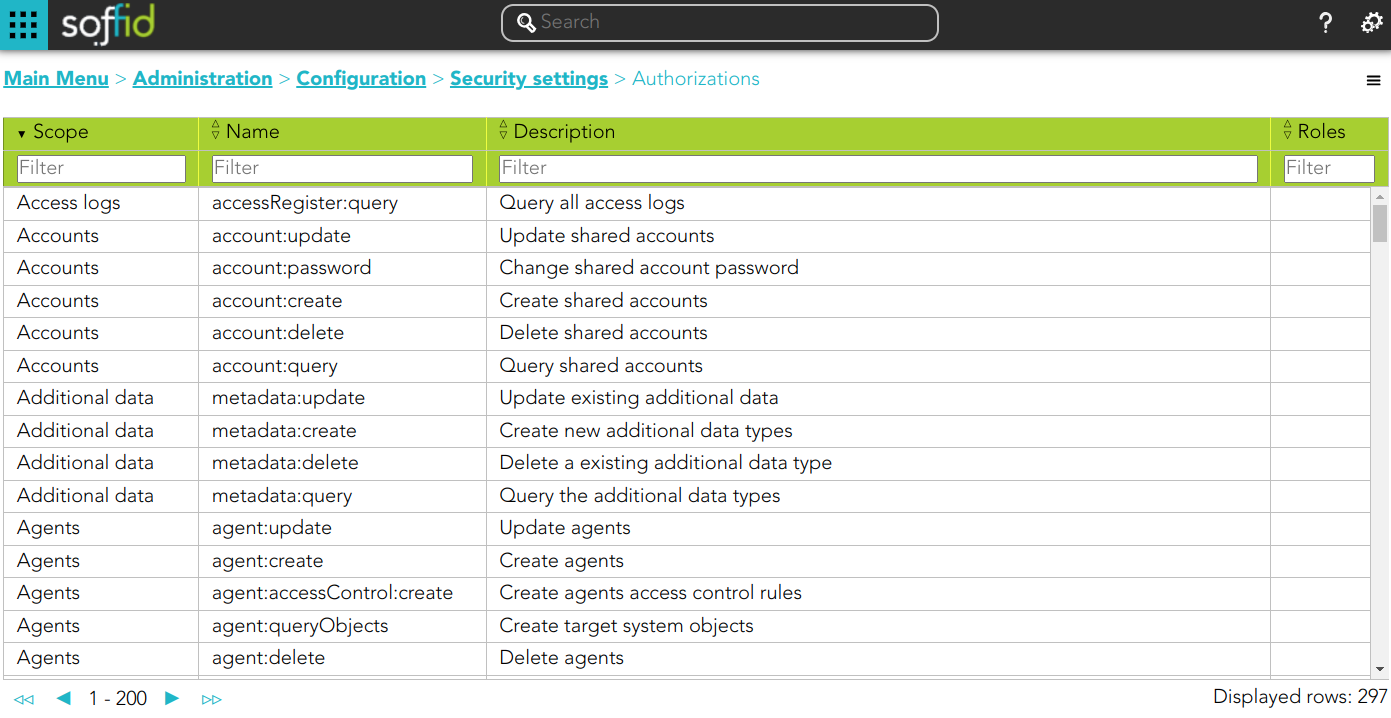
Related objects
Standard attributes
- Scope: scope of application.
- Name: name of the granular permission.
- Description: brief description of the granular permission.
- Roles: role list assigned to that granular permission.
- Description: role description
- Information system: asset or application, from a functional point of view.
- Target system: target system name.
- Domain: the role is limited to that scope.
Actions
Authorization query action
| Import |
Allows you to upload a CSV file with the authorization data to add or to update the granular control system. If they exist, the values of the CSV file will prevail. First, you need to pick up a CSV file, that CSV has to contain a specific configuration. Then you need to check the contents. And finally, you need to select the mappings for each column of the CSV file to import the data correctly and to click the Import button. |
| Download CSV file | Allows you to download a CSV file with the authorization data. |
Authorization detail actions
| Add new |
Allows you to add a new role to the authorization. You can choose that option clicking the add button (+). First, you need to search a role writing the role name on the field, and Soffid will show the values related. Second, you can select one or more roles and accept. And finally, you need to apply changes to save the roles added. If you cancel that action, no role will be assigned. |
| Delete |
Allows you to delete one or more roles from an authorization. To delete one role, you need to click the subtraction symbol (-), located at the end of the row, of the role which you want to delete and then apply changes. To delete more than one role, you can select the roles which you want to delete and there click the subtraction symbol (-) and then apply changes. It is mandatory apply changes to save the roles deleted. Soffid will ask you for confirmation to perform that action, you could confirm or cancel the operation. |
| Apply changes | Allows you to update the changes made on the authorization. |
| Undo | Allows you to quit without applying any changes. |
Authentication
Definition
Soffid could use different kinds of external authentication sources. These mechanisms could be selectively enabled or disabled.
Screen overview
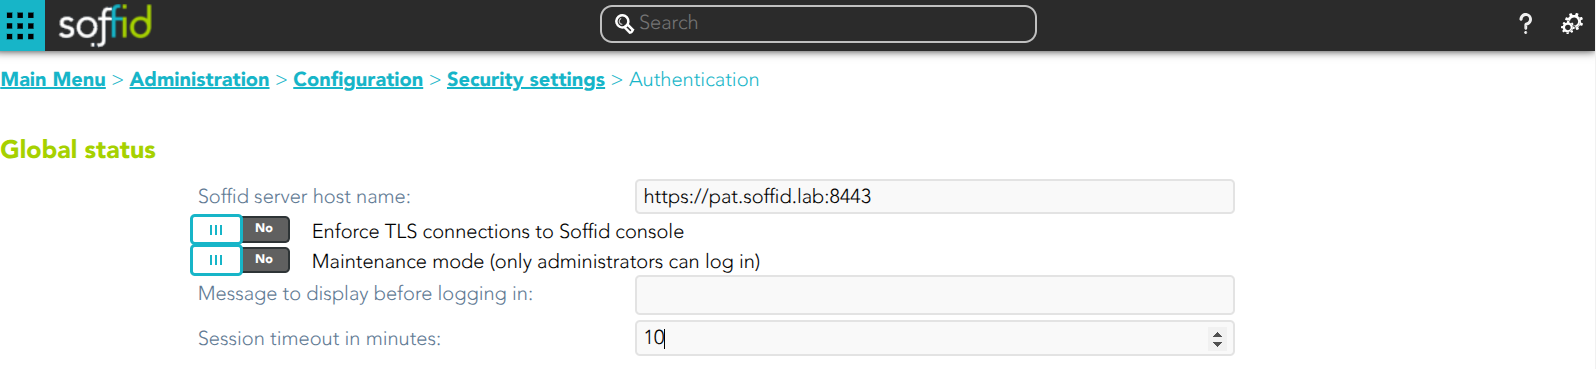
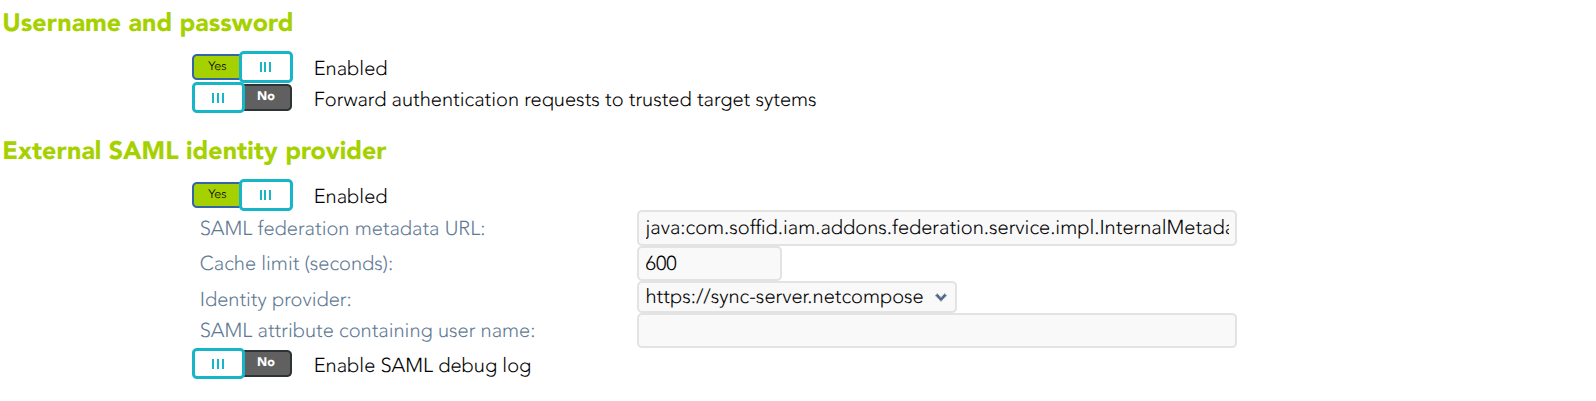

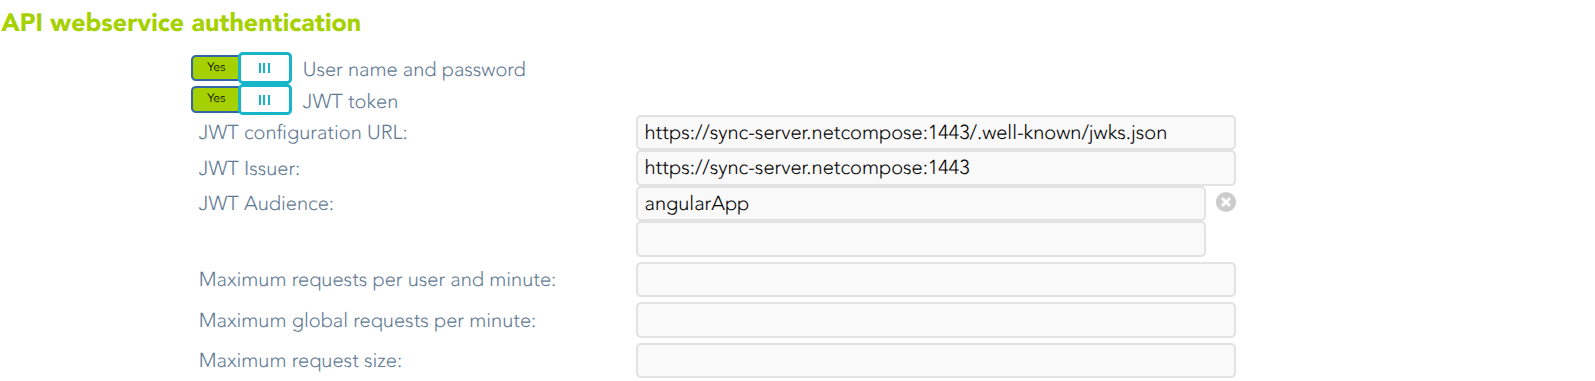

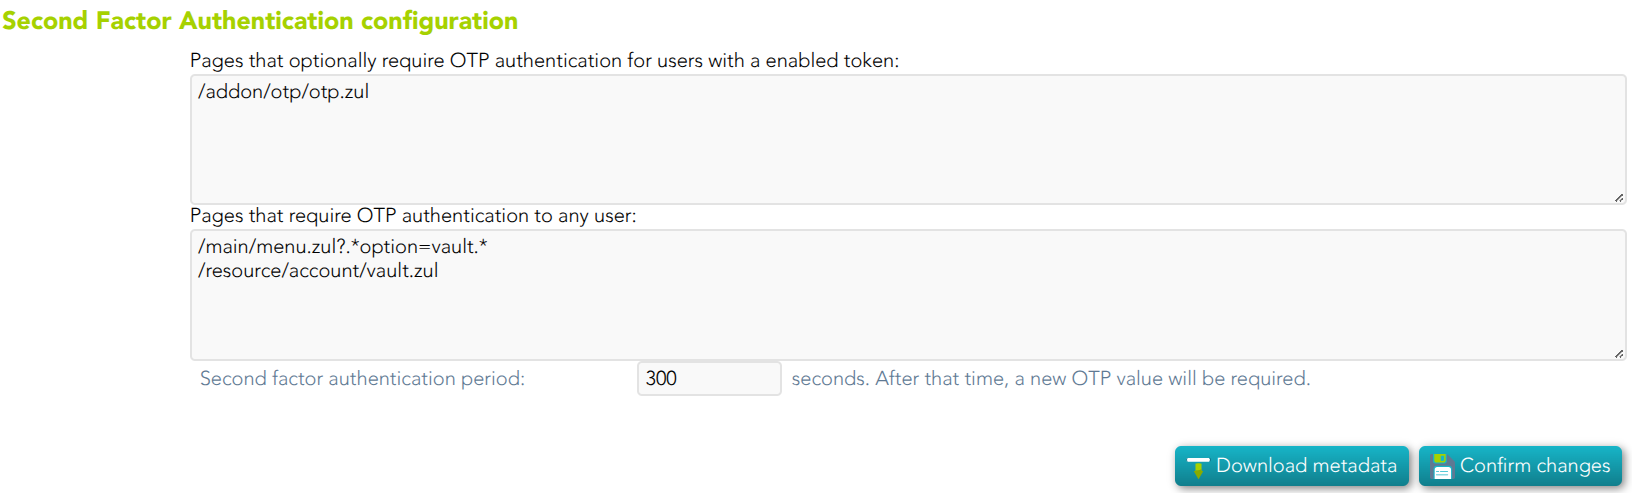
Standard attributes
Global status
- Soffid server host name
- Enforce TLS connections to Soffid console: If you check this option, it will be is mandatory to restart the Soffid Console
Once you check the Enforce TLS connections to Soffid Console option, there are no easy way to come back. You should use this option only en Production environments.
💻 Image
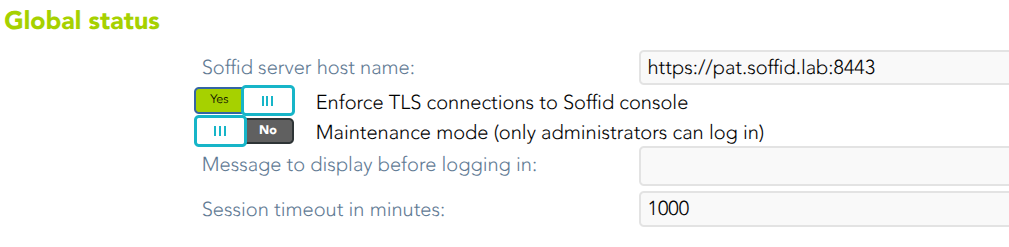
- Maintenance mode (only administrators can log in): if this option is checked (value is Yes), only the administrators could connect to Soffid Console.
💻 Image
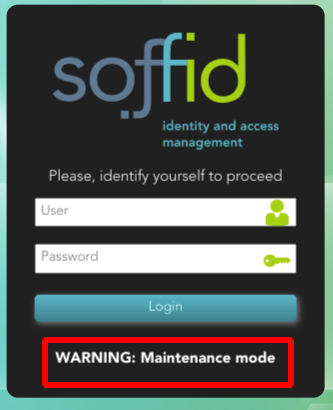
- Message to display before logging in: administrators can configure a banner that will be displayed before the user logging in. This banner will display security advice.
💻 Image
- Session timeout in minutes: time in seconds it takes for the console to display the message indicating that the session is being closed. If nothing is indicated, the session does not expire. (Available since console version 3.5.26)
💻 Image
Username and password
Internal
- Enabled: the only one enabled by default in the installation of Soffid. It is the internal username and password authentication mechanism. Therefore, the authentication is made with the username and password of the soffid account.
External
- Forward authentication requests to trusted target systems: to use external username and password sources. Therefore, the authentication is made with the username and password of an account of an external system.
Not all the external systems are included, only the ones that have marked the check "Trust password" on the agent. For more information about agents please visit the Agents page.
Once an agent is configured, Soffid will still use its internal tables to authenticate usernames and passwords.
If the password entered by the user does not match, the Soffid core will issue a "ValidatePassword" task for each trusted target system. If any of the trusted target systems accepts the password, it will be hashed and stored in Soffid tables and login will be accepted.
External SAML identity provider
It should be noted this feature does not depend on the federation addon. That is a feature included by default in the Soffid smart engine to allow you to include in the authentication flow a mechanism to use a third-party SAML system.
- Enable: check it (select value Yes) to use an external SAML Identity Provider.
- Soffid Server host name: the URL that will be used by external IdP. This URL will be resolved by end user's browser in order to send the SAML assertion.
- SAML federation metadata: the URL where federation information can be found. If the Soffid console can fetch federation metadata, the Identity provider drop-down will be filled in with any identity provider found in the federation metadata URL.
- Cache limit (seconds): how often the federation information will be refreshed. By default, 10 minutes will be taken.
- Identity provider: Identity Provider to use for authentication.
Finally, download the Soffid Console and load it into your SAML Identity Provider federation.
If SAML Identity Provider is enabled, as well as username and password, the user will have the chance to select the preferred authentication method. Otherwise, if only SAML is enabled, the user will be automatically redirected to SAML Identity Provider.
💻 Image
💻 Office 365 as External SAML identity provider
Introduction
Steps to configure Office 365 as External SAML identity provider.
Step-by-Step
1. Open a https://portal.azure.com
2. Open Microsoft Entra ID and then select Enterprise applications option
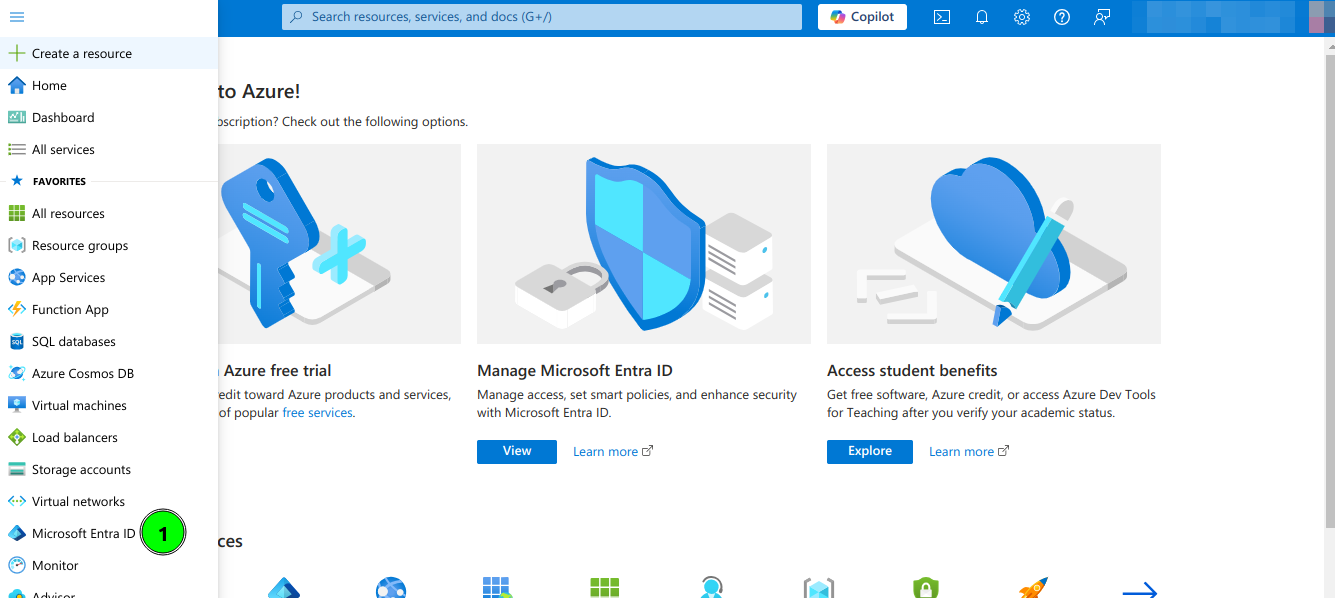
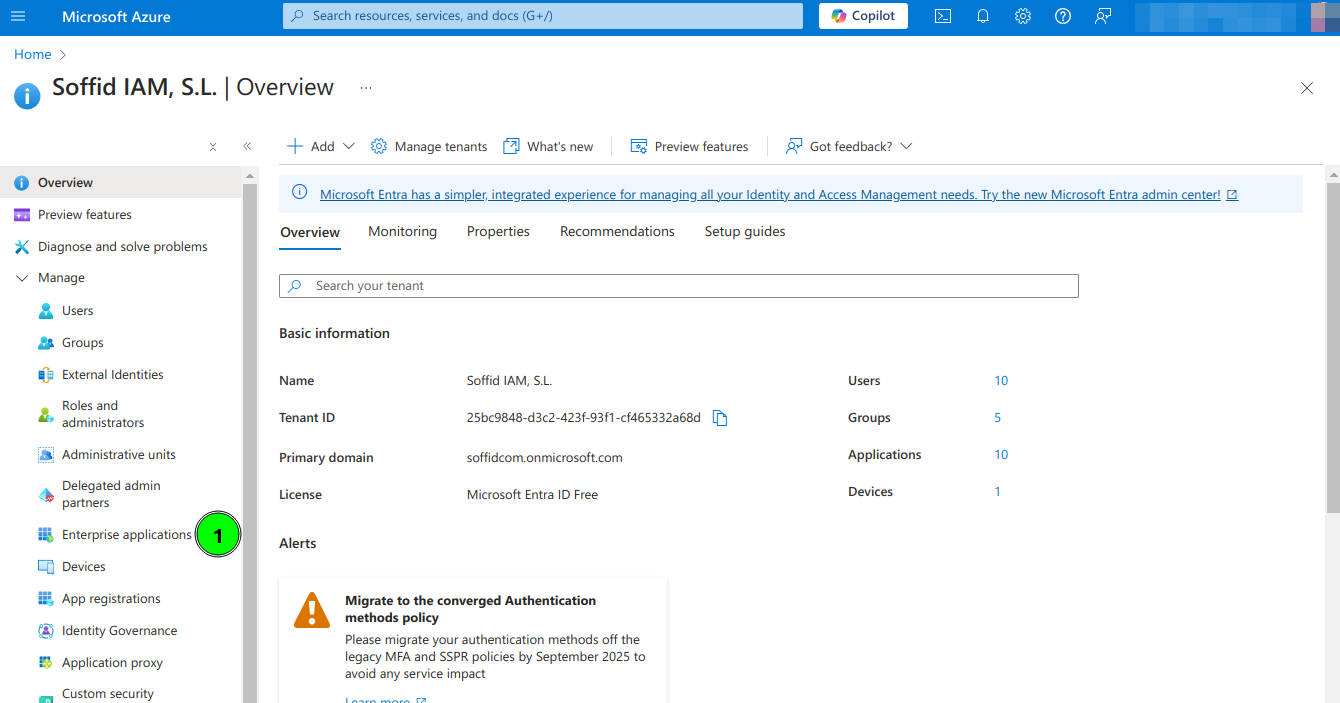
3. Select All applications and click New Application
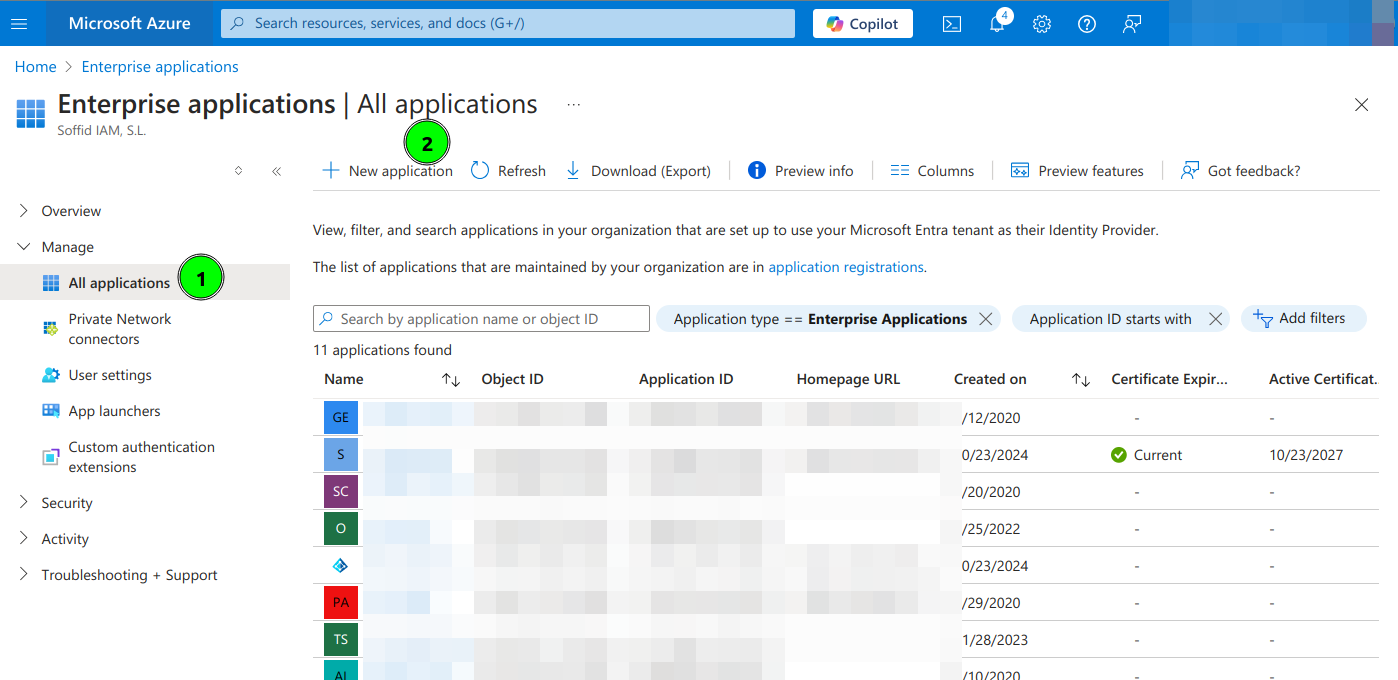
4. Select Create your own application
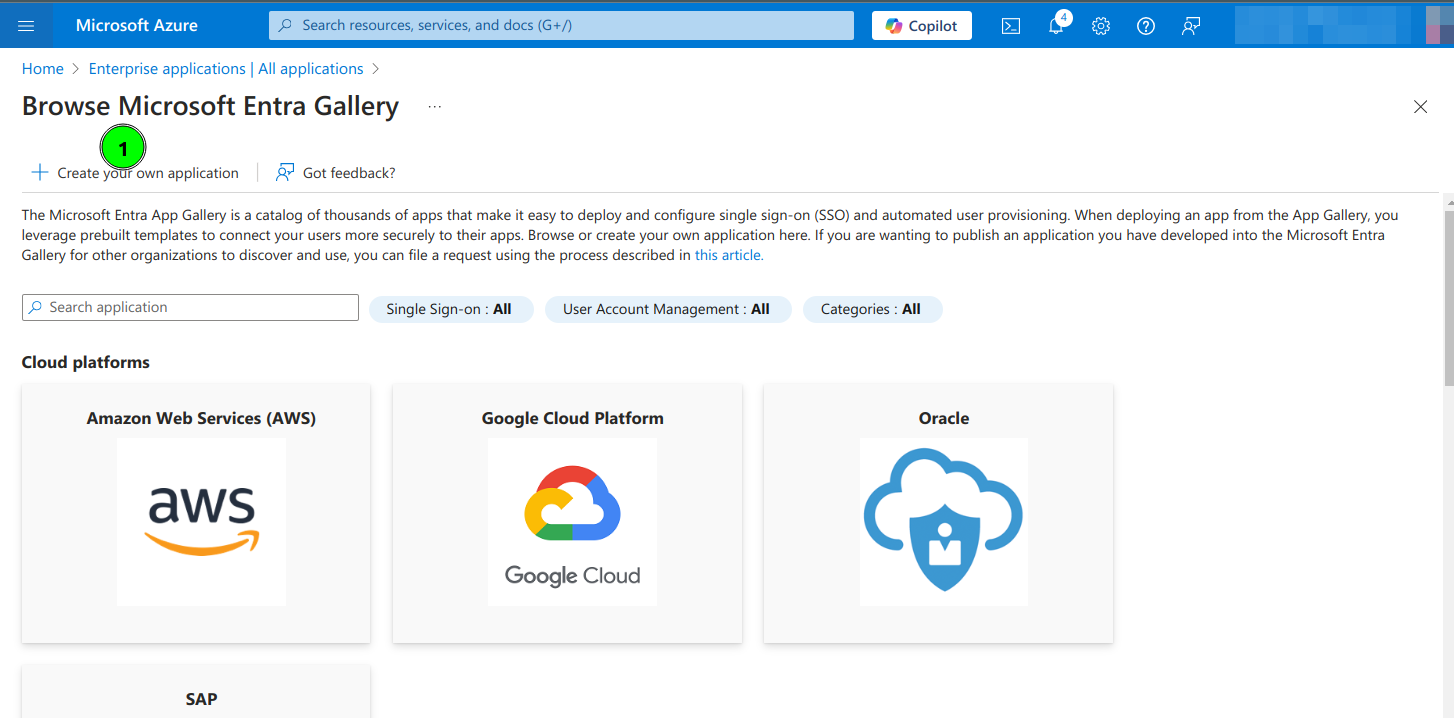
5. Type the name of your app and select the "Integrate any other application you don't find in the gallery (Non-gallery)" option

6. Click on Set up single sign on

7. Click the SAML option

8. Enter the Basic SAML Configuration and Save:
- Identifier: https://<YOUR-SERVER>/soffid-iam-console
- Reply URL: https://<YOUR-SERVER>/soffid/saml/log/post
- Sign on URL: https://<YOUR-SERVER>/soffid/
- Logout URL: https://<YOUR-SERVER>/soffid/saml/slo/post
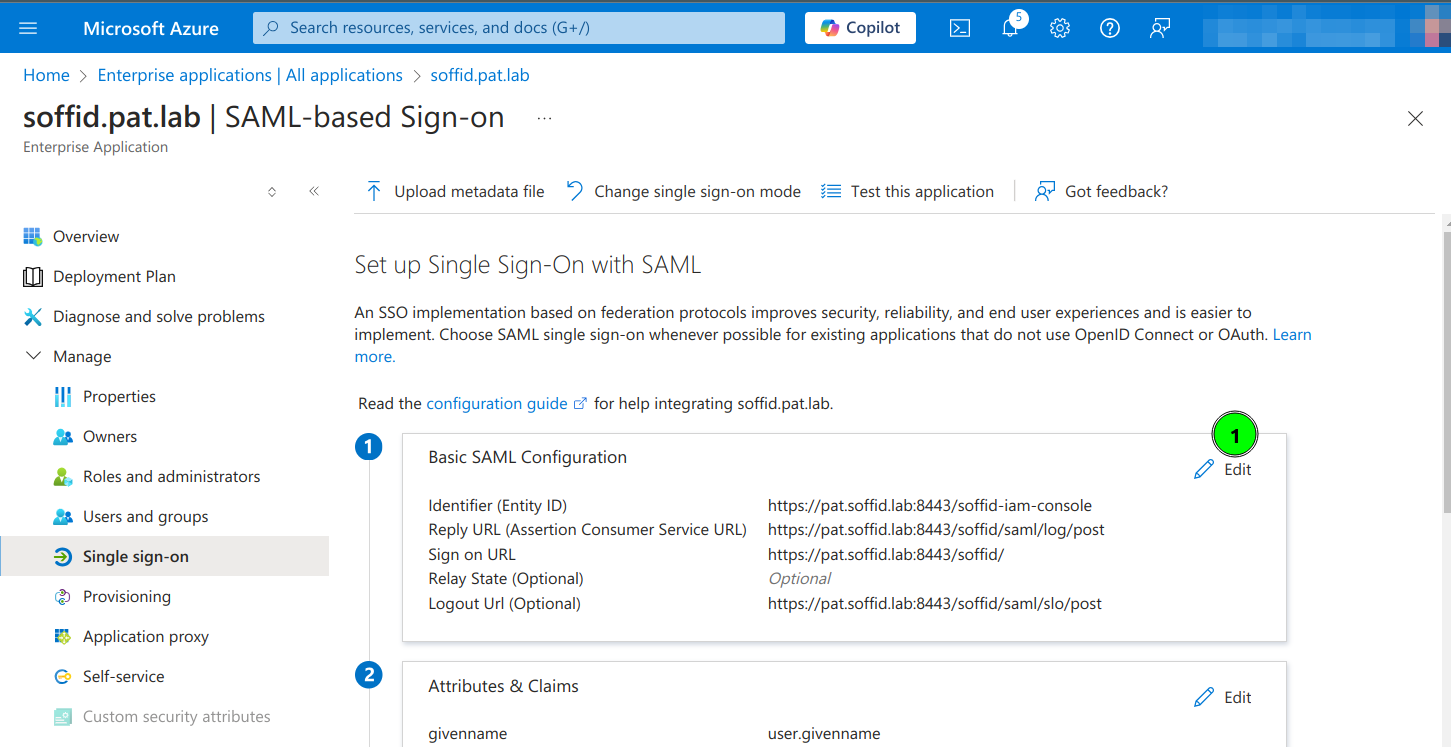
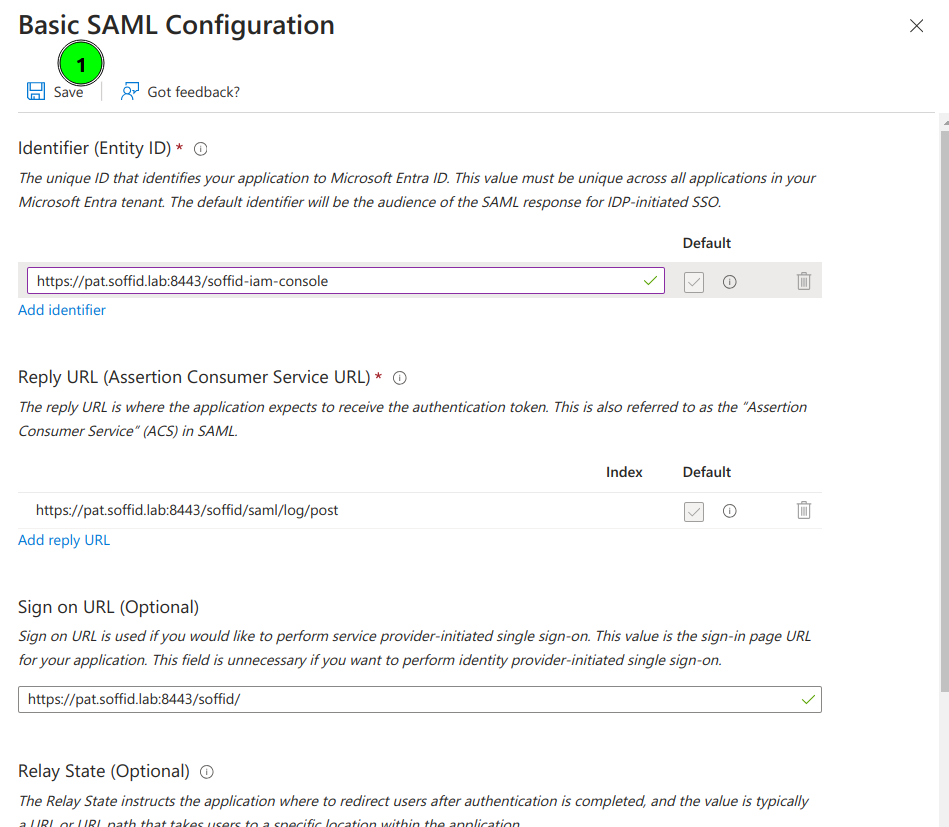
9. Configure Attributes & Claims and change the attributes and claims to send the mailnickname as the user identifier (nameid)
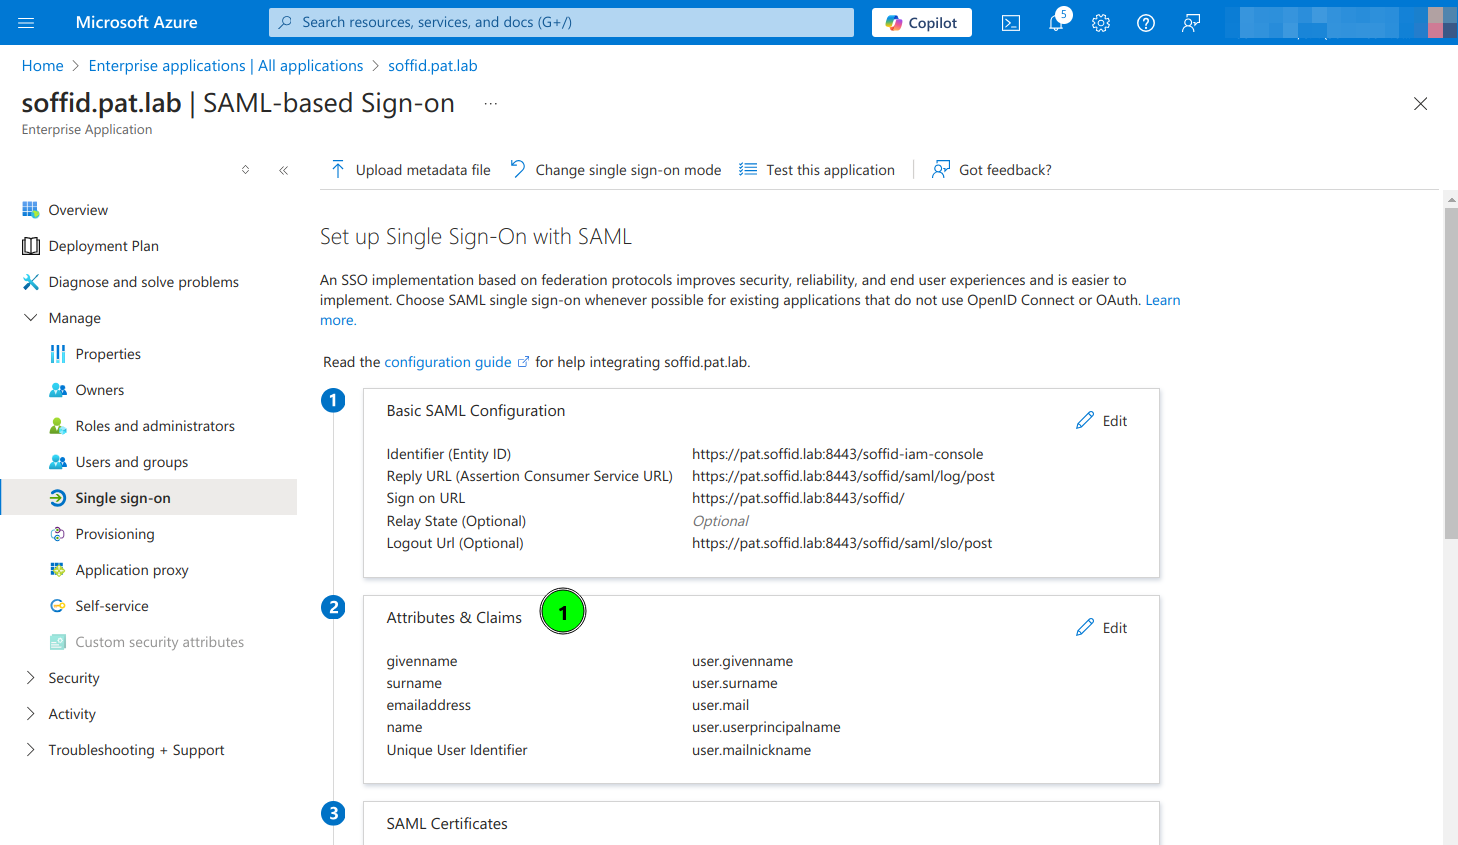
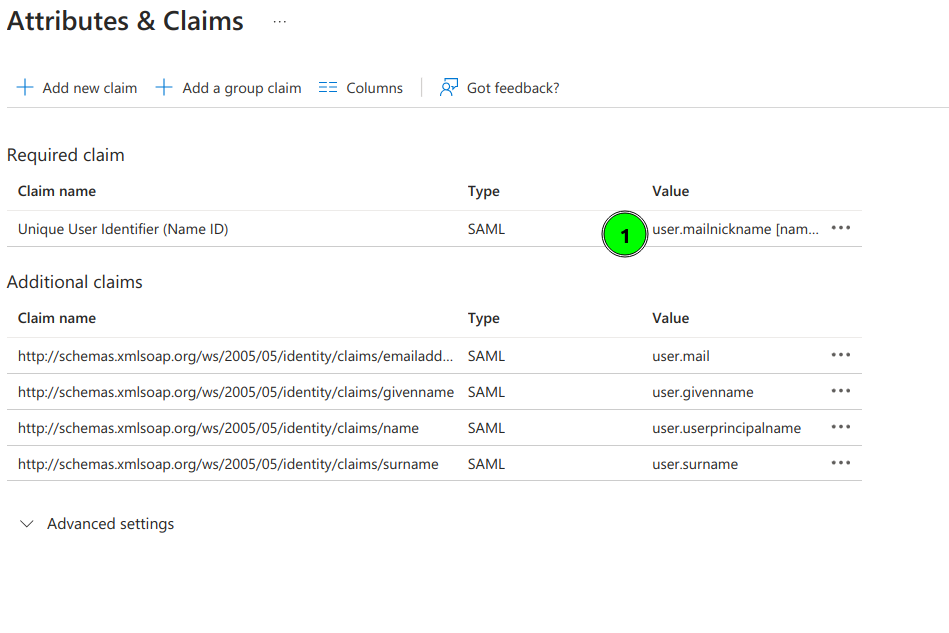
10. Copy the App Federation Metadata Url

11. Configure the External SAML identity Provider in the Soffid Console Authentication page
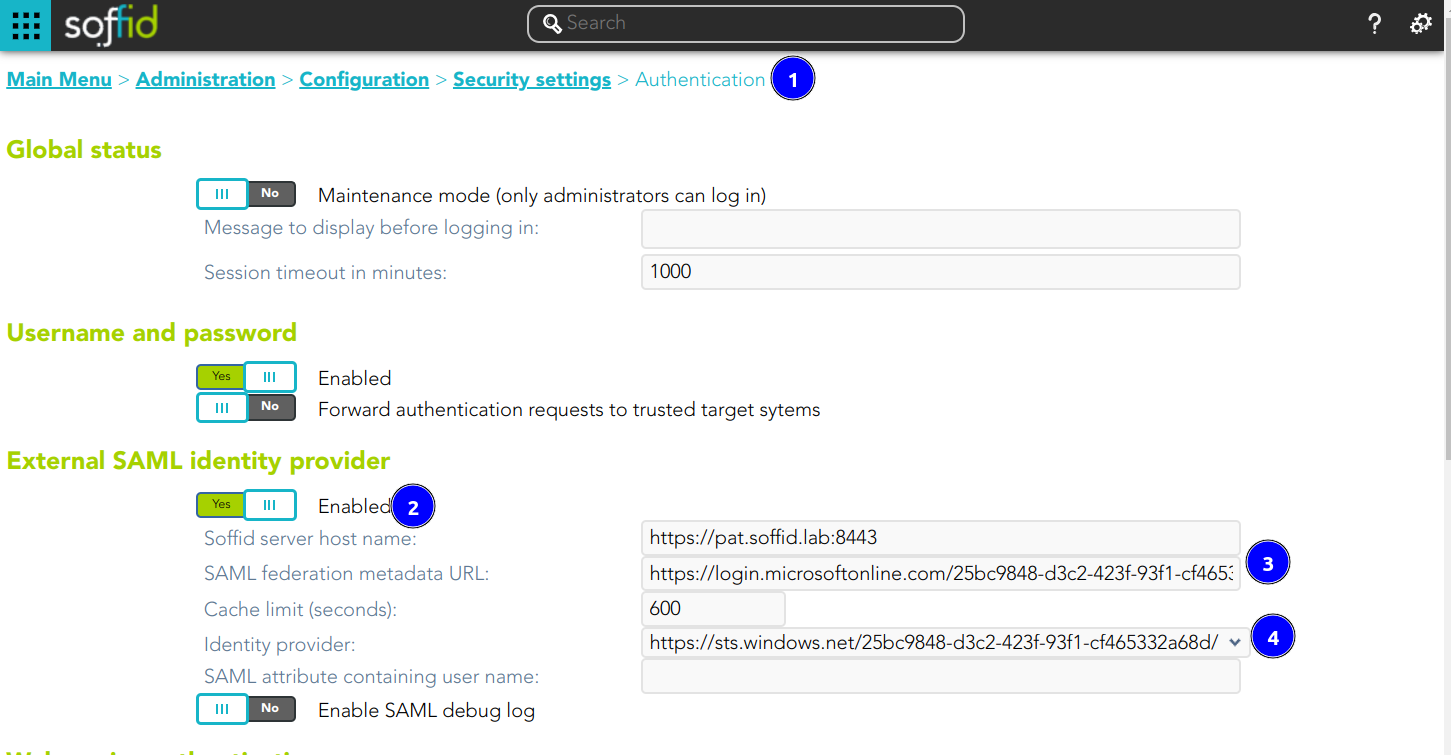
12. Optional, enable any user to login

Webservice authentication
Soffid allows you to configure the way to verify the identity of a user or sysctem accesing to the Soffid Web Service, to ensure that only authorized entities can interact with the service.
- User name and password: allows you to use user and password to access to the Soffid Web Service.
- JWT token: allows you to use JWT token to access to the Soffid Web Service.
- JWT configuration URL: URL where the jwks.json are available to download.
- JWT Issuer: identifies the principal that issued the JWT.
- JWT Audience: identifies the recipients that the JWT is intended for.
Bear in mind that the Identity Provider needs to have enabled the OpenID profile.
Also, the Identity Provider cert must be in the Console cacerts.
💻 Image

Enable LinOTP integration
Soffid allows you to use an external OTP, LinOTP in this case. If you decide to use LinOTP, Soffid could be configured to request the user to authenticate using a second factor authentication to perform certain actions. In another case, you can use the Soffid OTP.
- Enabled: check it (select value Yes) to use an external SAML Identity Provider.
- LinOTP server URL: URL of your LINOTP service.
- LinOTP admin username: username of the admin account used by Soffid.
- LinOTP admin password: password of the admin account used by Soffid.
- LinOTP users domain: the user's domain for LinOTP authentication. The selected user domain will guess the LinOTP username for any Soffid identity. It is extremely important when LinOTP users do not match Soffid usernames. Please visit the Account naming rules page for more information
If you want to configure the Soffid OTP you could visit Two factor authentication (2FA) chapter.
Second Factor Authentication configuration
- Pages that optionally require OTP authentication for users with an enabled token: (Optional) If a URL optionally requires OTP authentication, and the user does not have any OTP token, access will be granted. Otherwise, if the user has an OTP token, the OTP value will be required, and no access will be allowed until the user provides the right token value.
- You can include the list of pages to include the two factors only for the users with the token.
💻 Example
Request only the OTP for these pages:
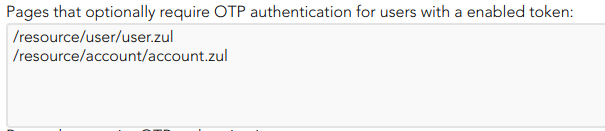
-
- You can add a regular expression to determine the list of pages to always include the second factor to the users with the token
💻 Example
Request OTP for all pages except those containing menu.zul or otp.zul:
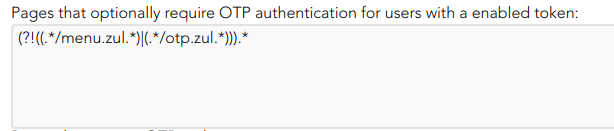
- Pages that require OTP authentication to any user: (Mandatory) You should include the list of pages to always include the second factor to the users with the token. Therefore, if a URL strictly requires OTP authentication, users with no token won't be allowed to use them.
💻 Example
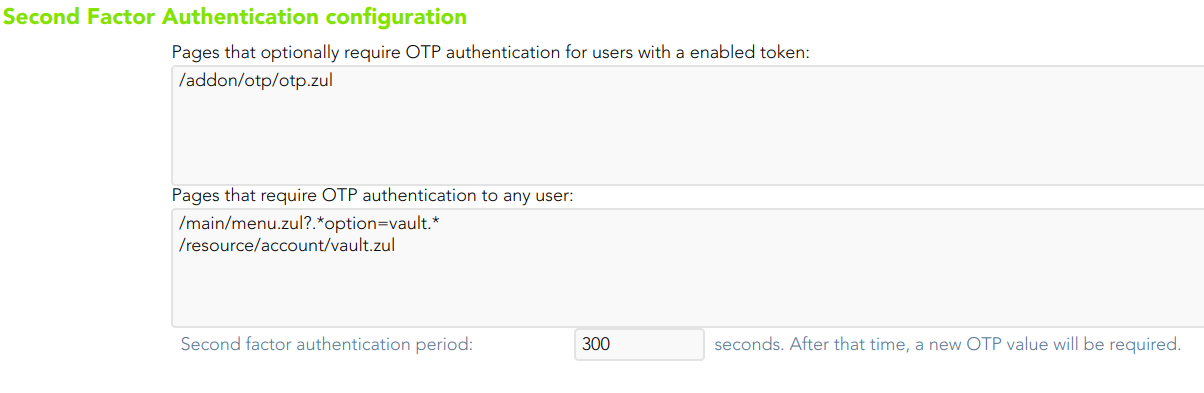
- Second factor authentication period: number of seconds after that, a new OTP value will be required.
In both configurations, if OTP is required by the user, a popup requesting the token value is raised to write the OTP value.
Actions
| Download metada |
Allows you to download an XML file with metadata to load it into your SAML Identity Provider federation when you use an External SAML identity provider |
| Confirm changes | Allows you to save the changes made in the Authentication setup. |
Password policies
Definition
Password domain
Is a logical way of grouping managed systems that are sharing the same password for each account. If the administrator chooses to have the same password for every system, only one password domain should exist. If the administrator chooses to assign a different password for each system, then a password domain should be created for each managed system.
Password policies
Password policies allow you to define custom rules that passwords must comply with to enhance system security. For each password domain, Soffid allows you to create different password policies related to user type. It is only possible to define a single password policy for one password domain and one user type.
There are two kinds of password policies.
- The first one is for user selected passwords. That is the default behavior.
- The second one is system generated passwords. These policies are useful for shared accounts when using Enterprise Single Sign-on.
A password policy will also define how often the password needs to be changed and how many days are allowed to change it.
Regarding password complexity, you can specify the minimum and the maximum number of lowercase letters, uppercase letters, numbers, and symbols, as well as password length.
The administrator users can define a regular expression that must match each password. This can be used, for instance, to ensure that the first password is not numeric.
It is allowed to create a list of forbidden words that cannot be used as passwords.
Screen overview
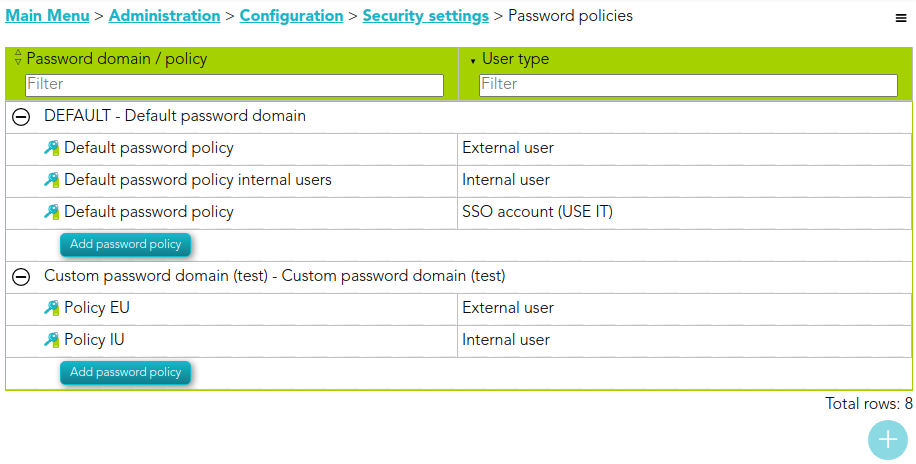
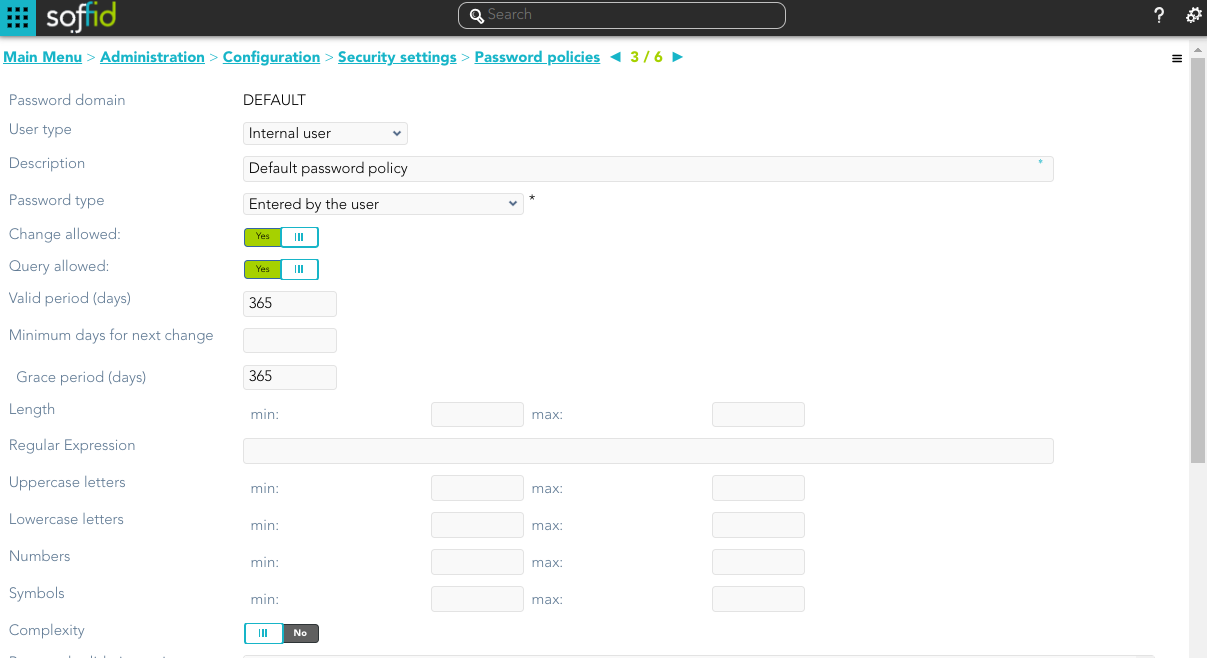
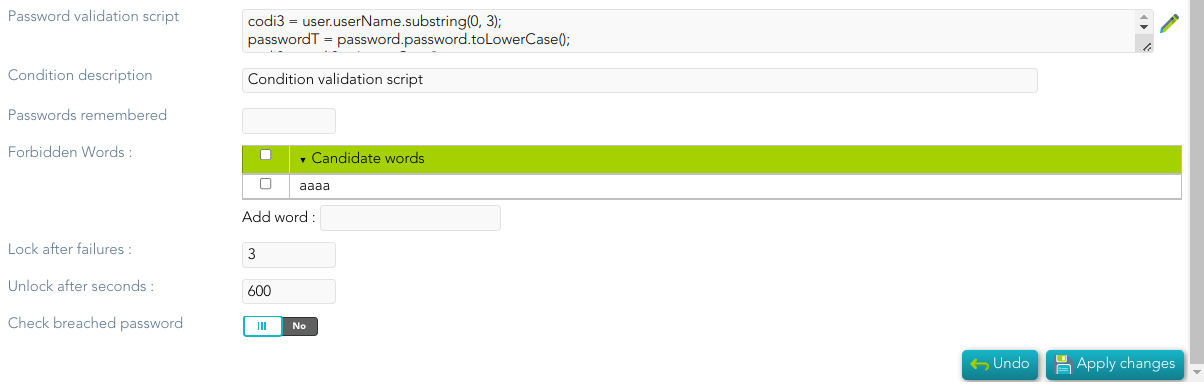
Related objects
Standard attributes
Password Domain
- Code: password domain identifier code.
- Description: a brief description of the password domain.
Password policies
- Password domain: the password policy belongs to that password domain.
- User type: specific user type for which the password policy is created.
- Description: a brief description of the password policy.
- Password type: the king of policies password:
- Entered by the user: that is the default behavior.
- Automatically generated: these policies are useful for shared accounts when using Enterprise Single Sign-on.
- Change allowed: if it is checked, the user could change automatically generated passwords.
- Query allowed: if is checked, the user can view the current password.
- Valid period (days): the change of the password will be asked in that number of days. That option is available when you select the "Entered by the user" option.
- Minimum days for next change
- Grace period (days): additional days allowed to the valid period, for changing the password. That option is available when you select the "Entered by the user" option.
- Renewal Time: added number of days to change the password. That option is available when you select the "Automatically generated" option.
- Length (min & max): added the number of days to change the password.
- Regular expression: the password must comply with that regular expression.
- Uppercase letters (min & max): min and max number of uppercase letters that be included on the password.
- Lowercase letters (min & max): min and max number of lowercase letters that be included on the password.
- Numbers (min & max): min and max number of numbers that be included on the password.
- Symbols (min & max): min and max number of symbols that are included on the password.
- Complexity: Similar operation to the same option in Active Directory. It is mandatory to use three different types of characters (uppercase, lowercase, numbers, and symbols), it is not allowed to use the user code, name, or surname.
- Password validation script: script to validate additional password conditions. The result must be true or false.
- Condition description: description of the validation script. This condition will be displayed in the Password policy field when the user try to change the password from My Profile.
- Passwords remembered: the number of passwords the system will remember.
- Forbidden words: list of forbidden words that may not be used to create a password if they are selected. It will be case insensitive. For instance, there will be no distinction between "Soffid", "SOFFID", or "soffid".
- Lock after failures: the number of login attempts before blocking an account.
- Unlock after seconds: the number of seconds an account is blocked.
- Check breached password
Password validation script example:
codi3 = user.userName.substring(0, 3);
codi3 = codi3.toLowerCase();
if (passwordT != null)
if(codi3.equals(passwordT.substring(0,3)))
return false;
return true;Actions
Password policies query actions
| Add new domain |
Allows you to create a new password domain. You can choose that option on the hamburger menu or click the add button (+).To add a new password domain it will be mandatory to fill in the required fields |
| Add new password policy |
Allows you to create a new password policy on a specific password domain. Below the father password domain, you can find the button to perform that action. To add a new password policy it will be mandatory to fill in the required fields. |
Password domain detail actions
| Apply changes |
Allows you to save a new password domain or to update the password domain changes. To save the data it will be mandatory to fill in the required fields. |
| Delete |
Allows you to delete a password domain. To delete a password domain you can click on the hamburger icon and then click the delete button (trash icon). Soffid will ask you for confirmation to perform that action, you could confirm or cancel the operation. |
| Undo |
Allows you to quit without applying any changes. |
Password policies detail actions
| Apply changes |
Allows you to create a new password policy or to update password policy changes. To save the data it will be mandatory to fill in the required fields. |
| Delete |
Allows you to delete a password policy. To delete a password policy you can click on the hamburger icon and then click the delete button (trash icon). Soffid will ask you for confirmation to perform that action, you could confirm or cancel the operation. |
| Undo |
Allows you to quit without applying any changes. |
| Add word |
Allows you to create a new forbidden word. Those forbidden words may not be used to create a password if they are selected. |
Configure PAM session servers
Definition
Soffid provides the functionality that allows you to Configure PAM session servers.
To configure that functionality is mandatory to install PAM following the instructions of the PAM installation page.
A Jump server is the control point that forces users to log into that system first, then, they could traverse to other servers without having to log in again. The purpose of a jump server is to be the only gateway for access to your infrastructure reducing the size of any potential attack surface.
Screen overview
Related objects
- soffid-pam-store: storage server container
- soffid-pam-launcher: launcher container
Standard attributes
- Group name: name to identify the configuration.
- Description: a brief description.
- User name: user name given at installation of PAM
- Password: password given at installation of PAM.
- URL: of the storage. The default port is 8081.
- Jump servers: list of jump servers. A URL of each jump server. The default port is 8082.
Actions
|
Add new |
Allows you to add a new configuration of PAM. You can choose that option by clicking the add button (+). You must fill in all the attributes to save a new configuration. |
|
Delete |
Allows you to delete one or more configuration PAM registers, you must select one or more records from the list and click the button with the subtraction symbol (-). To perform that action, Soffid will ask you for confirmation, you could confirm or cancel the operation. |
|
Apply chanages |
Allows you to create a new configuration PAM or to update an existing one. To save the data it will be mandatory to fill in the required fields. Also, the password and user name should be correct to connect. |
|
Undo |
Allows you to quit without applying any changes made. |
PAM Rules
Definition
Soffid allows you to define rules to detect commands executed on a server. When a user launches a command defined on a rule, Soffid will detect it.
To use those rules you need to define the PAM policies. For more information, you can visit the PAM policies page.
Screen overview
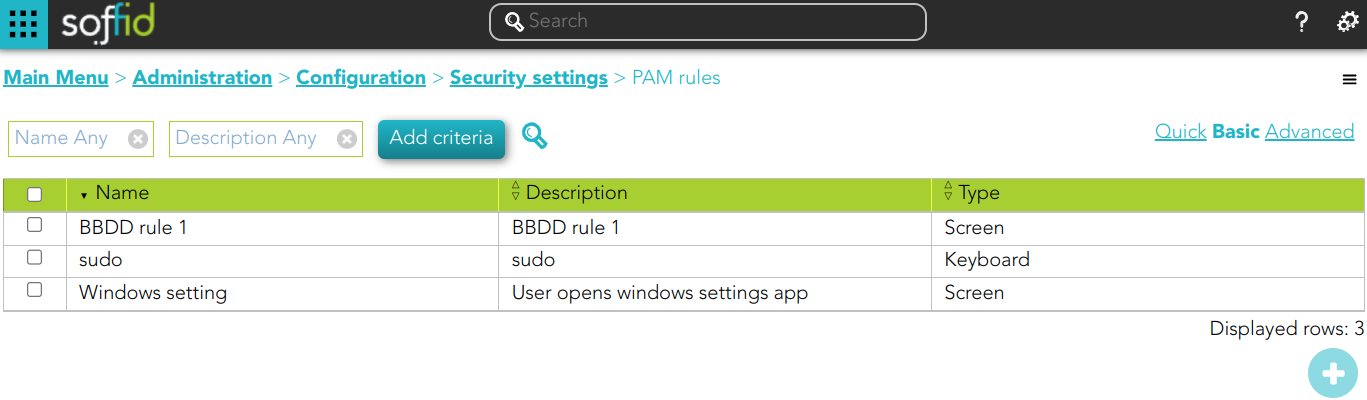
Keyboard example
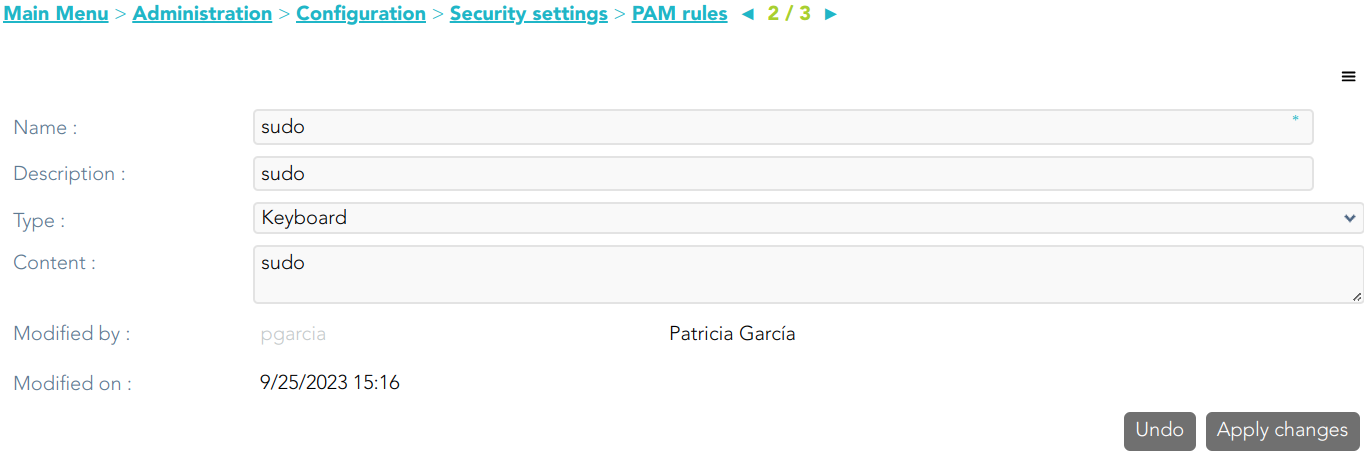
Screen example
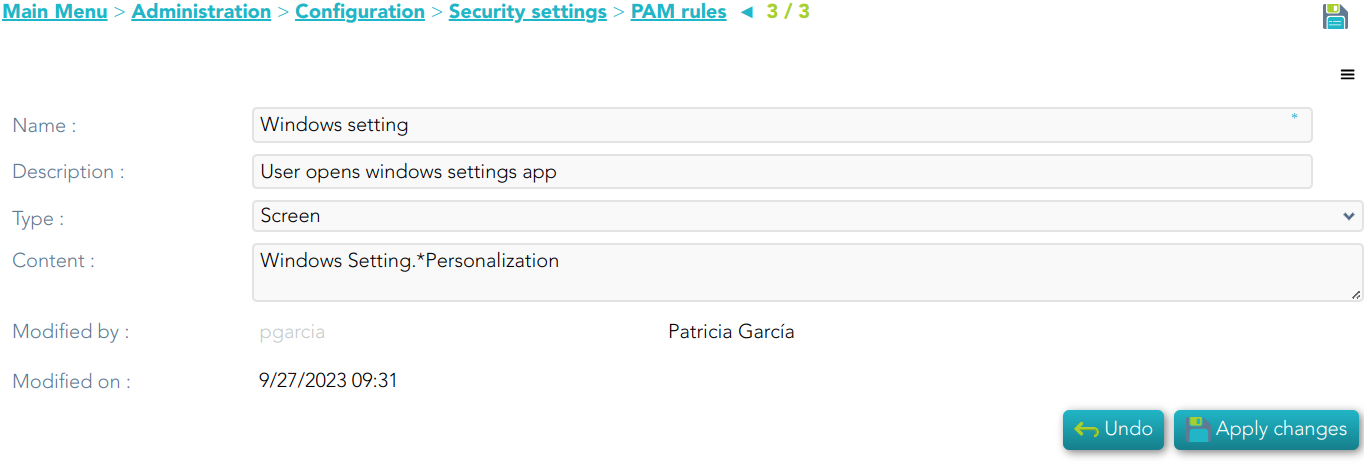
Keyboard example
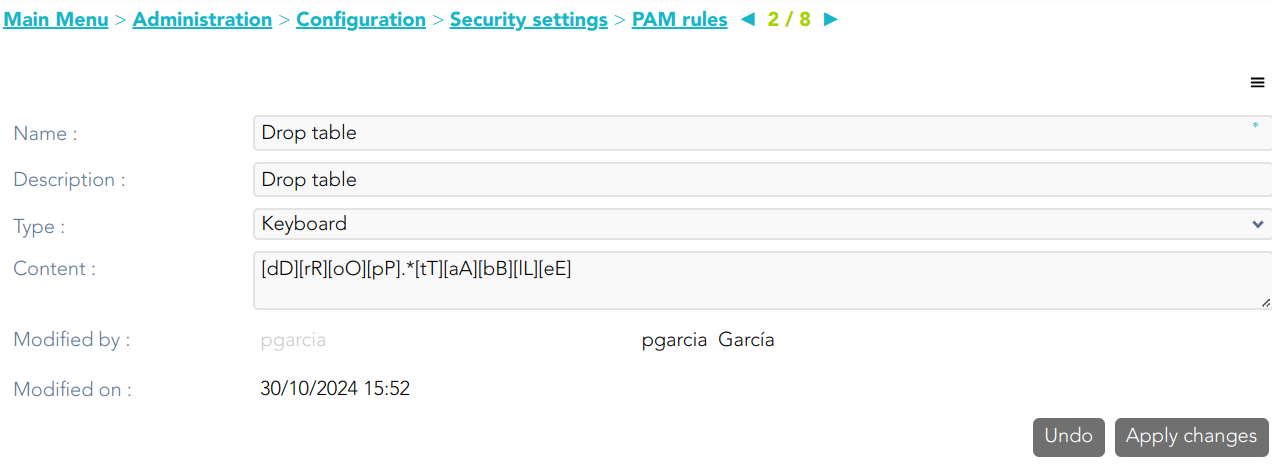
Standard attributes
- Name: name to identify the rule.
- Description: a brief description of the rule.
- Type: rule type.
- Keyboard: Indicate the command typed in the terminal that you want to control.
- Screen: Indicate the text displayed in the screen that you want to control.
- Content: the content of the rule that Soffid will detect. Be in mind, that Soffid will consider blanks, returns, and all characters you type.
- Modified by: user who modified that rule.
- Modified on: the date and time of the update.
Actions
PAM rules query
|
Query |
Allows you to query PAM rules through different search systems, Quick, Basic and Advanced. |
|
Add or remove columns |
Allows you to show and hide columns in the table. |
|
Add new |
Allows you to create a new PAM rule. You can choose that option on the hamburger menu or click the add button (+). To add a new PAM rule it will be mandatory to fill in the required fields. |
|
Delete |
Allows you to remove one or more PAM rules by selecting one or more records and next clicking the button with the subtraction symbol (-). To perform that action, Soffid will ask you for confirmation, you could confirm or cancel the operation. |
|
Import |
Allows you to upload a CSV file with the PAM rules list to add or update PAM rules to Soffid. First, you need to pick up a CSV file, that CSV has to contain a specific configuration. Then you need to check the content to be loaded, it is allowed to choose if you want or not to load a specific attribute. And finally, you need to select the mappings for each column of the CSV file to import the data correctly and click the Import button. |
|
Download CSV file |
Allows you to download a CSV file with the PAM rules information. |
PAM rules detail
|
Apply changes |
Allows you to create a new configuration PAM rule or to update an existing one. To save the data it will be mandatory to fill in the required fields. |
|
Undo |
Allows you to quit without applying any changes made. |
|
Delete |
Allows you to delete a PAM rule. To perform that action, Soffid will ask you for confirmation, you could confirm or cancel the operation. |
PAM Policies
Definition
Privileged Access Management (PAM) policies are a set of guidelines and controls that dictate how privileged access is granted, managed, and audited within an organization.
Soffid allows you to define policies, those policies can be made up of several rules. For each rule, you could select the action to perform when Soffid detects that rule is accomplished.
To use those policies you need to define how policies will be used by each folder in the password vault. For more information, you can visit the Password Vault page.
Screen overview
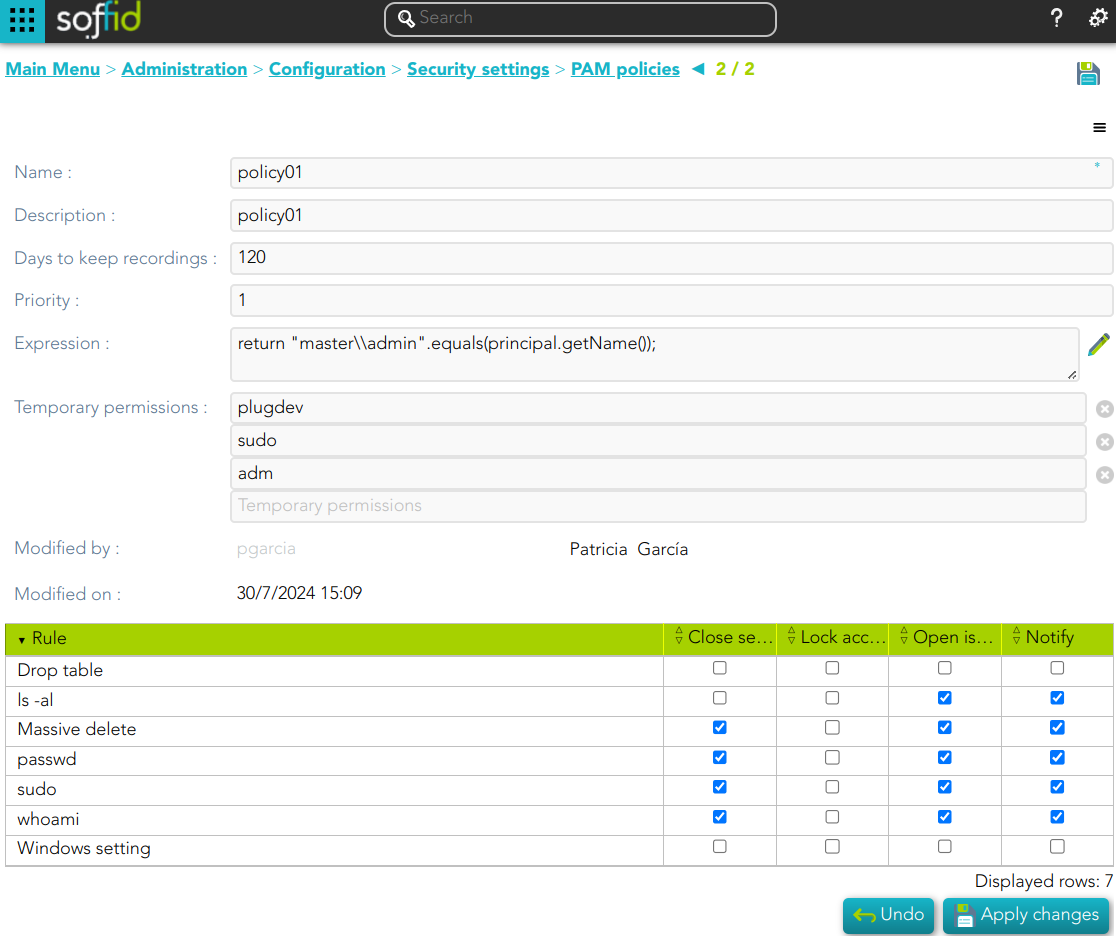
Standard attributes
- Name: name to identify the policy.
- Description: a brief description of the policy.
- Days to keep recordings: number of days that recordings will be kept.
- Priority: allows you to set the priority between the different PAM policies configured. When there are several policies, the policy to be applied is evaluated according to priority and expression.
- Expression: this expression is evaluated to determine the priority of the policy to be applied. When there are several policies, the policy to be applied is evaluated according to priority and expression.
- Temporary permissions: these permissions will be assigned to the user's account on the target system. The permissions will be maintained for the duration of the session. Once the session is over, the permissions will be revoked. The account must be a managed account.
- Modified by: user who modified that rule.
- Modified on: the date and time of the update.
When you save the standard attributes of a PAM policy and edit the policy again, the rule list will be shown. Here you can customize the policy depending on the existing rules.
- Rule list: show a list of the PAM rules defined. You can check/uncheck the available options. You can choose zero, one, or several:
- Close session: when the rule is met, Soffid will close the session.
- Lock account: when the rule is met, Soffid will lock the account.
- Open issue: when the rule is met, Soffid will open a new issue (*).
- Notify: when the rule is met, Soffid will send a notification about the action.
(*) You can visit the following page for more information about the issues: https://bookstack.soffid.com/books/soffid-3-reference-guide/page/issue-policies and https://bookstack.soffid.com/link/1153#bkmrk-pam-violation
The PAM policies configuration is sent to the user-console.policies to the Store container. You can find this file at /opt/soffid/tomee/data/ips
💻 Image

Actions
PAM rules query
|
Query |
Allows you to query PAM policies through different search systems, Quick, Basic and Advanced. |
|
Add or remove columns |
Allows you to show and hide columns in the table. |
|
Add new |
Allows you to create a new PAM policy. You can choose that option on the hamburger menu or click the add button (+). To add a new PAM policy it will be mandatory to fill in the required fields. |
|
Delete |
Allows you to remove one or more PAM policies by selecting one or more records and next clicking the button with the subtraction symbol (-). To perform that action, Soffid will ask you for confirmation, you could confirm or cancel the operation. |
|
Import |
Allows you to upload a CSV file with the PAM policies list to add or update PAM policies to Soffid. First, you need to pick up a CSV file, that CSV has to contain a specific configuration. Then you need to check the content to be loaded, it is allowed to choose if you want or not to load a specific attribute. Finally, you need to select the mappings for each column of the CSV file to import the data correctly and click the Import button. |
|
Download CSV file |
Allows you to download a CSV file with the PAM policies information. |
PAM rules detail
|
Apply changes |
Allows you to create a new configuration PAM policy or to update an existing one. To save the data it will be mandatory to fill in the required fields. |
|
Undo |
Allows you to quit without applying any changes made. |
|
Delete |
Allows you to delete a PAM policy. To perform that action, Soffid will ask you for confirmation, you could confirm or cancel the operation. |
Password recovery configuration
Description
Soffid provides you the functionality that allows to the users recover their passwords.
To do this, the administrator user, or a user with the proper roles/authorizations, must first config the password recovery settings.
This setting can be used in the Console login and in the Federation login if enabled in the Identity Provider.
There are several sending method configuration options, use the one that best suits your organization.
Screen Overview
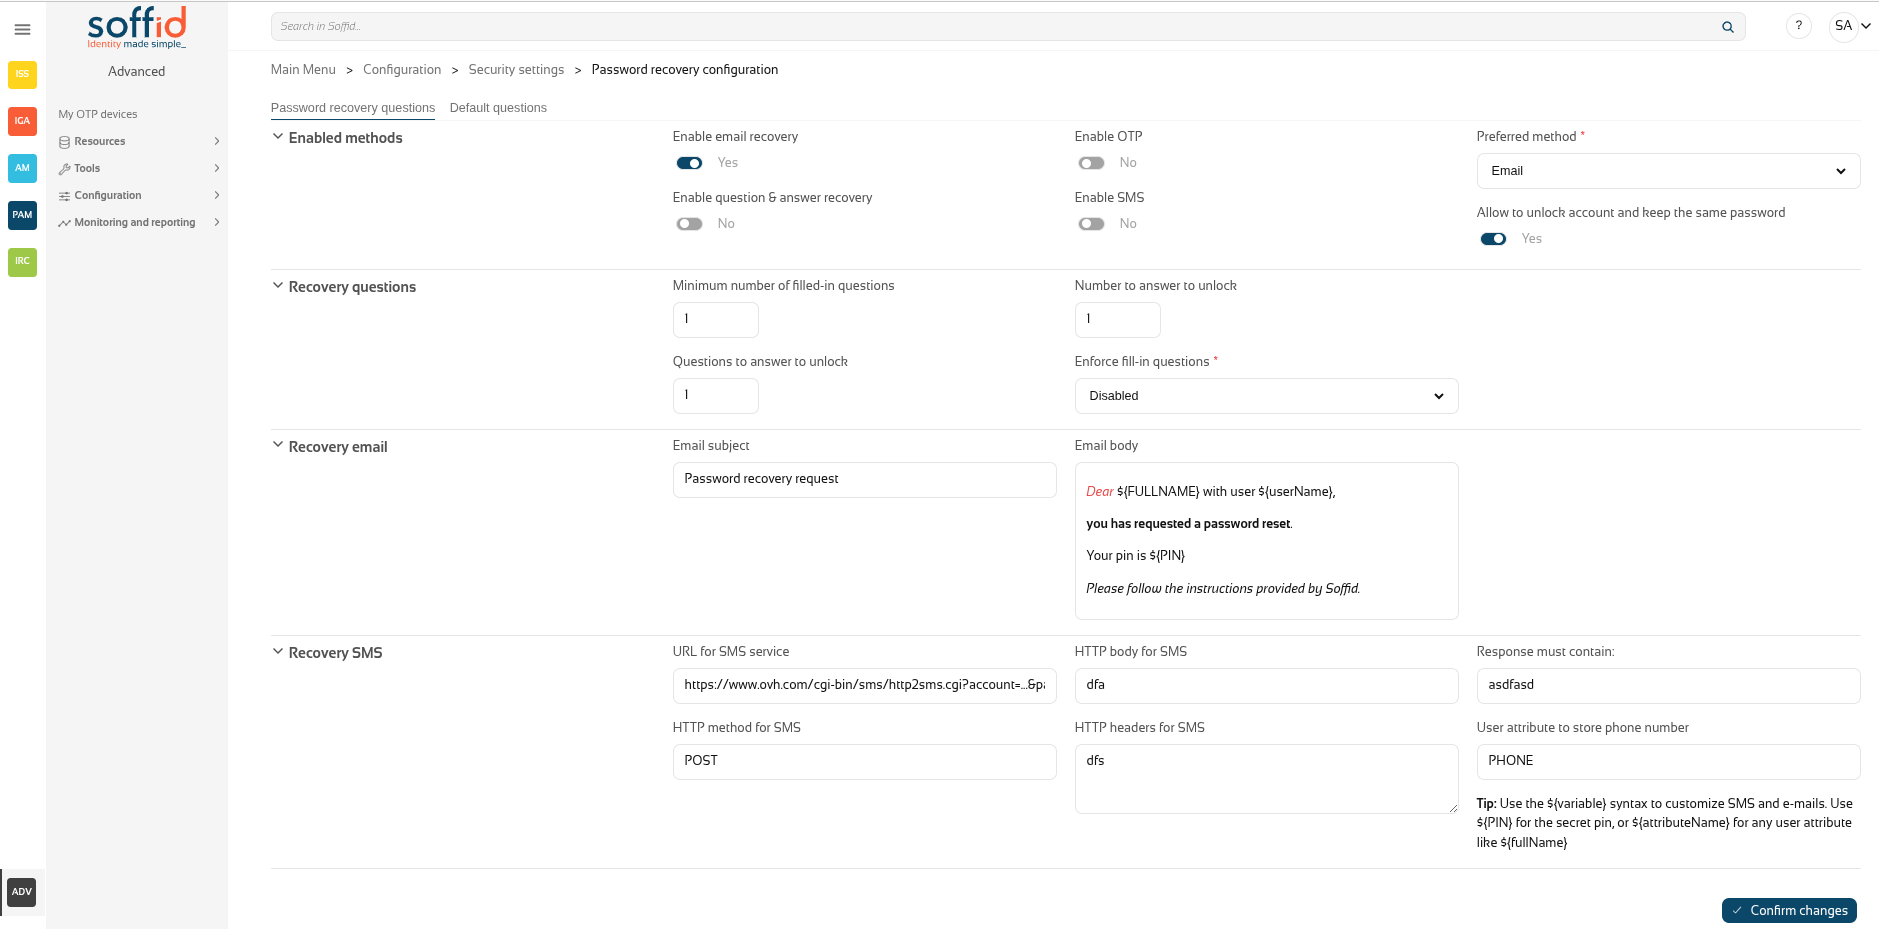
Related objects
- Soffid parameters : must provide a mail server to use mails
- Identity providers : to enable this opcion in federation
Standard attributes
Password recovery questions tab
Enabled methods
- Enable email recovery: if Yes is selected, it will allow password recovery through an e-mail sent to an authorized mailbox.
- Enable question&answer recovery: if Yes is selected, a question and control response will be requested.
- Enable OTP: if Yes is selected, an OTP will be required to recover the password. That OTP depends on the OTP settings configured into the Soffid Console and the OTP devices configured for the end-user.
- Enable SMS: if Yes is selected, an SMS will be send to recover the password.
- Preferred method: in case you select two or more previous options, this drop-drown will allow you to priorize one option over the others.
- Questions
- SMS
- OTP
- Allow to unlock account and keep the same password: Allows the user to unlock his account using the last stored password.
Recovery questions
- Minimum number of filled-in questions: indicates the minimum number of user questions that must be have answered in the end-user's profile to can use this recover password method.
- Questions to answer to unlock: indicates the number of questions that must be formulated to the end-user to reset his password.
- Numer to answer to unlock: indicates the number of answers that must be answered by the end-user to reset his password.
- Enforce fill-in questions: allow on each access Soffid to check if the questions are answered. In case the questions have not been not answered, Soffid will display a window with the questions to answer or to config to the end-user depending on that value.
- Disabled: allows you to disable that functionality.
- Required: if this option is selected, the system will check if the user questions are answered correctly.
If the user have not a required number of questions defined or he have not answered all his questions, the system will show the retrieve password questions page. - Optional: when this option is selected, the system will check the user questions but it will not show the retrieve password questions page if the user questions does not meet the configuration parameters.
Recovery email
- Email subject: the text of the subject sent in the email, you can use variables
- Email body: the text of the body sent in the email, this could be HTML stylel, you can use variables
Tip: Use the ${variable} syntax to customize SMS and e-mails. Use ${PIN} for the secret pin, or ${attributeName} for any user attributes like ${fullName}.
Recovery SMS
- URL for SMS service: URL for SMS service
- HTTP method for SMS: HTTP method for SMS, for example GET
- HTTP body for SMS: the text of the boy sent in the SMS, you can use variables
- HTTP headers for SMS: headers used in the HTTP request
- Response must contain: a text in the response to confirm the successful sending
- User attribute to store phone number: user object attribute defined on the Metadata page to save the phone number.
Tip: Use the ${variable} syntax to customize SMS and e-mails. Use ${PIN} for the secret pin, or ${attributeName} for any user attributes like ${fullName}.
Default questions tab
This Default questions tab is where you enter the questions that the end user will have to answer in order to recover their password.
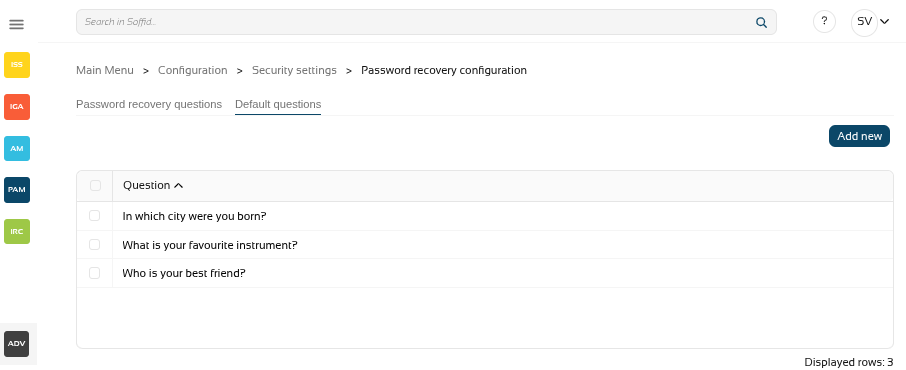
Table:
- Question: questions for the end user
Actions:
|
Add new |
Add a new row to the table to allow the administrator to write the question. |
|
Delete |
After selecting one or more questions, the "Delete" will be displayed and you could delete the question/s. |
For more information on how to activate and configure the question and answer feature, please review the page How to configure questions?
Actions
Password recovery questions tab
|
Confirm changes |
Allows you to save the data of password recovery configuration. To save the data it will be mandatory to fill in the required fields. |
Default questions tab
|
Add new |
Allows you to add a new question to the questions list |
Others
Login in console
First, activate one of the available methods, in this case email.
Sedond, when you log in to the console, you will see the option ‘Recover password’.
Image
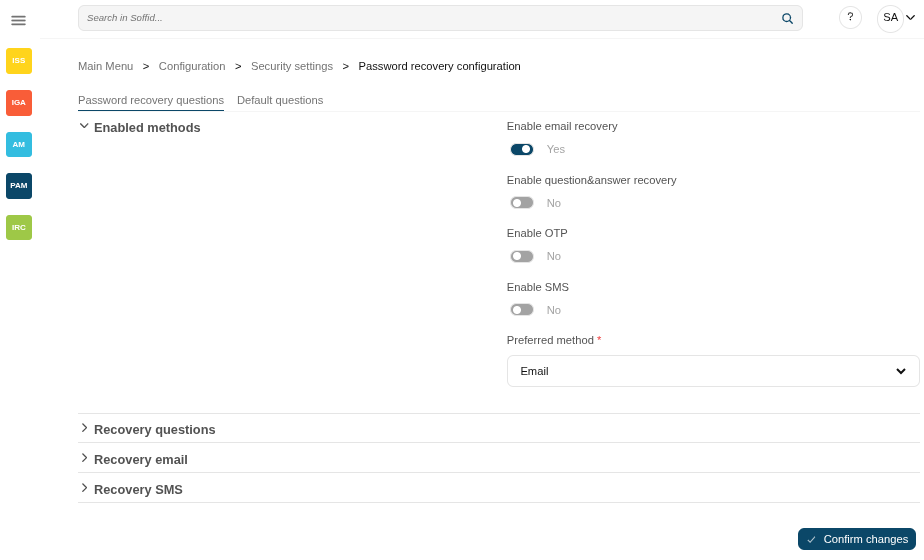
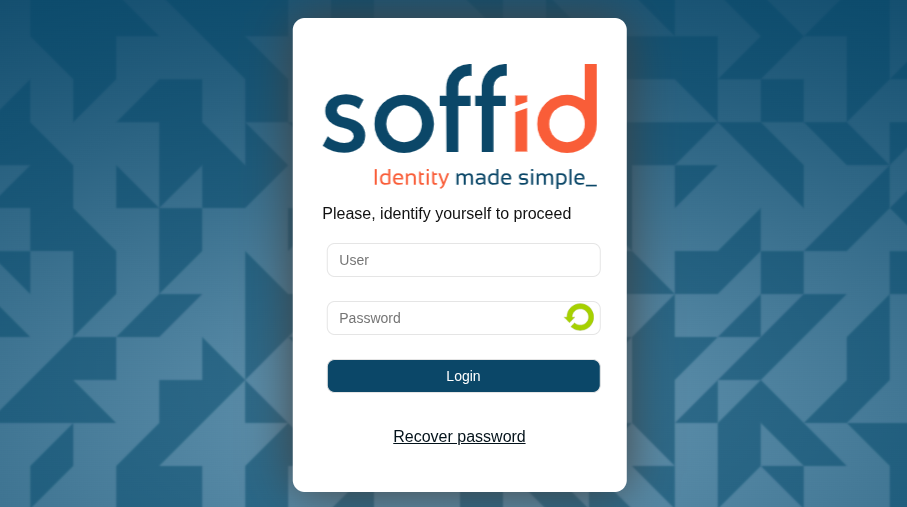
Login in federation
First, enable "Allow user to recover password" in the "Advanced authentication" section.
Second, when you log in to the federation, after entering the user, you will see the option "Forgot your password?".
Image
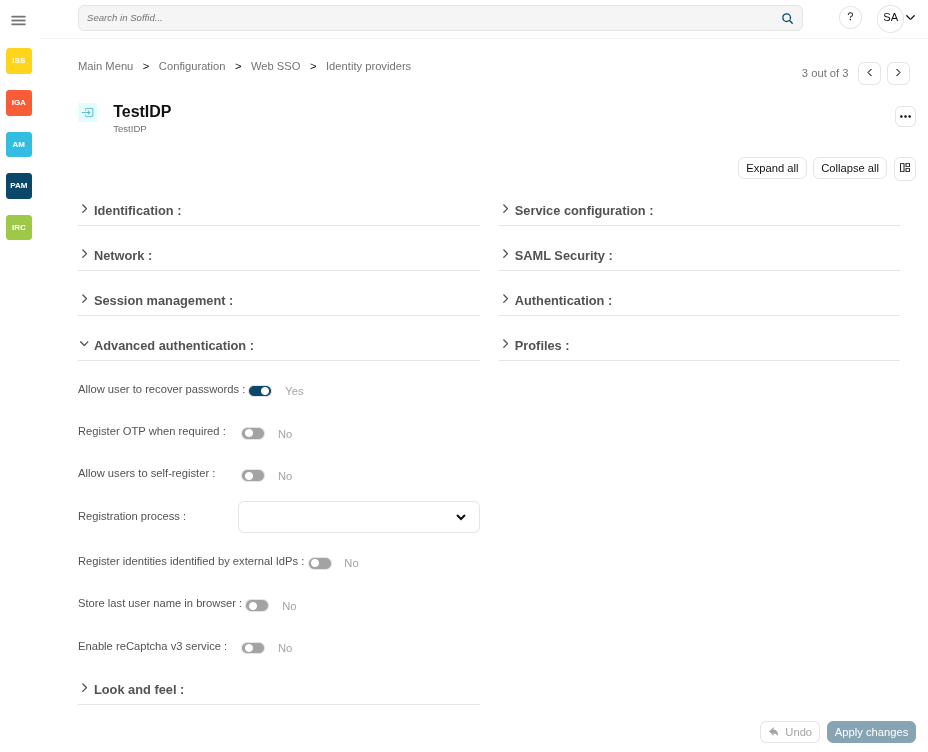
OTP settings
Definition
The OTP settings allow the administrator users to configure the available OPT options. Soffid provides four different OTP implementations.
Screen overview
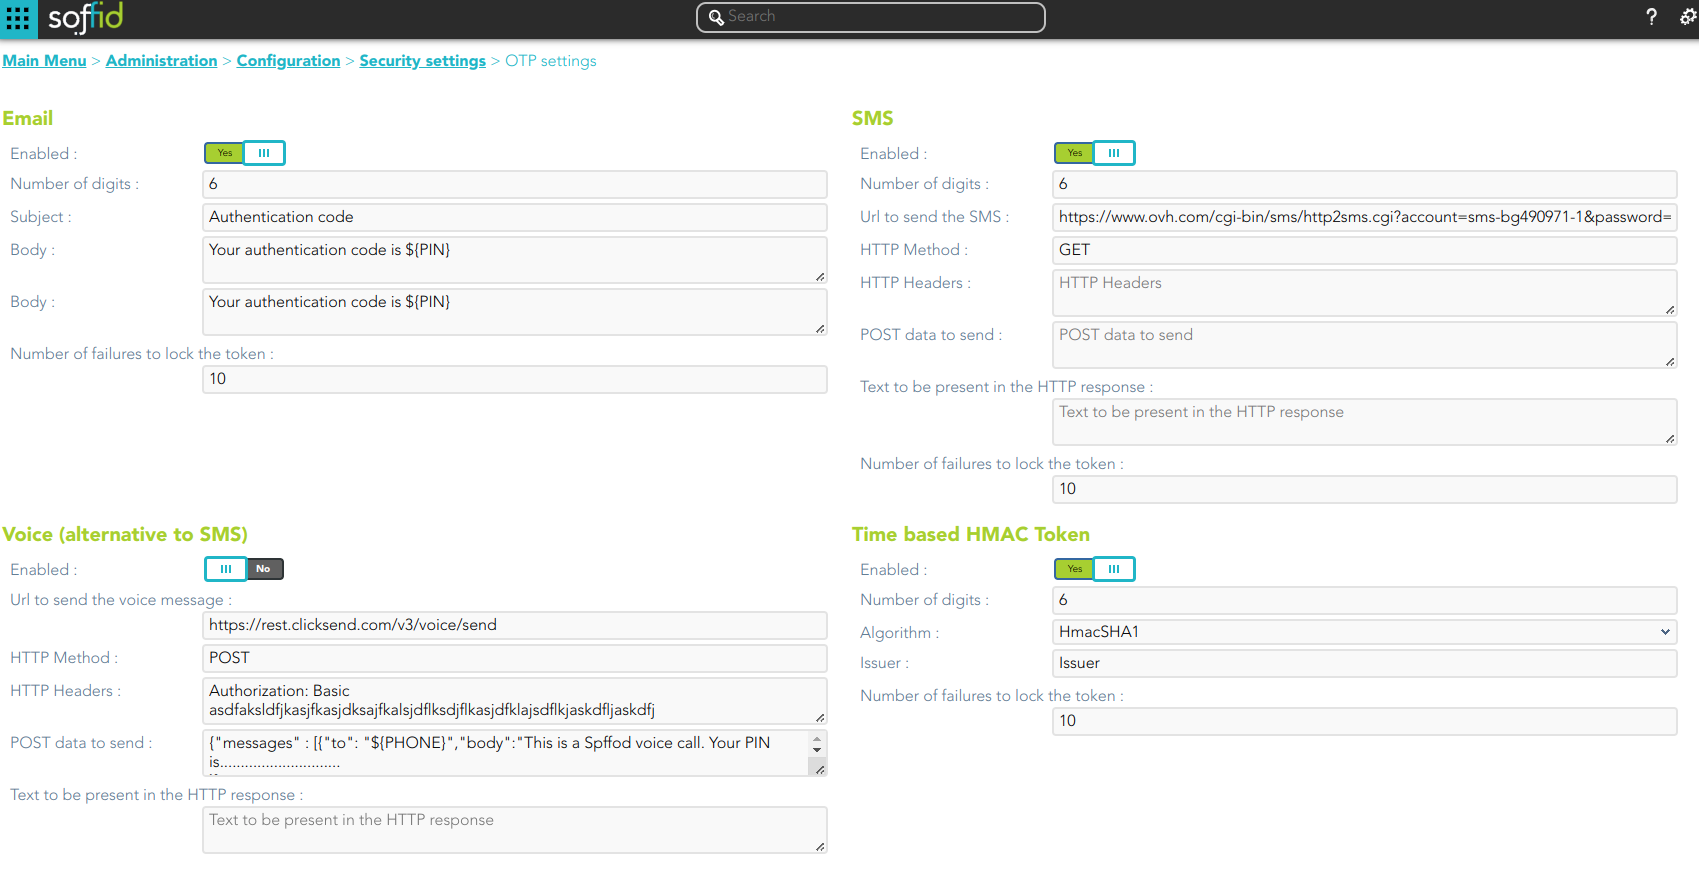

Standard attributes
- Enabled: allows you to enable or disable the OTP implementation.
- Number of digits: number of digits of the PIN code that will be generated.
- Subject
- Body
- Number of failures to lock the token
To send an email, will be mandatory to fill in the value of the mail.from parameter. You can visit the mail server parameters.
SMS
- Enabled: allows you to enable or disable the OTP implementation.
- Number of digits: number of digits of the PIN code that will be generated.
- URL to send the SMS: enter the URL of your SMS provider rest service
https://www.xxxxxxx.com/cgi-bin/sms/http2sms.cgi?account=sms-bg490971-1&password=XXXXXXt&login=user&from=SOFFID&to=${PHONE}&message=This is your access PIN: ${PIN}&noStop&contentType=application/json&class=0- HTTP Method: enter POST or GET depending on your provider documentation
- HTTP Header: optionally, you can add any HTTY header, including Basic or Bearer authentication tokens. The header must include the header name and header value. For instance:
Authorization: Basic dXNlcjpwYXNzd29yZA== - POST data to send Enter the body of the HTTP request
- Text to be present in the HTTP response: Soffid will check the response from your SMS Provider contains this text
"status":100- Number of failures to lock the token
The URL and POST data to be sent, the administrator can use some tags that will be replaced by some target user attributes:
- ${PHONE}: The target phone number
- ${PIN}: The one-time password to be entered by the user
- ${userAttribute}: Any of the standard or custom user attributes, like ${fullName} or ${userName}
Voice (alternative to SMS)
- Enabled: allows you to enable or disable the OTP implementation.
- URL to send the SMS: enter the URL of your voice call provider rest service
- HTTP Method: enter POST or GET depending on your provider's documentation
- HTTP Header: optionally, you can add any HTTY header, including Basic or Bearer authentication tokens. The header must include the header name and header value. For instance:
Authorization: Basic xxxxxxxxxxxxxxOUVCRS1DMzE0LTI3MzAtQkY0Qy05RDgwRTMyQUQ4OUY= Content-Type: application/json Accept: application/json - POST data to send Enter the body of the HTTP request.
Text to be present in the HTTP response: Soffid will check the response from your SMS Provider contains this text
The POST data to be sent, the administrator can use some tags that will be replaced by some target user attributes:
-
- ${PHONE}: The target phone number
- ${PIN}: The one-time password to be entered by the user
- Number of failures to lock the token
Time based HMAC Token
- Enabled: allows you to enable or disable the OTP implementation.
- Number of digits: number of digits of the PIN code that will be generated.
- Algorithm: allows you to select an HMAC algorithm.
- Issuer
- Number of failures to lock the token
Event based HMAC Token
- Enabled: allows you to enable or disable the OTP implementation.
- Number of digits: number of digits of the PIN code that will be generated.
- Algorithm: allows you to select an HMAC algorithm.
- Issuer
- Number of failures to lock the token
Security PIN
- Enabled: allows you to enable or disable the Security PIN implementation.
- Minimum PIN length: minimum number of digits that the PIN has to have.
- Number of digits from the PIN to ask: number of digits that Soffil will ask to verify the identity.
- Number of failures to lock the token
Actions
| Confirm changes |
Allows you to save the updates and quit the page. |
XACML Policy Management
Definition
The PDP, Policy Decision Point, is in charge of evaluating the defined rules. The Policy Decision Point is essentially a policy compiler. The PDP must verify that the specified rules are within the scope of the rule authors authority. The PDP provides the authorization to the PEP.
XACML Policy Management
The policy language is used to describe general access control requirements, and has standard extension points for defining new functions, data types, combining logic, etc. The request/response language lets you form a query to ask whether or not a given action should be allowed, and interpret the result.
It is possible to import an existing PolicySet into Soffid. The file to import must be a well-formed XML.
To know more about XACML, read XACML 2.0 Standard Specification
Related objects
https://www.oasis-open.org/committees/download.php/2713/Brief_Introduction_to_XACML.html
XACML PEP configuration
Description
The PEP, Policy enforcement point, is a component of policy-based management, where enforce the policies. It is the component that serves as the gatekeeper to access a digital resource. The PEP gives the PDP, Policy Decision Point, the job of deciding whether or not to authorize the user based on the description of the user's attributes.
XACML PEP configuration
Soffid allows you to configure different policies enforcement points, each of then can use a different policy set.
- Web Policy Enforcement Point
- Role centric Policy Enforcement Point
- Dynamic role Policy Enforcement Point
- External Policy Enforcement Point
- Password vault Policy Enforcement Point
Screen
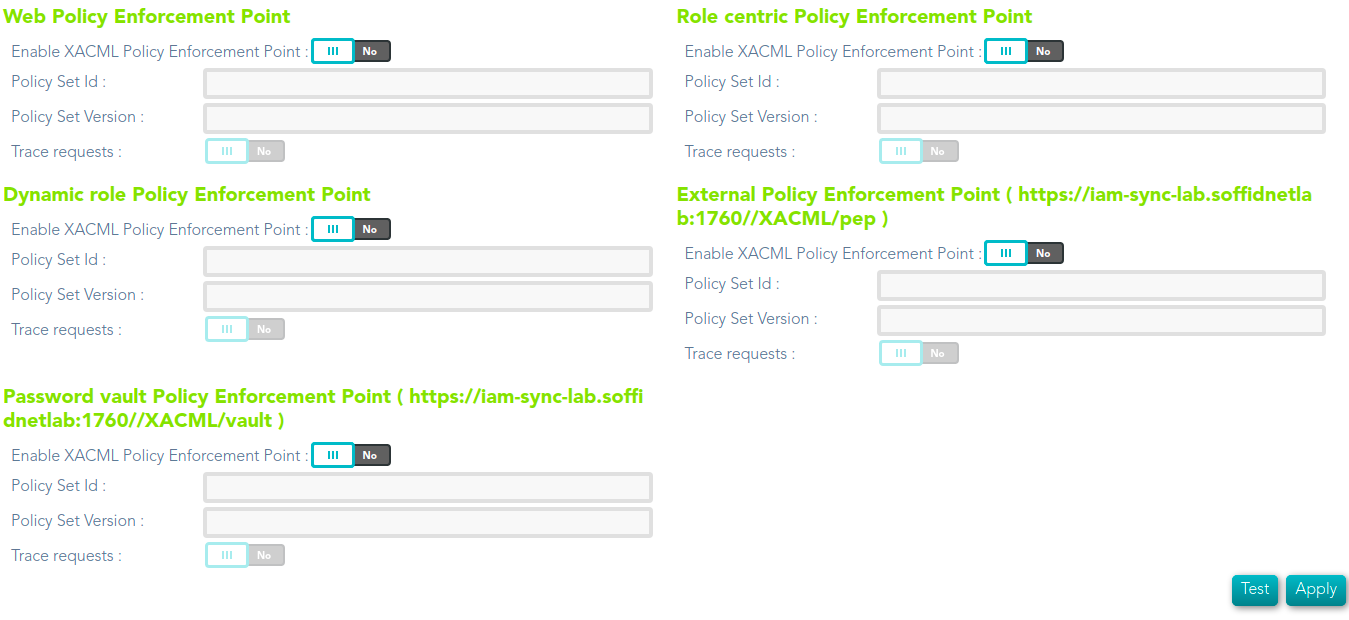
Common attributes
Common attributes for each PEP:
- Enable XACML Policy Enforcement Point: select the Yes option to enable the PEP.
- Policy Set Id: policy set identifier.
- Policy Set Version: version of the policy set to enforce.
- Trace requests: select the Yes option to enable the trace.
Policies enforcement points
Web Policy Enforcement Point
The policy will be enforced when the user open a new Soffid page. Using this PEP you can define the rules to access to Soffid pages.
| SUBJECTS | RESOURCES | ACTIONS | ENVIRONMENTS |
|
User |
Server URL |
Get Put Post |
Current Time Current Date Current DateTime |
Role centric Policy Enforcement Point
The policy will be enforced when the user login into Soffid. It will calculate the user authorizations as of the permissions that the user has assigned.
| SUBJECTS | RESOURCES | ACTIONS | ENVIRONMENTS |
|
User |
Soffid object Attributes
|
create update delete query |
Current Time Current Date Current DateTime |
Dynamic role Policy Enforcement Point
The policy will be enforced when the user performs an action to evaluate if the user has or not authorization. The user must have the proper role and comply with the XACML rule.
You can use that PEP to split the permissions, for instance, a support group can update the permission of a specific group of user, and another support group can update the permissions of another group of users.
| SUBJECTS | RESOURCES | ACTIONS | ENVIRONMENTS |
|
User |
Soffid object Attributes (*)
|
create update delete query |
Current Time Current Date Current DateTime |
(*) It is allowed to use "Attribute Selector" to configure Dynamic role policy.
External Policy Enforcement Point (https://iam-sync-lab.soffidnetlab:1760//XACML/pep)
PEP of general purpose. Calling the web service, the clients can made validations and figure out if the users have access.
| SUBJECTS | RESOURCES | ACTIONS | ENVIRONMENTS |
|
User |
Token Method Soffid object |
Get Put |
Current Time Current Date Current DateTime |
Password vault Policy Enforcement Point (https://iam-sync-lab.soffidnetlab:1760//XACML/vault)
The policy will be enforced when the password vault is used.
| SUBJECTS | RESOURCES | ACTIONS | ENVIRONMENTS |
|
User |
Access level Account System Login Vault Folder Server URL |
setPassword queryPassword queryPasswordBypassPolicy launch
|
Current Time Current Date Current DateTime |
Digital certificates
Definition
Soffid includes Digital certificate functionality as a security enhancement. You could add new Digital certificates, internal or external. If you select the external certificate, you could add a valid certificate to Soffid; If you select the internal certificate, Soffidl will generate a valid certificate.
Screen Overview
Internal
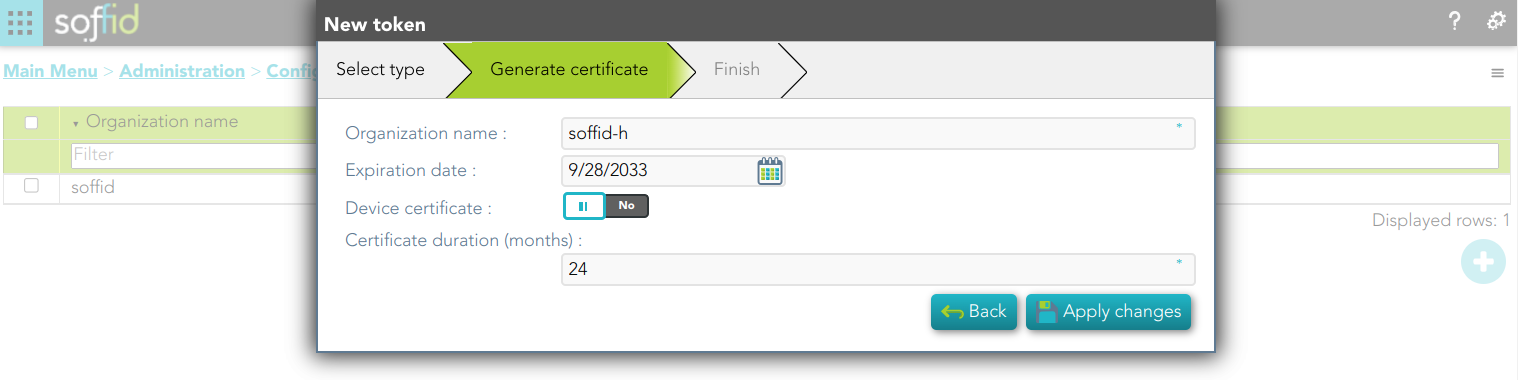
External
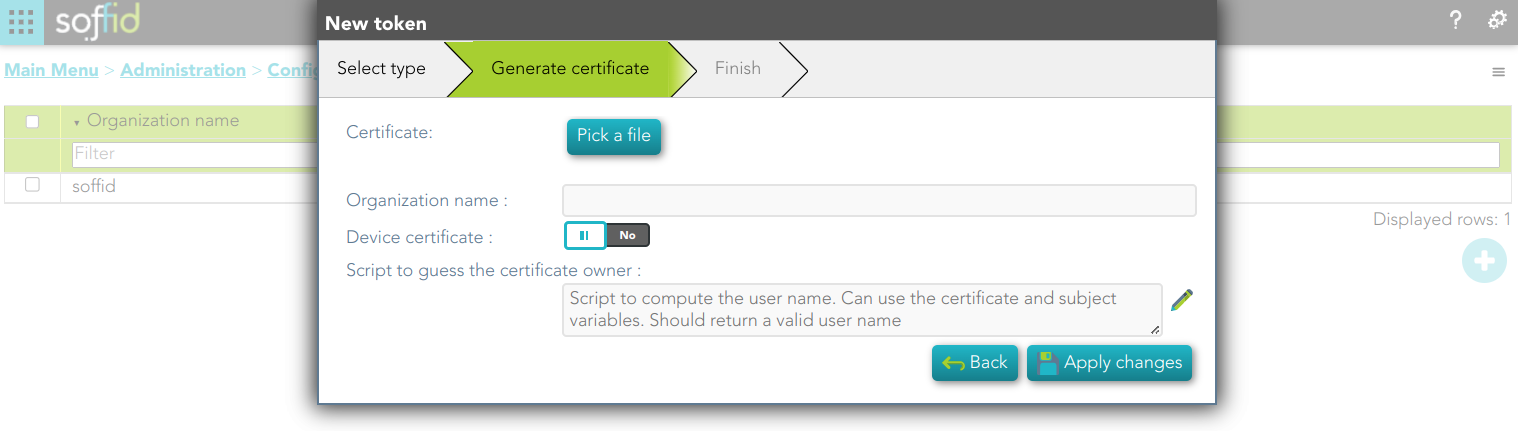
Standard attributes
Internal
- Organization name
- Expiration date: referring to the root certificate.
- Device certificate: Indicates if the certificate is for a device
- Certificate duration (months): Referring to users' certificates.
External
- Certificate: root of the certification authority.
- Organization name
- Device certificate: Indicates if the certificate is for a device
- Script to guess the certificate owner: script to compute the user name. Can use the certificate and subject variables. Should return a valid user name.
Actions
Digital certificates query
| Add new |
Allows you to add a new certificate. You can choose that option on the hamburger menu or click the add button (+). To add a new certificate it will be mandatory to fill in the required fields. |
| Delete |
Allows you to remove one or more certificates by selecting one or more records and next clicking the button with the subtraction symbol (-). To perform that action, Soffid will ask you for confirmation, you could confirm or cancel the operation. |
| Download CSV file |
Allows you to download a CSV file with the digital certificates data. |
New token
|
Next |
Allows you to browse the wizard to create a new certificate. |
|
Apply changes |
Allows you to save the data of a new certificate or to update the data of a specific certificate. To save the data it will be mandatory to fill in the required fields |
|
Undo |
Allows you to quit without applying any changes. |
Recertification policies
Description
Soffid allows you to establish some policies to define the scope of the recertification process.
Menu option
Screen overview
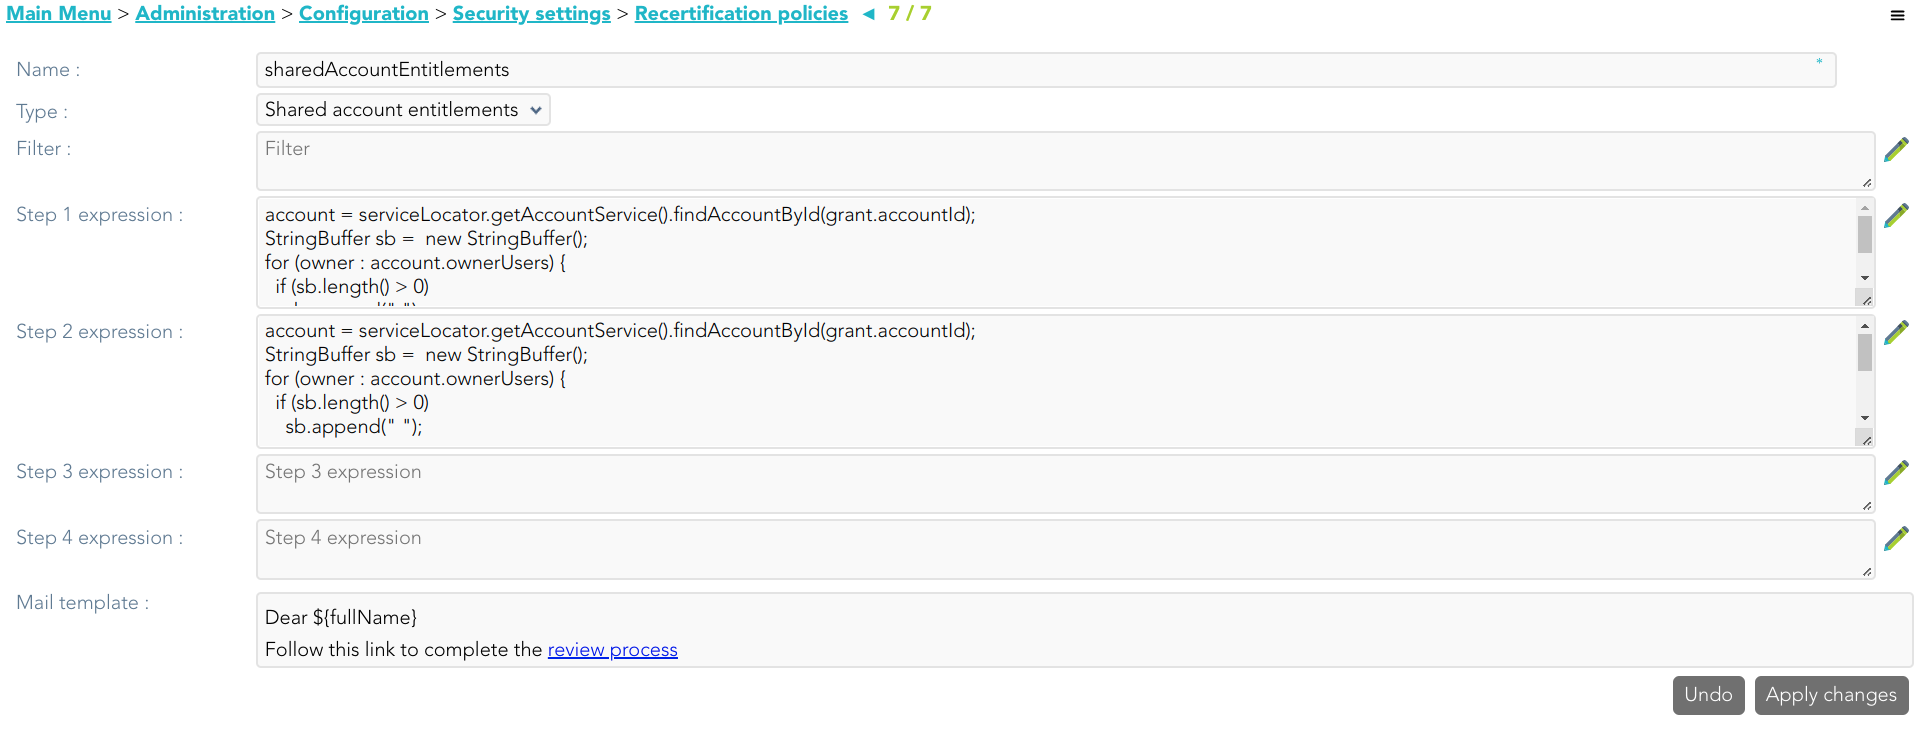
Custom attributes
- Name: name to identify the policy
- Type: list of available recertification types.
- User entitlements: the recertification process will be conducted to review user access rights.
- Role definitions: the recertification process will be conducted to review the relationship between roles.
- Share account entitlements: the recertification process will be conducted to review access rights to shared accounts.
- Filter: this allows you to define a script to identify the grant list to which to apply the recertification process. The grant object (*1) is always available. You can use the Enumeration SoDRisk to compare:
- SOD_LOW
- SOD_HIGH
- SOD_FORBIDDEN
- SOD_NA
- Step 1 expression: this allows you to define a script to determine who is or are in charge to approve or deny the recertification process in the first level.
- Step 2 expression: this allows you to define a script to determine who is or are in charge to approve or deny the recertification process after the first level of approval.
- Step 3 expression: this allows you to define a script to determine who is or are in charge to approve or deny the recertification process after the second level of approval.
- Step 4 expression: this allows you to define a script to determine who is or are in charge to approve or deny the recertification process after the third level of approval.
- Mail Template: this allows you to define a template to send an email to the people in charge to approve or deny. Be in mind, that to work fine, the review process link must be ${url}
(*1) grant object is a com.soffid.iam.api.RoleAccount object.
Examples
Some sample scripts for the filters and approval steps are shown below
Filter
Return all grants with risk.
return grant.sodRisk != null
&& grant.sodRisk != es.caib.seycon.ng.comu.SoDRisk.SOD_NA;Steps
account = serviceLocator.getAccountService().findAccountById(grant.accountId);
StringBuffer sb = new StringBuffer();
for (owner : account.ownerUsers) {
if (sb.length() > 0)
sb.append(" ");
sb.append(owner);
}
if (sb.length() > 0)
return sb.toString();
else
return "admin";com.soffid.iam.api.Role role = serviceLocator.getApplicationService().findRoleByNameAndSystem(grant.roleName, grant.system);
StringBuffer sb = new StringBuffer();
List owners = role.getAttributes().get("owner");
if (owners != null) {
for (owner : account.ownerUsers) {
if (sb.length() > 0)
sb.append(" ");
sb.append(owner);
}
}
if (sb.length() == 0)
return "admin";
else
return sb.toString();Mail template

Actions
Recertification policies query
|
Add new |
Allows you to add a new Recertification policy. You can choose that option on the hamburger menu or click the add button (+). To add a new it is necessary to fill in the required fields. |
| Delete |
Allows you to remove one or moreRecertification policies by selecting one or more records and next clicking the button with the subtraction symbol (-). To perform that action, Soffid will ask you for confirmation, you could confirm or cancel the operation. |
| Import |
Allows you to upload a CSV file with the Recertification policies to add or update the attribute definition to Soffid. First, you need to pick up a CSV file, that CSV has to contain a specific configuration. Then you need to check the content to be loaded, it is allowed to choose if you want or not to load a specific attribute. And finally, you need to select the mappings for each column of the CSV file to import the data correctly and click the Import button. |
|
Download CSV file |
Allows you to download a CSV file with the basic information of all Recertification policies. |
|
Add or remove columns |
Allows you to show and hide columns in the table. You can also set the order in which the columns will be displayed. The selected columns and order will be saved for the next time Soffid displays the page to the user. |
Recertification policies details
| Apply changes |
Allows you to save the data of a new policy or to update the data of a specific policy and quit. To save the data it will be mandatory to fill in the required fields. |
|
Save |
Allows you to save the data of a new policy or to update the data of a specific policy. To save the data it will be mandatory to fill in the required fields. |
|
Delete |
Allows you to remove a specific policy. You can choose that option on the hamburger icon. To perform that action, Soffid will ask you for confirmation, you could confirm or cancel the operation. |
|
Undo |
Allows you to quit without applying any changes. |
https://download.soffid.com/doc/console/latest/uml/es/caib/seycon/ng/comu/SoDRisk.html
Issue policies
Definition
Soffid has defined automatic events by default. For each of these events, it is possible to define the tasks to be performed and configure them.
You can find this functionality in the following path:
The default events are the following;
| Issue Type | Description |
| account-created |
This issue is created when the Sync Server detects when a new account is created. This may occur after the Reconciliation process has been executed. |
| disconnected-system | This issue is created when the Sync Server detects that some target system is offline. |
| discovered-host |
This issue is created when the Sync Server detects a new host in the network. This only occurs after the Network Discovery process has been executed. |
| discovered-system |
This issue is created when the Sync Server detects a new system in a host. This only occurs after the Network Discovery process has been executed. |
| duplicated-user |
This issue is created the system detects that there are duplicate users, or when the task is generated manually from the user management. |
| enabled-account-on-disabled-user | This issue is created when an enabled account is detected on a disabled user. This may occur after the reconciliation process has been executed. |
| failed-job |
This issue is created when the system detects job failures. This may occur by running any scheduled task. |
| global-failed-login | This issue is created when the number of session start failures exceeds the threshold of 0.8. |
| integration-errors | This issue is created when the Sync Server detects an integration error between Soffid and an end system. You can check the task in the Monitoring & Reporting. |
| locked-account |
This issue is created when an account has been blocked for exceeding the maximum number of login attempts. You can configure the property Lock after failures in the Password policies settings. Even if it is temporarily locked, the incident will be generated. |
| login-different-country |
This issue is created when Soffid detects a new login from a different country. It only works with the Identity Provider and it is necessary to have the geolocation database updated. |
| login-from-new-device |
This issue is created when Soffid detects a new login from a new device. It only works with the Identity Provider. |
| login-not-recognized | This issue is created when Soffid detects a login not recognized (disabled user or user does not exist) in the Soffid Console or in Soffid as an Identity Provider. |
| otp-failures | This issue is created when an OTP is blocked for exceeding the number of attempts. Currently blocked with 10 unsuccessful attempts. |
| pam-violation | This issue is created when any of the rules of the PAM are violated. You can define the PAM rules and the PAM policies. Be in mind, that you must check the "Open issue" option in the PAM policies you wish to control. |
| password-changed |
This issue is created when a Password change is detected. These changes come from the end system (Active Directory or Soffid OpenLDAP) and Soffid has been notified. The issue is not created if it is the operator or a script that changes the password in Soffid. |
| permissions-granted |
This issue is created when it is detected that permissions have been given to a user on the end system. This may occur after the reconciliation process has been executed. |
| risk-increase | This issue is created when it is detected the risk level of a user is increased. You can configure the risks in the Segregation of Duties option. |
| robot-login | This issue is created when it is detected is detected that someone who has not passed the CAPTCHA is trying to log in to the Identity Provider. |
| security-exception | This issue is created when unauthorized access to the console via WebService or admin console occurs. |
Screen Overview
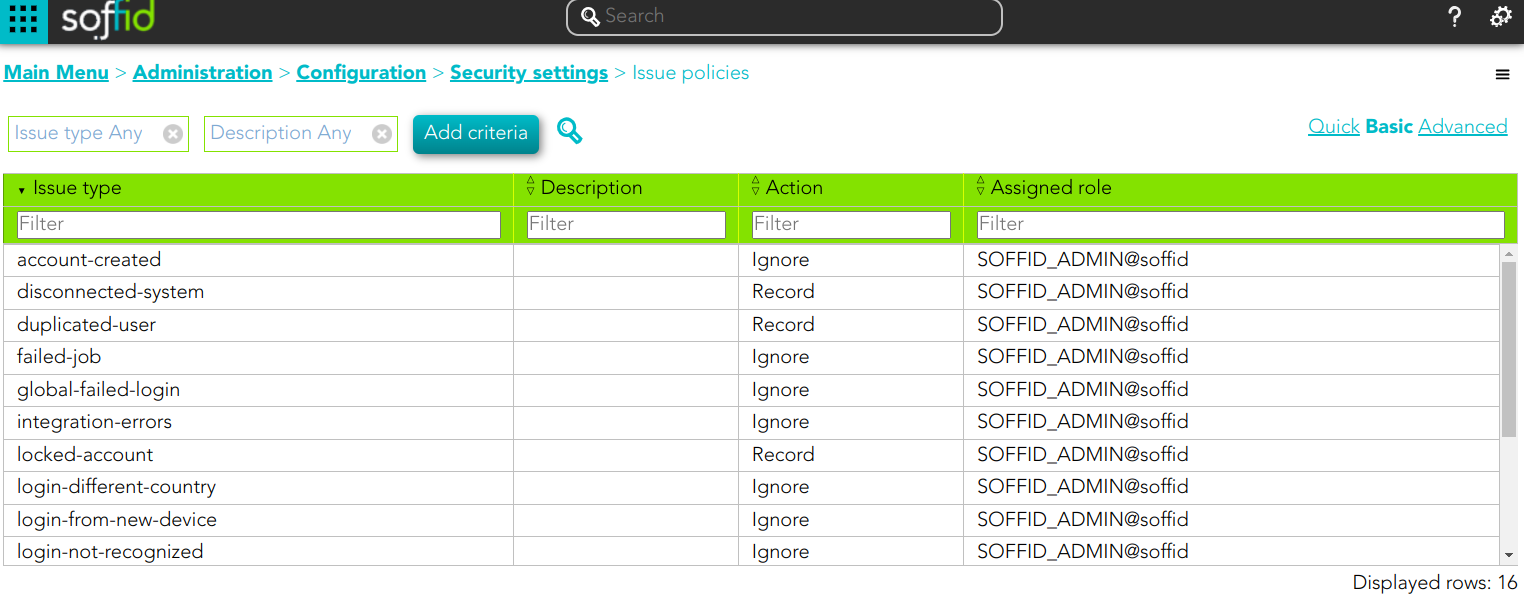
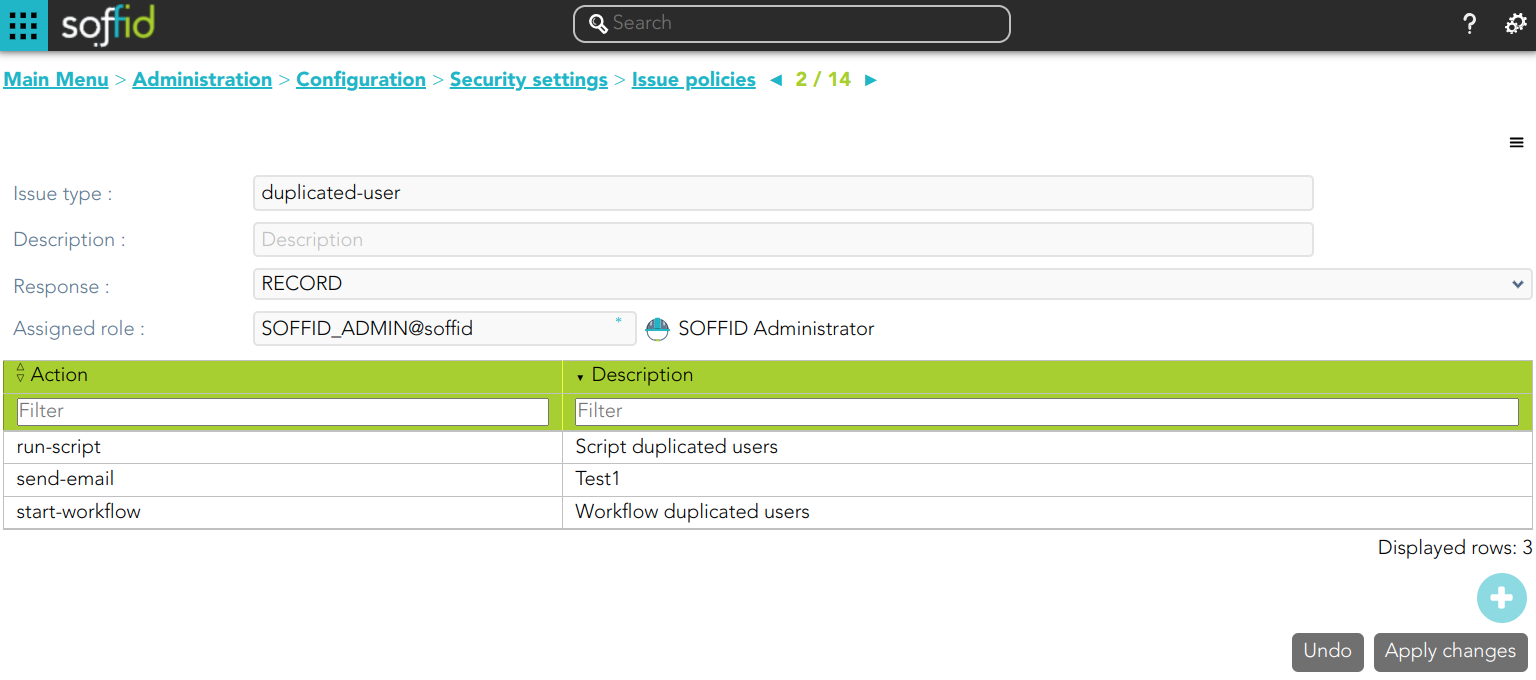
Related Objects
Standard attributes
- Issue type: by default, some issues type are defined in Soffid Console.
- Description: a brief description of the issue.
- Action:
- Ignore: the action will be ignored, and no additional actions will be run.
- Record: the action will be recorded and an issue with the status Acknowledged will be created. The actions configured for the Acknowledged status will be run.
- Manage: a new issue will be created in the New status and the action configured for this status will be run.
- Assigned role: the role who will be the owner of the created issues.
- Actions list: list of actions to be taken when this issue occurs. You can choose one or more actions from the list and configure them:
- Issue status: it is used to determine the point when the action will be launched.
- New.
- Acknowledged.
- Solved.
- Solved - Not a duplicate.
- Actions:
- Notify affected user: this allows you to configure an email that will be sent to the affected users.
- Send custom email: this allows you to configure a custom email that will be sent to specific users.
- Run script: allows you to type a script that will be performed
- Look affected accounts: allows you to configure an email that will be sent to the owner user.
- Look affected host.
- Notify issue owner by email.
- Acknowledge.
- Start new process.: allows you to configure the workflow that will be run.
- Description: a brief description of the action you are defining.
- Issue status: it is used to determine the point when the action will be launched.
Note that it will be necessary to restart the Sync Server when changing the action of an issue.
Actions
Issue policies query action
| Download CSV file | Allows you to download a CSV file with the issue policies data. |
Issue policy detail
| Add new |
Allows you to add a new action to the issue policy. You can choose the action from the action list. Depending on the selected action, you must fill in different information. Once the information will be filled in, you need to close the window and Apply the changes. |
| Delete |
Allows you to delete one or more actions from the actions list. |
| Apply changes | Allows you to update the changes made to the issue policy. |
| Undo | Allows you to quit without applying any changes. |
Break-glass recovery configuration
Definition
Break glass is the mechanism that allows users to gain emergency access to critical systems or information under exceptional circumstances when normal access procedures are not viable.
For more information you can visit the Break Glass book.
Screen overview
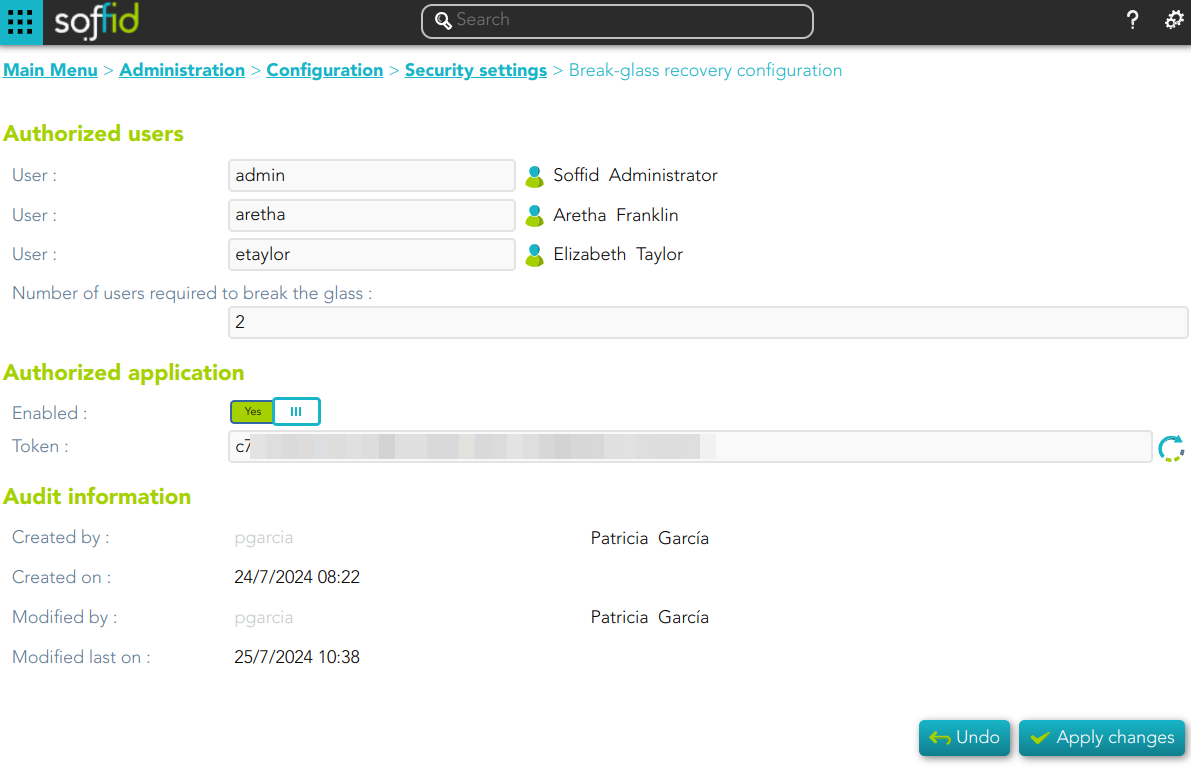
Related objects
Standard attributes
Authorized users
Allows you to configure from one to three users to break glass
- User: allows you to choose the first users to break the glass.
- User: allows you to choose the second users to break the glass.
- User: allows you to choose the third users to break the glass.
- Number of users required to break the glass: this number allows you to configure the number of users required to break the glass
Authorized application
- Enabled: allows you to enable or disable the the break-glass recovery.
- Token: allows you to generate a new token by clicking the refresh icon.
Audit information
- Created by
- Created on
- Modified by
- Modified last on
Actions
| Generate Token |
Allows you to generate a new Token by clicking the refresh icon
|
| Apply changes | Allows you to update the changes made on the break glass recovery configuration. |
| Undo | Allows you to quit without applying any changes. |

Resources Management
Users
Description
The user is the core object of the system. In Soffid, a user means an identity (usually a person). Every user can have a number of accounts spread on different information systems.
In traditional system management, one can assign roles and permissions to accounts. Then, the administrator uses to grant the account to one single user. In Soffid you can have a global view of permissions assigned to any user. Being the user and the main management object, you have a more clear perspective in terms of operation, security, and end-user engagement.
It is important to know that dependency rules can be established between systems, so a user with a role or permission in one system will automatically be assigned a role or permission in another system, according to the system policies.
The administrator can also identify the potential users of shared or system management accounts. These accounts are managed in a slightly different way. See the Accounts and Password Vault pages for more information.
Sometimes is possible to find that there is any user with duplicated user data. To solve that problem, Soffid provides the merge functionality. That allows you to combine two user records, selecting the proper data to fix that situation.
Screen overview
Related objects
Standard user attributes
Basic
On the basic user tab, you can view all the user attributes. Other attributes can be customized in Soffid.
Common attributes
- User name: short name to identify the user. It uses can be either a name abbreviation, an employee Id, or a system generated number.
- First name: name of the user.
- Last name: first surname.
- Middle name: used like a second surname.
- Full name: firstName + lastName + middleName.
Mail service
- Internal eMail: this will be the mail address that will appear on outgoing emails from this user.
- Mail aliases: In this box, there will be a comma-separated list of mail addresses that will be forwarded to this user mailbox. It will you one to one aliases and one to many distribution lists.
- External email: additional external email.
- Mail server: select which server will host its user mail.
User status
- Enable: uncheck in order to prevent this user from logging into any system.
- Multi session: uncheck to prevent this user from using more than one device at a time. If the user logs into the system when another session is active, the single sign-on agent will manage it in order to close the first session before opening a new one. This checkbox is only effective when using Soffid ESSO
- Comments.
Organization
- Type: identifies the password policy that is to be applied. More information on this link User Type.
- Primary group: select which organization unit this user belongs to.
- Home server: select which server will host its user folder. It is linked to the Home Drive attribute on Active Directory.
- Profile server: select which server will host its user profile. It is linked to Roaming UserProfile on Active Directory.
- Manager: select another user, who will be the manager
Other
- NIF
- Phone
Audit information
- Created by: user who created it.
- Created on: when this one was created.
- Modified by: responsible for the user's last change.
- Modified last on: date of last user modification.
Groups
Your company is organized into different business units, departments, or workgroups. In Soffid, they all are named as groups. Some systems, like Active Directory, use groups to control or restrict resource access. A Soffid Group is more like an Active Directory OU.
On the group tab, you can manage all the groups that the user belongs to. Be in mind that all users have to belong to a Primary Group defined on the Basic user attributes.
By clicking on a record, Soffid shows group membership details. It is possible to change the group, and the start date and add comments.
It is also possible to assign a new membership by clicking the button with the add symbol (+), and revoking the group membership from the group details, or by selecting one or more records from the list and clicking the button with the subtraction symbol (-).
Accounts
An account is a way a user is presented on a target system.
On the accounts tab, you can view the accounts that belong to the user that is currently displayed, grouped by password domains. The account can be displayed in black or gray color. The gray color is used to indicate that the account is unmanaged, that is because the agent is disconnected or because the agent is in Read-Only Mode.
Soffid smart engine will automatically create, disable or remove user accounts depending on the system policies.
Also, you can manually add a new account for a specific system, rename an existing one, delete it or change its password. You can also see when the password was last set and its expected expiration date. Mind that you cannot change a single account password, as long as any password belongs to a password domain, so each password belonging to the same user and password domain will be changed at a time. When you apply user changes, automatically they will be forwarded to target systems.
Mind that Soffid smart engine can revert some of your changes if those changes are violating any system policy.
Each change made at the Soffid console is asynchronously replicated into the managed system. At the accounts tab, the administrator can check when each account was updated last. When the Soffid console notices there the replication process is failing, an exclamation sign will appear next to the account name.
When the settings for a managed system exclude a user to be replicated, no account will be created for him. In case the user was replicated and due to user attributes changes it should be excluded, its account will be disabled and it will appear with line-through style.
At the agent configuration screen, the administrator can configure when to create or enable user accounts depending on the user type or the group the user belongs to. When the settings for a managed system exclude a user, no account will be created for him. In case the account exists and due to user attributes changes it should be excluded, its account will be disabled and it will appear with line-through style.
Regarding automatic account creation, it's important to know that if a user needs an account with a name, based on the user domain configuration, and that such an account already exists as a shared or single user account, this account won't be created or assigned. Nevertheless, if such account already exists as an unmanaged account, this existing account will be assigned to the user along with their role grants.
By clicking on a record Soffid displays more accurate information about the account. It will be allowed to rename the account, change it, change the account status or delete the account (logic delete). Also, Soffid allows you to query the properties if the account on the target system. Finally, Soffid will display custom attributes defined for the specific agent on the agent "Account metadata" tab, you can visit the Agent page for more information.
On the accounts tab, you can check the failed login attempts and if the account has been blocked, it is displayed until how long it has been blocked.
💻 Image

Roles
A role is a collection of permissions that can be granted to a user. With these permissions, the user will access to another system and perform some operations.
On the roles tab, you can assign or revoke roles to any user. Each role needs an account to be applied to. So, if a user has no account on a system and a role on that system is granted, a new account will be created on this system. In case a user has more than one account on a system, you should indicate which of the suitable accounts will be granted the role.
More and more, when the role should be scoped, the operator must select the right scope for the role. The scope and its allowed values are defined on the application management page.
By clicking on a record Soffid shows more information about the role, this information can not be updated. On this screen, you can browse through the different roles.
It is also possible to revoke the role to the user from the entitlement details or by selecting one or more records from the list and clicking the button with the subtraction symbol.
The roles list shows a column to display when there are risks with the roles assigned to the user. If you click on a record, Soffid will show the entitlement details including the SoD rules with the detail of the risk.
For more information about SoD visit the Segregation of Duties page.
Additionally, you can download a CSV file with the user's role information, or upload a CSV file to assign or revoke roles to the user.
Effective Roles
Hierarchy of permissions assigned to or inherited.
This screen details the effective roles of the selected user.
- By direct assignment of the role: when you assign a role to a user, you are assigning to the user all the permissions defined for that role.
- By belonging to a group: when you add a user to a group, the user will have all the roles assigned to the group
- By rules defined in the system: when a rule is satisfied for a user, the system assigns the roles defined in the rule to the user.
Shared accounts
Accounts that can be used by several users, those accounts can be privileged or shared.
By clicking on a record, you can browse the share account details page.
Sessions
On the sessions tab, you can view sessions opened by the user. Here will be displayed any open ESSO session, showing the host that has created the session and the host where the user is connected from, if applicable. The port number is the TCP/IP port number the ESSO session manager is listening to. It is used by the synchronization server to check for session validity.
ESSO Integration
Multi-session attribute: ESSO will prevent any user from having more than one session at a time unless it has the multisession attribute checked.
If ESSO detects the user trying to log in has an active session, it will do the following job:
- The previous session will be noticed of such a duplicate session.
- The new session will have the choice to:
-
Give up and not log in.
-
Wait until the previous session is closed.
-
Force the previous session to log out. If the user selects to close the remote session, the remote user will still have the chance to accept or reject such action.
-
No user with an active flag unchecked will be allowed to log in or use any system managed through ESSO.
User Processes
In the user processes tab you can view the business processes in which the user has been managed. It shows information about the process, the status process and when it was initiated and ended.
NOTE: Mind that this page does not show the business processes the user has acted.
Pending tasks
When a user has pending tasks, an icon will be appearing at the right corner. If the status of pending tasks is "Error", the icon will be a highlight alert icon, if the status is "Pending", the icon will be a wifi icon.
That window displays the most relevant task data, the task name, the agent that manages the task, the status task, and the schedule to will be executed, ... That pending task information is only available in consultation mode.
Tokens
In the Tokens tab, you can manage the user tokens. You can add or delete the users' tokens. Currently, the available options are Certificate and FIDO token.
Certificate
If you select the certificate option, you only need to register the certificate description. Then Soffid will read the existing certificates registered into Soffid, at the Digital certificates page, and finally, Soffid will give you a p12 file and a password to install the certificate in the browser.
If there are no registered certificates, Soffid will not allow you to add new certificate tokens for any user.
💻 Image
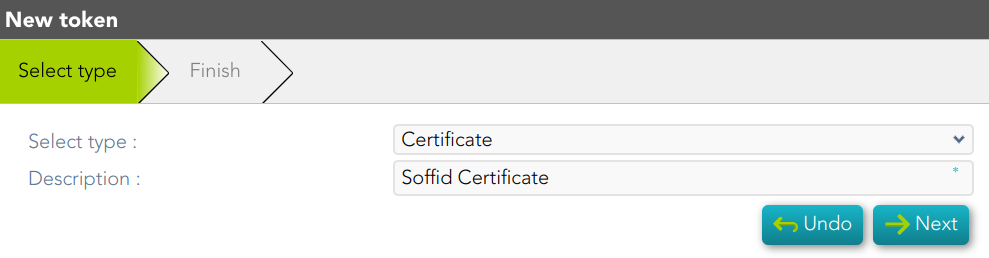
FIDO token
If you select the FIDO token option, you need to full fill in the following data:
- Identity provider: You need to select one Identity provider from the available list.
- Registration method: Soffid offers three different registration methods. To use one of them you will need to insert and touch the FIDO key to create a new token.
- Register now: Soffid allows you to register a new FIDO key related to a specific user. Once you select this option, you need to register the FIDO key, and Soffid automatically will register the key related to the user.
- Generate secure link: Soffid generates a secure link related to a specific user to register. You can follow the link and then register the FIDO key. Once you register the FIDO key, you can close this page. You only need to register the FIDO key and this page will close automatically.
- Generate insecure link: Soffidl will generate an insecure link, this link is not related to any user. Then you need to browse to the insecure link and type the user name, and then the password. Finally, you need to register the FIDO key. Once you register the FIDO key, you can close this page.
You can use the Generate secure or insecure link option to send it to users to complete the registration process.
When you register a FIDO token, this will be displayed on the proper user "My certificates and FIDO tokens" page and it will be available for this user.
💻 Image
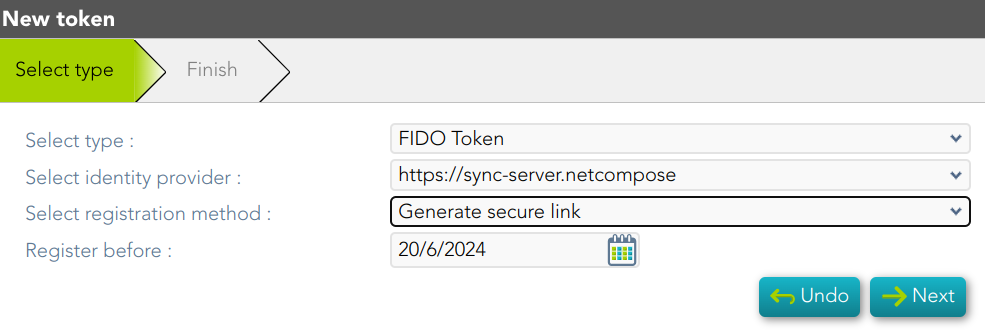
Soffid authenticator
If you select Soffid authenticator option, you will need to install the Soffid token app and then open the URL or scan the QR code with this app.
💻 Image
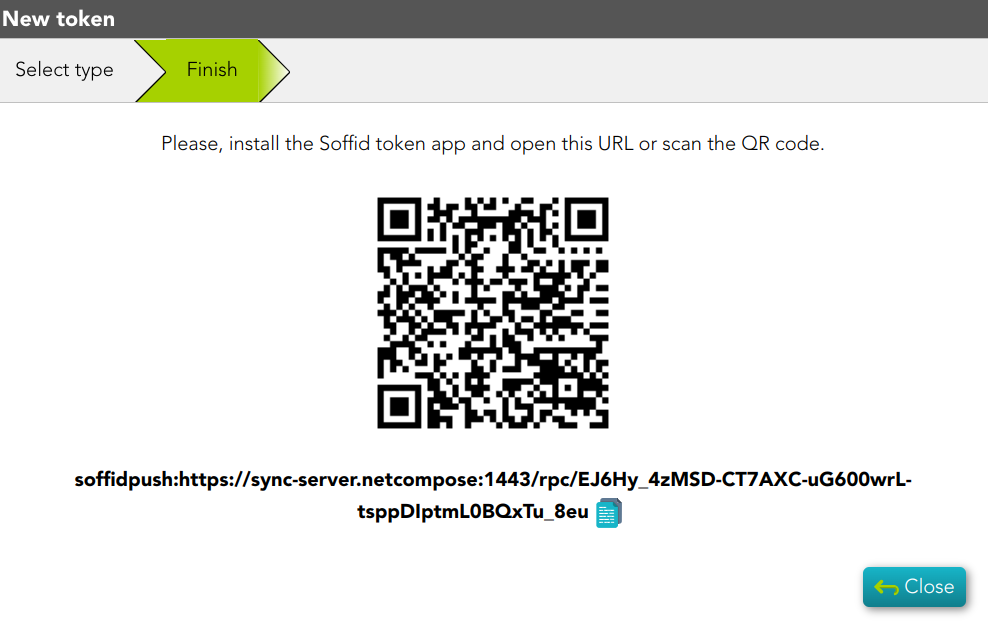
Backups
The backup functionality is available when the backup addon is loaded in the Soffid Console. By clicking on the Backups tab, Soffid will display all the snapshots available for the user, and you could restore what you need.
You can also check other available snapshots by clicking on the hamburger icon and a specific option. Those are the options:
Groups History
You can check all the group history changes for a specific user, and decide if you want to restore an earlier versión.
Accounts History
You can check all the account history changes for a specific user, and decide if you want to restore an earlier versión.
Roles history
You can check all the role history changes for a specific user, and decide if you want to restore an earlier versión.
Mail list history
You can check all the mail list history changes for a specific user, and decide if you want to restore an earlier version.
Download CSV file
Allows you to download a CSV file with the data of all backups.
OTP devices
In the OTP devices tab, Soffid displays all the OTP devices configured by this user. For each OTP device, Soffid displays the info about the name, the created date, the last time used, and the status. Soffid allows you to manage all the OTP devices for each user.
By clicking on a record, Soffid shows OTP device details, including the failed number. It is also possible to change the status.
💻 Image
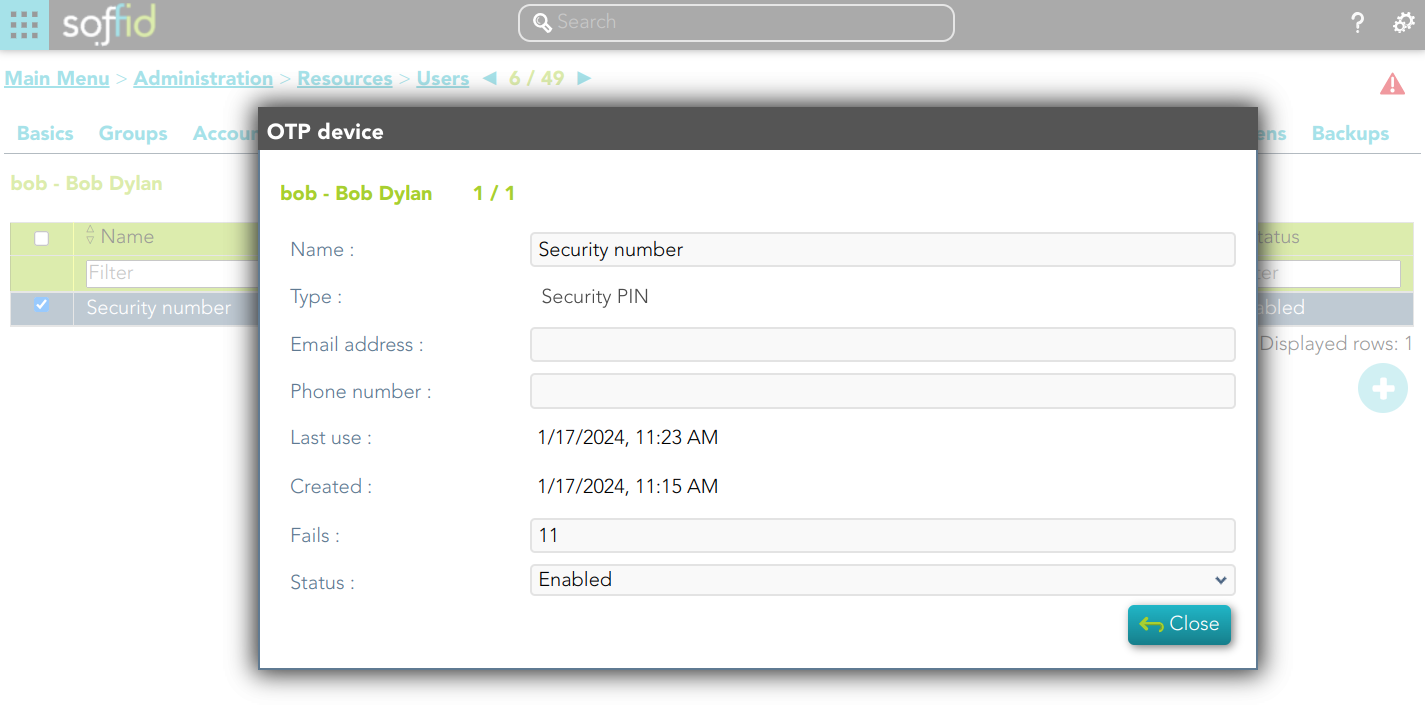
This option will only be available if the OTP addon is installed in the Soffid console.
Issues
In the Issues tab, Soffid displays all the issues in which the user is involved. If you click one issue, Soffid will display the issue detail and will allow you to perform any available operation if you have the proper permissions to do that.
This option will only be available in Soffid >= 3.5.x
For more information, you can visit the Issue page.
Actions
Users query actions
|
Query |
Allows you to query users through different search systems, Quick, Basic and Advanced. |
|
Add or remove columns |
Allows you to show and hide columns in the table. You can also set the order in which the columns will be displayed. The selected columns and order will be saved for the next time Soffid displays the page to the user. |
|
Add new |
Allows you to add a new user in the system. You can choose that option on the hamburger menu or click the add button (+). To add a new user it will be mandatory to fill in the required fields |
|
Delete |
Allows you to remove one or more users by selecting one or more records and next clicking the button with the subtraction symbol (-).To perform that action, Soffid will ask you for confirmation, you could confirm or cancel the operation. |
|
Import |
Allows you to upload a CSV file with the user list to add or update users to Soffid. First, you need to pick up a CSV file, that CSV has to contain a specific configuration. Then you need to check the content to be loaded, it is allowed to choose if you want or not to load a specific attribute. And finally, you need to select the mappings for each column of the CSV file to import the data correctly and click the Import button. |
|
Download CSV file |
Allows you to download a CSV file with the basic information of all users. |
|
Bulk actions |
Allows massive operations to be performed on all system users. With that operation, updates can be made to any of the user's parameters. First of all, you must select the records that you want to update, once you have selected them, you must choose the bulk action on the hamburger icon. For more information visit the Bulk action page. |
|
Merge |
Allows you to merge two or more identities when you identify that is necessary. First of all, you must select the identities to merge. Second, you need to click the hamburger icon and select the merge action. Then Soffid will display a window where you can choose if you want to merge right now, if you want to create an issue, or if you want to quit without applying any changes. 💻 Image
💻 Image
💻 Image
|
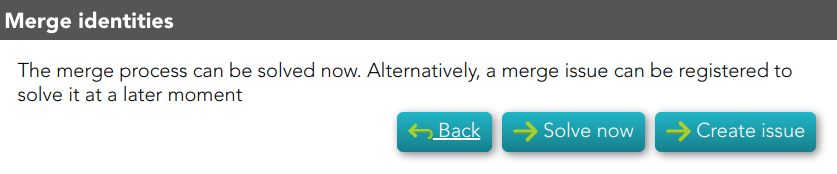
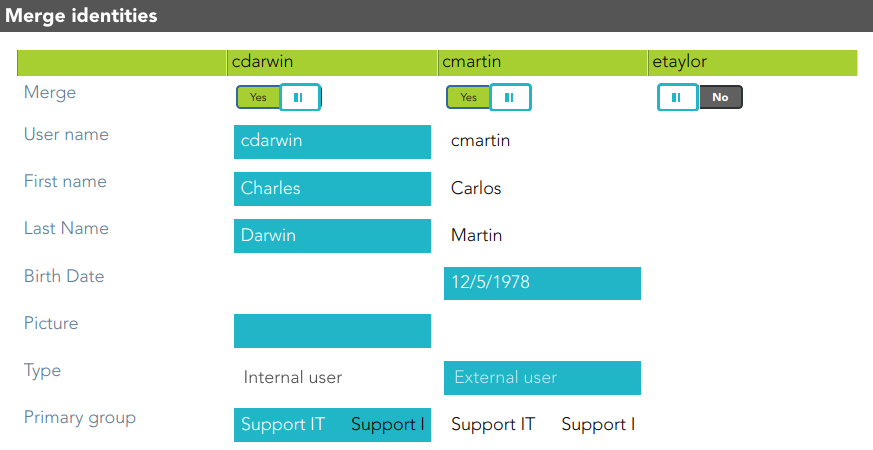
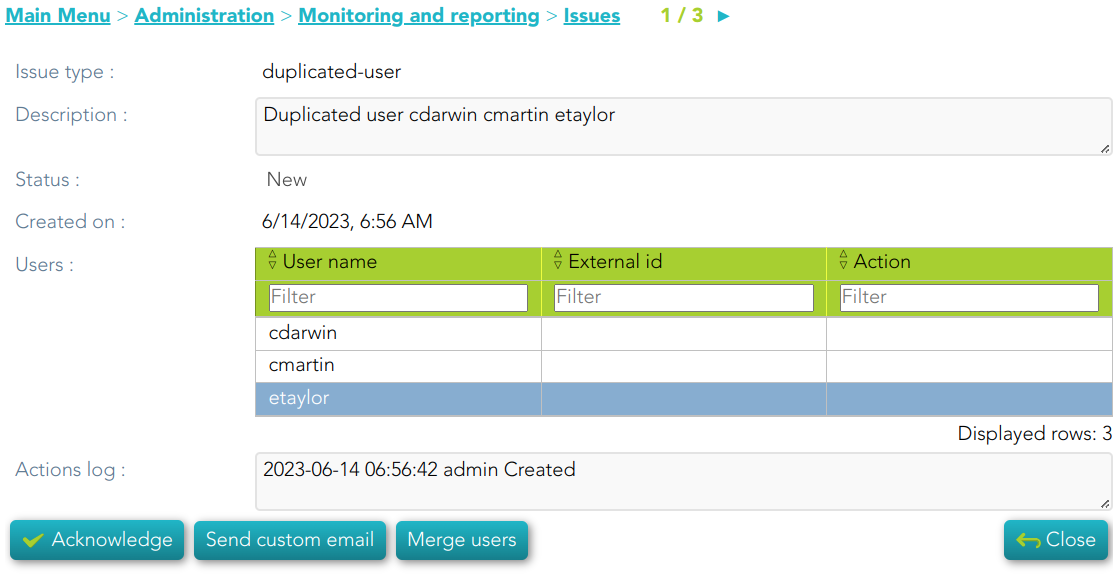
User detail actions
| Apply changes |
Allows you to save the data of a new user or to update the data of a specific user. To save the data it will be mandatory to fill in the required fields. When you apply changes, automatically they will be forwarded to target systems. |
|
Delete |
Allows you to remove a specific user. You can choose that option on the hamburger icon. To perform that action, Soffid will ask you for confirmation, you could confirm or cancel the operation. |
|
Undo |
Allows you to quit without applying any changes. |
|
Audit |
Browse to the Audit page and display all the detailed actions performed over the user. It is allowed to filter the information displayed and also to download a CSV file with the audit information. |
|
Access logs |
Browse to the Logs page and display all the detailed logs about the user actions. It is allowed to filter the information displayed and also to download a CSV file with the logs information. |
|
Propagates the changes |
Allows you to propagate the user changes to the repository systems configured. It is only necessary when the task engine mode is configured as Manual, visit the smart engine setting page for more information. |
|
Refresh |
Allows you to refresh all the user information. |
Groups actions
Group query actions
|
Assign |
Allows you to add a new group membership. You can choose that option on the hamburger menu or click the add button (+). Then you need to select a group the user will belong to it. Next, you need to define, if it is necessary the membership properties. And finally, you need to apply changes. |
|
Delete |
Allows you to delete group membership. You can select one or more groups and next click the button with the subtraction symbol (-). To perform that action, Soffid will ask you for confirmation, you could confirm or cancel the operation. |
Group detail actions
|
Apply changes |
Allows you to save the updates of the group. |
|
Undo |
Allows you to quit without applying any changes. |
|
Delete |
Allows you to delete a group membership. To perform that action, Soffid will ask you for confirmation, you could confirm or cancel the operation. |
Accounts actions
Accounts query actions
|
Change password |
Allows you to change the password for the accounts of a password domain.
💻 Image
It will be mandatory the password complies with the Password policies defined for the domain. |
|
New Account |
Allows you to add a new account for a user and a specific target system. First of all, you need to select the target system, then Soffid will show the target system name and the account name. The account name could be updated, but always with an account name which no be already in use on the target system. Then you need to choose the account status and finally, you can set the system properties. That properties depend on the target system and do not be mandatory. |
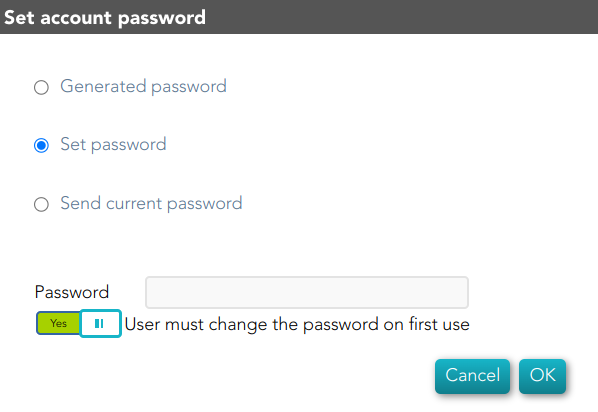
Accounts detail actions
|
Delete |
Once you are in the rename account modal, by clicking on the hamburger icon, you could choose the delete option. This option will delete the account selected. 💻 Image
|
|
Show actual account properties |
Once you are in the rename account modal, by clicking on the hamburger icon, you could select this option. When you click this option, Soffid will display a modal with all the info about this account in the target system. 💻 Image
|
|
Apply changes |
Allows you to save the updates of the account. You can change the name and status of the account. Also you can check the events history. 💻 Image
|
|
Undo |
Allows you to quit without applying any changes. |
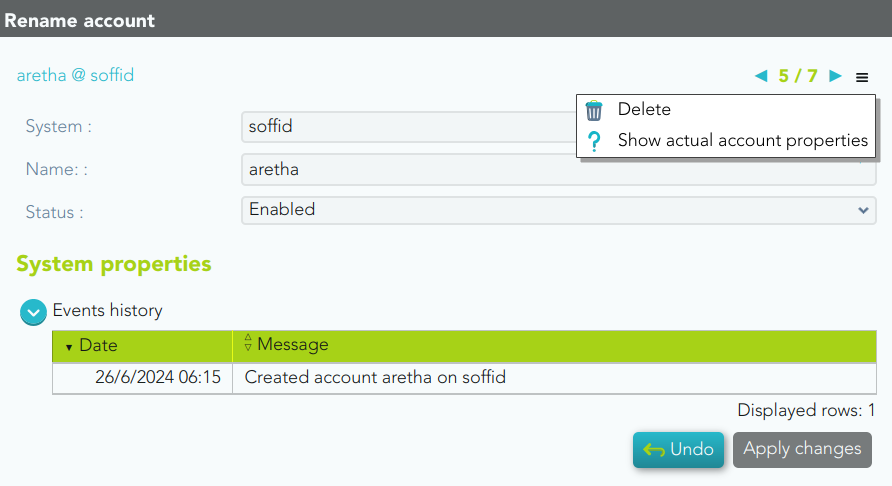
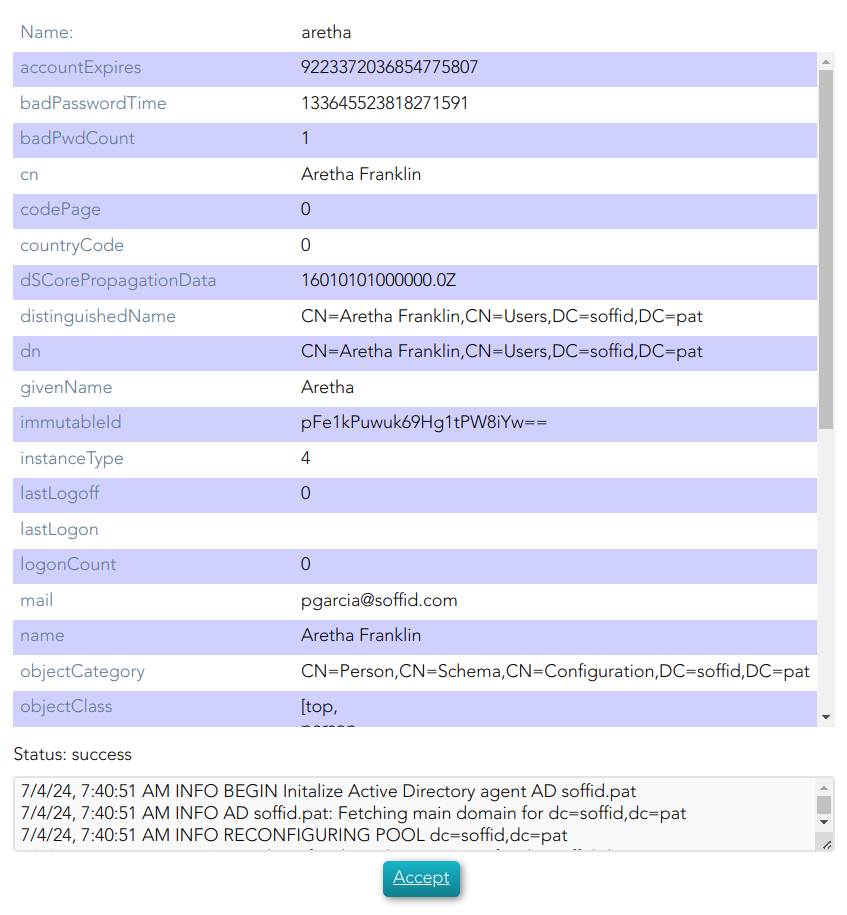
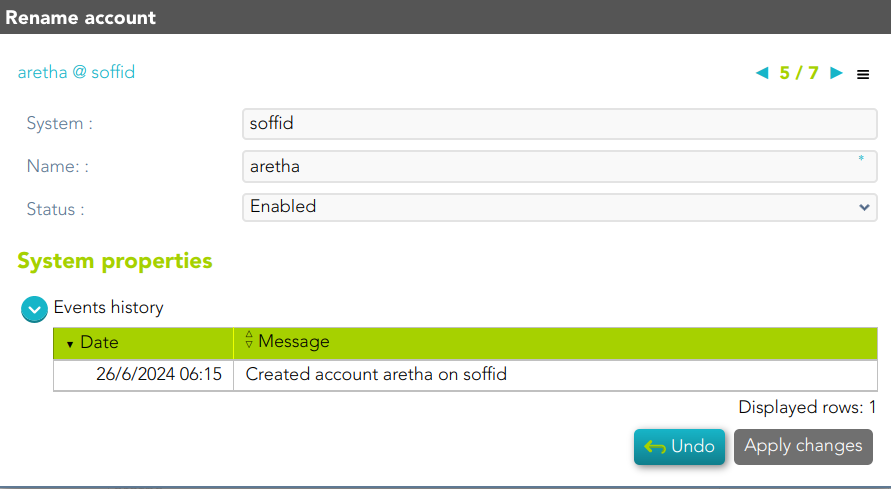
Roles actions
Roles query actions
|
Assign |
Allows you to assign a new role to the user. You can choose that option on the hamburger menu or click the add button (+). Then you need to select a role from the role list. If it is necessary, the next step will be to set the scope. Then you need to check and fill in the membership properties. And finally, apply changes. |
|
Revoke |
Allows you to revoke one by one or to revoke some roles at the same time. To revoke some roles at the same time, you need to select the roles, and then click the button with the subtraction symbol (-). To revoke one role, you can click the role, and then Soffid will show a form with the details. Then you can click the delete button (trash icon). Soffid will ask you for confirmation to perform that action, you could confirm or cancel the operation. |
|
Import |
Allows you to upload a CSV file with the role list to assign permission. First, you need to pick up a CSV file, that CSV has to contain a specific configuration. Then you need to check the content to be loaded, it is allowed to choose if you want or not to load a specific attribute. And finally, you need to select the mappings for each column of the CSV file to import the data correctly and click the Import button. |
|
Download CSV file |
Allows you to download a CSV file with all the information about user roles. |
Role detail action
|
Assign |
Allows you to assign a new role to the user. You can choose that option on the hamburger menu or click the add button (+). Then you need to select a role from the role list. If it is necessary, the next step will be to set the scope. Then you need to check and fill in the membership properties. And finally, apply changes. |
|
Revoke |
Allows you to revoke a role. To revoke one role, you can click the role, and then Soffid will show a form with the details. Then you can click the delete button (trash icon). Soffid will ask you for confirmation to perform that action, you could confirm or cancel the operation. |
Sessions actions
|
Download CSV file |
Allows you to download a CSV file with all the information about sessions. |
User processes
|
Query |
Allows you to query the process info by browsing the process page. |
OTP devices action
|
Add |
Allows you to add a new OTP device. To add a new OTP device you need to click the add button (+), then Soffid will display a wizard to config the OTP device. First of all, you need select the OTP device Type and then Apply changes. |
|
Delete |
Allows you to delete one or more OTP devices for a specific user. To delete OTP devices first select the devices, then click on the subtract button (-), then Soffid will ask you to confirm or cancel the operation. |
|
Change Status |
Allows you to change the OTP device status. First of all, you need to click the proper OTP device, then change the status, and finally close the window. |
Tokens
|
Add |
Allows you to add a new token. To add a new token device you need to click the add button (+), then Soffid will display a wizard to config the token. First of all, you need select the token Type and then Apply changes. |
|
Delete |
Allows you to delete one or more token for a specific user. To delete token first select the token, then click on the subtract button (-), then Soffid will ask you to confirm or cancel the operation. |
Issues
|
Query |
Allows you to query the issues info by browsing the process page. |
|
Display Issue |
By clicking one Issue, Soffid will display the issue detail will allow you to perform any available operation if you have the proper permissions to do that |
Groups
Description
Groups are a convenient way to apply policies to a collection of users. Groups allow administrator users to specify permission for multiple users in a quick and easy way. Groups are managed in a hierarchical way. A user can belong to a group, and that user will be assigned the roles of this group and all the roles that this group inherits from its parent.
Companies are organized in different business units, departments, or workgroups. In Soffid, they all are named as groups. Some systems, like Active Directory, use the groups to control or restrict access to resources. A Soffid Group is more like an Active Directory OU.
Screen overview
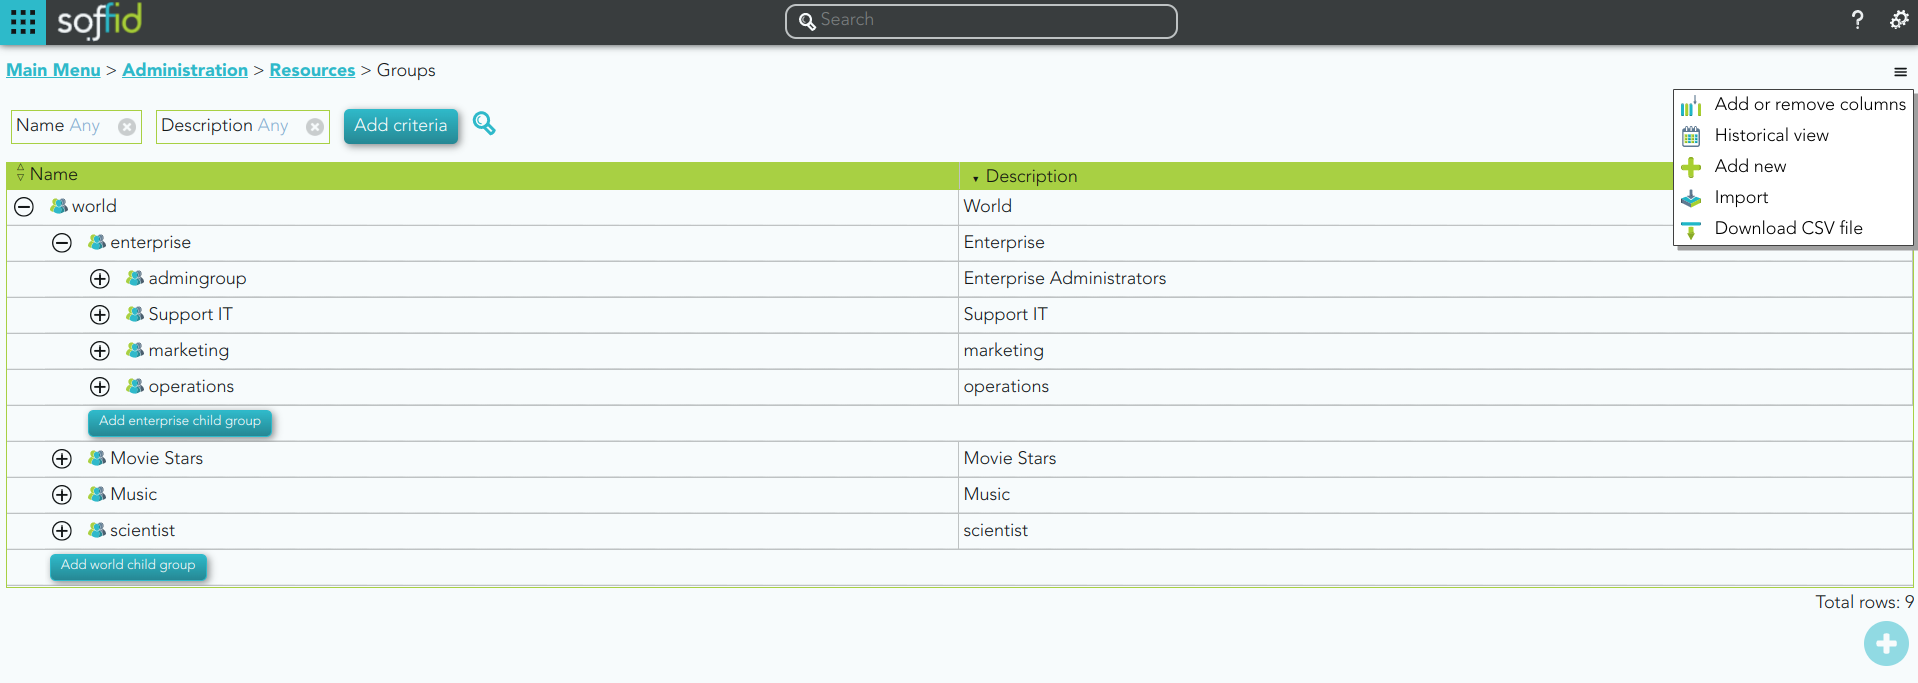
Related objects
Standard attributes
Basic
On the basic group tab, you can view all the group attributes. It is allowed to add new groups, and update or delete existing groups.
- Name: short name to identify the group. The group name must be unique.
- Description: a brief description of the group.
- Drive letter: if specified, a shared folder for this user will be created. This shared folder can be mounted on ESSO hosts by using a startup script.
- Parent group: name of the parent within the hierarchy. Only the root group doesn't have value. Be in mind the groups have a tree structure.
- Type: a group can be categorized by organizational unit types. You have more information about Group Type page.
- Drive server name: the server where the shared folders can be located.
- Disabled: allows you to enable and to disable the group. When a group is disabled, the group's role hierarchy is no longer available to the group's users.
💻 Image
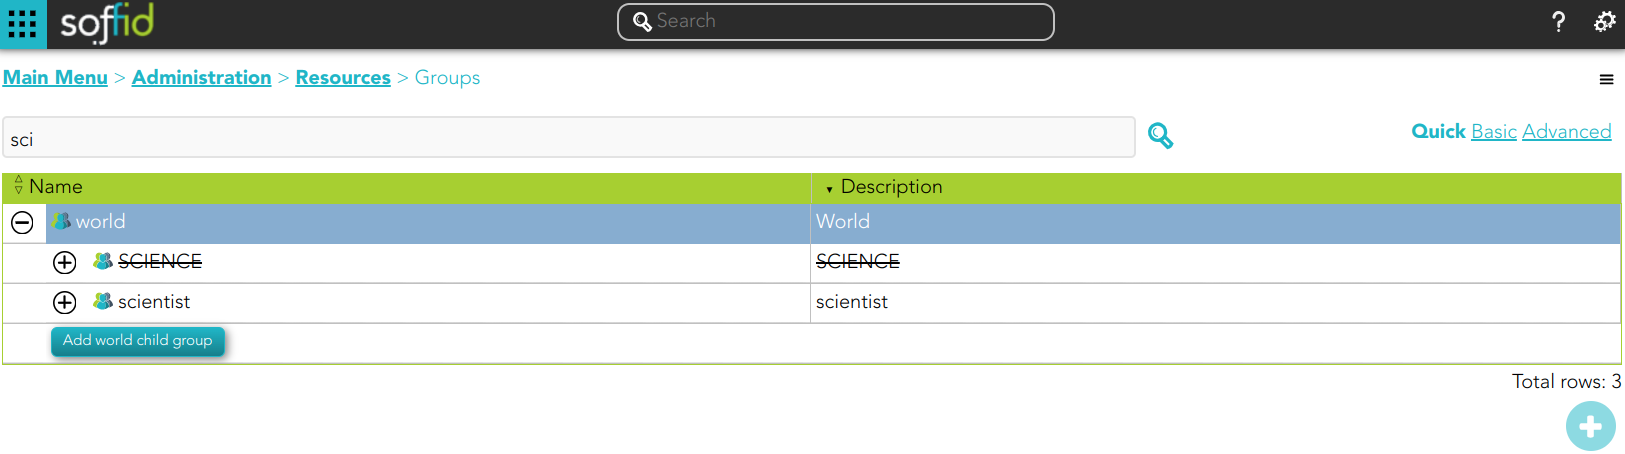
Users
Administrator users can manage the users who belong to the group. These users will have assigned all the permissions granted to that group and permissions inherited from its parent.
On the user's tab, you can add new users to the group by clicking the button with the add symbol (+), you must select the user to add, and select the membership properties.
It is also allowed to delete one or more users from a specific group, you can do it from the group membership details or by selecting one or more records from the list and clicking the button with the subtraction symbol (-).
Additionally, you can download a CSV file with the user's information and you can also upload a CSV file to add new users or update existing users.
💻 Image
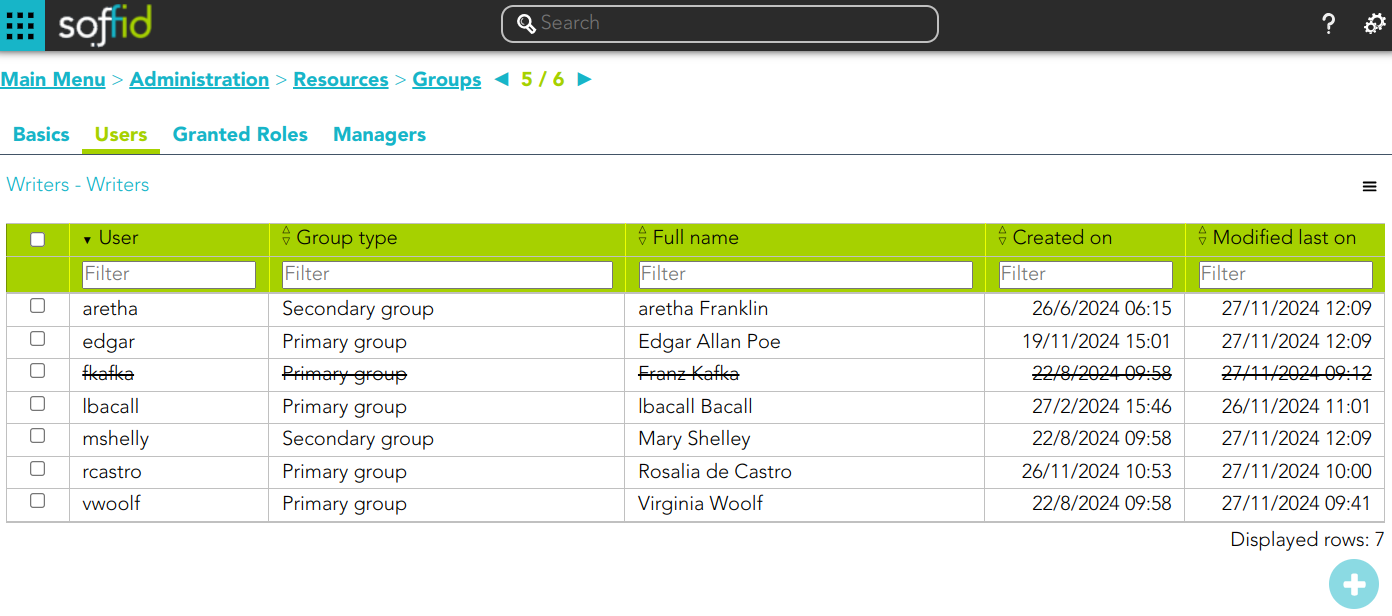
Granted roles
Administrator users can manage the permissions to a group, this is the way to establish an access policy to a collection of users. The users who belong to a group will inherit all the permissions granted of that group.
On the granted roles tab, you can assign or revoke roles to the group. To assign a new role, you must click the button with the add symbol (+), then select the role, in some cases specify the scope, and finally set membership properties. To revoke role, you can do it from the group membership detail or by selecting one or more records from the list and clicking the button with the subtraction symbol (-).
Additionally, you can download a CSV file with the granted roles information and you can also upload a CSV file to assign roles, modify or delete assigning roles.
💻 Image
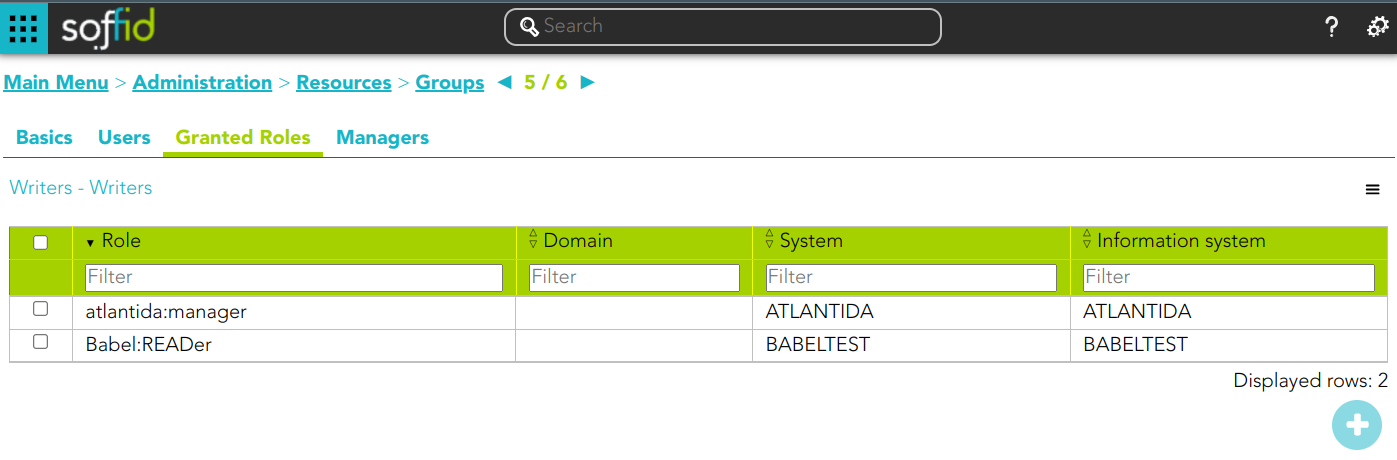
Managers
On the tab Managers, Soffid displays the Roles with Domain equals to Group and the proper authorization.
Here you can grant the role to one or more users. You can also assign the role to users on the Roles page or on the Users page. Users who have been assigned this role will be displayed in the Managers tab.
Be in mind, to query the information about the roles and users on the managers tab, it will be mandatory to give authorization to query users or groups, you must add the role to the authorization (user:query or group:query).
💻 Image
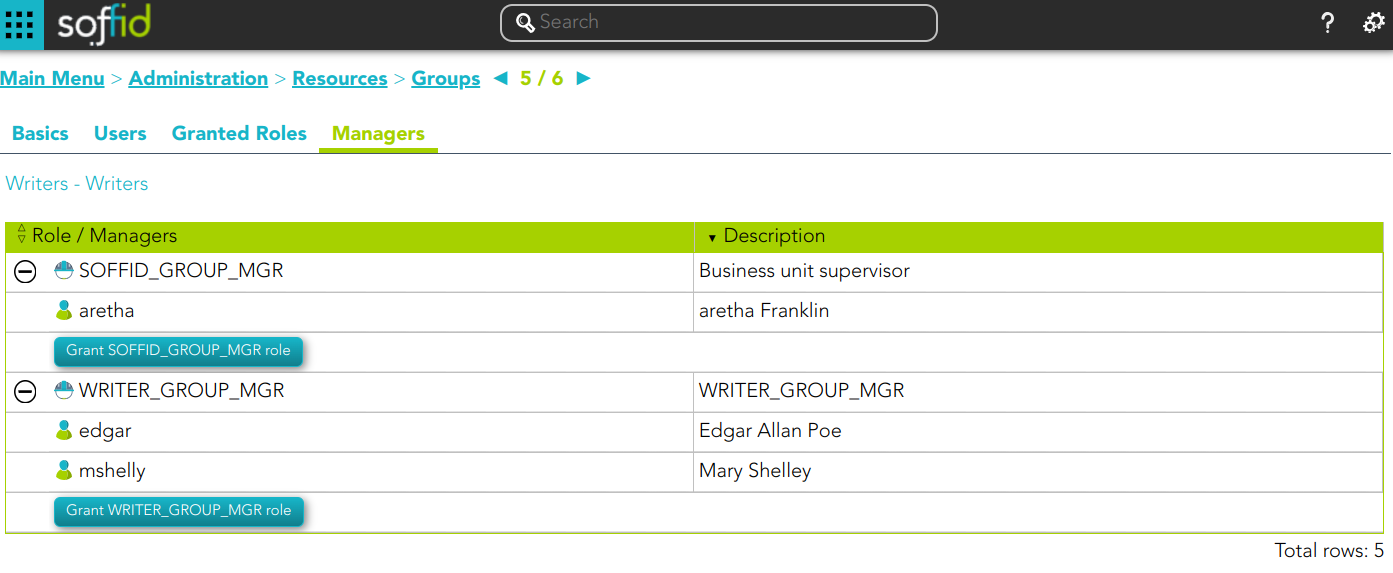
** Role
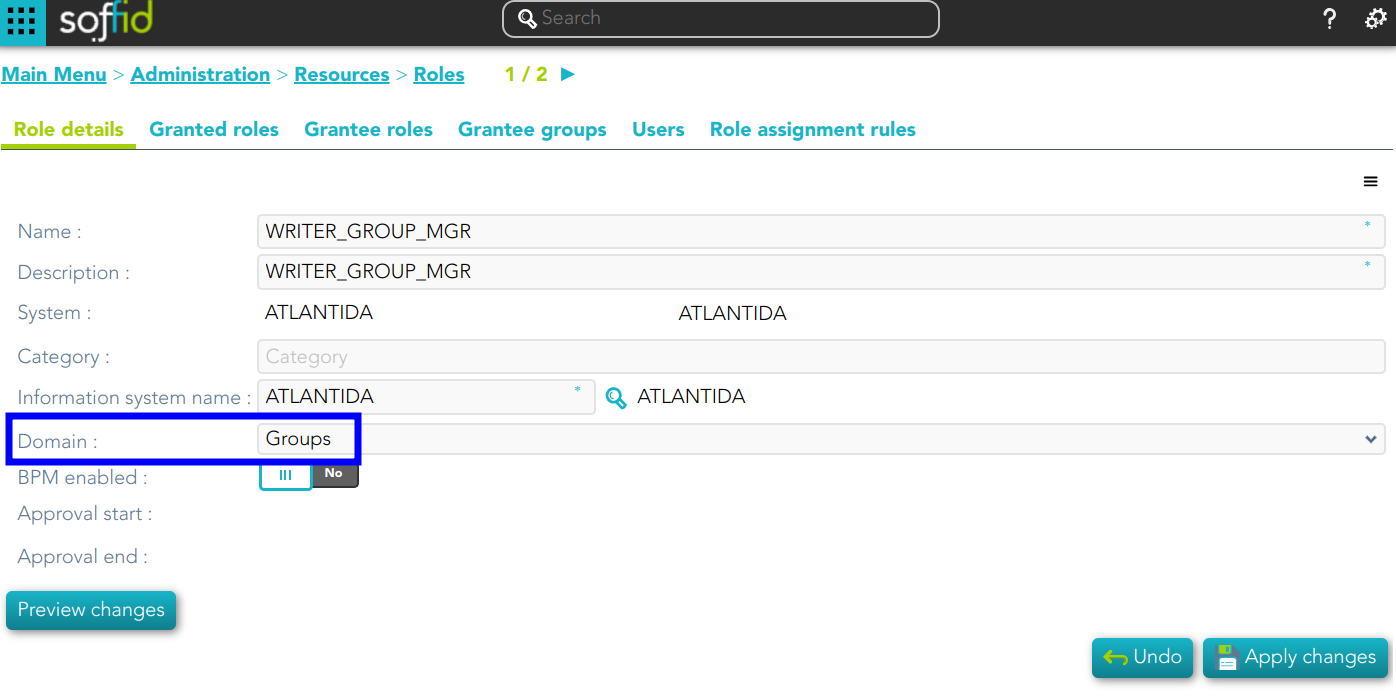
** Authorization
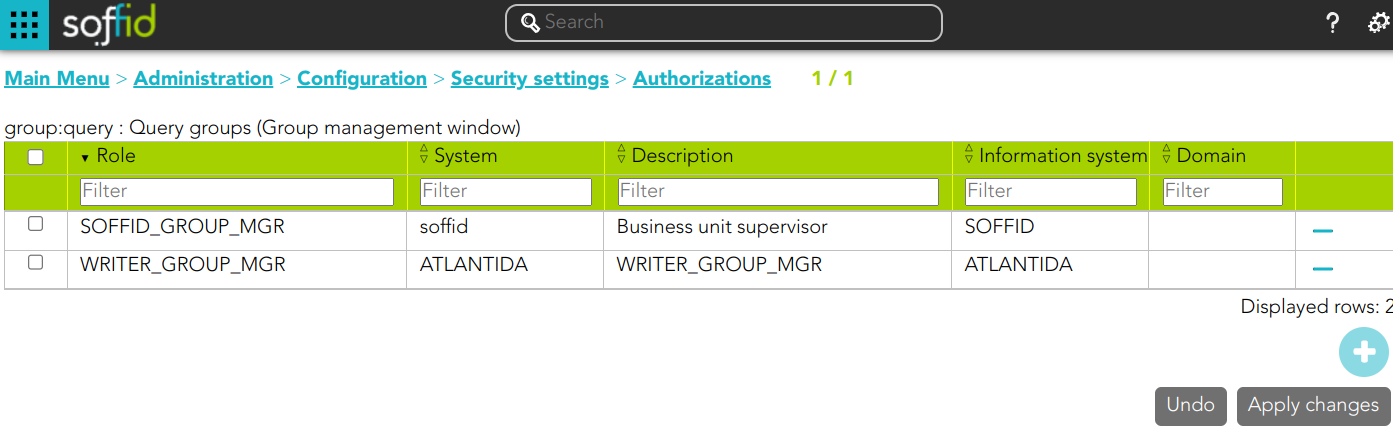
Actions
Group query actions
|
Query |
Allows you to query groups through different search systems, Quick, Basic and Advanced. |
|
Add or remove columns |
Allows you to show and hide columns in the table. |
|
Historical view |
Allows you to check all the group's historical data. If you click this option, Soffid will display a new modal window to manage the historical view. |
|
Add new |
Allows you to add a new group in the system. You can choose that option on the hamburger menu or clicking the add button (+). To add a new group it will be mandatory to fill in the required fields |
|
Add child group |
Allows you to add a child to a specific group. You can choose that option below the father group. To add a child it is necessary to fill in the required fields |
|
Import |
Allows you to upload a CSV file with the group list to add or update groups to Soffid. First, you need to pick up a CSV file, that CSV has to contain a specific configuration. Then you need to check the content to be loaded, it is allowed to choose if you want or not to load a specific attribute. And finally, you need to select the mappings for each column of the CSV file to import the data correctly and to click the Import button. |
|
Download CSV file |
Allows you to download a csv file with the basic information of all groups. |
Historical view
|
Switch to current view |
Allows you to come back to the current data view. |
|
Apply changes |
Once you have pickup the proper date at the date component, you can apply changes and Soffid will display all the group data at the selected date time. Then you can browse the Groups tree and check the information |
|
Undo |
Allows you to quit without applying any changes. |
Group detail actions
|
Apply changes |
Allows you to save the data of a new group or to update the data of a specific group. To save the data it will be mandatory to fill in the required fields |
|
Delete |
Allows you to remove a specific group. To perform that action, Soffid will ask you for confirmation, you could confirm or cancel the operation. |
|
Undo |
Allows you to quit without applying any changes. |
Users
|
Add or remove columns |
Allows you to show and hide columns in the table. |
|
Add new |
Allows you to add new user to a group. Fist of all, you need to select the user. Then you need to set the system properties. And finally you need to apply changes. |
|
Remove |
Allows you to delete one by one or to delete some users at the same time from a group . To delete some users at the same time, you need to select the users, and then click the button with the subtraction symbol (-). To delete one user, you can click the user, and then Soffid will display a form with the details. Then you can click the delete button (trash icon). Soffid will ask you for confirmation to perform that action, you could confirm or cancel the operation. |
|
Import |
Allows you to upload a CSV file with the user list to add to the group. First, you need to pick up a CSV file, that CSV has to contain a specific configuration. Then you need to check the content to be loaded, it is allowed to choose if you want or not to load a specific attribute. And finally, you need to select the mappings for each column of the CSV file to import the data correctly and to click the Import button. |
|
Download CSV file |
Allows you to download a CSV file with all the information about users. |
Granted roles
|
Add or remove columns |
Allows you to show and hide columns in the table. |
|
Assign role |
Allows you to assign a role to the group. You can choose that option on the hamburger menu or click the add button (+). Then you need to select a role from the role list. If it is necessary, the next step will be to set the scope. Then you need to check and fill in the membership properties. And finally, apply changes. |
|
Revoke role |
Allows you to revoke one by one or to revoke some roles at the same time. To revoke some roles at the same time, you need to select the roles, and then click the button with the subtraction symbol (-). To revoke one role, you can click the role, and then Soffid will show a form with the details. Then you can click the delete button (trash icon). Soffid will ask you for confirmation to perform that action, you could confirm or cancel the operation. |
|
Import |
Allows you to upload a CSV file with the role list to assign permission. First, you need to pick up a CSV file, that CSV has to contain a specific configuration. Then you need to check the content to be loaded, it is allowed to choose if you want or not to load a specific attribute. And finally, you need to select the mappings for each column of the CSV file to import the data correctly and click the Import button. |
|
Download CSV file |
Allows you to download a CSV file with all the information about roles assigned to the group. |
Managers
|
Grant <ROLE_NAME> role |
Allows you to grant the role, <ROLE_NAME>, to one or more users. You need to click on the "Grant <ROLE_NAME> role", under the role you want to grant. Then, Soffid will display a modal window that allows you to search for the users. Here you are able to write the user name and select it to grant the role. Finally, you need to accept by clicking on the "Accept" button. If you click on the "Cancel" button, no changes will be applied. |
Accounts
Description
An account is the way an user is presented on a target system. There can be user accounts as well as system-purpose accounts.
An account belongs to a system and that account can have specific permissions assigned to it. An account must have defined the account type, that is if the account is a single user, privileged, shared, or unmanaged.
The password policy is also mandatory to create an account. That password policy determines the conditions that the password must meet.
It is allowed to set a password for an account, which can be a generated password by the system, or a password set by the administrator user. That password must comply with the password policies defined. When the account is unmanaged, if the password change, it will not be sent to the target system.
The account can be displayed in black or gray color. The gray color is used to indicate that the account is unmanaged, that is because the agent is disconnected or because the agent is in Read-Only Mode.
Screen overview
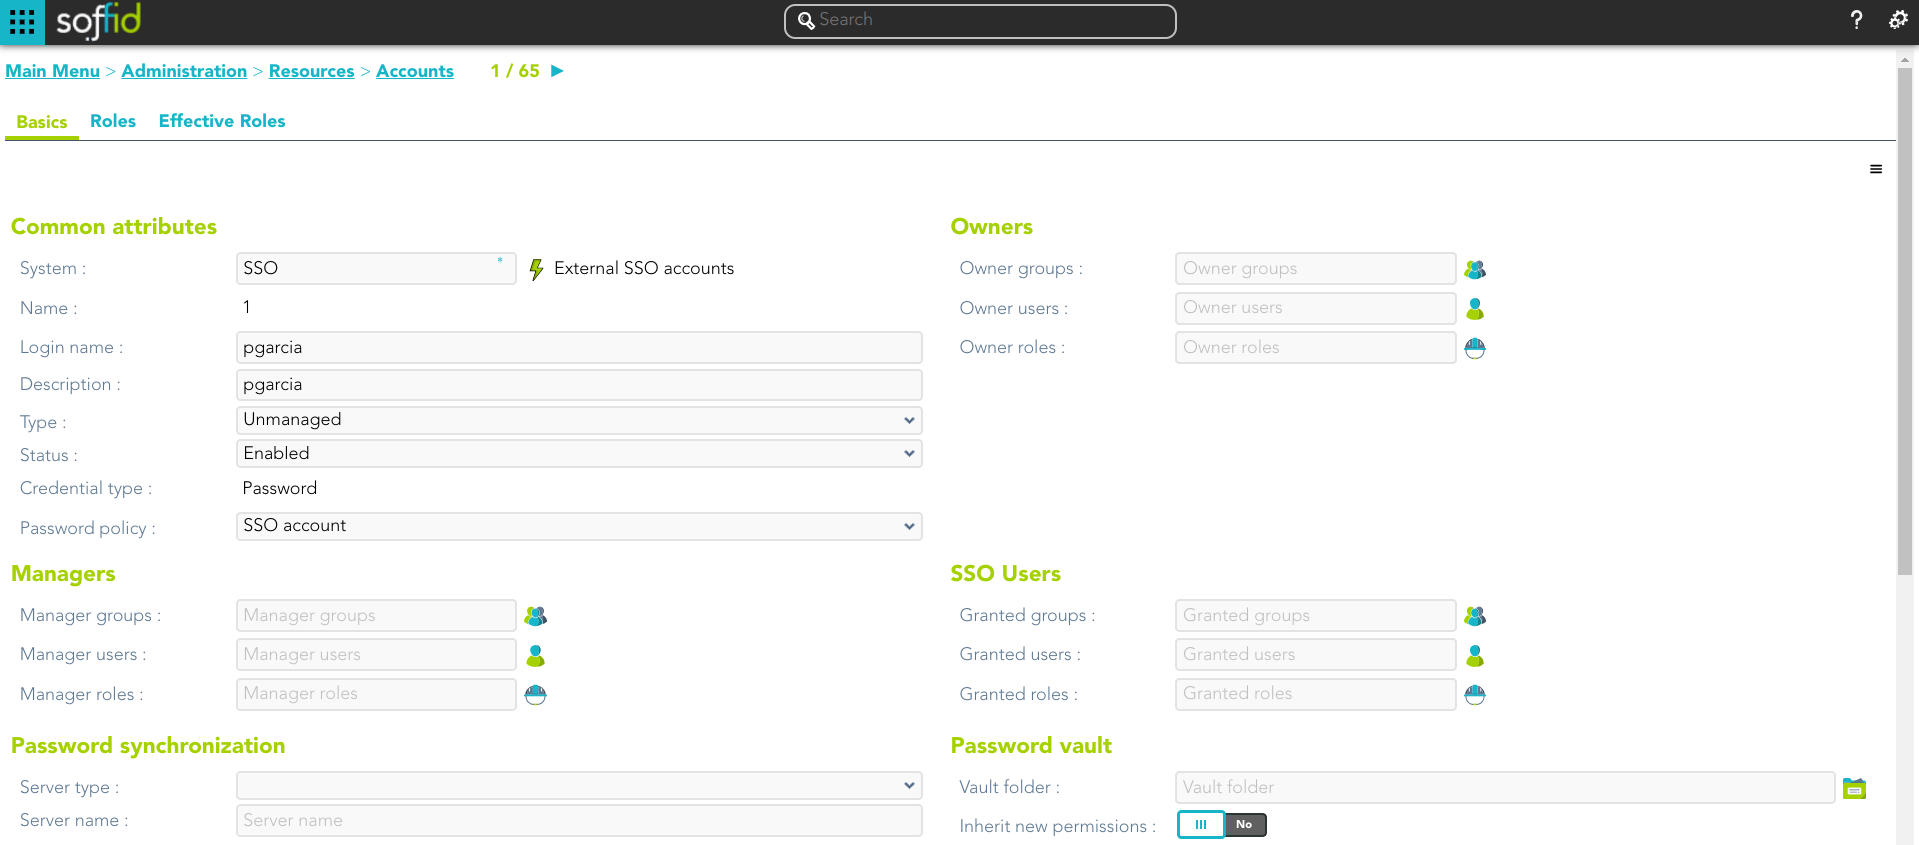
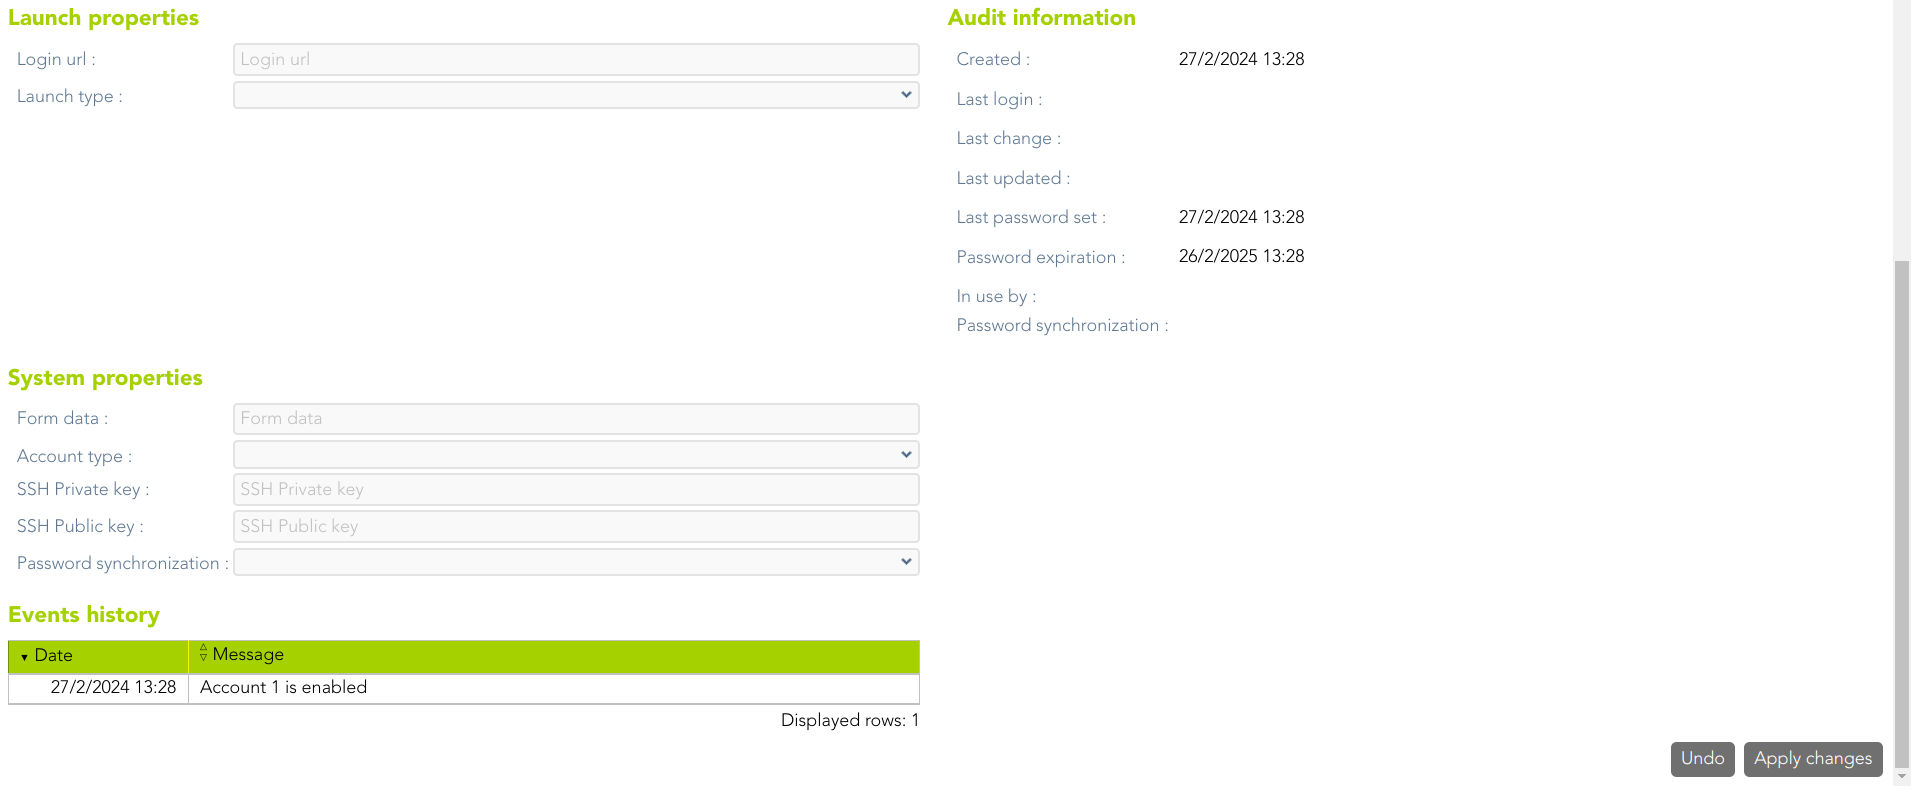
Related objects
An account is related, in Soffid, to other objects:
- User: users related to this account.
- Groups: groups to which the account belongs.
- Roles: the permissions that this account has associated with the system in which it is used. They can be assigned or revoked by users with administrator privileges.
- System: the environment in which that account is used (AD, Exchange, etc).
Standard attributes
Basic
On the basic account tab, you can view all the account attributes. It is allowed to add new accounts, update or delete existing accounts and other options.
Commons attributes
- System: target system to which the account will be connected. When SSO is the system selected, the account name is assigned by Soffid, that is because SSO is a multi-system connector and can be many accounts with the same login name.
- Name: name used to identify the account.
- Description: plain text with information about the account.
- Type: there are four kinds of accounts:
- Single user account: accounts should normally be user accounts and bound to a single user. We can see user accounts on the user management screen, and will mostly be created by Soffid.
- Shared accounts: these accounts are shared among multiple users. They have an access control list to prevent unauthorized usage. Will be granted to users, groups or roles. Passwords on shared accounts might be set by operators or by the user. It depends on the password policy definition. A shared account could have related services.
- High privilege accounts: shared among users, but only one user possesses it at one time. Through self-service portal, a high privilege account owner can check-in and check-out them. Will be granted to users, groups or roles. Passwords on these accounts will be set only by the user using the self-service portal. The user can set it for a period of time. After that, the system will change the password by a temporary one.
- Unmanaged accounts: ignored by Soffid. They can be populated based on existing system accounts. Soffid will be able track any changes applied to this type of accounts on the managed system, but Soffid will not apply any change to the actual system. You should have a limited number of unmanaged accounts, but they are extremely useful during deployment phase.
- Credential type: this field will be available when the system is filled with the SSO option.
- Password: this is the default value. This option will allow you to set the account password.
- SSH key: this option will allow you to add a SSH key. This SSH key could be an existing key or a generated new key.
- Kubernetes key: this option will allow you to enter a Yaml descriptor to configure the access.
- Status:
- Enabled: the account can be used by the user. Soffid engine will disable it when the user does not match the access requirement policy.
- Manually enabled: the account can be used by the user. Soffid engine will keep it enabled, even when the user does not match the access requirement policy.
- Disabled: the account cannot be used by the user. Soffid engine will enable it when the user does matches the access requirement policy.
- Manually enabled: the account cannot be used by the user. Soffid engine will keep it disabled, even when the user matches the access requirement policy.
- Removed: the account no longer exists in the target system, but its image is kept in Soffid for audit purposes.
- Locked: the account is locked when a user tries to access with a fail password too many times (5 times). The account will be enabled in a specific period of time (5 minutes).
- Archived:
- Password policy: the policy applied to this account. It is mandatory select a password policy. You can see more information on the User Type and Password policies pages.
💻 Image
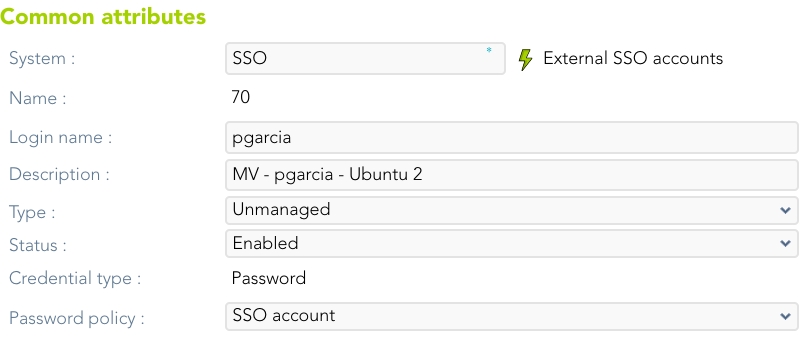
Owners, Managers, and SSO users
Specify the list of users authorized to use this account. For accounts of type "single user", only one user can be specified. Other accounts can have more than one user. The users that can use this account can be specified either directly, by entering the user name, or indirectly, by entering a group or role name. At the latest, any user having that group or role will automatically be entitled to use this account.
There are three access levels for each account and user:
- SSO User: can use it by means of the SSO or PAM engines. They cannot change their password, not even through single sign on engine.
- Manager: can use it, and set or query the password (using self-service portal), depending on the password policy restriction.
- Owner: can use it, modify the access control list, and set or query the password sing self-service portal or single sign-on engine.
💻 Image
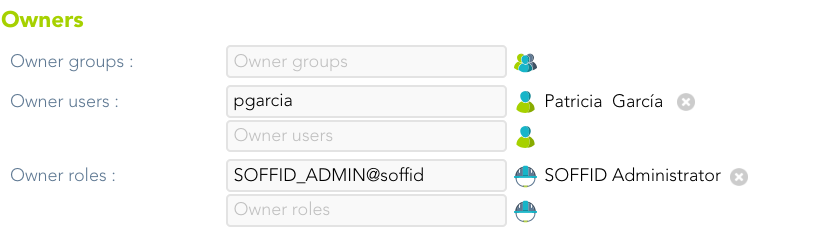
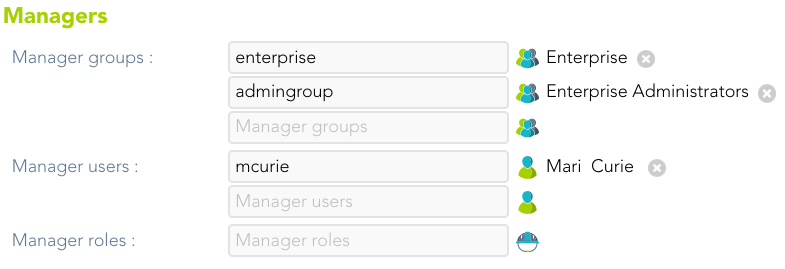
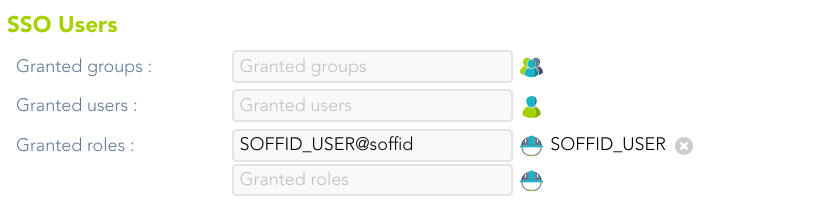
Password vault
- Vault folder: personal or shared folder, depending on the account type, in which account data are stored.
- Inherit new permissions: determines if the account will inherit the permissions granted to the folder that contains it.
💻 Image

Password synchronization
- Server type:
- Linux
- Windows
- Database
- Server name
- SSH Public key
💻 Image
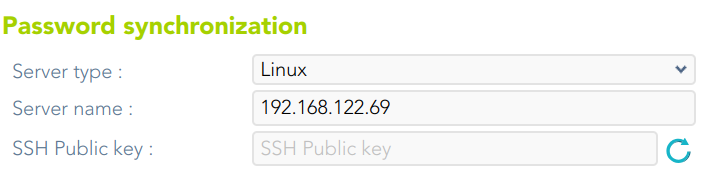
Launch properties
Defines the properties to connect to the target system.
- Login URL: URL to connect. You can add the port when you need it
- Login name: account name to connect.
- Launch type: connection type.
- Simple
- WebSSO
- PAM Jump server: it is mandatory to select the Jump server group.
💻 Image
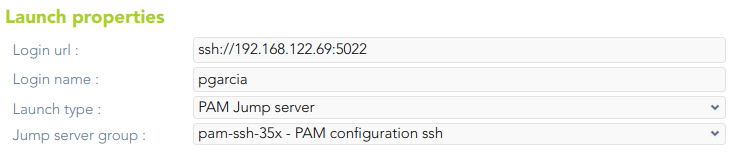
Audit information
- Created on: account creation date.
- Last login: last registered access.
- Last updated: last modified.
- Last password set: date of last password change.
- Password expiration: password expiry date.
- In use by: account owner
- Password synchronization.
System properties
- SSH Private key: private key that establishes trust to be able to access the system without requiring a password.
- SSH Public key: public key that establishes trust to be able to access the system without requiring a password.
Events history
List of events on this account
💻 Image
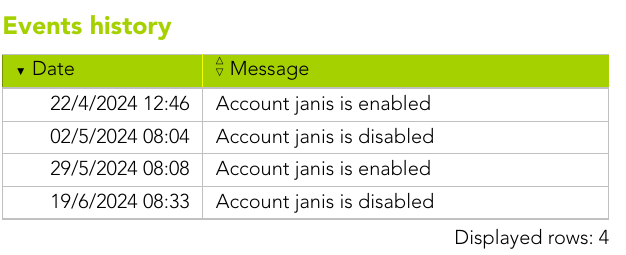
Services
List of services on this account. The account type must be shared to view those services. All these services appear after agent reconciliation.
💻 Image
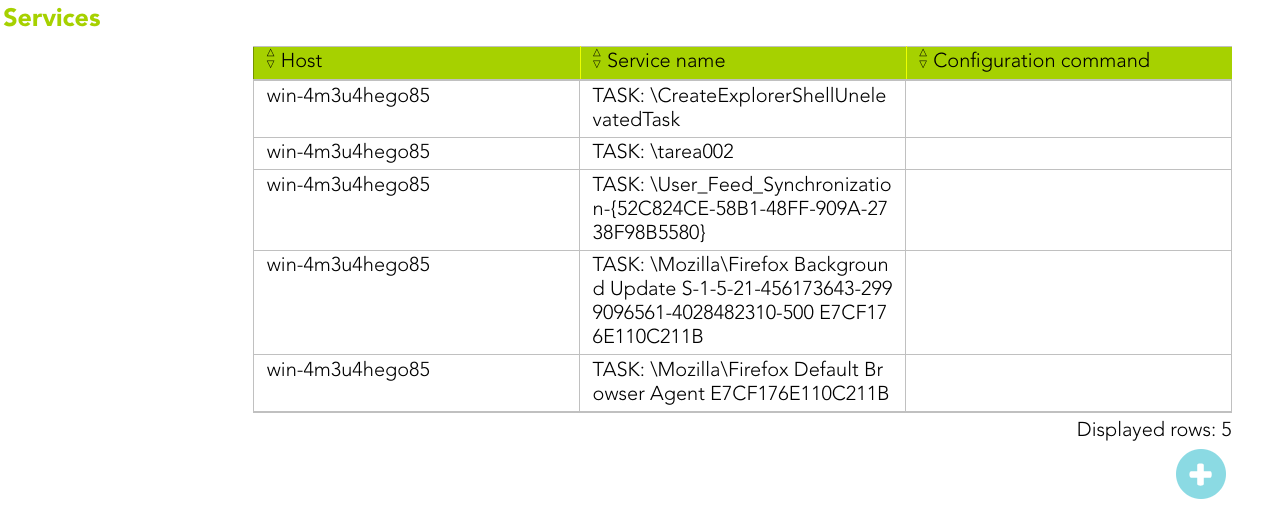
Soffid allows you to manage the existing services, you can add, update or remove services as well. This makes sense in the case of Linux machines.
💻 Image
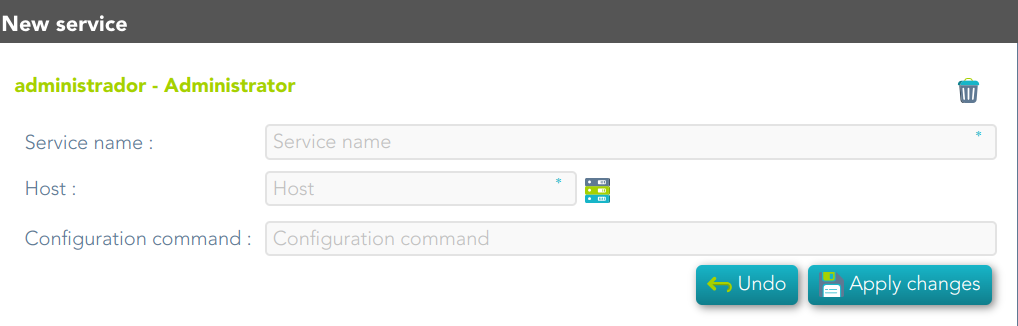
Roles
A role is a collection of permissions that can be granted.
On the roles tab, you can view the roles assigned to the account, it is shown information about the role name, description, application or start (and, if proceed, end) date of the role assignment.
You can also assign roles to the account, you can click the add symbol (+), select the role that you want to assign, depending on the role you must fill the scope, and finally set memberships properties.
It is also possible to revoke roles to the account from the entitlement details or by selecting one or more records from the list and clicking the button with the subtraction symbol (-).
By clicking on a record, it is shown the detail role assignment information.
Additionally, you can download a CSV file with the roles information and you can also upload a CSV file to assign or revoke roles.
💻 Image
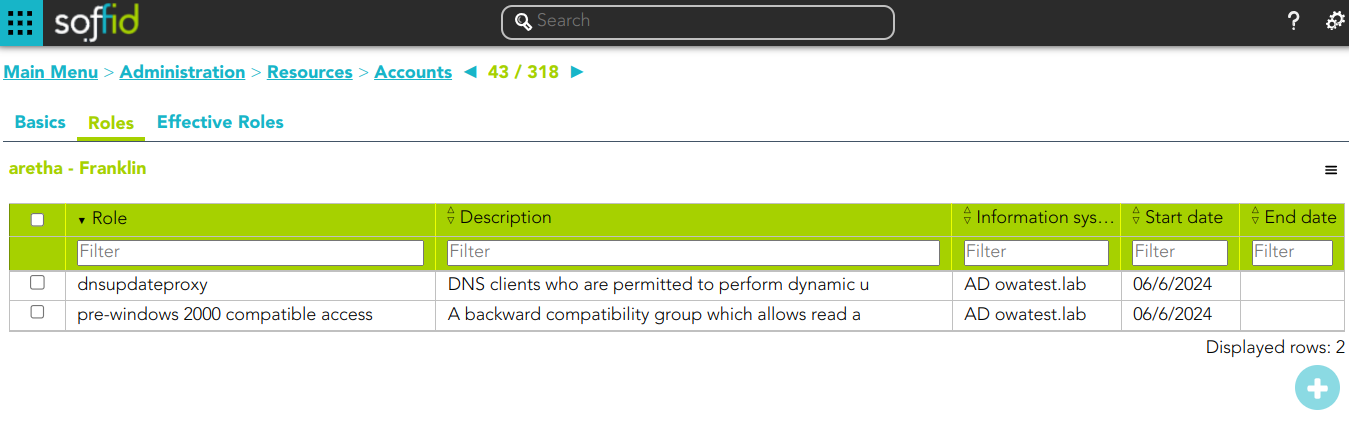
Effective roles
Hierarchy of permissions assigned to or inherited.
This screen details the effective roles for the selected account.
- By direct assignment of the role: when you assign a role to an account, you are assigning to the account all the permissions defined for that role.
- By belonging to a group: when you add a user to a group, the user will have all the roles assigned to the group.
- By rules defined in the system: when a rule is satisfied for a user, the system assigns the roles defined in the rule to the user.
💻 Image
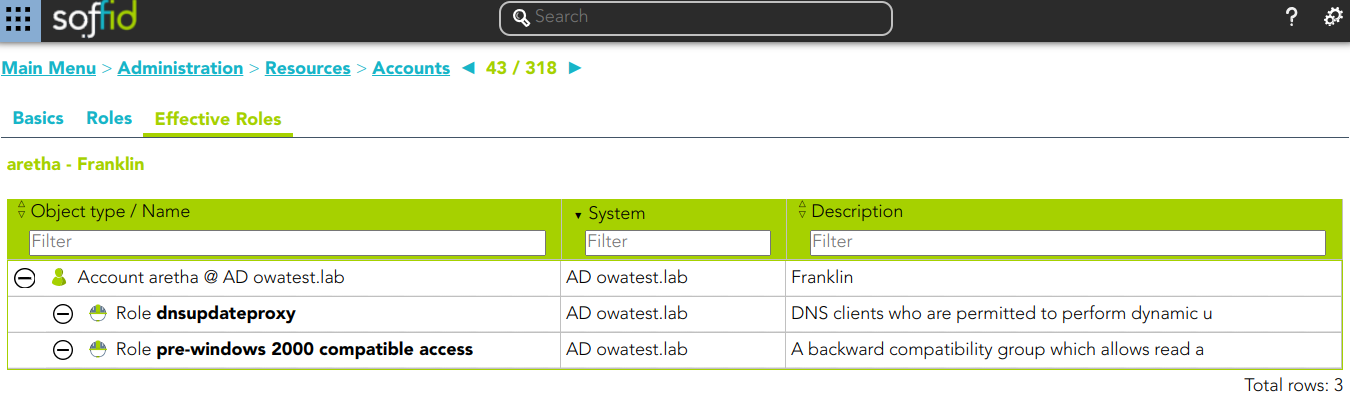
Actions
Account query actions
|
Query |
Allows you to query accounts through different search systems, Quick, Basic and Advanced. |
|
Add or remove columns |
Allows you to show and hide columns in the table. You can also set the order in which the columns will be displayed. The selected columns and order will be saved for the next time Soffid displays the page to the user. |
|
Add new |
Allows you to add a new account in the system. You can choose that option on the hamburger icon or click the add button (+).To add a new account it will be mandatory to fill in the required fields |
|
Delete |
Allows you to remove one or more accounts by selecting one or more records and next clicking the button with the subtraction symbol (-).To perform that action, Soffid will ask you for confirmation, you could confirm or cancel the operation. |
|
Download CSV file |
Allows you to download a CSV file with the basic information of all accounts. |
|
Bulk actions |
Allows massive operations to be performed on all system accounts. With that operation, updates can be made to any of the account's parameters. First of all, you must select the records that you want to update, once you have selected them, you must choose the bulk action on the hamburger icon. For more information visit the Bulk action page. |
Account detail actions
| Apply changes |
Allows you to save the data of a new account or to update the data of a specific account. To save the data it will be mandatory to fill in the required fields |
|
Delete |
Allow you to remove the account. You can choose that option on the hamburger icon To perform that action, Soffid will ask you for confirmation, you could confirm or cancel the operation. |
|
Undo |
Allows you to quit without applying any changes. |
|
Set password |
This option depends on the credential type selected. Password:
💻 Image
SSH key:
💻 Image
Kubernetes key:
💻 Image
|
|
Show actual account properties |
Display the account attributes at the target system. To perform that action, Soffid needs to connect with the target system and get the account attributes that will be shown. |
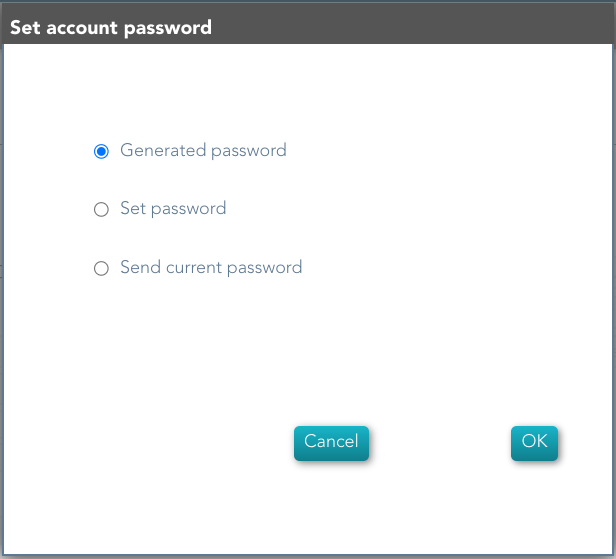


Roles
|
Assign Role |
Allows you to assign a new role to the account. You can choose that option on the hamburger menu or click the add button (+). Then you need to select a role from the role list. If it is necessary, the next step will be to set the scope. Then you need to check and fill in the membership properties. And finally, apply changes. |
|
Revoke Role |
Allows you to revoke one by one or to revoke some roles at the same time. To revoke some roles at the same time, you need to select the roles, and then click the button with the subtraction symbol (-). To revoke one role, you can click the role, and then Soffid will show a form with the details. Then you can click the delete button (trash icon). Soffid will ask you for confirmation to perform that action, you could confirm or cancel the operation. |
|
Import |
Allows you to upload a CSV file with the role list to assign permission. First, you need to pick up a CSV file, that CSV has to contain a specific configuration. Then you need to check the content to be loaded, it is allowed to choose if you want or not load a specific attribute. And finally, you need to select the mappings for each column of the CSV file to import the data correctly and to click the Import button. |
|
Download CSV file |
Allows you to download a CSV file with all the information about account roles. |
Roles
Description
Soffid allows you to create roles to specify permissions that can be assigned to a user, a group, or an account. These permissions determine what operations are allowed on a resource. You can use roles to delegate access to users, applications, or services. The main goal is to achieve optimal security administration.
Roles can be defined at different levels:
- Organizational permissions.
- Application permissions.
- Low-level permissions.
When needed, generic roles can be created. When such a role is granted to any user, it is converted into a specific role by specifying an organization unit, information system, or a specific value. So, for instance, a generic emergency coordinator role can be created. The master emergency coordinator will have this role granted for the whole organization, while a remote office emergency coordinator will have this role granted for his single unit.
Note that a role can belong to an information system with a defined role definition process.
Screen overview
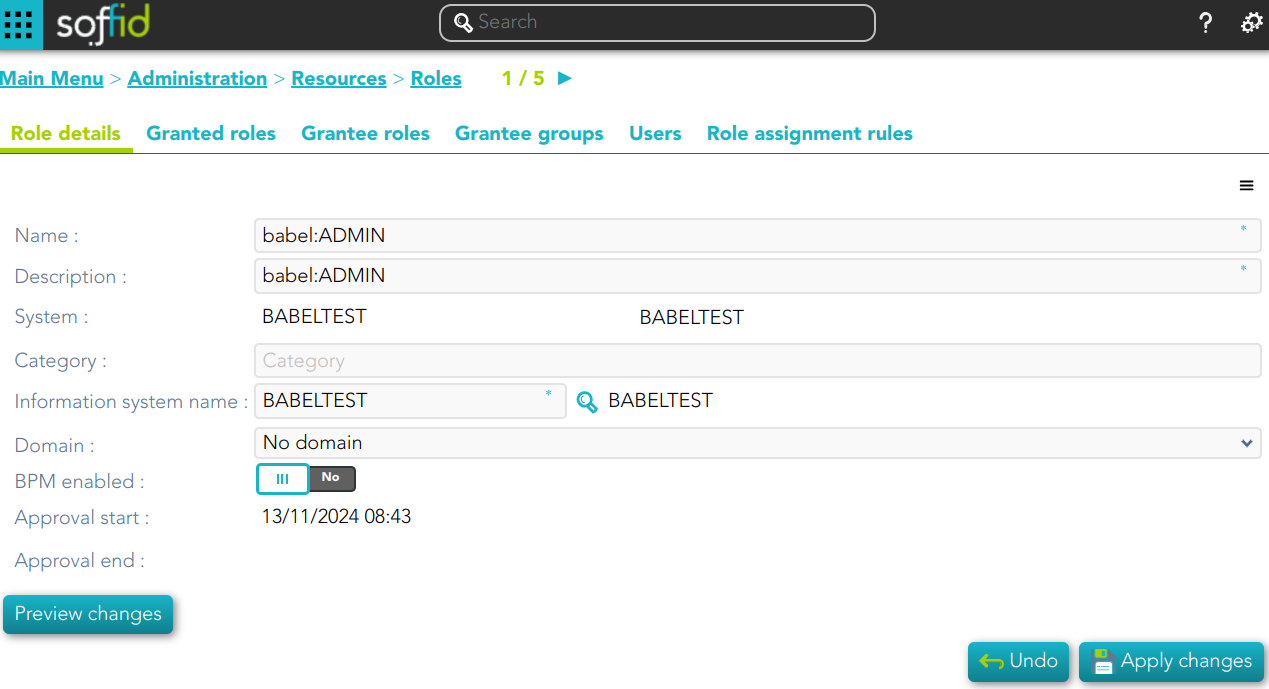
Related objects
Standard attributes
Role detail
- Name: name used to identify the role
- Description: detailed role description.
- System: information storage system from a technical point of view (active directory, database, CSV, ...).
- Category
- Information system name: asset or application, from a functional point of view, on which the permissions are granted or revoked.
- Domain: you can set a limitation of the role scope by selecting the domain. Initially, there are two domains defined, Groups and Information Systems. Soffid allows you to add more domains. (*1) (*2)
- BPM enabled: if you check this option (value selected is Yes) this role will be available in the Permissions management workflows.
- Approval start: at this date, Soffid will connect to the system and will assign the role. If there is no approval start, it will be assigned at the moment.
- Apploval end: at this date, Soffid will connect to the system and will revoke the role.
Domain example (*1)
First, you can define the scope for one specific Role, for instance, you define role manager in Soffid System, with the scope Groups:
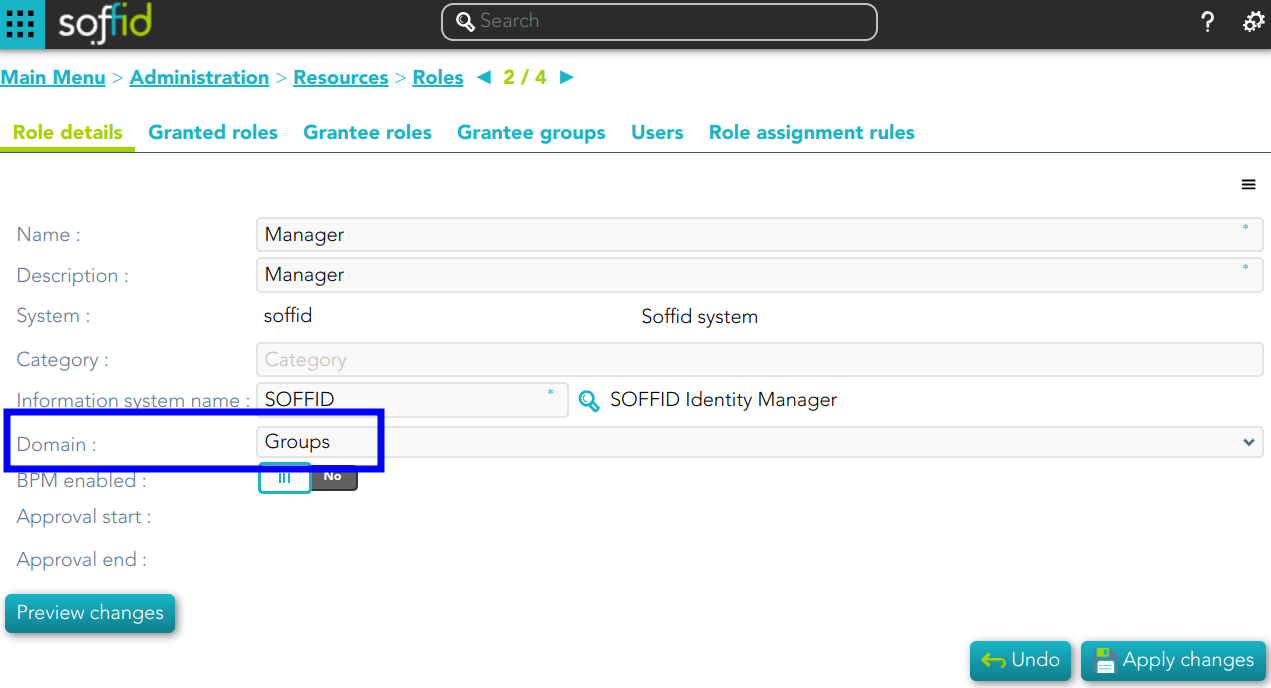
Then, you can assign this role to one or more users. To do this you must indicate the scope (can be one or more scoped):
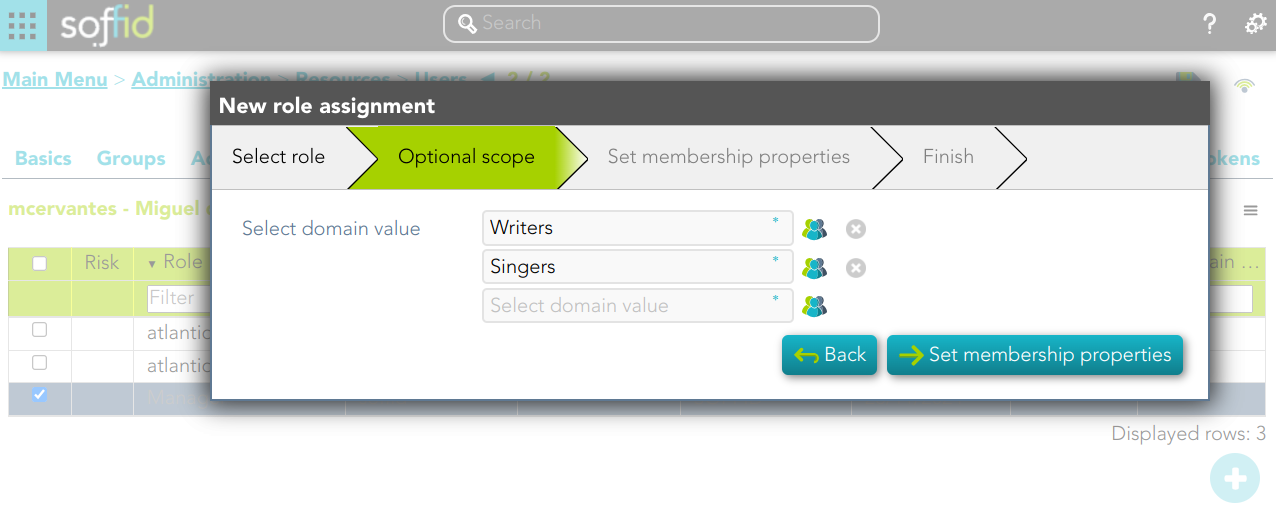
So the user will have the role in the scopes indicated:

If you try to assign the role without domain, this error will be displayed:

Domain example (*2)
You can define the scope for one specific Role, for instance, you define role manager in Soffid System, with the scope Information Systems:
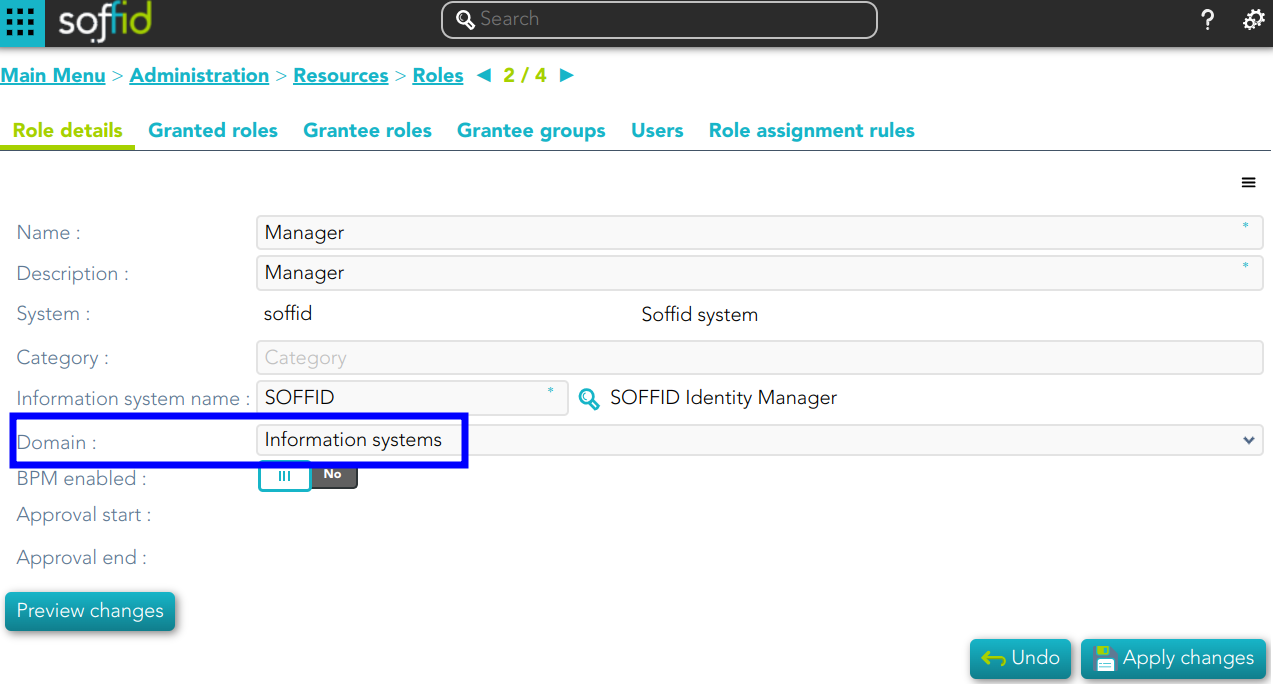
Then, you can assign this role to one or more users. To do this you must indicate the scope (can be one or more scoped):
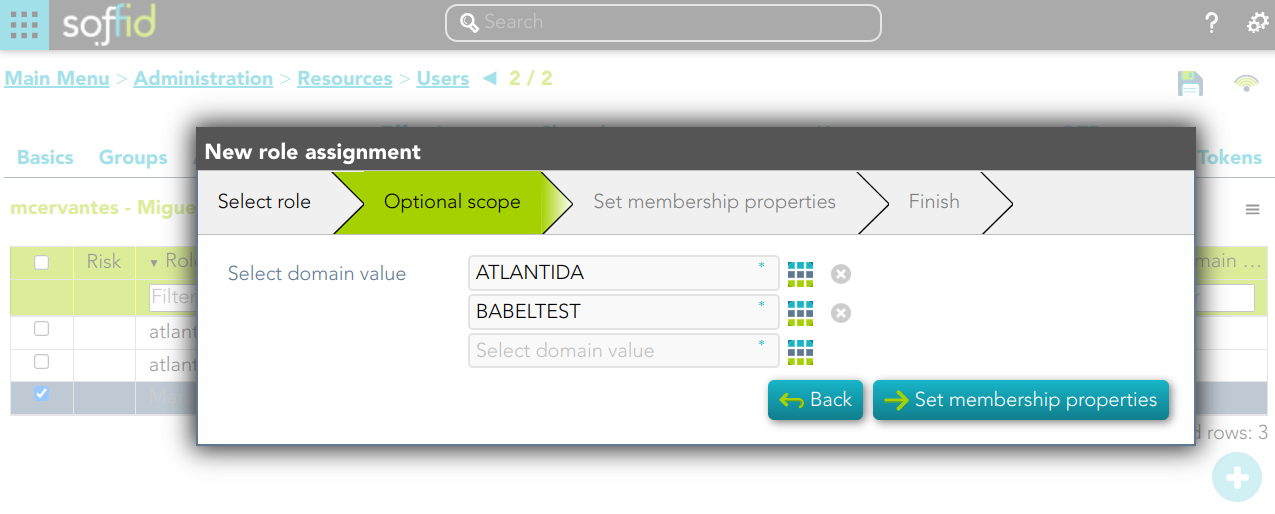
So the user will have the role in the scopes indicated:
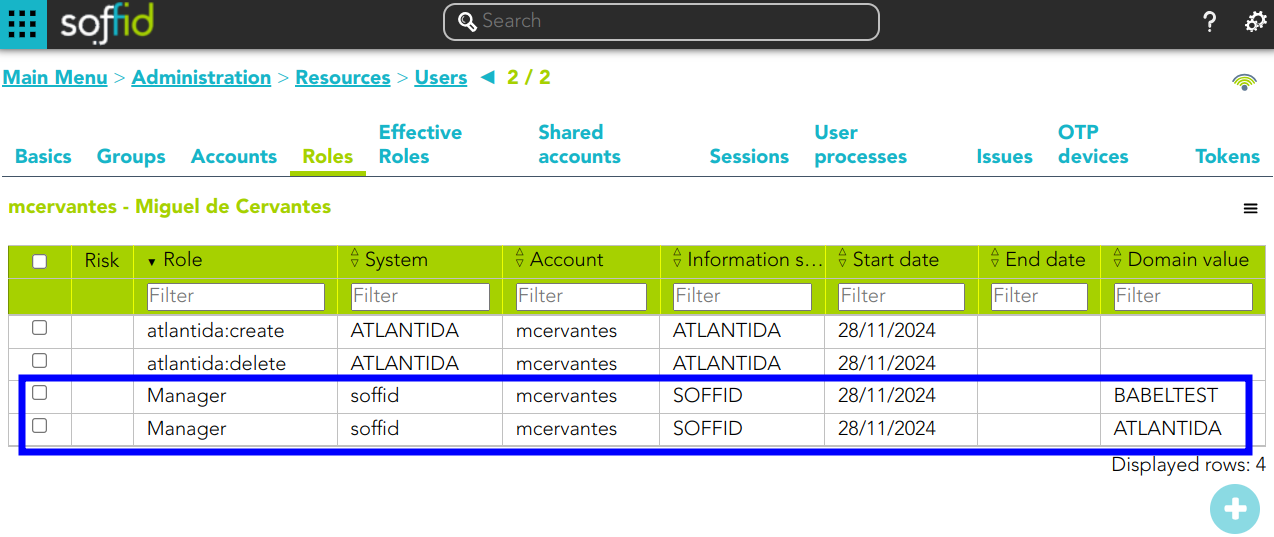
If you try to assign the role without domain, this error will be displayed:
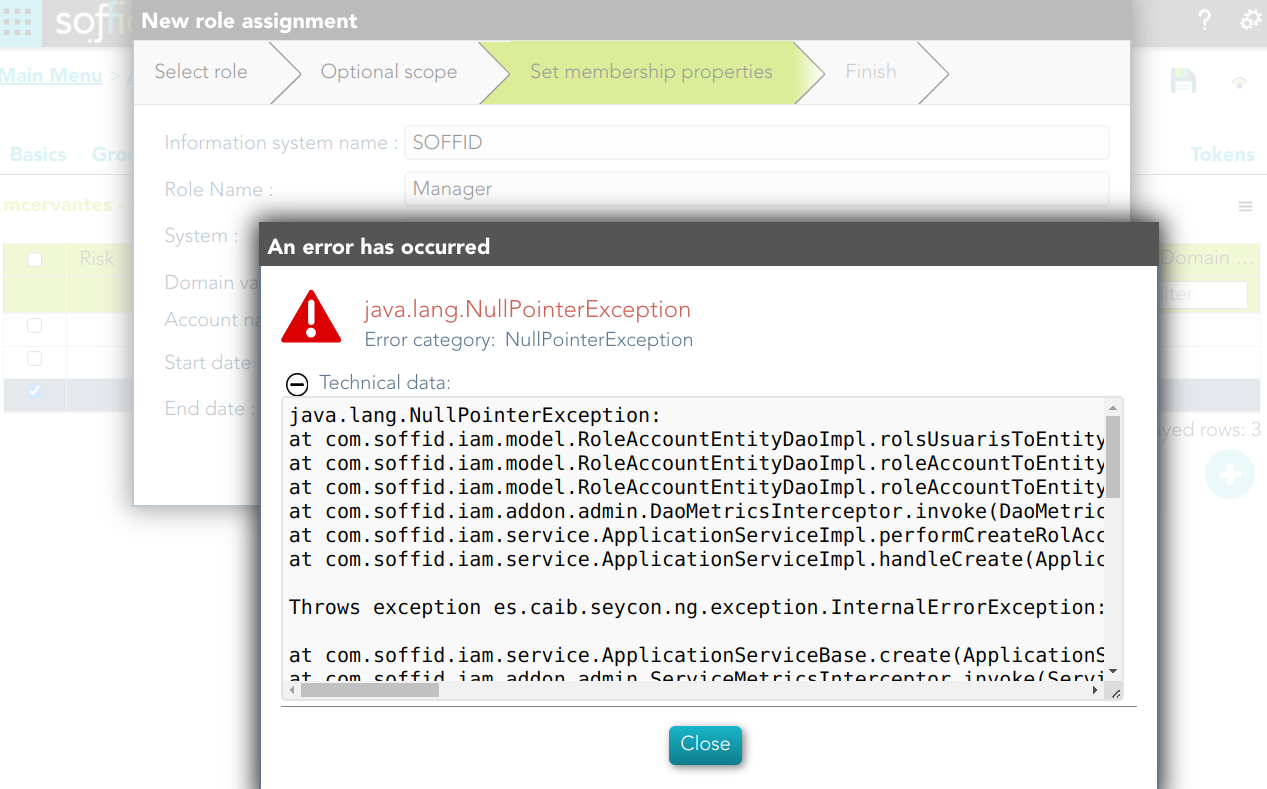
Granted roles
On the granted roles tab, you can assign the privileges of this role to another role in another system.
Assign privileges
To assign privileges you should click the button with the add (+) symbol, then select the target role, the domain values when necessary, and click the finish button. At this point the record will be added to the list.
Now you can check or uncheck the mandatory field.
- Mandatory: the roles with this flag checked will be displayed in the user's effective roles tab.
- No Mandatory: roles with this flag unchecked will be displayed in the user's roles tab and can be managed. It is not automatically assigned to users who already had the parent role.
And finally, you should click the Apply changes button to save the changes. With this operation, all the permissions of this will be assigned to the target role.
💻 Image

💻 Image
This role belong to an Information System with a defined Role definition process.
- This assignation is pending to approve
- This deletion is pending to approve
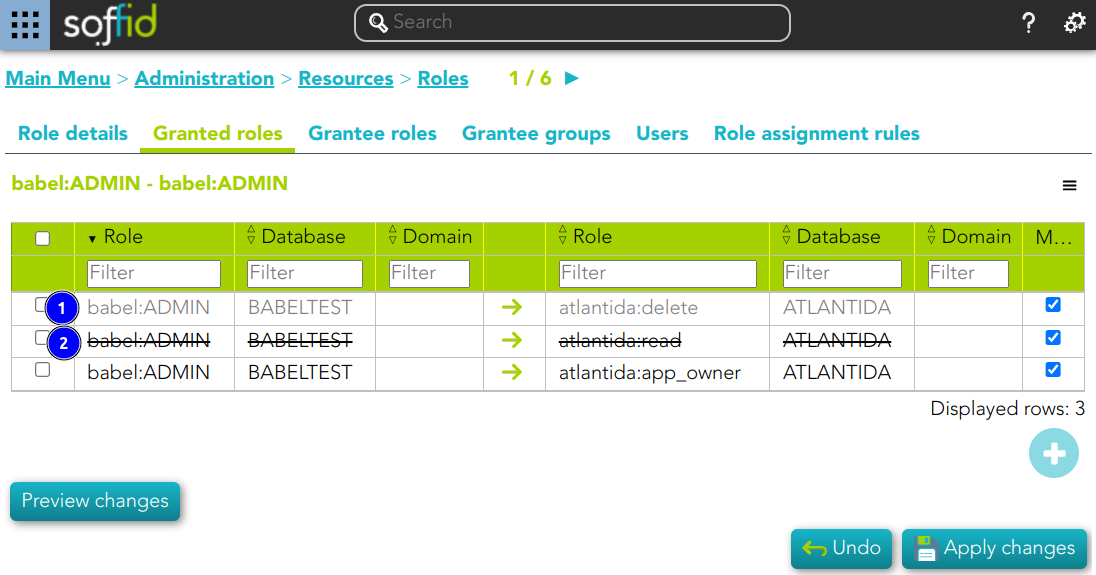
Revoke permissions
If you want to revoke permissions, you must select one or more records from the list and click the button with the subtraction symbol (-) and then click the Apply changes button to save the changes.
💻 Image
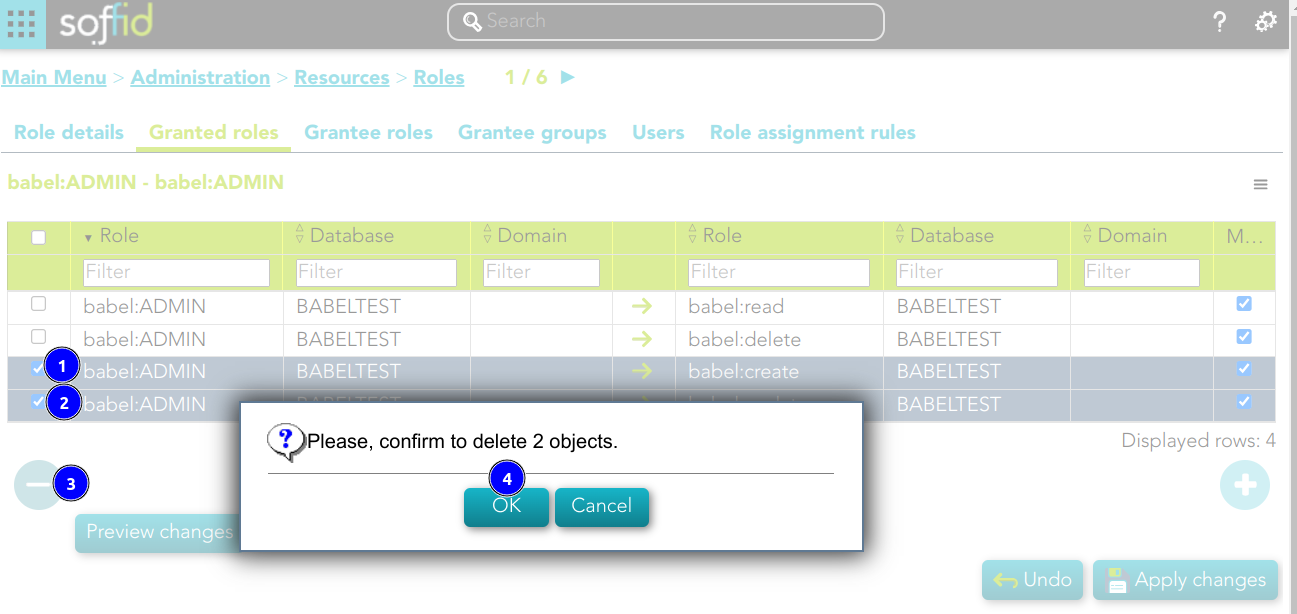
Preview changes
In addition, you can check the preview changes, it display information about the action, the user or account, and the role or domain, and you can apply them.
💻 Image
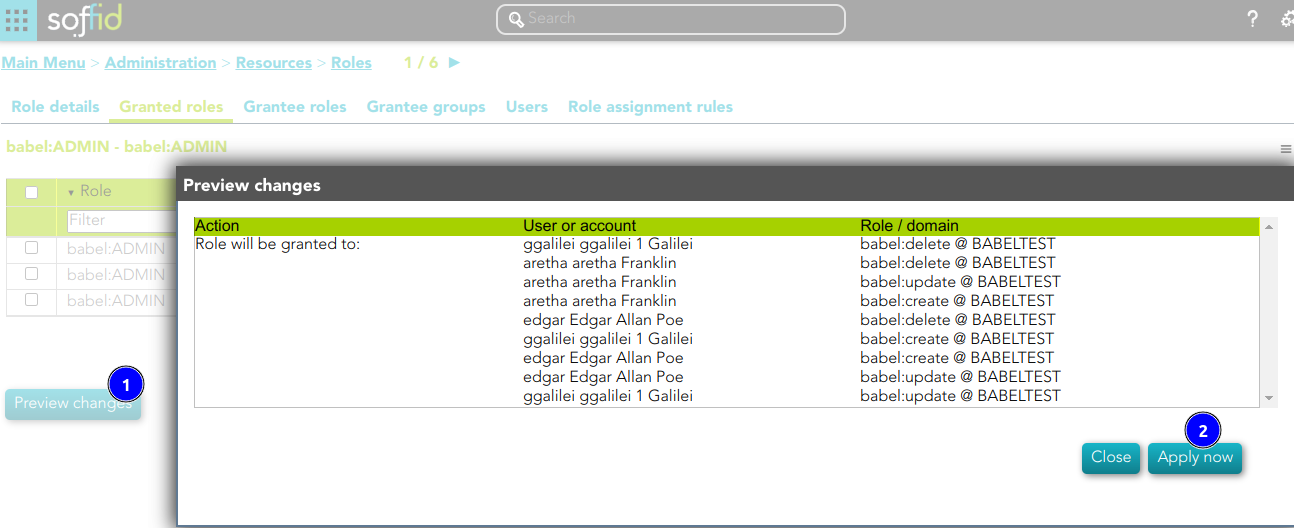
Grantee roles
On the grantee roles tab, you can assign the privileges of a role of any other system to this role.
Assign privileges
To assign privileges you should click the button with the add (+) symbol, then select the source role, the domain values when necessary, and click the finish button. At this point the record will be added to the list.
Now you can check or uncheck the mandatory field.
- Mandatory: the roles with this flag checked will be displayed in the user's effective roles tab.
- No Mandatory: roles with this flag unchecked will be displayed in the user's roles tab and can be managed. It is not automatically assigned to users who already had the parent role.
And finally, you should click the Apply changes button to save the changes. With this operation, all the permissions of this will be assigned to the target role.
💻 Image
This role belong to an Information System with a defined Role definition process.
- This assignation is pending to approve
- This deletion is pending to approve
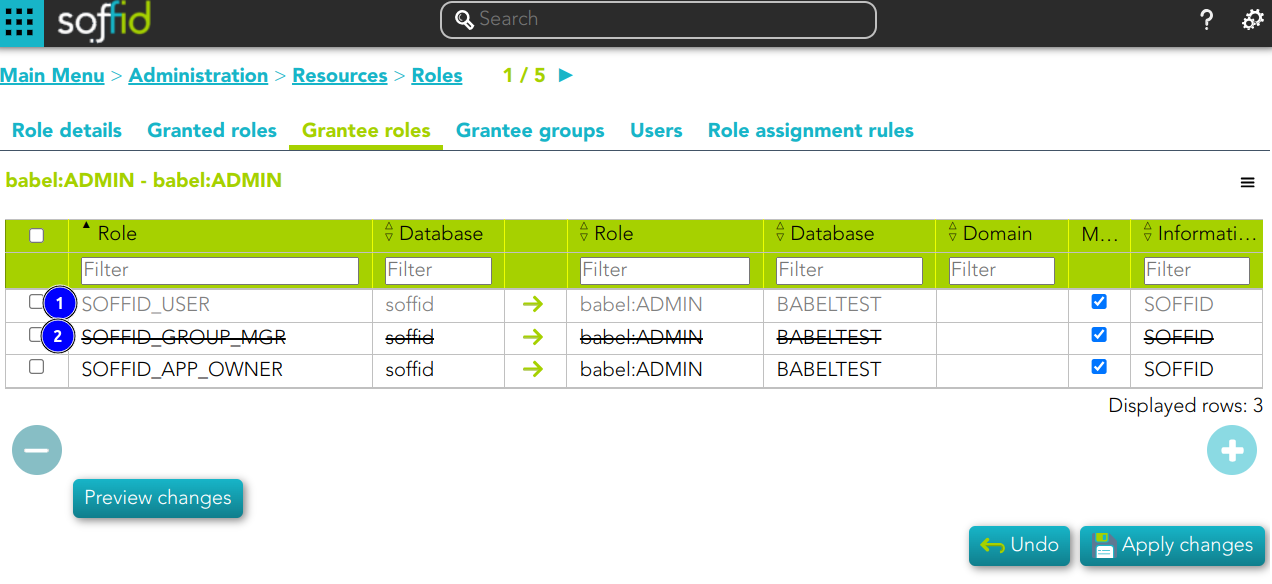
Revoke permissions
If you want to revoke permissions, you must select one or more records from the list and click the button with the subtraction symbol (-) click the Apply changes button to save the changes.
Preview changes
In addition, you can check the preview changes, it display information about the action, the user or account, and the role or domain, and you can apply them.
Grantee groups
On the grantee groups tab, you can assign the privileges from a specific group to this role, or revoke the privileges.
Assign privileges
To assign privileges you must click the button with the add symbol (+), then select the group, finish, and apply changes. Thus, the roles indicated, in the corresponding system, will be assigned to all users belonging to this group.
Now you can check or uncheck the mandatory field.
- Mandatory: the roles with this flag checked will be displayed in the user's effective roles tab.
- No Mandatory: roles with this flag unchecked will be displayed in the user's roles tab and can be managed. It is not automatically assigned to users who already had the parent role.
And finally, you should click the Apply changes button to save the changes. With this operation, all the permissions of this will be assigned to the target role.
💻 Image
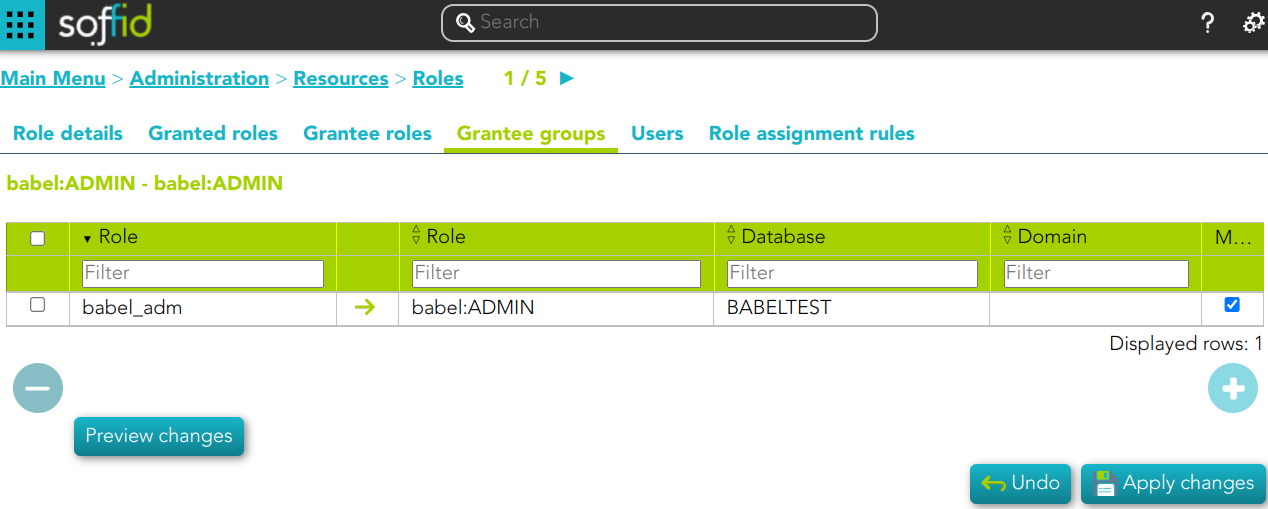
Revoke permissions
If you want to revoke permissions, you must select one or more records from the list and click the button with the subtraction symbol (-) click the Apply changes button to save the changes
Preview changes
In addition, you can check the preview changes, it display information about the action, the user or account, and the role or domain, and you can apply them.
Users
On the users tab, you can assign or revoke roles. To assign a role you must click the button with the add symbol (+) and choose one or more users, fill the scope when it is mandatory, and set membership properties. Each role needs an account to be applied to, so, if a user has no account on a system and a role on that system is granted, a new account will be created on this system. In case a user has more than one account on a system, you should indicate which of the suitable accounts will be granted the role.
It is also possible to revoke roles to the user from the entitlement details or by selecting one or more records from the list and clicking the button with the subtraction symbol.
The users with the role assigned by rules will be displayed with different colors. Soffid does not allow to revoke roles, on that page, that were assigned by rules.
Additionally, you can download a CSV file with the basic users data.
💻 Image
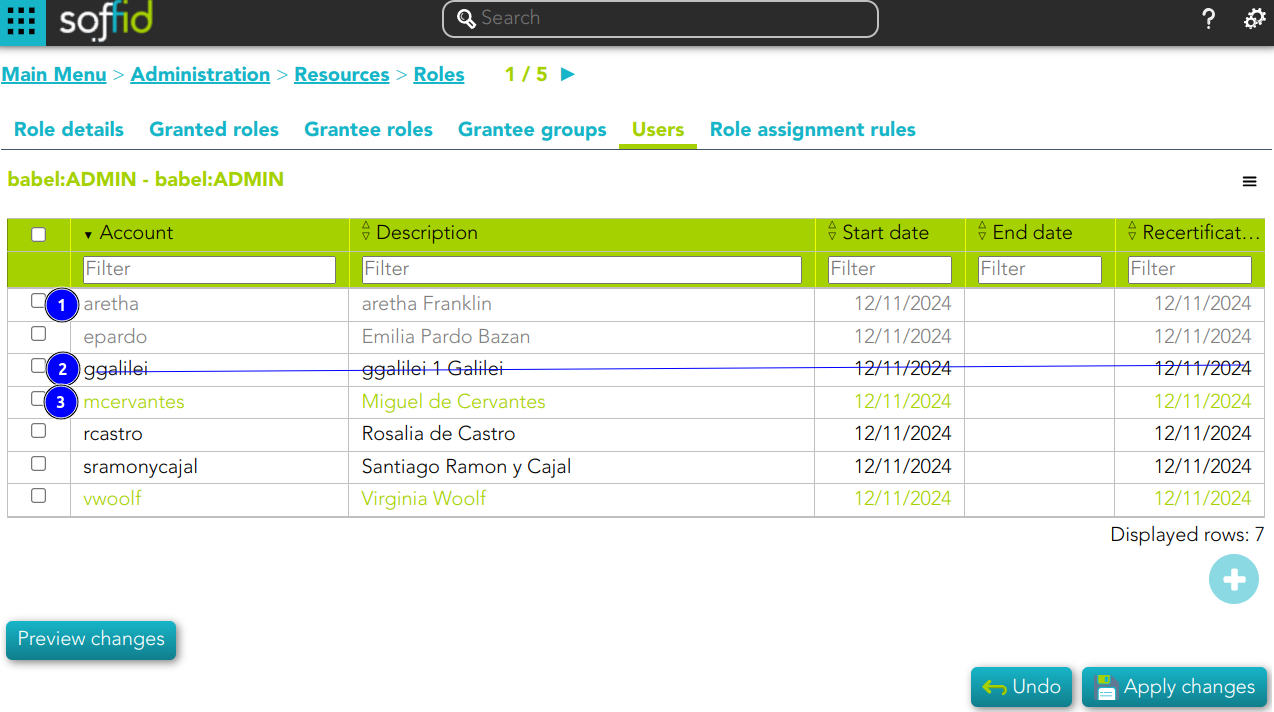
1) This assignation is pending to approve
2) This deletion is pending to approve
3) This assignation is by an assignment rule
Role assignment rules
You can consult the Role assignment rules related to this role.
💻 Image
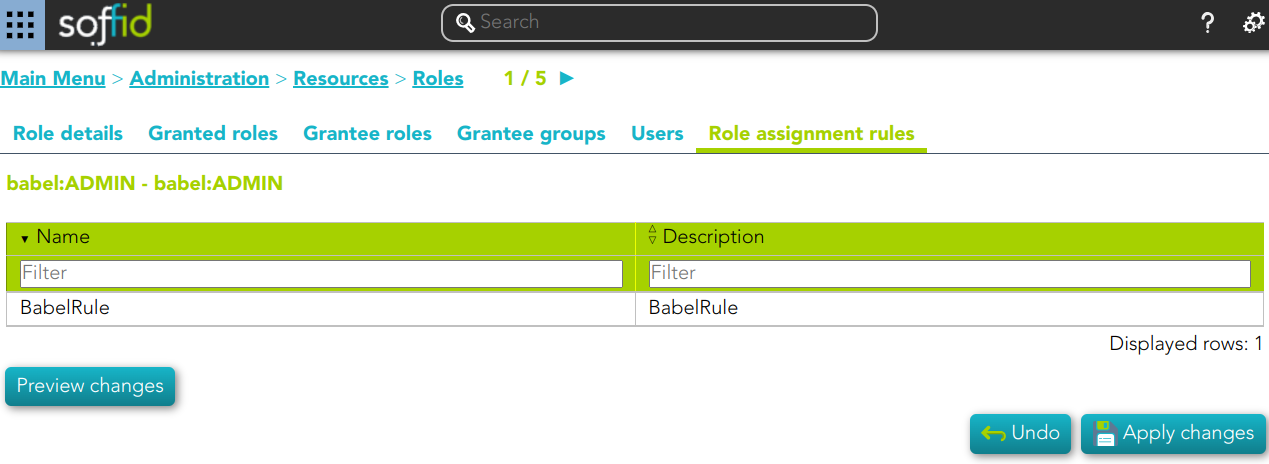
For more information, you can visit the Role assignment rules page.
Actions
Roles query
|
Query |
Allows you to query roles through different search systems, Quick, Basic and Advanced. |
|
Add or remove columns |
Allows you to show and hide columns in the table. You can also set the order in which the columns will be displayed. The selected columns and order will be saved for the next time Soffid displays tihis page. |
|
Add new |
Allows you to add a new role in the system. You can choose that option on the hamburger menu or click the add button (+). To add a new role it will be mandatory to fill in the required fields |
|
Delete |
Allows you to remove one or more roles by selecting one or more records and next clicking the button with the subtraction symbol (-). To perform that action, Soffid will ask you for confirmation, you could confirm or cancel the operation. |
|
Import |
Allows you to upload a CSV file with the role list to add or update roles to Soffid. First, you need to pick up a CSV file, that CSV has to contain a specific configuration. Then you need to check the content to be loaded, it is allowed to choose if you want or not to load a specific attribute. And finally, you need to select the mappings for each column of the CSV file to import the data correctly and to click the Import button. |
|
Download CSV file |
Allows you to download a csv file with the basic roles data. |
|
Bulk actions |
Allows massive operations to be performed on all system roles. With that operation, updates can be made to any of the role's parameters. First of all, you must select the records that you want to update, once you have selected them, you must choose the bulk action on the hamburger icon. For more information visit the Bulk action page. |
Roles detail
|
Delete |
Allows you to delete a role. You can choose that option on the hamburger icon. To perform that action, Soffid will ask you for confirmation, you could confirm or cancel the operation. |
|
Preview changes |
Shows the pending changes on users or accounts. Soffid displays the information about the user or accounts, the action and de Role. You can choose if you want to apply the changes, or close the previer changes window. |
|
Apply changes |
Allows you to apply the pending changes. |
|
Undo |
Allows you to quit without applying any changes. |
Granted roles
|
Apply changes |
Allows you to update the data changes. |
|
Add |
Allows you to add a new granted role. To add a granted role, first you need to click the add button (+). Second, you need to write or search for a role. Once you have selected the role, if it is necessary, the next step will be to set the scope. Then, you need to finish the process. And finally, you need to apply changes. |
|
Delete |
Allows you to delete one or more granted roles. To delete you need to select the records and then click the button with the subtraction symbol (-). To perform that action, Soffid will ask you for confirmation, you could confirm or cancel the operation. And finally, you need to apply changes. |
|
Preview changes |
Shows the pending changes on users or accounts. Soffid displays the information about the user or accounts, the action and de Role. You can choose if you want to apply the changes, or close the previer changes window. |
|
Apply changes |
Allows you to apply the pending changes. |
|
Undo |
Allows you to quit without applying any changes. |
Grantee roles
|
Add |
Allows you to add a new grantee role. To add a grantee role, first you need to click the add button (+). Second, you need to write or search for a role. Once you have selected the role, if it is necessary, the next step will be to set the source scope and the scope. Then, you need to finish the process. And finally, you need to apply changes. |
|
Delete |
Allows you to delete one or more grantee roles. To delete you need to select the records and then click the button with the subtraction symbol (-). To perform that action, Soffid will ask you for confirmation, you could confirm or cancel the operation. And finally, you need to apply changes. |
|
Preview changes |
Shows the pending changes on users or accounts. Soffid displays the information about the user or accounts, the action and de Role. You can choose if you want to apply the changes, or close the previer changes window. |
|
Apply changes |
Allows you to apply the pending changes. |
|
Undo |
Allows you to quit without applying any changes. |
Grantee groups
|
Add |
Allows you to add a new grantee group. To add a grantee group, first you need to click the add button (+). Second, you need to write or search for a group. Once you have selected the group, if it is necessary, the next step will be to set the scope. Then, you need to finish the process. And finally, you need to apply changes. |
|
Delete |
Allows you to delete one or more grantee groups. To delete you need to select the records and then click the button with the subtraction symbol (-). To perform that action, Soffid will ask you for confirmation, you could confirm or cancel the operation. And finally, you need to apply changes. |
|
Preview changes |
Shows the pending changes on users or accounts. Soffid displays the information about the user or accounts, the action and de Role. You can choose if you want to apply the changes, or close the previer changes window. |
|
Apply changes |
Allows you to apply the pending changes. |
|
Undo |
Allows you to quit without applying any changes. |
Users
|
Add or remove columns |
Allows you to show and hide columns in the table. |
|
Add |
Allows you to add users or accounts to assign the role. To add users or accounts, fist of all, you need to click the add button (+) or the "Add new" action located on the hamburger icon. Second, you need to search the users and/or accounts and select the users and/or accounts you want to add. Once you have selected the users and/or accounts, if it is necessary, the next step will be to set the scope. Then you need to fill in the membership properties and finish the process. Finally, you need to apply changes. |
|
Delete |
Allows you to delete one or more users and/or accounts, that is, Soffid will revoke the role. To delete one, you can select the record and click the button with the subtraction symbol (-) or the trash button located at the end of the row. To delete more at the same time, you need to select the records and then click the button with the subtraction symbol (-). To perform that action, Soffid will ask you for confirmation, you could confirm or cancel the operation. And finally, you need to apply changes. |
|
Download CSV file |
Allows you to download a CSV file with all the information about users. |
|
Import |
|
|
Preview changes |
Shows the pending changes on users or accounts. Soffid displays the information about the user or accounts, the action and de Role. You can choose if you want to apply the changes, or close the previer changes window. |
|
Apply changes |
Allows you to apply the pending changes. |
|
Undo |
Allows you to quit without applying any changes. |
Information systems
Description
Information systems are the systems that Soffid will protect granting and revoking roles. Each role and entry point is bound to an information system.
The information system can be created hierarchically. These information systems are managed in a tree structure.
Soffid allows you to categorize the information systems to facilitate the management, the available categories are Application, Container and Business. That categories are for information purposes only.
The permission can be granted by using workflows. You can access to Workflows page for more information.
Screen overview
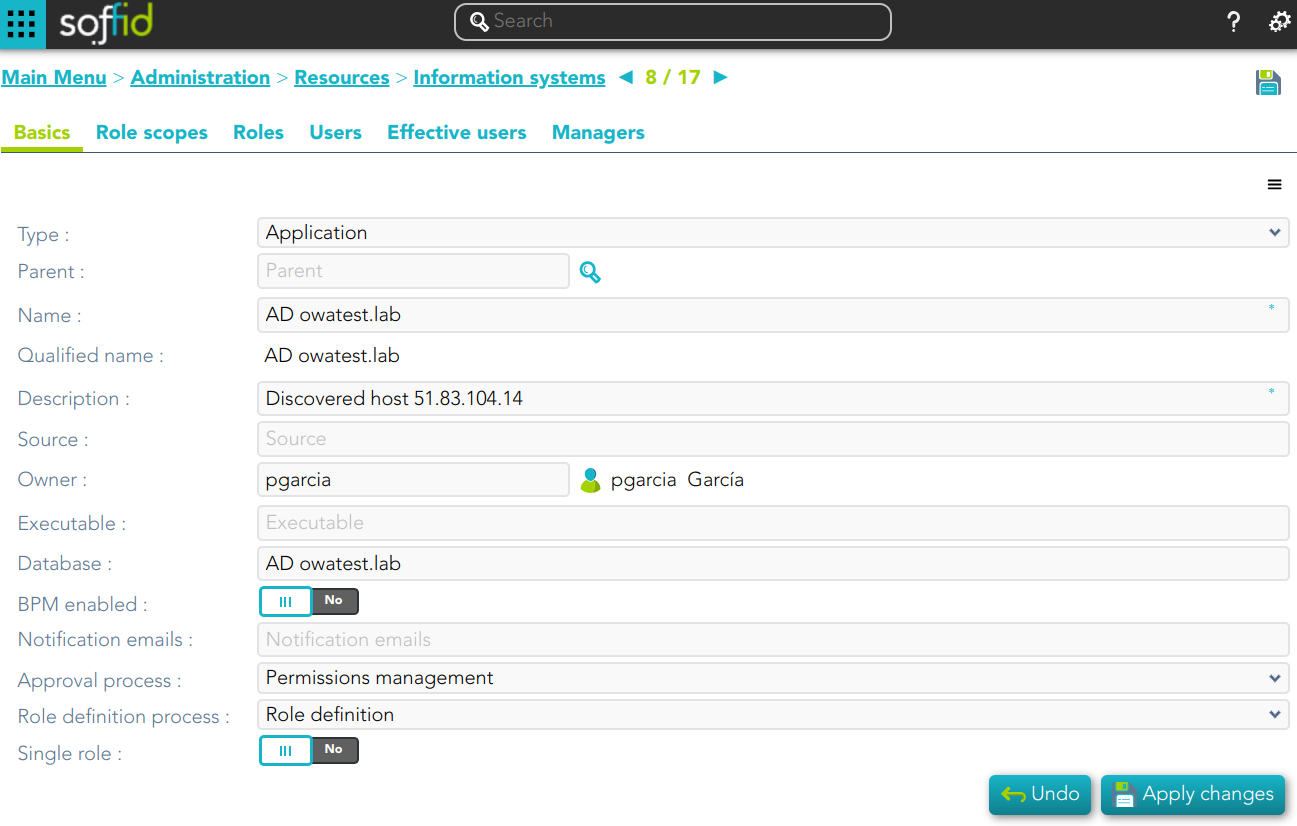
Related objects
Custom attributes
Basics
- Type: information system category.
- Parent: parent within the hierarchy.
- Name: short name to identify the information system.
- Description: detailed description information system.
- Source: documentation.
- Owner: is the information owner, and has the capability to appoint security manager.
- Executable: documentation.
- Database: documentation.
- Owner name: documentation.
- BPM enable: if enabled, permissions can be granted by using workflows.
- Notification emails: this list will be notified on a daily about grants and revokes performed.
- Approval process: allows you to select a Permissions management process. This process will be initiated when a role, in this information system, is assigned or revoked to a user. It is an advanced function for workflows. You can see an example of the Approval process.
- Role definition process: allows you to select a Role definition process. This process will be initiated when the definition of a role, in the information system, is updated. It is an advanced function for workflows. You can see an example of the Role definition process.
- Single role: if checked, the roles of this application are mutually exclusive: if a user has the role X and want to assign him the role Y, X will be removed to give him Y.
Role Scopes (Domain)
Role scope or domains are properties that can be assigned to some entitlements, limiting the scope of that entitlement. This can be used to limit, for instance, the maximum amount allowed for a money transfer, or the commercial zones to manage.
On this tab, you can add new domains, you must click the button with the add symbol and fill the information about the new domain. You can also delete a domain or update the domain information.
Other operations allowed are to download a CSV file with the domain data and toOther operations allowed are to download a CSV file with the domain data and to upload a CSV file to add new domains, or update existed domains to add new domains, or update existing domains
💻 Image

Roles
A role is a collection of permissions that determine what operations a user or a group of users can perform on that information system.
On the roles tab is allowed to create, update and delete roles. The effective privileges bound to each role are managed from each application.
To add a new role you must click the button with the add symbol (+) and fill all the role data.
You can update a specific role by clicking on the right record, making and applying changes.
It is also possible to delete roles from the role details or by selecting one or more records from the list and clicking the button with the subtraction symbol (-).
Additionally you can download a CSV file with the roles information and you can also upload a CSV file to add new roles, or modify existing roles.
💻 Image
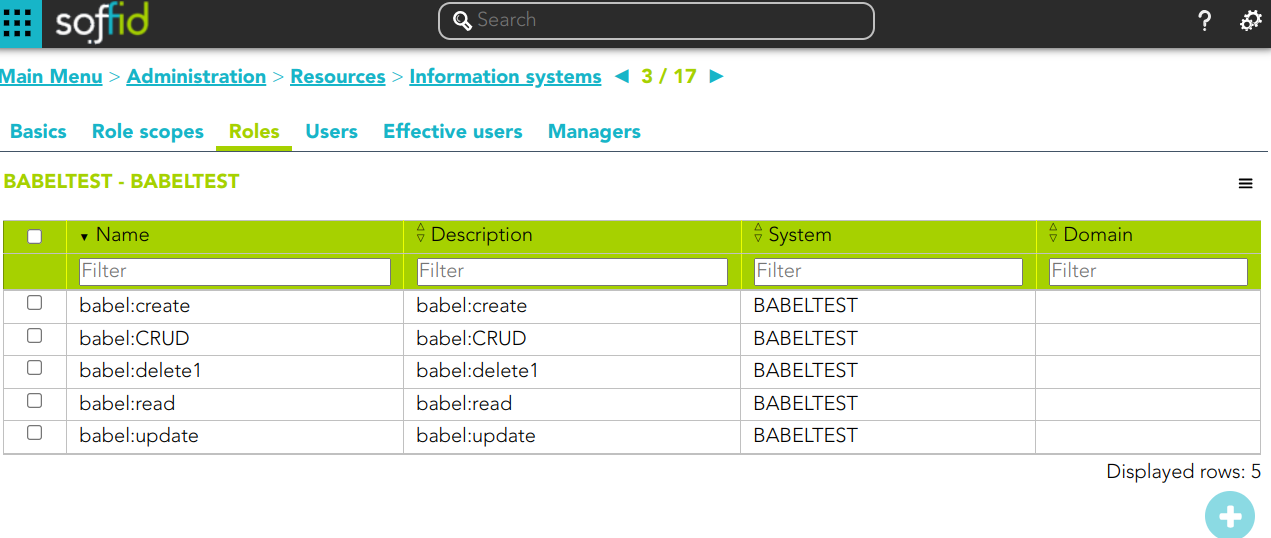
Users
On the user's tab, Soffid displays all the user with granted roles for this information system.
It is allowed to download a CSV file with all the user data.
💻 Image
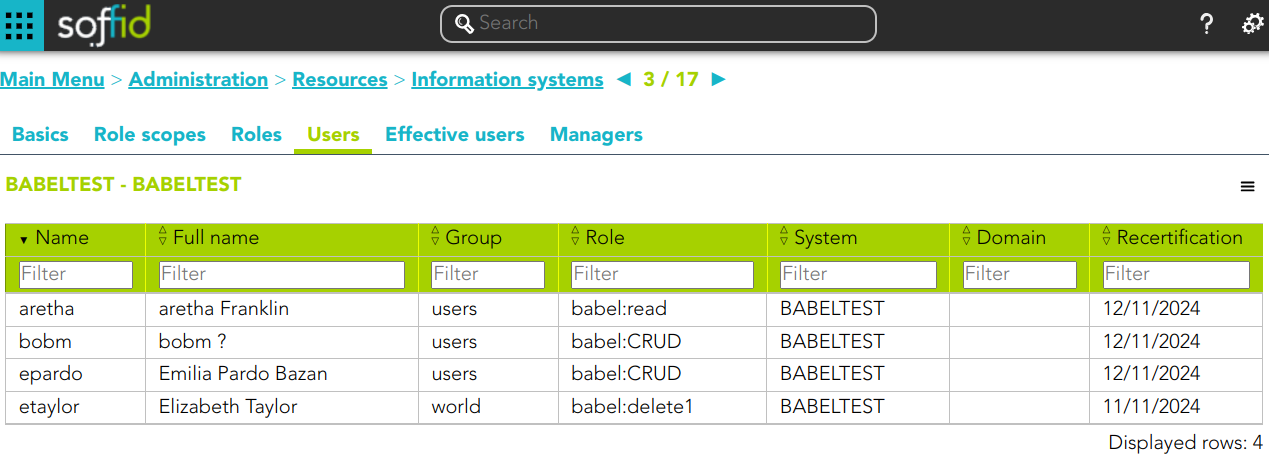
Effective users
Hierarchy of permissions assigned to or inherited from an account. If you visit the accounts page, you could see the roles on the Roles tab from a specific account.
💻 Image
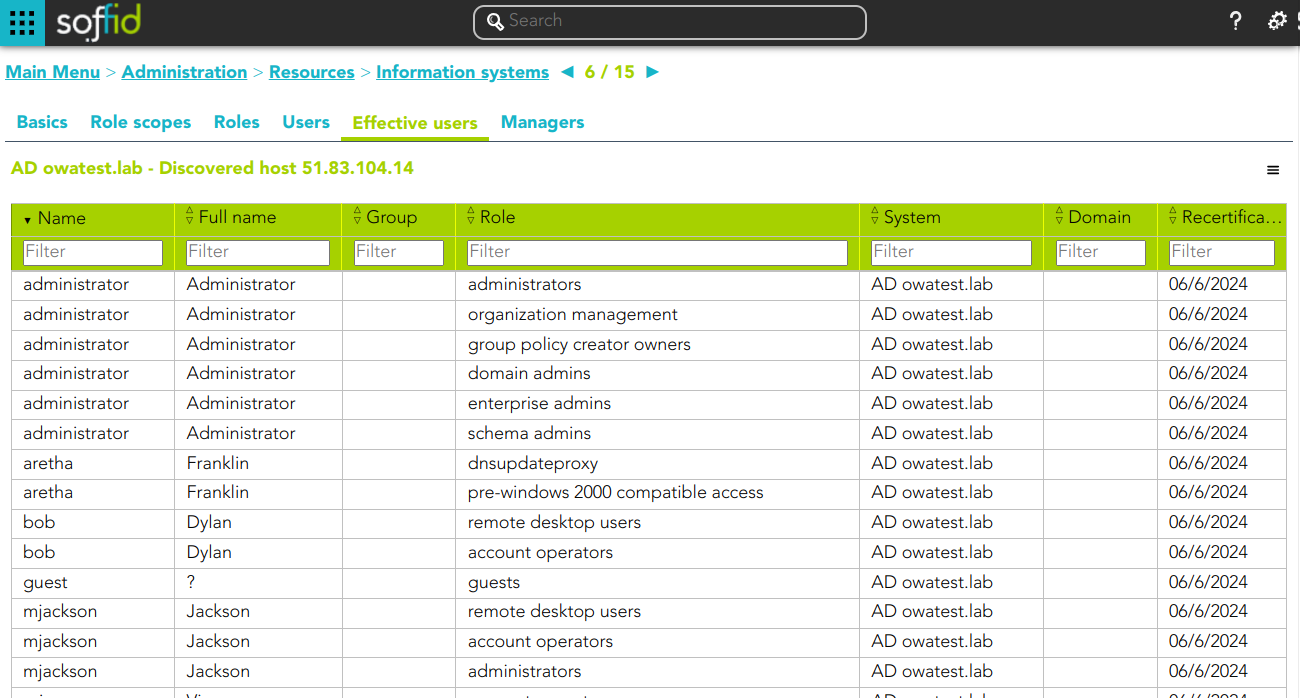
Managers
On the tab Managers, Soffid displays the Roles with Domain equals to Information System and the proper authorization.
Here you can grant the role to one or more users. You can also assign the role to users on the Roles page or on the Users page. Users who have been assigned this role will be displayed in the Managers tab.
Be in mind, to query the information about the roles and users on the managers tab, it will be mandatory to give authorization to query applications, you must add the role to the authorization (application:query).
💻 Image
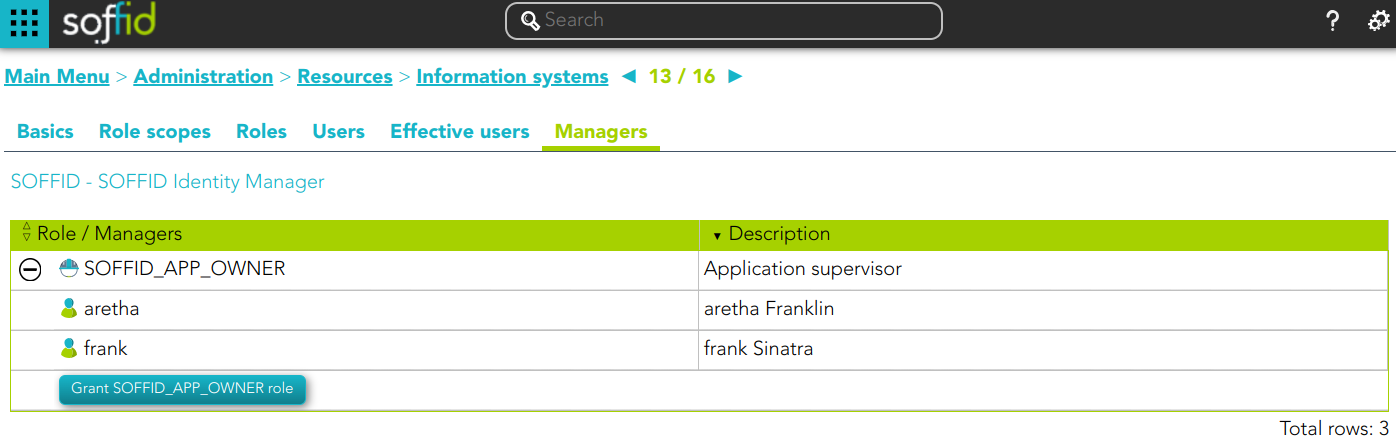
** Role
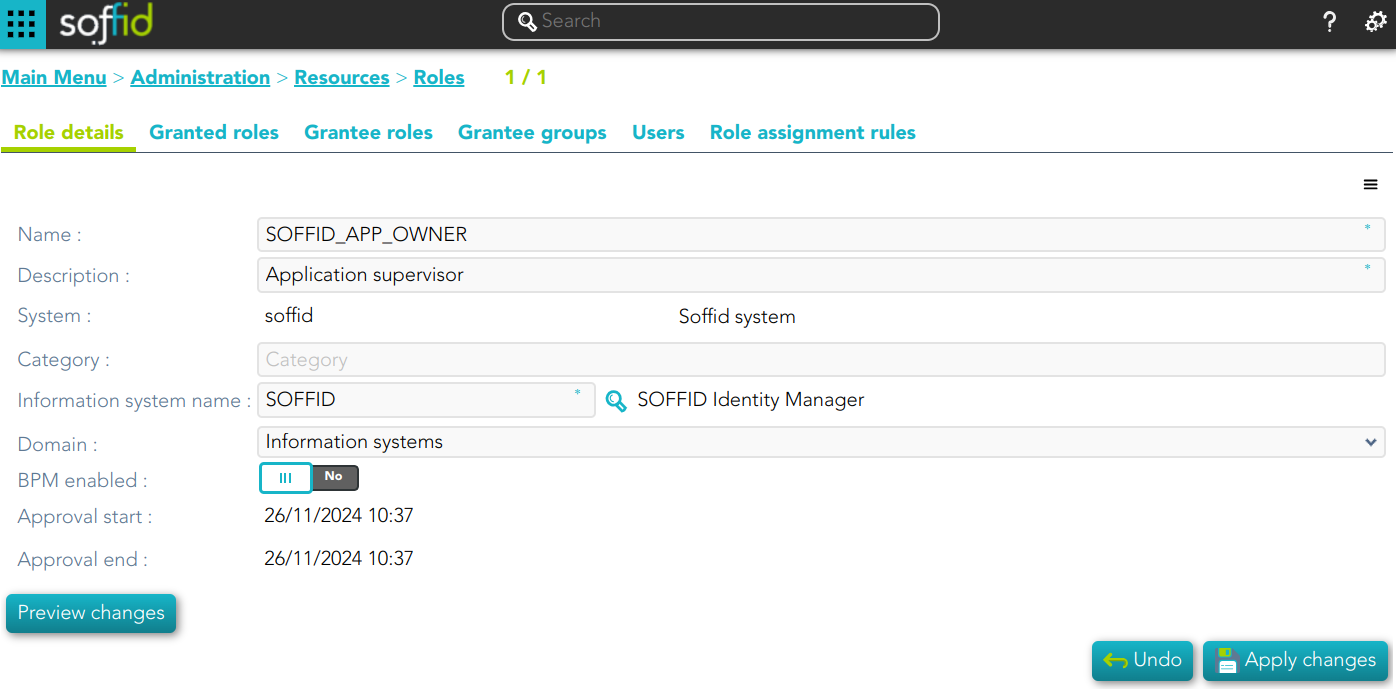
** Authorization

Actions
Information system query
|
Query |
Allows to query groups through different search systems, Quick, Basic and Advanced. |
|
Add or remove columns |
Allows to show and hide columns in the table. |
|
Add new |
Allows to create a new information system. You can choose that option on the hamburger menu or clicking the add button (+). To add a new information system it will be mandatory to fill in the required fields |
|
Add child information system |
Allows to add a child to a specific information system. You can choose that option below the father information system. To add a child it is necessary to fill in the required fields |
|
Import |
Allows you to upload a CSV file with the information system list to add or update information systems to Soffid. First, you need to pick up a CSV file, that CSV has to contain a specific configuration. Then you need to check the content to be loaded, it is allowed to choose if you want or not load a specific attribute. And finally, you need to select the mappings for each column of the CSV file to import the data correctly and to click the Import button. |
|
Download CSV file |
Allows to download a csv file with the basic information of all information systems. |
Information system detail actions
|
Apply changes |
Allows you to save the data of a new information system or to update the data of a specific information system. To save the data it will be mandatory to fill in the required fields |
|
Delete |
Allows you to remove a specific information system. To perform that action, Soffid will ask you for confirmation, you could confirm or cancel the operation. |
|
Undo |
Allows you to quit without applying any changes. |
Role scopes actions
|
Add domain |
Allows you to add a new domain to limit the scope. You can choose that option on the hamburger menu or clicking the add button (+). To add a new domain it will be mandatory to fill in the required fields |
|
Import |
Allows you to upload a CSV file with the domain list to add or update domains to Soffid. First, you need to pick up a CSV file, that CSV has to contain a specific configuration. Then you need to check the content to be loaded, it is allowed to choose if you want or not to load a specific attribute. And finally, you need to select the mappings for each column of the CSV file to import the data correctly and to click the Import button. |
|
Download CSV file |
Allows you to download a CSV file with all the information about domains. |
Roles actions
|
Add or remove columns |
Allows you to show and hide columns in the table. |
|
Add new |
Allows you to create a new role for that information system. You can choose that option on the hamburger menu or clicking the add button (+). To add a new role it will be mandatory to fill in the required fields |
|
Delete |
Allows you to delete one by one or to delete some roles at the same time from an information system . To delete some roles at the same time, you need to select the roles, and then click the button with the subtraction symbol (-). To delete one role, you can click the users, and then Soffid will show a form with the details. Then you can click the delete button (trash icon). Soffid will ask you for confirmation to perform that action, you could confirm or cancel the operation. |
|
Import |
Allows you to upload a CSV file with the roles list to add to the information system. First, you need to pick up a CSV file, that CSV has to contain a specific configuration. Then you need to check the content to be loaded, it is allowed to choose if you want or not to load a specific attribute. And finally, you need to select the mappings for each column of the CSV file to import the data correctly and to click the Import button. |
|
Download CSV file |
Allows to download a csv file with the basic role data |
In addition for each role you can perform the specific operations defined on the Role page
Users actions
|
Download CSV file |
Allows to download a CSV file with all the information about users. |
Example
Approval process Example
1. Assign a role a to a User: this role belong to an information system with an Approval process configured.
💻 Image
Information system definition
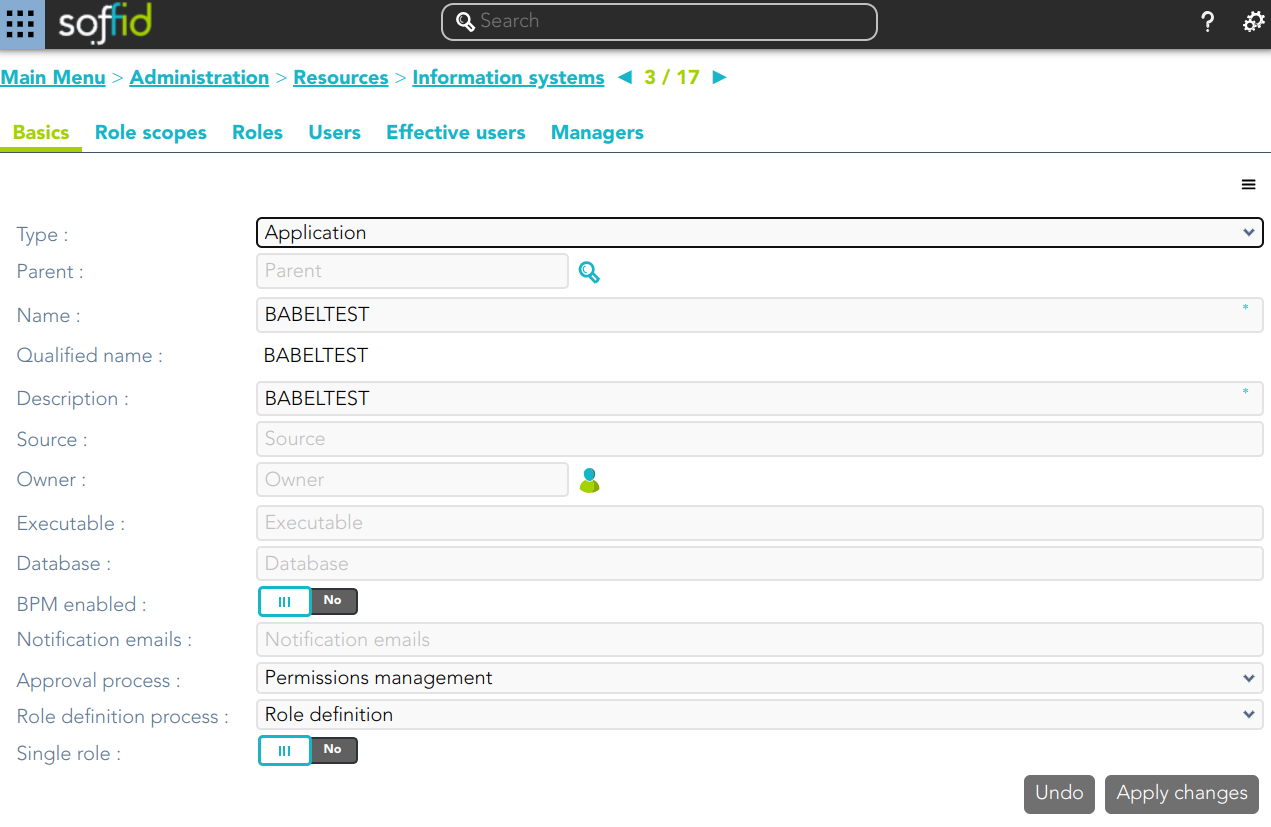
💻 Image
Assign a role a to an user
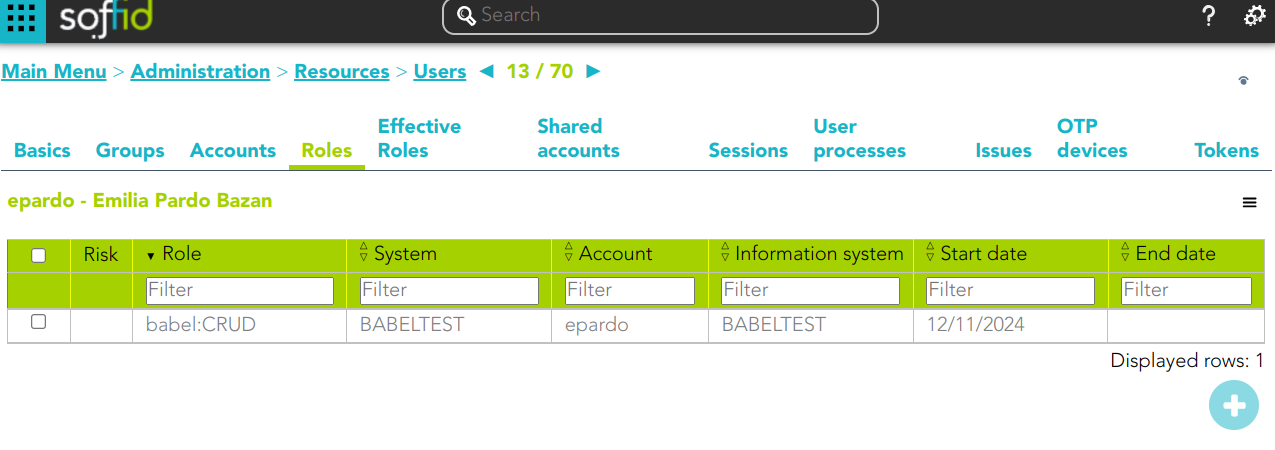
2. A task to approve o reject is created
💻 Image

Role definition process example
1. Update a role definition.This role belong to an information system with an Approval process configured.
💻 Image
Assign a role a to an user
💻 Image
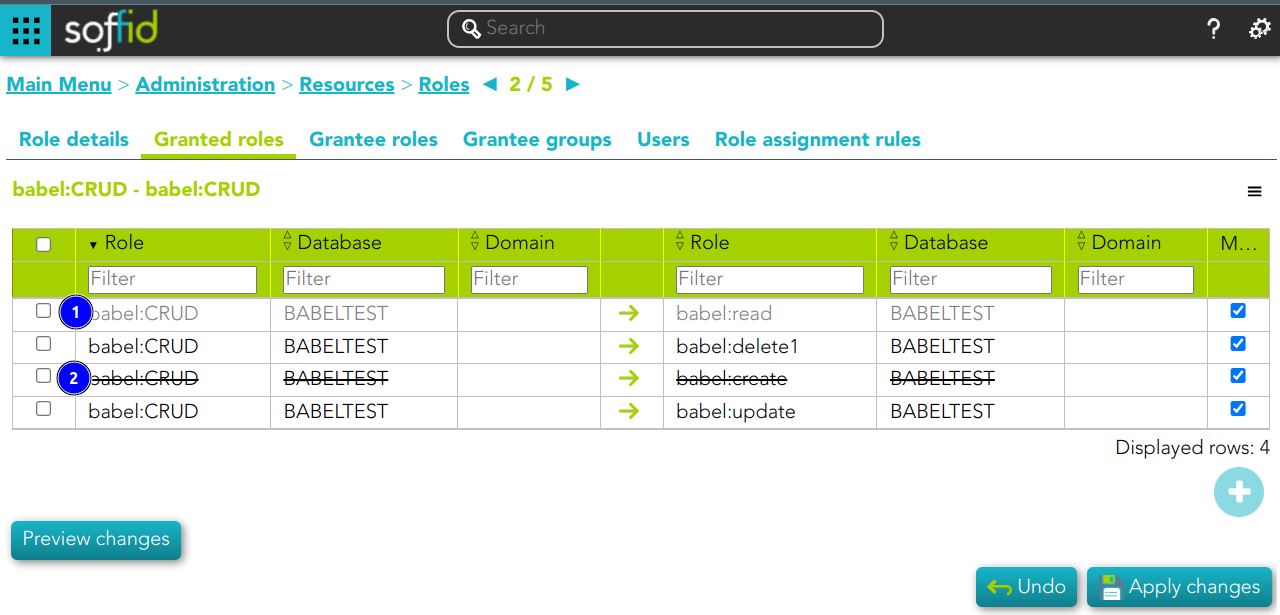
1) This assignation is pending to approve
2) This deletion is pending to approve
2. A task to approve o reject is created
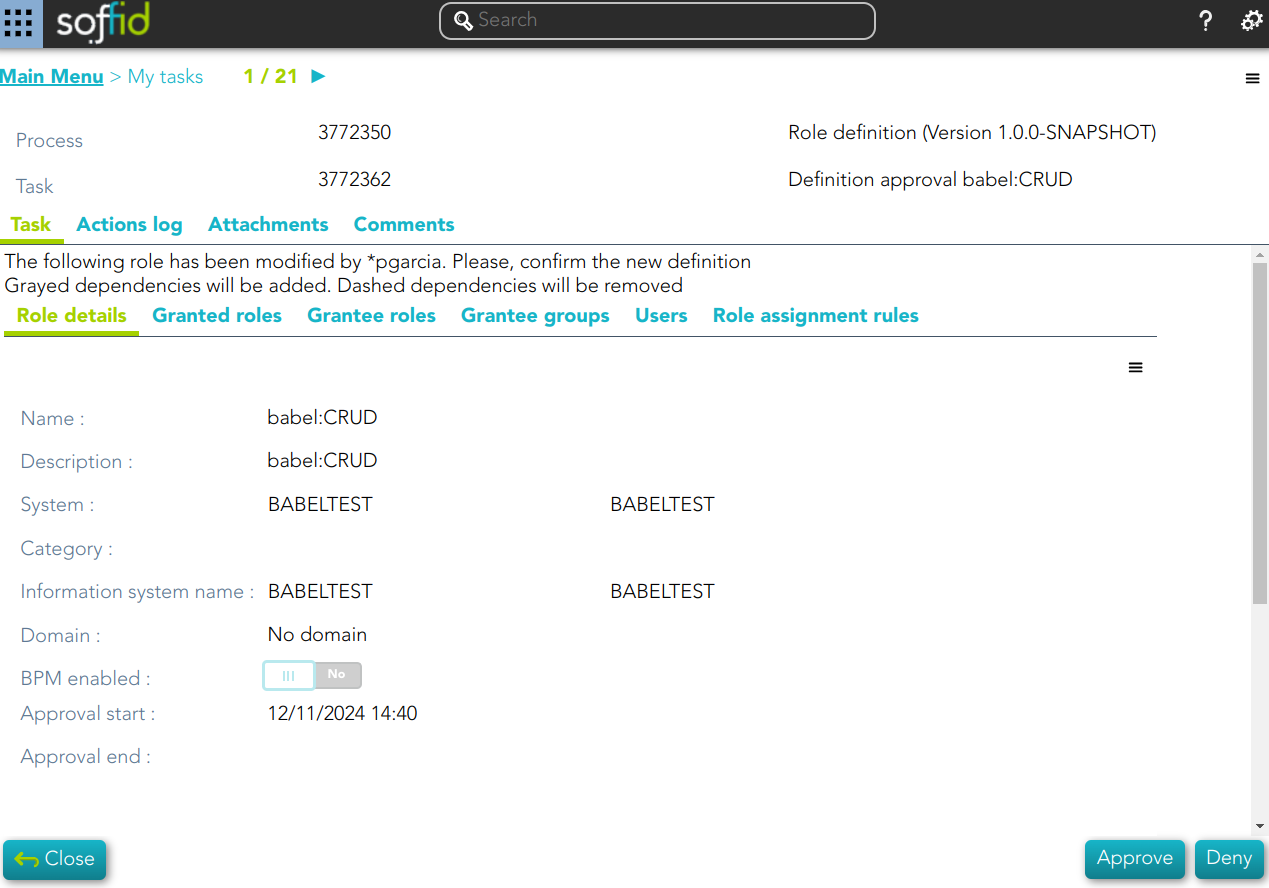
Role assignment rules
Description
Soffid console provides an option that allows you to customize policies to assign or revoke roles automatically to specific users. To assign or revoke roles, the users must comply with the defined requirements.
That option allows you to Preview changes before to Apply changes, to verify that the actions to be performed are the correct ones.
To Apply now the Role assignment rule, it is mandatory to have previously saved any changes made in the customization of the role assignment rule using the Apply changes button.
The rule evaluation is performed asynchronously.
When a user is updated, no matter from where, Soffid will launch the role assignment rules defined.
Screen overview
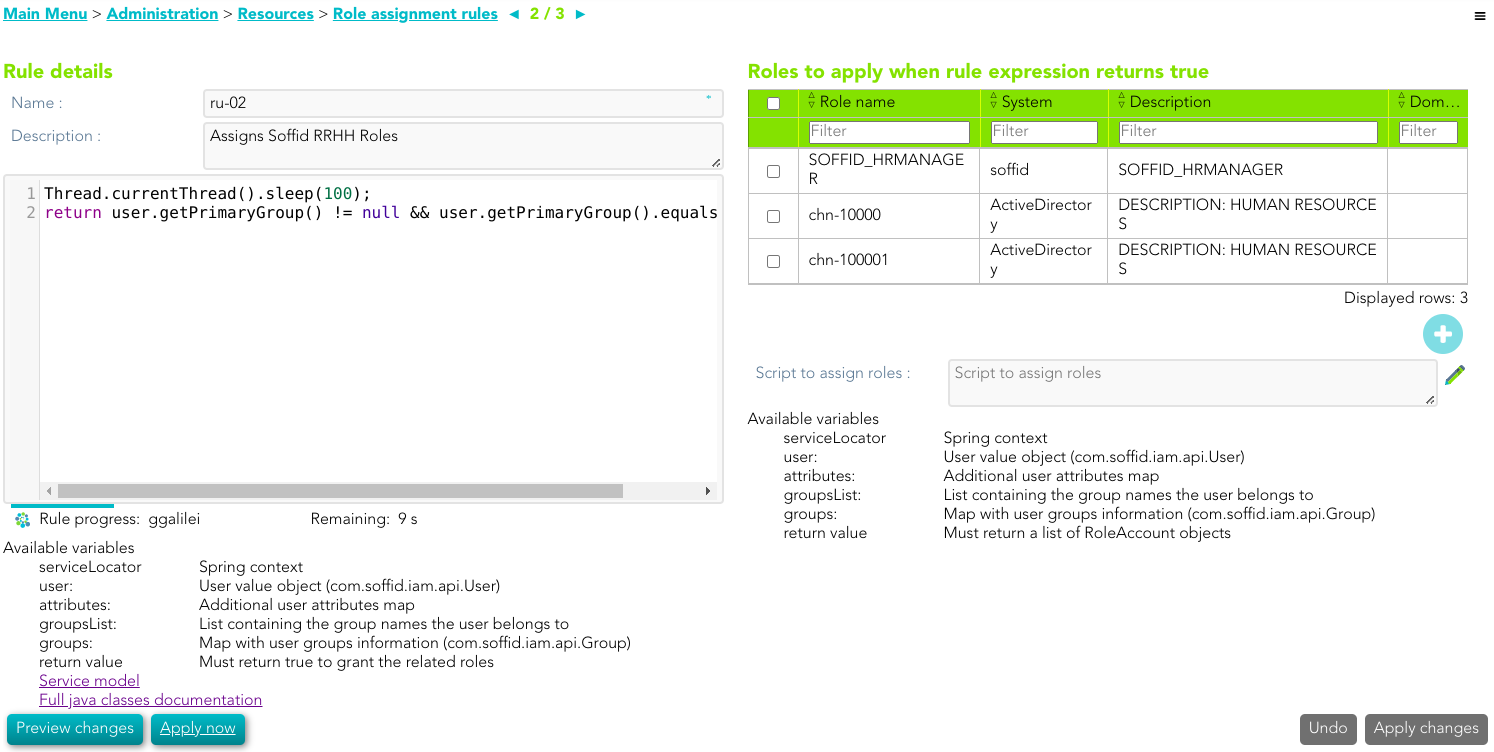
Related objects
Role detail
- Name: name of the rule.
- Description: brief description of the rule.
- Script (Rule expression): when returns true, the roles will be applied and the script that assigns roles.
- Rule Progress: displays the time remaining to finish applying the rule.
Roles to apply when rule expression returns true
- Role list: roles to apply when rule expression returns true.
- Script to assign roles: allows you to customize the rules to apply roles. That roles will be added to the role list.
The roles result will be a Role list, or RoleAccount list, or String list.
Actions
Role assignment rules query action
|
Add new |
Allows you to add a new role assignment rule in the system. You can choose that option on the hamburger menu or clicking the add button (+).To add a new role assignment rule it will be mandatory to fill in the required fields |
|
Delete |
Allows you to remove one or more role assignment rule by selecting one or more records and next clicking the button with the subtraction symbol (-).To perform that action, Soffid will ask you for confirmation, you could confirm or cancel the operation. |
|
Import |
Allows you to upload a CSV file with the role assignment rule list to add or update role assignment rules to Soffid.First, you need to pick up a CSV file, that CSV has to contain a specific configuration. Then you need to check the content to be loaded, it is allowed to choose if you want or not to load a specific attribute. And finally, you need to select the mappings for each column of the CSV file to import the data correctly and to click the Import button. |
|
Download CSV file |
Allows you to download a CSV file with the basic information of all role assignment rule. |
Role assignment rules detail action
|
Apply changes |
Allows you to save the changes made on the rule specification, or to save a new rule. |
|
Undo |
Allows you to undo any changes made on the rule, except the roles added or deleted to the role list. |
|
Add new role |
Allows you to add a role to be applied with the rule. |
|
Preview changes |
Displays a list with the changes that would be applied with that rule definition. |
|
Apply now |
Allows you to launch the role assignment rule process. When users comply with the rule specification, their roles will be updated. |
Scripts examples
return user.getPrimaryGroup() != null && user.getPrimaryGroup().equals("Writers");return "Writers".equals(user.getPrimaryGroup());return "1001".equals(user.attributes.get("employee")) ||
"1002".equals(user.attributes.get("employee"))||
"2001".equals(user.attributes.get("employee"));Segregation of Duties (SoD)
Description
The segregation of duties (SoD) is a fundamental element of internal controls, defined to prevent error and fraud. Segregation of duties ensure that at least two individuals are responsible for the separate parts of any task.
For each user, the roles tab displays the list of roles assigned to the user and the possible risks. If you click on a role record, Soffid will show the entitlement details including the SoD rules with the detail of the risk.
Screen overview
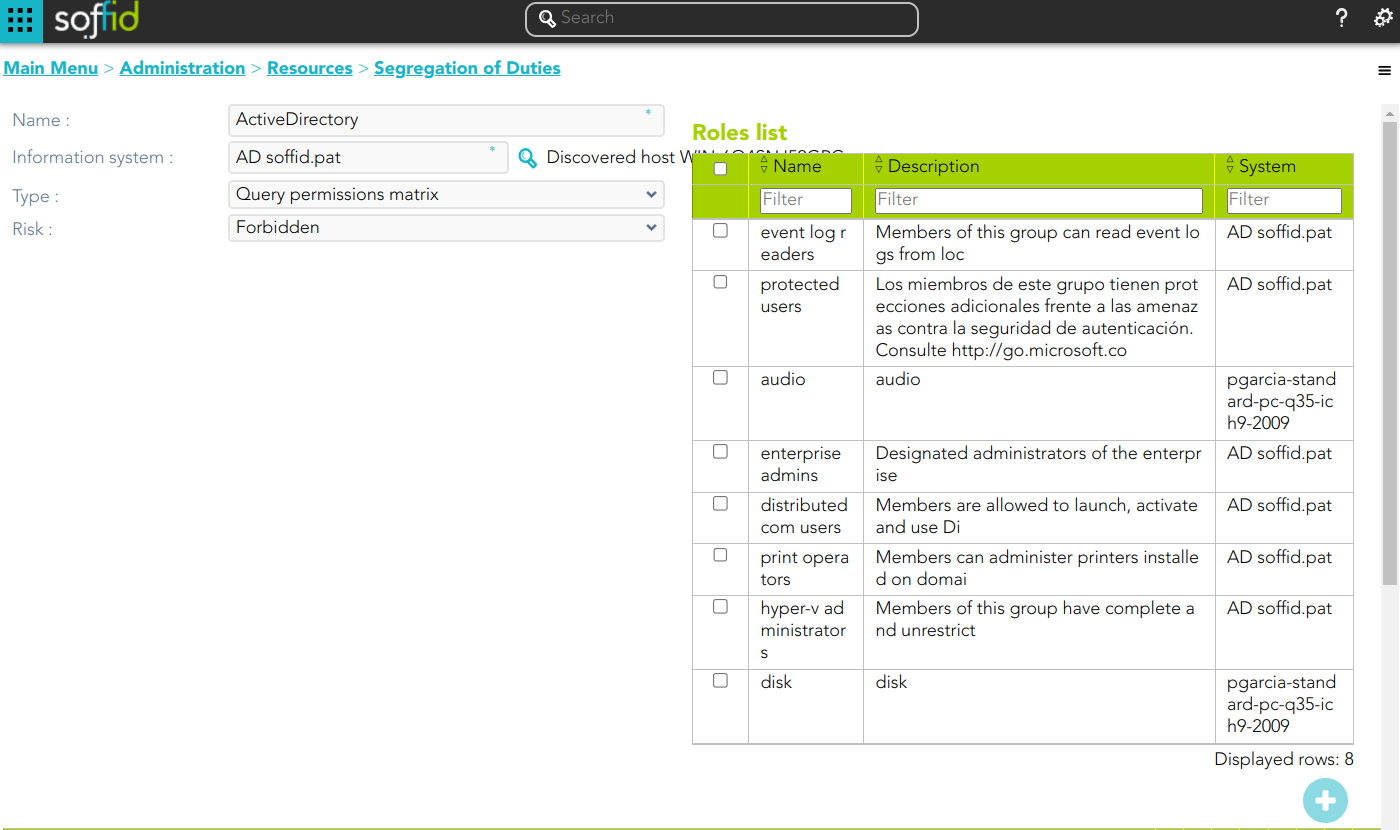
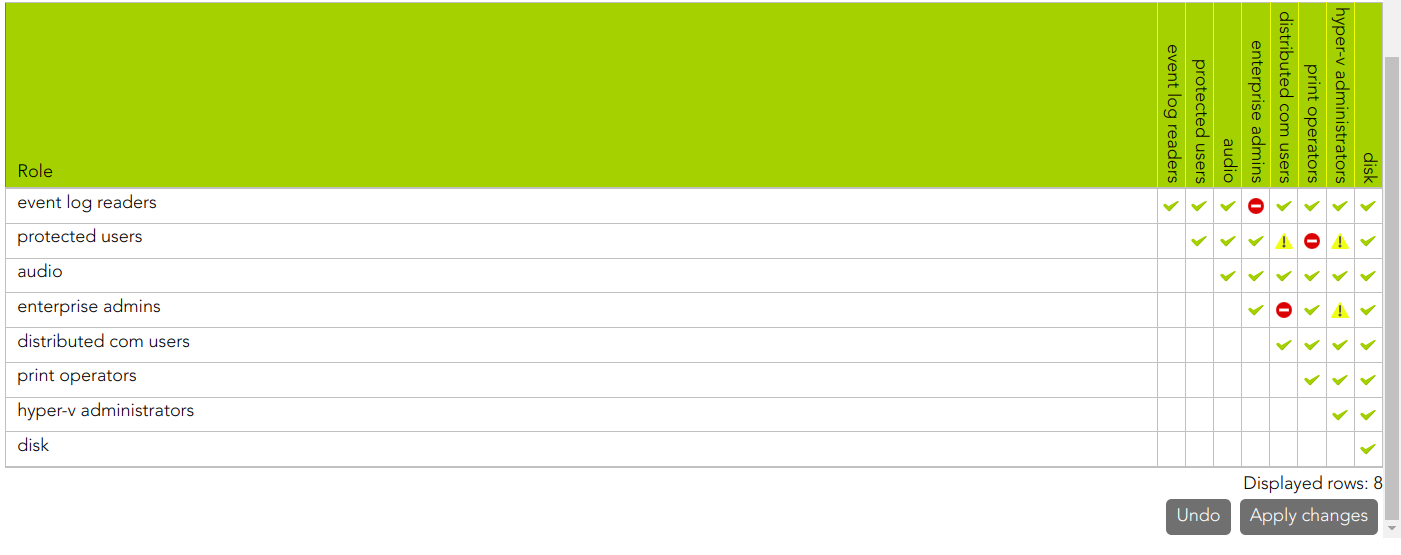
Related objects
- Name: name of the segregation separation of duties
- Information System: asset or application, from a functional point of view, on which the permissions are granted or revoked.
- Type: type of segregation
- Trigger on all permissions: no user can be assigned the roles added to the role list.
- Trigger on some permissions: if you select that option, you have to fill in the number of roles that can not match. Soffid will not allow you to assign to a user more than the number indicated of the roles added to the role list.
- Query permissions matrix: Soffid displays a matrix that allows you to select the risk between pairs of roles, those roles are the roles added to the role list.
- Risk: level of risk:
- Low.
- High.
- Forbidden: it is not allowed that one user to have assigned the roles defined on the role list.
- None: there is no risk.
- Role List: list of roles to keep in mind on the segregation of duties.
Actions
Segregation of Duties query actions
|
Query |
Allows you to query Segregation of Duties through different search systems, Basic and Advanced. |
|
Add new |
Allows you to add a new Segregation of Duties in the system. You can choose that option on the hamburger menu or click the add button (+). To add a new Segregation of Duties it will be mandatory to fill in the required fields |
|
Delete |
Allows you to remove one or more Segregation of Duties by selecting one or more records and next clicking the button with the subtraction symbol (-). To perform that action, Soffid will ask you for confirmation, you could confirm or cancel the operation. |
|
Download CSV file |
Allows you to download a CSV file with the basic Segregation of Duties data. |
Segregation of Duties detailed actions
|
Apply changes |
Allows you to save the data of a new role or to update the data of a specific role. To save the data it will be mandatory to fill in the required fields |
|
Delete |
Allows you to delete a Segregation of Duties. You can choose that option on the trash icon. To perform that action, Soffid will ask you for confirmation, you could confirm or cancel the operation. |
|
Undo |
Allows you to quit without applying any changes. |
| Add new role | Allows you to add a new role to the Role list. You can add a role by clicking the add button (+), then Soffid will show a form to search and select one or more roles. Finally, you need to click the apply changes button and the roles will be added to the role list. |
| Delete role |
Allows you to delete one or more roles from the role list. You can select one or more roles and then click the button with the subtraction symbol (-). The roles will be deleted from the role list without Soffid asking for confirmation. |
Networks
Description
Operators can define the subnets that compose the internal network, in order to manage the IP address space. The main goal is to manage a limited resource as the IP address is.
Soffid supports both static and dynamic IP assignments. Anyway, static IP management does not exclude the use of DHCP o BOOTP protocols in order to get them.
Screen overview
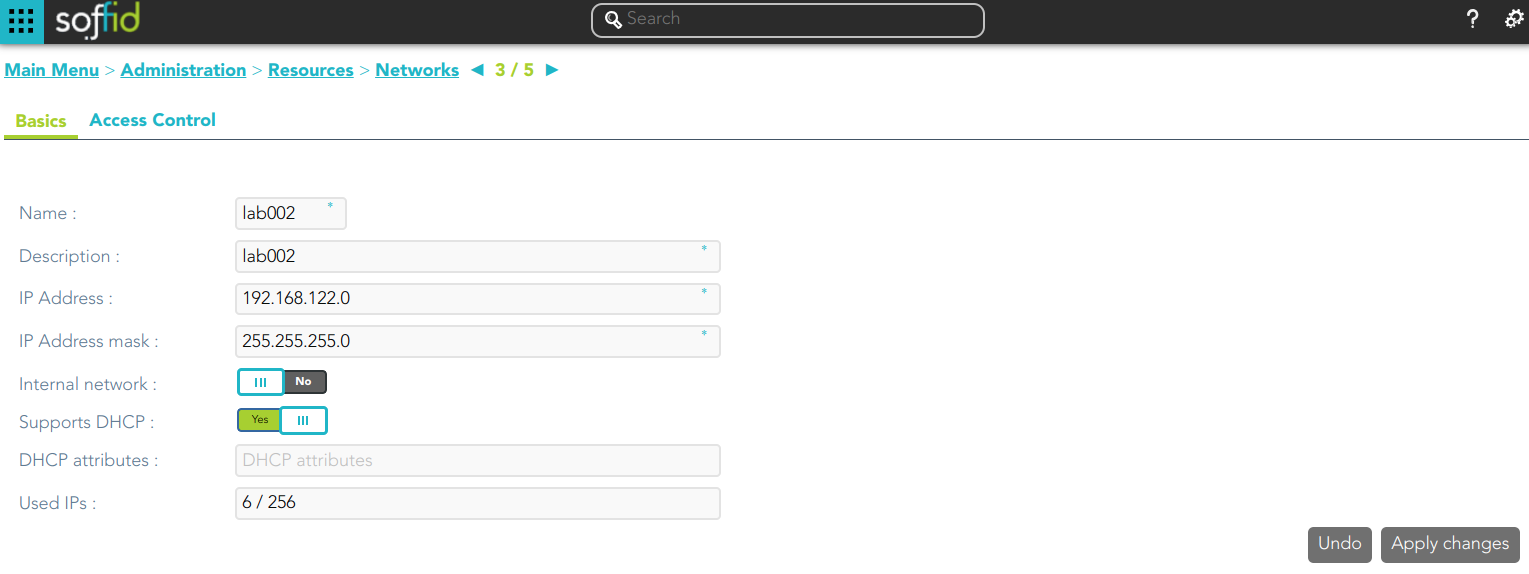
Custom attributes
Basics
On the network group tab, you can view all the network attributes. It is allowed to add new networks, update or delete existing networks.
- Name: short name that identifies the network.
- Description: network description.
- IP Address: IP range of this network.
- IP Address mask: IP mask of this network.
- Internal network: activate this check box to indicate if this network is fully managed or not. What fully managed means changes in each organization. It used to mean corporate office versus branch office. It affects mainly to access the menu tree. Application entry points have different scripts or URLs for internal and external networks.
- Support DHCP: if enabled (selected value is Yes), hosts belonging to this network will be automatically registered.
- DHCP attributes: allows to enter additional parameters that the DHCP server will use to assemble DHCP response. Usually, it will have a gw=0.1.2.34 like parameter. It is only needed when a DCHP connector is configured.
- Used IPs: IP addresses used. This data is auto calculated
Access control
In order to delegate the management of IP addresses in this network range, the Access Control List allows to select which users, groups or roles will be allowed to manage it.
- Restrict ESSO login: allows to restrict the access to the workstations of this network, otherwise, any Soffid users can log in.
Each Access Control List Entry has the following attributes:
- Access level: four levels are defined:
-
Without access: denies everything.
-
Query: allows to know about hosts on this network.
-
Support: allows to know about hosts on this network, and allows to manage the workstations on it. This option is fully tied to Single Sign On module.
-
Administration: allows to create, modify or remove hosts on this network.
-
- Mask: specifies a pattern that will be check against the host name in order to apply this authorization level.
-
Identity: specifies a user, group or role name.
- Description.
To add a new access control you can click the button with the add symbol (+), you have to select the grantee type (user, group or role), then you have to choose an user, group or role depending on the grantee selected, and finally set the acces level and the mask and apply the changes.
If you want to delete access controls, you must select one or more records from the list and clicking the button with the subtraction symbol (-).
Actions
Networks query
|
Query |
Allows you to query networks through different search systems, Quick, Basic and Advanced. |
|
Add or remove columns |
Allows you to show and hide columns in the table. |
|
Add new |
Allows you to create a new network. You can choose that option on the hamburger menu or clicking the add button (+). To add a new network it will be mandatory to fill in the required fields |
|
Delete |
Allows you to remove one or more networks by selecting one or more records and next clicking the button with the subtraction symbol (-). To perform that action, Soffid will ask you for confirmation, you could confirm or cancel the operation. |
|
Import |
Allows you to upload a CSV file with the network list to add or update networks to Soffid. First, you need to pick up a CSV file, that CSV has to contain a specific configuration. Then you need to check the content to be loaded, it is allowed to choose if you want or not to load a specific attribute. And finally, you need to select the mappings for each column of the CSV file to import the data correctly and to click the Import button. |
|
Download CSV file |
Allows you to download a csv file with the networks information. |
Networks detail
|
Apply changes |
Allows you to save the data of a new network or to update the data of a specific network. To save the data it will be mandatory to fill in the required fields |
|
Undo |
Allows you to quit without applying any changes. |
Access control
|
Add new |
Allows you to create a new access control. You can choose that option on the hamburger menu or clicking the add button (+). First, you will select the Grantee type, which could be a role, a user or a group. Second, you will select the Grantee, it will depend on the Grantee type selected. Then, you will fill in the access level. And finally you will apply changes. |
|
Delete |
Allows you to remove one or more access controls by selecting one or more records and next clicking the button with the subtraction symbol (-). To perform that action, Soffid will ask you for confirmation, you could confirm or cancel the operation. |
|
Import |
Allows you to upload a CSV file with the access control list to add or update access controls to Soffid. First, you need to pick up a CSV file, that CSV has to contain a specific configuration. Then you need to check the content to be loaded, it is allowed to choose if you want or not to load a specific attribute. And finally, you need to select the mappings for each column of the CSV file to import the data correctly and to click the Import button. |
|
Download CSV file |
Allows you to download a csv file with the basic access controls data. |
|
Restrict ESSO login |
Allows you to restrict the access to the workstations of this network. |
Hosts
Description
The host screen lets the administrator manage a static IP address assigned to any host. Dynamic IP addresses are automatically managed by Soffid ESSO.
Screen overview
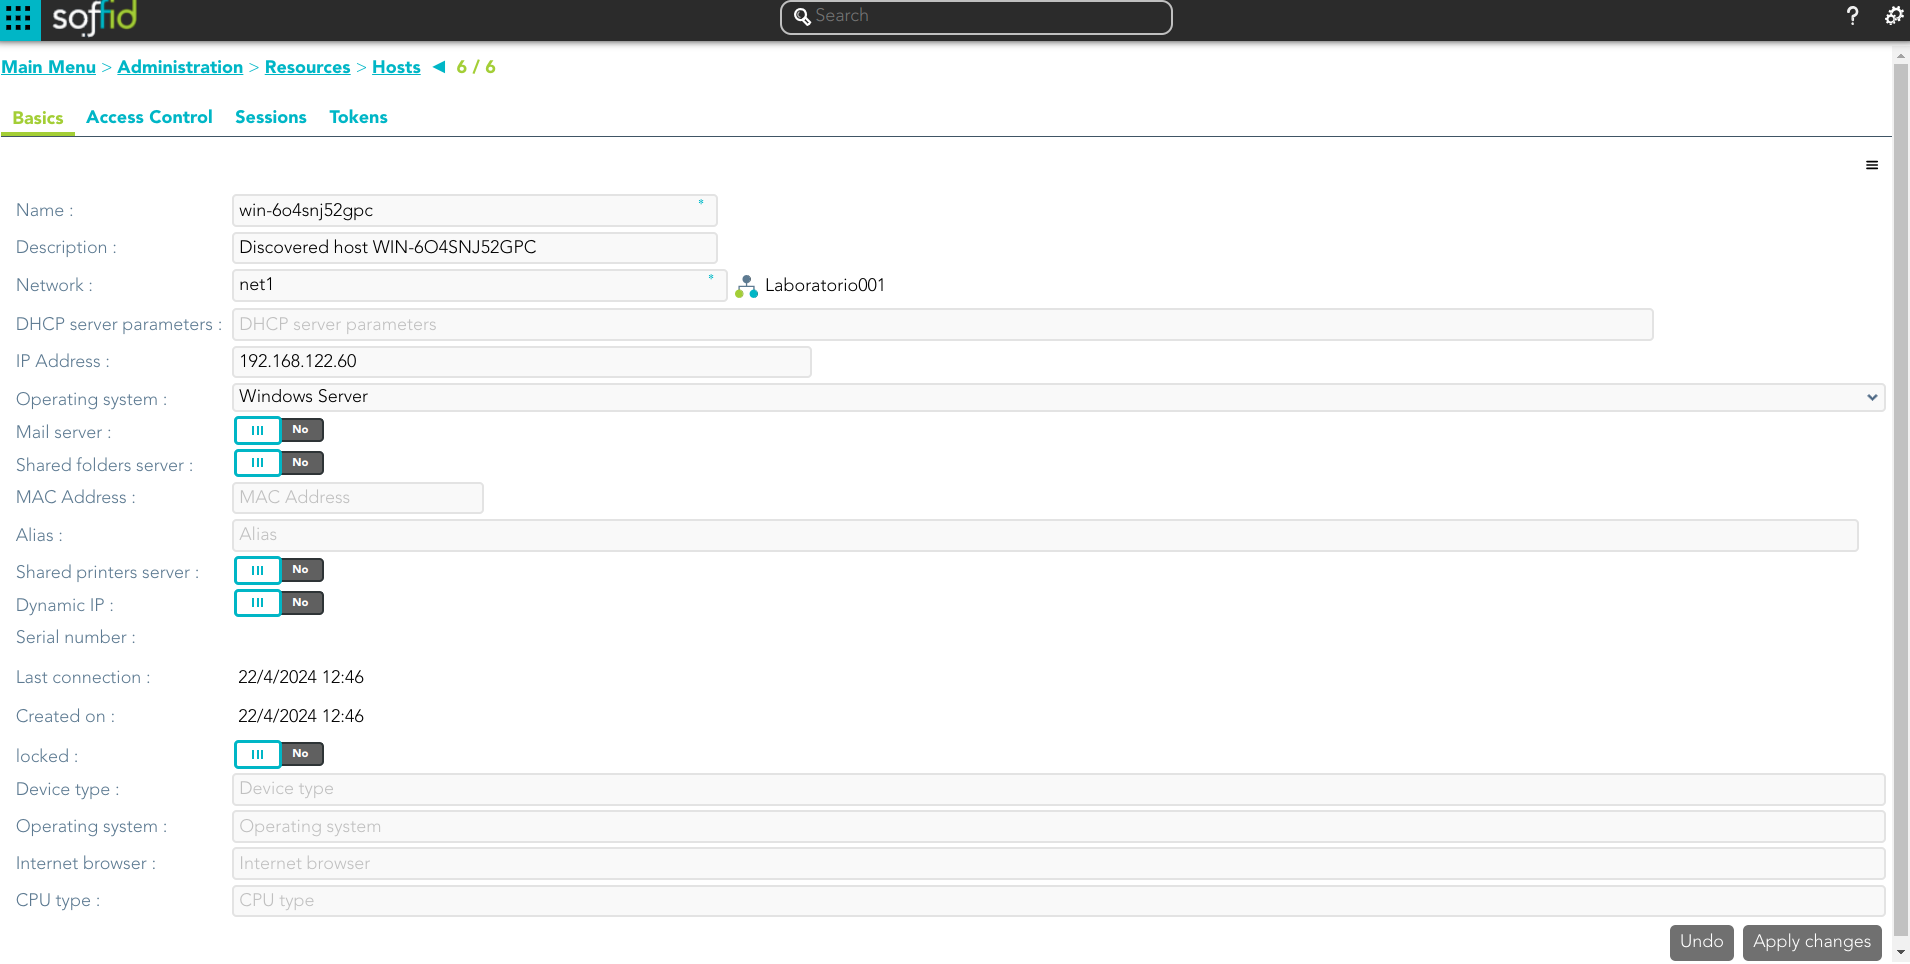
Related objects
- Network
- Operating systems
Basics
On the basic host tab, you can view all the host attributes. It is allowed to add new host, update or delete existing hosts.
- Name: host name.
- Description: location, owner and whatever other information you want.
- Network: to which it belongs
- DHCP server parameters: used by the DHCP agent in order to generate DHCP configuration files.
- IP Address: host IP
- Operating system: used by the Active Directory agent in order to know if this host must be have an Active Directory host account. Using this functionality, no operator needs to be authorized to add or remove hosts on Active Directory. Soffid will do it for them. More and more, whenever this hosts is left off its IP address, the host account will be removed from Active Directory. This behavior can, of course, be customized.
- Mail server: if enabled (selected value is Yes), the user will be able to create mailboxes in the host.
- Shared folders server: if enabled (selected value is Yes), the user will be able to create shared folders in the host.
- MAC Address: used by the DHCP agent in order to generate DHCP configuration files.
- Alias: This field is used to identify the possible IP addresses that may be associated with a single hostname. In complex and segmented environments, it is common for the same machine identifier to be used across multiple networks, whether for service replication, geographic redundancy, or the deployment of parallel test and production environments. This field enables such configurations by linking a hostname to multiple IP addresses, each corresponding to a different network where that hostname is resolvable and operational. As such, the alias acts as an abstraction mechanism that simplifies host identity management in multi-network or multi-site contexts, allowing a single logical identifier (machine name) to be present and active across several network domains, each with its respective IP addressing. The use of the alias field is particularly relevant in distributed architectures, hybrid infrastructures (on-premises and cloud), and high-availability environments, where logical name uniqueness does not imply a single physical address, but rather a flexible, context-dependent association with multiple IP representations of the same functional entity.
- Shared printer server: if enabled (selected value is Yes), the user will be able to create a printer queues in the host.
- Dynamic IP
- Serial number
- Last connection
- Created on
- Locked
- Device type
- Internet browser
- CPU type
Access Control
On the access control tab, you can delegate the host management.
If you add a user authorization, you will allow the user to execute any task as a local administrator on this server or workstation. This feature requires the Soffid ESSO to be installed in the target host. To add a user authorization you can click the button with the add symbol (+), then select the user and expiration date, and finally apply changes.
It is also allowed to delete one or more user authorizations, you can do it from the entitlement details or by selecting one or more records from the list and clicking the button with the subtraction symbol (-).
Additionally, you can download a CSV file with the access control data and you can also upload a CSV file to add user authorizations, and modify or delete user authorizations.
You also can view the administrator password.
Sessions
On the sessions tab, you can view the information about the last connection of a user to this host. Shows data about the user, server, client, port used and date of connection.
You can download a CSV file with the user sessions data.
Actions
Host query
|
Query |
Allows you to query host through different search systems, Quick, Basic and Advanced. |
|
Add or remove columns |
Allows you to show and hide columns in the table. |
|
Add new |
Allows you to create a new host. You can choose that option on the hamburger menu or by clicking the add button (+). To add a new host it will be mandatory to fill in the required fields |
|
Delete |
Allows you to remove one or more hosts by selecting one or more records and next clicking the button with the subtraction symbol (-). To perform that action, Soffid will ask you for confirmation, you could confirm or cancel the operation. |
|
Import |
Allows you to upload a CSV file with the host list to add or update hosts to Soffid. First, you need to pick up a CSV file, that CSV has to contain a specific configuration. Then you need to check the content to be loaded, it is allowed to choose if you want or not to load a specific attribute. And finally, you need to select the mappings for each column of the CSV file to import the data correctly and click the Import button. |
|
Download CSV file |
Allows you to download a csv file with the hosts information. |
|
Operating systems |
This option allows you to manage the Operating Systems. You can add new, update, or delete OS |
Host detail
|
Apply changes |
Allows you to save the data of a new host or to update the data of a specific host. To save the data it will be mandatory to fill in the required fields. |
|
Delete |
Allows you to delete the host. To delete a host you can click on the hamburger icon and then click the delete button (trash icon). Soffid will ask you for confirmation to perform that action, you could confirm or cancel the operation. |
|
Undo |
Allows you to quit without applying any changes. |
|
Assign free IP Address |
Allows you to assign a free IP address. You can find that option by clicking on the hamburger icon. |
|
View password |
Will show the administrator password if it is available. |
Access control
|
Add new |
Allows you to create a new access control. You can choose that option on the hamburger menu or clicking the add button (+). First, you will select the user and the expiration date of that authorization. Finally you need to apply changes. |
|
Delete |
Allows you to remove one or more access controls by selecting one or more records and next clicking the button with the subtraction symbol (-). To delete one access control, you can click the access control, and then Soffid will show a form with the details. Then you can click the delete button (trash icon). To perform that action, Soffid will ask you for confirmation, you could confirm or cancel the operation. |
|
Import |
Allows you to upload a CSV file with the access control list to add or update access controls to Soffid. First, you need to pick up a CSV file, that CSV has to contain a specific configuration. Then you need to check the content to be loaded, it is allowed to choose if you want or not to load a specific attribute. And finally, you need to select the mappings for each column of the CSV file to import the data correctly and to click the Import button. |
|
Download CSV file |
Allows you to download a csv file with the access control information |
|
View password |
Will show the administrator password if it is available. |
Sessions
|
Download CSV file |
Allows you to download a csv file with the sessions information |
Printers
Description
Soffid lets administrator users manage system printers. A printer must always be attached to a host. A network attached printer is composed of a host (network print server) and a printer (printer queue).
Printers can be assigned to specific users or to user groups. The effective assignment can be done on session startup by using a Single Sign On client script. To do that, it is necessary to add a script on a Login entry point with type x-mazinger-script.
Related objects
- Name: identifier name of the printer.
- Description: additional printer information.
- Model: printer model.
- Server: where the printer is hosted.
- Restricted: if checked, only users and groups of users assigned can be access to that, in another case any user could access to that printer.
- Users: assignment of printer queues to users.
- Groups: assignment of printer queues to groups
Actions
Printer query
|
Query |
Allows you to query printers through different search systems, Quick, Basic and Advanced. |
|
Add or remove columns |
Allows you to show and hide columns in the table. |
|
Add new |
Allows you to create a new printer. You can choose that option on the hamburger menu or clicking the add button (+). To add a new printer it will be mandatory to fill in the required fields |
|
Delete |
Allows you to remove one or more printers by selecting one or more records and next clicking the button with the subtraction symbol (-). To perform that action, Soffid will ask you for confirmation, you could confirm or cancel the operation. |
|
Import |
Allows you to upload a CSV file with the printer list to add or update printers to Soffid. First, you need to pick up a CSV file, that CSV has to contain a specific configuration. Then you need to check the content to be loaded, it is allowed to choose if you want or not to load a specific attribute. And finally, you need to select the mappings for each column of the CSV file to import the data correctly and to click the Import button. |
|
Download CSV file |
Allows you to download a csv file with the basic information of all printers. |
Printer detail
|
Add new |
Allows you to create a new printer. You can choose that option on the hamburger menu or clicking the add button (+). To add a new printer it will be mandatory to fill in the required fields and apply changes. |
|
Delete |
Allows you to remove one printer. You can find that option by clicking on the hamburger icon. To perform that action, Soffid will ask you for confirmation, you could confirm or cancel the operation. |
|
Undo |
Allows you to quit without applying any changes. |
Mail Domains
Description
The mail domains identify each single mail domain that is going to be managed. If a mail domain is marked as obsolete, it won't be assigned to a user anymore.
- Code: domain, it will be as in email address is written.
- Description: a brief description about domain name usage.
- Obsolete: enabled to indicate that the domain will not be used and therefore should not be assigned.
Actions
Mail Domains query
|
Add new |
Allows you to create a new mail domain. You can choose that option on the hamburger menu or clicking the add button (+). To add a new mail domain it will be mandatory to fill in the required fields |
|
Delete |
Allows you to remove one or more mail domains by selecting one or more records and next clicking the button with the subtraction symbol (-). To perform that action, Soffid will ask you for confirmation, you could confirm or cancel the operation. |
|
Import |
Allows you to upload a CSV file with the mail domain list to add or update mail domains to Soffid. First, you need to pick up a CSV file, that CSV has to contain a specific configuration. Then you need to check the content to be loaded, it is allowed to choose if you want or not to load a specific attribute. And finally, you need to select the mappings for each column of the CSV file to import the data correctly and to click the Import button. |
|
Download CSV file |
Allows you to download a CSV file with the mail domains information. |
Mail Domain detail
|
Apply changes |
Allows you to save the data of a new mail domain or to update the data of a specific mail domain. To save the data it will be mandatory to fill in the required fields. |
|
Delete |
Allows you to delete the mail domain. To delete a mail domain can click on the hamburger icon and then click the delete button (trash icon). Soffid will ask you for confirmation to perform that action, you could confirm or cancel the operation. |
|
Undo |
Allows you to undo the changes made. |
Mail List
Description
The mail lists identify addresses that are going to be delivered to one or more users, just as distribution mail lists do.
- Name: identifier name of the mail list.
- Mail domain: an existing domain in the system. It is a predictive field that facilitates the search.
- Description: a brief description of the mail list.
- Nested lists: nested mail lists.
- External address: other mail addresses not managed by Soffid that will be on the mail list.
- Roles: the users who have been assigned those roles, will be on the mail list.
- Groups: the users who belong to that groups, will be on the mail list.
- Users: users who will be on the mail list.
- Computed target users: breakdown list of users that are on the mailing list.
Actions
Mail List query
|
Query |
Allows you to query mail list through different search systems, Quick, Basic and Advanced. |
|
Add or remove columns |
Allows you to show and hide columns in the table. |
|
Add new |
Allows you to create a new mail list. You can choose that option on the hamburger menu or clicking the add button (+). To add a new mail list it will be mandatory to fill in the required fields |
|
Delete |
Allows you to remove one or more mail domains by selecting one or more records and next clicking the button with the subtraction symbol (-). To perform that action, Soffid will ask you for confirmation, you could confirm or cancel the operation. |
|
Import |
Allows you to upload a CSV file with the "mail list" list to add or update mail lists to Soffid. First, you need to pick up a CSV file, that CSV has to contain a specific configuration. Then you need to check the content to be loaded, it is allowed to choose if you want or not to load a specific attribute. And finally, you need to select the mappings for each column of the CSV file to import the data correctly and to click the Import button. |
|
Download CSV file |
Allows you to download a csv file with the mail domains information. |
Mail List detail
|
Apply changes |
Allows you to save the data of a new mail list or to update the data of a specific mail list. To save the data it will be mandatory to fill in the required fields. |
|
Delete |
Allows you to delete the mail list. To delete a mail list can click on the hamburger icon and then click the delete button (trash icon). Soffid will ask you for confirmation to perform that action, you could confirm or cancel the operation. |
|
Undo |
Allows you to quit without applying any changes. |
Application access tree
Description
The entry points could be to connect to information systems defined on Soffid, or to connect to other applications. These applications can be Web applications or Native applications. Each information systems can have one or more application entry points.
The entry points are managed in a tree structure, that allows creating new menus and new application access.
Each member of the tree can be tied to a list of users, account groups, or roles. Also, you can choose if the application menu entry will be visible or not by unauthorized users.
After logging on to a managed workstation, the system will apply such restrictions and will update the Windows or Linux start menu.
Each application entry point will have different execution methods for fully managed workstations, loosely managed workstations, or external devices. Each of them can be a web browser URL or a javascript piece.
Each application entry point can have a single sign on rule. Those roles are fully explained in the ESSO reference guide. For more information, you can visit the ESSO chapter.
The defined entry points allow to final users open applications from the self service portal. For more information can visit My Applications page.
2026-06-12 New feature: inheriting authorisations in new applications
Screen overview
 Related objects
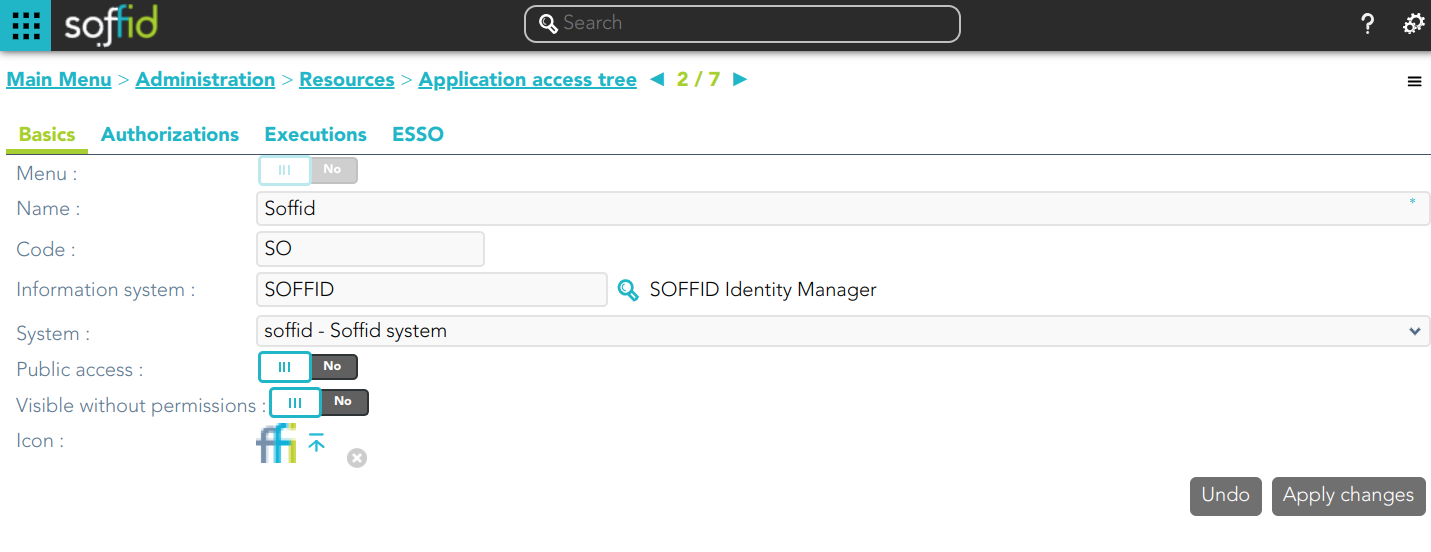
Standard attributes
Basics
Authorizations
Allows you to grant access permissions to users, groups, roles, or accounts.
- Manage: allows to update the entry point.
- Execute:
- When the entry point has selected the option public access to NO, only users with the assigned access level as execute could execute that entry point.
- When the entry point has selected the option public access to YES, all users can execute that entry point.
Executions
Allows Administrator users to configure the entry point access. It is only available to entry points with the option Menu not selected.
There are three options to configure the executions. Administrator users can configure one or more:
- Running from Intranet: if you select the Yes option, Soffid will check if the host that is trying to run this entry is located in a network flagged as internal, if so, Soffid will allow to run the entry.
- Running from Extranet: if you select the Yes option, Soffid will check if the host that is trying to run this entry is located in a network NOT flagged as internal, if so, Soffid will allow to run the entry.
- Running on the Internet: if you select the Yes option, Soffid will check if the host that is trying to run this entry is located in an unknown network, if so, Soffid will allow to run the entry.
For each execution option it is possible to configure the following parameters:
- Enabled: if the option is available to configure.
- Type: access connection type.
- Content:
- text/html: a URL to access to the application.

- x-application/x-mazinger-script: scripts that will be executed on ESSO clients

- Recorded session: configuration to use PAM service.

- Web Single Sign On: a URL to access the application with SSO.

- text/html: a URL to access to the application.


ESSO
Allows you to customize a script to define a pattern to detect when an application is used and how to inject the credentials.
For more information, you can visit the ESSO chapter.
Actions
Application query
💻 Image
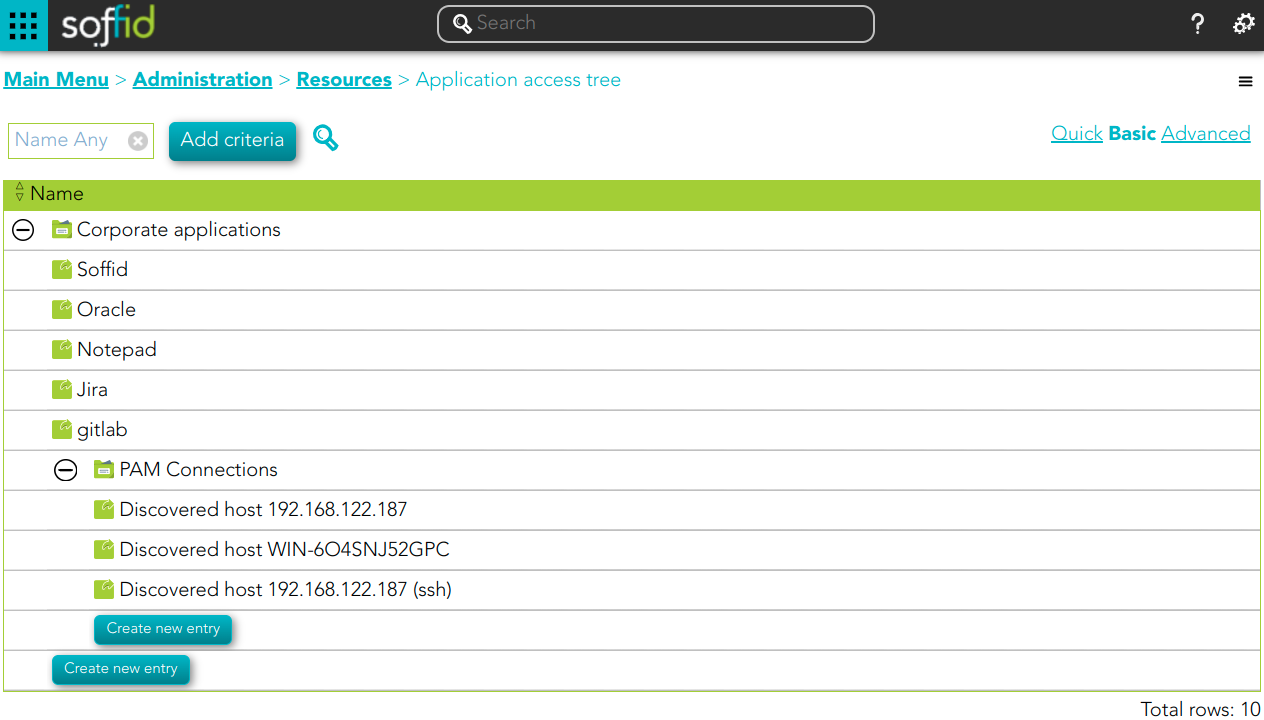
| Query | Allows to query the entry points through different search systems, Quick, Basic and Advanced. |
| Create new entry |
Allows you to add a new entry point. To create a new entry point you can click the Create new entry button, then Soffid will display a new window to fill in the entry point data. To add a new entry point it will be mandatory to fill in the required fields. |
Application detail
💻 Image
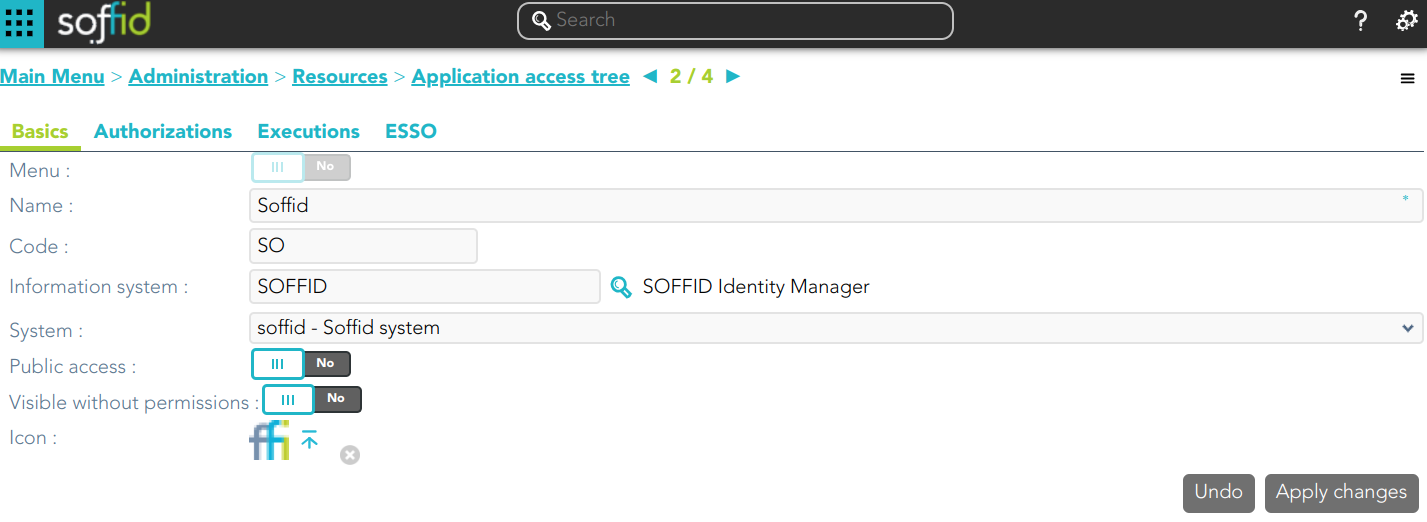
|
Apply changes |
Allows you to save the data of a new entry point or to update the data of a specific entry point. To save the data it will be mandatory to fill in the required fields. |
|
Delete |
Allows you to delete the entry point. To delete an entry point, you can click the hamburger icon and then click the delete button (trash icon). Soffid will ask you for confirmation to perform that action, you could confirm or cancel the operation. |
|
Undo |
Allows you to quit without applying any changes made. |
Authorizations
💻 Image
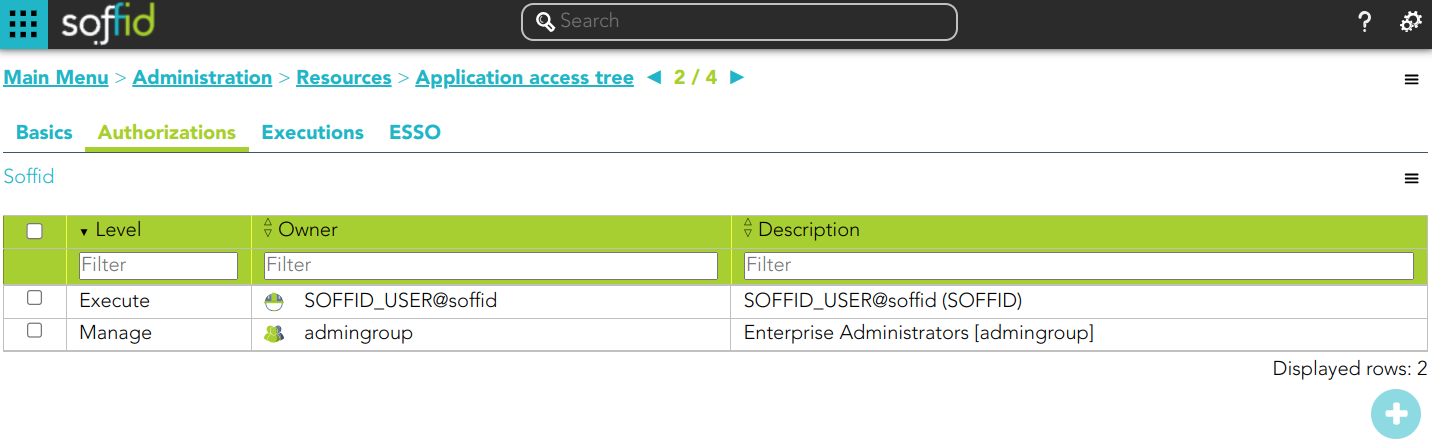
|
Add new |
Allows you to add a new authorization. You can choose that option on the hamburger menu or by clicking the add button (+). 💻 Image
First, you will select the Grantee type, which could be a role, a user, an account, or a group. Second, you will select the Grantee, it will depend on the Grantee type selected. Then, you will fill in the access level. And finally, you will apply changes. |
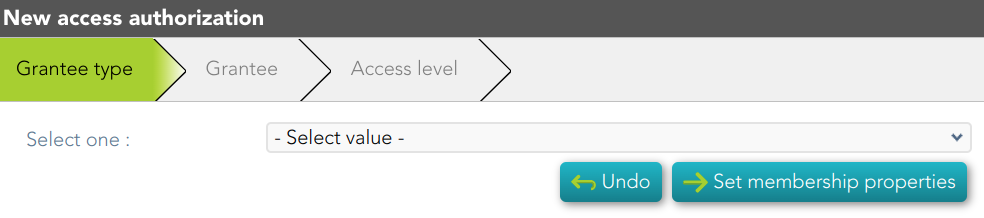
Executions
💻 Image
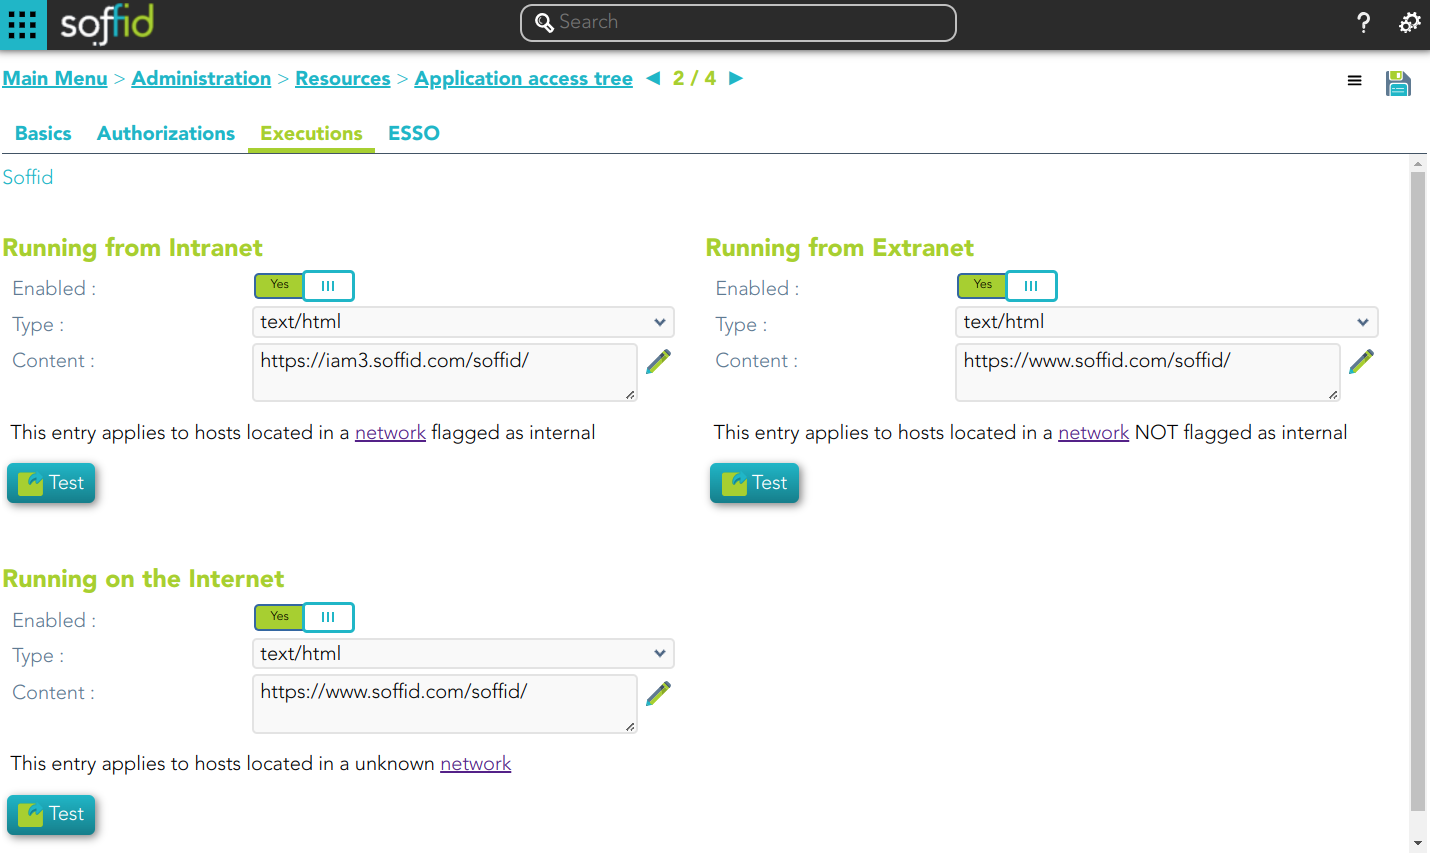
| Apply Changes | Allows you to save the execution configuration. |
| Delete | Allows you to delete the execution configuration. |
ESSO
💻 Image
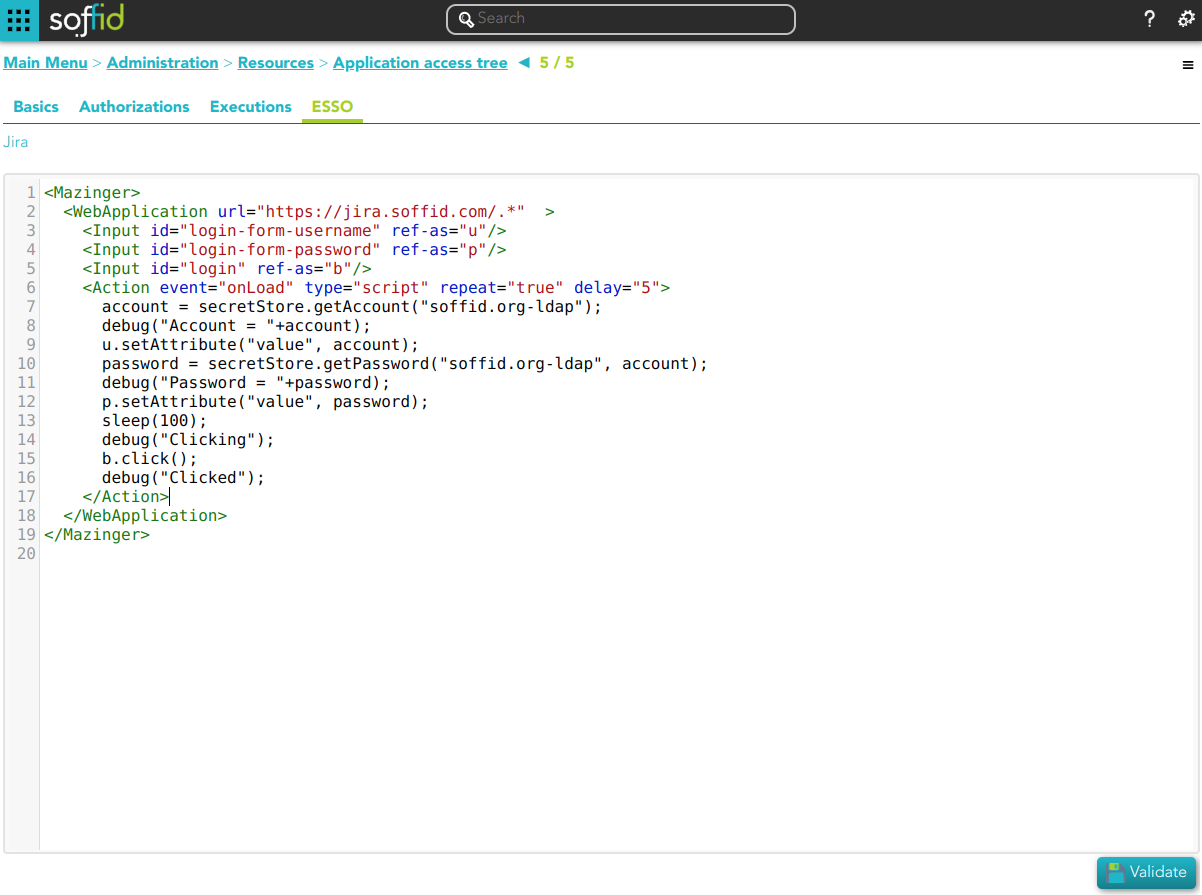
| Validate | Allows you to validate and save the script. |
Password vault
Description
Soffid provides a protected storage, to save and manage accounts for multiple applications, that is the Password vault. Here you can save the accounts and passwords to access to critical systems and to your applications as well. Password vault allows you to handle the access control list to these accounts. Sometimes these accounts can be used by a specific user or a set of users.
The accounts are organized in folders depending on the permissión, and the criticality level, .... These accounts can be system accounts or user accounts.
The Password vault exposes a subset of accounts to some users. These accounts are available through the Self-services portal. You can visit My applications page for more information.
When a privileged account is being config, it will be able to assign a workflow or approval process to request in order to use that account. For more information visit the link How to apply policies.
Folders
In the password vault, two kinds of folders are used: personal folders and shared folders, which depend on the Owners configuration you define.
On one hand, each user has their own personal folder. Inside this folder, the user can create accounts. That account will not be shared with any other user.
On the other hand, the shared folders could be used or managed by the owner/manager/SSO users.
Accounts
Soffid allows you to create new accounts on a specific folder on the password vault page, to add a new account will be mandatory to fill in some attributes, like System, name, and login name. You can consult the existing accounts related to a folder. For each account, you can update or delete the account, view and set a password.
Also, you can create accounts on the Account page and assign the appropriate vault folder.
Soffid allows administrator users to configure a workflow to request permissions when a user try to change the password of a privileged account in the password vault. That process can be defined with the BPM Editor as an Account reservation type. For more information you can visit the BPM Editor book.
Overview
Related objects
Standard attributes
Folder attributes
- Folder detail
- Name: folder name which will be displayed in My Applications.
- Description: folder description.
- PAM policy: when using PAM system, you could choose the policy that will comply with for each folder. When you define a policy for a folder, that policy will apply to all accounts hanging from this folder. For more information you can visit the Configure PAM page.
- Owners: allows you to handle the full privileged access control list.
- Owner users: list of users who will be the folder owners.
- Owner groups: list of groups, whose users will be the owners of the folder.
- Owner roles: list of roles. Users who have been granted these permissions will be the owners of the folder.
- Managers
- Manager users: list of users who can manage the folder. Those users can view the password depending on the password policy.
- Manager groups: list of groups, whose users can manage the folder. Those users can view the password depending on the password policy.
- Manager roles: list of roles. Users who have been granted these permissions can manage the folder. Those users can view the password depending on the password policy.
- SSO users
- Granted users: list of users who can use the account of that folder.
- Granted groups: list of groups, whose users can manage the account of that folder
- Granted roles: list of roles. Users who have been granted these permissions can manage the account of that folder.
- Browse folder
- Users: list of users who can browse the folder, but can not perform any action.
- Groups: list of groups, whose users can browse the folder, but can not perform any action.
- Roles: list of roles. Users who have been granted these permissions can browse the folder, but can not perform any action.
Accounts attributes
Actions Tab
This tab shows the read-only attributes of the user account:
- Name: user account name.
- Description: a brief description.
- System: target system to which the account will be connected.
- Login name: login name to connect to the target system.
- Login URL: URL to connect.
- In use by: user name who is using that account.
Also, this tab allows you to launch the connection to the target system, view the password, set the password to launch the connection, and unlock the use of that account. All those options depend on the account definition and user privileges.
Basics Tab
This tab displais all the account attributes and allows you to update the account configuration.
Visit the Account page to view more information about the standard attributes of an account.
Actions
Folders query actions
|
Query |
Allows you to query folders through, only Quick search is available. |
|
Add new |
Allows you to create a new folder. You can choose that option on the hamburger menu or by clicking the add button (+). To add a new folder it will be mandatory to fill in the required fields. A folder needs to have, at less, an owner to manage it. |
Folder actions
|
Apply changes |
Allows you to save a new folder or update an existing folder. To save the data it will be mandatory to fill in the required fields. Be in mind that is important to indicate who are the owners of the folder. |
|
Undo |
Allows you to quit without saving any change made. |
|
Delete |
Allows you to delete a folder if you have the right permissions. To delete a folder you can click on the hamburger icon and then click the delete button (trash icon). Soffid will ask you for confirmation to perform that action, you could confirm or cancel the operation. |
Account actions
|
Apply changes |
Allows you to save a new account. To save the data it will be mandatory to fill in the required fields. Be in mind that is important to indicate who are the owners of the folder. If the account exists on the system, you can assign the vault folder to the account window. |
|
Undo |
Allows you to quit without saving any change made. |
|
Delete |
Allows you to delete an account from a folder if you have the right permissions. To delete a host you can click on the hamburger icon and then click the delete button (trash icon). Soffid will ask you for confirmation to perform that action, you could confirm or cancel the operation. |
|
Set password |
This option depends on the credential type selected. Password:
💻 Image
SSH key:
💻 Image
Kubernetes key:
💻 Image
|
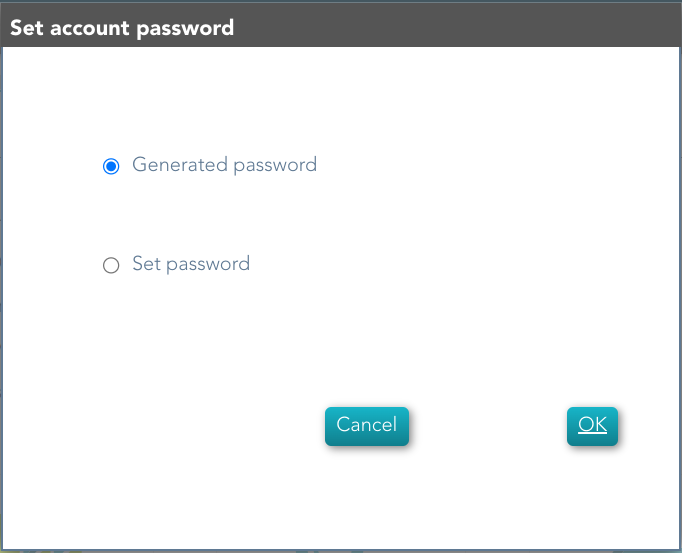
How to apply policies
Soffid allows you to define policies and rules to apply to a specific folder or a set of folders. To do that is needed to install the XACML addon and configure the proper policies and rules.
Also, you can config a workflow or approval process to request in order to use accounts saved on a folder.
It is mandatory to enable the Password Vault PEP and populate the information about the XACML policy set and the version which applies.
Example
XACML PEP config
It is mandatory to enable the Password Vault PEP and populate the information about the XACML policy set and the version which applies.
Password Vault:

XACML PEP config:

XACML Policy Management
You need to configure the access to the folder "VaultFolder", that folder can contain other folders and accounts. It will be mandatory to config the access list, who are the owners, managers, and so on. You need to know if you need to config the control access list by accounts, by folders, or both.

For instance, the policies you need to implement are the following:
1. Only users between 6:00 and 18:00 could use the accounts inside the "demoFolder".
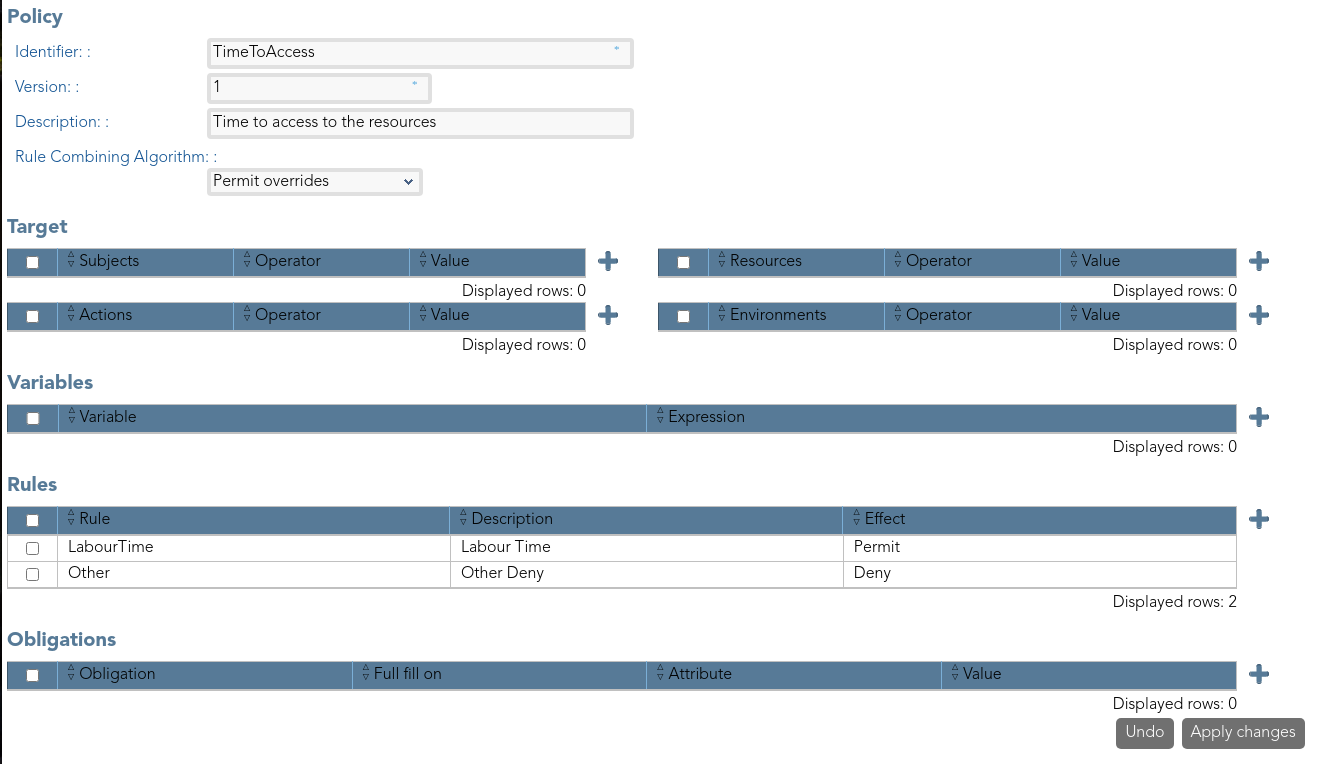
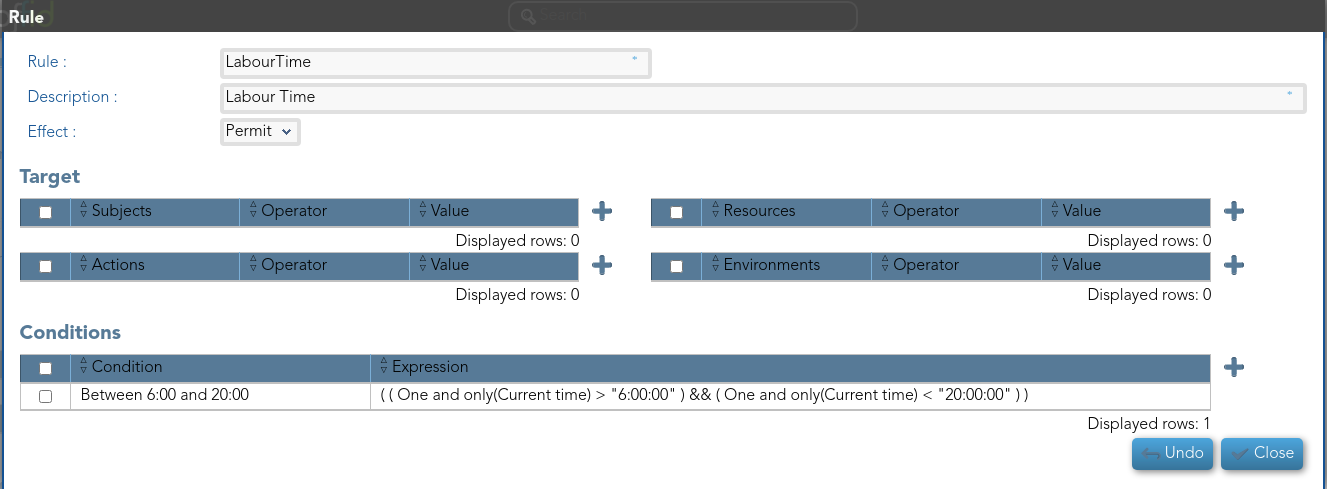
2.- User "bob" never could use the accounts of demoFolder.
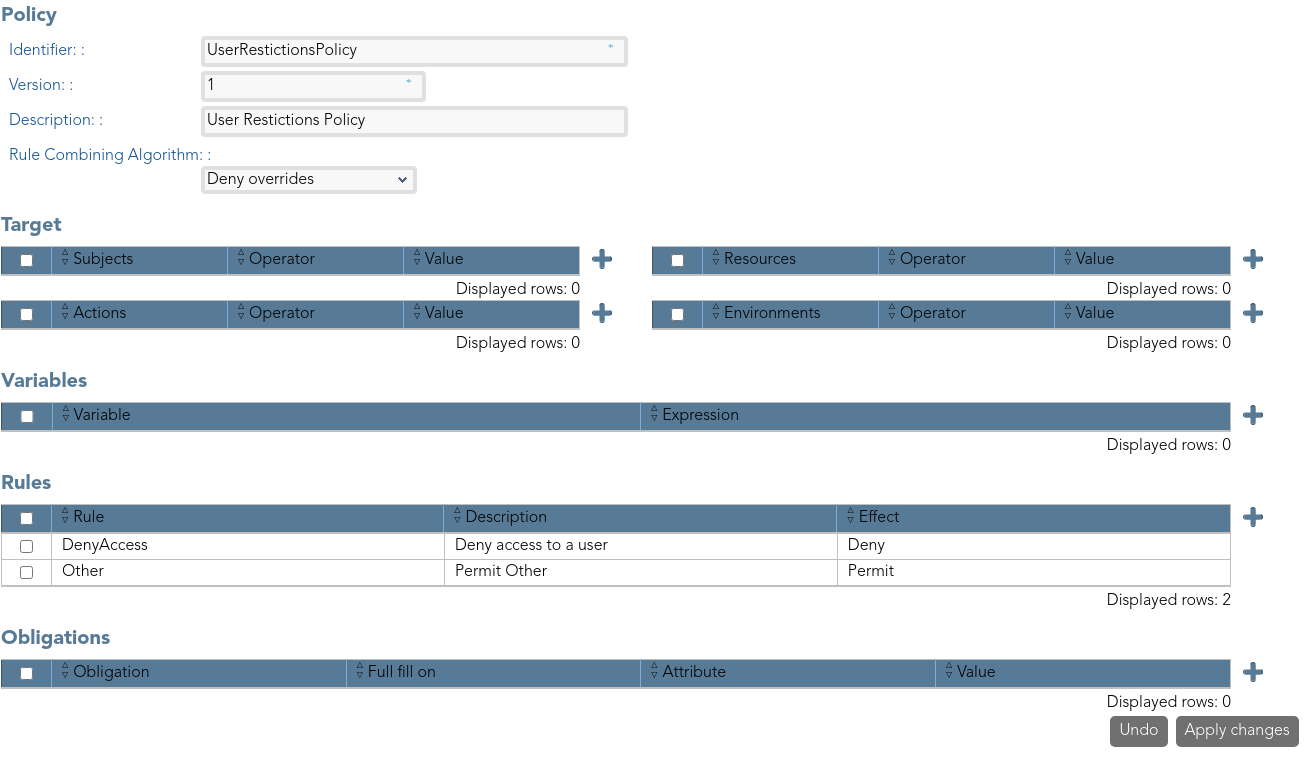
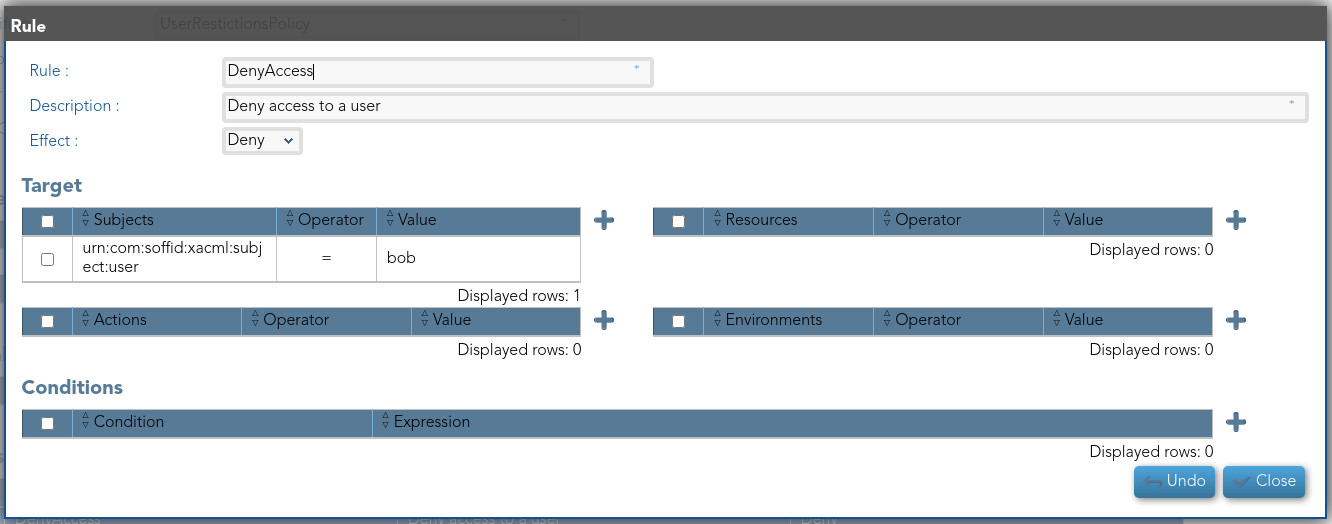
3. Users with result permits, need the authorization to use the accounts.
You need to config the workflow that will be called, to config you need to include the bpm obligation on the policy. Also, you can include a message to the user, or other obligations.
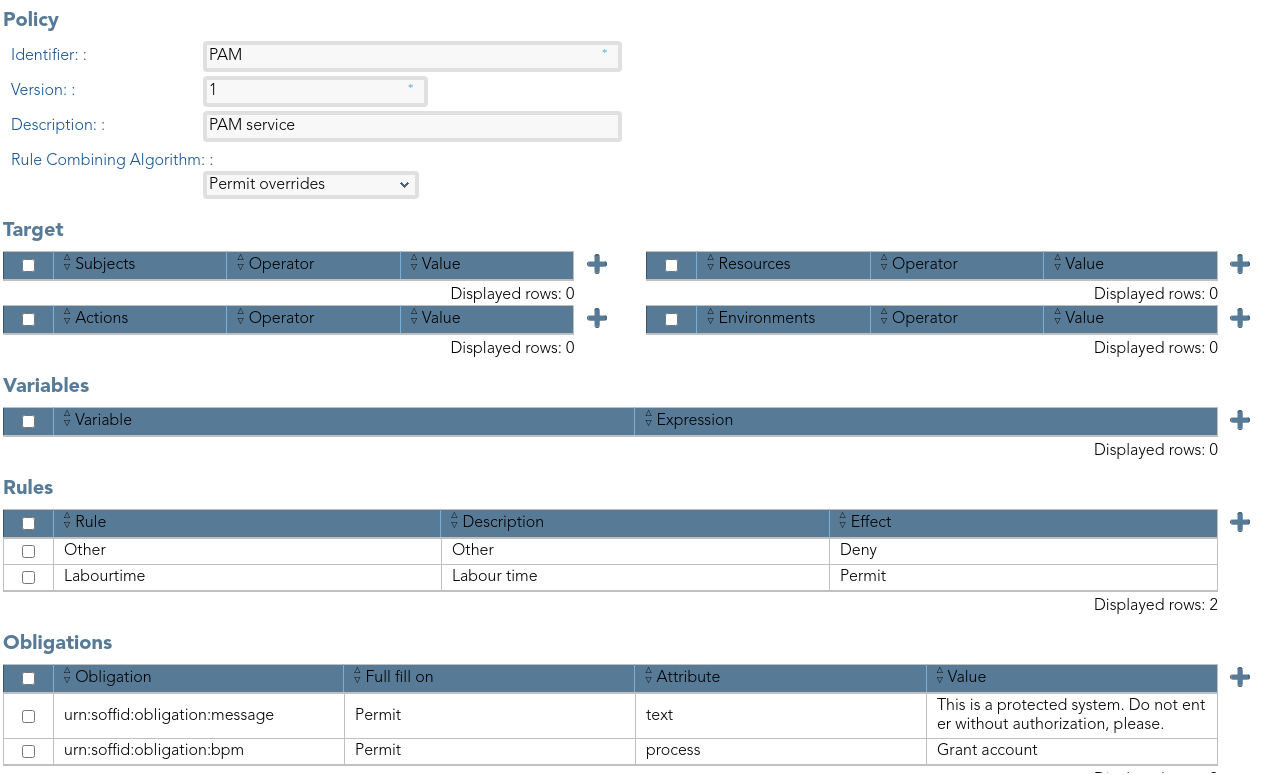
Visit the XACML Book for more information.
Visit the BPM Editor Book for more information.
Custom objects
Description
The custom objects are the objects created by the administrator to extend the Soffid underlying data model. This allows you to store additional information that is not natively supported by Soffid.
This option allows administrator users to provide objects with content.
For more information about how to create a new Custom object you can visit the Metadata page.
Screen overview
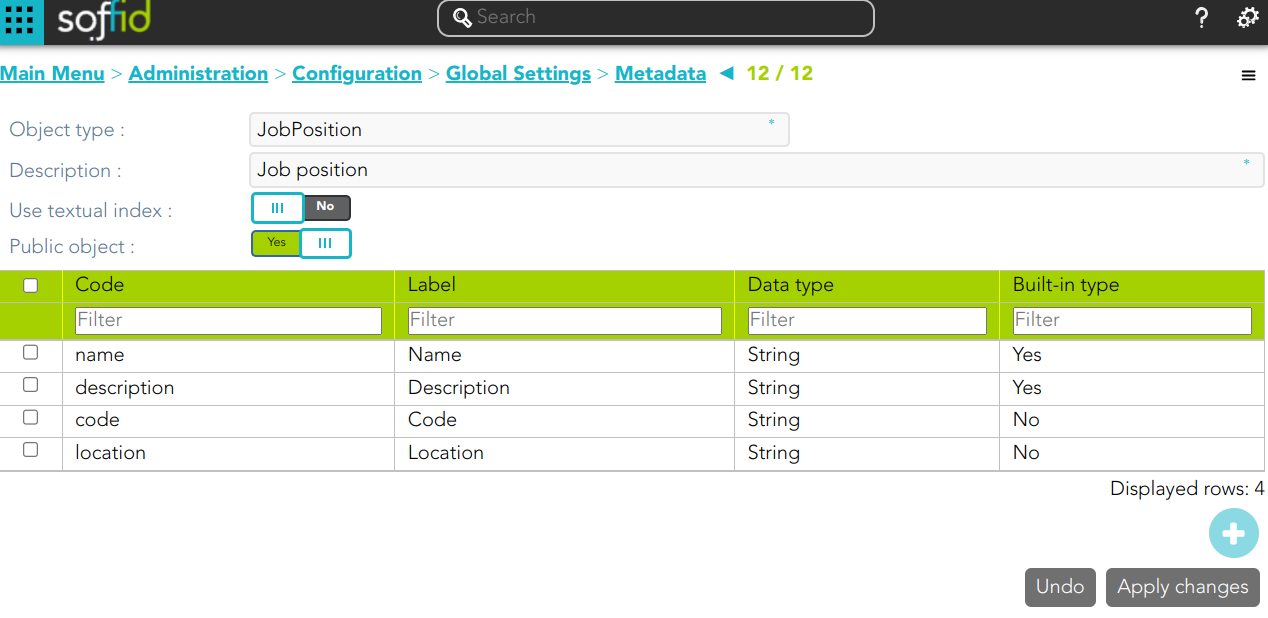
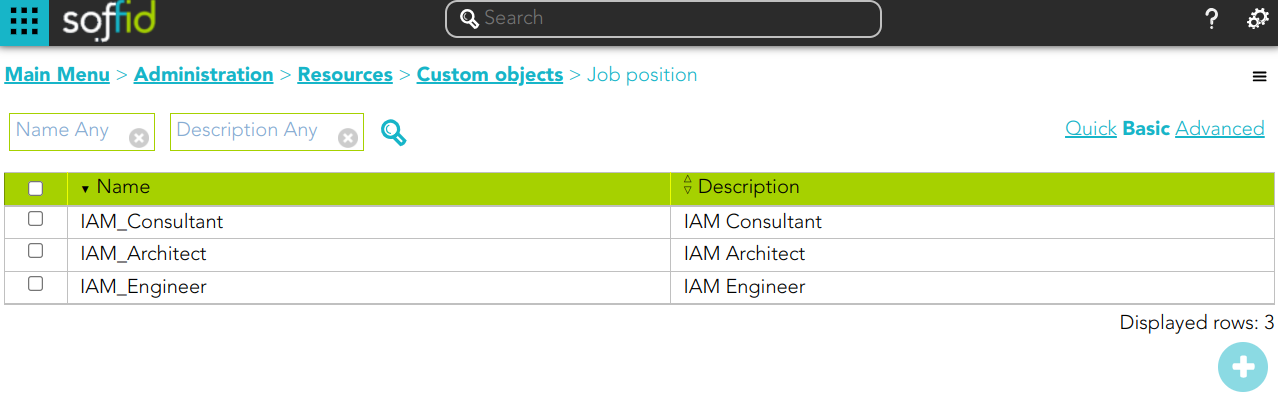
Related objects
- Object Type: objects created by the administrator.
Standard attributes
- Name: identification name.
- Description: brief description.
Every single custom object could have specified attributes defined by the administrator users when they create the object type.
Actions
Custom object query
|
Query |
Allows you to query custom object through different search systems, Quick, Basic and Advanced. |
|
Add or remove columns |
Allows you to show and hide columns in the table. |
|
Add new |
Allows you to create a new custom object. You can choose that option on the hamburger menu or clicking the add button (+). To add a new custom object it will be mandatory to fill in the required fields |
|
Delete |
Allows you to remove one or more custom objects by selecting one or more records and next clicking the button with the subtraction symbol (-). To perform that action, Soffid will ask you for confirmation, you could confirm or cancel the operation. |
|
Import |
Allows you to upload a CSV file with the custom object list to add or update custom objects to Soffid. First, you need to pick up a CSV file, that CSV has to contain a specific configuration. Then you need to check the content to be loaded, it is allowed to choose if you want or not to load a specific attribute. And finally, you need to select the mappings for each column of the CSV file to import the data correctly and to click the Import button. |
|
Download CSV file |
Allows you to download a csv file with the custom objects information. |
Custom object detail
|
Apply changes |
Allows you to save the data of a new custom object or to update the data of a specific custom object. To save the data it will be mandatory to fill in the required fields |
|
Undo |
Allows you to undo any changes made |
|
Delete |
Allows you to remove a custom object. You can choose that option on the trash icon. To perform that action, Soffid will ask you for confirmation, you could confirm or cancel the operation. |
Examples
Example 1
... ...
lCustomObj = serviceLocator.getCustomObjectService().findCustomObjectNames("JobPosition");
... ...Example 2
... ...
lCustomObj = serviceLocator.getCustomObjectService().findCustomObjectByTypeAndName("JobPosition", "IAM_Engineer");
... ...Example 3
... ...
lCustomObj = serviceLocator.getCustomObjectService().findCustomObjectByJsonQuery("JobPosition", "name co " + "\"IAM\"");
for (var i=0; i<lCustomObj.length; i++) {
atributes = lCustomObj[i].getAttributes();
out.println("*** Custom Object - " + i + " - " + lCustomObj[i].name);
out.println("*** Custom Object - " + i + " - " + atributes.get("code"));
out.println("*** Custom Object - " + i + " - " + atributes.get("location"));
... ...
}
... ...Integration Engine
Smart engine settings
Description
The administrator users can decide the engine mechanism for the synchronization task, i.e. when the tasks are created and sent to external systems.
Screen overview
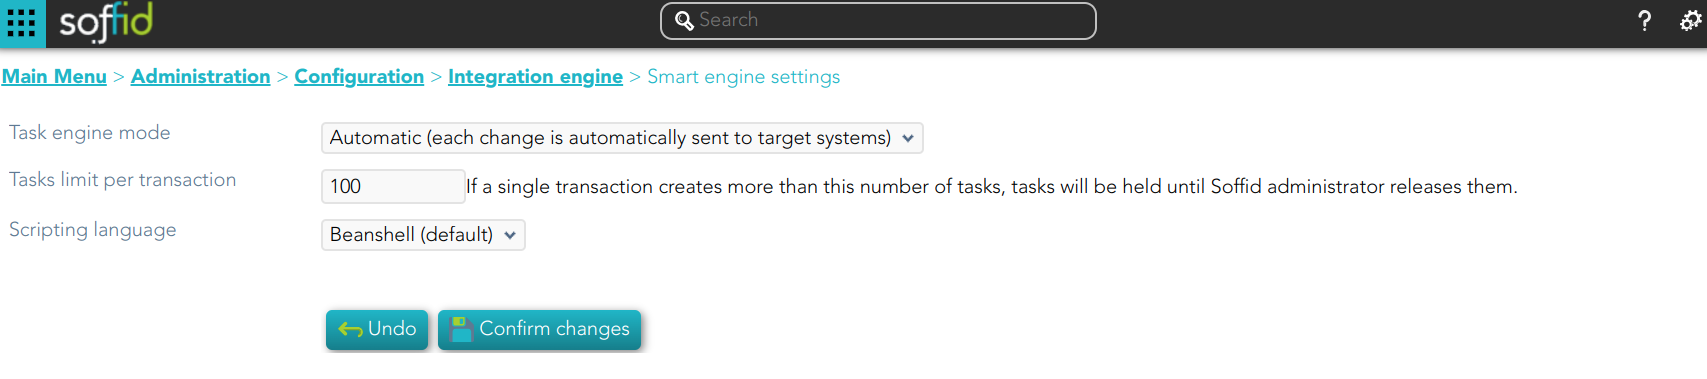
Standard attributes
- Task engine mode: allows you to select the synchronization mode. There are three available options:
- Read only: it is the option by default in the Soffid installation. No task is synchronized to external systems.
- Manual: only selected synchronization tasks are performed. You could synchronize manually a user, check the "Propagates the changes" action on the Users page. Or also synchronize a whole target system, check the Agents page.
- Automatic: each change is automatically send to target systems.
- Tasks limit per transaction: if a single transaction creates more than this number of tasks, tasks will be held until Soffid administrator releases them. The administrator could check them in the Sync server monitoring page.
- Scripting language: Soffid allows you to create scripts and you can choose the scripting language:
- Beanshell
- Javascript
- Autodetected
Soffid offers a set of sample scripts. You can find examples visiting the Sample scripts page.
Additionally, in the initial configuration of the container, we can configure the SOFFID_TRUSTED_SCRIPTS environment variable to allow the use of insecure classes. You can find this information visiting the Installing IAM Console page.
Tips
Use the task engine mode for these scenarios:
- Read Only: use this option after the Soffid installation until you have at least one target system configured to test the synchronization.
- Manual: use this option for testing environments, or at the beginning of a live release.
- Automatic: use this option for live environments, or also for the testing environments when the platform is mature.
Tasks limit per transaction:
- Use a high task limit when you are comfortable with the configured processes of Soffid, for instance, 1000 or 10000 depending on the number of accounts of these external systems.
Actions
| Confirm changes | Allows you to update the engine settings. |
| Undo | Allows you to cancel the changes made and not confirmed. |
Agents
Description
Soffid agents are the tool that allows the connection between the Soffid console and the target systems. To establish the connection with target systems, Soffid provides a large number of connectors that will be able to set up into the Soffid console.
You could see the complete list of Synchronization Server Connectors.
Soffid administrator has the chance to easily customize attribute mappings for some connectors addons, without having to code it using Java. Soffid provides a graphical interface to perform attribute mapping.
An agent will appear disabled when this agent won't have a server assigned. Bear in mind to select the “Disabled” flag on Server URL criteria when you will query if you want to search for disabled, but defined agents.
Related objects
Standard attributes
Basic
- Task engine mode: shows the current task engine configuration. For more information visit the Smart engine settings page.
- Name: agent's identifying name.
- Description: a brief description of the agent.
- Usage: identify whether the accounts created are to be used for IAM or PAM. The IAM and PAM tasks will be managed in separate queues. This attribute will be available in Soffid 3.5.10 or higher.
- IAM
- PAM:
- The PAM accounts will be managed as a Shared thread internally.
- The PAM accounts will be shared accounts and never will be single user accounts.
- Type: Identify the connector type to use. Different implementations of the server plugins are included in the connectors installed into Soffid. Each type has a Java class bound, the name of the Java class implementing the connector is displayed next to the connector name.
- Server: synchronization will be performed with the selected server. It is allowed to select two servers in cases high disponibility will be necessary. If you choose two servers, when one fails, the other will be used.
- If “Each main synchronization server” is selected, the agent will be run by every sync server.
- If "-disabled-" is selected, the agent will be disabled.
- If you select a single sync-server, the agent only will be run on that server.
- Shared Thread: if it is enabled, the same thread will be shared to several synchronization servers.
- Dedicated Thread: if "Shared thread" is disabled, it will be available the option to choose the number of threads to dedicate to the synchronization process.
- Task timeout (ms): add a timeout to the synchronization server tasks (query, insert, update, delete, update password, etc). If you add a timeout, when the connection gets this timeout, the synchronization server will stop the request and add it to the queue for a new retry later.
- Long task timeout (ms): add a timeout to the reconciliation server tasks (user, group, role, account, grants, etc). If you add a timeout, when the connection gets this timeout, the synchronization server will stop the request (no retry is added).
- Trust passwords: check if you can trust it to propagate their passwords to Soffid. Trusted password agents differ from the non-trusted ones in:
-
Temporary passwords generated from the console only propagate to agents that have trusted passwords checked. In the other case, the agents only receive definitive passwords.
-
When a password has reached its expiry date, it will automatically be disabled on agents where the trusted password is not checked, so the user can no longer access it.
-
When the managed system detects a change in the user request password, the password will be propagated to Soffid only if the agent associated trusted password is checked.
-
- If you want to forward the authentication requests to trusted target systems, you must enable the Trust passwords option and the proper feature on the Authentication page.
- Authoritative identity source: check if the agent will be used as the source for users' information. It is usually checked for the first load of users into Soffid, and then it is unchecked, being Soffid that manages users. Optionally, you can select a custom workflow to process incoming changes.
- Read-only: if it is checked (the selected option is Yes), no change will be applied to the managed system. Only read operations will be allowed.
- Paused task: if it is checked (the selected option is Yes), the system remains connected, but the tasks in the queue will be retained. It is very useful when conducting tests and ensuring that no tasks propagate, except the ones we are manually triggering (we pause, make the changes, and when everything is fine, we remove the pause). As a rule, you should pause when making configuration changes in production.
- Manual account creation:
- If you check NO, Soffid will create the new user accounts applying the defined policies.
- Check YES if you don't want Soffid to create automatically new accounts for the users.
- Role-based: when "Manual account creation" is not checked (option selected is No), it will show "Role-based". Check it if only users with any role on this agent should be created. When the identity or account loses its permissions, the account will be disabled. Uncheck to allow users with no role on it.
- Groups: when "Manual account creation" is not checked (option selected is No), it will show "Groups". Identify the business units that are allowed to have an account on this system.
- User domain: it is the rule used to determine how to generate account names. If the account name is the same as the user name (as is normally the case), the “Default user domain” should be used. The user domain values are defined on the Account naming rules page.
- Password domain: determines the password policies that will be used. If the "Default password domain" is selected, Soffid passwords will be shared with the managed systems. The user domain values are defined on the Password policies page.
- User Type: when "Manual account creation" is not checked (option selected is No), it will show User Type. Only users of the selected types will be created. Any change made in this field involves all accounts to be recalculated. New ones will be added to the repository and managed systems. Some accounts will get disabled if the owner user no longer belongs to any authorized user type.
When uploading authoritative data for identities from a managed system, firstly, users will be created in Soffid as indicated in the attribute mapping, and secondly, accounts will be created for the managed systems only if the agent option "Manual account creation" is not checked and only for User Types indicate.
Connector parameters
The custom attributes depend on the used plugin.
Here you will find all the information needed about the available Soffid connectors to integrate external managed systems.
- AWS Connector
- CSV Connector
- Google Apps Connector
- JSON REST Web Services Connector
- LDAP Connector
- Oracle Connector
- Oracle EBS Connector
- SAP Connector
- SCIM Connector
- Shell Connector
- SQL Connector
- Windows Connector
- Zarafa Connector
- SQL Server Connector
Integration flows
Some connector addons have associated integration workflows. On the Integration flows tab you can view the integration flows related to the agent. You also can view in detail the workflows and test them.
Attribute mapping
The attribute mapping tab only appears when the agent allows such customization. Soffid administrators have the chance to easily customize attribute mappings without having to code them using Java. The administrator users can select system objects and the Soffid objects related, manage their attributes, and make either inbound and outbound attribute mappings.
There is an action that creates all the default mapping depending on the agent connector type. That option creates automatically system objects with their attributes and properties, you can select them by clicking on the hamburger icon and then the Create default mapping option. Once created the default mapping, those can be customized as required.
Properties
Some agents require to configure some custom attributes in their properties section.
These properties are specific for each type of connector. You could see all these properties by visiting each connector type page.
Methods
This option is only available on some types of connectors. It is used to define methods that can be called using the defined properties.
Attributes
Each object mapping defines an agent object name and one bound Soffid object type.
The left hand side attributes are managed system attributes, so they are agent dependent that is being configured. The right side attributes are Soffid attributes and must be selected from an existing list.
It is allowed to use bean Shell expression in the source when the mapping is one-way.
System attributes
A configuration agent must define object types that can be created on it. Each object mapping defines an agent object name and needs bound Soffid object type.
At this column, the system's attribute name will be displayed.
When evaluating any expression, either the system or soffid attributes are available as script variables. Moreover, the following variables are available:
| Variable | Content |
|
serverService |
Server API that enables an easy object query [ Search the link "Public API Module" or "Data & Service model" ] |
|
serviceLocator |
Spring Singleton that gets access to any published service bean. Only available on the main syncserver |
|
remoteServiceLocator |
Singleton that gets access to any remotely published service bean. |
|
THIS |
HashMap that contains any soffid or system managed attribute. It can be used when the attribute name is not a valid java identifier. |
|
Service that allows the script to get or update information in the target system. |
Script Example 1

/*js*/
var name = new javax.naming.ldap.LdapName(distinguishedName);
var rdns = name.rdns;
var g = null;
var rn = null;
for (var i = rdns.length - 2; i > 0; i--) {
if (rdns[i].type == "DC") break;
if (g == null) {g = "", rn = ""}
else {g = g + "/"; rn = "," + rn}
g += rdns[i].value.toLowerCase();
rn = rdns[i].type+"="+rdns[i].value;
}
var gi = serviceLocator.groupService.findGroupByGroupName(g);
if (gi == null) {
var parent = ! rn.contains("/") ?
"world":
rn.substring(0, rn.lastIndexOf("/"));
gi = new com.soffid.iam.api.Group();
gi.name = g;
gi.description = rn;
gi.parentGroup = parent;
serviceLocator.groupService.create(gi);
}
return g;Directions
At the center column, an arrow will show the direction of the information flows.
When the information flows from the system (left) to Soffid (right), the left column name can be replaced by a bean shell expression. This expression will be evaluated on the system object prior to uploading it to Soffid.
When the information flows from Soffid (right) to the managed system (left), the right column can contain a bean shell expression that will be evaluated prior to provisioning the user.
Here are some examples:
| System attribute | Direction | Soffid attribute | Meaning |
|
cn |
<=> |
accountName |
The account name is the CN attribute of the LDAP |
|
departmentNumber |
<= |
|
Assigns the group description of the primary group to the departmentNumber attribute |
|
baseDN |
=> |
"ou="+primaryGroup+",dc=soffid,dc=org" |
Assigns the base dn of the user to the proper organization unit that is below dc=soffd,dc=org. |
Soffid attributes
You can consult the list of Soffid attributes:
When evaluating any expression, either the system or soffid attributes are available as script variables. Moreover, the following variables are available:
| Variable | Content |
|
serverService |
Server API that enables an easy object query [ Search the link "Public API Module" or "Data & Service model" ] |
|
serviceLocator |
Spring Singleton that gets access to any published service bean. Only available on the main syncserver |
|
remoteServiceLocator |
Singleton that gets access to any remotely published service bean. |
|
THIS |
HashMap that contains any soffid or system managed attribute. It can be used when the attribute name is not a valid java identifier. |
|
Service that allows the script to get or update information in the target system. |
Script Example 1

firstName + " " + lastNameScript Example 2

attributes = serviceLocator.getUserService().findUserAttributes(userName);
return attributes.get("position");Test
For the definition of an object, you can check the system attributes defined, in both the final system and in Soffid.
1. First of all, you need to click the Test button, then Soffid will display a text field and some buttons to perform new actions.
2. Secondly, the text field must be filled in with the appropriate data. It can be a user, an account, a group or another system object. It depends on the system object you are checking.
3. Then, you can choose the action to perform.
Text expression: allows you to test a system object.
Synchronize now: this allows you to synchronize the data object to the target system.
Fetch system raw data: brings the data of an object from a target system.
Fetch Soffid object: brings the data of a specific system object with processed data to update into Soffid
Triggers
It is allowed to define BeanShell or JavaScript scripts that will be triggered when data is loaded into the target system (outgoing triggers).
The trigger result will be a boolean value, true to continue or false to stop.
A configuration agent can configure triggers related to the operation to be performed. There are different trigger type, that determines the specific moment at which the script will be triggered.
Triggers can be used to validate or perform a specific action just before performing an operation or just after performing an operation on target objects.
To access Soffid data, you can use source{"attributeName"}, which recovers the value of the attributeName. That object will be Soffid format.
Also, you can use newObject{"attributeName"} to create the new value or oldObject{"attributeName"} to get the old value of the target system, those objects will be target system format.
| Trigger | |
|
preInsert |
It will be triggered just before the insert action. It will be used to validate or prevent the insert action, and also to prepare objects or actions when a new object will be inserted |
|
preUpdate |
It will be triggered just before the update action. It will be used to validate or prevent update an object. |
|
preDelete |
It will be triggered just before the delete action. It will be used to validate or prevent delete an object. |
|
postInsert |
It will be triggered just after the insert action. It will be used to trigger or prevent an action. |
|
postUpdate |
It will be triggered just after the update action. It will be used to trigger or prevent an action. |
|
postDelete |
It will be triggered just after the delete action. It will be used to trigger or prevent an action. |
|
preSetPassword |
It will be triggered just after the set password action. It will be used to trigger or prevent an action. |
|
postSetPassword |
It will be triggered just after the set password action. It will be used to trigger or prevent an action. |
Example 1
Get the attribute company option 1:
company = source{"attributes"}{"company"};Get the attribute company option 2
userName = source{"userName"};
attributes = serviceLocator.getUserService().findUserAttributes(userName);
company = attributes.get("company");Example 2
role = serviceLocator.getAplicacioService ().findRoleByNameAndSystem ( "Domain Users", "AcitveDirectory");
rg = new java.util.HashMap();
rg.put ("grantedRoleId", role.getId ());
list = new java.util.LinkedList ();
list.add (rg);
newObject{"ownedRoles"} = list;
return newObject{"name"} != nullExample 3
if (oldObject.get("userPrincipalName") != null) {
newObject.remove("userPrincipalName");
newObject.put("groupType", oldObject{"groupType"});
}For more examples, you can visit the Incoming Triggers examples page.
Load triggers
On the Load trigger tab, it is allowed to set up a specific configuration for the agent and define BeanShell or JavaScript scripts that will be triggered when data is loaded into Soffid (incoming triggers).
- Full reconciliation: switch off to enable incremental load process and disable Soffid object removal.
- Propagate changes: switch off to prevent sync-server to create synchronization tasks after loading incoming changes.
To add a new trigger, it is mandatory first of all, to select a Soffid object on which the action will be performed. Then to select the trigger, that determines the moment at which the script will be triggered. Finally, define the BeanShell script that will be executed. The available objects are the following:
- User
- Account
- Group
- Role
- Grant
Triggers can be used to validate or perform a specific action just before performing an operation or just after performing an operation into Soffid objects. The trigger result will be a boolean value, true to continue or false to stop.
In a Load Trigger, it is not possible to access to mapping definitions configured on the attribute mapping tab. It will be necessary to use newObject{"attributeName"} to get the new value, or oldObject{"attributeName"} to get the old value. Those objects will be in Soffid format.
For more info about the Soffid format, you can visit the Soffid Objects page.
| Trigger | |
|
preInsert |
It will be triggered just before the insert action. It will be used to validate or prevent the insert action. |
|
preUpdate |
It will be triggered just before the update action. It will be used to validate or prevent update an object. |
|
preDelete |
It will be triggered just before the delete action. It will be used to validate or prevent delete an object. |
|
postInsert |
It will be triggered just after the insert action. It will be used to trigger or prevent an action. |
|
postUpdate |
It will be triggered just after the update action. It will be used to trigger or prevent an action. |
|
postDelete |
It will be triggered just after the delete action. It will be used to trigger or prevent an action. |
Example 1
userName = newObject {"userName"};
system = "ActiveDirectory";
accounts = serviceLocator.getAccountService()
.findAccountByJsonQuery("(system eq \"" + system + "\") AND name eq \"" + userName + "\" AND (type eq \"I\")");
.....
user = serviceLocator.getUserService().findUserByUserName(userName);
.......Example 2
...........
if (isFound) {
newObject{"id-indicator"} = "1";
} else {
if (contFalse > 0) {
newObject{"id-indicator"} = "0";
} else if (contNull > 0) {
newObject{"id-indicator"} = null;
}
}
For more examples, you can visit the Outgoing Triggers examples page.
Massive actions
Massive Actions refer to bulk or large-scale operations that can be performed across multiple identities, accounts, or resources managed by an agent within the Soffid platform. Agents in Soffid are components responsible for interacting with external systems (like directories, databases, or applications) to manage and synchronize identity-related data. Massive actions allow administrators to execute operations on a large number of items simultaneously, making it easier to manage and maintain the system efficiently.
Provisioning all users on to managed systems
One of the main features of identity and access management (IAM) is automated user provisioning. User provisioning is the process that ensures the users are created, with proper permissions, updated, disabled, or deleted on to managed systems.
All managed systems must have an agent configuration, which will determine the way to perform the provisioning.
Soffid shows information about the last time that the option was run and a report with the details. You can access the report by clicking the verification icon (✓).
Propagate groups to agent
This option allows pushing to the managed system all the defined groups in Soffid.
Soffid shows information about the last time that option was run and a report with the details. You can access the report by clicking the verification icon (✓).
Reconcile (load target system objects)
The main purpose of reconciling process is to provide a mechanism to ensure that all users are aligned on the specific roles and responsibilities. Reconcile process discovers new, changed, deleted, or orphaned accounts to determine user access privileges.
Not every system connector has the capabilities needed to execute the reconcile process.
When "Read only" property, in Basic parameters, is checked (selected value is Yes), the reconcile process only considers unmanaged accounts.
Soffid shows information about the last time that the option was run and a report with the details. You can access the report by clicking the verification icon (✓).
Load authoritative data for identities and groups
Identities use to live on authoritative identity sources and they do in Soffid as well. Each identity may have any number of accounts on each managed system.
That option performs the operations to load data of groups and data of identities from the managed system into Soffid, following the rules configured in the agent.
Soffid shows information about the last time that the option was run and a report with the details. You can access to the report by clicking the verification icon (✓).
Also, Soffid creates a parameter on the Soffid parameters page, with information about the version of the data. If you need to perform the load authoritative action, it will be mandatory to delete this parameter before perform the action.
Generate target system potential impact
That option allows you to generate a report with all the potential changes that would be performed on the managed system with the current agent configuration
If that option was performed previously, Soffid will show information about the last time that the option was run and the report with the potential impact. You can access the report by clicking the verification icon (✓).
Account metadata
Agents allow you to create additional data, on the "Account metadata" tab, to customize the accounts created for that agent. This additional information will be loaded with the agent's information, or calculated as defined in the mappings.
The additional data can be used in both mappings and triggers.
To get the Account Metadata value, or to put value, you need to use accountAttributes{"ATT_NAME"}
Standard attributes
- Code: short name used by scripts and connectors to access the underlying information. It is suggested to use short names without blanks or special characters to make it easier to use.
- Label: text displayed just beside the attribute value. It is advised to use short descriptions in order to keep the screen cleaner.
- Data type: The attributes can have different data types
- Prevent duplicated values: mark this field as a unique key for the object type. There is no chance of two objects with the same attribute value. Soffid smart engine will avoid the creation of duplicated objects.
- Multiple values: some attributes can contain multiple values for the same object. For instance, an attribute containing the languages a user can speak can be multi-valued, as a user can speak multiple languages.
- Maximum number of rows to display: when an attribute is multivalued, the screen size can grow a lot. To prevent such a big form, the system will only display a maximum number of values, and a scroll bar will appear to browse through the attribute values.
- Size: primarily for string attributes, specify the maximum length in characters of the attribute value.
- Values: primarily for string attributes, you can specify the allowed values for the attribute. Then, the text box that the user has to fill in the data will be replaced by a drop-down list.
- Visibility expression: write an optional BeanShell expression to check if the field should be displayed or not. The expression should return true or false. The following variables are exposed to the expression:
-
ownerObject: current object owning the attribute.
-
value: current attribute value.
-
requentContext: tip about the screen using the attribute.
-
inputField: the ZK input object (ZK Framework).
-
inputFields: a map to get access to any other ZK input object (ZK Framework).
-
serviceLocator: locator to use any Soffid engine microservice.
-
- Validation expression: write an optional BeanShell expression to check if the field value is acceptable or not. The expression should return true if the value is acceptable. If the expression returns false or any other object, a warning message will be displayed. When the expression returns a string value, the return value will be considered the warning message to present to the end-user. The following variables are exposed to the expression:
- ownerObject: current object owning the attribute
- value: current value to evaluate.
- requentContext: tip about the screen using the attribute
- inputField: the ZK input object (ZK Framework).
- inputFields: a map to get access to any other ZK input object (ZK Framework).
- serviceLocator: locator to use any Soffid engine microservice.
- onLoad trigger: write an optional BeanShell expression that will be executed just after preparing the user interface. The script can modify in any way the inputField object before it is displayed, but cannot modify other input fields.
The following variables are exposed to the expression:
-
- ownerObject: current object owning the attribute
- value: current value to evaluate.
- requentContext: tip about the screen using the attribute
- inputField: the ZK input object (ZK Framework).
- inputFields: a map to get access to any other ZK input object (ZK Framework).
- serviceLocator: locator to use any Soffid engine microservice.
-
- onChange trigger: write an optional BeanShell expression that will be executed just after the user has changed the object value. The script can modify in any way the inputField object or any other input fields.
The following variables are exposed to the expression:
-
-
- ownerObject: current object owning the attribute.
- value: current value to evaluate.
- requentContext: tip about the screen using the attribute.
- inputField: the ZK input object (ZK Framework).
- inputFields: a map to get access to any other ZK input object (ZK Framework).
- serviceLocator: locator to use any Soffid engine microservice.
-
-
Example 1
Into the attribute mappings save the value of account metadata:
varX <= accountAttributes{"att_name"}Example 2
Get the value from the attribute account metadata to use it into a trigger
strValue = source.get("attributes").get("att_name");
if (strValue != null) {
.....
.....
} else {
.....
.....
}Actions
Agents query actions
|
Query |
Allows you to query roles through different search systems, Basic and Advanced. |
|
Add new |
Allows you to add a new agent to the system. You can choose that option on the hamburger menu or click the add button (+). To add a new role it will be mandatory to fill in the required fields |
|
Delete |
Allows you to remove one or more agents by selecting one or more records and next clicking the button with the subtraction symbol (-). To perform that action, Soffid will ask you for confirmation, you could confirm or cancel the operation. |
|
Download CSV file |
Allows you to download a CSV file with the basic information of all agents. |
Agent detail actions
|
Apply changes |
Allows you to create a new agent or update an existing agent. To save the data it will be mandatory to fill in the required fields |
|
Preview changes |
When there are some changes to be applied (when the configuration agent is updated), you can check them with this option. If you click this button, Soffid will display a new window with the list of users to be updated. |
|
Apply now |
When the configuration agent is updated, this button will be displayed. If you click this option the update action will be performed. The progress bar will be displayed during the execution of the process. This action is performed asynchronously. |
|
Delete |
Allows you to delete a specific agent. You can choose that option on the trash icon. To perform that action, Soffid will ask you for confirmation, you could confirm or cancel the operation. |
|
Undo |
Allows you to quit without applying any changes made. |
|
Import |
Allows you to upload an XML file with the attribute mapping data. This option deletes previous attribute mappings and creates new attribute mapping. |
|
Export |
Allows you to export an XML file with attribute mappings. |
|
Create default mapping |
Allows you to create automatically default mappings for the specific Type selected. |
|
Test |
Check if there is a connection to the target system. |
Integration flows
|
Open flow |
Opens a window with the workflow. |
|
Test |
Allows you to test the workflow. |
Attribute mapping
|
Apply changes/Save |
Allows you to update the agent with the changes made on Attribute mappings. |
|
Add System Objects |
Allows you to add a new system object based on a Soffid object. You need to click the button with the add symbol (+) located at the end of the row of System Objects. Once you click the button, Soffid adds new fields to the form to add new attributes, properties, and/or Triggers depending on the agent type. It is mandatory to apply changes by clicking the diskette button to update the agent. |
|
Delete System Objects |
Allows you to delete a system object. You need to click the button with the subtraction symbol (-) located at the end of the row system object which you want to delete. It is mandatory to apply changes by clicking the diskette button to update the agent. |
|
Add Property |
Allows you to add properties to a specific system object. You need to click the button with the add symbol (+) located at the end of the row of Properties. Once you click the button, Soffid adds new fields to the form to add the property. It is mandatory to apply changes by clicking the diskette button to update the agent. |
|
Delete Property |
Allows you to delete properties from a specific system object. You need to click the button with the subtraction symbol (-) located at the end of the row property which you want to delete. It is mandatory to apply changes by clicking the diskette button to update the agent. |
|
Add System attribute |
Allows you to add attribute mappings to a specific system object. You need to click the button with the add symbol (+) located at the end of the row of the System attribute. Once you click the button, Soffid adds new fields to the form to add the attribute. It is mandatory to apply changes by clicking the diskette button to update the agent. |
|
Detele System attribute |
Allows you to delete attribute mappings of a specific system object. You need to click the button with the subtraction symbol (-) located at the end of the row System attribute which you want to delete. It is mandatory to apply changes by clicking the diskette button to update the agent. |
|
Test expression |
Allows you to test a system object. When you click that option, Soffid will show you new fields and operations to test the system attribute config. |
|
Synchronize now |
Allows you to synchronize a specific system object to the target system. |
|
Fetch system raw data |
Brings the data of a specific system object from a target system. |
|
Fetch Soffid object |
Brings the data of a specific system object with processed data to update into Soffid |
|
Add Trigger |
Allows you to add a trigger to a specific system object that will be executed when data is loaded into a target system. You need to click the button with the add symbol (+) located at the end of the row of Trigger. Once you click the button, Soffid adds new fields to the form to add the trigger. It is mandatory to apply changes by clicking the diskette button to update the agent. |
|
Delete Trigger |
Allows you to delete a trigger of a specific system object. You need to click the button with the subtraction symbol (-) located at the end of the row Trigger which you want to delete. It is mandatory to apply changes by clicking the diskette button to update the agent. |
Load triggers
|
Apply changes |
Allows you to update the Load trigger data with the changes made on the Load Trigger |
|
Add Trigger |
Allows you to add a trigger that will be executed when data is loaded into Soffid. You need to click the button with the add symbol (+) located at the end of the row. Once you click the button, Soffid adds new fields to the form to add the trigger. Then you need to select the Object and the type of trigger and write the customized script. Finally, you need to apply changes to update the agent. |
|
Delete Trigger |
Allows you to delete a trigger. You need to click the button with the subtraction symbol (-) located at the end of the row which you want to delete. It is mandatory to apply changes by clicking the diskette button to update the agent. |
Massive actions
|
Provisioning all users on to managed systems |
Run the process to ensure the users are created, with proper permissions, updated, disabled, or deleted on to managed systems. |
|
Propagate groups to agent |
Run the process to push all the groups of Soffid into the managed system. |
|
Reconcile (load target system objects) |
Run the process to discover new, changed, deleted, or orphaned accounts to determine user access privileges. |
|
Load authoritative data for identities and groups |
Run the process to load data of groups and data of identities from the managed system into Soffid |
|
Generate target system potential impact |
Generate a report with all the potential changes that would be performed on the managed system. |
Account metadata
|
Add account metadata |
Allows you to update the agent with the changes made on metadata. |
|
Add account metadata |
Allows you to add account metadata. You need to click the button with the add symbol (+) located at the end of the row. Once you click the button, Soffid shows you an empty form to fill in with the new account metadata. Finally, you need to apply changes. |
|
Delete account metadata |
Allows you to delete one account metadata. First, you need to click on the account metadata which you want to delete. Then Soffid shows a form with the detailed account metadata. On the hamburger icon of that form, you can find the delete action. In this case, Soffid will not ask you for confirmation to delete. |
Scripting
In the agent's configuration, it may be possible to use scripting to include logic in the attribute mappings and in the trigger scripts.
In the attribute mapping, if you use a script on one side, it will be mandatory to a single direction to the other side:
- System attribute <= script
- script => Soffid attribute
Below, an easy script to send a full name to the system:
system attribute <= return firstName + lastName;Below, a more complex script to create the main domain if it doesn't exist in Soffid:
String mailDomain = null;
if (email != void && email != null && email.contains("@")) {
String[] mailTokens = email.split("@");
mailDomain = mailTokens[1];
}
com.soffid.iam.service.MailListsService service = com.soffid.iam.ServiceLocator.instance().getMailListsService();
com.soffid.iam.api.MailDomain domain = service.findMailDomainByName(mailDomain);
if (domain==null) {
domain = new com.soffid.iam.api.MailDomain();
domain.setCode(mailDomain);
domain.setDescription(mailDomain);
domain.setObsolete(new Boolean(false));
domain = service.create(domain);
}
return mailDomain;
=> mailDomainYou could find a set of sample scripts: Sample scripts
You could find a link with the SCIM Query Language used in some methods as findUserByJsonQuery("query"). You can visit the SCIM chapter.
Below you could find a set of custom utility classes: Utility classes
More information
Password synchronization
The passwords a user has on an agent will be synchronized with any other "single user account" the user has on this agent. Shared accounts will never get their password synchronized.
Password in an agent will be also synchronized with any other account the user has on other agents that are sharing the same password domain.
The password change can be produced by an operator using the Soffid console, the user itself using the Soffid Self Service portal, or a timed automatic task. Furthermore, some managed systems can forward their password to Soffid in order to get them synchronized. In order to accept these password changes coming from managed systems, the trusted passwords box must be checked for the source agent.
Mind that this is the flow for normal user passwords. Temporary passwords generated by the Soffid console will only be sent to agents marked as trusted. Agents not checked as trusted will have a random new password instead. Later, when the user changes the password on Soffid or any trusted system, the new password will be notified to Soffid by the managed system, and every agent on the same password domain will actually get the new password.
Agents account management
The agent configuration sets the way accounts are created and disabled.
Whenever a user is modified, the following rules will be applied to check if the user should have or not an account on this agent:
- The user type is checked against valid user types.
- If there is a business unit or group bound to the agent, the user membership will be assessed.
- If the role based box is checked, the system will verify if the user has any role or entitlement assigned to this agent.
If the user does not apply for any of the conditions, every account the user has at this agent will be changed to Disabled status.
If the user verifies every one of the conditions, the user can have an account on this agent. Every account the user has at this agent will be changed to Enabled status.
Unless the "Manual account creation" is checked, if the user can have an account on this agent, but it has no one, the account creation method will be invoked. To create it, Soffid will search for the user domain bound to this agent and will follow its configuration. If the user domain is configured with a script, this script will be executed and the result value will be accepted as the new account name. Mind that if the script returns a null value, no account can be created.
If the returning value from the script clashes with an existing account, the existing account will remain unchanged, unless the existing account is marked as an unmanaged account. In such a case, the account will be changed from an unmanaged state to a single user.
Operational
Monitoring
After the agent configuration you could check on the monitoring page if the service is running in the Synchronization Server, please go to:
Tasks
Authoritative
If you are checked "Authorized identity source", an automatic task to load identities from the managed system to Soffid is available, please go to:
And you will something like "Import authoritative data from <AGENT_NAME>".
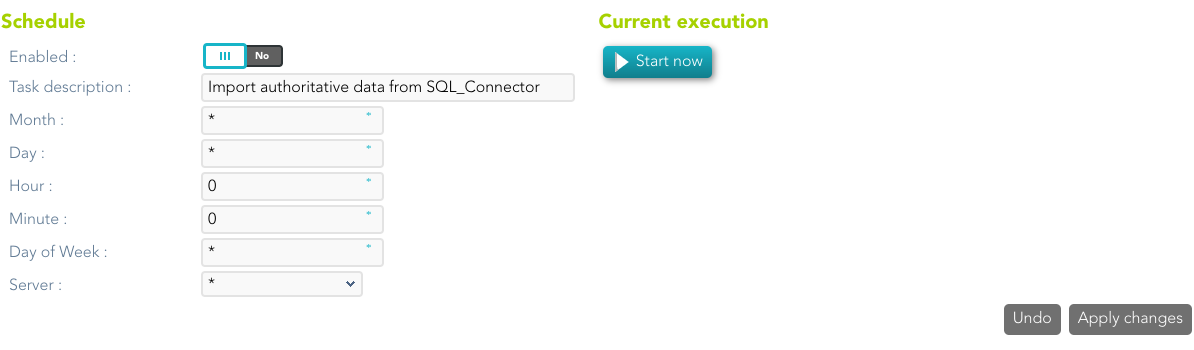
You can also run the Authoritative load from the Massive actions tab in the Agent
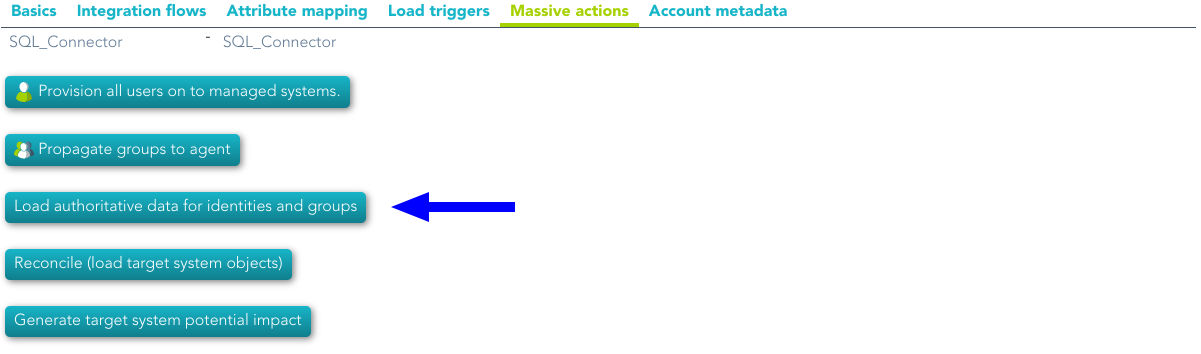
Reconcile
If you are configured the "Attribute Mapping" tab with some of our objects: "user, account, role, group or grant", an automatic task to synchronize these objects from the managed system to Soffid is available, please go to:
And you will do something like "Reconcile all accounts from <AGENT_NAME>".
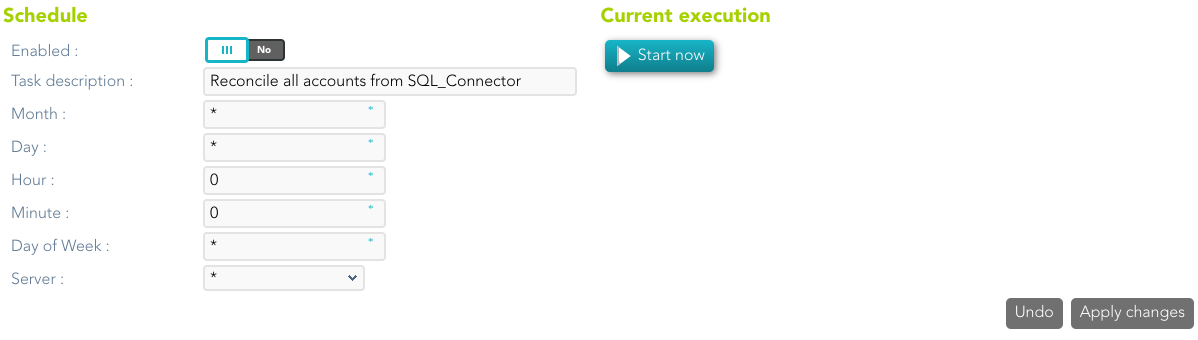
You can also run the Reconcile from the Massive actions tab in the Agent
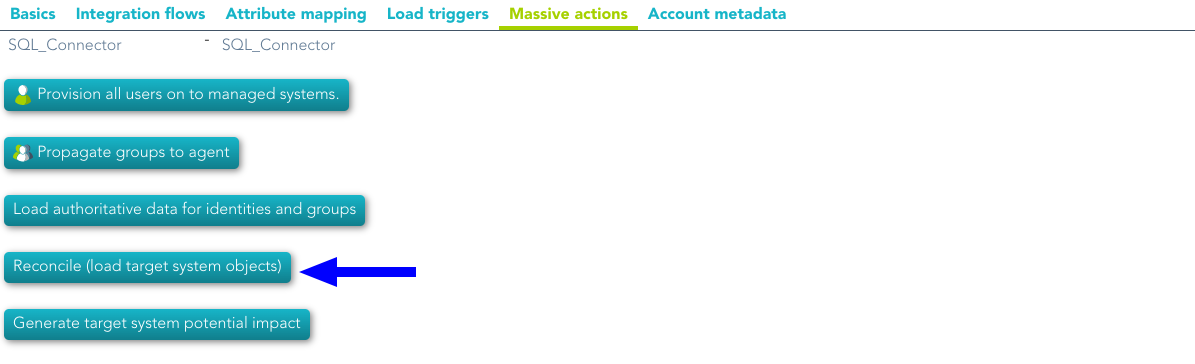
Synchronization
Regarding the synchronization of the objects, there are two possible options:
- If the "Read Only" attribute is checked in the "Basics" tab (select Yes option), only the changes in the managed systems will be updated in Soffid. We recommend these options until the global configuration of Soffid will be tested.
- If the "Read Only" attribute is not checked in the "Basics" tab (select No option), all the changes in Soffid or the managed system will be updated in the other. Note that this synchronization must be configured in the "Basic" tab correctly.
Synchronization servers
Description
Sync server is the engine responsible for connecting Soffid with data sources or managed systems.
Soffid allows you to configure different synchronization servers. These synchronization servers are installed and configurated using command line tool.
More information about how to install sync server on the Installation chapter. Here you can find information on how to install a sync server in different environments.
Whenever an action is performed on any Soffid object, a synchronization task is created in Soffid database.
Initially, most of the tasks should be forwarded to every managed system connector. The specific system connector will be responsible for applying (or ignoring) the task to the managed system.
The normal synchronization server flow for a task is as follows:
1. Engine timely reads pending tasks table (SC_TASQUE). To avoid two sync servers to process the same task, the column TAS_SERVER is updated to reflect the actual server that is processing it.
2. Engine manage tasks priorities and updates the task queue. Engine keeps track of one task queue for each managed system connector.
Soffid allows you to configure the parameter soffid.sync.engine.threads with the number of threads available to run the tasks.
For more information about this parameter you can visit the Soffid Parameter page.
3. Engine has created some execution threads to forward each task to the specific connector class. During this process, dispatcher can decide to reject (mark as done) the task without forwarding it.
4. The specific connector class gets additional information about the task from core services.
5. Task is removed from database when every dispatcher has done it.
This architecture and its optimized engine allow Soffid to achieve great performance.
Screen overview


Standard attributes
- Name: name of the synchronization server.
- URL: URL of the synchronization server.
- Type: there are different kinds of synchronization servers:
- Synchronization server: that server connects to the main database and allocates the task to the different agents.
- Synchronization agent proxy: uses a push mechanism. The main Synchronization server will send the tasks to the synchronization agent proxy when it detects tasks for the proxy. That server does not connect to the main database.
- Remote synchronization server: uses a pull mechanism. That server is asking for its tasks, when it asks and the Synchronization server has a task for the remote, the Synchronization server will send that tasks. That server does not connect to the main database.
- Synchronization agent gateway: this server is the broker between the main synchronization server and the remote servers.
- Java options: additional parameters to pass to JVM (Java Virtual Machine). Some useful parameters:
- For a high capacity server are:
-Xmx1024M - For debugging communication: -Djavax.net.debug=ssl
- To enable sync server to use old TLS version in client connections (from sync server to a managed system) add
-Djdk.tls.client.protocols=TLSv1,TLSv1.1(Be in mind TLSv1.2 will be the default version, but some old applications can use TLSv1) - To enable sync server to use old TLS version for incoming connections (from a server or desktop to the sync server) add
-Dsoffid.tls.protocols=TLSv1.1,TLSv1,TLSv1.2,TLSv1.3 -Dsoffid.tls.excludedCiphers="^.*_(MD5)$"Mind that the system security can be compromised by using deprecated TLS protocols - To define how long Java keeps the DNS (domain name resolution) responses in cache you can add the paramameters
-Dsun.net.inetaddr.ttl=1or the newest-Dsun.net.inetaddr.ttl=1"time-to-live" (TTL).
- For a high capacity server are:
If you change the Java Options of an existing Syncserver, you will need to restart the Syncserver. You can visit the Sync server monitoring page for more information about how to restat the Syncserver.
If you are working on Soffid Console version 2.x to change the capacity you need to edit the iam-console.vmoptions file and change the -Xmx attribute.
Actions
Synchronization server query
|
Download CSV file |
Allows you to download a CSV file with the information of all synchronization servers. |
Synchronization server detail
| Apply changes | Allows you to save the synchronization server data and quit. |
| Save | Allows you to save the synchronization server data |
| Undo | Allows you to undo the changes to quit without save them. |
| Delete |
To delete a sync server you can click on the hamburger icon and then click the delete button (trash icon). Soffid will ask you for confirmation to perform that action, you could confirm or cancel the operation. |
Account naming rules
Definition
Account naming rules define how to generate account names to connect with final systems. The normal case is the account name will be the same as the user name, in other cases, here you could define the customized account name rules.
When you are configuring an agent, you have to indicate the user domain which will be used to create new accounts, that user domain refers to the Account naming rules defined on the Soffid console. You can visit the Agents page for more information.
Standard attributes
- Code: code used to identify the account naming rule.
- Description: a brief description of the rule. That value will be displayed to select the user domain on the agent's setup.
- User domain type: use to define the kind of
- Main user name: use the main user name.
- Assigned by the operator: the operator will assign the account name.
- Script: allows you to configure the script condition and script creation of account naming.
- Server Addon: allows selecting an addon to generate the account naming rules.
- Generator: allows you to select an addon when the user domain type selected is "Server addon".
- Create account condition: defines the conditions to enable or prevent the creation of the account. It is only available when the Script option is selected in the User domain type.
- Script: computes the name to assign to the user account. If the script returns null, the account is not going to be created. It is only available when the Script option is selected in the User domain type.
Create account condition
The create account condition enables or prevents the creation of the account.
Available objects
| user | User object: Details |
| attributes | User attributes map |
| groups |
The groups that the user belongs to. It's composed of a java map. The key is the group name, and the value is the Group object |
| groupsList |
The groups that the user belongs to. It's composed of a java list of Group objects |
| serviceLocator | Helper to get access to Soffid microservices |
| userDomain | User domain object |
| system | Target system object |
Expected result
| boolean | Return true if the account can be created |
Examples
Only users with mail address in soffid.com can have an account:
"soffid.com".equals(user.mailDomain)Account name Script
The create account script computes the name to assign to the user account. If the script returns null, the account is not going to be created.
Available objects
| user | User object: Details |
| attributes | User attributes map |
| groups |
The groups that the user belongs to. It's composed of a java map. The key is the group name, and the value is the Group object |
| groupsList |
The groups that the user belongs to. It's composed of a java list of Group objects |
| serviceLocator | Helper to get access to Soffid microservices |
| userDomain | User domain object |
| system | Target system object |
Expected result
| String | Return the account name to use |
Example
// Uses the email address as the account name
user.shortName+"@"+user.mailDomainActions
Account naming rules query
|
Add new |
Allows you to add a new account naming rule in the system. To add a new agent it is necessary to fill in the required fields. |
|
Delete |
Allows you to remove one or more agents by selecting one or more records on the list. |
|
Export |
Allows you to export a CSV file with the account naming rules configuration. |
|
Import |
Allows you to upload a CSV file with the account naming rules configuration to add new rules to the system. First, you need to pick up a CSV file, that CSV has to contain a specific configuration. Then you need to check the contents. And finally, you need to select the mappings for each column of the CSV file to import the data correctly and click the Import button. |
Account naming rules detail
|
Apply changes |
Allows you to save new account naming rules or to save an updated account naming rule. |
|
Undo |
Allows you to undo any changes made. |
|
Delete |
Allows you to remove one account naming rule. |
Attribute translation tables
Definition
Soffid provides an easy to use mechanism to translate references or external codes into internal codes. For example, the HHRR application could be using a diferent coding scheme for business units.
To deal with this data mismatch, users can extend the data model, or can either use translation tables. This screen allows the user to create and maintain such tables. This tables can also be downloaded or uploaded as CSV files, enable the import of data contained into spreadsheets.
Usage of translation table is bound, but not restricted to, attribute translation expressions, by using trigger scripts, through the use of serverService interface.
Screen overview

Standard attributes
- Domain: the domain column represents the translation table name.
- Column 1
- Column 2
- Column 3
- Column 4
- Column 5
Column 1 to 5 meaning is user defined. Usage of translation table is bound, but not restricted to, attribute translation expressions, through the use of serverService interface.
Actions
|
Query |
Allows to query groups through different search systems, Quick, Basic and Advanced. |
|
Add new |
Allows you to add a new attribute translation table. That option adds a new row on the table to fill in the data. It will be mandatory to apply changes to save the data. |
|
Delete |
Allows you to remove one or more agents by selecting one or more records on the list. Or delete one by one. |
|
Import |
Allows you to upload a CSV file with the attribute translation table data to add to the system. First, you need to pick up a CSV file, that CSV has to contain a specific configuration. Then you need to check the contents. And finally, you need to select the mappings for each column of the CSV file to import the data correctly and to click the Import button. |
|
Download CSV file |
Allows you to download a CSV file with the information of all attribute translation tables. |
|
Apply changes |
Allows you to save new attribute translation tables or to save updated attribute translation tables. |
|
Undo |
Allows you to undo any changes made. |
Examples
Example 1
Long userId = source{id};
for ( account: serverService.getUserAccounts(userId, "AD soffid.pat")) {
//TO-DO
}Example 2
lCentros = serviceLocator.getAttributeTranslationService().findByColumn1("CENTROS", "Madrid");
if (lCentros != null) {
for (var i = 0; i < lCentros.length; i++) {
if (lCentros[i] != null) {
out.println("** Centro - " + lCentros[i].column1 + " - " + lCentros[i].column2 + " - "
+ lCentros[i].column3 + " - " + lCentros[i].column4);
}
}
}Example 3
lServer = serviceLocator.getAttributeTranslationService().findByExample("SERVER_COPIAS", null, null);
if (lServer != null) {
out.println("** SERVER_COPIAS - " + lServer);
}Soffid Objects
You can consult the list of Soffid attributes:
- User Object
- Account Object
- Group Object
- Role Object
- Grant Object
- Maillist Object
- Membership Object
- dispatcherService
- Authoritative change object
User object
A user objects are maps that hold the information belonging to a single user account.
|
Attribute
|
Type
|
Description
|
|---|---|---|
| id | Long | user id |
| accountId | Long | account id |
| accountName | String | account name |
| system | String | managed system (agent) name |
| accountDescription | String | account description |
| active | Boolean | true if user is active |
| accountDisabled | Boolean | true if account is diabled |
| mailAlias | String | blank separated mails |
| userName | String | user name |
| primaryGroup | String | user's primary group name |
| comments | String | user's comments |
| createdOn | Date | user creation date |
| modifiedOn | Date | user last modification date |
| mailDomain | Date | user mail domain ( email right side of @) |
| fullName | String | user full name |
| shortName | String | user mail name (email left side of @) |
| firstName | String | user first name |
| lastName | String | user last name |
| lastName2 | String | user second last name (when applicable) |
| mailServer | String | mail server host name |
| homeServer | String | home drive server host name |
| profileServer | String | roaming profile server host name |
| phone | String | user's phone number |
| userType | String | user type |
| createdBy | String | user name creator of this user |
| modifiedBy | String | user name modifier of this user |
| secondaryGroups | List<Map<String,Object>> |
list of groups the user belongs to, including primary group The attributes of the inner map are described later |
| attributes | Map<String,String> | additional user attributes |
| grantedRoles | List<Map<String,Object>> | list of grants directly granted to the user |
| allGrantedRoles | List<Map<String,Object>> | list of grants directly on indirectly granted to the user |
| granted | List<String> | list of role names and group names directly granted to the user |
| allGranted | List<String> | list of role names and group names directly or indirectly granted to the user |
Account object
An account object holds the information belonging to an account.
|
Attribute
|
Type
|
Description
|
|---|---|---|
| accountDescription | String | account description |
| accountDisabled | Boolean | true if account is diabled |
| accountId | Long | account id |
| accountName | String | account name |
| allGranted | List<String> | list of role names directly or indirectly granted to the user |
| allGrantedRoles | List<Map<String,Object>> | list of grants directly on indirectly granted to the user |
| attributes | Map<String,String> | additional account attributes |
| granted | List<String> | list of role names directly granted to the user |
| grantedRoles | List<Map<String,Object>> | list of grants directly granted to the user |
| lastLogin | Calendar | lastLogin |
| lastPasswordUpdate | Calendar | lastPasswordUpdate |
| lastUpdate | Calendar | lastUpdate |
| passwordExpiration | Calendar | passwordExpiration |
| passwordPolicy | String | password policy |
| system | String | managed system (agent) name |
| type | AccountType | "U"=user, "S"=shared, "P"=privileged, "I"=ignored |
Group object
An group object holds the information belonging to a group.
|
Attribute
|
Type
|
Description
|
|---|---|---|
| groupId | Long | group id |
| name | String | group name |
| description | String | group description |
| parent | String | parent group name |
| server | String | home server host name |
| disabled | boolean | true if the group is disabled |
| accountingGroup | String | group accounting information |
| type | String | group type |
| driveLetter | String | home server letter to connect to |
| users | List<Map<String,Object>> | list of users belonging to this group |
| userNames | List<String> | list of user names belonging to this group |
| allUsers | List<Map<String,Object>> | list of users directly or indirectly belonging to this group |
| allUserNames | List<String> | list of user names either directly or indirectly grantee of this role |
| grantedRoles | List<Map<String,Object>> | list of roles granted to this group |
| grantedRoleNames | List<String> | list of role names granted to this group |
Role object
An role object holds the information belonging to a role.
|
Attribute
|
Type
|
Description
|
|---|---|---|
| roleId | Long | role id |
| system | String | managed system (agent) name |
| name | String | role name |
| application | String | application system name |
| category | String | role category |
| passwordProtected | boolean | true if role should be password protected (where applicable) |
| description | String | Role description |
| wfmanaged | boolean | true if role should be displayed in self service requests |
| domain | String | custom domain for this role: Use com.soffid.iam.api.DomainType constants or configured custom domain |
| ownedRoles | List<Map<String,Object>> | list of roles granted to this one |
| ownerRoles | List<Map<String,Object>> | list of roles grantee of this one |
| ownerGroups | List<Map<String,Object>> | list of groups grantee of this role |
| grantedAccountNames | List<String> | list of account names directly grantee of this role |
| grantedAccounts | List<Map<String,Object>> | list of users directly grantee of this role |
| allGrantedAccountNames | List<String> | list of account names either directly or indirectly grantee of this role |
| allGrantedAccounts | List<Map<String,Object>> | list of users either directly or indirectly grantee of this role |
| attributes | Map<String,Object> | role's custom attributes |
Grant object
Grant, grantedRole & allGrantedRoles
The objects grant, grantedRole and allGrantedRoles are used to assing roles to accounts and roles.
|
Attribute
|
Type
|
Description
|
|---|---|---|
| domainValue | String | grant value (if any) |
| grantedRole | String | granted role name |
| grantedRoleId | Long | granted role id |
| grantedRoleObject | role object | granted role |
| grantedRoleSystem | String | granted role managed system (agent) name |
| id | Long | grant id |
| ownerAccount | String | grantee account name |
| ownerAccountObject | account object | grantee account |
| ownerGroup | String | grantee group name |
| ownerRoleId | String | grantee role id |
| ownerRoleName | String | grantee role name |
| ownerSystem | String | grantee account or role managed system name |
| ownerUser | String | grantee user name |
By default, use the grantedRole object
The grant object adds the roles and the groups, use it only in this case
Examples
Grant
Example to map a grant object (assign a role to an account):
|
System attribute
|
Direction
|
Soffid attribute
|
|---|---|---|
| role_name | => | grantedRole |
| account_name | => | ownerAccount |
GrantedRole
Example to map a grantedRole object (assign a role as a child of another role):
|
System attribute
|
Direction
|
Soffid attribute
|
|---|---|---|
| role_name | => | grantedRole |
| parent_role_name | => | ownerRoleName |
AllGrantedRoles
Example to map a allGrantedRoles object in a holderGroup (assign a role to an account in a specific group):
|
System attribute
|
Direction
|
Soffid attribute
|
|---|---|---|
| role_name | => | grantedRole |
| parent_role_name | => | ownerRoleName |
| group_code | => | domainValue |
| group_code | => | holderGroup |
| userName | => | ownerUser |
Maillist object
|
Attribute
|
Type
|
Description
|
|---|---|---|
| id | Long | internal mail list id |
| name | String | mail list name ( the initial part, before the @ sign) |
| domain | String | mail list domain ( the remaining part after the @ sign) |
| system | String | managed system (agent) name |
| description | String | mail list description |
| users | String array | user names that are bound to this mail list |
| groups | String array | group names thta are subscribed to this mai list |
| roles | String array | role names that grant access to this mail list |
| lists | String array | Nested mail lists |
| explodedUsers | String array | Names of the users that should be subscribed to this mail list, including the users that should be subscribed due to group or role membership |
| explodedUserAddresses | String array | Mail addresses of any exploded User |
Membership object
A membership object contains the user account information as well as the group the user belongs to.
|
Attribute
|
Type
|
Description
|
|---|---|---|
| userName | String | User name |
| user | Map<String,Object> | user object |
| groupName | String | Group name |
| group | Map<String,Object> | group object |
| attributes | Map<String,Object> | Membership custom attributes |
dispatcherService
dispatcherService is an object available from agents' attribute translation rules.
This object contains four methods:
|
method name
|
parameters
|
result type
|
comments
|
|---|---|---|---|
| soffidToSystem | ExtensibleObject soffidObject | ExtensibleObject |
Uses attribute translation tables to transform a soffid object to a target system object. Mind to fill-in objectType property to use the proper object mapping |
| systemToSoffid | ExtensibleObject systemObject | ExtensibleObject |
Uses attribute translation tables to transform a target system object to a Soffid object. Mind to fill-in objectType property to use the proper object mapping |
| search | ExtensibleObject exampleObject | ExtensibleObject |
Uses the exampleObject to perform a query by example on the target system. If the object exists on the target system, it is returned. Mind to fill-in objectType property with the desired system object type |
| invoke |
String verb String action Map parameters |
List of Map |
This method allows arbitrary executions on the target system, but it semantics can change depending on the connector used. For instance, it can be used to perform a GET on the target system in REST connector, can issue an LDAP query on ActiveDirectory connector, can execute a SELECT sentence on a SQL connector, or can execute an operating system command in Shell connector. The results are returned as a list of objects (map). |
Examples
Snippet to query the sys_id attribute for a grant owner
System.out.println("Searching id for "+ownerRoleName);
com.soffid.iam.sync.intf.ExtensibleObject eo = new com.soffid.iam.sync.intf.ExtensibleObject();
eo.setObjectType("ROLE");
eo{"name"} = ownerRoleName;
eo = dispatcherService.search(eo);
System.out.println("FOUND "+eo{"sys_id"});
return eo{"sys_id"};Snippet that performs a REST query to get group to role assignments in ServiceNow
list = dispatcherService.invoke ("GET",
"https://arxusdev.service-now.com/api/now/table/sys_group_has_role?sysparm_exclude_reference_link=true&sysparm_display_value=all&sysparm_fields=role%2Cgroup&sysparm_query=group="+sys_id,
null).
get(0).get("result")
r = new java.util.LinkedList();
for ( d: list)
{
grant = new java.util.HashMap();
grant{"grantedRole"} = d.get("role").get("display_value");
grant{"grantedRoleSystem"} = "ServiceNow";
grant{"ownerRoleName"} = name;
grant{"ownerSystem"} = "ServiceNow";
r.add (grant);
}
return r;Snippet of invoke usage on a relational database
// Table ITREPRT
role = source{"granted"}.size() == 0 ? "" : source{"granted"}.get(0);
System.out.println ("************** ROLE "+role);
args = new java.util.HashMap();
args.put("user", source{"accountName"}.toUpperCase());
if (role.equals ("Receptores PR") || role.equals("Jefes_Personal")) {
r = dispatcherService.invoke("select", "* from ITREPRT where IDUSER=:user", args);
if (r.size() == 0) {
dispatcherService.invoke("insert", "into ITREPRT(IDUSER,NOMECO) values (:user, 1)", args);
}
} else {
dispatcherService.invoke("delete", "from ITREPRT where IDUSER=:user", args);
}
// TABLE MRGEUCT
cc = source{"attributes"}{"dominio"};
if ( source{"userType"} .equals ("T")) {
cc = source{"userName"}.substring(1);
}
while (cc != null && cc.startsWith("0")) cc = cc.substring(1);
System.out.println ("************** COST CENTER "+cc);
if (cc != null && ! cc.trim().isEmpty())
{
args = new java.util.HashMap();
args.put("user", source{"accountName"}.toUpperCase());
args.put("cc", cc);
r = dispatcherService.invoke("SELECT", "* from MRGEUCT where IDUSER=:user and MOARPR=:cc", args);
if (r.size() == 0) {
dispatcherService.invoke("INSERT", "into MRGEUCT(MOARPR,CENTRA, IDUSER, NOTIFI ) "+
"values ('II', :cc, :user, 'S')", args);
dispatcherService.invoke("INSERT", "into MRGEUCT(MOARPR,CENTRA, IDUSER, NOTIFI ) "+
"values ('BM', :cc, :user, 'S')", args);
dispatcherService.invoke("DELETE", "FROM MRGEUCT WHERE CENTRA!=:cc AND IDUSER=:user", args);
}
}
return true;Snippet of invoke usage on a Active Directory I
hashMap = new java.util.HashMap();
list = serviceLocator.getDispatcherService().invoke("AD soffid.pat",
"select",
"(&(objectClass=user))",
hashMap);
out.println("** list.size -- " + list.size());Snippet of invoke usage on a Active Directory II
ACC = source{"accountName"};
la = dispatcherService.invoke("AD soffid.pat", "(&(objectClass=user)(sAMAccountName=userName))", new java.util.HashMap());Authoritative change object
A user objects are maps that hold the information belonging to a single user account
|
Attribute
|
Type
|
Description
|
|---|---|---|
| id | Long | user id |
| accountId | Long | account id |
| accountName | String | account name |
| system | String | managed system (agent) name |
| accountDescription | String | account description |
| active | Boolean | true if user is active |
| accountDisabled | Boolean | true if account is diabled |
| mailAlias | String | blank separated mails |
| userName | String | user name |
| primaryGroup | String | user's primary group name |
| comments | String | user's comments |
| createdOn | Date | user creation date |
| modifiedOn | Date | user last modification date |
| mailDomain | Date | user mail domain ( email right side of @) |
| fullName | String | user full name |
| shortName | String | user mail name (email left side of @) |
| firstName | String | user first name |
| lastName | String | user last name |
| lastName2 | String | user second last name (when applicable) |
| mailServer | String | mail server host name |
| homeServer | String | home drive server host name |
| profileServer | String | roaming profile server host name |
| phone | String | user's phone number |
| userType | String | user type |
| createdBy | String | user name creator of this user |
| modifiedBy | String | user name modifier of this user |
| secondaryGroups | List<Map<String,Object>> |
list of groups the user belongs to, including primary group The attributes of the inner map are described in the link |
| secondariGroups2 | List<Map<String,Object>> |
list of user memberships, excluding primary group The attributes of the inner map are described link |
| attributes | Map<String,String> | additional user attributes |
| grantedRoles | List<Map<String,Object>> | list of grants directly granted to the user |
| allGrantedRoles | List<Map<String,Object>> | list of grants directly on indirectly granted to the user |
| granted | List<String> | list of role names and group names directly granted to the user |
| allGranted | List<String> | list of role names and group names directly or indirectly granted to the user |
Sample scripts
Note that Soffid supports different scripting languages, you can configure it in the Smart engine settings screen.
Additionally, in the initial configuration of the container, we can configure the SOFFID_TRUSTED_SCRIPTS environment variable to allow the use of insecure classes. You can find this information visiting the Installing IAM Console page.
Table of contents
1. Agent scripts
User full name
return firstName + lastName;Create mainDomain if it doesn't exit
String mailDomain = null;
if (email != void && email != null && email.contains("@")) {
String[] mailTokens = email.split("@");
mailDomain = mailTokens[1];
}
com.soffid.iam.service.MailListsService service = com.soffid.iam.ServiceLocator.instance().getMailListsService();
com.soffid.iam.api.MailDomain domain = service.findMailDomainByName(mailDomain);
if (domain==null) {
domain = new com.soffid.iam.api.MailDomain();
domain.setCode(mailDomain);
domain.setDescription(mailDomain);
domain.setObsolete(new Boolean(false));
domain = service.create(domain);
}
return mailDomain;Recover active agents
llistaAgents = serviceLocator.getDispatcherService().findAllActiveDispatchers();
for(agent:llistaAgents) {
out.println("Nom: " + agent.name);
out.println("Class Name: " + agent.className + "\n");
}Show by a user the agents that have associates
llistaUsuaris = serviceLocator.getUserService().findUserByJsonQuery("userName eq \"Ivan\" ");
for(usuari:llistaUsuaris) {
out.println("Usuario: " + usuari.userName);
llisstacuentas = serviceLocator.getAccountService().findAccountByJsonQuery("users.user.userName eq \""+usuari.userName+"\" ");
for(cuenta:llisstacuentas){
out.print(" Cuenta : " + cuenta.name);
out.println(" ID: " + cuenta.id);
llistaRole = serviceLocator.getApplicationService().findRoleAccountByAccount(cuenta.id);
for(role:llistaRole){
out.print(" Role: " + role.roleName + "\n");
out.println(" Aplicacion: " + role.informationSystemName);
out.println(" Agente: " + role.system);
}
}
}2. Identity scripts
Recover a user for userName
u = serviceLocator.getUserService().findUserByUserName("Ivan");
out.print("Usuari: " + u.firstName);Recover a users from a Jquery
llistaUsuari = serviceLocator.getUserService().findUserByJsonQuery("firstName sw \"A\" AND lastName sw \"V\" ");
for (usuari:llistaUsuari){
out.println("Usuari: " + usuari.userName);
}Print some attributes
u = serviceLocator.getUserService().findUserByUserName("02");
out.println("UserName: " + u.userName);
out.println("Name: " + u.firstName);
out.println("LastName: " + u.lastName);Print by user the email
u = serviceLocator.getUserService().findUserByUserName("02");
out.print("Email: " + u.shortName + "@" + u.mailDomain);Print by user some additional data
llistaDadesUsuari = serviceLocator.getUserService().findUserDataByUserName("18008366X");
for(dadaUsuari:llistaDadesUsuari){
out.println("Atributs " + dadaUsuari.attribute + " = " + dadaUsuari.value);
}Create a new identity
try {
newUser = new com.soffid.iam.api.User();
//Instanciar un nuevo objeto de tipo usuario
newUser.userName = "IvanVis"; //Faltan 6 parametres
newUser.firstName = "Ivannn";
newUser.lastName = "Visarttt";
newUser.userType = "I";
newUser.profileServer = "null" ;
newUser.homeServer = "null" ;
newUser.mailServer = "null" ;
newUser.primaryGroup = "world";
newUser.active = true;
serviceLocator.getUserService().create(newUser);
}catch(Exception e){
e.printStackTrace(out);
}Update an identity
u = serviceLocator.getUserService().findUserByUserName("Ivan");
u.firstName = "Ivaaan1";
u = serviceLocator.getUserService().update(u);
out.print(u.firstName);
out.print(u.userName);Delete an identity
try {
u = serviceLocator.getUserService().findUserByUserName("02");
serviceLocator.getUserService().delete(u);
} catch(Exception e) {
e.printStackTrace(out);
}3. Account scripts
Recover accounts of user
la = serviceLocator.getAccountService().findAccountByJsonQuery("users.user.userName eq \"02\" ");
for(a:la) {
out.println("Cuenta: " + a.name);
out.println("ID: " + a.id);
out.println("System: " + a.system + "\n");
}Remove attribute values of a metadata
public void removeUnAttributeValues(String attribute, String system) {
la = serviceLocator.getAccountService().findAccountByJsonQuery("system eq \""+system+"\"");
for (a : la) {
laa = serviceLocator.getAccountService().getAccountAttributes(a);
for (aa : laa) {
if (aa.attribute.equals(attribute)) {
if (aa.value!=null) {
out.print("accountName: "+accountName+", attribute.value: "+aa.value);
serviceLocator.getAccountService().removeAccountAttribute(aa);
out.println(" ---> removed");
}
}
}
}
}
removeUnAttributeValues("manager","OSCM");4. Role scripts
Recover roles of a user
user = serviceLocator.getUserService().findUserByUserName("Ivan");
out.println("Usuari: " + user.userName + "\n");
rolsUser = serviceLocator.getUserService().findUserRolesHierachyByUserName(user.userName);
for(listrRolsUser:rolsUser){
out.println("Nombre: " + listrRolsUser.name);
out.println("Descripcion: " + listrRolsUser.description);
out.println();
}Print the associated roles for each account
llistaUsuaris = serviceLocator.getUserService().findUserByJsonQuery("userName eq \"Ivan\" ");
for(usuari:llistaUsuaris){
llisstacuentas = serviceLocator.getAccountService().findAccountByJsonQuery("users.user.userName eq \""+usuari.userName+"\" ");
for(cuenta:llisstacuentas){
out.print(" Cuenta : " + cuenta.name);
llistaRole = serviceLocator.getApplicationService().findRoleAccountByAccount(cuenta.id);
for(role:llistaRole){
out.print(" Role: " + role.roleName + "\n");
}
}
}Print for an account the roles and applications for each of them
llistaUsuaris = serviceLocator.getUserService().findUserByJsonQuery("userName eq \"Ivan\" ");
for(usuari:llistaUsuaris){
llisstacuentas = serviceLocator.getAccountService().findAccountByJsonQuery("users.user.userName eq \""+usuari.userName+"\" ");
for(cuenta:llisstacuentas){
out.print(" Cuenta : " + cuenta.name);
out.println(" ID: " + cuenta.id);
llistaRole = serviceLocator.getApplicationService().findRoleAccountByAccount(cuenta.id);
for(role:llistaRole){
out.print(" Role: " + role.roleName + "\n");
out.println(" Aplicacion: " + role.informationSystemName);
}
}
}Print the roles associated with each account
usuCuenta = serviceLocator.getUserService().findUserByJsonQuery("");
for(listaUsuCuenta:usuCuenta) {
out.println("Usuario: " + listaUsuCuenta.userName);
out.println("Nombre: " + listaUsuCuenta.firstName);
rolsUser = serviceLocator.getUserService().findUserRolesHierachyByUserName(listaUsuCuenta.userName);
for(listaRolsUser:rolsUser){
out.println("Nombre del Rol: " + listaRolsUser.name);
out.println("Descripcion: " + listaRolsUser.description);
out.println();
}
}Create a new role
try {
newRol = new com.soffid.iam.api.Role();
newRol.name = "Rol_New_Script";
newRol.description = "Rol Script";
newRol.informationSystemName = "SOFFID";
newRol.system = "APLICACION01";
serviceLocator.getApplicationService().create(newRol);
} catch(Exception e){
e.printStackTrace(out);
}Update a role
editRole = serviceLocator.getApplicationService().findRoleByJsonQuery("name eq \"Rol editado por script\" and informationSystemName eq \"APLICACION01\" ");
for (role:editRole){
out.println(role.name);
role.name = "ROL01";
role = serviceLocator.getApplicationService().update(role);
out.print(role.name);
}Delete a role
try {
editRole = serviceLocator.getApplicationService().findRoleById(232734);
serviceLocator.getApplicationService().delete(editRole);
} catch(Exception e){
e.printStackTrace(out);
}List the roles of an application
list = serviceLocator.getApplicationService().findRoleByJsonQuery("informationSystemName eq \"SOFFID\"");
for (role : list) {
out.println(role.name);
}5. Mail scripts
Send email
import javax.mail.BodyPart;
import javax.mail.internet.MimeBodyPart;
import javax.activation.DataHandler;
import javax.activation.FileDataSource;
import java.util.ArrayList;
path = "/tmp/";
name = "file.txt";
BodyPart att = new MimeBodyPart();
att.setDataHandler(new DataHandler(new FileDataSource(path+name)));
att.setFileName(name);
to = "aretha@soffid.com";
cc = "etaylor@soffid.com";
subject = "This is an email with attachment ";
body = "In this email you can see an attachment.";
mimeBodyParts = new ArrayList();
mimeBodyParts.add(att);
serviceLocator.getMailService().sendHtmlMail(to, subject, body, mimeBodyParts);
serviceLocator.getMailService().sendHtmlMail(to, cc, subject, body, mimeBodyParts);
serviceLocator.getMailService().sendTextMailToActors(new String[]{"aretha"}, subject, body, mimeBodyParts);
serviceLocator.getMailService().sendTextMailToActors(new String[]{"aretha"}, cc, subject, body, mimeBodyParts);
out.println("Mails sent!");Utility classes
Crypt
Crypt allows to encrypt text with different algorithms and verify the resulting hash.
To use this class: com.soffid.iam.crypt.Crypt
All methods are static:
hash(String algorithm, String text) -> String
pBKDF2Sha256(String text, String utf8Salt, int iterations) -> String
pBKDF2Sha256(String text, byte []salt, int iterations) -> String
pBKDF2Sha1(String text, String utf8Salt, int iterations) -> String
pBKDF2Sha1(String text, byte []salt, int iterations) -> String
genSaltBytes() -> byte[] // 8 bytes
genSaltBytes(int size) -> byte[]
genSalt() -> String // 8 bytes
genSalt(int size) -> String
verify(String algorithm, String text, String hash) -> boolean
The algorithms allowed are:
- bcrypt
- pBKDF2Sha256
- pBKDF2Sha1 (or pBKDF2)
- Base64 (used by default is the algorithm is not in the previous list)
One example:
String myText = "abcd";
String myAlgorithm = "bcrypt";
String myHash = com.soffid.iam.crypt.Crypt.hash(myAlgorithm, myText);
boolean isVerified = com.soffid.iam.crypt.Crypt.verify(myAlgorithm, myText, myHash);
if (isVerified) {
return myHash;
} else {
return null;
}CalendarConverter
CalendarConverter allows to covert Calendar into String.
To use this class: com.soffid.iam.json.CalendarConverter
The methods (non static):
toString(Calendar instance) -> String
fromString(final String text) -> CalendarOne example:
out.println(new com.soffid.iam.json.CalendarConverter().toString(date));Network discovery
Description
The Network discovery tool will be in charge to scan the networks to find the hosts and retrieve information about user accounts. Network discovery can detect system accounts as well.
First of all, you need to create the networks that you want to scan. Visit the Networks page for more information. Then, on the Network discovery page, you need to configure for each network, the accounts and passwords of potential administrators to connect to the host and retrieve the information. And finally, you need to start the process execution or you can schedule the execution of the network discovery task.
The operating system of machines can be Windows or Linux and it is not necessary to install any additional software on those machines.
When the Network discovery process is finished, it is recommended to launch the Reconciliation process of the agents created by the process to detect the Account protected services. To know how to run the Renconciliation process you can visit the Agents page.
Once the machines and accounts, both user and system, have been discovered, the critical accounts must be located in the password vault. You can visit the Password vault page for more information.
How Network discovery works?
The Network Discovery is the tool in charge to scan the network to discover the hosts of the network. For each host discovered, the Nmap utility gets the info about the ports and the protocols used. Also, that process gets the IP Address and the operating system. All the recover information will be saved on Soffid database. The discovery proxy server works as a proxy to connect to the target systems.
When the discovery manager discovers a host, it gets the host information and then, through discovery proxy server, it attempts to connect to the host using the accounts defined on the accounts to probe list.
- If it can not connect to the host, it will attempt with the next host discovered.
- If it gets to connect to the host, then it will create automatically a Soffid agent with the proper attributes and connector parameters, also with the necessary account metadata.
Then, the reconciliation process of the created agent, will be launched and it will try to recover the information about the accounts defined on the host. Also, it will try to recover the information about the account protected services. The recover information will be saved on Soffid database.
Screen overview
Standard attributes
Network attributes
Basic
Those attributes are readOnly, you can update them on the Networks page.
- Name: network name.
- Description: a brief description.
- IP Address: IP range of this network.
- IP address mask: IP mask of this network.
- IP ranges to analyze: allows you to set the range of IPs to scan
💻 Image
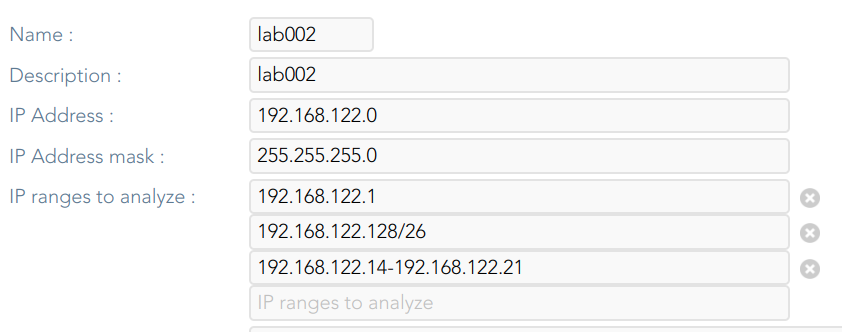
Server
- Server: list of available sync servers.
Accounts to probe
- Accounts to probe: list of potential administrators accounts to connect to the hosts. You can register a new account or use an existing account.
- Register new account: you need to define the login name and the password of the new account.
- Login name
- Password
- SSH key
- Register new account: you need to define the login name and the password of the new account.
💻 Image
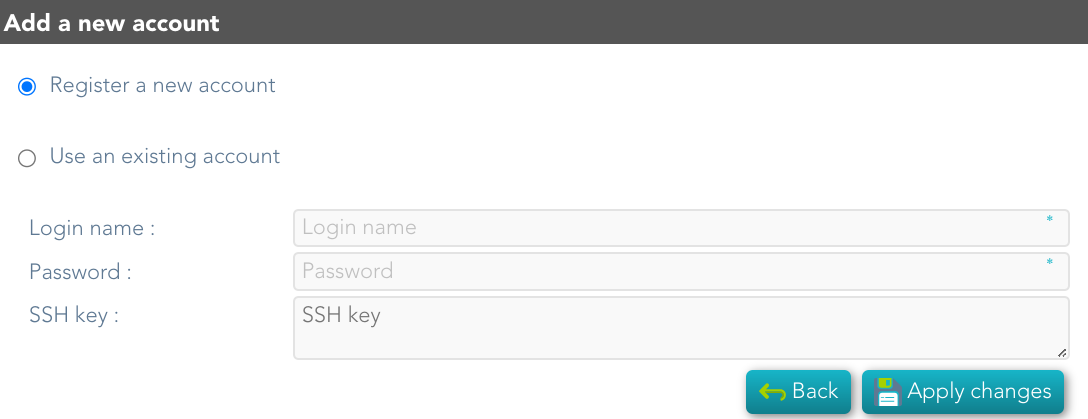
- Use an existing account: you need to select an existing account on the system.
💻 Image
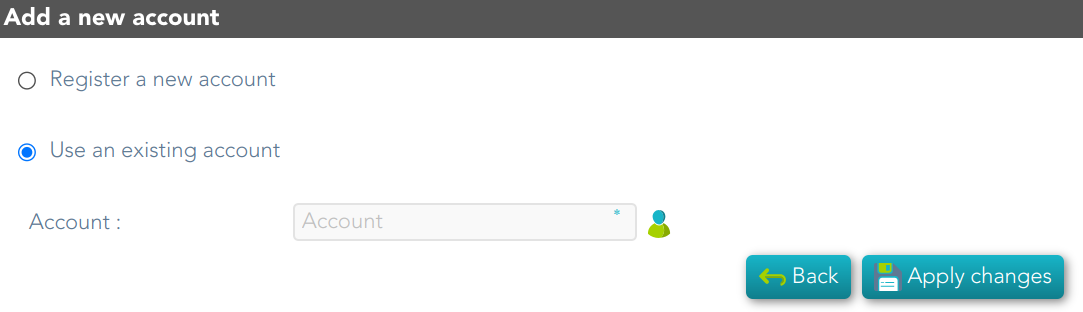
When you register a new account, that will be created as an unmanaged account.
Schedule
- Enabled: if it is selected (value is Yes), a task will be created and performed on schedule defined.
- Task description: a brief description of the task
- Month: number of the month (1-12) when the task will be performed.
- Day: number of the day (1-31) when the task will be performed.
- Hour: hour (0-23) when the task will be performed.
- Minute: minute (0-59) when the task will be performed.
- Day of week: number of the day (0-7 where 0 means Sunday) of the week when the task will be performed.
- Server: you must select the sync server where the agent will be run.
For each value of month, day, hour, minute, or day of the week:
- * means any month, day, hour, minute, or day of the week. e.g. */5 to schedule every five minutes.
- A single number specifies that unit value: 3
- Some comma separated numbers: 1,3,5,7
- A range of values: 1-5
Current execution
- Start now: this allows you to launch the task execution.
Last execution
- Status: The available status for a task is:
- Done (green light): task finished.
- Pending (yellow light): the task has been started but it has not finished yet.
- Error (red light): task could not be executed.
- Start date: start date and time of the last execution.
- End date: end date and time of the last execution.
- Execution log: log trace. Allows you to download the log file.
Previous executions
List the information about the previous executions:
- Start date: start date and time of the execution.
- Status: status of the execution.
- Execution: log of the execution. Allows you to download the log file.
Machine attributes
By clicking the machine record, you can check the following information:
- Name
- IP Address
- Description
- Operating system
- Port /Protocol List:
- Port
- Description
💻 Image
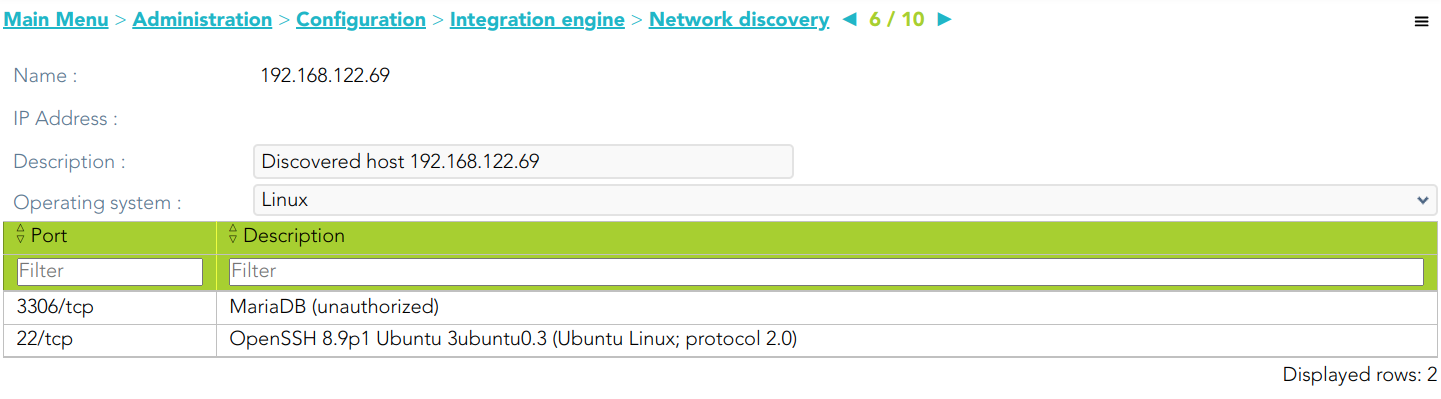
Machine details
If you display the contents of a machine from which the information has been obtained, you could check and manage information about:
- Protected services per account
- Account repositories
- Entry points
It may be necessary to perform the Reconciliation process of the proper agent in order to obtain the information from the Account protected services
💻 Image
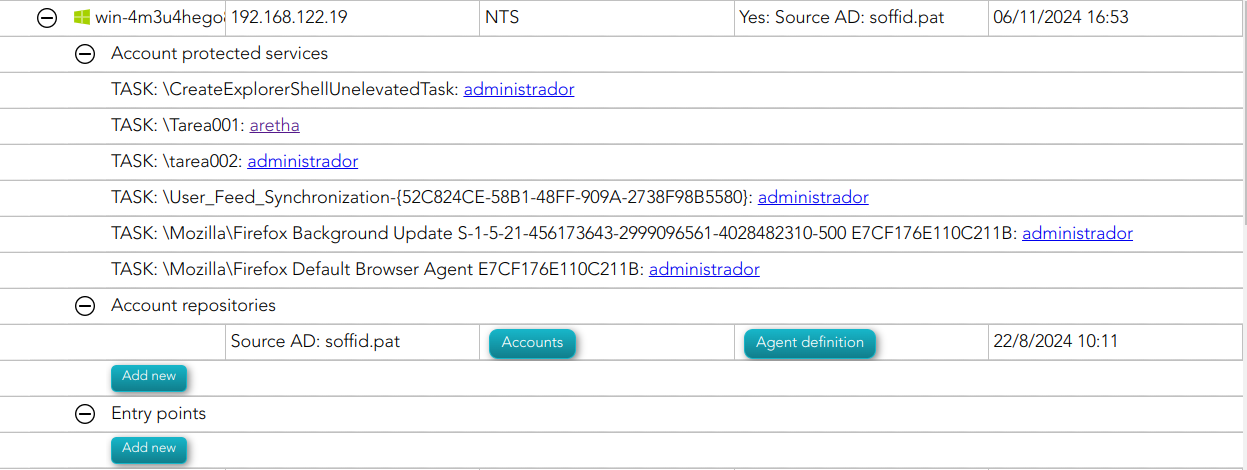
Actions
Network discovery query
| Add new account repository |
Allows you to create a new agent. You must select the System type and the login name and password. When the agent is created, if the connection is successful, the reconciliation process will be executed. 💻 Image
|
|
Agent definition |
Allows you to browse to the agent definition. |
|
Accounts |
Allows you to browse the accounts page and the accounts, which belong to this system, will be displayed |
|
Add new entry point |
Allows you to create a new entry point. You must select the Entry point type and the pale to locate it. Once the entry point is created, you can connect to the target system. Bear in mind, that if you need to create an account to connect, when you set the password to this account, the system (agent) must be in No ReadOnly mode. 💻 Image
|
|
Entry point definition |
Allows you to browse to the entry point definition. |
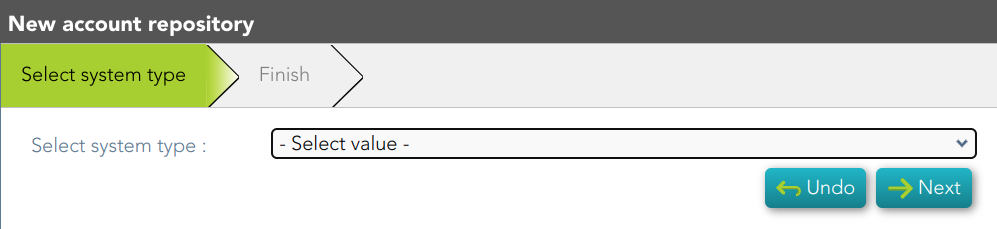
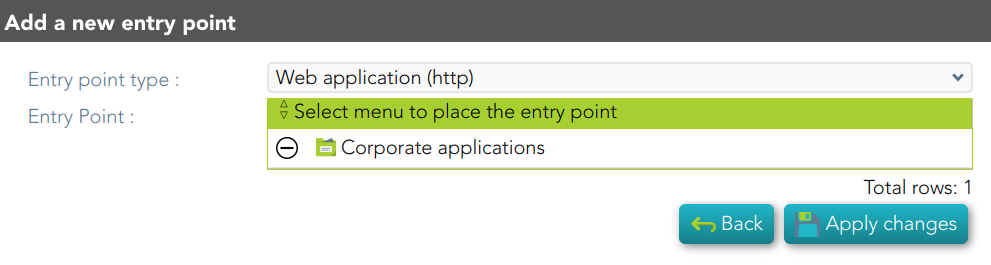
Network discovery detail
|
Apply changes |
Allows you to save the data of network detail. To save the data it will be mandatory to fill in the required fields. |
|
Undo |
Allows you to undo any changes made. |
Accounts to probe
| Add |
Allows you to add a new administrator potential account to connect to the machines of the network. To add a new account, first of all, you need to click the add button (+) and close the accounts to probe list. Then you will need to choose if you want to add an existing account or register a new account. save the data of a new network or update the data of a specific network. To save the data it will be mandatory to fill in the required fields |
|
Delete |
Allows you to delete one or more accounts of the accounts to probe. You need to select one or more records and next click the button with the subtraction symbol (-). |
Schedule
|
Start now |
Allows you to launch the task execution. |
Previous execution
|
Logs |
Allows you to download the log files of previous executions. |
Machine
|
Delete |
Allows you to delete the machine and the PAM connectors for the device. Soffid will display a message to confirm the deletion process. |
Tools
Clear redundant roles
Description
A high level profile can contain or grant application permissions. On the other side, application permissions can contain or grant low level permissions. All of them are referred to generally as roles.
Some users could have been granted both high level profiles and application permissions or low level permissions.
In that case, low level roles can be removed from the Soffid database, as they are inherited through role inheritance rules.
This tool identifies any low level roles granted to users at the same time that its owner high level role, and removes them.
Screen overview
Related objects
Actions
Introduction
A brief description of this process.
|
Next |
Allows you to browse to the Filter roles step. |
Filter roles
Allows you to filter a subset of roles to apply the process.
|
Undo |
Allows you to return to the previous step without applying any changes. |
|
Next |
Once you search for the proper Roles, you can click the Next button to browse to the Preview result step. |
Preview result
Displays a list with the subset filtered of roles.
|
Undo |
Allows you to return to the previous step without applying any changes. |
|
Next |
Allows you to run the Clear redundant roles process to the subset of roles & accounts there are in the list. |
Disable inactive users
Description
Probably there are some users that do not need access to any information system. Using this tool you will be able to identify them and act upon them.
The process is a two step process:
- Filter out the universe of users to analyze.
- Select the actions to perform on these users.
The available actions are the following:
- Send an email.
- Disable the user.
- Remove accounts from the target system.
It's usual to initially use this tool for only a subset of your users.
For instance, you can send a message when the password is reaching the expiration date, disable the user when no login has been made in the last 90 days or completely remove its accounts when the identity has been disabled for 30 days.
Screen overview
* Send an email message: Send To: #{userName} #{attributes.manager} issuers@soffid.com
Related objects
Actions
Introduction
A brief description of this process.
|
Next |
Allows you to browse to the Filter roles step. |
Filter users
Allows you to filter a subset of users to apply the process
|
Undo |
Allows you to return to the previous step without applying any changes. |
|
Next |
Once you search for the proper Users, you can click the Next button to browse to the Criteria result step. |
Criteria
Allows you to establish the action to perform on these users.
|
Undo |
Allows you to return to the previous step without applying any changes. |
|
Next |
Once you search for the proper Users, you can click the Next button to browse to the Criteria result step. |
Preview result
Displays a list with the subset filtered of users.
|
Undo |
Allows you to return to the previous step without applying any changes. |
|
Next |
Allows you to run the process to the subset of users there are in the list. |
Disable inactive accounts
Description
Probably there are some accounts that are no longer used. Using this tool you will be able to identify them and act upon them.
The process is a two step process:
- Filter out the universe of accounts to analyze.
- Select the actions to perform on that accounts.
The available actions are the following:
- Send an email.
- Disable the user.
- Remove accounts from the target system.
It's usual to initially use this tool for only a subset of your accounts.
For instance, you can send a message when the password is reaching the expiration date, disable the account when no login has been made in the last 90 days or completely remove it when the account has been disabled for 30 days
Screen overview
* Send an email message: Send To: #{userName} #{attributes.manager} issuers@soffid.com
Related objects
Actions
Introduction
A brief description of this process.
|
Next |
Allows you to browse to the Filter roles step. |
Filter accounts
Allows you to filter a subset of accounts to apply the process
|
Undo |
Allows you to return to the previous step without applying any changes. |
|
Next |
Once you search for the proper Accounts, you can click the Next button to browse to the Criteria result step. |
Criteria
Allows you to establish the action to perform on these accounts.
|
Undo |
Allows you to return to the previous step without applying any changes. |
|
Next |
Once you search for the proper Accounts, you can click the Next button to browse to the Criteria result step. |
Preview result
Displays a list with the subset filtered of accounts.
|
Undo |
Allows you to return to the previous step without applying any changes. |
|
Next |
Allows you to run the process to the subset of accounts there are in the list. |
Role mining
Description
Soffid’s role mining feature applies data mining technology to create business profiles based upon current application permissions in order to minimize the number of roles to be managed and maintained with the relevant cost saving.
In this context, Soffid allows the administrator to select different role management strategies:
- More roles with fewer permissions.
- Fewer roles with more permissions.
- Balanced approach.
Once you configure the role mining strategy, you will run the Role mining process (Scheduled task)
Screen overview
Custom attributes
Scope
- Description: a brief description to identify the operation.
- Groups: This component allows you to add groups to the list. Those groups will be evaluated with the role mining process.
- Applications: This component allows you to add applications to the list. Those applications will be evaluated with the role mining process.
Parameters
- User entitlement management cost How much does it cost to assign a role to a user?
- Role entitlement management cost: How much does it cost to assign a role to a profile?
- Role management cost: How much does it cost to create a role?
- Status:
- Preparation
- Scheduled
- Review
- Finished
Results
- Name: name for the new role.
- Description: a brief description.
- Actual Users: actual users number.
- Permission: roles number.
- Benefit: benefit to be obtained.
- Cost: current cost.
- Status:
- Proposed.
- Accepted.
- Rejected.
Reports
- Permissions per role
- Users per role
- Entitlement changes
Actions
Role mining query actions
|
Query |
Allows you to query the role mining process through different search systems, Basic and Advanced. |
|
Add or remove columns |
Allows you to show and hide columns in the table. You can also set the order in which the columns will be displayed. The selected columns and order will be saved the next time Soffid displays the page. |
|
Add new |
Allows you to add a new role mining process in the system. You can choose that option on the hamburger menu or by clicking the add button (+). |
|
Delete |
Allows you to remove one or more role mining processes by selecting one or more records and next clicking the button with the subtraction symbol (-). To perform that action, Soffid will ask you for confirmation, you could confirm or cancel the operation. |
|
Download CSV file |
Allows you to download a CSV file with the basic information of all role mining processes. |
|
Merge |
Allows you to merge two identities when you identify that is necessary. First of all, you need select two identities. Second, you need to click the hamburger icon and select the merge action. Then Soffid will display a window where you need to select the correct value for each standard and custom parameter. Finally, you need to apply changes to save the updates, or back to cancel that action. |
Role mining scope
|
Save |
Allows you to save the scope defined. It will be mandatory to select some groups and information systems before continuing. When the role mining process is created, the default status will be Preparation. |
|
Add Groups |
Allows you to add new groups to be evaluated. You need to click the add groups button (+) and search the proper groups, then click the Add group button. |
|
Add Applications |
Allows you to add new applications to be evaluated. You need to click the add application button (+) and search the proper groups, then click the Add application button. |
|
Undo |
Allows you to quit without applying any changes. |
|
Next |
Allows you to browse to the Parameter step. It will be mandatory to select some groups and information systems before continuing. |
Parameters
|
Start |
If you click the start button, Soffid will change the process status to Scheduled. |
|
Undo |
Allows you to quit without applying any changes. |
Result
|
Next |
If you click the Next button, Soffid will browse to the Reports tab. |
|
Undo |
Allows you to quit without applying any changes. |
Reports
|
Download |
Allows you to download a report with the permissions matrix. |
|
Apply changes |
If you click the Apply changes button, Soffid will make the changes in the roles of users and entitlements. |
|
Undo |
Allows you to quit without applying any changes. |
Monitoring and reporting
Sync server monitoring
Description
Soffid provides a monitoring functionality to consult all the information of the different agents and the status of each one of them and the amount of tasks assigned. Consequently, it allows diagnosing possible incidents in a quick and easy way.
This option allows you to manage all the options related to the tasks created according to the configuration of each of the agents.
Sync server
Shows a list with the URL of all the sync servers that you have configured and the options to perform for every sync server.
💻 Image
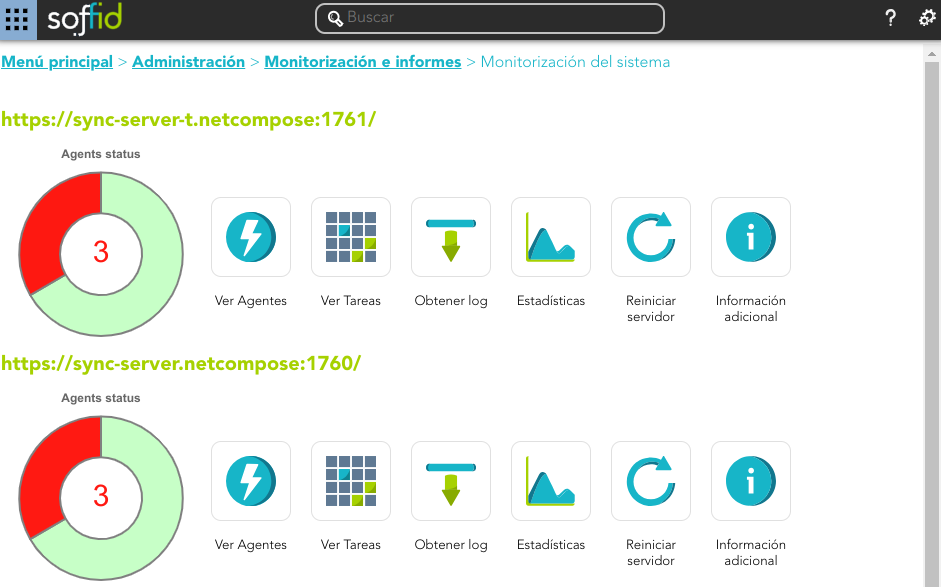
Agent Status
The graph of agent status shows the number of agents connected (green light) and the number of agents disconnected (red light). By clicking on the captions you can select if you want to show only the connected agents, only the disconnected agents, or both agents.
💻 Image
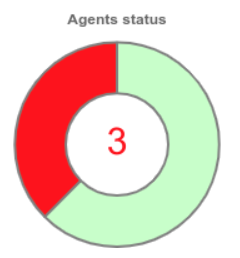
View Agents
Allows you to access a new window with the information of every single agent. That page shows a list with the information about Agent, Number of the pending tasks, the Status, and the URL of the agent.
If you click one of the agents, Soffid will display all the pending tasks for that agent. If you click on one pending task, you can view the details of that task and you could perform the actions available for that depending on your permissions.
💻 Image
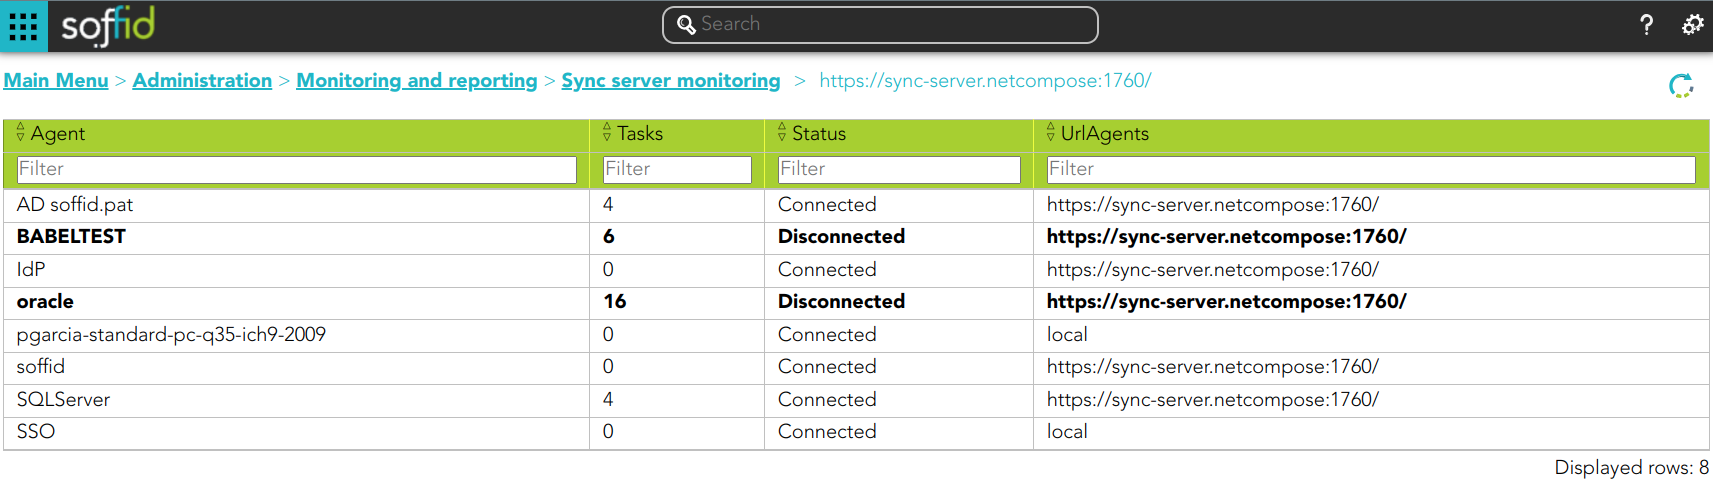
View Tasks
Displays a matrix with all the agents configured, all the tasks, and the status of the task for each agent. You can reload the matrix with the updated tasks.
The available status for a task are:
- Done (green light): finished tasks.
- Pending (yellow light).
- Error (red light).
If you click on one error task, Soffid will display the details of that task, the basic data, and the specific data about Execution time, Error message, Scheduled and Log detail, and Soffid will allow you to perform the available actions. If you click on one pending task, you can perform the available actions.
💻 Image
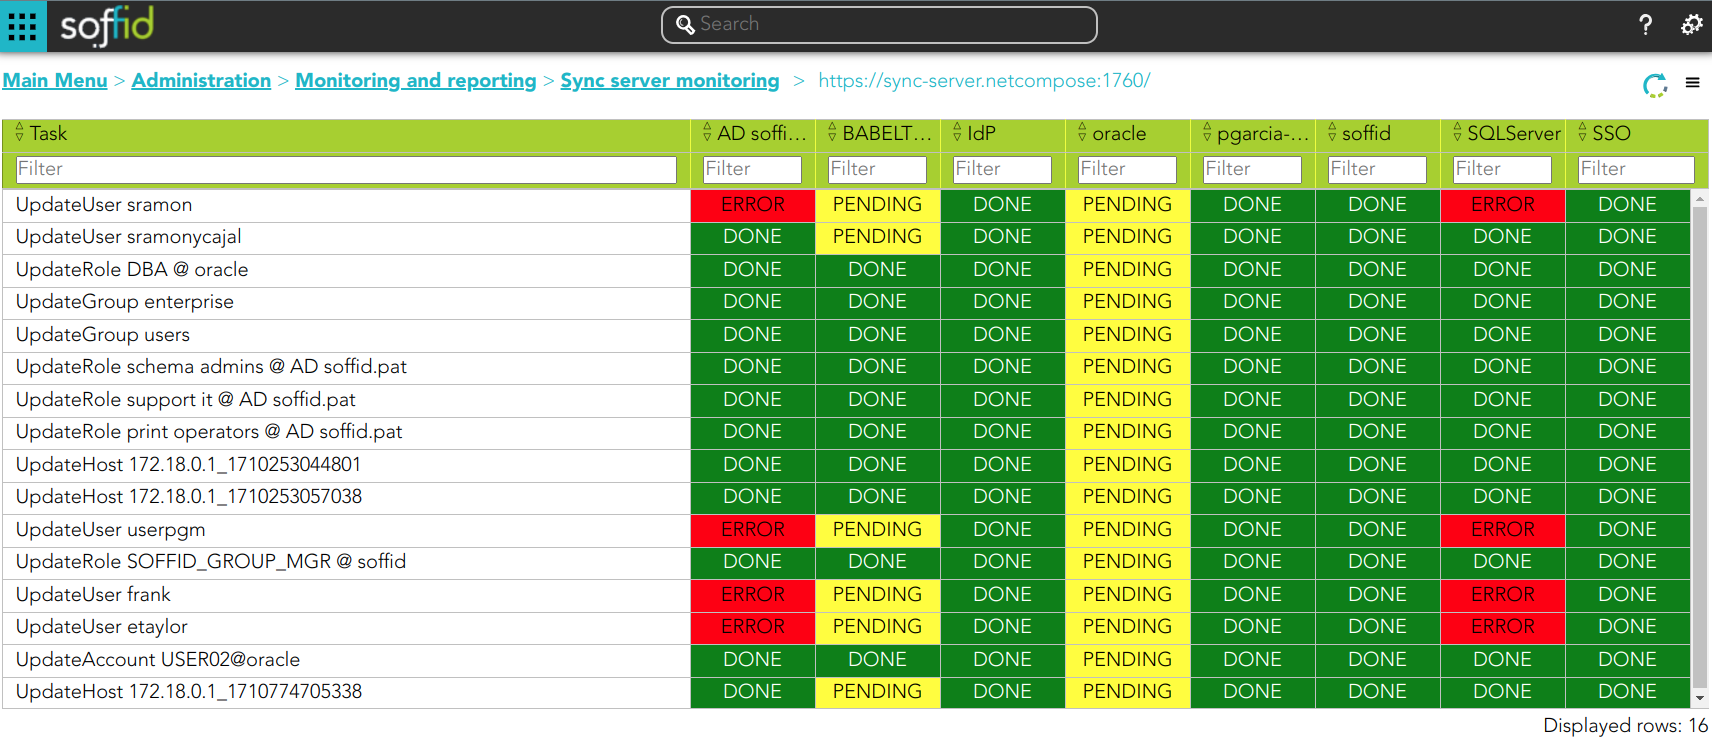
Get log
Allows you to download the Sync Server log file.
Stats
Displays the performance (tasks per minute) graph of the synchronization servers.
💻 Image
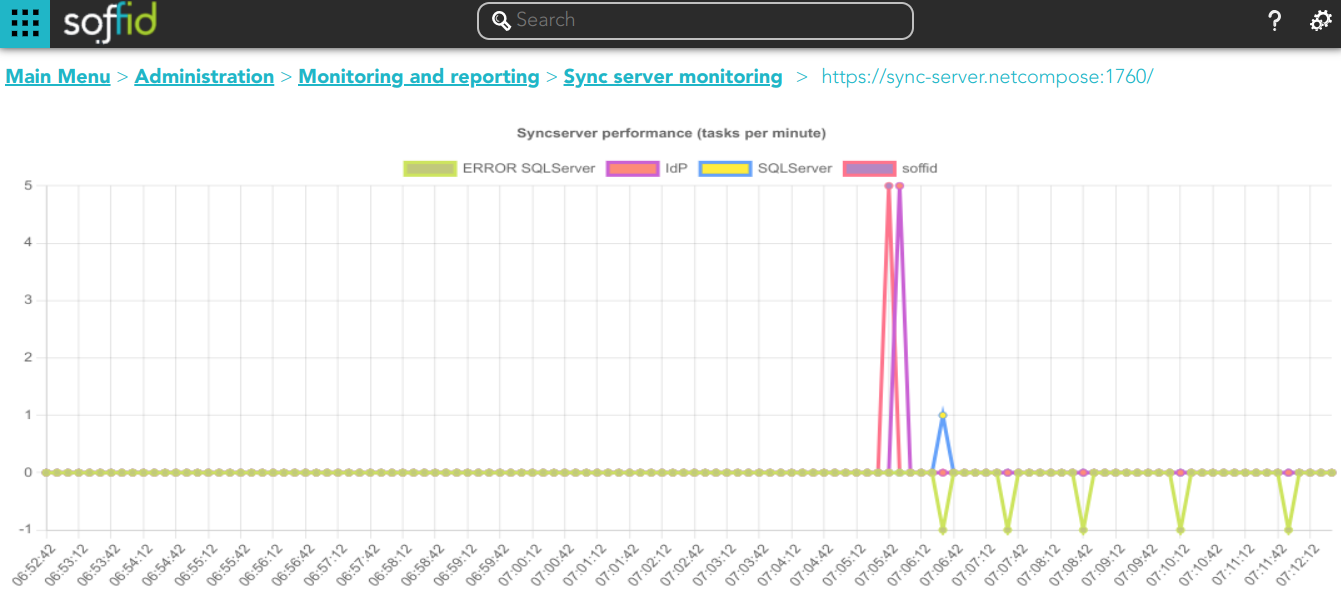
Restart server
Allows you to restart the synchronization server that hosts any agent. Soffis will ask for your confirmation before performing that action. If you confirm, the server will be restarted.
Additional information
Display the additional information of Soffid
💻 Image
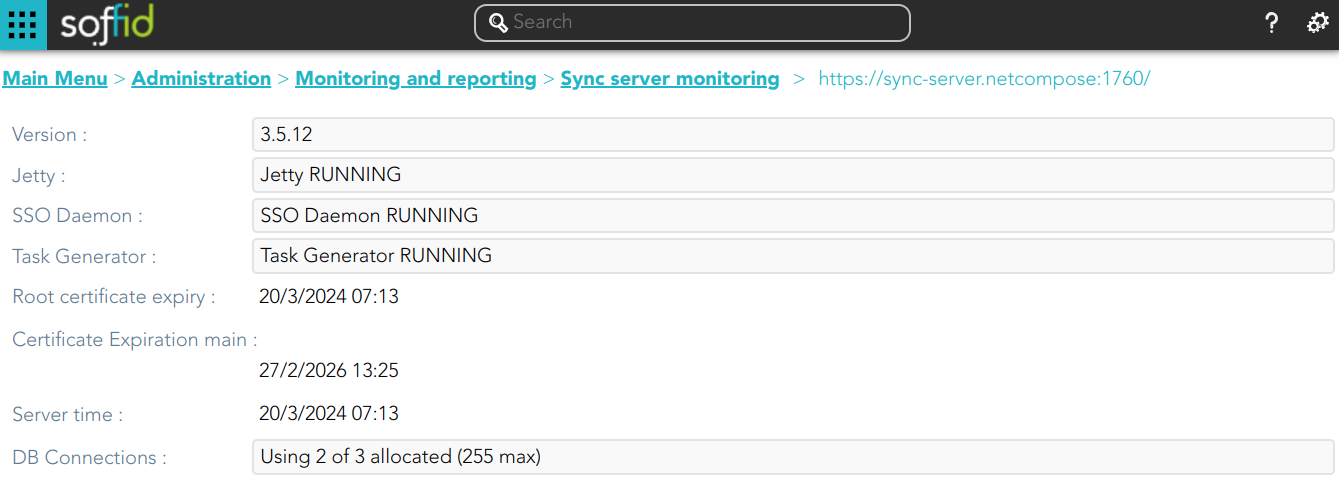
Tasks
Active tasks
Displays a graph with information about the tasks pending to be performed on the different systems.
Tasks by server
Displays a graph with information about the tasks for each server.
View Agents
Displays a view with a list of agent tasks, regardless of which synchronization server they are running on.
Not scheduled tasks
Displays a view with a list not scheduled tasks. At that view, you can cancel and release the held tasks
💻 Image
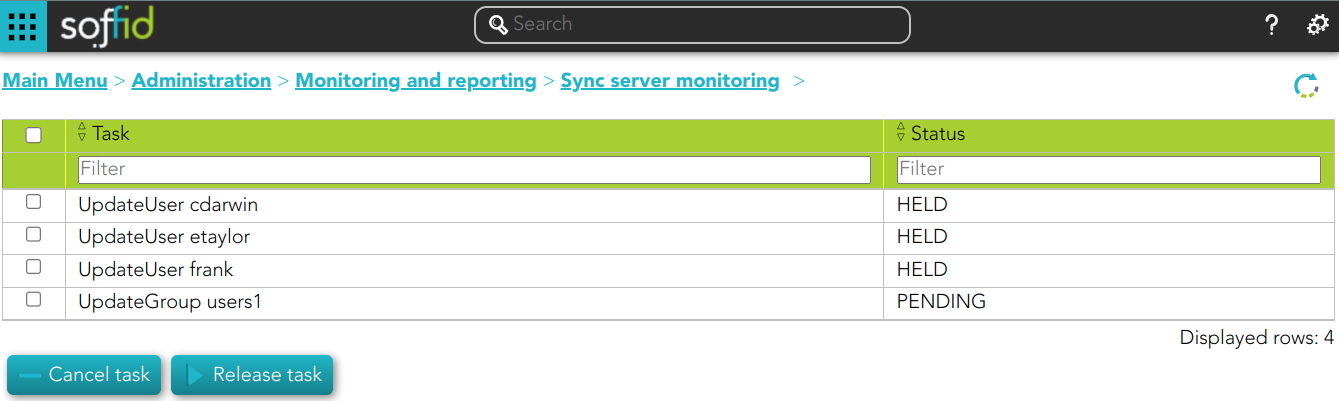
Screen overview
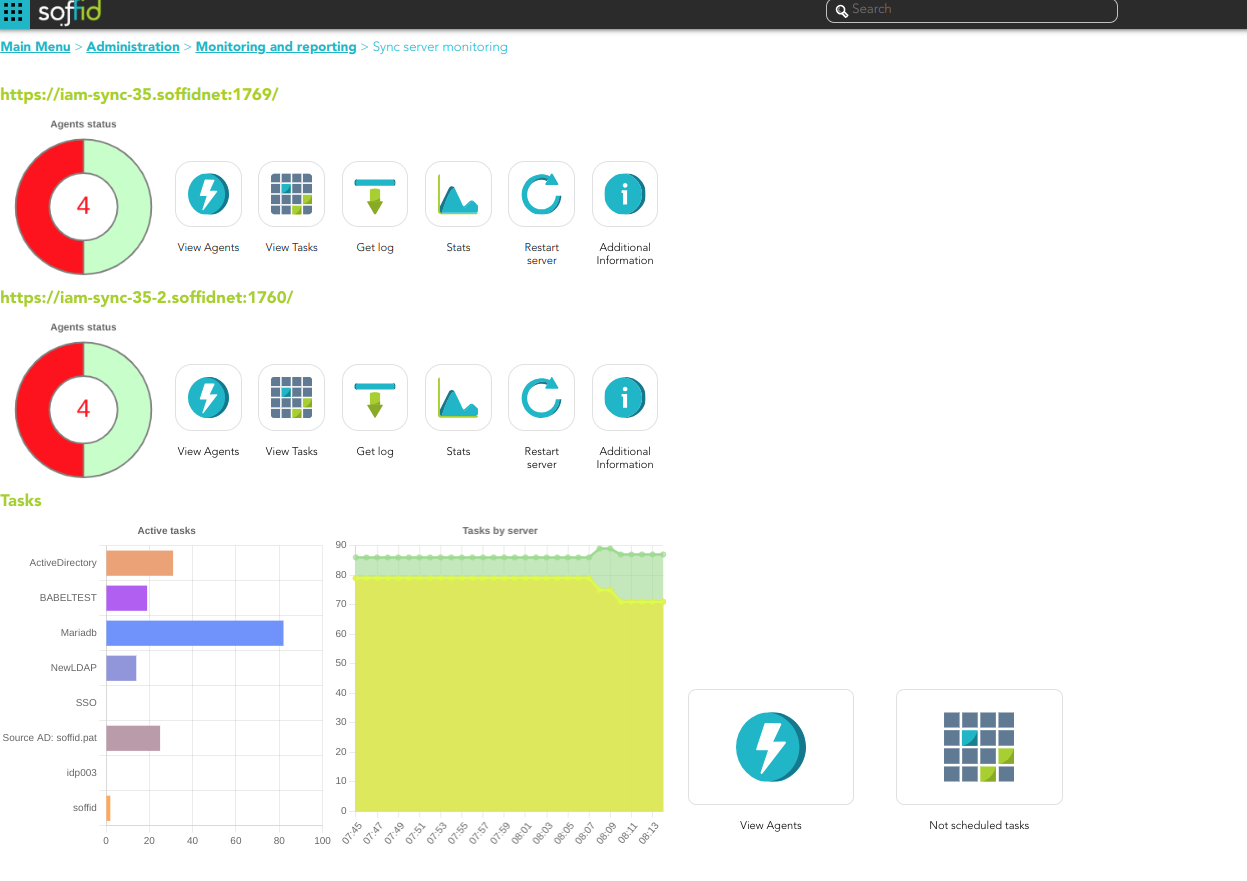
Related objects
Agent actions
| Get log |
Soffid displays the log trace. |
| Reset | Allows you to restart the synchronization server that hosts any agent. Soffis will ask for your confirmation before performing that action. |
Tasks actions
| Cancel task |
Allows you to cancel a specific task. Soffid will ask for your confirmation, if you confirm, that task will be canceled. |
| Prioritize | Allows you to release a specific task. Soffid will ask for your confirmation, if you confirm, that task will be executed. |
Scheduled tasks
Description
Schedule tasks display all the automatic tasks defined on Soffid, the scheduling of each task, and information about the last execution. Also, allows administrator users to update the execution of that tasks using a cron pattern and init the execution.
Screen overview
Scheduled tasks list
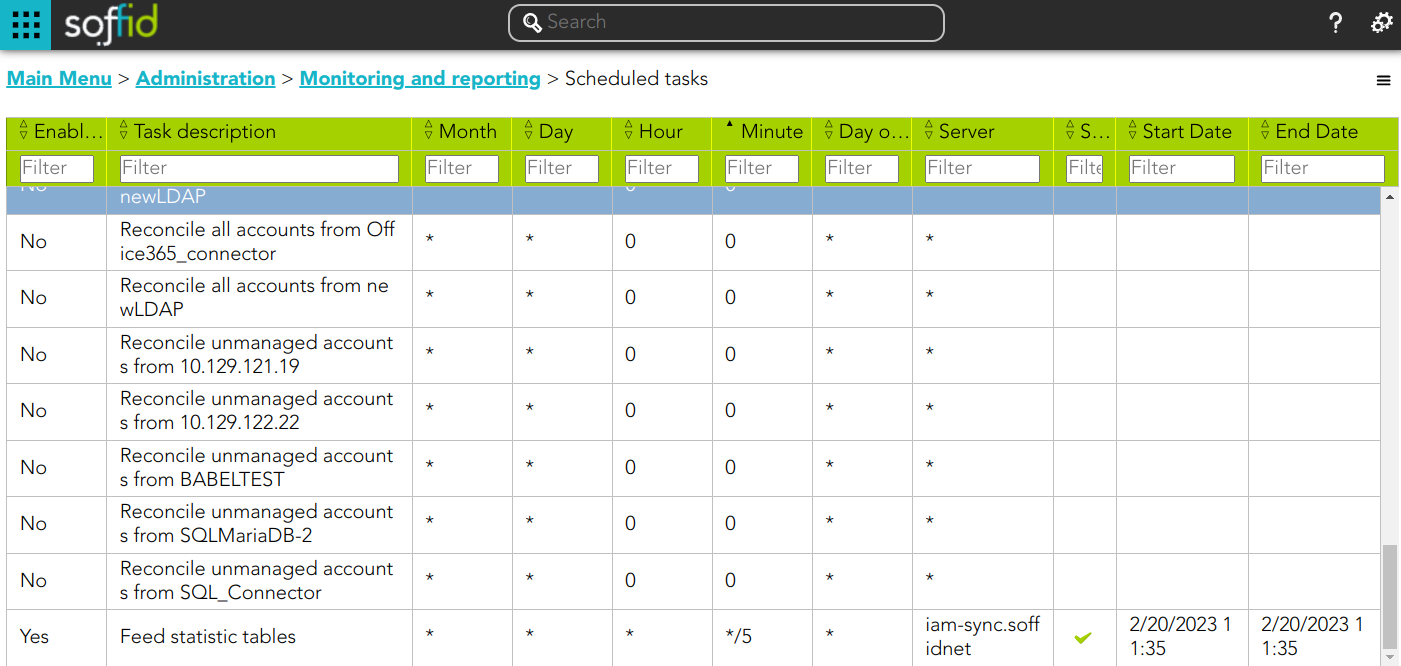
Schedule task detail
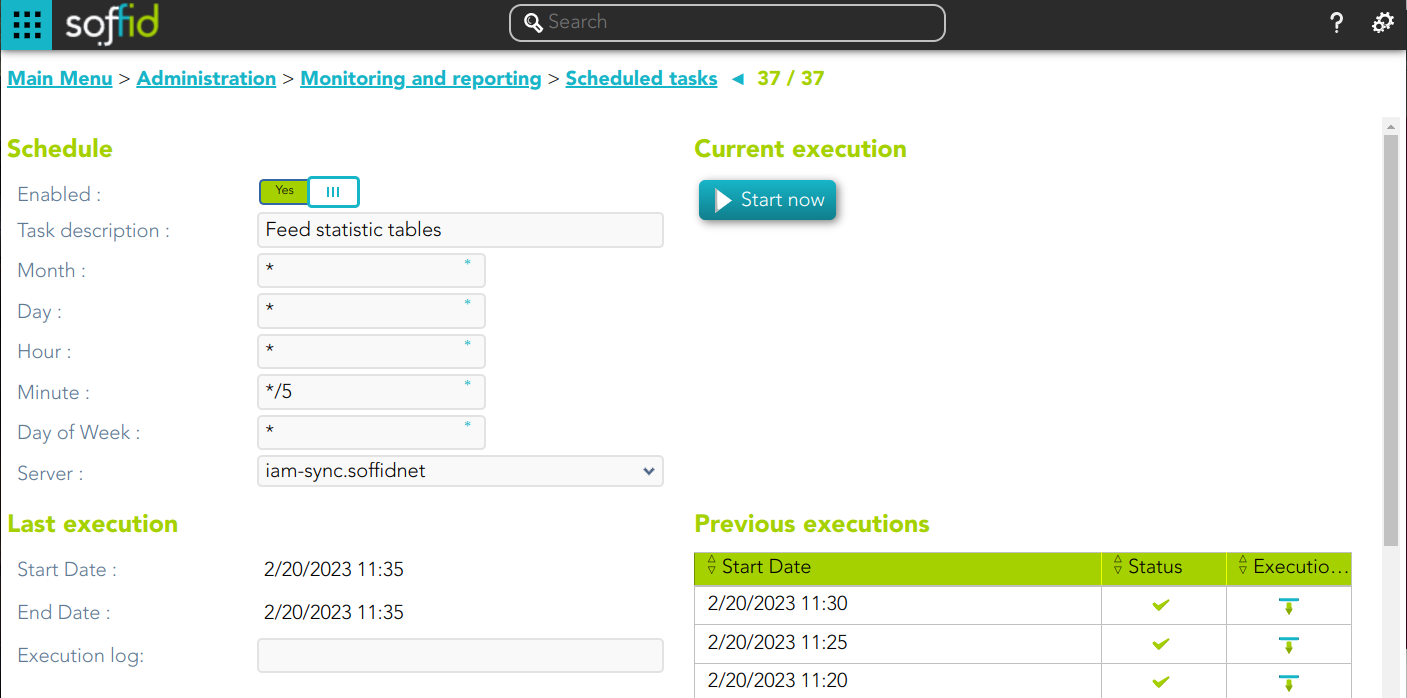
Standard attributes
Schedule
- Enabled: if it is selected (value is Yes), the task will be perform on scheduled defined.
- Task description: brief description of the task
- Month: number of the month (1-12) when the task will be performed.
- Day: number of the day (1-31) when the task will be performed.
- Hour: hour (0-23) when the task will be performed.
- Minute: minute (0-59) when the task will be performed.
- Day of week: number of the day (0-7 where 0 means Sunday) of the week when the task will be performed.
- Server: where the agent is running.
- Start date: start date and time of the last execution.
- End date: end date and time of the last execution.
- Status: The available status for a task are:
- Done (green light): finished tasks.
- Pending (yellow light).
- Error (red light).
For each value of month, day, hour, minute, or day of the week:
- * means any month, day, hour, minute, or day of week. e.g. */5 to schedule every five minutes.
- A single number specifies that unit value: 3
- Some comma separated numbers: 1,3,5,7
- A range of values: 1-5
Current execution
- Start now: this allows you to launch the task execution.
Last execution
- Status: The available status for a task are:
- Done (green light): task finished.
- Pending (yellow light): task has been started but it has not finished yet.
- Error (red light): task could not be executed.
- Start date: start date and time of the last execution.
- End date: end date and time of the last execution.
- Execution log: log trace. Allows you to download the log file.
Previous executions
List with the information about the previous executions:
- Start date: start date and time of the execution.
- Status: status of the execution.
- Execution: log of the execution. Allows you to download the log file.
Actions
Scheduled tasks query actions
|
Add or remove columns |
Allows you to show and hide columns in the table. |
|
Download CSV file |
Allows you to download a CSV file with the scheduled tasks. |
Scheduled Task detail actions
|
Apply changes |
Allows you to save the data of scheduled tasks. To save the data it will be mandatory to fill in the required fields. |
|
Start now |
Allows you to launch the task execution. |
|
Undo |
Allows you to undo any changes made. |
|
Logs |
Allows you to download the log file. |
Scheduled jobs
Description
Schedule jobs display all the asynchronous tasks generated for the workflows engine. When a job is finished, it will disappear from that list.
Standard attributes
- ID: job identifier.
- Name: job name.
- Process: process identifier and description.
- Next Rerun: date and time scheduled for next execution.
- Failed Attempts: number of failed attempts.
- Status
Actions
Scheduled jobs query actions
|
Add or remove columns |
Allows you to show and hide columns in the table. |
|
Download CSV file |
Allows you to download a CSV file with the information of the scheduled jobs. |
Scheduled Task detail actions
|
Resume |
Allows you to resume the task |
|
Hold |
Allows you to retain the task. |
|
Close |
Allows you to close the window without perform any action. |
Audit
Description
The audit trail page allows you to query for audit records. Each action done at the Soffid console will be reported.
Here you have a list of common Advanced searches, you only have to copy, paste and search, e.g.
// User changes trace
calendar ge "2020-01-01T00:00:00.000+01:00" AND user co "admin"
// User actions trace
calendar ge "2020-01-01T00:00:00.000+01:00" AND author co "admin"
// Soffid accounts
calendar ge "2020-01-01T00:00:00.000+01:00" AND user co "admin" AND database co "soffid"
// Created accounts
calendar ge "2020-01-01T00:00:00.000+01:00" AND action co "C" AND object co "SC_ACCOUN"
// Removed objects
calendar ge "2020-01-01T00:00:00.000+01:00" AND action co "D" AND object co "SC_ACCOUN"
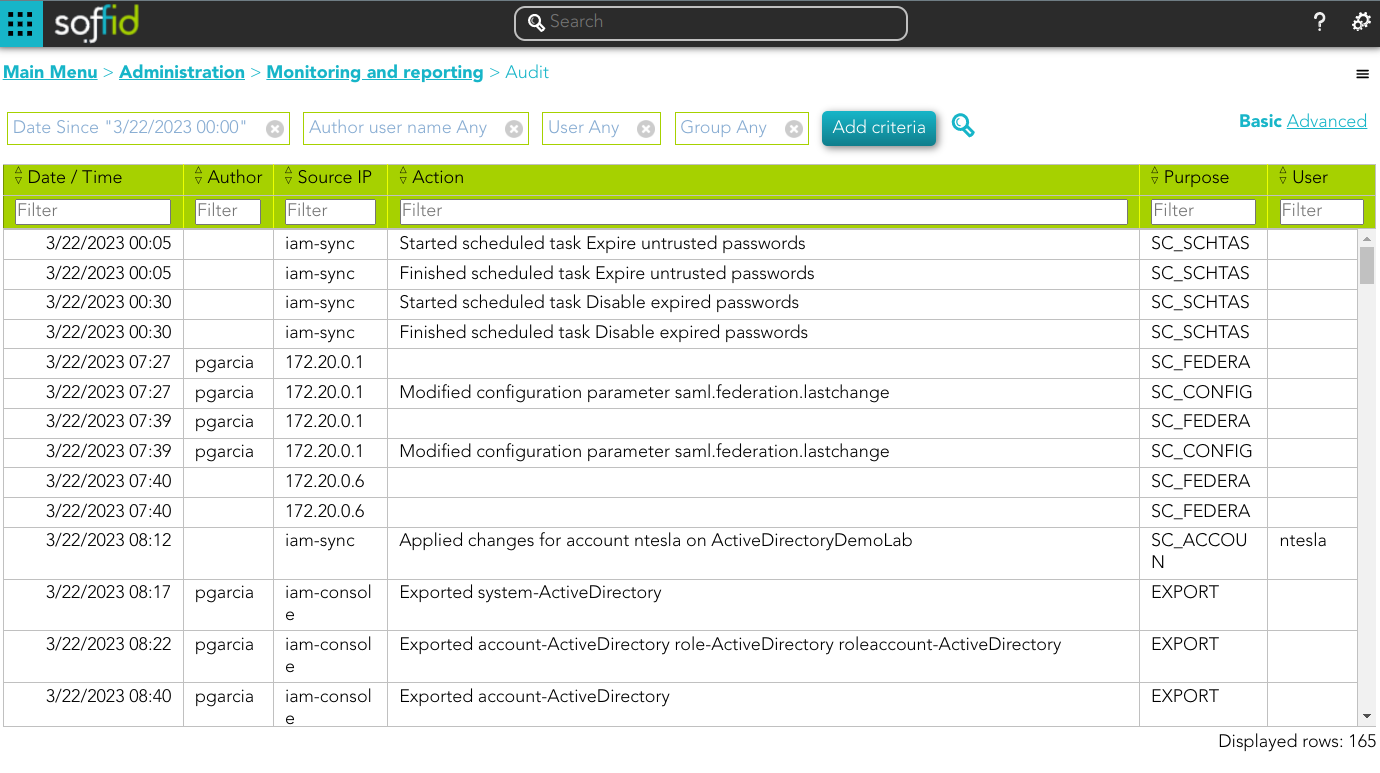
- Date/Time: date on which the action was performed.
- Author: user who launched the task. When the author is empty, the Syncserver launched this task.
- Purpose: is the name of the internal object (also the table of the database) which the action was performed.
- Source IP
- User: identity who performed the action.
- Information system: details on which information system the action was performed.
- Role: details the role with which the action was performed.
- Account: if the action has taken place on an account, it will be indicated on which one in this section.
- Group: details the group with which the action was performed.
- Action: the task performed is specified.
Actions
| Query | Allows you to query accounts through different search systems, Quick and Advanced. |
| Add or remove columns | Allows you to show and hide columns in the table. |
| Download CSV file | Allows you to download a csv file with the information of audit records. |
Access logs
Description
The access log page allows querying all the information about the opened sessions.
Note that any session that was active during the specified date will be shown, even when it started before of finished after that date.
- Type
- Protocol: access protocol.
- SSO
- SAML
- PAM
- CONSOLE
- Start date: date and time when start the access.
- End date: date and time when end the access.
- Session: session identifier.
- Server
- Client
- User: user who perform the access.
- Information: additional connection information.
- When the information is about the Authentication method, there are the following options:
- P: Password
- K: Kerberos
- E: Broker
- O: OTP
- M: Email
- S: SMS
- I: PIN
- C: Certificate
- F: Finger print
- Z: Push
- When the information is about the Authentication method, there are the following options:
Actions
| Query | Allows you to query accounts through different search systems, Quick and Advanced. |
| Add or remove columns | Allows to show and hide columns in the table. |
| Download CSV file | Allows to download a CSV file with the information of access logs. |
Sessions
Description
The sessions page displays the current open sessions made with ESSO, WSSO or PAM for which the user is the owner.
This functionality allows the owner users, with appropriate privileges, to open and view online a session opened by another user. It also allows them to interact if necessary.
- User: name of the user who opened the session.
- Device: IP from which the connection was executed.
- Client
- Type:
- ESSO
- WSSO
- PAM
- Service URL: connection URL
- Account name: user account name to connect.
Actions
| Add or remove columns | Allows to show and hide columns in the table. |
| Download CSV file | Allows to download a CSV file with the information of access logs. |
Console log
Description
That option allows you to look up server logs from the console. The logs are created on the server filesystem.
Screen Overview

Actions
| Download | Allows you to download the log file |
Privileged accounts dashboard
Description
Soffid provides a monitoring functionality to consult all the information about the different Jump servers installed and configured.
The displayed info is the following:
- Jump server enabled accounts.
- High-privileged accounts.
- Jump server sessions.
- Used storage by PAM storage server.
- Free storage by PAM storage server.
- User with access to PAM jump servers.
Screen overview
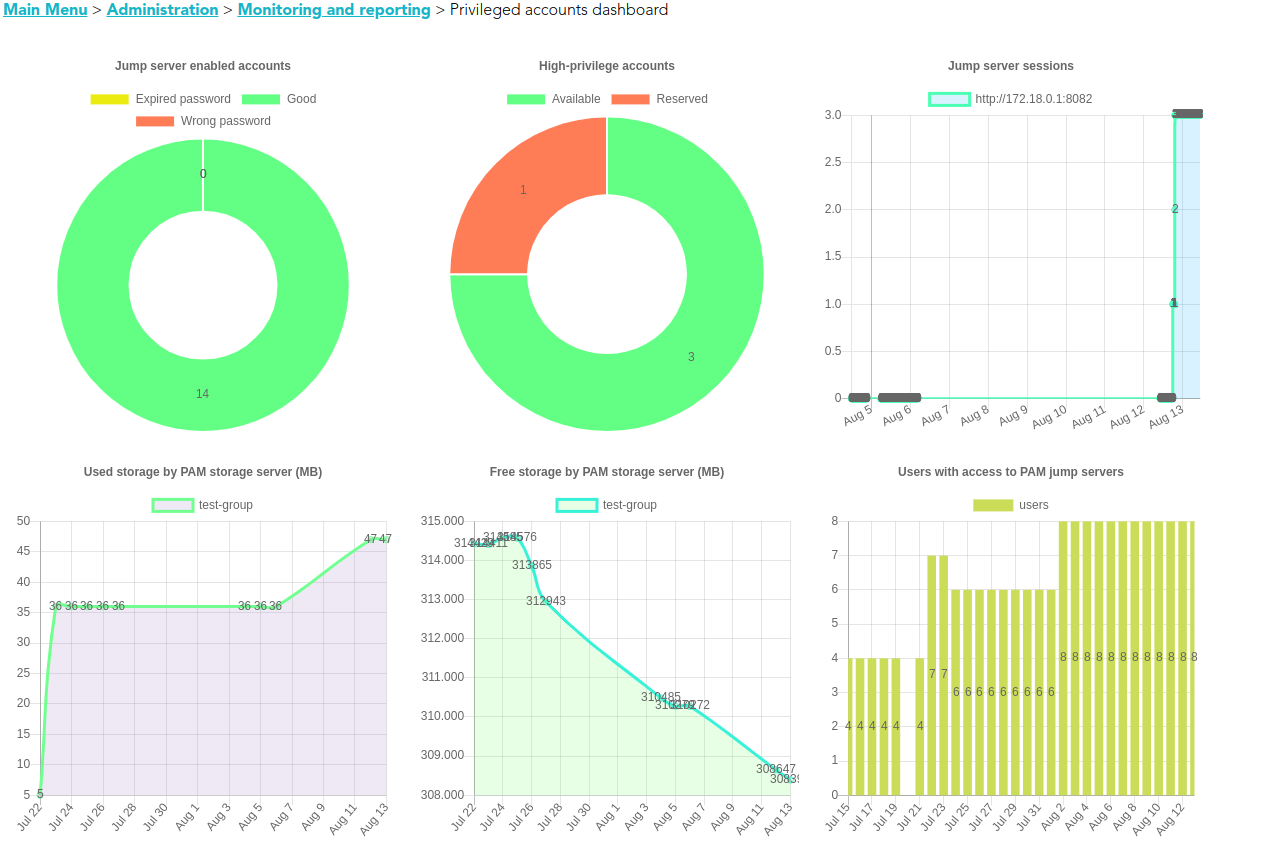
Related objects
- Jump servers: Configure PAM session servers
- High-privileged accounts: Accounts
To activate this view you will need to enable the Feed statistic tables task on the Scheduled tasks page.
Search in PAM recordings
Description
Soffid provides the functionality that allows searching for information about the PAM recording sessions.
That option is located on Main Menu > Administration > Monitoring and reporting > Search in PAM recordings
First of all, to query the PAM recording, you could apply some filters to refine your search. Then, when you click the Search button, Soffid will show you all the recording sessions that comply with the criteria specified.
If you click on one record, Soffid will show you a new page with all the data about the session and the recorded video. If you query with a typed keys filter, a bookmark with the minute and second will show, and it will allow you to go directly to that point and view the action.
Screen overview
Standard attributes
- Jum server group: used to connect to the system.
- URL: service URL
- Typed keys: allows you to search in PAM recording
- Typed keys by the user on the system.
- Other information:
- violation of rule
- Ctrl
- "[ctrl]+l"
- "[ctrl]+d"
- ...
- Other information:
- Screenshot contents by screen content
- Typed keys by the user on the system.
- User name: user who created the session.
- Start date
Actions
|
Download CSV file |
Allows you to download a CSV file with the PAM recording information. |
|
Search |
Allows you to query the PAM recording by applying some filters. |
|
View recording |
Allows you to view the recording. You need to click on the record of the PAM recording that you want to view, then Soffid will show you a new page with all the information about the session and the recording video. |
Issues
Definition
Soffid provides a tool to manage all issues and allows you to perform the operations available for each type of task. The actions to be performed will depend on each kind of task.
You can find this functionality in the following path:
Screen Overview
Issues
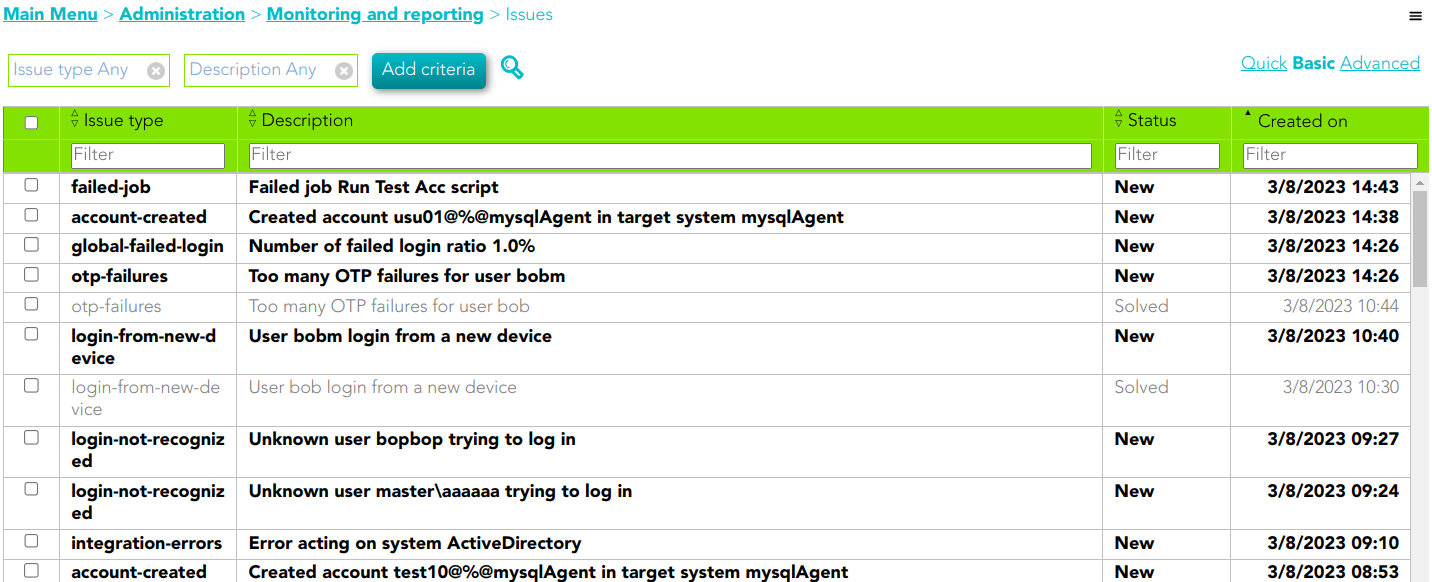
Related objects
Standard attributes
- Issue number: an incremental number to identify the issue.
- Created on: date of creation.
- Issue type: issue list defined by Soffid.
- Description: a brief description of the issue.
- Times: number of times the issue has been repeated.
- Status: possible task status. There are three available statuses:
- New
- Acknowledged
- Solved
- Exception: Error occurred
- jobName
- Actor: owner of this issue.
- Actions log: each of the actions that have been carried out on the issue.
Actions
Issues query action
| Download CSV file | Allows you to download a CSV file with the issue data. |
|
Add or remove columns |
Allows you to show and hide columns in the table. You can also set the order in which the columns will be displayed. The selected columns and order will be saved for the next time Soffid displays the page. |
Issue detail
| Close | Allows you to quit without applying any changes. |
| Acknowledge |
Allows you to check as Acknowledged |
| Solve issue |
Allows you to mark as solved the issue. |
| Send custom email | Allows you to send a custom email to one recipient. |
| Add Comments | Allows you to add comments to the Action logs. |
account-created
💻 Image
| Unlock account | If you click this option, Soffil will unlock the account. |
|
Look affected accounts |
If you click this option, Soffil will lock affected accounts. |
|
Disable user |
If you click this option, Soffid will disable the user. |
disconnected-system
💻 Image
discovered-host
💻 Image
discovered-system
💻 Image
duplicated-user
💻 Image
|
Mege users |
If you click this option, Soffid will allow you to merge the identities by selecting the data of each of them. 💻 Image
|
failed-job
💻 Image
enabled-account-on-disabled-user
💻 Image
| Unlock account | If you click this option, Soffil will unlock the account. |
|
Look affected accounts |
If you click this option, Soffil will lock affected accounts. |
global-failed-login
💻 Image
integration-errors
💻 Image
locked-account
💻 Image
| Unlock account | If you click this option, Soffil will unlock the account. |
|
Look affected accounts |
If you click this option, Soffil will lock affected accounts. |
|
Disable user |
If you click this option, Soffid will disable the user. |
|
Lock affected host |
If you click this option, Soffid will lock the affected host. |
|
Unlock host |
If you click this option, Soffid will unlock the host. |
login-different-country
💻 Image
| Unlock account | If you click this option, Soffil will unlock the account. |
|
Look affected accounts |
If you click this option, Soffil will lock affected accounts. |
|
Disable user |
If you click this option, Soffid will disable the user. |
|
Lock affected host |
If you click this option, Soffid will lock the affected host. |
|
Unlock host |
If you click this option, Soffid will unlock the host. |
login-from-new-device
💻 Image
| Unlock account | If you click this option, Soffil will unlock the account. |
|
Look affected accounts |
If you click this option, Soffil will lock affected accounts. |
|
Disable user |
If you click this option, Soffid will disable the user. |
|
Lock affected host |
If you click this option, Soffid will lock the affected host. |
|
Unlock host |
If you click this option, Soffid will unlock the host. |
login-not-recognized
💻 Image
| Unlock account | If you click this option, Soffil will unlock the account. |
|
Look affected accounts |
If you click this option, Soffil will lock affected accounts. |
|
Disable user |
If you click this option, Soffid will disable the user. |
|
Lock affected host |
If you click this option, Soffid will lock the affected host. |
|
Unlock host |
If you click this option, Soffid will unlock the host. |
otp-failures
💻 Image
| Unlock account | If you click this option, Soffil will unlock the account. |
|
Look affected accounts |
If you click this option, Soffil will lock affected accounts. |
|
Disable user |
If you click this option, Soffid will disable the user. |
|
Lock affected host |
If you click this option, Soffid will lock the affected host. |
|
Unlock host |
If you click this option, Soffid will unlock the host. |
pam-violation
💻 Image
| Unlock account | If you click this option, Soffil will unlock the account. |
|
Look affected accounts |
If you click this option, Soffil will lock affected accounts. |
|
Disable user |
If you click this option, Soffid will disable the user. |
|
Lock affected host |
If you click this option, Soffid will lock the affected host. |
|
Unlock host |
If you click this option, Soffid will unlock the host. |
password-changed
💻 Image
permissions-granted
💻 Image
| Unlock account | If you click this option, Soffil will unlock the account. |
|
Look affected accounts |
If you click this option, Soffil will lock affected accounts. |
|
Disable user |
If you click this option, Soffid will disable the user. |
risk-increase
💻 Image
| Unlock account | If you click this option, Soffil will unlock the account. |
|
Look affected accounts |
If you click this option, Soffil will lock affected accounts. |
|
Disable user |
If you click this option, Soffid will disable the user. |
robot-login
💻 Image
| Unlock account | If you click this option, Soffil will unlock the account. |
|
Look affected accounts |
If you click this option, Soffil will lock affected accounts. |
|
Disable user |
If you click this option, Soffid will disable the user. |
|
Lock affected host |
If you click this option, Soffid will lock the affected host. |
|
Unlock host |
If you click this option, Soffid will unlock the host. |
security-exception
💻 Image
|
Disable user |
If you click this option, Soffid will disable the user. |
Common actions
Search Types
Description
Throughout the Soffid you will be able to perform searches on the different objects that make up the application.
You will be able to search in the system by applying different ways of searching.
Quick
This option allows a quick search by fields that have been defined in the application metadata. You can find metadata configuration on Global Settings > Metadata
You only have to type in the field provided for this purpose and press enter or click on the magnifying glass, then Soffid will display the list with the objects that complain the criteria typed.
You can include some characters "," "." and "/" as word separators in the search text.
Example
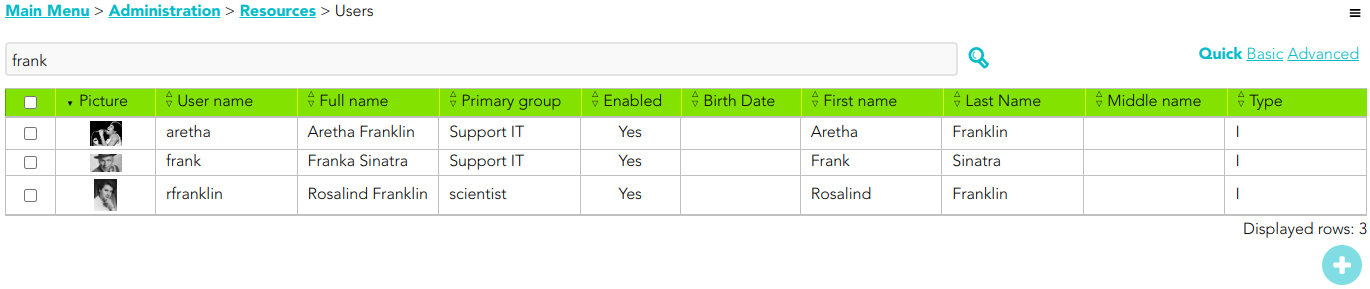
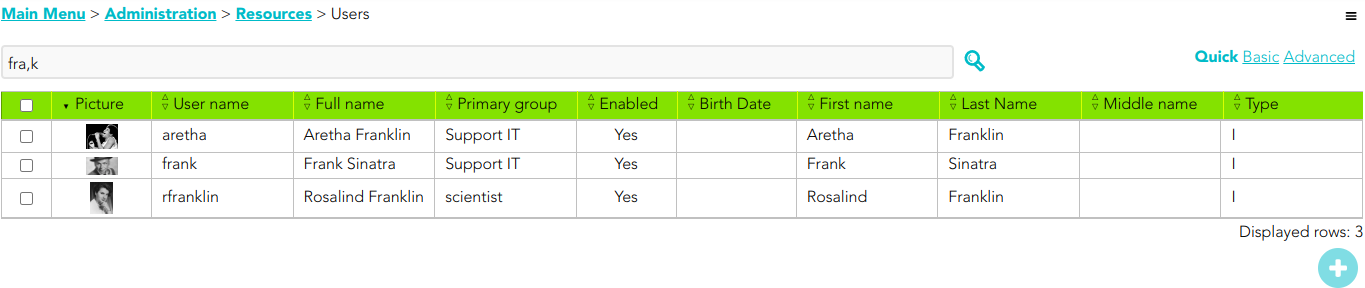
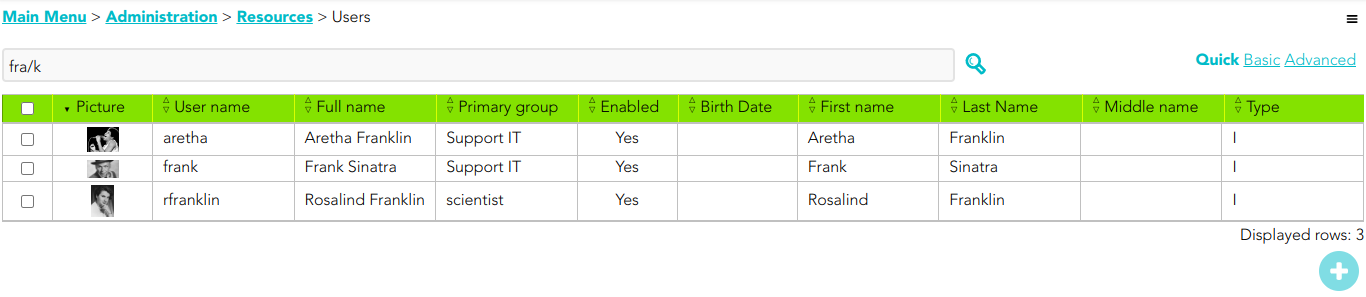
Basic
This is the default option. It provides some default search criteria and other criteria can be added from the add criteria option. These criteria will depend on the entity or object on which the search is being performed.
Remember, each criteria will be added to the previous ones. Each search criterion will have different search forms depending on the type of data in the particular field. For instance, a text field provides four different options to search, "Contains", "Start with", "End with" and "Equals", a date field provides the date "Since" and date "Until".
Soffid allows you to and criteria by clicking on the Add criteria button, then Soffid will display a list with all the criteria available and allows you to select to add a new one. To delete criteria you only have to click on the Equis icon (x) of the criteria you want to remove and automatically Soffid will remove the criteria and run the search without the removed criteria.
The criteria depend on the object list where you are working, so for instance the criteria are not the same for the user's list and the group's list.
Example
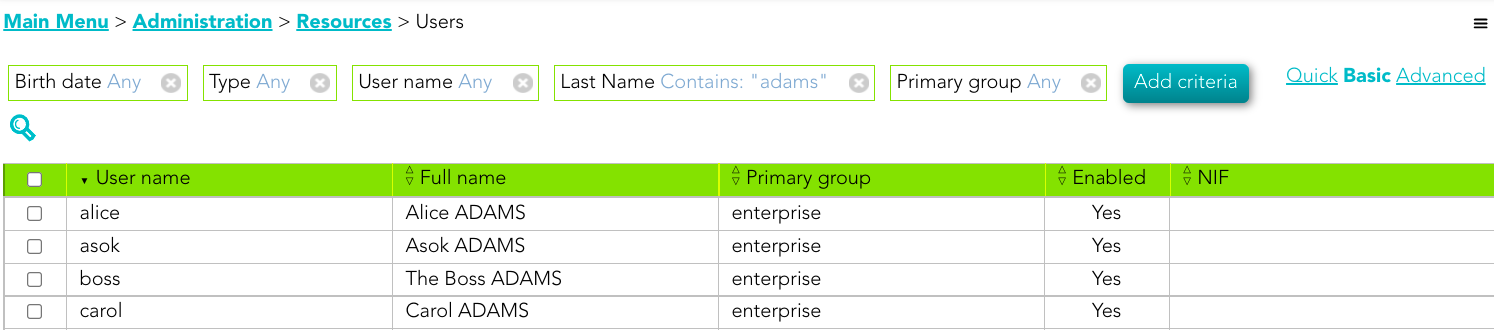
Advanced
This option allows an advanced search system using the SCIM standard. You can type the query to search the info using the SCIM standard.
You can access to SCIM Book for more information
Example 1

Example 2
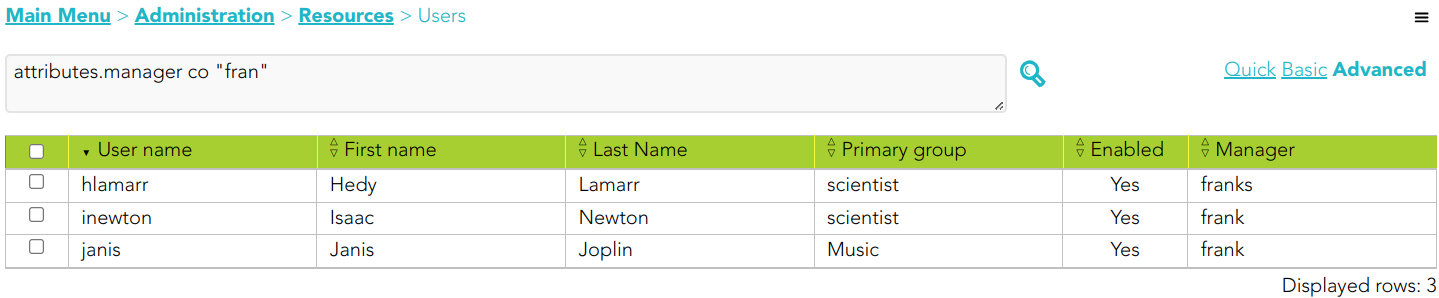
Column Selector
Description
Throughout the Soffid Console, we can find a large number of list-type components. These lists are used to display the corresponding objects data in each case, for instance users, accounts, ...
This component allows you to add or remove columns, but also allows you to sort by the name of the columns to display them in the list. Be in mind, the columns are the attributes of an object (an user, or an account...).
It is easy to use, once you click on the hamburger icon and the Add or remove columns option, Soffid will display a window with the available columns for the object, then just drag and drop them in the order you want and click on the Apply changes button. Once you Applu changes, Soffid will display the list with the attributes in the order you defined.
Example
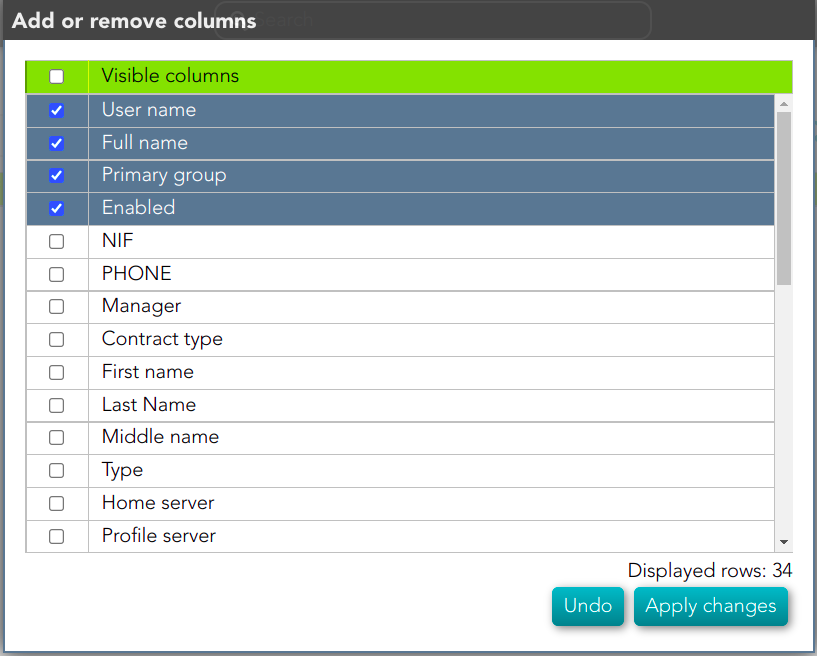
Download CSV file & Import
Download CSV file
Soffid allows you to download all data objects displayed in tables in a CSV file.
You can access to Download CSV file option through the hamburger icon from most of the components of the table type.
Import
Soffid allows you to upload a CSV file with the data list to add, update or delete information to the data table. The operations that can be performed with the data import depend on the table on which the process is being performed.
You can access to Import option through the hamburger icon from most of the components of the table type.
To import data from a CSV file, first of all it will be to pick the file to import. Once the file has been selected, the data will be displayed to check contents. If the content is correct, then it is allowed to set up the mappings for each CSV file column, "Don't load" option is available. Finally it is allowed to perform the import process.
When the import process finishes, Soffid will show a message with the result of the process execution.
Bulk actions
Description
Allows massive operations to be performed on the selected records. With that operation, updates can be made to any of the object parameters.
You can access this option through the hamburger icon from a few of the components of the table type, like users list or accounts list.
1. First of all, you need to select the records that you want to update from the list, once you have selected them, you must choose the bulk action on the hamburguer icon.
2. Then Soffid display a modal where you can select one by one the attributes that will be updated.
The fist dropdown list displays the attributes of the object, for instance, the user attributes.
The second dropdown list displays the operation to be performed on the selected attribute. The operation can be change the value or clear the value, and if it is neccesary the new value.
The type of the third field will depend on the attribute type selected previously.
💻 Image
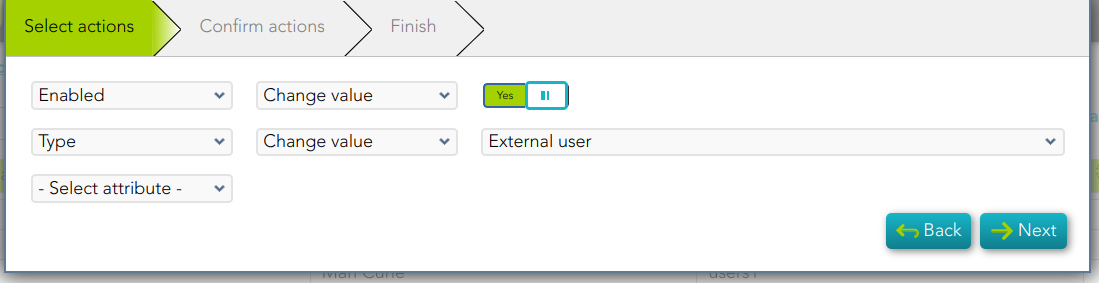
3. Soffid shows a confirmation message with the number of records that will be updated. Finally, you can choose apply or come back. If you apply the changes, the attributes of the seleccted records will be updated
💻 Image
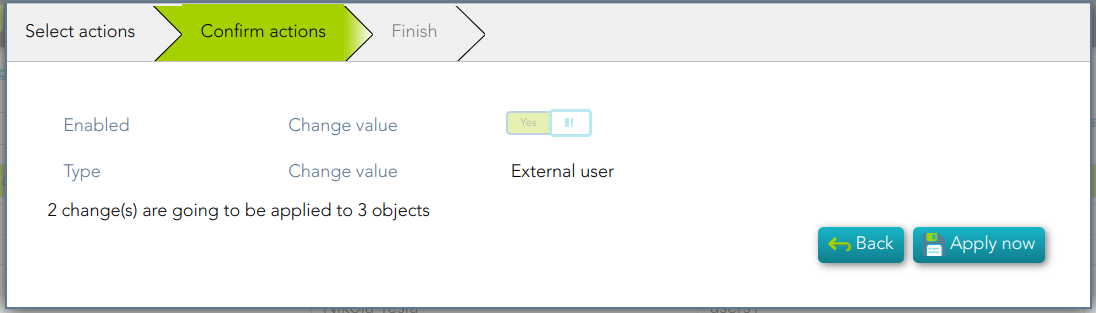
Issue Actions
Actions
Issues query action
| Download CSV file | Allows you to download a CSV file with the issue data. |
|
Add or remove columns |
Allows you to show and hide columns in the table. You can also set the order in which the columns will be displayed. The selected columns and order will be saved for the next time Soffid displays the page. |
Issue detail
| Close | Allows you to quit without applying any changes. |
| Acknowledge |
Allows you to check as Acknowledged |
| Solve issue |
Allows you to mark as solved the issue. |
| Send custom email | Allows you to send a custom email to one recipient. |
| Add Comments | Allows you to add comments to the Action logs. |
account-created
💻 Image
| Unlock account | If you click this option, Soffil will unlock the account. |
|
Look affected accounts |
If you click this option, Soffil will lock affected accounts. |
|
Disable user |
If you click this option, Soffid will disable the user. |
disconnected-system
💻 Image
discovered-host
💻 Image
discovered-system
💻 Image
duplicated-user
💻 Image
|
Mege users |
If you click this option, Soffid will allow you to merge the identities by selecting the data of each of them. 💻 Image
|
failed-job
💻 Image
enabled-account-on-disabled-user
💻 Image
| Unlock account | If you click this option, Soffil will unlock the account. |
|
Look affected accounts |
If you click this option, Soffil will lock affected accounts. |
global-failed-login
💻 Image
integration-errors
💻 Image
locked-account
💻 Image
| Unlock account | If you click this option, Soffil will unlock the account. |
|
Look affected accounts |
If you click this option, Soffil will lock affected accounts. |
|
Disable user |
If you click this option, Soffid will disable the user. |
|
Lock affected host |
If you click this option, Soffid will lock the affected host. |
|
Unlock host |
If you click this option, Soffid will unlock the host. |
login-different-country
💻 Image
| Unlock account | If you click this option, Soffil will unlock the account. |
|
Look affected accounts |
If you click this option, Soffil will lock affected accounts. |
|
Disable user |
If you click this option, Soffid will disable the user. |
|
Lock affected host |
If you click this option, Soffid will lock the affected host. |
|
Unlock host |
If you click this option, Soffid will unlock the host. |
login-from-new-device
💻 Image
| Unlock account | If you click this option, Soffil will unlock the account. |
|
Look affected accounts |
If you click this option, Soffil will lock affected accounts. |
|
Disable user |
If you click this option, Soffid will disable the user. |
|
Lock affected host |
If you click this option, Soffid will lock the affected host. |
|
Unlock host |
If you click this option, Soffid will unlock the host. |
login-not-recognized
💻 Image
| Unlock account | If you click this option, Soffil will unlock the account. |
|
Look affected accounts |
If you click this option, Soffil will lock affected accounts. |
|
Disable user |
If you click this option, Soffid will disable the user. |
|
Lock affected host |
If you click this option, Soffid will lock the affected host. |
|
Unlock host |
If you click this option, Soffid will unlock the host. |
otp-failures
💻 Image
| Unlock account | If you click this option, Soffil will unlock the account. |
|
Look affected accounts |
If you click this option, Soffil will lock affected accounts. |
|
Disable user |
If you click this option, Soffid will disable the user. |
|
Lock affected host |
If you click this option, Soffid will lock the affected host. |
|
Unlock host |
If you click this option, Soffid will unlock the host. |
pam-violation
💻 Image
| Unlock account | If you click this option, Soffil will unlock the account. |
|
Look affected accounts |
If you click this option, Soffil will lock affected accounts. |
|
Disable user |
If you click this option, Soffid will disable the user. |
|
Lock affected host |
If you click this option, Soffid will lock the affected host. |
|
Unlock host |
If you click this option, Soffid will unlock the host. |
password-changed
💻 Image
permissions-granted
💻 Image
| Unlock account | If you click this option, Soffil will unlock the account. |
|
Look affected accounts |
If you click this option, Soffil will lock affected accounts. |
|
Disable user |
If you click this option, Soffid will disable the user. |
risk-increase
💻 Image
| Unlock account | If you click this option, Soffil will unlock the account. |
|
Look affected accounts |
If you click this option, Soffil will lock affected accounts. |
|
Disable user |
If you click this option, Soffid will disable the user. |
robot-login
💻 Image
| Unlock account | If you click this option, Soffil will unlock the account. |
|
Look affected accounts |
If you click this option, Soffil will lock affected accounts. |
|
Disable user |
If you click this option, Soffid will disable the user. |
|
Lock affected host |
If you click this option, Soffid will lock the affected host. |
|
Unlock host |
If you click this option, Soffid will unlock the host. |
security-exception
💻 Image
|
Disable user |
If you click this option, Soffid will disable the user. |
Textual Index
Textual Index
Introduction
A textual index is a data structure used in database systems to facilitate efficient search and retrieval of text-based information. It is designed to handle large volumes of textual data and provide quick access to relevant documents or records based on specified search criteria.
When a search query is performed on a database with a textual index, the index is queried to identify relevant documents or records that match the search terms. The index provides information about the location and relevance of the documents, which enables the database system to retrieve and present the results in a timely manner.
Textual indexes play a crucial role in enabling efficient search and retrieval of textual information in databases, making them an essential component in applications that handle large volumes of textual data, such as search engines, content management systems, and document repositories.
Soffid incorporates the textual index from version 3.5 using the Apache Lucene library.
Index configuration
Soffid allows you to configure the objects you want to use in the textual index. To do this, you must select the proper object from the metadata page and enable the option "Use textual index". Once you enable this option, the textual index will be applied to the attributes of this object that have been included in the quick search.
Notice, from the user interface, it is not interpreted as a Lucene expression.
Example
1. Enable the "Use textual index" on the User object and save the changes.
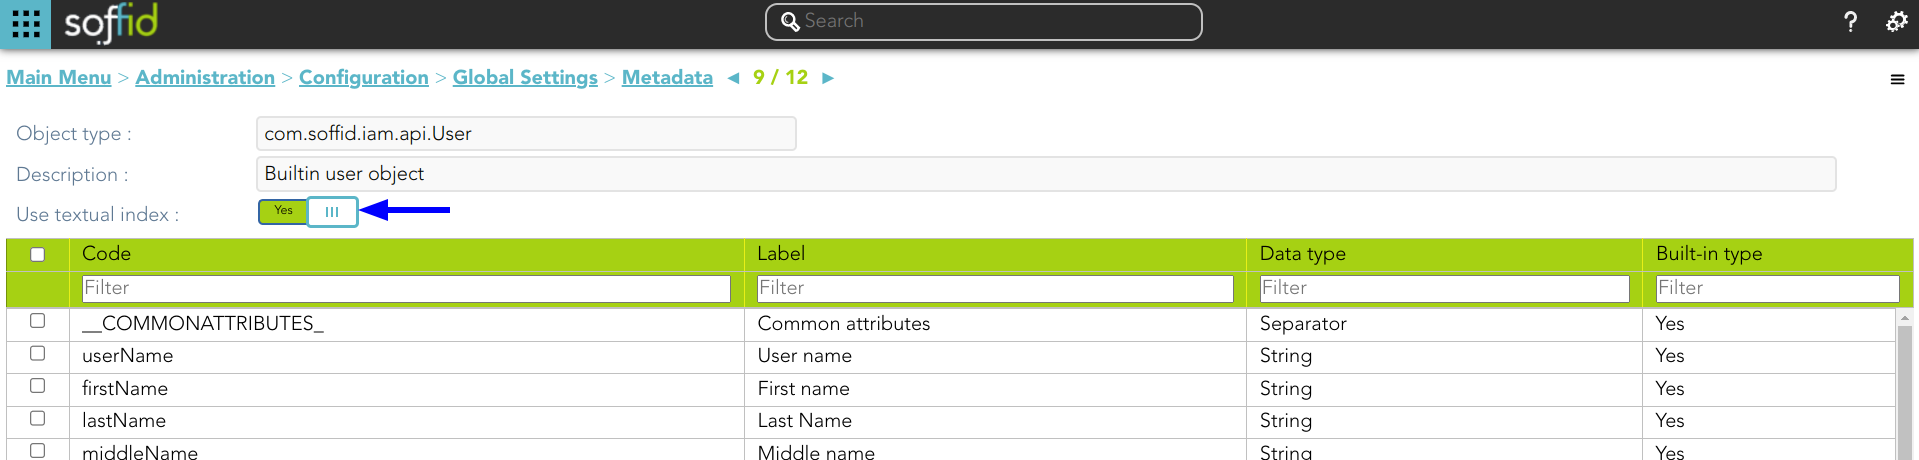
2. Check the attributes included in the quick search.
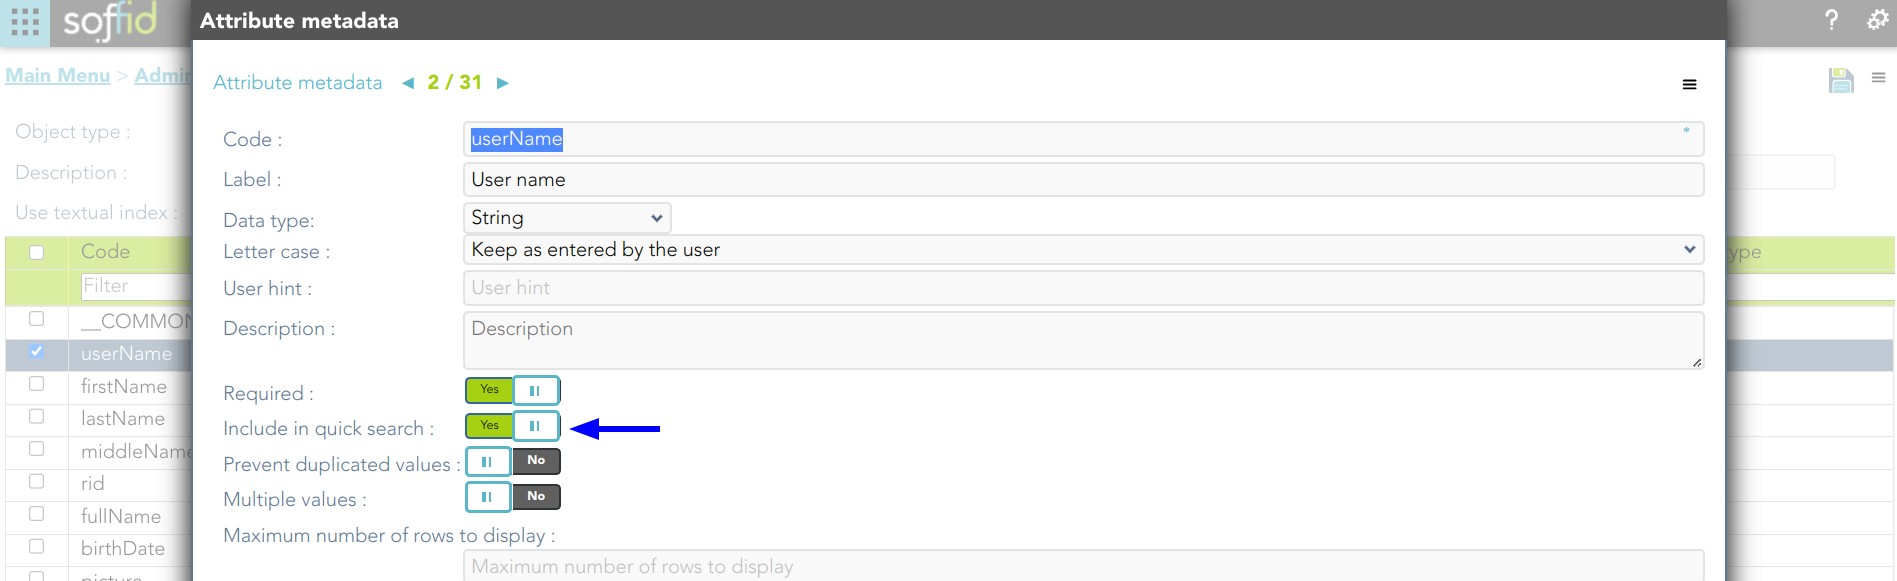
How does the user interface search work?
Once you have configured the textual index for a specific object, Soffid will apply it when you use Quick Search on this object.
Example 1
1. If you search for users using the text "frankin", then Soffid will display all the users whose userName, firstName, lastName, or middleName match, to some degree, with the typed text following the textual index rules.
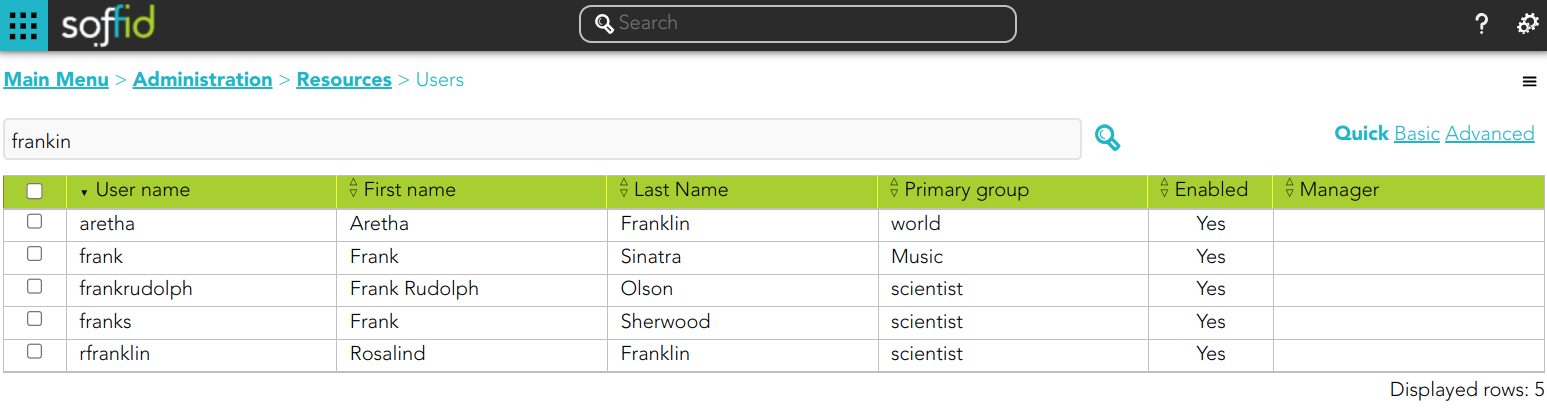
2. If you include the attribute manager in the quick search:
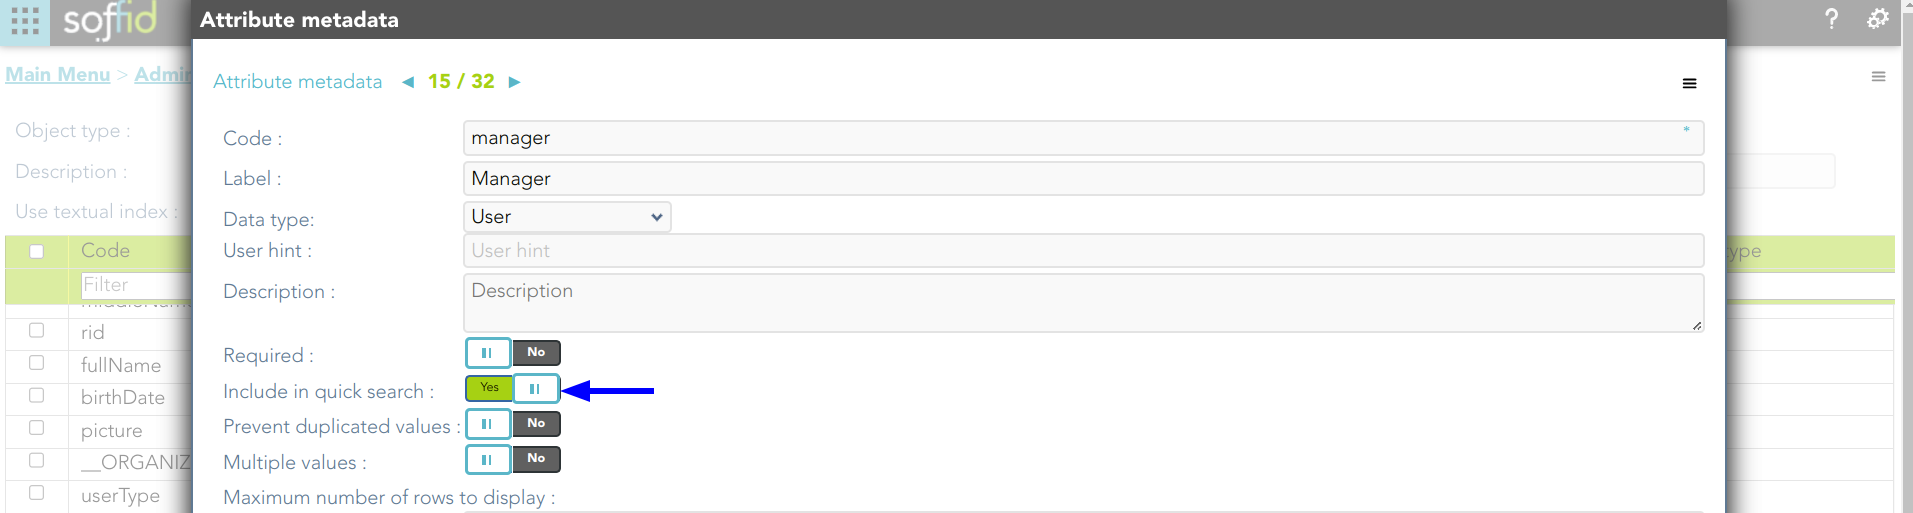
3. And search for "frankin", then Soffid will display all the users whose userName, firstName, lastName, middleName, or manager match with the typed text following the textual index rules.
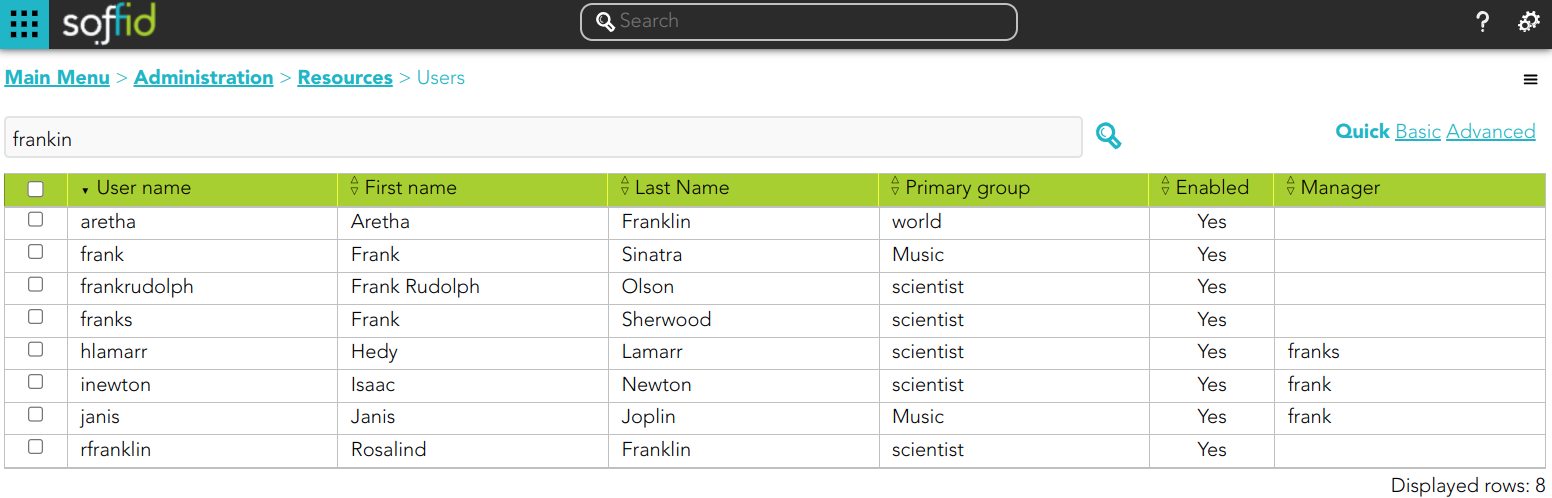
Example 2
1. If you search for users using the text "manager:frank" Soffid will display all users whose manager matches the text "frank".
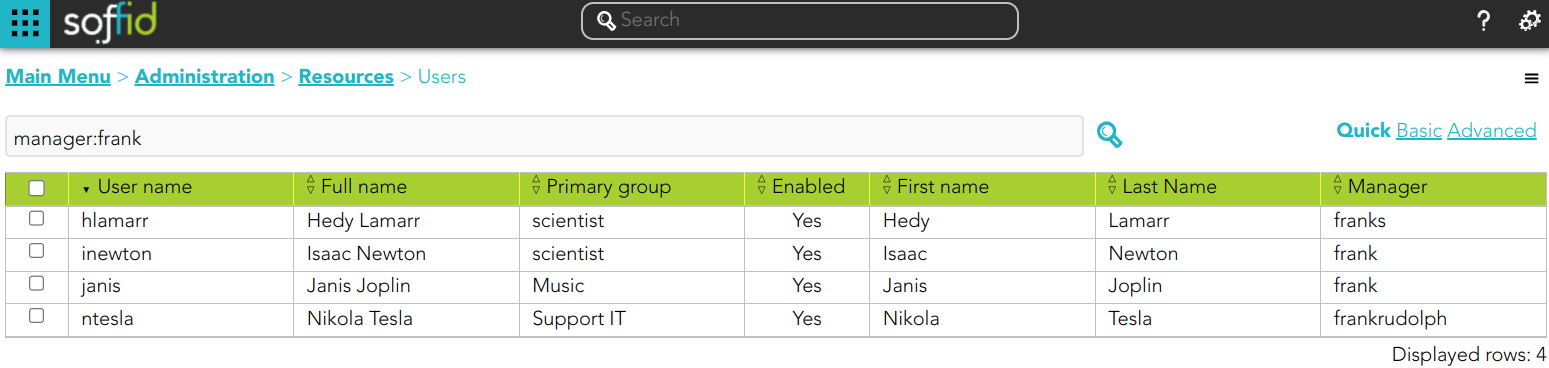
Notice the difference by searching "manager:frank?":

And by searching "manager:frank*":
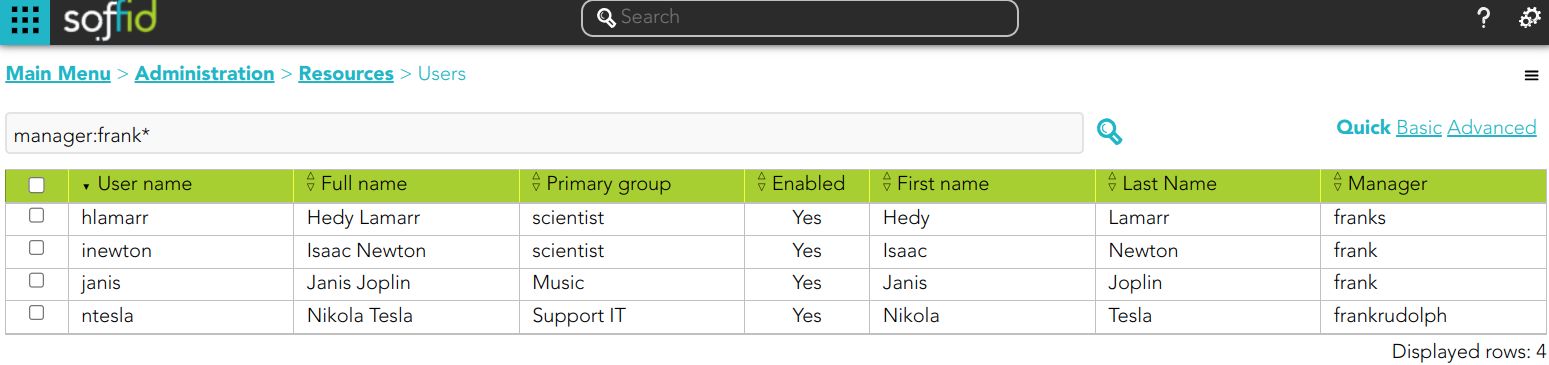
And also by searching "manager:fr*"
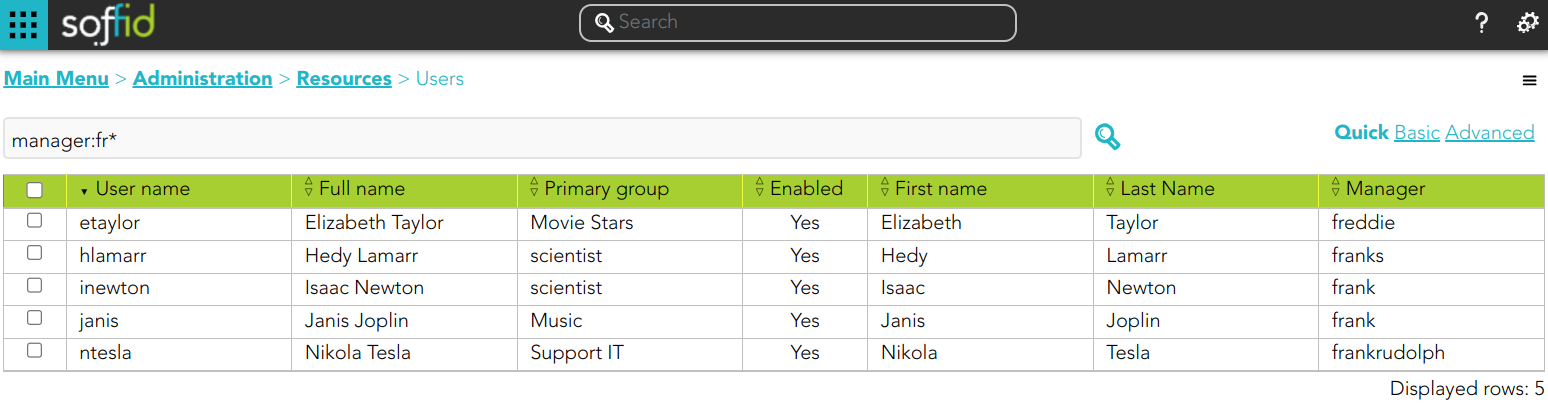
Example 3
1. If you search for users using the text "userName:frank*" Soffid will display all users whose user name matches the text "frank" followed by any other text.

Notice the difference by searching the text "userName:frank?":

Example 4
1. If you search for users using the text "frank" plus the wildcard "?", Soffid will display all users whose userName, firstName, lastName, middleName, or manager match the typed text as long as it has variation in the characters where the wildcard has been used.
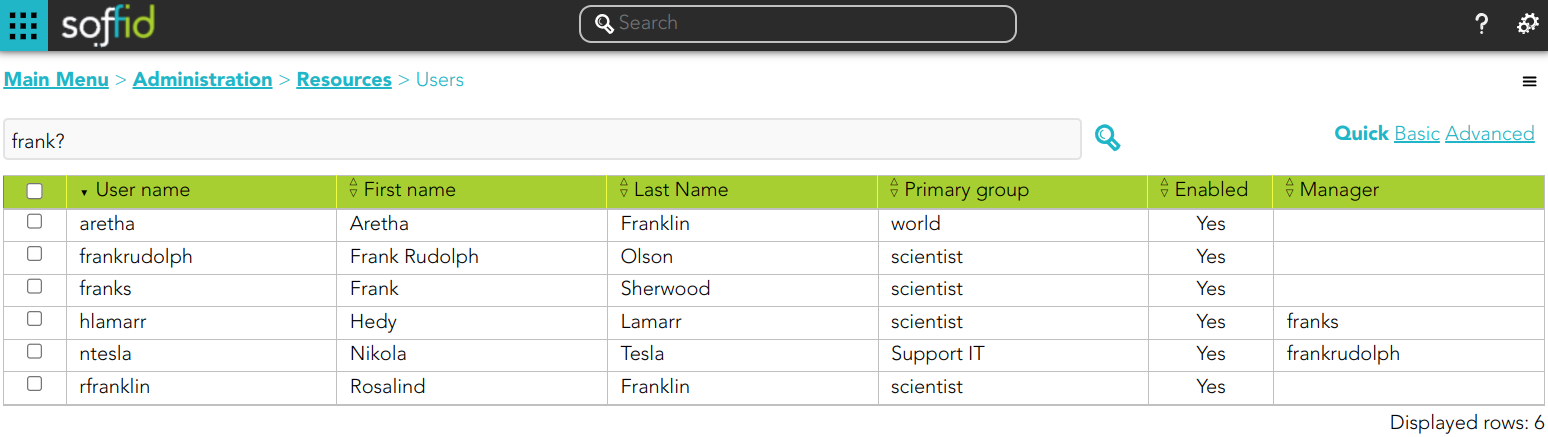
Notice the difference by searching "fran?"
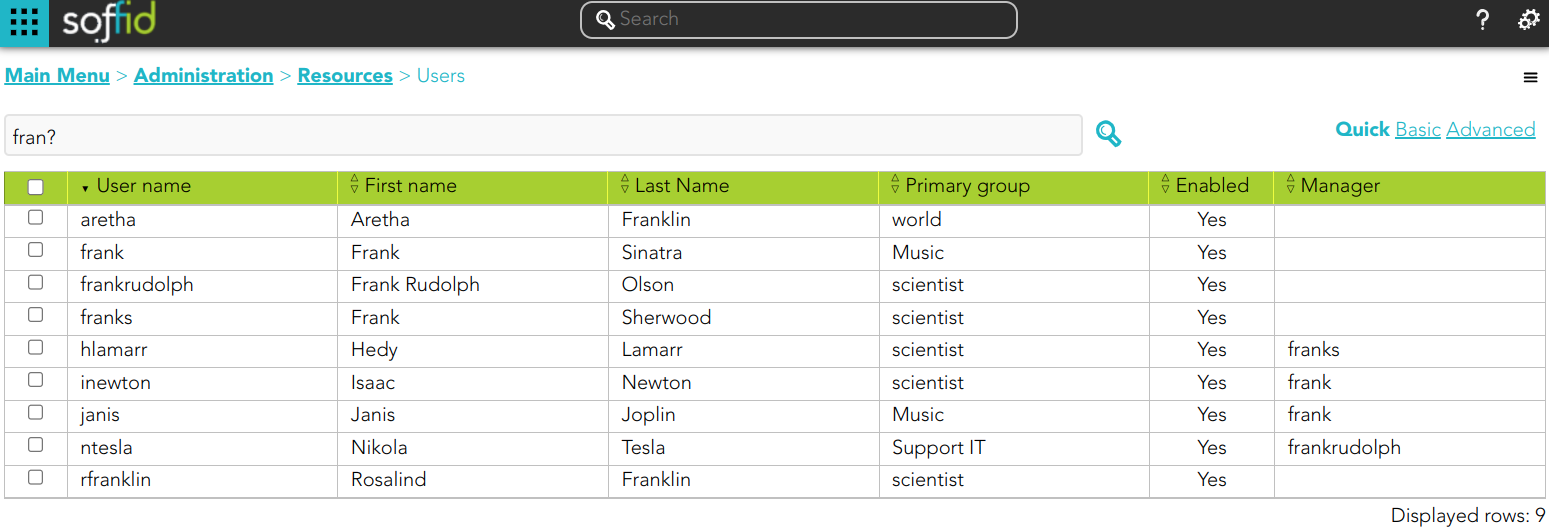
How does the SCIM interface search work?
1. First of all, you must install the SCIM addon in Soffid.
For more information, you can visit the How to install SCIM in Soffid? page.
2. Then, you can use any REST client to test and consume our SCIM REST web service.
For more information, you can visit the Testing tool page.
3. Finally, you can start to use the SCIM interface search by using Lucene syntaxis
Lucene syntaxis
Please browse the standard specifications in this link: https://bookstack.soffid.com/books/soffid-3-reference-guide/page/lucene-query-parser-syntax
Term Modifiers
Lucene supports modifying query terms to provide a wide range of search options. Here are the most common ones:
| Wildcard Searches |
To perform a single character wildcard search use the "?" symbol. To perform a multiple character wildcard search use the "*" symbol. |
| Regular Expression Searches | Lucene supports regular expression searches matching a pattern between forward slashes "/" |
| Fuzzy Searches |
To do a fuzzy search use the tilde, "~", symbol at the end of a Single word Term Soffid Console <= 3.4 version ~0.8: stricter search ~0.1: more lax search Soffid Console > 3.4 version An additional (optional) parameter can specify the maximum number of edits allowed. The value is between 0 and 2. |
| Range Searches | Range Queries allow one to match documents whose field(s) values are between the lower and upper bound specified by the Range Query |
| Boosting a Term | To boost a term use the caret, "^", symbol with a boost factor (a number) at the end of the term you are searching. The higher the boost factor, the more relevant the term will be. |
Boolean Operators
| OR | The OR operator links two terms and finds a matching document if either of the terms exist in a document. This is equivalent to a union using sets |
| AND | The AND operator matches documents where both terms exist anywhere in the text of a single document. This is equivalent to an intersection using sets. |
| + | The "+" or required operator requires that the term after the "+" symbol exist somewhere in a the field of a single document. |
| NOT | The NOT operator excludes documents that contain the term after NOT. This is equivalent to a difference using sets. |
| - | The "-" or prohibit operator excludes documents that contain the term after the "-" symbol. |
Escaping Special Characters
Lucene supports escaping special characters that are part of the query syntax.
The current list of special characters are + - && || ! ( ) { } [ ] ^ " ~ * ? : \ /
Examples
Example 1
1. Use the wildcard search
1.1. *
Request
GET http://<domain>/webservice/scim2/v1/User?textFilter=fran*Response 200 OK
{
"schemas": [
"urn:ietf:params:scim:api:messages:2.0:ListResponse"
],
"totalResults": 4,
"startIndex": 1,
"Resources": [
{
"lastName": "Franklin",
"createdByUser": "ActiveDirectory",
"fullName": "Rosalind Franklin",
"active": true,
"userName": "rfranklin",
"mailAlias": "",
"firstName": "Rosalind",
"createdDate": "2023-08-08 14:26:14",
"multiSession": true,
"meta": {
"location": "http://soffid.35x.lab:8089/soffid/webservice/scim2/v1/User/2862",
"links": {
"roleAccounts": "http://soffid.35x.lab:8089/soffid/webservice/scim2/v1/RoleAccount?filter=userCode+eq+'rfranklin'+and+enabled+eq+true",
"groupUsers": "http://soffid.35x.lab:8089/soffid/webservice/scim2/v1/GroupUser?filter=user+eq+'rfranklin'+and+disabled+eq+false",
"accounts": "http://soffid.35x.lab:8089/soffid/webservice/scim2/v1/Account?filter=type+eq+U+and+users.user.userName+eq+'rfranklin'",
"issues": "http://soffid.35x.lab:8089/soffid/webservice/scim2/v1/Issue?filter=user.userName+eq+'rfranklin'",
"effectiveGrants": "http://soffid.35x.lab:8089/soffid/webservice/scim2/v1/User/2862/effectiveGrants"
},
"resourceType": "User"
},
"modifiedByUser": "ActiveDirectory",
"schemas": [
"urn:soffid:com.soffid.iam.api.User"
],
"modifiedDate": "2023-08-08 14:26:14",
"attributes": {},
"id": 2862,
"userType": "I",
"primaryGroupDescription": "scientist",
"primaryGroup": "scientist"
},
{
"lastName": "Franklin",
"createdByUser": "ActiveDirectory",
"fullName": "Aretha Franklin",
"active": true,
"userName": "aretha",
"mailAlias": "",
"firstName": "Aretha",
"createdDate": "2023-09-06 13:12:54",
"multiSession": true,
"meta": {
"location": "http://soffid.35x.lab:8089/soffid/webservice/scim2/v1/User/276397",
"links": {
"roleAccounts": "http://soffid.35x.lab:8089/soffid/webservice/scim2/v1/RoleAccount?filter=userCode+eq+'aretha'+and+enabled+eq+true",
"groupUsers": "http://soffid.35x.lab:8089/soffid/webservice/scim2/v1/GroupUser?filter=user+eq+'aretha'+and+disabled+eq+false",
"accounts": "http://soffid.35x.lab:8089/soffid/webservice/scim2/v1/Account?filter=type+eq+U+and+users.user.userName+eq+'aretha'",
"issues": "http://soffid.35x.lab:8089/soffid/webservice/scim2/v1/Issue?filter=user.userName+eq+'aretha'",
"effectiveGrants": "http://soffid.35x.lab:8089/soffid/webservice/scim2/v1/User/276397/effectiveGrants"
},
"resourceType": "User"
},
"modifiedByUser": "ActiveDirectory",
"schemas": [
"urn:soffid:com.soffid.iam.api.User"
],
"modifiedDate": "2023-09-06 13:12:54",
"attributes": {},
"id": 276397,
"userType": "I",
"primaryGroupDescription": "World",
"primaryGroup": "world"
},
{
"lastName": "Sinatra",
"createdByUser": "ActiveDirectory",
"fullName": "Frank Sinatra",
"active": true,
"userName": "frank",
"mailAlias": "",
"firstName": "Frank",
"createdDate": "2023-09-06 13:12:54",
"multiSession": true,
"meta": {
"location": "http://soffid.35x.lab:8089/soffid/webservice/scim2/v1/User/276435",
"links": {
"roleAccounts": "http://soffid.35x.lab:8089/soffid/webservice/scim2/v1/RoleAccount?filter=userCode+eq+'frank'+and+enabled+eq+true",
"groupUsers": "http://soffid.35x.lab:8089/soffid/webservice/scim2/v1/GroupUser?filter=user+eq+'frank'+and+disabled+eq+false",
"accounts": "http://soffid.35x.lab:8089/soffid/webservice/scim2/v1/Account?filter=type+eq+U+and+users.user.userName+eq+'frank'",
"issues": "http://soffid.35x.lab:8089/soffid/webservice/scim2/v1/Issue?filter=user.userName+eq+'frank'",
"effectiveGrants": "http://soffid.35x.lab:8089/soffid/webservice/scim2/v1/User/276435/effectiveGrants"
},
"resourceType": "User"
},
"modifiedByUser": "ActiveDirectory",
"schemas": [
"urn:soffid:com.soffid.iam.api.User"
],
"modifiedDate": "2023-09-06 13:12:55",
"attributes": {},
"id": 276435,
"userType": "I",
"primaryGroupDescription": "Music",
"primaryGroup": "Music"
},
{
"lastName": "Sherwood",
"createdByUser": "pgarcia",
"fullName": "Frank Sherwood",
"active": true,
"userName": "franks",
"mailAlias": "",
"firstName": "Frank",
"createdDate": "2023-10-05 15:32:40",
"multiSession": false,
"meta": {
"location": "http://soffid.35x.lab:8089/soffid/webservice/scim2/v1/User/432644",
"links": {
"roleAccounts": "http://soffid.35x.lab:8089/soffid/webservice/scim2/v1/RoleAccount?filter=userCode+eq+'franks'+and+enabled+eq+true",
"groupUsers": "http://soffid.35x.lab:8089/soffid/webservice/scim2/v1/GroupUser?filter=user+eq+'franks'+and+disabled+eq+false",
"accounts": "http://soffid.35x.lab:8089/soffid/webservice/scim2/v1/Account?filter=type+eq+U+and+users.user.userName+eq+'franks'",
"issues": "http://soffid.35x.lab:8089/soffid/webservice/scim2/v1/Issue?filter=user.userName+eq+'franks'",
"effectiveGrants": "http://soffid.35x.lab:8089/soffid/webservice/scim2/v1/User/432644/effectiveGrants"
},
"resourceType": "User"
},
"modifiedByUser": "pgarcia",
"schemas": [
"urn:soffid:com.soffid.iam.api.User"
],
"modifiedDate": "2023-10-05 15:32:40",
"attributes": {},
"id": 432644,
"userType": "I",
"primaryGroupDescription": "scientist",
"primaryGroup": "scientist"
}
]
}1.2. ?
Request
http://<domain>/webservice/scim2/v1/User?textFilter=fran?Response 200 OK
{
"schemas": [
"urn:ietf:params:scim:api:messages:2.0:ListResponse"
],
"totalResults": 2,
"startIndex": 1,
"Resources": [
{
"lastName": "Sinatra",
"createdByUser": "ActiveDirectory",
"fullName": "Frank Sinatra",
"active": true,
"userName": "frank",
"mailAlias": "",
"firstName": "Frank",
"createdDate": "2023-09-06 13:12:54",
"multiSession": true,
"meta": {
"location": "http://soffid.35x.lab:8089/soffid/webservice/scim2/v1/User/276435",
"links": {
"roleAccounts": "http://soffid.35x.lab:8089/soffid/webservice/scim2/v1/RoleAccount?filter=userCode+eq+'frank'+and+enabled+eq+true",
"groupUsers": "http://soffid.35x.lab:8089/soffid/webservice/scim2/v1/GroupUser?filter=user+eq+'frank'+and+disabled+eq+false",
"accounts": "http://soffid.35x.lab:8089/soffid/webservice/scim2/v1/Account?filter=type+eq+U+and+users.user.userName+eq+'frank'",
"issues": "http://soffid.35x.lab:8089/soffid/webservice/scim2/v1/Issue?filter=user.userName+eq+'frank'",
"effectiveGrants": "http://soffid.35x.lab:8089/soffid/webservice/scim2/v1/User/276435/effectiveGrants"
},
"resourceType": "User"
},
"modifiedByUser": "ActiveDirectory",
"schemas": [
"urn:soffid:com.soffid.iam.api.User"
],
"modifiedDate": "2023-09-06 13:12:55",
"attributes": {},
"id": 276435,
"userType": "I",
"primaryGroupDescription": "Music",
"primaryGroup": "Music"
},
{
"lastName": "Sherwood",
"createdByUser": "pgarcia",
"fullName": "Frank Sherwood",
"active": true,
"userName": "franks",
"mailAlias": "",
"firstName": "Frank",
"createdDate": "2023-10-05 15:32:40",
"multiSession": false,
"meta": {
"location": "http://soffid.35x.lab:8089/soffid/webservice/scim2/v1/User/432644",
"links": {
"roleAccounts": "http://soffid.35x.lab:8089/soffid/webservice/scim2/v1/RoleAccount?filter=userCode+eq+'franks'+and+enabled+eq+true",
"groupUsers": "http://soffid.35x.lab:8089/soffid/webservice/scim2/v1/GroupUser?filter=user+eq+'franks'+and+disabled+eq+false",
"accounts": "http://soffid.35x.lab:8089/soffid/webservice/scim2/v1/Account?filter=type+eq+U+and+users.user.userName+eq+'franks'",
"issues": "http://soffid.35x.lab:8089/soffid/webservice/scim2/v1/Issue?filter=user.userName+eq+'franks'",
"effectiveGrants": "http://soffid.35x.lab:8089/soffid/webservice/scim2/v1/User/432644/effectiveGrants"
},
"resourceType": "User"
},
"modifiedByUser": "pgarcia",
"schemas": [
"urn:soffid:com.soffid.iam.api.User"
],
"modifiedDate": "2023-10-05 15:32:40",
"attributes": {},
"id": 432644,
"userType": "I",
"primaryGroupDescription": "scientist",
"primaryGroup": "scientist"
}
]
}Example 2
1. Use the wildcard search in a specific attribute
Request
GET http://soffid.35x.lab:8089/soffid/webservice/scim2/v1/User?textFilter=userName:frankResponse 200 OK
{
"schemas": [
"urn:ietf:params:scim:api:messages:2.0:ListResponse"
],
"totalResults": 1,
"startIndex": 1,
"Resources": [
{
"lastName": "Sinatra",
"profileServer": "Void host",
"createdByUser": "admin",
"fullName": "Frankaaa Sinatra",
"active": true,
"userName": "frank",
"mailAlias": "",
"mailServer": "Void host",
"firstName": "Frankaaa",
"emailAddress": "pgarcia@soffid.com",
"mailDomain": "soffid.com",
"createdDate": "2023-06-02 07:41:47",
"multiSession": false,
"meta": {
"location": "http://soffid.35x.lab:8089/soffid/webservice/scim2/v1/User/3910",
"links": {
"roleAccounts": "http://soffid.35x.lab:8089/soffid/webservice/scim2/v1/RoleAccount?filter=userCode+eq+'frank'+and+enabled+eq+true",
"groupUsers": "http://soffid.35x.lab:8089/soffid/webservice/scim2/v1/GroupUser?filter=user+eq+'frank'+and+disabled+eq+false",
"accounts": "http://soffid.35x.lab:8089/soffid/webservice/scim2/v1/Account?filter=type+eq+U+and+users.user.userName+eq+'frank'",
"effectiveGrants": "http://soffid.35x.lab:8089/soffid/webservice/scim2/v1/User/3910/effectiveGrants"
},
"resourceType": "User"
},
"modifiedByUser": "admin",
"schemas": [
"urn:soffid:com.soffid.iam.api.User"
],
"modifiedDate": "2023-06-02 07:41:47",
"attributes": {
"picture": "/9j/4AAQSkZJRgABAQAAAQABAAD/2wCEAAoHCBYWFRgVFRYYGRgaGhkYGhgaGBoYGhoYHBkaGhgZGhgcIS4lHB4rIRgYJjgmKy8xNTU1GiQ7QDs0Py40NTEBDAwMBgYGEAYGEDEdFh0xMTExMTExMTExMTExMTExMTExMTExMTExMTExMTExMTExMTExMTExMTExMTExMTExMf/AABEIAKgBKwMBIgACEQEDEQH/xAAcAAABBQEBAQAAAAAAAAAAAAADAQIEBQYABwj/xABFEAACAQIDBAcECAQFAgcBAAABAgADEQQSIQUxQVEGEyJhcYGRMkKhsQcjUnKSwdHwFGKCoiQzY7LhU3NDZIOTo8LxFf/EABQBAQAAAAAAAAAAAAAAAAAAAAD/xAAUEQEAAAAAAAAAAAAAAAAAAAAA/9oADAMBAAIRAxEAPwDeqIVZwEcBAQQiCIBHqIDgItogjwICWiqIto4CAqiZn6ScNnwDn7DI/wAcp/3TUKJX9JcNnwldOdNj5qMw+UD5zcQYh6qG+gPpGrQblAdThBHUsK3MfEw4wR5n5QG4dtd8t8JU3DT0/wCZBpYVRvI9ZMpqg97ytxgTi44n8zz3D9+k4G+4ee79iR/4pF3C/iY2rtIAakD0gT6WHOlz4/v97oZEpL7RzHu5/nM/U2wg3Fm+Eh1NsN7oA+MDWfxir7Kj975FxO0re04Xuvb+0a+kyVTaDtvc+ANh6CANQwNFW2wg3ZnP4R6nX4SFV2y59kKv9x9Tp8JUXMab3gS62MZvaYnxOnpI7Vo0oeAJiVKLAXINoCl41njAJzixsdPnAUNEZpY7H2FiMSbUabMOLnsoPFzp6XM9G6O/R/SpEPiCKrjULb6tT906ue86d0DLdEuhz4krVqhkob+IaoOSclP2vTmPWqNFUUIihVUBVUCwAG4AQw3RpEBhEYVhjGkQAOsCZJYQbLAjO0ZeFqLBQNAqwgSKphFgMCRwSEAhVWAFUsCToBqSdwHEmUmI6YYJCQapJH2Uc/G0r/pH2y1FEpLcBwSx5gaBfz9J4/isWzHfaB61ivpKwqexTrP32RB8Wv8ACU2J+lVrkU8MgHAvULf2qo+c8xZol4G1xn0kY5/ZdKY/00F/V80pMX0jxNX/ADMTVYHeM5VfwrYfCUmaITAmCoI7r5BzTrmBYDFGDav3yJaKtNjwgGOJPjGHFNFXCkyTR2cDqxPgIEA12PExERmPZBPgCZd0cIgOiE+MtKeznb2QQDwtv/esDLjBPxGXx/SOTB8zfwm2w/Rose1eXOH6PUltm3wMBhtiM5si+usu8N0KdvaNvKwm/wAFhUQjIl7d36y1COfcC+JEDzE9Csu8mFodF1G+3pN9XRuQ+cjFLDUQMvh+j6BtRbyhdq7DTJu56j9JatvvFxL9gg3/AHxgeYYjZ6qWPLlu8ZsuhfRzDPSGIemHcsw7faUZTYWTdfxvKNkzswtcA30F766D4fGekbCw4TD01At2Qbd51J8TeBNRQAABYDcBuHlHho2dAfeJmgyY0mATNGs0YzRmeA8tBu0VngWeAjtBZo4vB5oGlQwimAVo4PAkq0KryIHjg8CJ0k2DSxtLq6hZWGqOp7SHjpuIPEGeN9IuhWKwpLMhqU+FRAWFv5l3p56d89yDxy1IHzNEn0BtTozg8QSalBMx3ul0bzKWv5zM4z6L8M2tOtVp9zZXHyB+MDyOJPRqv0VVPcxKH71Nl+TGQNofRzWoI9Z61Iog1Az5iScqgXHMiBjUp3498lrhlG+DanlPwlmaV0Q/y/L/APIEXIL6CEWnynDfJ2BVScpNoDMNgGYiwB85ZJsuotiU08QZabMwigg38949RNKmFDLrYwMxgKS3CurKeFx++c02GwAt2XBHDSSKOFKqLi45b/Cd1AGqi3h+kB38Jbe/oJJpBFGm+N0y8z6RmGIBvx5wDde5PZB8bWkoI1u03kJyMOJnVsQAL6Ad/OAKpSHf6yvxNhuvFq7U1IW1++RhXz3vpADm3yJjn7DW0IBsYdjyOm6QsShyt90/KBUbOw/YVt9xmJ14k6fAes3+DZcqoHViqqDYi+gHDhMLhELhETQMoGhsQNM5PLfaW+MxaU6iJTUllIuw9lRbUM3EnlA1BE6DLxM8B5Ea0b1k7NAY4g4UxpEATGBYw7iDKwAxmWHIEbpAv1hAIJYQGA4R4jBHKYBBFiAziYCGKI0mKIDxKHp4p/gnt9unfwzj87S+WVnSxL4Kv3Jn/Awb8oHi+LpAtpwCmTqVH6pL8j/uMFTp7yfD0AEnYpciIOBRfjrAqkoXa1o9sMyG/wCWnpCqLax+P2oEAAAzHXUcOEBuG2w9M3yg25f8S2wnTNcwDIV4XHw0mTxWIe/bsugPAWvz7+6Ds9sxW4G/mLgEEjkQQbwPYdnbdpOtlYa+nfLBmVhpuni2G2nk5ibjox0jD9g+1A09OoBmEitj0Q9owi4RzrKDaxdWsqFiONtLwJe1Nt1stqKgXF8zfvTjKHE9o3r4nX71hfmBI2JNUkK1xfQKDqSeQ4eJg2Z8Ndy6U7OEuEzszWubs29R690C1wGKw6nLnDHd2jL1KiMNDfvvYD0kKjgKuJpO2alXZGKulSmACAAVNNxYrcHiN8yiYoo/1QqBNzI3a6sg20f3l+UDb1TcaayG99YLDVibZuUk110vAhbBpXJHHMU8r3NvIXlxWpAOVAFrgj9+szmA26uHxLoVuxF8xPshgCQB4W9Zf5y75h7639bpf+4QLmn7I8B8opESLAQRSZxEYRAW84xVE5lgBYxpjmSMcQBuYO8c0HaBqFEdaIojhA60UCdaKIC3nTohMDoojLxYBVMbjsP1lGpT+2jp+JSBOWSKZgeB1Kp0Oul7jkbk/vwlli6oegjjgSvkDp8CI/pbs/qcXWp7lc51+6/at4A3HlImFX6t6ZG7tr8j+UAlLCO40F4zEbH7S52sx0vb2eXjNL0VIZATb/n9/KWu19kBxmXQj98IGOTYFU5lennDEMHVwpzDQWO+1uGnHnNbsvolSSiyOLs5zWXUILAKoYgXsANe+Q8Hh6yEAG/jrL6i1S3bbTugYXaXQ1kVnDLZbm2rE6nyGhHpM9sZiuJS2mtp6ltrFKtJgd1tTPLqFT65SN94HsuGfsAnu+Ufhgt75QfLjIuz+1RvxtHYapAj4/C02a5WxBBvoDod17eMqcZsNajEq+W9iylQwJGgOp0PfNTXoh1uN8rv4fnp++cBcFhkw6ZFYm9yxvqzHS5t4W8pG/gUe5YAchbcJMTBrvzEwopiBUrg8h/4lZtB7dkbyQB56TQ4phaZjFDNUQd9/Td8bQI229jI9RKiXznsuP5V7Kn0EvcEgzKo1ChU89Xb/avrCVqJVLKbE72tckHSwHG5Mk7OweRdd9txNyL6knmx4+AECTOvHGNIgcTEvEvHgQODTs04iNJgKRBOsfnjWeBHcRto52gs8DUARwjVMdA4CLEvEJgLmiXnRsB0VYwQloDhDI0AIRTAxP0o7PNqWJUaLenUI4Am6E+eYeYmDw9UBh37/Oe5VqSujI6hkYZWU6gg8JgdrdBEo5qwxGSiNSGQu4/lQgjOeAvr4wM1sXH9VVKndfT4zd0cfmE80xrIxFSncKb2DEFhY21K6E7t3OXuwto7lJ8PlA2Ard3nO6y5sYGlVBj0S8Cg6Z4oCnkHEzE7Io56qjvvL/ppibsEXgLmM6G4G5LnU7v1gej7Jp2pnw/f78JGXeRLHZOnZ5iQ8ahDHxgHwb8L/v8AZkhwDvEqkdl13jjJlDFBhA51I3QLsRvk1jIWJ4wKjG4nWU+GrMa6sqlramys1hY6kKCQOEtMYmhJ/fKO6LJ2qrfcF/xE/lAs8Iju2dxlA0VbWPiV90b9DrrraTTFtOgDjSsIREgCyx6xWEEzQFcwbGNZ4wtAdeNaNBjjAG8FDNBWgaVIVYNBCCAtowwgEaywEnRLR0DgI4CII4QHARwWcsKggKizyb6SuknWv1CEdWhsbnss/E2Gr24DcOPdrun3SL+HpGjTI611Nze2SnuJJ4E7v+bTxqtUN81wt9c7DtH7icB+7wJWz3GQ7rF2IsLC4VLi3C418pJw1TIwPCQcC+dKiBizLaqtxY2HZf4FT5Q9B8ynmNfKBv8AAV8wUjWWO0topRpFjvI0HMzObBq2S54CUO2tqmq1+A3DugQ8XiC7Mx1JMteiWOCVCjGwOovzmezzkuzALcnhaB7LhMcpbRh6ynx/SJDV6tFeq17HIhZVPe268pNh7EZSHrs1j7oNvWbzB00RQEUKOAAAgOw1AhbuLE7xy7ryn2jQek3WJdk3uo3gfaHdLt60jjFKDraBFwe0VdbqZ1epbUyi21hjSb+IoeyT9YnAX94Dh3jvklMVnTN3XgLjDmU21PLvgMBtE4cMhpliTc62bcBfLa5XvGmshPisis53LZv7h+svMLthHUHQ8bwOo9JUb3G13ZSGv929s3leSqe26De/bhqDv46jSGQYeotmRCDvuo1MhbU6NKwLJdWt97dqAQfbHc3kRAnjF0yLiolueYTqeJRjZXRjyDAn0BmAqsyOUcEMBmsLtdQdXS+rqOK+2ttcwgXRDe9gGs5INldRufMpF1ud+4ccu6B6SwgnWYXCbfq4dsrl3UvlyN1aJTW1xZyBw58LTZbO2lTrpnpsDb2gGBKnkcpIgPYRhEKyxloAwJ0JlnZYAmg80M6wVoGlURyiDVo9WgEUzmiRYDZ1o4LHBYAwIRRHBI9afpA5Fld0g22mFplmILkHIv8A9jyUSDtXpfQpBshFRl35TdR4kanyE8l25t56zl3bUm4JF2HIIl7IOV9YAdtY96jmo7asbl21uearvbkCQAOHOVYJOqIW/nqaj46R5ze0EAv79Q3Y9/a/SMrFTrUqM55LrbuudPSBKwGOenVR3emQDZl7PsEWYaC24mWO1MAcPUsuqPc025rxUnmNPKxmeDJuWmW8ST8BN30bdMVhuoqqQUsNfaAt2HUnlqPLvgR9m1s1F1XeFOg4ixmeqLlAvLV6L4StkfVT7LcGXn+o4SHj6gZrj0gRKKK28i3jNVsJcOhzM6X7yJjqyEbxLXZWyKdXXPc8V9lh+vH1gennFUKlO6upAtexBt6RKG0aIATrVuObCZzBdEcPa+errycDcByGssE6MYNd6FiL+3UbXfwB8IFliNoU1FzUQD74/WQ6rmqv1Op0IY6KdeHP5QB2bhUYFKNPNwsoNvM6k+Mt6LhBfjAr8ArglKo9rnuInbSpBFsDpu/WO2lWLLpvGt5SYmpUqsiXsSQo8WNh5m8CJjaud0QA5ew5W2joHAbXkCJXdSp60K/VFKpSmST1be2VVrjsaL7V7a6jjLPpIow2ITLotHEVKZ/7bpTqW/C7yp2jh7L1V7t1qlydNVZqRPhYo3/qXgEo4qrTdHd2K0zldCMrI/DOOIPBhoZ6XsnaiuoN73nmW0axavinDG1IBRfVWBdaZpsOKntaeYtJOysU9FkKezUynIWGZMwzDxUjc3rY7w3nSHYi10upKPcMjrvVx7LDv+YnntXOjMjjqyHGew0pVW0TEU/9J9zLuveeobLrFls2t5lOm2FAIrBc2VWWon/Uot/mKOZA7Y+6YGXF7dWUANygQ3KrUHabDk7zTcdpD7p3RNlY16Lq9JaRQDsgkU6zpftIdbOym6kHiNN8FVXQqXuAEps/NG7WExPipshPIyLinS4esjFHZg6Icpp11stS3DWwax/KB6xhMStRFqJqrC4594I4EboRhMj0Hx62egHzrq9Jjo2XQOjD7amxP3r8Zq2eAhMS8S8SBzmBzwjiDtA0Aj1M4COtAVWhVMCBCKIBRHARiiRNq7XTDrdu05BKotyzd9hqB3wD7R2hToJnqNbkPeY8gPz3Cefbb6Q1MV2EJCfYp1aYc/eBBznuB8oLaWJq1nNR1qDk3ULUVV5atoB4CQEqVGPZGGxAPuZFV/JLIw8rwKDGk7hUL2YDIyZKwN9ymx1vyPlK50ZfdWn3sbufz+E021aYrLlCZKo0FOr7R5CnVNmBvuV9OR4SrOAFuxg3J+1UZiPSyiBRsyX1Lufwj8zHpm9ykB3kFj6tJGIp1UOuSn3Bk09CZFc39qrfuAY/OwgPdXPtOq92YD4LJmwdonD1lfrMynsuNTdTvI7xv8u+Vl6Y4OfML+s4svBP7mMD1fauAXE0SgIv7dN+Aa2mv2Tx9eE87VGRzTcFWU5WB3gzRdCtsAr/AA7XBXVNd68VvzHyPdLHpPsXrl62mPrUH/uKPdP8w4engFDiMASugvpKhsM6nshr915ouju0Vaytv3WPxmjQICCANf3+/CBisM2ONsgqW3bv1Es8NsrHsczs4B3gkCbZKigX+EmJXUiBQbP2a6bxr6n1lg1Mrv3yfUrASqx+LAHfuA4k8LCBWba2itJc7nTlxJ5DmZA6C4tsTjKebgxcjkEBK/HLKfpc5Y6nQbhy5zQ/Q3hO3WrHgqovmczH4CAP6SFHW4pbah8NVH9aGkf9qiE2bsF6/wBY3YLomZSAe2qKGPgSin+kS8x2CTEYypiASUKU0A91shJzeFybeF5Z136pVYaWdAfBjl+ZEDzTpXQqUi6OEyuVLMihCxW5UtbedTIH8cGxKuoIRVRFB3gKoFj33BM3PTvCipTzDhr+v5TzzDUi7qote/tW1sPnA9d2HUBUGQemastPrE1ZCHA+0FN3XzXMPOSdh0cqAdwndKCwoO6i7IpcDmV7VvO0Dzg0kVsl70xZM3PC4jWm39Dnfwgu0wdH9tlI3X/xOGNhod5en63hCiEZfcQ5Cf8AyuJ7VNv6HIgqrsCKje2pV3H+rQcUq/4kZWgM2btIJUTEU1C9pespjQB7WLIPsuuYW4G3dPUetDAMpupAIPMEXE8uxRp1M9RRlKXSqqjUoHHV107xZcwm56J4o1MMoNsyMyG27TVSO4gi0C2Dzs84rGEQH5oy8WMtA0itHgwSiFUQHrDoINU4zGdIek3WXo4c3QGzuC/a5gdWpIXzF/DeFztjpMlO6Uu2/wBoK7IvgUUhjMJjHaqxLujltSr1alIn8YRYF6ii1+qB/mOLuPMyRQqZtFBb/s1s/wD8Fa5bwgREwrUzmFDEp/NScOO7ULb4yQtRa182WsRvV16rEabyrrcOd+hJPdEZFQK9xlL5M6B8PURt5zpqmnd6wjJUc5Hb/E02z0yQt6iWuAHHtEAZhqQdYA8QV6tTmaphnOVs4+sovpoDztqOBA3XlXicJTRnTE1atwQaZUB1dCLhrsRv/MS4p4hAGqZPqqnYxFIb0YnR0HAX1XkbjlB1kdCEV1z01vSqEArUwzm7C5BtYdsb9zCBncSuEX2RWfvZkXX+mV75T7FEkcNWf8psHbEnQYnDaaAhqY9Oxf4SsxeHrn28ZT8qxPwUAQKEdYNyZf6Lf7o1jV4sB/Uo+XhCYvCoNTXVj3Bm+N5DyJ9o+SwDU69VHV1cZlII7SnX9P1nqGx9pJWpo67yO0L+y3vCeTOE4FvSXHRnaYo1At+w5AJ3Wf3Tv47vTlA1u2+jpZzXw1g+903BjxZTuDcxuO/TjQrtipSbI6spG9WFj6H5zbUsRcSPjXUizqGHJgGHxgRMN0ipMmrWPIx9Hb6D3x6yH/8AzqbGwo0/wLNBszohhaq2enlb7SGx9LW9RArK/SBdynOeAGvryjMCjM2dzdzcADco7uZ75dYno3h6JP1yIBpeoMgNt4DAENbQHdaRa+TIWoulWxCk03R+0QSq2U3zEA2HceUCsw1Km1Zmex6u1g1rDjmN+QmgwLtUzCklkIKs9ygdTvAG8i3Ezz7Z2MV8Qrkgrmtl4HS4J5ier7LqLYeEBlNcgHYJUb8upHlxHhrIfSHFKcJWdWBC0y6nvWzD4iX7rxEwfTqkiISzMqVDcqpsrOpv6nTTja8Cg2p0g69FppfddzyEi7FT64abpV0WBHYBuxsANSeQ75othbJc1O2xVtDlWxIHedwgegbLY2F5Kx9MMpHAjXzkbD0coGpPiZIfVbwPLsVhVpv1TaJrh3v/ANGsSabX5JUVvK0hKC5AbewGcfz64asfU03mk6V0Q532zjqSeRftU2Pg6IP6zM2WLHNuNTK/eDUU0qg7stVEPnAFg665ErFRmpDqcQm7rKT9gP4i+U94Uy96A1slSpSvcG4/qT2GH3lLfglFtHDhLOvsYijUvbXtg3YfiVJJ2VieorLWJy5KjUqwIJ3lijEDXUZlvwtxgemMIwiSaRV1V0IZWAII1BB3WIiMkCPaDtJBgvOBoEWFd1RS7sFUbyTYTp0DC9Iekj1wUpgrR5nKvWcLl3ITL/KA/eAZQI/86eeKcHw7ChR6Tp0Agruuod7aC9PGo1rm2qtra54+sI6Z2am7KtVWVqfWU6ahxbRS677k6Xup011iToBqdRsz5UIc/wCdhXvapzemTx423jeMwjKioEUhyaOb6up/4mHqb8j21tfXTxHI9OgdUZyzOFXrkU9fT9yvSPtOoGhuLE27mG6MWmjotLP2HzNh6jWBR/foudwBNvPKdxnToFfhKN1KnCO7U2NNyr1PbXmoBANiDbviVqCa5sFWHi9QfNPGLOgVmKRPdwr373qH4BRKmop4Ubd1nPznToAWY/YH4W/WNKnflsNxGtjOnQNv0Y2pnQKx7SaG/EcD+veJpKeEaoQBOnQNJs3YoWxI1/f6SZtnGU8Jh3rsAci3VLhc77kQHvNok6B5JT2saH+ISun8TUqVC6OjMtMPmcvncZb3IAABOp7xM2+LZ83ZA7CltWIZlv23Gt3OY2JtlvpaLOgDw+Is2lgBusLcbi/E8tZ6p0a2mHRTfXd5zp0DV0sRKjpdsX+ModWrhGDBwxGYXAIsRcEXvvE6dAotl9HqeDQsVNSqB7ZsLE7gg90X85Z7D2aEGdtXY3J8Yk6BdVGAtIuKJtp8506BjNvIztkU+32A2mj5WZCP60UTO583aC2LXcDgpqA51/pr0x+KLOgBwo6xBTJ0FSoi62s1VCafkXQjzkps9UU61NVZ3BpVUYLlNSmAwJDGxLIN3MGdOgazoNtEWfDFSjKSwpNe6X9oITqUvrY6i54Wmqczp0ATiAnToH//2Q=="
},
"id": 3910,
"userType": "I",
"homeServer": "Void host",
"shortName": "pgarcia",
"primaryGroupDescription": "Music",
"primaryGroup": "Music"
}
]
}Example 3
1. Use the Fuzzy Searches
Request
GET http://soffid.35x.lab:8089/soffid/webservice/scim2/v1/User?textFilter=fran~Response 200 OK
{
"schemas": [
"urn:ietf:params:scim:api:messages:2.0:ListResponse"
],
"totalResults": 2,
"startIndex": 1,
"Resources": [
{
"lastName": "Sinatra",
"createdByUser": "ActiveDirectory",
"fullName": "Frank Sinatra",
"active": true,
"userName": "frank",
"mailAlias": "",
"firstName": "Frank",
"createdDate": "2023-09-06 13:12:54",
"multiSession": true,
"meta": {
"location": "http://soffid.35x.lab:8089/soffid/webservice/scim2/v1/User/276435",
"links": {
"roleAccounts": "http://soffid.35x.lab:8089/soffid/webservice/scim2/v1/RoleAccount?filter=userCode+eq+'frank'+and+enabled+eq+true",
"groupUsers": "http://soffid.35x.lab:8089/soffid/webservice/scim2/v1/GroupUser?filter=user+eq+'frank'+and+disabled+eq+false",
"accounts": "http://soffid.35x.lab:8089/soffid/webservice/scim2/v1/Account?filter=type+eq+U+and+users.user.userName+eq+'frank'",
"issues": "http://soffid.35x.lab:8089/soffid/webservice/scim2/v1/Issue?filter=user.userName+eq+'frank'",
"effectiveGrants": "http://soffid.35x.lab:8089/soffid/webservice/scim2/v1/User/276435/effectiveGrants"
},
"resourceType": "User"
},
"modifiedByUser": "ActiveDirectory",
"schemas": [
"urn:soffid:com.soffid.iam.api.User"
],
"modifiedDate": "2023-09-06 13:12:55",
"attributes": {},
"id": 276435,
"userType": "I",
"primaryGroupDescription": "Music",
"primaryGroup": "Music"
},
{
"lastName": "Sherwood",
"createdByUser": "pgarcia",
"fullName": "Frank Sherwood",
"active": true,
"userName": "franks",
"mailAlias": "",
"firstName": "Frank",
"createdDate": "2023-10-05 15:32:40",
"multiSession": false,
"meta": {
"location": "http://soffid.35x.lab:8089/soffid/webservice/scim2/v1/User/432644",
"links": {
"roleAccounts": "http://soffid.35x.lab:8089/soffid/webservice/scim2/v1/RoleAccount?filter=userCode+eq+'franks'+and+enabled+eq+true",
"groupUsers": "http://soffid.35x.lab:8089/soffid/webservice/scim2/v1/GroupUser?filter=user+eq+'franks'+and+disabled+eq+false",
"accounts": "http://soffid.35x.lab:8089/soffid/webservice/scim2/v1/Account?filter=type+eq+U+and+users.user.userName+eq+'franks'",
"issues": "http://soffid.35x.lab:8089/soffid/webservice/scim2/v1/Issue?filter=user.userName+eq+'franks'",
"effectiveGrants": "http://soffid.35x.lab:8089/soffid/webservice/scim2/v1/User/432644/effectiveGrants"
},
"resourceType": "User"
},
"modifiedByUser": "pgarcia",
"schemas": [
"urn:soffid:com.soffid.iam.api.User"
],
"modifiedDate": "2023-10-05 15:32:40",
"attributes": {},
"id": 432644,
"userType": "I",
"primaryGroupDescription": "scientist",
"primaryGroup": "scientist"
}
]
}2. Use the Fuzzy Searches: specify the maximum number of edits allowed
Request
GET http://soffid.35x.lab:8089/soffid/webservice/scim2/v1/User?textFilter=frankl~2Response 200 OK
{
"schemas": [
"urn:ietf:params:scim:api:messages:2.0:ListResponse"
],
"totalResults": 4,
"startIndex": 1,
"Resources": [
{
"lastName": "Franklin",
"createdByUser": "ActiveDirectory",
"fullName": "Rosalind Franklin",
"active": true,
"userName": "rfranklin",
"mailAlias": "",
"firstName": "Rosalind",
"createdDate": "2023-08-08 14:26:14",
"multiSession": true,
"meta": {
"location": "http://soffid.35x.lab:8089/soffid/webservice/scim2/v1/User/2862",
"links": {
"roleAccounts": "http://soffid.35x.lab:8089/soffid/webservice/scim2/v1/RoleAccount?filter=userCode+eq+'rfranklin'+and+enabled+eq+true",
"groupUsers": "http://soffid.35x.lab:8089/soffid/webservice/scim2/v1/GroupUser?filter=user+eq+'rfranklin'+and+disabled+eq+false",
"accounts": "http://soffid.35x.lab:8089/soffid/webservice/scim2/v1/Account?filter=type+eq+U+and+users.user.userName+eq+'rfranklin'",
"issues": "http://soffid.35x.lab:8089/soffid/webservice/scim2/v1/Issue?filter=user.userName+eq+'rfranklin'",
"effectiveGrants": "http://soffid.35x.lab:8089/soffid/webservice/scim2/v1/User/2862/effectiveGrants"
},
"resourceType": "User"
},
"modifiedByUser": "ActiveDirectory",
"schemas": [
"urn:soffid:com.soffid.iam.api.User"
],
"modifiedDate": "2023-08-08 14:26:14",
"attributes": {},
"id": 2862,
"userType": "I",
"primaryGroupDescription": "scientist",
"primaryGroup": "scientist"
},
{
"lastName": "Franklin",
"createdByUser": "ActiveDirectory",
"fullName": "Aretha Franklin",
"active": true,
"userName": "aretha",
"mailAlias": "",
"firstName": "Aretha",
"createdDate": "2023-09-06 13:12:54",
"multiSession": true,
"meta": {
"location": "http://soffid.35x.lab:8089/soffid/webservice/scim2/v1/User/276397",
"links": {
"roleAccounts": "http://soffid.35x.lab:8089/soffid/webservice/scim2/v1/RoleAccount?filter=userCode+eq+'aretha'+and+enabled+eq+true",
"groupUsers": "http://soffid.35x.lab:8089/soffid/webservice/scim2/v1/GroupUser?filter=user+eq+'aretha'+and+disabled+eq+false",
"accounts": "http://soffid.35x.lab:8089/soffid/webservice/scim2/v1/Account?filter=type+eq+U+and+users.user.userName+eq+'aretha'",
"issues": "http://soffid.35x.lab:8089/soffid/webservice/scim2/v1/Issue?filter=user.userName+eq+'aretha'",
"effectiveGrants": "http://soffid.35x.lab:8089/soffid/webservice/scim2/v1/User/276397/effectiveGrants"
},
"resourceType": "User"
},
"modifiedByUser": "ActiveDirectory",
"schemas": [
"urn:soffid:com.soffid.iam.api.User"
],
"modifiedDate": "2023-09-06 13:12:54",
"attributes": {},
"id": 276397,
"userType": "I",
"primaryGroupDescription": "World",
"primaryGroup": "world"
},
{
"lastName": "Sinatra",
"createdByUser": "ActiveDirectory",
"fullName": "Frank Sinatra",
"active": true,
"userName": "frank",
"mailAlias": "",
"firstName": "Frank",
"createdDate": "2023-09-06 13:12:54",
"multiSession": true,
"meta": {
"location": "http://soffid.35x.lab:8089/soffid/webservice/scim2/v1/User/276435",
"links": {
"roleAccounts": "http://soffid.35x.lab:8089/soffid/webservice/scim2/v1/RoleAccount?filter=userCode+eq+'frank'+and+enabled+eq+true",
"groupUsers": "http://soffid.35x.lab:8089/soffid/webservice/scim2/v1/GroupUser?filter=user+eq+'frank'+and+disabled+eq+false",
"accounts": "http://soffid.35x.lab:8089/soffid/webservice/scim2/v1/Account?filter=type+eq+U+and+users.user.userName+eq+'frank'",
"issues": "http://soffid.35x.lab:8089/soffid/webservice/scim2/v1/Issue?filter=user.userName+eq+'frank'",
"effectiveGrants": "http://soffid.35x.lab:8089/soffid/webservice/scim2/v1/User/276435/effectiveGrants"
},
"resourceType": "User"
},
"modifiedByUser": "ActiveDirectory",
"schemas": [
"urn:soffid:com.soffid.iam.api.User"
],
"modifiedDate": "2023-09-06 13:12:55",
"attributes": {},
"id": 276435,
"userType": "I",
"primaryGroupDescription": "Music",
"primaryGroup": "Music"
},
{
"lastName": "Sherwood",
"createdByUser": "pgarcia",
"fullName": "Frank Sherwood",
"active": true,
"userName": "franks",
"mailAlias": "",
"firstName": "Frank",
"createdDate": "2023-10-05 15:32:40",
"multiSession": false,
"meta": {
"location": "http://soffid.35x.lab:8089/soffid/webservice/scim2/v1/User/432644",
"links": {
"roleAccounts": "http://soffid.35x.lab:8089/soffid/webservice/scim2/v1/RoleAccount?filter=userCode+eq+'franks'+and+enabled+eq+true",
"groupUsers": "http://soffid.35x.lab:8089/soffid/webservice/scim2/v1/GroupUser?filter=user+eq+'franks'+and+disabled+eq+false",
"accounts": "http://soffid.35x.lab:8089/soffid/webservice/scim2/v1/Account?filter=type+eq+U+and+users.user.userName+eq+'franks'",
"issues": "http://soffid.35x.lab:8089/soffid/webservice/scim2/v1/Issue?filter=user.userName+eq+'franks'",
"effectiveGrants": "http://soffid.35x.lab:8089/soffid/webservice/scim2/v1/User/432644/effectiveGrants"
},
"resourceType": "User"
},
"modifiedByUser": "pgarcia",
"schemas": [
"urn:soffid:com.soffid.iam.api.User"
],
"modifiedDate": "2023-10-05 15:32:40",
"attributes": {},
"id": 432644,
"userType": "I",
"primaryGroupDescription": "scientist",
"primaryGroup": "scientist"
}
]
}Example 4
1. Use the boolean operator AND
Request
GET http://soffid.35x.lab:8089/soffid/webservice/scim2/v1/User?textFilter=fran~ AND SinatraResponse 200 OK
{
"schemas": [
"urn:ietf:params:scim:api:messages:2.0:ListResponse"
],
"totalResults": 1,
"startIndex": 1,
"Resources": [
{
"lastName": "Sinatra",
"profileServer": "Void host",
"createdByUser": "admin",
"fullName": "Frankaaa Sinatra",
"active": true,
"userName": "frank",
"mailAlias": "",
"mailServer": "Void host",
"firstName": "Frankaaa",
"emailAddress": "pgarcia@soffid.com",
"mailDomain": "soffid.com",
"createdDate": "2023-06-02 07:41:47",
"multiSession": false,
"meta": {
"location": "http://soffid.35x.lab:8089/soffid/webservice/scim2/v1/User/3910",
"links": {
"roleAccounts": "http://soffid.35x.lab:8089/soffid/webservice/scim2/v1/RoleAccount?filter=userCode+eq+'frank'+and+enabled+eq+true",
"groupUsers": "http://soffid.35x.lab:8089/soffid/webservice/scim2/v1/GroupUser?filter=user+eq+'frank'+and+disabled+eq+false",
"accounts": "http://soffid.35x.lab:8089/soffid/webservice/scim2/v1/Account?filter=type+eq+U+and+users.user.userName+eq+'frank'",
"effectiveGrants": "http://soffid.35x.lab:8089/soffid/webservice/scim2/v1/User/3910/effectiveGrants"
},
"resourceType": "User"
},
"modifiedByUser": "admin",
"schemas": [
"urn:soffid:com.soffid.iam.api.User"
],
"modifiedDate": "2023-06-02 07:41:47",
"attributes": {
"picture": "/9j/4AAQSkZJRgABAQAAAQABAAD/2wCEAAoHCBYWFRgVFRYYGRgaGhkYGhgaGBoYGhoYHBkaGhgZGhgcIS4lHB4rIRgYJjgmKy8xNTU1GiQ7QDs0Py40NTEBDAwMBgYGEAYGEDEdFh0xMTExMTExMTExMTExMTExMTExMTExMTExMTExMTExMTExMTExMTExMTExMTExMTExMf/AABEIAKgBKwMBIgACEQEDEQH/xAAcAAABBQEBAQAAAAAAAAAAAAADAQIEBQYABwj/xABFEAACAQIDBAcECAQFAgcBAAABAgADEQQSIQUxQVEGEyJhcYGRMkKhsQcjUnKSwdHwFGKCoiQzY7LhU3NDZIOTo8LxFf/EABQBAQAAAAAAAAAAAAAAAAAAAAD/xAAUEQEAAAAAAAAAAAAAAAAAAAAA/9oADAMBAAIRAxEAPwDeqIVZwEcBAQQiCIBHqIDgItogjwICWiqIto4CAqiZn6ScNnwDn7DI/wAcp/3TUKJX9JcNnwldOdNj5qMw+UD5zcQYh6qG+gPpGrQblAdThBHUsK3MfEw4wR5n5QG4dtd8t8JU3DT0/wCZBpYVRvI9ZMpqg97ytxgTi44n8zz3D9+k4G+4ee79iR/4pF3C/iY2rtIAakD0gT6WHOlz4/v97oZEpL7RzHu5/nM/U2wg3Fm+Eh1NsN7oA+MDWfxir7Kj975FxO0re04Xuvb+0a+kyVTaDtvc+ANh6CANQwNFW2wg3ZnP4R6nX4SFV2y59kKv9x9Tp8JUXMab3gS62MZvaYnxOnpI7Vo0oeAJiVKLAXINoCl41njAJzixsdPnAUNEZpY7H2FiMSbUabMOLnsoPFzp6XM9G6O/R/SpEPiCKrjULb6tT906ue86d0DLdEuhz4krVqhkob+IaoOSclP2vTmPWqNFUUIihVUBVUCwAG4AQw3RpEBhEYVhjGkQAOsCZJYQbLAjO0ZeFqLBQNAqwgSKphFgMCRwSEAhVWAFUsCToBqSdwHEmUmI6YYJCQapJH2Uc/G0r/pH2y1FEpLcBwSx5gaBfz9J4/isWzHfaB61ivpKwqexTrP32RB8Wv8ACU2J+lVrkU8MgHAvULf2qo+c8xZol4G1xn0kY5/ZdKY/00F/V80pMX0jxNX/ADMTVYHeM5VfwrYfCUmaITAmCoI7r5BzTrmBYDFGDav3yJaKtNjwgGOJPjGHFNFXCkyTR2cDqxPgIEA12PExERmPZBPgCZd0cIgOiE+MtKeznb2QQDwtv/esDLjBPxGXx/SOTB8zfwm2w/Rose1eXOH6PUltm3wMBhtiM5si+usu8N0KdvaNvKwm/wAFhUQjIl7d36y1COfcC+JEDzE9Csu8mFodF1G+3pN9XRuQ+cjFLDUQMvh+j6BtRbyhdq7DTJu56j9JatvvFxL9gg3/AHxgeYYjZ6qWPLlu8ZsuhfRzDPSGIemHcsw7faUZTYWTdfxvKNkzswtcA30F766D4fGekbCw4TD01At2Qbd51J8TeBNRQAABYDcBuHlHho2dAfeJmgyY0mATNGs0YzRmeA8tBu0VngWeAjtBZo4vB5oGlQwimAVo4PAkq0KryIHjg8CJ0k2DSxtLq6hZWGqOp7SHjpuIPEGeN9IuhWKwpLMhqU+FRAWFv5l3p56d89yDxy1IHzNEn0BtTozg8QSalBMx3ul0bzKWv5zM4z6L8M2tOtVp9zZXHyB+MDyOJPRqv0VVPcxKH71Nl+TGQNofRzWoI9Z61Iog1Az5iScqgXHMiBjUp3498lrhlG+DanlPwlmaV0Q/y/L/APIEXIL6CEWnynDfJ2BVScpNoDMNgGYiwB85ZJsuotiU08QZabMwigg38949RNKmFDLrYwMxgKS3CurKeFx++c02GwAt2XBHDSSKOFKqLi45b/Cd1AGqi3h+kB38Jbe/oJJpBFGm+N0y8z6RmGIBvx5wDde5PZB8bWkoI1u03kJyMOJnVsQAL6Ad/OAKpSHf6yvxNhuvFq7U1IW1++RhXz3vpADm3yJjn7DW0IBsYdjyOm6QsShyt90/KBUbOw/YVt9xmJ14k6fAes3+DZcqoHViqqDYi+gHDhMLhELhETQMoGhsQNM5PLfaW+MxaU6iJTUllIuw9lRbUM3EnlA1BE6DLxM8B5Ea0b1k7NAY4g4UxpEATGBYw7iDKwAxmWHIEbpAv1hAIJYQGA4R4jBHKYBBFiAziYCGKI0mKIDxKHp4p/gnt9unfwzj87S+WVnSxL4Kv3Jn/Awb8oHi+LpAtpwCmTqVH6pL8j/uMFTp7yfD0AEnYpciIOBRfjrAqkoXa1o9sMyG/wCWnpCqLax+P2oEAAAzHXUcOEBuG2w9M3yg25f8S2wnTNcwDIV4XHw0mTxWIe/bsugPAWvz7+6Ds9sxW4G/mLgEEjkQQbwPYdnbdpOtlYa+nfLBmVhpuni2G2nk5ibjox0jD9g+1A09OoBmEitj0Q9owi4RzrKDaxdWsqFiONtLwJe1Nt1stqKgXF8zfvTjKHE9o3r4nX71hfmBI2JNUkK1xfQKDqSeQ4eJg2Z8Ndy6U7OEuEzszWubs29R690C1wGKw6nLnDHd2jL1KiMNDfvvYD0kKjgKuJpO2alXZGKulSmACAAVNNxYrcHiN8yiYoo/1QqBNzI3a6sg20f3l+UDb1TcaayG99YLDVibZuUk110vAhbBpXJHHMU8r3NvIXlxWpAOVAFrgj9+szmA26uHxLoVuxF8xPshgCQB4W9Zf5y75h7639bpf+4QLmn7I8B8opESLAQRSZxEYRAW84xVE5lgBYxpjmSMcQBuYO8c0HaBqFEdaIojhA60UCdaKIC3nTohMDoojLxYBVMbjsP1lGpT+2jp+JSBOWSKZgeB1Kp0Oul7jkbk/vwlli6oegjjgSvkDp8CI/pbs/qcXWp7lc51+6/at4A3HlImFX6t6ZG7tr8j+UAlLCO40F4zEbH7S52sx0vb2eXjNL0VIZATb/n9/KWu19kBxmXQj98IGOTYFU5lennDEMHVwpzDQWO+1uGnHnNbsvolSSiyOLs5zWXUILAKoYgXsANe+Q8Hh6yEAG/jrL6i1S3bbTugYXaXQ1kVnDLZbm2rE6nyGhHpM9sZiuJS2mtp6ltrFKtJgd1tTPLqFT65SN94HsuGfsAnu+Ufhgt75QfLjIuz+1RvxtHYapAj4/C02a5WxBBvoDod17eMqcZsNajEq+W9iylQwJGgOp0PfNTXoh1uN8rv4fnp++cBcFhkw6ZFYm9yxvqzHS5t4W8pG/gUe5YAchbcJMTBrvzEwopiBUrg8h/4lZtB7dkbyQB56TQ4phaZjFDNUQd9/Td8bQI229jI9RKiXznsuP5V7Kn0EvcEgzKo1ChU89Xb/avrCVqJVLKbE72tckHSwHG5Mk7OweRdd9txNyL6knmx4+AECTOvHGNIgcTEvEvHgQODTs04iNJgKRBOsfnjWeBHcRto52gs8DUARwjVMdA4CLEvEJgLmiXnRsB0VYwQloDhDI0AIRTAxP0o7PNqWJUaLenUI4Am6E+eYeYmDw9UBh37/Oe5VqSujI6hkYZWU6gg8JgdrdBEo5qwxGSiNSGQu4/lQgjOeAvr4wM1sXH9VVKndfT4zd0cfmE80xrIxFSncKb2DEFhY21K6E7t3OXuwto7lJ8PlA2Ard3nO6y5sYGlVBj0S8Cg6Z4oCnkHEzE7Io56qjvvL/ppibsEXgLmM6G4G5LnU7v1gej7Jp2pnw/f78JGXeRLHZOnZ5iQ8ahDHxgHwb8L/v8AZkhwDvEqkdl13jjJlDFBhA51I3QLsRvk1jIWJ4wKjG4nWU+GrMa6sqlramys1hY6kKCQOEtMYmhJ/fKO6LJ2qrfcF/xE/lAs8Iju2dxlA0VbWPiV90b9DrrraTTFtOgDjSsIREgCyx6xWEEzQFcwbGNZ4wtAdeNaNBjjAG8FDNBWgaVIVYNBCCAtowwgEaywEnRLR0DgI4CII4QHARwWcsKggKizyb6SuknWv1CEdWhsbnss/E2Gr24DcOPdrun3SL+HpGjTI611Nze2SnuJJ4E7v+bTxqtUN81wt9c7DtH7icB+7wJWz3GQ7rF2IsLC4VLi3C418pJw1TIwPCQcC+dKiBizLaqtxY2HZf4FT5Q9B8ynmNfKBv8AAV8wUjWWO0topRpFjvI0HMzObBq2S54CUO2tqmq1+A3DugQ8XiC7Mx1JMteiWOCVCjGwOovzmezzkuzALcnhaB7LhMcpbRh6ynx/SJDV6tFeq17HIhZVPe268pNh7EZSHrs1j7oNvWbzB00RQEUKOAAAgOw1AhbuLE7xy7ryn2jQek3WJdk3uo3gfaHdLt60jjFKDraBFwe0VdbqZ1epbUyi21hjSb+IoeyT9YnAX94Dh3jvklMVnTN3XgLjDmU21PLvgMBtE4cMhpliTc62bcBfLa5XvGmshPisis53LZv7h+svMLthHUHQ8bwOo9JUb3G13ZSGv929s3leSqe26De/bhqDv46jSGQYeotmRCDvuo1MhbU6NKwLJdWt97dqAQfbHc3kRAnjF0yLiolueYTqeJRjZXRjyDAn0BmAqsyOUcEMBmsLtdQdXS+rqOK+2ttcwgXRDe9gGs5INldRufMpF1ud+4ccu6B6SwgnWYXCbfq4dsrl3UvlyN1aJTW1xZyBw58LTZbO2lTrpnpsDb2gGBKnkcpIgPYRhEKyxloAwJ0JlnZYAmg80M6wVoGlURyiDVo9WgEUzmiRYDZ1o4LHBYAwIRRHBI9afpA5Fld0g22mFplmILkHIv8A9jyUSDtXpfQpBshFRl35TdR4kanyE8l25t56zl3bUm4JF2HIIl7IOV9YAdtY96jmo7asbl21uearvbkCQAOHOVYJOqIW/nqaj46R5ze0EAv79Q3Y9/a/SMrFTrUqM55LrbuudPSBKwGOenVR3emQDZl7PsEWYaC24mWO1MAcPUsuqPc025rxUnmNPKxmeDJuWmW8ST8BN30bdMVhuoqqQUsNfaAt2HUnlqPLvgR9m1s1F1XeFOg4ixmeqLlAvLV6L4StkfVT7LcGXn+o4SHj6gZrj0gRKKK28i3jNVsJcOhzM6X7yJjqyEbxLXZWyKdXXPc8V9lh+vH1gennFUKlO6upAtexBt6RKG0aIATrVuObCZzBdEcPa+errycDcByGssE6MYNd6FiL+3UbXfwB8IFliNoU1FzUQD74/WQ6rmqv1Op0IY6KdeHP5QB2bhUYFKNPNwsoNvM6k+Mt6LhBfjAr8ArglKo9rnuInbSpBFsDpu/WO2lWLLpvGt5SYmpUqsiXsSQo8WNh5m8CJjaud0QA5ew5W2joHAbXkCJXdSp60K/VFKpSmST1be2VVrjsaL7V7a6jjLPpIow2ITLotHEVKZ/7bpTqW/C7yp2jh7L1V7t1qlydNVZqRPhYo3/qXgEo4qrTdHd2K0zldCMrI/DOOIPBhoZ6XsnaiuoN73nmW0axavinDG1IBRfVWBdaZpsOKntaeYtJOysU9FkKezUynIWGZMwzDxUjc3rY7w3nSHYi10upKPcMjrvVx7LDv+YnntXOjMjjqyHGew0pVW0TEU/9J9zLuveeobLrFls2t5lOm2FAIrBc2VWWon/Uot/mKOZA7Y+6YGXF7dWUANygQ3KrUHabDk7zTcdpD7p3RNlY16Lq9JaRQDsgkU6zpftIdbOym6kHiNN8FVXQqXuAEps/NG7WExPipshPIyLinS4esjFHZg6Icpp11stS3DWwax/KB6xhMStRFqJqrC4594I4EboRhMj0Hx62egHzrq9Jjo2XQOjD7amxP3r8Zq2eAhMS8S8SBzmBzwjiDtA0Aj1M4COtAVWhVMCBCKIBRHARiiRNq7XTDrdu05BKotyzd9hqB3wD7R2hToJnqNbkPeY8gPz3Cefbb6Q1MV2EJCfYp1aYc/eBBznuB8oLaWJq1nNR1qDk3ULUVV5atoB4CQEqVGPZGGxAPuZFV/JLIw8rwKDGk7hUL2YDIyZKwN9ymx1vyPlK50ZfdWn3sbufz+E021aYrLlCZKo0FOr7R5CnVNmBvuV9OR4SrOAFuxg3J+1UZiPSyiBRsyX1Lufwj8zHpm9ykB3kFj6tJGIp1UOuSn3Bk09CZFc39qrfuAY/OwgPdXPtOq92YD4LJmwdonD1lfrMynsuNTdTvI7xv8u+Vl6Y4OfML+s4svBP7mMD1fauAXE0SgIv7dN+Aa2mv2Tx9eE87VGRzTcFWU5WB3gzRdCtsAr/AA7XBXVNd68VvzHyPdLHpPsXrl62mPrUH/uKPdP8w4engFDiMASugvpKhsM6nshr915ouju0Vaytv3WPxmjQICCANf3+/CBisM2ONsgqW3bv1Es8NsrHsczs4B3gkCbZKigX+EmJXUiBQbP2a6bxr6n1lg1Mrv3yfUrASqx+LAHfuA4k8LCBWba2itJc7nTlxJ5DmZA6C4tsTjKebgxcjkEBK/HLKfpc5Y6nQbhy5zQ/Q3hO3WrHgqovmczH4CAP6SFHW4pbah8NVH9aGkf9qiE2bsF6/wBY3YLomZSAe2qKGPgSin+kS8x2CTEYypiASUKU0A91shJzeFybeF5Z136pVYaWdAfBjl+ZEDzTpXQqUi6OEyuVLMihCxW5UtbedTIH8cGxKuoIRVRFB3gKoFj33BM3PTvCipTzDhr+v5TzzDUi7qote/tW1sPnA9d2HUBUGQemastPrE1ZCHA+0FN3XzXMPOSdh0cqAdwndKCwoO6i7IpcDmV7VvO0Dzg0kVsl70xZM3PC4jWm39Dnfwgu0wdH9tlI3X/xOGNhod5en63hCiEZfcQ5Cf8AyuJ7VNv6HIgqrsCKje2pV3H+rQcUq/4kZWgM2btIJUTEU1C9pespjQB7WLIPsuuYW4G3dPUetDAMpupAIPMEXE8uxRp1M9RRlKXSqqjUoHHV107xZcwm56J4o1MMoNsyMyG27TVSO4gi0C2Dzs84rGEQH5oy8WMtA0itHgwSiFUQHrDoINU4zGdIek3WXo4c3QGzuC/a5gdWpIXzF/DeFztjpMlO6Uu2/wBoK7IvgUUhjMJjHaqxLujltSr1alIn8YRYF6ii1+qB/mOLuPMyRQqZtFBb/s1s/wD8Fa5bwgREwrUzmFDEp/NScOO7ULb4yQtRa182WsRvV16rEabyrrcOd+hJPdEZFQK9xlL5M6B8PURt5zpqmnd6wjJUc5Hb/E02z0yQt6iWuAHHtEAZhqQdYA8QV6tTmaphnOVs4+sovpoDztqOBA3XlXicJTRnTE1atwQaZUB1dCLhrsRv/MS4p4hAGqZPqqnYxFIb0YnR0HAX1XkbjlB1kdCEV1z01vSqEArUwzm7C5BtYdsb9zCBncSuEX2RWfvZkXX+mV75T7FEkcNWf8psHbEnQYnDaaAhqY9Oxf4SsxeHrn28ZT8qxPwUAQKEdYNyZf6Lf7o1jV4sB/Uo+XhCYvCoNTXVj3Bm+N5DyJ9o+SwDU69VHV1cZlII7SnX9P1nqGx9pJWpo67yO0L+y3vCeTOE4FvSXHRnaYo1At+w5AJ3Wf3Tv47vTlA1u2+jpZzXw1g+903BjxZTuDcxuO/TjQrtipSbI6spG9WFj6H5zbUsRcSPjXUizqGHJgGHxgRMN0ipMmrWPIx9Hb6D3x6yH/8AzqbGwo0/wLNBszohhaq2enlb7SGx9LW9RArK/SBdynOeAGvryjMCjM2dzdzcADco7uZ75dYno3h6JP1yIBpeoMgNt4DAENbQHdaRa+TIWoulWxCk03R+0QSq2U3zEA2HceUCsw1Km1Zmex6u1g1rDjmN+QmgwLtUzCklkIKs9ygdTvAG8i3Ezz7Z2MV8Qrkgrmtl4HS4J5ier7LqLYeEBlNcgHYJUb8upHlxHhrIfSHFKcJWdWBC0y6nvWzD4iX7rxEwfTqkiISzMqVDcqpsrOpv6nTTja8Cg2p0g69FppfddzyEi7FT64abpV0WBHYBuxsANSeQ75othbJc1O2xVtDlWxIHedwgegbLY2F5Kx9MMpHAjXzkbD0coGpPiZIfVbwPLsVhVpv1TaJrh3v/ANGsSabX5JUVvK0hKC5AbewGcfz64asfU03mk6V0Q532zjqSeRftU2Pg6IP6zM2WLHNuNTK/eDUU0qg7stVEPnAFg665ErFRmpDqcQm7rKT9gP4i+U94Uy96A1slSpSvcG4/qT2GH3lLfglFtHDhLOvsYijUvbXtg3YfiVJJ2VieorLWJy5KjUqwIJ3lijEDXUZlvwtxgemMIwiSaRV1V0IZWAII1BB3WIiMkCPaDtJBgvOBoEWFd1RS7sFUbyTYTp0DC9Iekj1wUpgrR5nKvWcLl3ITL/KA/eAZQI/86eeKcHw7ChR6Tp0Agruuod7aC9PGo1rm2qtra54+sI6Z2am7KtVWVqfWU6ahxbRS677k6Xup011iToBqdRsz5UIc/wCdhXvapzemTx423jeMwjKioEUhyaOb6up/4mHqb8j21tfXTxHI9OgdUZyzOFXrkU9fT9yvSPtOoGhuLE27mG6MWmjotLP2HzNh6jWBR/foudwBNvPKdxnToFfhKN1KnCO7U2NNyr1PbXmoBANiDbviVqCa5sFWHi9QfNPGLOgVmKRPdwr373qH4BRKmop4Ubd1nPznToAWY/YH4W/WNKnflsNxGtjOnQNv0Y2pnQKx7SaG/EcD+veJpKeEaoQBOnQNJs3YoWxI1/f6SZtnGU8Jh3rsAci3VLhc77kQHvNok6B5JT2saH+ISun8TUqVC6OjMtMPmcvncZb3IAABOp7xM2+LZ83ZA7CltWIZlv23Gt3OY2JtlvpaLOgDw+Is2lgBusLcbi/E8tZ6p0a2mHRTfXd5zp0DV0sRKjpdsX+ModWrhGDBwxGYXAIsRcEXvvE6dAotl9HqeDQsVNSqB7ZsLE7gg90X85Z7D2aEGdtXY3J8Yk6BdVGAtIuKJtp8506BjNvIztkU+32A2mj5WZCP60UTO583aC2LXcDgpqA51/pr0x+KLOgBwo6xBTJ0FSoi62s1VCafkXQjzkps9UU61NVZ3BpVUYLlNSmAwJDGxLIN3MGdOgazoNtEWfDFSjKSwpNe6X9oITqUvrY6i54Wmqczp0ATiAnToH//2Q=="
},
"id": 3910,
"userType": "I",
"homeServer": "Void host",
"shortName": "pgarcia",
"primaryGroupDescription": "Music",
"primaryGroup": "Music"
}
]
}2. Use the boolean operator +
Request
GET http://soffid.35x.lab:8089/soffid/webservice/scim2/v1/User?textFilter=fran~ +bacallResponse 200 OK
{
"schemas": [
"urn:ietf:params:scim:api:messages:2.0:ListResponse"
],
"totalResults": 3,
"startIndex": 1,
"Resources": [
{
"lastName": "Bacall",
"createdByUser": "ActiveDirectory",
"fullName": "Lauren Bacall",
"active": true,
"userName": "lbacall",
"mailAlias": "",
"firstName": "Lauren",
"createdDate": "2023-08-08 14:26:14",
"multiSession": true,
"meta": {
"location": "http://soffid.35x.lab:8089/soffid/webservice/scim2/v1/User/2844",
"links": {
"roleAccounts": "http://soffid.35x.lab:8089/soffid/webservice/scim2/v1/RoleAccount?filter=userCode+eq+'lbacall'+and+enabled+eq+true",
"groupUsers": "http://soffid.35x.lab:8089/soffid/webservice/scim2/v1/GroupUser?filter=user+eq+'lbacall'+and+disabled+eq+false",
"accounts": "http://soffid.35x.lab:8089/soffid/webservice/scim2/v1/Account?filter=type+eq+U+and+users.user.userName+eq+'lbacall'",
"issues": "http://soffid.35x.lab:8089/soffid/webservice/scim2/v1/Issue?filter=user.userName+eq+'lbacall'",
"effectiveGrants": "http://soffid.35x.lab:8089/soffid/webservice/scim2/v1/User/2844/effectiveGrants"
},
"resourceType": "User"
},
"modifiedByUser": "pgarcia",
"schemas": [
"urn:soffid:com.soffid.iam.api.User"
],
"modifiedDate": "2023-08-22 17:34:07",
"attributes": {},
"id": 2844,
"userType": "I",
"primaryGroupDescription": "Music",
"primaryGroup": "Music"
},
{
"lastName": "Sinatra",
"createdByUser": "ActiveDirectory",
"fullName": "Frank Sinatra",
"active": true,
"userName": "frank",
"mailAlias": "",
"firstName": "Frank",
"createdDate": "2023-09-06 13:12:54",
"multiSession": true,
"meta": {
"location": "http://soffid.35x.lab:8089/soffid/webservice/scim2/v1/User/276435",
"links": {
"roleAccounts": "http://soffid.35x.lab:8089/soffid/webservice/scim2/v1/RoleAccount?filter=userCode+eq+'frank'+and+enabled+eq+true",
"groupUsers": "http://soffid.35x.lab:8089/soffid/webservice/scim2/v1/GroupUser?filter=user+eq+'frank'+and+disabled+eq+false",
"accounts": "http://soffid.35x.lab:8089/soffid/webservice/scim2/v1/Account?filter=type+eq+U+and+users.user.userName+eq+'frank'",
"issues": "http://soffid.35x.lab:8089/soffid/webservice/scim2/v1/Issue?filter=user.userName+eq+'frank'",
"effectiveGrants": "http://soffid.35x.lab:8089/soffid/webservice/scim2/v1/User/276435/effectiveGrants"
},
"resourceType": "User"
},
"modifiedByUser": "ActiveDirectory",
"schemas": [
"urn:soffid:com.soffid.iam.api.User"
],
"modifiedDate": "2023-09-06 13:12:55",
"attributes": {},
"id": 276435,
"userType": "I",
"primaryGroupDescription": "Music",
"primaryGroup": "Music"
},
{
"lastName": "Sherwood",
"createdByUser": "pgarcia",
"fullName": "Frank Sherwood",
"active": true,
"userName": "franks",
"mailAlias": "",
"firstName": "Frank",
"createdDate": "2023-10-05 15:32:40",
"multiSession": false,
"meta": {
"location": "http://soffid.35x.lab:8089/soffid/webservice/scim2/v1/User/432644",
"links": {
"roleAccounts": "http://soffid.35x.lab:8089/soffid/webservice/scim2/v1/RoleAccount?filter=userCode+eq+'franks'+and+enabled+eq+true",
"groupUsers": "http://soffid.35x.lab:8089/soffid/webservice/scim2/v1/GroupUser?filter=user+eq+'franks'+and+disabled+eq+false",
"accounts": "http://soffid.35x.lab:8089/soffid/webservice/scim2/v1/Account?filter=type+eq+U+and+users.user.userName+eq+'franks'",
"issues": "http://soffid.35x.lab:8089/soffid/webservice/scim2/v1/Issue?filter=user.userName+eq+'franks'",
"effectiveGrants": "http://soffid.35x.lab:8089/soffid/webservice/scim2/v1/User/432644/effectiveGrants"
},
"resourceType": "User"
},
"modifiedByUser": "pgarcia",
"schemas": [
"urn:soffid:com.soffid.iam.api.User"
],
"modifiedDate": "2023-10-05 15:32:40",
"attributes": {},
"id": 432644,
"userType": "I",
"primaryGroupDescription": "scientist",
"primaryGroup": "scientist"
}
]
}3. Use the boolean operator -
Request
GET http://soffid.35x.lab:8089/soffid/webservice/scim2/v1/User?textFilter=fran~ -SherwoodResponse 200 OK
{
"schemas": [
"urn:ietf:params:scim:api:messages:2.0:ListResponse"
],
"totalResults": 1,
"startIndex": 1,
"Resources": [
{
"lastName": "Sinatra",
"createdByUser": "ActiveDirectory",
"fullName": "Frank Sinatra",
"active": true,
"userName": "frank",
"mailAlias": "",
"firstName": "Frank",
"createdDate": "2023-09-06 13:12:54",
"multiSession": true,
"meta": {
"location": "http://soffid.35x.lab:8089/soffid/webservice/scim2/v1/User/276435",
"links": {
"roleAccounts": "http://soffid.35x.lab:8089/soffid/webservice/scim2/v1/RoleAccount?filter=userCode+eq+'frank'+and+enabled+eq+true",
"groupUsers": "http://soffid.35x.lab:8089/soffid/webservice/scim2/v1/GroupUser?filter=user+eq+'frank'+and+disabled+eq+false",
"accounts": "http://soffid.35x.lab:8089/soffid/webservice/scim2/v1/Account?filter=type+eq+U+and+users.user.userName+eq+'frank'",
"issues": "http://soffid.35x.lab:8089/soffid/webservice/scim2/v1/Issue?filter=user.userName+eq+'frank'",
"effectiveGrants": "http://soffid.35x.lab:8089/soffid/webservice/scim2/v1/User/276435/effectiveGrants"
},
"resourceType": "User"
},
"modifiedByUser": "ActiveDirectory",
"schemas": [
"urn:soffid:com.soffid.iam.api.User"
],
"modifiedDate": "2023-09-06 13:12:55",
"attributes": {},
"id": 276435,
"userType": "I",
"primaryGroupDescription": "Music",
"primaryGroup": "Music"
}
]
}Example 5
1. U
Request
GET
http://soffid.35x.lab:8089/soffid/webservice/scim2/v1/User?textFilter=(firstName:aretha OR firstName:Rosalind)
AND lastName:Franklin AND birthDate:1979-01-01Response 200 OK
{
"schemas": [
"urn:ietf:params:scim:api:messages:2.0:ListResponse"
],
"totalResults": 2,
"startIndex": 1,
"Resources": [
{
"lastName": "Franklin",
"createdByUser": "ActiveDirectory",
"fullName": "Aretha Franklin",
"active": true,
"userName": "aretha",
"mailAlias": "",
"firstName": "Aretha",
"createdDate": "2023-09-06 13:12:54",
"multiSession": true,
"meta": {
"location": "http://soffid.35x.lab:8089/soffid/webservice/scim2/v1/User/276397",
"links": {
"roleAccounts": "http://soffid.35x.lab:8089/soffid/webservice/scim2/v1/RoleAccount?filter=userCode+eq+'aretha'+and+enabled+eq+true",
"groupUsers": "http://soffid.35x.lab:8089/soffid/webservice/scim2/v1/GroupUser?filter=user+eq+'aretha'+and+disabled+eq+false",
"accounts": "http://soffid.35x.lab:8089/soffid/webservice/scim2/v1/Account?filter=type+eq+U+and+users.user.userName+eq+'aretha'",
"issues": "http://soffid.35x.lab:8089/soffid/webservice/scim2/v1/Issue?filter=user.userName+eq+'aretha'",
"effectiveGrants": "http://soffid.35x.lab:8089/soffid/webservice/scim2/v1/User/276397/effectiveGrants"
},
"resourceType": "User"
},
"modifiedByUser": "pgarcia",
"schemas": [
"urn:soffid:com.soffid.iam.api.User"
],
"modifiedDate": "2023-10-05 16:02:40",
"attributes": {
"birthDate": "1979-01-01 00:00:00"
},
"id": 276397,
"userType": "I",
"primaryGroupDescription": "World",
"primaryGroup": "world"
},
{
"lastName": "Franklin",
"createdByUser": "ActiveDirectory",
"fullName": "Rosalind Franklin",
"active": true,
"userName": "rfranklin",
"mailAlias": "",
"firstName": "Rosalind",
"createdDate": "2023-08-08 14:26:14",
"multiSession": true,
"meta": {
"location": "http://soffid.35x.lab:8089/soffid/webservice/scim2/v1/User/2862",
"links": {
"roleAccounts": "http://soffid.35x.lab:8089/soffid/webservice/scim2/v1/RoleAccount?filter=userCode+eq+'rfranklin'+and+enabled+eq+true",
"groupUsers": "http://soffid.35x.lab:8089/soffid/webservice/scim2/v1/GroupUser?filter=user+eq+'rfranklin'+and+disabled+eq+false",
"accounts": "http://soffid.35x.lab:8089/soffid/webservice/scim2/v1/Account?filter=type+eq+U+and+users.user.userName+eq+'rfranklin'",
"issues": "http://soffid.35x.lab:8089/soffid/webservice/scim2/v1/Issue?filter=user.userName+eq+'rfranklin'",
"effectiveGrants": "http://soffid.35x.lab:8089/soffid/webservice/scim2/v1/User/2862/effectiveGrants"
},
"resourceType": "User"
},
"modifiedByUser": "pgarcia",
"schemas": [
"urn:soffid:com.soffid.iam.api.User"
],
"modifiedDate": "2023-10-05 16:03:02",
"attributes": {
"birthDate": "1979-01-01 00:00:00"
},
"id": 2862,
"userType": "I",
"primaryGroupDescription": "scientist",
"primaryGroup": "scientist"
}
]
}Operation
Operation
The Lucene index information is stored in files arranged in a folder structure. This folder structure is replicated in every Soffid Console and every Sync Server and also is saved in the database.
In case an instance (Docker, Kubernetes, or stand-alone) detects an inconsistency, the information will be overwritten with the database data.
When you update an object, marked as the textual index, a task will be created. The soffid agent will execute this task and the Sync Server will update the database tables related to the textual index.
Folder structure
The folder structure is the following:
- ../index/<TENANT>/<SOFFID_OBJECT>
Example
1. Here you are the folder structure for the Soffid Console


2. And the folder structure for the Sync Server


Database
The database tables involved:
- SC_LUINPA
- SC_LUNIND
Example
1. The database structure

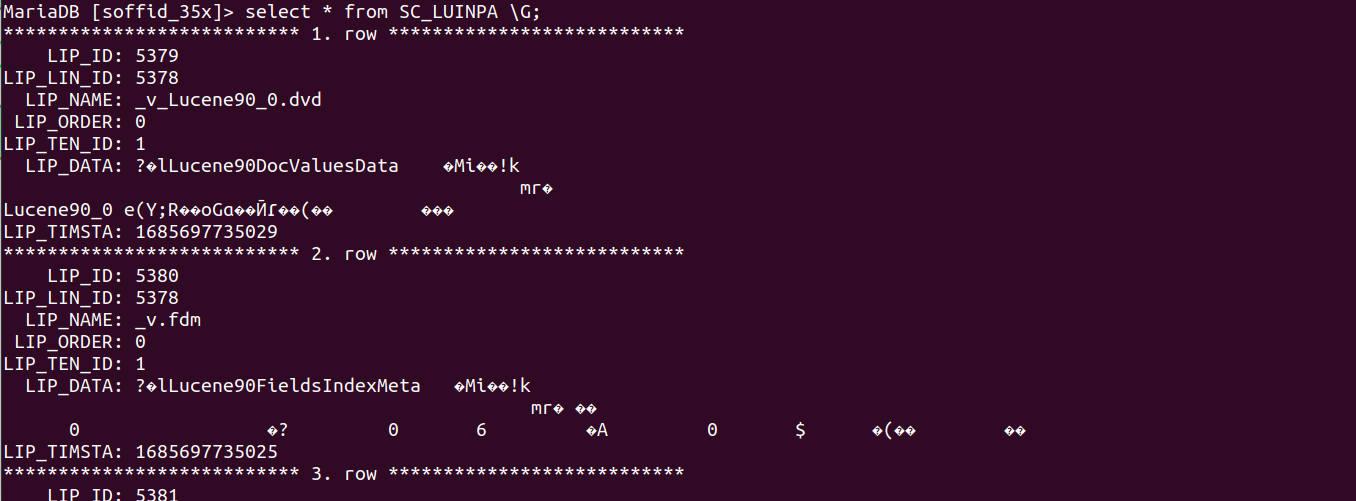
soffid agent
You can check the soffid agent status by visiting the Sync Server monitoring page:
Example
1. A soffid agent pending task:
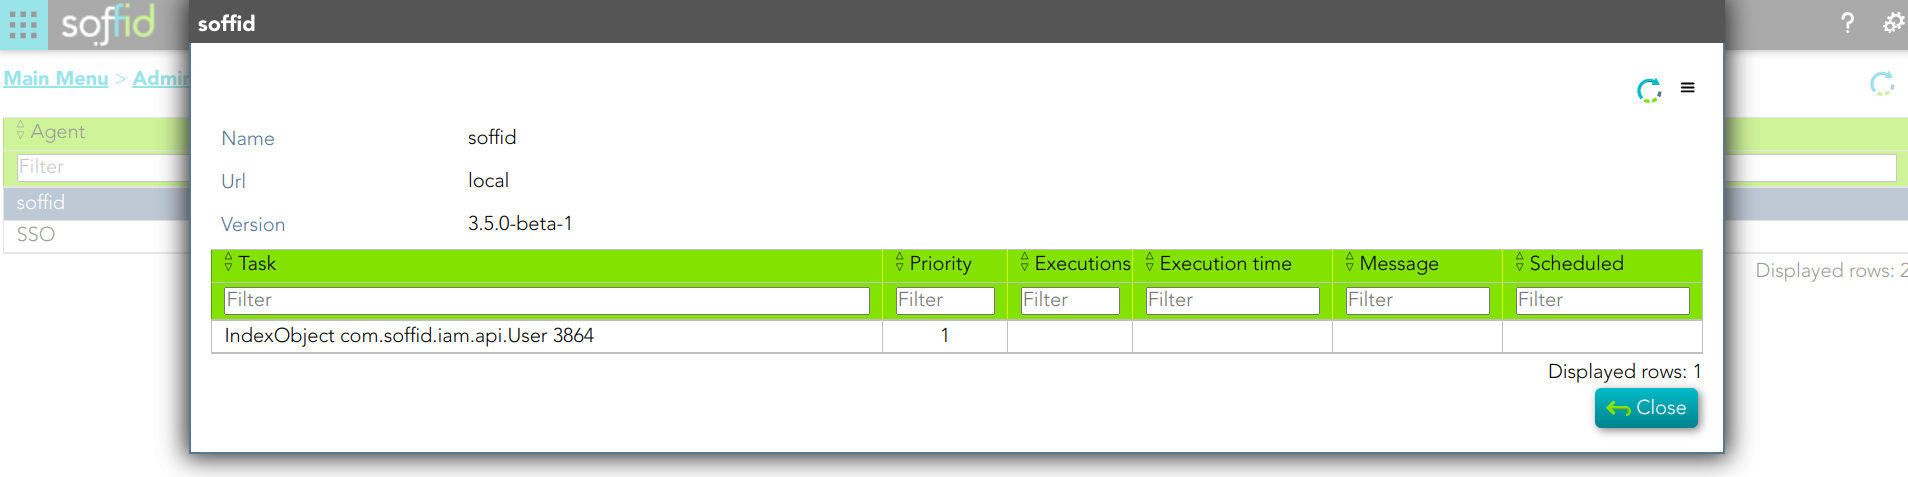
Step-by-step
Example 1
1. You update one user's data and save the changes.
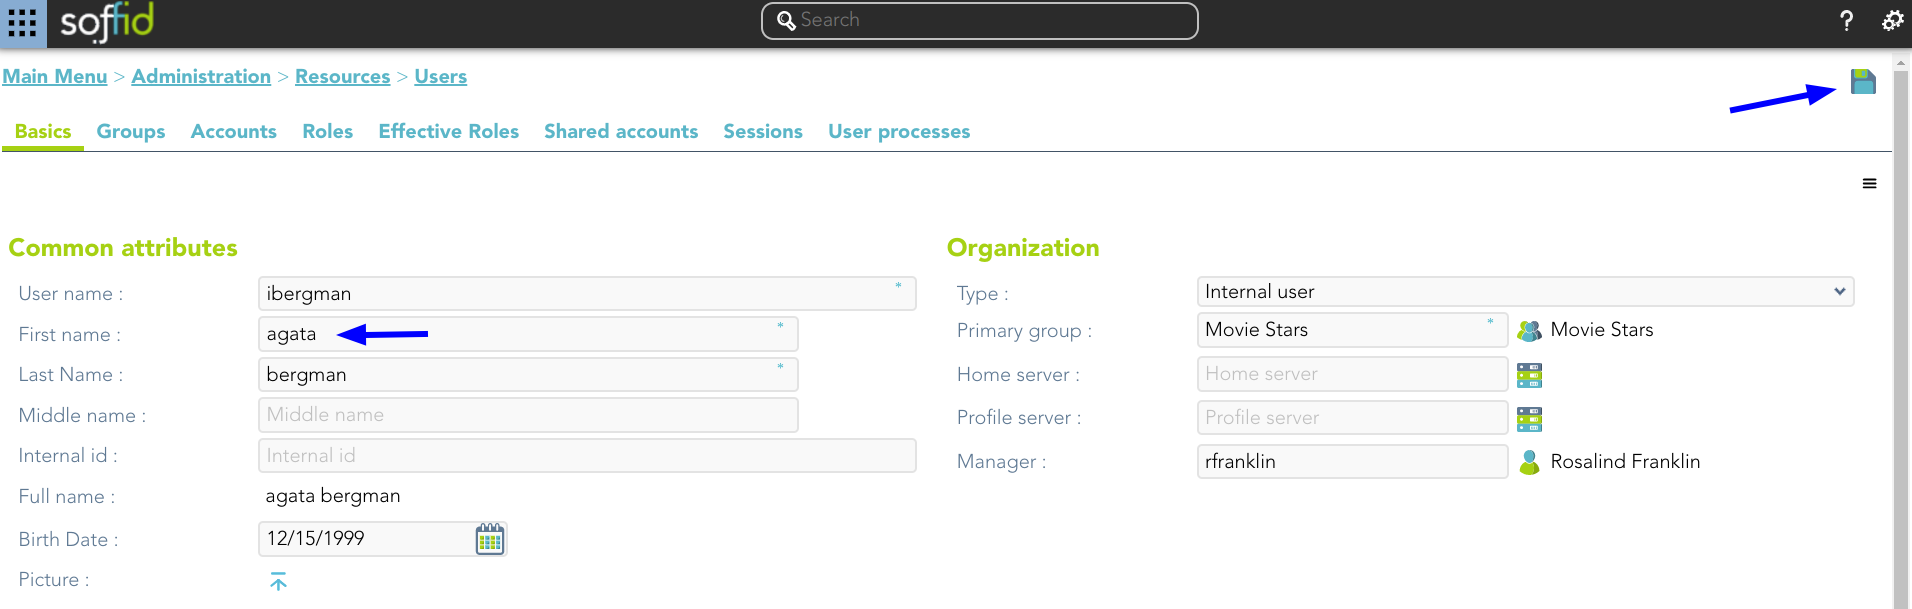
2. New tasks are created and executed.
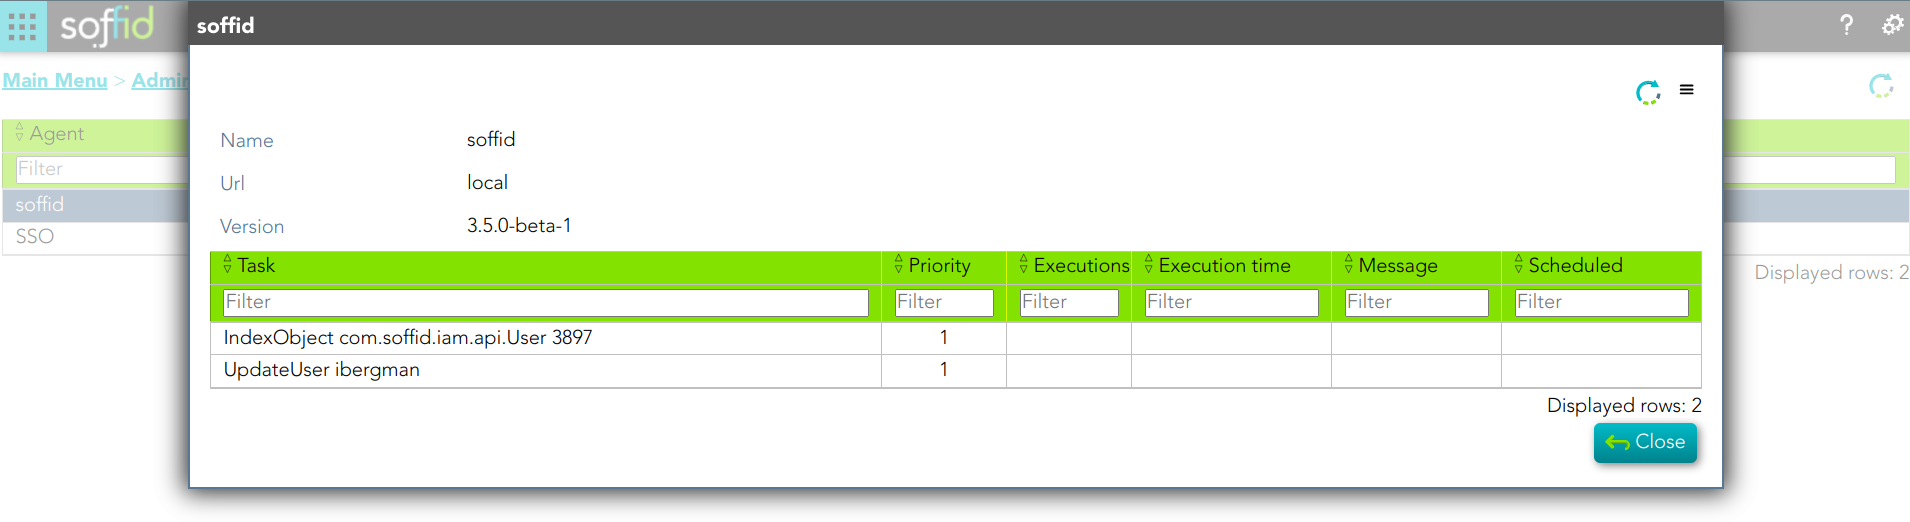
3. Then Sync Server indexes the updated text and places the index file.
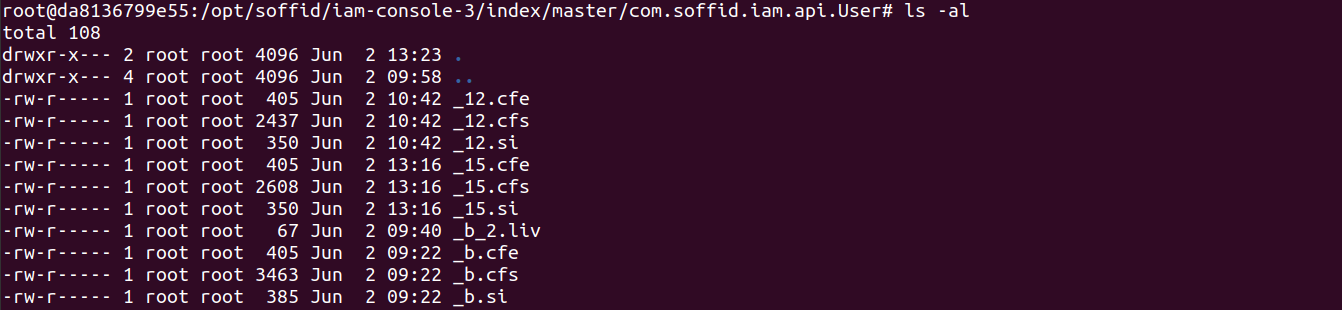
4. Then Sync Server and updates the database table SC_LUNIND by upgrading the LIP_TIMSTA field of the User object or by creating a new record if it did not previously exist.

5. When the following search will be performed, the very first thing to do is check the database file. If it is necessary update the file system and finally perform the search.
Example 2
1. The task engine mode is Read only
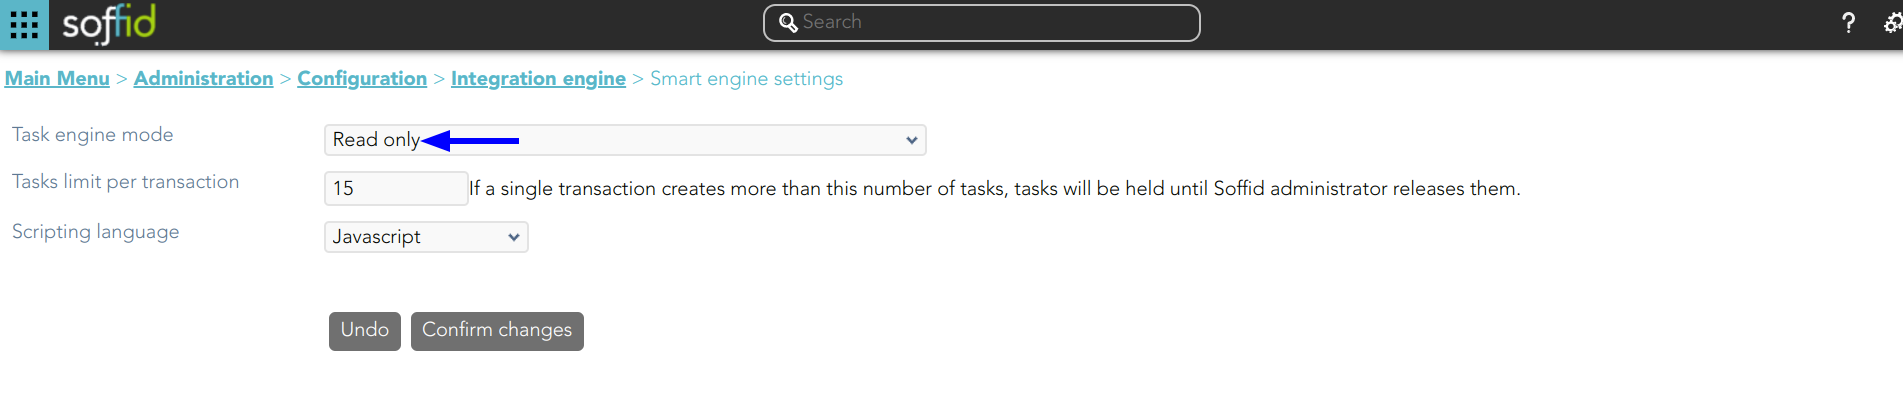
2. You update one user's data and save the changes.
3. A new task is created and executed
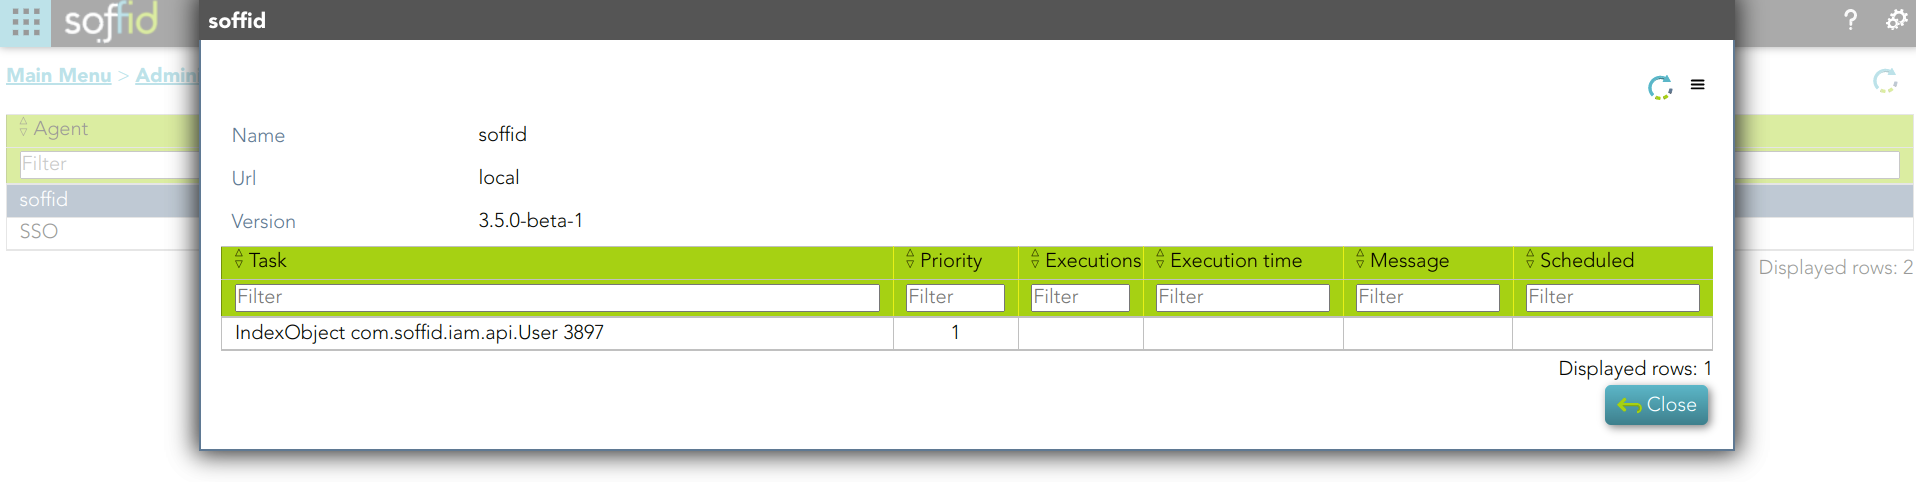
4. Then Sync Server indexes the updated text and places the index file.
5. Then Sync Server and updates the database table SC_LUNIND by upgrading the LIP_TIMSTA field of the User object or by creating a new record if it did not previously exist.
6. When the following search will be performed, the very first thing to do is check the database file. If it is necessary update the file system and finally perform the search.
Lucene - Query Parser Syntax
Overview
Although Lucene provides the ability to create your own queries through its API, it also provides a rich query language through the Query Parser, a lexer which interprets a string into a Lucene Query using JavaCC.
Generally, the query parser syntax may change from release to release. This page describes the syntax as of the current release. If you are using a different version of Lucene, please consult the copy of docs/queryparsersyntax.html that was distributed with the version you are using.
Before choosing to use the provided Query Parser, please consider the following:
- If you are programmatically generating a query string and then parsing it with the query parser then you should seriously consider building your queries directly with the query API. In other words, the query parser is designed for human-entered text, not for program-generated text.
- Untokenized fields are best added directly to queries, and not through the query parser. If a field's values are generated programmatically by the application, then so should query clauses for this field. An analyzer, which the query parser uses, is designed to convert human-entered text to terms. Program-generated values, like dates, keywords, etc., should be consistently program-generated.
- In a query form, fields which are general text should use the query parser. All others, such as date ranges, keywords, etc. are better added directly through the query API. A field with a limit set of values, that can be specified with a pull-down menu should not be added to a query string which is subsequently parsed, but rather added as a TermQuery clause.
Terms
A query is broken up into terms and operators. There are two types of terms: Single Terms and Phrases.
A Single Term is a single word such as "test" or "hello".
A Phrase is a group of words surrounded by double quotes such as "hello dolly".
Multiple terms can be combined together with Boolean operators to form a more complex query (see below).
Note: The analyzer used to create the index will be used on the terms and phrases in the query string. So it is important to choose an analyzer that will not interfere with the terms used in the query string.
Fields
Lucene supports fielded data. When performing a search you can either specify a field, or use the default field. The field names and default field is implementation specific.
You can search any field by typing the field name followed by a colon ":" and then the term you are looking for.
As an example, let's assume a Lucene index contains two fields, title and text and text is the default field. If you want to find the document entitled "The Right Way" which contains the text "don't go this way", you can enter:
title:"The Right Way" AND text:go
or
title:"The Right Way" AND go
Since text is the default field, the field indicator is not required.
Note: The field is only valid for the term that it directly precedes, so the query
title:The Right Way
Will only find "The" in the title field. It will find "Right" and "Way" in the default field (in this case the text field).
Term Modifiers
Lucene supports modifying query terms to provide a wide range of searching options.
Wildcard Searches
Lucene supports single and multiple character wildcard searches within single terms (not within phrase queries).
To perform a single character wildcard search use the "?" symbol.
To perform a multiple character wildcard search use the "*" symbol.
The single character wildcard search looks for terms that match that with the single character replaced. For example, to search for "text" or "test" you can use the search:
te?t
Multiple character wildcard searches looks for 0 or more characters. For example, to search for test, tests or tester, you can use the search:
test*
You can also use the wildcard searches in the middle of a term.
te*t
Note: You cannot use a * or ? symbol as the first character of a search.
Regular Expression Searches
Lucene supports regular expression searches matching a pattern between forward slashes "/". The syntax may change across releases, but the current supported syntax is documented in the RegExp class. For example to find documents containing "moat" or "boat":
/[mb]oat/
Fuzzy Searches
Lucene supports fuzzy searches based on Damerau-Levenshtein Distance. To do a fuzzy search use the tilde, "~", symbol at the end of a Single word Term. For example to search for a term similar in spelling to "roam" use the fuzzy search:
roam~
This search will find terms like foam and roams.
An additional (optional) parameter can specify the maximum number of edits allowed. The value is between 0 and 2, For example:
roam~1
The default that is used if the parameter is not given is 2 edit distances.
Previously, a floating point value was allowed here. This syntax is considered deprecated and will be removed in Lucene 5.0
Proximity Searches
Lucene supports finding words are a within a specific distance away. To do a proximity search use the tilde, "~", symbol at the end of a Phrase. For example to search for a "apache" and "jakarta" within 10 words of each other in a document use the search:
"jakarta apache"~10
Range Searches
Range Queries allow one to match documents whose field(s) values are between the lower and upper bound specified by the Range Query. Range Queries can be inclusive or exclusive of the upper and lower bounds. Sorting is done lexicographically.
mod_date:[20020101 TO 20030101]
This will find documents whose mod_date fields have values between 20020101 and 20030101, inclusive. Note that Range Queries are not reserved for date fields. You could also use range queries with non-date fields:
title:{Aida TO Carmen}
This will find all documents whose titles are between Aida and Carmen, but not including Aida and Carmen.
Inclusive range queries are denoted by square brackets. Exclusive range queries are denoted by curly brackets.
Boosting a Term
Lucene provides the relevance level of matching documents based on the terms found. To boost a term use the caret, "^", symbol with a boost factor (a number) at the end of the term you are searching. The higher the boost factor, the more relevant the term will be.
Boosting allows you to control the relevance of a document by boosting its term. For example, if you are searching for
jakarta apache
and you want the term "jakarta" to be more relevant boost it using the ^ symbol along with the boost factor next to the term. You would type:
jakarta^4 apache
This will make documents with the term jakarta appear more relevant. You can also boost Phrase Terms as in the example:
"jakarta apache"^4 "Apache Lucene"
By default, the boost factor is 1. Although the boost factor must be positive, it can be less than 1 (e.g. 0.2)
Boolean Operators
Boolean operators allow terms to be combined through logic operators. Lucene supports AND, "+", OR, NOT and "-" as Boolean operators(Note: Boolean operators must be ALL CAPS).
OR
The OR operator is the default conjunction operator. This means that if there is no Boolean operator between two terms, the OR operator is used. The OR operator links two terms and finds a matching document if either of the terms exist in a document. This is equivalent to a union using sets. The symbol || can be used in place of the word OR.
To search for documents that contain either "jakarta apache" or just "jakarta" use the query:
"jakarta apache" jakarta
or
"jakarta apache" OR jakarta
AND
The AND operator matches documents where both terms exist anywhere in the text of a single document. This is equivalent to an intersection using sets. The symbol && can be used in place of the word AND.
To search for documents that contain "jakarta apache" and "Apache Lucene" use the query:
"jakarta apache" AND "Apache Lucene"
+
The "+" or required operator requires that the term after the "+" symbol exist somewhere in a the field of a single document.
To search for documents that must contain "jakarta" and may contain "lucene" use the query:
+jakarta lucene
NOT
The NOT operator excludes documents that contain the term after NOT. This is equivalent to a difference using sets. The symbol ! can be used in place of the word NOT.
To search for documents that contain "jakarta apache" but not "Apache Lucene" use the query:
"jakarta apache" NOT "Apache Lucene"
Note: The NOT operator cannot be used with just one term. For example, the following search will return no results:
NOT "jakarta apache"
-
The "-" or prohibit operator excludes documents that contain the term after the "-" symbol.
To search for documents that contain "jakarta apache" but not "Apache Lucene" use the query:
"jakarta apache" -"Apache Lucene"
Grouping
Lucene supports using parentheses to group clauses to form sub queries. This can be very useful if you want to control the boolean logic for a query.
To search for either "jakarta" or "apache" and "website" use the query:
(jakarta OR apache) AND website
This eliminates any confusion and makes sure you that website must exist and either term jakarta or apache may exist.
Field Grouping
Lucene supports using parentheses to group multiple clauses to a single field.
To search for a title that contains both the word "return" and the phrase "pink panther" use the query:
title:(+return +"pink panther")
Escaping Special Characters
Lucene supports escaping special characters that are part of the query syntax. The current list special characters are
+ - && || ! ( ) { } [ ] ^ " ~ * ? : \ /
To escape these character use the \ before the character. For example to search for (1+1):2 use the query:
\(1\+1\)\:2
| Interface | Description |
|---|---|
| QueryParserConstants |
Token literal values and constants.
|
| Class | Description |
|---|---|
| MultiFieldQueryParser |
A QueryParser which constructs queries to search multiple fields.
|
| QueryParser |
This class is generated by JavaCC.
|
| QueryParserBase |
This class is overridden by QueryParser in QueryParser.jj and acts to separate the majority of the Java code from the .jj grammar file.
|
| QueryParserTokenManager |
Token Manager.
|
| Token |
Describes the input token stream.
|
| Enum | Description |
|---|---|
| QueryParser.Operator |
The default operator for parsing queries.
|
| Exception | Description |
|---|---|
| ParseException |
This exception is thrown when parse errors are encountered.
|
| Error | Description |
|---|---|
| TokenMgrError |
Token Manager Error.
|
Use Case
This folder will contain information about different use cases
Office 365 as External SAML identity provider
Introduction
Steps to configure Office 365 as External SAML identity provider.
Step-by-Step
1. Open a https://portal.azure.com
2. Open Microsoft Entra ID and then select Enterprise applications option
3. Select All applications and click New Application
4. Select Create your own application
5. Type the name of your app and select the "Integrate any other application you don't find in the gallery (Non-gallery)" option
6. Click on Set up single sign on
7. Click the SAML option
8. Enter the Basic SAML Configuration and Save:
- Identifier: https://<YOUR-SERVER>/soffid-iam-console
- Reply URL: https://<YOUR-SERVER>/soffid/saml/log/post
- Sign on URL: https://<YOUR-SERVER>/soffid/
- Logout URL: https://<YOUR-SERVER>/soffid/saml/slo/post
9. Configure Attributes & Claims and change the attributes and claims to send the mailnickname as the user identifier (nameid)
10. Copy the App Federation Metadata Url
11. Configure the External SAML identity Provider in the Soffid Console Authentication page
12. Optional, enable any user to login
Releases Soffid 3
2025 september
2025-09-24
- Syncserver 3.6.39
- Fix account identification upon kerberos token
- Fix account identification upon kerberos token
- ESSO 3.5.35-enterprise
- Allow administrator login when system is offline
- Allow administrator login when system is offline
- PAM (only in Docker Hub) 1.4.59
- Query environment property to not to compute used disk storage
2025-09-17
- Consola 3.6.45
- Fixed error when importing users in the users tab of the role view
- Fixed error when importing users in the users tab of the role view
- Syncserver 3.6.38
- Fix query of single host
- Do not store logs for deleted agents
- Improve test method for agents
- Add timeout in connection to gateway server
- Allow weak crypto algorithms
- Query of hosts now returns the serial number
- Ignore old tasks during schedule phase
- Fix compilation error
- Fix kerberos agent connection
- Fix kubernetes saver
- Improve kerberos login performance
- Fix query of single host
- Federation addon 3.6.55
- Do not register hosts without user agent
- Do not create sessions for clients without user agent
- Improve expiration of oauth tokens
- Do not register hosts without user agent
- Recover Password addon 3.0.16
- Fix password recovery from ESSO
- Fix error with legacy ESSO
- Fix send mail without user attributes
- Fix password recovery from ESSO
- Report addon 3.0.20
- Do not execute reports on disabled tenants
- Do not execute reports on disabled tenants
- Domino connector 2.3.2
- Added triggers
- Added remove objects
- Enable additional FullNames
- Added triggers
- Windows connector 5.4.31
- Change permissions to set passwords
- Allow weak crypto algorithms for kerberos
- Fix undelete method
- Change permissions to set passwords
2025 octubre
2025-10-29
- Consola 3.6.49
- Do not update account's last login after ten minutes
- Improve method to search for hosts
- Use hashtable instead of Hashmap
- Fix exception dump
- Update last login date in a separate transaction
- Fix page to search for groups
- Do not update account's last login after ten minutes
- Federation addon 3.6.63
- Attributes cache
- Only update last login every ten minutes
- User remote service locator to use local services
- Verify post_logout_redirect_uri is valid
- Fix CAS SAML endpoint
- Attributes cache
- BPM addon 3.2.4
- Fix null pointer when there is no grant
- Fix null pointer when there is no grant
- PAM (only in Docker Hub) 1.4.64
- Fix osKeyboard does not exist
- Fix osKeyboard does not exist
2025-10-22
- Syncserver 3.6.42
- Fix update password tasks are ignored
- Reduce locks in sessions table
- Fix update password tasks are ignored
- Federation addon 3.6.59
- Fix CAS / SAML1 endpoint
- Remove synchronization requirements
- Fix CAS / SAML1 endpoint
- PAM (only in Docker Hub) 1.4.63
- Improve kubernetes file manager
- Large file transfer in kubernetes
- Improve kubernetes file manager
2025-10-15
- Federation addon 3.6.57
- Change SAML date format
- Change SAML date format
- LDAP connector 2.8.2
- Fix user logon error
- Fix user logon error
- PAM (only in Docker Hub) 1.4.61
- Update client access
- Update chrome image
- Change VNC keyboard behaviour
- Update client access
2025-10-08
- Consola 3.6.46
- Remove serial numbers when the machine is marked as deleted
- Prevent duplicates in email field #513
- Improve performance of new-task page
- Remove serial numbers when the machine is marked as deleted
- Federation addon 3.6.56
- Add SAML1.1 bridge for CAS
- Add SAML1.1 bridge for CAS
- ESSO 3.5.37-enterprise
- Store password cache
- Switch to offline login if online login fails
- Store password cache
2025-10-01
- ESSO 3.5.36-enterprise
- URL decode received password for administrator login
- URL decode received password for administrator login
- PAM (only in Docker Hub) 1.4.60
- Remove directory path from name when downloading a file
2025 november
2025-11-26
- Consola 3.6.52
- Changes for mariadb / mysql divergence
- Create user with attributes in authoritative loader engine
- Changes for mariadb / mysql divergence
- Federation addon 3.6.65
- Allow post or get
- Change SCM
- Allow post or get
- SQL connector 1.7.13
- Add iSeries driver
- Add driver for SQL Anywhere
- Update JDK
- Add iSeries driver
- PAM (only in Docker Hub) 1.4.70
- Improve http image to add custom scripts
- Update preferences every 10 seconds
- Fix international backslash key
- Improve http image to add custom scripts
2025-11-19
- LDAP connector 2.8.3
- Add ldap filter property
- Add ldap filter property
2025-11-12
- Consola 3.6.50
- Fix message compositions
- Improve jump server monitoring
- Fix message compositions
- Federation addon 3.6.64
- Increase buffer size
- Prevent NullPointer during logout
- Increase buffer size
- PAM (only in Docker Hub) 1.4.68
- VNC Reconnection
- Only count non-closed sessions
- Handle induced closing
- Reset keyboard when the focus is lost
- Add option to share static data with client pods
- VNC Reconnection
2025-11-05
- PAM (only in Docker Hub) 1.4.65
- Add vm support in https
- Do not loop in RDP connections
- Fix tab and caps lock
- Add vm support in https
2025 december
2025-12-31
- LDAP connector 2.8.4
- Fix smart grant mechanism
- Fix smart grant mechanism
- ESSO 3.5.40-enterprise
- Fix dialog resource
- Fix dialog resource
2025-12-24
- Federation addon 3.6.69
- Do not fail when the kerberos token is not acceptable
- Fix login endpoint for CAS
- Fix value too long when accepting external IdPs
- Fix account attribute generation
- Do not fail when the kerberos token is not acceptable
- Report addon 3.0.21
- Fix report generation
- ESSO 3.5.39-enterprise
- Add support for disabling ESSO login on startup
- Fix report generation
2025-12-17
- Consola 3.6.58
- Option to not to store user credentials
- Allow manual launcher when passwords are not stored
- Fix method to switch to manual login on PAM
- Fix method to guess network
- Option to not to store user credentials
- Syncserver 3.6.45
- Only store passwords when the password policy allows it
- Only store passwords when the password policy allows it
- Federation addon 3.6.67
- Prevent dead-lock
- Support unsafe CAS profile
- Fix multiple values stored for same account
- Prevent dead-lock
- ESSO 3.5.38-enterprise
- Let the user to change the user name for privilege escalation
- Let the user to change the user name for privilege escalation
- PAM (only in Docker Hub) 1.4.77
- Fix method to send large clipboard contents, like images
2025-12-10
- Consola 3.6.56
- Check changes in authoritative engine
- Set the right network for a host whose IP address has changed
- Fix compilation error
- Fix method to assing IP address when the network is full
- Add scroll in process page
- Check changes in authoritative engine
- Syncserver 3.6.44
- Fix process to remove old tasks
- Fix process to remove old tasks
- Recertification addon 3.0.9
- Notification process
- Improve user experience
- Add email notifications
- Fix recertification cannot be completed when the recertified role has been revoked
- Notification process
- PAM (only in Docker Hub) 1.4.76
- Methods to get and set clipboard
- Apply look and feel of version 4
- Methods to close sessions
- Fix javascript error
- Add client access
- Add DBeaver data
- Add MariaDB drivers
- Update dbeaver drivers
- Fix index process is stalled
- Methods to get and set clipboard
2025-12-03
- Consola 3.6.53
- Add mysql driver
- Add mysql driver
- Syncserver 3.6.43
- Add mysql driver
- Add mysql driver
- PAM (only in Docker Hub) 1.4.74
- Add new drivers
- Fix method to change keyboard
- Fix keyboard problem in some old operating systems
- Allow IAMGE_REPOSITORY environment variable
- Accept persistent volume claim
- Unpress left control when sending altgr
- Add new drivers
2026 january
2026-01-07
- Console 3.6.60
- Fix attachments list overlaps process buttons
- Create service for pam-ssh gateway without password vault
- Improve performance for users with many holder groups
- Default group for holdergroups
- Fix attachments list overlaps process buttons
- Syncserver 3.6.46
- Implement pam proxy service
- Implement pam proxy service
2026-01-14
- Federation addon 3.6.71
- Add debugging to SSO process
- Fix for the automatic deletion process of oauth tokens
- Add debugging to SSO process
2026-01-21
- Recover password addon 3.0.17
- Enlarge table to fill in recovery questions #18
- Display the minimum answers to fill-in #19
- Enlarge table to fill in recovery questions #18
- REST connector 1.2.25
- Support for sending JSON requests with JSON arrays as values
- Fix null pointer
- Support for sending JSON requests with JSON arrays as values
- PAM (only in Docker Hub) 1.4.80
- Do not check spice protocol anymore
- Fix process froze running docker inspect
- Remove backslashes from downloaded file name
- Fix images are not uploaded on time
- Expire sessions after 48 hours
- Fix file transfer icon
- Prevent recording tail is incomplete
- Do not cache images or scripts
- Disable cache
- Fix password encoding in authorzation header
- Pause keyboard during login process
- Improve resuming of paused session
- Do not check spice protocol anymore
2026-01-28
- Console 3.6.61
- Fix retrieval of non-user accounts identity
- Fix retrieval of non-user accounts identity
- REST connector 1.3.0
- Fix null pointer
- Upgrade configuration
- Fix null pointer
2026 february
2026-02-04
- Console 3.6.62
- Fix retrieval of non-user accounts identity
- Fix retrieval of non-user accounts identity
- Federation addon 3.6.73
- Add token index
- Improve CAS Response URL
- Mark authentication as MFA for microsoft
- Add token index
2026-02-11
- Federation addon 3.6.74
- Do not send response to unauthorized URL
- Expose third party idp attributes
- Do not send response to unauthorized URL
2026-02-18
- Console 3.6.64
- Socket for SYSLOG SSL
- Changes for paswordless ssh-gateway
- Add octet-length framing in syslog
- Socket for SYSLOG SSL
- Federation addon 3.6.75
- Set default authentication method
- Set default authentication method
2026-02-24
- Console 3.6.65
- Fix warning getting user passwords switch
- Fix warning getting user passwords switch
- Federation addon 3.6.76
- Get session from cache for SSO
- Get session from cache for SSO
- ESSO 3.5.43
- Second step to sign components
- Update .gitlab-ci.yml file
- Change execution attributes
- Fix signing tool
- Second step to sign components
2026 march
2026-03-04
- Console 3.6.66
- Flush syslog message
- Flush syslog message
2026-03-18
- Federation addon 3.6.80
- Method to specify loa in CAS request
- Method to disable creation of accounts for 3rd party IdPs
- Add gateway option for CAS Login
- Method to set a custom lists of holder groups
- Fix consent page
- Relax CAS Host validation
- Method to specify loa in CAS request
2026-03-25
- Console 3.6.69
- Fail on signature corruption
- Fail on signature corruption
- Federation addon 3.6.83
- Method to set a custom lists of holder groups
- Fix: assertion or response must be signed
- Improve security fix
- Throw error when the signature is wrong
- Method to set a custom lists of holder groups
2026 april
2026-04-22
- Console 3.6.72
- Switch to disable local authentication
- Fix method to jump into soffid console
- Fixes problem due to secure class loaders
- Switch to disable local authentication
- Federation addon 3.6.87
- Secure XML injection
- feat: Make LOA a driver for adaptive authentication
- Reauthenticate when loa level raises
- Fix null pointer exception
- Secure XML injection
- ESSO 3.5.45-enterprise
- perf: Update all settings at once
- Fix host address was not updated
- perf: Update all settings at once
2026 may
2026-05-06
- Console 3.6.73
- Allow creation of hosts by users allowed to create hosts on a single network
- Improve method to update user aliases. Remove alias if no other user is assigned
- Fix ordering of recertification date
- Remove account services before removing accounts
- Allow creation of hosts by users allowed to create hosts on a single network
- Federation addon 3.6.89
- Fix loa is lost when the progressive profile is configured- Trace load requests
- Fix code style
- Fix shared signals authorization header
- Fix removal of old tokens
- Relax CAS checkings for logout
- Fix LOA selector for adaptive authentication
- Persist 3rd party idp attributes
- Trace loa requests
- Fix code style
- fix shared signals authorization header
- Fix removal of old tokens
- Fix loa is lost when the progressive profile is configured- Trace load requests
- BPM addon 3.2.5
- Localize messages
- Localize messages
- LDAP connector 2.8.5
- Confirm connection is connected and alive
- Option to remove accounts
- Confirm connection is connected and alive
New features
2026-06-12 New feature: inheriting authorisations in new applications
The new feature
Now, on the Application access tree page, when creating an entry point, a folder or an application, the authorizations from the parent folder are now inherited.
Bear in mind
Please note the following points:
- If there are multiple levels of folders, only the authorizations from the parent folder are inherited.
How to configure it?
The following components must be installed:
- Console 3.6.75 (or higher)
Let's look at an example
On our "‘Application access tree" page, there are two levels of folders.
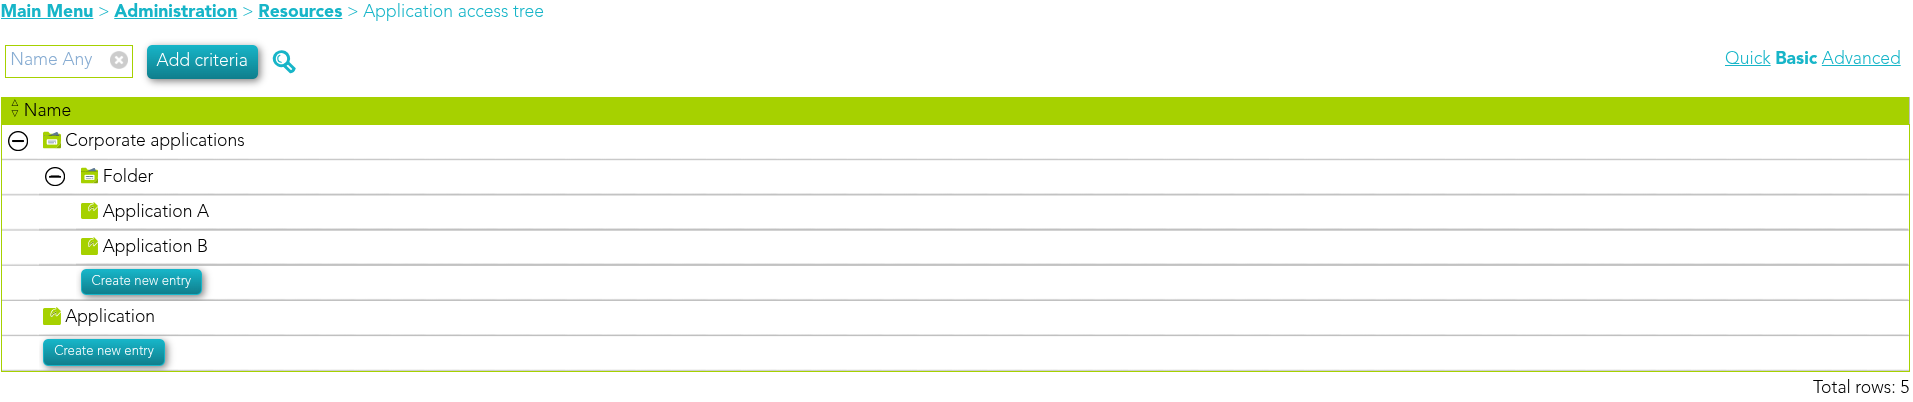
The first folder contains the following authorisations.

The second folder contains the following authorisations, the "Manager" user is different.

Now, let’s create a new application in the second folder.
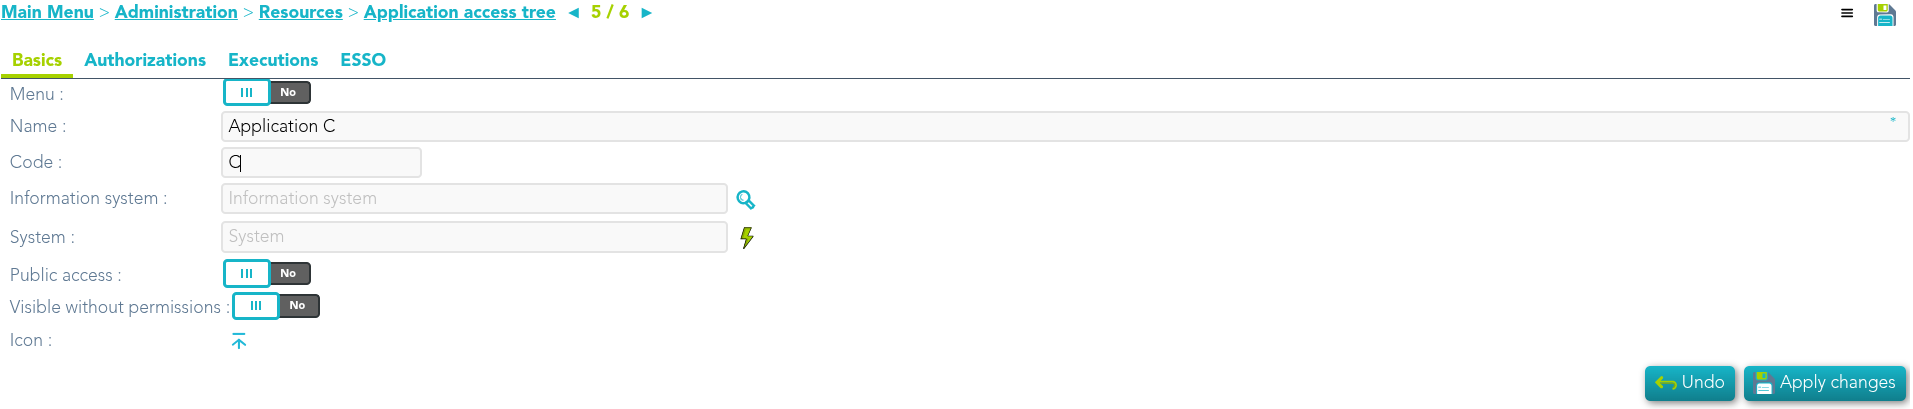
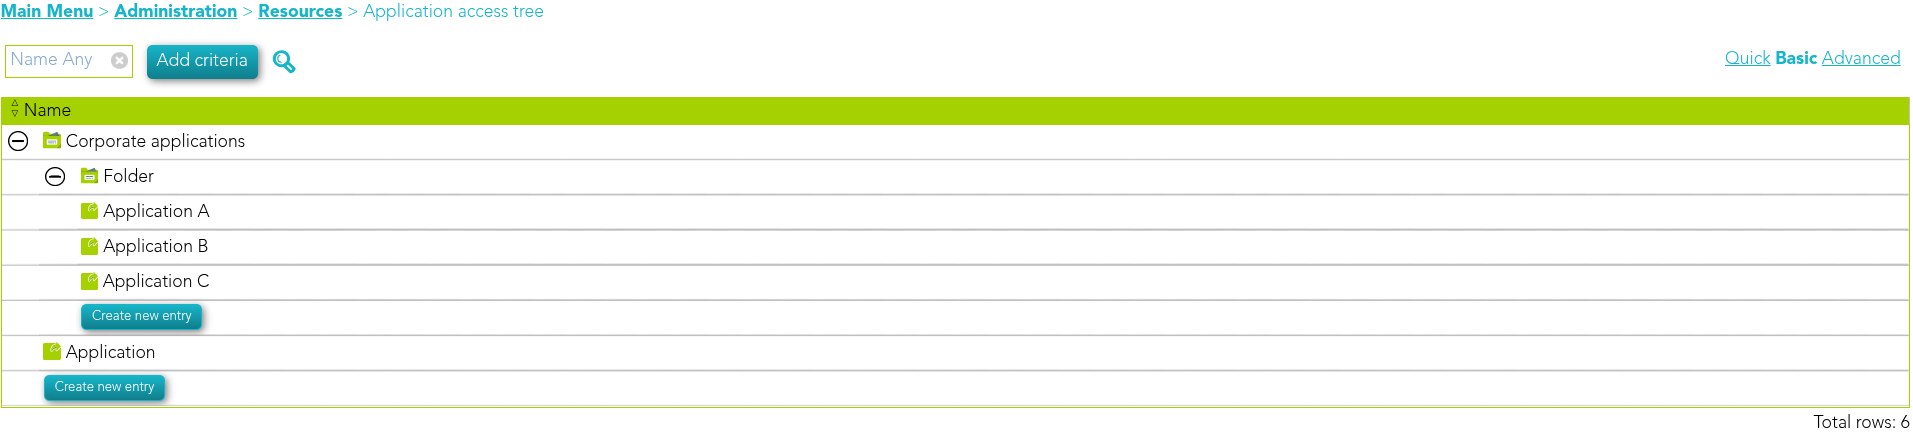
If we access it, we can see that it has the authorizations of its parent Folder.

2026-06-12 New feature: use holder group in UID script
The new feature
Now, on the Service provider configuration page, the holder group can now be used in the UID selection script.
Bear in mind
Please note the following points:
- If there are multiple levels of folders, only the authorizations from the parent folder are inherited.
How to configure it?
The following components must be installed:
- Federation addon 3.6.92 (or higher)
Let's look at an example
First of all, we check that we have a user with holder groups.

We can now confirm that the service provider has the option "" enabled.
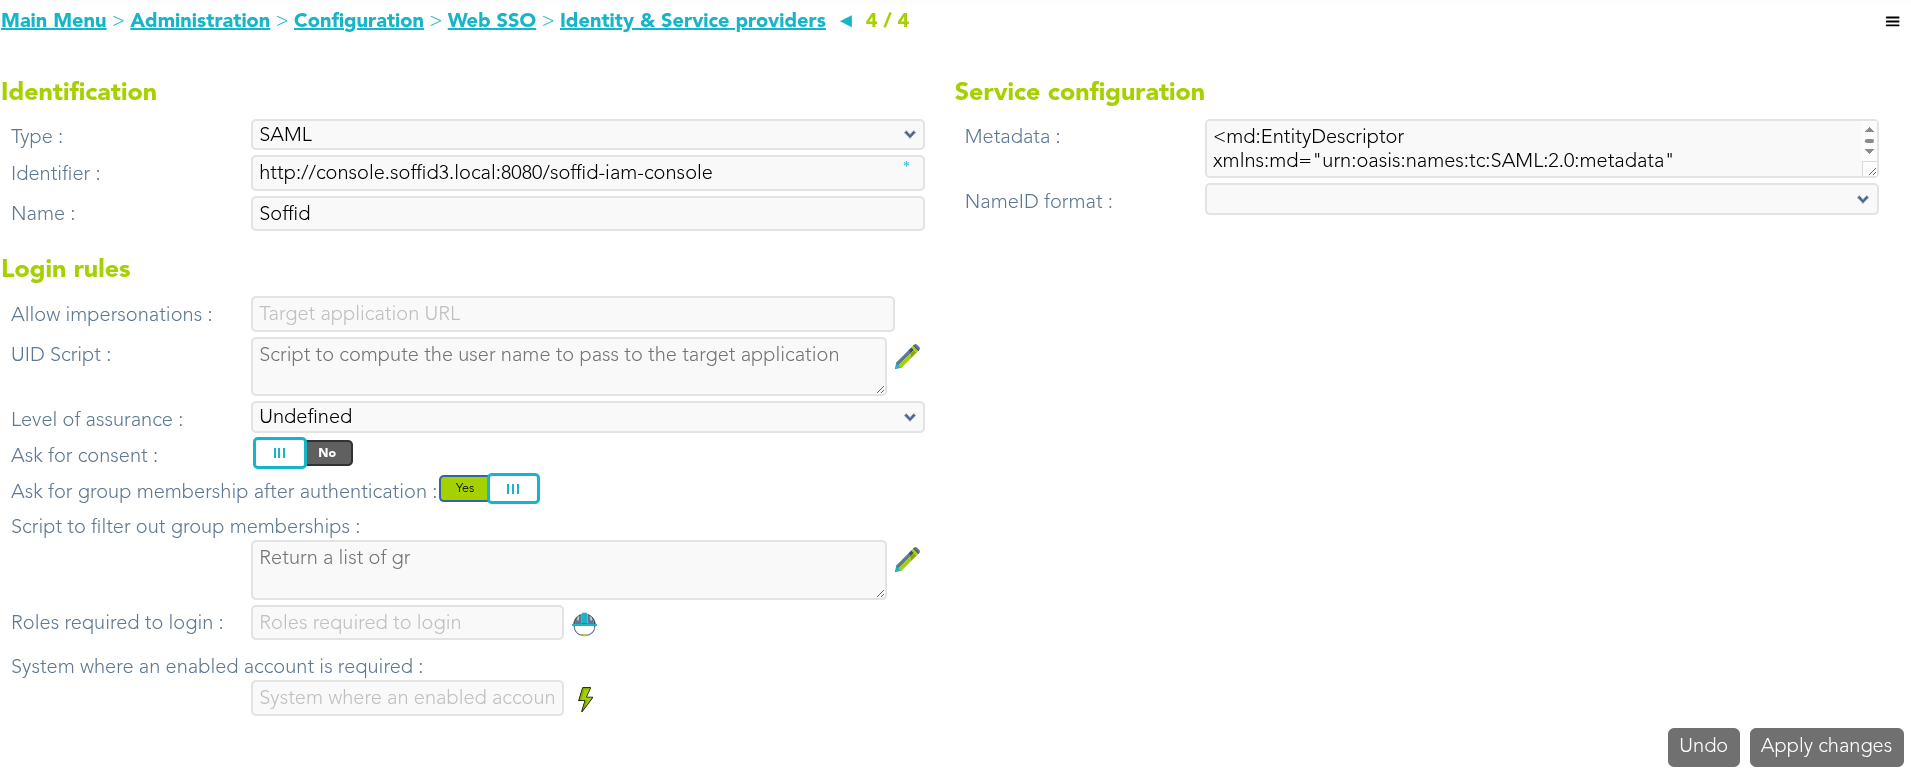
We use the holderGroup attribute in the UID script.
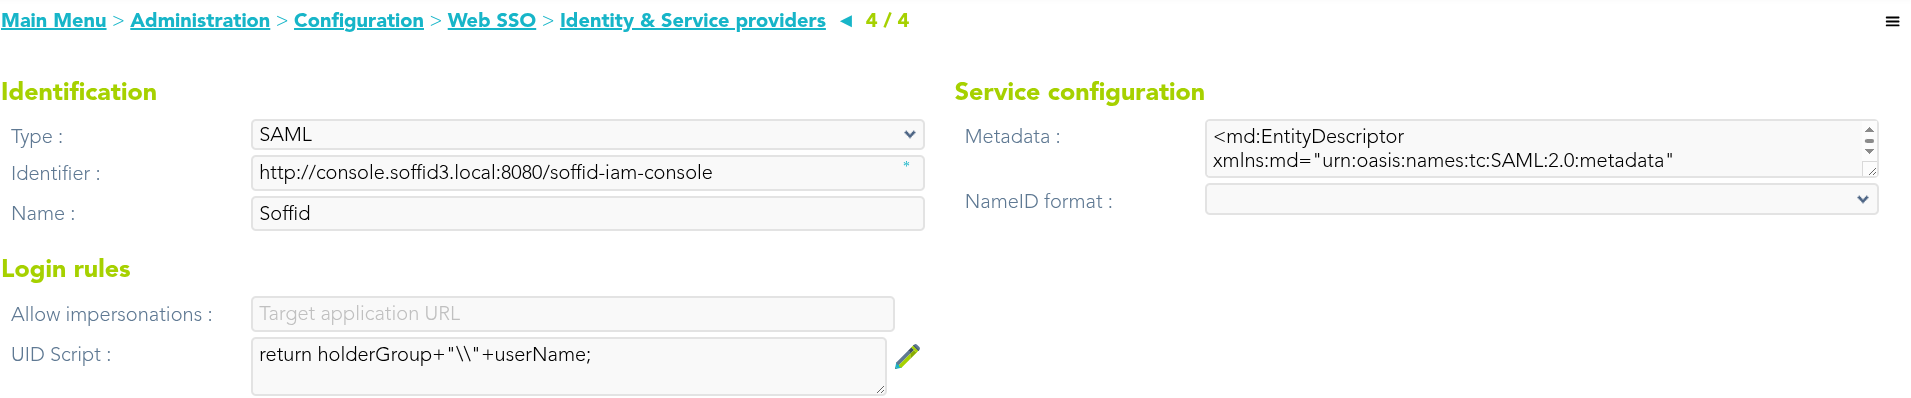
Finally, we’re going to authenticate with the service provider and check the value of the UID attribute.