Resources Management
- Users
- Groups
- Accounts
- Roles
- Information systems
- Role assignment rules
- Segregation of Duties (SoD)
- Networks
- Hosts
- Printers
- Mail Domains
- Mail List
- Application access tree
- Password vault
- Custom objects
Users
Description
The user is the core object of the system. In Soffid, a user means an identity (usually a person). Every user can have a number of accounts spread on different information systems.
In traditional system management, one can assign roles and permissions to accounts. Then, the administrator uses to grant the account to one single user. In Soffid you can have a global view of permissions assigned to any user. Being the user and the main management object, you have a more clear perspective in terms of operation, security, and end-user engagement.
It is important to know that dependency rules can be established between systems, so a user with a role or permission in one system will automatically be assigned a role or permission in another system, according to the system policies.
The administrator can also identify the potential users of shared or system management accounts. These accounts are managed in a slightly different way. See the Accounts and Password Vault pages for more information.
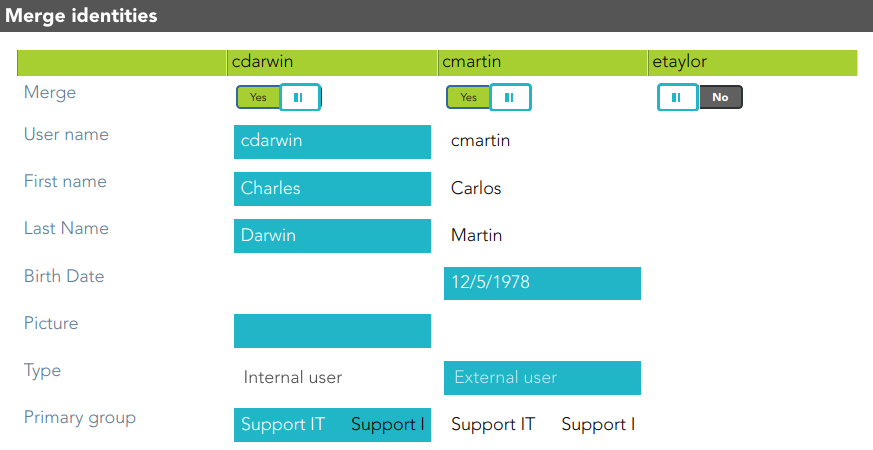
Sometimes is possible to find that there is any user with duplicated user data. To solve that problem, Soffid provides the merge functionality. That allows you to combine two user records, selecting the proper data to fix that situation.
Screen overview
Related objects
Standard user attributes
Basic
On the basic user tab, you can view all the user attributes. Other attributes can be customized in Soffid.
Common attributes
- User name: short name to identify the user. It uses can be either a name abbreviation, an employee Id, or a system generated number.
- First name: name of the user.
- Last name: first surname.
- Middle name: used like a second surname.
- Full name: firstName + lastName + middleName.
Mail service
- Internal eMail: this will be the mail address that will appear on outgoing emails from this user.
- Mail aliases: In this box, there will be a comma-separated list of mail addresses that will be forwarded to this user mailbox. It will you one to one aliases and one to many distribution lists.
- External email: additional external email.
- Mail server: select which server will host its user mail.
User status
- Enable: uncheck in order to prevent this user from logging into any system.
- Multi session: uncheck to prevent this user from using more than one device at a time. If the user logs into the system when another session is active, the single sign-on agent will manage it in order to close the first session before opening a new one. This checkbox is only effective when using Soffid ESSO
- Comments.
Organization
- Type: identifies the password policy that is to be applied. More information on this link User Type.
- Primary group: select which organization unit this user belongs to.
- Home server: select which server will host its user folder. It is linked to the Home Drive attribute on Active Directory.
- Profile server: select which server will host its user profile. It is linked to Roaming UserProfile on Active Directory.
- Manager: select another user, who will be the manager
Other
- NIF
- Phone
Audit information
- Created by: user who created it.
- Created on: when this one was created.
- Modified by: responsible for the user's last change.
- Modified last on: date of last user modification.
Groups
Your company is organized into different business units, departments, or workgroups. In Soffid, they all are named as groups. Some systems, like Active Directory, use groups to control or restrict resource access. A Soffid Group is more like an Active Directory OU.
On the group tab, you can manage all the groups that the user belongs to. Be in mind that all users have to belong to a Primary Group defined on the Basic user attributes.
By clicking on a record, Soffid shows group membership details. It is possible to change the group, and the start date and add comments.
It is also possible to assign a new membership by clicking the button with the add symbol (+), and revoking the group membership from the group details, or by selecting one or more records from the list and clicking the button with the subtraction symbol (-).
Accounts
An account is a way a user is presented on a target system.
On the accounts tab, you can view the accounts that belong to the user that is currently displayed, grouped by password domains. The account can be displayed in black or gray color. The gray color is used to indicate that the account is unmanaged, that is because the agent is disconnected or because the agent is in Read-Only Mode.
Soffid smart engine will automatically create, disable or remove user accounts depending on the system policies.
Also, you can manually add a new account for a specific system, rename an existing one, delete it or change its password. You can also see when the password was last set and its expected expiration date. Mind that you cannot change a single account password, as long as any password belongs to a password domain, so each password belonging to the same user and password domain will be changed at a time. When you apply user changes, automatically they will be forwarded to target systems.
Mind that Soffid smart engine can revert some of your changes if those changes are violating any system policy.
Each change made at the Soffid console is asynchronously replicated into the managed system. At the accounts tab, the administrator can check when each account was updated last. When the Soffid console notices there the replication process is failing, an exclamation sign will appear next to the account name.
When the settings for a managed system exclude a user to be replicated, no account will be created for him. In case the user was replicated and due to user attributes changes it should be excluded, its account will be disabled and it will appear with line-through style.
At the agent configuration screen, the administrator can configure when to create or enable user accounts depending on the user type or the group the user belongs to. When the settings for a managed system exclude a user, no account will be created for him. In case the account exists and due to user attributes changes it should be excluded, its account will be disabled and it will appear with line-through style.
Regarding automatic account creation, it's important to know that if a user needs an account with a name, based on the user domain configuration, and that such an account already exists as a shared or single user account, this account won't be created or assigned. Nevertheless, if such account already exists as an unmanaged account, this existing account will be assigned to the user along with their role grants.
By clicking on a record Soffid displays more accurate information about the account. It will be allowed to rename the account, change it, change the account status or delete the account (logic delete). Also, Soffid allows you to query the properties if the account on the target system. Finally, Soffid will display custom attributes defined for the specific agent on the agent "Account metadata" tab, you can visit the Agent page for more information.
On the accounts tab, you can check the failed login attempts and if the account has been blocked, it is displayed until how long it has been blocked.
💻 Image

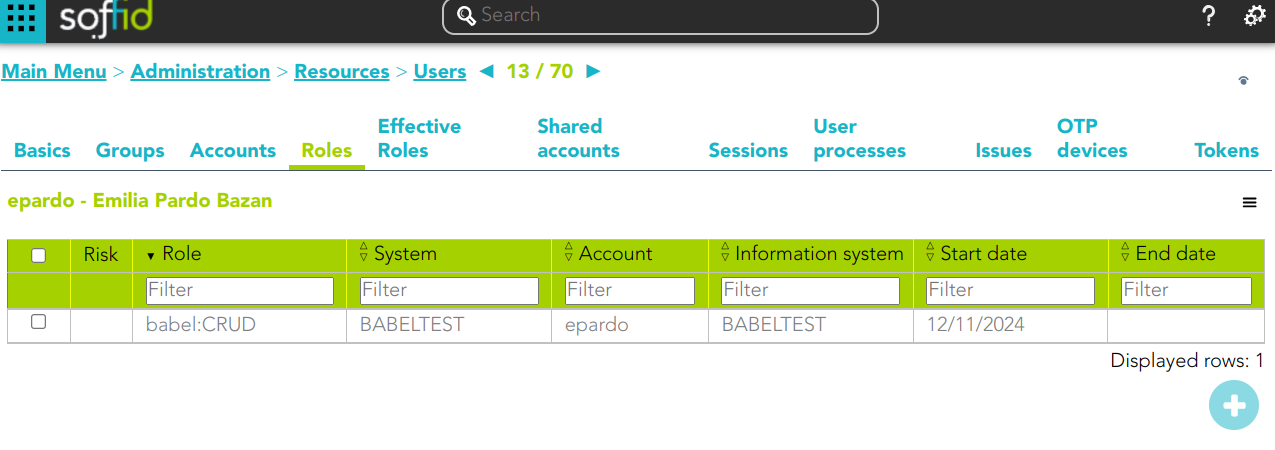
Roles
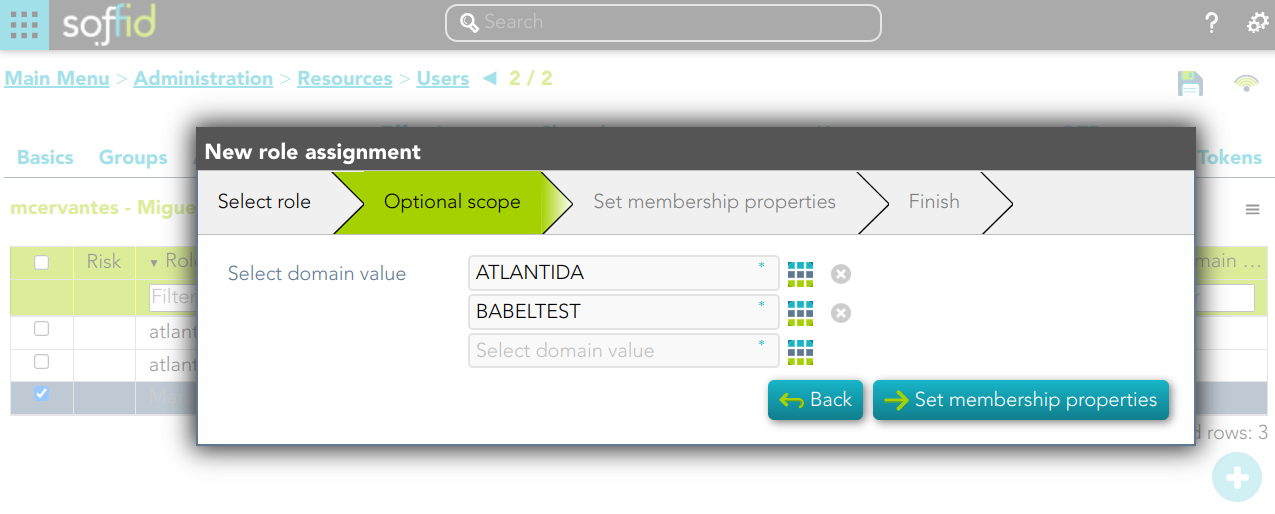
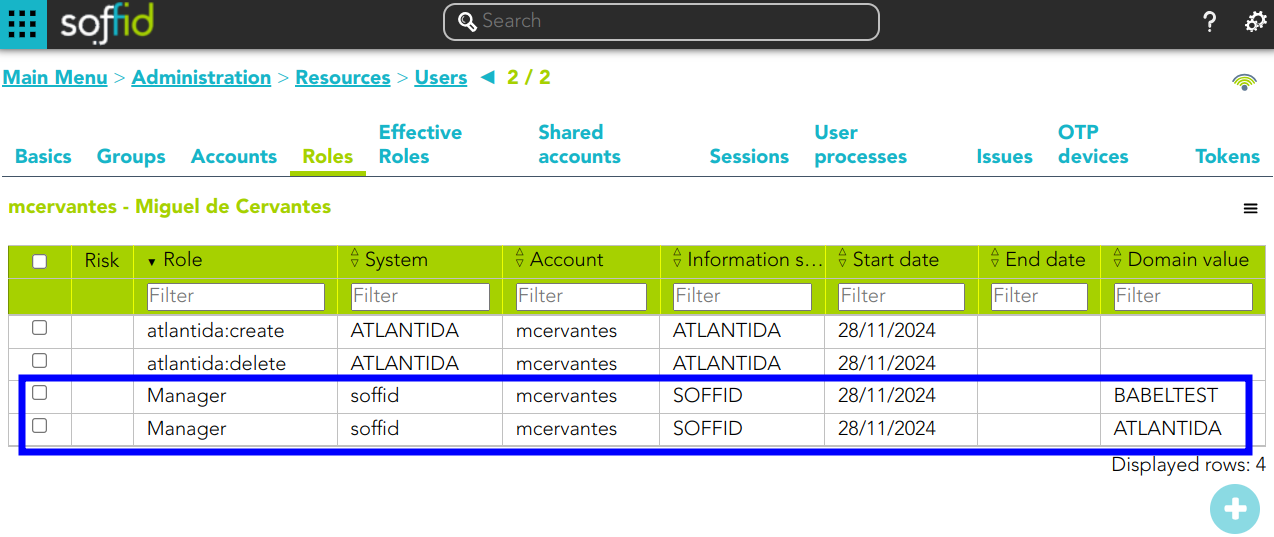
A role is a collection of permissions that can be granted to a user. With these permissions, the user will access to another system and perform some operations.
On the roles tab, you can assign or revoke roles to any user. Each role needs an account to be applied to. So, if a user has no account on a system and a role on that system is granted, a new account will be created on this system. In case a user has more than one account on a system, you should indicate which of the suitable accounts will be granted the role.
More and more, when the role should be scoped, the operator must select the right scope for the role. The scope and its allowed values are defined on the application management page.
By clicking on a record Soffid shows more information about the role, this information can not be updated. On this screen, you can browse through the different roles.
It is also possible to revoke the role to the user from the entitlement details or by selecting one or more records from the list and clicking the button with the subtraction symbol.
The roles list shows a column to display when there are risks with the roles assigned to the user. If you click on a record, Soffid will show the entitlement details including the SoD rules with the detail of the risk.
For more information about SoD visit the Segregation of Duties page.
Additionally, you can download a CSV file with the user's role information, or upload a CSV file to assign or revoke roles to the user.
Effective Roles
Hierarchy of permissions assigned to or inherited.
This screen details the effective roles of the selected user.
- By direct assignment of the role: when you assign a role to a user, you are assigning to the user all the permissions defined for that role.
- By belonging to a group: when you add a user to a group, the user will have all the roles assigned to the group
- By rules defined in the system: when a rule is satisfied for a user, the system assigns the roles defined in the rule to the user.
Shared accounts
Accounts that can be used by several users, those accounts can be privileged or shared.
By clicking on a record, you can browse the share account details page.
Sessions
On the sessions tab, you can view sessions opened by the user. Here will be displayed any open ESSO session, showing the host that has created the session and the host where the user is connected from, if applicable. The port number is the TCP/IP port number the ESSO session manager is listening to. It is used by the synchronization server to check for session validity.
ESSO Integration
Multi-session attribute: ESSO will prevent any user from having more than one session at a time unless it has the multisession attribute checked.
If ESSO detects the user trying to log in has an active session, it will do the following job:
- The previous session will be noticed of such a duplicate session.
- The new session will have the choice to:
-
Give up and not log in.
-
Wait until the previous session is closed.
-
Force the previous session to log out. If the user selects to close the remote session, the remote user will still have the chance to accept or reject such action.
-
No user with an active flag unchecked will be allowed to log in or use any system managed through ESSO.
User Processes
In the user processes tab you can view the business processes in which the user has been managed. It shows information about the process, the status process and when it was initiated and ended.
NOTE: Mind that this page does not show the business processes the user has acted.
Pending tasks
When a user has pending tasks, an icon will be appearing at the right corner. If the status of pending tasks is "Error", the icon will be a highlight alert icon, if the status is "Pending", the icon will be a wifi icon.
That window displays the most relevant task data, the task name, the agent that manages the task, the status task, and the schedule to will be executed, ... That pending task information is only available in consultation mode.
Tokens
In the Tokens tab, you can manage the user tokens. You can add or delete the users' tokens. Currently, the available options are Certificate and FIDO token.
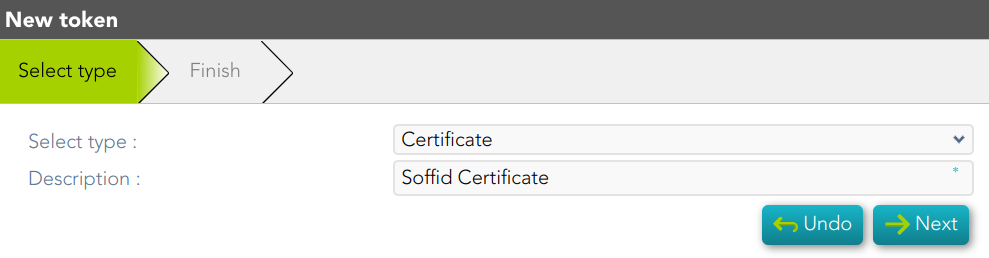
Certificate
If you select the certificate option, you only need to register the certificate description. Then Soffid will read the existing certificates registered into Soffid, at the Digital certificates page, and finally, Soffid will give you a p12 file and a password to install the certificate in the browser.
If there are no registered certificates, Soffid will not allow you to add new certificate tokens for any user.
💻 Image
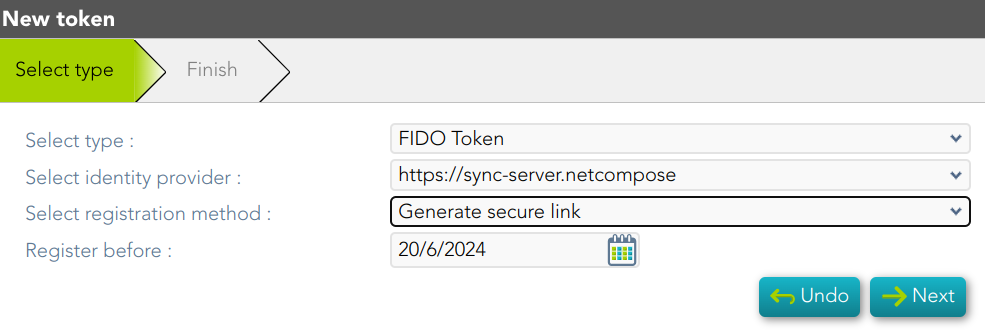
FIDO token
If you select the FIDO token option, you need to full fill in the following data:
- Identity provider: You need to select one Identity provider from the available list.
- Registration method: Soffid offers three different registration methods. To use one of them you will need to insert and touch the FIDO key to create a new token.
- Register now: Soffid allows you to register a new FIDO key related to a specific user. Once you select this option, you need to register the FIDO key, and Soffid automatically will register the key related to the user.
- Generate secure link: Soffid generates a secure link related to a specific user to register. You can follow the link and then register the FIDO key. Once you register the FIDO key, you can close this page. You only need to register the FIDO key and this page will close automatically.
- Generate insecure link: Soffidl will generate an insecure link, this link is not related to any user. Then you need to browse to the insecure link and type the user name, and then the password. Finally, you need to register the FIDO key. Once you register the FIDO key, you can close this page.
You can use the Generate secure or insecure link option to send it to users to complete the registration process.
When you register a FIDO token, this will be displayed on the proper user "My certificates and FIDO tokens" page and it will be available for this user.
💻 Image
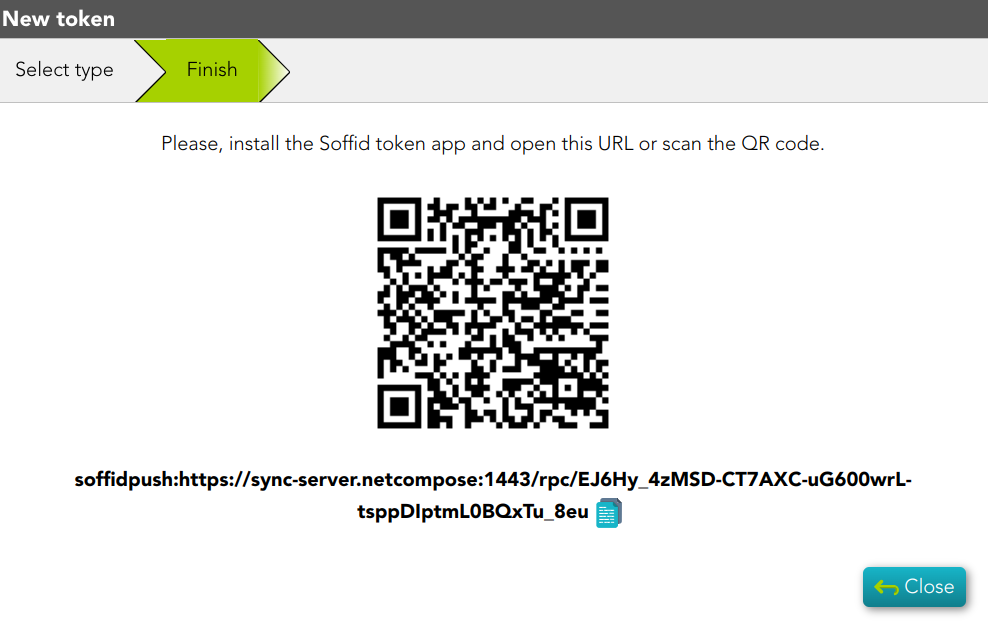
Soffid authenticator
If you select Soffid authenticator option, you will need to install the Soffid token app and then open the URL or scan the QR code with this app.
💻 Image
Backups
The backup functionality is available when the backup addon is loaded in the Soffid Console. By clicking on the Backups tab, Soffid will display all the snapshots available for the user, and you could restore what you need.
You can also check other available snapshots by clicking on the hamburger icon and a specific option. Those are the options:
Groups History
You can check all the group history changes for a specific user, and decide if you want to restore an earlier versión.
Accounts History
You can check all the account history changes for a specific user, and decide if you want to restore an earlier versión.
Roles history
You can check all the role history changes for a specific user, and decide if you want to restore an earlier versión.
Mail list history
You can check all the mail list history changes for a specific user, and decide if you want to restore an earlier version.
Download CSV file
Allows you to download a CSV file with the data of all backups.
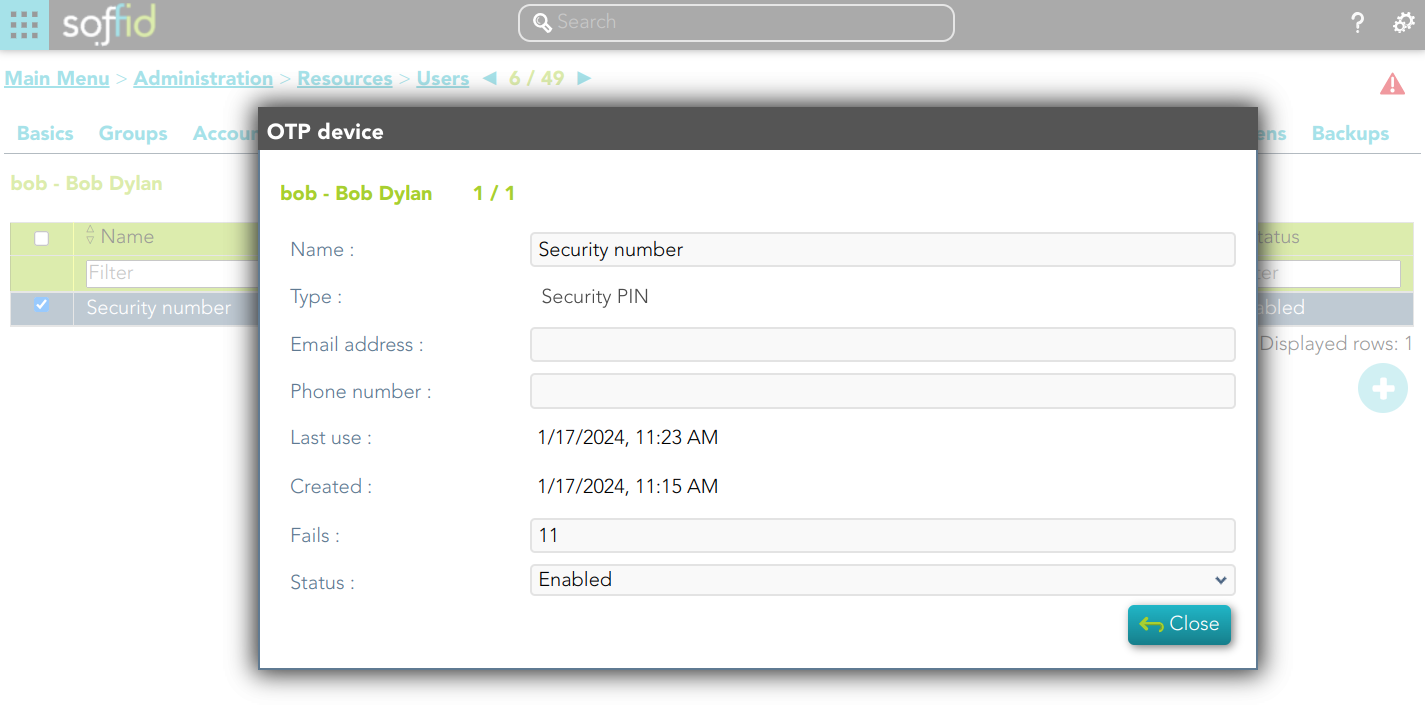
OTP devices
In the OTP devices tab, Soffid displays all the OTP devices configured by this user. For each OTP device, Soffid displays the info about the name, the created date, the last time used, and the status. Soffid allows you to manage all the OTP devices for each user.
By clicking on a record, Soffid shows OTP device details, including the failed number. It is also possible to change the status.
💻 Image
This option will only be available if the OTP addon is installed in the Soffid console.
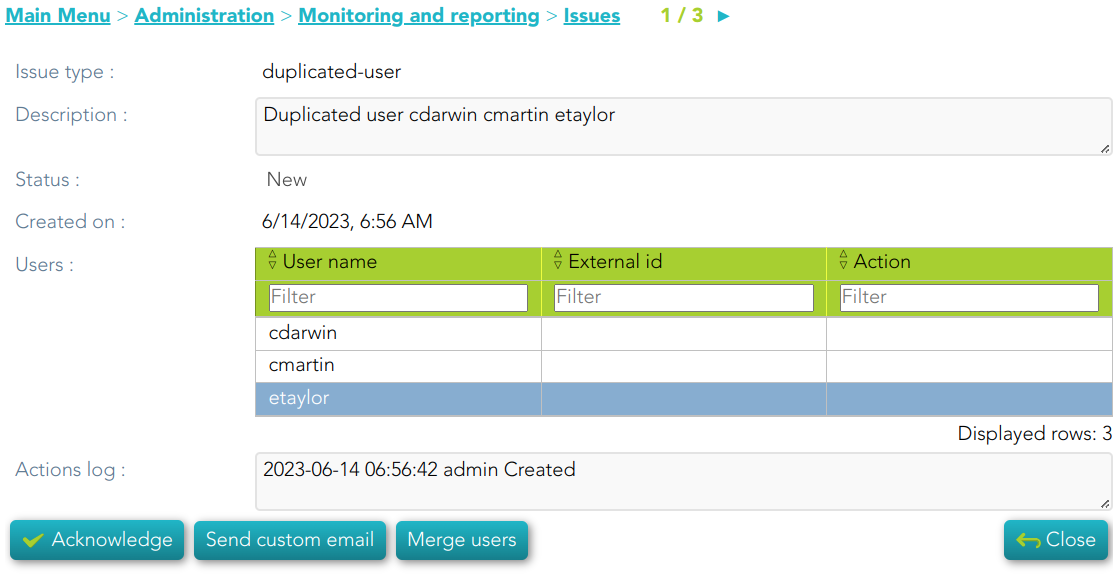
Issues
In the Issues tab, Soffid displays all the issues in which the user is involved. If you click one issue, Soffid will display the issue detail and will allow you to perform any available operation if you have the proper permissions to do that.
This option will only be available in Soffid >= 3.5.x
For more information, you can visit the Issue page.
Actions
Users query actions
|
Query |
Allows you to query users through different search systems, Quick, Basic and Advanced. |
|
Add or remove columns |
Allows you to show and hide columns in the table. You can also set the order in which the columns will be displayed. The selected columns and order will be saved for the next time Soffid displays the page to the user. |
|
Add new |
Allows you to add a new user in the system. You can choose that option on the hamburger menu or click the add button (+). To add a new user it will be mandatory to fill in the required fields |
|
Delete |
Allows you to remove one or more users by selecting one or more records and next clicking the button with the subtraction symbol (-).To perform that action, Soffid will ask you for confirmation, you could confirm or cancel the operation. |
|
Import |
Allows you to upload a CSV file with the user list to add or update users to Soffid. First, you need to pick up a CSV file, that CSV has to contain a specific configuration. Then you need to check the content to be loaded, it is allowed to choose if you want or not to load a specific attribute. And finally, you need to select the mappings for each column of the CSV file to import the data correctly and click the Import button. |
|
Download CSV file |
Allows you to download a CSV file with the basic information of all users. |
|
Bulk actions |
Allows massive operations to be performed on all system users. With that operation, updates can be made to any of the user's parameters. First of all, you must select the records that you want to update, once you have selected them, you must choose the bulk action on the hamburger icon. For more information visit the Bulk action page. |
|
Merge |
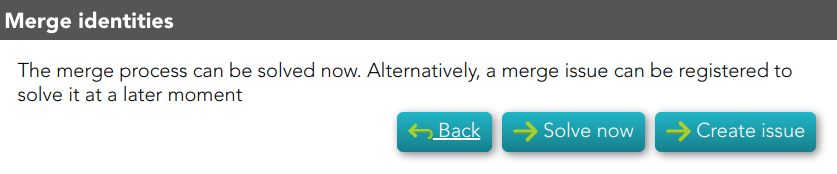
Allows you to merge two or more identities when you identify that is necessary. First of all, you must select the identities to merge. Second, you need to click the hamburger icon and select the merge action. Then Soffid will display a window where you can choose if you want to merge right now, if you want to create an issue, or if you want to quit without applying any changes. 💻 Image
💻 Image
💻 Image
|
User detail actions
| Apply changes |
Allows you to save the data of a new user or to update the data of a specific user. To save the data it will be mandatory to fill in the required fields. When you apply changes, automatically they will be forwarded to target systems. |
|
Delete |
Allows you to remove a specific user. You can choose that option on the hamburger icon. To perform that action, Soffid will ask you for confirmation, you could confirm or cancel the operation. |
|
Undo |
Allows you to quit without applying any changes. |
|
Audit |
Browse to the Audit page and display all the detailed actions performed over the user. It is allowed to filter the information displayed and also to download a CSV file with the audit information. |
|
Access logs |
Browse to the Logs page and display all the detailed logs about the user actions. It is allowed to filter the information displayed and also to download a CSV file with the logs information. |
|
Propagates the changes |
Allows you to propagate the user changes to the repository systems configured. It is only necessary when the task engine mode is configured as Manual, visit the smart engine setting page for more information. |
|
Refresh |
Allows you to refresh all the user information. |
Groups actions
Group query actions
|
Assign |
Allows you to add a new group membership. You can choose that option on the hamburger menu or click the add button (+). Then you need to select a group the user will belong to it. Next, you need to define, if it is necessary the membership properties. And finally, you need to apply changes. |
|
Delete |
Allows you to delete group membership. You can select one or more groups and next click the button with the subtraction symbol (-). To perform that action, Soffid will ask you for confirmation, you could confirm or cancel the operation. |
Group detail actions
|
Apply changes |
Allows you to save the updates of the group. |
|
Undo |
Allows you to quit without applying any changes. |
|
Delete |
Allows you to delete a group membership. To perform that action, Soffid will ask you for confirmation, you could confirm or cancel the operation. |
Accounts actions
Accounts query actions
|
Change password |
Allows you to change the password for the accounts of a password domain.
💻 Image
It will be mandatory the password complies with the Password policies defined for the domain. |
|
New Account |
Allows you to add a new account for a user and a specific target system. First of all, you need to select the target system, then Soffid will show the target system name and the account name. The account name could be updated, but always with an account name which no be already in use on the target system. Then you need to choose the account status and finally, you can set the system properties. That properties depend on the target system and do not be mandatory. |
Accounts detail actions
|
Delete |
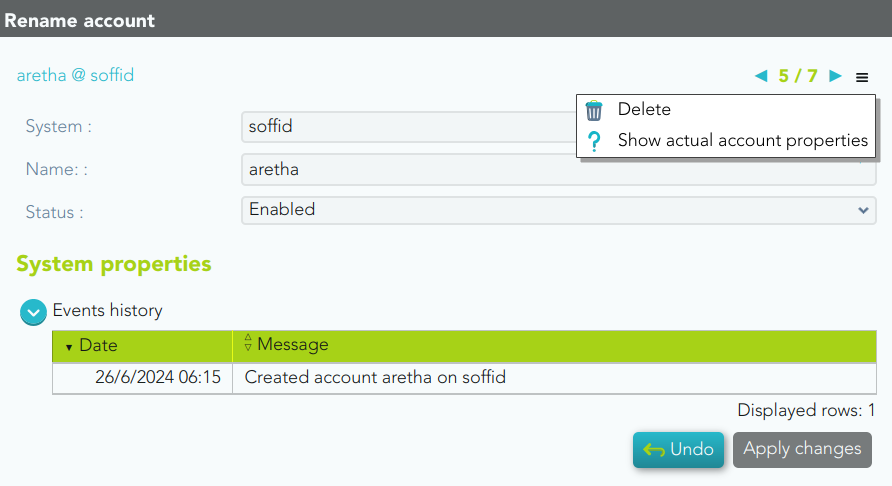
Once you are in the rename account modal, by clicking on the hamburger icon, you could choose the delete option. This option will delete the account selected. 💻 Image
|
|
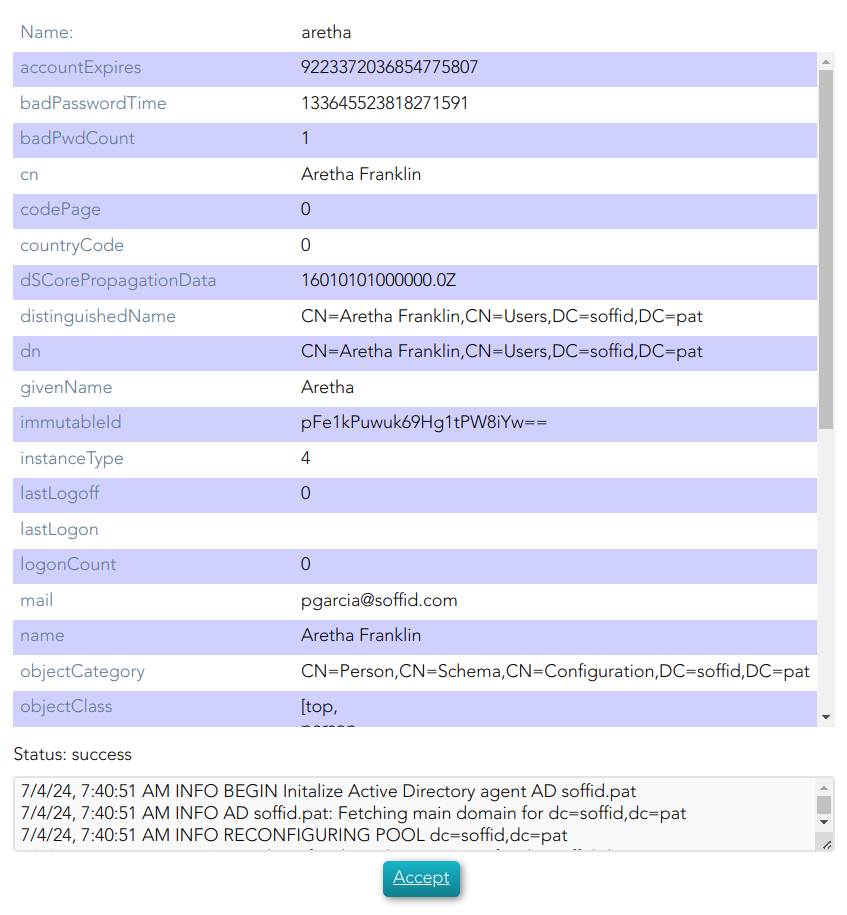
Show actual account properties |
Once you are in the rename account modal, by clicking on the hamburger icon, you could select this option. When you click this option, Soffid will display a modal with all the info about this account in the target system. 💻 Image
|
|
Apply changes |
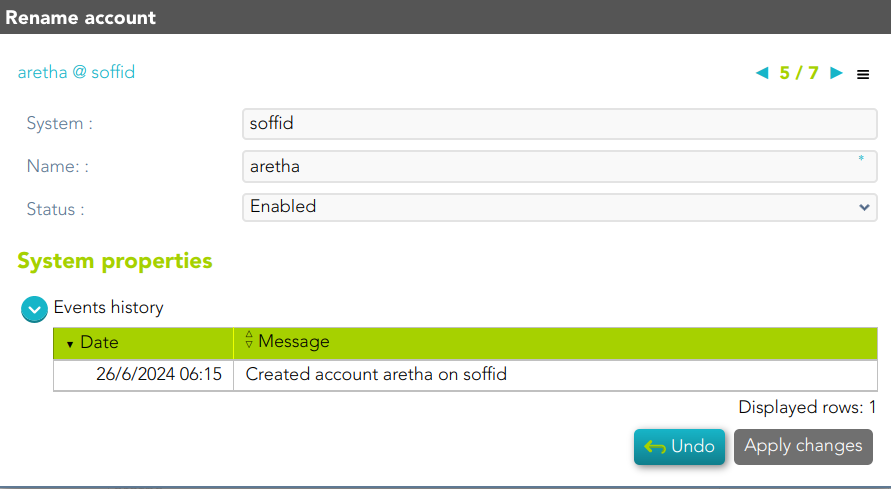
Allows you to save the updates of the account. You can change the name and status of the account. Also you can check the events history. 💻 Image
|
|
Undo |
Allows you to quit without applying any changes. |
Roles actions
Roles query actions
|
Assign |
Allows you to assign a new role to the user. You can choose that option on the hamburger menu or click the add button (+). Then you need to select a role from the role list. If it is necessary, the next step will be to set the scope. Then you need to check and fill in the membership properties. And finally, apply changes. |
|
Revoke |
Allows you to revoke one by one or to revoke some roles at the same time. To revoke some roles at the same time, you need to select the roles, and then click the button with the subtraction symbol (-). To revoke one role, you can click the role, and then Soffid will show a form with the details. Then you can click the delete button (trash icon). Soffid will ask you for confirmation to perform that action, you could confirm or cancel the operation. |
|
Import |
Allows you to upload a CSV file with the role list to assign permission. First, you need to pick up a CSV file, that CSV has to contain a specific configuration. Then you need to check the content to be loaded, it is allowed to choose if you want or not to load a specific attribute. And finally, you need to select the mappings for each column of the CSV file to import the data correctly and click the Import button. |
|
Download CSV file |
Allows you to download a CSV file with all the information about user roles. |
Role detail action
|
Assign |
Allows you to assign a new role to the user. You can choose that option on the hamburger menu or click the add button (+). Then you need to select a role from the role list. If it is necessary, the next step will be to set the scope. Then you need to check and fill in the membership properties. And finally, apply changes. |
|
Revoke |
Allows you to revoke a role. To revoke one role, you can click the role, and then Soffid will show a form with the details. Then you can click the delete button (trash icon). Soffid will ask you for confirmation to perform that action, you could confirm or cancel the operation. |
Sessions actions
|
Download CSV file |
Allows you to download a CSV file with all the information about sessions. |
User processes
|
Query |
Allows you to query the process info by browsing the process page. |
OTP devices action
|
Add |
Allows you to add a new OTP device. To add a new OTP device you need to click the add button (+), then Soffid will display a wizard to config the OTP device. First of all, you need select the OTP device Type and then Apply changes. |
|
Delete |
Allows you to delete one or more OTP devices for a specific user. To delete OTP devices first select the devices, then click on the subtract button (-), then Soffid will ask you to confirm or cancel the operation. |
|
Change Status |
Allows you to change the OTP device status. First of all, you need to click the proper OTP device, then change the status, and finally close the window. |
Tokens
|
Add |
Allows you to add a new token. To add a new token device you need to click the add button (+), then Soffid will display a wizard to config the token. First of all, you need select the token Type and then Apply changes. |
|
Delete |
Allows you to delete one or more token for a specific user. To delete token first select the token, then click on the subtract button (-), then Soffid will ask you to confirm or cancel the operation. |
Issues
|
Query |
Allows you to query the issues info by browsing the process page. |
|
Display Issue |
By clicking one Issue, Soffid will display the issue detail will allow you to perform any available operation if you have the proper permissions to do that |
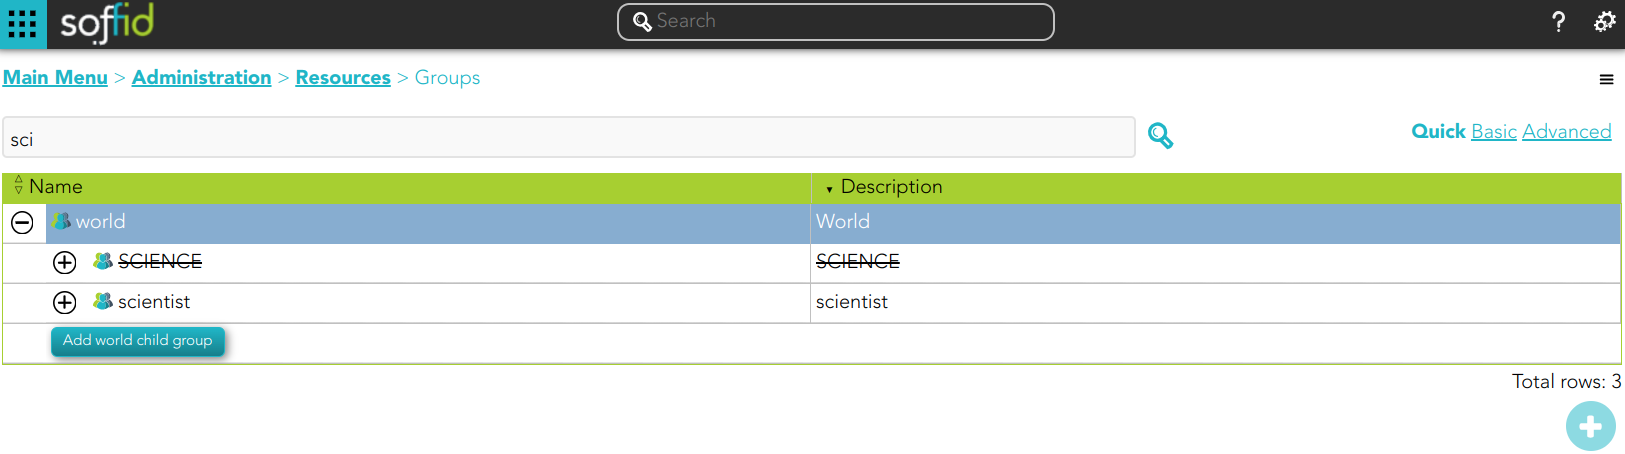
Groups
Description
Groups are a convenient way to apply policies to a collection of users. Groups allow administrator users to specify permission for multiple users in a quick and easy way. Groups are managed in a hierarchical way. A user can belong to a group, and that user will be assigned the roles of this group and all the roles that this group inherits from its parent.
Companies are organized in different business units, departments, or workgroups. In Soffid, they all are named as groups. Some systems, like Active Directory, use the groups to control or restrict access to resources. A Soffid Group is more like an Active Directory OU.
Screen overview
Related objects
Standard attributes
Basic
On the basic group tab, you can view all the group attributes. It is allowed to add new groups, and update or delete existing groups.
- Name: short name to identify the group. The group name must be unique.
- Description: a brief description of the group.
- Drive letter: if specified, a shared folder for this user will be created. This shared folder can be mounted on ESSO hosts by using a startup script.
- Parent group: name of the parent within the hierarchy. Only the root group doesn't have value. Be in mind the groups have a tree structure.
- Type: a group can be categorized by organizational unit types. You have more information about Group Type page.
- Drive server name: the server where the shared folders can be located.
- Disabled: allows you to enable and to disable the group. When a group is disabled, the group's role hierarchy is no longer available to the group's users.
💻 Image
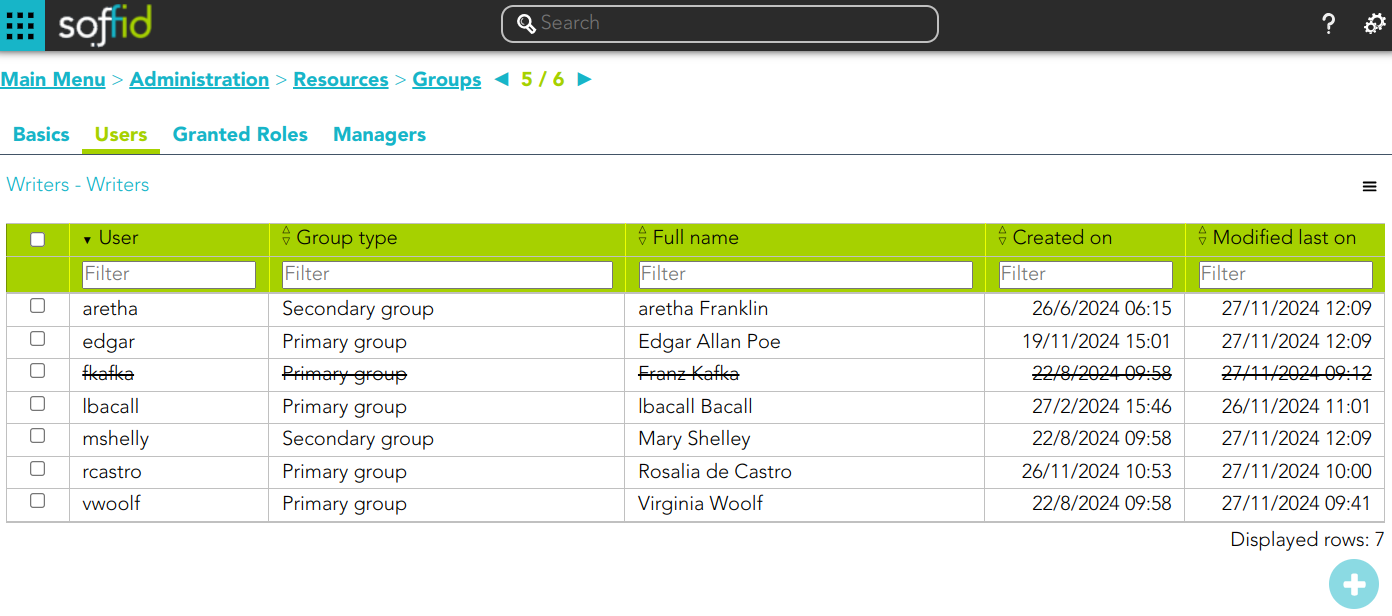
Users
Administrator users can manage the users who belong to the group. These users will have assigned all the permissions granted to that group and permissions inherited from its parent.
On the user's tab, you can add new users to the group by clicking the button with the add symbol (+), you must select the user to add, and select the membership properties.
It is also allowed to delete one or more users from a specific group, you can do it from the group membership details or by selecting one or more records from the list and clicking the button with the subtraction symbol (-).
Additionally, you can download a CSV file with the user's information and you can also upload a CSV file to add new users or update existing users.
💻 Image
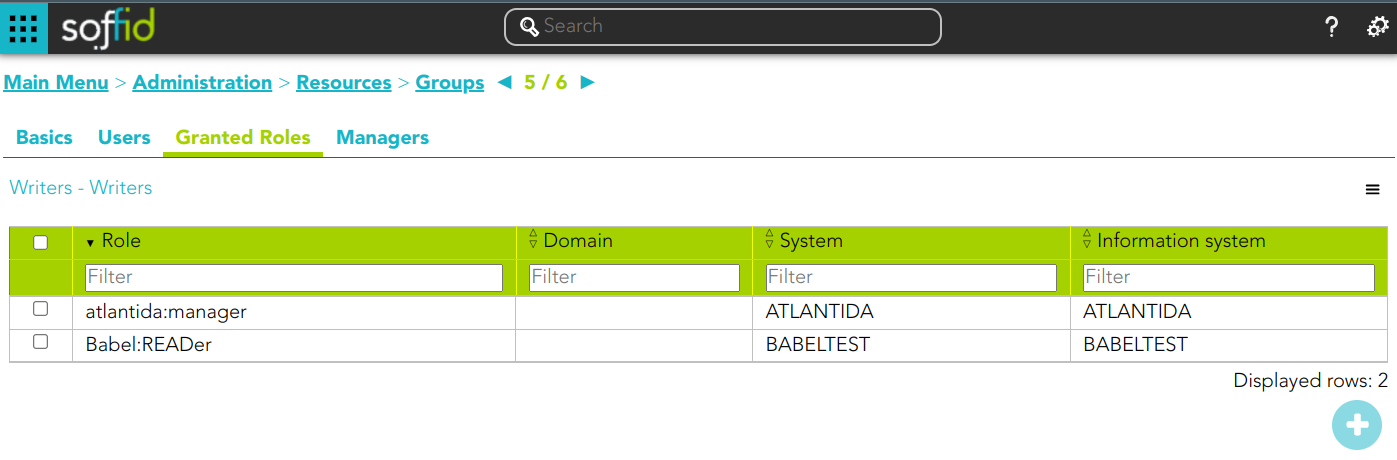
Granted roles
Administrator users can manage the permissions to a group, this is the way to establish an access policy to a collection of users. The users who belong to a group will inherit all the permissions granted of that group.
On the granted roles tab, you can assign or revoke roles to the group. To assign a new role, you must click the button with the add symbol (+), then select the role, in some cases specify the scope, and finally set membership properties. To revoke role, you can do it from the group membership detail or by selecting one or more records from the list and clicking the button with the subtraction symbol (-).
Additionally, you can download a CSV file with the granted roles information and you can also upload a CSV file to assign roles, modify or delete assigning roles.
💻 Image
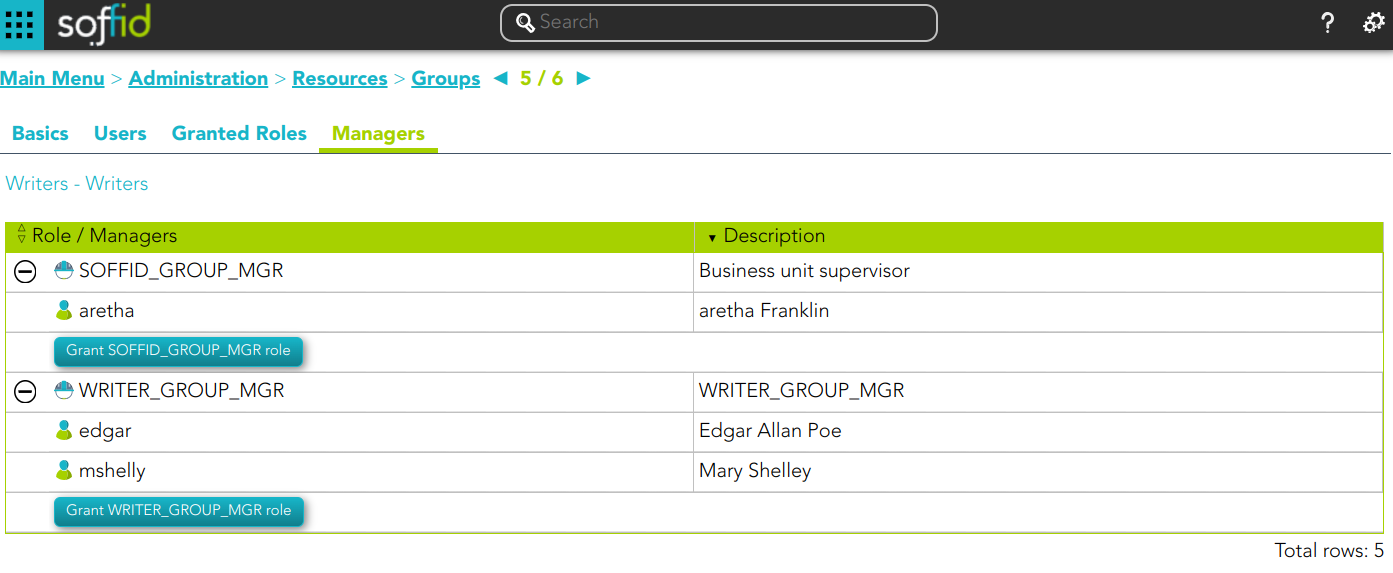
Managers
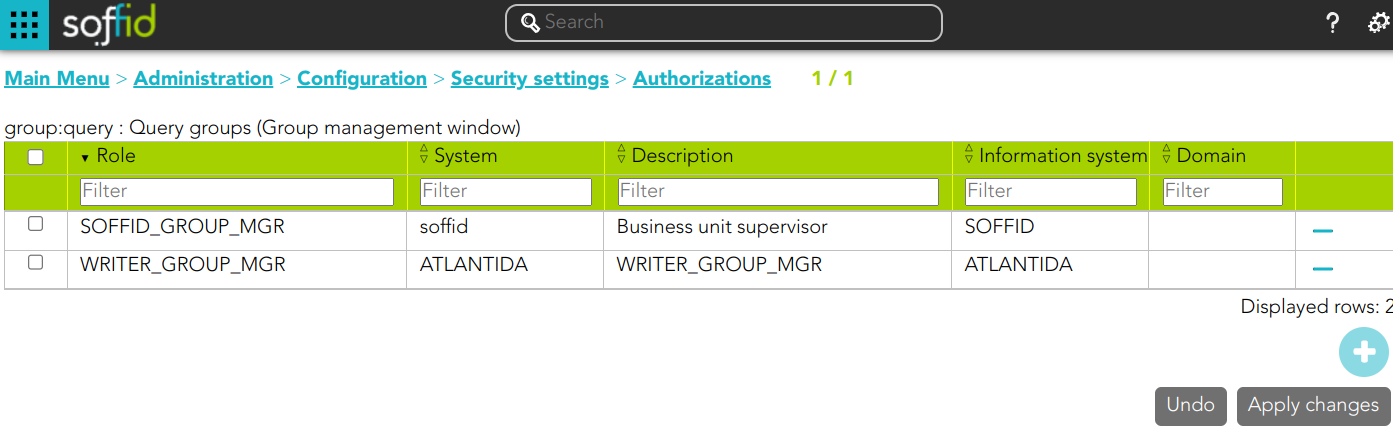
On the tab Managers, Soffid displays the Roles with Domain equals to Group and the proper authorization.
Here you can grant the role to one or more users. You can also assign the role to users on the Roles page or on the Users page. Users who have been assigned this role will be displayed in the Managers tab.
Be in mind, to query the information about the roles and users on the managers tab, it will be mandatory to give authorization to query users or groups, you must add the role to the authorization (user:query or group:query).
💻 Image
** Role
** Authorization
Actions
Group query actions
|
Query |
Allows you to query groups through different search systems, Quick, Basic and Advanced. |
|
Add or remove columns |
Allows you to show and hide columns in the table. |
|
Historical view |
Allows you to check all the group's historical data. If you click this option, Soffid will display a new modal window to manage the historical view. |
|
Add new |
Allows you to add a new group in the system. You can choose that option on the hamburger menu or clicking the add button (+). To add a new group it will be mandatory to fill in the required fields |
|
Add child group |
Allows you to add a child to a specific group. You can choose that option below the father group. To add a child it is necessary to fill in the required fields |
|
Import |
Allows you to upload a CSV file with the group list to add or update groups to Soffid. First, you need to pick up a CSV file, that CSV has to contain a specific configuration. Then you need to check the content to be loaded, it is allowed to choose if you want or not to load a specific attribute. And finally, you need to select the mappings for each column of the CSV file to import the data correctly and to click the Import button. |
|
Download CSV file |
Allows you to download a csv file with the basic information of all groups. |
Historical view
|
Switch to current view |
Allows you to come back to the current data view. |
|
Apply changes |
Once you have pickup the proper date at the date component, you can apply changes and Soffid will display all the group data at the selected date time. Then you can browse the Groups tree and check the information |
|
Undo |
Allows you to quit without applying any changes. |
Group detail actions
|
Apply changes |
Allows you to save the data of a new group or to update the data of a specific group. To save the data it will be mandatory to fill in the required fields |
|
Delete |
Allows you to remove a specific group. To perform that action, Soffid will ask you for confirmation, you could confirm or cancel the operation. |
|
Undo |
Allows you to quit without applying any changes. |
Users
|
Add or remove columns |
Allows you to show and hide columns in the table. |
|
Add new |
Allows you to add new user to a group. Fist of all, you need to select the user. Then you need to set the system properties. And finally you need to apply changes. |
|
Remove |
Allows you to delete one by one or to delete some users at the same time from a group . To delete some users at the same time, you need to select the users, and then click the button with the subtraction symbol (-). To delete one user, you can click the user, and then Soffid will display a form with the details. Then you can click the delete button (trash icon). Soffid will ask you for confirmation to perform that action, you could confirm or cancel the operation. |
|
Import |
Allows you to upload a CSV file with the user list to add to the group. First, you need to pick up a CSV file, that CSV has to contain a specific configuration. Then you need to check the content to be loaded, it is allowed to choose if you want or not to load a specific attribute. And finally, you need to select the mappings for each column of the CSV file to import the data correctly and to click the Import button. |
|
Download CSV file |
Allows you to download a CSV file with all the information about users. |
Granted roles
|
Add or remove columns |
Allows you to show and hide columns in the table. |
|
Assign role |
Allows you to assign a role to the group. You can choose that option on the hamburger menu or click the add button (+). Then you need to select a role from the role list. If it is necessary, the next step will be to set the scope. Then you need to check and fill in the membership properties. And finally, apply changes. |
|
Revoke role |
Allows you to revoke one by one or to revoke some roles at the same time. To revoke some roles at the same time, you need to select the roles, and then click the button with the subtraction symbol (-). To revoke one role, you can click the role, and then Soffid will show a form with the details. Then you can click the delete button (trash icon). Soffid will ask you for confirmation to perform that action, you could confirm or cancel the operation. |
|
Import |
Allows you to upload a CSV file with the role list to assign permission. First, you need to pick up a CSV file, that CSV has to contain a specific configuration. Then you need to check the content to be loaded, it is allowed to choose if you want or not to load a specific attribute. And finally, you need to select the mappings for each column of the CSV file to import the data correctly and click the Import button. |
|
Download CSV file |
Allows you to download a CSV file with all the information about roles assigned to the group. |
Managers
|
Grant <ROLE_NAME> role |
Allows you to grant the role, <ROLE_NAME>, to one or more users. You need to click on the "Grant <ROLE_NAME> role", under the role you want to grant. Then, Soffid will display a modal window that allows you to search for the users. Here you are able to write the user name and select it to grant the role. Finally, you need to accept by clicking on the "Accept" button. If you click on the "Cancel" button, no changes will be applied. |
Accounts
Description
An account is the way an user is presented on a target system. There can be user accounts as well as system-purpose accounts.
An account belongs to a system and that account can have specific permissions assigned to it. An account must have defined the account type, that is if the account is a single user, privileged, shared, or unmanaged.
The password policy is also mandatory to create an account. That password policy determines the conditions that the password must meet.
It is allowed to set a password for an account, which can be a generated password by the system, or a password set by the administrator user. That password must comply with the password policies defined. When the account is unmanaged, if the password change, it will not be sent to the target system.
The account can be displayed in black or gray color. The gray color is used to indicate that the account is unmanaged, that is because the agent is disconnected or because the agent is in Read-Only Mode.
Screen overview
Related objects
An account is related, in Soffid, to other objects:
- User: users related to this account.
- Groups: groups to which the account belongs.
- Roles: the permissions that this account has associated with the system in which it is used. They can be assigned or revoked by users with administrator privileges.
- System: the environment in which that account is used (AD, Exchange, etc).
Standard attributes
Basic
On the basic account tab, you can view all the account attributes. It is allowed to add new accounts, update or delete existing accounts and other options.
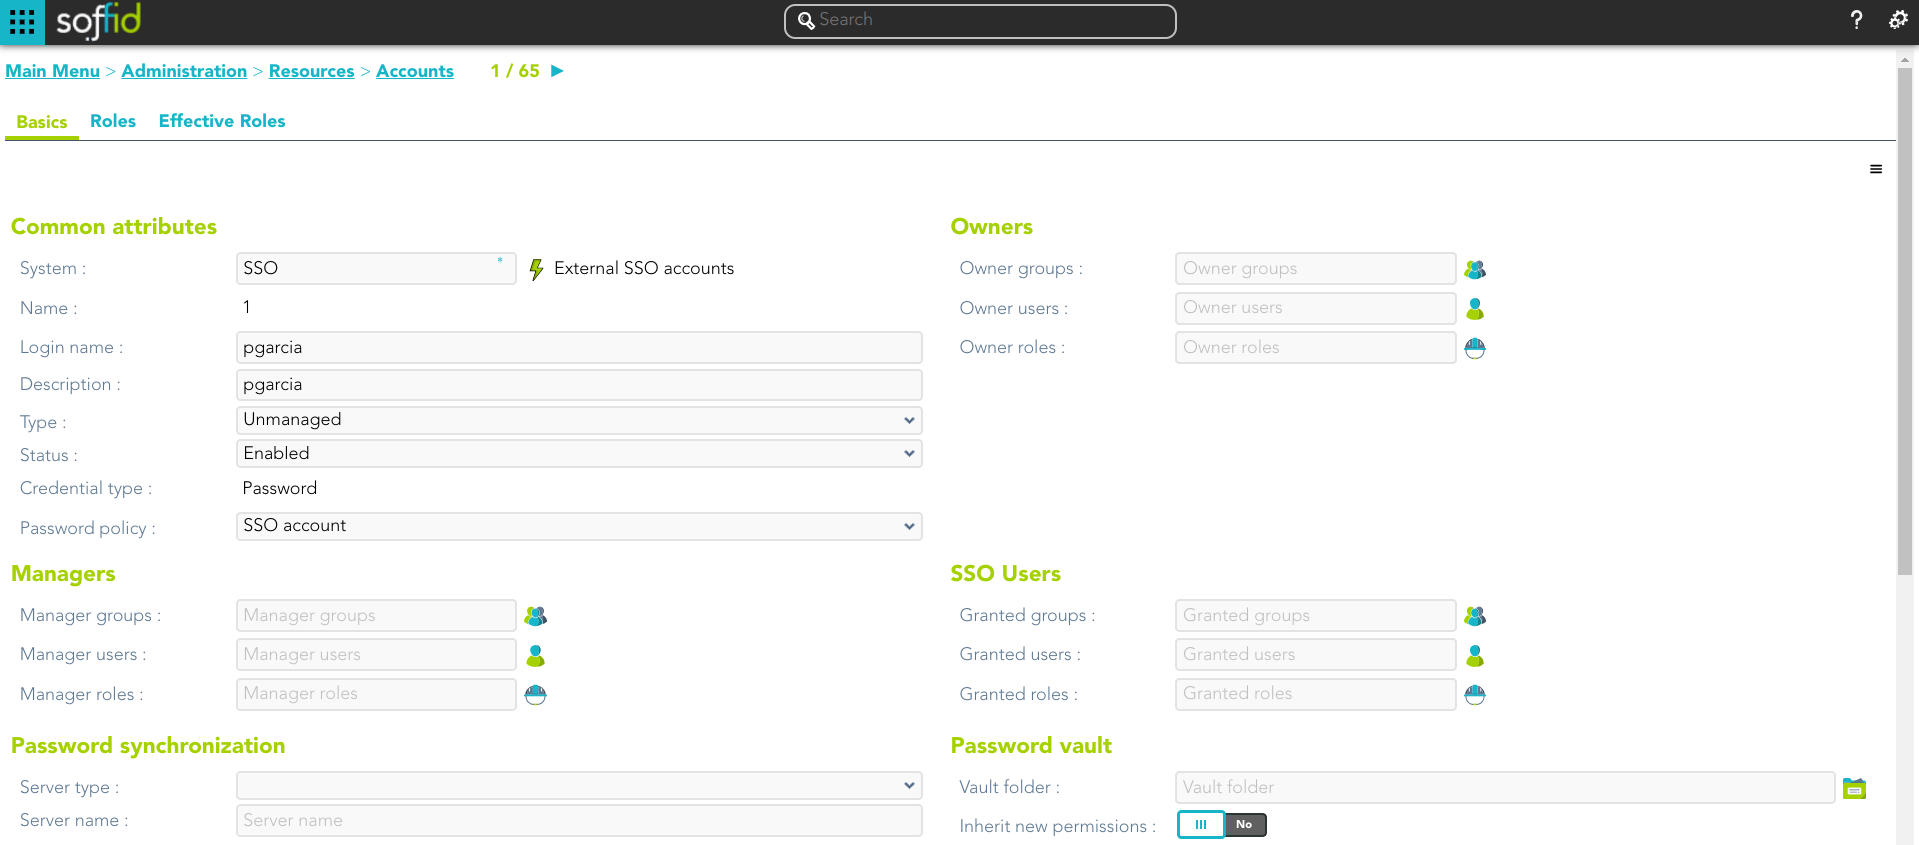
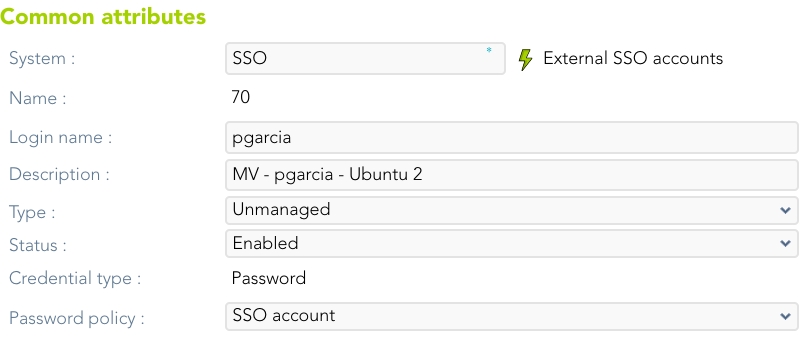
Commons attributes
- System: target system to which the account will be connected. When SSO is the system selected, the account name is assigned by Soffid, that is because SSO is a multi-system connector and can be many accounts with the same login name.
- Name: name used to identify the account.
- Description: plain text with information about the account.
- Type: there are four kinds of accounts:
- Single user account: accounts should normally be user accounts and bound to a single user. We can see user accounts on the user management screen, and will mostly be created by Soffid.
- Shared accounts: these accounts are shared among multiple users. They have an access control list to prevent unauthorized usage. Will be granted to users, groups or roles. Passwords on shared accounts might be set by operators or by the user. It depends on the password policy definition. A shared account could have related services.
- High privilege accounts: shared among users, but only one user possesses it at one time. Through self-service portal, a high privilege account owner can check-in and check-out them. Will be granted to users, groups or roles. Passwords on these accounts will be set only by the user using the self-service portal. The user can set it for a period of time. After that, the system will change the password by a temporary one.
- Unmanaged accounts: ignored by Soffid. They can be populated based on existing system accounts. Soffid will be able track any changes applied to this type of accounts on the managed system, but Soffid will not apply any change to the actual system. You should have a limited number of unmanaged accounts, but they are extremely useful during deployment phase.
- Credential type: this field will be available when the system is filled with the SSO option.
- Password: this is the default value. This option will allow you to set the account password.
- SSH key: this option will allow you to add a SSH key. This SSH key could be an existing key or a generated new key.
- Kubernetes key: this option will allow you to enter a Yaml descriptor to configure the access.
- Status:
- Enabled: the account can be used by the user. Soffid engine will disable it when the user does not match the access requirement policy.
- Manually enabled: the account can be used by the user. Soffid engine will keep it enabled, even when the user does not match the access requirement policy.
- Disabled: the account cannot be used by the user. Soffid engine will enable it when the user does matches the access requirement policy.
- Manually enabled: the account cannot be used by the user. Soffid engine will keep it disabled, even when the user matches the access requirement policy.
- Removed: the account no longer exists in the target system, but its image is kept in Soffid for audit purposes.
- Locked: the account is locked when a user tries to access with a fail password too many times (5 times). The account will be enabled in a specific period of time (5 minutes).
- Archived:
- Password policy: the policy applied to this account. It is mandatory select a password policy. You can see more information on the User Type and Password policies pages.
💻 Image
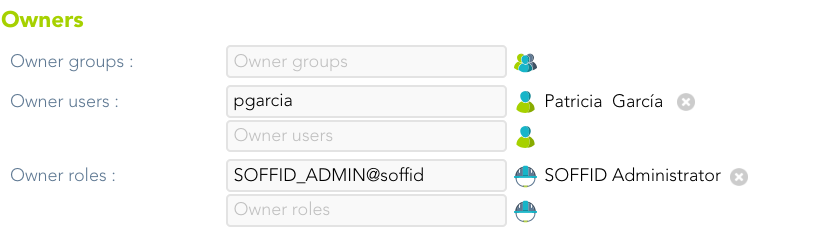
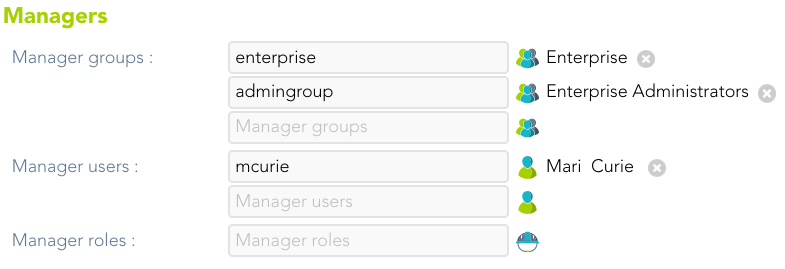
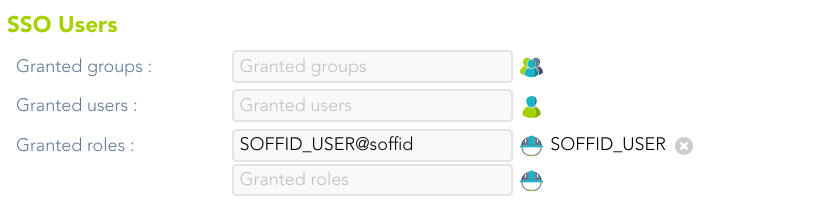
Owners, Managers, and SSO users
Specify the list of users authorized to use this account. For accounts of type "single user", only one user can be specified. Other accounts can have more than one user. The users that can use this account can be specified either directly, by entering the user name, or indirectly, by entering a group or role name. At the latest, any user having that group or role will automatically be entitled to use this account.
There are three access levels for each account and user:
- SSO User: can use it by means of the SSO or PAM engines. They cannot change their password, not even through single sign on engine.
- Manager: can use it, and set or query the password (using self-service portal), depending on the password policy restriction.
- Owner: can use it, modify the access control list, and set or query the password sing self-service portal or single sign-on engine.
💻 Image
Password vault
- Vault folder: personal or shared folder, depending on the account type, in which account data are stored.
- Inherit new permissions: determines if the account will inherit the permissions granted to the folder that contains it.
💻 Image

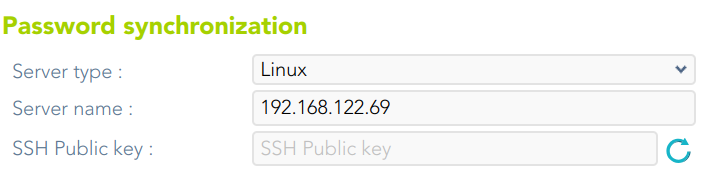
Password synchronization
- Server type:
- Linux
- Windows
- Database
- Server name
- SSH Public key
💻 Image
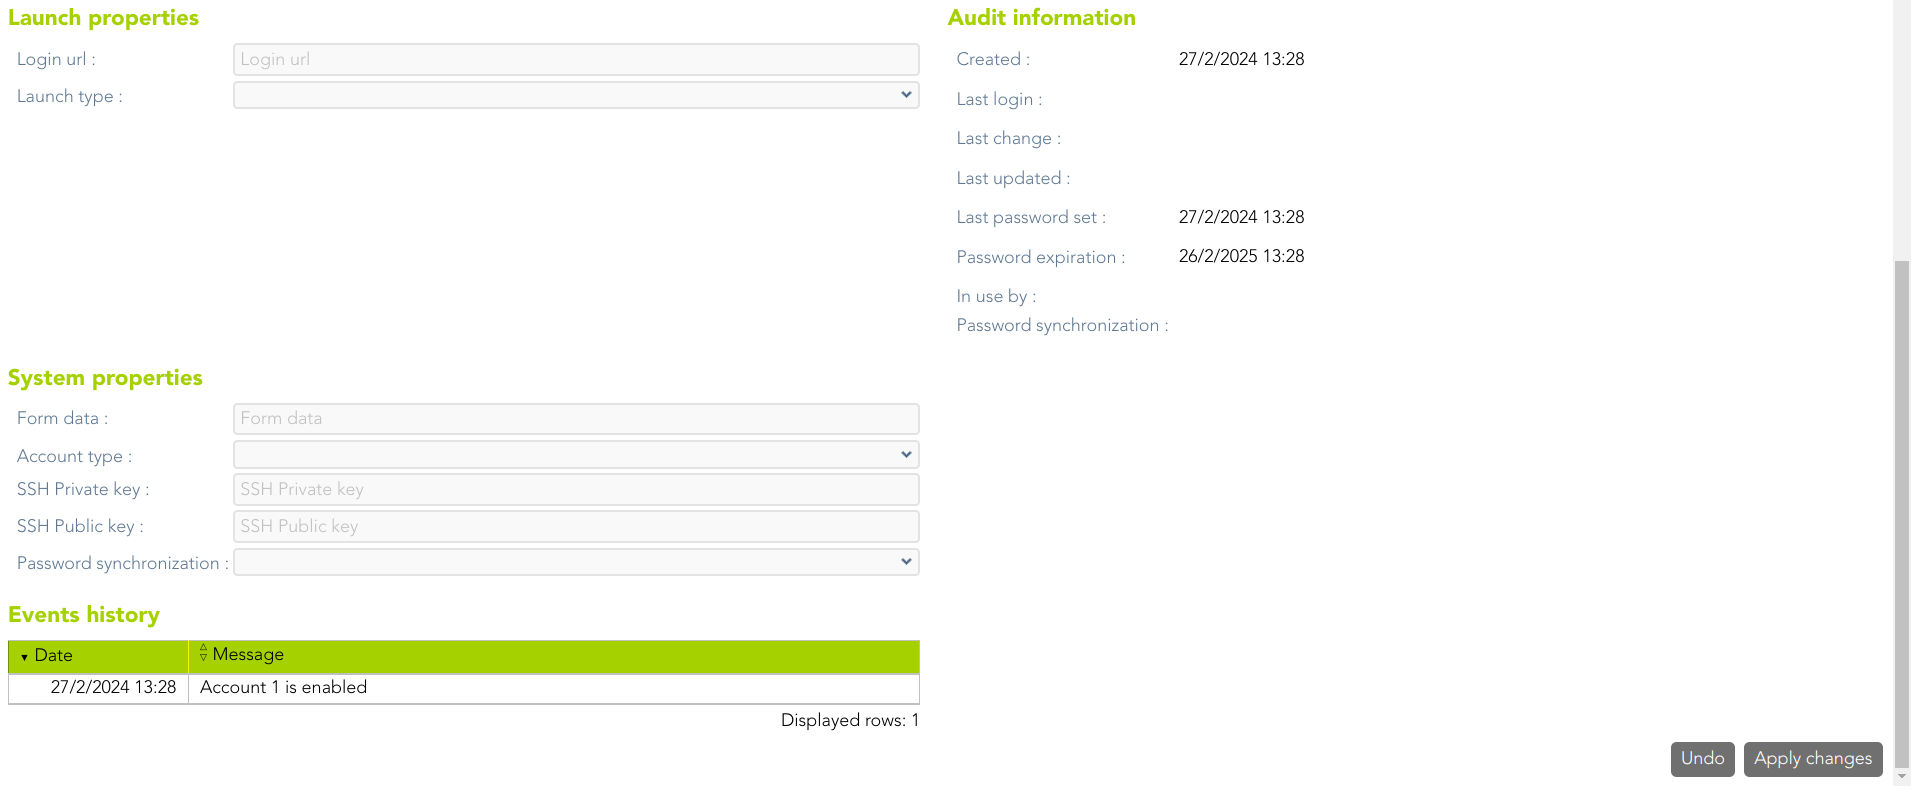
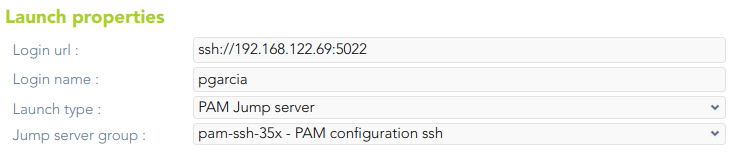
Launch properties
Defines the properties to connect to the target system.
- Login URL: URL to connect. You can add the port when you need it
- Login name: account name to connect.
- Launch type: connection type.
- Simple
- WebSSO
- PAM Jump server: it is mandatory to select the Jump server group.
💻 Image
Audit information
- Created on: account creation date.
- Last login: last registered access.
- Last updated: last modified.
- Last password set: date of last password change.
- Password expiration: password expiry date.
- In use by: account owner
- Password synchronization.
System properties
- SSH Private key: private key that establishes trust to be able to access the system without requiring a password.
- SSH Public key: public key that establishes trust to be able to access the system without requiring a password.
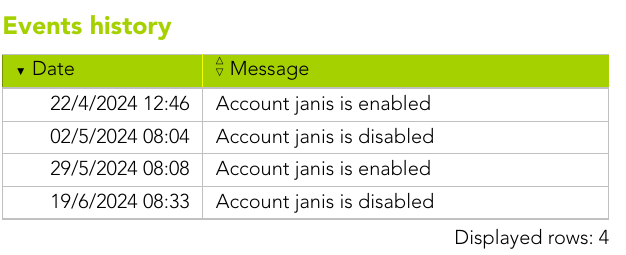
Events history
List of events on this account
💻 Image
Services
List of services on this account. The account type must be shared to view those services. All these services appear after agent reconciliation.
💻 Image
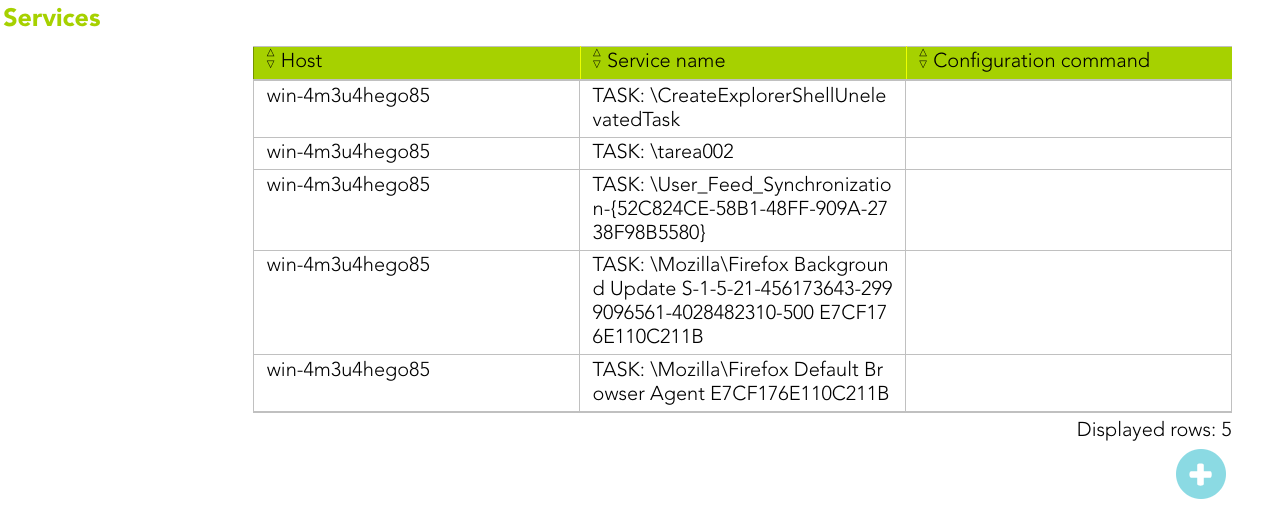
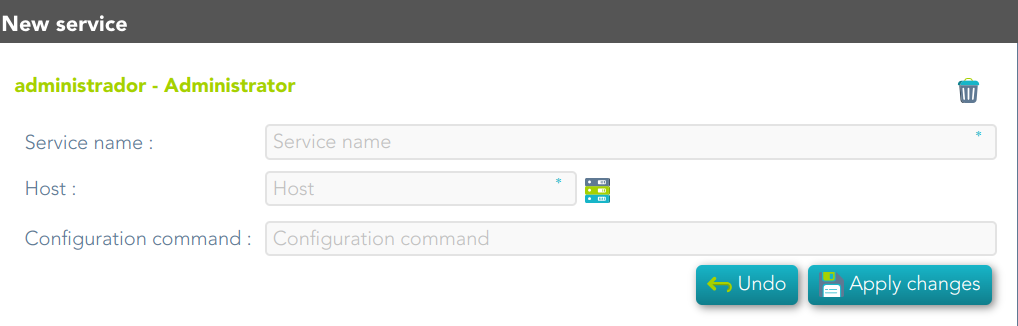
Soffid allows you to manage the existing services, you can add, update or remove services as well. This makes sense in the case of Linux machines.
💻 Image
Roles
A role is a collection of permissions that can be granted.
On the roles tab, you can view the roles assigned to the account, it is shown information about the role name, description, application or start (and, if proceed, end) date of the role assignment.
You can also assign roles to the account, you can click the add symbol (+), select the role that you want to assign, depending on the role you must fill the scope, and finally set memberships properties.
It is also possible to revoke roles to the account from the entitlement details or by selecting one or more records from the list and clicking the button with the subtraction symbol (-).
By clicking on a record, it is shown the detail role assignment information.
Additionally, you can download a CSV file with the roles information and you can also upload a CSV file to assign or revoke roles.
💻 Image
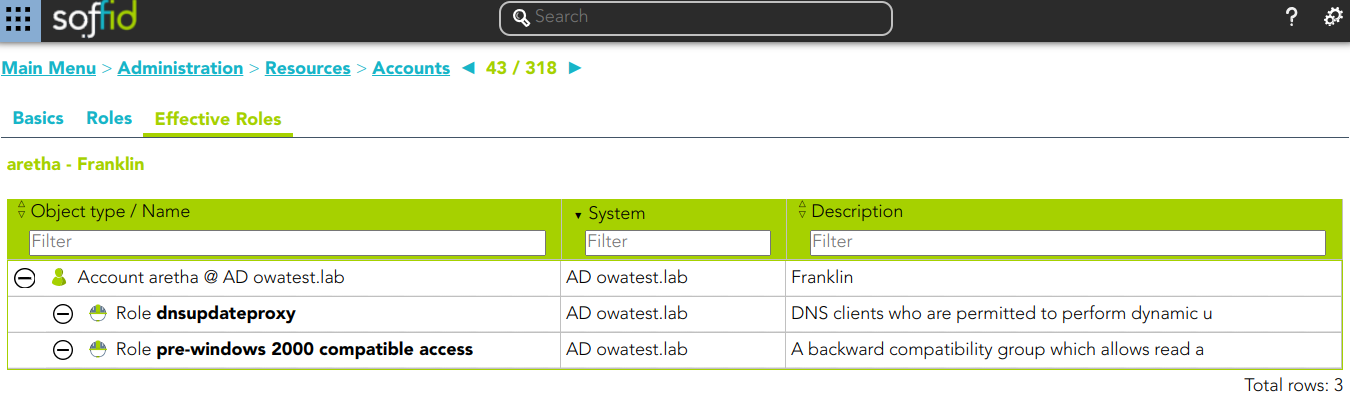
Effective roles
Hierarchy of permissions assigned to or inherited.
This screen details the effective roles for the selected account.
- By direct assignment of the role: when you assign a role to an account, you are assigning to the account all the permissions defined for that role.
- By belonging to a group: when you add a user to a group, the user will have all the roles assigned to the group.
- By rules defined in the system: when a rule is satisfied for a user, the system assigns the roles defined in the rule to the user.
💻 Image
Actions
Account query actions
|
Query |
Allows you to query accounts through different search systems, Quick, Basic and Advanced. |
|
Add or remove columns |
Allows you to show and hide columns in the table. You can also set the order in which the columns will be displayed. The selected columns and order will be saved for the next time Soffid displays the page to the user. |
|
Add new |
Allows you to add a new account in the system. You can choose that option on the hamburger icon or click the add button (+).To add a new account it will be mandatory to fill in the required fields |
|
Delete |
Allows you to remove one or more accounts by selecting one or more records and next clicking the button with the subtraction symbol (-).To perform that action, Soffid will ask you for confirmation, you could confirm or cancel the operation. |
|
Download CSV file |
Allows you to download a CSV file with the basic information of all accounts. |
|
Bulk actions |
Allows massive operations to be performed on all system accounts. With that operation, updates can be made to any of the account's parameters. First of all, you must select the records that you want to update, once you have selected them, you must choose the bulk action on the hamburger icon. For more information visit the Bulk action page. |
Account detail actions
| Apply changes |
Allows you to save the data of a new account or to update the data of a specific account. To save the data it will be mandatory to fill in the required fields |
|
Delete |
Allow you to remove the account. You can choose that option on the hamburger icon To perform that action, Soffid will ask you for confirmation, you could confirm or cancel the operation. |
|
Undo |
Allows you to quit without applying any changes. |
|
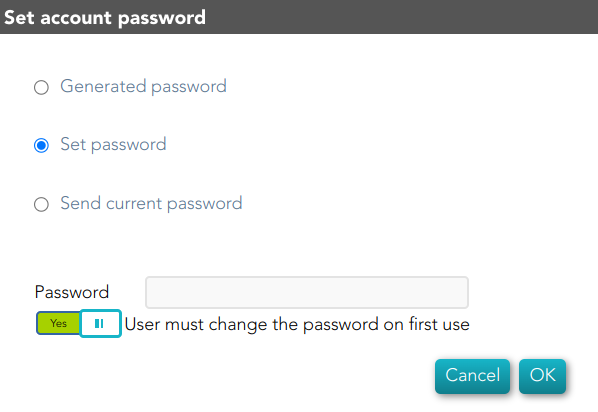
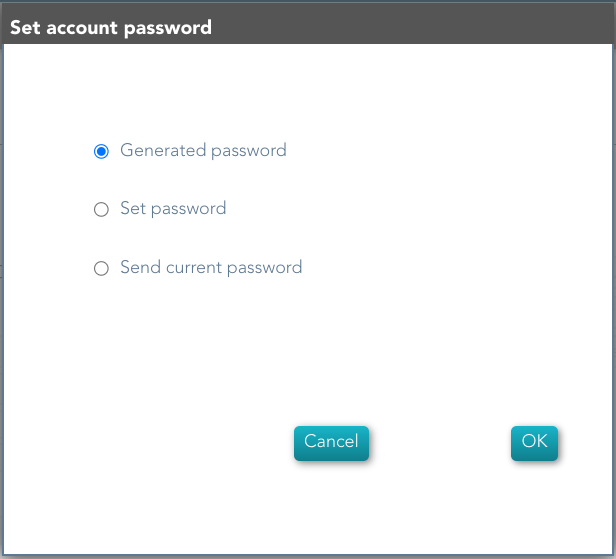
Set password |
This option depends on the credential type selected. Password:
💻 Image
SSH key:
💻 Image
Kubernetes key:
💻 Image
|
|
Show actual account properties |
Display the account attributes at the target system. To perform that action, Soffid needs to connect with the target system and get the account attributes that will be shown. |


Roles
|
Assign Role |
Allows you to assign a new role to the account. You can choose that option on the hamburger menu or click the add button (+). Then you need to select a role from the role list. If it is necessary, the next step will be to set the scope. Then you need to check and fill in the membership properties. And finally, apply changes. |
|
Revoke Role |
Allows you to revoke one by one or to revoke some roles at the same time. To revoke some roles at the same time, you need to select the roles, and then click the button with the subtraction symbol (-). To revoke one role, you can click the role, and then Soffid will show a form with the details. Then you can click the delete button (trash icon). Soffid will ask you for confirmation to perform that action, you could confirm or cancel the operation. |
|
Import |
Allows you to upload a CSV file with the role list to assign permission. First, you need to pick up a CSV file, that CSV has to contain a specific configuration. Then you need to check the content to be loaded, it is allowed to choose if you want or not load a specific attribute. And finally, you need to select the mappings for each column of the CSV file to import the data correctly and to click the Import button. |
|
Download CSV file |
Allows you to download a CSV file with all the information about account roles. |
Roles
Description
Soffid allows you to create roles to specify permissions that can be assigned to a user, a group, or an account. These permissions determine what operations are allowed on a resource. You can use roles to delegate access to users, applications, or services. The main goal is to achieve optimal security administration.
Roles can be defined at different levels:
- Organizational permissions.
- Application permissions.
- Low-level permissions.
When needed, generic roles can be created. When such a role is granted to any user, it is converted into a specific role by specifying an organization unit, information system, or a specific value. So, for instance, a generic emergency coordinator role can be created. The master emergency coordinator will have this role granted for the whole organization, while a remote office emergency coordinator will have this role granted for his single unit.
Note that a role can belong to an information system with a defined role definition process.
Screen overview
Related objects
Standard attributes
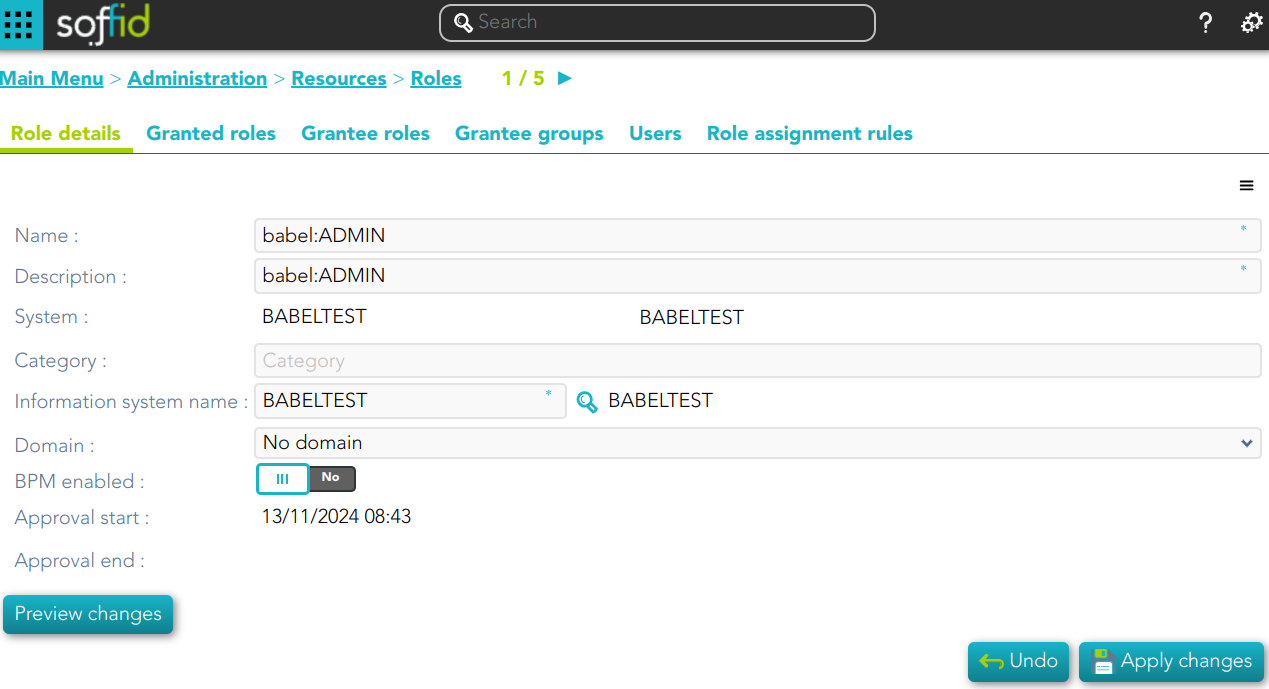
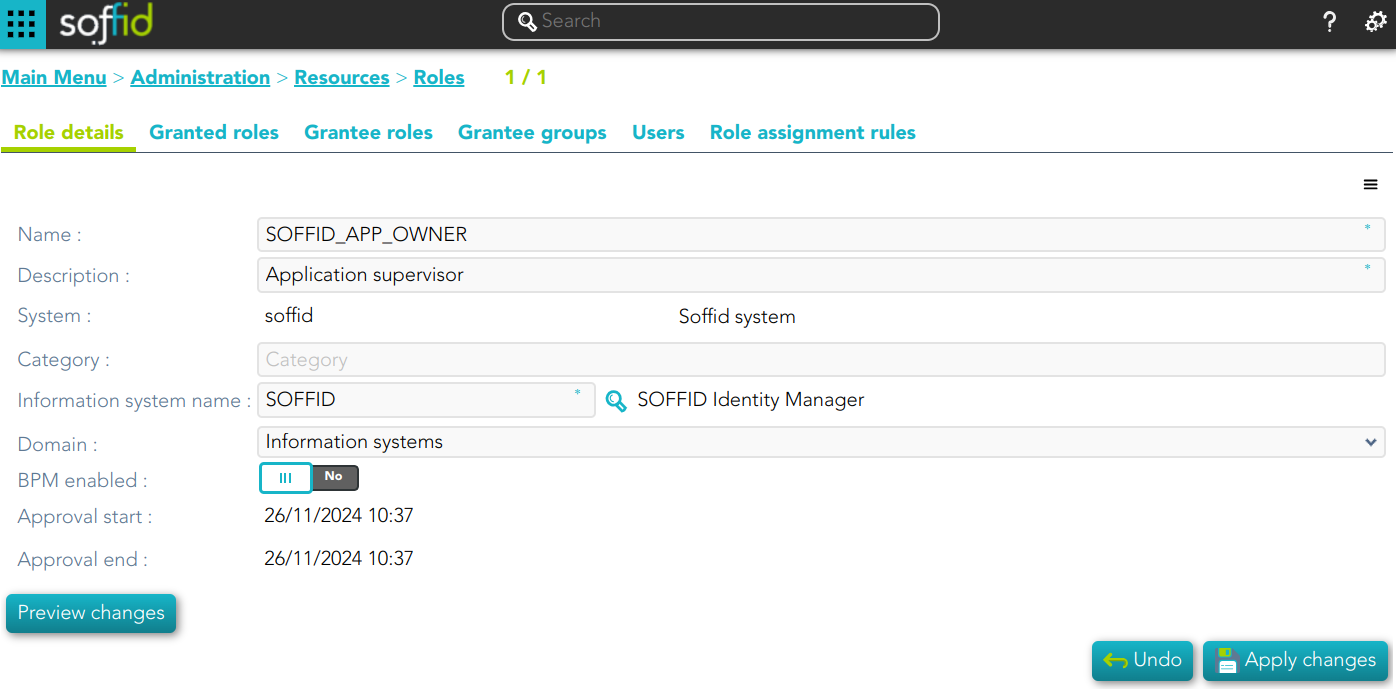
Role detail
- Name: name used to identify the role
- Description: detailed role description.
- System: information storage system from a technical point of view (active directory, database, CSV, ...).
- Category
- Information system name: asset or application, from a functional point of view, on which the permissions are granted or revoked.
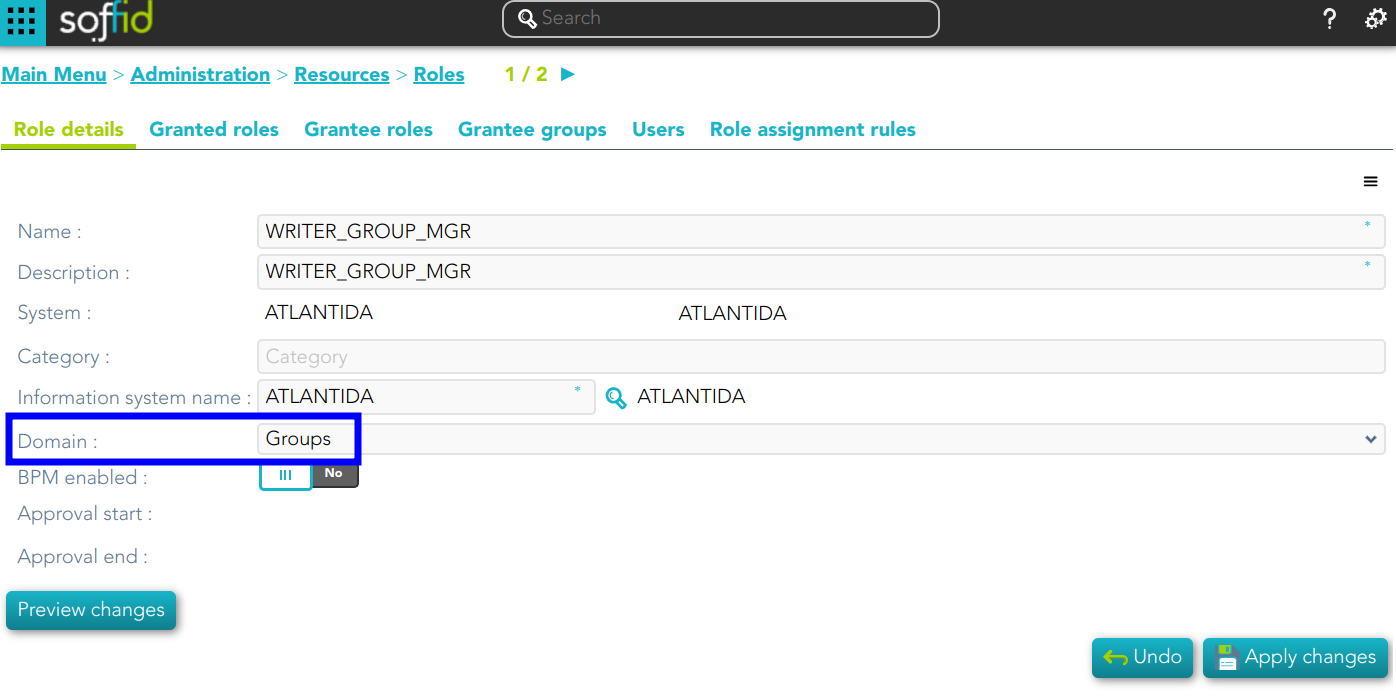
- Domain: you can set a limitation of the role scope by selecting the domain. Initially, there are two domains defined, Groups and Information Systems. Soffid allows you to add more domains. (*1) (*2)
- BPM enabled: if you check this option (value selected is Yes) this role will be available in the Permissions management workflows.
- Approval start: at this date, Soffid will connect to the system and will assign the role. If there is no approval start, it will be assigned at the moment.
- Apploval end: at this date, Soffid will connect to the system and will revoke the role.
Domain example (*1)
First, you can define the scope for one specific Role, for instance, you define role manager in Soffid System, with the scope Groups:
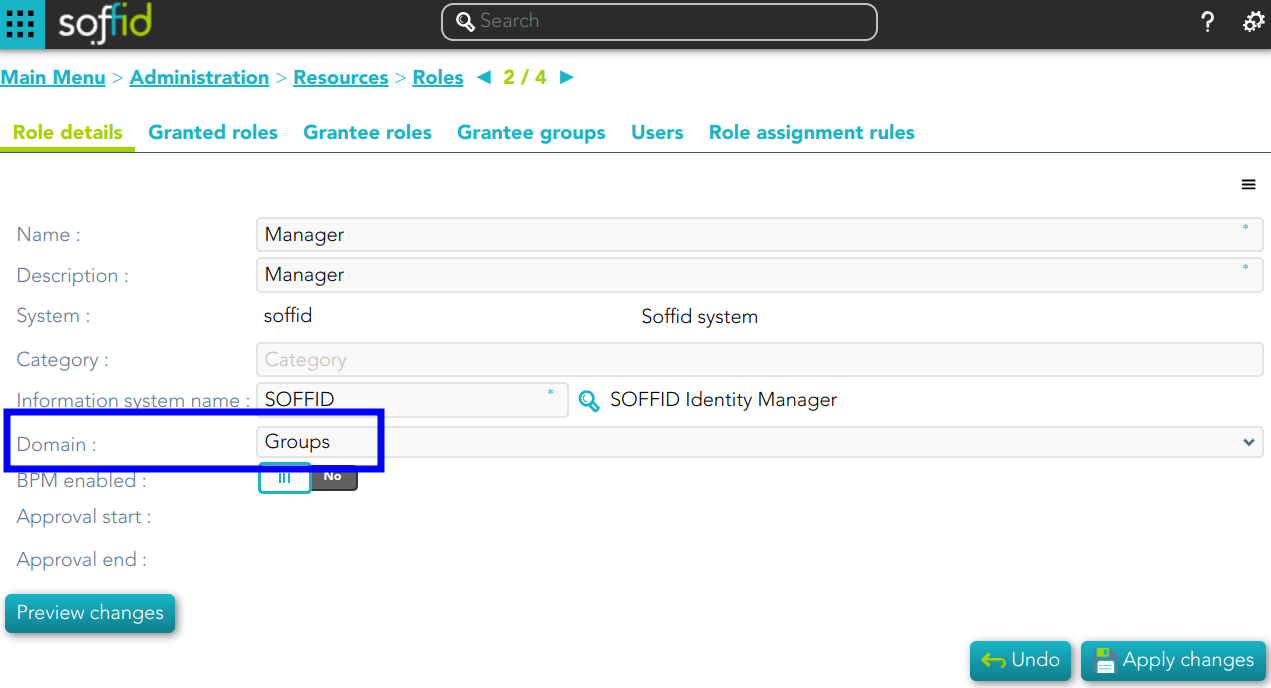
Then, you can assign this role to one or more users. To do this you must indicate the scope (can be one or more scoped):
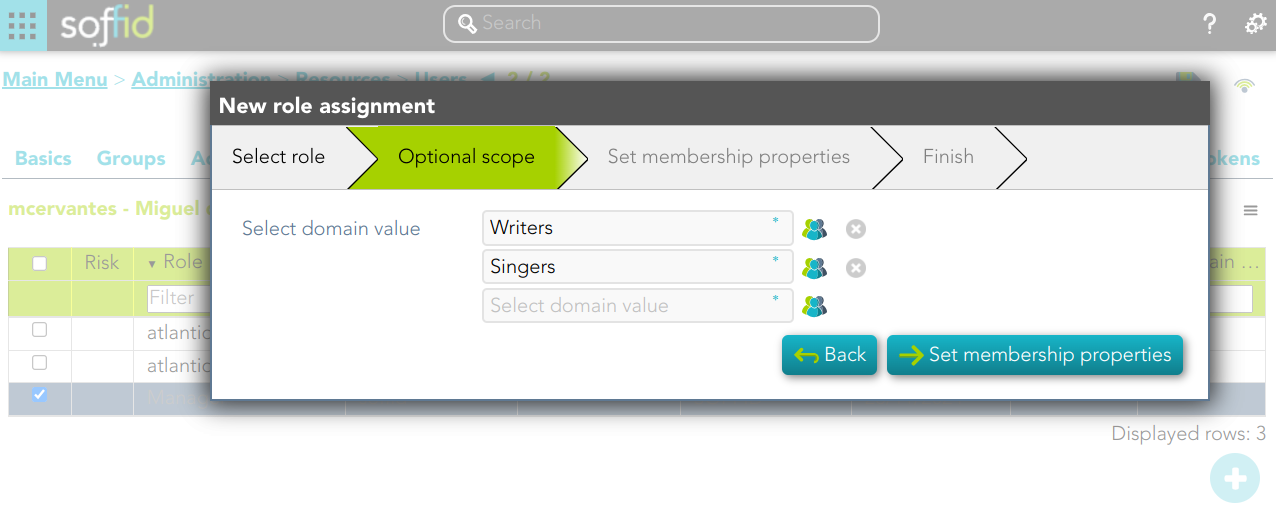
So the user will have the role in the scopes indicated:

If you try to assign the role without domain, this error will be displayed:

Domain example (*2)
You can define the scope for one specific Role, for instance, you define role manager in Soffid System, with the scope Information Systems:
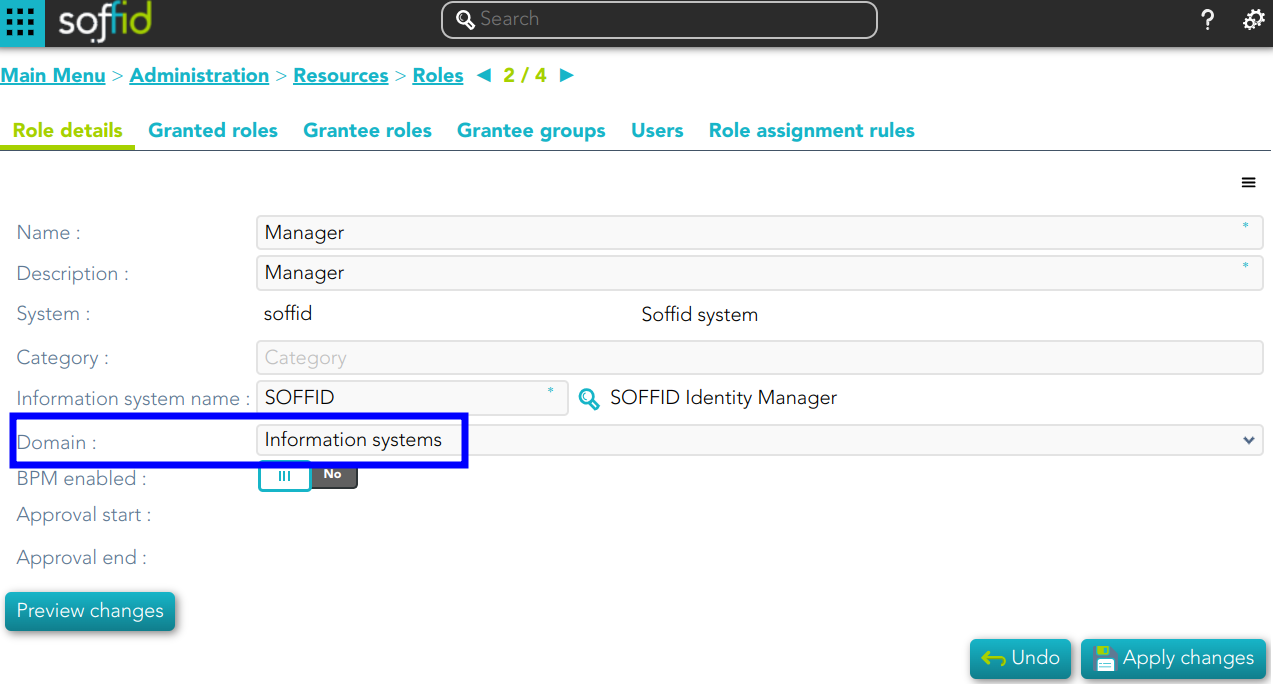
Then, you can assign this role to one or more users. To do this you must indicate the scope (can be one or more scoped):
So the user will have the role in the scopes indicated:
If you try to assign the role without domain, this error will be displayed:
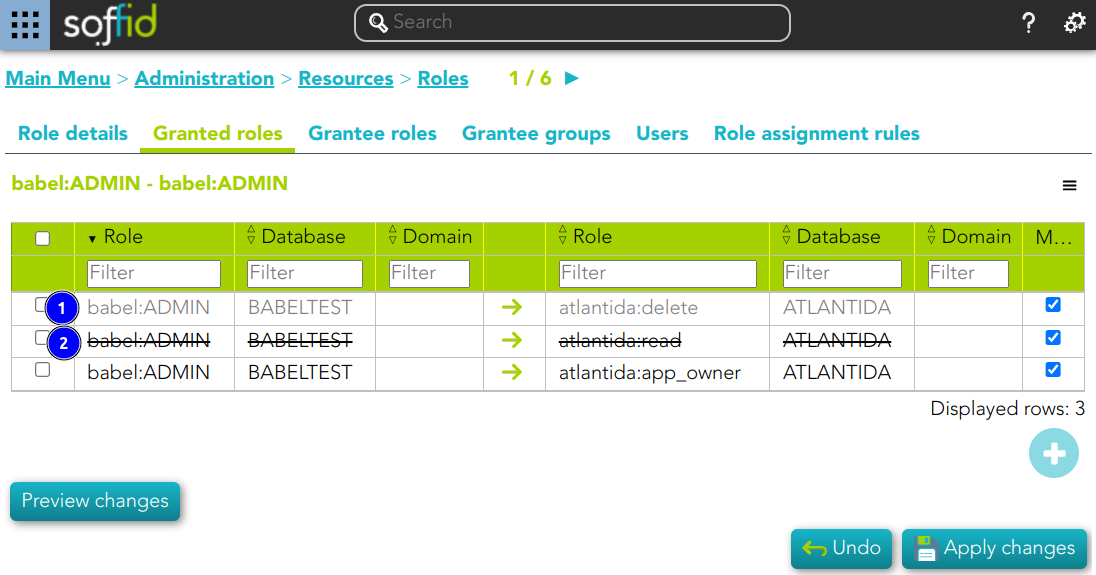
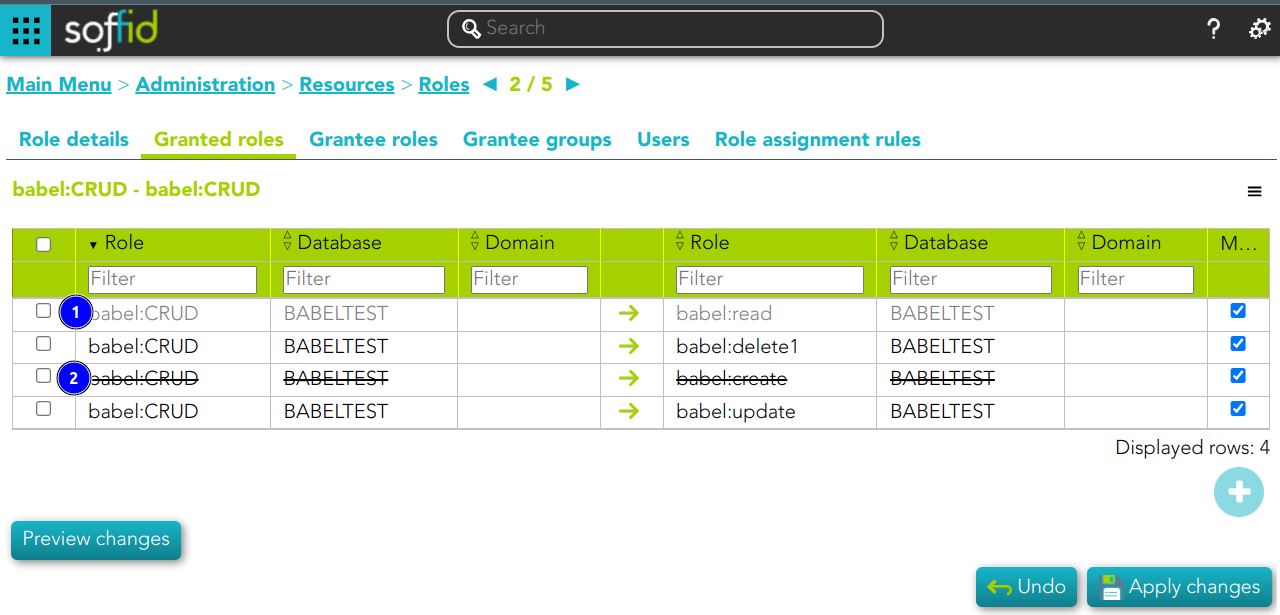
Granted roles
On the granted roles tab, you can assign the privileges of this role to another role in another system.
Assign privileges
To assign privileges you should click the button with the add (+) symbol, then select the target role, the domain values when necessary, and click the finish button. At this point the record will be added to the list.
Now you can check or uncheck the mandatory field.
- Mandatory: the roles with this flag checked will be displayed in the user's effective roles tab.
- No Mandatory: roles with this flag unchecked will be displayed in the user's roles tab and can be managed. It is not automatically assigned to users who already had the parent role.
And finally, you should click the Apply changes button to save the changes. With this operation, all the permissions of this will be assigned to the target role.
💻 Image

💻 Image
This role belong to an Information System with a defined Role definition process.
- This assignation is pending to approve
- This deletion is pending to approve
Revoke permissions
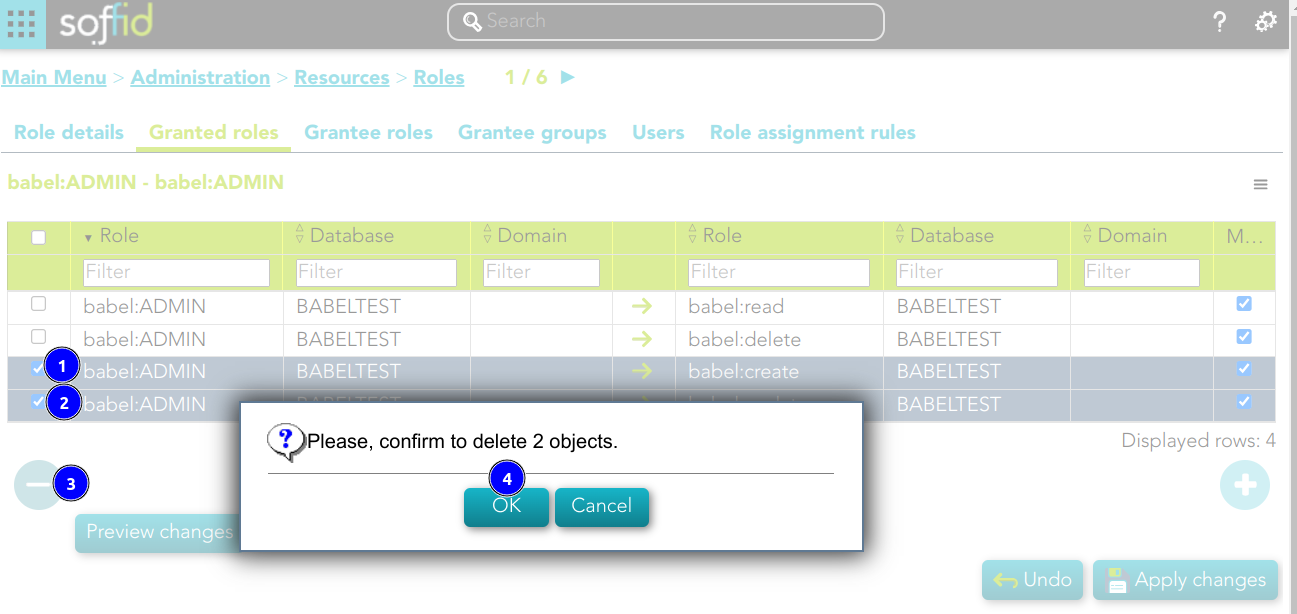
If you want to revoke permissions, you must select one or more records from the list and click the button with the subtraction symbol (-) and then click the Apply changes button to save the changes.
💻 Image
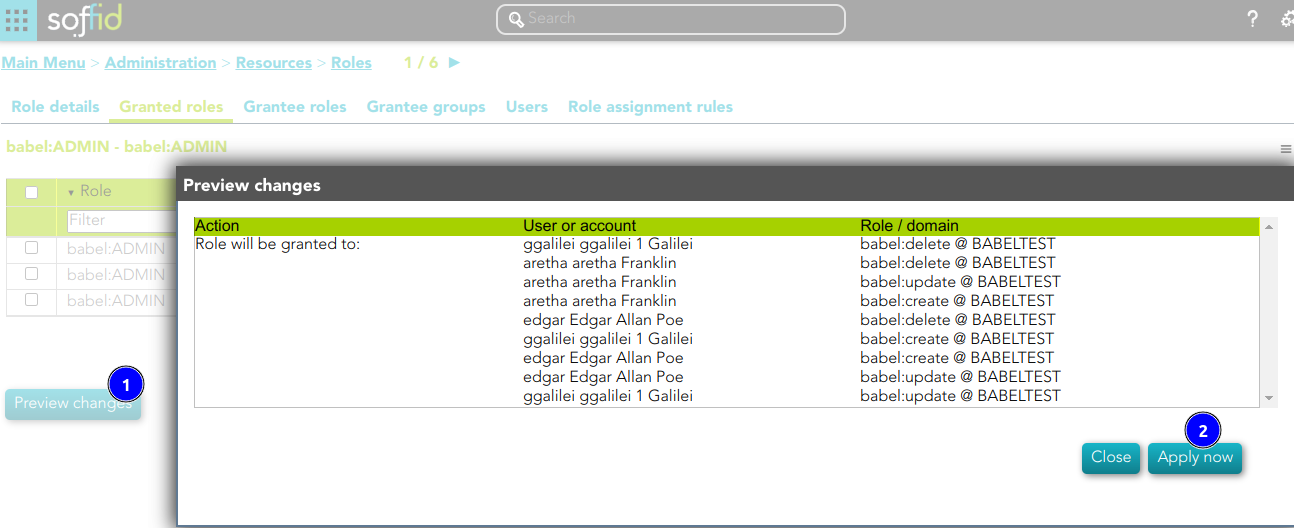
Preview changes
In addition, you can check the preview changes, it display information about the action, the user or account, and the role or domain, and you can apply them.
💻 Image
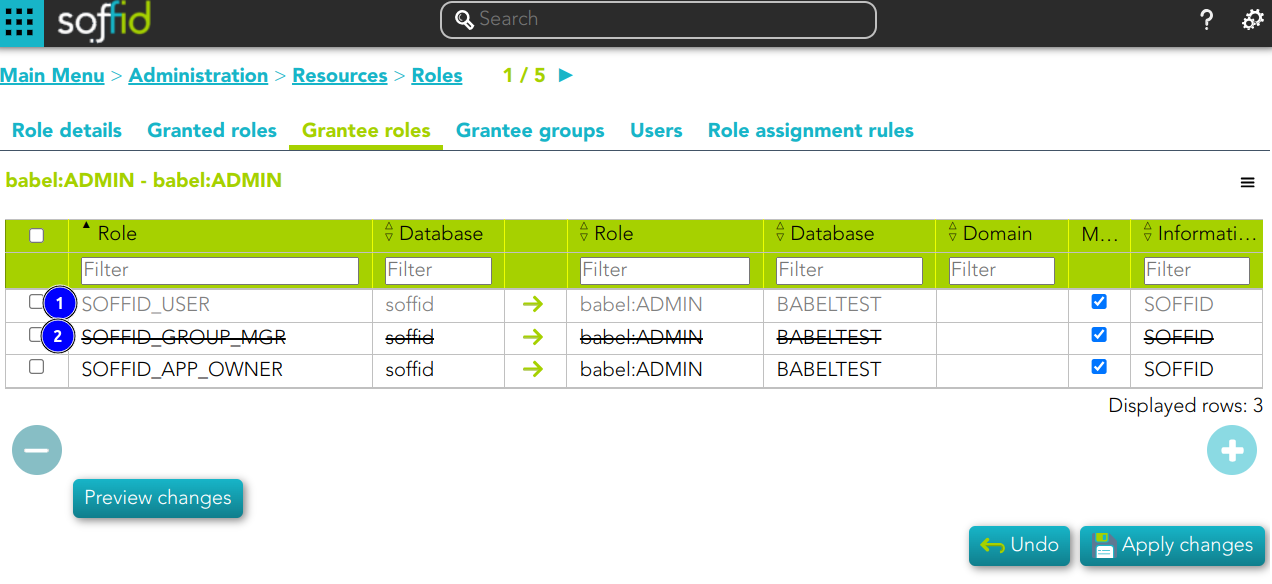
Grantee roles
On the grantee roles tab, you can assign the privileges of a role of any other system to this role.
Assign privileges
To assign privileges you should click the button with the add (+) symbol, then select the source role, the domain values when necessary, and click the finish button. At this point the record will be added to the list.
Now you can check or uncheck the mandatory field.
- Mandatory: the roles with this flag checked will be displayed in the user's effective roles tab.
- No Mandatory: roles with this flag unchecked will be displayed in the user's roles tab and can be managed. It is not automatically assigned to users who already had the parent role.
And finally, you should click the Apply changes button to save the changes. With this operation, all the permissions of this will be assigned to the target role.
💻 Image
This role belong to an Information System with a defined Role definition process.
- This assignation is pending to approve
- This deletion is pending to approve
Revoke permissions
If you want to revoke permissions, you must select one or more records from the list and click the button with the subtraction symbol (-) click the Apply changes button to save the changes.
Preview changes
In addition, you can check the preview changes, it display information about the action, the user or account, and the role or domain, and you can apply them.
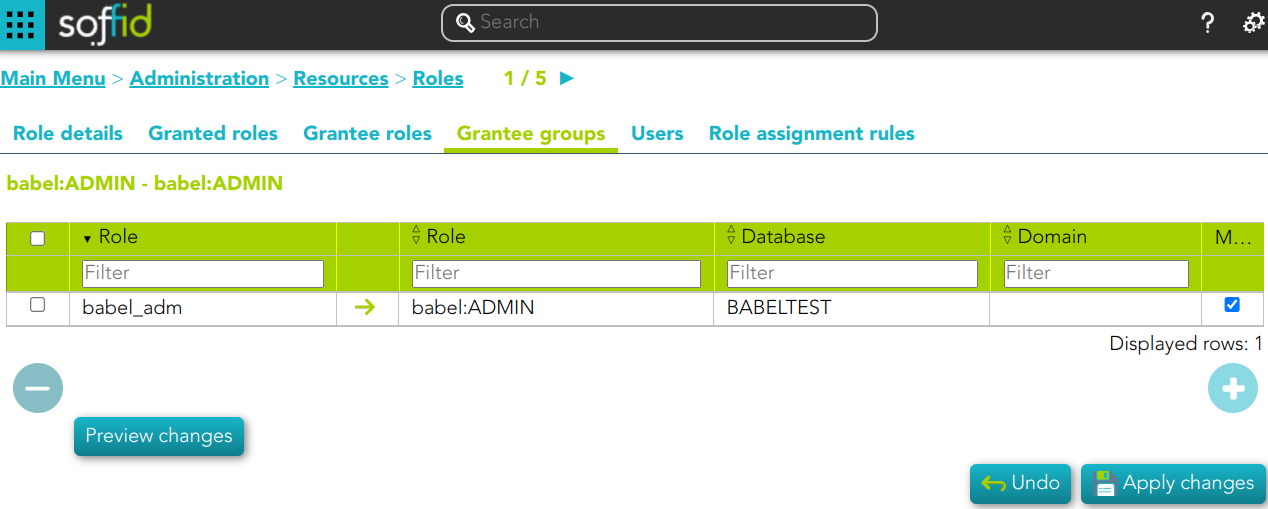
Grantee groups
On the grantee groups tab, you can assign the privileges from a specific group to this role, or revoke the privileges.
Assign privileges
To assign privileges you must click the button with the add symbol (+), then select the group, finish, and apply changes. Thus, the roles indicated, in the corresponding system, will be assigned to all users belonging to this group.
Now you can check or uncheck the mandatory field.
- Mandatory: the roles with this flag checked will be displayed in the user's effective roles tab.
- No Mandatory: roles with this flag unchecked will be displayed in the user's roles tab and can be managed. It is not automatically assigned to users who already had the parent role.
And finally, you should click the Apply changes button to save the changes. With this operation, all the permissions of this will be assigned to the target role.
💻 Image
Revoke permissions
If you want to revoke permissions, you must select one or more records from the list and click the button with the subtraction symbol (-) click the Apply changes button to save the changes
Preview changes
In addition, you can check the preview changes, it display information about the action, the user or account, and the role or domain, and you can apply them.
Users
On the users tab, you can assign or revoke roles. To assign a role you must click the button with the add symbol (+) and choose one or more users, fill the scope when it is mandatory, and set membership properties. Each role needs an account to be applied to, so, if a user has no account on a system and a role on that system is granted, a new account will be created on this system. In case a user has more than one account on a system, you should indicate which of the suitable accounts will be granted the role.
It is also possible to revoke roles to the user from the entitlement details or by selecting one or more records from the list and clicking the button with the subtraction symbol.
The users with the role assigned by rules will be displayed with different colors. Soffid does not allow to revoke roles, on that page, that were assigned by rules.
Additionally, you can download a CSV file with the basic users data.
💻 Image
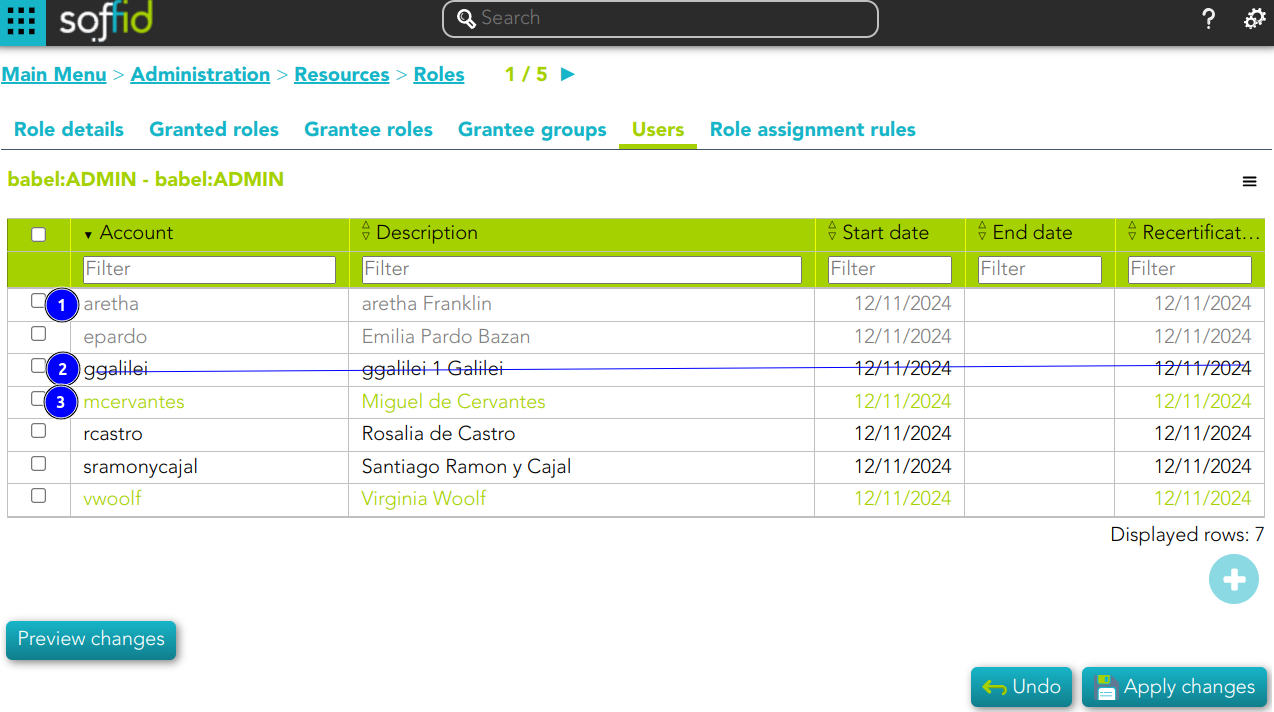
1) This assignation is pending to approve
2) This deletion is pending to approve
3) This assignation is by an assignment rule
Role assignment rules
You can consult the Role assignment rules related to this role.
💻 Image
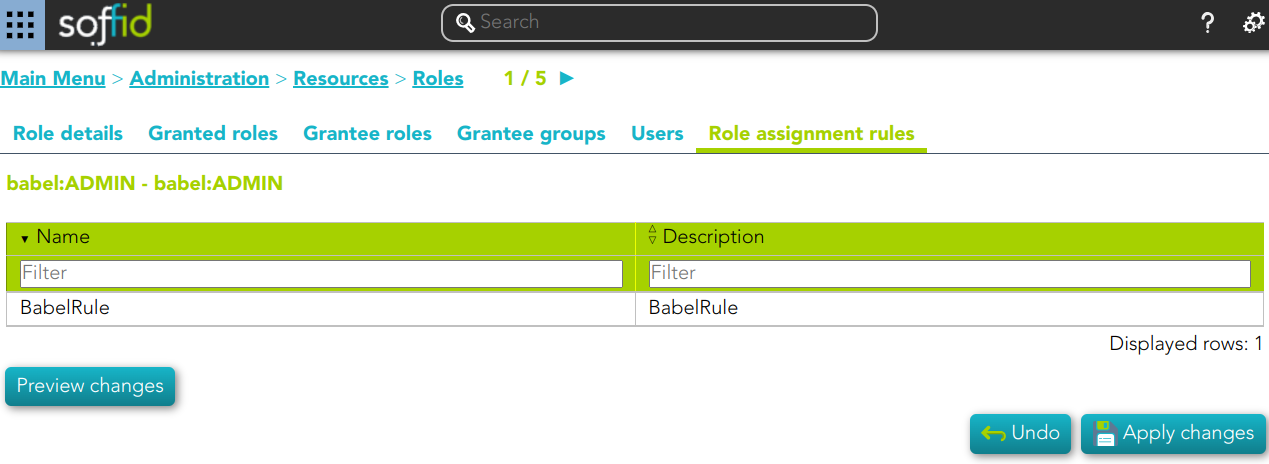
For more information, you can visit the Role assignment rules page.
Actions
Roles query
|
Query |
Allows you to query roles through different search systems, Quick, Basic and Advanced. |
|
Add or remove columns |
Allows you to show and hide columns in the table. You can also set the order in which the columns will be displayed. The selected columns and order will be saved for the next time Soffid displays tihis page. |
|
Add new |
Allows you to add a new role in the system. You can choose that option on the hamburger menu or click the add button (+). To add a new role it will be mandatory to fill in the required fields |
|
Delete |
Allows you to remove one or more roles by selecting one or more records and next clicking the button with the subtraction symbol (-). To perform that action, Soffid will ask you for confirmation, you could confirm or cancel the operation. |
|
Import |
Allows you to upload a CSV file with the role list to add or update roles to Soffid. First, you need to pick up a CSV file, that CSV has to contain a specific configuration. Then you need to check the content to be loaded, it is allowed to choose if you want or not to load a specific attribute. And finally, you need to select the mappings for each column of the CSV file to import the data correctly and to click the Import button. |
|
Download CSV file |
Allows you to download a csv file with the basic roles data. |
|
Bulk actions |
Allows massive operations to be performed on all system roles. With that operation, updates can be made to any of the role's parameters. First of all, you must select the records that you want to update, once you have selected them, you must choose the bulk action on the hamburger icon. For more information visit the Bulk action page. |
Roles detail
|
Delete |
Allows you to delete a role. You can choose that option on the hamburger icon. To perform that action, Soffid will ask you for confirmation, you could confirm or cancel the operation. |
|
Preview changes |
Shows the pending changes on users or accounts. Soffid displays the information about the user or accounts, the action and de Role. You can choose if you want to apply the changes, or close the previer changes window. |
|
Apply changes |
Allows you to apply the pending changes. |
|
Undo |
Allows you to quit without applying any changes. |
Granted roles
|
Apply changes |
Allows you to update the data changes. |
|
Add |
Allows you to add a new granted role. To add a granted role, first you need to click the add button (+). Second, you need to write or search for a role. Once you have selected the role, if it is necessary, the next step will be to set the scope. Then, you need to finish the process. And finally, you need to apply changes. |
|
Delete |
Allows you to delete one or more granted roles. To delete you need to select the records and then click the button with the subtraction symbol (-). To perform that action, Soffid will ask you for confirmation, you could confirm or cancel the operation. And finally, you need to apply changes. |
|
Preview changes |
Shows the pending changes on users or accounts. Soffid displays the information about the user or accounts, the action and de Role. You can choose if you want to apply the changes, or close the previer changes window. |
|
Apply changes |
Allows you to apply the pending changes. |
|
Undo |
Allows you to quit without applying any changes. |
Grantee roles
|
Add |
Allows you to add a new grantee role. To add a grantee role, first you need to click the add button (+). Second, you need to write or search for a role. Once you have selected the role, if it is necessary, the next step will be to set the source scope and the scope. Then, you need to finish the process. And finally, you need to apply changes. |
|
Delete |
Allows you to delete one or more grantee roles. To delete you need to select the records and then click the button with the subtraction symbol (-). To perform that action, Soffid will ask you for confirmation, you could confirm or cancel the operation. And finally, you need to apply changes. |
|
Preview changes |
Shows the pending changes on users or accounts. Soffid displays the information about the user or accounts, the action and de Role. You can choose if you want to apply the changes, or close the previer changes window. |
|
Apply changes |
Allows you to apply the pending changes. |
|
Undo |
Allows you to quit without applying any changes. |
Grantee groups
|
Add |
Allows you to add a new grantee group. To add a grantee group, first you need to click the add button (+). Second, you need to write or search for a group. Once you have selected the group, if it is necessary, the next step will be to set the scope. Then, you need to finish the process. And finally, you need to apply changes. |
|
Delete |
Allows you to delete one or more grantee groups. To delete you need to select the records and then click the button with the subtraction symbol (-). To perform that action, Soffid will ask you for confirmation, you could confirm or cancel the operation. And finally, you need to apply changes. |
|
Preview changes |
Shows the pending changes on users or accounts. Soffid displays the information about the user or accounts, the action and de Role. You can choose if you want to apply the changes, or close the previer changes window. |
|
Apply changes |
Allows you to apply the pending changes. |
|
Undo |
Allows you to quit without applying any changes. |
Users
|
Add or remove columns |
Allows you to show and hide columns in the table. |
|
Add |
Allows you to add users or accounts to assign the role. To add users or accounts, fist of all, you need to click the add button (+) or the "Add new" action located on the hamburger icon. Second, you need to search the users and/or accounts and select the users and/or accounts you want to add. Once you have selected the users and/or accounts, if it is necessary, the next step will be to set the scope. Then you need to fill in the membership properties and finish the process. Finally, you need to apply changes. |
|
Delete |
Allows you to delete one or more users and/or accounts, that is, Soffid will revoke the role. To delete one, you can select the record and click the button with the subtraction symbol (-) or the trash button located at the end of the row. To delete more at the same time, you need to select the records and then click the button with the subtraction symbol (-). To perform that action, Soffid will ask you for confirmation, you could confirm or cancel the operation. And finally, you need to apply changes. |
|
Download CSV file |
Allows you to download a CSV file with all the information about users. |
|
Import |
|
|
Preview changes |
Shows the pending changes on users or accounts. Soffid displays the information about the user or accounts, the action and de Role. You can choose if you want to apply the changes, or close the previer changes window. |
|
Apply changes |
Allows you to apply the pending changes. |
|
Undo |
Allows you to quit without applying any changes. |
Information systems
Description
Information systems are the systems that Soffid will protect granting and revoking roles. Each role and entry point is bound to an information system.
The information system can be created hierarchically. These information systems are managed in a tree structure.
Soffid allows you to categorize the information systems to facilitate the management, the available categories are Application, Container and Business. That categories are for information purposes only.
The permission can be granted by using workflows. You can access to Workflows page for more information.
Screen overview
Related objects
Custom attributes
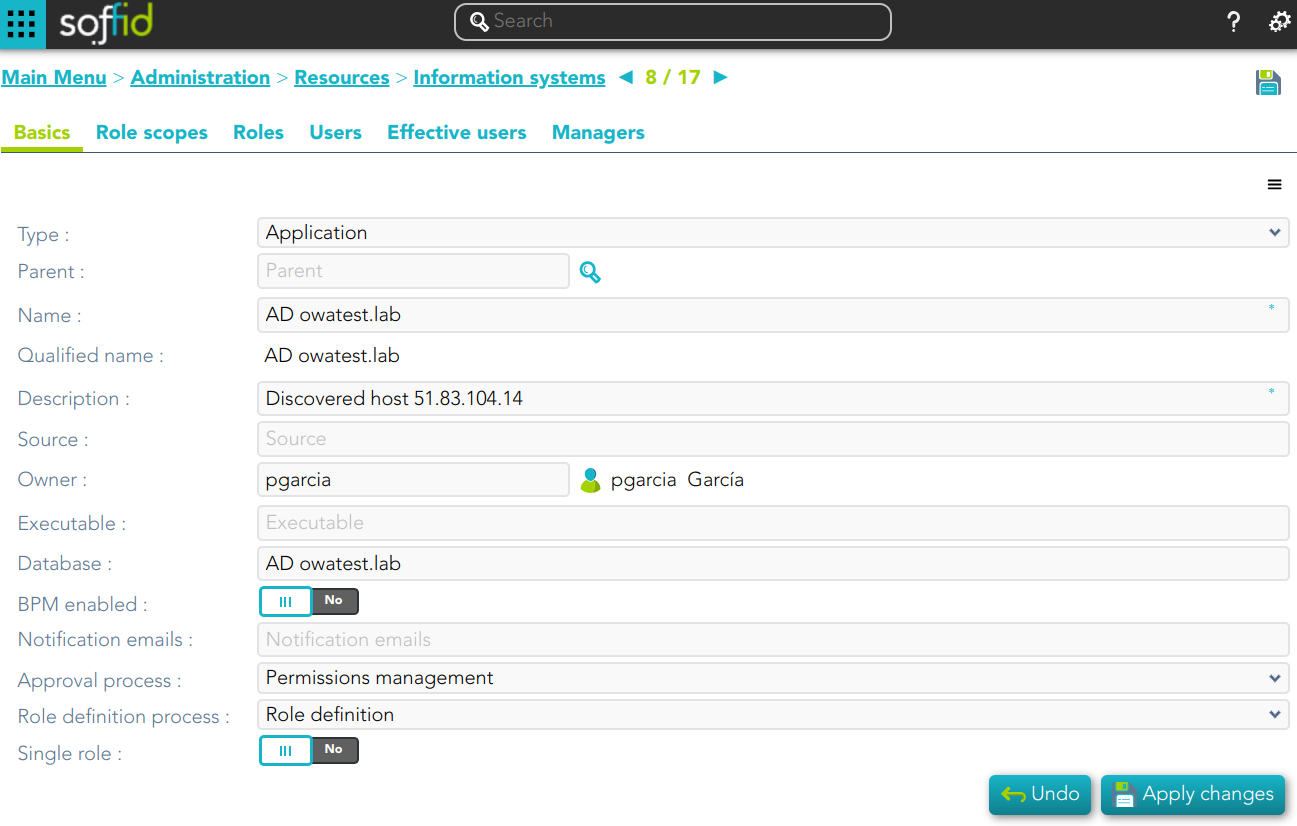
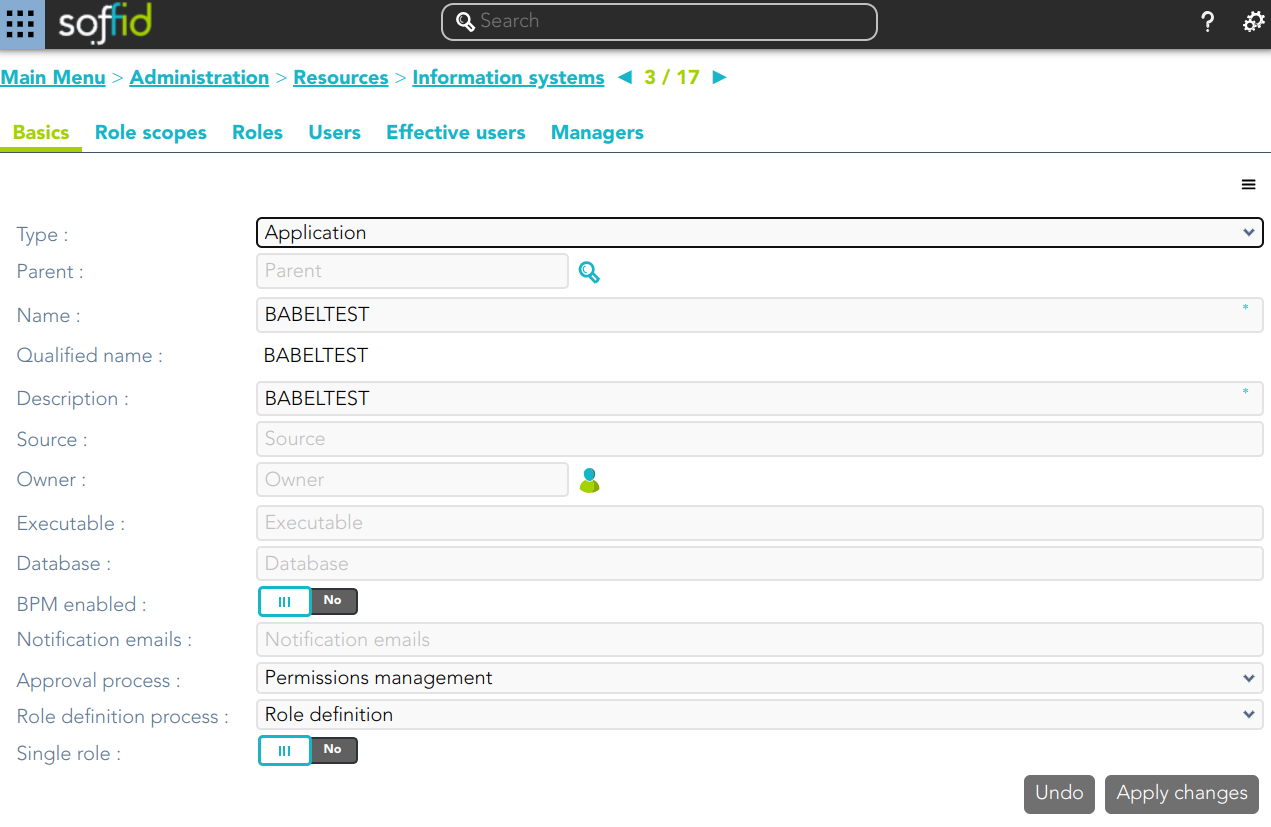
Basics
- Type: information system category.
- Parent: parent within the hierarchy.
- Name: short name to identify the information system.
- Description: detailed description information system.
- Source: documentation.
- Owner: is the information owner, and has the capability to appoint security manager.
- Executable: documentation.
- Database: documentation.
- Owner name: documentation.
- BPM enable: if enabled, permissions can be granted by using workflows.
- Notification emails: this list will be notified on a daily about grants and revokes performed.
- Approval process: allows you to select a Permissions management process. This process will be initiated when a role, in this information system, is assigned or revoked to a user. It is an advanced function for workflows. You can see an example of the Approval process.
- Role definition process: allows you to select a Role definition process. This process will be initiated when the definition of a role, in the information system, is updated. It is an advanced function for workflows. You can see an example of the Role definition process.
- Single role: if checked, the roles of this application are mutually exclusive: if a user has the role X and want to assign him the role Y, X will be removed to give him Y.
Role Scopes (Domain)
Role scope or domains are properties that can be assigned to some entitlements, limiting the scope of that entitlement. This can be used to limit, for instance, the maximum amount allowed for a money transfer, or the commercial zones to manage.
On this tab, you can add new domains, you must click the button with the add symbol and fill the information about the new domain. You can also delete a domain or update the domain information.
Other operations allowed are to download a CSV file with the domain data and toOther operations allowed are to download a CSV file with the domain data and to upload a CSV file to add new domains, or update existed domains to add new domains, or update existing domains
💻 Image

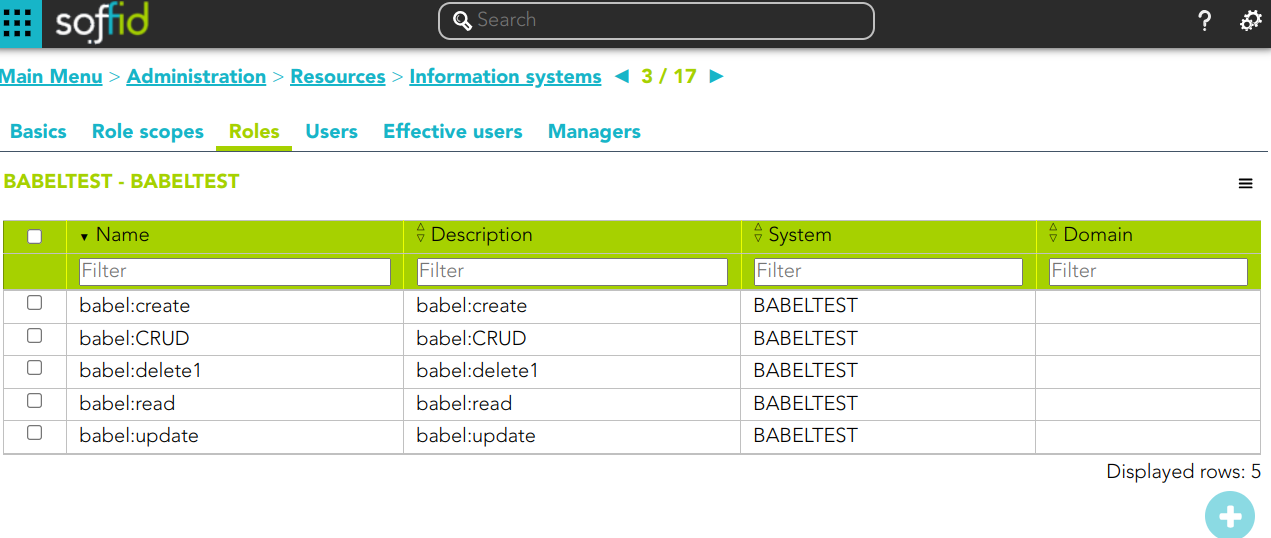
Roles
A role is a collection of permissions that determine what operations a user or a group of users can perform on that information system.
On the roles tab is allowed to create, update and delete roles. The effective privileges bound to each role are managed from each application.
To add a new role you must click the button with the add symbol (+) and fill all the role data.
You can update a specific role by clicking on the right record, making and applying changes.
It is also possible to delete roles from the role details or by selecting one or more records from the list and clicking the button with the subtraction symbol (-).
Additionally you can download a CSV file with the roles information and you can also upload a CSV file to add new roles, or modify existing roles.
💻 Image
Users
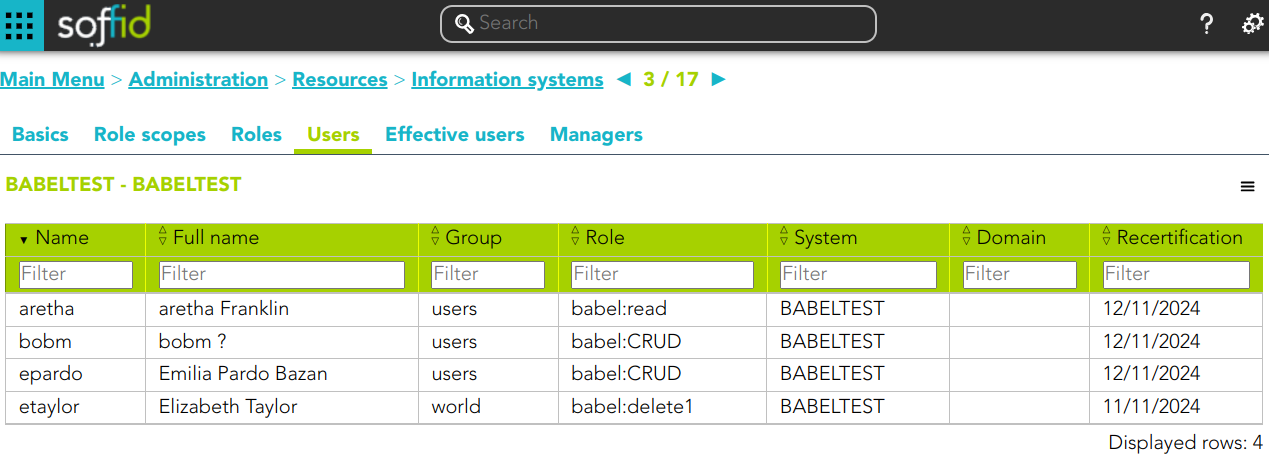
On the user's tab, Soffid displays all the user with granted roles for this information system.
It is allowed to download a CSV file with all the user data.
💻 Image
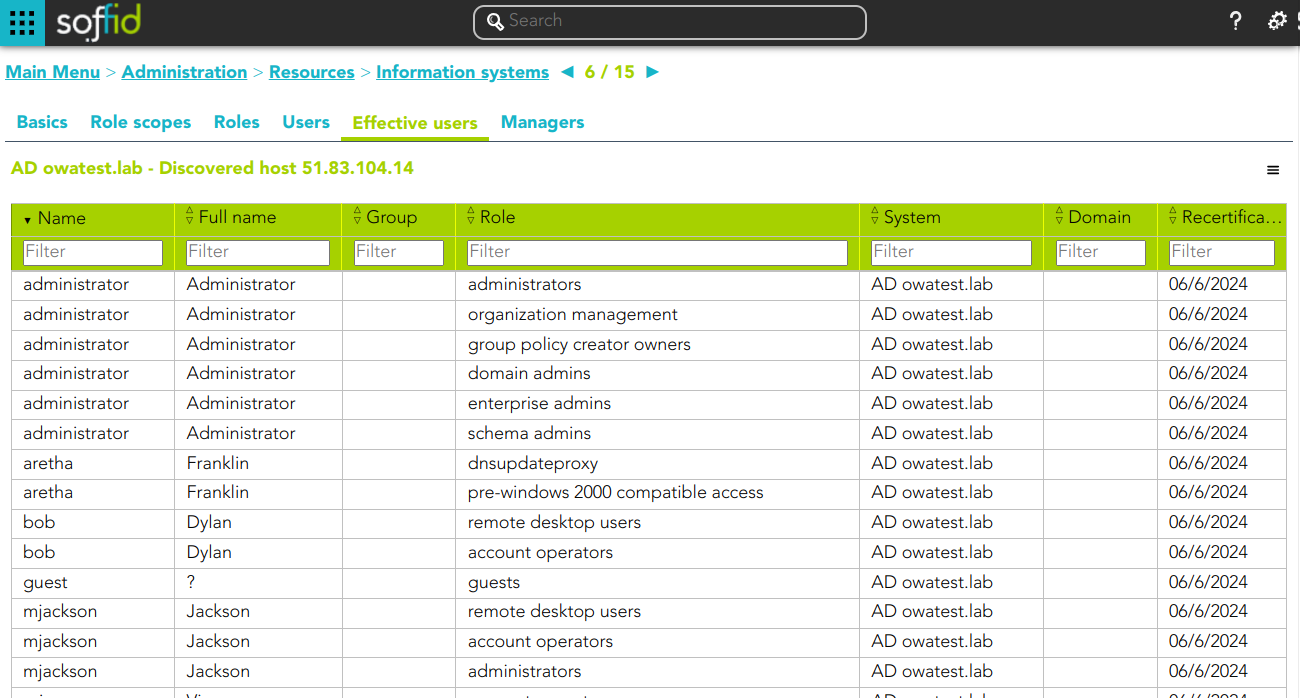
Effective users
Hierarchy of permissions assigned to or inherited from an account. If you visit the accounts page, you could see the roles on the Roles tab from a specific account.
💻 Image
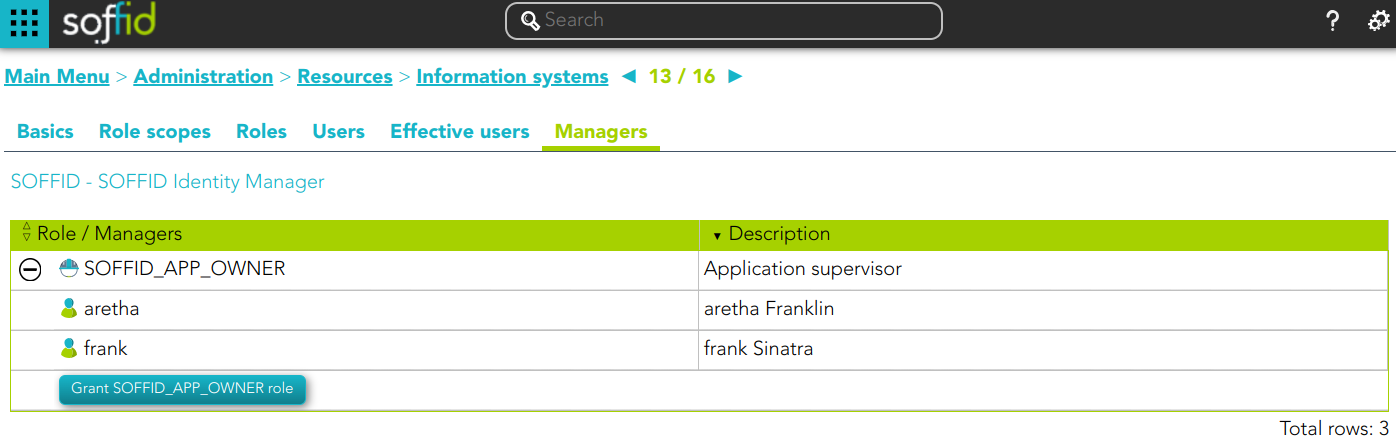
Managers
On the tab Managers, Soffid displays the Roles with Domain equals to Information System and the proper authorization.
Here you can grant the role to one or more users. You can also assign the role to users on the Roles page or on the Users page. Users who have been assigned this role will be displayed in the Managers tab.
Be in mind, to query the information about the roles and users on the managers tab, it will be mandatory to give authorization to query applications, you must add the role to the authorization (application:query).
💻 Image
** Role
** Authorization

Actions
Information system query
|
Query |
Allows to query groups through different search systems, Quick, Basic and Advanced. |
|
Add or remove columns |
Allows to show and hide columns in the table. |
|
Add new |
Allows to create a new information system. You can choose that option on the hamburger menu or clicking the add button (+). To add a new information system it will be mandatory to fill in the required fields |
|
Add child information system |
Allows to add a child to a specific information system. You can choose that option below the father information system. To add a child it is necessary to fill in the required fields |
|
Import |
Allows you to upload a CSV file with the information system list to add or update information systems to Soffid. First, you need to pick up a CSV file, that CSV has to contain a specific configuration. Then you need to check the content to be loaded, it is allowed to choose if you want or not load a specific attribute. And finally, you need to select the mappings for each column of the CSV file to import the data correctly and to click the Import button. |
|
Download CSV file |
Allows to download a csv file with the basic information of all information systems. |
Information system detail actions
|
Apply changes |
Allows you to save the data of a new information system or to update the data of a specific information system. To save the data it will be mandatory to fill in the required fields |
|
Delete |
Allows you to remove a specific information system. To perform that action, Soffid will ask you for confirmation, you could confirm or cancel the operation. |
|
Undo |
Allows you to quit without applying any changes. |
Role scopes actions
|
Add domain |
Allows you to add a new domain to limit the scope. You can choose that option on the hamburger menu or clicking the add button (+). To add a new domain it will be mandatory to fill in the required fields |
|
Import |
Allows you to upload a CSV file with the domain list to add or update domains to Soffid. First, you need to pick up a CSV file, that CSV has to contain a specific configuration. Then you need to check the content to be loaded, it is allowed to choose if you want or not to load a specific attribute. And finally, you need to select the mappings for each column of the CSV file to import the data correctly and to click the Import button. |
|
Download CSV file |
Allows you to download a CSV file with all the information about domains. |
Roles actions
|
Add or remove columns |
Allows you to show and hide columns in the table. |
|
Add new |
Allows you to create a new role for that information system. You can choose that option on the hamburger menu or clicking the add button (+). To add a new role it will be mandatory to fill in the required fields |
|
Delete |
Allows you to delete one by one or to delete some roles at the same time from an information system . To delete some roles at the same time, you need to select the roles, and then click the button with the subtraction symbol (-). To delete one role, you can click the users, and then Soffid will show a form with the details. Then you can click the delete button (trash icon). Soffid will ask you for confirmation to perform that action, you could confirm or cancel the operation. |
|
Import |
Allows you to upload a CSV file with the roles list to add to the information system. First, you need to pick up a CSV file, that CSV has to contain a specific configuration. Then you need to check the content to be loaded, it is allowed to choose if you want or not to load a specific attribute. And finally, you need to select the mappings for each column of the CSV file to import the data correctly and to click the Import button. |
|
Download CSV file |
Allows to download a csv file with the basic role data |
In addition for each role you can perform the specific operations defined on the Role page
Users actions
|
Download CSV file |
Allows to download a CSV file with all the information about users. |
Example
Approval process Example
1. Assign a role a to a User: this role belong to an information system with an Approval process configured.
💻 Image
Information system definition
💻 Image
Assign a role a to an user
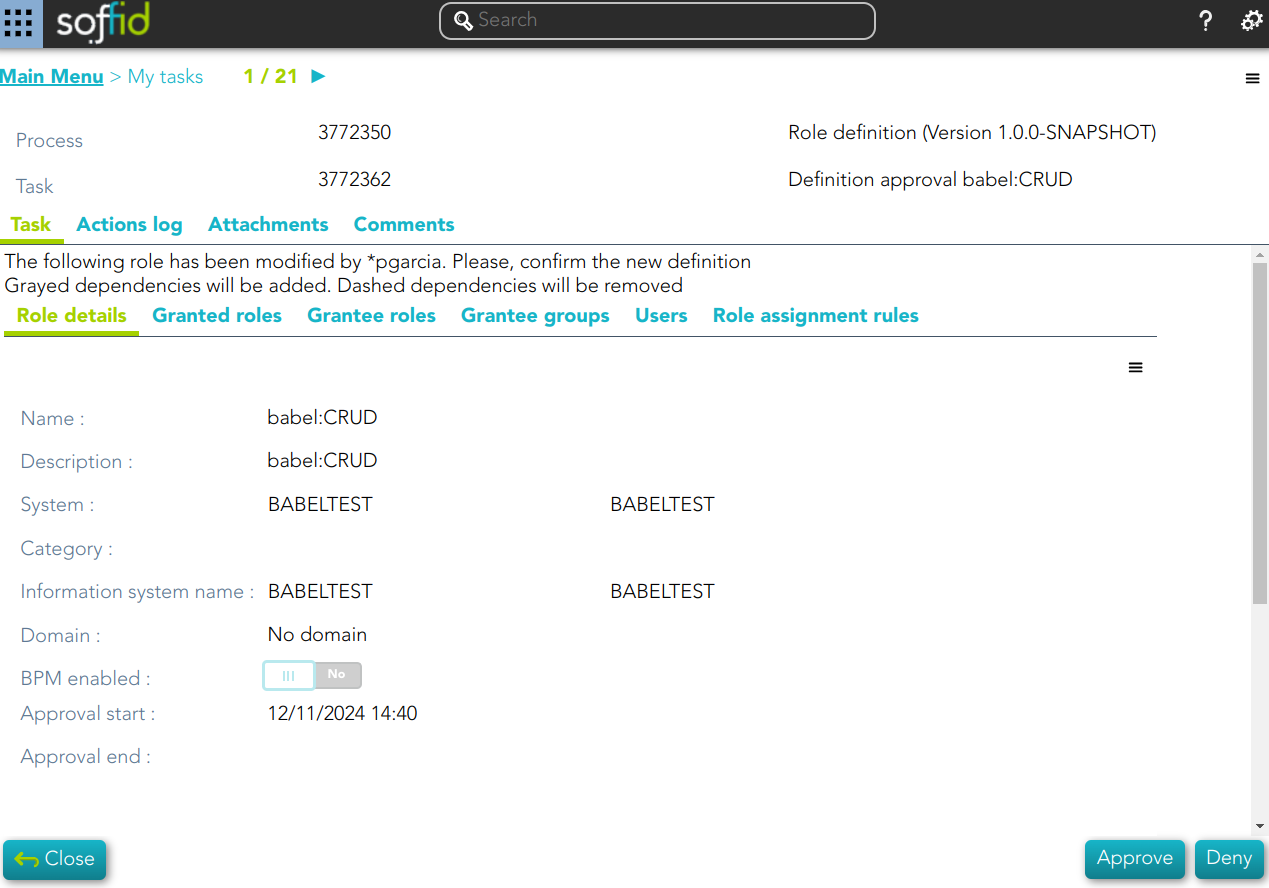
2. A task to approve o reject is created
💻 Image

Role definition process example
1. Update a role definition.This role belong to an information system with an Approval process configured.
💻 Image
Assign a role a to an user
💻 Image
1) This assignation is pending to approve
2) This deletion is pending to approve
2. A task to approve o reject is created
Role assignment rules
Description
Soffid console provides an option that allows you to customize policies to assign or revoke roles automatically to specific users. To assign or revoke roles, the users must comply with the defined requirements.
That option allows you to Preview changes before to Apply changes, to verify that the actions to be performed are the correct ones.
To Apply now the Role assignment rule, it is mandatory to have previously saved any changes made in the customization of the role assignment rule using the Apply changes button.
The rule evaluation is performed asynchronously.
When a user is updated, no matter from where, Soffid will launch the role assignment rules defined.
Screen overview
Related objects
Role detail
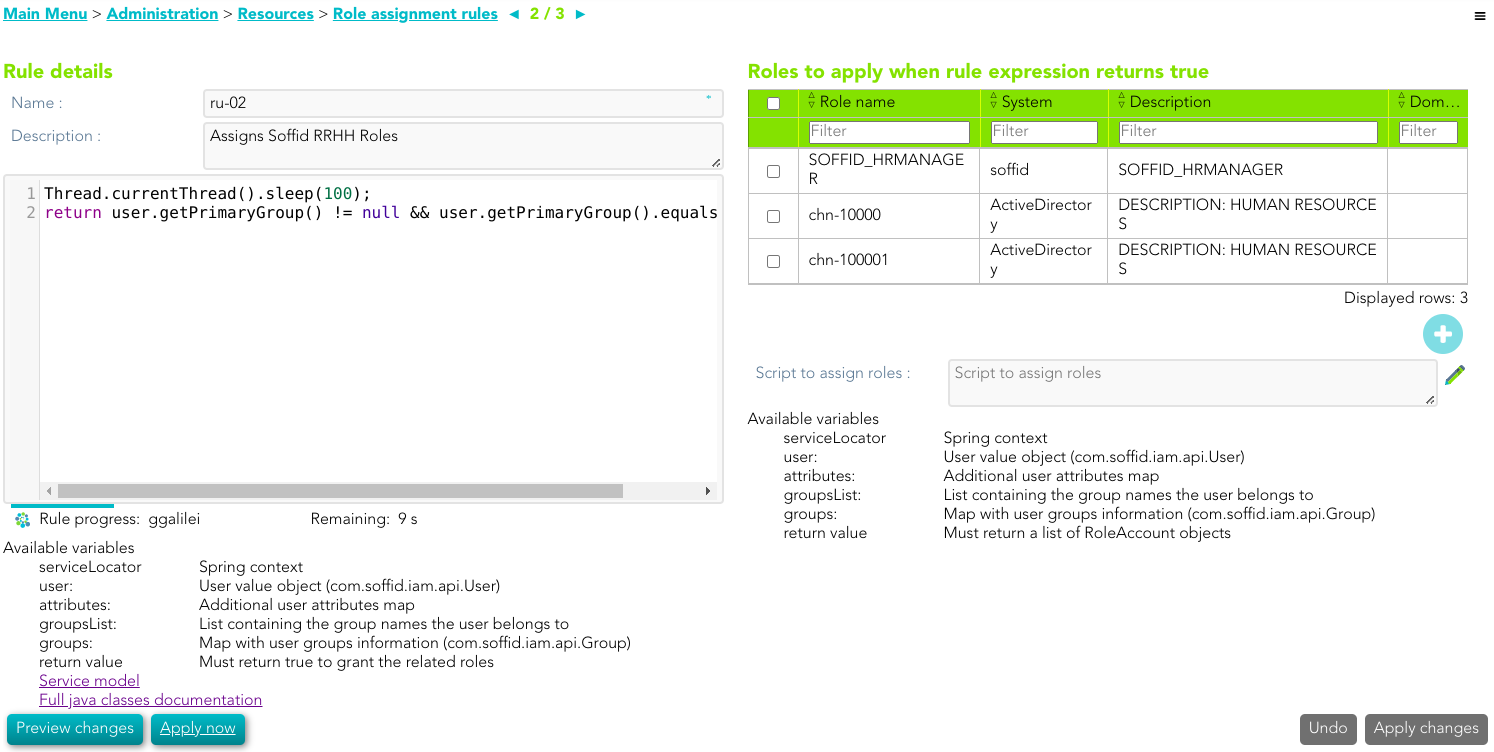
- Name: name of the rule.
- Description: brief description of the rule.
- Script (Rule expression): when returns true, the roles will be applied and the script that assigns roles.
- Rule Progress: displays the time remaining to finish applying the rule.
Roles to apply when rule expression returns true
- Role list: roles to apply when rule expression returns true.
- Script to assign roles: allows you to customize the rules to apply roles. That roles will be added to the role list.
The roles result will be a Role list, or RoleAccount list, or String list.
Actions
Role assignment rules query action
|
Add new |
Allows you to add a new role assignment rule in the system. You can choose that option on the hamburger menu or clicking the add button (+).To add a new role assignment rule it will be mandatory to fill in the required fields |
|
Delete |
Allows you to remove one or more role assignment rule by selecting one or more records and next clicking the button with the subtraction symbol (-).To perform that action, Soffid will ask you for confirmation, you could confirm or cancel the operation. |
|
Import |
Allows you to upload a CSV file with the role assignment rule list to add or update role assignment rules to Soffid.First, you need to pick up a CSV file, that CSV has to contain a specific configuration. Then you need to check the content to be loaded, it is allowed to choose if you want or not to load a specific attribute. And finally, you need to select the mappings for each column of the CSV file to import the data correctly and to click the Import button. |
|
Download CSV file |
Allows you to download a CSV file with the basic information of all role assignment rule. |
Role assignment rules detail action
|
Apply changes |
Allows you to save the changes made on the rule specification, or to save a new rule. |
|
Undo |
Allows you to undo any changes made on the rule, except the roles added or deleted to the role list. |
|
Add new role |
Allows you to add a role to be applied with the rule. |
|
Preview changes |
Displays a list with the changes that would be applied with that rule definition. |
|
Apply now |
Allows you to launch the role assignment rule process. When users comply with the rule specification, their roles will be updated. |
Scripts examples
return user.getPrimaryGroup() != null && user.getPrimaryGroup().equals("Writers");return "Writers".equals(user.getPrimaryGroup());return "1001".equals(user.attributes.get("employee")) ||
"1002".equals(user.attributes.get("employee"))||
"2001".equals(user.attributes.get("employee"));Segregation of Duties (SoD)
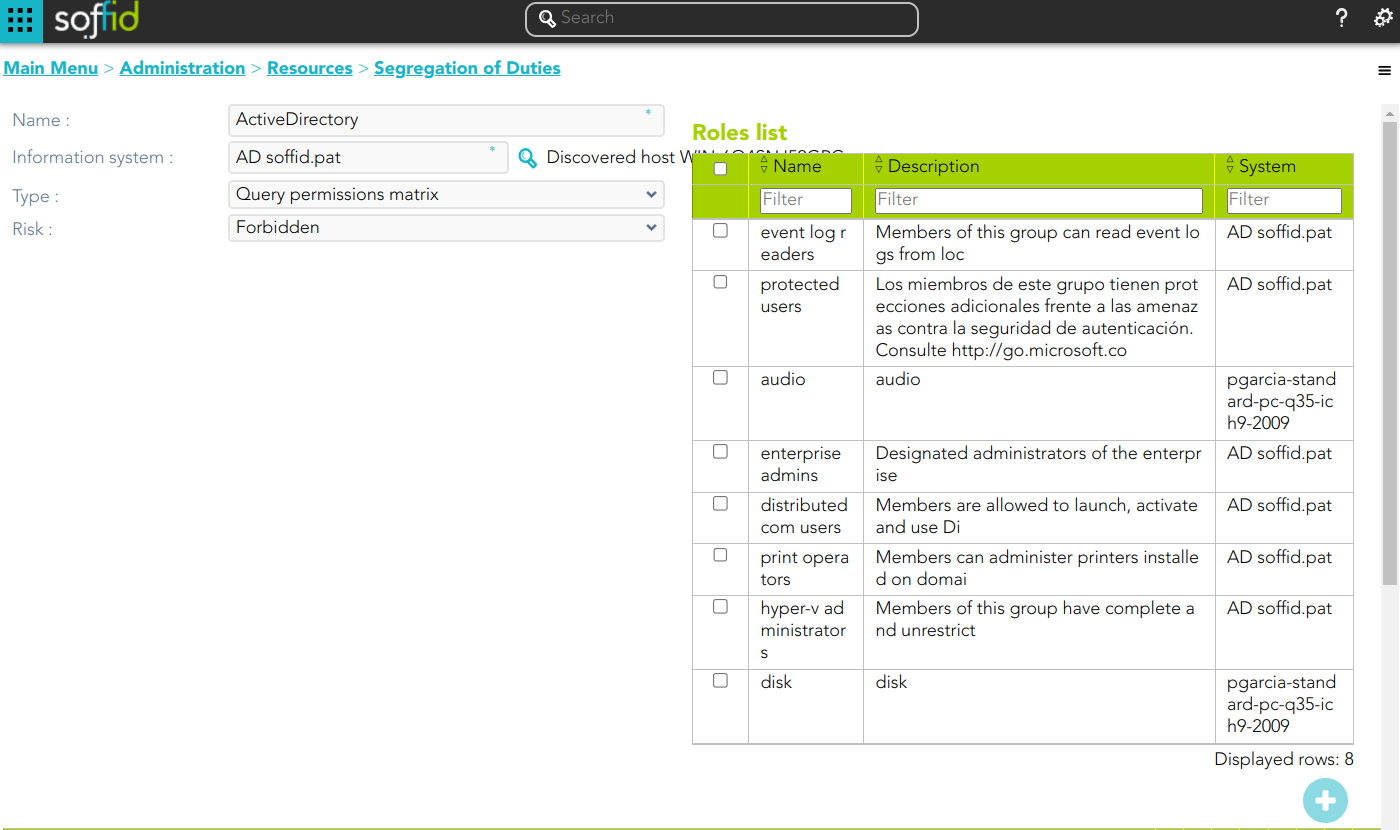
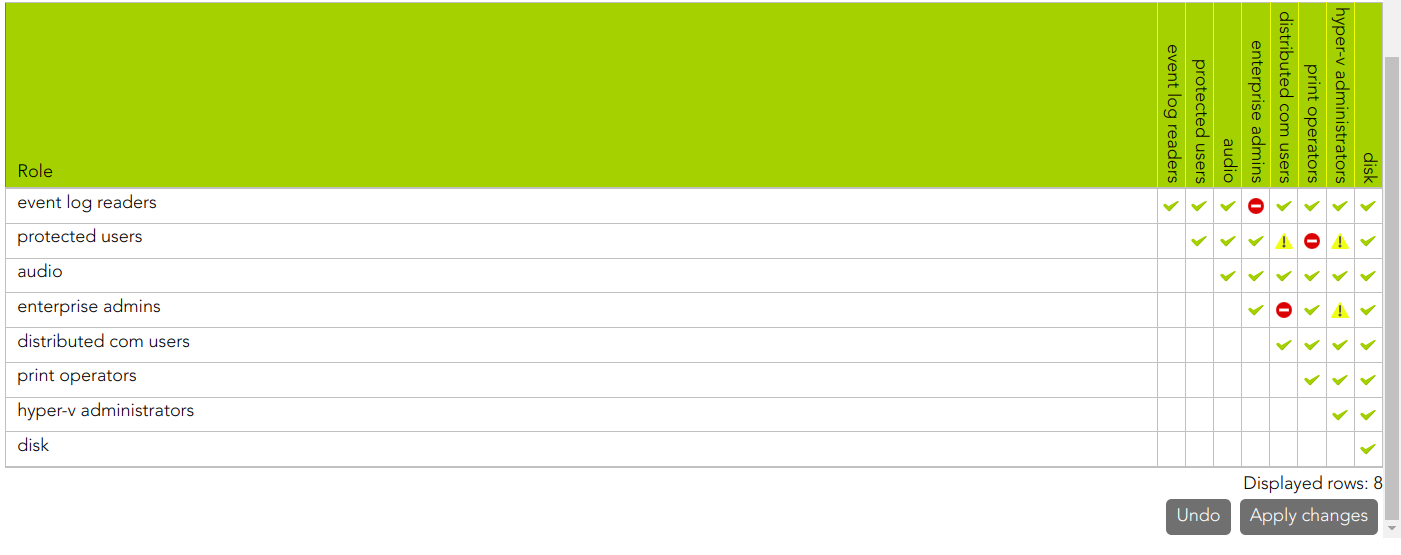
Description
The segregation of duties (SoD) is a fundamental element of internal controls, defined to prevent error and fraud. Segregation of duties ensure that at least two individuals are responsible for the separate parts of any task.
For each user, the roles tab displays the list of roles assigned to the user and the possible risks. If you click on a role record, Soffid will show the entitlement details including the SoD rules with the detail of the risk.
Screen overview
Related objects
- Name: name of the segregation separation of duties
- Information System: asset or application, from a functional point of view, on which the permissions are granted or revoked.
- Type: type of segregation
- Trigger on all permissions: no user can be assigned the roles added to the role list.
- Trigger on some permissions: if you select that option, you have to fill in the number of roles that can not match. Soffid will not allow you to assign to a user more than the number indicated of the roles added to the role list.
- Query permissions matrix: Soffid displays a matrix that allows you to select the risk between pairs of roles, those roles are the roles added to the role list.
- Risk: level of risk:
- Low.
- High.
- Forbidden: it is not allowed that one user to have assigned the roles defined on the role list.
- None: there is no risk.
- Role List: list of roles to keep in mind on the segregation of duties.
Actions
Segregation of Duties query actions
|
Query |
Allows you to query Segregation of Duties through different search systems, Basic and Advanced. |
|
Add new |
Allows you to add a new Segregation of Duties in the system. You can choose that option on the hamburger menu or click the add button (+). To add a new Segregation of Duties it will be mandatory to fill in the required fields |
|
Delete |
Allows you to remove one or more Segregation of Duties by selecting one or more records and next clicking the button with the subtraction symbol (-). To perform that action, Soffid will ask you for confirmation, you could confirm or cancel the operation. |
|
Download CSV file |
Allows you to download a CSV file with the basic Segregation of Duties data. |
Segregation of Duties detailed actions
|
Apply changes |
Allows you to save the data of a new role or to update the data of a specific role. To save the data it will be mandatory to fill in the required fields |
|
Delete |
Allows you to delete a Segregation of Duties. You can choose that option on the trash icon. To perform that action, Soffid will ask you for confirmation, you could confirm or cancel the operation. |
|
Undo |
Allows you to quit without applying any changes. |
| Add new role | Allows you to add a new role to the Role list. You can add a role by clicking the add button (+), then Soffid will show a form to search and select one or more roles. Finally, you need to click the apply changes button and the roles will be added to the role list. |
| Delete role |
Allows you to delete one or more roles from the role list. You can select one or more roles and then click the button with the subtraction symbol (-). The roles will be deleted from the role list without Soffid asking for confirmation. |
Networks
Description
Operators can define the subnets that compose the internal network, in order to manage the IP address space. The main goal is to manage a limited resource as the IP address is.
Soffid supports both static and dynamic IP assignments. Anyway, static IP management does not exclude the use of DHCP o BOOTP protocols in order to get them.
Screen overview
Custom attributes
Basics
On the network group tab, you can view all the network attributes. It is allowed to add new networks, update or delete existing networks.
- Name: short name that identifies the network.
- Description: network description.
- IP Address: IP range of this network.
- IP Address mask: IP mask of this network.
- Internal network: activate this check box to indicate if this network is fully managed or not. What fully managed means changes in each organization. It used to mean corporate office versus branch office. It affects mainly to access the menu tree. Application entry points have different scripts or URLs for internal and external networks.
- Support DHCP: if enabled (selected value is Yes), hosts belonging to this network will be automatically registered.
- DHCP attributes: allows to enter additional parameters that the DHCP server will use to assemble DHCP response. Usually, it will have a gw=0.1.2.34 like parameter. It is only needed when a DCHP connector is configured.
- Used IPs: IP addresses used. This data is auto calculated
Access control
In order to delegate the management of IP addresses in this network range, the Access Control List allows to select which users, groups or roles will be allowed to manage it.
- Restrict ESSO login: allows to restrict the access to the workstations of this network, otherwise, any Soffid users can log in.
Each Access Control List Entry has the following attributes:
- Access level: four levels are defined:
-
Without access: denies everything.
-
Query: allows to know about hosts on this network.
-
Support: allows to know about hosts on this network, and allows to manage the workstations on it. This option is fully tied to Single Sign On module.
-
Administration: allows to create, modify or remove hosts on this network.
-
- Mask: specifies a pattern that will be check against the host name in order to apply this authorization level.
-
Identity: specifies a user, group or role name.
- Description.
To add a new access control you can click the button with the add symbol (+), you have to select the grantee type (user, group or role), then you have to choose an user, group or role depending on the grantee selected, and finally set the acces level and the mask and apply the changes.
If you want to delete access controls, you must select one or more records from the list and clicking the button with the subtraction symbol (-).
Actions
Networks query
|
Query |
Allows you to query networks through different search systems, Quick, Basic and Advanced. |
|
Add or remove columns |
Allows you to show and hide columns in the table. |
|
Add new |
Allows you to create a new network. You can choose that option on the hamburger menu or clicking the add button (+). To add a new network it will be mandatory to fill in the required fields |
|
Delete |
Allows you to remove one or more networks by selecting one or more records and next clicking the button with the subtraction symbol (-). To perform that action, Soffid will ask you for confirmation, you could confirm or cancel the operation. |
|
Import |
Allows you to upload a CSV file with the network list to add or update networks to Soffid. First, you need to pick up a CSV file, that CSV has to contain a specific configuration. Then you need to check the content to be loaded, it is allowed to choose if you want or not to load a specific attribute. And finally, you need to select the mappings for each column of the CSV file to import the data correctly and to click the Import button. |
|
Download CSV file |
Allows you to download a csv file with the networks information. |
Networks detail
|
Apply changes |
Allows you to save the data of a new network or to update the data of a specific network. To save the data it will be mandatory to fill in the required fields |
|
Undo |
Allows you to quit without applying any changes. |
Access control
|
Add new |
Allows you to create a new access control. You can choose that option on the hamburger menu or clicking the add button (+). First, you will select the Grantee type, which could be a role, a user or a group. Second, you will select the Grantee, it will depend on the Grantee type selected. Then, you will fill in the access level. And finally you will apply changes. |
|
Delete |
Allows you to remove one or more access controls by selecting one or more records and next clicking the button with the subtraction symbol (-). To perform that action, Soffid will ask you for confirmation, you could confirm or cancel the operation. |
|
Import |
Allows you to upload a CSV file with the access control list to add or update access controls to Soffid. First, you need to pick up a CSV file, that CSV has to contain a specific configuration. Then you need to check the content to be loaded, it is allowed to choose if you want or not to load a specific attribute. And finally, you need to select the mappings for each column of the CSV file to import the data correctly and to click the Import button. |
|
Download CSV file |
Allows you to download a csv file with the basic access controls data. |
|
Restrict ESSO login |
Allows you to restrict the access to the workstations of this network. |
Hosts
Description
The host screen lets the administrator manage a static IP address assigned to any host. Dynamic IP addresses are automatically managed by Soffid ESSO.
Screen overview
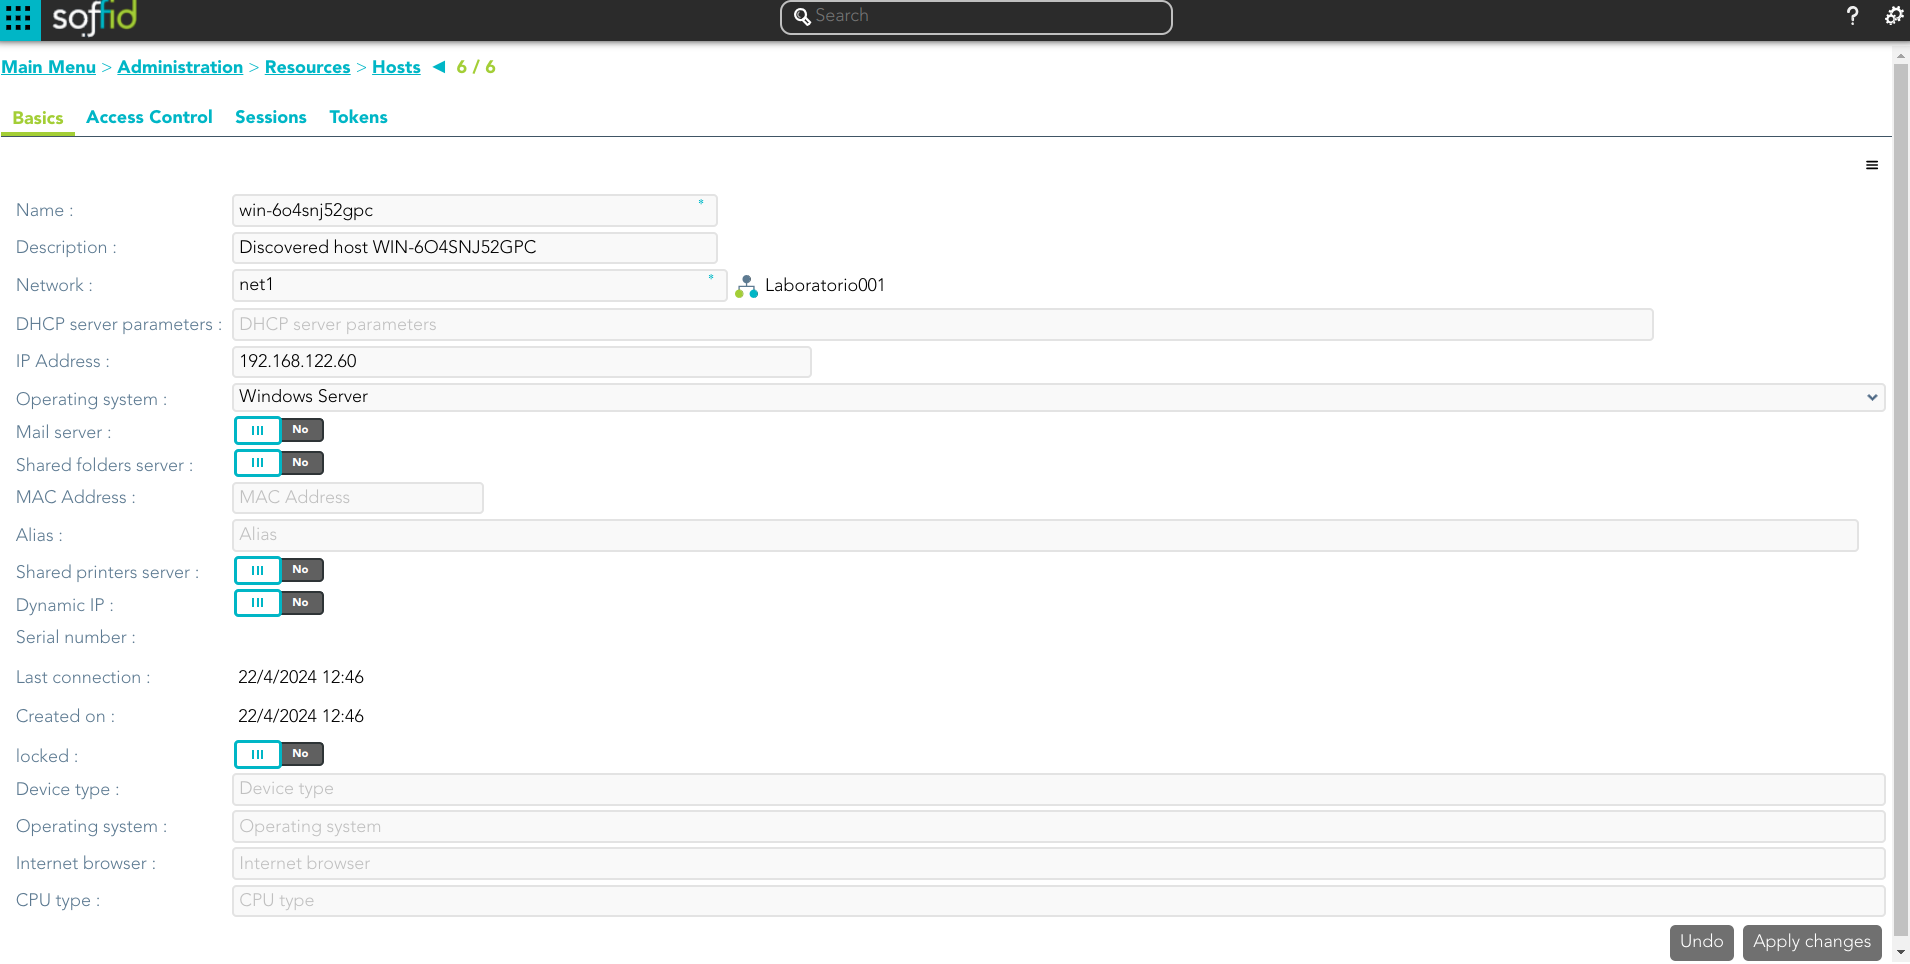
Related objects
- Network
- Operating systems
Basics
On the basic host tab, you can view all the host attributes. It is allowed to add new host, update or delete existing hosts.
- Name: host name.
- Description: location, owner and whatever other information you want.
- Network: to which it belongs
- DHCP server parameters: used by the DHCP agent in order to generate DHCP configuration files.
- IP Address: host IP
- Operating system: used by the Active Directory agent in order to know if this host must be have an Active Directory host account. Using this functionality, no operator needs to be authorized to add or remove hosts on Active Directory. Soffid will do it for them. More and more, whenever this hosts is left off its IP address, the host account will be removed from Active Directory. This behavior can, of course, be customized.
- Mail server: if enabled (selected value is Yes), the user will be able to create mailboxes in the host.
- Shared folders server: if enabled (selected value is Yes), the user will be able to create shared folders in the host.
- MAC Address: used by the DHCP agent in order to generate DHCP configuration files.
- Alias: This field is used to identify the possible IP addresses that may be associated with a single hostname. In complex and segmented environments, it is common for the same machine identifier to be used across multiple networks, whether for service replication, geographic redundancy, or the deployment of parallel test and production environments. This field enables such configurations by linking a hostname to multiple IP addresses, each corresponding to a different network where that hostname is resolvable and operational. As such, the alias acts as an abstraction mechanism that simplifies host identity management in multi-network or multi-site contexts, allowing a single logical identifier (machine name) to be present and active across several network domains, each with its respective IP addressing. The use of the alias field is particularly relevant in distributed architectures, hybrid infrastructures (on-premises and cloud), and high-availability environments, where logical name uniqueness does not imply a single physical address, but rather a flexible, context-dependent association with multiple IP representations of the same functional entity.
- Shared printer server: if enabled (selected value is Yes), the user will be able to create a printer queues in the host.
- Dynamic IP
- Serial number
- Last connection
- Created on
- Locked
- Device type
- Internet browser
- CPU type
Access Control
On the access control tab, you can delegate the host management.
If you add a user authorization, you will allow the user to execute any task as a local administrator on this server or workstation. This feature requires the Soffid ESSO to be installed in the target host. To add a user authorization you can click the button with the add symbol (+), then select the user and expiration date, and finally apply changes.
It is also allowed to delete one or more user authorizations, you can do it from the entitlement details or by selecting one or more records from the list and clicking the button with the subtraction symbol (-).
Additionally, you can download a CSV file with the access control data and you can also upload a CSV file to add user authorizations, and modify or delete user authorizations.
You also can view the administrator password.
Sessions
On the sessions tab, you can view the information about the last connection of a user to this host. Shows data about the user, server, client, port used and date of connection.
You can download a CSV file with the user sessions data.
Actions
Host query
|
Query |
Allows you to query host through different search systems, Quick, Basic and Advanced. |
|
Add or remove columns |
Allows you to show and hide columns in the table. |
|
Add new |
Allows you to create a new host. You can choose that option on the hamburger menu or by clicking the add button (+). To add a new host it will be mandatory to fill in the required fields |
|
Delete |
Allows you to remove one or more hosts by selecting one or more records and next clicking the button with the subtraction symbol (-). To perform that action, Soffid will ask you for confirmation, you could confirm or cancel the operation. |
|
Import |
Allows you to upload a CSV file with the host list to add or update hosts to Soffid. First, you need to pick up a CSV file, that CSV has to contain a specific configuration. Then you need to check the content to be loaded, it is allowed to choose if you want or not to load a specific attribute. And finally, you need to select the mappings for each column of the CSV file to import the data correctly and click the Import button. |
|
Download CSV file |
Allows you to download a csv file with the hosts information. |
|
Operating systems |
This option allows you to manage the Operating Systems. You can add new, update, or delete OS |
Host detail
|
Apply changes |
Allows you to save the data of a new host or to update the data of a specific host. To save the data it will be mandatory to fill in the required fields. |
|
Delete |
Allows you to delete the host. To delete a host you can click on the hamburger icon and then click the delete button (trash icon). Soffid will ask you for confirmation to perform that action, you could confirm or cancel the operation. |
|
Undo |
Allows you to quit without applying any changes. |
|
Assign free IP Address |
Allows you to assign a free IP address. You can find that option by clicking on the hamburger icon. |
|
View password |
Will show the administrator password if it is available. |
Access control
|
Add new |
Allows you to create a new access control. You can choose that option on the hamburger menu or clicking the add button (+). First, you will select the user and the expiration date of that authorization. Finally you need to apply changes. |
|
Delete |
Allows you to remove one or more access controls by selecting one or more records and next clicking the button with the subtraction symbol (-). To delete one access control, you can click the access control, and then Soffid will show a form with the details. Then you can click the delete button (trash icon). To perform that action, Soffid will ask you for confirmation, you could confirm or cancel the operation. |
|
Import |
Allows you to upload a CSV file with the access control list to add or update access controls to Soffid. First, you need to pick up a CSV file, that CSV has to contain a specific configuration. Then you need to check the content to be loaded, it is allowed to choose if you want or not to load a specific attribute. And finally, you need to select the mappings for each column of the CSV file to import the data correctly and to click the Import button. |
|
Download CSV file |
Allows you to download a csv file with the access control information |
|
View password |
Will show the administrator password if it is available. |
Sessions
|
Download CSV file |
Allows you to download a csv file with the sessions information |
Printers
Description
Soffid lets administrator users manage system printers. A printer must always be attached to a host. A network attached printer is composed of a host (network print server) and a printer (printer queue).
Printers can be assigned to specific users or to user groups. The effective assignment can be done on session startup by using a Single Sign On client script. To do that, it is necessary to add a script on a Login entry point with type x-mazinger-script.
Related objects
- Name: identifier name of the printer.
- Description: additional printer information.
- Model: printer model.
- Server: where the printer is hosted.
- Restricted: if checked, only users and groups of users assigned can be access to that, in another case any user could access to that printer.
- Users: assignment of printer queues to users.
- Groups: assignment of printer queues to groups
Actions
Printer query
|
Query |
Allows you to query printers through different search systems, Quick, Basic and Advanced. |
|
Add or remove columns |
Allows you to show and hide columns in the table. |
|
Add new |
Allows you to create a new printer. You can choose that option on the hamburger menu or clicking the add button (+). To add a new printer it will be mandatory to fill in the required fields |
|
Delete |
Allows you to remove one or more printers by selecting one or more records and next clicking the button with the subtraction symbol (-). To perform that action, Soffid will ask you for confirmation, you could confirm or cancel the operation. |
|
Import |
Allows you to upload a CSV file with the printer list to add or update printers to Soffid. First, you need to pick up a CSV file, that CSV has to contain a specific configuration. Then you need to check the content to be loaded, it is allowed to choose if you want or not to load a specific attribute. And finally, you need to select the mappings for each column of the CSV file to import the data correctly and to click the Import button. |
|
Download CSV file |
Allows you to download a csv file with the basic information of all printers. |
Printer detail
|
Add new |
Allows you to create a new printer. You can choose that option on the hamburger menu or clicking the add button (+). To add a new printer it will be mandatory to fill in the required fields and apply changes. |
|
Delete |
Allows you to remove one printer. You can find that option by clicking on the hamburger icon. To perform that action, Soffid will ask you for confirmation, you could confirm or cancel the operation. |
|
Undo |
Allows you to quit without applying any changes. |
Mail Domains
Description
The mail domains identify each single mail domain that is going to be managed. If a mail domain is marked as obsolete, it won't be assigned to a user anymore.
- Code: domain, it will be as in email address is written.
- Description: a brief description about domain name usage.
- Obsolete: enabled to indicate that the domain will not be used and therefore should not be assigned.
Actions
Mail Domains query
|
Add new |
Allows you to create a new mail domain. You can choose that option on the hamburger menu or clicking the add button (+). To add a new mail domain it will be mandatory to fill in the required fields |
|
Delete |
Allows you to remove one or more mail domains by selecting one or more records and next clicking the button with the subtraction symbol (-). To perform that action, Soffid will ask you for confirmation, you could confirm or cancel the operation. |
|
Import |
Allows you to upload a CSV file with the mail domain list to add or update mail domains to Soffid. First, you need to pick up a CSV file, that CSV has to contain a specific configuration. Then you need to check the content to be loaded, it is allowed to choose if you want or not to load a specific attribute. And finally, you need to select the mappings for each column of the CSV file to import the data correctly and to click the Import button. |
|
Download CSV file |
Allows you to download a CSV file with the mail domains information. |
Mail Domain detail
|
Apply changes |
Allows you to save the data of a new mail domain or to update the data of a specific mail domain. To save the data it will be mandatory to fill in the required fields. |
|
Delete |
Allows you to delete the mail domain. To delete a mail domain can click on the hamburger icon and then click the delete button (trash icon). Soffid will ask you for confirmation to perform that action, you could confirm or cancel the operation. |
|
Undo |
Allows you to undo the changes made. |
Mail List
Description
The mail lists identify addresses that are going to be delivered to one or more users, just as distribution mail lists do.
- Name: identifier name of the mail list.
- Mail domain: an existing domain in the system. It is a predictive field that facilitates the search.
- Description: a brief description of the mail list.
- Nested lists: nested mail lists.
- External address: other mail addresses not managed by Soffid that will be on the mail list.
- Roles: the users who have been assigned those roles, will be on the mail list.
- Groups: the users who belong to that groups, will be on the mail list.
- Users: users who will be on the mail list.
- Computed target users: breakdown list of users that are on the mailing list.
Actions
Mail List query
|
Query |
Allows you to query mail list through different search systems, Quick, Basic and Advanced. |
|
Add or remove columns |
Allows you to show and hide columns in the table. |
|
Add new |
Allows you to create a new mail list. You can choose that option on the hamburger menu or clicking the add button (+). To add a new mail list it will be mandatory to fill in the required fields |
|
Delete |
Allows you to remove one or more mail domains by selecting one or more records and next clicking the button with the subtraction symbol (-). To perform that action, Soffid will ask you for confirmation, you could confirm or cancel the operation. |
|
Import |
Allows you to upload a CSV file with the "mail list" list to add or update mail lists to Soffid. First, you need to pick up a CSV file, that CSV has to contain a specific configuration. Then you need to check the content to be loaded, it is allowed to choose if you want or not to load a specific attribute. And finally, you need to select the mappings for each column of the CSV file to import the data correctly and to click the Import button. |
|
Download CSV file |
Allows you to download a csv file with the mail domains information. |
Mail List detail
|
Apply changes |
Allows you to save the data of a new mail list or to update the data of a specific mail list. To save the data it will be mandatory to fill in the required fields. |
|
Delete |
Allows you to delete the mail list. To delete a mail list can click on the hamburger icon and then click the delete button (trash icon). Soffid will ask you for confirmation to perform that action, you could confirm or cancel the operation. |
|
Undo |
Allows you to quit without applying any changes. |
Application access tree
Description
The entry points could be to connect to information systems defined on Soffid, or to connect to other applications. These applications can be Web applications or Native applications. Each information systems can have one or more application entry points.
The entry points are managed in a tree structure, that allows creating new menus and new application access.
Each member of the tree can be tied to a list of users, account groups, or roles. Also, you can choose if the application menu entry will be visible or not by unauthorized users.
After logging on to a managed workstation, the system will apply such restrictions and will update the Windows or Linux start menu.
Each application entry point will have different execution methods for fully managed workstations, loosely managed workstations, or external devices. Each of them can be a web browser URL or a javascript piece.
Each application entry point can have a single sign on rule. Those roles are fully explained in the ESSO reference guide. For more information, you can visit the ESSO chapter.
The defined entry points allow to final users open applications from the self service portal. For more information can visit My Applications page.
2026-06-12 New feature: inheriting authorisations in new applications
Screen overview
 Related objects
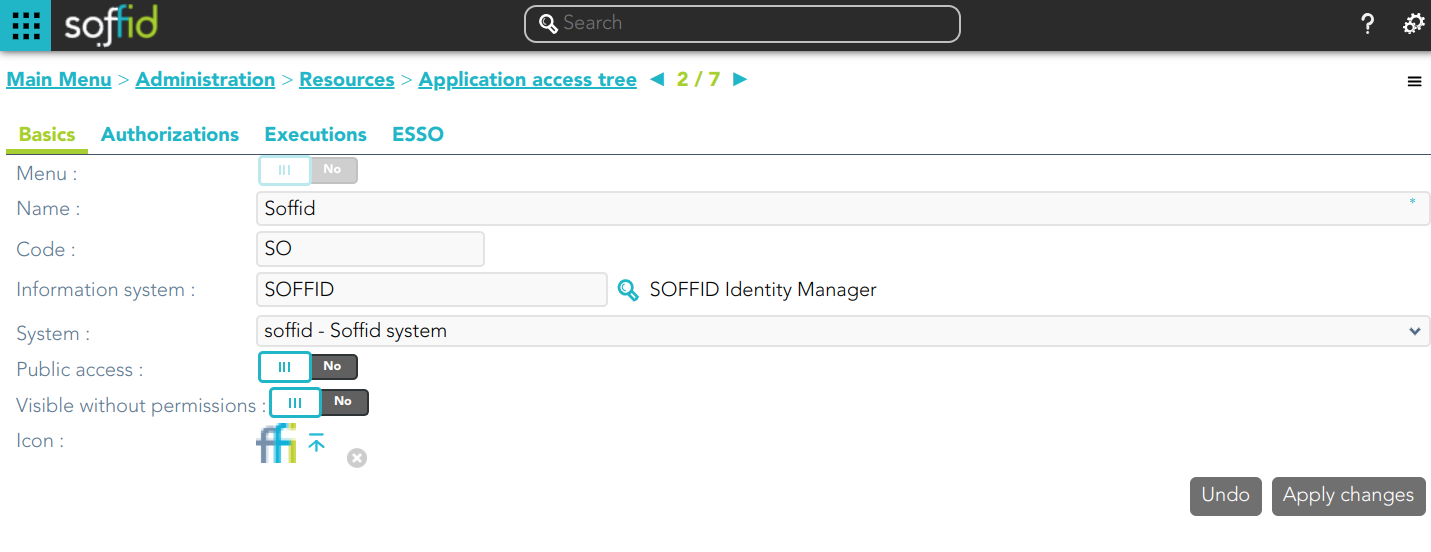
Standard attributes
Basics
Authorizations
Allows you to grant access permissions to users, groups, roles, or accounts.
- Manage: allows to update the entry point.
- Execute:
- When the entry point has selected the option public access to NO, only users with the assigned access level as execute could execute that entry point.
- When the entry point has selected the option public access to YES, all users can execute that entry point.
Executions
Allows Administrator users to configure the entry point access. It is only available to entry points with the option Menu not selected.
There are three options to configure the executions. Administrator users can configure one or more:
- Running from Intranet: if you select the Yes option, Soffid will check if the host that is trying to run this entry is located in a network flagged as internal, if so, Soffid will allow to run the entry.
- Running from Extranet: if you select the Yes option, Soffid will check if the host that is trying to run this entry is located in a network NOT flagged as internal, if so, Soffid will allow to run the entry.
- Running on the Internet: if you select the Yes option, Soffid will check if the host that is trying to run this entry is located in an unknown network, if so, Soffid will allow to run the entry.
For each execution option it is possible to configure the following parameters:
- Enabled: if the option is available to configure.
- Type: access connection type.
- Content:
- text/html: a URL to access to the application.

- x-application/x-mazinger-script: scripts that will be executed on ESSO clients

- Recorded session: configuration to use PAM service.

- Web Single Sign On: a URL to access the application with SSO.

- text/html: a URL to access to the application.


ESSO
Allows you to customize a script to define a pattern to detect when an application is used and how to inject the credentials.
For more information, you can visit the ESSO chapter.
Actions
Application query
💻 Image
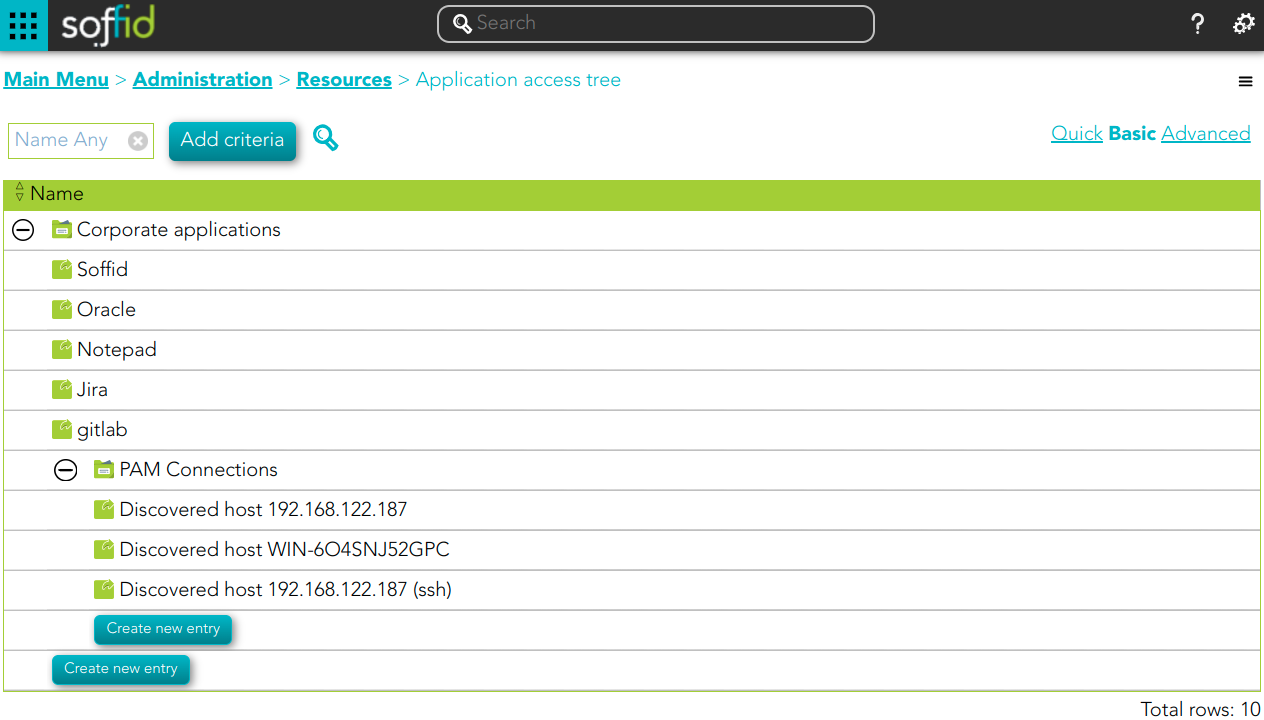
| Query | Allows to query the entry points through different search systems, Quick, Basic and Advanced. |
| Create new entry |
Allows you to add a new entry point. To create a new entry point you can click the Create new entry button, then Soffid will display a new window to fill in the entry point data. To add a new entry point it will be mandatory to fill in the required fields. |
Application detail
💻 Image
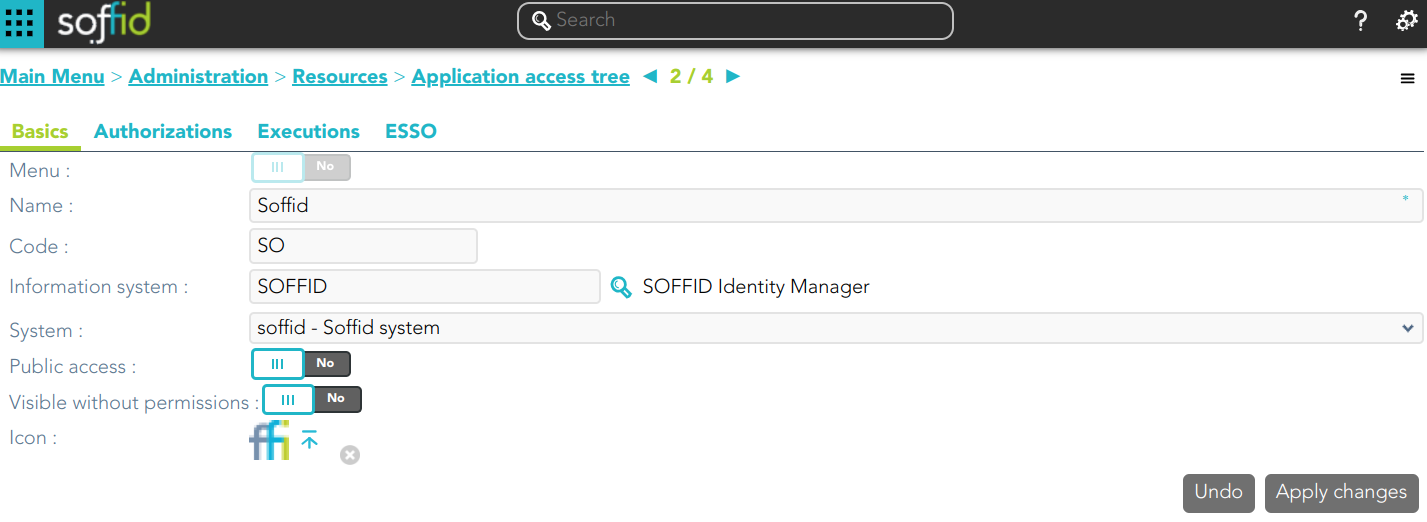
|
Apply changes |
Allows you to save the data of a new entry point or to update the data of a specific entry point. To save the data it will be mandatory to fill in the required fields. |
|
Delete |
Allows you to delete the entry point. To delete an entry point, you can click the hamburger icon and then click the delete button (trash icon). Soffid will ask you for confirmation to perform that action, you could confirm or cancel the operation. |
|
Undo |
Allows you to quit without applying any changes made. |
Authorizations
💻 Image
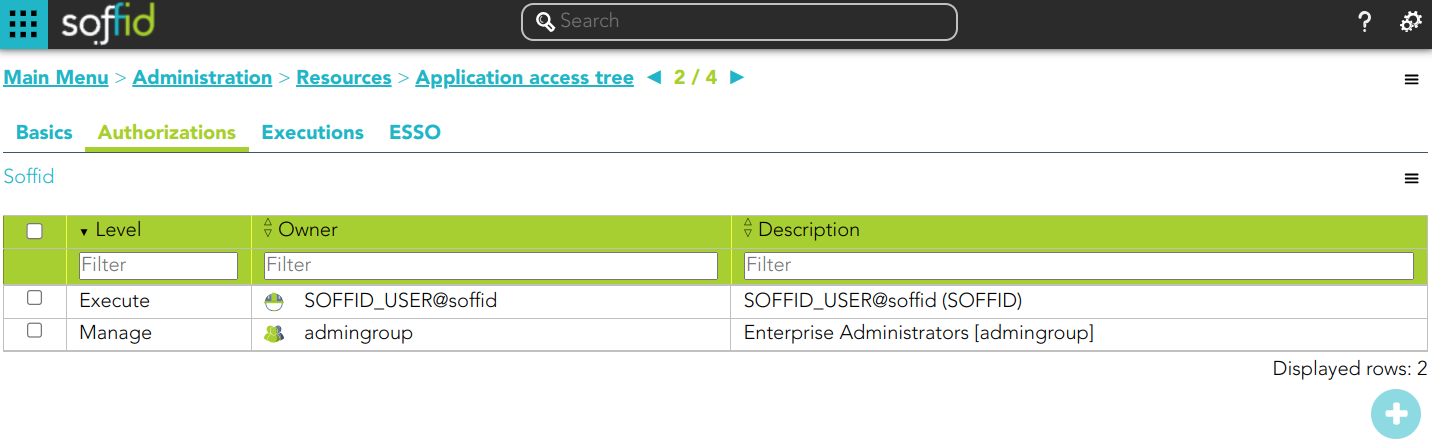
|
Add new |
Allows you to add a new authorization. You can choose that option on the hamburger menu or by clicking the add button (+). 💻 Image
First, you will select the Grantee type, which could be a role, a user, an account, or a group. Second, you will select the Grantee, it will depend on the Grantee type selected. Then, you will fill in the access level. And finally, you will apply changes. |
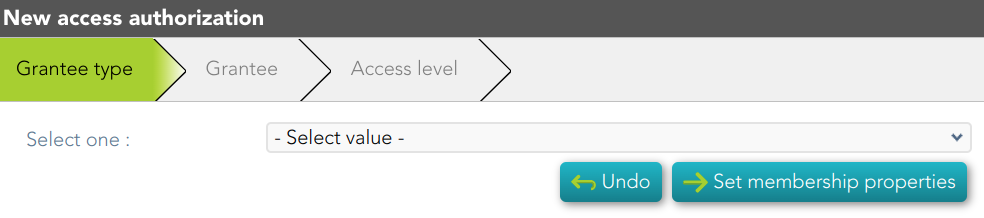
Executions
💻 Image
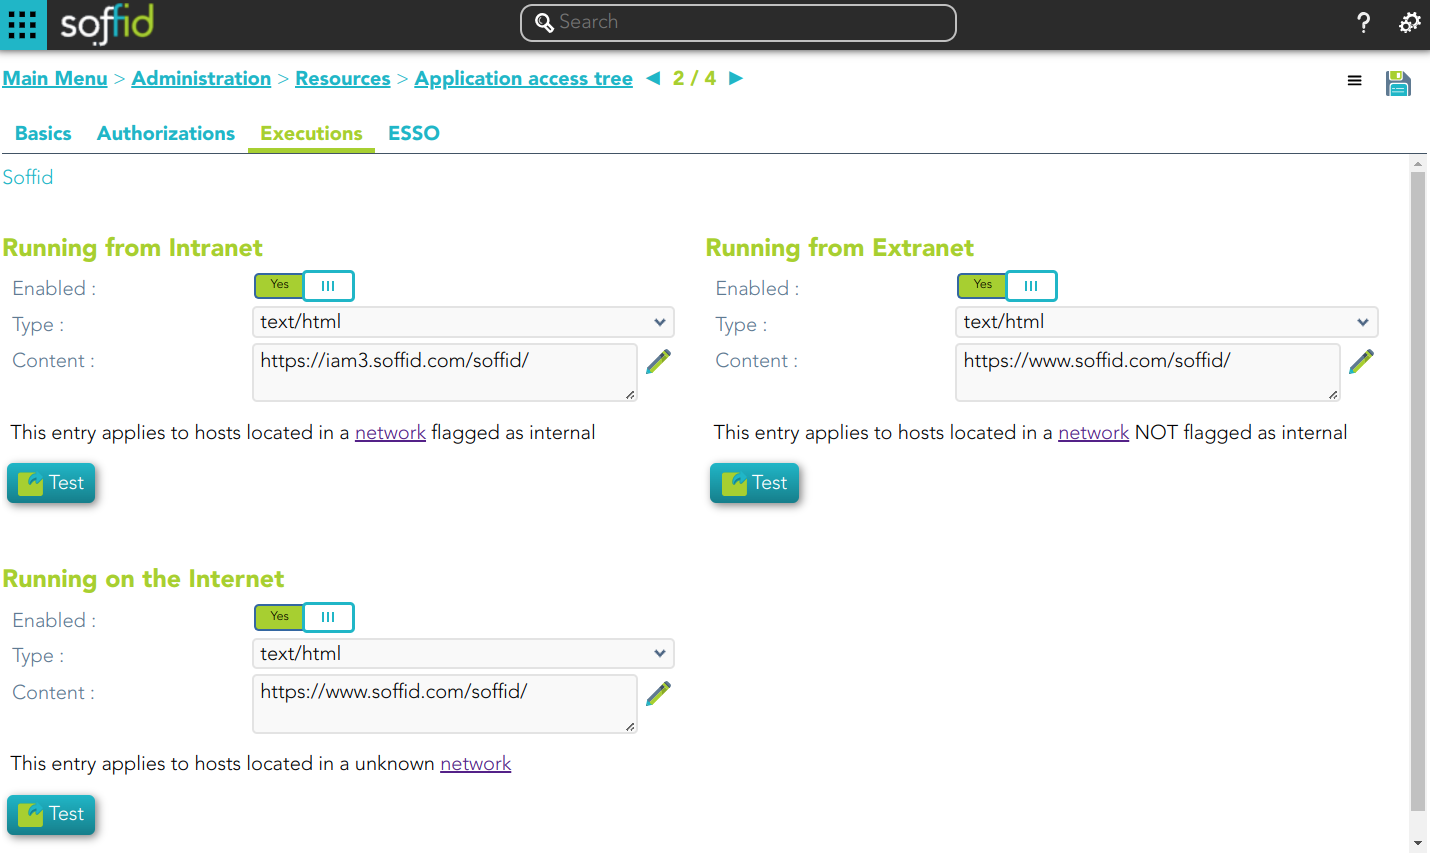
| Apply Changes | Allows you to save the execution configuration. |
| Delete | Allows you to delete the execution configuration. |
ESSO
💻 Image
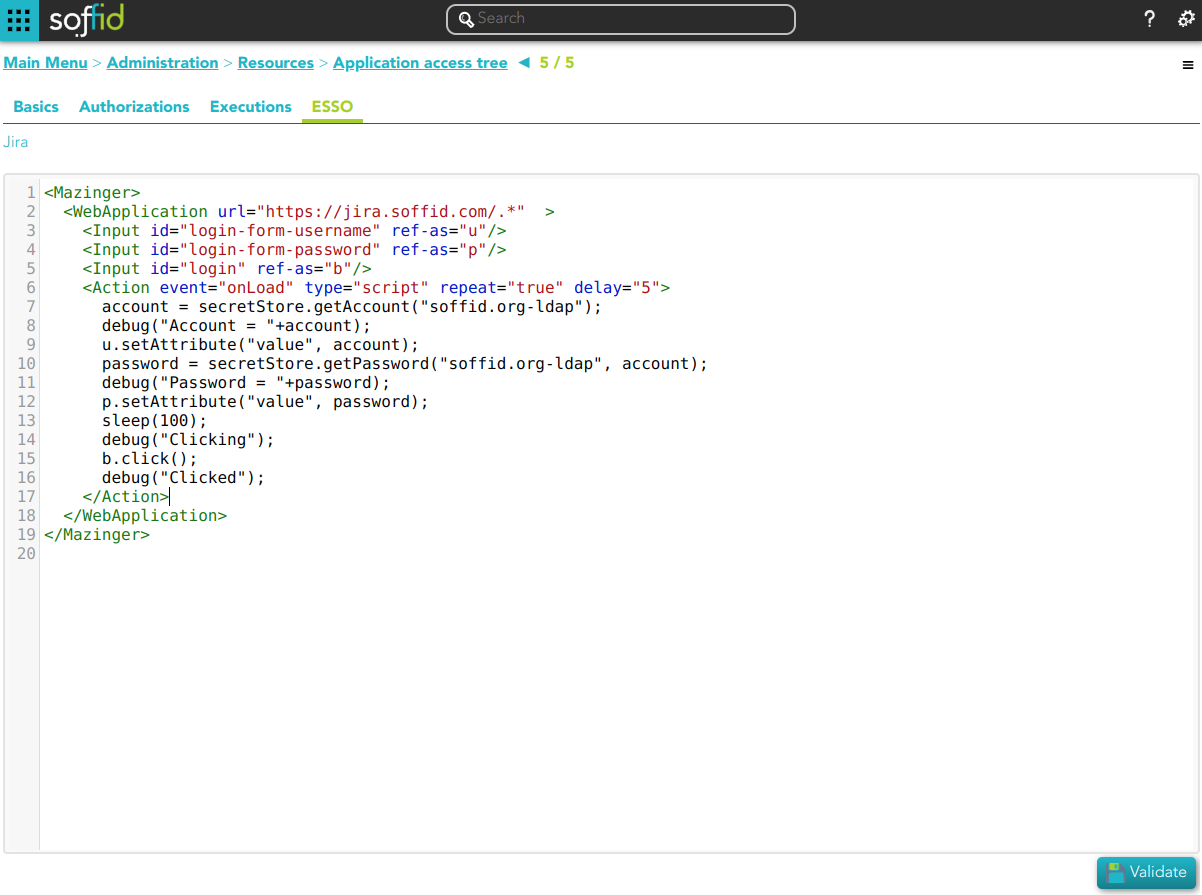
| Validate | Allows you to validate and save the script. |
Password vault
Description
Soffid provides a protected storage, to save and manage accounts for multiple applications, that is the Password vault. Here you can save the accounts and passwords to access to critical systems and to your applications as well. Password vault allows you to handle the access control list to these accounts. Sometimes these accounts can be used by a specific user or a set of users.
The accounts are organized in folders depending on the permissión, and the criticality level, .... These accounts can be system accounts or user accounts.
The Password vault exposes a subset of accounts to some users. These accounts are available through the Self-services portal. You can visit My applications page for more information.
When a privileged account is being config, it will be able to assign a workflow or approval process to request in order to use that account. For more information visit the link How to apply policies.
Folders
In the password vault, two kinds of folders are used: personal folders and shared folders, which depend on the Owners configuration you define.
On one hand, each user has their own personal folder. Inside this folder, the user can create accounts. That account will not be shared with any other user.
On the other hand, the shared folders could be used or managed by the owner/manager/SSO users.
Accounts
Soffid allows you to create new accounts on a specific folder on the password vault page, to add a new account will be mandatory to fill in some attributes, like System, name, and login name. You can consult the existing accounts related to a folder. For each account, you can update or delete the account, view and set a password.
Also, you can create accounts on the Account page and assign the appropriate vault folder.
Soffid allows administrator users to configure a workflow to request permissions when a user try to change the password of a privileged account in the password vault. That process can be defined with the BPM Editor as an Account reservation type. For more information you can visit the BPM Editor book.
Overview
Related objects
Standard attributes
Folder attributes
- Folder detail
- Name: folder name which will be displayed in My Applications.
- Description: folder description.
- PAM policy: when using PAM system, you could choose the policy that will comply with for each folder. When you define a policy for a folder, that policy will apply to all accounts hanging from this folder. For more information you can visit the Configure PAM page.
- Owners: allows you to handle the full privileged access control list.
- Owner users: list of users who will be the folder owners.
- Owner groups: list of groups, whose users will be the owners of the folder.
- Owner roles: list of roles. Users who have been granted these permissions will be the owners of the folder.
- Managers
- Manager users: list of users who can manage the folder. Those users can view the password depending on the password policy.
- Manager groups: list of groups, whose users can manage the folder. Those users can view the password depending on the password policy.
- Manager roles: list of roles. Users who have been granted these permissions can manage the folder. Those users can view the password depending on the password policy.
- SSO users
- Granted users: list of users who can use the account of that folder.
- Granted groups: list of groups, whose users can manage the account of that folder
- Granted roles: list of roles. Users who have been granted these permissions can manage the account of that folder.
- Browse folder
- Users: list of users who can browse the folder, but can not perform any action.
- Groups: list of groups, whose users can browse the folder, but can not perform any action.
- Roles: list of roles. Users who have been granted these permissions can browse the folder, but can not perform any action.
Accounts attributes
Actions Tab
This tab shows the read-only attributes of the user account:
- Name: user account name.
- Description: a brief description.
- System: target system to which the account will be connected.
- Login name: login name to connect to the target system.
- Login URL: URL to connect.
- In use by: user name who is using that account.
Also, this tab allows you to launch the connection to the target system, view the password, set the password to launch the connection, and unlock the use of that account. All those options depend on the account definition and user privileges.
Basics Tab
This tab displais all the account attributes and allows you to update the account configuration.
Visit the Account page to view more information about the standard attributes of an account.
Actions
Folders query actions
|
Query |
Allows you to query folders through, only Quick search is available. |
|
Add new |
Allows you to create a new folder. You can choose that option on the hamburger menu or by clicking the add button (+). To add a new folder it will be mandatory to fill in the required fields. A folder needs to have, at less, an owner to manage it. |
Folder actions
|
Apply changes |
Allows you to save a new folder or update an existing folder. To save the data it will be mandatory to fill in the required fields. Be in mind that is important to indicate who are the owners of the folder. |
|
Undo |
Allows you to quit without saving any change made. |
|
Delete |
Allows you to delete a folder if you have the right permissions. To delete a folder you can click on the hamburger icon and then click the delete button (trash icon). Soffid will ask you for confirmation to perform that action, you could confirm or cancel the operation. |
Account actions
|
Apply changes |
Allows you to save a new account. To save the data it will be mandatory to fill in the required fields. Be in mind that is important to indicate who are the owners of the folder. If the account exists on the system, you can assign the vault folder to the account window. |
|
Undo |
Allows you to quit without saving any change made. |
|
Delete |
Allows you to delete an account from a folder if you have the right permissions. To delete a host you can click on the hamburger icon and then click the delete button (trash icon). Soffid will ask you for confirmation to perform that action, you could confirm or cancel the operation. |
|
Set password |
This option depends on the credential type selected. Password:
💻 Image
SSH key:
💻 Image
Kubernetes key:
💻 Image
|
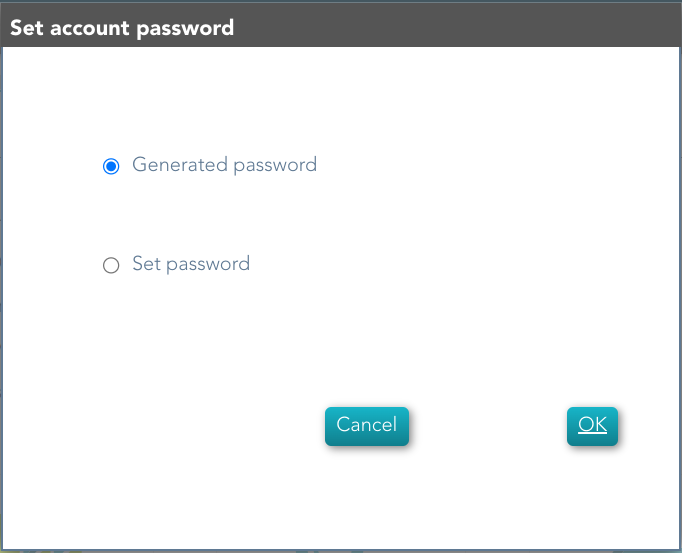
How to apply policies
Soffid allows you to define policies and rules to apply to a specific folder or a set of folders. To do that is needed to install the XACML addon and configure the proper policies and rules.
Also, you can config a workflow or approval process to request in order to use accounts saved on a folder.
It is mandatory to enable the Password Vault PEP and populate the information about the XACML policy set and the version which applies.
Example
XACML PEP config
It is mandatory to enable the Password Vault PEP and populate the information about the XACML policy set and the version which applies.
Password Vault:

XACML PEP config:

XACML Policy Management
You need to configure the access to the folder "VaultFolder", that folder can contain other folders and accounts. It will be mandatory to config the access list, who are the owners, managers, and so on. You need to know if you need to config the control access list by accounts, by folders, or both.

For instance, the policies you need to implement are the following:
1. Only users between 6:00 and 18:00 could use the accounts inside the "demoFolder".
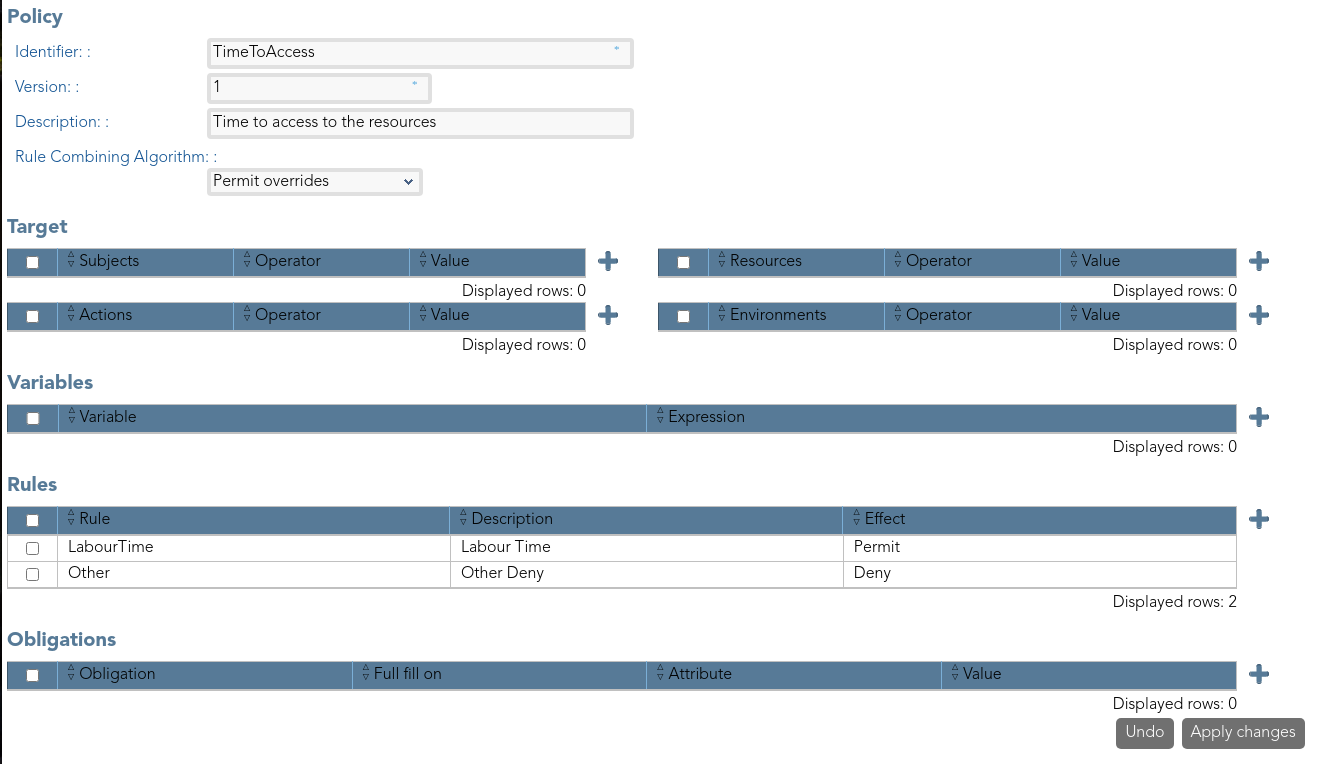
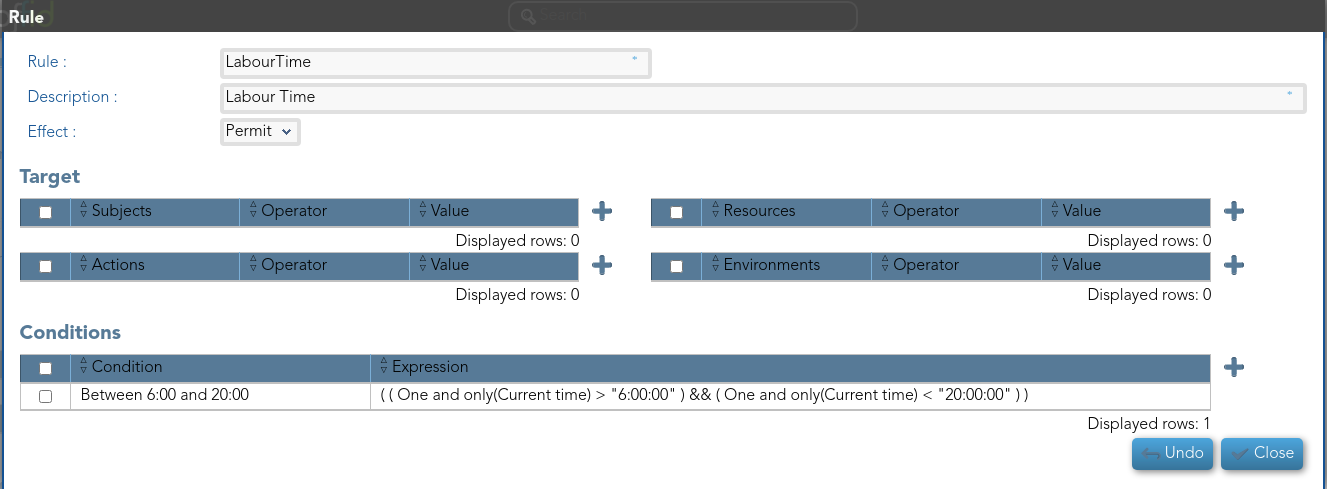
2.- User "bob" never could use the accounts of demoFolder.
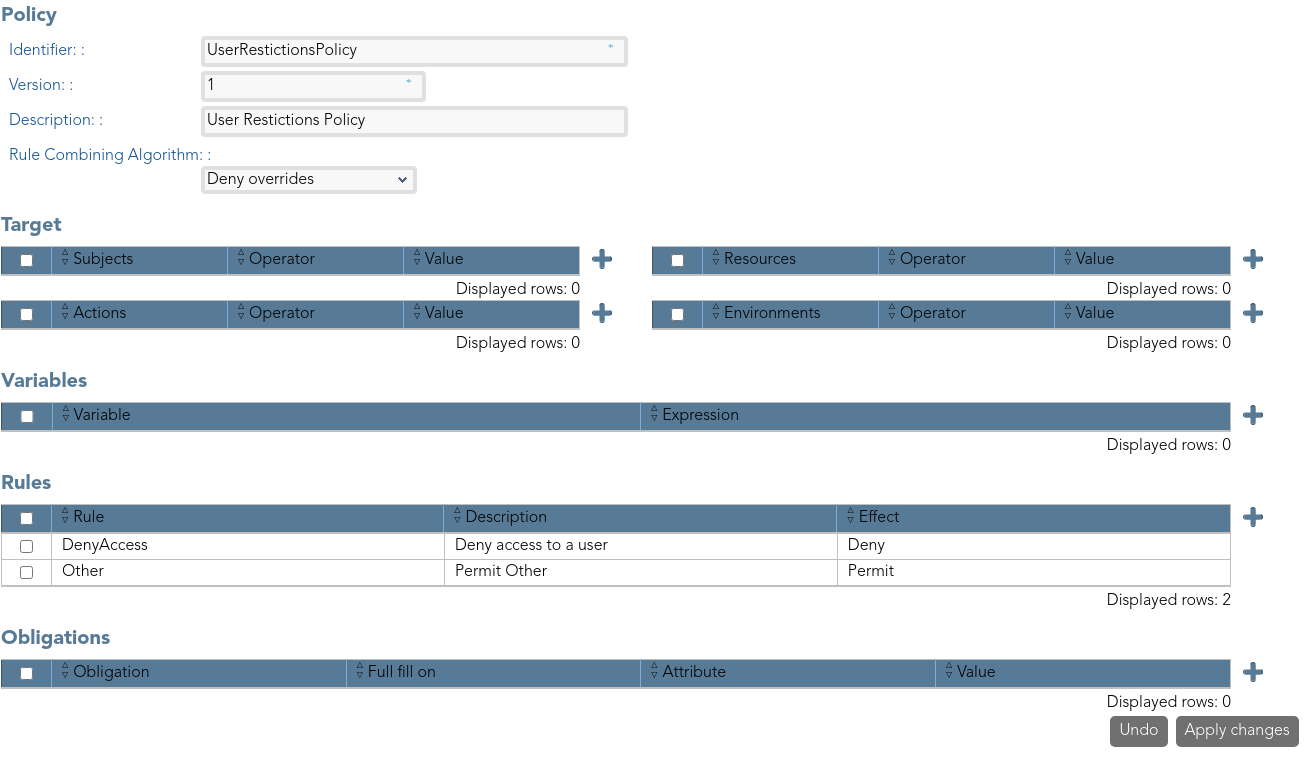
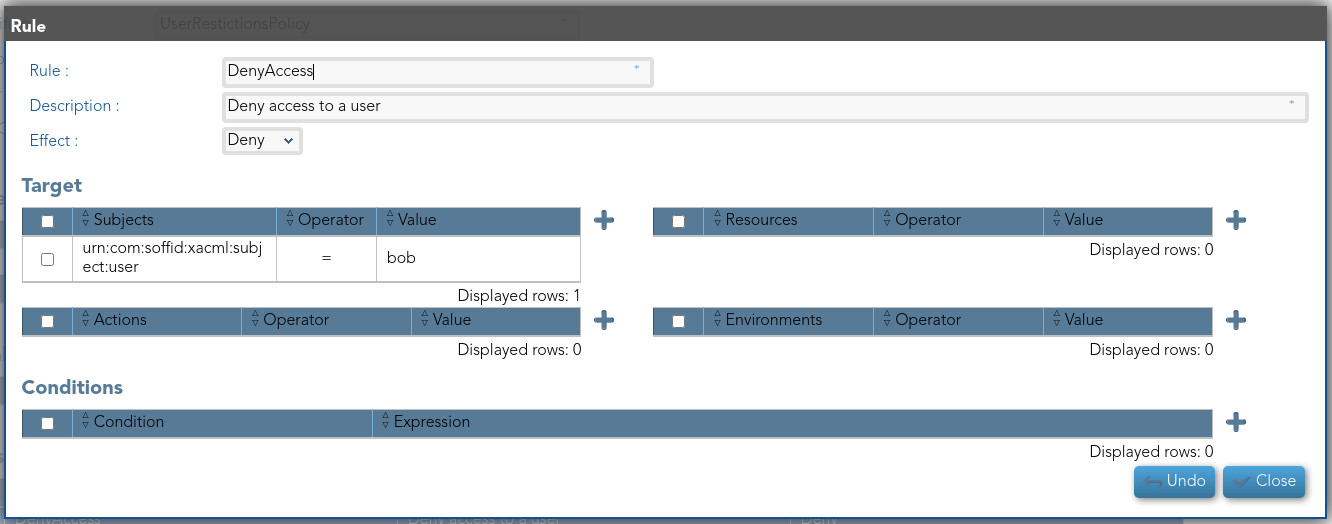
3. Users with result permits, need the authorization to use the accounts.
You need to config the workflow that will be called, to config you need to include the bpm obligation on the policy. Also, you can include a message to the user, or other obligations.
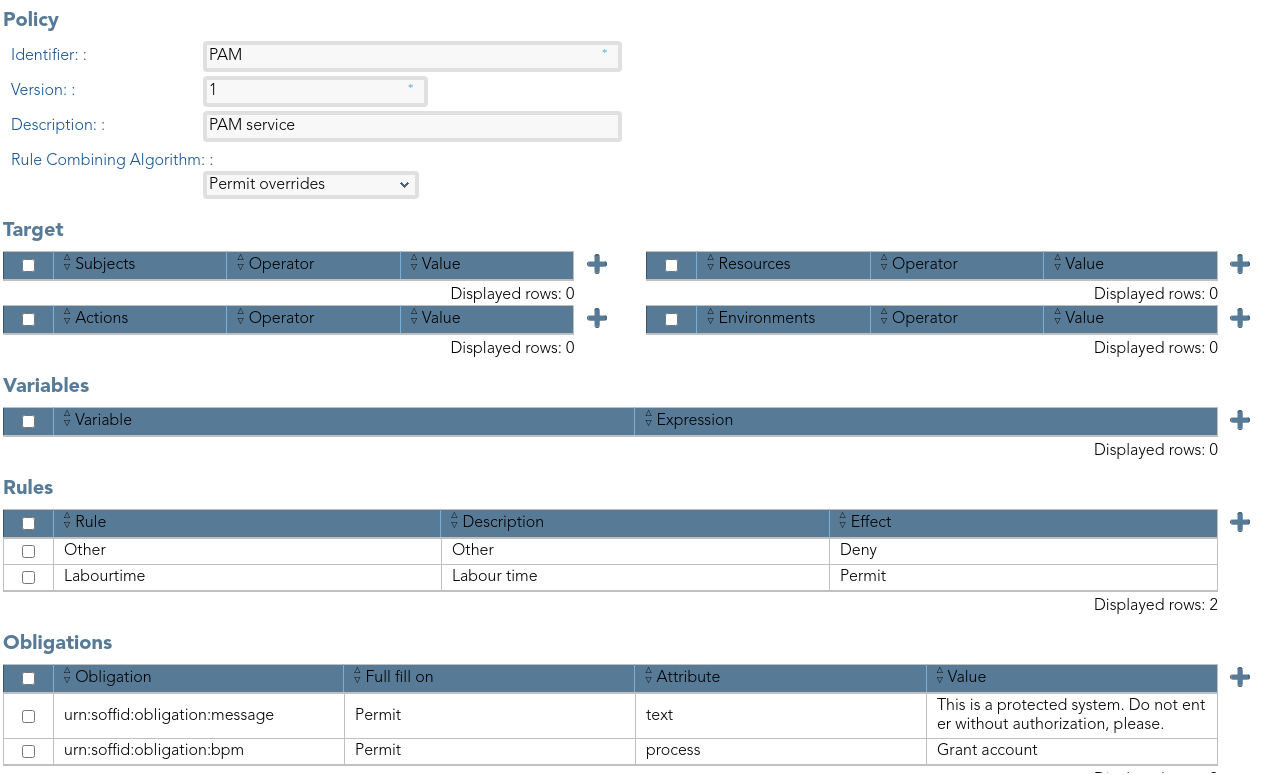
Visit the XACML Book for more information.
Visit the BPM Editor Book for more information.
Custom objects
Description
The custom objects are the objects created by the administrator to extend the Soffid underlying data model. This allows you to store additional information that is not natively supported by Soffid.
This option allows administrator users to provide objects with content.
For more information about how to create a new Custom object you can visit the Metadata page.
Screen overview
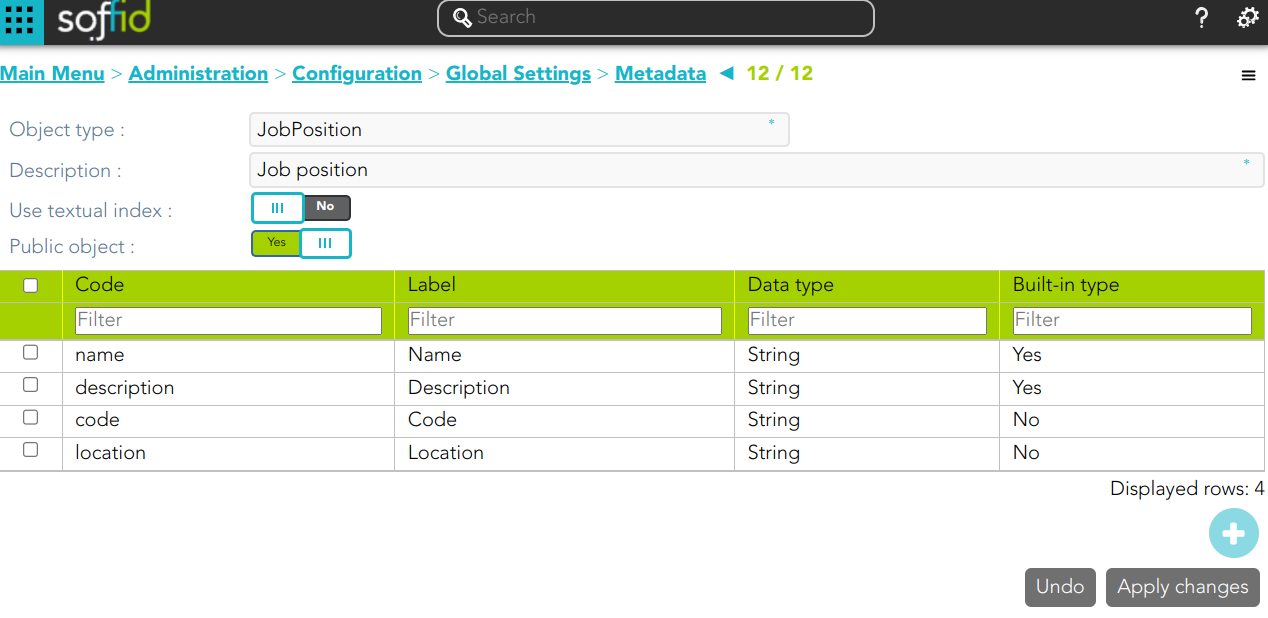
Related objects
- Object Type: objects created by the administrator.
Standard attributes
- Name: identification name.
- Description: brief description.
Every single custom object could have specified attributes defined by the administrator users when they create the object type.
Actions
Custom object query
|
Query |
Allows you to query custom object through different search systems, Quick, Basic and Advanced. |
|
Add or remove columns |
Allows you to show and hide columns in the table. |
|
Add new |
Allows you to create a new custom object. You can choose that option on the hamburger menu or clicking the add button (+). To add a new custom object it will be mandatory to fill in the required fields |
|
Delete |
Allows you to remove one or more custom objects by selecting one or more records and next clicking the button with the subtraction symbol (-). To perform that action, Soffid will ask you for confirmation, you could confirm or cancel the operation. |
|
Import |
Allows you to upload a CSV file with the custom object list to add or update custom objects to Soffid. First, you need to pick up a CSV file, that CSV has to contain a specific configuration. Then you need to check the content to be loaded, it is allowed to choose if you want or not to load a specific attribute. And finally, you need to select the mappings for each column of the CSV file to import the data correctly and to click the Import button. |
|
Download CSV file |
Allows you to download a csv file with the custom objects information. |
Custom object detail
|
Apply changes |
Allows you to save the data of a new custom object or to update the data of a specific custom object. To save the data it will be mandatory to fill in the required fields |
|
Undo |
Allows you to undo any changes made |
|
Delete |
Allows you to remove a custom object. You can choose that option on the trash icon. To perform that action, Soffid will ask you for confirmation, you could confirm or cancel the operation. |
Examples
Example 1
... ...
lCustomObj = serviceLocator.getCustomObjectService().findCustomObjectNames("JobPosition");
... ...Example 2
... ...
lCustomObj = serviceLocator.getCustomObjectService().findCustomObjectByTypeAndName("JobPosition", "IAM_Engineer");
... ...Example 3
... ...
lCustomObj = serviceLocator.getCustomObjectService().findCustomObjectByJsonQuery("JobPosition", "name co " + "\"IAM\"");
for (var i=0; i<lCustomObj.length; i++) {
atributes = lCustomObj[i].getAttributes();
out.println("*** Custom Object - " + i + " - " + lCustomObj[i].name);
out.println("*** Custom Object - " + i + " - " + atributes.get("code"));
out.println("*** Custom Object - " + i + " - " + atributes.get("location"));
... ...
}
... ...