Integration Engine
- Smart engine settings
- Agents
- Synchronization servers
- Account naming rules
- Attribute translation tables
- Soffid Objects
- Sample scripts
- Utility classes
- Network discovery
Smart engine settings
Description
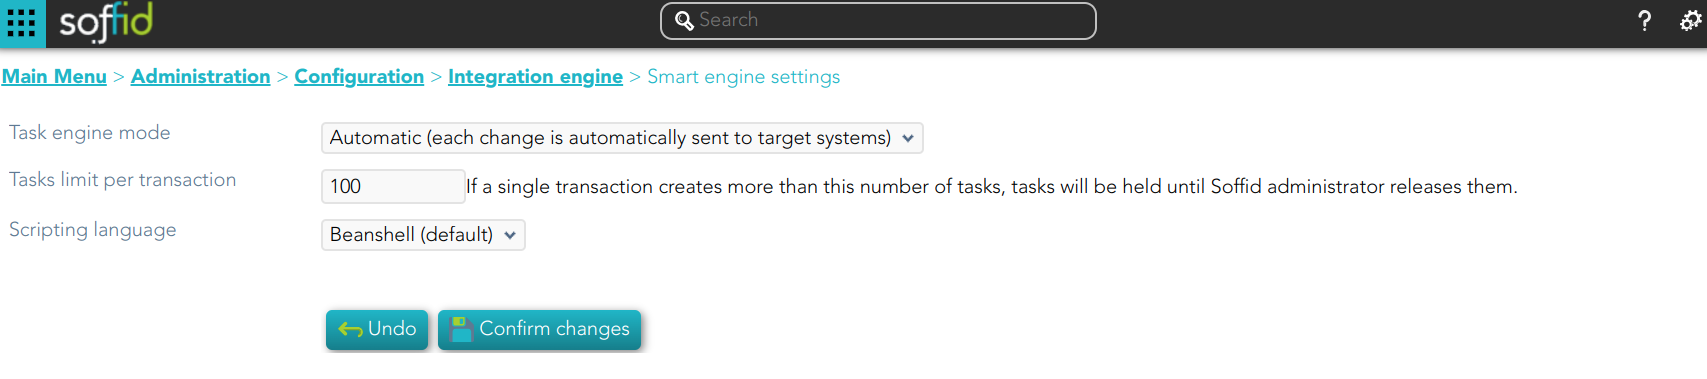
The administrator users can decide the engine mechanism for the synchronization task, i.e. when the tasks are created and sent to external systems.
Screen overview
Standard attributes
- Task engine mode: allows you to select the synchronization mode. There are three available options:
- Read only: it is the option by default in the Soffid installation. No task is synchronized to external systems.
- Manual: only selected synchronization tasks are performed. You could synchronize manually a user, check the "Propagates the changes" action on the Users page. Or also synchronize a whole target system, check the Agents page.
- Automatic: each change is automatically send to target systems.
- Tasks limit per transaction: if a single transaction creates more than this number of tasks, tasks will be held until Soffid administrator releases them. The administrator could check them in the Sync server monitoring page.
- Scripting language: Soffid allows you to create scripts and you can choose the scripting language:
- Beanshell
- Javascript
- Autodetected
Soffid offers a set of sample scripts. You can find examples visiting the Sample scripts page.
Additionally, in the initial configuration of the container, we can configure the SOFFID_TRUSTED_SCRIPTS environment variable to allow the use of insecure classes. You can find this information visiting the Installing IAM Console page.
Tips
Use the task engine mode for these scenarios:
- Read Only: use this option after the Soffid installation until you have at least one target system configured to test the synchronization.
- Manual: use this option for testing environments, or at the beginning of a live release.
- Automatic: use this option for live environments, or also for the testing environments when the platform is mature.
Tasks limit per transaction:
- Use a high task limit when you are comfortable with the configured processes of Soffid, for instance, 1000 or 10000 depending on the number of accounts of these external systems.
Actions
| Confirm changes | Allows you to update the engine settings. |
| Undo | Allows you to cancel the changes made and not confirmed. |
Agents
Description
Soffid agents are the tool that allows the connection between the Soffid console and the target systems. To establish the connection with target systems, Soffid provides a large number of connectors that will be able to set up into the Soffid console.
You could see the complete list of Synchronization Server Connectors.
Soffid administrator has the chance to easily customize attribute mappings for some connectors addons, without having to code it using Java. Soffid provides a graphical interface to perform attribute mapping.
An agent will appear disabled when this agent won't have a server assigned. Bear in mind to select the “Disabled” flag on Server URL criteria when you will query if you want to search for disabled, but defined agents.
Related objects
Standard attributes
Basic
- Task engine mode: shows the current task engine configuration. For more information visit the Smart engine settings page.
- Name: agent's identifying name.
- Description: a brief description of the agent.
- Usage: identify whether the accounts created are to be used for IAM or PAM. The IAM and PAM tasks will be managed in separate queues. This attribute will be available in Soffid 3.5.10 or higher.
- IAM
- PAM:
- The PAM accounts will be managed as a Shared thread internally.
- The PAM accounts will be shared accounts and never will be single user accounts.
- Type: Identify the connector type to use. Different implementations of the server plugins are included in the connectors installed into Soffid. Each type has a Java class bound, the name of the Java class implementing the connector is displayed next to the connector name.
- Server: synchronization will be performed with the selected server. It is allowed to select two servers in cases high disponibility will be necessary. If you choose two servers, when one fails, the other will be used.
- If “Each main synchronization server” is selected, the agent will be run by every sync server.
- If "-disabled-" is selected, the agent will be disabled.
- If you select a single sync-server, the agent only will be run on that server.
- Shared Thread: if it is enabled, the same thread will be shared to several synchronization servers.
- Dedicated Thread: if "Shared thread" is disabled, it will be available the option to choose the number of threads to dedicate to the synchronization process.
- Task timeout (ms): add a timeout to the synchronization server tasks (query, insert, update, delete, update password, etc). If you add a timeout, when the connection gets this timeout, the synchronization server will stop the request and add it to the queue for a new retry later.
- Long task timeout (ms): add a timeout to the reconciliation server tasks (user, group, role, account, grants, etc). If you add a timeout, when the connection gets this timeout, the synchronization server will stop the request (no retry is added).
- Trust passwords: check if you can trust it to propagate their passwords to Soffid. Trusted password agents differ from the non-trusted ones in:
-
Temporary passwords generated from the console only propagate to agents that have trusted passwords checked. In the other case, the agents only receive definitive passwords.
-
When a password has reached its expiry date, it will automatically be disabled on agents where the trusted password is not checked, so the user can no longer access it.
-
When the managed system detects a change in the user request password, the password will be propagated to Soffid only if the agent associated trusted password is checked.
-
- If you want to forward the authentication requests to trusted target systems, you must enable the Trust passwords option and the proper feature on the Authentication page.
- Authoritative identity source: check if the agent will be used as the source for users' information. It is usually checked for the first load of users into Soffid, and then it is unchecked, being Soffid that manages users. Optionally, you can select a custom workflow to process incoming changes.
- Read-only: if it is checked (the selected option is Yes), no change will be applied to the managed system. Only read operations will be allowed.
- Paused task: if it is checked (the selected option is Yes), the system remains connected, but the tasks in the queue will be retained. It is very useful when conducting tests and ensuring that no tasks propagate, except the ones we are manually triggering (we pause, make the changes, and when everything is fine, we remove the pause). As a rule, you should pause when making configuration changes in production.
- Manual account creation:
- If you check NO, Soffid will create the new user accounts applying the defined policies.
- Check YES if you don't want Soffid to create automatically new accounts for the users.
- Role-based: when "Manual account creation" is not checked (option selected is No), it will show "Role-based". Check it if only users with any role on this agent should be created. When the identity or account loses its permissions, the account will be disabled. Uncheck to allow users with no role on it.
- Groups: when "Manual account creation" is not checked (option selected is No), it will show "Groups". Identify the business units that are allowed to have an account on this system.
- User domain: it is the rule used to determine how to generate account names. If the account name is the same as the user name (as is normally the case), the “Default user domain” should be used. The user domain values are defined on the Account naming rules page.
- Password domain: determines the password policies that will be used. If the "Default password domain" is selected, Soffid passwords will be shared with the managed systems. The user domain values are defined on the Password policies page.
- User Type: when "Manual account creation" is not checked (option selected is No), it will show User Type. Only users of the selected types will be created. Any change made in this field involves all accounts to be recalculated. New ones will be added to the repository and managed systems. Some accounts will get disabled if the owner user no longer belongs to any authorized user type.
When uploading authoritative data for identities from a managed system, firstly, users will be created in Soffid as indicated in the attribute mapping, and secondly, accounts will be created for the managed systems only if the agent option "Manual account creation" is not checked and only for User Types indicate.
Connector parameters
The custom attributes depend on the used plugin.
Here you will find all the information needed about the available Soffid connectors to integrate external managed systems.
- AWS Connector
- CSV Connector
- Google Apps Connector
- JSON REST Web Services Connector
- LDAP Connector
- Oracle Connector
- Oracle EBS Connector
- SAP Connector
- SCIM Connector
- Shell Connector
- SQL Connector
- Windows Connector
- Zarafa Connector
- SQL Server Connector
Integration flows
Some connector addons have associated integration workflows. On the Integration flows tab you can view the integration flows related to the agent. You also can view in detail the workflows and test them.
Attribute mapping
The attribute mapping tab only appears when the agent allows such customization. Soffid administrators have the chance to easily customize attribute mappings without having to code them using Java. The administrator users can select system objects and the Soffid objects related, manage their attributes, and make either inbound and outbound attribute mappings.
There is an action that creates all the default mapping depending on the agent connector type. That option creates automatically system objects with their attributes and properties, you can select them by clicking on the hamburger icon and then the Create default mapping option. Once created the default mapping, those can be customized as required.
Properties
Some agents require to configure some custom attributes in their properties section.
These properties are specific for each type of connector. You could see all these properties by visiting each connector type page.
Methods
This option is only available on some types of connectors. It is used to define methods that can be called using the defined properties.
Attributes
Each object mapping defines an agent object name and one bound Soffid object type.
The left hand side attributes are managed system attributes, so they are agent dependent that is being configured. The right side attributes are Soffid attributes and must be selected from an existing list.
It is allowed to use bean Shell expression in the source when the mapping is one-way.
System attributes
A configuration agent must define object types that can be created on it. Each object mapping defines an agent object name and needs bound Soffid object type.
At this column, the system's attribute name will be displayed.
When evaluating any expression, either the system or soffid attributes are available as script variables. Moreover, the following variables are available:
| Variable | Content |
|
serverService |
Server API that enables an easy object query [ Search the link "Public API Module" or "Data & Service model" ] |
|
serviceLocator |
Spring Singleton that gets access to any published service bean. Only available on the main syncserver |
|
remoteServiceLocator |
Singleton that gets access to any remotely published service bean. |
|
THIS |
HashMap that contains any soffid or system managed attribute. It can be used when the attribute name is not a valid java identifier. |
|
Service that allows the script to get or update information in the target system. |
Script Example 1

/*js*/
var name = new javax.naming.ldap.LdapName(distinguishedName);
var rdns = name.rdns;
var g = null;
var rn = null;
for (var i = rdns.length - 2; i > 0; i--) {
  if (rdns[i].type == "DC") break;
  if (g == null) {g = "", rn = ""}
  else {g = g + "/"; rn = "," + rn}
  g += rdns[i].value.toLowerCase();
  rn = rdns[i].type+"="+rdns[i].value;
}
var gi = serviceLocator.groupService.findGroupByGroupName(g);
if (gi == null) {
  var parent = ! rn.contains("/") ?
    "world":
   rn.substring(0, rn.lastIndexOf("/"));
  gi = new com.soffid.iam.api.Group();
  gi.name = g;
  gi.description = rn;
  gi.parentGroup = parent;
  serviceLocator.groupService.create(gi);
}
return g;
Directions
At the center column, an arrow will show the direction of the information flows.
When the information flows from the system (left) to Soffid (right), the left column name can be replaced by a bean shell expression. This expression will be evaluated on the system object prior to uploading it to Soffid.
When the information flows from Soffid (right) to the managed system (left), the right column can contain a bean shell expression that will be evaluated prior to provisioning the user.
Here are some examples:
| System attribute | Direction | Soffid attribute | Meaning |
|
cn |
<=> |
accountName |
The account name is the CN attribute of the LDAP |
|
departmentNumber |
<= |
|
Assigns the group description of the primary group to the departmentNumber attribute |
|
baseDN |
=> |
"ou="+primaryGroup+",dc=soffid,dc=org" |
Assigns the base dn of the user to the proper organization unit that is below dc=soffd,dc=org. |
Soffid attributes
You can consult the list of Soffid attributes:
When evaluating any expression, either the system or soffid attributes are available as script variables. Moreover, the following variables are available:
| Variable | Content |
|
serverService |
Server API that enables an easy object query [ Search the link "Public API Module" or "Data & Service model" ] |
|
serviceLocator |
Spring Singleton that gets access to any published service bean. Only available on the main syncserver |
|
remoteServiceLocator |
Singleton that gets access to any remotely published service bean. |
|
THIS |
HashMap that contains any soffid or system managed attribute. It can be used when the attribute name is not a valid java identifier. |
|
Service that allows the script to get or update information in the target system. |
Script Example 1

firstName + " " + lastNameScript Example 2

attributes = serviceLocator.getUserService().findUserAttributes(userName);
return attributes.get("position");
Test
For the definition of an object, you can check the system attributes defined, in both the final system and in Soffid.
1. First of all, you need to click the Test button, then Soffid will display a text field and some buttons to perform new actions.
2. Secondly, the text field must be filled in with the appropriate data. It can be a user, an account, a group or another system object. It depends on the system object you are checking.
3. Then, you can choose the action to perform.
Text expression: allows you to test a system object.
Synchronize now: this allows you to synchronize the data object to the target system.
Fetch system raw data: brings the data of an object from a target system.
Fetch Soffid object: brings the data of a specific system object with processed data to update into Soffid
Triggers
It is allowed to define BeanShell or JavaScript scripts that will be triggered when data is loaded into the target system (outgoing triggers).
The trigger result will be a boolean value, true to continue or false to stop.
A configuration agent can configure triggers related to the operation to be performed. There are different trigger type, that determines the specific moment at which the script will be triggered.
Triggers can be used to validate or perform a specific action just before performing an operation or just after performing an operation on target objects.
To access Soffid data, you can use source{"attributeName"}, which recovers the value of the attributeName. That object will be Soffid format.
Also, you can use newObject{"attributeName"} to create the new value or oldObject{"attributeName"} to get the old value of the target system, those objects will be target system format.
| Trigger | |
|
preInsert |
It will be triggered just before the insert action. It will be used to validate or prevent the insert action, and also to prepare objects or actions when a new object will be inserted |
|
preUpdate |
It will be triggered just before the update action. It will be used to validate or prevent update an object. |
|
preDelete |
It will be triggered just before the delete action. It will be used to validate or prevent delete an object. |
|
postInsert |
It will be triggered just after the insert action. It will be used to trigger or prevent an action. |
|
postUpdate |
It will be triggered just after the update action. It will be used to trigger or prevent an action. |
|
postDelete |
It will be triggered just after the delete action. It will be used to trigger or prevent an action. |
|
preSetPassword |
It will be triggered just after the set password action. It will be used to trigger or prevent an action. |
|
postSetPassword |
It will be triggered just after the set password action. It will be used to trigger or prevent an action. |
Example 1
Get the attribute company option 1:
company = source{"attributes"}{"company"};Get the attribute company option 2
userName = source{"userName"};
attributes = serviceLocator.getUserService().findUserAttributes(userName);
company = attributes.get("company");
Example 2
role = serviceLocator.getAplicacioService ().findRoleByNameAndSystem ( "Domain Users", "AcitveDirectory");
rg = new java.util.HashMap();
rg.put ("grantedRoleId", role.getId ());

list = new java.util.LinkedList ();
list.add (rg);
newObject{"ownedRoles"} = list;

return newObject{"name"} != null
Example 3
if (oldObject.get("userPrincipalName") != null)   {
	newObject.remove("userPrincipalName");
    newObject.put("groupType", oldObject{"groupType"});
}
For more examples, you can visit the Incoming Triggers examples page.
Load triggers
On the Load trigger tab, it is allowed to set up a specific configuration for the agent and define BeanShell or JavaScript scripts that will be triggered when data is loaded into Soffid (incoming triggers).
- Full reconciliation: switch off to enable incremental load process and disable Soffid object removal.
- Propagate changes: switch off to prevent sync-server to create synchronization tasks after loading incoming changes.
To add a new trigger, it is mandatory first of all, to select a Soffid object on which the action will be performed. Then to select the trigger, that determines the moment at which the script will be triggered. Finally, define the BeanShell script that will be executed. The available objects are the following:
- User
- Account
- Group
- Role
- Grant
Triggers can be used to validate or perform a specific action just before performing an operation or just after performing an operation into Soffid objects. The trigger result will be a boolean value, true to continue or false to stop.
In a Load Trigger, it is not possible to access to mapping definitions configured on the attribute mapping tab. It will be necessary to use newObject{"attributeName"} to get the new value, or oldObject{"attributeName"} to get the old value. Those objects will be in Soffid format.
For more info about the Soffid format, you can visit the Soffid Objects page.
| Trigger | |
|
preInsert |
It will be triggered just before the insert action. It will be used to validate or prevent the insert action. |
|
preUpdate |
It will be triggered just before the update action. It will be used to validate or prevent update an object. |
|
preDelete |
It will be triggered just before the delete action. It will be used to validate or prevent delete an object. |
|
postInsert |
It will be triggered just after the insert action. It will be used to trigger or prevent an action. |
|
postUpdate |
It will be triggered just after the update action. It will be used to trigger or prevent an action. |
|
postDelete |
It will be triggered just after the delete action. It will be used to trigger or prevent an action. |
Example 1
userName = newObject {"userName"};
system = "ActiveDirectory";

accounts = serviceLocator.getAccountService()
  .findAccountByJsonQuery("(system eq \"" + system + "\") AND name eq \"" + userName + "\" AND (type eq \"I\")");
.....
user = serviceLocator.getUserService().findUserByUserName(userName);
.......
Example 2
...........
if (isFound) {
  newObject{"id-indicator"} = "1";
} else {
  if (contFalse > 0) {
    newObject{"id-indicator"} = "0";
  } else if (contNull > 0) {
    newObject{"id-indicator"} =  null;
  }
}
For more examples, you can visit the Outgoing Triggers examples page.
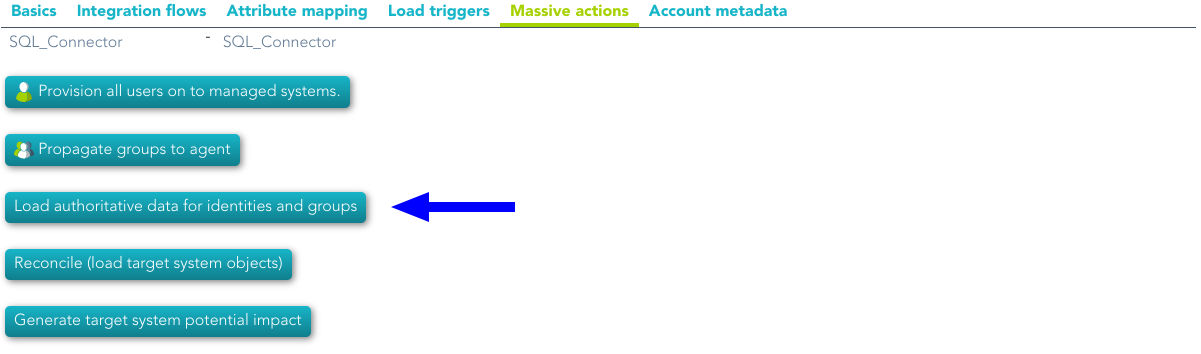
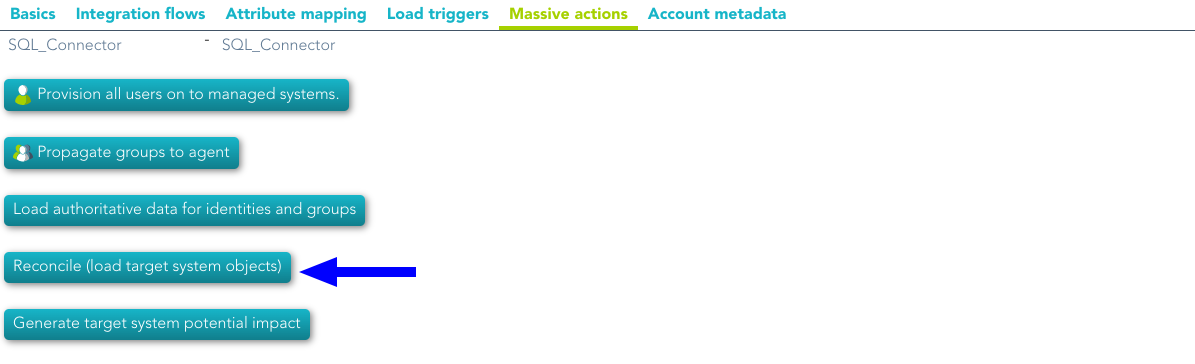
Massive actions
Massive Actions refer to bulk or large-scale operations that can be performed across multiple identities, accounts, or resources managed by an agent within the Soffid platform. Agents in Soffid are components responsible for interacting with external systems (like directories, databases, or applications) to manage and synchronize identity-related data. Massive actions allow administrators to execute operations on a large number of items simultaneously, making it easier to manage and maintain the system efficiently.
Provisioning all users on to managed systems
One of the main features of identity and access management (IAM) is automated user provisioning. User provisioning is the process that ensures the users are created, with proper permissions, updated, disabled, or deleted on to managed systems.
All managed systems must have an agent configuration, which will determine the way to perform the provisioning.
Soffid shows information about the last time that the option was run and a report with the details. You can access the report by clicking the verification icon (✓).
Propagate groups to agent
This option allows pushing to the managed system all the defined groups in Soffid.
Soffid shows information about the last time that option was run and a report with the details. You can access the report by clicking the verification icon (✓).
Reconcile (load target system objects)
The main purpose of reconciling process is to provide a mechanism to ensure that all users are aligned on the specific roles and responsibilities. Reconcile process discovers new, changed, deleted, or orphaned accounts to determine user access privileges.
Not every system connector has the capabilities needed to execute the reconcile process.
When "Read only" property, in Basic parameters, is checked (selected value is Yes), the reconcile process only considers unmanaged accounts.
Soffid shows information about the last time that the option was run and a report with the details. You can access the report by clicking the verification icon (✓).
Load authoritative data for identities and groups
Identities use to live on authoritative identity sources and they do in Soffid as well. Each identity may have any number of accounts on each managed system.
That option performs the operations to load data of groups and data of identities from the managed system into Soffid, following the rules configured in the agent.
Soffid shows information about the last time that the option was run and a report with the details. You can access to the report by clicking the verification icon (✓).
Also, Soffid creates a parameter on the Soffid parameters page, with information about the version of the data. If you need to perform the load authoritative action, it will be mandatory to delete this parameter before perform the action.
Generate target system potential impact
That option allows you to generate a report with all the potential changes that would be performed on the managed system with the current agent configuration
If that option was performed previously, Soffid will show information about the last time that the option was run and the report with the potential impact. You can access the report by clicking the verification icon (✓).
Account metadata
Agents allow you to create additional data, on the "Account metadata" tab, to customize the accounts created for that agent. This additional information will be loaded with the agent's information, or calculated as defined in the mappings.
The additional data can be used in both mappings and triggers.
To get the Account Metadata value, or to put value, you need to use accountAttributes{"ATT_NAME"}
Standard attributes
- Code: short name used by scripts and connectors to access the underlying information. It is suggested to use short names without blanks or special characters to make it easier to use.
- Label: text displayed just beside the attribute value. It is advised to use short descriptions in order to keep the screen cleaner.
- Data type: The attributes can have different data types
- Prevent duplicated values: mark this field as a unique key for the object type. There is no chance of two objects with the same attribute value. Soffid smart engine will avoid the creation of duplicated objects.
- Multiple values: some attributes can contain multiple values for the same object. For instance, an attribute containing the languages a user can speak can be multi-valued, as a user can speak multiple languages.
- Maximum number of rows to display: when an attribute is multivalued, the screen size can grow a lot. To prevent such a big form, the system will only display a maximum number of values, and a scroll bar will appear to browse through the attribute values.
- Size: primarily for string attributes, specify the maximum length in characters of the attribute value.
- Values: primarily for string attributes, you can specify the allowed values for the attribute. Then, the text box that the user has to fill in the data will be replaced by a drop-down list.
- Visibility expression: write an optional BeanShell expression to check if the field should be displayed or not. The expression should return true or false. The following variables are exposed to the expression:
-
ownerObject: current object owning the attribute.
-
value: current attribute value.
-
requentContext: tip about the screen using the attribute.
-
inputField: the ZK input object (ZK Framework).
-
inputFields: a map to get access to any other ZK input object (ZK Framework).
-
serviceLocator: locator to use any Soffid engine microservice.
-
- Validation expression: write an optional BeanShell expression to check if the field value is acceptable or not. The expression should return true if the value is acceptable. If the expression returns false or any other object, a warning message will be displayed. When the expression returns a string value, the return value will be considered the warning message to present to the end-user. The following variables are exposed to the expression:
- ownerObject: current object owning the attribute
- value: current value to evaluate.
- requentContext: tip about the screen using the attribute
- inputField: the ZK input object (ZK Framework).
- inputFields: a map to get access to any other ZK input object (ZK Framework).
- serviceLocator: locator to use any Soffid engine microservice.
- onLoad trigger: write an optional BeanShell expression that will be executed just after preparing the user interface. The script can modify in any way the inputField object before it is displayed, but cannot modify other input fields.
The following variables are exposed to the expression:
-
- ownerObject: current object owning the attribute
- value: current value to evaluate.
- requentContext: tip about the screen using the attribute
- inputField: the ZK input object (ZK Framework).
- inputFields: a map to get access to any other ZK input object (ZK Framework).
- serviceLocator: locator to use any Soffid engine microservice.
-
- onChange trigger: write an optional BeanShell expression that will be executed just after the user has changed the object value. The script can modify in any way the inputField object or any other input fields.
The following variables are exposed to the expression:
-
-
- ownerObject: current object owning the attribute.
- value: current value to evaluate.
- requentContext: tip about the screen using the attribute.
- inputField: the ZK input object (ZK Framework).
- inputFields: a map to get access to any other ZK input object (ZK Framework).
- serviceLocator: locator to use any Soffid engine microservice.
-
-
Example 1
Into the attribute mappings save the value of account metadata:
varX <= accountAttributes{"att_name"}Example 2
Get the value from the attribute account metadata to use it into a trigger
strValue = source.get("attributes").get("att_name");
if (strValue != null) {
	.....
	.....
} else {
	.....
    .....
}
Actions
Agents query actions
|
Query |
Allows you to query roles through different search systems, Basic and Advanced. |
|
Add new |
Allows you to add a new agent to the system. You can choose that option on the hamburger menu or click the add button (+). To add a new role it will be mandatory to fill in the required fields |
|
Delete |
Allows you to remove one or more agents by selecting one or more records and next clicking the button with the subtraction symbol (-). To perform that action, Soffid will ask you for confirmation, you could confirm or cancel the operation. |
|
Download CSV file |
Allows you to download a CSV file with the basic information of all agents. |
Agent detail actions
|
Apply changes |
Allows you to create a new agent or update an existing agent. To save the data it will be mandatory to fill in the required fields |
|
Preview changes |
When there are some changes to be applied (when the configuration agent is updated), you can check them with this option. If you click this button, Soffid will display a new window with the list of users to be updated. |
|
Apply now |
When the configuration agent is updated, this button will be displayed. If you click this option the update action will be performed. The progress bar will be displayed during the execution of the process. This action is performed asynchronously. |
|
Delete |
Allows you to delete a specific agent. You can choose that option on the trash icon. To perform that action, Soffid will ask you for confirmation, you could confirm or cancel the operation. |
|
Undo |
Allows you to quit without applying any changes made. |
|
Import |
Allows you to upload an XML file with the attribute mapping data. This option deletes previous attribute mappings and creates new attribute mapping. |
|
Export |
Allows you to export an XML file with attribute mappings. |
|
Create default mapping |
Allows you to create automatically default mappings for the specific Type selected. |
|
Test |
Check if there is a connection to the target system. |
Integration flows
|
Open flow |
Opens a window with the workflow. |
|
Test |
Allows you to test the workflow. |
Attribute mapping
|
Apply changes/Save |
Allows you to update the agent with the changes made on Attribute mappings. |
|
Add System Objects |
Allows you to add a new system object based on a Soffid object. You need to click the button with the add symbol (+) located at the end of the row of System Objects. Once you click the button, Soffid adds new fields to the form to add new attributes, properties, and/or Triggers depending on the agent type. It is mandatory to apply changes by clicking the diskette button to update the agent. |
|
Delete System Objects |
Allows you to delete a system object. You need to click the button with the subtraction symbol (-) located at the end of the row system object which you want to delete. It is mandatory to apply changes by clicking the diskette button to update the agent. |
|
Add Property |
Allows you to add properties to a specific system object. You need to click the button with the add symbol (+) located at the end of the row of Properties. Once you click the button, Soffid adds new fields to the form to add the property. It is mandatory to apply changes by clicking the diskette button to update the agent. |
|
Delete Property |
Allows you to delete properties from a specific system object. You need to click the button with the subtraction symbol (-) located at the end of the row property which you want to delete. It is mandatory to apply changes by clicking the diskette button to update the agent. |
|
Add System attribute |
Allows you to add attribute mappings to a specific system object. You need to click the button with the add symbol (+) located at the end of the row of the System attribute. Once you click the button, Soffid adds new fields to the form to add the attribute. It is mandatory to apply changes by clicking the diskette button to update the agent. |
|
Detele System attribute |
Allows you to delete attribute mappings of a specific system object. You need to click the button with the subtraction symbol (-) located at the end of the row System attribute which you want to delete. It is mandatory to apply changes by clicking the diskette button to update the agent. |
|
Test expression |
Allows you to test a system object. When you click that option, Soffid will show you new fields and operations to test the system attribute config. |
|
Synchronize now |
Allows you to synchronize a specific system object to the target system. |
|
Fetch system raw data |
Brings the data of a specific system object from a target system. |
|
Fetch Soffid object |
Brings the data of a specific system object with processed data to update into Soffid |
|
Add Trigger |
Allows you to add a trigger to a specific system object that will be executed when data is loaded into a target system. You need to click the button with the add symbol (+) located at the end of the row of Trigger. Once you click the button, Soffid adds new fields to the form to add the trigger. It is mandatory to apply changes by clicking the diskette button to update the agent. |
|
Delete Trigger |
Allows you to delete a trigger of a specific system object. You need to click the button with the subtraction symbol (-) located at the end of the row Trigger which you want to delete. It is mandatory to apply changes by clicking the diskette button to update the agent. |
Load triggers
|
Apply changes |
Allows you to update the Load trigger data with the changes made on the Load Trigger |
|
Add Trigger |
Allows you to add a trigger that will be executed when data is loaded into Soffid. You need to click the button with the add symbol (+) located at the end of the row. Once you click the button, Soffid adds new fields to the form to add the trigger. Then you need to select the Object and the type of trigger and write the customized script. Finally, you need to apply changes to update the agent. |
|
Delete Trigger |
Allows you to delete a trigger. You need to click the button with the subtraction symbol (-) located at the end of the row which you want to delete. It is mandatory to apply changes by clicking the diskette button to update the agent. |
Massive actions
|
Provisioning all users on to managed systems |
Run the process to ensure the users are created, with proper permissions, updated, disabled, or deleted on to managed systems. |
|
Propagate groups to agent |
Run the process to push all the groups of Soffid into the managed system. |
|
Reconcile (load target system objects) |
Run the process to discover new, changed, deleted, or orphaned accounts to determine user access privileges. |
|
Load authoritative data for identities and groups |
Run the process to load data of groups and data of identities from the managed system into Soffid |
|
Generate target system potential impact |
Generate a report with all the potential changes that would be performed on the managed system. |
Account metadata
|
Add account metadata |
Allows you to update the agent with the changes made on metadata. |
|
Add account metadata |
Allows you to add account metadata. You need to click the button with the add symbol (+) located at the end of the row. Once you click the button, Soffid shows you an empty form to fill in with the new account metadata. Finally, you need to apply changes. |
|
Delete account metadata |
Allows you to delete one account metadata. First, you need to click on the account metadata which you want to delete. Then Soffid shows a form with the detailed account metadata. On the hamburger icon of that form, you can find the delete action. In this case, Soffid will not ask you for confirmation to delete. |
Scripting
In the agent's configuration, it may be possible to use scripting to include logic in the attribute mappings and in the trigger scripts.
In the attribute mapping, if you use a script on one side, it will be mandatory to a single direction to the other side:
- System attribute <= script
- script => Soffid attribute
Below, an easy script to send a full name to the system:
system attribute <= return firstName + lastName;Below, a more complex script to create the main domain if it doesn't exist in Soffid:
String mailDomain = null;
if (email != void && email != null && email.contains("@")) {
    String[] mailTokens = email.split("@");
    mailDomain = mailTokens[1];
}
com.soffid.iam.service.MailListsService service = com.soffid.iam.ServiceLocator.instance().getMailListsService();
com.soffid.iam.api.MailDomain domain = service.findMailDomainByName(mailDomain);
if (domain==null) {
    domain = new com.soffid.iam.api.MailDomain();
    domain.setCode(mailDomain);
    domain.setDescription(mailDomain);
    domain.setObsolete(new Boolean(false));
    domain = service.create(domain);
}
return mailDomain;

=> mailDomain
You could find a set of sample scripts: Sample scripts
You could find a link with the SCIM Query Language used in some methods as findUserByJsonQuery("query"). You can visit the SCIM chapter.
Below you could find a set of custom utility classes: Utility classes
More information
Password synchronization
The passwords a user has on an agent will be synchronized with any other "single user account" the user has on this agent. Shared accounts will never get their password synchronized.
Password in an agent will be also synchronized with any other account the user has on other agents that are sharing the same password domain.
The password change can be produced by an operator using the Soffid console, the user itself using the Soffid Self Service portal, or a timed automatic task. Furthermore, some managed systems can forward their password to Soffid in order to get them synchronized. In order to accept these password changes coming from managed systems, the trusted passwords box must be checked for the source agent.
Mind that this is the flow for normal user passwords. Temporary passwords generated by the Soffid console will only be sent to agents marked as trusted. Agents not checked as trusted will have a random new password instead. Later, when the user changes the password on Soffid or any trusted system, the new password will be notified to Soffid by the managed system, and every agent on the same password domain will actually get the new password.
Agents account management
The agent configuration sets the way accounts are created and disabled.
Whenever a user is modified, the following rules will be applied to check if the user should have or not an account on this agent:
- The user type is checked against valid user types.
- If there is a business unit or group bound to the agent, the user membership will be assessed.
- If the role based box is checked, the system will verify if the user has any role or entitlement assigned to this agent.
If the user does not apply for any of the conditions, every account the user has at this agent will be changed to Disabled status.
If the user verifies every one of the conditions, the user can have an account on this agent. Every account the user has at this agent will be changed to Enabled status.
Unless the "Manual account creation" is checked, if the user can have an account on this agent, but it has no one, the account creation method will be invoked. To create it, Soffid will search for the user domain bound to this agent and will follow its configuration. If the user domain is configured with a script, this script will be executed and the result value will be accepted as the new account name. Mind that if the script returns a null value, no account can be created.
If the returning value from the script clashes with an existing account, the existing account will remain unchanged, unless the existing account is marked as an unmanaged account. In such a case, the account will be changed from an unmanaged state to a single user.
Operational
Monitoring
After the agent configuration you could check on the monitoring page if the service is running in the Synchronization Server, please go to:
Tasks
Authoritative
If you are checked "Authorized identity source", an automatic task to load identities from the managed system to Soffid is available, please go to:
And you will something like "Import authoritative data from <AGENT_NAME>".
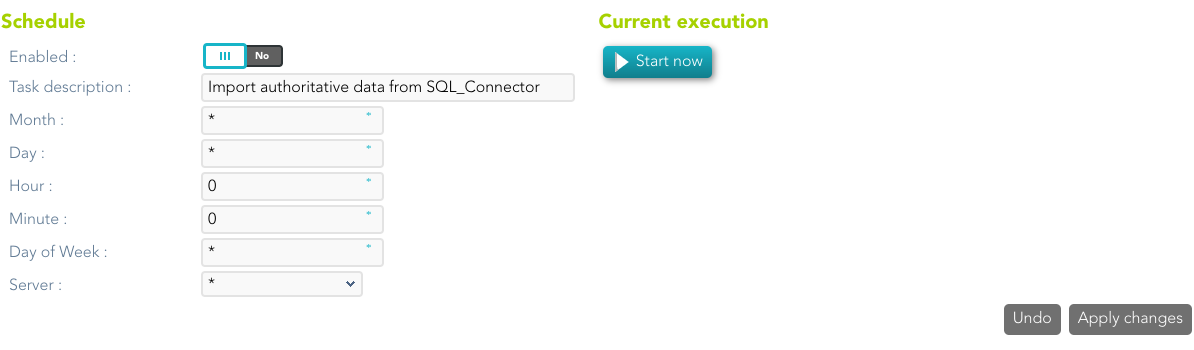
You can also run the Authoritative load from the Massive actions tab in the Agent
Reconcile
If you are configured the "Attribute Mapping" tab with some of our objects: "user, account, role, group or grant", an automatic task to synchronize these objects from the managed system to Soffid is available, please go to:
And you will do something like "Reconcile all accounts from <AGENT_NAME>".
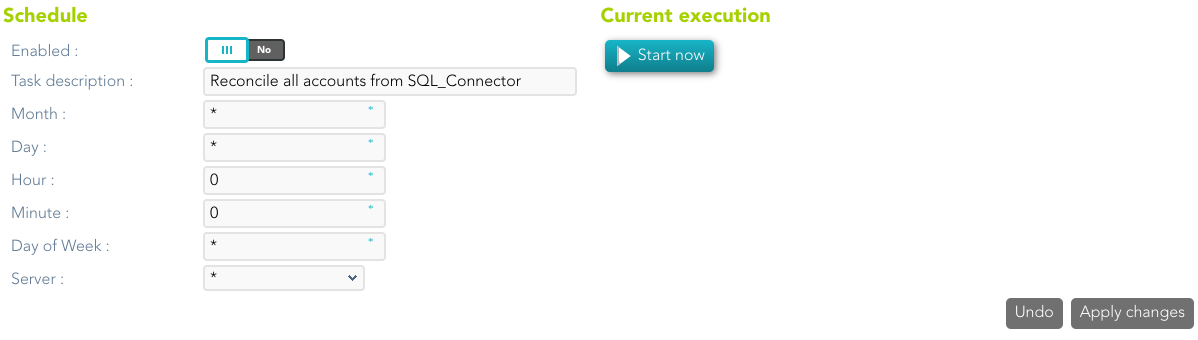
You can also run the Reconcile from the Massive actions tab in the Agent
Synchronization
Regarding the synchronization of the objects, there are two possible options:
- If the "Read Only" attribute is checked in the "Basics" tab (select Yes option), only the changes in the managed systems will be updated in Soffid. We recommend these options until the global configuration of Soffid will be tested.
- If the "Read Only" attribute is not checked in the "Basics" tab (select No option), all the changes in Soffid or the managed system will be updated in the other. Note that this synchronization must be configured in the "Basic" tab correctly.
Synchronization servers
Description
Sync server is the engine responsible for connecting Soffid with data sources or managed systems.
Soffid allows you to configure different synchronization servers. These synchronization servers are installed and configurated using command line tool.
More information about how to install sync server on the Installation chapter. Here you can find information on how to install a sync server in different environments.
Whenever an action is performed on any Soffid object, a synchronization task is created in Soffid database.
Initially, most of the tasks should be forwarded to every managed system connector. The specific system connector will be responsible for applying (or ignoring) the task to the managed system.
The normal synchronization server flow for a task is as follows:
1. Engine timely reads pending tasks table (SC_TASQUE). To avoid two sync servers to process the same task, the column TAS_SERVER is updated to reflect the actual server that is processing it.
2. Engine manage tasks priorities and updates the task queue. Engine keeps track of one task queue for each managed system connector.
Soffid allows you to configure the parameter soffid.sync.engine.threads with the number of threads available to run the tasks.
For more information about this parameter you can visit the Soffid Parameter page.
3. Engine has created some execution threads to forward each task to the specific connector class. During this process, dispatcher can decide to reject (mark as done) the task without forwarding it.
4. The specific connector class gets additional information about the task from core services.
5. Task is removed from database when every dispatcher has done it.
This architecture and its optimized engine allow Soffid to achieve great performance.
Screen overview


Standard attributes
- Name: name of the synchronization server.
- URL: URL of the synchronization server.
- Type: there are different kinds of synchronization servers:
- Synchronization server: that server connects to the main database and allocates the task to the different agents.
- Synchronization agent proxy: uses a push mechanism. The main Synchronization server will send the tasks to the synchronization agent proxy when it detects tasks for the proxy. That server does not connect to the main database.
- Remote synchronization server: uses a pull mechanism. That server is asking for its tasks, when it asks and the Synchronization server has a task for the remote, the Synchronization server will send that tasks. That server does not connect to the main database.
- Synchronization agent gateway: this server is the broker between the main synchronization server and the remote servers.
- Java options: additional parameters to pass to JVM (Java Virtual Machine). Some useful parameters:
- For a high capacity server are:
-Xmx1024M - For debugging communication: -Djavax.net.debug=ssl
- To enable sync server to use old TLS version in client connections (from sync server to a managed system) add
-Djdk.tls.client.protocols=TLSv1,TLSv1.1(Be in mind TLSv1.2 will be the default version, but some old applications can use TLSv1) - To enable sync server to use old TLS version for incoming connections (from a server or desktop to the sync server) add
-Dsoffid.tls.protocols=TLSv1.1,TLSv1,TLSv1.2,TLSv1.3 -Dsoffid.tls.excludedCiphers="^.*_(MD5)$"Mind that the system security can be compromised by using deprecated TLS protocols - To define how long Java keeps the DNS (domain name resolution) responses in cache you can add the paramameters
-Dsun.net.inetaddr.ttl=1or the newest-Dsun.net.inetaddr.ttl=1"time-to-live" (TTL).
- For a high capacity server are:
If you change the Java Options of an existing Syncserver, you will need to restart the Syncserver. You can visit the Sync server monitoring page for more information about how to restat the Syncserver.
If you are working on Soffid Console version 2.x to change the capacity you need to edit the iam-console.vmoptions file and change the -Xmx attribute.
Actions
Synchronization server query
|
Download CSV file |
Allows you to download a CSV file with the information of all synchronization servers. |
Synchronization server detail
| Apply changes | Allows you to save the synchronization server data and quit. |
| Save | Allows you to save the synchronization server data |
| Undo | Allows you to undo the changes to quit without save them. |
| Delete |
To delete a sync server you can click on the hamburger icon and then click the delete button (trash icon). Soffid will ask you for confirmation to perform that action, you could confirm or cancel the operation. |
Account naming rules
Definition
Account naming rules define how to generate account names to connect with final systems. The normal case is the account name will be the same as the user name, in other cases, here you could define the customized account name rules.
When you are configuring an agent, you have to indicate the user domain which will be used to create new accounts, that user domain refers to the Account naming rules defined on the Soffid console. You can visit the Agents page for more information.
Standard attributes
- Code: code used to identify the account naming rule.
- Description: a brief description of the rule. That value will be displayed to select the user domain on the agent's setup.
- User domain type: use to define the kind of
- Main user name: use the main user name.
- Assigned by the operator: the operator will assign the account name.
- Script: allows you to configure the script condition and script creation of account naming.
- Server Addon: allows selecting an addon to generate the account naming rules.
- Generator: allows you to select an addon when the user domain type selected is "Server addon".
- Create account condition: defines the conditions to enable or prevent the creation of the account. It is only available when the Script option is selected in the User domain type.
- Script: computes the name to assign to the user account. If the script returns null, the account is not going to be created. It is only available when the Script option is selected in the User domain type.
Create account condition
The create account condition enables or prevents the creation of the account.
Available objects
| user | User object: Details |
| attributes | User attributes map |
| groups |
The groups that the user belongs to. It's composed of a java map. The key is the group name, and the value is the Group object |
| groupsList |
The groups that the user belongs to. It's composed of a java list of Group objects |
| serviceLocator | Helper to get access to Soffid microservices |
| userDomain | User domain object |
| system | Target system object |
Expected result
| boolean | Return true if the account can be created |
Examples
Only users with mail address in soffid.com can have an account:
"soffid.com".equals(user.mailDomain)Account name Script
The create account script computes the name to assign to the user account. If the script returns null, the account is not going to be created.
Available objects
| user | User object: Details |
| attributes | User attributes map |
| groups |
The groups that the user belongs to. It's composed of a java map. The key is the group name, and the value is the Group object |
| groupsList |
The groups that the user belongs to. It's composed of a java list of Group objects |
| serviceLocator | Helper to get access to Soffid microservices |
| userDomain | User domain object |
| system | Target system object |
Expected result
| String | Return the account name to use |
Example
// Uses the email address as the account name
user.shortName+"@"+user.mailDomain
Actions
Account naming rules query
|
Add new |
Allows you to add a new account naming rule in the system. To add a new agent it is necessary to fill in the required fields. |
|
Delete |
Allows you to remove one or more agents by selecting one or more records on the list. |
|
Export |
Allows you to export a CSV file with the account naming rules configuration. |
|
Import |
Allows you to upload a CSV file with the account naming rules configuration to add new rules to the system. First, you need to pick up a CSV file, that CSV has to contain a specific configuration. Then you need to check the contents. And finally, you need to select the mappings for each column of the CSV file to import the data correctly and click the Import button. |
Account naming rules detail
|
Apply changes |
Allows you to save new account naming rules or to save an updated account naming rule. |
|
Undo |
Allows you to undo any changes made. |
|
Delete |
Allows you to remove one account naming rule. |
Attribute translation tables
Definition
Soffid provides an easy to use mechanism to translate references or external codes into internal codes. For example, the HHRR application could be using a diferent coding scheme for business units.
To deal with this data mismatch, users can extend the data model, or can either use translation tables. This screen allows the user to create and maintain such tables. This tables can also be downloaded or uploaded as CSV files, enable the import of data contained into spreadsheets.
Usage of translation table is bound, but not restricted to, attribute translation expressions, by using trigger scripts, through the use of serverService interface.
Screen overview

Standard attributes
- Domain: the domain column represents the translation table name.
- Column 1
- Column 2
- Column 3
- Column 4
- Column 5
Column 1 to 5 meaning is user defined. Usage of translation table is bound, but not restricted to, attribute translation expressions, through the use of serverService interface.
Actions
|
Query |
Allows to query groups through different search systems, Quick, Basic and Advanced. |
|
Add new |
Allows you to add a new attribute translation table. That option adds a new row on the table to fill in the data. It will be mandatory to apply changes to save the data. |
|
Delete |
Allows you to remove one or more agents by selecting one or more records on the list. Or delete one by one. |
|
Import |
Allows you to upload a CSV file with the attribute translation table data to add to the system. First, you need to pick up a CSV file, that CSV has to contain a specific configuration. Then you need to check the contents. And finally, you need to select the mappings for each column of the CSV file to import the data correctly and to click the Import button. |
|
Download CSV file |
Allows you to download a CSV file with the information of all attribute translation tables. |
|
Apply changes |
Allows you to save new attribute translation tables or to save updated attribute translation tables. |
|
Undo |
Allows you to undo any changes made. |
Examples
Example 1
Long userId = source{id};
for ( account:  serverService.getUserAccounts(userId, "AD soffid.pat")) {
  //TO-DO
}
Example 2
lCentros = serviceLocator.getAttributeTranslationService().findByColumn1("CENTROS", "Madrid");
if (lCentros != null) {
    for (var i = 0; i < lCentros.length; i++) {
      if (lCentros[i] != null) {
      	out.println("** Centro - " + lCentros[i].column1 + " - "  + lCentros[i].column2 + " - "
                    + lCentros[i].column3 + " - "  + lCentros[i].column4);
      }
    }
}
Example 3
lServer = serviceLocator.getAttributeTranslationService().findByExample("SERVER_COPIAS", null, null);
if (lServer != null) {
	out.println("** SERVER_COPIAS - " + lServer);
}
Soffid Objects
You can consult the list of Soffid attributes:
- User Object
- Account Object
- Group Object
- Role Object
- Grant Object
- Maillist Object
- Membership Object
- dispatcherService
- Authoritative change object
User object
A user objects are maps that hold the information belonging to a single user account.
|
Attribute
|
Type
|
Description
|
|---|---|---|
| id | Long | user id |
| accountId | Long | account id |
| accountName | String | account name |
| system | String | managed system (agent) name |
| accountDescription | String | account description |
| active | Boolean | true if user is active |
| accountDisabled | Boolean | true if account is diabled |
| mailAlias | String | blank separated mails |
| userName | String | user name |
| primaryGroup | String | user's primary group name |
| comments | String | user's comments |
| createdOn | Date | user creation date |
| modifiedOn | Date | user last modification date |
| mailDomain | Date | user mail domain ( email right side of @) |
| fullName | String | user full name |
| shortName | String | user mail name (email left side of @) |
| firstName | String | user first name |
| lastName | String | user last name |
| lastName2 | String | user second last name (when applicable) |
| mailServer | String | mail server host name |
| homeServer | String | home drive server host name |
| profileServer | String | roaming profile server host name |
| phone | String | user's phone number |
| userType | String | user type |
| createdBy | String | user name creator of this user |
| modifiedBy | String | user name modifier of this user |
| secondaryGroups | List<Map<String,Object>> |
list of groups the user belongs to, including primary group The attributes of the inner map are described later |
| attributes | Map<String,String> | additional user attributes |
| grantedRoles | List<Map<String,Object>> | list of grants directly granted to the user |
| allGrantedRoles | List<Map<String,Object>> | list of grants directly on indirectly granted to the user |
| granted | List<String> | list of role names and group names directly granted to the user |
| allGranted | List<String> | list of role names and group names directly or indirectly granted to the user |
Account object
An account object holds the information belonging to an account.
|
Attribute
|
Type
|
Description
|
|---|---|---|
| accountDescription | String | account description |
| accountDisabled | Boolean | true if account is diabled |
| accountId | Long | account id |
| accountName | String | account name |
| allGranted | List<String> | list of role names directly or indirectly granted to the user |
| allGrantedRoles | List<Map<String,Object>> | list of grants directly on indirectly granted to the user |
| attributes | Map<String,String> | additional account attributes |
| granted | List<String> | list of role names directly granted to the user |
| grantedRoles | List<Map<String,Object>> | list of grants directly granted to the user |
| lastLogin | Calendar | lastLogin |
| lastPasswordUpdate | Calendar | lastPasswordUpdate |
| lastUpdate | Calendar | lastUpdate |
| passwordExpiration | Calendar | passwordExpiration |
| passwordPolicy | String | password policy |
| system | String | managed system (agent) name |
| type | AccountType | "U"=user, "S"=shared, "P"=privileged, "I"=ignored |
Group object
An group object holds the information belonging to a group.
|
Attribute
|
Type
|
Description
|
|---|---|---|
| groupId | Long | group id |
| name | String | group name |
| description | String | group description |
| parent | String | parent group name |
| server | String | home server host name |
| disabled | boolean | true if the group is disabled |
| accountingGroup | String | group accounting information |
| type | String | group type |
| driveLetter | String | home server letter to connect to |
| users | List<Map<String,Object>> | list of users belonging to this group |
| userNames | List<String> | list of user names belonging to this group |
| allUsers | List<Map<String,Object>> | list of users directly or indirectly belonging to this group |
| allUserNames | List<String> | list of user names either directly or indirectly grantee of this role |
| grantedRoles | List<Map<String,Object>> | list of roles granted to this group |
| grantedRoleNames | List<String> | list of role names granted to this group |
Role object
An role object holds the information belonging to a role.
|
Attribute
|
Type
|
Description
|
|---|---|---|
| roleId | Long | role id |
| system | String | managed system (agent) name |
| name | String | role name |
| application | String | application system name |
| category | String | role category |
| passwordProtected | boolean | true if role should be password protected (where applicable) |
| description | String | Role description |
| wfmanaged | boolean | true if role should be displayed in self service requests |
| domain | String | custom domain for this role: Use com.soffid.iam.api.DomainType constants or configured custom domain |
| ownedRoles | List<Map<String,Object>> | list of roles granted to this one |
| ownerRoles | List<Map<String,Object>> | list of roles grantee of this one |
| ownerGroups | List<Map<String,Object>> | list of groups grantee of this role |
| grantedAccountNames | List<String> | list of account names directly grantee of this role |
| grantedAccounts | List<Map<String,Object>> | list of users directly grantee of this role |
| allGrantedAccountNames | List<String> | list of account names either directly or indirectly grantee of this role |
| allGrantedAccounts | List<Map<String,Object>> | list of users either directly or indirectly grantee of this role |
| attributes | Map<String,Object> | role's custom attributes |
Grant object
Grant, grantedRole & allGrantedRoles
The objects grant, grantedRole and allGrantedRoles are used to assing roles to accounts and roles.
|
Attribute
|
Type
|
Description
|
|---|---|---|
| domainValue | String | grant value (if any) |
| grantedRole | String | granted role name |
| grantedRoleId | Long | granted role id |
| grantedRoleObject | role object | granted role |
| grantedRoleSystem | String | granted role managed system (agent) name |
| id | Long | grant id |
| ownerAccount | String | grantee account name |
| ownerAccountObject | account object | grantee account |
| ownerGroup | String | grantee group name |
| ownerRoleId | String | grantee role id |
| ownerRoleName | String | grantee role name |
| ownerSystem | String | grantee account or role managed system name |
| ownerUser | String | grantee user name |
By default, use the grantedRole object
The grant object adds the roles and the groups, use it only in this case
Examples
Grant
Example to map a grant object (assign a role to an account):
|
System attribute
|
Direction
|
Soffid attribute
|
|---|---|---|
| role_name | => | grantedRole |
| account_name | => | ownerAccount |
GrantedRole
Example to map a grantedRole object (assign a role as a child of another role):
|
System attribute
|
Direction
|
Soffid attribute
|
|---|---|---|
| role_name | => | grantedRole |
| parent_role_name | => | ownerRoleName |
AllGrantedRoles
Example to map a allGrantedRoles object in a holderGroup (assign a role to an account in a specific group):
|
System attribute
|
Direction
|
Soffid attribute
|
|---|---|---|
| role_name | => | grantedRole |
| parent_role_name | => | ownerRoleName |
| group_code | => | domainValue |
| group_code | => | holderGroup |
| userName | => | ownerUser |
Maillist object
|
Attribute
|
Type
|
Description
|
|---|---|---|
| id | Long | internal mail list id |
| name | String | mail list name ( the initial part, before the @ sign) |
| domain | String | mail list domain ( the remaining part after the @ sign) |
| system | String | managed system (agent) name |
| description | String | mail list description |
| users | String array | user names that are bound to this mail list |
| groups | String array | group names thta are subscribed to this mai list |
| roles | String array | role names that grant access to this mail list |
| lists | String array | Nested mail lists |
| explodedUsers | String array | Names of the users that should be subscribed to this mail list, including the users that should be subscribed due to group or role membership |
| explodedUserAddresses | String array | Mail addresses of any exploded User |
Membership object
A membership object contains the user account information as well as the group the user belongs to.
|
Attribute
|
Type
|
Description
|
|---|---|---|
| userName | String | User name |
| user | Map<String,Object> | user object |
| groupName | String | Group name |
| group | Map<String,Object> | group object |
| attributes | Map<String,Object> | Membership custom attributes |
dispatcherService
dispatcherService is an object available from agents' attribute translation rules.
This object contains four methods:
|
method name
|
parameters
|
result type
|
comments
|
|---|---|---|---|
| soffidToSystem | ExtensibleObject soffidObject | ExtensibleObject |
Uses attribute translation tables to transform a soffid object to a target system object. Mind to fill-in objectType property to use the proper object mapping |
| systemToSoffid | ExtensibleObject systemObject | ExtensibleObject |
Uses attribute translation tables to transform a target system object to a Soffid object. Mind to fill-in objectType property to use the proper object mapping |
| search | ExtensibleObject exampleObject | ExtensibleObject |
Uses the exampleObject to perform a query by example on the target system. If the object exists on the target system, it is returned. Mind to fill-in objectType property with the desired system object type |
| invoke |
String verb String action Map parameters |
List of Map |
This method allows arbitrary executions on the target system, but it semantics can change depending on the connector used. For instance, it can be used to perform a GET on the target system in REST connector, can issue an LDAP query on ActiveDirectory connector, can execute a SELECT sentence on a SQL connector, or can execute an operating system command in Shell connector. The results are returned as a list of objects (map). |
Examples
Snippet to query the sys_id attribute for a grant owner
System.out.println("Searching id for "+ownerRoleName);
com.soffid.iam.sync.intf.ExtensibleObject eo = new com.soffid.iam.sync.intf.ExtensibleObject();
eo.setObjectType("ROLE");
eo{"name"} = ownerRoleName;
eo = dispatcherService.search(eo);
System.out.println("FOUND "+eo{"sys_id"});
return eo{"sys_id"};
Snippet that performs a REST query to get group to role assignments in ServiceNow
list = dispatcherService.invoke ("GET",
  "https://arxusdev.service-now.com/api/now/table/sys_group_has_role?sysparm_exclude_reference_link=true&sysparm_display_value=all&sysparm_fields=role%2Cgroup&sysparm_query=group="+sys_id,
  null).
  get(0).get("result")

r = new java.util.LinkedList();
for ( d: list)
{
  grant = new java.util.HashMap();
  grant{"grantedRole"} = d.get("role").get("display_value");
  grant{"grantedRoleSystem"} = "ServiceNow";
  grant{"ownerRoleName"} = name;
  grant{"ownerSystem"} = "ServiceNow";
  r.add  (grant);
}
return r;
Snippet of invoke usage on a relational database
// Table ITREPRT
role = source{"granted"}.size() == 0 ? "" : source{"granted"}.get(0);
System.out.println ("************** ROLE "+role);
args = new java.util.HashMap();
args.put("user", source{"accountName"}.toUpperCase());
if (role.equals ("Receptores PR") || role.equals("Jefes_Personal")) {
  r = dispatcherService.invoke("select", "* from ITREPRT where IDUSER=:user", args);
  if (r.size() == 0) {
    dispatcherService.invoke("insert", "into ITREPRT(IDUSER,NOMECO) values (:user, 1)", args);
  }
} else {
  dispatcherService.invoke("delete", "from ITREPRT where IDUSER=:user", args);
}
// TABLE MRGEUCT
cc = source{"attributes"}{"dominio"};
if ( source{"userType"} .equals ("T")) {
  cc = source{"userName"}.substring(1);
}
while (cc != null && cc.startsWith("0")) cc = cc.substring(1);
System.out.println ("************** COST CENTER "+cc);
if (cc != null && ! cc.trim().isEmpty())
{
  args = new java.util.HashMap();
  args.put("user", source{"accountName"}.toUpperCase());
  args.put("cc", cc);
  r = dispatcherService.invoke("SELECT", "* from MRGEUCT where IDUSER=:user and MOARPR=:cc", args);
  if (r.size() == 0) {
    dispatcherService.invoke("INSERT", "into MRGEUCT(MOARPR,CENTRA, IDUSER, NOTIFI ) "+
                             "values ('II', :cc, :user, 'S')", args);
    dispatcherService.invoke("INSERT", "into MRGEUCT(MOARPR,CENTRA, IDUSER, NOTIFI ) "+
                             "values ('BM', :cc, :user, 'S')", args);
    dispatcherService.invoke("DELETE", "FROM MRGEUCT WHERE CENTRA!=:cc AND IDUSER=:user", args);
  }
}
return true;
Snippet of invoke usage on a Active Directory I
hashMap = new java.util.HashMap();
list = serviceLocator.getDispatcherService().invoke("AD soffid.pat",
                                                    "select",
                                                    "(&(objectClass=user))",
                                                    hashMap);
out.println("** list.size -- " + list.size());
Snippet of invoke usage on a Active Directory II
ACC = source{"accountName"};
la = dispatcherService.invoke("AD soffid.pat", "(&(objectClass=user)(sAMAccountName=userName))", new java.util.HashMap());
Authoritative change object
A user objects are maps that hold the information belonging to a single user account
|
Attribute
|
Type
|
Description
|
|---|---|---|
| id | Long | user id |
| accountId | Long | account id |
| accountName | String | account name |
| system | String | managed system (agent) name |
| accountDescription | String | account description |
| active | Boolean | true if user is active |
| accountDisabled | Boolean | true if account is diabled |
| mailAlias | String | blank separated mails |
| userName | String | user name |
| primaryGroup | String | user's primary group name |
| comments | String | user's comments |
| createdOn | Date | user creation date |
| modifiedOn | Date | user last modification date |
| mailDomain | Date | user mail domain ( email right side of @) |
| fullName | String | user full name |
| shortName | String | user mail name (email left side of @) |
| firstName | String | user first name |
| lastName | String | user last name |
| lastName2 | String | user second last name (when applicable) |
| mailServer | String | mail server host name |
| homeServer | String | home drive server host name |
| profileServer | String | roaming profile server host name |
| phone | String | user's phone number |
| userType | String | user type |
| createdBy | String | user name creator of this user |
| modifiedBy | String | user name modifier of this user |
| secondaryGroups | List<Map<String,Object>> |
list of groups the user belongs to, including primary group The attributes of the inner map are described in the link |
| secondariGroups2 | List<Map<String,Object>> |
list of user memberships, excluding primary group The attributes of the inner map are described link |
| attributes | Map<String,String> | additional user attributes |
| grantedRoles | List<Map<String,Object>> | list of grants directly granted to the user |
| allGrantedRoles | List<Map<String,Object>> | list of grants directly on indirectly granted to the user |
| granted | List<String> | list of role names and group names directly granted to the user |
| allGranted | List<String> | list of role names and group names directly or indirectly granted to the user |
Sample scripts
Note that Soffid supports different scripting languages, you can configure it in the Smart engine settings screen.
Additionally, in the initial configuration of the container, we can configure the SOFFID_TRUSTED_SCRIPTS environment variable to allow the use of insecure classes. You can find this information visiting the Installing IAM Console page.
Table of contents
1. Agent scripts
User full name
return firstName + lastName;Create mainDomain if it doesn't exit
String mailDomain = null;
if (email != void && email != null && email.contains("@")) {
    String[] mailTokens = email.split("@");
    mailDomain = mailTokens[1];
}
com.soffid.iam.service.MailListsService service = com.soffid.iam.ServiceLocator.instance().getMailListsService();
com.soffid.iam.api.MailDomain domain = service.findMailDomainByName(mailDomain);
if (domain==null) {
    domain = new com.soffid.iam.api.MailDomain();
    domain.setCode(mailDomain);
    domain.setDescription(mailDomain);
    domain.setObsolete(new Boolean(false));
    domain = service.create(domain);
}
return mailDomain;
Recover active agents
llistaAgents =  serviceLocator.getDispatcherService().findAllActiveDispatchers();
for(agent:llistaAgents) {
  out.println("Nom: " + agent.name);
  out.println("Class Name: " + agent.className + "\n");
}
Show by a user the agents that have associates
llistaUsuaris = serviceLocator.getUserService().findUserByJsonQuery("userName eq \"Ivan\" ");
for(usuari:llistaUsuaris) {
  out.println("Usuario: " + usuari.userName);

   llisstacuentas = serviceLocator.getAccountService().findAccountByJsonQuery("users.user.userName eq \""+usuari.userName+"\" ");

  for(cuenta:llisstacuentas){
    out.print("   Cuenta : " + cuenta.name);
    out.println("   ID: " + cuenta.id);
    llistaRole = serviceLocator.getApplicationService().findRoleAccountByAccount(cuenta.id);

    for(role:llistaRole){
      out.print("      Role: " + role.roleName + "\n");
      out.println("          Aplicacion: " + role.informationSystemName);
      out.println("             Agente: " + role.system);
    }
  }
}
2. Identity scripts
Recover a user for userName
u = serviceLocator.getUserService().findUserByUserName("Ivan");
out.print("Usuari: " + u.firstName);
Recover a users from a Jquery
llistaUsuari = serviceLocator.getUserService().findUserByJsonQuery("firstName sw \"A\" AND lastName sw \"V\" ");
for (usuari:llistaUsuari){
    out.println("Usuari: " + usuari.userName);
}
Print some attributes
u = serviceLocator.getUserService().findUserByUserName("02");
out.println("UserName: " + u.userName);
out.println("Name: " + u.firstName);
out.println("LastName: " + u.lastName);
Print by user the email
u = serviceLocator.getUserService().findUserByUserName("02");
out.print("Email: " + u.shortName + "@" + u.mailDomain);
Print by user some additional data
llistaDadesUsuari = serviceLocator.getUserService().findUserDataByUserName("18008366X");
for(dadaUsuari:llistaDadesUsuari){
  out.println("Atributs " + dadaUsuari.attribute + " = " + dadaUsuari.value);
}
Create a new identity
 try {
 newUser = new com.soffid.iam.api.User();
//Instanciar un nuevo objeto de tipo usuario

 newUser.userName = "IvanVis"; //Faltan 6 parametres
 newUser.firstName = "Ivannn";
 newUser.lastName = "Visarttt";
 newUser.userType = "I";
 newUser.profileServer = "null" ;
 newUser.homeServer = "null" ;
 newUser.mailServer = "null" ;
 newUser.primaryGroup = "world";
 newUser.active = true;

 serviceLocator.getUserService().create(newUser);
}catch(Exception e){
 e.printStackTrace(out);
}
Update an identity
u = serviceLocator.getUserService().findUserByUserName("Ivan");
u.firstName = "Ivaaan1";
u = serviceLocator.getUserService().update(u);
out.print(u.firstName);
out.print(u.userName);
Delete an identity
try {
  u = serviceLocator.getUserService().findUserByUserName("02");
  serviceLocator.getUserService().delete(u);
} catch(Exception e) {
    e.printStackTrace(out);
}
3. Account scripts
Recover accounts of user
la = serviceLocator.getAccountService().findAccountByJsonQuery("users.user.userName eq \"02\" ");
for(a:la) {
  out.println("Cuenta: " + a.name);
  out.println("ID: " + a.id);
  out.println("System: " + a.system + "\n");
}
Remove attribute values of a metadata
public void removeUnAttributeValues(String attribute, String system) {
  la = serviceLocator.getAccountService().findAccountByJsonQuery("system eq \""+system+"\"");
  for (a : la) {
    laa = serviceLocator.getAccountService().getAccountAttributes(a);
    for (aa : laa) {
      if (aa.attribute.equals(attribute)) {
        if (aa.value!=null) {
          out.print("accountName: "+accountName+", attribute.value: "+aa.value);
          serviceLocator.getAccountService().removeAccountAttribute(aa);
          out.println(" ---> removed");
        }
      }
    }
  }
}
removeUnAttributeValues("manager","OSCM");
4. Role scripts
Recover roles of a user
user = serviceLocator.getUserService().findUserByUserName("Ivan");
out.println("Usuari: " + user.userName + "\n");
rolsUser = serviceLocator.getUserService().findUserRolesHierachyByUserName(user.userName);
for(listrRolsUser:rolsUser){
  out.println("Nombre: " + listrRolsUser.name);
  out.println("Descripcion: " + listrRolsUser.description);
  out.println();
}
Print the associated roles for each account
llistaUsuaris = serviceLocator.getUserService().findUserByJsonQuery("userName eq \"Ivan\" ");
for(usuari:llistaUsuaris){

   llisstacuentas = serviceLocator.getAccountService().findAccountByJsonQuery("users.user.userName eq \""+usuari.userName+"\" ");

  for(cuenta:llisstacuentas){
    out.print("   Cuenta : " + cuenta.name);
    llistaRole = serviceLocator.getApplicationService().findRoleAccountByAccount(cuenta.id);

    for(role:llistaRole){
      out.print("      Role: " + role.roleName + "\n");
    }
  }
}
Print for an account the roles and applications for each of them
llistaUsuaris = serviceLocator.getUserService().findUserByJsonQuery("userName eq \"Ivan\" ");
for(usuari:llistaUsuaris){

   llisstacuentas = serviceLocator.getAccountService().findAccountByJsonQuery("users.user.userName eq \""+usuari.userName+"\" ");

  for(cuenta:llisstacuentas){
    out.print("   Cuenta : " + cuenta.name);
    out.println("   ID: " + cuenta.id);
    llistaRole = serviceLocator.getApplicationService().findRoleAccountByAccount(cuenta.id);

    for(role:llistaRole){
      out.print("      Role: " + role.roleName + "\n");
      out.println("          Aplicacion: " + role.informationSystemName);
    }
  }
}
Print the roles associated with each account
usuCuenta = serviceLocator.getUserService().findUserByJsonQuery("");
for(listaUsuCuenta:usuCuenta) {

    out.println("Usuario: " + listaUsuCuenta.userName);
    out.println("Nombre: " + listaUsuCuenta.firstName);

    rolsUser = serviceLocator.getUserService().findUserRolesHierachyByUserName(listaUsuCuenta.userName);

    for(listaRolsUser:rolsUser){
      out.println("Nombre del Rol: " + listaRolsUser.name);
      out.println("Descripcion: " + listaRolsUser.description);
      out.println();
    }
}
Create a new role
try {
  newRol = new com.soffid.iam.api.Role();
  newRol.name = "Rol_New_Script";
  newRol.description = "Rol Script";
  newRol.informationSystemName = "SOFFID";
  newRol.system = "APLICACION01";
  serviceLocator.getApplicationService().create(newRol);

} catch(Exception e){
    e.printStackTrace(out);
}
Update a role
editRole = serviceLocator.getApplicationService().findRoleByJsonQuery("name eq \"Rol editado por script\" and informationSystemName eq \"APLICACION01\" ");
for (role:editRole){

  out.println(role.name);
  role.name = "ROL01";

  role = serviceLocator.getApplicationService().update(role);
  out.print(role.name);
}
Delete a role
try {
  editRole = serviceLocator.getApplicationService().findRoleById(232734);
  serviceLocator.getApplicationService().delete(editRole);
} catch(Exception e){
    e.printStackTrace(out);
}
List the roles of an application
list = serviceLocator.getApplicationService().findRoleByJsonQuery("informationSystemName eq \"SOFFID\"");
for (role : list) {
  out.println(role.name);
}
5. Mail scripts
Send email
import javax.mail.BodyPart;
import javax.mail.internet.MimeBodyPart;
import javax.activation.DataHandler;
import javax.activation.FileDataSource;
import java.util.ArrayList;
path = "/tmp/";
name = "file.txt";
BodyPart att = new MimeBodyPart();
att.setDataHandler(new DataHandler(new FileDataSource(path+name)));
att.setFileName(name);
to = "aretha@soffid.com";
cc = "etaylor@soffid.com";
subject = "This is an email with attachment ";
body = "In this email you can see an attachment.";
mimeBodyParts = new ArrayList();
mimeBodyParts.add(att);

serviceLocator.getMailService().sendHtmlMail(to, subject, body, mimeBodyParts);
serviceLocator.getMailService().sendHtmlMail(to, cc, subject, body, mimeBodyParts);
serviceLocator.getMailService().sendTextMailToActors(new String[]{"aretha"}, subject, body, mimeBodyParts);
serviceLocator.getMailService().sendTextMailToActors(new String[]{"aretha"}, cc, subject, body, mimeBodyParts);
out.println("Mails sent!");
Utility classes
Crypt
Crypt allows to encrypt text with different algorithms and verify the resulting hash.
To use this class: com.soffid.iam.crypt.Crypt
All methods are static:
hash(String algorithm, String text) -> String
pBKDF2Sha256(String text, String utf8Salt, int iterations) -> String
pBKDF2Sha256(String text, byte []salt, int iterations) -> String
pBKDF2Sha1(String text, String utf8Salt, int iterations) -> String
pBKDF2Sha1(String text, byte []salt, int iterations) -> String
genSaltBytes() -> byte[] // 8 bytes
genSaltBytes(int size) -> byte[]
genSalt() -> String // 8 bytes
genSalt(int size) -> String
verify(String algorithm, String text, String hash) -> boolean
The algorithms allowed are:
- bcrypt
- pBKDF2Sha256
- pBKDF2Sha1 (or pBKDF2)
- Base64 (used by default is the algorithm is not in the previous list)
One example:
String myText = "abcd";
String myAlgorithm = "bcrypt";
String myHash = com.soffid.iam.crypt.Crypt.hash(myAlgorithm, myText);
boolean isVerified = com.soffid.iam.crypt.Crypt.verify(myAlgorithm, myText, myHash);
if (isVerified) {
    return myHash;
} else {
    return null;
}
CalendarConverter
CalendarConverter allows to covert Calendar into String.
To use this class: com.soffid.iam.json.CalendarConverter
The methods (non static):
toString(Calendar instance) -> String
fromString(final String text) -> Calendar
One example:
out.println(new com.soffid.iam.json.CalendarConverter().toString(date));Network discovery
Description
The Network discovery tool will be in charge to scan the networks to find the hosts and retrieve information about user accounts. Network discovery can detect system accounts as well.
First of all, you need to create the networks that you want to scan. Visit the Networks page for more information. Then, on the Network discovery page, you need to configure for each network, the accounts and passwords of potential administrators to connect to the host and retrieve the information. And finally, you need to start the process execution or you can schedule the execution of the network discovery task.
The operating system of machines can be Windows or Linux and it is not necessary to install any additional software on those machines.
When the Network discovery process is finished, it is recommended to launch the Reconciliation process of the agents created by the process to detect the Account protected services. To know how to run the Renconciliation process you can visit the Agents page.
Once the machines and accounts, both user and system, have been discovered, the critical accounts must be located in the password vault. You can visit the Password vault page for more information.
How Network discovery works?
The Network Discovery is the tool in charge to scan the network to discover the hosts of the network. For each host discovered, the Nmap utility gets the info about the ports and the protocols used. Also, that process gets the IP Address and the operating system. All the recover information will be saved on Soffid database. The discovery proxy server works as a proxy to connect to the target systems.
When the discovery manager discovers a host, it gets the host information and then, through discovery proxy server, it attempts to connect to the host using the accounts defined on the accounts to probe list.
- If it can not connect to the host, it will attempt with the next host discovered.
- If it gets to connect to the host, then it will create automatically a Soffid agent with the proper attributes and connector parameters, also with the necessary account metadata.
Then, the reconciliation process of the created agent, will be launched and it will try to recover the information about the accounts defined on the host. Also, it will try to recover the information about the account protected services. The recover information will be saved on Soffid database.
Screen overview
Standard attributes
Network attributes
Basic
Those attributes are readOnly, you can update them on the Networks page.
- Name: network name.
- Description: a brief description.
- IP Address: IP range of this network.
- IP address mask: IP mask of this network.
- IP ranges to analyze: allows you to set the range of IPs to scan
💻 Image
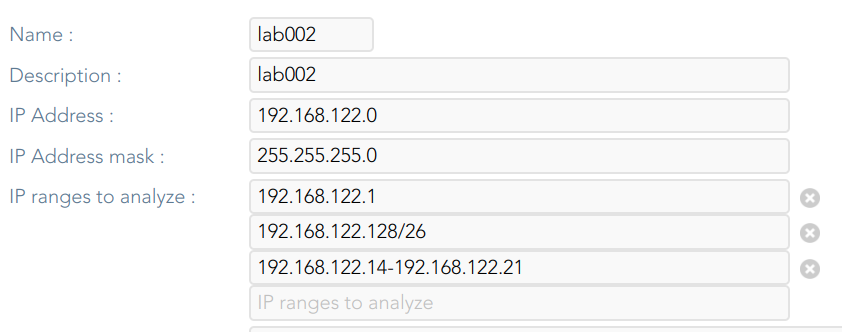
Server
- Server: list of available sync servers.
Accounts to probe
- Accounts to probe: list of potential administrators accounts to connect to the hosts. You can register a new account or use an existing account.
- Register new account: you need to define the login name and the password of the new account.
- Login name
- Password
- SSH key
- Register new account: you need to define the login name and the password of the new account.
💻 Image
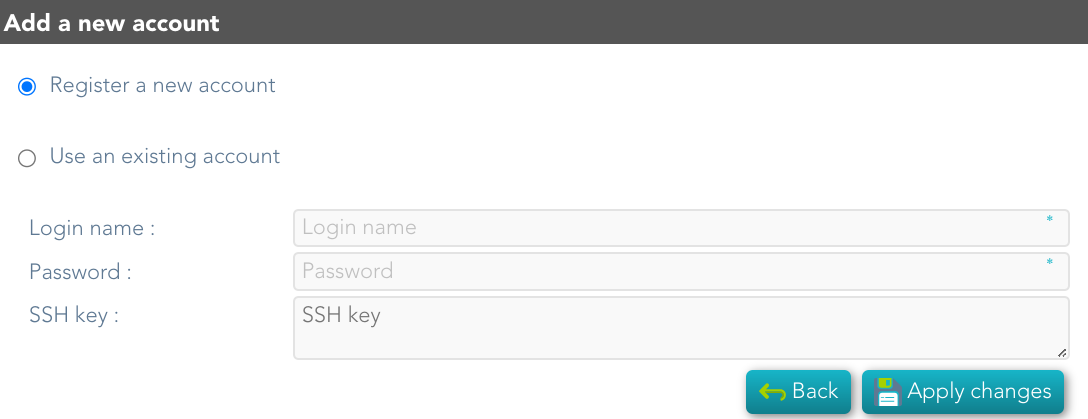
- Use an existing account: you need to select an existing account on the system.
💻 Image
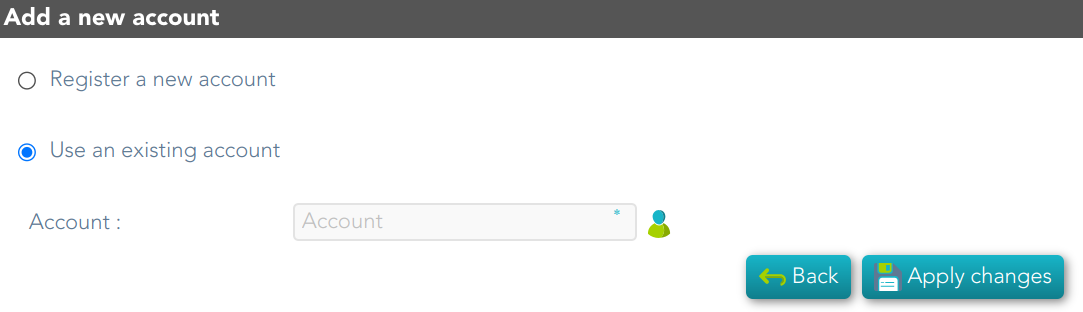
When you register a new account, that will be created as an unmanaged account.
Schedule
- Enabled: if it is selected (value is Yes), a task will be created and performed on schedule defined.
- Task description: a brief description of the task
- Month: number of the month (1-12) when the task will be performed.
- Day: number of the day (1-31) when the task will be performed.
- Hour: hour (0-23) when the task will be performed.
- Minute: minute (0-59) when the task will be performed.
- Day of week: number of the day (0-7 where 0 means Sunday) of the week when the task will be performed.
- Server: you must select the sync server where the agent will be run.
For each value of month, day, hour, minute, or day of the week:
- * means any month, day, hour, minute, or day of the week. e.g. */5 to schedule every five minutes.
- A single number specifies that unit value: 3
- Some comma separated numbers: 1,3,5,7
- A range of values: 1-5
Current execution
- Start now: this allows you to launch the task execution.
Last execution
- Status: The available status for a task is:
- Done (green light): task finished.
- Pending (yellow light): the task has been started but it has not finished yet.
- Error (red light): task could not be executed.
- Start date: start date and time of the last execution.
- End date: end date and time of the last execution.
- Execution log: log trace. Allows you to download the log file.
Previous executions
List the information about the previous executions:
- Start date: start date and time of the execution.
- Status: status of the execution.
- Execution: log of the execution. Allows you to download the log file.
Machine attributes
By clicking the machine record, you can check the following information:
- Name
- IP Address
- Description
- Operating system
- Port /Protocol List:
- Port
- Description
💻 Image
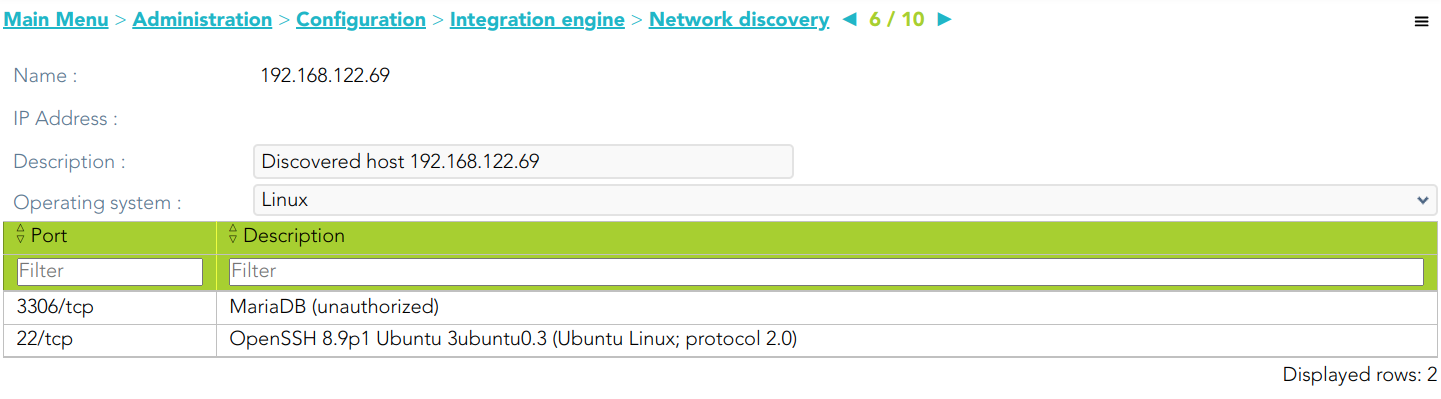
Machine details
If you display the contents of a machine from which the information has been obtained, you could check and manage information about:
- Protected services per account
- Account repositories
- Entry points
It may be necessary to perform the Reconciliation process of the proper agent in order to obtain the information from the Account protected services
💻 Image
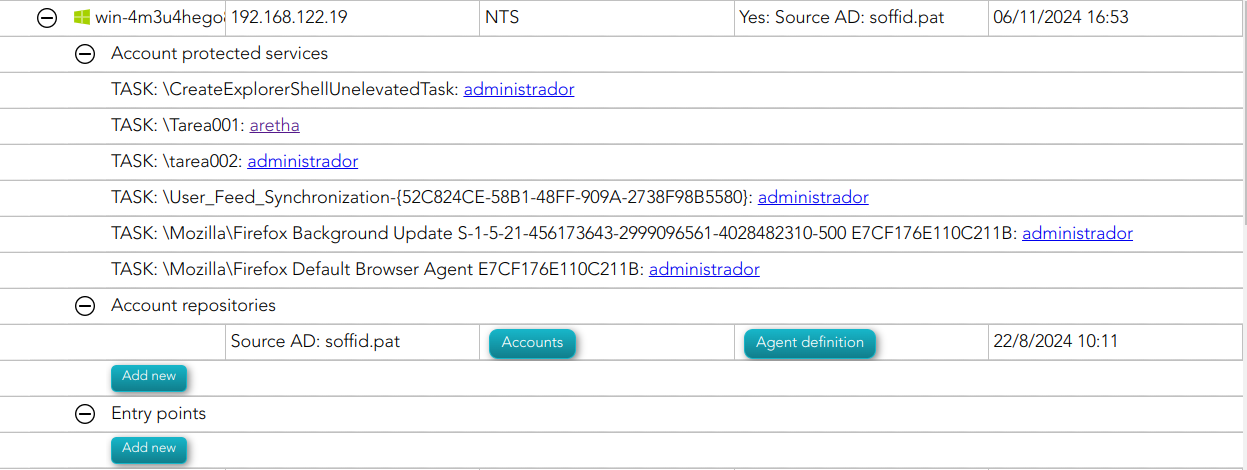
Actions
Network discovery query
| Add new account repository |
Allows you to create a new agent. You must select the System type and the login name and password. When the agent is created, if the connection is successful, the reconciliation process will be executed. 💻 Image
|
|
Agent definition |
Allows you to browse to the agent definition. |
|
Accounts |
Allows you to browse the accounts page and the accounts, which belong to this system, will be displayed |
|
Add new entry point |
Allows you to create a new entry point. You must select the Entry point type and the pale to locate it. Once the entry point is created, you can connect to the target system. Bear in mind, that if you need to create an account to connect, when you set the password to this account, the system (agent) must be in No ReadOnly mode. 💻 Image
|
|
Entry point definition |
Allows you to browse to the entry point definition. |
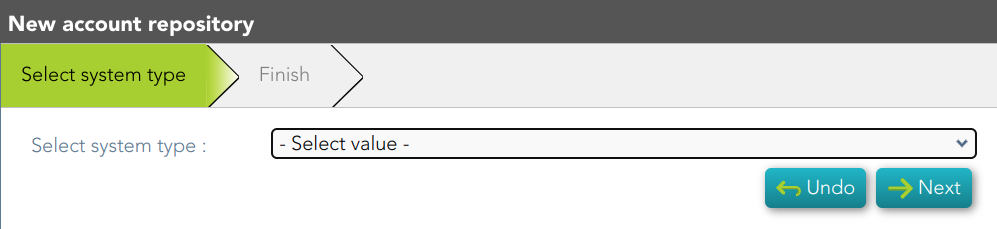
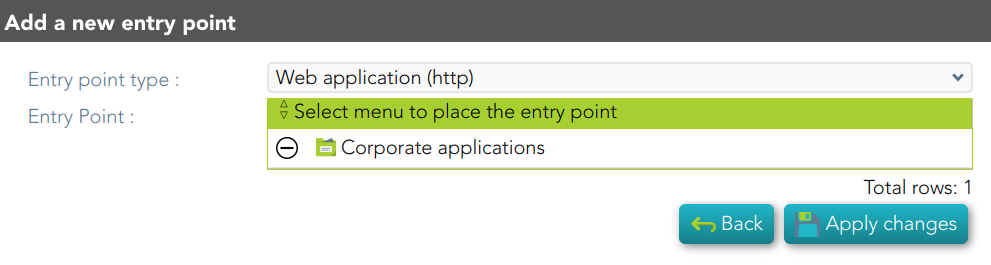
Network discovery detail
|
Apply changes |
Allows you to save the data of network detail. To save the data it will be mandatory to fill in the required fields. |
|
Undo |
Allows you to undo any changes made. |
Accounts to probe
| Add |
Allows you to add a new administrator potential account to connect to the machines of the network. To add a new account, first of all, you need to click the add button (+) and close the accounts to probe list. Then you will need to choose if you want to add an existing account or register a new account. save the data of a new network or update the data of a specific network. To save the data it will be mandatory to fill in the required fields |
|
Delete |
Allows you to delete one or more accounts of the accounts to probe. You need to select one or more records and next click the button with the subtraction symbol (-). |
Schedule
|
Start now |
Allows you to launch the task execution. |
Previous execution
|
Logs |
Allows you to download the log files of previous executions. |
Machine
|
Delete |
Allows you to delete the machine and the PAM connectors for the device. Soffid will display a message to confirm the deletion process. |