Global settings
- Tenants
- Plugins
- Look & feel
- Soffid parameters
- User Type
- Group Type
- Metadata
- User backup configure & restore
- Configuration wizard
- Export settings and objects
- Import settings and objects
Tenants
Definition
Soffid 3 is multi tenant. This means that one can configure many differente tenants to manage disjoints groups of identities and applications.
Each Soffid object, including applications, systems, roles, users, and accounts are bound to a single tenant.
Of course, there is a special tenant named master. Master tenant administrators can jump to any other tenant with administration privileges.
Soffid recommends connecting directly to the specific tenant to configure it correctly. You have more information about this topic in the Tenant access section.
Screen overview
Tenant properties
- Name: Set a short name for the tenant.
- Description: Enter a long description for the tenant
- Enabled: Usually set to yes. If it's set to NO, no user will be able to log in to that tenant, and no provisioning or automated task will be ran on that tenant.
- Disabled permissions: By default, tenant administrator permissions are restricted, so they are not able to bypass tenant borders and access to other tenant information. To achive this, the following permissions are disabled by default, but some others can be added:
- Open the tenants management page
- Use the tenant micro-service
- Manage sync servers
- Assigned sync servers: By default, the new tenant will not be able to use any sync server unless it is authorized to. So, one can create a sync server for a specific tenant that cannot be used by any other tenant.
Actions
The following actions can be performed on tenants:
|
Export a tenant |
The process will generate a compressed file with all the information contained in the Tenant. It includes even the connectors configurations, mappings and global settings. |
|
Import a tenant |
The user can upload the previously exported tenant. The process will restore all the information contained in the Tenant, including connectors configurations, mappings and global settings.If the Tenant already exists, the process will not replace it. A new tenant will be created with a new name. If you want to replace the existing tenant, remove it before uploading the tenant export file. |
|
Log into a tenant |
If you have permission to log into a different tenant, you can use this option to access to it. This option is not intended for normal usage, but for administrative purposes |
Tenant access
Option 1
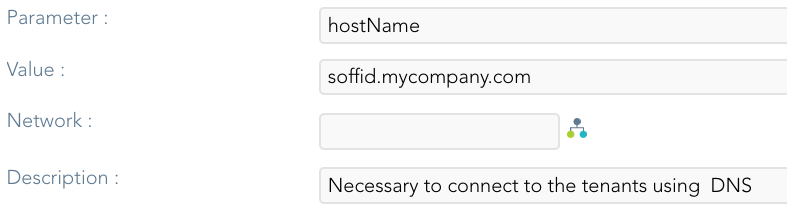
When users are connecting to Soffid console, the master tenant is displayed by default. In order to directly connect to any tenant, a DNS entry with the tenant name must be added to your DNS server.
For instance, if you have deployed a Soffid console with the DNS name soffid.mycompany.com, the DNS name test1.soffid.mycompany.com will be used to access to the test1 tenant.
Note that you must configure the hostName Soffid parameter in the master with your DNS name
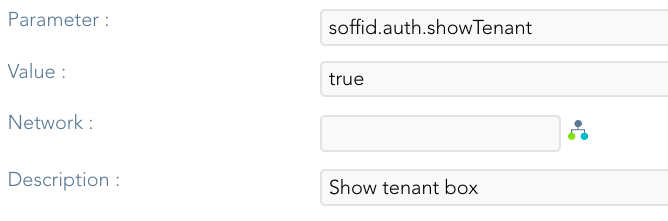
Option 2
You can also configure the login page using the soffid.auth.showTenant Soffid parameter. If the parameter value is true, Soffid will display a new box in the login page to write the tenant name to login.
Plugins
Definition
Soffid provides you additional functionality that allows installing addons and server plugins. There are two main types of addons: system connectors and console addons.
You can download existing addons and plugins developed by Soffid by visiting http://download.soffid.com/download or http://download.soffid.com/download/enterprise if you have a Soffid user with authorization.
Addons and plugins can be developed using Addon Development Guide.
An addon or plugin, must be upload into a Master tenant, the other tenant will inherit these installed addons and plugins.
System connectors
Also referred as plugins, there are little pieces of software able to manage identities on some type of systems. They can be generic plugins (SQL or LDAP plugins) or custom specific plugins.
The system connector is configured when the administrator creates an agent. An agent can be viewed as a configured instance of a plugin.
In order to upgrade existing (running) plugins, the synchronization server that hosts this plugin must be restarted from the system monitoring screen.
Console addons
Add important features to Soffid console. A console addon can contain common classes, data models, transactional services, web services, and web interfaces.
In order to apply addon changes, the console must be restarted. It can be restarted from this page by clicking on the restart console button.
From the addon management screen, you will be able to upload and upgrade server plugins, as well and enable or disable them.
Screen overview
Related objects
Standard attributes
- Plugin: identified name of the plugin or addon deployed.
- Version: version of the plugin or addon.
- Deployed by: user that deployed the addon or plugin.
- Date: date and time of the deployment.
- Enabled: if enabled is Yes, the plugin or addon will be available to use it.
- Components: component list that make up the plugin or addon.
Actions
Plugins query actions
|
Add new |
Allows you to upload and install a new plugin or addon. You can choose that option on the hamburger menu or click the add button (+). You must pick a file, that file has to be a valid add-on or plugin. Once the file is selected, it will be uploaded automatically. Then, you must restart the Sync server or Console depending on the uploaded plugin |
|
Delete |
Allows you to delete one or more plugins or addons, you must select one or more records from the list and click the button with the subtraction symbol (-). To perform that action, Soffid will ask you for confirmation, you could confirm or cancel the operation. |
|
Restart Console |
Allows you to restart the console to apply addon changes. That operation will be mandatory when you load an addon. |
|
Download CSV file |
Allows you to download a CSV file with all the information about plugins and addons. |
Plugins detail actions
| Apply changes | Allows you to update the plugin. Only Enabled attribute can be modified. Once you apply changes, the plugin details page will be closed. |
| Save | Allows you to update the plugin. Only Enabled attribute can be modified. |
| Delete |
Allows you to delete and desinstall a specific plugin. To delete a plugin, you can click on the hamburger icon and then click the delete button (trash icon). Soffid will ask you for confirmation to perform that action, you could confirm or cancel the operation. |
| Undo | Allows you to undo any changes. |
Look & feel
Definition
Soffid's Look & feel page allows you to adjust the Console styles to your organization.
In this configuration page, the customization of three sections is allowed:
- You can change the colors of the Soffid components and text.
- You can change the image of the logo that appears on the login page.
- You can change the image of the logo that appears in the header.
- Changes made on this page affect the entire Console.
Some changes may require updating the browser several times because some items are in the browser's cache.
Overview
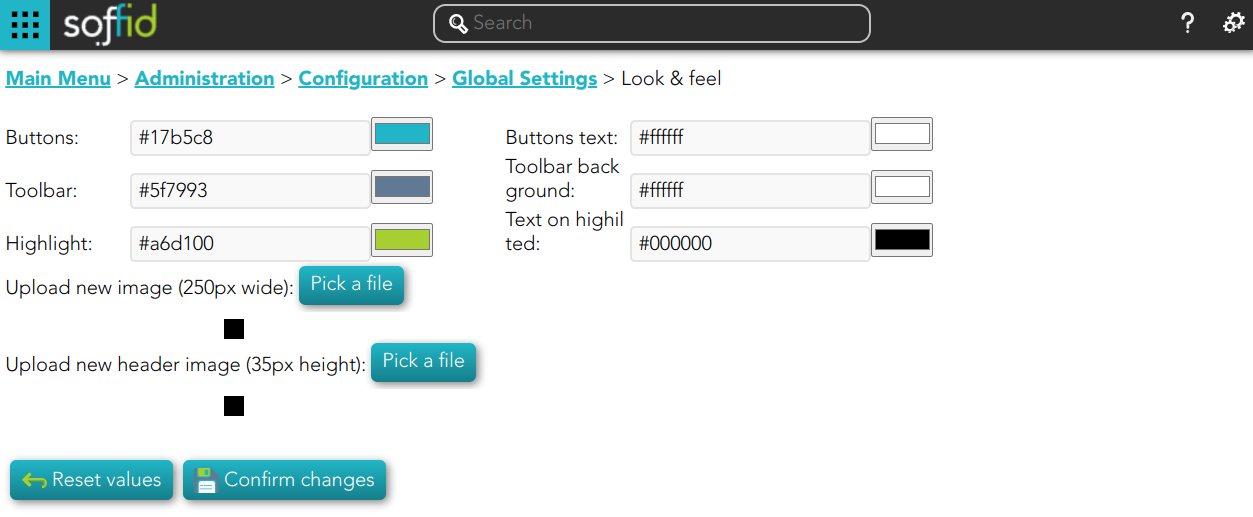
Actions
|
Reset values |
Allows you to return to the default Soffid values. |
|
Confirm changes |
Allows you to apply the changes made. |
|
Pick a file |
Allows you to pick a file to load. The file must have a specific configuration |
Soffid parameters
Definition
Soffid allows you to customize the configuration of some attributes of the Console, Syncserver, connectors and add-ons.
There are several types of parameters.
- Informative parameters, such as the versions of internal components of Soffid.
- Parameters used as attributes in Soffid screens, such as the values of the look & feel fields.
- There are also parameters that can be modified, such as some configuration data for the synchronization server.
- There are new attributes that can be included to expand the functionality of Soffid, such as mail server data.
If you want to know the Soffid console version check the component.iam-core.version parameter.
Screen overview
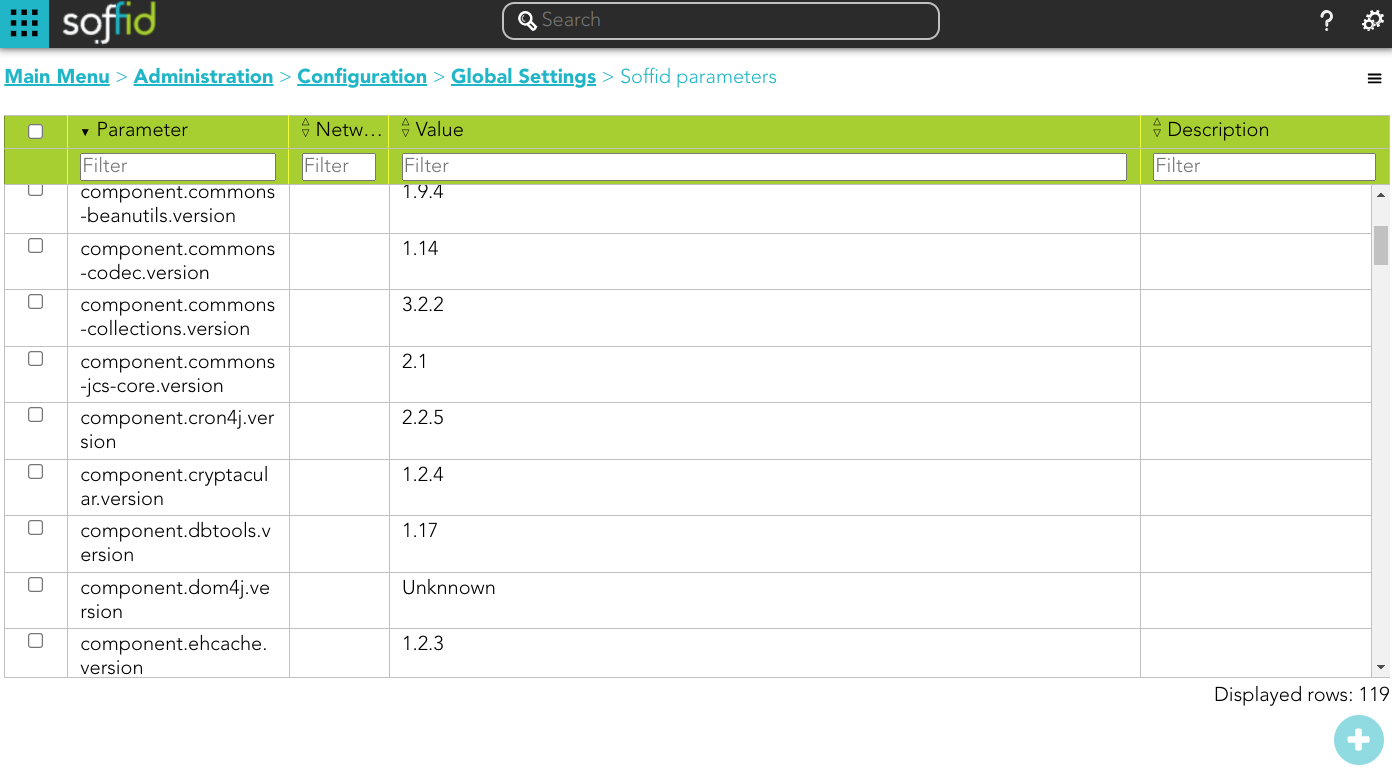
Standard attributes
- Name: code used to identify the parameter.
- Value: parameter value.
- Network (optional): network to which this parameter would be assigned.
- Description (optional): a brief description of the parameter.
Actions
Soffid parameters query actions
|
Add new |
Allows you to add a new Soffid parameter. You can choose that option on the hamburger menu or clicking the add button (+). To add a new parameter it will be mandatory to fill in the required fields. |
|
Delete |
Allows you to delete one or more Soffid parameters by selecting one or more records and next clicking the button with the subtraction symbol (-). To perform that action, Soffid will ask you for confirmation, you could confirm or cancel the operation. |
|
Import |
Allows you to upload a CSV file with the parameter list to add, update or delete parameters to Soffid. First, you need to pick up a CSV file, that CSV has to contain a specific configuration. Then you need to check the content to be loaded, it is allowed to choose if you want or not to load a specific attribute. And finally, you need to select the mappings for each column of the CSV file to import the data correctly and to click the Import button. To delete a parameter, the values of the parameter have to be empty |
|
Download CSV file |
Allows you to download a csv file with the basic information of all Soffid parameters. |
Soffid parameters detail actions
|
Apply changes |
Allows you to save the data of a new parameter or to update the data of a specific parameter. To save the data it will be mandatory to fill in the required fields. |
|
Delete |
Allows you to delete a specific Soffid parameter. To delete a host you can click on the hamburger icon and then click the delete button (trash icon). Soffid will ask you for confirmation to perform that action, you could confirm or cancel the operation. |
|
Undo |
Allows you to quit without applying any changes. |
List of parameters sorted by functionality
Console
|
Parameter
|
Description
|
|---|---|
|
soffid.auth.system |
Select the managed system where the account name will be searched on the user login. Defaults to soffid. |
|
soffid.auth.trustedLogin |
Set to true to enable the Soffid console to validate passwords on trusted systems. Setting it to false, the password will be validated against internal tables only. |
|
soffid.delegation.disable |
Set to true to prevent users to delegate permissions from self service page. |
|
soffid.entitlement.group.holder |
Set to optional enables the operator to set a group as the group holder for any entitlement assignment. Set to always enforce that any entitlement assignment must be bound to a holder group. Set to none to disable this feature. This parameter affects to role holder |
|
soffid.language |
Enforce user interface language. |
|
soffid.language.default |
Default user interface language (en). |
|
soffid.network.internet |
Sets the name for a generic subnet that will hold any host not included on any listed network. |
|
soffid.proxy.trustedIps |
Set the IP address of any reverse proxy in front of Soffid servers. This parameter can take a list of IP addresses, separated by commas, like the following ones:
To allow a range of network IPS, one can use the wildcard(*) symbol, as in the following example:
Starting with Soffid console 3.3.0, the network-address/bits notation is allowed, as in the following example:
|
|
soffid.propagate.timeout |
Timeout in seconds to retry the password validation needed to propagate a managed system notified password change (requires syncserver 1.5.4). |
|
soffid.server.sharedThreads |
Number of shared dispatcher threads per synchronization servers (by default 1) |
|
soffid.syslog.server |
Hostname or IP address of server hosts SIEM. The SIEM will receive audit information using the syslog protocol. |
|
soffid.task.limit |
The maximum number of tasks allowed per transaction. If a simple or complex transaction generates more tasks than specified, these tasks will be kept on hold. Administrators can release them through the monitoring page. (version 2.0+) |
|
soffid.ui.docPath |
The path where to store report and workflow documents. |
|
soffid.ui.docServer |
URL where is the server to store the files. |
|
soffid.ui.docStrategy |
Class responsible for managing report and workflow documents. |
|
soffid.ui.docTempPath |
The path where to store temporary files |
|
soffid.ui.docUsername |
Username of the doc server. |
|
soffid.ui.docUserPassword |
The password of the doc server. |
|
soffid.ui.maxrows |
The maximum number of rows to display in searches. The default value is 200 but you can change it. |
|
soffid.ui.timeout |
Max time (in milliseconds) a query can take to complete (version 2.0 +). |
|
soffid.ui.wildcarts |
Setting the auto value enables the user interface to add wildcards on user queries. Setting it to off disables this feature. |
|
soffid.externalURL |
External URL to access to Soffid console. |
|
soffid.kerberos.agent |
The name of the Windows server agent so that any incoming Kerberos packets will be authenticated against that domain. |
|
soffid.pam.search.recordings.timeout |
Timeout reached in the query, use the parameter to specify a longer timeout in milliseconds. By default, if you don't config this parameter is 60000 milliseconds. (version 3.5.18+) |
|
soffid.nameformat |
Parameter to configure how to display the users full name. Where:
For instance: |
|
soffid.issue.next |
Allows you to initialize the parameter to indicate what will be the ID of the next issue. 1 will be the default value. |
|
soffid.upload.maxsize |
Allows you to set a maximum value in bytes for uploading files to Soffid. |
Syncserver
|
Parameter
|
Description
|
|---|---|
| SSOServer | This parameter indicates which server acts on the workstations that run SSO. This parameter can have different values for any subnet. So you can define ESSO servers allowed for any subnet. |
| seycon.https.port | Port where synchronization server connects to. This parameter is used by ESSO clients to connect to synchronization servers. |
| seycon.server.list | Shows where Syncserver and SyncServer backup is installed. When installing the first server synchronization, this parameter is automatically updated. If you want to install a synchronization server backup you must update this parameter manually. Note that proxy synchronization servers are not on this list. See the Soffid installation guide. |
| soffid.sync.engine.threads |
This parameter allows you to configure the number of threads available to run the tasks. If you do not fill this parameter, Soffid will run 1 thread for every 50 systems, but never more than twice the number of CPUs of the server. The value of the parameter must be equal or greater than 1. (Available in Sync Server version 3.5.15+) |
Mail server
|
Parameter |
Description |
|---|---|
|
mail.host |
Host to send electronic mail messages. |
|
mail.from |
Recipient address that will be set as the email sender. |
|
mail.transport.protocol |
Set to SMTPS to get secure mail. Default value "SMTP" to use plain SMTP protocol. |
|
mail.auth |
Set to true if your mail server requires user authentication. |
|
mail.user |
Set your email user name if your mail server requires user authentication. |
|
mail.password |
Set your email password if your mail server requires user authentication. |
|
mail.port |
25 by default, with this parameter a new port can be set. |
|
mail.smtp.sasl.enable |
Set to true to enable SASL. |
Job notifications
|
Parameter |
Description |
|---|---|
|
soffid.scheduler.error.notify |
Users to notify when a scheduled task fails. |
|
soffid.bpm.error.notify |
Users to notify when a BPM task fails. |
|
soffid.bpm.error.retry |
Set to true to always retry any failed BPM task. |
Syncserver provisioning
|
Parameter
|
Description
|
|---|---|
| soffid.server.register |
Set to direct value to bypass standard workflow needed for a syncserver to join the syncservers security network. Otherwise, the standard approval workflow will be required(Since syncserver 2.6.0). You also can set it to no-direct |
Addons
Federation
|
Parameter
|
Description
|
|---|---|
| addon.federation.essoidp |
Set the Identity Provider identifier to indicate that this will be the authentication provider. For more information, you can visit the How to add to ESSO a second factor of authentication page. |
Exclude menu options
To exclude default menu options for all users of the Sofid console, the following steps can be followed
1. To exclude some menu options from your Soffid console, you must edit the system.properties file of this console. You can find this file in the following path: /opt/soffid/iam-console-3/conf/
2. Add the soffid.menu.hidden parameter to the system.properties file. The value of this parameter can be the menu options name that you can find in the console.yaml file.
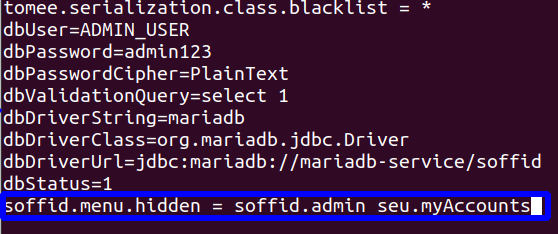
3. Restart the Soffid console.
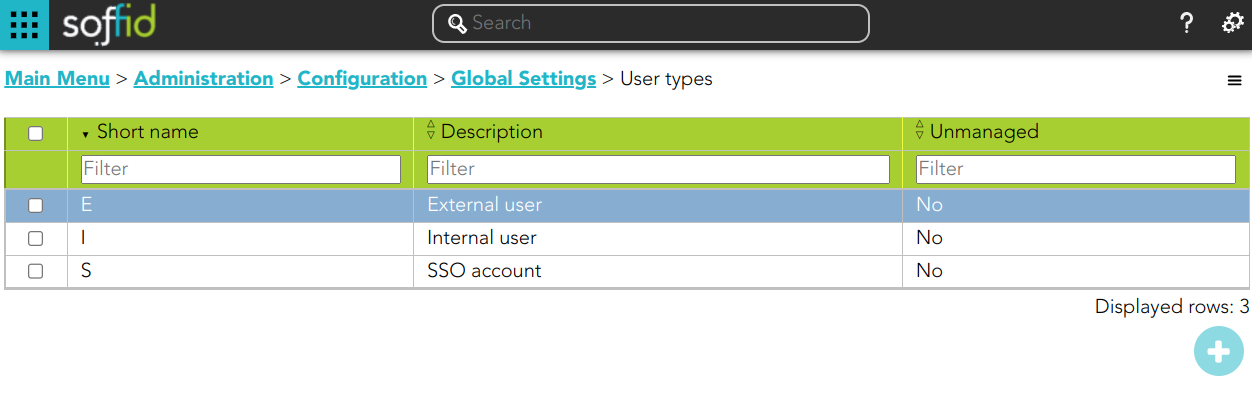
User Type
Description
User type is the way to categorize users and allows configuring different password policies. Those policies can be more or less restrictive depending on the user's risk. For instance, internal users (automatically created) are different from external ones.
Therefore, this field is very useful for the following cases:
- Sort or list the users on the user's page or in the reports
- Apply different password policies
- Apply restrictions on the synchronization of Soffid to the target systems
- Ease configuration in automatic rules or custom scripts
Be in mind that a user always must belong to a User Type.
Overview
Related objects
- User: each user must be assigned a user type.
- Account: the shared or privileged accounts also require having selected a user type to associate it with a password policy
Standard attributes
- Short name: internal code used to identify the user type.
- Description: brief description of the user type.
- Unmanaged: (yes|no) if unmanaged is Yes, users belonging to this category will not be propagated to final systems. You must use it when you are developing a PoC.
Actions
User type query
|
Add new |
Allows you to create a new User type. You can choose that option on the hamburger menu or clicking the add button (+). To add a new User type it will be mandatory to fill in the required fields |
|
Delete |
Allows you to remove one or more User type by selecting one or more records and next clicking the button with the subtraction symbol (-). To perform that action, Soffid will ask you for confirmation, you could confirm or cancel the operation. |
|
Import |
Allows you to upload a CSV file with the User type list to add or update User types to Soffid. First, you need to pick up a CSV file, that CSV has to contain a specific configuration. Then you need to check the content to be loaded, it is allowed to choose if you want or not to load a specific attribute. And finally, you need to select the mappings for each column of the CSV file to import the data correctly and to click the Import button. |
|
Download CSV file |
Allows you to download a csv file with the basic information of all user types. |
User type detail
|
Apply changes |
Allows you to save the data of a new User type or to update the data of a specific User type. To save the data it will be mandatory to fill in the required fields. |
|
Delete |
Allows you to delete the User type. To delete a host you can click on the hamburger icon and then click the delete button (trash icon). Soffid will ask you for confirmation to perform that action, you could confirm or cancel the operation. |
|
Undo |
Allows you to undo any changes made. |
Group Type
Description
Companies are organized in different business units, departments or workgroups. In Soffid, they all are named as groups. These group can be categorized by a group type.
Group types can be used in the definition of Holder Groups. Some roles can be assigned to a user only through a group enabled for it. When a user no longer belongs to a group, it is not allow assign that role to the user.
A user always belongs to a user type, but groups do not necessarily have to belong a group type.
Related objects
Standard attributes
- Name: name (or code) of the organizational unit.
- Description: description of the organizational unit.
- Role holder: (yes|no), when this attribute is active (yes), all the groups of this type of organizational unit could be assigned to a user as a domain of a role.
Role holder (and holder group)
In some organizations is necessary to assign roles that affect only a part of the structure, for instance, a department, a division or a country. A Holder Group can be defined as a collection of entities (referred to as "holders") that share similar characteristics, roles, permissions, or access requirements. The concept of a Holder Group simplifies the management of identities by enabling administrators to apply policies, assign roles, and manage permissions at the group level rather than individually.
The role holder is the role that requires to be assigned to a group, and the holder group is the group that can be assigned role permission.
To configure correctly this functionality you have to apply the next steps:
- Create at least one organizational unit (Group Type) with the role holder attribute active (yes).
- Assign groups to the organizational unit (with the attribute type of the group).
- Also, you can include new custom attributes to this membership relation, go to Metadata page and select the GroupUser to add these attributes.
- In the soffid parameters page, create a new parameter named soffid.entitlement.group.holder. It can have one of these three values:
- Set to optional enables the operator to set a group as the group holder for any entitlement assignment.
- Set to always to enforce that any entitlement assignment must be bound to a holder group.
- Set to none to disable this feature
Now you can start to apply this configuration to the users:
- In the Users page, select a user.
- In the Groups tab, add a new group.
- In the Roles tab, add a new role and select the holder group in the optional scope.
- If the holder group column is hidden, you can add with the option Add or remove columns.
Actions
Group type query
|
Add new |
Allows you to create a new Group type. You can choose that option on the hamburger menu or clicking the add button (+). To add a new Group type it will be mandatory to fill in the required fields |
|
Delete |
Allows you to remove one or more Group types by selecting one or more records and next clicking the button with the subtraction symbol (-). To perform that action, Soffid will ask you for confirmation, you could confirm or cancel the operation. |
|
Import |
Allows you to upload a CSV file with the Group type list to add or update Group types to Soffid. First, you need to pick up a CSV file, that CSV has to contain a specific configuration. Then you need to check the content to be loaded, it is allowed to choose if you want or not to load a specific attribute. And finally, you need to select the mappings for each column of the CSV file to import the data correctly and to click the Import button. |
|
Download CSV file |
Allows you to download a csv file with the basic information of all groups types. |
Group type detail
|
Apply changes |
Allows you to save the data of a new Group type or to update the data of a specific Group type. To save the data it will be mandatory to fill in the required fields. |
|
Delete |
Allows you to delete the Group type. To delete a host you can click on the hamburger icon and then click the delete button (trash icon). Soffid will ask you for confirmation to perform that action, you could confirm or cancel the operation. |
|
Undo |
Allows you to undo any changes made. |
Metadata
Description
The Metadata functionality allows expanding the Soffid objects, their attributes, and their data types. Also, it allows expanding custom objects.
By default, there is a list of built-in objects, but it is possible to create new custom objects and add new custom attributes to each of them.
It is usual to add custom attributes in the User built-in object to hold additional information.
Each attribute has a data type, it may be a basic type as a String (simple text), integer value, date, or something more complex as a reference to a custom object, or a popup to select a manager. In this way, one can build relationships between objects.
Screen overview
Related objects
Basically, there are two types of metadata objects. The built-in objects are part of the Soffid core and the custom objects as new objects.
built-in objects
The built-in objects are the objects that are part of the Soffid core. It can not be removed, but more custom attributes can be added.
The following objects are Soffid well-known objects that can be customized by means of this screen. All of them are tagged as Built-in objects.
Custom objects
The custom objects are the objects created by the administrator to extend the Soffid underlying data model. All of them are marked as Built-in type No.
Each custom object type created by the administrator is displayed at the custom objects menu options. Unfortunately, all custom object types share the same icon.
Custom object attributes
- Name: name of the custom object. This field is mandatory.
- Description: a brief description of the custom object. This field is mandatory.
- Public object: if you select the Yes option, the object will be visible to all the users with the proper permissions. If you select the No option, you must indicate what roles can Read and what roles can Write this object.
- Write access: allows you to select the proper roles with permissions to write. This field is only displayed when the Public object value is No
- Read access: allows you to select the proper roles with permissions to read. This field is only displayed when the Public object value is No
For more information, you can visit the Custom Objects page.
Standard attributes
Object attributes
- Object type
- Description: a brief description of the object.
- Use textual index: allows you to check the Yes option if you want to use the Textual index for searching data in this object.
For more information, you can visit the Textual index page.
Attribute metadata
- Code: short name used by scripts and connectors to access the underlying information. It is suggested to use short names without blanks or special characters to make it easier to use.
- Label: text displayed just beside the attribute value. It is advised to use short descriptions in order to keep the screen cleaner.
- Data type: The attributes can have different data types
- Basics
-
- String
- Numeric
- Password: a text that will be stored encrypted in the database. This field will never be displayed to the end user.
- Binary: raw information, probably images or documents.
- Boolean
- Photo: an image that is displayed as a small image.
- Date: a date with a calendar popup.
- Date and time: a date and time with a calendar popup.
- E-mail: a text with email format.
- HTML: rich text.
- Separator: a separator is a label to group attributes according to some criteria
- SSO HTML input: used primarily for the web SSO engine includes an input field and a value.
-
- Extensible built-in objects
-
- User
- Account
- Role
- Group
- Information System
- Host
-
- Other built-in objects
-
- Group Type
- User Type
- Network
- Mail domain
- Mail list
- Operating system
-
- Custom objects: any other custom object created by the administrator.
- Basics
- Description: text field to write a brief description of the attribute.
- Required: enabling this box will enforce the user to enter a value for this attribute at any object. Set no to allow objects without value.
- Include in quick search: the system will find any object that contains all the words included in the text search at any of the most relevant attributes. For instance, a quick search of "John Joe" will find users named "Joe Johnson" or "Johnathan Joel" as the first and last marked to be included in the quick search. If you enable the quick search for any new attribute, the same query will find a user named "Joe Williams" whose new attribute value is "John".
- Prevent duplicated values: mark this field as a unique key for the object type. There is no chance of two objects with the same attribute value. Soffid smart engine will avoid the creation of duplicated objects.
- Multiple values: some attributes can contain multiple values for the same object. For instance, an attribute containing the languages a user can speak can be multi-valued, as a user can speak multiple languages.
- Maximum number of rows to display: when an attribute is multivalued, the screen size can grow a lot. To prevent such a big form, the system will only display a maximum number of values, and a scroll bar will appear to browse through the attribute values.
- Size: primarily for string attributes, specify the maximum length in characters of the attribute value.
- Values: primarily, for attributes of data type String, you can specify the allowed values for the attribute. Then, the text box to the data type String is replaced by a drop-down list. Also, you can define a "code:label" for the value, the "code" is used internally and the "label" is displayed in the drop-down list, e.g. "ESP:Spain".
- Administrator visibility: sets the maximum visibility level for administrators. If the visibility level is set to read-only, the administrator will not be allowed to modify it. If the visibility is set to hidden, the administrator will not be able to query it. A user is considered as administrator when has the role SOFFID_ADMIN.
This field is only used in the user object.
- Operator visibility: sets the maximum visibility level for operators. If the visibility level is set to read-only, the operator will not be allowed to modify it. If the visibility is set to hidden, the operator will not be able to query it. A user is considered as an operator when has permission to open the users management page but lacks the role SOFFID_ADMIN.
This field is only used in the user object.
- User visibility: sets the maximum visibility level for end-users. If the visibility level is set to read-only, the user will not be allowed to modify it. If the visibility is set to hidden, the user will not be able to query it. Mind that even an administrator is considered to be a user rather than an administrator or operator when accessing their own identity.
This field is only used in the user object.
- Visibility expression: write an optional BeanShell expression to check if the field should be displayed or not. The expression should return true or false. The following variables are exposed to the expression:
-
ownerObject: current object owning the attribute.
-
value: current attribute value.
-
requestContext: tip about the screen using the attribute.
-
inputField: the ZK input object (ZK Framework).
-
inputFields: a map to get access to any other ZK input object (ZK Framework).
-
serviceLocator: locator to use any Soffid engine microservice.
-
// Sample to enable company name attribute only when the user is of type E (external)
return "E".equals(object{"userType"});- Validation expression: write an optional BeanShell expression to check if the field value is acceptable or not. The expression should return true if the value is acceptable. If the expression returns false or any other object, a warning message will be displayed. When the expression returns a string value, the return value will be considered the warning message to present to the end-user.
The following variables are exposed to the expression:
- ownerObject: current object owning the attribute
- value: current value to evaluate.
- requestContext: tip about the screen using the attribute
- inputField: the ZK input object (ZK Framework).
- inputFields: a map to get access to any other ZK input object (ZK Framework).
- serviceLocator: locator to use any Soffid engine microservice.
// Sample for checking birthDate is greater than 18 years old
c = java.util.Calendar.getInstance();
c.add(-18, c.YEAR);
if (birthDate == null || birthDate.before(c.getTime()) return true;
else return "Birth date should be before "+ new java.text.SimpleDateFormat().format(c.getTime());
- onLoad trigger: write an optional BeanShell expression that will be executed just after preparing the user interface. The script can modify in any way the inputField object before it is displayed, but cannot modify other input fields.
The following variables are exposed to the expression:
- ownerObject: current object owning the attribute
- value: current value to evaluate.
- requestContext: tip about the screen using the attribute
- inputField: the ZK input object (ZK Framework).
- inputFields: a map to get access to any other ZK input object (ZK Framework).
- serviceLocator: locator to use any Soffid engine microservice.
// Sample to set contract number attribute to read only if the attribute company is empty
// Place as an on-load trigger in the contract number field
if (ownerObject.attributes.get("company") == null || ownerObject.attributes.get("company").trim().isEmpty())
  inputField.setReadonly(true);
else
inputField.setReadonly(false);- onChange trigger: write an optional BeanShell expression that will be executed just after the user has changed the object value. The script can modify in any way the inputField object or any other input fields.
The following variables are exposed to the expression:
- ownerObject: current object owning the attribute.
- value: current value to evaluate.
- requestContext: tip about the screen using the attribute.
- inputField: the ZK input object (ZK Framework).
- inputFields: a map to get access to any other ZK input object (ZK Framework).
- serviceLocator: locator to use any Soffid engine microservice.
// Sample trigger to set contract number attribute to read only when the company attribute gets empty
// Place as an on-change trigger in the contract field
contractField = inputFields.get("contractNumber");
if (value == null || value.trim().isEmpty())
  contractField.setReadonly(true);
else
  contractField.setReadonly(false);
contractField.invalidate(); // Redraw contract number field
......
inputFields.get("contractNumber").getValue();- You can add a SCIM expression: exclusive for Soffid objects (users, groups, roles...). Write an optional SCIM query using the SCIM standard to filter valid results for a specific field.
You can access to SCIM Chapter for more information
Actions
Metadata query
|
Add or remove columns |
Allows you to show and hide columns in the table. You can also set the order in which the columns will be displayed. The selected columns and order will be saved for the next time Soffid displays the page. |
|
Add new |
Allows you to add a new metadata object in the system. You can choose that option on the hamburger menu or by clicking the add button (+). To add a new it is necessary to fill in the required fields. By default, it will has have two mandatory attributes, name and description. |
|
Delete |
Allows you to remove one or more metadata objects by selecting one or more records and next clicking the button with the subtraction symbol (-). To perform that action, Soffid will ask you for confirmation, you could confirm or cancel the operation. |
|
Download CSV file |
Allows you to download a CSV file with the basic information of all metadata. |
Metadata object detail
|
Add new |
Allows you to add a new attribute metadata. You can choose that option by clicking the add button (+). |
|
Add or remove columns |
Allows you to show and hide columns in the table. You can also set the order in which the columns will be displayed. The selected columns and order will be saved for the next time Soffid displays the page. |
|
Delete |
Allows you to delete the metadata object. To delete a host you can click on the hamburger icon and then click the delete button (trash icon). Soffid will ask you for confirmation to perform that action, you could confirm or cancel the operation. |
|
Set to default |
Allows you to set the factory setting. Sometimes, usually after an upgrade, it is advisable to reset the built-in attributes of a built-in object. In that case, the properties of the attribute will be changed to the factory setting ones. |
|
Import |
Allows you to upload a CSV file with the attribute metadata to add or update attribute metadata to Soffid. First, you need to pick up a CSV file, that CSV has to contain a specific configuration. Then you need to check the content to be loaded, it is allowed to choose if you want or not to load a specific attribute. And finally, you need to select the mappings for each column of the CSV file to import the data correctly and click the Import button. |
|
Download CSV file |
Allows you to download a CSV file with the basic information of the metadata object. |
Attribute metadata
|
Delete |
Allows you to delete the metadata object. To delete a host you can click on the hamburger icon and then click the delete button (trash icon). Soffid will ask you for confirmation to perform that action, you could confirm or cancel the operation. |
|
Undo |
Allows you to quit without applying any changes made. |
|
Apply changes |
Allows you to save the data of a new Metadata object or to update the data of a specific Metadata object. To save the data it will be mandatory to fill in the required fields. |
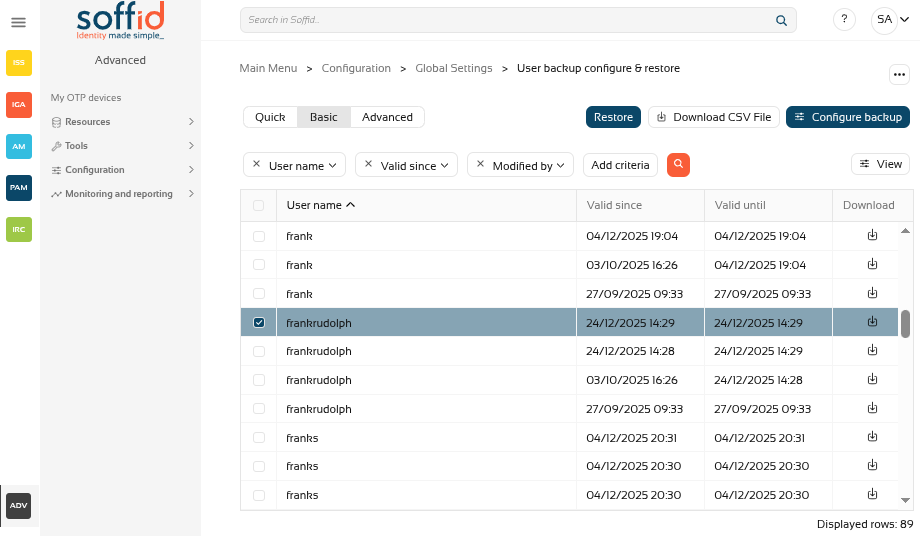
User backup configure & restore
Description
On the User backup configure & restore page, you could search, check and restore the user's snapshots.
Also on this screen, you can also configure the frequency and number of backups to be performed.
Screen overview

Related objects
- Users: new Backups tab in the Users page, user object has backups
- Groups: user assignments to groups have backup
- Accounts: user's accounts have backup
- Roles: user's roles (grants) have backup
- Mail lists: user's mail lists have backup
Standard attributes
- User Name: userName of a user
- Valid since: date and time when this backup started
- Valid until: if it is not the last backup, date and time when this backup finished
- Download: XML file with the user snapshot info.
Actions
Table actions
|
Query |
Allows you to query users through different search systems, Basic and Advanced. |
|
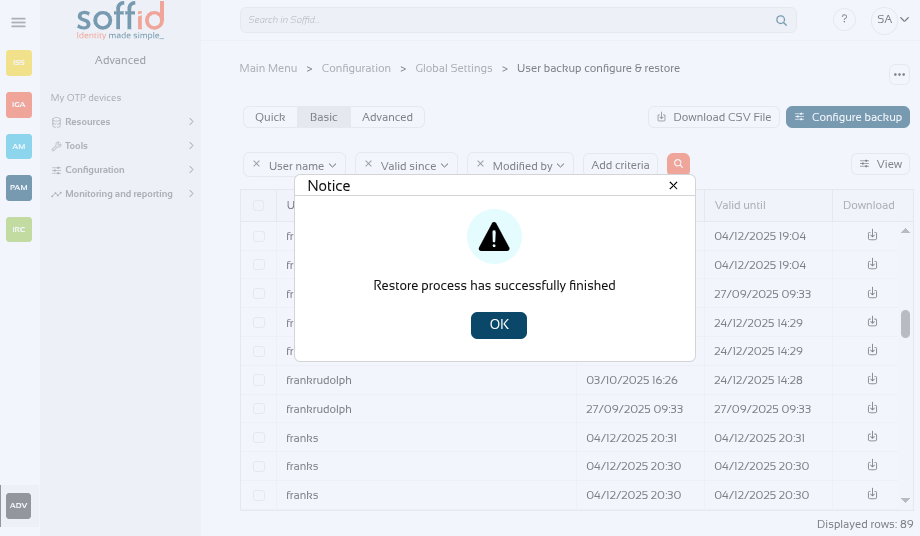
Restore |
Allows you to restore one or more user's snapshots. First of all, you need select one or more snapshots. Second, you need to click the "Restore" button. Then Soffid will run the restore process.
Image
|
|
Download CSV File |
Allows you to download a CSV file with the basic information of all backups, with the same columns as displayed in the table. |
|
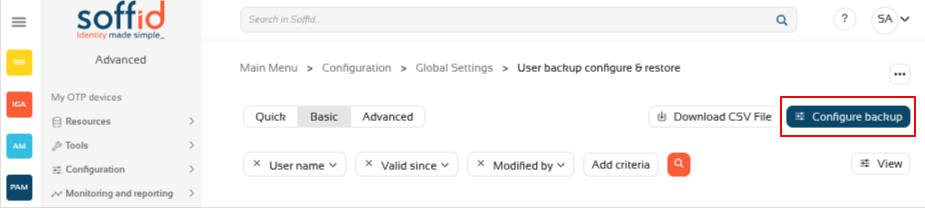
Configure backup |
Allows you to configure the backup parameters. |
| View |
Allows you to show and hide columns in the table. You can also set the order in which the columns will be displayed. |
|
Download |
Allows you to download an XML file with the user. You only need to click on the download icon of one of the records and save the file on your computer. |
Configure backup button
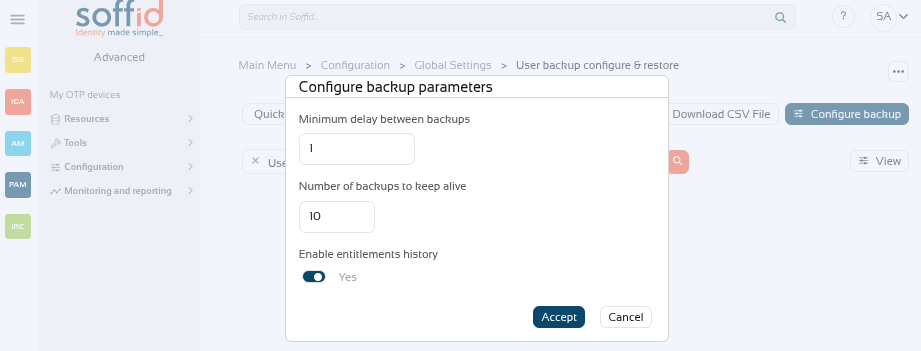
With the "Configure backup" button, you can configure the frequency and number of backups. These are the available parameters:
- Minimum delay between backups: if the value is 1, when a backup is created, the system will not create a new backup until 1 day later, even if there has been more than one change during that period.
-
Number of backups to keep alive: if the value is 10, when 10 backups are reached, the oldest backup will be deleted when the next one is created.
-
Enable entitlements history: enable the history of roles assigned to users.
Image
Others
Backup tab on user's page
On the users screen, when you select a user, this addon enables the Backups tab.
Image

This tab displays the user's backups.
Image
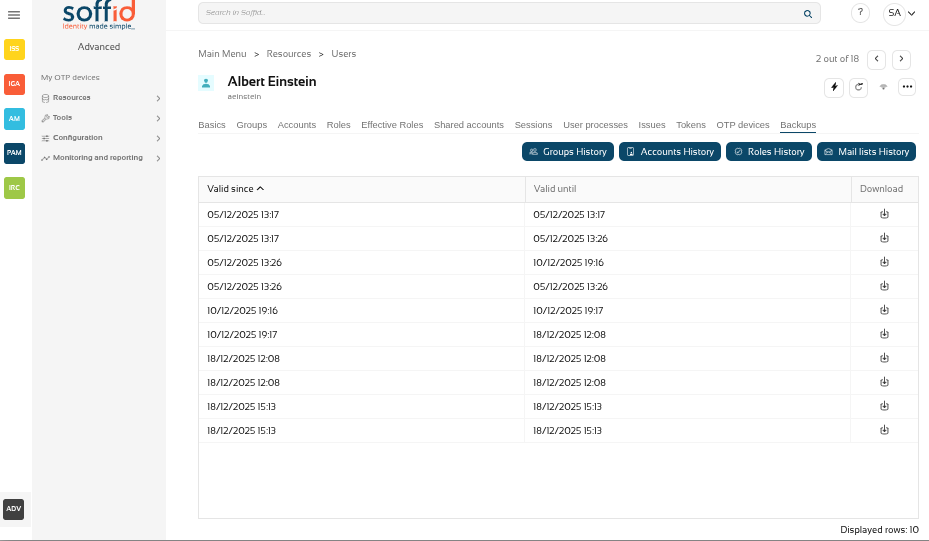
There are also several buttons with the rest of the items that can have backup.
Image

These are the buttons:
- Groups History: user assignments to groups have backup
- Accounts History: user's accounts have backup
- Roles History: user's roles (grants) have backup
- Mail lists History: user's mail lists have backup
Image
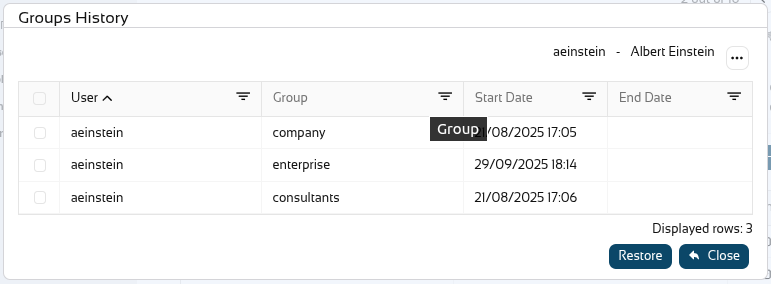
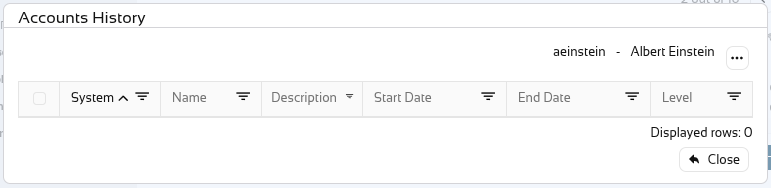
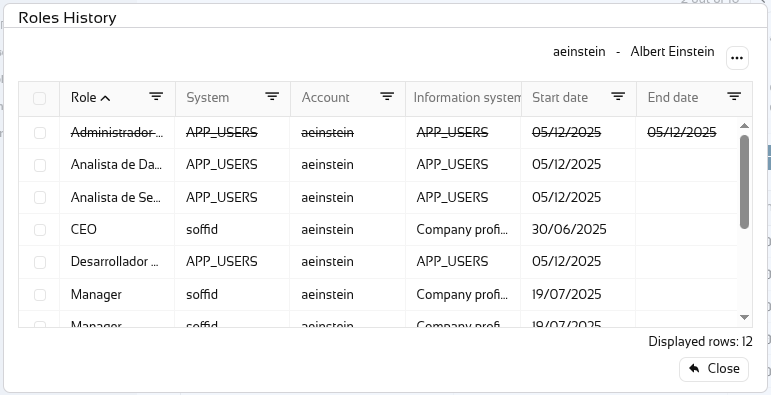
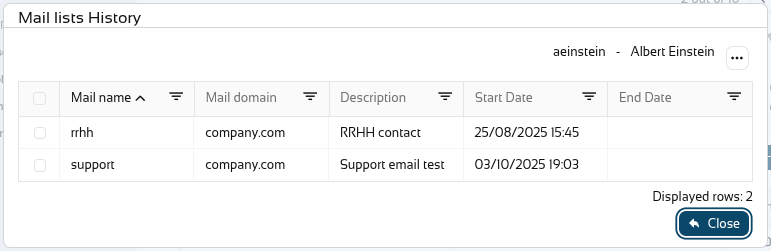
In any of the four options, when selecting an old record, the ‘Restore’ button will appear and this object can be restored to the user.
Image

Configuration wizard
For more information, you can visit the Configuration wizard book
Introduction
Soffid provides you a 360° perspective of the identities of your organization employees, providers and customers:
- Identity governance to manage the identities life-cycle
- Access management identifies your users accessing applications, including multi-factor authentication
- Privileged access management tracks usage and access of service and system management accounts
- Identity risk and compliance
Screen overview
For more information, you can visit the Configuration wizard book
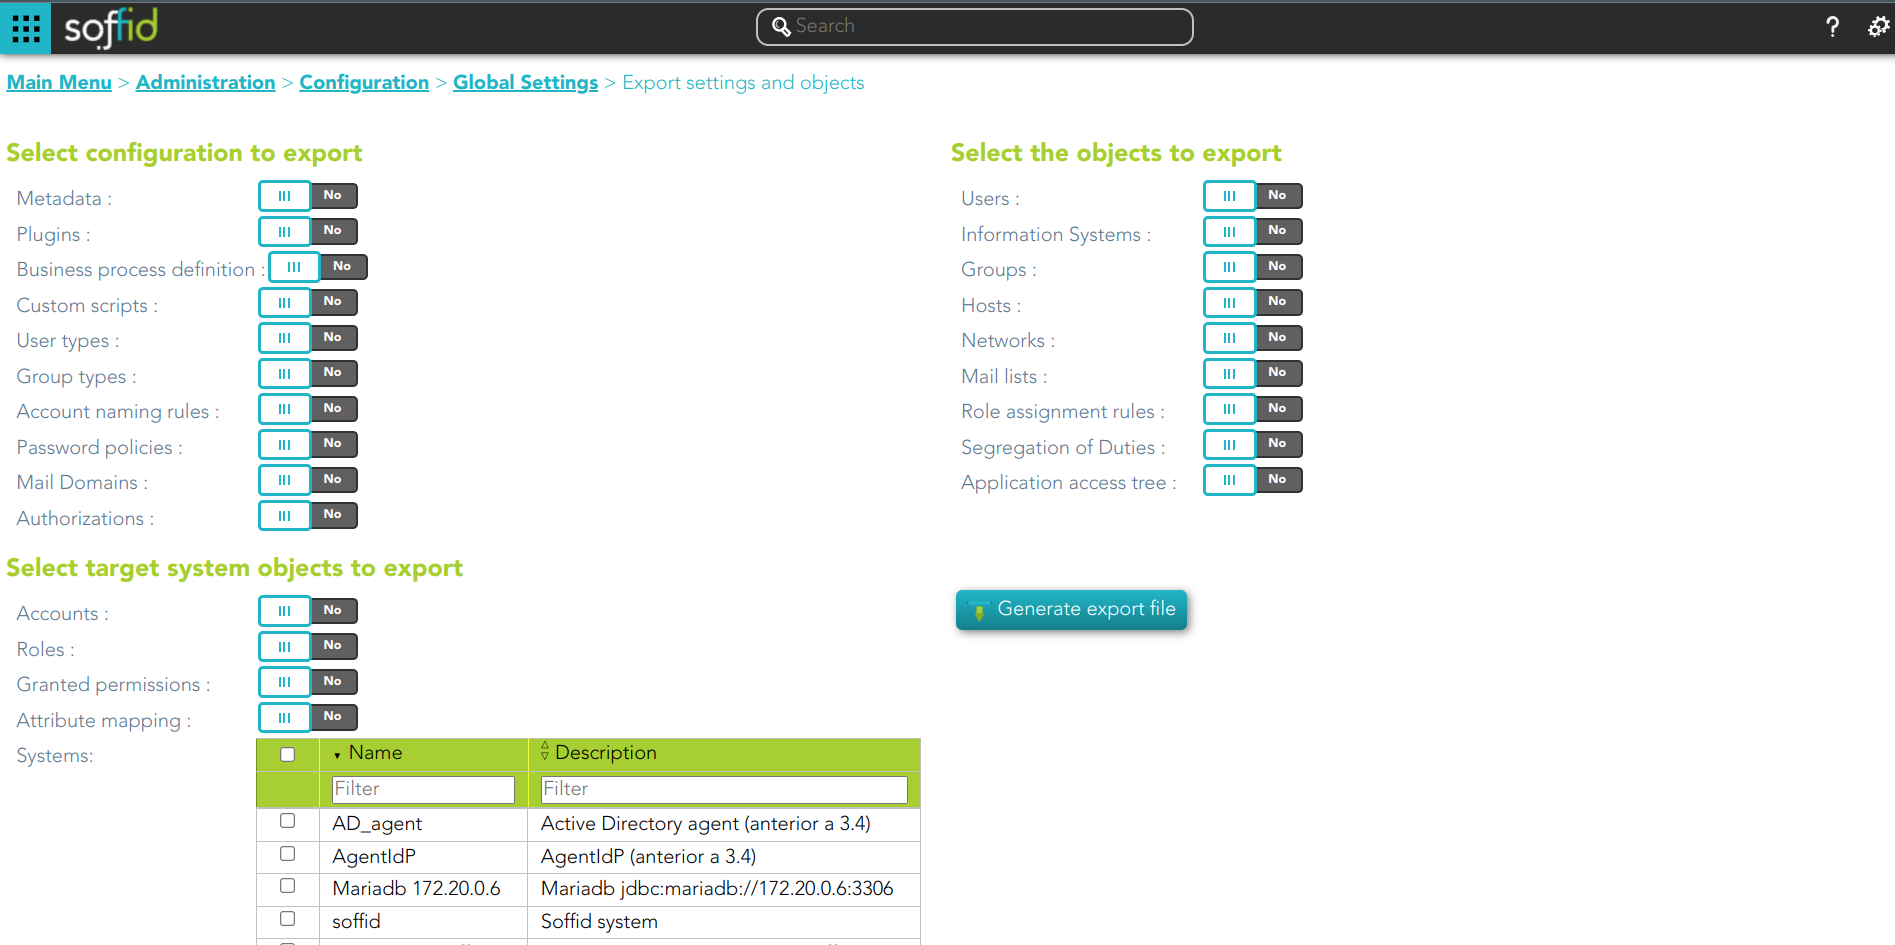
Export settings and objects
Description
Soffid has the functionality that allows you to export configuration, Soffid objects, and objects from target systems in a ZIP file. Every object or configuration will be downloaded into the ZIP in a binary file. This ZIP file could be imported into another Soffid tenant to be used.
For more information, you can visit the Import settings and objects page.
Once you open the Export settings and objects, you must select the configuration, objects, and target system objects you want to export. Then you only need to click the Generate export file button to download the ZIP that will contain all the previous information selected.
It is not allowed to export the basic configuration and configuration parameters of an agent for security reasons. You must create them manually and make sure you put the same names as in the source system if you are going to import accounts.
Overview
Related objects
Configuration
- Metadata
- Plugins
- Business process definition
- Custom Scripts
- User types
- Group types
- Account naming rules
- Password policies
- Mail Domains
- Authorizations
Objects
- Users
- Information Systems
- Groups
- Hosts
- Networks
- Mail lists
- Role assignment rules
- Segregation of Duties
- Application access tree
- Custom objects
Target system objects
- Accounts
- Roles
- Granted permissions
- Attribute mappings
- Systems: if you select and target system object, you must also select the system.
Actions
|
Generate export file |
By clicking this button, Soffid will generate a ZIP file with the objects and configuration that you have selected and will download it to your computer. |
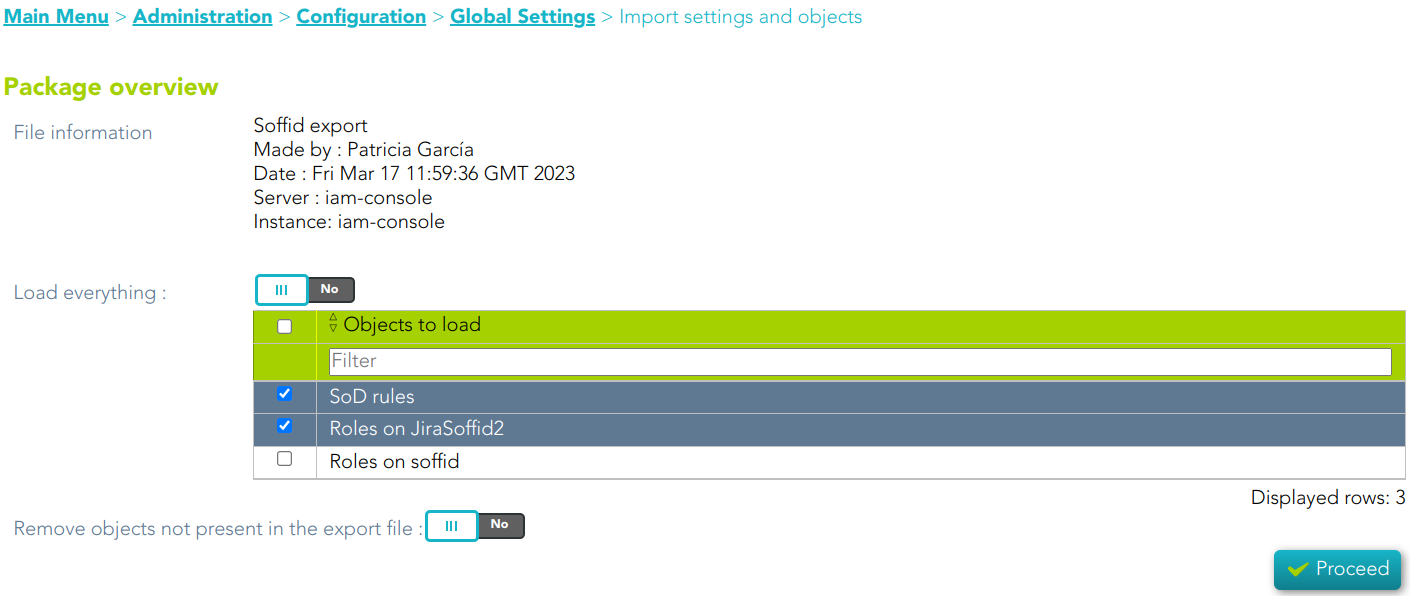
Import settings and objects
Description
Soffid has the functionality that allows you to import configuration, Soffid objects, and objects from target systems from a ZIP file. This ZIP file must be generated by the export action from another Soffid tenant.
For more information, you can visit the Export settings and objects page.
Once you pick the file to import, Soffid will display all the objects and configurations that you can load. You must select the proper objects and settings to import or enable the Load everything option. And finally, you must click the Proceed buttons to launch the import process. Once the process is finished, Soffid will display the result and allows you to download the log file.
It is not allowed to import the basic configuration and configuration parameters of an agent for security reasons. You must create them manually and make sure you put the same names as in the source system if you are going to import accounts.
Overview
Related objects
Configuration
- Metadata
- Plugins
- Business process definition
- Custom Scripts
- User types
- Group types
- Account naming rules
- Password policies
- Mail Domains
- Authorizations
Objects
- Users
- Information Systems
- Groups
- Hosts
- Networks
- Mail lists
- Role assignment rules
- Segregation of Duties
- Application access tree
- Custom objects
Target system objects
- Accounts
- Roles
- Granted permissions
- Attribute mappings
- Systems: if you select and target system object, you must also select the system.
Actions
|
Proceed |
Allows you to start the import process. |