From version **1.4.36 and higher,** Soffid PAM Launcher and Store installs allowing only **TLSv1.3 protocol.**
## Prerequisites Prerequisites to install PAM using Dockers: 1\. Install docker ( [https://docs.docker.com/install/](https://docs.docker.com/install/) ) 2\. Create a Docker network(\*), that network allows you to connect containers to the same bridge network to communicate: ``` sudo docker network create -d bridge NETWORKNAME ``` *\* You can use the same network defined in the Console and Sync Server installation to avoid visibility problems.* ## Screen overview ## Installation The steps required to install PAM are: 1. Create the storage server container. 2. Create the launcher container. 3. Register storage server in Soffid console. ### Fast path to create storage server and launcher containers 1\. To create both containers, you can download the following script: **[install-pam.sh](https://bookstack.soffid.com/attachments/15)** 2\. Before installing, you have to edit the file and set the name of the new network you have created, and the latest versions of the store and launcher ```shell ......... docker create \ --network soffid \ -v soffid-pam-store:/opt/soffid/tomee/data \ -p 8081:8080 \ --name soffid-pam-store \ soffid/pam-store:1.3.0 >/dev/null ...... ``` ```shell ...... docker create \ --network soffid \ -v soffid-pam-launcher:/opt/soffid/tomee/launcher \ -v /var/run/docker.sock:/var/run/docker.sock \ -p 8082:8080 \ -e STORE_SERVER="http://$PUBLIC_IP:8081/" \ -e STORE_USER="$userid" \ -e STORE_PASSWORD="$pass" \ --name soffid-pam-launcher \ soffid/pam-launcher:1.3.0 >/dev/null ...... ``` 3\. Finally, you can execute the script ``` ~/Downloads$ bash ./install-pam.sh ``` ##### A brief description of the script 1. Creates two volumes, one for the storage and the other for the launcher. 2. Creates a storage server container: 2.1. In that container the files and videos recorded will be saved. 2.2. All the data will be saved using a key. 2.3. By default, it will use the 8081 port. 3. Starts the storage container. 4. Generates the user and password to connect the launcher. 5. Creates a launcher server container: 5.1. That container will be in charge of recording and sending the recording files to the storage. 5.2. Soffid allows you to configure some environment variables:| Variable | Description |
| STORE\_SERVER | Store URL |
| STORE\_USER | Store user |
| STORE\_PASSWORD | Store password |
| JAVA\_KEYSTORE | (optional) Key store path that contains the key SSL |
| KEYSTORE\_PASS | (optional) SSL key |
| NETWORK\_ID | (optional) Network ID for docker services |
From version **1.4.36 and higher,** Soffid PAM Launcher and Store installs allowing only **TLSv1.3 protocol.**
\------------------------------------------------------------------------- \--- CREAR VOLUMNES \------------------------------------------------------------------------- docker volume create certificados-2 docker volume create soffid-pam-store-2 docker volume create soffid-pam-launcher-2 docker volume create soffid-pam-store-conf-2 docker volume create soffid-pam-launcher-conf-2 docker volume create soffid-pam-trustedcerts-2 \------------------------------------------------------------------------- \--- CREAR CERTIFICADOS JKS \------------------------------------------------------------------------- sudo openssl genrsa -aes256 -out soffid-pam-store-2.key sudo openssl req -x509 -days 1000 -new -key soffid-pam-store-2.key -out soffid-pam-store-2.pem sudo openssl pkcs12 -export -in soffid-pam-store-2.pem -inkey soffid-pam-store-2.key -out soffid-pam-store-2.pfx sudo openssl genrsa -aes256 -out soffid.pat.pam-2.key sudo openssl req -x509 -days 1000 -new -key soffid.pat.pam-2.key -out soffid.pat.pam-2.pem sudo openssl pkcs12 -export -in soffid.pat.pam-2.pem -inkey soffid.pat.pam-2.key -out soffid.pat.pam-2.pfx sudo keytool -v -importkeystore -srckeystore soffid-pam-store-2.pfx -srcstoretype PKCS12 \\ -destkeystore soffid-pam-store-2.jks \\ -deststoretype JKS \\ -destkeypass 123456 -srcstorepass 123456 -deststorepass 123456 sudo keytool -v -importkeystore -srckeystore soffid.pat.pam-2.pfx -srcstoretype PKCS12 \\ -destkeystore soffid.pat.pam-2.jks \\ -deststoretype JKS \\ -destkeypass 123456 -srcstorepass 123456 -deststorepass 123456 \------------------------------------------------------------------------- \--- COPIAR CERTIFICADOS JKS EN EL VOLUMEN LOS CERTFICADOS \------------------------------------------------------------------------- cp \*.jks /var/lib/docker/volumes/certificados-2/\_data \------------------------------------------------------------------------- \--- CREAR CONTENDOR STORE https://soffid-pam-store-2:8443 \------------------------------------------------------------------------- docker stop soffid-pam-store-2 docker rm soffid-pam-store-2 docker create \\ -v certificados-2:/opt/soffid/tomee/certificados \\ -v soffid-pam-store-conf-2:/opt/soffid/tomee/conf \\ -v soffid-pam-trustedcerts-2:/opt/soffid/tomee/trustedcerts \\ \--network netcompose \\ -p 8081:8443 \\ -v soffid-pam-store-2:/opt/soffid/tomee/data \\ \--name soffid-pam-store-2 \\ -e JAVA\_KEYSTORE=/opt/soffid/tomee/certificados/soffid-pam-store-2.jks \\ -e KEYSTORE\_PASS=123456 \\ soffid/pam-store:1.4.34 docker start soffid-pam-store-2 >/dev/null keytool -list -keystore keystore.jks docker exec soffid-pam-store-2 cat /opt/soffid/tomee/data/passwd docker exec soffid-pam-store-2 /opt/soffid/tomee/bin/add-user.sh soffid.pat.lab-launcher launcher Pass: i8h3CLzYxIzRb6d4RRhjpuKF6MOmZIlF0aZBxu8Nk5aPJfkKDYegbiOyzUzSggn7 \------------------------------------------------------------------------- \--- CREAR CONTENDOR LAUNCHER \------------------------------------------------------------------------- docker stop soffid-pam-launcher-2 docker rm soffid-pam-launcher-2 docker create \\ -v certificados-2:/opt/soffid/tomee/certificados \\ -v soffid-pam-launcher-conf-2:/opt/soffid/tomee/conf \\ -v soffid-pam-trustedcerts-2:/opt/soffid/tomee/trustedcerts \\ \--network netcompose \\ -v soffid-pam-launcher-2:/opt/soffid/tomee/launcher \\ -v /var/run/docker.sock:/var/run/docker.sock \\ -p 8082:8443 \\ -e STORE\_SERVER="https://soffid-pam-store-2:8443/" \\ -e STORE\_USER="soffid.pat.lab-launcher" \\ -e STORE\_PASSWORD="i8h3CLzYxIzRb6d4RRhjpuKF6MOmZIlF0aZBxu8Nk5aPJfkKDYegbiOyzUzSggn7" \\ -e JAVA\_KEYSTORE=/opt/soffid/tomee/certificados/soffid.pat.pam-2.jks \\ -e KEYSTORE\_PASS=123456 \\ \--name soffid-pam-launcher-2 \\ soffid/pam-launcher:1.4.35 docker start soffid-pam-launcher-2 keytool -list -keystore keystore.jks keytool -list -keystore soffid.pat.pam-2.jks \------------------------------------------------------------------------- \--- CERTIFICADOS DE CONFIANZA \------------------------------------------------------------------------- openssl s\_client -connect sync-server.netcompose:1760 < /dev/null | sed -ne '/-BEGIN CERTIFICATE-/,/-END CERTIFICATE-/p' > sync-server.netcompose.crt keytool -import -file sync-server.netcompose.crt -keystore cacerts -alias sync-server.netcompose docker restart soffid-pam-store-2 docker restart soffid-pam-launcher-2 \------------------------------------------------------------------------- \--- USUARIO EN STORE PARA CONSOLA \------------------------------------------------------------------------- docker exec soffid-pam-store-2 /opt/soffid/tomee/bin/add-user.sh soffid.pat.lab-console console Password: BWP0j7Ean8p0FrYVZsjnacYrYsDxs0UlG975HwJ3dYRGOF8YbuCnlUbHZnHlcw9c \------------------------------------------------------------------------- \--- CERTIFICADOS DE CONFIANZA EN LA CONSOLA \------------------------------------------------------------------------- cd /opt/soffid/iam-console-4/trustedcerts openssl s\_client -connect soffid-pam-store-2:8443 < /dev/null | sed -ne '/-BEGIN CERTIFICATE-/,/-END CERTIFICATE-/p' > soffid-pam-store-2.crt openssl s\_client -connect soffid.pat.pam-2:8082 < /dev/null | sed -ne '/-BEGIN CERTIFICATE-/,/-END CERTIFICATE-/p' > soffid.pat.pam-2.crt docker restart consola \------------------------------------------------------------------------- \--- CERTIFICADOS DE CONFIANZA EN EL SYNC SERVER \------------------------------------------------------------------------- cd /opt/soffid/iam-sync/conf/ openssl s\_client -connect soffid-pam-store-2:8443 < /dev/null | sed -ne '/-BEGIN CERTIFICATE-/,/-END CERTIFICATE-/p' > soffid-pam-store-2.crt \------------------------------------------------------------------------- \--- CERTIFICADOS DE CONFIANZA EN EL LAUNCHER \------------------------------------------------------------------------- openssl s\_client -connect soffid-pam-store-2:8443 < /dev/null | sed -ne '/-BEGIN CERTIFICATE-/,/-END CERTIFICATE-/p' > soffid-pam-store-2.crt keytool -import -file soffid-pam-store-2.crt -cacerts \------------------------------------------------------------------------- soffid.pat.pam-2:192.168.122.1 # Installing PAM using Docker Compose How to Install PAM using Docker Compose # PAM Jump Server Installation The purpose of this tutorial is to show how to install Jump servers and configure PAM using Docker compose, to use critical resources without knowing the password required. ### Jump Server > A jump server, jump host or jump box is a system on a network used to access and manage devices in a separate security zone. A jump server is a hardened and monitored device that spans two dissimilar security zones and provides a controlled means of access between them. (\*) ## Installation ### 1. Execute the Store YAML ```YAML version: '3.8' services: pam-store: image: soffid/pam-store:1.4.48 environment: JAVA_KEYSTORE: /opt/soffid/tomee/certificates/YOUR_soffid-pam-store.jks KEYSTORE_PASS: YOUR_KEYSTORE ports: - "8081:8443" networks: - network volumes: - store-trustedcerts:/opt/soffid/tomee/trustedcerts - store-certificates:/opt/soffid/tomee/certificates - store-data:/opt/soffid/tomee/data networks: network: name: YOUR_NETWORK driver: bridge volumes: store-trustedcerts: name: soffid-pam-store-trustedcerts store-certificates: name: soffid-pam-certificates store-data: name: soffid-pam-store ``` Execute: ``` sudo docker compose up -d ``` ### 2. Create a user in the Store to use it in the Launcher Once, we are connected to the Store, we need to run a script to create the user. This script has two parameters, the user name, and the role. We have to type launcher in the role parameter. ```shell docker exec YOUR_pam-store_CONTAINER /opt/soffid/tomee/bin/add-user.sh user-launcher launcher ``` Result: ``` /bin/bash: warning: setlocale: LC_ALL: cannot change locale (en_US.UTF-8) Password: cccccc/Qul9NFIqQnDU73gYccccVHThyew7Qt8Hqpf0rEzVq1Ft7azccccccc ``` As a result of the script, we receive the password for the created user. This password will be needed later when we create the launcher container. ### 3. Create a user in the Store to use it in the Console Once, we are connected to the Store, we need to run a script to create the user. This script has two parameters, the user name, and the role. We have to type console in the role parameter. ```shell docker exec YOUR_pam-store_CONTAINER /opt/soffid/tomee/bin/add-user.sh user-console console ``` Result: ``` /bin/bash: warning: setlocale: LC_ALL: cannot change locale (en_US.UTF-8) Password: asdadadasdads/Qul9NFIqQnDU73gYccccVHThyew7Qt8Hqpf0rEzVq1Ft7aadadadasd ``` As a result of the script, we receive the password for the created user. This password will be needed later when we configure PAM in the Soffid Console. ### 4. Execute the Launcher YAML YAML example to create the Launcher using traefik as Ingress Controller ```YAML version: '3.8' services: pam-launcher: image: soffid/pam-launcher:1.4.36 environment: JAVA_KEYSTORE: /opt/soffid/tomee/certificates/YOUR_soffid-pam-launcher.jks KEYSTORE_PASS: YOUR_KESYSTORE STORE_SERVER: https://YOUR_pam-store_CONTAINER:8443 STORE_USER: user-launcher STORE_PASSWORD: cccccc/Qul9NFIqQnDU73gYccccVHThyew7Qt8Hqpf0rEzVq1Ft7azccccccc ports: - "8082:8443" networks: - network volumes: - launcher-trustedcerts:/opt/soffid/tomee/trustedcerts - launcher-certificates:/opt/soffid/tomee/certificates - launcher-data:/opt/soffid/tomee/launcher - /var/run/docker.sock:/var/run/docker.sock networks: network: name: YOUR_NETWORK driver: bridge volumes: launcher-trustedcerts: name: soffid-pam-launcher-trustedcerts launcher-certificates: name: soffid-pam-certificates launcher-data: name: soffid-pam-launcher ``` Execute: ``` sudo docker compose up -d ``` ### 5. Configure the Console [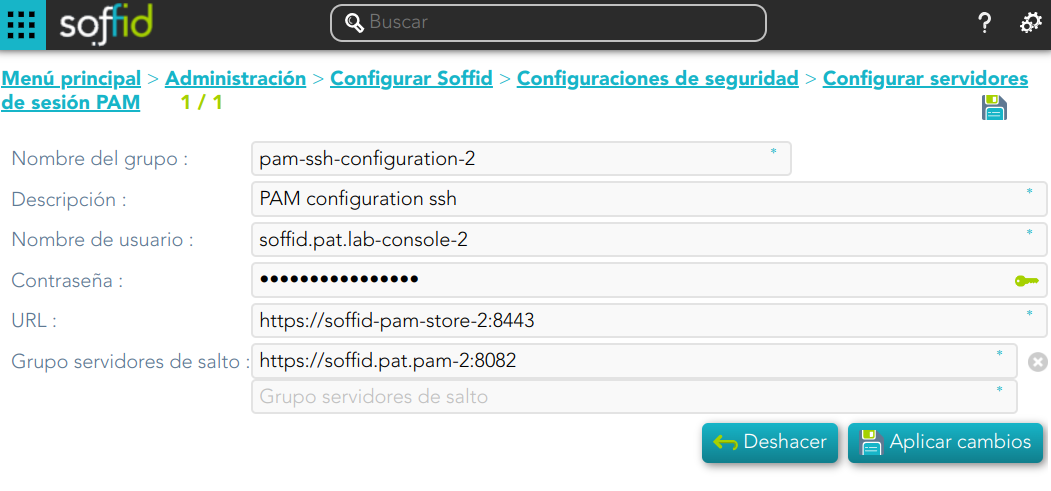](https://bookstack.soffid.com/uploads/images/gallery/2024-08/8Cn4v2ygTQZZjLXo-image.png) ### Privileged Account Session Recording Be in mind that you need to download the latest image of the required Privileged Account Session Recording that you need depending on the protocol. - soffid-pasr-ssh - soffid-pasr-rdp - soffid-pasr-jdbc - soffid-pasr-http - soffid-pasr-https - soffid-pasr-tn5250 - soffid-pasr-kube ##### Examples Linux ``` docker pull soffid/soffid-pasr-ssh ``` Windows ``` docker pull soffid/soffid-pasr-rdp ``` --- To save a Web session you will need to add some parameters to the launcher system.properties (/opt/soffid/tomee/conf/system.properties) Parameters to add: ```shell SOFFID_PAM_PARAMS_http=--shm-size=1024m --privileged -eVNCSERVER=yes SOFFID_PAM_PARAMS_https=--shm-size=1024m --privileged -eVNCSERVER=yes ``` --- *(\*) [https://en.wikipedia.org/wiki/Jump\_server](https://en.wikipedia.org/wiki/Jump_server)* # Full PAM installation using Docker Compose ## Introduction This tutorial describes **all the steps required to install and configure a basic PAM environment** for a local, demo or small production environment. ## Prerequisites - We have a **Linux** machine; Ubuntu 24 has been used for this tutorial. - **Docker** and the **Docker Compose** plugin are already installed. - The **database**, **Console** and **Syncserver** have already been installed. - The Linux administrator user has **sudo privileges**. ## Step 1: Prepare certificates #### 1.1 Some initial stepsThis tutorial will use **self-signed certificates** generated for a lab environment.
If you have your **own certificates**, follow the steps depending on the file type.
For this tutorial, we will be using the following hostnames: **store.soffid4.local** and **launcher.soffid4.local**
Go to the current Soffid 4 **directory** where the docker-compose.yaml is located. ```shell cd /home/user/lab/soffid4/ ---> (this is an example) ``` Add the hostnames in your **hosts** file. ```shell sudo vim /etc/hosts ---> (use vim or your favourite editor) ``` ```shell 127.0.0.1 store.soffid4.local 127.0.0.1 launcher.soffid4.local ``` And now you will need **java**, confirm is you have it or not. ```shell java -version ``` If you do not have it, for example **install java 17** (you can install another version). ```shell sudo apt-get update sudo apt-get install openjdk-17-jdk java -version ``` #### 1.2 Generate .key filesWhen you run the command, you will be prompted for a **password**. In this tutorial, we will always use the value **12345678**; please replace this with the password of your choice (minimum 8 characters)
```shell sudo openssl genrsa -aes256 -out store.soffid4.local.key sudo openssl genrsa -aes256 -out launcher.soffid4.local.key ``` #### 1.3 Generate .pem filesWhen you run the command, the prompt will ask for the **CN (Common Name)** attribute; use the values from our domains: **store.soffid4.local** or **launcher.soffid4.local**
```shell sudo openssl req -x509 -days 1000 -new -key store.soffid4.local.key -out store.soffid4.local.pem sudo openssl req -x509 -days 1000 -new -key launcher.soffid4.local.key -out launcher.soffid4.local.pem ``` #### 1.3 Generate .pfx files ``` sudo openssl pkcs12 -export -in store.soffid4.local.pem -inkey store.soffid4.local.key -out store.soffid4.local.pfx sudo openssl pkcs12 -export -in launcher.soffid4.local.pem -inkey launcher.soffid4.local.key -out launcher.soffid4.local.pfx ``` #### 1.4 Generate .jks files ``` sudo keytool -v -importkeystore -srckeystore store.soffid4.local.pfx -srcstoretype PKCS12 -destkeystore store.soffid4.local.jks -deststoretype JKS -destkeypass 12345678 -srcstorepass 12345678 -deststorepass 12345678 sudo keytool -v -importkeystore -srckeystore launcher.soffid4.local.pfx -srcstoretype PKCS12 -destkeystore launcher.soffid4.local.jks -deststoretype JKS -destkeypass 12345678 -srcstorepass 12345678 -deststorepass 12345678 ``` ## Step 2: Store configuration #### 2.1 Add the store in the yaml file **Edit** your docker-compose.yaml. ``` sudo vim docker-compose.yaml ``` **Add** the store service in your docker-compose.yaml.For this tutorial, **ports 8090** and **8091** have been opened.
Replace **<YOUR-KEYSTORE-PASSWORD>** for your password
```YAML services: store: image: soffid/pam-store:1.4.88 environment: JAVA_KEYSTORE: /opt/soffid/tomee/certificates/store.soffid4.local.jks KEYSTORE_PASS:The **console** and the **launcher** will need **users** to **connect** to the **store**.
We have to **run** a **script** in the **store** container to **create the user**. This script has two parameters, the user name, and the role. The role opcions are "console" or "launcher".
When the user is created, its **password** is **generated** and displayed in the script’s output; please **copy and save it** for use in the next steps.
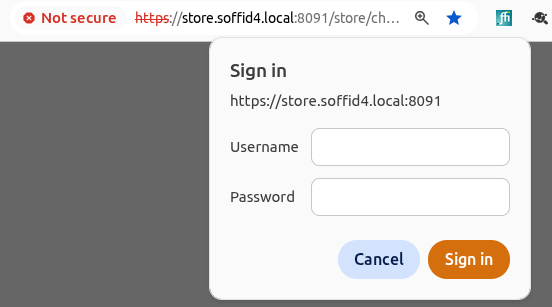
Create the **user-console**. ```shell docker compose exec store /opt/soffid/tomee/bin/add-user.sh user-console console ``` ``` /bin/bash: warning: setlocale: LC_ALL: cannot change locale (en_US.UTF-8) Password: cccccc/Qul9NFIqQnDU73gYccccVHThyew7Qt8Hqpf0rEzVq1Ft7azccccccc ``` Create the **user-launcher**. ```shell docker compose exec store /opt/soffid/tomee/bin/add-user.sh user-launcher launcher ``` ``` /bin/bash: warning: setlocale: LC_ALL: cannot change locale (en_US.UTF-8) Password: asdadadasdads/Qul9NFIqQnDU73gYccccVHThyew7Qt8Hqpf0rEzVq1Ft7aadadadasd ``` #### 2.3 Add the certificate Copy the **jks certificate** into the container. ```sqlite docker compose cp store.soffid4.local.jks store:/opt/soffid/tomee/certificates ``` **Restart** the store. ```sqlite docker compose restart store ``` #### 2.4 Monitoring the storeIf the store has started successfully, we will be able to access the store’s **monitoring** page.
[https://store.soffid4.local:8091/store/check](https://store.soffid4.local:8091/store/check)You must use the **user-console** to log in.
[](https://bookstack.soffid.com/uploads/images/gallery/2026-05/Cg1rAopu5r0DnPWm-image.png) This is result. [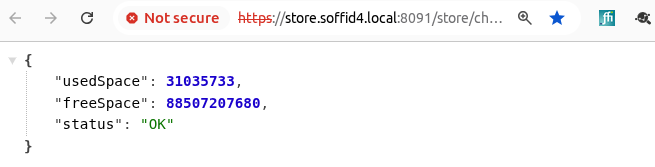](https://bookstack.soffid.com/uploads/images/gallery/2026-05/Y7bHklUUrXA3njKT-image.png) Confirm the CN name (Not secure > Certificate details). [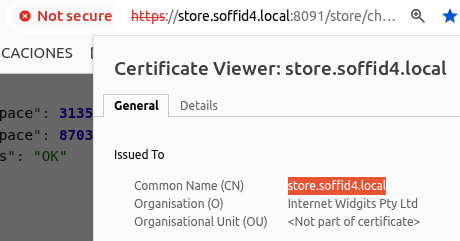](https://bookstack.soffid.com/uploads/images/gallery/2026-05/09UPW3zn5SlDFRUH-image.png) If something has gone wrong, you need to check the log. ```sqlite docker compose logs store ``` ## Step 3: Launcher configuration #### 3.1 Add the launcher in the yaml file **Edit** your docker-compose.yaml. ``` sudo vim docker-compose.yaml ``` **Add** the launcher service in your docker-compose.yaml.For this tutorial, **ports 8092** and **8093** have been opened.
Update the **<YOUR-USER-LAUNCHER-PASSWORD>** value for the one generated previously.
```YAML services: launcher: image: soffid/pam-launcher:1.4.88 environment: JAVA_KEYSTORE: /opt/soffid/tomee/certificates/launcher.soffid4.local.jks KEYSTORE_PASS: 12345678 STORE_SERVER: http://store:8080 STORE_USER: user-launcher STORE_PASSWORD:If the launcher has started successfully, we will be able to access the store’s **monitoring** page.
[https://launcher.soffid4.local:8093/launch/status](https://launcher.soffid4.local:8093/launch/status) This is result. [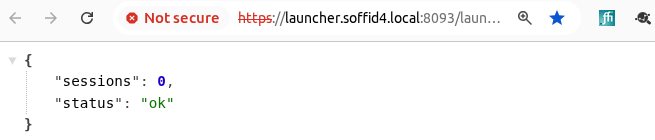](https://bookstack.soffid.com/uploads/images/gallery/2026-05/fRPor6qeHwFRzXk9-image.png) Confirm the CN name (Not secure > Certificate details). [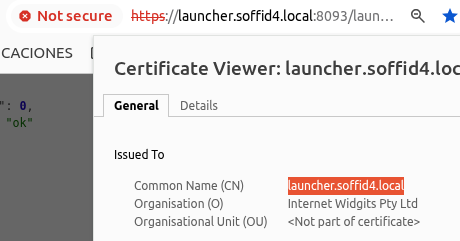](https://bookstack.soffid.com/uploads/images/gallery/2026-05/f6SQiTaB4nERcfke-image.png) If something has gone wrong, you need to check the log. ```sqlite docker compose logs launcher ``` ## Step 4: Register certificates #### 4.1 In the Console Add the PAM hostnames in the console service.Check the **IP** of the **docker environtment**, in this tutorial 192.168.122.1.
```sqlite sudo vim docker-compose.yaml extra_hosts: - store.soffid4.local:192.168.122.1 - launcher.soffid4.local:192.168.122.1 docker compose up -d ``` Created the PAM certificates for the Console. ```sqlite docker compose exec -it console bash cd /opt/soffid/iam-console-4/trustedcerts openssl s_client -connect store.soffid4.local:8091 < /dev/null | sed -ne '/-BEGIN CERTIFICATE-/,/-END CERTIFICATE-/p' > store.soffid4.local.crt openssl s_client -connect launcher.soffid4.local:8093 < /dev/null | sed -ne '/-BEGIN CERTIFICATE-/,/-END CERTIFICATE-/p' > launcher.soffid4.local.crt exit docker compose restart console ``` #### 4.2 Add a store certificate to the sync server Add the PAM hostnames in the syncserver service. ```sqlite sudo vim docker-compose.yaml extra_hosts: - store.soffid4.local:192.168.122.1 docker compose up -d ``` Add a store certificate to the sync server ```sqlite docker compose exec -it syncserver bash cd /opt/soffid/iam-sync/conf openssl s_client -connect store.soffid4.local:8091 < /dev/null | sed -ne '/-BEGIN CERTIFICATE-/,/-END CERTIFICATE-/p' > store.soffid4.local.crt keytool -import -file store.soffid4.local.crt -keystore cacerts -alias store.soffid4.local password: changeit exit docker compose restart syncserver ``` #### 4.3 Add the store/syncserver certificate to the launcher Add hostnames in the launcher service. ```sqlite sudo vim docker-compose.yaml extra_hosts: - store.soffid4.local:192.168.122.1 docker compose up -d ``` Add the store/syncserver certificate to the launcher.Check if **sync-server-version4.network:1768** is the same in your environment (Console > syncserver moniroring).
```sqlite docker compose exec -it launcher bash cd /opt/soffid/tomee/trustedcerts openssl s_client -connect store.soffid4.local:8091 < /dev/null | sed -ne '/-BEGIN CERTIFICATE-/,/-END CERTIFICATE-/p' > store.soffid4.local.crt openssl s_client -connect sync-server-version4.network:1768 < /dev/null | sed -ne '/-BEGIN CERTIFICATE-/,/-END CERTIFICATE-/p' > sync-server-version4.network.crt exit docker compose restart launcher ``` ## Step 5: Session types #### 5.1 IntroductionWhen starting a user session through the launcher, it requires images for each **session type**; you must **load** the **latest** docker **image** so that the launcher can start the session.
#### 5.2 load imagesDownload only the **session types** that **you need**.
```sqlite docker pull soffid/soffid-pasr-ssh:latest docker pull soffid/soffid-pasr-rdp:latest docker pull soffid/soffid-pasr-http:latest docker pull soffid/soffid-pasr-https:latest docker pull soffid/soffid-pasr-jdbc:latest docker pull soffid/soffid-pasr-tn5250:latest docker pull soffid/soffid-pasr-kube:latest docker pull soffid/soffid-pasr-google-chrome:latest docker pull soffid/soffid-pasr-vnc:latest docker pull soffid/soffid-pasr-iaccess:latest docker pull soffid/soffid-pasr-sap:latest docker pull soffid/soffid-pasr-gke:latest ``` #### 5.3 Save web sessions To **save a web sessions** you will need to add some parameters to the launcher **system.properties**. If it already exists, do nothing. ```shell docker compose exec -it launcher bash cd /opt/soffid/tomee/conf/ apt-get update apt-get install vim vim system.properties SOFFID_PAM_PARAMS_http=--shm-size=1024m --privileged -eVNCSERVER=yes SOFFID_PAM_PARAMS_https=--shm-size=1024m --privileged -eVNCSERVER=yes exit docker compose restart launcher ``` ## Step 6: Configure PAM in Console #### 6.1 Introduction We can now go to the **Configure PAM session servers** page. [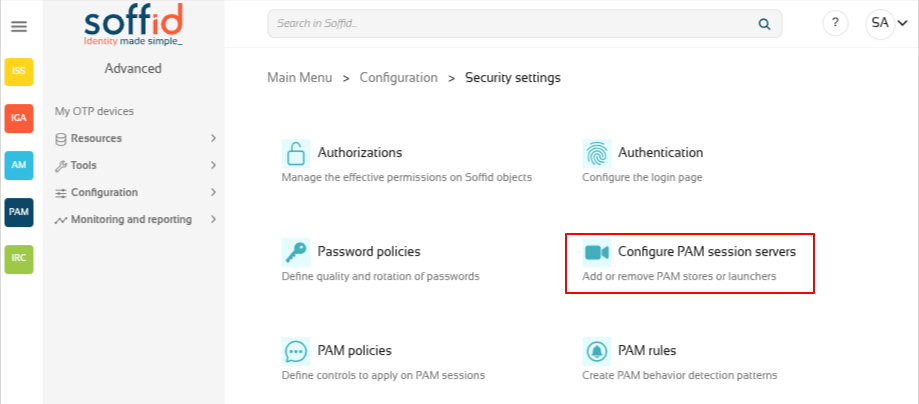](https://bookstack.soffid.com/uploads/images/gallery/2026-05/2laHWFH7kCNicSM3-image.png) #### 6.2 Create the PAM group Create a new group and you register the **store** with its **user** and **password**, along with the **launcher**.If everything goes well, it will let you to save the changes!
[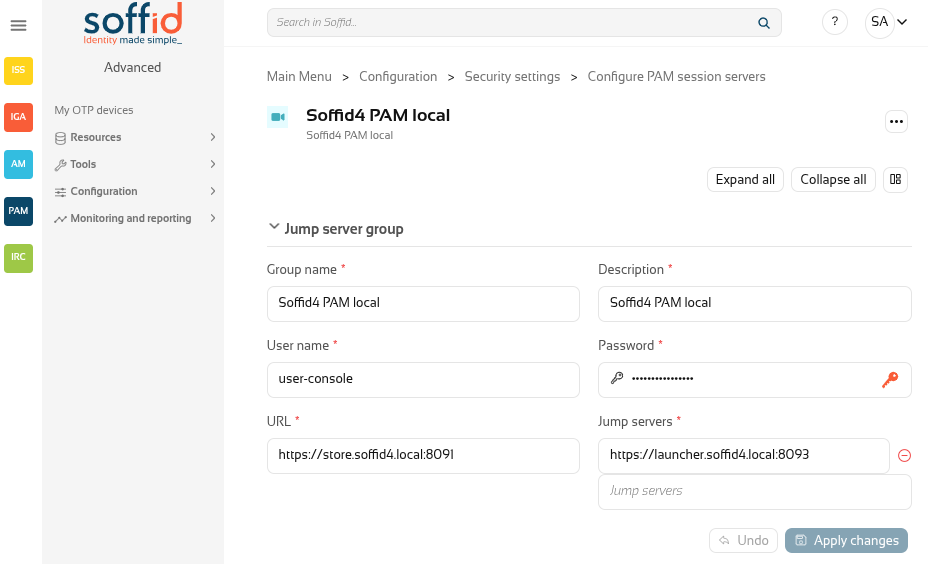](https://bookstack.soffid.com/uploads/images/gallery/2026-05/H5hsir5RfUy1rswQ-image.png) ## Step 7: Open a web session #### 7.1 Password vault Go to **Password vault** page. [](https://bookstack.soffid.com/uploads/images/gallery/2026-05/PrYmSOqepcB0xhqa-image.png) #### 7.2 Create an account Create a new folder "Password vault accounts" with the button "Add new". Now, on the "Password vault accounts", click the three poins icon and "Create new account". [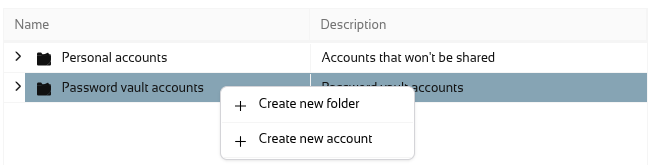](https://bookstack.soffid.com/uploads/images/gallery/2026-05/84AWorlMkHSQfowV-image.png) Add these values and click the dick button. [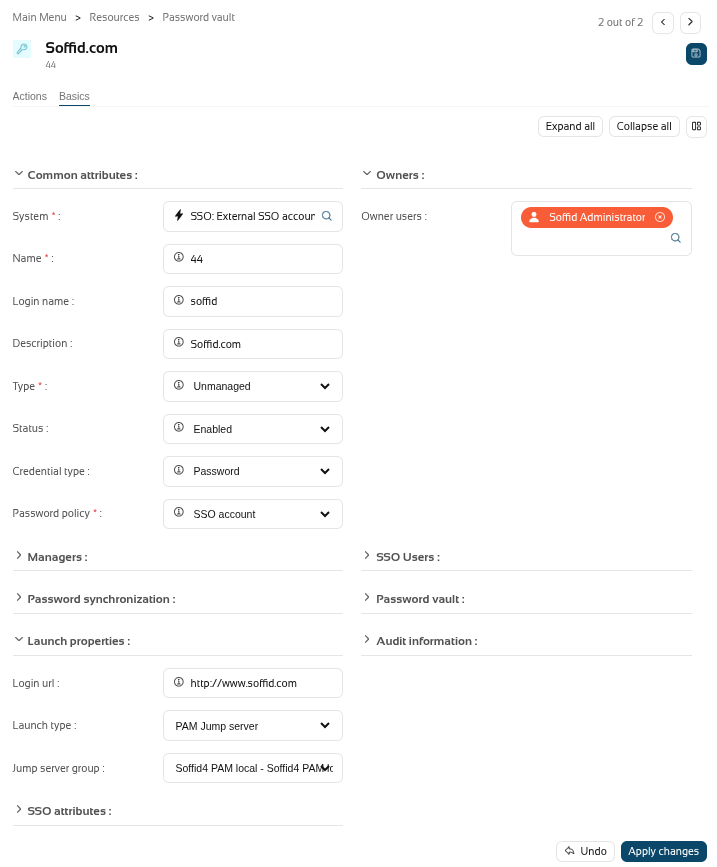](https://bookstack.soffid.com/uploads/images/gallery/2026-05/zTl1IFh7mpeXTmQp-image.png) Save a dummy password. [](https://bookstack.soffid.com/uploads/images/gallery/2026-05/8t1AIWjTZX6loHH5-image.png) [](https://bookstack.soffid.com/uploads/images/gallery/2026-05/Uw7cyNMlHlOwwSFF-image.png) #### 7.3 Launch Click the Launch button to confirm that the launcher can open the session type correctly. [](https://bookstack.soffid.com/uploads/images/gallery/2026-05/rYCkXEkuU2HGvtxX-image.png) [](https://bookstack.soffid.com/uploads/images/gallery/2026-05/KnxwmN7Xxt3gOlTj-image.png)Now you have the PAM environment ready to continu
# Installing PAM using Kubernetes How to install PAM using Kubernetes # PAM Jump Server Installation The purpose of this tutorial is to show how to install Jump servers and configure PAM using Kubernetes, to use critical resources without knowing the password required. ### Jump Server > A jump server, jump host or jump box is a system on a network used to access and manage devices in a separate security zone. A jump server is a hardened and monitored device that spans two dissimilar security zones and provides a controlled means of access between them. (\*) ## Installation ### 1. Execute the Store YAML ```YAML apiVersion: v1 kind: PersistentVolumeClaim metadata: namespace: iam name: pam-storage spec: accessModes: - ReadWriteOnce resources: requests: storage: 10Gi --- apiVersion: apps/v1 kind: Deployment metadata: name: pam-store namespace: iam labels: app: pam-store spec: strategy: rollingUpdate: maxSurge: 0 maxUnavailable: 1 type: RollingUpdate replicas: 1 selector: matchLabels: app: pam-store template: metadata: labels: app: pam-store spec: restartPolicy: Always containers: - name: pam-store image: soffid/pam-store:1.4.31 volumeMounts: - name: data mountPath: /opt/soffid/tomee/data ports: - containerPort: 8080 volumes: - name: data persistentVolumeClaim: claimName: pam-storage imagePullSecrets: - name: regcred --- kind: Service apiVersion: v1 metadata: name: pam-store-service namespace: iam spec: selector: app: pam-store ports: - name: http port: 8080 protocol: TCP ``` ### 2. Create a user in the Store to use it in the Launcher Once, we are connected to the Store, we need to run a script to create the user. This script has two parameters, the user name, and the role. We have to type launcher in the role parameter. ```shell root@soffid-pam-store:/# /opt/soffid/tomee/bin/add-user.sh launcher001 launcher Password: xxxxxx+JJnLlRtcBIGj+qQGyNHYR4zhkl7HucBsxxxx04zQ7ccccc3333 root@soffid-pam-store:/# ``` As a result of the script, we receive the password for the created user. This password will be needed later when we create the launcher container. ### 3. Create a user in the Store to use it in the Console Once, we are connected to the Store, we need to run a script to create the user. This script has two parameters, the user name, and the role. We have to type console in the role parameter. ```shell root@soffid-pam-store:/# /opt/soffid/tomee/bin/add-user.sh userconsole console Password: dddddd+JJnLlRtcBIGj+qQGyNHYR4zhkl7HucBsxxxx04zQ7cccaaaawwwww root@soffid-pam-store:/# ``` As a result of the script, we receive the password for the created user. This password will be needed later when we configure PAM in the Soffid Console. ### 4. Execute the Launcher YAML YAML example to create the Launcher using traefik as Ingress Controller ```YAML apiVersion: v1 kind: ServiceAccount metadata: namespace: iam name: pam-launcher --- kind: Role apiVersion: rbac.authorization.k8s.io/v1 metadata: name: pam-launcher namespace: iam rules: - verbs: - get - update - create - delete - list - watch apiGroups: - '' resources: - pods/attach - pods/log - pods/exec - pods --- kind: RoleBinding apiVersion: rbac.authorization.k8s.io/v1 metadata: name: pam-launcher namespace: iam subjects: - kind: ServiceAccount name: pam-launcher roleRef: apiGroup: rbac.authorization.k8s.io kind: Role name: pam-launcher --- apiVersion: apps/v1 kind: Deployment metadata: name: pam-launcher namespace: iam labels: role: pam-launcher spec: strategy: rollingUpdate: maxSurge: 0 maxUnavailable: 1 type: RollingUpdate replicas: 1 selector: matchLabels: role: pam-launcher template: metadata: labels: role: pam-launcher spec: serviceAccountName: pam-launcher restartPolicy: Always containers: - name: pam-launcher image: soffid/pam-launcher:latest imagePullPolicy: Always volumeMounts: - name: data mountPath: /opt/soffid/tomee/launcher ports: - containerPort: 8080 env: - name: STORE_SERVER value: http://pam-store-service:8080 - name: STORE_USER value: userLauncher - name: STORE_PASSWORD value: dddddddGf14+JJnLlRtcBIGj+ddddddddd4zhkl7HucBs9eVU6wQg044444444 volumes: - name: data nfs: # URL for the NFS server service server: "YOUR_SERVER_IP" path: /pam-launcher imagePullSecrets: - name: regcred --- kind: Service apiVersion: v1 metadata: name: pam-launcher namespace: iam spec: selector: role: pam-launcher ports: # Open the ports required by the NFS server # Port 2049 for TCP - name: http port: 8080 protocol: TCP --- apiVersion: traefik.containo.us/v1alpha1 kind: IngressRoute metadata: name: launcher namespace: iam spec: entryPoints: # [1] - https routes: # [2] - kind: Rule match: Host("pam-launcher.deployment.com") priority: 10 # [4] services: # [8] - kind: Service name: pam-launcher namespace: iam passHostHeader: true port: 8080 # [9] responseForwarding: flushInterval: 1ms scheme: http sticky: cookie: httpOnly: true name: srvrid secure: true sameSite: none strategy: RoundRobin weight: 10 tls: secretName: SECRET_NAME --- # Service to locate PASR containers apiVersion: v1 kind: Service metadata: name: pasr namespace: iam spec: selector: type: pasr clusterIP: None ports: - name: vnc # Actually, no port is needed. port: 5900 targetPort: 5900 --- ``` ### 5. Configure the Console [](https://bookstack.soffid.com/uploads/images/gallery/2024-08/8Cn4v2ygTQZZjLXo-image.png) ### Privileged Account Session Recording Be in mind that you need to download the latest image of the required Privileged Account Session Recording that you need depending on the protocol. - soffid-pasr-ssh - soffid-pasr-rdp - soffid-pasr-jdbc - soffid-pasr-http - soffid-pasr-https - soffid-pasr-tn5250 - soffid-pasr-kube --- To save a Web session you will need to add some parameters to the launcher system.properties (/opt/soffid/tomee/conf/system.properties) Parameters to add: ```shell SOFFID_PAM_PARAMS_http=--shm-size=1024m --privileged -eVNCSERVER=yes SOFFID_PAM_PARAMS_https=--shm-size=1024m --privileged -eVNCSERVER=yes ``` --- *(\*) [https://en.wikipedia.org/wiki/Jump\_server](https://en.wikipedia.org/wiki/Jump_server)* # Configure PAM session servers ## Definition Soffid provides the functionality that allows you to [Configure PAM session servers](https://bookstack.soffid.com/books/soffid-4-reference-guide/page/configure-pam-session-servers "Configure PAM session servers"). To configure that functionality is mandatory to install PAM following the instructions of the [PAM installation page](https://bookstack.soffid.com/books/pam/page/pam-installation "PAM installation").A Jump server is the control point that forces users to log into that system first, then, they could traverse to other servers without having to log in again. The purpose of a jump server is to be the only gateway for access to your infrastructure reducing the size of any potential attack surface.
## Screen overview ## Related objects - **soffid-pam-store**: storage server container - **soffid-pam-launcher**: launcher container ## Standard attributes - **Group name**: name to identify the configuration. - **Description**: a brief description. - **User name**: user name given at installation of PAM - **Password**: password given at installation of PAM. - **URL**: of the storage. The default port is 8081. - **Jump servers**: list of jump servers. A URL of each jump server. The default port is 8082. ## Actions| **Add new** | Allows you to add a new configuration of PAM. You can choose that option by clicking the add button (+). You must fill in all the attributes to save a new configuration. |
| **Delete** | Allows you to delete one or more configuration PAM registers, you must select one or more records from the list and click the button with the subtraction symbol (-). To perform that action, Soffid will ask you for confirmation, you could confirm or cancel the operation. |
| **Apply chanages** | Allows you to create a new configuration PAM or to update an existing one. To save the data it will be mandatory to fill in the required fields. Also, the password and user name should be correct to connect. |
| **Undo** | Allows you to quit without applying any changes made. |
You can visit the [PAM Jump Server Installation page](https://bookstack.soffid.com/books/pam-install-config/page/pam-jump-server-installation) for more information about how to install PAM
3. Create a Docker network(\*), that network allows you to connect containers to the same bridge network to communicate: ``` sudo docker network create -d bridge NETWORKNAME ``` *\* You can use the same network defined in the Console and Sync Server installation to avoid visibility problems.* ## Installation The steps required to install SSH container are: ### 1. Create a user We need to create a user in the pam store container. To do this, we need to connect to the store container. ```shell sudo docker exec -it soffid-pam-store /bin/bash ``` Once, we are connected to the container, we need to run a script to create the user. This script has two parameters, the user name, and the role. We have to type launcher in the role parameter ```shell root@soffid-pam-store:/# /opt/soffid/tomee/bin/add-user.sh proxysshtest launcher Password: c4ZRcmgemq3nMr1VQJCD1pJRhPbdX5hrmmrP6RX7zBE4HSs3RV3+cGwDdL1WaaqZ root@soffid-pam-store:/# ``` As a result of the script, we receive the password for the created user. This password will be needed later when we create the container. ### 2. Create volume We need to create a volume that will be used by the docker container ```shell sudo docker volume create soffid-ssh ``` ### 3. Create a docker container Finally, we need to execute the command to create the ssh gateway container ```shell docker run \ --name soffid-ssh \ -e SOFFID_SERVER=https://iam-sync.soffidnet:1760 \ -e SOFFID_USER=admin \ -e SOFFID_PASS=changeit \ -e SOFFID_HOSTNAME=ssh-gateway \ -e STORE_SERVER=http://soffid-pam-store:8080 \ -e STORE_PASSWORD=kDH0vh8MFWWn843Vhzmj0Np7uzMEfbqFYM1ELCQqOf++tF0xfd=Ve2eGq81OXvqy \ -e STORE_USER=proxysshtest \ -v soffid-ssh:/opt/soffid/iam-sync/conf \ --publish 2222:22 \ --network=soffidnet \ soffid/pam-ssh:1.4.2 ``` #### Environment Variables To create the new SSH container you need to set the following environment variables:| **Variable** | **Description** | **Example** |
| SOFFID\_SERVER | Sync Server URL | https://syncserver01.soffid.com:1760 |
| SOFFID\_USER | Soffid user to join the security domain | admin |
| SOFFID\_PASSWORD | Soffid user password | changeit |
| SOFFID\_HOSTNAME | The hostname used to access the ssh gateway | ssh-gateway |
| STORE\_SERVER | Store URL | http://soffid-pam-store:8080 |
| STORE\_PASSWORD | Password received when you created the user in the store container. | \*\*\*\*\*\*\*\*\*\*\*\* |
| STORE\_USER | Store user | proxyssh |
You can visit the [PAM Jump Server Installation page](https://bookstack.soffid.com/books/pam-install-config/page/pam-jump-server-installation-u6p) for more information about how to install PAM
## Installation The steps required to install SSH container are: ### 1. Create a user We need to create a user in the pam store container. To do this, we need to connect to the store container. ```shell sudo docker exec -it soffid-pam-store /bin/bash ``` Once, we are connected to the container, we need to run a script to create the user. This script has two parameters, the user name, and the role. We have to type launcher in the role parameter ```shell root@soffid-pam-store:/# /opt/soffid/tomee/bin/add-user.sh proxyssh-user launcher Password: c4ZRcmgemq3nMr1VQJCD1pJRhPbdX5hrmmrP6RX7zBE4HSs3RV3+cGwDdL1WaaqZ root@soffid-pam-store:/# ``` As a result of the script, we receive the password for the created user. This password will be needed later when we create the container. ### 2. Execute the YAML ```yaml version: '3.8' services: ssh-gateway: image: soffid/pam-ssh:1.4.47 environment: SOFFID_SERVER: https://syncserver01.soffid.com:1760 SOFFID_USER: soffidUser SOFFID_PASS: SoffidPassword SOFFID_HOSTNAME: ssh-gateway STORE_SERVER: https://soffid-pam-store:8443 STORE_PASSWORD: c4ZRcmgemq3nMr1VQJCD1pJRhPbdX5hrmmrP6RX7zBE4HSs3RV3+cGwDdL1WaaqZ STORE_USER: proxyssh-user ports: - "2222:22" networks: - network volumes: - ssh-gateway-data:/opt/soffid/iam-sync/conf networks: network: name: netcompose driver: bridge volumes: ssh-gateway-data: name: compose-ssh-gateway-data ``` Execute: ```shell sudo docker compose up -d ``` #### Environment Variables To create the new SSH container you need to set the following environment variables:| **Variable** | **Description** | **Example** |
| SOFFID\_SERVER | Sync Server URL | https://syncserver01.soffid.com:1760 |
| SOFFID\_USER | Soffid user to join the security domain | admin |
| SOFFID\_PASSWORD | Soffid user password | \*\*\*\*\*\*\*\*\* |
| SOFFID\_HOSTNAME | The hostname used to access the ssh gateway | ssh-gateway |
| STORE\_SERVER | Store URL | http://soffid-pam-store:8080 |
| STORE\_PASSWORD | Password received when you created the user in the store container. | \*\*\*\*\*\*\*\*\*\*\*\* |
| STORE\_USER | Store user | proxyssh |
Soffid needs the **ssh\_key** attribute in the user object metadata, please check the attribute is created properly, and the fill in with your public key.
[](https://bookstack.soffid.com/uploads/images/gallery/2022-04/image-1649409347766.png) [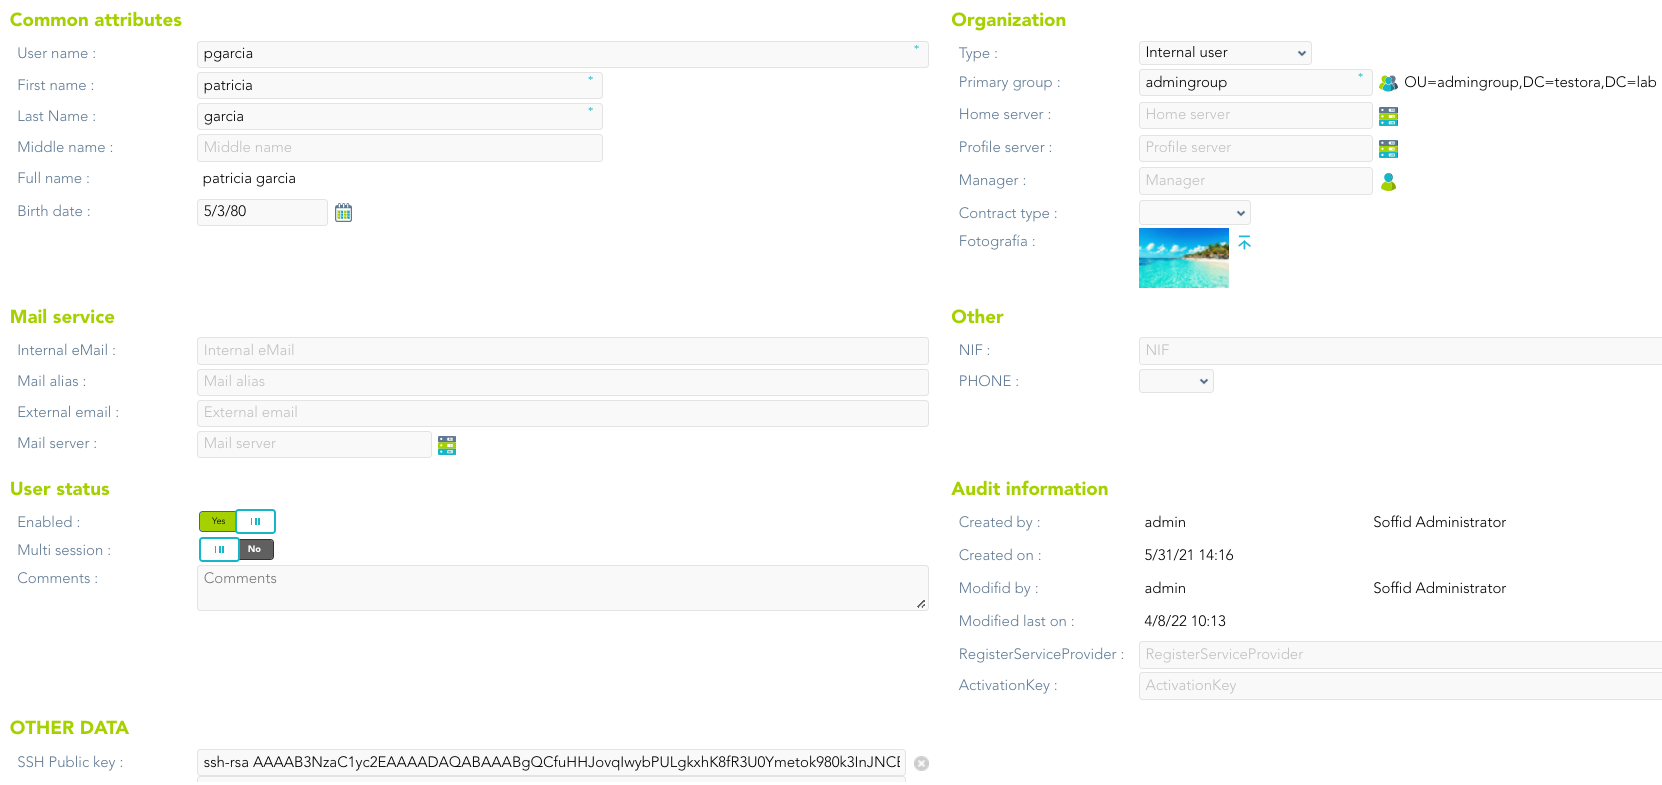](https://bookstack.soffid.com/uploads/images/gallery/2022-04/image-1650351248718.png) --- *[https://es.wikipedia.org/wiki/Secure\_Shell](https://es.wikipedia.org/wiki/Secure_Shell)* # RDP gateway # RDP Gateway Docker Installation ## Introduction Soffid allows you to deploy a new docker container with the **RDP gateway**. The configuration is similar to the sync server configuration. ### Prerequisites The RDP Service is only released as a docker service. 1. Install docker ( [https://docs.docker.com/install/](https://docs.docker.com/install/) ) 2. Install Soffid PAM (store container and launcher container)You can visit the [PAM Jump Server Installation page](https://bookstack.soffid.com/books/pam-install-config/page/pam-jump-server-installation) for more information about how to install PAM
3. Create a Docker network(\*), that network allows you to connect containers to the same bridge network to communicate: ``` sudo docker network create -d bridge NETWORKNAME ``` *\* You can use the same network defined in the Console and Sync Server installation to avoid visibility problems.* ## Installation The steps required to install RDP container are: ### 1. Create a user We need to create a user in the pam store container. To do this, we need to connect to the store container. ```shell sudo docker exec -it soffid-pam-store /bin/bash ``` Once, we are connected to the container, we need to run a script to create the user. This script has two parameters, the user name, and the role. We have to type launcher in the role parameter ```shell root@soffid-pam-store:/# /opt/soffid/tomee/bin/add-user.sh proxyrdptest launcher Password: c4ZRcmgemq3nMr1VQJCD1pJRhPbdX5hrmmrP6RX7zBE4HSs3RV3+cGwDdL1WaaqZ root@soffid-pam-store:/# ``` As a result of the script, we receive the password for the created user. This password will be needed later when we create the container. ### 2. Create volume We need to create a volume that will be used by the docker container ```shell sudo docker volume create soffid-rdp ``` ### 3. Create a docker container Finally, we need to execute the command to create the rdp gateway container ```shell docker run \ --name soffid-rdp \ -e SOFFID_SERVER=https://iam-sync.soffidnet:1760 \ -e SOFFID_USER=admin \ -e SOFFID_PASS=changeit \ -e SOFFID_HOSTNAME=rdp-gateway \ -e STORE_SERVER=http://soffid-pam-store:8080 \ -e STORE_PASSWORD=/Dp77Kho5QB2vVKjNNGmXYLzVa6PoPWJ8p0E4O7EP++9/ZM+l3cieGKMRSgOnFCMc \ -e STORE_USER=proxyrdp \ -v soffid-rdp:/opt/soffid/iam-sync/conf \ --privileged \ --shm-size=1024m \ -p 3389:3389 \ --network=soffidnet.intenal \ soffid/pam-rdp:1.4.2 ``` ##### Environment Variables To create the new SSH container you need to set the following environment variables:| **Variable** | **Description** | **Example** |
| SOFFID\_SERVER | Sync Server URL | https://syncserver01.soffid.com:1760 |
| SOFFID\_USER | Soffid user to join the security domain | admin |
| SOFFID\_PASSWORD | Soffid user password | changeit |
| SOFFID\_HOSTNAME | The hostname used to access the ssh gateway | ssh-gateway |
| STORE\_SERVER | Store URL | http://soffid.pat.pam:8082 |
| STORE\_PASSWORD | Password received when you created the user in the store container. | \*\*\*\*\*\*\*\*\*\*\*\* |
| STORE\_USER | Store user | proxyrdp |
You can visit the [PAM Jump Server Installation page](https://bookstack.soffid.com/books/pam-install-config/page/pam-jump-server-installation-u6p) for more information about how to install PAM
## Installation The steps required to install RDP container are: ### 1. Create a user We need to create a user in the pam store container. To do this, we need to connect to the store container. ```shell sudo docker exec -it soffid-pam-store /bin/bash ``` Once, we are connected to the container, we need to run a script to create the user. This script has two parameters, the user name, and the role. We have to type launcher in the role parameter ```shell root@soffid-pam-store:/# /opt/soffid/tomee/bin/add-user.sh proxyrdp-user launcher Password: c4ZRcmgemq3nMr1VQJCD1pJRhPbdX5hrmmrP6RX7zBE4HSs3RV3+cGwDdL1WaaqZ root@soffid-pam-store:/# ``` As a result of the script, we receive the password for the created user. This password will be needed later when we create the container. ### 2. Execute the YAML ```yaml version: '3.8' services: ssh-gateway: image: soffid/pam-rdp:1.4.47 environment: SOFFID_SERVER: https://syncserver01.soffid.com:1760 SOFFID_USER: admin SOFFID_PASS: admin123 SOFFID_HOSTNAME: rdp-gateway-2 STORE_SERVER: https://soffid-pam-store:8443 STORE_PASSWORD: c4ZRcmgemq3nMr1VQJCD1pJRhPbdX5hrmmrP6RX7zBE4HSs3RV3+cGwDdL1WaaqZ STORE_USER: proxyrdp ports: - "2222:22" networks: - network volumes: - rdp-gateway-data:/opt/soffid/iam-sync/conf networks: network: name: netcompose driver: bridge volumes: rdp-gateway-data: name: compose-rdp-gateway-data ``` Execute: ```shell sudo docker compose up -d ``` ##### Environment Variables To create the new SSH container you need to set the following environment variables:| **Variable** | **Description** | **Example** |
| SOFFID\_SERVER | Sync Server URL | https://syncserver01.soffid.com:1760 |
| SOFFID\_USER | Soffid user to join the security domain | admin |
| SOFFID\_PASSWORD | Soffid user password | changeit |
| SOFFID\_HOSTNAME | The hostname used to access the ssh gateway | ssh-gateway |
| STORE\_SERVER | Store URL | http://soffid.pat.pam:8082 |
| STORE\_PASSWORD | Password received when you created the user in the store container. | \*\*\*\*\*\*\*\*\*\*\*\* |
| STORE\_USER | Store user | proxyrdp |