# Step 5. Account management
The account management step shows you how to manage the accounts to change the type, how to locate the accounts on the password vault and how to assign a password. To comply this step the discovery process must be completed.
# Step 5.1. Account management
The account management step shows you how to manage the accounts to change the type, how to locate the accounts on the password vault, and how to assign a password. To comply with this step the discovery process must be completed.
## Step-by-step
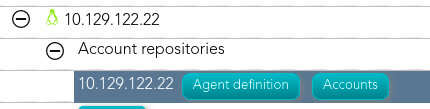
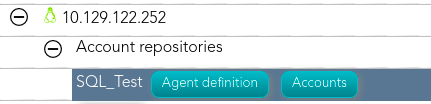
1. To access the accounts of a specific host or database (SQL Server or Oracle), you must click the "Accounts" button. The button is located close to the name of the host or the agent, inside the "Account repositories" of a specific host, on the network discovery tree.
- Host
[](https://bookstack.soffid.com/uploads/images/gallery/2021-08/image-1629971294668.png)
[](https://bookstack.soffid.com/uploads/images/gallery/2021-08/image-1629971278636.png)
2. Once you click the button, Soffid will display the accounts list which belongs to the host or agent.
3. You must click on the account record to edit the detailed account info.
4. Then, you will be able to change the account type, place the account on the password vault, and assign a password for each account, one by one.
a. [Step 5.2. Change account type](https://bookstack.soffid.com/books/pam-implementation-guide/page/step-51-change-account-type "Step 5.1. Change account type")
b. [Step 5.3. Publish on Password Vault](https://bookstack.soffid.com/books/pam-implementation-guide/page/step-52-publish-on-password-vault "Step 5.2. Publish on Password vault")
c. [Step 5.4. Assign the password](https://bookstack.soffid.com/books/pam-implementation-guide/page/step-53-assign-the-password "Step 5.3. Assign the password")
5. And finally, to save the updates you must click on the "Apply changes" button.
# Step 5.2. Change account type
The Change account type step shows how to change the type from *unmanaged* to **shared** or **privileged** depending on the case.
## Step-by-step
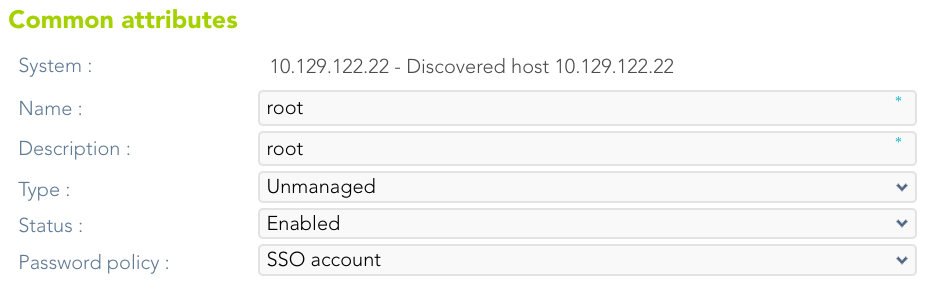
1. Once Soffid displays the account detail, you can change the Type (located on the Common attributes) to the proper type. You must click on the "Type" drop-down list and select the proper value for the account.
[](https://bookstack.soffid.com/uploads/images/gallery/2023-07/image-1688997986305.png)
2. Then, you can save the update by clicking on the disk icon (located at the top right), and continue with the next step.
# Step 5.3. Publish on Password vault
When **critical accounts** are detected, the best way to **keep them safe** is to place them on the Password vault. The password vault allows you to handle the access control list to these accounts, here you can define who are the owners, the managers, and the SSO users
## Step-by-step
1. Once Soffid displays the account detail, you can select the "Vault folder" on the "Password vault" section.
[](https://bookstack.soffid.com/uploads/images/gallery/2023-07/image-1688998033808.png)
2. There are two ways to assign the vault folder:
2.1. Writing on the predictive text field. In that case, Soffid will show the folders name that matches, and you could select the proper folder.
2.1. Click on the folder icon. Then you could search for the proper folder and select
Be in mind that the vault folders have to be created previously on the Password vault page.
3. Finally, you can save the update by clicking on the disk icon (located at the top right), and continue with the next step.
# Step 5.4. Assign the password
To be able to use an account, it is necessary to assign a password, this can be the current password or a new password. In the case of assigning a new password, it will be synchronized with the target system.
## Step-by-step
1. Once Soffid displays the account detail, you can change the password. You need to click on the hamburger icon and then on the "Set password" option.
2. Then, Soffid will show a new form to set the password.
3. You must select one of the available options:
3.1. **Generated password**: If you select that option, Soffid will generate a random password and will display the password on the form.
3.1. **Set password**: If you select that option, you must create a password and write it on the text field. That password should comply with the password policies defined on Soffid.
4. Finally, Soffid will send the new password to the target system.