# Step 4. Register additional resources (Optional)
# Step 4.1. Add database (Optional)
The fourth step, to add a database, is an **optional** step. You only need to configure when there is any database (SQL Server or Oracle) in some of the discovered hosts and you want to manage its accounts as privileged or shared accounts.
## Step-by-step
The network discovery process can discover and connect to the hosts. Then Soffid allows you to add databases as account repositories in the proper host.
1. First of all, the agent must be created on Soffid. That agent could be a SQL Server agent or an Oracle agent. To create an agent you can visit the next page[ Step 4.2. Create an agent (Optional)](https://bookstack.soffid.com/books/pam-implementation-guide/page/step-41-create-agent-optional "Step 4.1. Create agent (Optional)")
2. Then, you must access the network discovery page in the following path:
`Main Menu > Administration > Configuration > Integration engine > Network discovery`
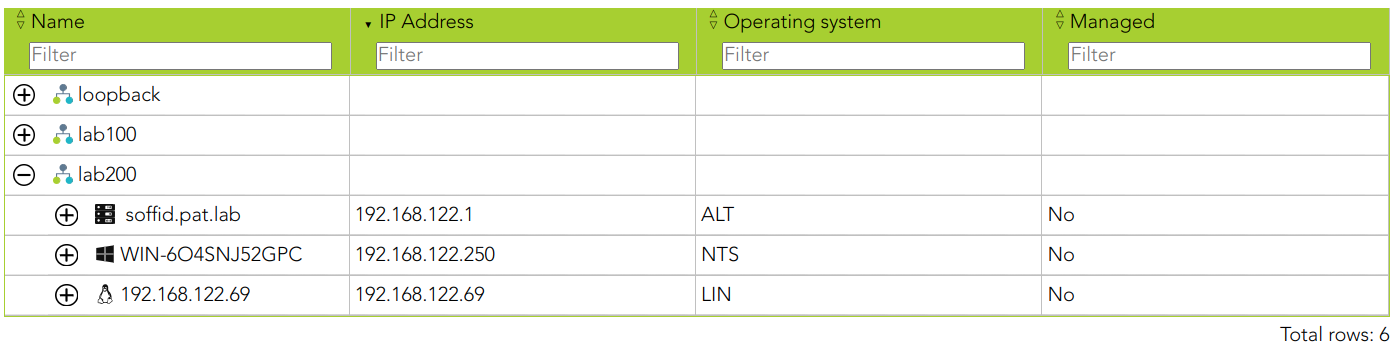
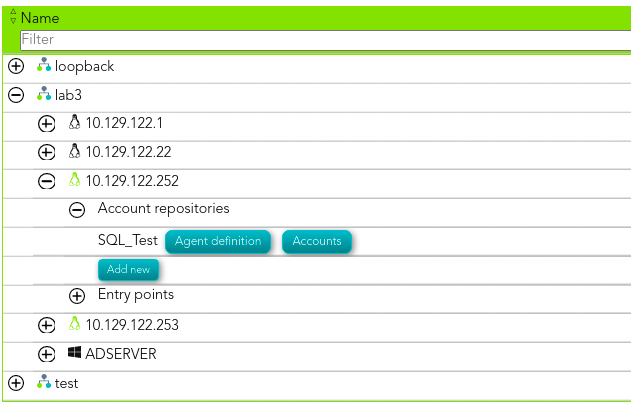
3. Once you have accessed the network discovery page, Soffid will display all the networks.
3.1. First, you must identify the network and click on the plus icon (+) to display all the hosts discovered.
[](https://bookstack.soffid.com/uploads/images/gallery/2023-10/image-1696427236754.png)
3.2. Then, you must identify the host.
[](https://bookstack.soffid.com/uploads/images/gallery/2023-10/image-1696427285978.png)
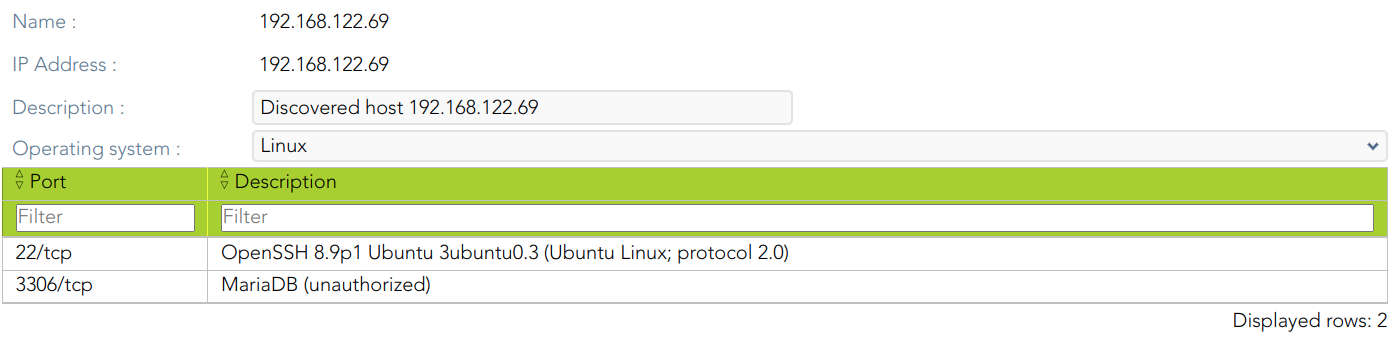
You can consult the information retrieved
[](https://bookstack.soffid.com/uploads/images/gallery/2023-10/image-1696427363496.png)
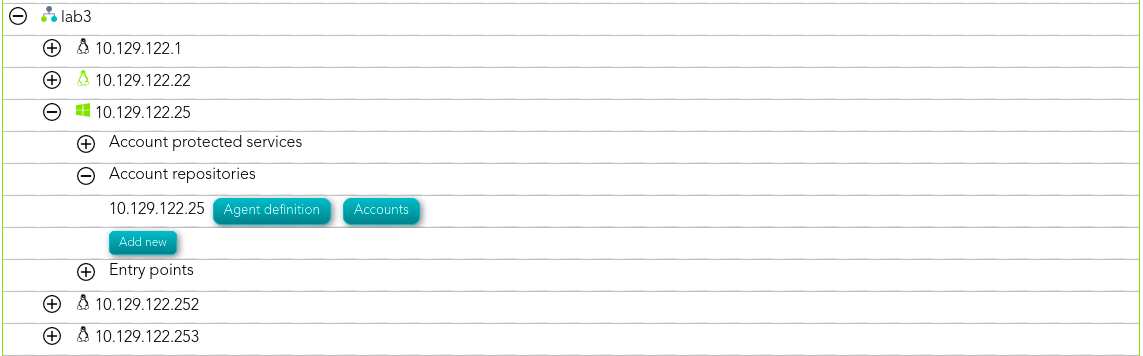
3.3. Finally, on the "Account repositories" you must click the "Add new" button.
[](https://bookstack.soffid.com/uploads/images/gallery/2021-08/image-1629874227338.png)
4. When you click "Add new" Soffid will display a wizard to add the database.
[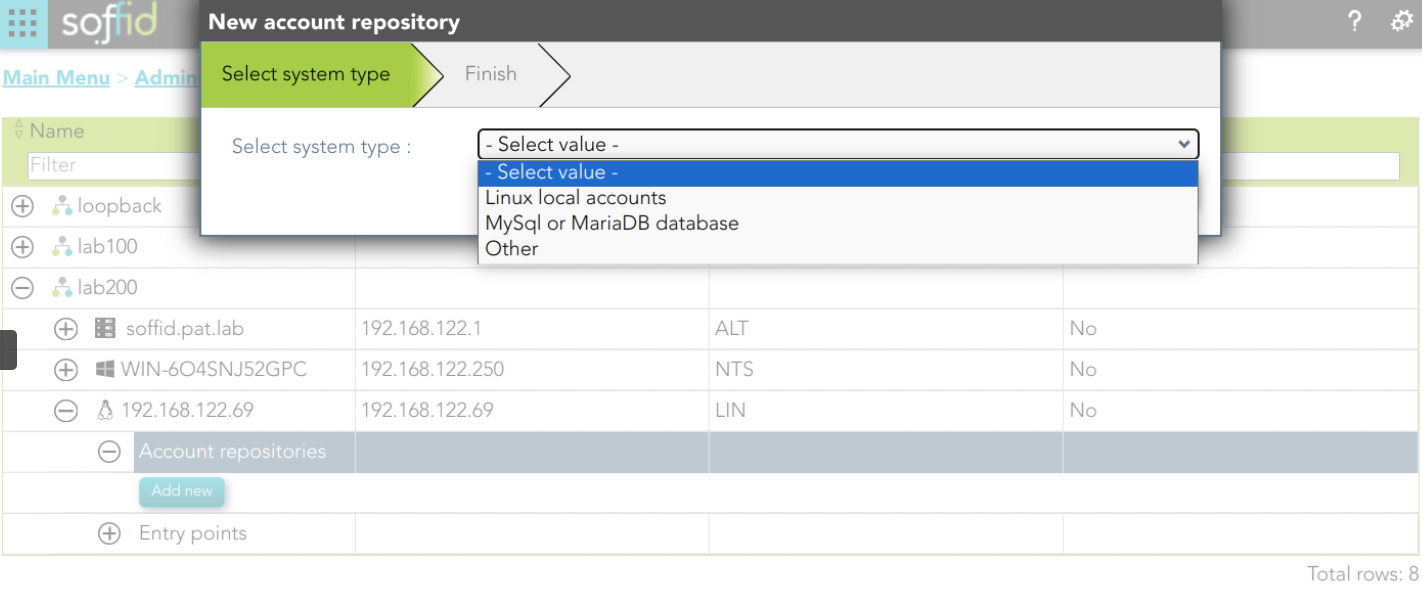](https://bookstack.soffid.com/uploads/images/gallery/2023-10/image-1696427556107.png)
5. You must select the option "Other" on the "Select system type", and click the "Next" button.
5.1. If you click the "Next" button, the wizard will allow you to search the system using Quick, Basic, or Advanced search. When you run the search, Soffid will display all the systems that apply to the search criteria. Be in mind, the agent must have been previously created.
5.2. You must select the proper system from the result list and click the "Next" button. Then Soffid will add the agent to the "Account repositories" list and close the wizard.
[](https://bookstack.soffid.com/uploads/images/gallery/2021-08/image-1629905496878.png)
\* When you are in the wizard and click the "Undo" button, the wizard will browse to the previous page of the wizard, or close and no operation will execute if it is the first page.
6. Once the database is added to the host, the next step will be to run the reconcile process to get all the accounts and permissions from the database to load into Soffid.
6.1. To access the agent definition, you must click the "Agent definition" button. The button is located close to the name of the agent, inside the "Account repositories" of a specific host, on the network discovery tree.
[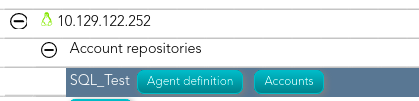](https://bookstack.soffid.com/uploads/images/gallery/2021-08/image-1629970666238.png)
6.2. Once you click the button, Soffid will browse to the agent definition.
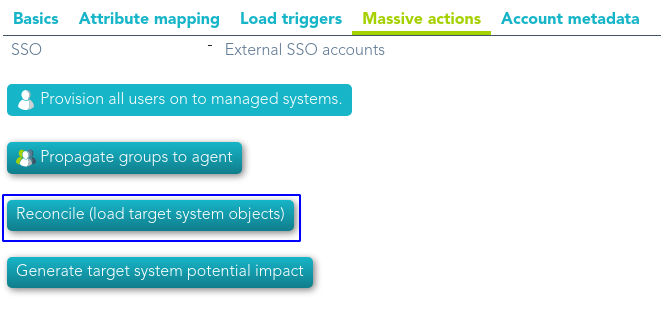
6.3. Then you must click the "Massive actions" tab.
6.4. At the "Massive actions" tab you must click the button "Reconcile (load target system objects)". That process is in charge to load into Soffid the accounts and permissions defined on the database.
6.4.1. If the process is successfully completed you could continue with the next step of the PAM implementation.
6.4.2. In another case, you must check the agent configuration and run again the process.
## Screen overview
# Step 4.2. Create an agent (Optional)
That step will be an **optional** step, and it will be mandatory only when the **SQL Server agent** or the **Oracle agent** was not created previously on Soffid Console and you need to add a database to manage its accounts.
## Step-by-step
1. First of all, to create an agent you must access the agent page in the following path:
`Main Menu > Administration > Configure Soffid > Integration engine > Agents`
2. Once you have accessed the agent page, Soffid will display all the active agents created on Soffid. You must click the button with the add symbol (+) to add a new agent. Then Soffid will display a new empty page to fill in the agent data.
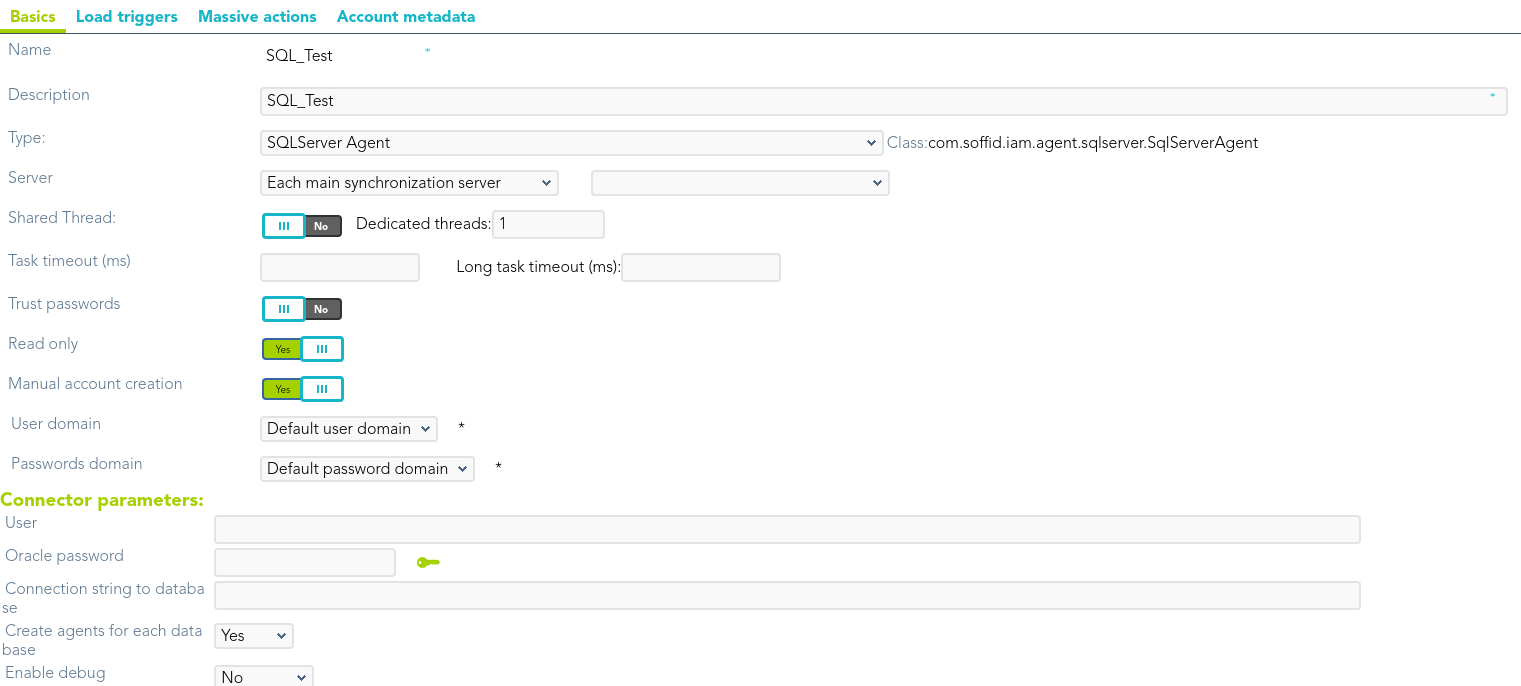
2.1. You must fill, at least the required fields (fields with an asterisk) to create an agent.
- - - The **Name** should be an identificative and unique agent name
- The **Description** should be a brief description of the agent.
- The **Type** allows you to select the connector type to use, the [SQL Server connector](https://bookstack.soffid.com/books/connectors/chapter/sql-connector) or the [Oracle connector](https://bookstack.soffid.com/books/connectors/chapter/oracle-connectors). Be in mind that you need to load the connector on Soffid if you did not do it previously.
- The **Server** allows you to select the synchronization server that will perform the agent tasks. It is allowed to select two servers in cases high disponibility will be necessary. If you choose two servers, when one fails, the other will be used.
- If *"-disabled-"* is selected, the agent will be disabled-
- The **User domain** allows you to select how to generate account names. If the account name is the same as the user name (as it is normally the case), the “Default user domain” should be used. The user domain values are defined on the [Account naming rules](https://bookstack.soffid.com/books/soffid-3-reference-guide/page/account-naming-rules "Account naming rules") page.
- The **Password domain** allows you to select the password policies that will be used. If the "Default password domain" is selected, Soffid passwords will be shared with the managed systems. The user domain values are defined on the [Password policies](https://bookstack.soffid.com/books/soffid-3-reference-guide/page/password-policies "Password policies") page.
You can visit the [Plugins page](https://bookstack.soffid.com/books/soffid-3-reference-guide/page/plugins) for more information about how to load a connector on Soffid Console.
2.2. You must fill in the optional parameters that you need to config the agent.
2.3. You must fill in the "Connector parameters". Those parameters depend on the agent.
2.3.1. SQL Server connector:
{{@97#bkmrk-below-there-are-the-}}
{{@97#bkmrk-parameter-descriptio}}
2.3.1. Oracle connector:
{{@91#bkmrk-below-there-are-the-}}
{{@91#bkmrk-parameter-descriptio}}
3. Then, you should click the "Apply changes" button to save the new agent. Then Soffid will close the form, and display the agent list including the new agent created.
If you click the "Undo" button, the form will be closed and updates will not be saved.
Once the agent is configured, it could be assigned to the host to continue with the PAM implementation process: [Step 4. Add database](https://bookstack.soffid.com/books/pam-implementation-guide/page/step-4-add-database "Step 4. Add database")
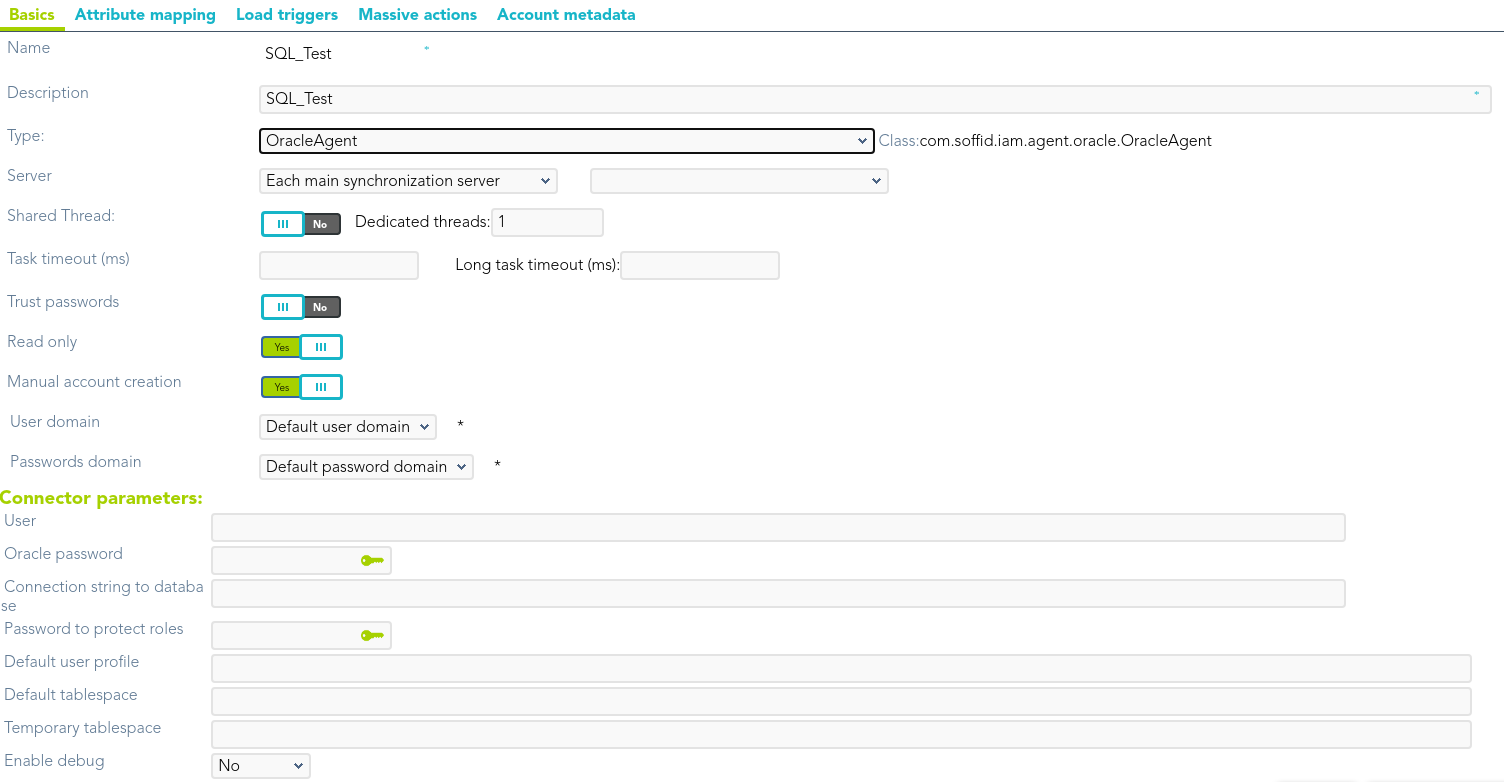
## Screen overview
#### SQL Server agent
#### Oracle agent
# Step 4.3. Reconcile (Optional)
To request the accounts you must launch the reconciliation process. The main purpose of reconciling process is to provide a mechanism to ensure that all users are aligned on the specific roles and responsibilities.
## Step-by-step
1. First of all, you need to edit the agent must access the agent page in the following path:
`Main Menu > Administration > Configure Soffid > Integration engine > Agents`
2. Once you have accessed the agent page, Soffid will display all the active agents created on Soffid. You must click on the record of the agent you want to reconcile. Then Soffid will display a new window with the agent data.
3. Then, you must click on the "Massive actions" tab.
4. At the "Massive actions" tab, you must click on the "Reconcile (load target system objects)" button to launch the reconciliation process.
5. Once completion of the conciliation process, Soffid will show the result of the process execution. You could click on the alert to view the process result.
5.1. Green alert: the process finished ok.
5.2. Red alert: the process finished with an error.
## Screen overview