Configuration
Network discovery
Description
The Network discovery tool will be in charge to scan the networks to find the hosts and retrieve information about user accounts. Network discovery can detect system accounts as well.
First of all, you need to create the networks that you want to scan. Visit the Networks page for more information. Then, on the Network discovery page, you need to configure for each network, the accounts and passwords of potential administrators to connect to the host and retrieve the information. And finally, you need to start the process execution or you can schedule the execution of the network discovery task.
The operating system of machines can be Windows or Linux and it is not necessary to install any additional software on those machines.
When the Network discovery process is finished, it is recommended to launch the Reconciliation process of the agents created by the process to detect the Account protected services. To know how to run the Renconciliation process you can visit the Agents page.
Once the machines and accounts, both user and system, have been discovered, the critical accounts must be located in the password vault. You can visit the Password vault page for more information.
How Network discovery works?
The Network Discovery is the tool in charge to scan the network to discover the hosts of the network. For each host discovered, the Nmap utility gets the info about the ports and the protocols used. Also, that process gets the IP Address and the operating system. All the recover information will be saved on Soffid database. The discovery proxy server works as a proxy to connect to the target systems.
When the discovery manager discovers a host, it gets the host information and then, through discovery proxy server, it attempts to connect to the host using the accounts defined on the accounts to probe list.
- If it can not connect to the host, it will attempt with the next host discovered.
- If it gets to connect to the host, then it will create automatically a Soffid agent with the proper attributes and connector parameters, also with the necessary account metadata.
Then, the reconciliation process of the created agent, will be launched and it will try to recover the information about the accounts defined on the host. Also, it will try to recover the information about the account protected services. The recover information will be saved on Soffid database.
Screen overview
Standard attributes
Network attributes
Basic
Those attributes are readOnly, you can update them on the Networks page.
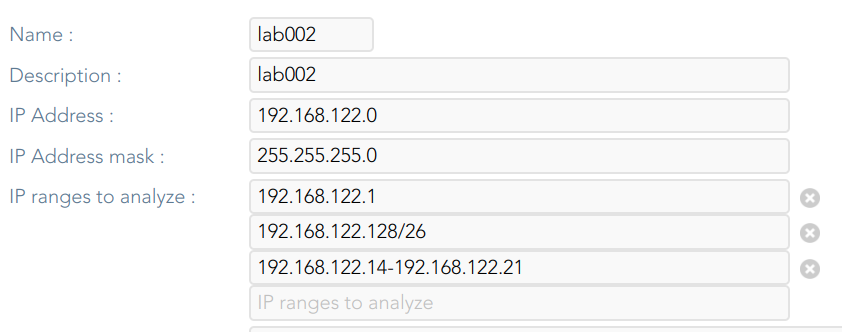
- Name: network name.
- Description: a brief description.
- IP Address: IP range of this network.
- IP address mask: IP mask of this network.
- IP ranges to analyze: allows you to set the range of IPs to scan
💻 Image
Server
- Server: list of available sync servers.
Accounts to probe
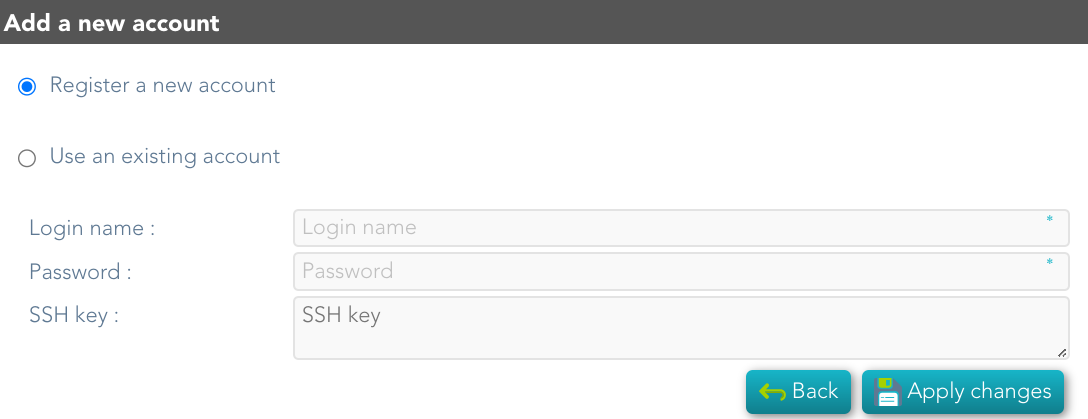
- Accounts to probe: list of potential administrators accounts to connect to the hosts. You can register a new account or use an existing account.
- Register new account: you need to define the login name and the password of the new account.
- Login name
- Password
- SSH key
- Register new account: you need to define the login name and the password of the new account.
💻 Image
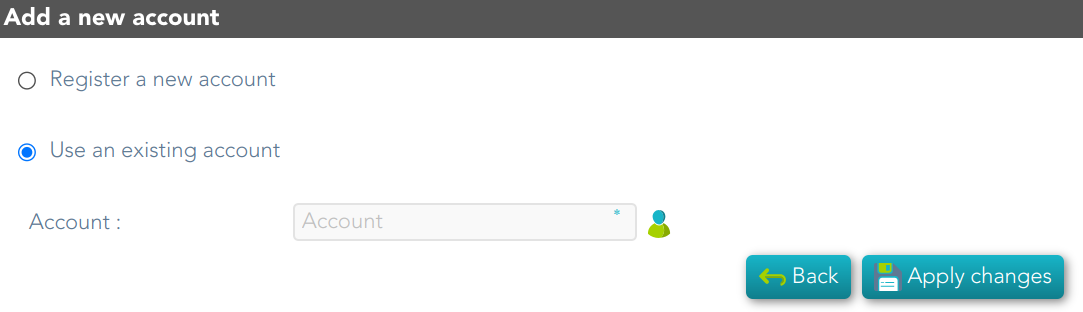
- Use an existing account: you need to select an existing account on the system.
💻 Image
When you register a new account, that will be created as an unmanaged account.
Schedule
- Enabled: if it is selected (value is Yes), a task will be created and performed on schedule defined.
- Task description: a brief description of the task
- Month: number of the month (1-12) when the task will be performed.
- Day: number of the day (1-31) when the task will be performed.
- Hour: hour (0-23) when the task will be performed.
- Minute: minute (0-59) when the task will be performed.
- Day of week: number of the day (0-7 where 0 means Sunday) of the week when the task will be performed.
- Server: you must select the sync server where the agent will be run.
For each value of month, day, hour, minute, or day of the week:
- * means any month, day, hour, minute, or day of the week. e.g. */5 to schedule every five minutes.
- A single number specifies that unit value: 3
- Some comma separated numbers: 1,3,5,7
- A range of values: 1-5
Current execution
- Start now: this allows you to launch the task execution.
Last execution
- Status: The available status for a task is:
- Done (green light): task finished.
- Pending (yellow light): the task has been started but it has not finished yet.
- Error (red light): task could not be executed.
- Start date: start date and time of the last execution.
- End date: end date and time of the last execution.
- Execution log: log trace. Allows you to download the log file.
Previous executions
List the information about the previous executions:
- Start date: start date and time of the execution.
- Status: status of the execution.
- Execution: log of the execution. Allows you to download the log file.
Machine attributes
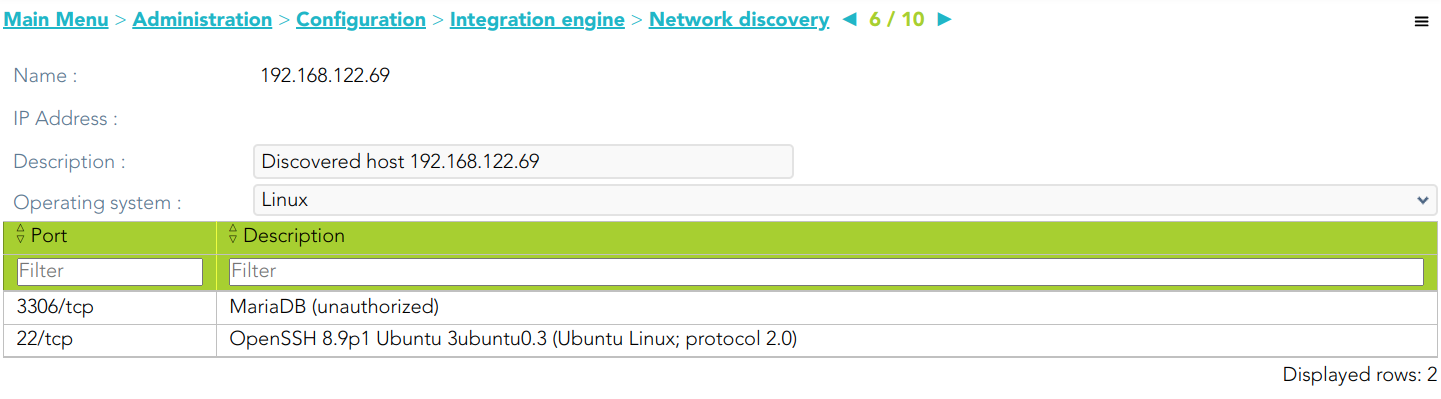
By clicking the machine record, you can check the following information:
- Name
- IP Address
- Description
- Operating system
- Port /Protocol List:
- Port
- Description
💻 Image
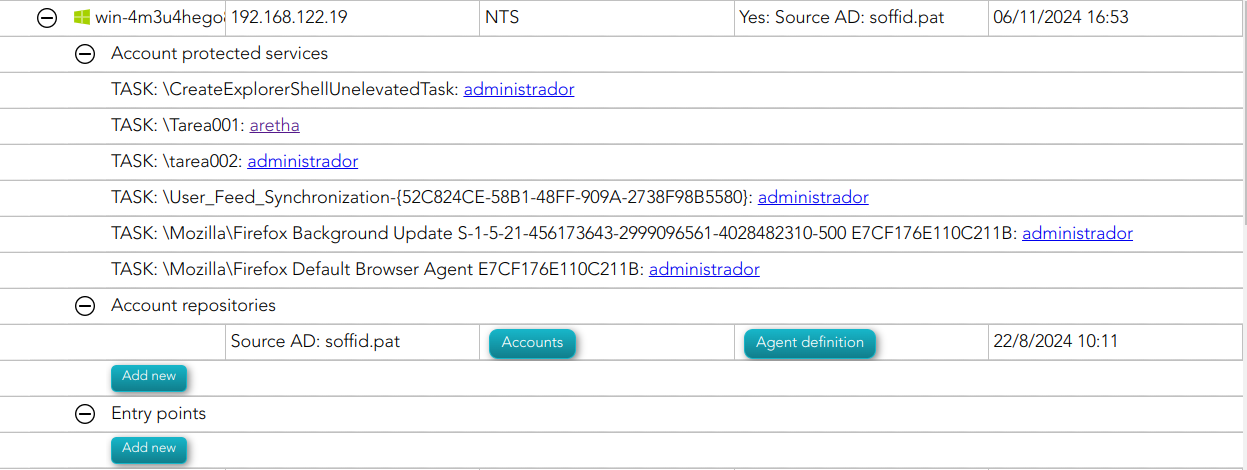
Machine details
If you display the contents of a machine from which the information has been obtained, you could check and manage information about:
- Protected services per account
- Account repositories
- Entry points
It may be necessary to perform the Reconciliation process of the proper agent in order to obtain the information from the Account protected services
💻 Image
Actions
Network discovery query
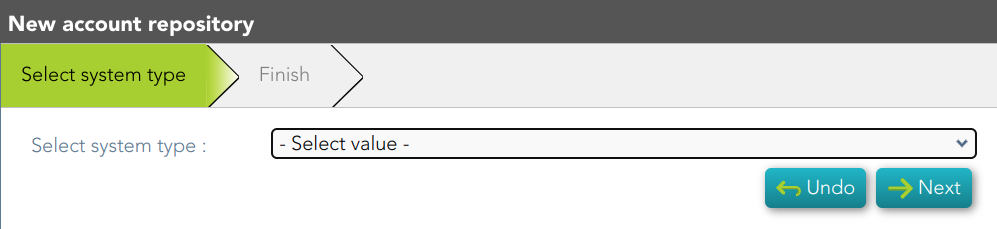
| Add new account repository |
Allows you to create a new agent. You must select the System type and the login name and password. When the agent is created, if the connection is successful, the reconciliation process will be executed. 💻 Image
|
|
Agent definition |
Allows you to browse to the agent definition. |
|
Accounts |
Allows you to browse the accounts page and the accounts, which belong to this system, will be displayed |
|
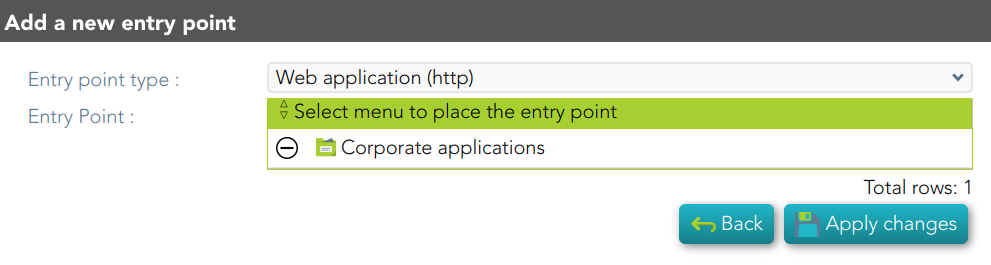
Add new entry point |
Allows you to create a new entry point. You must select the Entry point type and the pale to locate it. Once the entry point is created, you can connect to the target system. Bear in mind, that if you need to create an account to connect, when you set the password to this account, the system (agent) must be in No ReadOnly mode. 💻 Image
|
|
Entry point definition |
Allows you to browse to the entry point definition. |
Network discovery detail
|
Apply changes |
Allows you to save the data of network detail. To save the data it will be mandatory to fill in the required fields. |
|
Undo |
Allows you to undo any changes made. |
Accounts to probe
| Add |
Allows you to add a new administrator potential account to connect to the machines of the network. To add a new account, first of all, you need to click the add button (+) and close the accounts to probe list. Then you will need to choose if you want to add an existing account or register a new account. save the data of a new network or update the data of a specific network. To save the data it will be mandatory to fill in the required fields |
|
Delete |
Allows you to delete one or more accounts of the accounts to probe. You need to select one or more records and next click the button with the subtraction symbol (-). |
Schedule
|
Start now |
Allows you to launch the task execution. |
Previous execution
|
Logs |
Allows you to download the log files of previous executions. |
Machine
|
Delete |
Allows you to delete the machine and the PAM connectors for the device. Soffid will display a message to confirm the deletion process. |
Password vault
Description
Soffid provides a protected storage, to save and manage accounts for multiple applications, that is the Password vault. Here you can save the accounts and passwords to access to critical systems and to your applications as well. Password vault allows you to handle the access control list to these accounts. Sometimes these accounts can be used by a specific user or a set of users.
The accounts are organized in folders depending on the permissión, and the criticality level, .... These accounts can be system accounts or user accounts.
The Password vault exposes a subset of accounts to some users. These accounts are available through the Self-services portal. You can visit My applications page for more information.
When a privileged account is being config, it will be able to assign a workflow or approval process to request in order to use that account. For more information visit the link How to apply policies.
Folders
In the password vault, two kinds of folders are used: personal folders and shared folders, which depend on the Owners configuration you define.
On one hand, each user has their own personal folder. Inside this folder, the user can create accounts. That account will not be shared with any other user.
On the other hand, the shared folders could be used or managed by the owner/manager/SSO users.
Accounts
Soffid allows you to create new accounts on a specific folder on the password vault page, to add a new account will be mandatory to fill in some attributes, like System, name, and login name. You can consult the existing accounts related to a folder. For each account, you can update or delete the account, view and set a password.
Also, you can create accounts on the Account page and assign the appropriate vault folder.
Soffid allows administrator users to configure a workflow to request permissions when a user try to change the password of a privileged account in the password vault. That process can be defined with the BPM Editor as an Account reservation type. For more information you can visit the BPM Editor book.
Overview
Related objects
Standard attributes
Folder attributes
- Folder detail
- Name: folder name which will be displayed in My Applications.
- Description: folder description.
- PAM policy: when using PAM system, you could choose the policy that will comply with for each folder. When you define a policy for a folder, that policy will apply to all accounts hanging from this folder. For more information you can visit the Configure PAM page.
- Owners: allows you to handle the full privileged access control list.
- Owner users: list of users who will be the folder owners.
- Owner groups: list of groups, whose users will be the owners of the folder.
- Owner roles: list of roles. Users who have been granted these permissions will be the owners of the folder.
- Managers
- Manager users: list of users who can manage the folder. Those users can view the password depending on the password policy.
- Manager groups: list of groups, whose users can manage the folder. Those users can view the password depending on the password policy.
- Manager roles: list of roles. Users who have been granted these permissions can manage the folder. Those users can view the password depending on the password policy.
- SSO users
- Granted users: list of users who can use the account of that folder.
- Granted groups: list of groups, whose users can manage the account of that folder
- Granted roles: list of roles. Users who have been granted these permissions can manage the account of that folder.
- Browse folder
- Users: list of users who can browse the folder, but can not perform any action.
- Groups: list of groups, whose users can browse the folder, but can not perform any action.
- Roles: list of roles. Users who have been granted these permissions can browse the folder, but can not perform any action.
Accounts attributes
Actions Tab
This tab shows the read-only attributes of the user account:
- Name: user account name.
- Description: a brief description.
- System: target system to which the account will be connected.
- Login name: login name to connect to the target system.
- Login URL: URL to connect.
- In use by: user name who is using that account.
Also, this tab allows you to launch the connection to the target system, view the password, set the password to launch the connection, and unlock the use of that account. All those options depend on the account definition and user privileges.
Basics Tab
This tab displais all the account attributes and allows you to update the account configuration.
Visit the Account page to view more information about the standard attributes of an account.
Actions
Folders query actions
|
Query |
Allows you to query folders through, only Quick search is available. |
|
Add new |
Allows you to create a new folder. You can choose that option on the hamburger menu or by clicking the add button (+). To add a new folder it will be mandatory to fill in the required fields. A folder needs to have, at less, an owner to manage it. |
Folder actions
|
Apply changes |
Allows you to save a new folder or update an existing folder. To save the data it will be mandatory to fill in the required fields. Be in mind that is important to indicate who are the owners of the folder. |
|
Undo |
Allows you to quit without saving any change made. |
|
Delete |
Allows you to delete a folder if you have the right permissions. To delete a folder you can click on the hamburger icon and then click the delete button (trash icon). Soffid will ask you for confirmation to perform that action, you could confirm or cancel the operation. |
Account actions
|
Apply changes |
Allows you to save a new account. To save the data it will be mandatory to fill in the required fields. Be in mind that is important to indicate who are the owners of the folder. If the account exists on the system, you can assign the vault folder to the account window. |
|
Undo |
Allows you to quit without saving any change made. |
|
Delete |
Allows you to delete an account from a folder if you have the right permissions. To delete a host you can click on the hamburger icon and then click the delete button (trash icon). Soffid will ask you for confirmation to perform that action, you could confirm or cancel the operation. |
|
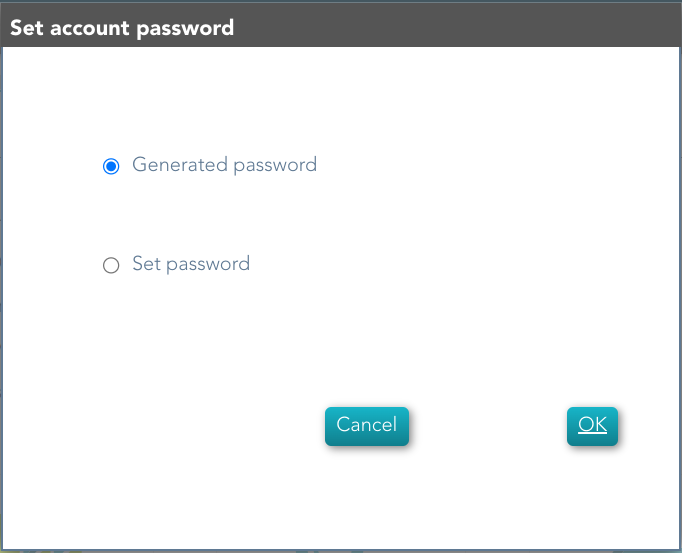
Set password |
This option depends on the credential type selected. Password:
💻 Image
SSH key:
💻 Image
Kubernetes key:
💻 Image
|


How to apply policies
Soffid allows you to define policies and rules to apply to a specific folder or a set of folders. To do that is needed to install the XACML addon and configure the proper policies and rules.
Also, you can config a workflow or approval process to request in order to use accounts saved on a folder.
It is mandatory to enable the Password Vault PEP and populate the information about the XACML policy set and the version which applies.
Example
XACML PEP config
It is mandatory to enable the Password Vault PEP and populate the information about the XACML policy set and the version which applies.
Password Vault:

XACML PEP config:

XACML Policy Management
You need to configure the access to the folder "VaultFolder", that folder can contain other folders and accounts. It will be mandatory to config the access list, who are the owners, managers, and so on. You need to know if you need to config the control access list by accounts, by folders, or both.

For instance, the policies you need to implement are the following:
1. Only users between 6:00 and 18:00 could use the accounts inside the "demoFolder".
2.- User "bob" never could use the accounts of demoFolder.
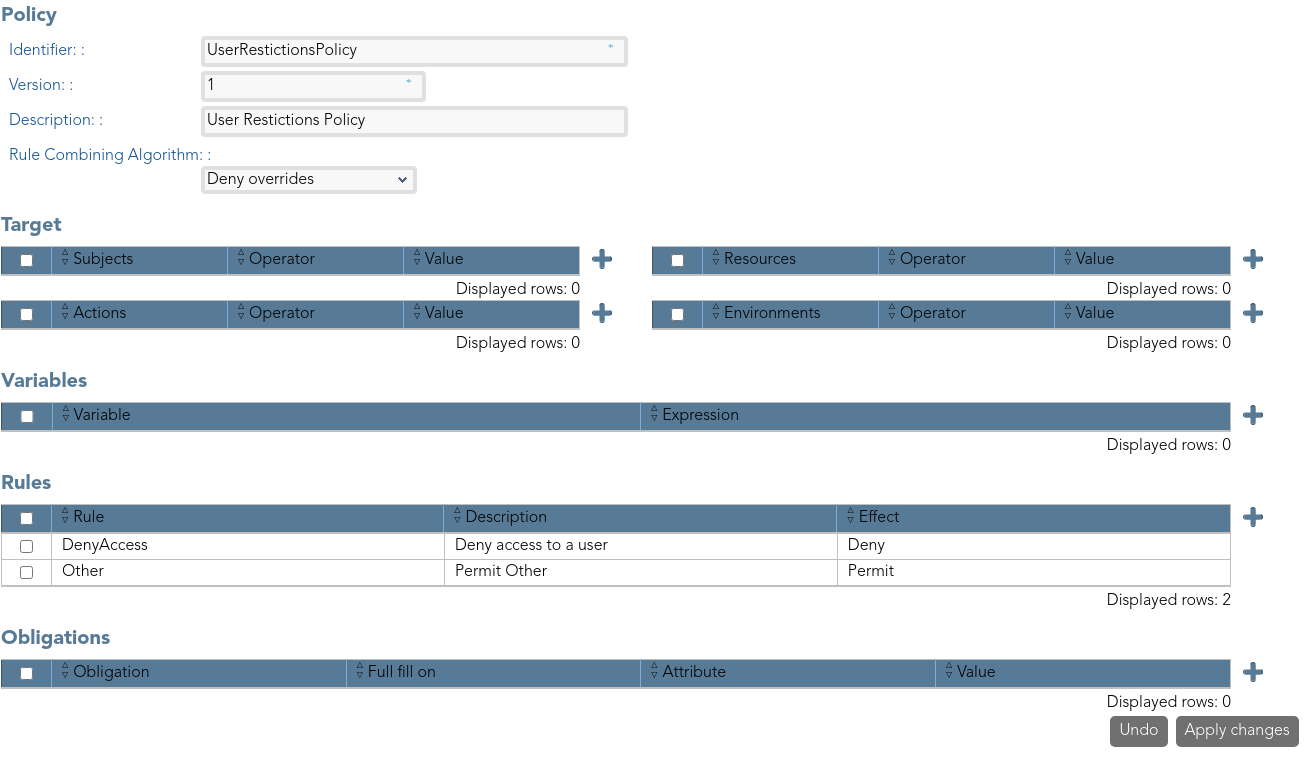
3. Users with result permits, need the authorization to use the accounts.
You need to config the workflow that will be called, to config you need to include the bpm obligation on the policy. Also, you can include a message to the user, or other obligations.
Visit the XACML Book for more information.
Visit the BPM Editor Book for more information.
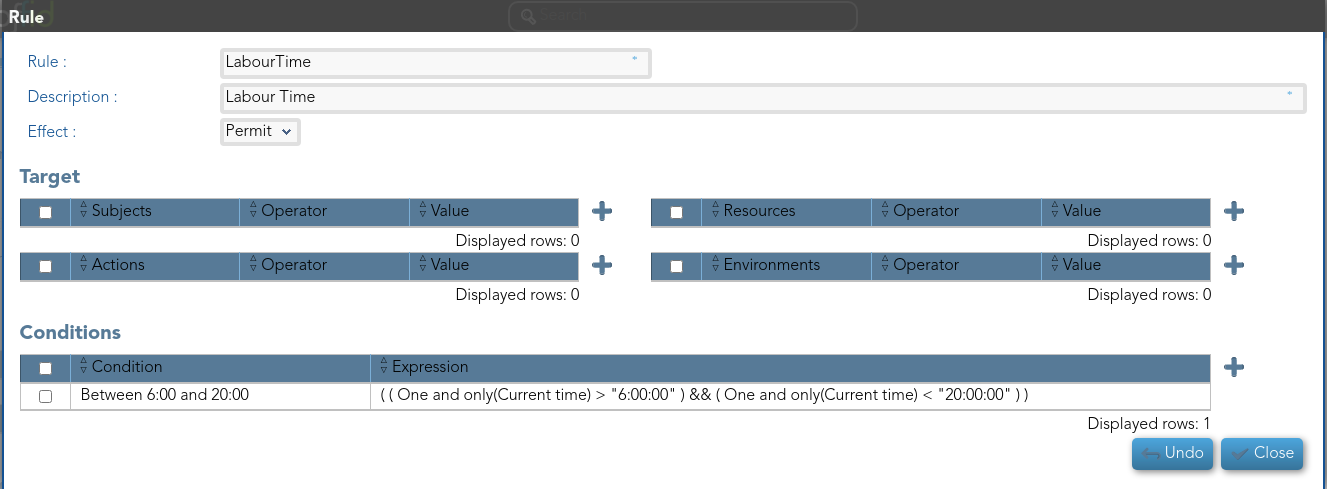
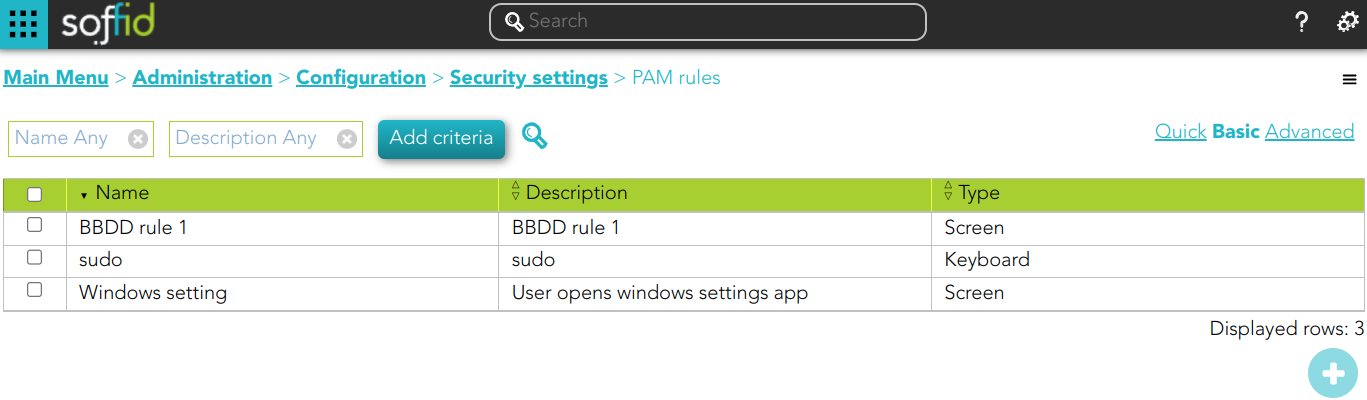
PAM Rules
Definition
Soffid allows you to define rules to detect commands executed on a server. When a user launches a command defined on a rule, Soffid will detect it.
To use those rules you need to define the PAM policies. For more information, you can visit the PAM policies page.
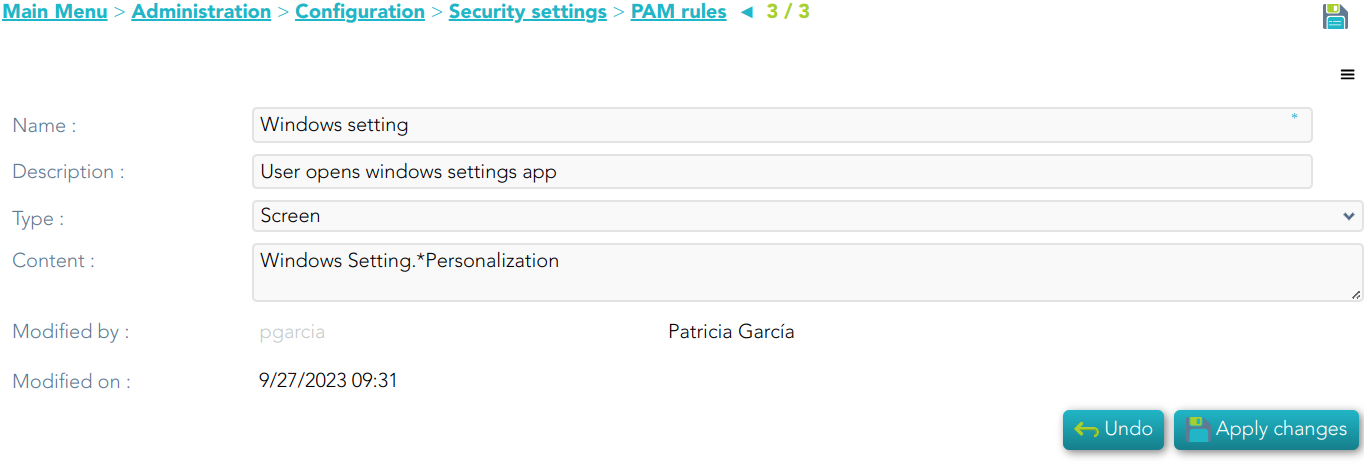
Screen overview
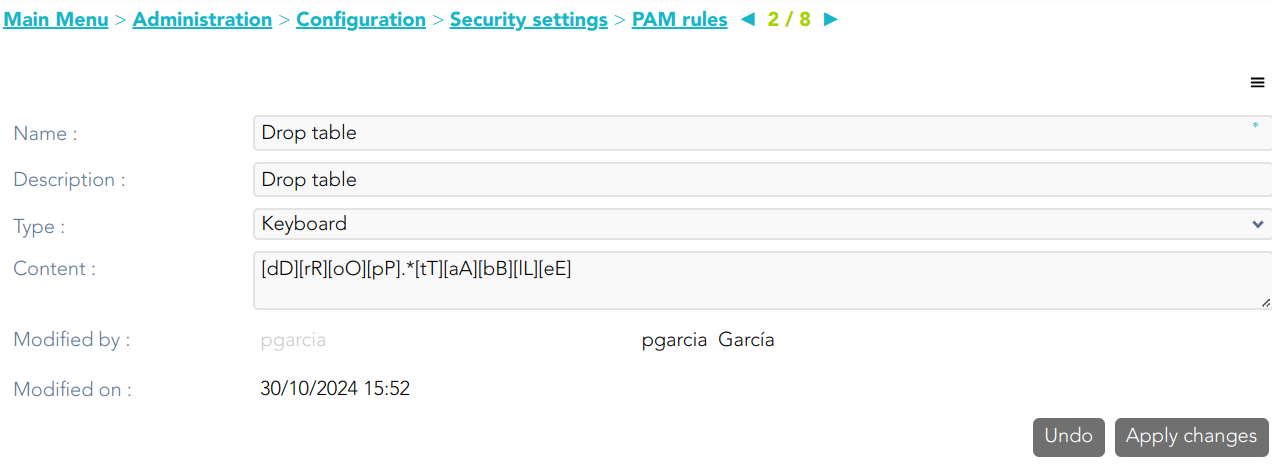
Keyboard example
Screen example
Keyboard example
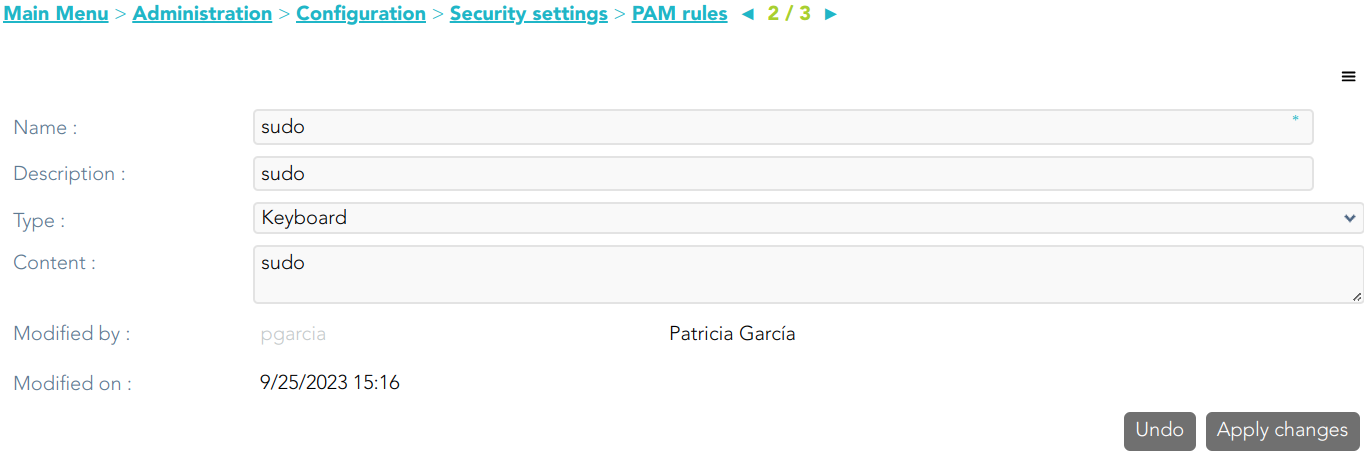
Standard attributes
- Name: name to identify the rule.
- Description: a brief description of the rule.
- Type: rule type.
- Keyboard: Indicate the command typed in the terminal that you want to control.
- Screen: Indicate the text displayed in the screen that you want to control.
- Content: the content of the rule that Soffid will detect. Be in mind, that Soffid will consider blanks, returns, and all characters you type.
- Modified by: user who modified that rule.
- Modified on: the date and time of the update.
Actions
PAM rules query
|
Query |
Allows you to query PAM rules through different search systems, Quick, Basic and Advanced. |
|
Add or remove columns |
Allows you to show and hide columns in the table. |
|
Add new |
Allows you to create a new PAM rule. You can choose that option on the hamburger menu or click the add button (+). To add a new PAM rule it will be mandatory to fill in the required fields. |
|
Delete |
Allows you to remove one or more PAM rules by selecting one or more records and next clicking the button with the subtraction symbol (-). To perform that action, Soffid will ask you for confirmation, you could confirm or cancel the operation. |
|
Import |
Allows you to upload a CSV file with the PAM rules list to add or update PAM rules to Soffid. First, you need to pick up a CSV file, that CSV has to contain a specific configuration. Then you need to check the content to be loaded, it is allowed to choose if you want or not to load a specific attribute. And finally, you need to select the mappings for each column of the CSV file to import the data correctly and click the Import button. |
|
Download CSV file |
Allows you to download a CSV file with the PAM rules information. |
PAM rules detail
|
Apply changes |
Allows you to create a new configuration PAM rule or to update an existing one. To save the data it will be mandatory to fill in the required fields. |
|
Undo |
Allows you to quit without applying any changes made. |
|
Delete |
Allows you to delete a PAM rule. To perform that action, Soffid will ask you for confirmation, you could confirm or cancel the operation. |
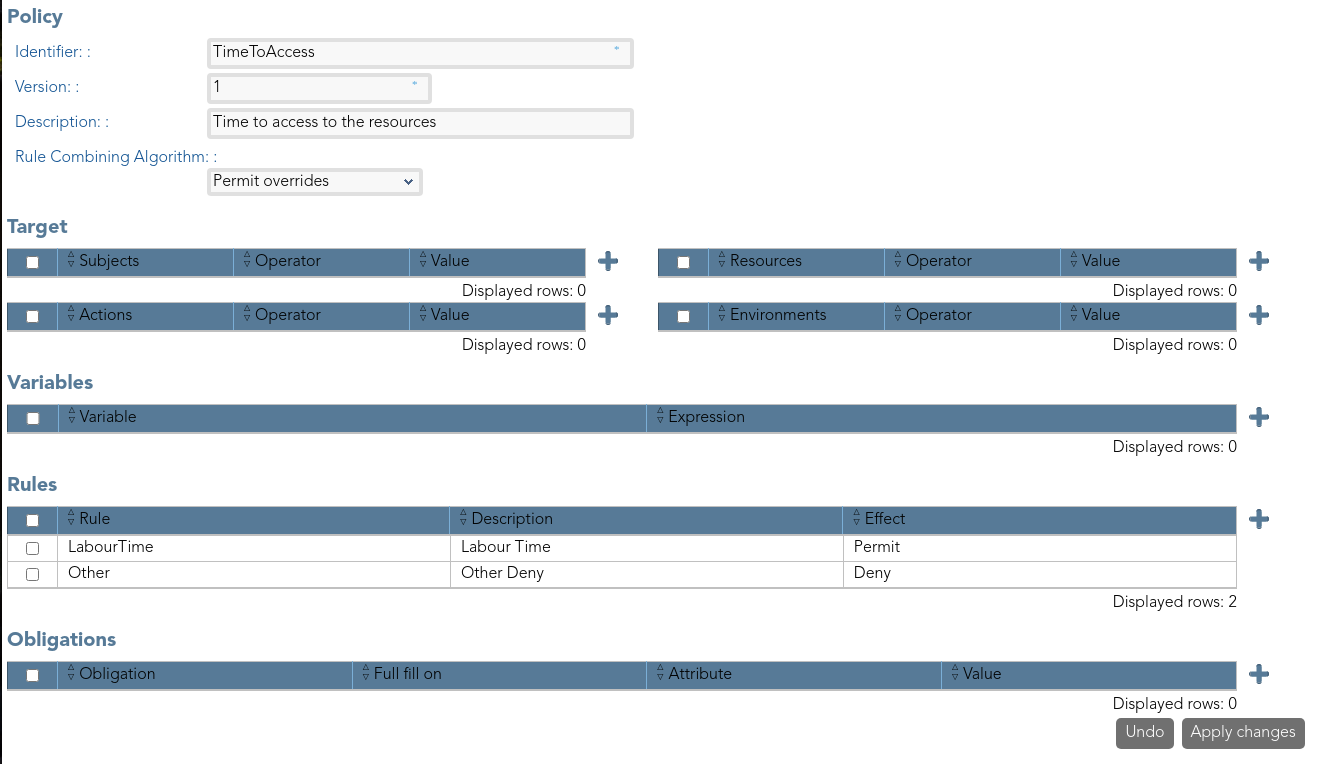
PAM Policies
Definition
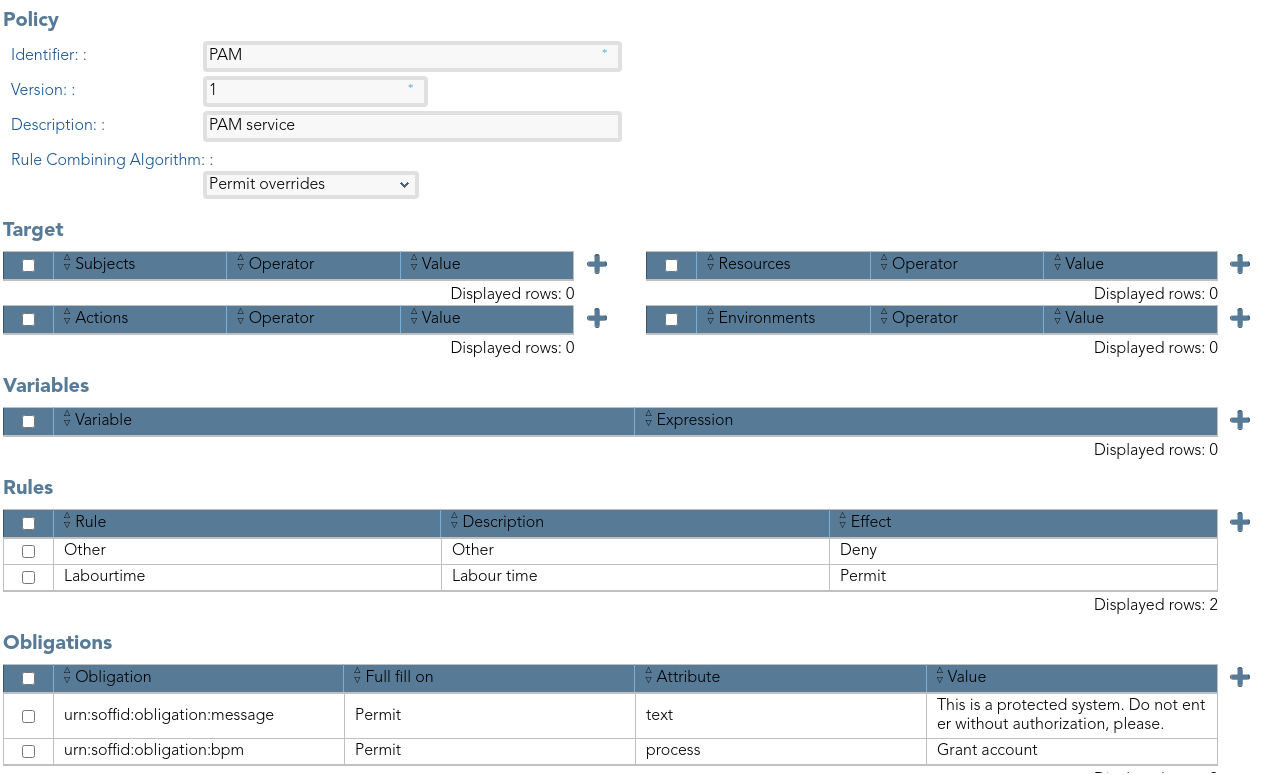
Privileged Access Management (PAM) policies are a set of guidelines and controls that dictate how privileged access is granted, managed, and audited within an organization.
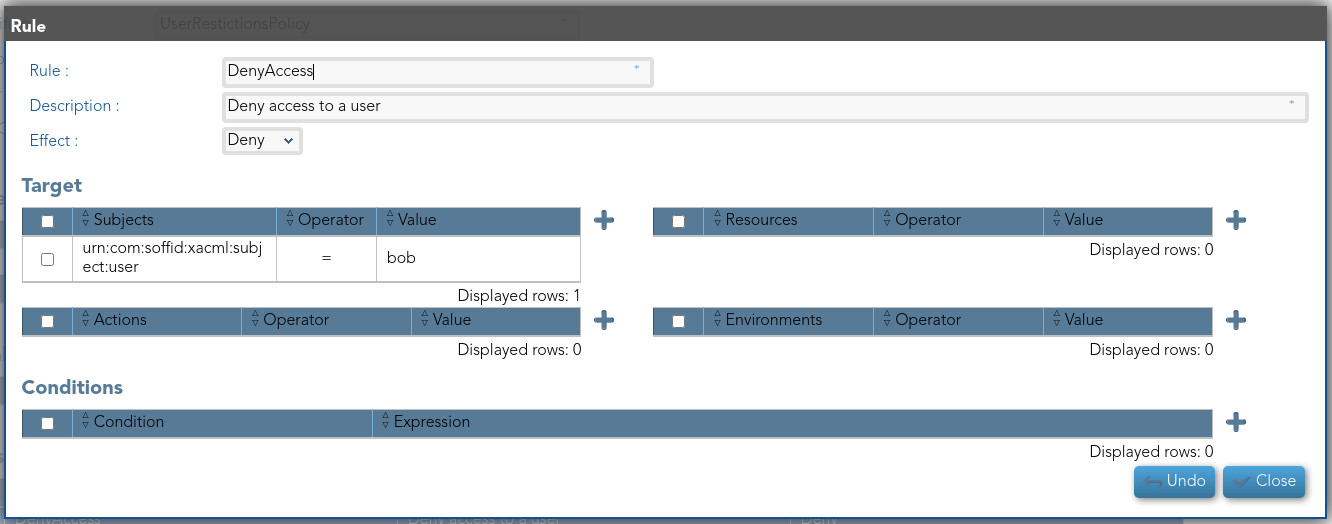
Soffid allows you to define policies, those policies can be made up of several rules. For each rule, you could select the action to perform when Soffid detects that rule is accomplished.
To use those policies you need to define how policies will be used by each folder in the password vault. For more information, you can visit the Password Vault page.
Screen overview
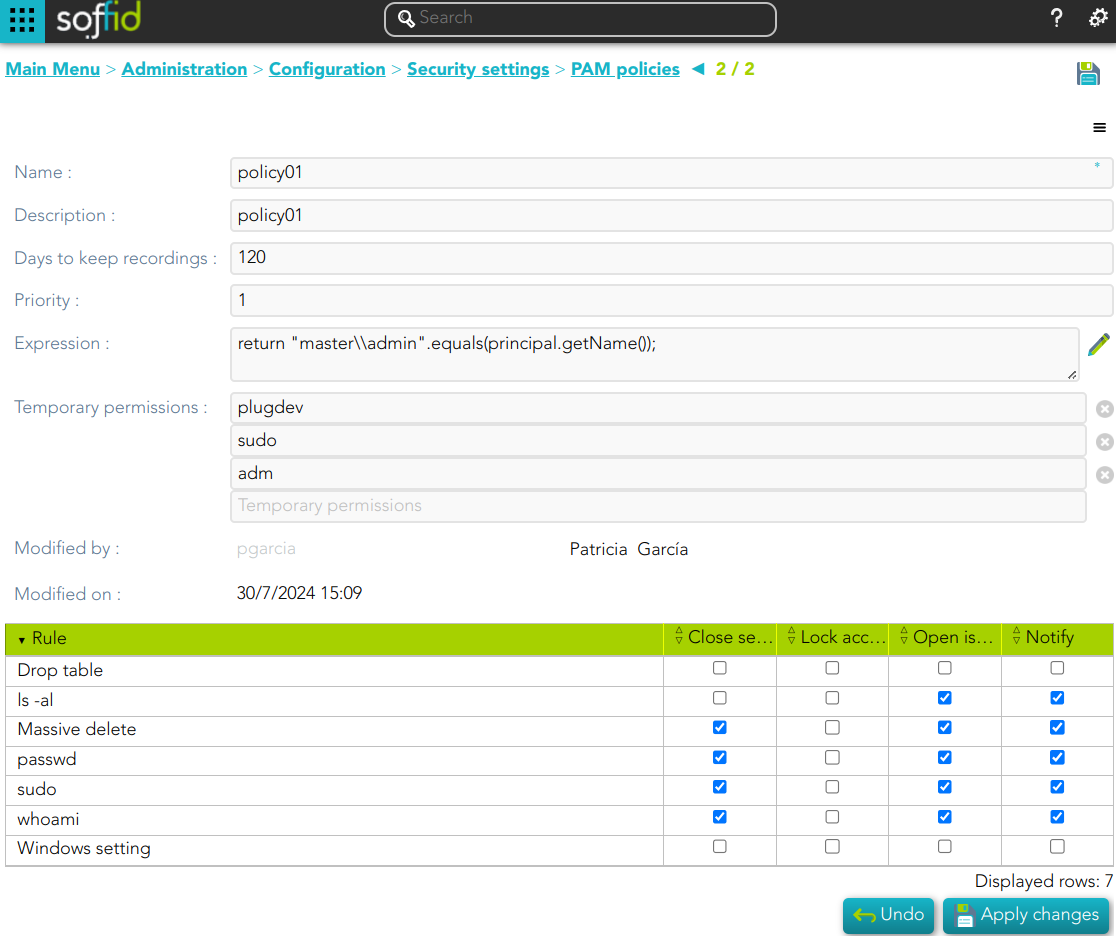
Standard attributes
- Name: name to identify the policy.
- Description: a brief description of the policy.
- Days to keep recordings: number of days that recordings will be kept.
- Priority: allows you to set the priority between the different PAM policies configured. When there are several policies, the policy to be applied is evaluated according to priority and expression.
- Expression: this expression is evaluated to determine the priority of the policy to be applied. When there are several policies, the policy to be applied is evaluated according to priority and expression.
- Temporary permissions: these permissions will be assigned to the user's account on the target system. The permissions will be maintained for the duration of the session. Once the session is over, the permissions will be revoked. The account must be a managed account.
- Modified by: user who modified that rule.
- Modified on: the date and time of the update.
When you save the standard attributes of a PAM policy and edit the policy again, the rule list will be shown. Here you can customize the policy depending on the existing rules.
- Rule list: show a list of the PAM rules defined. You can check/uncheck the available options. You can choose zero, one, or several:
- Close session: when the rule is met, Soffid will close the session.
- Lock account: when the rule is met, Soffid will lock the account.
- Open issue: when the rule is met, Soffid will open a new issue (*).
- Notify: when the rule is met, Soffid will send a notification about the action.
(*) You can visit the following page for more information about the issues: https://bookstack.soffid.com/books/soffid-3-reference-guide/page/issue-policies and https://bookstack.soffid.com/link/1153#bkmrk-pam-violation
The PAM policies configuration is sent to the user-console.policies to the Store container. You can find this file at /opt/soffid/tomee/data/ips
💻 Image

Actions
PAM rules query
|
Query |
Allows you to query PAM policies through different search systems, Quick, Basic and Advanced. |
|
Add or remove columns |
Allows you to show and hide columns in the table. |
|
Add new |
Allows you to create a new PAM policy. You can choose that option on the hamburger menu or click the add button (+). To add a new PAM policy it will be mandatory to fill in the required fields. |
|
Delete |
Allows you to remove one or more PAM policies by selecting one or more records and next clicking the button with the subtraction symbol (-). To perform that action, Soffid will ask you for confirmation, you could confirm or cancel the operation. |
|
Import |
Allows you to upload a CSV file with the PAM policies list to add or update PAM policies to Soffid. First, you need to pick up a CSV file, that CSV has to contain a specific configuration. Then you need to check the content to be loaded, it is allowed to choose if you want or not to load a specific attribute. Finally, you need to select the mappings for each column of the CSV file to import the data correctly and click the Import button. |
|
Download CSV file |
Allows you to download a CSV file with the PAM policies information. |
PAM rules detail
|
Apply changes |
Allows you to create a new configuration PAM policy or to update an existing one. To save the data it will be mandatory to fill in the required fields. |
|
Undo |
Allows you to quit without applying any changes made. |
|
Delete |
Allows you to delete a PAM policy. To perform that action, Soffid will ask you for confirmation, you could confirm or cancel the operation. |
How to enable WinRM?
Introduction
On this page we will describe the steps to follow to enable WinRM with the domain controller Group Policy for WMI monitoring.
Step by Step
Step 1: Create a Group Policy object
Fist of all, you need to create a Group Policy object for your domain.
1. From the start menu, open Control Panel.
2. Select Administrative Tools.
3. Select Group Policy Management.
4. From the menu tree, click Domains > [your domain’s name].
5. Right-click and select Create a GPO in this domain, and Link it here.
6. Input Enable WinRM.
7. Click OK.
Step 2: Enable WinRM services
Secondly, it is necessary to enable WinRm services to allow remote management of the server through WinRM. You must edit the Group Policy you just created.
1. Right-click on the new Enable WinRM Group Policy Object and select Edit.
3. Right-click on Allow remote server management through WinRM and click Edit.
4. Select Enabled to allow remote server management through WinRM.
5. Enter an asterisk (*) into each field.
6. Click OK.
Step 3: Enable the service that goes the policy
1. From the Group Policy Management Editor window, click Preferences > Control Panel Settings > Services.
2. Right-click on Services and select New > Service.
3. Select Automatic as the startup.
4. Enter WinRM as the service name.
5. Select Start service as the service action.
6. All remaining details can stay on the defaults. Click OK.
Step 4: Allow for inbound remote administration
You have to allow for inbound remote administration by updating the firewall rules
1. From the menu tree, click Computer Configuration > Policies > Windows Settings > Security Settings > Windows Firewall with Advanced Security > Windows Firewall with Advanced Security > Inbound Rules.
2. Right-click on Inbound Rules and click New Rule.
3. Select Predefined.
4. Select Windows Remote Management from the list of services.
5. Click Next.
6. Uncheck the Public rule. Leave the Domain, Private rule checked.
7. Click Next.
8. Leaving the defaults, click Finish.
9. Right-click on the new rule and click Properties.
10. Click the Scope tab.
11. Add the remote IP address

12. Click OK.
13. From the menu tree, click Computer Configuration > Policies > Windows Settings > Security Settings > Network List Manager Policies.
14. Right-click Unidentified Networks and click Properties.
15. Change the location type from Not configured to Private.
16. Click OK.
17. Close the Local Group Policy Editor window.
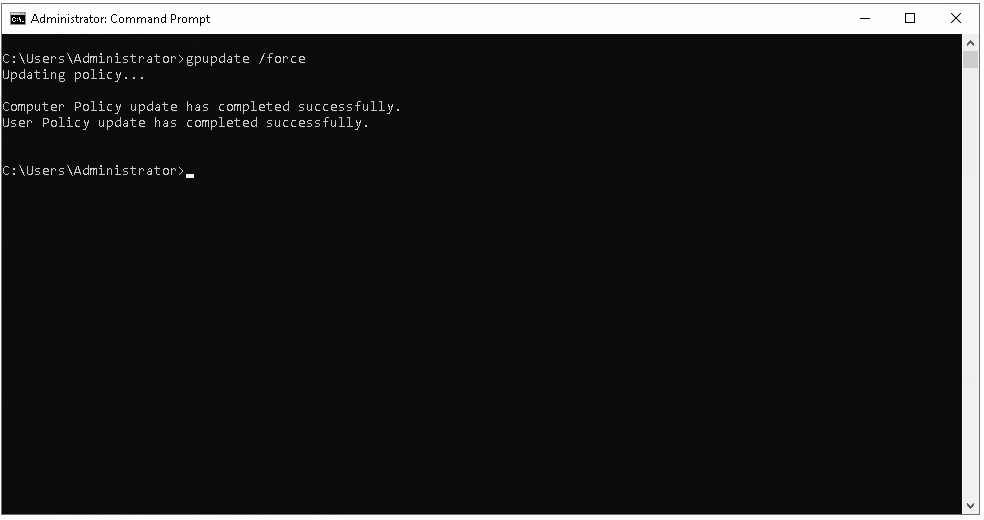
18. Run the gpupdate /force command to update the policy