# Installing Soffid using Docker
Guide to show the installation process os Soffid IAM using Docker
# Installing IAM Console
Guide to install IAM Console using Docker.
## Prerequisites
- Docker
- 8GB RAM
- > 10GB disk space (50GB recomended)
- [Supported database installed](https://bookstack.soffid.com/books/installation/page/initialize-database-using-docker)
## Repositories
Soffid 3 uses the public Docker Hub: [https://hub.docker.com/r/soffid/iam-console/](https://hub.docker.com/r/soffid/iam-console/)
Soffid 4 uses the Google Cloud Artifact Registry, contact to Soffid when you need access to it.
## Video Tutorial
## Installation
To configure IAM console, the following environment variables can be set:
(optional) Allows you to use insecure classes.
Available since console version 3.5.6
true
false
HIDE\_MENU
(optional) Allows you to hide the Console menu options.
Available since console version 3.5.6
soffid.admin
You can choose the proper option from the Console.yaml file.
AUTH\_METHODS
(optional) Allows to force the authentication mechanisms. This configuration overrides the one configured in the authentication option of the Soffid console.
Available since console version 3.5.6
Options
SAML
PASSWORD
SAML PASSWORD
EXTERNAL\_URL
(optional) Allows to override host name configuration when there are two Consoles.
Available since console version 3.5.9.5
https://soffid.lab.internal.com
Additional parameters to configure the database connections. Allows you to establish the min and the max of database connections:
Variable
Description
Example
DBPOOL\_MIN\_IDLE
The minimum number of connections should be kept in the pool at all times.
1 or 2
DBPOOL\_MAX\_IDLE
The maximum number of connections should be kept in the pool at all times.
between 10 and 15
DBPOOL\_INITIAL
The connection number will be established when the connection pool is started.
3 or 4
DBPOOL\_MAX
The maximum number of active connections that can be allocated. If no value is indicated, the default value is 30.
The transaction fails if the maximum connections are reached within 30 seconds and no connection is released.
Text search engine index files. It can be erased at any time. The engine will regenerate the search engine. `/opt/soffid/iam-console-4/index/`
/opt/soffid/iam-console-4/conf
Configuration files, including server.xml and tomee.xml files `/opt/soffid/iam-console-4/conf`
Here you have a sample command to start a docker container running IAM console, in this case the docker will be in a docker network, previously created. MariaDB docker is at the same network.
```shell
docker run -d \
-e DB_URL=jdbc:mariadb://mariadb-service/soffid \
-e DB_USER=soffid \
-e DB_PASSWORD=soffid \
--name=iam-console \
--publish=8080:8080 \
--network=soffidnet \
soffid/iam-console
```
To see console log files, execute:
```shell
docker logs -f iam-console
```
By default, the 8080 port will be exposed. When the TLS connection is going to be configured, add the tag --publish=443:443 to publish the TLS port.
When the console is created, the password for the user *admin* will be *changeit* and it will be valid for 24 hours.
Now you can connect the Soffid Console [http://localhost:8080/soffid](http://localhost:8080/soffid)/The first thing you must do is to change the admin user password.
Next Step: [Installing Sync server](https://bookstack.soffid.com/books/installation/page/installing-sync-server-b3e "Installing Sync server")
# Installing Sync server
Guide to install Sync server using Docker.
## Prerequisites
Soffid IAM sync server requires the following requirements:
- [Supported database installed](https://bookstack.soffid.com/books/installation/page/initialize-database "Initialize database")
- [Soffid Console Installed](https://bookstack.soffid.com/books/installation/page/installing-iam-console-ef0 "Installing IAM Console")
## Repositories
Soffid 3 uses the public Docker Hub: [https://hub.docker.com/r/soffid/iam-console/](https://hub.docker.com/r/soffid/iam-console/)
Soffid 4 uses the Google Cloud Artifact Registry, contact to Soffid when you need access to it.
## Video Tutorial
### Linux
## Installation
### Install first Sync server
To configure the first IAM Sync server, the following environment variables can be set for the first server:
Variable
Description
Example
DB\_URL
JDBC URL
jdbc:mariadb://dbcontainer/soffid
DB\_USER
Database user
Soffid
DB\_PASSWORD
Database password
5uper5ecret
SOFFID\_HOSTNAME
The hostname used to access the sync server
syncserver01.soffid.com
SOFFID\_PORT
TCP port used for incoming connections
760
**SOFFID\_MAIN**
Set to yes for the first sync server, no for the next ones
**yes**
Additional parameters to configure the database connections. Allows you to establish the min and the max of database connections:
Variable
Description
Example
DBPOOL\_MIN\_IDLE
The minimum number of connections should be kept in the pool at all times.
1 or 2
DBPOOL\_MAX\_IDLE
The maximum number of connections should be kept in the pool at all times.
between 10 and 15
DBPOOL\_INITIAL
The number of connections will be established when the connection pool is started.
3 or 4
DBPOOL\_MAX
The maximum number of active connections that can be allocated. If no value is indicated, the default value is 30.
The transaction fails if the maximum connections are reached within 30 seconds and no connection is released.
25
DBPOOL\_MAX\_IDLE\_TIME
Number of seconds that a connection to a DB that is not in use is maintained.
Available since Sync Server version 3.5.4.3
3600
### Install next Sync servers
To configure the next sync servers, the following environment variables can be set:
Variable
Description
Example
SOFFID\_SERVER
First sync server url
https://syncserver01.soffid.com:1760
SOFFID\_USER
Soffid user to join the security domain. If you are working in a tenant, the user of the tenant.
admin
SOFFID\_PASS
Soffid user password. If you are working in a tenant, the user password of the tenant.
changeit
SOFFID\_HOSTNAME
The host name used to access to the sync server
syncserver.soffid.com
SOFFID\_PORT
TCP port used for incomming connections
760
SOFFID\_TENANT
Tenant name
master
**SOFFID\_MAIN**
Set to yes for the first sync server, no for the next ones
**no**
### Install Sync server in a private network
To configure a sync server in a private network, not directly accessible from the main sync server, the following environment variables can be set:
Variable
Description
Example
SOFFID\_SERVER
First sync server url
https://syncserver01.soffid.com:1760
SOFFID\_USER
Soffid user to join the security domain
admin
SOFFID\_PASS
Soffid user password
changeit
SOFFID\_HOSTNAME
The host name used to access to the sync server
syncserver.soffid.com
SOFFID\_TENANT
Tenant name
master
**SOFFID\_MAIN**
Set to yes for the first sync server, no for the next ones
**no**
**SOFFID\_REMOTE**
Flag to enable cloud protocol
**yes**
You can use this configuration when the main sync server is located in the cloud.
### The following volumes are defined by default
Volume
Usage
/opt/soffid/iam-sync/conf
Configuration files, including private keys and certificates
### Command
Here you have a sample command to start a docker container running IAM sync server. Mind to specify the port number to expose the sync server docker to the outside world. It is not needed when using the cloud connectivity:
```shell
docker run -d \
-e DB_URL=jdbc:mysql://mariadb-service/soffid \
-e DB_USER=soffid \
-e DB_PASSWORD=soffid \
-e SOFFID_PORT=1760 \
-e SOFFID_HOSTNAME=iam-sync.soffidnet \
-e SOFFID_MAIN=yes \
--name=iam-sync \
--publish 1760:1760 \
--network=soffidnet \
soffid/iam-sync:latest
```
To see sync server log file, execute:
```shell
docker logs -f iam-sync
```
You can also view the log files inside the container. To do this, first enter the container, then you should find the log files in the **/var/log/soffid/** directory.
```
root@soffid:~# docker exec -it iam-sync /bin/bash
root@e1a90ff25d99:/# less /var/log/soffid/syncserver.log
```
Now you can connect to the IAM console [http://localhost:8080/soffid](http://%3Cnode-ip%3E%3Cpublish-port%3E/) and chek if Console and Syncserver are connected.
# How to add a certificate to cacerts
## Step by step
This procedure is valid for the docker environment, but it is not for Kubernetes.
How to add the Sync server certificate to the Java key store of Soffid console or Soffid PAM launcher.
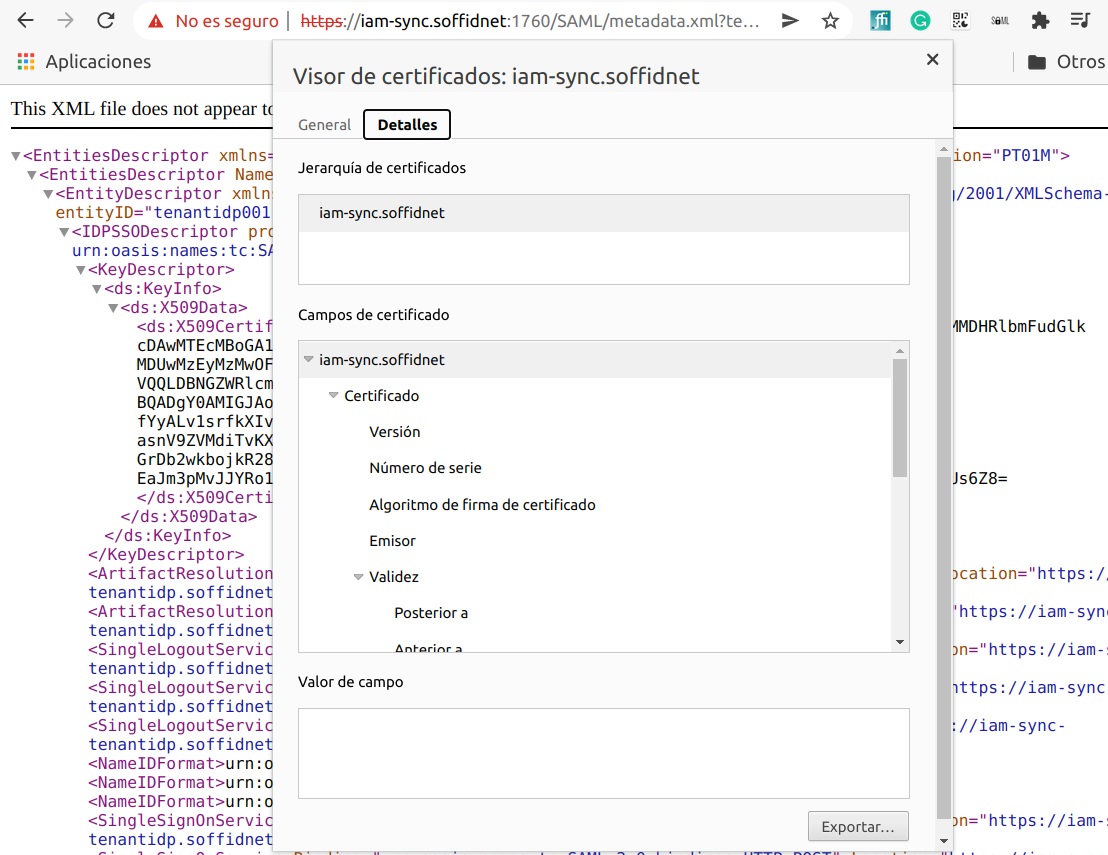
1. Start by downloading the certificate from the Sync server:
a. Connect to [https://<SYNC-SERVER>:1760/SAML/metadata.xml?tenant=<your-tenant>](https://iam-sync.soffidnet:1760/SAML/metadata.xml?tenant=demolab)
To get the master's certificate:
```
https://iam-sync.soffidnet:1760/SAML/metadata.xml?tenant=master
```
To get a tenant's certificate:
```
https://iam-sync.soffidnet:1760/SAML/metadata.xml?tenant=demolab
```
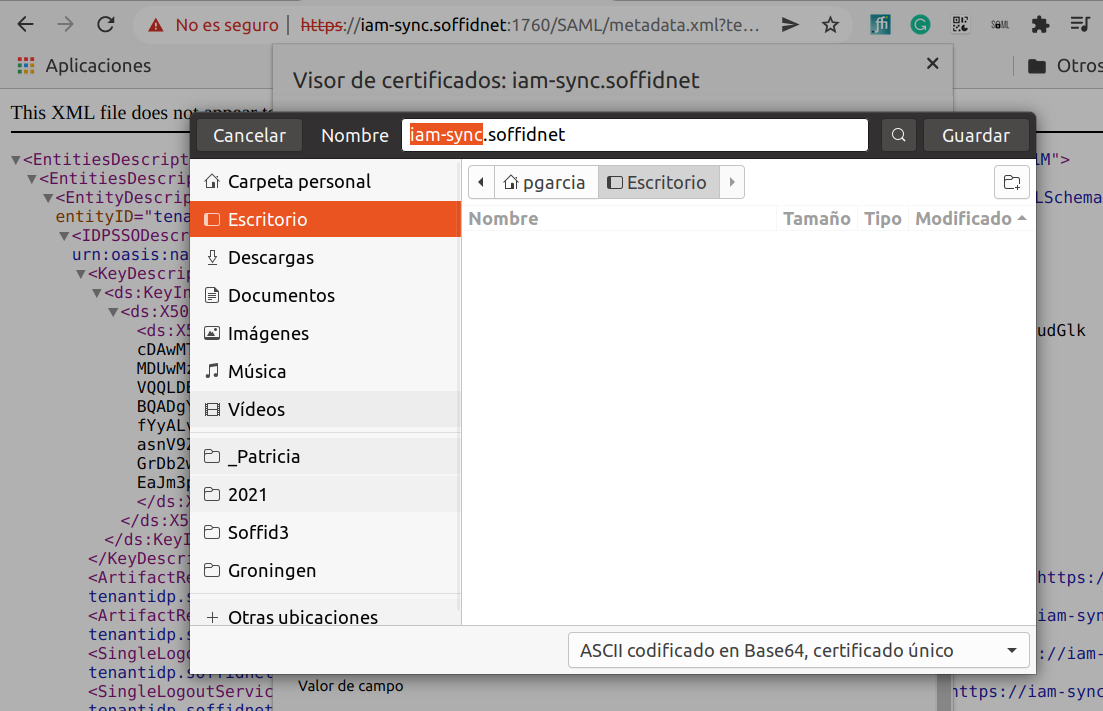
b. Download the certificate:
[](https://bookstack.soffid.com/uploads/images/gallery/2022-05/image-1652881836064.png)
[](https://bookstack.soffid.com/uploads/images/gallery/2022-05/image-1652881869458.png)
[](https://bookstack.soffid.com/uploads/images/gallery/2022-05/image-1652881914804.png)
2. Copy the certificate file to the container (Soffid Console or Soffid PAM Launcher):
Sample how to copy the file to the tmp folder:
```shell
sudo docker cp iam-sync.soffidnet iam-console:tmp
```
Sample how to copy the file to the root folder:
```shell
sudo docker cp iam-sync.soffidnet iam-console:/
```
3. Connect to the container
```shell
sudo docker exec -it iam-console /bin/bash
```
4. Import the certiticate:
```shell
keytool -import -file /tmp/iam-sync.soffidnet -cacerts
```
- password: **changeit**
- Trust this certificate? \[no\]: **yes**
- Certificate was added to Keystore5. **Restart** the container
---
If you want to display the current certificate:
```shell
openssl s_client -connect iam-sync.soffidnet:1760 -showcert
```