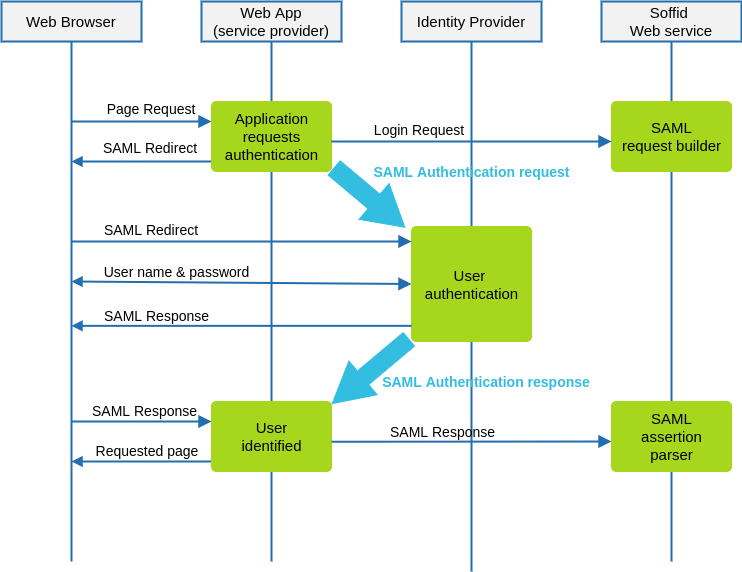
# Connecting your custom applications ## Introduction SAML 2.0 is a complex and not easy to implement standard. There are some libraries that can help somewhat, but a correct implementation needs a deep knowledge of SAML protocol, and is always hard to test and debug. To make it easier, Soffid provides some JSON rest web services, that can help any application to correctly implement the SAML service provider part of the protocol. ## Data flow The following diagram, shows the resulting data flow between the end user, your application, the identity provider and Soffid web services:
### Data flow steps 1. The end-user requests access to a protected page 2. The custom application can check the user identity looking up a session variable. By the time being, the user is not authenticated. 3. The custom application issues a JSON request to Soffid web service. In turn, Soffid web service builds, signs and maybe encrypts a SAML request 4. Then custom application taks the JSON request and builds an HTTP Redirect response with the received data. 5. The identity provider identifies the user as usual. 6. The custom application receives the SAML response. At this point, the application packs and forwards the received data to Soffid Web Service. 7. Soffid Web Service decrypts and checks SAML response integrity and correctnes, and returns a JSON document specifying the success or failure status, and the underlying identity attributes. If needed, Soffid web service can provision a new identity in target systems on the fly. 8. The custom application gets the identity data, stores it in a session variable and provides the protected resource to the end user. In order to get it, will be necessary: 1. Declare the custom application as an internal service provider in the federation page. 2. Create a Soffid application account for the custom application. 3. Implement the protection filters. 4. Implement the endpoint where the SAML response must be sent. ## Example ### 1. Creating an internal service provider You can create an internal service provider as a SAML service provider. ### 2. SAML Request generator After deploying Soffid SAML addon, a web service to generate SAML request will be automatically deployed. This web service requires an account with the **federation:serviceProvider** authorization. The endpoint will be locate in Soffid Console: [http://your.soffid.console:8080/webservice/federation/rest/generate-saml-request](http://your.soffid.console:8080/webservice/federation/rest/generate-saml-request) Method: ```POST` Headers to include in the request: `Accept = “application/json”` `Content-Type = “application/json”` Request: Send a JSON decument with following fields: `user → suggested user to authenticate (optional)` `identityProvider → identity provider public ID. Must match the public ID of any` `identity provider registered in Soffid federation.` `serviceProviderName → service provider which requests the user` `authentication. Must match the public ID of an internal service provider` `sessionSeconds → max time for the user session inactivity` Response: `method → Method to use: urn:oasis:names:tc:SAML:2.0:bindings:HTTP-POST` `instructs the application to build a HTML Form that automatically submits the` `following parameters. Value urn:oasis:names:tc:SAML:2.0:bindings:HTTP-Redirect` `instructs the application to perform a redirect (Location HTTP header) with the` `URL and parameters specified` `parameters → every parameter included must be submited to the identity` `provider. Usually, these two will be present:` `RelayState → identifier of the ticket of the SAML request` `SAMLRequest → encoded SAML request` `url → identity provider endpoint.` Request sample:
{ "user" : "myuser@soffid.poc", "identityProvider" : "my-service-provider", "serviceProviderName" : "https://idp.soffid.com", "sessionSeconds" : "3600" }
Response sample:
{ "method": "urn:oasis:names:tc:SAML:2.0:bindings:HTTP-Redirect", "parameters": { "RelayState": "\_457cab260c4948ef4c6d35a67cac000d3348d1ec48f53215", SAMLRequest": “PD94bWwgdmVyc2lvbj0iMS4wIiBlbmNvZGluZz0iVVRGLTgiPz48c2FtbDJ..." }, "url": "https://idp.soffid.com/SAML/Redirect" }
### 3. In turn, your application will issue the following location header to the browser
Location: https://idp.soffid.com/SAML/Redirect?RelayState=\_457cab260c4948ef4c6d35a67cac000d3348d1ec48f53215&SAMLRequest=PD94bWwgdmVyc2lvbj0iMS4wIiBlbmNvZGluZz0iVVRGLTgiPz48c2FtbDJ...
Should the method be urn:oasis:names:tc:SAML:2.0:bindings:HTTP-POST, your application should build an HTML similar the following one:
<form action="https://idp.soffid.com/SAML/Redirect"> <input type="hidden" name="RelayState" value="457cab260c4948ef4c6d35a67cac000d3348d1ec48f53215" /> <input type="hidden" name="SAMLRequest" value="PD94bWwgdmVyc2lvbj0iMS4wIiBlbmNvZGluZz0iVVRGLTgiPz48c2FtbDJ....." /> </form> <script> document.form\[0\].submit(); </script>
### 4. SAML Response endpoints Your application must implement the SAML response endpoint. This endpoint must accept the POST method and forward each received parameter to Soffid's parse-saml-response. Mind that your endpoint must accept application/x-www-form-urlencoded parametern while Soffid service accepts application/json. Soffid endpoint will be located in Soffid Console: `http://your.soffid.console:8080/webservice/federation/rest/generate-saml-request` Method: `POST` Headers: `Accept = “application/json”` `Content-Type = “application/json”` Authentication: Use your application account to login using basic authentication schema. In multitenant environments, the user name will have the forma TENANT\_NAME\\ACCOUNT\_NAME Request: send a JSON document with following fields `autoProvision → [false|true] Set to true if you want Soffid to automatically enroll` `unknown identities. This is not normally needed if you are using Soffid IdP, but it's` `useful when using third party IdPs.` `response: JSON object with any parameter received in post method.` `RelayState → identifier of the ticket of the SAML response` `SAMLResponse → encoded SAML response` `protocol → use always “urn:oasis:names:tc:SAML:2.0:bindings:HTTP-POST”` `serviceProviderName → service provider which requests the user authentication` Response: `authentication → [yes|no]` `failureMessage → if authentication=”no”, a message with the error cause.` `principalName → account name, as sent by the IdP` `user → Soffid identity with standard attributes` `attributes → Soffid identity custom attributes` `sessionId → session identifier` ##### Example data received by your endpoint
POST /saml-receiver Host: my-service-provider Content-Type: application/x-www-form-urlencoded RelayState=\_523866242f943b4c63234dc8942ffc2f08cea03aa129a4e2&SAMLResponse=PD94bWwgdmVyc2lvbj0iMS4wIiBlbmNvZGluZz0iVVRGLTgiPz48c2FtbDJ.…
##### Example request
{ "autoProvision" : false, "response" : { "RelayState": "\_523866242f943b4c63234dc8942ffc2f08cea03aa129a4e2", "SAMLResponse": "PD94bWwgdmVyc2lvbj0iMS4wIiBlbmNvZGluZz0iVVRGLTgiPz48c2FtbDJ...." }, "protocol" : "urn:oasis:names:tc:SAML:2.0:bindings:HTTP-POST", "serviceProviderName" : "my-service-provider" }
##### Example response
{ "authentication": "yes", "principalName": "your-name@somedomain.com", "user": { "id": 123456, "userName": "your-id", "firstName": "Your", "lastName": "Name", "primaryGroup": "enterprise", "active": true, "shortName": "your-name", "mailDomain": "somedomain.com" }, "attributes": { "employeeId": "AS14567" }, "sessionId": "ABCTASHO54684A" }