# Connecting Office 365

## Introduction

You can use an Identity Provider defined into Soffid to connect to Office 365. You only need to register the Office 365 metadata into a Soffid Service Provider and register the Identity Provider Metadata into your Office 365.

At this tutorial Soffid explain how to connect to Office 365 using PowerShell.

## Step By Step

### Attribute definition

Review the attribute definition to check if it will be necessary to add the Required attributes.

<p class="callout info">[*https://docs.microsoft.com/en-us/azure/active-directory/hybrid/how-to-connect-fed-saml-idp*](https://docs.microsoft.com/en-us/azure/active-directory/hybrid/how-to-connect-fed-saml-idp)</p>

### Attribute sharing policies

Review the attribute sharing policies to add the required attributes.

### Option 1

Soffid will be in charge of creating users in Office 365.

1\. First of all, you need to configure your **Identity Provide**r, in that case, we configure Soffid as Identity Provider.

[![image-1644228339942.png](https://bookstack.soffid.com/uploads/images/gallery/2022-02/scaled-1680-/image-1644228339942.png)
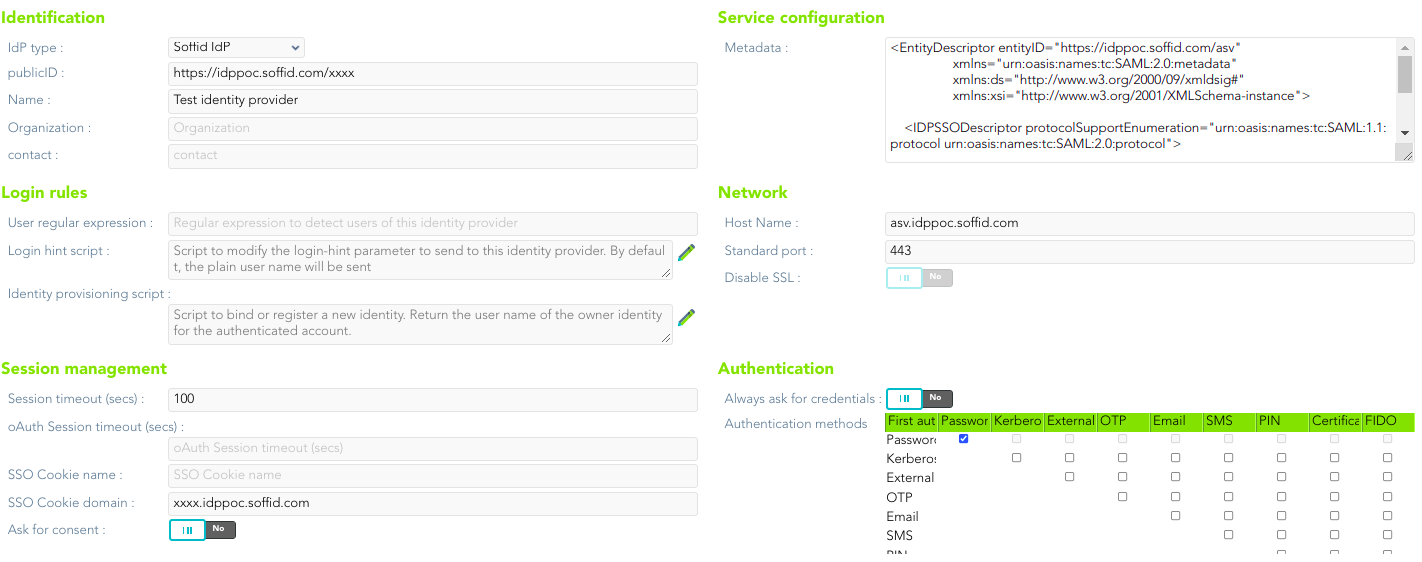
](https://bookstack.soffid.com/uploads/images/gallery/2022-02/image-1644228339942.png)

[![image-1644228359906.png](https://bookstack.soffid.com/uploads/images/gallery/2022-02/scaled-1680-/image-1644228359906.png)
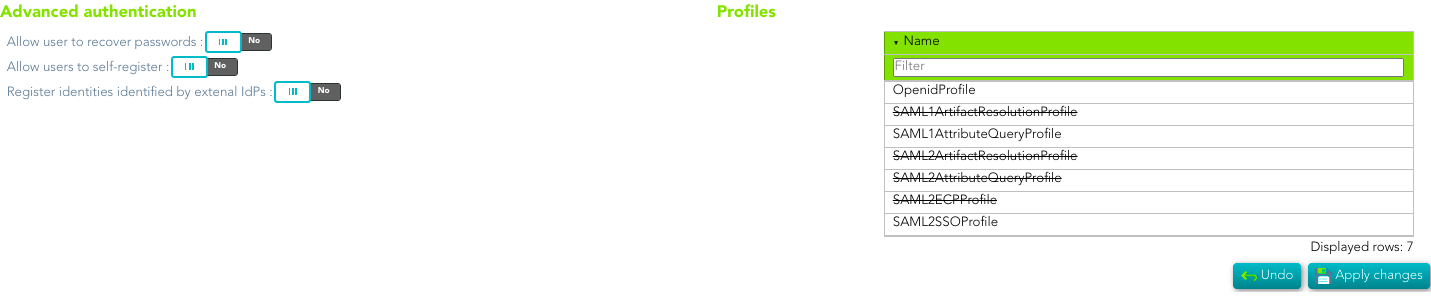
](https://bookstack.soffid.com/uploads/images/gallery/2022-02/image-1644228359906.png)

2\. Then, you need to configure the **Service provider**. It will be mandatory to copy the Metadata of Office 365 into the Service Configuration.

[![image-1644228483247.png](https://bookstack.soffid.com/uploads/images/gallery/2022-02/scaled-1680-/image-1644228483247.png)](https://bookstack.soffid.com/uploads/images/gallery/2022-02/image-1644228483247.png)

3\. You need to configure an Office 365 agent: [https://bookstack.soffid.com/books/connectors/page/how-to-configure-the-office-365-agent](https://bookstack.soffid.com/books/connectors/page/how-to-configure-the-office-365-agent)

### <span style="font-weight: 400;">Option 2</span>

<span style="font-weight: 400;">The Active Directory will be in charge of creating users in Office 365.</span>

<span style="font-weight: 400;">1. You need to create the attribute *inmutableId* in the agent configuration</span>

[![image-1681898221429.png](https://bookstack.soffid.com/uploads/images/gallery/2023-04/scaled-1680-/image-1681898221429.png)
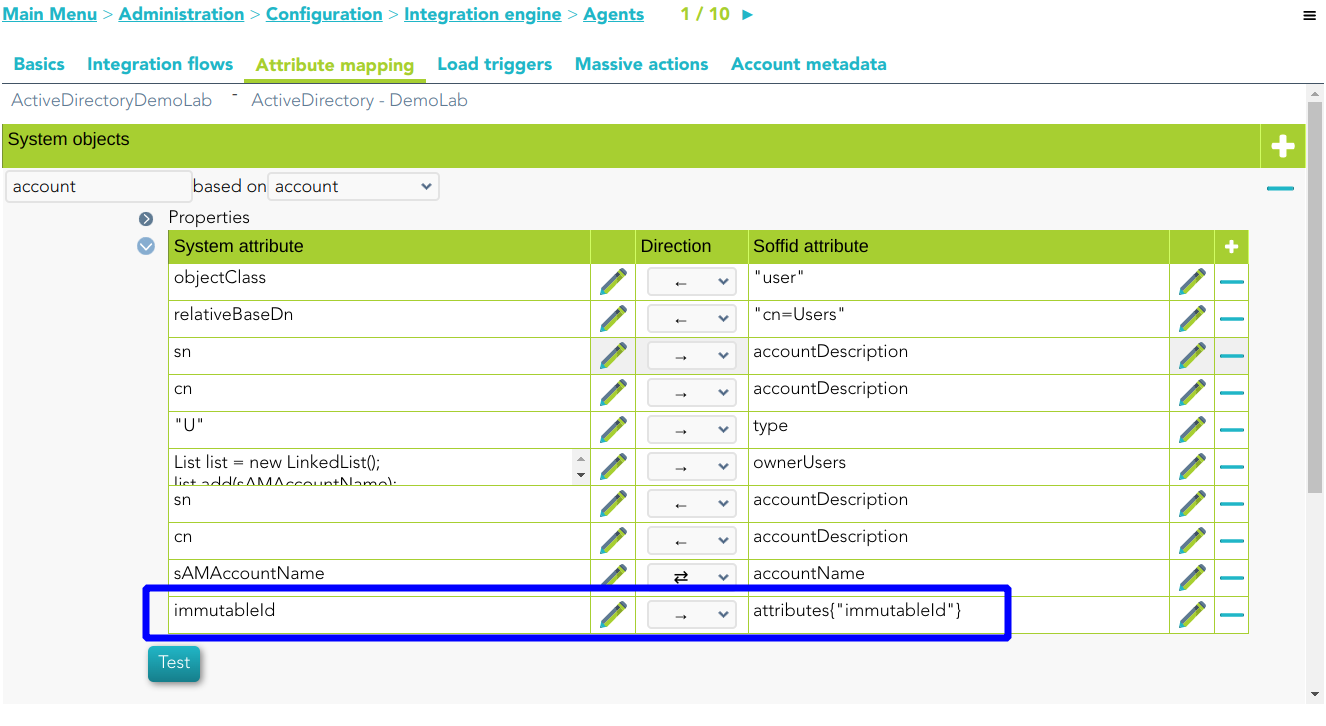
](https://bookstack.soffid.com/uploads/images/gallery/2023-04/image-1681898221429.png)

If you fetch the Soffid object, Soffid will display this new attribute

[![image-1681898371943.png](https://bookstack.soffid.com/uploads/images/gallery/2023-04/scaled-1680-/image-1681898371943.png)
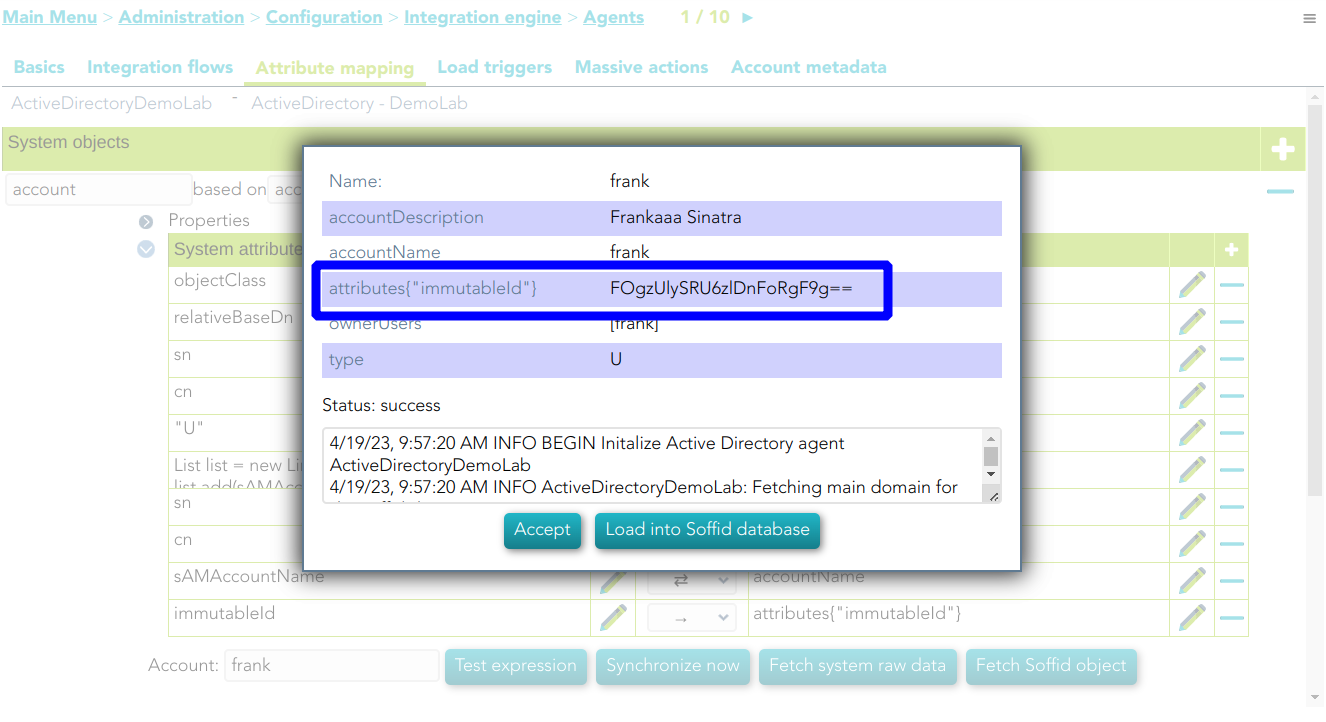
](https://bookstack.soffid.com/uploads/images/gallery/2023-04/image-1681898371943.png)

2\. You must add a UID Script in the Office 365 Service Provider

[![image-1681898502855.png](https://bookstack.soffid.com/uploads/images/gallery/2023-04/scaled-1680-/image-1681898502855.png)
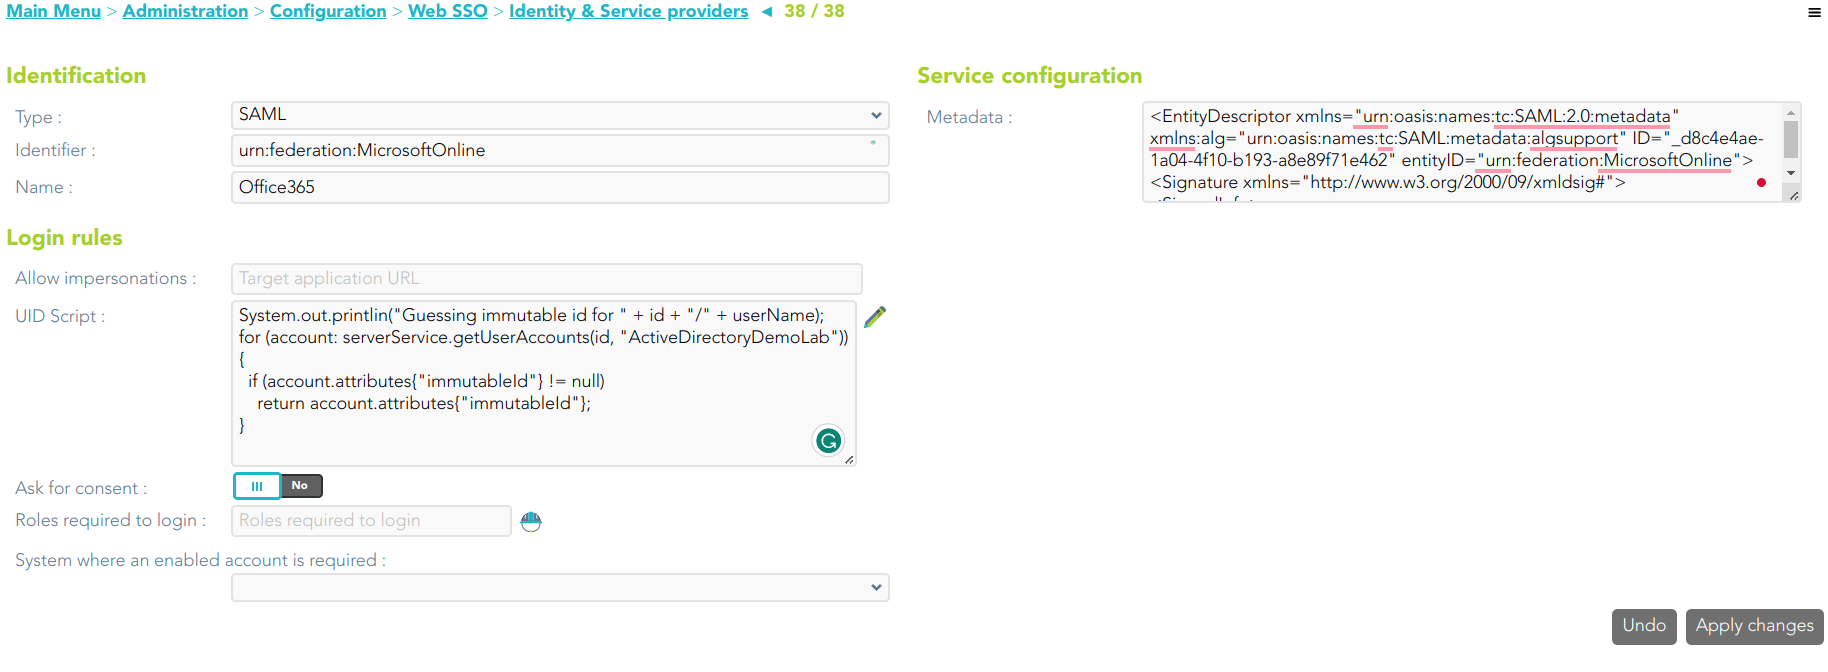
](https://bookstack.soffid.com/uploads/images/gallery/2023-04/image-1681898502855.png)

```JavaScript
System.out.printlin("Guessing immutable id for " + id + "/" + userName);
for (account: serverService.getUserAccounts(id, "ActiveDirectoryDemoLab")) {
  if (account.attributes{"immutableId"} != null) 
    return account.attributes{"immutableId"};
}
```

### <span style="font-weight: 400;">PowerShell</span>

<span style="font-weight: 400;">If necessary you can install the Azure AD module for Windows PowerShell</span>

```Powershell
Install-Module MSOnline
```

<span style="font-weight: 400;">Then you can connect to the service</span>

```shell
Connect-MsolService
```

When you executed the connect method, a new window will open to login Microsoft in as an administrator domain user.

[![image-1643903332457.png](https://bookstack.soffid.com/uploads/images/gallery/2022-02/scaled-1680-/image-1643903332457.png)
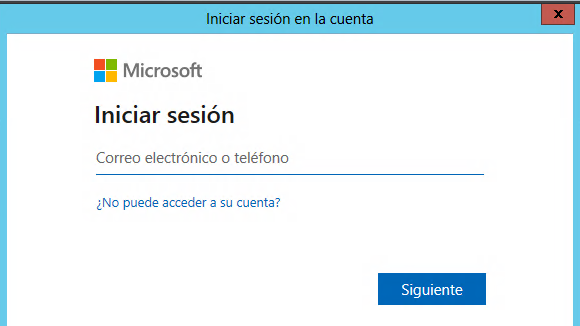
](https://bookstack.soffid.com/uploads/images/gallery/2022-02/image-1643903332457.png)

Once you have logged in, you could execute some commands to configure the connection to Office 365:

- **Register-PSRepository -Default:** registers a PowerShell repository
- **Get-MsolDomain**: displays the registered domains in Azure Active Directory.
- **GetMsolDomainFederationSettings**: get the settings for a federated domain
- **Set-Msoldomain -Name &lt;YOUR\_DOMAIN&gt; -isdefault**: set as default one domain
- **Set-MsolDomainAuthentication -DomainName &lt;YOUR\_DOMAIN&gt; -Authentication federated**: set as federated a specific domain.

In order to connect to Office 365, one can use the following script:

```shell
$dom = "<Your demain>"
$BrandName = "<Your company>"
$LogOnUrl = "https://<Your Soffid IdP>/profile/SAML2/POST/SSO"
$LogOffUrl = "https://<Your Soffid IdP>/profile/SAML2/POST/SLO"
$ecpUrl = "https://<Your Soffid IdP>/SAML2/POST/PAOS"
$MyURI = "<Your Soffid IdP>"
$MySigningCert = "<Your certificate in Base64>";
# "MIIGaDCCBVCgAwIBAgIQAWdkq9pxzP/bK+Mlym5y5zANBgkqhkiG9w0BAQsFADBeMQswCQY....
$Protocol = "SAMLP"
 
# To enable
Set-MsolDomainAuthentication -DomainName $dom -FederationBrandName $BrandName -Authentication Federated -PassiveLogOnUri $LogOnUrl -SigningCertificate $MySigningCert -IssuerUri $MyURI -LogOffUri $LogOffUrl -PreferredAuthenticationProtocol $Protocol
 
# To disable
# Set-MsolDomainAuthentication -DomainName $dom -Authentication Managed
```

---

[*https://docs.microsoft.com/en-us/powershell/module/cimcmdlets/?view=powershell-7.2*](https://docs.microsoft.com/en-us/powershell/module/cimcmdlets/?view=powershell-7.2)

*[https://docs.microsoft.com/en-us/powershell/azure/active-directory/install-msonlinev1?view=azureadps-1.0#install-the-azure-ad-module](https://docs.microsoft.com/en-us/powershell/azure/active-directory/install-msonlinev1?view=azureadps-1.0#install-the-azure-ad-module)*

[*https://docs.microsoft.com/en-us/azure/active-directory/hybrid/how-to-connect-fed-saml-idp*](https://docs.microsoft.com/en-us/azure/active-directory/hybrid/how-to-connect-fed-saml-idp)