# Federation
# Introduction to Identity Federation
## What is Identity Federation?
A **federated identity** in [information technology](https://en.wikipedia.org/wiki/Information_technology "Information technology") is the means of linking a person's [electronic identity](https://en.wikipedia.org/wiki/Digital_identity "Digital identity") and attributes, stored across multiple distinct [identity management](https://en.wikipedia.org/wiki/Identity_management "Identity management") systems. The federation is a system of trust between two parties for the purpose of authenticating users and sharing information needed to authorize their access to resources.
> A federated identity in information technology is the means of linking a person's electronic identity and attributes, stored across multiple distinct identity management systems.
>
> It is related to single sign-on (SSO), in which a user's single authentication ticket, or token, is trusted across multiple IT systems or even organizations. SSO is a subset of federated identity management, as it relates only to authentication and is understood on the level of technical interoperability and it would not be possible without some sort of federation.
Federated identity is related to single sign-on (SSO), in which a user's single authentication ticket, or token, is trusted across multiple IT systems or even organizations. SSO is a subset of federated identity management, as it relates only to authentication and is understood on the level of technical interoperability and it would not be possible without some sort of federation.
With the identity federation, we get to separate the applications and, the login and get permissions process. Currently, there are two mainstream identity federation standards: **SAML** and **OpenID-Connect**.
The authentication service is responsible for identifying users and passing the information to the applications.
#### Which protocols are supported by Soffid?
- [SAML](https://bookstack.soffid.com/books/federation/chapter/saml)
- [OpenID-Connect](https://bookstack.soffid.com/books/federation/chapter/openid-connect)
- [CAS](https://bookstack.soffid.com/books/federation/chapter/cas)
- [Radius](https://bookstack.soffid.com/books/federation/chapter/radius)
- [TACACS+](https://bookstack.soffid.com/books/federation/chapter/tacacs)
## SAML (Security Assertion Markup Language)
Visit the[ SAML Chapter](https://bookstack.soffid.com/books/federation/chapter/saml "SAML") for more information.
## OpenID-Connect
Visit the[ OpenID-Connect Chapter](https://bookstack.soffid.com/books/federation/page/openid-connect "OpenID-Connect") for more information.
## The main differences between SAML and OpenID-connect
- OpenID-connect uses simple form encoding or JSON rather than complex XML documents.
- OpenID-connect does not encrypt or sign requests or responses. Instead, it uses simple username/password authentication leveraging HTTPS transport security.
- OpenID-connect requires server to server communication to transfer security tokens. SAML allows this kind of communication, but does not need it.
---
[*https://en.wikipedia.org/wiki/Federated\_identity*](https://en.wikipedia.org/wiki/Federated_identity)
# SAML
# SAML (Security Assertion Markup Language)
## Introduction
> Security Assertion Markup Language is an open standard for exchanging authentication and authorization data between parties, in particular, between an identity provider and a service provider.
It is an identity federation protocol, born in 2001 and published in 2005. The design of SAML is highly secure and based on the technologies used at the beginning of this century. It uses XML tokens, signed and optionally encrypted using XMLdSig standard, and uses SOAP as its transport protocol.
SAML is an important component of many SSO systems that allow users to access multiple applications, services or websites from a single login process. SAML allows sharing security credential across systems.
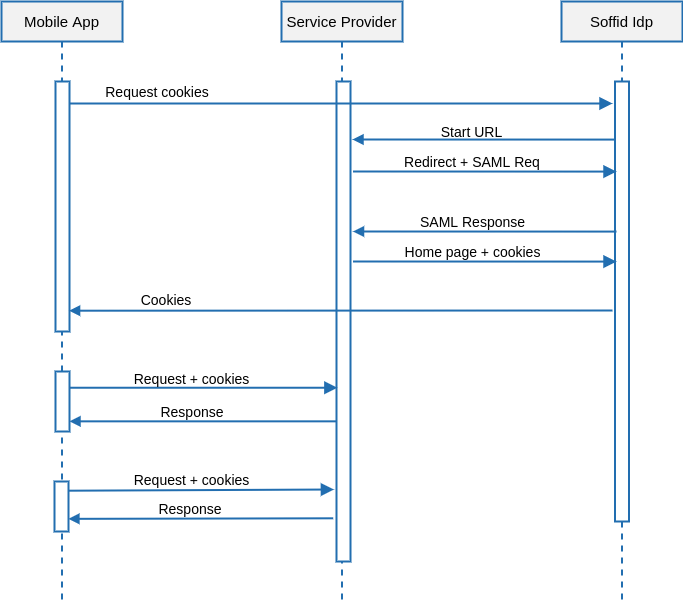
SAML establishes indirect communication with applications through the browser.
[](https://bookstack.soffid.com/uploads/images/gallery/2021-09/0dNsaml-logo.png)
[http://saml.xml.org/](http://saml.xml.org/)
[https://en.wikipedia.org/wiki/Security\_Assertion\_Markup\_Language](https://en.wikipedia.org/wiki/Security_Assertion_Markup_Language)
# SAML architecture
## Introduction
SAML is the most complete, secure, and mature solution to get identity federation. SAML defines three main kinds of servers:
- Federation metadata server. Publishes information about the federation members, its protocols, and capabilities. Any federation member will only trust on other federation members.
- Identity providers are able to identify the user and publish its information to any application that requires it.
- Service providers are standard application servers that relay on identity providers to let users log in.
For now, we will focus on the **single log-in** and **single log-out** use cases, but be in mind that SAML defines much more use cases.
Communication is done through the browser
## Single Log-in
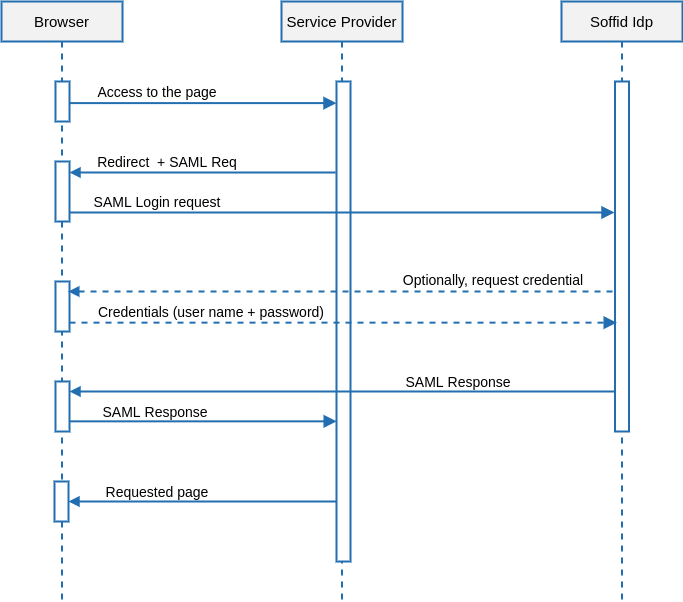
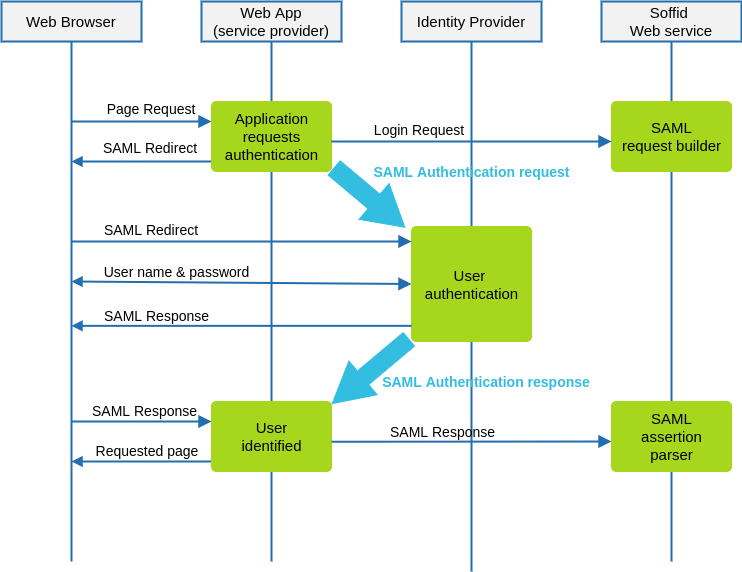
The single log-in is usually initiated by the application server. The typical UML use case is as follows:
### Description
1. The user’s browser tries to get a web page from the service providers.
2. The service provider wants to authenticate the user identity. To get this, builds an AuthenticationRequest document. It is an XML document that includes the server name and time and date. This XML document is signed using its private key and optionally encrypted using the identity provider public key. Both keys are published by the federation metadata server.
3. The service provider generates an HTML page that automatically posts the AuthenticationRequest document to the identity provider.
4. The AuthenticationRequest is received by the identity provider. At this point, the identity provider verifies it is correct and safe.
Next, the identity providers checks if the user browser does have an active SSO session. In such a case, skip to step 6.
5. The identity providers ask for credentials to the user.
6. The user enters its credentials. At this time, the identity provider verifies the user name and password are correct, and creates a new SSO session.
7. The identity provider sends a SAML assertion to the service provider. This assertion is signed using its private key and optionally encrypted using the service provider public key. The SAML assertion contains some user attributes. The included attributes and its value can vary depending on the service provider that will receive it.
As previously seen in the authentication request, the assertion is always sent through the user’s browser.
8. The service provider receives the SAML assertions, decrypts and verifies it, obtaining all the user attributes.
## Single Log-out
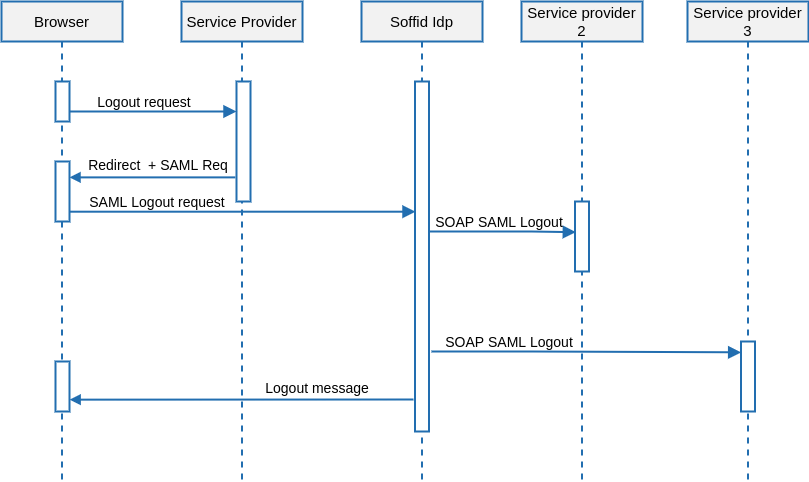
The single log-out process follows the next UML diagram:
### Description
1. The user requests to log out the application. At this point, the application (service provider) can give the user the chance to log out from any other application.
2. The service provider issues a global SAML logout request to the identity provider. The SAML logout request includes the user or session id. It is signed using its private key and optionally encrypted with the identity provider public key.
3. The identity provider sends a SOAP SAML logout request to any service provider with active sessions for this user. These logout requests are almost identical to the one sent from the service provider to the identity provider, but it is sent using SOAP rather than an HTTP URL.
4. After closing any active session, the user is informed about the logout progress, or optionally redirected to a farewell web page specified by the service provider.
*The logout request must be signed, it is not mandatory to the login request.*
# SAML Example
## Service Provider
[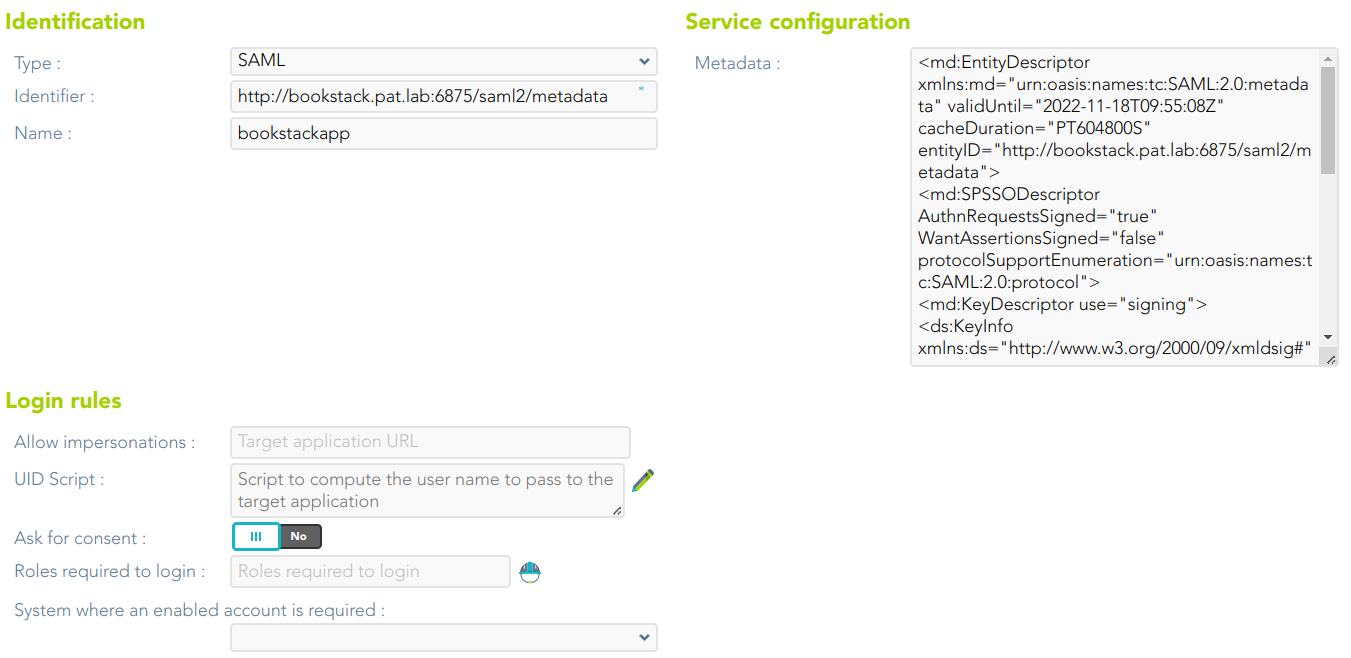](https://bookstack.soffid.com/uploads/images/gallery/2023-04/image-1681222787894.png)
# OpenID-Connect
# OpenID-Connect
## Introduction
> OpenID is an open standard and decentralized authentication protocol. It allows users to be authenticated by cooperating sites (known as relying parties, or RP) using a third-party service, eliminating the need for webmasters to provide their own ad hoc login systems, and allowing users to log into multiple unrelated websites without having to have a separate identity and password for each.
It is identity layer on top of the OAuth 2.0 protocol. OpenID-Connect is based on most modern protols. It uses JSON tokens, signed and optionally encripted using JWT standard, and uses simple REST as its transport protocol.
Sometimes referred as OpenID, must not be confused with an older and deprecated standard named OpenID.
[](https://bookstack.soffid.com/uploads/images/gallery/2021-09/1024px-openid-logo-2-svg.png)
---
*[https://openid.net/](https://openid.net/)*
*[https://en.wikipedia.org/wiki/OpenID#OpenID\_Connect\_(OIDC)](https://en.wikipedia.org/wiki/OpenID#OpenID_Connect_(OIDC))*
# OpenID-Connect architecture
## Introduction
OpenID is based on the well known protocol. It is easier to implement and deploy, as it does not require digital signature or encryption. The drawback is that it is significantly less secure. For example, the single logout protocol is not finished yet.
## Single Log-in
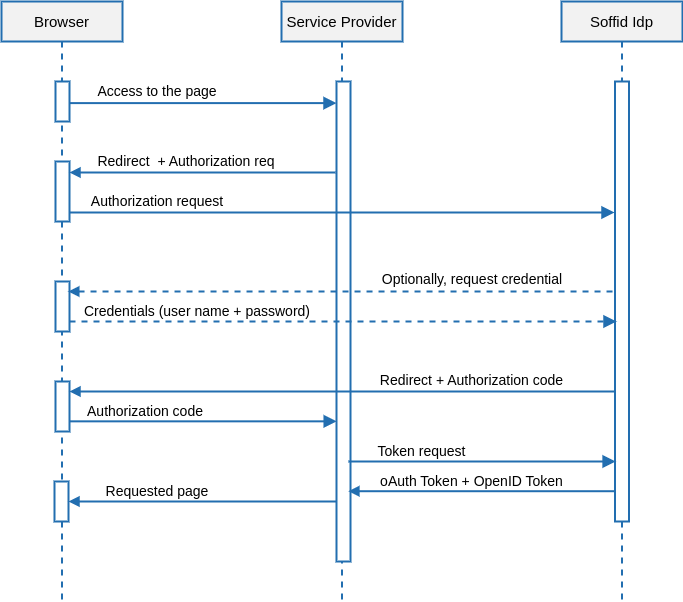
The usual log-in process follows the next UML diagram:
### Description
1. User’s browser tries to get a web page from the service providers
2. . The service provider wants to authenticate the user identity. To get this, redirects the user to the identity provider, including the returning URL.
3. The authorization request is received by the identity provider. At this point, the identity provider verifies it is issued by an authorized service provider.
Next, the identity providers checks if the user browser does have an active SSO session. In such a case, skip to step 6.
4. The identity providers ask for credentials to the user.
5. The user enters its credentials. At this time, the identity provider verifies the user name and password are correct, and creates a new SSO session.
6. The identity provider redirects the user to the service provider, sending an authorization code.
7. The service provider connects to the identity provider, using its client id and client secret, as well as the authorization code.
8. The identity provider verifies the authorization code and generates two tokens: the oAuth token and the OpenID token. The Auth token is a bare token that can be used by the service provider to perform additional requests.
The Openid token contains some user attributes. The included attributes and its value can vary depending on the service provider that will receive it. This token can be signed using JWT standard.
9. The service provider receives the both tokens, parsing the JSON document contained in the JWT OpenID token.
## Single Log-out
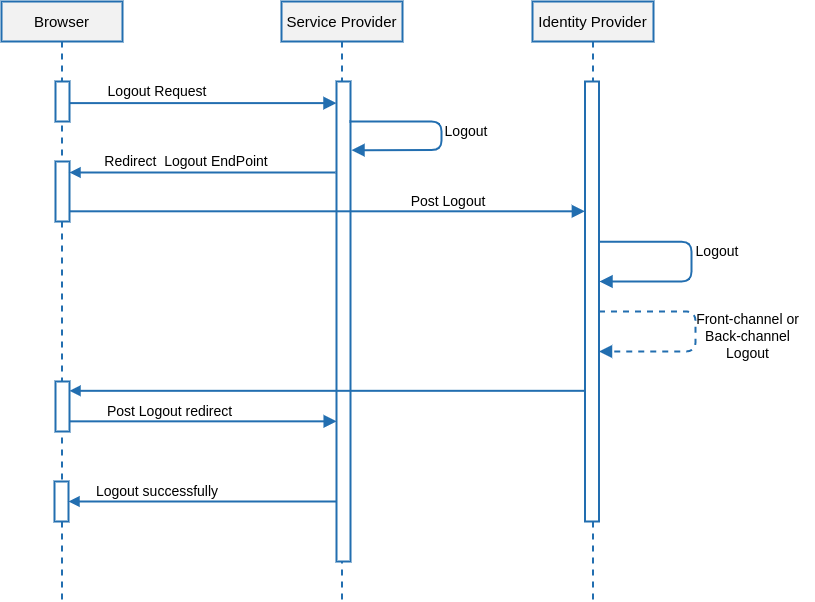
One generic logout process diagram:
### Description
1. The user requests to log out the application.
2. Logout in the Service Provider, for instance, delete cookies.
3. Redirect to the Identity Provider logout endpoint
4. Logout in the Identity Provider, for instance, delete cookies.
5. The Identity Provider can trigger logout from other Service Providers using Font-channel or Back-channel.
6. The Identity Provider redirects to the Service Provider EndPoint
7. The Service Provider returns successfully logout
# OpenID-Connect example
## Identity Provider
[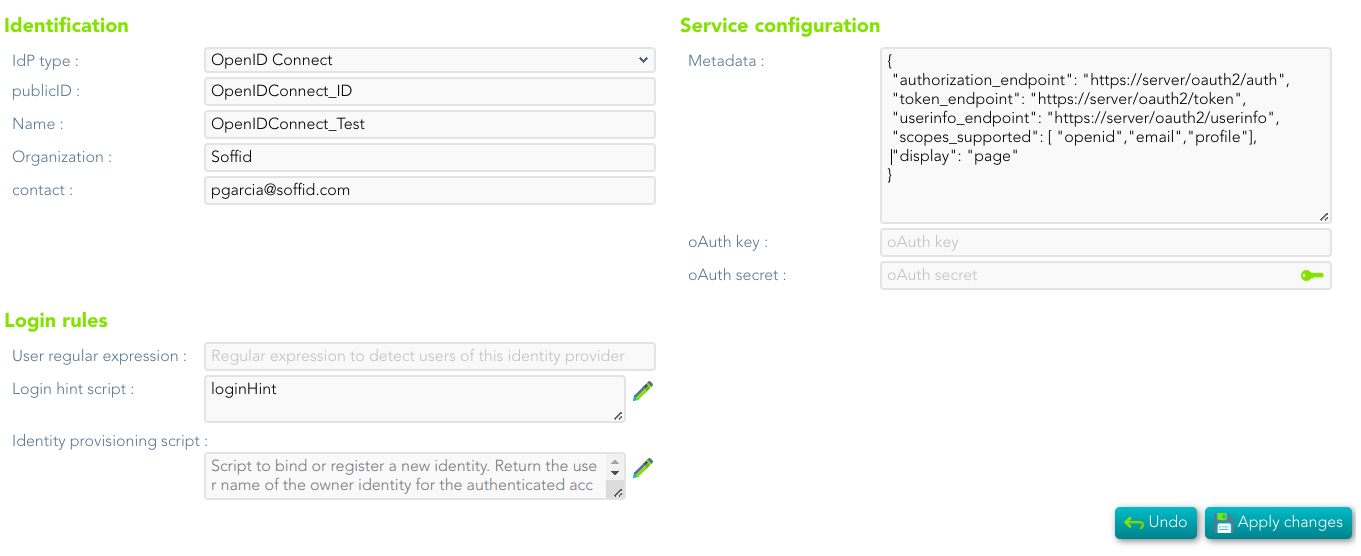](https://bookstack.soffid.com/uploads/images/gallery/2022-08/image-1661408366204.png)
## Service Provider
[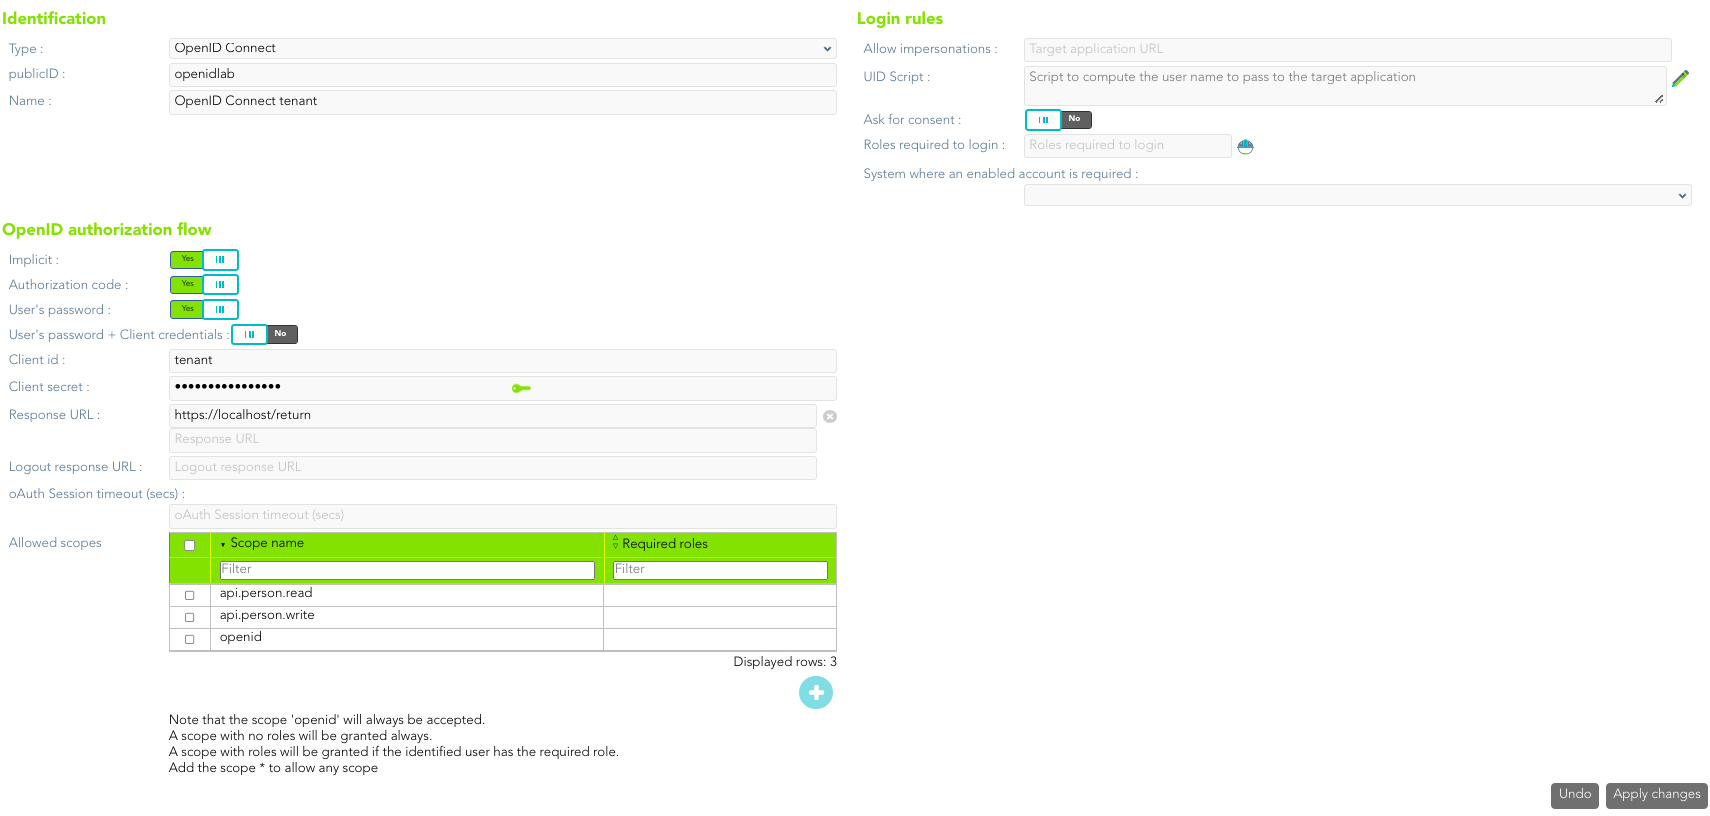](https://bookstack.soffid.com/uploads/images/gallery/2022-08/image-1661408426358.png)
# CAS
# CAS (Central Authentication Service)
## Introduction
> The CAS protocol is a simple and powerful ticket-based protocol. It involves one or many clients and one server. Clients are embedded in CASified applications (called “CAS services”) whereas the CAS server is a standalone component.
The Cas protocol makes it possible to implement the SSO authentication method that allows users to access web applications with a single sign-on.
The specification versions recognized are 3.0.3 and 2.0
[](https://bookstack.soffid.com/uploads/images/gallery/2022-08/cas-max-logo-0.png)
---
[*https://apereo.github.io/cas/6.5.x/protocol/CAS-Protocol.html*](https://apereo.github.io/cas/6.5.x/protocol/CAS-Protocol.html)
# CAS architecture
## Introduction
The CAS is a Single Sign On protocol for the web. This protocol allows users to access multiple applications by providing their credentials.
The response will be a JSON or XML
## Single Log-in
The single log-in is usually initiated by the application server. The typical UML use case is as follows:
[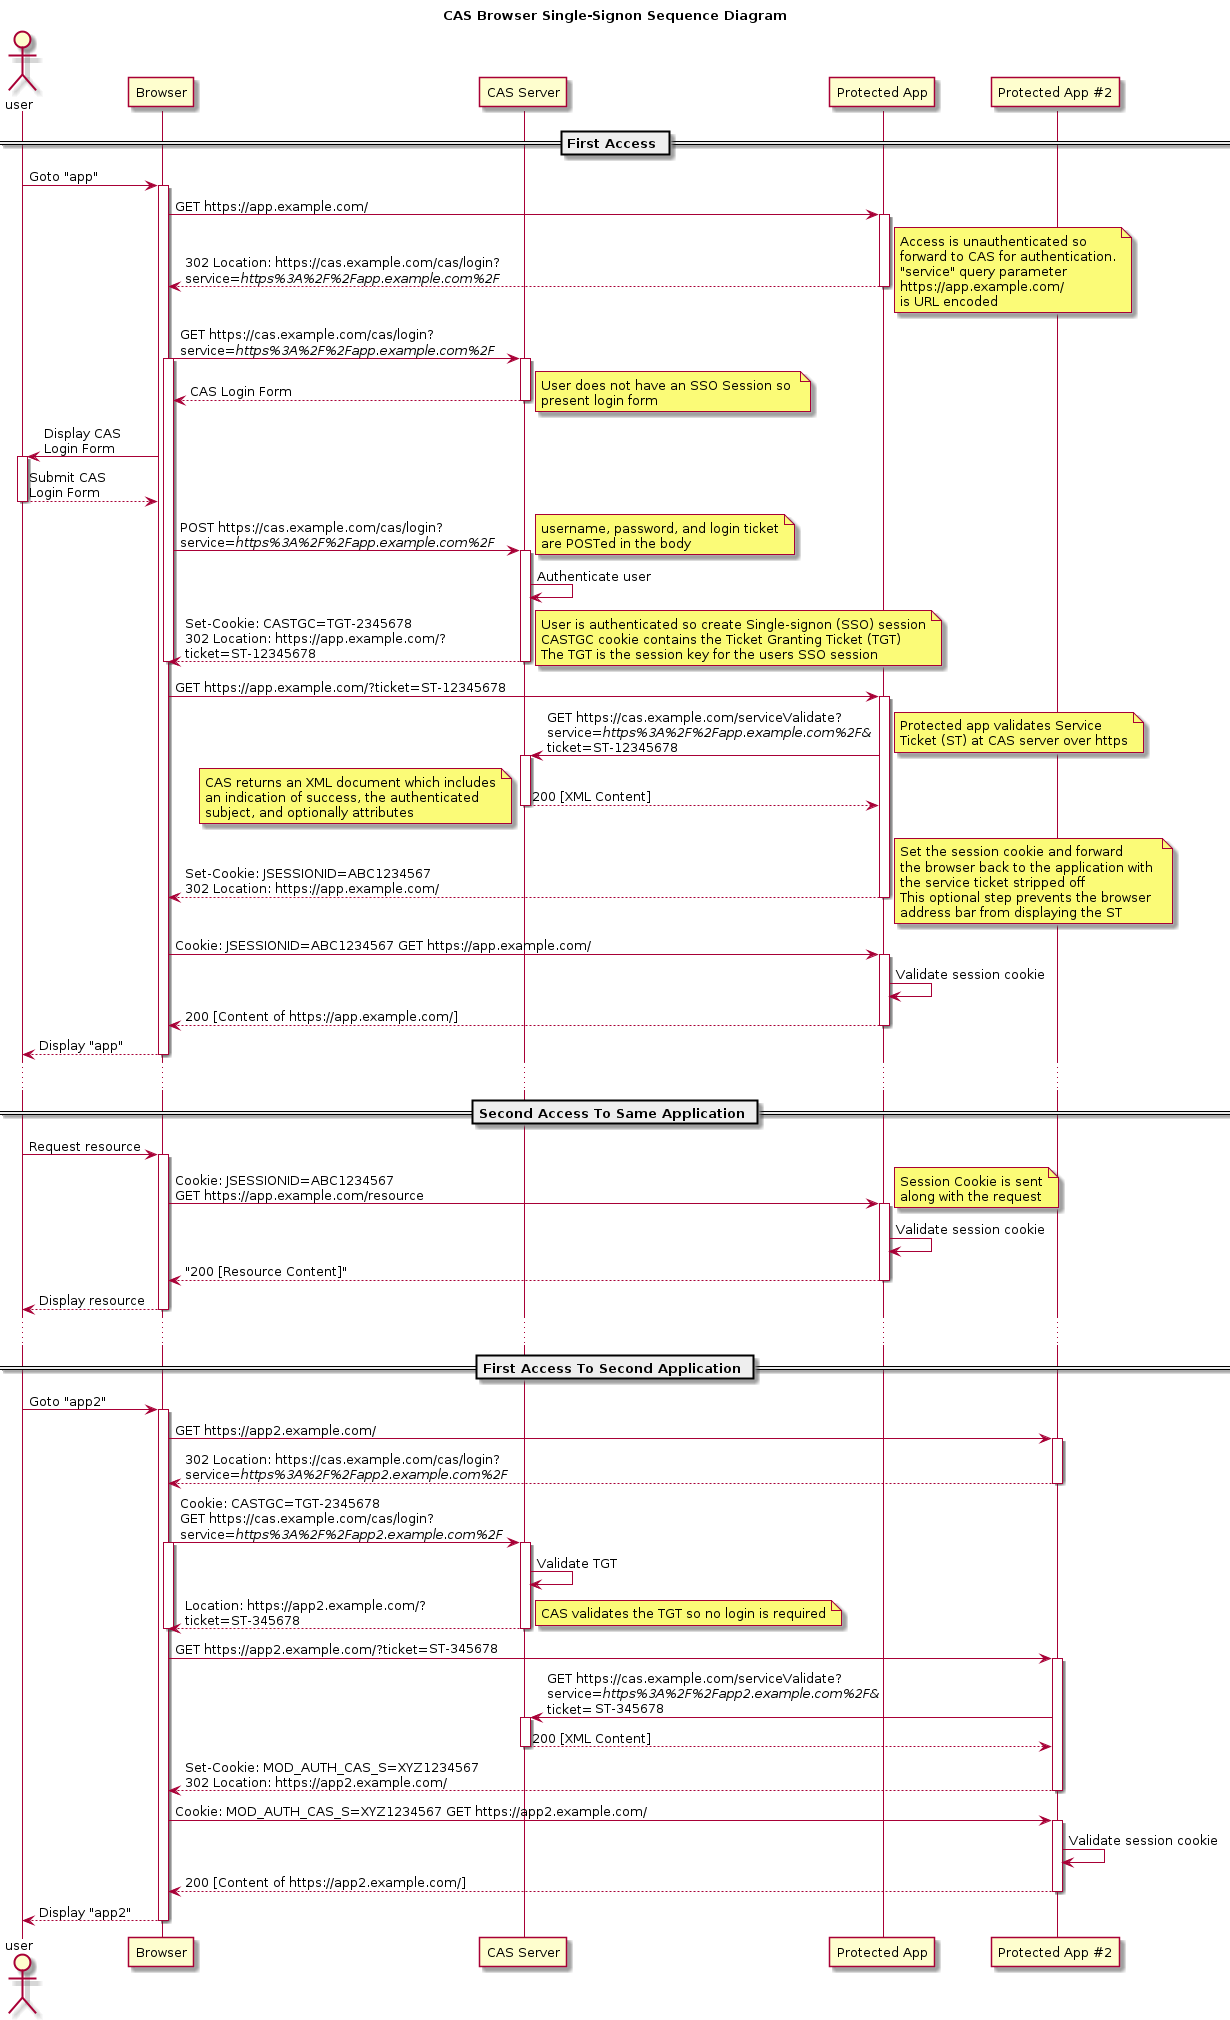](https://bookstack.soffid.com/uploads/images/gallery/2022-08/image-1661327423181.png)
## Proxy web flow diagram
[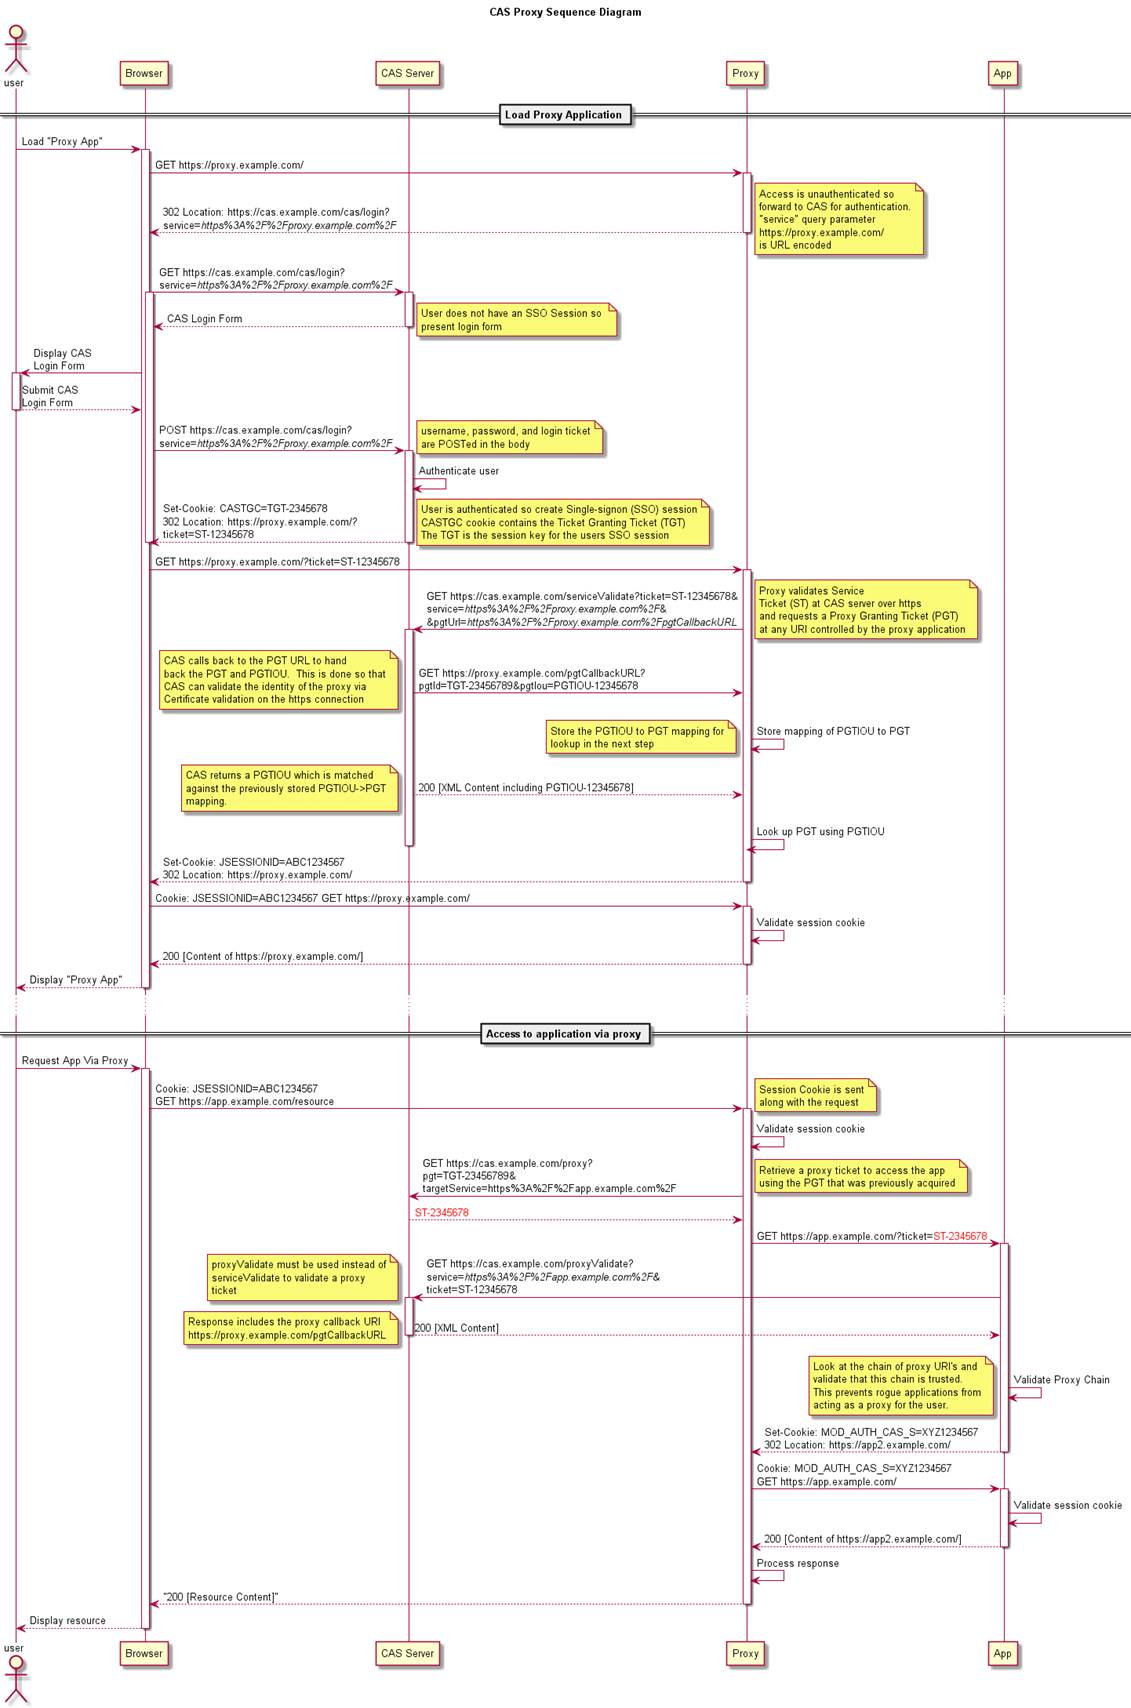](https://bookstack.soffid.com/uploads/images/gallery/2022-08/image-1661327695882.png)
---
*[https://en.wikipedia.org/wiki/Central\_Authentication\_Service](https://en.wikipedia.org/wiki/Central_Authentication_Service)*
# CAS Example
## Service Provider
## [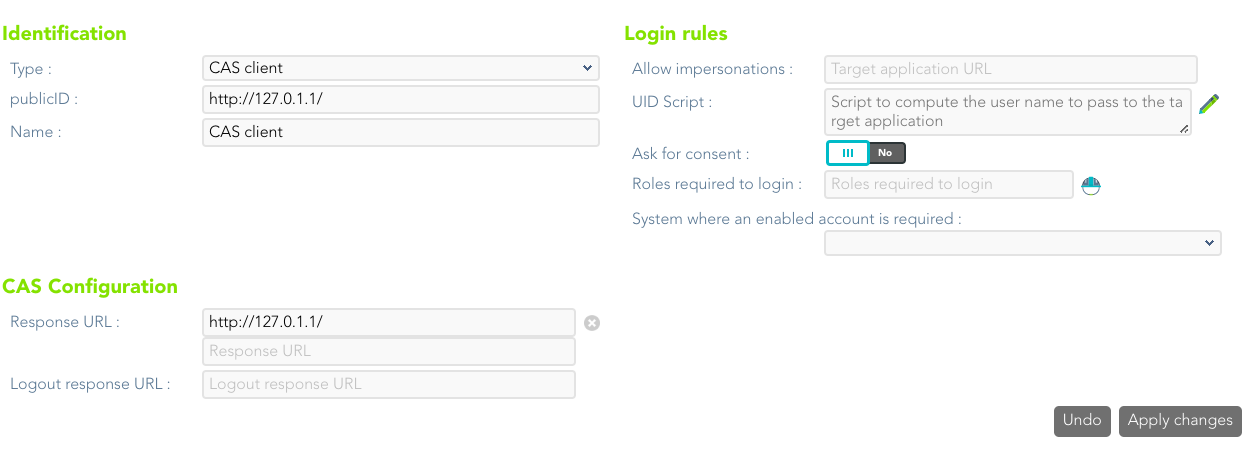](https://bookstack.soffid.com/uploads/images/gallery/2022-08/image-1661408241083.png)
# Radius
# Radius (Remote Authentication Dial-In User Service)
## Introduction
> The Radius protocol (Remote Authentication Dial-In User Service) is a networking protocol that authorizes and authenticates users who access a remote network.
---
[https://es.wikipedia.org/wiki/RADIUS](https://es.wikipedia.org/wiki/RADIUS)
# Radius architecture
## Introduction
[](https://bookstack.soffid.com/uploads/images/gallery/2022-08/image-1661408963698.png)
**Access Reject:** The user is unconditionally denied access to all requested network resources. Reasons may include failure to provide proof of identification or an unknown or inactive user account.
**Access Challenge:** Requests additional information from the user such as a secondary password, PIN, token, or card. Access Challenge is also used in more complex authentication dialogs where a secure tunnel is established between the user machine and the Radius Server in a way that the access credentials are hidden from the NAS.
**Access Accept:** The user is granted access. Once the user is authenticated, the RADIUS server will often check that the user is authorized to use the network service requested. A given user may be allowed to use a company's wireless network, but not its VPN service, for example. Again, this information may be stored locally on the RADIUS server, or may be looked up in an external source such as LDAP or Active Directory.
---
[https://en.wikipedia.org/wiki/RADIUS](https://en.wikipedia.org/wiki/RADIUS)
# Radius Example
## Service Provider
[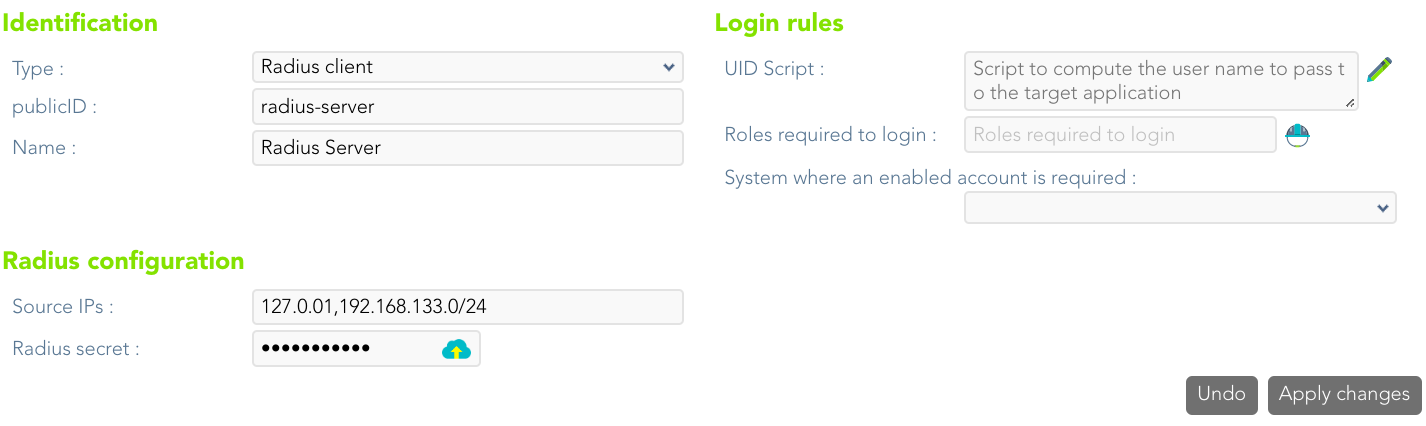](https://bookstack.soffid.com/uploads/images/gallery/2022-08/image-1661409204083.png)
# TACACS+
Tacacs+
# TACACS+ (The Terminal Access Controller Access-Control System Plus)
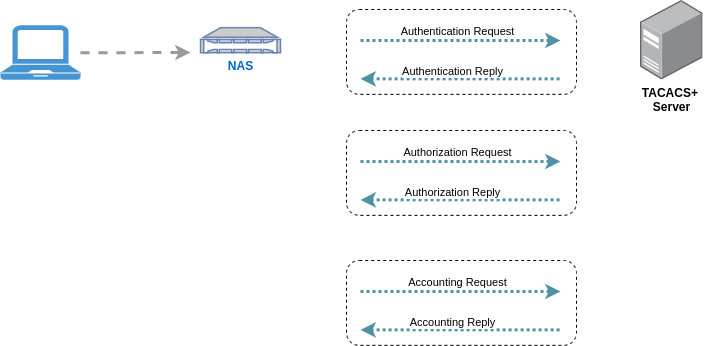
> TACACS+ is a security protocol that provides centralized validation of users who are attempting to gain access to a router or other devices.
>
> TACACS+ is a protocol for AAA services:
>
> - Authentication
> - Authorization
> - Accounting
---
[*https://www.rfc-editor.org/rfc/rfc8907.html*](https://www.rfc-editor.org/rfc/rfc8907.html)
# TACACS+ architecture
## Introduction
# TACACS+ Example
## Service Provider
[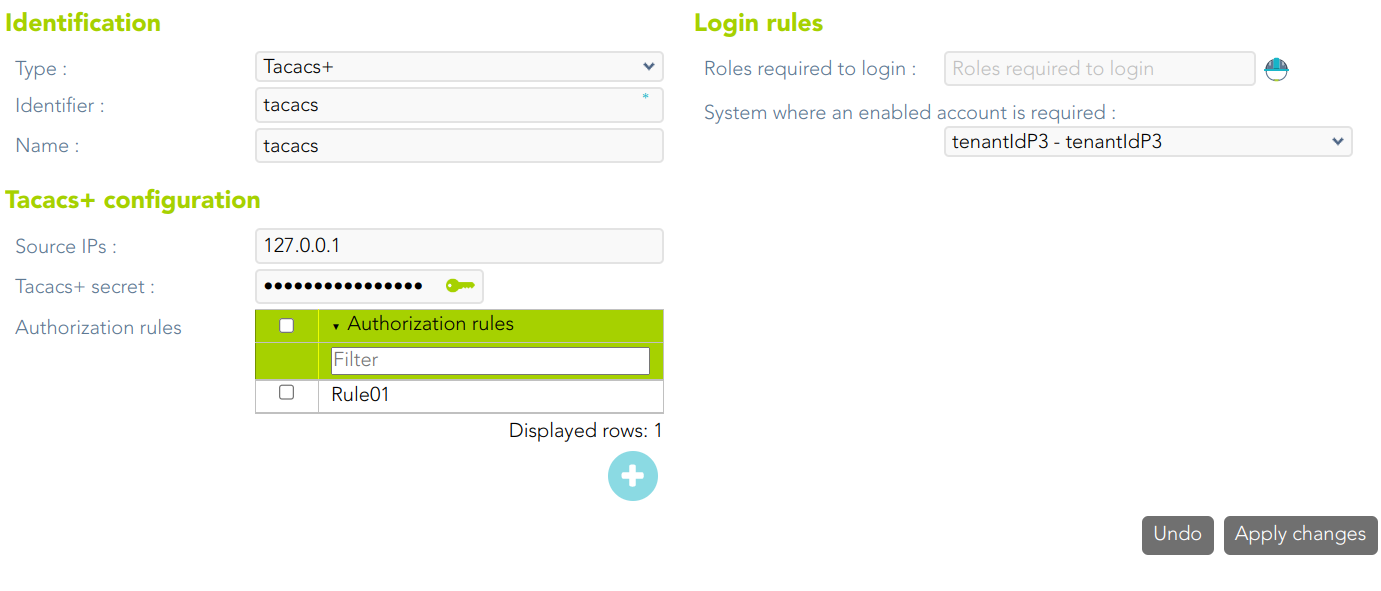](https://bookstack.soffid.com/uploads/images/gallery/2023-04/image-1681221680349.png)
## Information Systems
When a Tacacs Service Provider is created, Soffid creates an Information System
[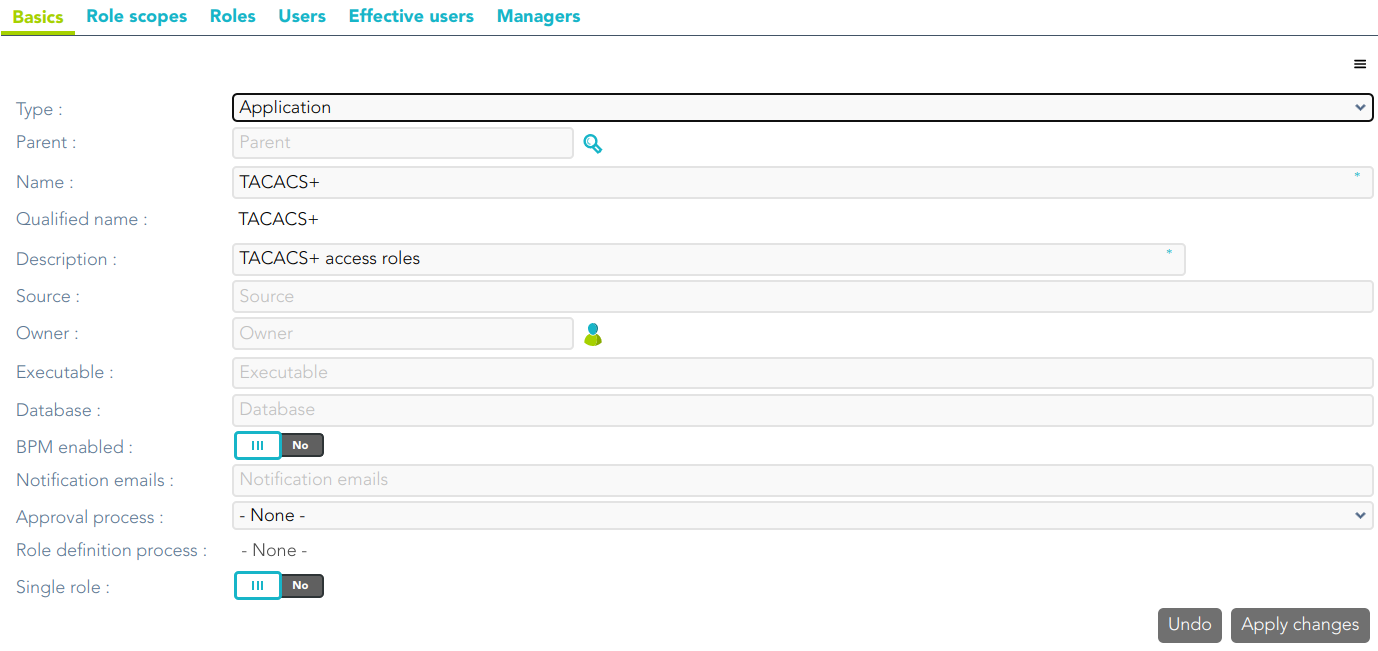](https://bookstack.soffid.com/uploads/images/gallery/2023-04/image-1681221732876.png)
There are some roles defined for this Information System (0: anonymous, 1: user, ....15: root)
[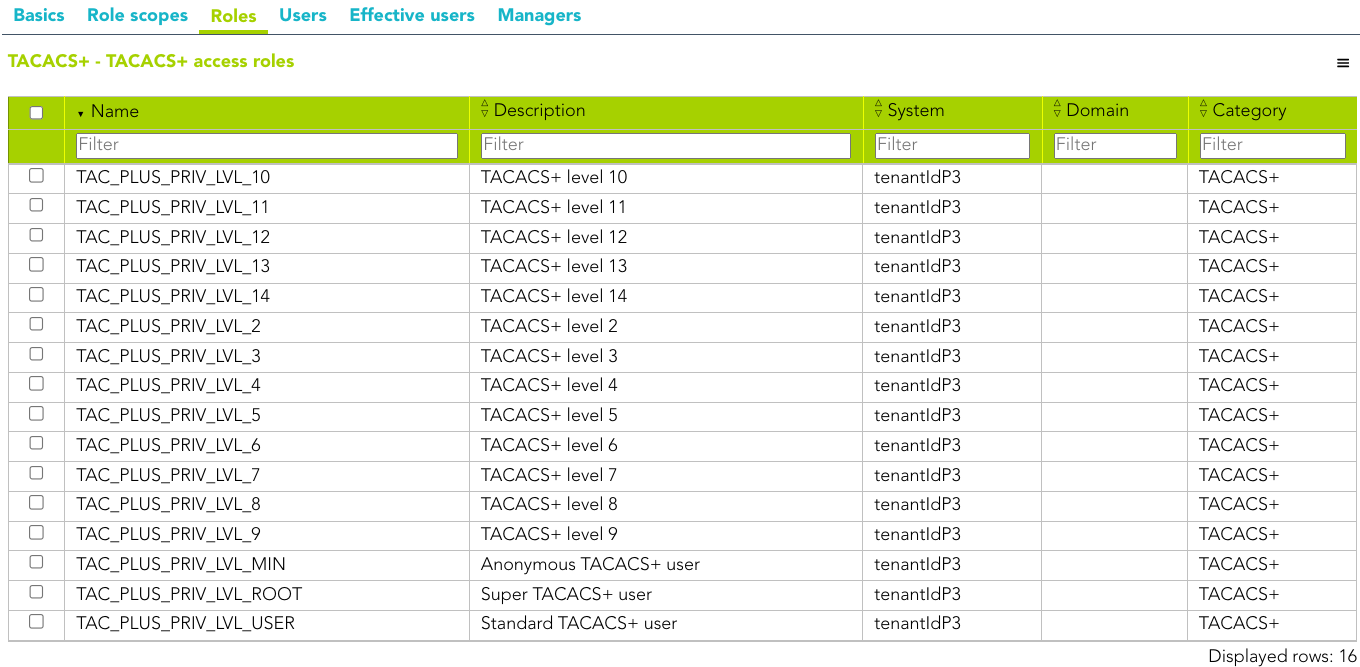](https://bookstack.soffid.com/uploads/images/gallery/2023-04/image-1681221803826.png)
# WS-Fed
WS-Federation
# WS-Fed
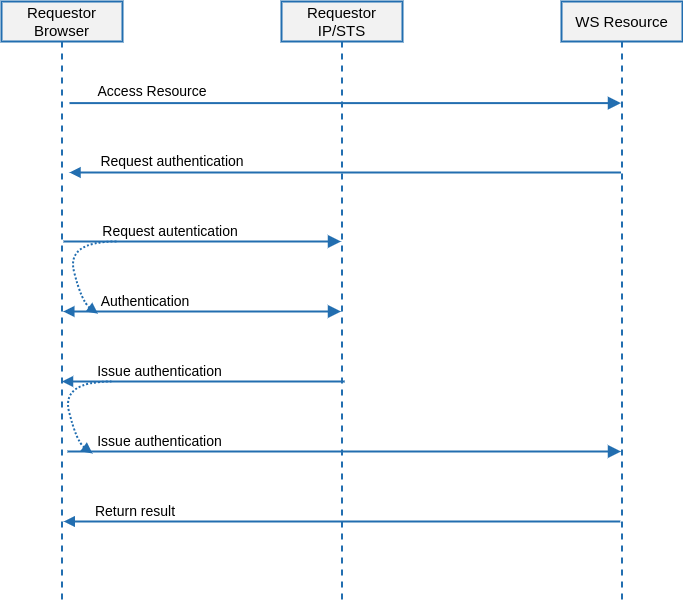
> WS-Federation (Web Services Federation) is an Identity Federation specification
>
> WS-Federation defines mechanisms for allowing different security realms to broker information on identities, identity attributes and authentication. WS-Federation focuses on federated identity and trusting authentication tokens across different realms, privileged password management is concerned with the security, control, and audit of high-risk account passwords within an IT environment
WS-Fed will only be used with **Exchange** and a few other applications.
---
*[https://en.wikipedia.org/wiki/WS-Federation](https://en.wikipedia.org/wiki/WS-Federation)*
# WS-Fed Architecture
## Introduction
WS-Federation (Web Services Federation) is an Identity Federation specification
### Sign-On
---
[*http://docs.oasis-open.org/wsfed/federation/v1.2/cd/ws-federation-1.2-spec-cd-01.html*](http://docs.oasis-open.org/wsfed/federation/v1.2/cd/ws-federation-1.2-spec-cd-01.html)
# WS-Fed Example
## Steps
### Attribute definition
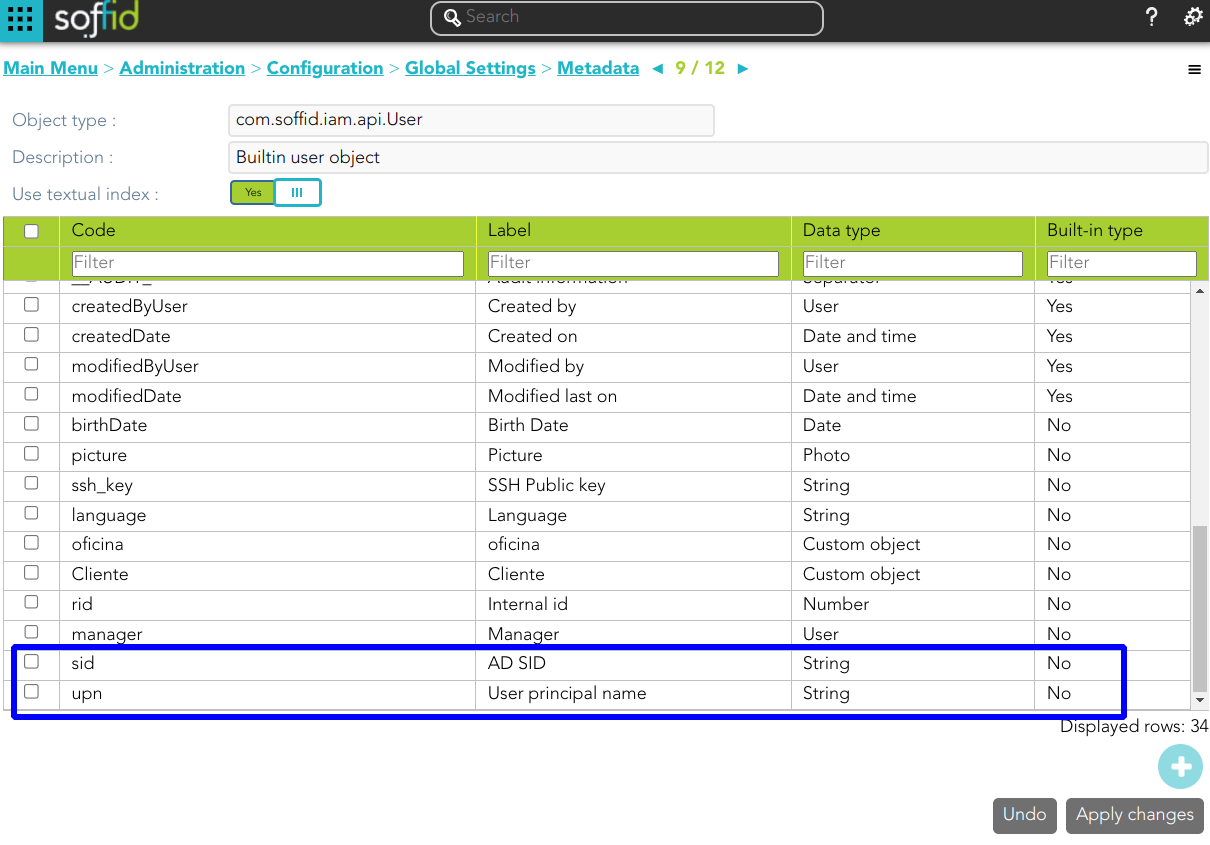
First of all, will be mandatory to create two new attributes
- User principal name
- AD SID
[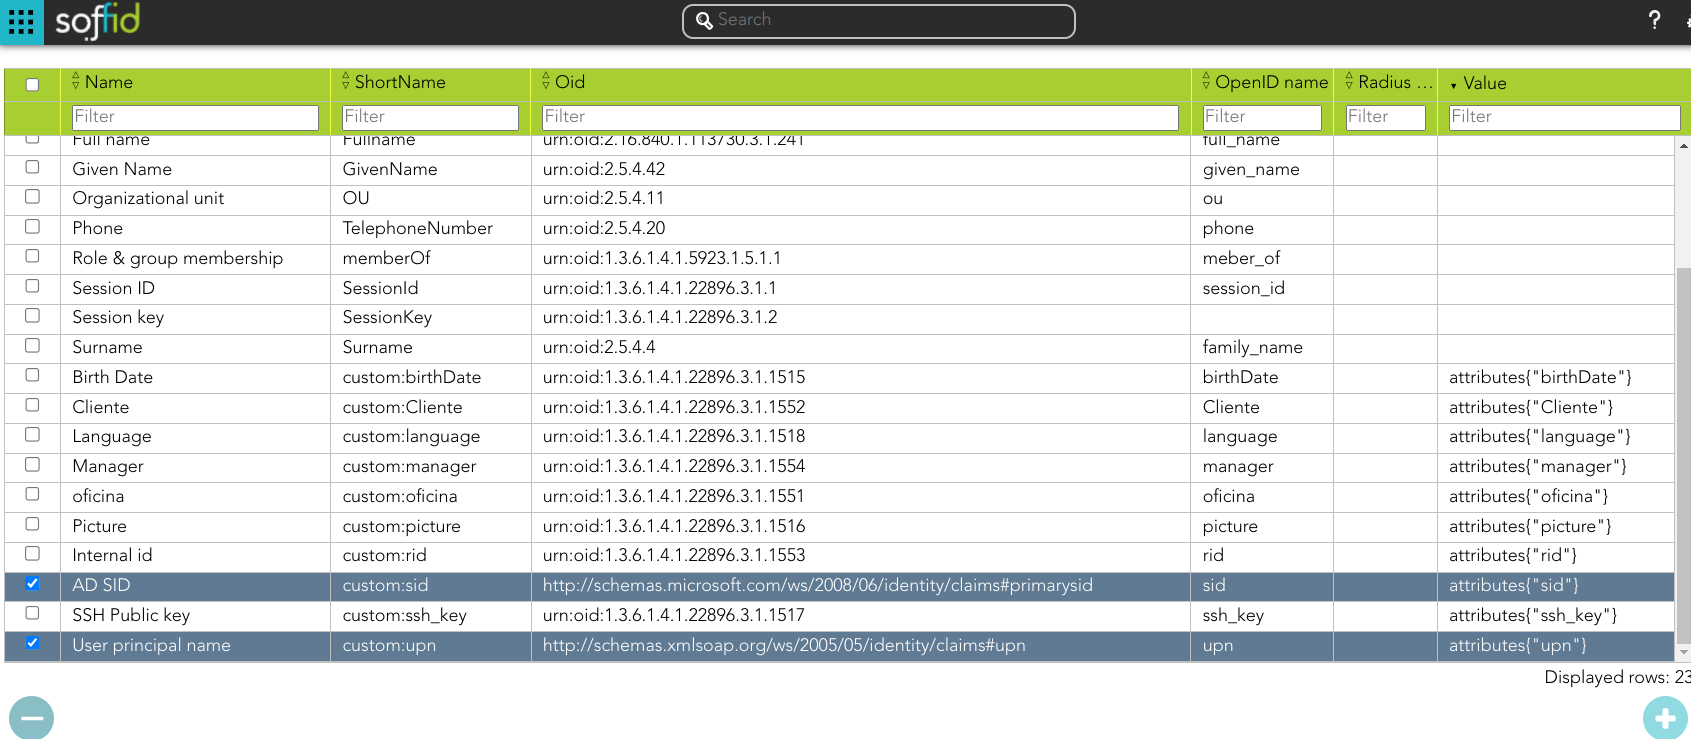](https://bookstack.soffid.com/uploads/images/gallery/2023-09/image-1695799061910.png)
Bear in mind, that those attributes have to be retrieved from the appropriate system:
[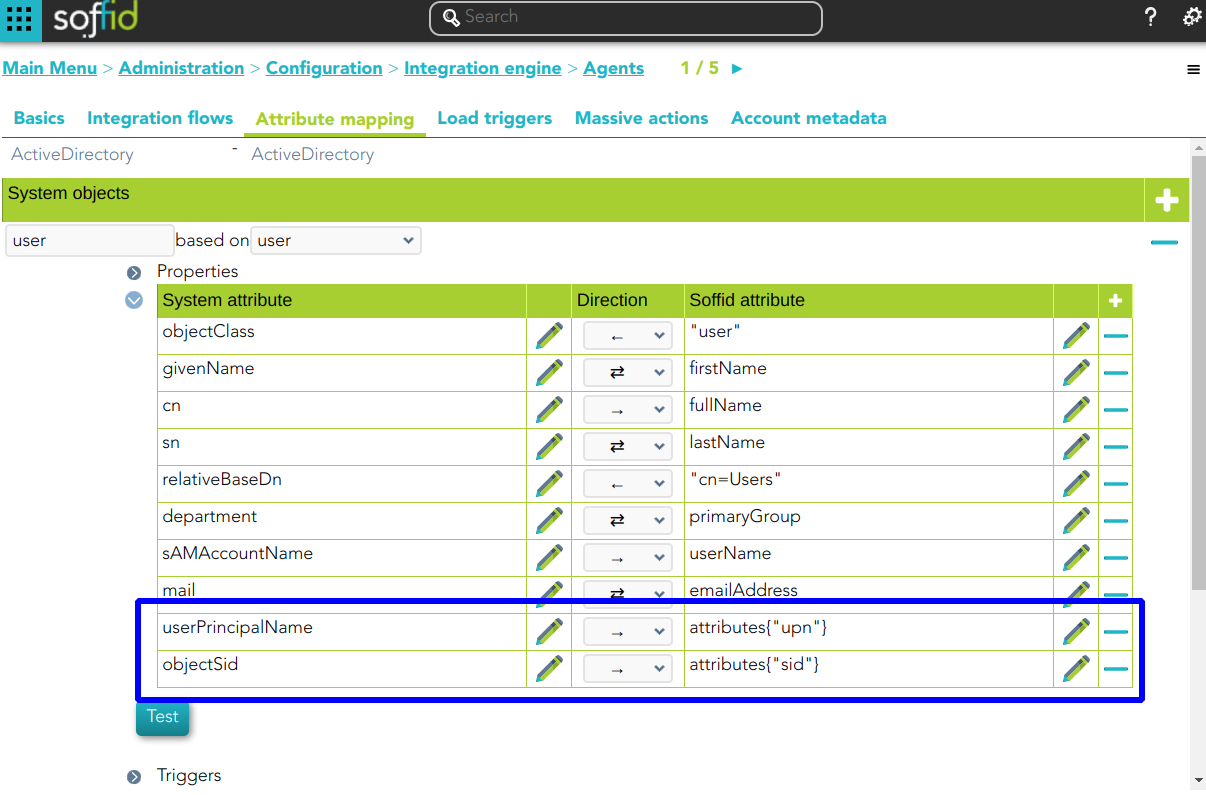](https://bookstack.soffid.com/uploads/images/gallery/2023-09/image-1695803778715.png)
And those attributes have to be defined in the object metadata:
[](https://bookstack.soffid.com/uploads/images/gallery/2023-09/image-1695804665489.png)
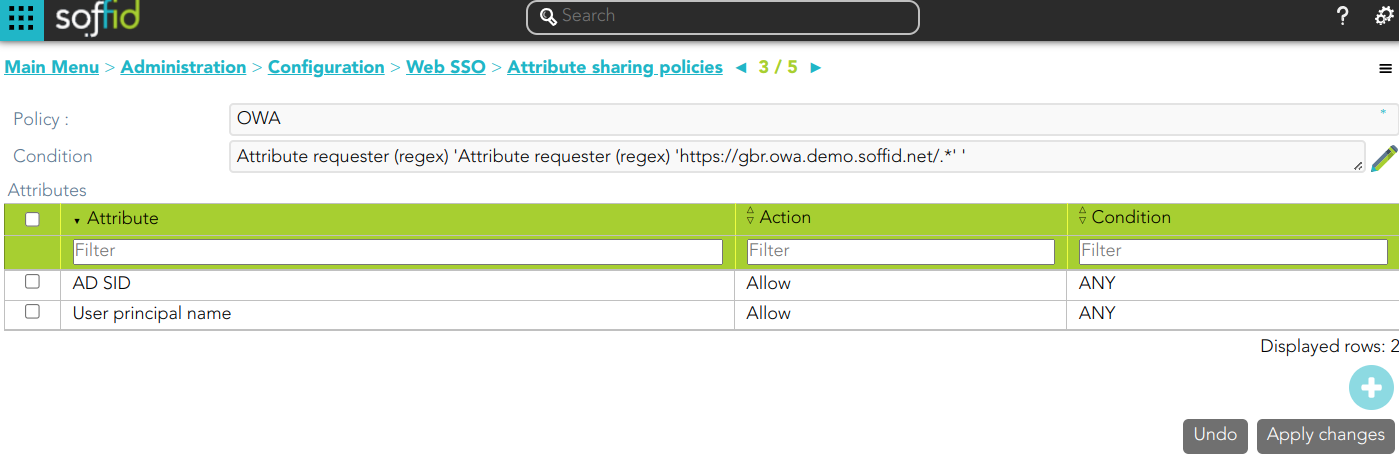
### Attribute sharing policies
Define the proper attribute policy
[](https://bookstack.soffid.com/uploads/images/gallery/2023-09/image-1695801239762.png)
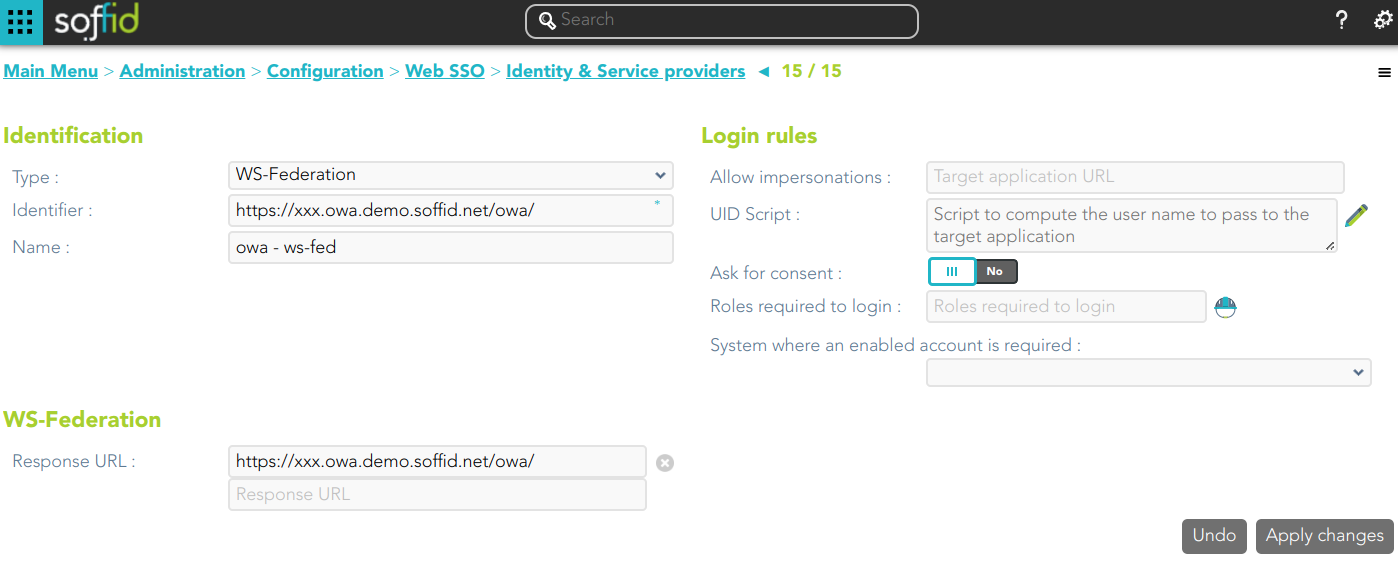
### Service Provider
[](https://bookstack.soffid.com/uploads/images/gallery/2023-09/image-1695801347498.png)
### Configure Exchange
Finally, you must configure the Exchange.
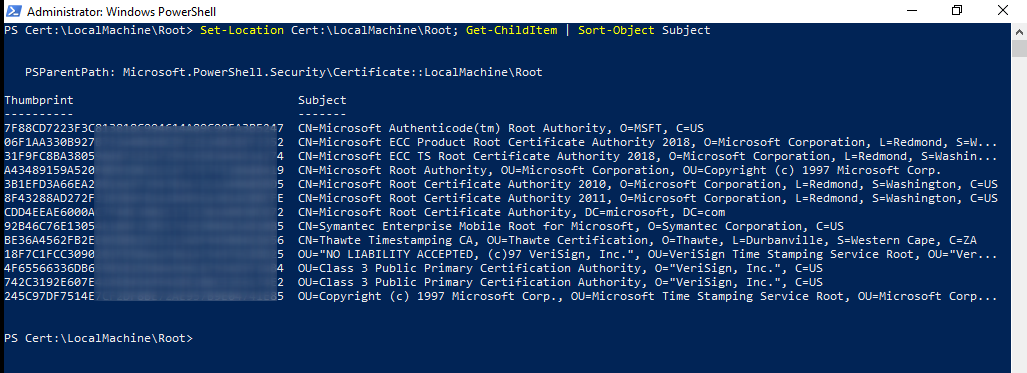
1.- Upload the SAML certificate to the certificate repository
2.- Search for the thumbprint of the certificate:
```
Set-Location Cert:\LocalMachine\Root; Get-ChildItem | Short-Object Subject
```
[](https://bookstack.soffid.com/uploads/images/gallery/2023-09/image-1695814095103.png)
3.- From the Exchange Management Shell, run:
```
Set-OrganizationConfig -AdfsIssuer https://gbr.idp.demo.soffid.net/profile/wsfed `
-AdfsAudienceUris "https://gbr.owa.demo.soffid.net/owa/","https://gbr.owa.demo.soffid.net/ecp/" `
-AdfsSignCertificateThumbprint "XXXXXXXXXXXXXXXX"
```
```
Set-OWAVirtualDirectory -Identity "OWA (Default Web Site)" -AdfsAuthentication $true `
-BasicAuthentication $false -DigestAuthentication $false -FormsAuthentication $false `
-WindowsAuthentication $false
```
```
Set-ECPVirtualDirectory -Identity "ECP (Default Web Site)" -AdfsAuthentication $true `
-BasicAuthentication $false -DigestAuthentication $false -FormsAuthentication $false `
-WindowsAuthentication $false
```
```
net stop was /y
```
```
net start w3svc
```
The server must be up to date. Otherwise WS-Fed will reject the response
# How to install Federation in Soffid?
## Installation
### Download
Please download the Soffid Federation add-on.
You could download it at the following link [http://www.soffid.com/download/enterprise/](http://www.soffid.com/download/enterprise/) if you have a Soffid user with authorization, or in the following [http://download.soffid.com/download/](http://download.soffid.com/download/) by registering.
### Upload
1. Once the Federation add-on is downloaded, please log in to IAM Console.
You need to be an administrator user of the Soffid console or a user with permission to upload addons.
It is recommended to upload the addons to the master, this is the way to maintain updated all, master and tenants if there are.
2. In the Soffid console, please go to:
`Main Menu > Administration > Configure Soffid > Global Settings > Plugins`
3. Then, click the add button (+) and pick the file and Soffild will upload the addon file.
4. Finally, when the addon is installed, it will be required to **restart the Soffid Console and the Sync Server.**
5. Once the Soffid console is restarted, you could check the plugin was uploaded properly on the plugins page:
`Main Menu > Administration > Configure Soffid > Global Settings > Plugins`
6. Now, you can set up the Federation.
# Web SSO
# ⏰ Getting started
## Introduction
---
To configure the Web SSO you must complete the next steps
**1. Attribute definition**: add the necessary attributes if they are not in the list.
**2. Attribute sharing policies**: define the proper attribute sharing policies to determine which attributes will be shared. The policies will apply to those IdPs that meet the conditions defined in the policy. You can define public policies that apply to all IdPs, or specific policies that only apply to certain IdPs.
**3. Identity & Service providers**: configure the identity and the service provider.
---
Soffid performs the validation in the following order
**1. Login**: first of all, it checks the login, if the access is correct then follow the next step
**2. Policies**: then, it checks the attribute sharing policies. Soffid checks all policies and applies the ones that meet the conditions.
**3. Attributes**: For policies that result in Yes or True, the attribute conditions will be evaluated. The attributes will be shared when the conditions are true.
# Attribute definition
## Description
The attribute definition page displays all the **auto-generated user attributes**. Those attributes will be the attributes to deliver from the identity providers to the service providers depending on the defined rules.
Soffid has a default implementation for common attributes like FullName or uid, but you can modify it by creating a custom script.
## Screen overview
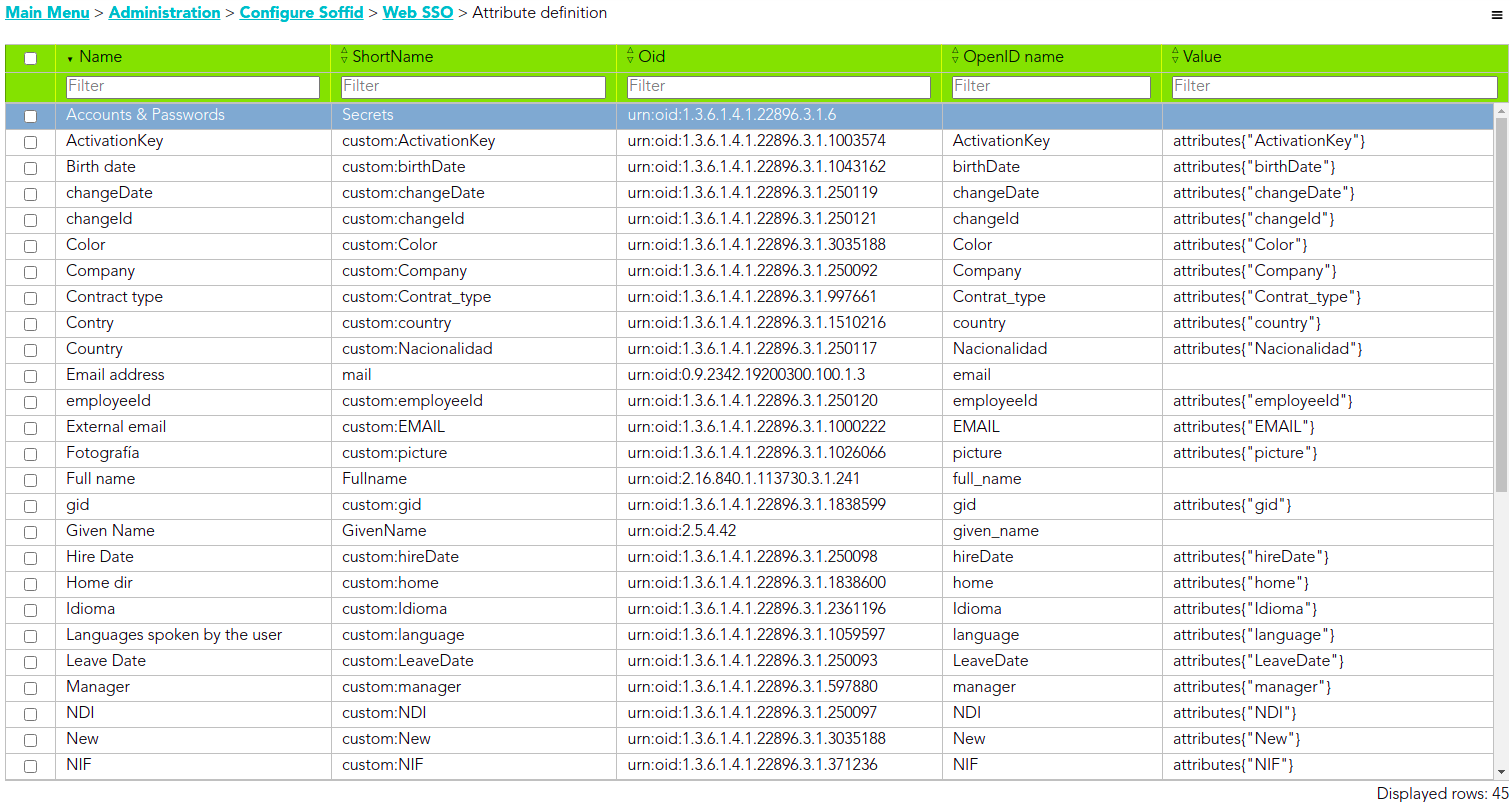
## Custom attributes
- **Name**: a descriptive name.
- **ShortName**: short name to be used by SAML 2 service providers (without blanks).
- **Oid**: OID to be used by SAML 1 and SAML 2 service providers.
- **OpenID name**: OpenID name to be used by OAuth and OpenID connect service provider.
- **Radius ID**: Radius ID name.
- **Value**: an attribute value. Allows you to define a BeanShell script to determine the value of the attribute.
## Examples
Soffid IdP has a default implementation for common attributes like FullName or uid, but you can modify it by creating a custom script. You can use the custom script to define the value of an attribute.
Examples to define the value of an attribute.
#### Example 1
Return full name in upper case:
```Java
return fullName.toUpperCase();
```
#### Example 2
Send one value if an attribute is blank. Otherwise, its value:
```Java
return
attributes{"company"} == null ||
attributes{"company"}.isEmpty() ?
"Soffid" :
attributes{"company"}
```
#### Example 3
Use serverService to fech the OU attribute of the account owned by the user in the Active Directory (AD) system:
```JSON
for (account: serverService.getUserAccounts(id, "ad")) {
return account{"attributes"}{"ou"};
}
return null;
```
## Actions
#### Attribute definition query
| **Add new**
| Allows you to add a new attribute definition in the system. You can choose that option on the hamburger menu or clicking the add button (+).
To add a new it is necessary to fill in the required fields.
|
| **Delete** | Allows you to remove one or more Attribute definitions by selecting one or more records and next clicking the button with the subtraction symbol (-).
To perform that action, Soffid will ask you for confirmation, you could confirm or cancel the operation.
|
| **Import** | Allows you to upload a CSV file with the attribute definition to add or update attribute definition to Soffid.
First, you need to pick up a CSV file, that CSV has to contain a specific configuration. Then you need to check the content to be loaded, it is allowed to choose if you want or not to load a specific attribute. And finally, you need to select the mappings for each column of the CSV file to import the data correctly and to click the Import button.
|
| **Download CSV file**
| Allows you to download a CSV file with the basic information of all attribute definitions.
|
#### Attribute definition detail
| **Delete**
| Allows you to save the data of a new Attribute definition or to update the data of a specific Attribute definition. To save the data it will be mandatory to fill in the required fields.
|
| **Save**
| Allows you to download a csv file with the basic information of the Attribute definition.
|
# Attribute sharing policies
## Description
After defining the attributes to publish, it’s required to write a policy that defines which attributes will be allowed to share with each service provider.
Soffid allows you to define security rules that apply to any attribute that should be delivered from identity providers to service providers.
## Custom attributes
- **Policy**: policy name.
- [**Condition** (policy)](#bkmrk-condition): a boolean expression that will be evaluated first. If this expression evaluates to false, the rule is completely ignored. It is used to evaluate to which applies the policy.
- **Attributes List**: allows you to add attributes with the proper condition for each one.
- **Attribute**: allows you to select an attribute from the attribute list. Those attributes are defined at the Attribute definition page.
- **Allow**: if selected value is Yes, the attribute will be shared when the condition was true. If selected value is No, the attribute will no be shared.
- [**Condition** (shared attributes)](#bkmrk-condition): a boolean expression to be evaluated. Allows you to customize a condition to evaluated and decide if the attribute should or not be delivered
#### Condition
It is a boolean expression to be evaluated. The condition will be evaluatuated when the Allow value was yes. You can use the conditions to configure the **conditions policy** and to configure the **shared attributes**.
The boolean operator are the follow:
- **ANY**: the result will always be true.
- **OR**: the result will be true if any of its subexpressions are true
- **AND**: the result will be true if all of its subexpressions are true.
- **Attribute requester**: the result will be true if the service provider public id equals the specified value. Optionally, the ignore case checkbox will ignore upper and lower case differences.
- **Attribute Issuer**: the result will be true if the identity provider public id equals the specified value. Optionally, the ignore case checkbox will ignore upper and lower case differences.
- **PrincipalName**: the result will be true if the principal name equals the specified value. Optionally, the ignore case checkbox will ignore upper and lower case differences. Mind that some service providers want to use the email address as PrincipalName. Some others use the account name or X.509 subject name.
- **Authentication Method**: the result will be true if the used authentication method equals the specified value. Optionally, the ignore case checkbox will ignore upper and lower case differences. Some useful values are:
- When using SAML, it contains the standard SAML identifier corresponding to the used authentication method. When multifactor authentication is used, it contains the strongest one:
- **urn:oasis:names:tc:SAML:2.0:ac:classes:PasswordProtectedTransport** password authentication (using SSL)
- **urn:oasis:names:tc:SAML:2.0:ac:classes:PreviousSession** already authenticated using previous session
- **urn:oasis:names:tc:SAML:2.0:ac:classes:X509** user has a X.509 certificate
- **urn:oasis:names:tc:SAML:2.0:ac:classes:TLSClient** X.509's public key has been verified using TLS protocol
- **urn:oasis:names:tc:SAML:2.0:ac:classes:TimeSyncToken** time synchronized token.
- **urn:oasis:names:tc:SAML:2.0:ac:classes:unspecified** unspecified protocol. This tag is used when Soffid IDP relies on third party identity providers that don't give information about the authentication method used, such as oAuth or OpenId.
- When using OpenID connect, the value can be any of:
- **P**: Password
- **PO**: Password + OneTimePassword
- **PC**: Password + Certificate
- **PE**: Password + External identity provider
- **K**: Kerberos token
- **KO**: Kerberos token + OneTimePassword
- **KC**: Kerberos token + Certificate
- **KE**: Kerberos token + External identity provider
- **E**: External identity providers
- **EO**: External identity provider + One time password
- **EC**: External identity provider + Certificate
- **O**: One time password
- **OC**: One time password + Certificate
- **C**: Certificate
- **Attribute value**: the result will be true if the related attribute has a specific value.
- **Attribute requester (regex)**: the result will be true if the service provider public id matches the specified regular expression.
- **Attribute issuer (regex)**: the result will be true if the identity provider public id matches the specified regular expression.
- **Principal name (regex)**: the result will be true if the principal name matches the specified regular expression. Mind that some service providers want to use the email address as PrincipalName. Some others use the account name or X.509 subject name.
- **Authentication method (regex)**: the result will be true if the used authentication method matches the specified regular expression.
- **Attribute value (regex)**: the result will be true if the related attribute has a specific value.
- **Attribute requester in entity group**: the result will be true if the service provider belongs to the specified group.
- **Attribute issuer in entity group**: the result will be true if the identity provider belongs to the specified group.
- **Attribute issuer nameID format**: the result will be true if the identity provider supports a specified identifier format.
- **Issuer entity attribute**: the result will be true if the identity provider metadata contains a specified attribute name and value.
- **Issuer entity attribute (regex)**: the result will be true if the identity provider metadata contains an attribute name and value that matches the specified regular expression.
- **Requester entity attribute**:the result will be true if the service provider metadata contains a specified attribute name and value.
- **Requester entity attribute (regex)**:the result will be true if the service provider metadata contains an attribute name and value that matches the specified regular expression.
- **Attribute requester nameID format**: the result will be true if the service provider supports a specified identifier format.
## Examples
Examples to define conditions in an attribute sharing policy:
#### Example 1
Give the email address and the user ID to any trusted service provider. We define this as a public policy.
[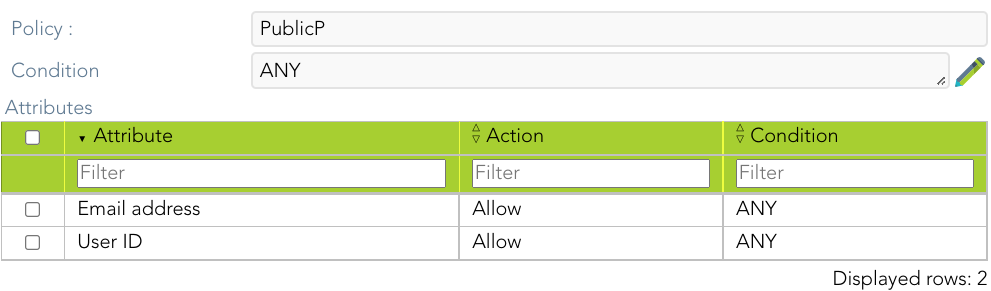](https://bookstack.soffid.com/uploads/images/gallery/2022-05/image-1651591008906.png)
[](https://bookstack.soffid.com/uploads/images/gallery/2022-05/image-1652347213357.png)
#### Example 2
Give some extra attributes, like full name and roles to any service provider belonging to soffid-demo entity group
[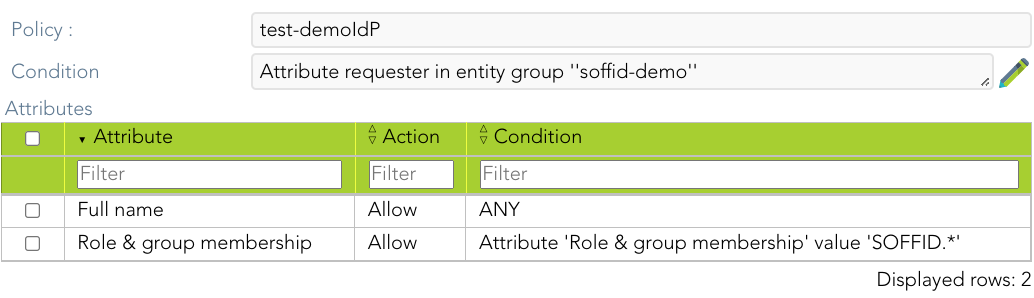](https://bookstack.soffid.com/uploads/images/gallery/2022-05/image-1651732807889.png)
[](https://bookstack.soffid.com/uploads/images/gallery/2022-05/image-1652347060000.png)
#### Example 3
Rule that will be applied to the service provider named “test’ or any other service provider whose name starts with “soffid-”
[](https://bookstack.soffid.com/uploads/images/gallery/2022-05/image-1652347158677.png)
[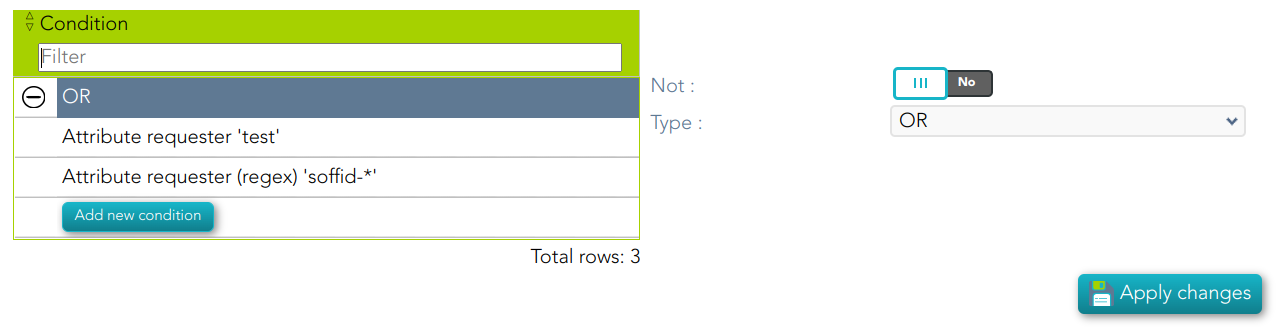](https://bookstack.soffid.com/uploads/images/gallery/2022-05/image-1652347180776.png)
## Actions
#### Attribute sharing policies query
| **Add new**
| Allows you to add a new Attribute sharing policies in the system. You can choose that option on the hamburger menu or clicking the add button (+).
To add a new it is necessary to fill in the required fields.
|
| **Delete**
| Allows you to remove one or more Attribute sharing policies by selecting one or more records and next clicking the button with the subtraction symbol (-).
To perform that action, Soffid will ask you for confirmation, you could confirm or cancel the operation.
|
| **Import** | Allows you to upload a CSV file with the ttribute sharing policies to add or update Attribute sharing policies to Soffid.
First, you need to pick up a CSV file, that CSV has to contain a specific configuration. Then you need to check the content to be loaded, it is allowed to choose if you want or not to load a specific attribute. And finally, you need to select the mappings for each column of the CSV file to import the data correctly and to click the Import button.
|
| **Download CSV file**
| Allows you to download a CSV file with the basic information of all Attribute sharing policies.
|
#### Attribute sharing policies detail
| **Delete**
| Allows you to save the data of a new Attribute sharing policy or to update the data of a specific Attribute sharing policy. To save the data it will be mandatory to fill in the required fields.
|
| **Apply changes**
| Allows you to save the data of a new Metada object or to update the data of a specific Metadata object. To save the data it will be mandatory to fill in the required fields.
|
| **Undo**
| Allows you to quit without applying any changes made.
|
# Identity & Service providers
## Description
Soffid Identity Federation addon helps administrators to manage an Identity Federation. With Soffid you can manage the whole federation security configuration, increasing the security while reducing the federation management costs. Soffid can also act as a Service Provider, serving identities to any SAML capable application server.
The main supported standard is [SAML](http://en.wikipedia.org/wiki/SAML_2.0). SAML allows to completely detach the identification process from web applications, known as Service Providers. With SAML, identification is performed by specialized servers known as Identity Providers. Additionaly, some other, less secure, but some times convenient protocols like [OAuth](https://en.wikipedia.org/wiki/OAuth) (Open Authorization) and [OpenID-Connect](https://en.wikipedia.org/wiki/OpenID_Connect) protocols are supported. Elder protocols like Openid (do not confuse with OpenID-Connect) are deprecated and no longer supported.
You can visit the Introduction page to find more information about the [federation members](https://bookstack.soffid.com/link/325#bkmrk-federation-members).
## Federation members
1. [Entity Group](#bkmrk-entity-group)
2. [Identity Provider](#bkmrk-identity-provider)
3. [Service Provider](#bkmrk-service-provider)
4. [Virtual Identity Provider](#bkmrk-virtual-identity-pro)
## Entity Group
{{@389}}
## Identity Provider
{{@390}}
## Service Provider
{{@392}}
## Virtual Identity Provider
{{@391}}
## Actions
#### Federation Tree view
| **Add group**
| Allows you to create a new Entity group. You can choose that option by clicking on the "Add group" button, then Soffid will display a new window with the fields to fullfil.
To add a new Entity group it will be mandatory to fill in the required fields and save or apply changes..
|
| **Add identity provider**
| Allows you to add a new Identity Provider. You must click the "Add identity provider" button, under the proper Entity Group and "Identity Provider" label, then Soffid will display a new window with the data to fulfill for new Identity Provider.
To add a new Identity provider it will be mandatory to fill in the required fields and save or apply changes..
|
| **Add virtual identity provider**
| Allows you to add a Virtual Identity Provider. You must click the "Add virtual identity provider" button, under the proper Identity Provider, which has to be a Soffid IdP, then Soffid will display a new window with the data to fulfill for the new Virtual identity provider.
To add a new Virtual identity provider it will be mandatory to fill in the required fields and save or apply changes..
|
#### Entity goup
##### List
| **Add new**
| You can add a new Entity groups by clicking on the add button (+). Then Soffid will display a new window and you need to fill in the required fields and save or apply changes.
|
| **Delete**
| Allows you to remove one or more Entity group by selecting one or more records and next clicking the button with the subtraction symbol (-).
To perform that action, Soffid will ask you for confirmation, you could confirm or cancel the operation.
|
##### Detail
| **Save** | Allows you to save the data of a new Entity group or to update the data of a specific Entity group.
To save the data it will be mandatory to fill in the required fields
|
| **Apply changes**
| Allows you to save the data of a new Entity group or to update the data of a specific Entity group and quit.
To save the data it will be mandatory to fill in the required fields.
|
| **Delete**
| Allows you to delete the Entity group. To delete a host you can click on the hamburger icon and then click the delete button (trash icon).
Soffid will ask you for confirmation to perform that action, you could confirm or cancel the operation.
|
| **Undo**
| Allows you to quit without applying any changes made.
|
#### Identity Provider
##### List
| **Add new**
| You can add a new Identity provider by clicking on the add button (+). Then Soffid will display a new window and you need to fill in the required fields and save or apply changes.
|
| **Delete**
| Allows you to remove one or more Identity providers by selecting one or more records and next clicking the button with the subtraction symbol (-).
To perform that action, Soffid will ask you for confirmation, you could confirm or cancel the operation.
|
##### Detail
| **Save** | Allows you to save the data of a new Identity provider or to update the data of a specific Identity provider.
To save the data it will be mandatory to fill in the required fields
|
| **Apply changes**
| Allows you to save the data of a new Identity provider or to update the data of a specific Identity provider and quit.
To save the data it will be mandatory to fill in the required fields.
|
| **Delete**
| Allows you to delete the Identity provider. To delete a host you can click on the hamburger icon and then click the delete button (trash icon).
Soffid will ask you for confirmation to perform that action, you could confirm or cancel the operation.
|
| **Undo**
| Allows you to quit without applying any changes made.
|
#### Service Provider
##### List
| **Add new**
| You can add a new Service provider by clicking on the add button (+). Then Soffid will display a new window and you need to fill in the required fields and save or apply changes.
|
| **Delete**
| Allows you to remove one or more Service providers by selecting one or more records and next clicking the button with the subtraction symbol (-).
To perform that action, Soffid will ask you for confirmation, you could confirm or cancel the operation.
|
##### Detail
| **Save** | Allows you to save the data of a new Service provider or to update the data of a specific Service provider.
To save the data it will be mandatory to fill in the required fields
|
| **Apply changes**
| Allows you to save the data of a new Identity provider or to update the data of a specific Service provider and quit.
To save the data it will be mandatory to fill in the required fields.
|
| **Delete**
| Allows you to delete the Service provider. To delete a host you can click on the hamburger icon and then click the delete button (trash icon).
Soffid will ask you for confirmation to perform that action, you could confirm or cancel the operation.
|
| **Undo**
| Allows you to quit without applying any changes made.
|
#### Virtyal Identity Provider
##### List
| **Add new**
| You can add a new Virtual identity provider by clicking on the add button (+). Then Soffid will display a new window and you need to fill in the required fields and save or apply changes.
|
| **Delete**
| Allows you to remove one or more Virtual identity providers by selecting one or more records and next clicking the button with the subtraction symbol (-).
To perform that action, Soffid will ask you for confirmation, you could confirm or cancel the operation.
|
##### Detail
| **Save** | Allows you to save the data of a new Virtual identity provider or to update the data of a specific Virtual identity provider.
To save the data it will be mandatory to fill in the required fields
|
| **Apply changes**
| Allows you to save the data of a new Virtual identity provider or to update the data of a specific Virtual identity provider and quit.
To save the data it will be mandatory to fill in the required fields.
|
| **Delete**
| Allows you to delete the Virtual identity provider. To delete a host you can click on the hamburger icon and then click the delete button (trash icon).
Soffid will ask you for confirmation to perform that action, you could confirm or cancel the operation.
|
| **Undo**
| Allows you to quit without applying any changes made.
|
---
[*https://en.wikipedia.org/wiki/Federated\_identity*](https://en.wikipedia.org/wiki/Federated_identity)
*[https://en.wikipedia.org/wiki/Identity\_provider](https://en.wikipedia.org/wiki/Identity_provider)*
[*https://en.wikipedia.org/wiki/Service\_provider*](https://en.wikipedia.org/wiki/Service_provider)
# Shared signals & events members
{{@1198}}
# Federation members
# Entity Group
### Description
An entity group is just like a folder that allows you to manage different kinds of federation members. One of the most common ways to group federation members is by trust level.
When you create an entity group, the Identity Providers and the Service Providers records will be displayed. Then you could add identities and services selecting the proper record.
### Screen overview
[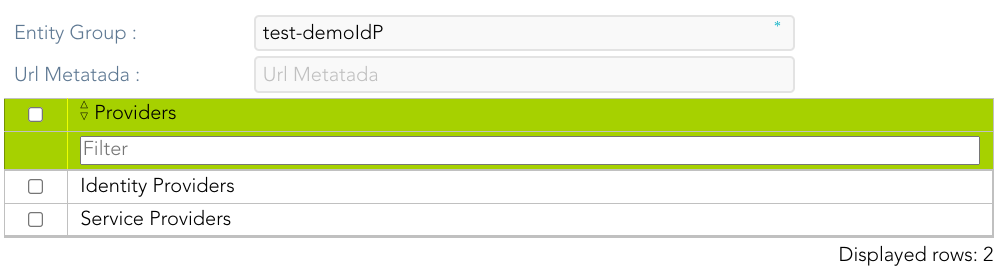](https://bookstack.soffid.com/uploads/images/gallery/2022-05/image-1652360950792.png)
### Standard attributes
- **Entity Group**: name of the group.
- **Url Metadata**: will be the URL of an external entity group when the entity group was esternal.
- **Providers**: by default, it creates two groups, an identity provider and a service provider.
# Identity Provider
### Description
> An identity provider (abbreviated IdP or IDP) is a system entity that creates, maintains, and manages identity information for principals and also provides authentication services to relying applications within a federation or distributed network.
An Identity Provider is responsible for identifying users. Also, it is responsible for giving service providers information regarding the identified user.
Soffid allows you to configure different identity providers, you can choose the best option for you by selecting the IdP type:
- [**Soffid IdP**:](#bkmrk-soffid-idp) identifies the identity provider implemented by Soffid. Soffid IdP implements both OpenID-Connect and SAML.
- [**External SAML IdP**](#bkmrk-external-saml-idp): is used to identify providers not implemented by Soffid. For instance, it could be an ADFS (Active Directory Federation Services) or Shibboleth identity provider.
- [**OpenID-Connect**](#bkmrk-openid-connect): is used for third-party identity providers, like ADFS.
- [**Facebook**](#bkmrk-facebook): if you select that option, oAuth2 will be used to identify Facebook users. You will need to register Soffid as a Facebook application to use it.
- [**Google**](#bkmrk-google): if you select that option OpenID-Connect will be used to identify Google users. You will need to register Soffid as a Google application to use it.
- [**LinkedIn**](#bkmrk-linkedin): if you select that option, oAuth2 will be used to identify LinkedIn users. You will need to register Soffid as a LinkedIn application to use it.
To create an identity provider, it is advisable to install a dedicated sync server. It can be configured as a proxy sync server as it does not need direct access to the Soffid database. Instead, it will connect to the main sync server to get users and federation information.
For more information about how to configure a dedicated sync server, you can visit the [Install Sync server page](https://bookstack.soffid.com/link/31#bkmrk-next-servers-configu).
### Standard attributes
The fields for each IdP type are detailed below:
#### Soffid IdP
##### Identification
- **publicID**: unique name to identify the identity provider. The name has to be the same as the Public ID of the Soffid Identity Provider agent.
- **Name**: friendly user name.
- **Organization**: company name of the external IdP.
- **Contact**: email address of the external IdP.
It will be mandatory to create an Agent (Soffid Identity Provider).
##### Service Configuration
- **Metadata**: the Metadata for an Identity Provider defines how this Identity Provider delivers its service:
- Which security algorithms does it support.
- The public portion of it's signing and encrypting keys.
- The SAML protocols do it support.
- The URL of each SAML protocol endpoint.
- Contact information.
The Metadata is the information that any application needs to use the IdP. That is an XML file that contains the public encryption keys and the services provided
Leave it blank as Soffid IdP will fulfill it for you.
The metadata will be created when the network data and SAML Security data. Restarting the sync server will be necessary to fill in the Metadata.
##### Network
- **Host name**: public hostname that will be used by users and service providers. The full qualified name should be used.
- **Allow IdP to be included inside an IFRAME**: Soffid allows you to configure the Identity Provider to be incluided within a IFRAME. If this option is updated, the Sync Server must be restarted. *This attribute will be available in Federation addon 3.5.37 or higher.*
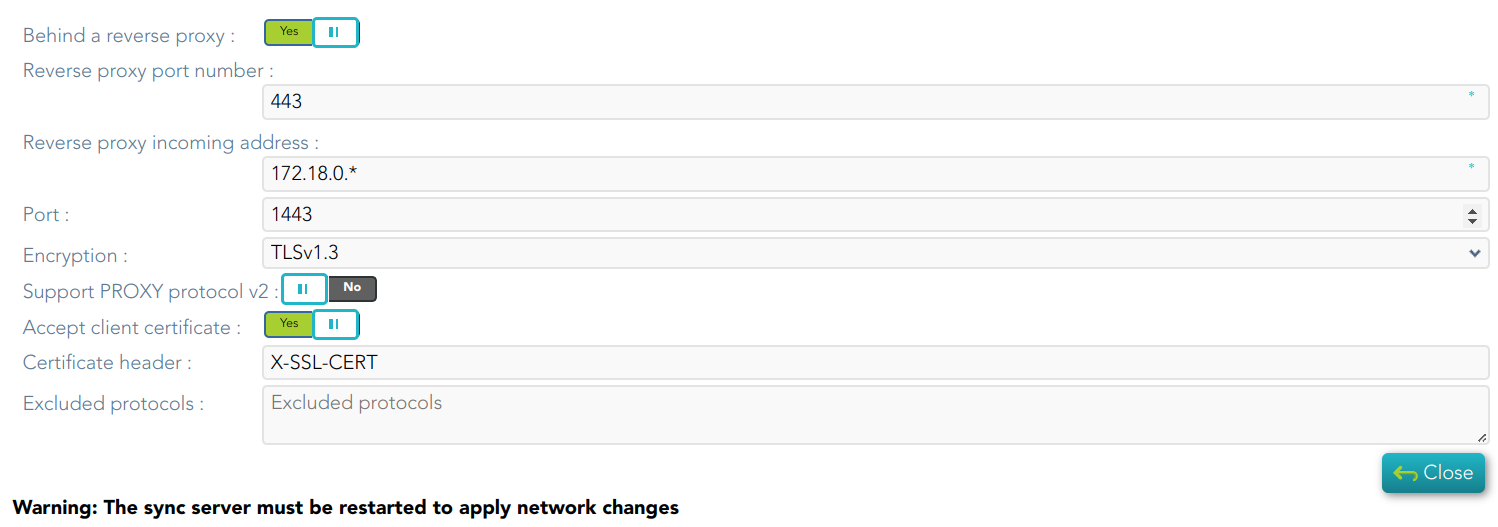
- **Network ports**:
- **Behind a reverse proxy**
- **Reverse proxy port number**: port where the reverse proxy is listening.
- **Reverse proxy incoming address**: IP addresses allowed to make calls to the reverse proxy.
- **Port**: TCP port number used by the identity provider. By default, TLS will be used (default 1443).
- **Encryption**: encryption type is only allowed behind a reverse proxy.
- **Support PROXY protocol v2**: protocol between the reverse proxy and the Identity Provider.
- **Accept client certificate**
- **Certificate header**: certificate data header (only behind a reverse proxy).
- **Excluded protocols**: encryption protocols to be excluded.
💻 Image
[](https://bookstack.soffid.com/uploads/images/gallery/2024-02/image-1709029065265.png)
**Server certificate management:** there are two options for certificate management. You can visit the [Server certificate management page](https://bookstack.soffid.com/books/federation/page/server-certificate-management "Server certificate management") for more information.
##### SAML Security
- **PublicKey**:
- Clicking on the **Generates public / private key** button, a new private key pair will be generated. Once the private key pair is generated, you could generate a certificate request file, also known as PKC#10 or CSR file. The certificate authority will be able to create a certificate for you using this certificate request. Once you have created the public/private key, you could run other new functions:
- **Change public/private key**: allows you to change the public/private key generated previously.
- **Delete public/private key**: allows you to delete the public/private key generated previously.
- **Generate PKCS10**: generates a PKCS10 file (Certification request standard).
- Clicking on the **Upload PKCS12 file** button it will be able to upload a PKCS#12 file. That file must to contain the private an public keys and the server certificate as well. Mind that PKCS#12 file use to be protected by a PIN.
- **Certificate chain**: text certificate chain created with one of the previous options.
##### Session management
- **Session timeout (secs)**: time in seconds that will take the session. If the user has been authenticated, and later is requested to authenticate again, the user will be authenticated without any intervention as long as the timeout has not been elapsed.
- **oAuth Session timeout (secs)**: time in seconds that will take the oAuth session. The oAuth has its own life cycle, regardless the session timeout.
- **Maximum session duration (secs) :** maximum time during which session can be renewed
- **SSO Cookie name**: name of the cookie that will keep the session id, you can change the name. This SSO cookie is not really needed, as the identity provider will store a session cookie to track the SSO session. This SSO cookie is needed in two circumstances:
- When the identity provider is restarted, the session cookie is lost. This SSO Cookie allows the identity provider to restart the lost session.
- When you have more than one identity provider instance, this cookie allows all the identity providers to handle the session as if only was one identity provider. The SSO cookie can be allocated by any identity provider, and it will be accepted by any other one.
- **SSO Cookie domain**: is needed when you have more than one identity provider instance and they are using different host names. If all the identity providers are serving the same virtual host name, the SSO Cookie domain will be needed.
##### Authentication
- **Authentication methods**: matrix to define the authentication methods that will be required to successfully authenticate the user. Each row indicates the first authentication method, and each column indicates the second factor to use.
- Password
- Kerberos
- External IdP
- OTP
- Email
- SMS
- PIN Certificate
- FIDO
- Push
- **Adaptive authentication**: that option allows you to add an additional authentication matrix which will be run when the condition defined was complied with. That is the way to change the authentication method depending on the environment.
- **Description**: rule description to identify it.
- **Condition**: script to enable that rule. The result of the rule must be true or false. There are some available vars to create the condition. You can visit the [Condition for Adaptive authentication page](https://bookstack.soffid.com/books/federation/page/condition-for-adaptive-authentication "Condition for Adaptive authentication") for more information and some examples.
- **Matrix**: to define the authentication methods that will be required to successfully authenticate the user. Each row indicates the first authentication method, and each column indicates the second factor to use.
- **Always ask for credentials:** if checked (the selected value is Yes), the IdP will always request credentials from users who meet the condition defined in this rule.
- **Register OTP when required:** if it is checked (selected value is Yes), Soffid will allow registering the OTP to users who meet the condition and do not have one previously.
- **Kerberos domain**: allows you to pick up a file to configure the Kerberos authentication method. For more information, you can visit the [How to enable Kerberos authentication page](https://bookstack.soffid.com/books/federation/page/how-to-enable-kerberos-authentication "How to enable kerberos authentication").
##### Advanced Authentication
- **Allow user to recover password**: if it is checked (selected value is Yes), and the password recovery addon is installed, the user will be allowed to execute the password recovery mechanism.
- **Register OTP when required:** if it is checked (selected value is Yes), Soffid will allow to register the new OTP to the user during the login process.
- **Allow user to self-register**: if it is checked (selected value is Yes), the user will be allowed to register itself. This option sends an email to the user to verify the email address is correct, and then lets the user to enter a new password.
- **Registration process:** workflow selected to create the new identity.
- **User Type**: identifies the password policy that is to be applied. More information on this link [User Type.](https://bookstack.soffid.com/books/soffid-3-reference-guide/page/user-type "User Type")
- **Primary Group**: select which organization unit this user belongs to.
- **Register identities identified by external IdPs**: allows Soffid IdP to automatically register a new identity when a user authenticates with a third-party IdP, and this identity does not exist yet in Soffid database. Furthermore, at the third party IdP configuration page, one can tune how this identity is going to be created.
- **Store last user name in browser**: allows the browser to save the last user name when Yes is selected.
- **Enable reCaptcha v3 service**: *(\*)* helps to keep save your website. You can enable it by selecting the Yes option. When you select the Yes option, you must fill in the following fields:
- **Captcha site key**: this key is used to invoke the reCAPTCHA service
- **Captcha site secret**: the secret key to communicate your web site with reCAPTCHA service. This secret key authorizes the communication.
- **Captcha threshold (1 for highest confidence, 0 for low confidence)**:
##### Profiles
A profile is a protocol or subset of protocols implemented by the Identity Provider. There are some accepted protocols, those allows a custom config dependent on the selected profile.
You can visit the [Profiles chapter](https://bookstack.soffid.com/books/federation/chapter/profiles) for more information about each one.
##### Look and feel
Soffid allows you to personalize your login page by adding some style elements, as well as header and footer elements.
- **Logo**: this logo will be displayed for user in Windows desktop.
- **CSS Style**: allows you to add a CSS style for your login page.
- **Html header**: allows you to add an Html header.
- **Html footer**: allows you to add an Html footer.
- **Language (2 characters code)**
#### External SAML IdP
##### Identification
- **publicID**: unique name to identify the identity provider.
- **Name**: friendly user name.
- **Organization**: company name of the external IdP.
- **Contact**: email address of the external IdP.
##### Service Configuration
- **Metadata**: the Metadata for an Identity Provider defines how this Identity Provider delivers its service:
- Which security algorithms does it support.
- The public portion of it's signing and encrypting keys.
- The SAML protocols does it support.
- The URL of each SAML protocol endpoint.
- Contact information.
The Metadata is the information that any application need to use the IdP. That is an XML file that contains the public encryption keys and the services provided
Leave it blank as Soffid IdP will fulfill it for you.
##### Login Rules
- **User regular expression**: regular expression to detect users of this identity provider.
- **Login hint script**: script to help to login. Return the text to help.
- **Identity provisioning script**: script to bind or register a new identity. Return the user name of the owner identity for the authenticated account.
#### OpenID-Connect
##### Service Configuration
- **Metadata**: there are some required parameters:
- **authorization\_endpoint**: contains the oAuth endpoint to forward the user to get the authorization token.
- **token\_endpoint**: contains the oAuth endpoint to get the access token, based on the authorization token got at previous step.
- **userinfo\_endpoint**: if remote IdP is OpenID-connect compliant, the token endpoint should have sent an access token along a JWT OpenID token containing user claims. If this is not the case, Soffid will use this user\_info endpoint to fetch user claims. This mechanism is needed for oAuth2 servers.
- **scopes\_sopported**: The list of scopes specified here will be used at first step, when redirecting the user to the authorization endpoint.
|
| ```
{
"authorization_endpoint": "https://server/oauth2/auth",
"token_endpoint": "https://server/oauth2/token",
"userinfo_endpoint": "https://server/oauth2/userinfo",
"scopes_supported": [ "openid","email","profile"]
}
```
|
|
- **oAuth key**: is the identificator token generated by the oAuth server.
- **oAuth secret**: is the secret generated by the oAuth server.
The Metadata is the information that any application need to use the IdP. That is an XML file that contains the public encryption keys and the services provided
##### Login rules
- **User regular expression**: regular expression to detect users of this identity provider.
- **Login hint script**: script to help to login. Return the text to help.
- **Identity provisioning script**: script to bind or register a new identity. Return the user name of the owner identity for the authenticated account.
|
| ```Java
sn = attributes{"screen_name"};
i = sn.indexOf(" ");
if (i> 0) {
user.firstName = sn.substring(0, i);
user.lastName = sn.substring(i+1);
} else {
user.firstName = "?";
user.lastName = sn;
}
return attributes{"name"};
```
|
|
#### Facebook
##### Identification
- **publicID**: unique name to identify the identity provider. Soffid will fulfill wint the Facebook URL.
- **Name**: friendly user name.
- **Organization**: company name of the external IdP.
- **Contact**: email address of the external IdP.
##### Service Configuration
- **Click here to obtain a client id and client secret**: allows you to get the oAuth key and secret.
- **oAuth key**: is the identificator token generated by the oAuth server.
- **oAuth secret**: is the secret generated by the oAuth server.
##### Login rules
- **User regular expression**: regular expression to detect users of this identity provider.
- **Login hint script**: script to help to login. Return the text to help.
- **Identity provisioning script**: script to bind or register a new identity. Return the user name of the owner identity for the authenticated account.
#### Google
##### Identification
- **publicID**: unique name to identify the identity provider. Soffid will fulfill wint the Google URL.
- **Name**: friendly user name.
- **Organization**: company name of the external IdP.
- **Contact**: email address of the external IdP.
##### Service Configuration
- **Click here to obtain a client id and client secret**: allows you to get the oAuth key and secret.
- **oAuth key**: is the identificator token generated by the oAuth server.
- **oAuth secret**: is the secret generated by the oAuth server.
##### Login rules
- **User regular expression**: regular expression to detect users of this identity provider.
- **Login hint script**: script to help to login. Return the text to help.
- **Identity provisioning script**: script to bind or register a new identity. Return the user name of the owner identity for the authenticated account.
#### Linkedin
##### Identification
- **publicID**: unique name to identify the identity provider. Soffid will fulfill wint the Linkedin URL.
- **Name**: friendly user name.
- **Organization**: company name of the external IdP.
- **Contact**: email address of the external IdP.
##### Service Configuration
- **Click here to obtain a client id and client secret**: allows you to get the oAuth key and secret.
- **oAuth key**: is the identificator token generated by the oAuth server.
- **oAuth secret**: is the secret generated by the oAuth server.
##### Login rules
- **User regular expression**: regular expression to detect users of this identity provider.
- **Login hint script**: script to help to login. Return the text to help.
- **Identity provisioning script**: script to bind or register a new identity. Return the user name of the owner identity for the authenticated account.
---
[*(\*) What is CAPTCHA --> https://support.google.com/a/answer/1217728?hl=en*](https://support.google.com/a/answer/1217728?hl=en)
*[(\*) ](https://support.google.com/a/answer/1217728?hl=en)https://www.google.com/recaptcha/about/*
# Service Provider
### Definition
The Service Providers are standard applications that rely on Identity Providers to let the users log in.
#### Join federation
To join the federation, the service provider management team must deliver its "Metadata". The service provider Metadata describes how the service providers behave:
- Which security algorithms does it support.
- The public portion of its signing and encrypting keys.
- The SAML protocol does it support.
- The URL of each SAML protocol endpoint.
- Contact information.
### Standard attributes
To see more information about the service providers types and attributes, you can check the [Service providers](https://bookstack.soffid.com/books/soffid-4-reference-guide/page/service-providers-addon-federation "Service Providers (addon federation)") page.
# Virtual Identity Provider
### Definition
A single identity provider usually offers different profiles or service levels to diffeferent service provider. To be able to define this behavior, any Identity Provider can be split into many virtual identity providers. Those identity providers will be served by the same actual identity provider, but they will have different profile configurations.
### Standard attributes
#### Identification
- **publicID**: unique name to identify the identity provider.
- **Name**: user friendly name to identify the identity provider.
- **Organization**: company name of the external IdP.
- **Contact**: email address of the external IdP.
#### Service configuration
- **Metadata**: the Metadata for an Identity Provider defines how this Identity Provider delivers its service:
- Which security algorithms does it support.
- The public portion of it's signing and encrypting keys.
- The SAML protocols does it support.
- The URL of each SAML protocol endpoint.
- Contact information.
Leave it blank as Soffid IdP will fulfill it for you.
#### SAML Security
- **Public key**:
- **Generate public/private key**:
- **Delete public/private key**: allows you to delete the public/private key generated previously.
- **Generate PKCS10**: generates a PKCS10 file (Certification request standard)
- **Upload PKCS12 file**: allows you to upload a PKCS#12 file. That file must contain the private and public kesus and the server certificate as weel. Mind that PKCS#12 file use to be protected by a PIN.
- **Certificate chain**: text certificate chain created with one of the previous options.
#### Authentication
- **Authentication methods**: matrix to define the authentication methods that will be required to successfully authenticate the user. Each row indicates the first authentication method, and each column indicates the second factor to use.
- **Adaptive authentication**: that option allows you to add additional authentication matrix which will be run when the condition defined was comply.
- **Description**: rule description to identify it.
- **Condition**: script to enable that rule. The result of the rule must be true or false. There are some available vars to create the condition. You can visit the [Condition for Adaptive authentication page](https://bookstack.soffid.com/books/federation/page/condition-for-adaptive-authentication "Condition for Adaptive authentication") for more information and some examples.
- **Matrix**: to define the authentication methods that will be required to successfully authenticate the user. Each row indicates the first authentication method, and each column indicates the second factor to use.
#### Advances authentication
- **Allow user to recover password**: if it is checked (selected value is Yes), and the password recovery addon is installed, the user will be allowed to execute the password recovery mechanism.
- **Allow user to self-register**: if it is checked (selected value is Yes), the user will be allowed to register itself. This option sends an email to the user to verify the email address is correct, and then lets the user to enter a new password.
- **Registet identities identified by external IdPs**: allows Soffid IdP to automatically register a new identity when a user authenticates with a third-party IdP, and this identity does not exist yet in Soffid database. Furthermore, at the third party IdP configuration page, one can tune how this identity is going to be created.
#### Profiles
A profile is a protocol implemented by the Identity Provider. There are some accepted protocols, those allows a custom config dependent on the selected profile
- OpenIDProfile
- SAML1ArtifactResolutionProfile
- SAML1AttributeQueryProfile
- SAML2ArtifactResolutionProfile
- SAML2AttributeQueryProfile
- SAML2ECPProfile
- SAML2SSOProfile
You can visit the [Profiles chapter](https://bookstack.soffid.com/books/federation/chapter/profiles) for more information about each one.
#### Service Providers
It will be necessary to bind any service provider to the virtual identity provider. When no such bind exists for a service provider, the actual identity provider profile configuration applies.
# Profiles
# Profiles
## Description
A profile is a protocol or subset of protocols implemented by the Identity Provider. There are some accepted protocols, those allows a custom config dependent on the selected profile.
The accepted protocols are the following:
1. [OpenIDProfile](https://bookstack.soffid.com/books/federation/page/openidprofile "OpenIDProfile")
2. [SAML1ArtifactResolutionProfile](https://bookstack.soffid.com/books/federation/page/saml1artifactresolutionprofile "SAML1ArtifactResolutionProfile")
3. [SAML1AttributeQueryProfile](https://bookstack.soffid.com/books/federation/page/saml1attributequeryprofile "SAML1AttributeQueryProfile")
4. [SAML2ArtifactResolutionProfile](https://bookstack.soffid.com/books/federation/page/saml2artifactresolutionprofile "SAML2ArtifactResolutionProfile")
5. [SAML2AttributeQueryProfile](https://bookstack.soffid.com/books/federation/page/saml2attributequeryprofile "SAML2AttributeQueryProfile")
6. [SAML2ECPProfile](https://bookstack.soffid.com/books/federation/page/saml2ecpprofile "SAML2ECPProfile")
7. [SAML2SSOProfile](https://bookstack.soffid.com/books/federation/page/saml2ssoprofile "SAML2SSOProfile")
8. [CAS](https://bookstack.soffid.com/books/federation/page/cas)
9. [Radius](https://bookstack.soffid.com/books/federation/page/radius)
10. Tacacs+
11. Ws-Federation
12. Shared signals & events
13. [Esso](https://bookstack.soffid.com/books/federation/page/esso)
## Screen overview
[](https://bookstack.soffid.com/uploads/images/gallery/2024-09/XvjN1I1K1bTKb77c-image.png)
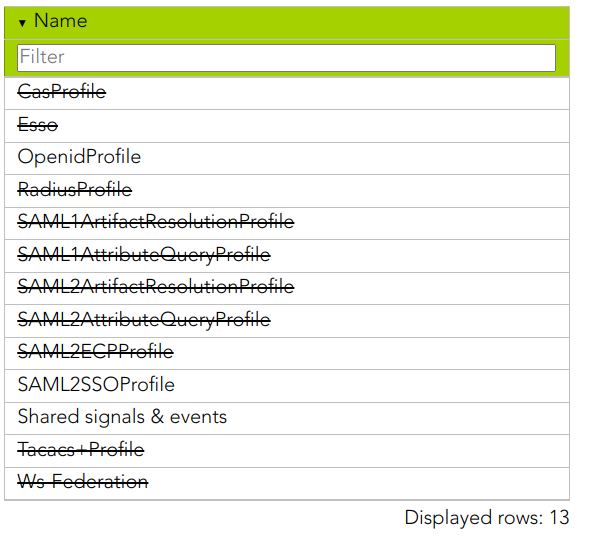
When an identity provider is created, by default, all the profiles appear disabled (the profile is displayed strikethrough). It will be necessary to config one by one depending on your company needs. To config a profile you must click on the proper profile, and Soffid will display a new window to config it.
## Actions
| **Open profile**
| If you click on a row of the profile list, Soffid will display a modal window with the data and configuration of the profile selected.
|
# OpenIDProfile
## Definition
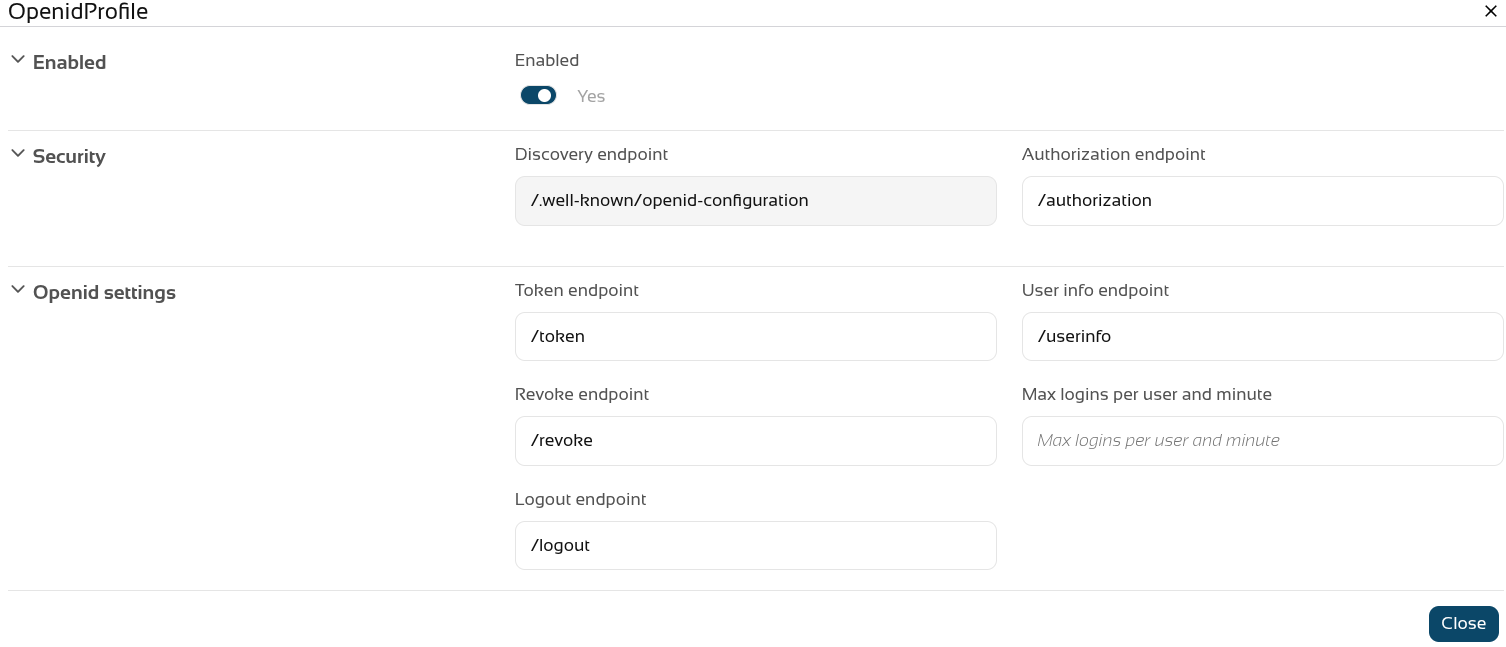
The Identity Provider will serve the OpenID-Connect protocol. It is possible to accept the default endpoints or modify them.
You can check the server features visiting [https://<YOUR-IdP>/.well-known/openid-configuration](https:///.well-known/openid-configuration). That JSON gives you information about the oAuth authentication types allowed, the key URL, the soported authentication methods and the info about the endpoints defined.
You can download an example [openid-configuration.json](https://bookstack.soffid.com/attachments/29)
## Screen overview
[](https://bookstack.soffid.com/uploads/images/gallery/2026-08/W1Dzjoej57iRn4KC-image.png)
## Standard attributes
- **Enabled**: if it is checked (selected option is Yes) that protocol will be enable.
- **Discovery endpoint**: call this endpoint to request the OpenID-Connect provider metadata.
- **Authorization endpoint**: call this endpoint to request or authorization grant.
- **Token endpoint**: call this endpoint to get the token or to renew the token.
- **User info endpoint**: call this endpoint to request user information.
- **Revoke endpoint:** call this endpoint when you finish and do not need more use the token.
- **Max logins per user and minute**: limits the number of requests a user can make to an OpenID Connect service provide. Check the new feature [2026-07-20 New feature: configure maximum openid logins](https://bookstack.soffid.com/books/soffid-4-reference-guide/page/2026-07-20-new-feature-configure-maximum-openid-logins "2026-07-20 New feature: configure maximum openid logins").
- **Logout endpoint**: call this endpoint to close the session with the service provider
# SAML1ArtifactResolutionProfile
## Definition
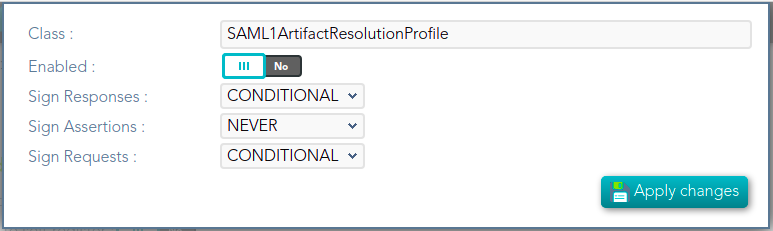
Based on SAML version 1 standard. This profile is used when the Service Provider wants to resolve or check a received assertion.
Screen overview
[](https://bookstack.soffid.com/uploads/images/gallery/2021-12/image-1638533916859.png)
## Standard attributes
- **Class**: class name (readOnly field).
- **Enabled**: if it is checked (selected option is Yes) that protocol will be enable.
- **Sign Responses**: usually it can be set to never, as long as the assertions are signed. Its preferable to sign assertions rather than responses, because the assertion can be forwarded by the service provider to another service provider, but the response not.
- **Sign Assertions**: it's advisable to sign every assertion, so it avoids assertion spoofing. The assertion can be forwarded by the service provider to another service provider.
- **Sign Request**: the identity provider will issue requests to service providers in order to perform the single logout process. Unless it is needed by any service provider, leave it to conditional.
# SAML1AttributeQueryProfile
## Definition
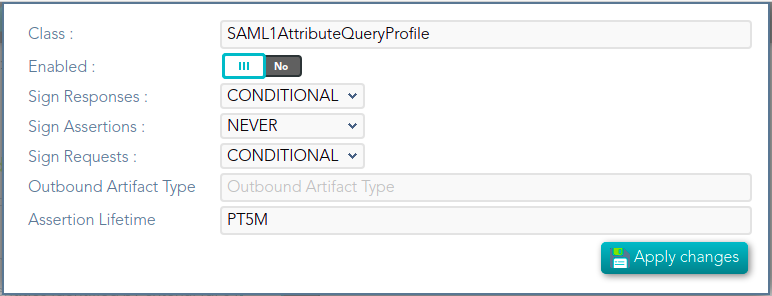
Based on SAML version 1 standard. This profile is used when the SSOProfile does not include attributes statements in the assertion. This profile allows to the applications request user data.
When you are configuring the profile, you could define what data will be encrypted and signed.
## Screen overview
[](https://bookstack.soffid.com/uploads/images/gallery/2021-12/image-1638533961155.png)
Standard attributes
- **Class**: class name (readOnly field).
- **Enabled**: if it is checked (selected option is Yes) that protocol will be enable.
- **Sign Responses**: usually it can be set to never, as long as the assertions are signed. Its preferable to sign assertions rather than responses, because the assertion can be forwarded by the service provider to another service provider, but the response not.
- **Sign Assertions**: it's advisable to sign every assertion, so it avoids assertion spoofing. The assertion can be forwarded by the service provider to another service provider.
- **Sign Request**: the identity provider will issue requests to service providers in order to perform the single logout process. Unless it is needed by any service provider, leave it to conditional.
- **Outbound Artifact Type**: defaults to 4. Any other value is not supported. For more information, see SAML specification.
- **Assertion** **Lifetime**: specifies the validity period for the generated assertions . The time period is specified using the ISO 8601 notation. The standard format follows the pattern: PnYnMnDTnHnMnS.
Assertion Lifetime examples:
- PT5M sets a duration of five minutes.
- PT1H30M sets a duration of one hour and a half.
- P3Y6M4DT12H30M5S" sets a duration of three years, six months, four days, twelve hours, thirty minutes, and five seconds.
---
*[https://en.wikipedia.org/wiki/ISO\_8601 ](https://en.wikipedia.org/wiki/ISO_8601)*
[*http://saml.xml.org/saml-specifications*](http://saml.xml.org/saml-specifications)
# SAML2ArtifactResolutionProfile
## Definition
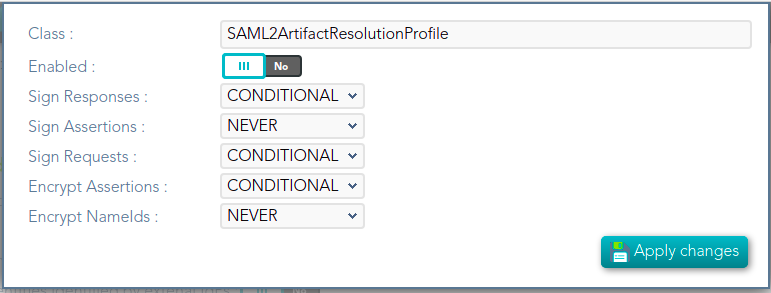
Based on SAML version 1 standard. This profile is used when the Service Provider wants to resolve or check a received assertion. The profile configuration settings are quite similar to those present in SAML2SSOProfile.
When you are configuring the profile, you could define what data will be encrypted and signed.
## Screen overview
[](https://bookstack.soffid.com/uploads/images/gallery/2021-12/image-1638534011855.png)
## Standard attributes
- **Class**: class name (readOnly field).
- **Enabled**: if it is checked (selected option is Yes) that protocol will be enable.
- **Sign Responses**: usually it can be set to never, as long as the assertions are signed. Its preferable to sign assertions rather than responses, because the assertion can be forwarded by the service provider to another service provider, but the response not.
- **Sign Assertions**: it's advisable to sign every assertion, so it avoids assertion spoofing. The assertion can be forwarded by the service provider to another service provider.
- **Sign Request**: the identity provider will issue requests to service providers in order to perform the single logout process. Unless it is needed by any service provider, leave it to conditional.
- **Encrypt Assertions**: is a desired feature, but some service providers, mainly public cloud service providers do not support it. Thus, the default value is to never encrypt, but you can set it to optional or always as needed.
- If you set it to optional and the public key of the service provider who is going to receive the assertion is available, it will be used to encrypt it.
- If you set it to never, it will not ever be encrypted in any case.
- If you set it to always, but the remote service provider encryption key is unknown, an exception will be raised.
- **Encrypt NameIds**: should be let to never.
# SAML2AttributeQueryProfile
## Definition
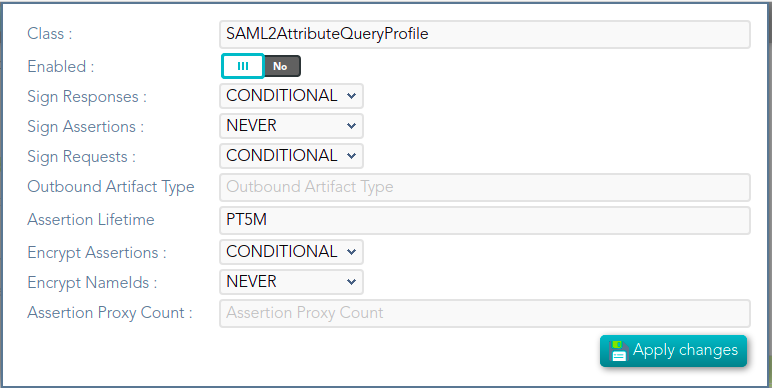
Based on SAML version 1 standard. This profile is used when the SSOProfile does not include attributes statements in the assertion. This profile allows to the applications request user data.
When you are configuring the profile, you could define what data will be encrypted and signed.
## Screen overview
[](https://bookstack.soffid.com/uploads/images/gallery/2021-12/image-1638534055413.png)
## Standard attributes
- **Class**: class name (readOnly field).
- **Enabled**: if it is checked (selected option is Yes) that protocol will be enable.
- **Sign Responses**: usually it is set to conditional or always, so as the service provider can verify the response authenticity.
- **Sign Assertions**: is usually set to never, as long as the response is already signed.
- **Sign Request**: not used, as the service provider will not need to generate requests.
- **Outbound Artifact Type:** usually kept in blank, unless you are using old SAML 1 service.
- **Assertion Lifetime:** specifies the validity period for the generated assertions. The time period is specified using the ISO 8601 notation. The standard format follows the pattern: PnYnMnDTnHnMnS. This means that PT5M sets a duration of five minutes. For instance, PT1H30M sets a duration of one hour and a half.
- **Encrypt Assertions**: is a desired feature, but some service providers, mainly public cloud service providers do not support it. Thus, the default value is to never encrypt, but you can set it to optional or always as needed.
- If you set it to optional and the public key of the service provider who is going to receive the assertion is available, it will be used to encrypt it.
- If you set it to never, it will not ever be encrypted in any case.
- If you set it to always, but the remote service provider encryption key is unknown, an exception will be raised.
- **Encrypt NameIds**: should be let to never.
- **Assertion Proxy Count**: sets the maximum number of hops that can be accepted for any assertion. A number of 0 does not set any limit.
# SAML2ECPProfile
## Definition
The Enhanced Client Profile is used when the Service Provider is not a web application. Nowadays, it is rarely used, as most mobile applications have shifted to OAuth or OpenIDConnect.
When you are configuring the profile, you could define what data will be encrypted and signed.
## Screen overview
[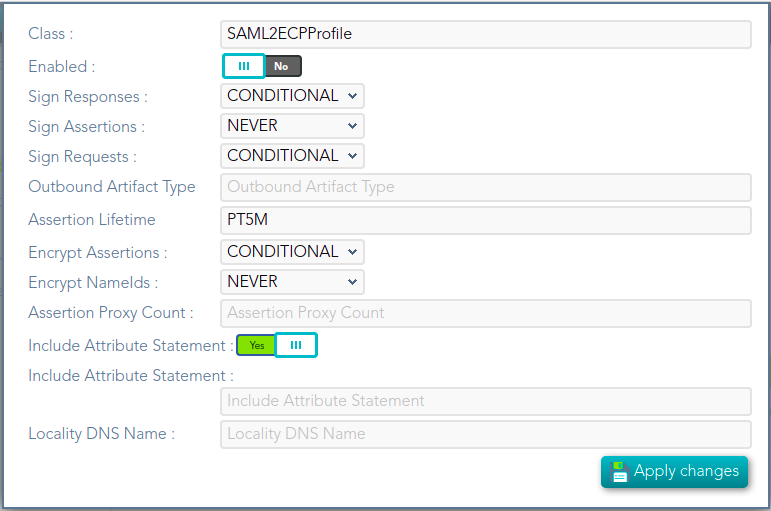](https://bookstack.soffid.com/uploads/images/gallery/2021-12/image-1638534117678.png)
## Standard attributes
- **Class**: class name (readOnly field).
- **Enabled**: if it is checked (selected option is Yes) that protocol will be enable.
- **Sign Responses**: usually it can be set to never, as long as the assertions are signed. Its preferable to sign assertions rather than responses, because the assertion can be forwarded by the service provider to another service provider, but the response not.
- **Sign Assertions**: it's advisable to sign every assertion, so it avoids assertion spoofing. The assertion can be forwarded by the service provider to another service provider.
- **Sign Request**: the identity provider will issue requests to service providers in order to perform the single logout process. Unless it is needed by any service provider, leave it to conditional.
- **Encrypt Assertions**: is a desired feature, but some service providers, mainly public cloud service providers do not support it. Thus, the default value is to never encrypt, but you can set it to optional or always as needed.
- If you set it to optional and the public key of the service provider who is going to receive the assertion is available, it will be used to encrypt it.
- If you set it to never, it will not ever be encrypted in any case.
- If you set it to always, but the remote service provider encryption key is unknown, an exception will be raised.
- **Encrypt NameIds**: should be let to never.
- **Assertion Proxy Count**: sets the maximum number of hops that can be accepted for any assertion. A number of 0 does not set any limit
- **Include Attribute Statement**:
- - If the attribute statements are included (selected value is Yes), that is the user attributes are included on the response the performance is increased as this additional step is no longer needed. It is particularly recommended when using public cloud service providers.
- If attribute statements are not included (selected value is No), the service provider will receive the SAML assertion with the principal name, then the service provider will issue a attribute statement request to the service provider to get them.
- **Locality DNS Name**
# SAML2SSOProfile
## Definition
This is the most commonly used SAML profile. It allows the IdP to identify users and to give such information to Service Providers. This profile is used to log in.
When you are configuring the profile, you could define what data will be encrypted and signed.
## Screen overview
[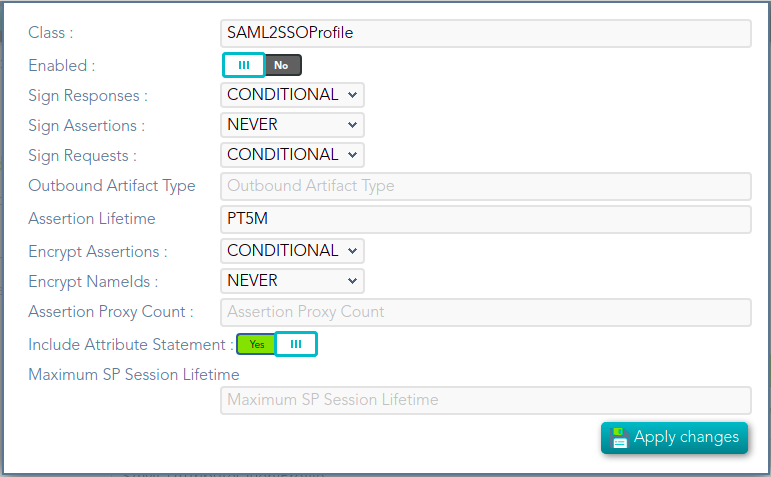](https://bookstack.soffid.com/uploads/images/gallery/2021-12/image-1638534204054.png)
## Standard attributes
- **Class**: class name (readOnly field).
- **Enabled**: if it is checked (selected option is Yes) that protocol will be enabled.
- **Sign Responses**: usually it can be set to never, as long as the assertions are signed. Its preferable to sign assertions rather than responses, because the assertion can be forwarded by the service provider to another service provider, but the response not.
- **Sign Assertions**: it's advisable to sign every assertion, so it avoids assertion spoofing. The assertion can be forwarded by the service provider to another service provider.
- **Sign Request**: the identity provider will issue requests to service providers in order to perform the single logout process. Unless it is needed by any service provider, leave it to conditional.
- **Outbound Artifact Type**: usually kept in blank, unless you are using old SAML 1 service.
- **Encrypt Assertions**: is a desired feature, but some service providers, mainly public cloud service providers do not support it. Thus, the default value is to never encrypt, but you can set it to optional or always as needed.
- If you set it to optional and the public key of the service provider who is going to receive the assertion is available, it will be used to encrypt it.
- If you set it to never, it will not ever be encrypted in any case.
- If you set it to always, but the remote service provider encryption key is unknown, an exception will be raised.
- **Encrypt NameIds**: should be let to never.
- **Assertion Proxy Count**: sets the maximum number of hops that can be accepted for any assertion. A number of 0 does not set any limit
- **Include Attribute Statement**:
- If the attribute statements are included (selected value is Yes), that is the user attributes are included on the response the performance is increased as this additional step is no longer needed. It is particularly recommended when using public cloud service providers.
- If attribute statements are not included (selected value is No), the service provider will receive the SAML assertion with the principal name, then the service provider will issue a attribute statement request to the service provider to get them.
# CAS
## Definition
Cas protocol is rarely used.
## Screen overview
[](https://bookstack.soffid.com/uploads/images/gallery/2022-08/image-1661330455520.png)
## Standard attributes
- **Class**: class name (readOnly field).
- **Enabled**: if it is checked (the selected option is Yes) that protocol will be enabled.
# Radius
## Definition
Networking protocol that authorizes and authenticates users who access a remote network.
## Screen overview
[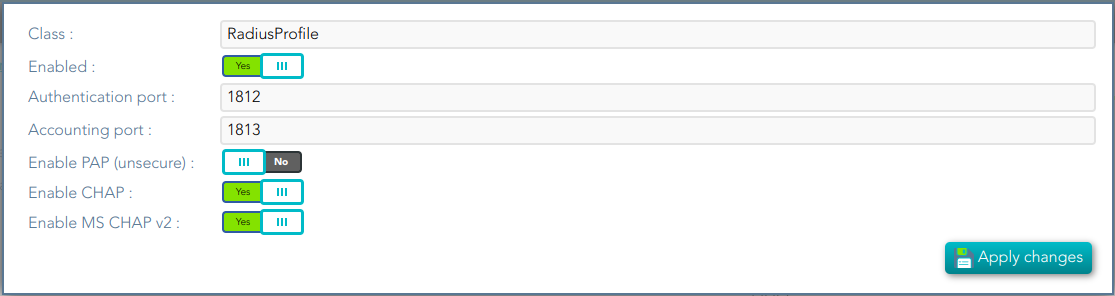](https://bookstack.soffid.com/uploads/images/gallery/2022-08/image-1661330603198.png)
## Standard attributes
- **Class**: class name (readOnly field).
- **Enabled**: if it is checked (selected option is Yes) that protocol will be enabled.
- **Authentication port**: UDP authentication port. This port is used to log in.
- **Accounting port**: UDP authentication port. This port is used to manage the session, when the session starts and when finishes.
- **Enable PAP (unsecure)**: authentication protocol. The password to send is unencrypted.
- **Enable CHAP**: authentication protocol. The password to send is encrypted.
- **Enable MS CHAP v2**: authentication protocol.
# ESSO
## Definition
Here is an explanation about how to configure the ESSO profile by using Soffid as Identity Provider.
Please note that the profile parameters will be automatically updated on the PCs.
## Screen overview
[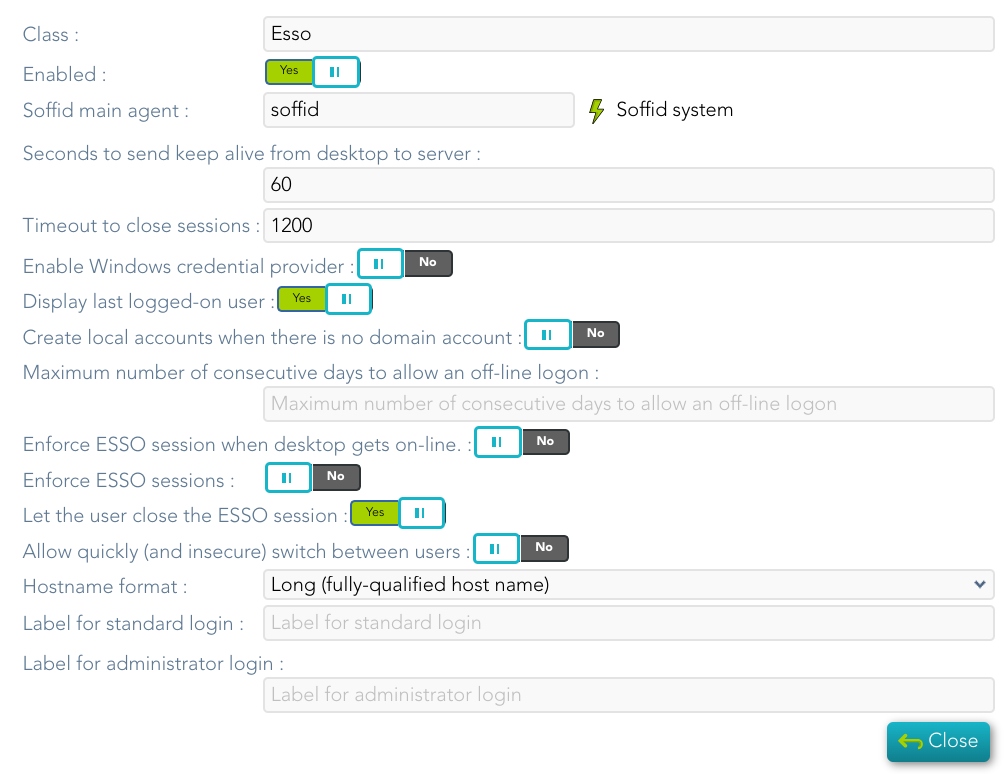](https://bookstack.soffid.com/uploads/images/gallery/2024-10/MdAnpxT99fDQPpaY-image.png)
## Standard attributes
- **Class**: class name (readOnly field).
- **Enabled**: if it is checked (selected option is Yes) that protocol will be enabled.
- **Soffid main agent**: main agent to check the user account.
- **Seconds to send keep alive from desktop to server**:
- **Timeout to close sessions**:
- **Enable Windows credential provider**: if it is checked (selected option is Yes), the soffid logo will be displayed.
- **Display last logged-on user**: if it is checked (selected option is Yes), the last logged-on user will be displayed.
- **Create local accounts when there is no domain account**: if checked (the selected option is Yes) and the account does not exist in the main Soffid agent, the account is created as a local machine user.
- **Let user login as a shared account:** PAM Desktop
- **Maximum number of consecutive days to allow an off-line logon**: the maximum value is 30 days.
- **Enforce ESSO session when desktop gets on-line**: if it is checked (selected option is Yes), the authentication is forced when the connection is retrieved
- **Enforce ESSO sessions**: if it is checked (selected option is Yes), performs authentication against the Windows domain without logging into Soffid.
- **Let the user close the ESSO session**: allow the user to log out from ESSO
- **Allow quickly (and insecure) switch between users**: if it is checked (selected option is Yes),
- **Hostname format**
- **Label for standard login**: label to be displayed for standard user in Windows desktop.
- **Label for administrator login**: label to be displayed for adminsitrator user in Windows desktop.
## Configuration
Once you have configured the Esso profile you must add an Adaptive authentication rule.
For more information, visit [the Condition for Adaptive authentication page.](https://bookstack.soffid.com/books/federation/page/condition-for-adaptive-authentication)
[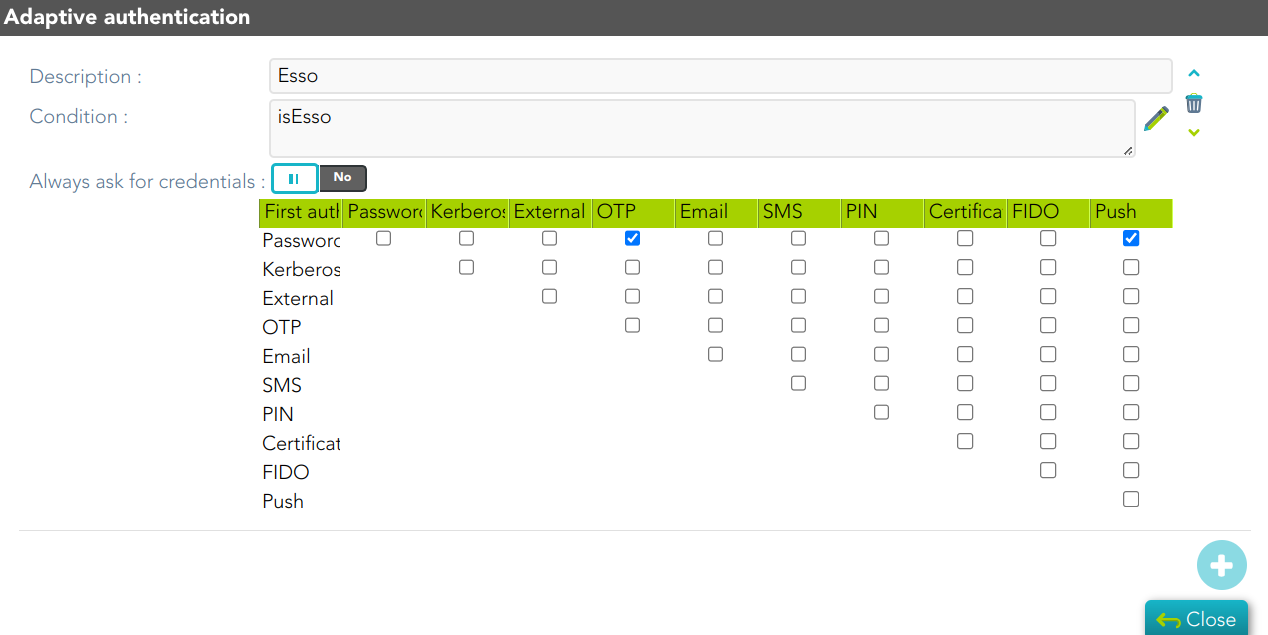](https://bookstack.soffid.com/uploads/images/gallery/2024-09/b3cBiTezEfctVmJk-image.png)
# Condition for Adaptive authentication
## Introduction
Adaptive authentication is designed to improve the security of online accounts by adding an additional layer of protection against unauthorized access.
When the authentication is being defined, Soffid allows you to add some **adaptive authentications** in addition to the Authentication methods. Those adaptive authentications will be evaluated, and when the result of the condition will be true, the rule will be enabled.
## Screen overview
[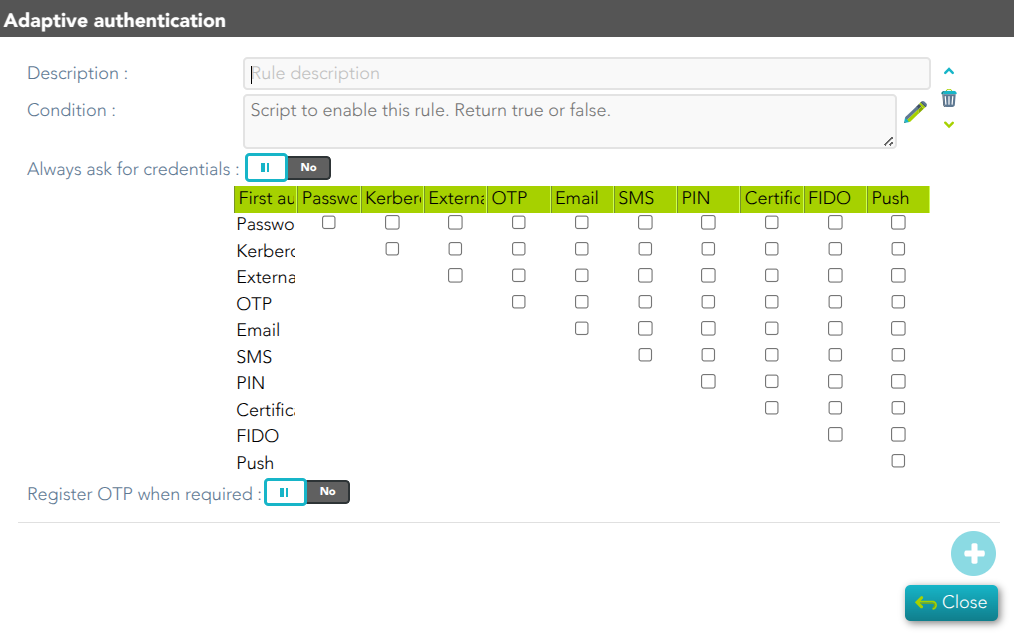](https://bookstack.soffid.com/uploads/images/gallery/2025-04/V0qafkpzfJfb3BQq-image.png)
## Standard attributes
#### Description
Description to identify the rule
#### Condition
Allows you to write a script validation, with the result true or false. To develop the script you can use some vars defined to that:
There are some available vars to create the condition:
- **currentAuthenticationMethod**: return tue current authentication method. Check the [Authentication methods available](#bkmrk-authentication-metho).
- **dayOfWeek**: number of the day of the week (1-7 where 1 is Sunday and 7 is Saturday).
- **daysSinceLastLogon**: number of days (integer).
- **daysSinceLastLogonByMethod**: return a hashmap with the logon method and the number of days (integer). Check the [Authentication methods available](#bkmrk-authentication-metho).
- **daysSinceLastLogonFromSameHost**: number of days (integer).
- **deviceCertificate**: is or is not a device certificate (boolean).
- **displacement**: distance in kilometers (Double).
- **displacementSpeed**: distance in kilometers since last login attempt (Double).
- **failuresForSameIp**: integer value to determine the number of failures.
- **failuresForSameUser**: integer value to determine the number of failures.
- **failuresRatio**: value between 0 and 1.
- **geoInformation**: it is an object that contains:
- ip (string)
- date (Date)
- country (string)
- countryDivision1 (string)
- countryDivision2 (string)
- city (string)
- latitude (Double)
- longitude (Double)
- accuracy (Double): accuracy in kilometers.
- domain (string)
- isp (string)
- userType (string)
- anonymous (Double): what is the probability that they use an anonymizer?:
- > 0.5 => anonymizer
- < 0.5 => end user
- **hasCertificate**: the user has or does not have a certificate (boolean).
- **hasFidoToken**: the user has or does not have a Fido token (boolean).
- **hasOtp**: the user has or does not have an OTP (boolean).
- **hasOtpHotp**: the user has or does not have an OTP based on events (boolean).
- **hasOtpMail**: the user has or does not have an email OTP(boolean).
- **hasOtpPin**: the user has or does not have a Pin OTP (boolean).
- **hasOtpSms**: the user has or does not have an SMS OTP (boolean).
- **hasOtpTotp**: the user has or does not have an OTP based on time (boolean).
- **hasPushToken**: the user has or does not have a Push Token (boolean).
- **hasToken**: the user has or does not have a Token (boolean).
- **hour**: integer value between 0 and 23.
- **identityProvider**: string value with the name of the identity provider.
- **ipAddress**: string with the IP address.
- **isEsso**: return true if the login is done through ESSO.
- **minute**: integer value between 0 and 59.
- **newDevice**: boolean value (true or false). It validates if the connection is from a new device.
- **remoteHost**: it is a host object.
- **sameCountry**: boolean value (true or false). It validates if the connection is from the same country as the last user connection.
- **serviceProvider**: string value with the name of the service provider.
- **sourceCountry**: sting value to identify the country. It uses the first two ISO characters.
- **user**: it is a user object.
##### Authentication methods available:
- **P**: Password
- **K**: Kerberos
- **E**: Broker
- **O**: OTP
- **M**: Email
- **S**: SMS
- **I**: PIN
- **C**: Certificate
- **F**: Finger print
- **Z**: Push
#### Matrix
To define the authentication methods that will be required to successfully authenticate the user. Each row indicates the first authentication method, and each column indicates the second factor to use.
#### Always ask for credentials
Use this option to force the request for credentials when the user meets the defined condition.
#### Register OTP when required
Use this option to allow the user to register the OTP the first time he/she attempts to log in when the user meets the defined condition.
## Actions
| **Apply changes** | Allows you to save the data of a new adaptive authentication or to update the data of the previously created adaptive authentucation.
|
| **Add**
| Allows you to add a new adaptive authentication. When you click the add button (+) Soffid will display new fields to fill in. For each adaptive authentication you must fulfill the description, the condition to evaluate and the matrix which will be enable when the condition will be true.
Then you must click on the "Apply changes" button to save the data.
|
| **Delete**
| Allows you to remove one by one the adaptive authentication defined. You must click on the trash icon the account of the proper rule. Then you must click the "Apply changes" button to save the data.
|
| **Up**
| Allows you to reorder (up) the defined adaptive authentication.
|
| **Down**
| Allows you to reorder (down) the defined adaptive authentication.
|
## Examples
##### Rule 1
```shell
failuresRatio > 0.8
```
##### Rule 2
```
(daysSinceLastLogon > 10) && (ipAddress.startsWith("192.168.")
```
##### Rule 3
```shell
((dayOfWeek == 7) || (dayOfWeek == 1)) && (user!=null && "".equals(user.userName))
```
##### Rule 4
```
"ES".equals(sourceCountry) || ipAddress.startsWith("192.168.")
```
##### Rule 5
```
isEsso
```
##### Rule 6
```
if (daysSinceLastLogonByMethod["PO"] == null || daysSinceLastLogonByMethod["PO"] > 30)
return true;
```
##### Rule 7
```
"YOUR_SERVICE_PROVIDER".equals(serviceProvider)
```
##### Rule 8
```
"P".equals(currentAuthenticationMethod)
```
##### Rule 9
```
if (user!=null)
log.info("**** User " + user.userName);
user!=null && "Ada".equals(user.userName);
```
# How to deploy the identity & service provider
# How to deploy the identity & service provider
## Step-by-step
1. To deploy the identity provider is advisable to install a dedicated sync server. It can be configured as a proxy sync server as it does not need direct access to Soffid database. Instead, it will connect to main sync servers to get users and federation information. Also, you can deploy the identity provider in your existing sync.
To install a proxy sync server follow the instructions at the [Install sync server page](https://bookstack.soffid.com/link/28#bkmrk-install-next-sync-se).
2. If the installation is in a **dedicated Sync server:**
2.1. You need open the Sofid Console and approve the Task to accept the new Sync server.
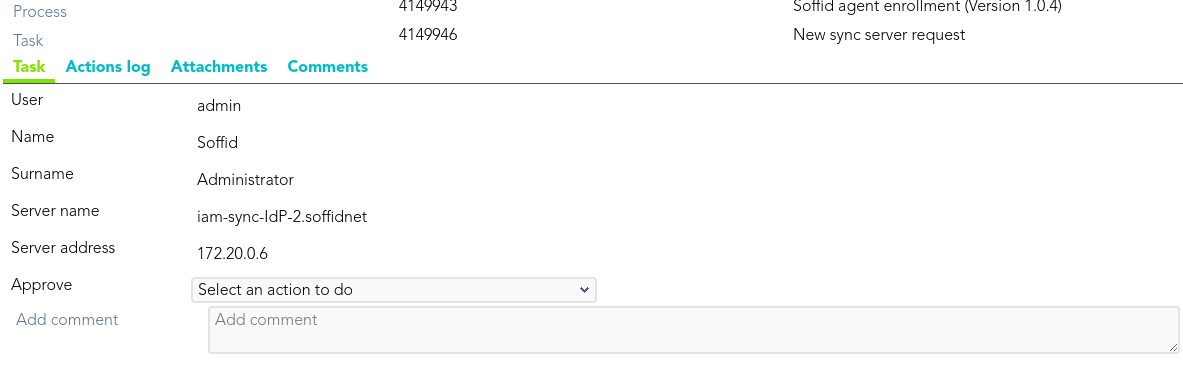
2.1. You need tune the **Sync server memory usage.**
`Main Menu > Administration > Configure Soffid > Integration engine > Synchronization servers`
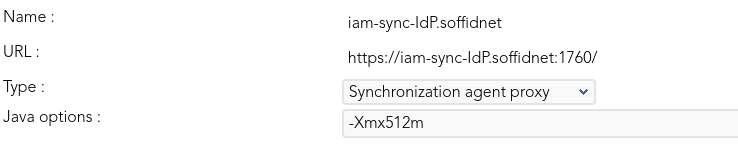
3. Once the Sync server is registered, if you want to create a **Soffid IdP** you must create a new **Identity Provider Agent**.
`Main Menu > Administration > Configure Soffid > Integration engine > Agents`
- **Type**: Soffid Identity Provider.
- **Server**: select the sync server that will host the identity provider.
- **Trust password**: must be unchecked.
- **Read only**: must be unchecked.
- **Manual account creation**: usually is unchecked, but could be useful to check it during initial tests.
- **Role based**: usually is unchecked, despite it could be used to limit the users that can use it.
- **Groups**: select the groups that can use it. Leave it blank to allow any user.
- **User domain**: use default users domain. Nevertheless, depending on your needs, creating another user domain could be a good option.
- **Password domain**: use default password domain.
- **User types**: check the user types that can use the identity provider.
- **Public ID**: enter the public ID assigned in the federation management page.
Your identity provider agent should look like this one:
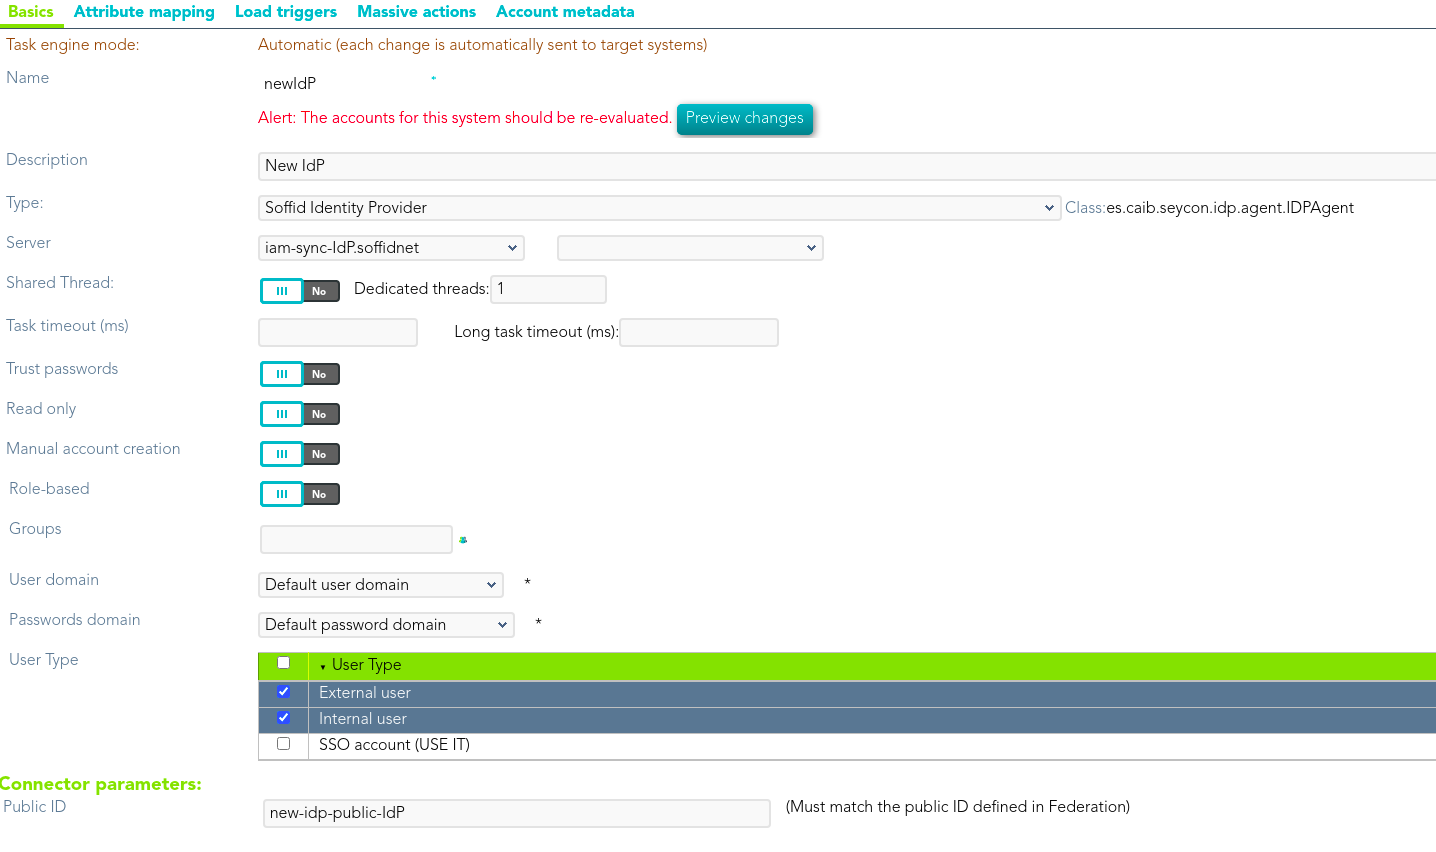
4. Upload the **Federation addon** to the Soffid Console:
To upload the addon follow the instructions at the [How to install Federation in Soffid page](https://bookstack.soffid.com/books/federation/page/how-to-install-federation-in-soffid "How to install Federation in Soffid").
5. Once you are connected to the Soffid console, you can start creating an **Entity Group**.
5.1. First of all, open the **Identity & Service providers** page
`Main Menu > Administration > Configure Soffid > Web SSO > Identity & Service providers`
5.2. Then, click the "Add group" button and Soffid will display a new window to fill in the **Entity group** attributes.
5.3. Once you fill in the fields, you need to save (disk button) or apply changes (Apply changes button) to save the data.
When the Entity Group is created, inside there will be two options, one to create the Identity Providers and other to create the Service Providers.
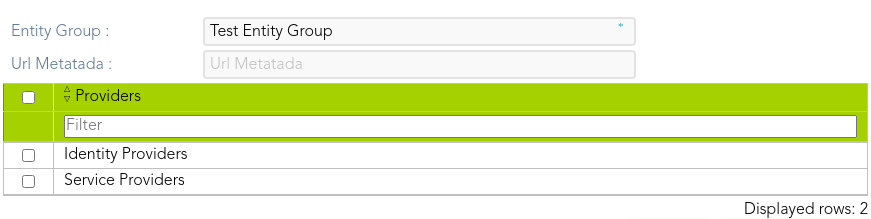
5.3.1. Clicking on the Identity Providers record a identity providers list will be displayed and it will be able to create new identity providers. To create a new Identity Provider continue on step 5rd.
5.3.2. Clicking on the Service Providers record a service provider list will be displayed and it will be able to create new service providers. To create a new Service Provider continue on step 6th.
6. New **Identity Provider:**
6.1. To create a new Identity Provider you can click on the "Add identity provider" button on the tree view, or click the add button (+) on the Identity Provider list. Then Soffid will display a new window.
6.2. At the new window you must select the IdP type you want to create and fill in the required fields. The fields to full fill depend on the IdP type selected.
- - You can visit the [Identity Provider page ](https://bookstack.soffid.com/books/federation/page/identity-provider)for more detail.
6.2.1. When creating a Soffid identity provider, it will be mandatory to create an agent. The agent will have to be a Soffid Identity Provider agent. On the connector parameters you must define a unique *Public ID* which will be used on the Identity Provider configuration.

6.3. Once you fill in all the data, you need to enable the proper profiles by clicking on the profile list and configuring them.
- - You can fin more information visiting the[ Profile page](https://bookstack.soffid.com/books/federation/page/profiles "Profiles") where the available protocols are defined.
6.4. Finally, you need to save (disk button) or apply changes (Apply changes button) to save the data.
Note that in some cases it will be necessary to **restart the synchronization server**, so Soffid will generate the additional metadata or certificate data needed.
Note that you may have to **open the standard port**.
**Soffid Identity Provider Screenshot**
[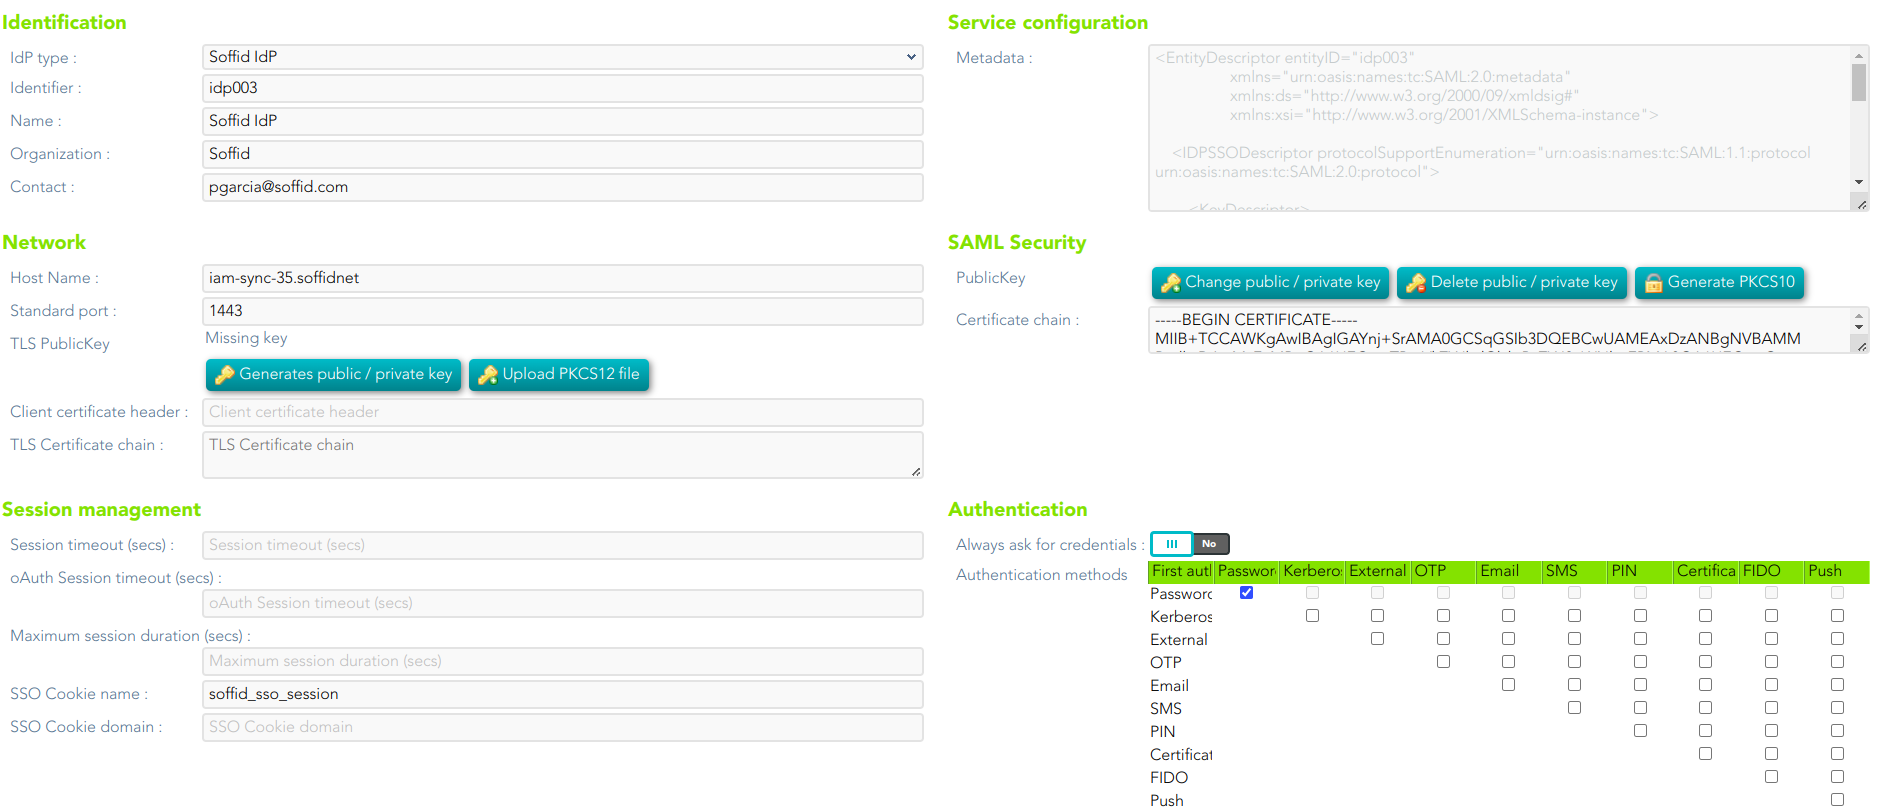](https://bookstack.soffid.com/uploads/images/gallery/2023-08/image-1691748396068.png)
[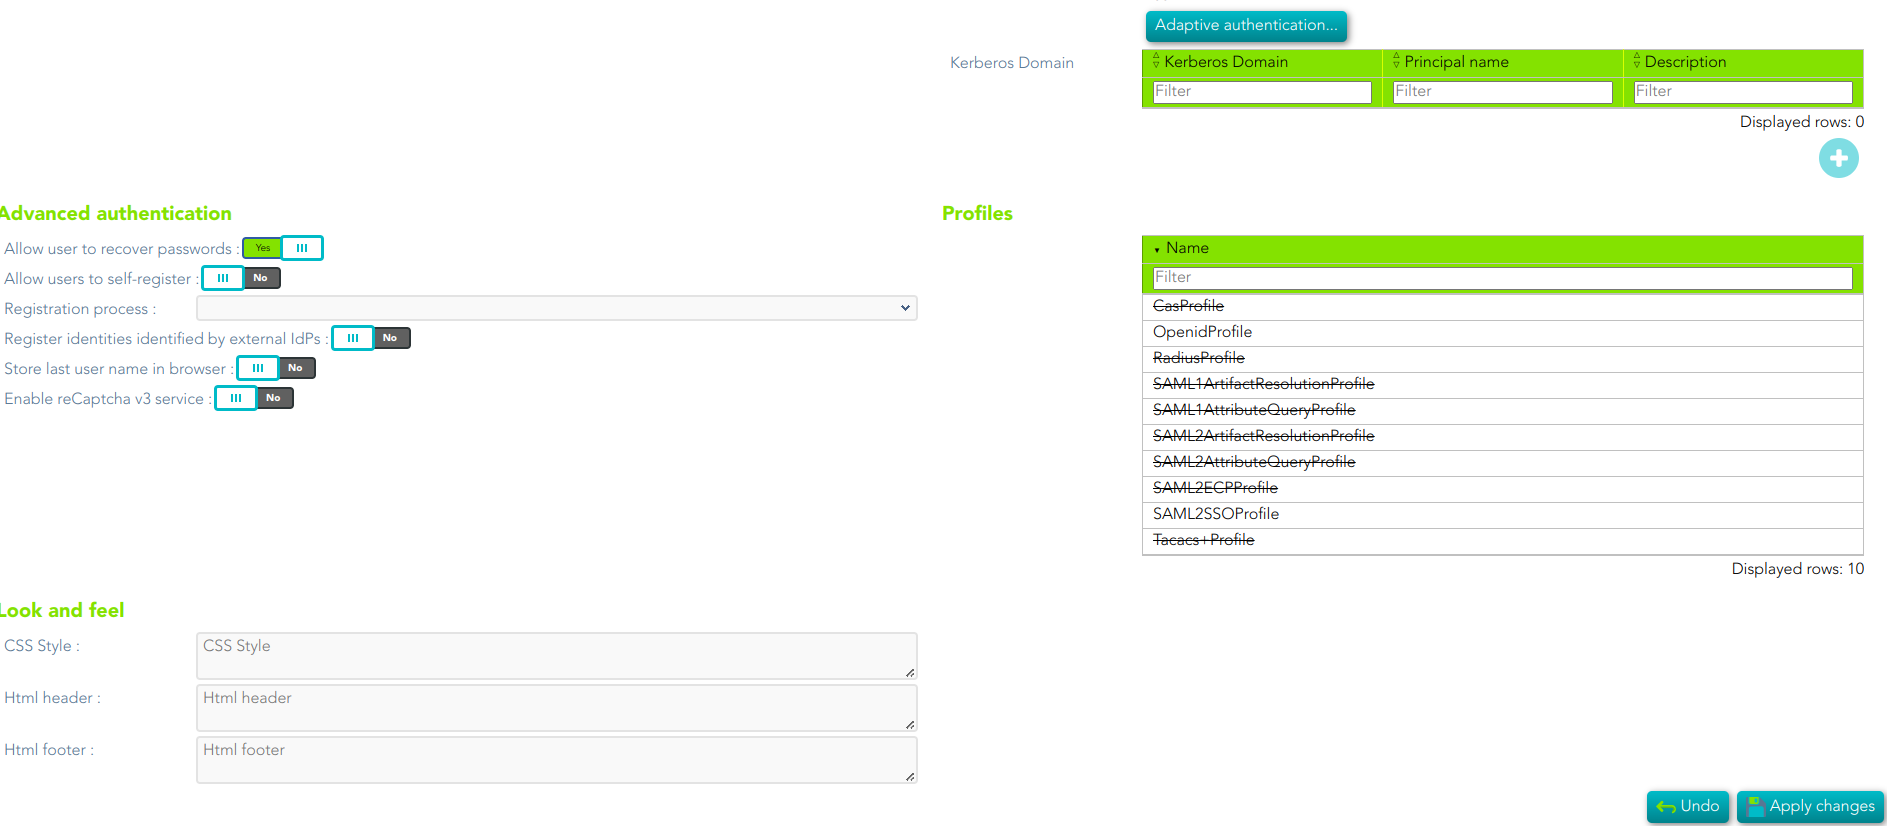](https://bookstack.soffid.com/uploads/images/gallery/2023-08/image-1691748424764.png)
##### You could check your Identity Provider
```
https://:1443/protected
```
For instance: https://iam-sync-idp.soffidnet:1443/protected
##### You could view your IdP metadata
```
https://:1443/SAML/metadata.xml
```
For instance: https://iam-sync-idp.soffidnet:1443/SAML/metadata.xml
##### In addition, the complete metadata of soffid
```
https://:1760/SAML/metadata.xml
```
For instance: https://iam-sync.soffidnet:1760/SAML/metadata.xml
7. New **Service Provider:**
7.1. To create a new Service Provider you can click on the "Add service provider" button on the tree view, or click the add button (+) on the Service Provider list. Then Soffid will display a new window.
7.2. At the new window you must select the Service provider type you want to create and fill in the required fields. The fields to full fill depend on the IdP type.
- - You can visit the [ Service Provider page ](https://bookstack.soffid.com/books/federation/page/service-provider)for more detail.
7.3. One you fill in all the data, you need to save (disk button) or apply changes (Apply changes button) to save the data.
**SAML Service Provider Screenshot**
[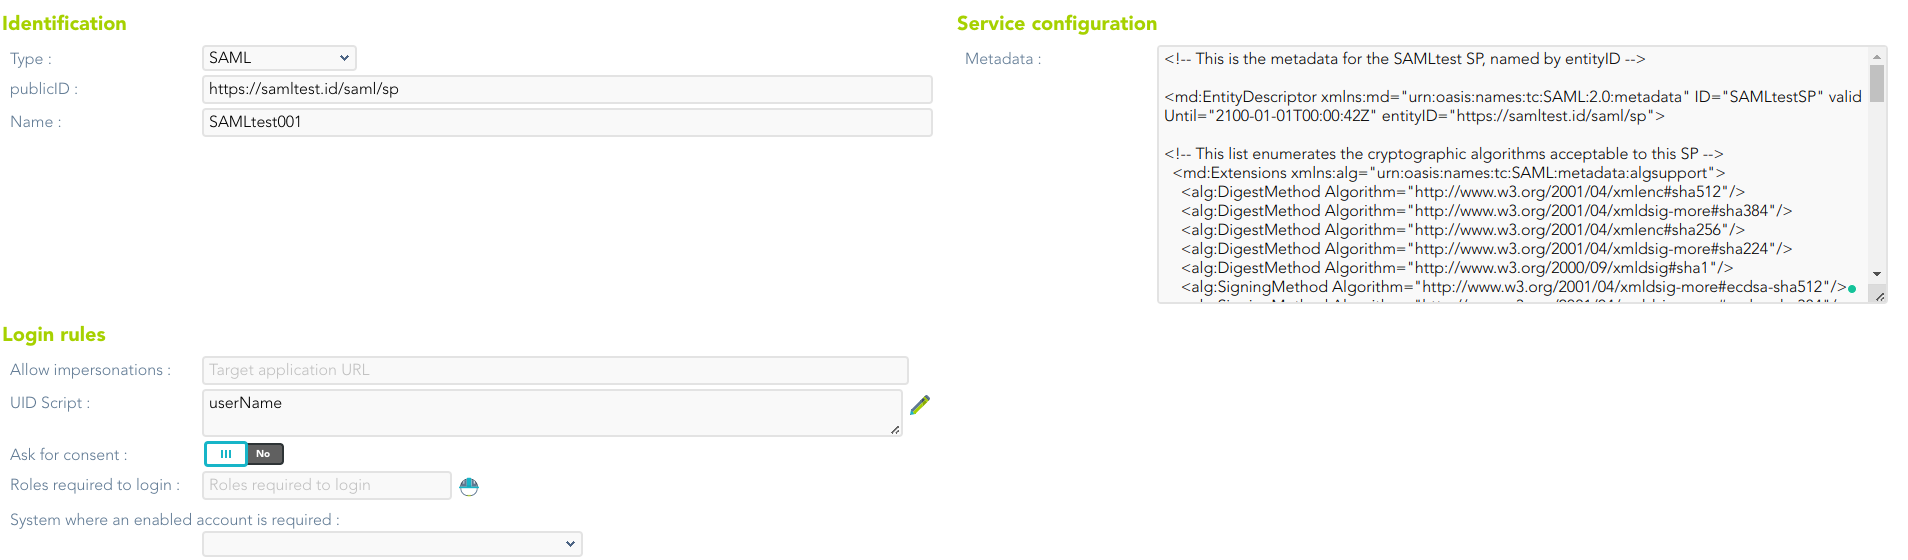](https://bookstack.soffid.com/uploads/images/gallery/2022-05/image-1652361192558.png)
**OpenID Connect Service Provider Screenshot**
[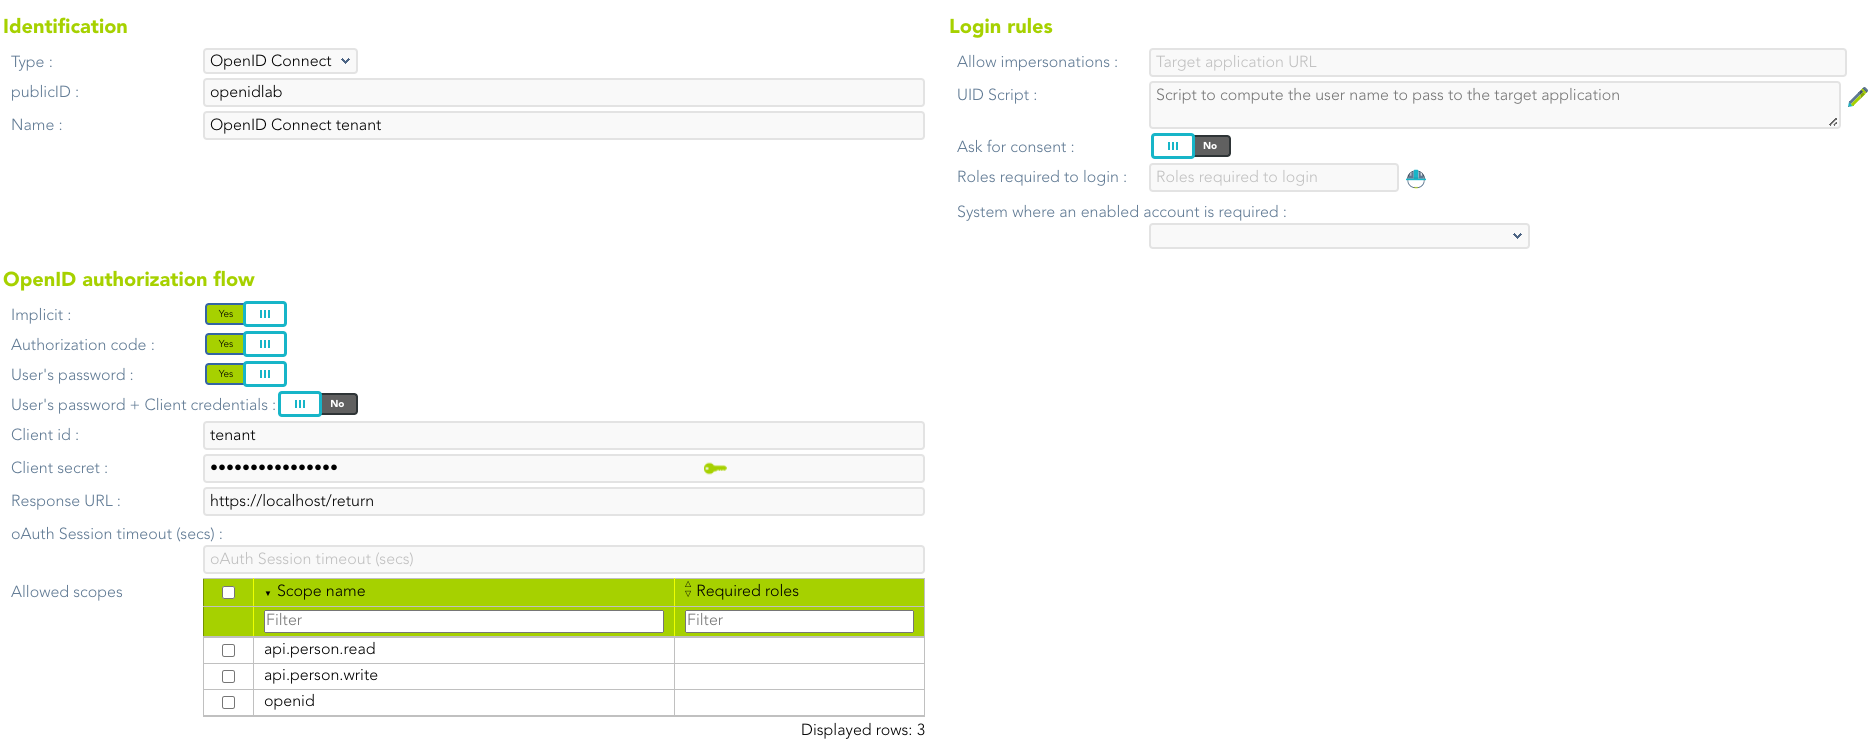](https://bookstack.soffid.com/uploads/images/gallery/2022-05/image-1652361115515.png)
---
8. Enable, when it will be necessary, the External SAML identity provider. To do that you need to access to the Authentication page:
`Main Menu > Administration > Configure Soffid > Security settings > Authentication`
[](https://bookstack.soffid.com/uploads/images/gallery/2022-01/image-1643294485047.png)
You can visit the [Authentication page](https://bookstack.soffid.com/books/soffid-3-reference-guide/page/authentication "Authentication") for more information.
# Change Password URL
There is a service point to allow users change their passwords. Simply redirect the user to:
```
https://:1443/protected/passwordChange
```
For instance: [https://iam-sync-idp.soffidnet:1443/protected/passwordChange](https://iam-sync-idp.soffidnet:1443/protected/passwordChange)
💻 Image
[](https://bookstack.soffid.com/uploads/images/gallery/2024-04/image-1714486394997.png)
For more information about the attributes, you can visit [the OpenID Connect detailed info](https://bookstack.soffid.com/link/392#bkmrk-openid-connect).
4. Finally, you must apply changes.
## Examples
### 1. Authorization code flow
The client application creates a random String, named nonce, and sends to the user the following URL
#### Request
| https://[youridentityprovider:2443](https://soffid.bubu.lab:2443/token)/**authorization**?
**redirect\_uri**=https://<serviceprovider>/response&
**client\_id**=MYCLIENT&
**nonce**=12345679801234567890&
**scope**=openid+test+other&
**response\_type**=code
|
Then, the user will be asked for a username and password, or any other means of authentication. After authenticating the user, the browser will be redirected to the URL configured in the service provider page, adding a one-time authorization code.
| https://<serviceprovider>/response/?
code=XXXXXXXXXXXXXXX&
nonce=12345679801234567980
|
Once the service provider has received the one-time authorization code, it can connect to the identity provider to retrieve the oAuth token, as well as the OpenID token.
#### Request
| **POST** [https://youridentityprovider:2443/**token**](https://soffid.bubu.lab:2443/token)
*HEADERS*
**Accept**: application/json
**Authorization**: Basic dGVzdDp0ZXN0
**Content-Type:** application/x-www-form-urlencoded
*BODY PARAMS*
**grant\_type**=authorization\_code&
**code**=XXXXXXXXXXXX
|
##### Parameters
- **Authorization**: contains, coded in base 64, the **client id** and the **client secret**, as it would have been sent for a standard Basic authentication header. The identity provider will match these against the stored credentials.
- **grant\_type**: should be authorization\_code.
- **code**: should be the one-time authorization code received in the previous requested.
#### Response
| {
"access\_token":"8bDP2P...",
"refresh\_token":"gjLmSW...",
"id\_token":"eyJra.eyJ.LQ\_XtHKr.RY3A4...",
"token\_type":"Bearer",
"expires\_in":11998
}
|
- The *id\_token* tag contains the OpenId token.
- The *access\_token* tag contains the oAuth token.
Before the number of seconds specified om *expires\_in* are elapsed, the token can be renewed by invoking again the token endpoint changing the grant\_type:
#### Request
| **POS****T** [https://](https://soffid.bubu.lab:2443/token)[youridentityprovider:2443](https://soffid.bubu.lab:2443/token)[/**token**](https://soffid.bubu.lab:2443/token)
*HEADERS*
**Accept**: application/json
**Authorization**: Basic dGVzdDp0ZXN0
**Content-Type**: application/x-www-form-urlencoded
*BODY PARAMS*
**grant\_type**=refresh\_token&
**refresh\_token**=gjLmSW...
|
##### Parameters
- **Authorization**: contains, coded in base 64, the **client id** and the **client secret**, as it would have been sent for a standard Basic authentication header. The identity provider will match these against the stored credentials.
- **grant\_type**: should be refresh\_token.
- **refresh\_code**: should be refresh code received in the previous requested.
#### Response
| {
"access\_token":"8bDP2P...",
"refresh\_token":"gjLmSW...",
"id\_token":"eyJra.eyJ.LQ\_XtHKr.RY3A4...",
"token\_type":"Bearer",
"expires\_in":11998
}
|
### 2. User’s password + client credentials flow
The application asks the user for the user name and password. Then, it connects to the token endpoint to get an access token:
#### Request
| **POST** [https://](https://soffid.bubu.lab:2443/token)[youridentityprovider:2443](https://soffid.bubu.lab:2443/token)[/**token**](https://soffid.bubu.lab:2443/token)
*HEADERS*
**Accept**: application/json
**Authorization**: Basic dGVzdDp0ZXN0
**Content-Type**: application/x-www-form-urlencoded
*BODY PARAMS*
**grant\_type**=password&
**username**=USER&
**password**=PASSWORD&XXXXXXXXXXXX
|
##### Parameters
- **Authorization**: contains, coded in base 64, the client id and the client secret, as it would have been sent for a standard Basic authentication header. The identity provider will match these against the stored credentials
- **grant\_type**: should be password
- **username**: must be the user name entered by the user.
- **password**: must be the password entered by the user.
#### Response
| {
"access\_token":"8bDP2P...",
"refresh\_token":"gjLmSW...",
"id\_token":"eyJra.eyJ.LQ\_XtHKr.RY3A4...",
"token\_type":"Bearer",
"expires\_in":11998
}
|
- The *id\_token* tag contains the openid token.
- The *access\_token* tag contains the oAuth token.
Before the number of seconds specified in expires\_in are elapsed, the token can be renewed by invoking again the token endpoint:
#### Request
| **POST** [https://](https://soffid.bubu.lab:2443/token)[youridentityprovider:2443](https://soffid.bubu.lab:2443/token)[/**token**](https://soffid.bubu.lab:2443/token)
*HEADERS*
**Accept**: application/json
**Authorization**: Basic dGVzdDp0ZXN0
**Content-Type:** application/x-www-form-urlencoded
*BODY PARAMS*
**grant\_type**=refresh\_token&
**refresh\_token**=gjLmSW...
|
##### Parameters
- **Authorization**: contains, coded in base 64, the client id and the client secret, as it would have been sent for a standard Basic authentication header. The identity provider will match these against the stored credentials
- **grant\_type**: should be refresh\_token
- **refresh\_code**: should be refresh code received in the previous requested
#### Response
| {
"access\_token":"8bDP2P...",
"refresh\_token":"gjLmSW...",
"id\_token":"eyJra.eyJ.LQ\_XtHKr.RY3A4...",
"token\_type":"Bearer",
"expires\_in":11998
}
|
### 3. Closing the session
The application wants to revoke the token and session cookie:
#### Request
| **POST** https://[youridentityprovider:2443](https://soffid.bubu.lab:2443/token)/**revoke**
*HEADERS*
**Accept**: application/json
**Content-type**: application/x-www-form-urlencoded
**Authorization**: Basic dGVzdDp0ZXN0
*BODY PARAMS*
**token\_type\_hint**=token=access\_token&
**token**=8bDP2P...
|
##### Parameters
- **Authorization**: contains the encoded client id and client secret.
- **token\_type\_hint**: can have the following values:
- access\_token
- refresh\_token
- session\_cookie
- **token**: contains the authorization token, refresh\_token or session\_cookie value
### 4. Getting user attributes
All the user attributes can be extracted from the OpenID token. Anyway, it is possible to get them in a more readable format user the user-info endpoint.
#### Request
| **GET** [https://](https://soffid.bubu.lab:2443/session_cookie)[youridentityprovider:2443](https://soffid.bubu.lab:2443/token)[/**userinfo**](https://soffid.bubu.lab:2443/session_cookie)
*HEADERS*
**Accept**: application/json
**Authorization**: Bearer dGVzdDp0ZXN0
|
##### Parameters
- **Authorization**: contains a valid access token.
#### Response
| {
"sub": "admin",
"surname": "Admin",
"given\_name": "Admin",
"member\_of": \[
"TestRole2@soffid",
"TestRole@soffid"
\]
}
|
### 5. Getting a session cookie for the user
Sometimes, a mobile application has authenticated the user using the username & password grant, but wants to share this authenticated session with the underlying web browser. For such a case, the application can request a session cookie with this request:
#### Request
| **GET** [https://](https://soffid.bubu.lab:2443/session_cookie)[youridentityprovider:2443](https://soffid.bubu.lab:2443/token)[/session\_cookie](https://soffid.bubu.lab:2443/session_cookie)
*HEADERS*
**Accept**: application/json
**Authorization**: Bearer dGVzdDp0ZXN0
|
##### Parameters
- **Authorization**: contains a valid access token.
#### Response
| {
"cookie\_domain": "cookied",
"user": "pgarcia",
"cookie\_value": "5458083\_bT2CZlaa6psl/q3ue6NObxX8Q7duQKj0hAuUJIouT5Y=",
"cookie\_name": "cookien"
}
|
Please note that it is mandatory to fill in the name of the cookie in the identity provider, at the session management section
# Connecting a SAML service
## Introduction
To connect a SAML service provider, the service provider must offer you its SAML metadata. The SAML metadata contains information about its public id, the services that implement and the service endpoints.
## Register a SAML service provider
1. Open the **Identity & Service Provider** page.
`Main Menu > Administration > Configure Soffid > Web SSO > Identity & Service providers`
2. To add a new service provider, click on the **Add Service Provider** button.
Be in mind that you can configure more than one Entity Group and you could add new service providers in each one.
3. Then you must fill in the required fields. Also, you need to provide the identity provider metadata. You can either copy it from the Soffid federation page or instruct the service provider to download the federation metadata by itself.
[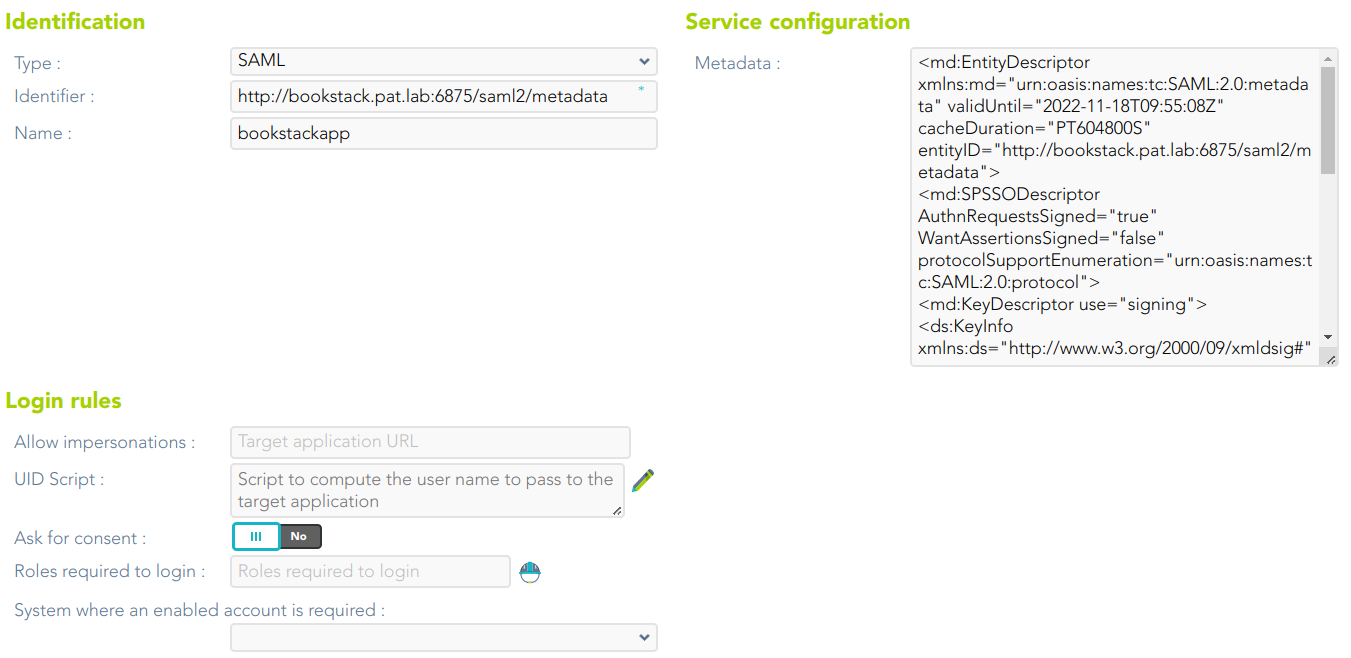](https://bookstack.soffid.com/uploads/images/gallery/2023-07/image-1689237747516.png)
For more information about the attributes, you can visit [the SAML detailed info](https://bookstack.soffid.com/link/392#bkmrk-openid-connecthttps://bookstack.soffid.com/link/392#bkmrk-saml).
4. To publish the federation members metadata, the main sync server exports the members metadata at the path /SAML/metadata.xml. Thus, if your sync server is listening at soffid1.your.domain, you can get the whole federation metadata document from https://soffid1.your.domain:760/SAML/metadata.xml.
5. After some seconds, up to five minutes, every federation member will notice any change.
# Connecting Soffid console
## Introduction
Soffid console has a built-in SAML client, so it can act as a service provider in the Soffid federation. It is interesting to use this configuration, as it allows you to enforce the use of two factors authentication to log into the Soffid console.
### Register Soffid as a service provider
1. Enable the SAML protocol in the Soffid console:
1.1. Open the **Authentication** page:
`Main Menu > Administration > Configure Soffid > Security settings > Authentication`
1.2. You must enable the **External XAML identity provider**.
1.3. Then you must fill in the fields:
[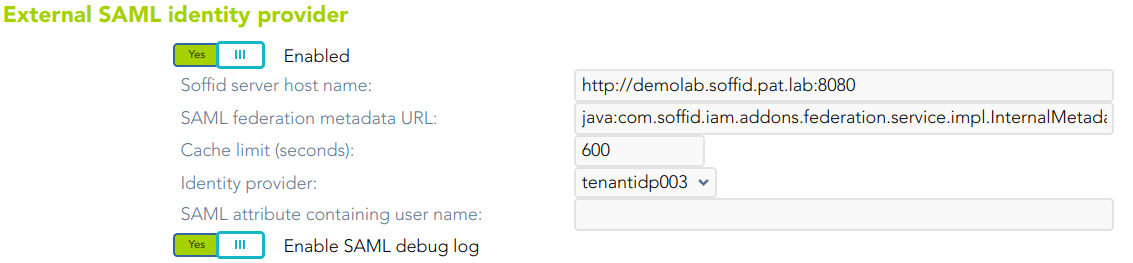](https://bookstack.soffid.com/uploads/images/gallery/2023-07/image-1689256229585.png)
- **Soffid server host name**: URL of the Soffid console.
- **SAML federation metadata URL**: URL where the whole federation metadata can be obtained. It used to be [https://your.primary.sync.server:760/SAML/metadata.xml ](https://your.primary.sync.server:760/SAM/metadata.xml)Sometimes, an error as "unable to find valid certification path to requested target" could be displayed.
In that case, you must obtain the public certificate from the sync server and store in your Java trusted certs repository. To do that, use the keytool command. The trusted certs repository is located at <JAVA\_HOME>/lib/security/cacerts
The command should look like the next one. When prompted for a password type in "changeit"
| root@myserver:~$ /usr/lib/jvm/java-8-openjdk-amd64/jre/bin/keytool
-import -file /tmp/RootCA -trustcacerts -alias syncserver
-keystore /usr/lib/jvm/java-8-openjdk-amd64/jre/lib/security/cacerts
|
- **Cache limit (seconds)**: the amount of time the metadata should be kept in memory before refreshing.
- **Identity provider**: after reading the federation metadata, this drop-down box lets you select any identity provider present at the federation. Usually, you will select the Soffid IdP.
2. Download Soffid console metadata:
2.1. Open the **Authentication** page:
`Main Menu > Administration > Configure Soffid > Security settings > Authentication`
2.1. Click the **Download metadata** button and save the file.
[](https://bookstack.soffid.com/uploads/images/gallery/2023-07/image-1689329490746.png)
This XML file is the metadata descriptor for the console, including a self-signed certificate generated to sign SAML requests.
The XML file will be like the next one:
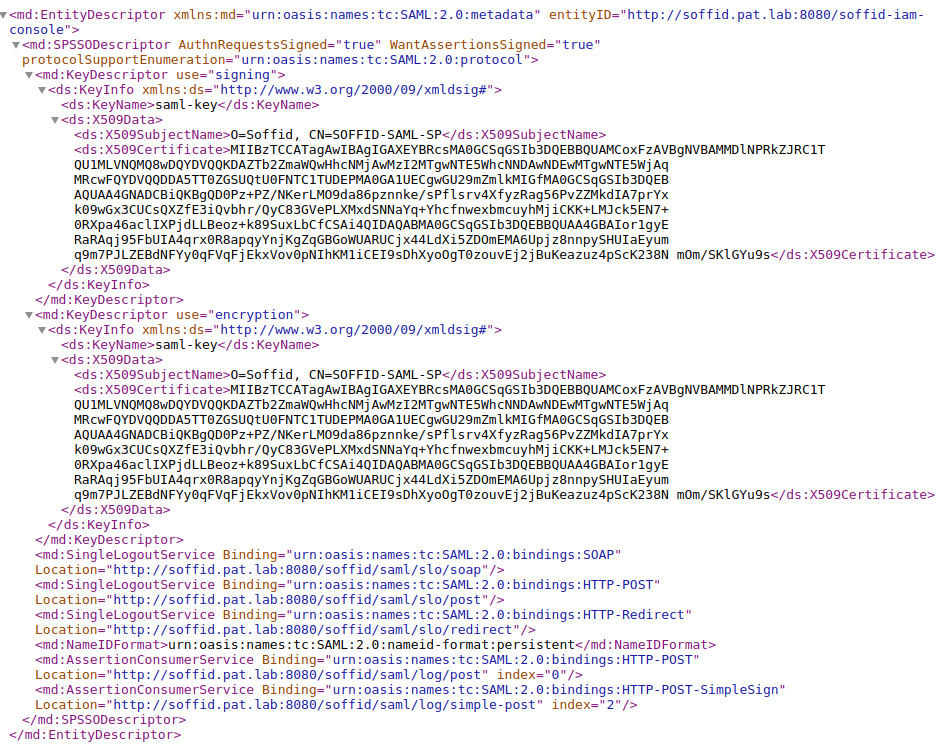
3. Register Soffid Metadata in the third-party Identity Provider.
4. You can use the Wizard to Add Applications
[](https://bookstack.soffid.com/uploads/images/gallery/2023-07/image-1689334608813.png)
For more information, visit [the Add Applications page.](https://bookstack.soffid.com/books/configuration-wizard/page/add-applications-qO4)
5. Test it
5.1. Next time you log into the Soffid console, a new button will appear for **External (XAML) login**
[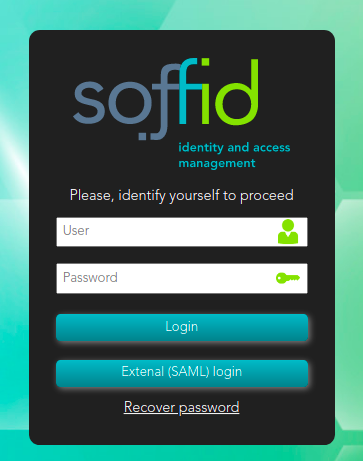](https://bookstack.soffid.com/uploads/images/gallery/2021-12/image-1640009166065.png)
**5.2.** Click on the External (SAML) login button, and the user will be forwarded to the identity provider.
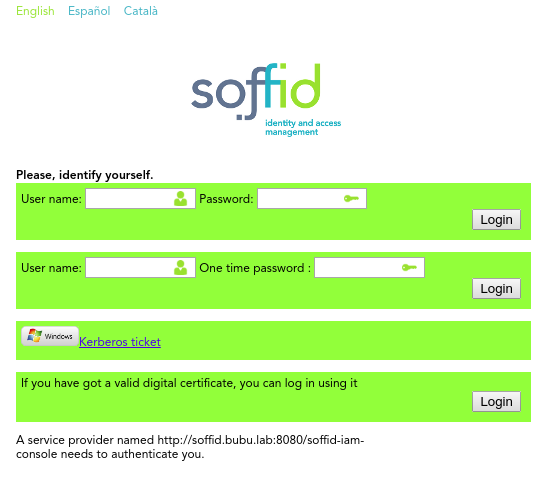
# Connecting your custom applications
## Introduction
SAML 2.0 is a complex and not easy to implement standard. There are some libraries that can help somewhat, but a correct implementation needs a deep knowledge of SAML protocol, and is always hard to test and debug.
To make it easier, Soffid provides some JSON rest web services, that can help any application to correctly implement the SAML service provider part of the protocol.
## Data flow
The following diagram, shows the resulting data flow between the end user, your application, the identity provider and Soffid web services:
### Data flow steps
1. The end-user requests access to a protected page
2. The custom application can check the user identity looking up a session variable. By the time being, the user is not authenticated.
3. The custom application issues a JSON request to Soffid web service. In turn, Soffid web service builds, signs and maybe encrypts a SAML request
4. Then custom application taks the JSON request and builds an HTTP Redirect response with the received data.
5. The identity provider identifies the user as usual.
6. The custom application receives the SAML response. At this point, the application packs and forwards the received data to Soffid Web Service.
7. Soffid Web Service decrypts and checks SAML response integrity and correctnes, and returns a JSON document specifying the success or failure status, and the underlying identity attributes. If needed, Soffid web service can provision a new identity in target systems on the fly.
8. The custom application gets the identity data, stores it in a session variable and provides the protected resource to the end user.
In order to get it, will be necessary:
1. Declare the custom application as an internal service provider in the federation page.
2. Create a Soffid application account for the custom application.
3. Implement the protection filters.
4. Implement the endpoint where the SAML response must be sent.
## Example
### 1. Creating an internal service provider
You can create an internal service provider as a SAML service provider.
### 2. SAML Request generator
After deploying Soffid SAML addon, a web service to generate SAML request will be automatically deployed. This web service requires an account with the **federation:serviceProvider** authorization.
The endpoint will be locate in Soffid Console:
[http://your.soffid.console:8080/webservice/federation/rest/generate-saml-request](http://your.soffid.console:8080/webservice/federation/rest/generate-saml-request)
Method:
```POST`
Headers to include in the request:
`Accept = “application/json”`
`Content-Type = “application/json”`
Request: Send a JSON decument with following fields:
`user → suggested user to authenticate (optional)`
`identityProvider → identity provider public ID. Must match the public ID of any`
`identity provider registered in Soffid federation.`
`serviceProviderName → service provider which requests the user`
`authentication. Must match the public ID of an internal service provider`
`sessionSeconds → max time for the user session inactivity`
Response:
`method → Method to use: urn:oasis:names:tc:SAML:2.0:bindings:HTTP-POST`
`instructs the application to build a HTML Form that automatically submits the`
`following parameters. Value urn:oasis:names:tc:SAML:2.0:bindings:HTTP-Redirect`
`instructs the application to perform a redirect (Location HTTP header) with the`
`URL and parameters specified`
`parameters → every parameter included must be submited to the identity`
`provider. Usually, these two will be present:`
`RelayState → identifier of the ticket of the SAML request`
`SAMLRequest → encoded SAML request`
`url → identity provider endpoint.`
Request sample:
| {
"user" : "myuser@soffid.poc",
"identityProvider" : "my-service-provider",
"serviceProviderName" : "https://idp.soffid.com",
"sessionSeconds" : "3600"
}
|
Response sample:
| {
"method": "urn:oasis:names:tc:SAML:2.0:bindings:HTTP-Redirect",
"parameters": {
"RelayState":
"\_457cab260c4948ef4c6d35a67cac000d3348d1ec48f53215",
SAMLRequest":
“PD94bWwgdmVyc2lvbj0iMS4wIiBlbmNvZGluZz0iVVRGLTgiPz48c2FtbDJ..."
},
"url": "https://idp.soffid.com/SAML/Redirect"
}
|
### 3.
In turn, your application will issue the following location header to the browser
| Location: https://idp.soffid.com/SAML/Redirect?RelayState=\_457cab260c4948ef4c6d35a67cac000d3348d1ec48f53215&SAMLRequest=PD94bWwgdmVyc2lvbj0iMS4wIiBlbmNvZGluZz0iVVRGLTgiPz48c2FtbDJ...
|
Should the method be urn:oasis:names:tc:SAML:2.0:bindings:HTTP-POST, your application should build an HTML similar the following one:
### 4. SAML Response endpoints
Your application must implement the SAML response endpoint. This endpoint must accept the POST method and forward each received parameter to Soffid's parse-saml-response. Mind that your endpoint must accept application/x-www-form-urlencoded parametern while Soffid service accepts application/json.
Soffid endpoint will be located in Soffid Console:
`http://your.soffid.console:8080/webservice/federation/rest/generate-saml-request`
Method:
`POST`
Headers:
`Accept = “application/json”`
`Content-Type = “application/json”`
Authentication:
Use your application account to login using basic authentication schema. In multitenant environments, the user name will have the forma TENANT\_NAME\\ACCOUNT\_NAME
Request: send a JSON document with following fields
`autoProvision → [false|true] Set to true if you want Soffid to automatically enroll`
`unknown identities. This is not normally needed if you are using Soffid IdP, but it's`
`useful when using third party IdPs.`
`response: JSON object with any parameter received in post method.`
`RelayState → identifier of the ticket of the SAML response`
`SAMLResponse → encoded SAML response`
`protocol → use always “urn:oasis:names:tc:SAML:2.0:bindings:HTTP-POST”`
`serviceProviderName → service provider which requests the user authentication`
Response:
`authentication → [yes|no]`
`failureMessage → if authentication=”no”, a message with the error cause.`
`principalName → account name, as sent by the IdP`
`user → Soffid identity with standard attributes`
`attributes → Soffid identity custom attributes`
`sessionId → session identifier`
##### Example data received by your endpoint
| POST /saml-receiver
Host: my-service-provider
Content-Type: application/x-www-form-urlencoded
RelayState=\_523866242f943b4c63234dc8942ffc2f08cea03aa129a4e2&SAMLResponse=PD94bWwgdmVyc2lvbj0iMS4wIiBlbmNvZGluZz0iVVRGLTgiPz48c2FtbDJ.…
|
##### Example request
| {
"autoProvision" : false,
"response" : {
"RelayState":
"\_523866242f943b4c63234dc8942ffc2f08cea03aa129a4e2",
"SAMLResponse":
"PD94bWwgdmVyc2lvbj0iMS4wIiBlbmNvZGluZz0iVVRGLTgiPz48c2FtbDJ...."
},
"protocol" : "urn:oasis:names:tc:SAML:2.0:bindings:HTTP-POST",
"serviceProviderName" : "my-service-provider"
}
|
##### Example response
| {
"authentication": "yes",
"principalName": "your-name@somedomain.com",
"user": {
"id": 123456,
"userName": "your-id",
"firstName": "Your",
"lastName": "Name",
"primaryGroup": "enterprise",
"active": true,
"shortName": "your-name",
"mailDomain": "somedomain.com"
},
"attributes": {
"employeeId": "AS14567"
},
"sessionId": "ABCTASHO54684A"
}
|
# Openid-connect to SAML interoperability
## Introduction
**OpenID-Connect** has a clear design suitable for both frontend and backend.
**SAML** has a clear design for the frontend, but the backend usage is harder as the security in SAML cannot be placed at transport layer. Instead, in must be placed at document level. Additionally, it requires intensive use of cryptographic algorithms for signature and encryption.
That’s why some applications put a SAML frontend protection for both the frontend and relay on the session cookies generated by the fronted for backend access.
The problem arises when one service provider needs to invoke some services from a SAML enabled application that does not support or implement WS-Security.
To solve it, **Soffid Identity Provide**r provides a service to get the session cookies required to access to a SAML application.
## Data flow
The rest service **/userinfo/impersonate?url=….** will do the job, and will return the cookies to use to act upon the target application impersonating the current user.
#### Request
| POST [https://<YOUR\_SERVER>:2443/](https://soffid.bubu.lab:2443/token)userinfo/impersonate?url=http://targetapplication/
Accept: application/json
Content-type: application/x-www-form-urlencoded
Authorization: Basic dGVzdDp0ZXN0
\[
{
"path":"/",
"domain":"samltest.id",
"name":"\_shibsession\_64656661756c7468747470733a2f2f73616d6c746573742e69642f73616d6c2f7370",
"value":"\_fa49874951dd05c18a0f68642c0736e9"
},
{
"path":"/",
"domain":"samltest.id",
"name":"\_opensaml\_req\_ss%3Amem%3A88b0af3e1ff47c911257490bc1a5749dfda1670948a563cec2fdf9e8a799f2c4",
"value":""
}
\]
|
##### Parameters
- **URL**: is the access URL for the target application.
- **Authorization**: contains the oauth token.
#### Response
The response contains the list of cookies to send to the target application.
| \[
{
"path":"/",
"domain":"samltest.id",
"name":"\_shibsession\_64656661756c7468747470733a2f2f73616d6c746573742e69642f73616d6c2f7370",
"value":"\_fa49874951dd05c18a0f68642c0736e9"
},
{
"path":"/",
"domain":"samltest.id",
"name":"\_opensaml\_req\_ss%3Amem%3A88b0af3e1ff47c911257490bc1a5749dfda1670948a563cec2fdf9e8a799f2c4",
"value":""
}
\]
|
#### Request
Once the application has got the list of cookies, it can invoke the target application URL
| POST [https://targetapplication/api/service1](https://targetapplication/api/service1)
Accept: application/json
Content-type: application/json
Cookie: cookie1=value1
|
As security measures, the impersonation profile must be enabled, and the source application must be entitled to use it against the target application
# Openid-connect Dynamic Register
## Introduction
Openid-connect allows a service provider registers dynamically other service providers.
## Dynamic Register
To dynamically register a client, acquire an initial access token, and then register the new application by using the registration API. You can get the access token from Soffid.
#### Register Server
##### Request
```shell
POST https://:2443/register
```
**Authorization**
- **Authorization**: contains the Bearer Token.
**Header**
- **Content-type**: application/x-www-form-urlencoded
**JSON**
```shell
{
"application_type": "web",
"redirect_uris":
["https://client.example.org/callback",
"https://client.example.org/callback2"],
"client_name": "My Example 7",
"logo_uri": "https://client.example.org/logo.png",
"subject_type": "pairwise",
"token_endpoint_auth_method": "client_secret_basic",
"jwks_uri": "https://client.example.org/my_public_keys.jwks",
"userinfo_encrypted_response_alg": "RSA1_5",
"userinfo_encrypted_response_enc": "A128CBC-HS256",
"contacts": ["ve7jtb@example.org", "mary@example.org"],
"request_uris":
["https://client.example.org/rf.txt#qpXaRLh_n93TTR9F252ValdatUQvQiJi5BDub2BeznA"]
}
```
##### Response 200 OK
```shell
{
"client_secret_expires_at": 0,
"registration_client_uri": "https://iam-sync-tenantidp.soffidnet:2443/register?client_id=DR_7",
"client_secret": "wBeH8G6hT2GRwr7jJ6HfX2lMJDGdwGi9M49SKF2MjHRGOtwZ",
"redirect_uris": [
"https://client.example.org/callback",
"https://client.example.org/callback2"
],
"registration_access_token": "NjYxODg1Ng.AFa8jQbltq+bocWQpT3okPvHXHrTM+HqXQC26Kz5mfAWfXWG",
"client_name": "My Example 7",
"client_id": "DR_7"
}
```
#### Client read request
##### Request
```shell
GET https://:2443/register?client_id=DR_7
```
**Authorization**
- **Authorization**: contains the Bearer Token. It contains the registration\_access\_token Token received as the response when the server was registered.
**Header**
- **Content-type**: application/json
**Params**
- **client\_id**
##### Response
```shell
{
"client_secret_expires_at": 0,
"registration_client_uri": "https://iam-sync-tenantidp.soffidnet:2443/register?client_id=DR_7",
"redirect_uris": [
"https://client.example.org/callback",
"https://client.example.org/callback2"
],
"client_name": "My Example 7",
"client_id": "DR_7"
}
```
####
# Connecting CAS client
## Introduction
The CAS protocol is a simple and powerful ticket-based protocol. It involves one or many clients and one server. Clients are embedded in CASified applications (called “CAS services”) whereas the CAS server is a standalone component.
## Register CAS client
1. Open the **Identity & Service Provider** page.
`Main Menu > Administration > Configure Soffid > Web SSO > Identity & Service providers`
2. To add a new service provider, click on the **Add Service Provider** button.
Be in mind that you can configure more than one Entity Group and you could add new service providers in each one.
3. Then you must fill in the required fields. Also, you need to provide the identity provider metadata. You can either copy it from the Soffid federation page or instruct the service provider to download the federation metadata by itself.
## [](https://bookstack.soffid.com/uploads/images/gallery/2022-08/image-1661408241083.png)
For more information about the attributes, you can visit [the CAS client detailed info](https://bookstack.soffid.com/link/392#bkmrk-cas-client).
# Connecting Tacacs+
## Introduction
TACACS (**Terminal Access Controller Access Control System**) is a security protocol that provides centralized validation of users who are attempting to gain access to a router or NAS
TACACS+ is a protocol for AAA services:
- Authentication
- Authorization
- Accounting
## Register Tacas+
1. Open the **Identity & Service Provider** page.
`Main Menu > Administration > Configure Soffid > Web SSO > Identity & Service providers`
2. To add a new service provider, click on the **Add Service Provider** button.
Be in mind that you can configure more than one Entity Group and you could add new service providers in each one.
3. Then you must fill in the required fields. Also, you need to provide the identity provider metadata. You can either copy it from the Soffid federation page or instruct the service provider to download the federation metadata by itself.
[](https://bookstack.soffid.com/uploads/images/gallery/2023-04/image-1681221680349.png)
For more information about the attributes, you can visit [the Tacacs+ detailed info](https://bookstack.soffid.com/link/392#bkmrk-tacacs%2B).
When a Tacacs Service Provider is created, Soffid creates an Information System
[](https://bookstack.soffid.com/uploads/images/gallery/2023-04/image-1681221732876.png)
There are some roles defined for this Information System (0: anonymous, 1: user, ....15: root)
[](https://bookstack.soffid.com/uploads/images/gallery/2023-04/image-1681221803826.png)
# Connecting Radius client
## Introduction
The Radius protocol (Remote Authentication Dial-In User Service) is a networking protocol that authorizes and authenticates users who access a remote network.
## Register a Radius client
1. Open the **Identity & Service Provider** page.
`Main Menu > Administration > Configure Soffid > Web SSO > Identity & Service providers`
2. To add a new service provider, click the **Add Service Provider** button.
Be in mind that you can configure more than one Entity Group and you could add new service providers in each one.
3. Then, you must fill in the required fields. Also, you need to provide the identity provider metadata. You can either copy it from the Soffid federation page or instruct the service provider to download the federation metadata by itself.
[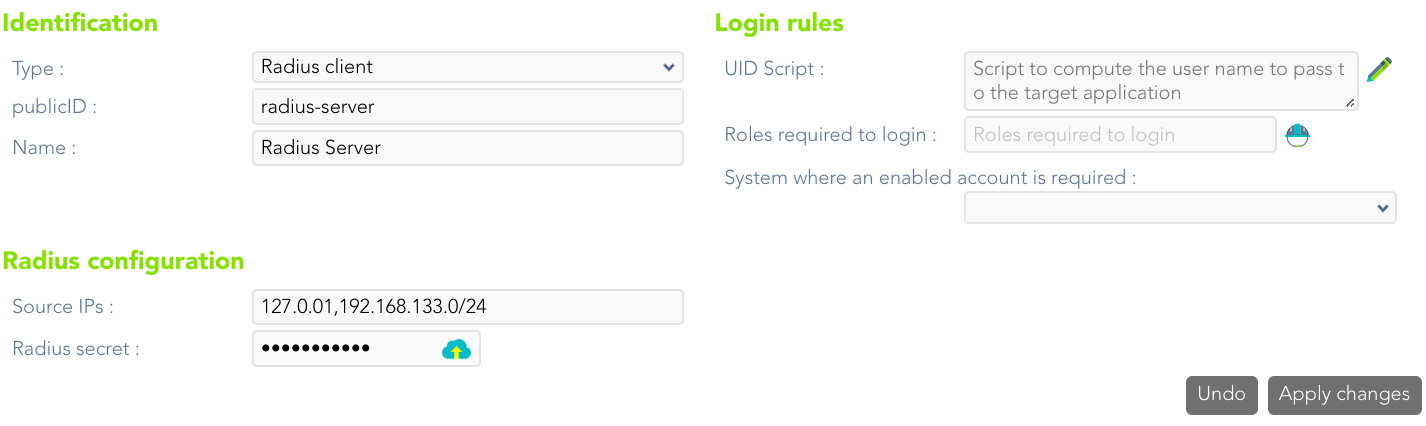](https://bookstack.soffid.com/uploads/images/gallery/2023-07/image-1689336949656.png)
For more information about the attributes, you can visit [the Radius detailed info.](https://bookstack.soffid.com/link/392#bkmrk-radius-client)
# Web services reference
# validate-domain
##### Definition
- This operation allows to validate the user domain and return the IDP ower of the user.
##### URL
- <console-domain>/webservice/federation/rest/validate-domain
##### Method
- POST
##### Headers
- Accept = “application/json”
- Content-Type = “application/json”
##### Authentication
- Use the “admin” user of the Soffid IAM Console
##### Request (body JSON)
- domain → domain of the user (right side of the email)
```
{
"domain" : "arxus.eu"
}
```
##### Response (JSON)
- exists → \[yes|no\]
- identityProvider → identity provider public ID
```
{
"exists": "yes",
"identityProvider": "http://stasts-sof.arxus.eu/adfs/services/trust"
}
```
# validate-credentials
##### Definition
- This operation allows to validate the credentials of the user against Soffid.
##### URL
- <console-domain>/webservice/federation/rest/validate-credentials
##### Method
- POST
##### Headers
- Accept = “application/json”
- Content-Type = “application/json”
##### Authentication
- Use an account with **[federation:serviceProvider](http://federationserviceprovider/)** permission
##### Request (body JSON)
- user → user (or nick or alias)
- password → password of the user
- identityProvider → identity provider public ID
- serviceProviderName → service provider which requests the user authentication
- sessionSeconds → max time for the user session inactivity
```western
{
"user" : "edmond.halley",
"password" : "12345",
"identityProvider" : "my-service-provider",
"serviceProviderName" : "https://idp.soffid.com",
"sessionSeconds" : "3600"
}
```
##### Response (JSON)
- authentication → \[yes|no\]
- principalName → account name
- failureMessage → if authentication=”no”, a description text of the error
- user → account owner identity standard attributes
- attributes → account owner identity custom attributes
- sessionId → session identifier
```western
{
"valid": true,
"sessionCookie": "_2307e8b5566ba600be64508a132f7f40c4578928733f2c3c:hRoFimsCGZSau7zjbWeVocTv13WAaui7dj00A7F39dM0R+daKHPQVi2WiAbhB/rV776S0TW5JXq7/9HjV0zo0h4E7AW72tCUD9I/8UD4VP5oTRWgR6xTP3mUwhn5NCuiHOE02kuITf6l3y6ZrUOBA6qVFo/Twlfhww9dZ2l7NrdrO/s3K40L",
"attributes": {},
"user": {
"lastName": "Halley",
"createdByUser": "csvIDs",
"modifiedDate": "2017-12-15T11:01:02+01:00",
"userType": "I",
"shortName": "edmond.halley"
},
"identityProvider": "soffid"
}
```
# expire-session
##### Definition
- This operation allows to close a session created by either validate-credentials or parse-saml-response. If you want to get real global logout, this method invocation is not enough. You should also use the generate-saml-logout-request method.
##### URL
- <console-domain>/webservice/federation/rest/expire-session
##### Method
- POST
##### Headers
- Accept = “application/json”
- Content-Type = “application/json”
##### *Authentication*
- Use an account with **[federation:serviceProvider](http://federationserviceprovider/)** permission
##### Request (body JSON)
- sessionId → session id obtained from prior parse-saml-response or validate-credentials invocation
##### Response (JSON)
- sessionId → id of closed session
```
{
"sessionId" : "_8164940b408c1508dfd84525a3ef568475f317085cf36e7d:rvJgZnMfsWUbQWlXdhTcVGgI3mC2qXJC..."
}
```
# generate-saml-request
Definition
- This operation allows to generate a SAML request to an external IDP.
##### URL
- <console-domain>/webservice/federation/rest/generate-saml-request
##### Method
- POST
##### Headers
- Accept = “application/json”
- Content-Type = “application/json”
##### Authentication
- Use an account with **[federation:serviceProvider](http://federationserviceprovider/)** permission
##### Request (body JSON)
- user → user (or nick or alias)
- identityProvider → identity provider public ID
- serviceProviderName → service provider which requests the user authentication
- sessionSeconds → max time for the user session inactivity
```western
{
"user" : "lucasfr@soffid.poc",
"identityProvider" : "http://stasts-sof.arxus.eu/adfs/services/trust",
"serviceProviderName" : "http://portal.arxus.com",
"sessionSeconds" : "3600"
}
```
##### Response (JSON)
- method → \[POST|GET\]
- parameters
- RelayState → identifier of the ticket of the SAML request
- SAMLRequest → encoded SAML request
- url → form’s target URL
```
{
"method": "urn:oasis:names:tc:SAML:2.0:bindings:HTTP-POST",
"parameters": {
"RelayState": "_457cab260c4948ef4c6d35a67cac000d3348d1ec48f53215",
"SAMLRequest": "PD94bWwgdmVyc2lvbj0iMS4wIiBlbmNvZGluZz0iVVRGLTgiPz48c2FtbDJ
wOkF1dGhuUmVxdWVzdCB4bWxuczpzYW1sMnA9InVybjpvYXNpczpuYW1lczp
YzpTQU1MOjIuMDpwcm90b2NvbCIgQXNzZXJ0aW9uQ29uc3VtZXJTZXJ2aWN
lVVJMPSJodHRwczovL3BvcnRhbC5hcnh1cy5jb206NDQzL1NBTUwtcmVzcG9uc2UiIEZvcmNlQXV0aG49ImZhbHNlI
iBJRD0iXzQ1N2NhYjI2MGM0OTQ4ZWY0YzZkMzVhNjdjYWMwMDBkMzM0OGQxZ
WM0OGY1MzIxNSIgSXNzdWVJbnN0YW50PSIyMDE4LTAxLTExVDEyOjEzOjA0L
Y2NFoiIFZlcnNpb249IjIuMCI+PHNhbWwyOklzc3VlciB4bWxuczpzYW1sMj0idXJuOm9hc2lzOm5hbWVzOnRjOlN
TUw6Mi4wOmFzc2VydGlvbiI+aHR0cDovL3BvcnRhbC5hcnh1cy5jb208L3NhbWwyOklzc3Vlcj48c2FtbDI6U3Via
mVjdCB4bWxuczpzYW1sMj0idXJuOm9hc2lzOm5hbWVzOnRjOlNBTUw6Mi4wO
mFzc2VydGlvbiI+PHNhbWwyOk5hbWVJRCBGb3JtYXQ9InVybjpvYXNpczpuY
W1lczp0YzpTQU1MOjEuMTpuYW1laWQtZm9ybWF0OmVtYWlsQWRkcmVzcyI+b
HVjYXNmckBzb2ZmaWQucG9jPC9zYW1sMjpOYW1lSUQ+PC9zYW1sMjpTdWJqZ
WN0Pjwvc2FtbDJwOkF1dGhuUmVxdWVzdD4="
},
"url": "https://stasts-sof.arxus.eu/adfs/ls/"
}
```
# parse-saml-response
##### Definition
- This operation allows to validate a SAML response generated by another external IDP that support SAML protocol.
##### URL
- <console-domain>/webservice/federation/rest/parse-saml-response
##### Method
- POST
##### Headers
- Accept = “application/json”
- Content-Type = “application/json”
##### Authentication
- Use an account with **[federation:serviceProvider](http://federationserviceprovider/)** permission
##### Request (URL parameter)
- autoProvision → \[false|true\] (currently only false functionality is implemented)
- response
- RelayState → identifier of the ticket of the SAML response
- SAMLResponse → encoded SAML response
- protocol → use always “[urn:oasis:names:tc:SAML:2.0:bindings:HTTP-POST](http://urnoasisnamestcsaml:2.0:bindings:HTTP-POST)”
- serviceProviderName → service provider which requests the user authentication
```western
{
"autoProvision" : false,
"response" : {
"RelayState": "_523866242f943b4c63234dc8942ffc2f08cea03aa129a4e2",
"SAMLResponse": "PD94bWwgdmVyc2lvbj0iMS4wIiBlbmNvZGluZz0iVVRGLTgiPz48c2FtbDJ
wOkF1dGhuUmVxdWVzdCB4bWxuczpzYW1sMnA9InVybjpvYXNpczpuYW1lczp
0YzpTQU1MOjIuMDpwcm90b2NvbCIgQXNzZXJ0aW9uQ29uc3VtZXJTZXJ2aWN
lSW5kZXg9IjEiIEFzc2VydGlvbkNvbnN1bWVyU2VydmljZVVSTD0iaHR0cHM6Ly9hYmM6NDQzLy94eHgiIERlc3Rpb
mF0aW9uPSJodHRwczovL3N0YXN0cy5hcnh1cy5ldS9hZGZzL2xzLyIgRm9yY2VBdXRobj0iZmFsc2UiIElEPSJfNTI
zODY2MjQyZjk0M2I0YzYzMjM0ZGM4OTQyZmZjMmYwOGNlYTAzYWExMjlhNGU
yIiBJc3N1ZUluc3RhbnQ9IjIwMTctMTItMjJUMTQ6NTU6MjAuODYyWiIgUHJvdG9jb2xCaW5kaW5nPSJ1cm46b2Fza
XM6bmFtZXM6dGM6U0FNTDoyLjA6YmluZGluZ3M6SFRUUC1SZWRpcmVjdCIgV
mVyc2lvbj0iMi4wIj48c2FtbDI6SXNzdWVyIHhtbG5zOnNhbWwyPSJ1cm46b2FzaXM6bmFtZXM6dGM6U0FNTDoyLjA
6YXNzZXJ0aW9uIj5odHRwOi8vcG9ydGFsLmFyeHVzLmNvbTwvc2FtbDI6SXN
zdWVyPjxzYW1sMjpTdWJqZWN0IHhtbG5zOnNhbWwyPSJ1cm46b2FzaXM6bmF
tZXM6dGM6U0FNTDoyLjA6YXNzZXJ0aW9uIj48c2FtbDI6TmFtZUlEIEZvcm1
hdD0idXJuOm9hc2lzOm5hbWVzOnRjOlNBTUw6Mi4wOm5hbWVpZC1mb3JtYXQ6cGVyc2lzdGVudCI+
ZWRtb25kLmhhbGxleTwvc2FtbDI6TmFtZUlEPjwvc2FtbDI6U3ViamVjdD48L3NhbWwycDpBdXRoblJlcXVlc3Q+"
},
"protocol" : "urn:oasis:names:tc:SAML:2.0:bindings:HTTP-POST",
"serviceProviderName" : "https://stasts.arxus.eu/adfs/ls/"
}
```
##### Response (JSON)
- authentication → \[yes|no\]
- failureMessage → if authentication=”no”, a description text of the error
- principalName → account name
- user → account owner identity standard attributes
- attributes → account owner identity custom attributes
- sessionId → session identifier
# generate-saml-logout-request
##### Definition
- This operation allows to generate a SAML logout request to be sent to a IdP supporting SAML Global Logout, including Soffid IdP.
- <console-domain>/webservice/federation/rest/generate-saml-logout-request
- Accept = “application/json”
- Content-Type = “application/json”
- Use an account with **federation:serviceProvider** permission
- user → Id of the user to log out
- force → set to false if you want to give a chance to the end user to abort logout process. Set to true otherwise.
- backChannel → set to true if you want to send the logout process via SOAP to the identity provider. Set to false if you want to send the logout process using a Redirect or HTML Form. The later allows interaction between the end user and the identity provider.
- serviceProviderName → service provider that notifies user logout
- identityProvider → identity provider to send the logout request
- parameters → parameters to send to identity provider.
- RelayState → identifier of the request id
- SAMLRequest → encoded SAML request
- method → method to use: urn:oasis:names:tc:SAML:2.0:bindings:HTTP-POST, urn:oasis:names:tc:SAML:2.0:bindings:HTTP-Redirect or urn:oasis:names:tc:SAML:2.0:bindings:SOAP
- url → url where to send the request