Web SSO
- ⏰ Getting started
- Attribute definition
- Attribute sharing policies
- Identity & Service providers
- Shared signals & events members
⏰ Getting started
Introduction
To configure the Web SSO you must complete the next steps
1. Attribute definition: add the necessary attributes if they are not in the list.
2. Attribute sharing policies: define the proper attribute sharing policies to determine which attributes will be shared. The policies will apply to those IdPs that meet the conditions defined in the policy. You can define public policies that apply to all IdPs, or specific policies that only apply to certain IdPs.
3. Identity & Service providers: configure the identity and the service provider.
Soffid performs the validation in the following order
1. Login: first of all, it checks the login, if the access is correct then follow the next step
2. Policies: then, it checks the attribute sharing policies. Soffid checks all policies and applies the ones that meet the conditions.
3. Attributes: For policies that result in Yes or True, the attribute conditions will be evaluated. The attributes will be shared when the conditions are true.
Attribute definition
Description
The attribute definition page displays all the auto-generated user attributes. Those attributes will be the attributes to deliver from the identity providers to the service providers depending on the defined rules.
Soffid has a default implementation for common attributes like FullName or uid, but you can modify it by creating a custom script.
Screen overview

Custom attributes
- Name: a descriptive name.
- ShortName: short name to be used by SAML 2 service providers (without blanks).
- Oid: OID to be used by SAML 1 and SAML 2 service providers.
- OpenID name: OpenID name to be used by OAuth and OpenID connect service provider.
- Radius ID: Radius ID name.
- Value: an attribute value. Allows you to define a BeanShell script to determine the value of the attribute.
Examples
Soffid IdP has a default implementation for common attributes like FullName or uid, but you can modify it by creating a custom script. You can use the custom script to define the value of an attribute.
Examples to define the value of an attribute.
Example 1
Return full name in upper case:
return fullName.toUpperCase();Example 2
Send one value if an attribute is blank. Otherwise, its value:
return
    attributes{"company"} == null ||
    attributes{"company"}.isEmpty() ?
        "Soffid" :
        attributes{"company"}
Example 3
Use serverService to fech the OU attribute of the account owned by the user in the Active Directory (AD) system:
for (account: serverService.getUserAccounts(id, "ad")) {
    return account{"attributes"}{"ou"};
}
return null;
Actions
Attribute definition query
|
Add new |
Allows you to add a new attribute definition in the system. You can choose that option on the hamburger menu or clicking the add button (+). To add a new it is necessary to fill in the required fields. |
| Delete |
Allows you to remove one or more Attribute definitions by selecting one or more records and next clicking the button with the subtraction symbol (-). To perform that action, Soffid will ask you for confirmation, you could confirm or cancel the operation. |
| Import |
Allows you to upload a CSV file with the attribute definition to add or update attribute definition to Soffid. First, you need to pick up a CSV file, that CSV has to contain a specific configuration. Then you need to check the content to be loaded, it is allowed to choose if you want or not to load a specific attribute. And finally, you need to select the mappings for each column of the CSV file to import the data correctly and to click the Import button. |
|
Download CSV file |
Allows you to download a CSV file with the basic information of all attribute definitions. |
Attribute definition detail
|
Delete |
Allows you to save the data of a new Attribute definition or to update the data of a specific Attribute definition. To save the data it will be mandatory to fill in the required fields. |
|
Save |
Allows you to download a csv file with the basic information of the Attribute definition. |
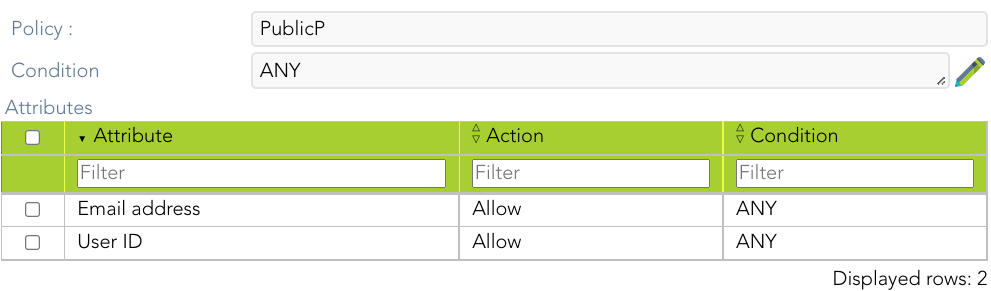
Attribute sharing policies
Description
After defining the attributes to publish, it’s required to write a policy that defines which attributes will be allowed to share with each service provider.
Soffid allows you to define security rules that apply to any attribute that should be delivered from identity providers to service providers.
Custom attributes
- Policy: policy name.
- Condition (policy): a boolean expression that will be evaluated first. If this expression evaluates to false, the rule is completely ignored. It is used to evaluate to which applies the policy.
- Attributes List: allows you to add attributes with the proper condition for each one.
- Attribute: allows you to select an attribute from the attribute list. Those attributes are defined at the Attribute definition page.
- Allow: if selected value is Yes, the attribute will be shared when the condition was true. If selected value is No, the attribute will no be shared.
- Condition (shared attributes): a boolean expression to be evaluated. Allows you to customize a condition to evaluated and decide if the attribute should or not be delivered
Condition
It is a boolean expression to be evaluated. The condition will be evaluatuated when the Allow value was yes. You can use the conditions to configure the conditions policy and to configure the shared attributes.
The boolean operator are the follow:
- ANY: the result will always be true.
- OR: the result will be true if any of its subexpressions are true
- AND: the result will be true if all of its subexpressions are true.
- Attribute requester: the result will be true if the service provider public id equals the specified value. Optionally, the ignore case checkbox will ignore upper and lower case differences.
- Attribute Issuer: the result will be true if the identity provider public id equals the specified value. Optionally, the ignore case checkbox will ignore upper and lower case differences.
- PrincipalName: the result will be true if the principal name equals the specified value. Optionally, the ignore case checkbox will ignore upper and lower case differences. Mind that some service providers want to use the email address as PrincipalName. Some others use the account name or X.509 subject name.
- Authentication Method: the result will be true if the used authentication method equals the specified value. Optionally, the ignore case checkbox will ignore upper and lower case differences. Some useful values are:
- When using SAML, it contains the standard SAML identifier corresponding to the used authentication method. When multifactor authentication is used, it contains the strongest one:
- urn:oasis:names:tc:SAML:2.0:ac:classes:PasswordProtectedTransport password authentication (using SSL)
- urn:oasis:names:tc:SAML:2.0:ac:classes:PreviousSession already authenticated using previous session
- urn:oasis:names:tc:SAML:2.0:ac:classes:X509 user has a X.509 certificate
- urn:oasis:names:tc:SAML:2.0:ac:classes:TLSClient X.509's public key has been verified using TLS protocol
- urn:oasis:names:tc:SAML:2.0:ac:classes:TimeSyncToken time synchronized token.
- urn:oasis:names:tc:SAML:2.0:ac:classes:unspecified unspecified protocol. This tag is used when Soffid IDP relies on third party identity providers that don't give information about the authentication method used, such as oAuth or OpenId.
-
When using OpenID connect, the value can be any of:
-
P: Password
-
PO: Password + OneTimePassword
-
PC: Password + Certificate
-
PE: Password + External identity provider
-
K: Kerberos token
-
KO: Kerberos token + OneTimePassword
-
KC: Kerberos token + Certificate
-
KE: Kerberos token + External identity provider
-
E: External identity providers
-
EO: External identity provider + One time password
-
EC: External identity provider + Certificate
-
O: One time password
-
OC: One time password + Certificate
-
C: Certificate
-
- When using SAML, it contains the standard SAML identifier corresponding to the used authentication method. When multifactor authentication is used, it contains the strongest one:
- Attribute value: the result will be true if the related attribute has a specific value.
- Attribute requester (regex): the result will be true if the service provider public id matches the specified regular expression.
- Attribute issuer (regex): the result will be true if the identity provider public id matches the specified regular expression.
- Principal name (regex): the result will be true if the principal name matches the specified regular expression. Mind that some service providers want to use the email address as PrincipalName. Some others use the account name or X.509 subject name.
- Authentication method (regex): the result will be true if the used authentication method matches the specified regular expression.
- Attribute value (regex): the result will be true if the related attribute has a specific value.
- Attribute requester in entity group: the result will be true if the service provider belongs to the specified group.
- Attribute issuer in entity group: the result will be true if the identity provider belongs to the specified group.
- Attribute issuer nameID format: the result will be true if the identity provider supports a specified identifier format.
- Issuer entity attribute: the result will be true if the identity provider metadata contains a specified attribute name and value.
- Issuer entity attribute (regex): the result will be true if the identity provider metadata contains an attribute name and value that matches the specified regular expression.
- Requester entity attribute:the result will be true if the service provider metadata contains a specified attribute name and value.
- Requester entity attribute (regex):the result will be true if the service provider metadata contains an attribute name and value that matches the specified regular expression.
- Attribute requester nameID format: the result will be true if the service provider supports a specified identifier format.
Examples
Examples to define conditions in an attribute sharing policy:
Example 1
Give the email address and the user ID to any trusted service provider. We define this as a public policy.

Example 2
Give some extra attributes, like full name and roles to any service provider belonging to soffid-demo entity group


Example 3
Rule that will be applied to the service provider named “test’ or any other service provider whose name starts with “soffid-”


Actions
Attribute sharing policies query
|
Add new |
Allows you to add a new Attribute sharing policies in the system. You can choose that option on the hamburger menu or clicking the add button (+). To add a new it is necessary to fill in the required fields. |
|
Delete |
Allows you to remove one or more Attribute sharing policies by selecting one or more records and next clicking the button with the subtraction symbol (-). To perform that action, Soffid will ask you for confirmation, you could confirm or cancel the operation. |
| Import |
Allows you to upload a CSV file with the ttribute sharing policies to add or update Attribute sharing policies to Soffid. First, you need to pick up a CSV file, that CSV has to contain a specific configuration. Then you need to check the content to be loaded, it is allowed to choose if you want or not to load a specific attribute. And finally, you need to select the mappings for each column of the CSV file to import the data correctly and to click the Import button. |
|
Download CSV file |
Allows you to download a CSV file with the basic information of all Attribute sharing policies. |
Attribute sharing policies detail
|
Delete |
Allows you to save the data of a new Attribute sharing policy or to update the data of a specific Attribute sharing policy. To save the data it will be mandatory to fill in the required fields. |
|
Apply changes |
Allows you to save the data of a new Metada object or to update the data of a specific Metadata object. To save the data it will be mandatory to fill in the required fields. |
|
Undo |
Allows you to quit without applying any changes made. |
Identity & Service providers
Description
Soffid Identity Federation addon helps administrators to manage an Identity Federation. With Soffid you can manage the whole federation security configuration, increasing the security while reducing the federation management costs. Soffid can also act as a Service Provider, serving identities to any SAML capable application server.
The main supported standard is SAML. SAML allows to completely detach the identification process from web applications, known as Service Providers. With SAML, identification is performed by specialized servers known as Identity Providers. Additionaly, some other, less secure, but some times convenient protocols like OAuth (Open Authorization) and OpenID-Connect protocols are supported. Elder protocols like Openid (do not confuse with OpenID-Connect) are deprecated and no longer supported.
You can visit the Introduction page to find more information about the federation members.
Federation members
1. Entity Group
Entity Group
Description
An entity group is just like a folder that allows you to manage different kinds of federation members. One of the most common ways to group federation members is by trust level.
When you create an entity group, the Identity Providers and the Service Providers records will be displayed. Then you could add identities and services selecting the proper record.
Screen overview
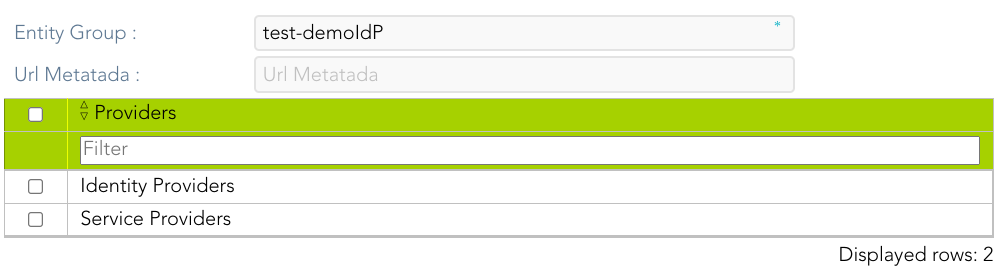
Standard attributes
- Entity Group: name of the group.
- Url Metadata: will be the URL of an external entity group when the entity group was esternal.
- Providers: by default, it creates two groups, an identity provider and a service provider.
Identity Provider
Description
An identity provider (abbreviated IdP or IDP) is a system entity that creates, maintains, and manages identity information for principals and also provides authentication services to relying applications within a federation or distributed network.
An Identity Provider is responsible for identifying users. Also, it is responsible for giving service providers information regarding the identified user.
Soffid allows you to configure different identity providers, you can choose the best option for you by selecting the IdP type:
- Soffid IdP: identifies the identity provider implemented by Soffid. Soffid IdP implements both OpenID-Connect and SAML.
- External SAML IdP: is used to identify providers not implemented by Soffid. For instance, it could be an ADFS (Active Directory Federation Services) or Shibboleth identity provider.
- OpenID-Connect: is used for third-party identity providers, like ADFS.
- Facebook: if you select that option, oAuth2 will be used to identify Facebook users. You will need to register Soffid as a Facebook application to use it.
- Google: if you select that option OpenID-Connect will be used to identify Google users. You will need to register Soffid as a Google application to use it.
- LinkedIn: if you select that option, oAuth2 will be used to identify LinkedIn users. You will need to register Soffid as a LinkedIn application to use it.
To create an identity provider, it is advisable to install a dedicated sync server. It can be configured as a proxy sync server as it does not need direct access to the Soffid database. Instead, it will connect to the main sync server to get users and federation information.
For more information about how to configure a dedicated sync server, you can visit the Install Sync server page.
Standard attributes
The fields for each IdP type are detailed below:
Soffid IdP
Identification
- publicID: unique name to identify the identity provider. The name has to be the same as the Public ID of the Soffid Identity Provider agent.
- Name: friendly user name.
- Organization: company name of the external IdP.
- Contact: email address of the external IdP.
It will be mandatory to create an Agent (Soffid Identity Provider).
Service Configuration
- Metadata: the Metadata for an Identity Provider defines how this Identity Provider delivers its service:
- Which security algorithms does it support.
- The public portion of it's signing and encrypting keys.
- The SAML protocols do it support.
- The URL of each SAML protocol endpoint.
- Contact information.
The Metadata is the information that any application needs to use the IdP. That is an XML file that contains the public encryption keys and the services provided
Leave it blank as Soffid IdP will fulfill it for you.
The metadata will be created when the network data and SAML Security data. Restarting the sync server will be necessary to fill in the Metadata.
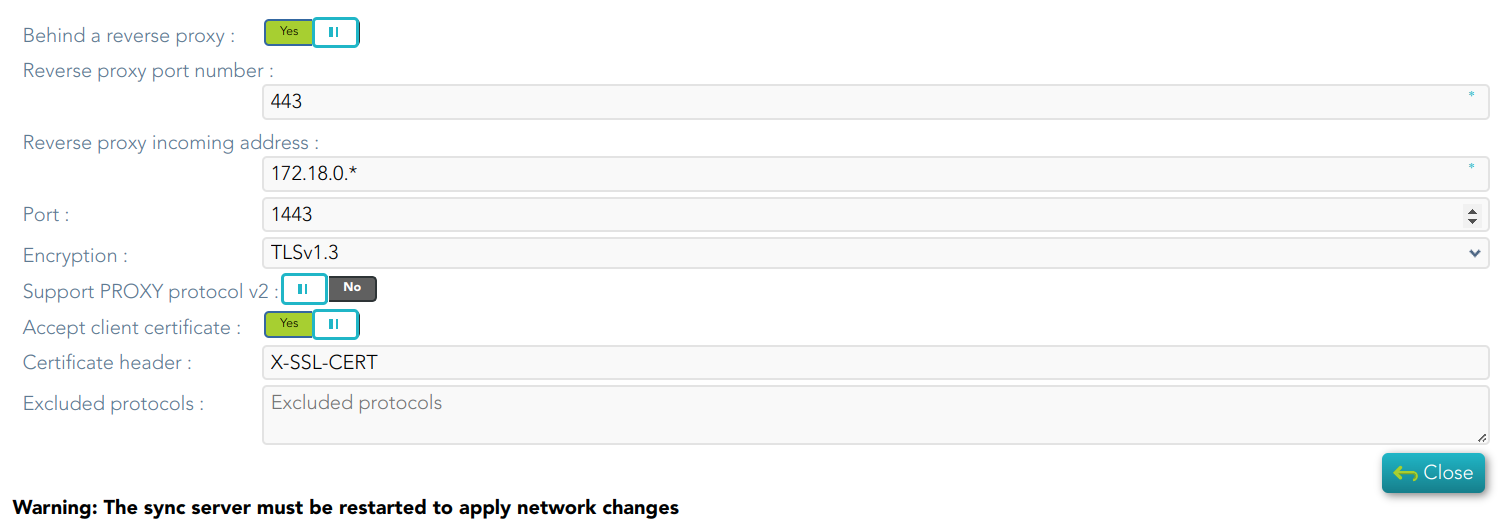
Network
- Host name: public hostname that will be used by users and service providers. The full qualified name should be used.
- Allow IdP to be included inside an IFRAME: Soffid allows you to configure the Identity Provider to be incluided within a IFRAME. If this option is updated, the Sync Server must be restarted. This attribute will be available in Federation addon 3.5.37 or higher.
- Network ports:
- Behind a reverse proxy
- Reverse proxy port number: port where the reverse proxy is listening.
- Reverse proxy incoming address: IP addresses allowed to make calls to the reverse proxy.
- Port: TCP port number used by the identity provider. By default, TLS will be used (default 1443).
- Encryption: encryption type is only allowed behind a reverse proxy.
- Support PROXY protocol v2: protocol between the reverse proxy and the Identity Provider.
- Accept client certificate
- Certificate header: certificate data header (only behind a reverse proxy).
- Excluded protocols: encryption protocols to be excluded.
💻 Image
- TLS PublicKey: there are three available options
- Leave in blank and Soffid IdP will generate a self-signed certificate.
- Clicking on the Generates public/private key button, a new private key pair will be generated. Once the private key pair is generated, you could generate a certificate request file, also known as PKCS#10 or CSR file. The certificate authority will be able to create a certificate for you using this certificate request. Once you have created the public/private key, you could run other new functions:
- Change public/private key: allows you to change the public/private key generated previously.
- Delete public/private key: allows you to delete the public/private key generated previously.
- Generate PKCS10: generates a PKCS10 file (Certification request standard).
- Clicking on the Upload PKCS12 file button it will be able to upload a PKCS#12 file. That file must contain the private and public keys and the server certificate as well. Mind that PKCS#12 file use to be protected by a PIN.
- TLS Certificate chain: text certificate chain created with one of the previous options.
Server certificate management: there are two options for certificate management. You can visit the Server certificate management page for more information.
SAML Security
- PublicKey:
- Clicking on the Generates public / private key button, a new private key pair will be generated. Once the private key pair is generated, you could generate a certificate request file, also known as PKC#10 or CSR file. The certificate authority will be able to create a certificate for you using this certificate request. Once you have created the public/private key, you could run other new functions:
- Change public/private key: allows you to change the public/private key generated previously.
- Delete public/private key: allows you to delete the public/private key generated previously.
- Generate PKCS10: generates a PKCS10 file (Certification request standard).
- Clicking on the Upload PKCS12 file button it will be able to upload a PKCS#12 file. That file must to contain the private an public keys and the server certificate as well. Mind that PKCS#12 file use to be protected by a PIN.
- Clicking on the Generates public / private key button, a new private key pair will be generated. Once the private key pair is generated, you could generate a certificate request file, also known as PKC#10 or CSR file. The certificate authority will be able to create a certificate for you using this certificate request. Once you have created the public/private key, you could run other new functions:
- Certificate chain: text certificate chain created with one of the previous options.
Session management
- Session timeout (secs): time in seconds that will take the session. If the user has been authenticated, and later is requested to authenticate again, the user will be authenticated without any intervention as long as the timeout has not been elapsed.
- oAuth Session timeout (secs): time in seconds that will take the oAuth session. The oAuth has its own life cycle, regardless the session timeout.
- Maximum session duration (secs) : maximum time during which session can be renewed
- SSO Cookie name: name of the cookie that will keep the session id, you can change the name. This SSO cookie is not really needed, as the identity provider will store a session cookie to track the SSO session. This SSO cookie is needed in two circumstances:
- When the identity provider is restarted, the session cookie is lost. This SSO Cookie allows the identity provider to restart the lost session.
- When you have more than one identity provider instance, this cookie allows all the identity providers to handle the session as if only was one identity provider. The SSO cookie can be allocated by any identity provider, and it will be accepted by any other one.
- SSO Cookie domain: is needed when you have more than one identity provider instance and they are using different host names. If all the identity providers are serving the same virtual host name, the SSO Cookie domain will be needed.
Authentication
- Authentication methods: matrix to define the authentication methods that will be required to successfully authenticate the user. Each row indicates the first authentication method, and each column indicates the second factor to use.
- Password
- Kerberos
- External IdP
- OTP
- SMS
- PIN Certificate
- FIDO
- Push
- Adaptive authentication: that option allows you to add an additional authentication matrix which will be run when the condition defined was complied with. That is the way to change the authentication method depending on the environment.
- Description: rule description to identify it.
- Condition: script to enable that rule. The result of the rule must be true or false. There are some available vars to create the condition. You can visit the Condition for Adaptive authentication page for more information and some examples.
- Matrix: to define the authentication methods that will be required to successfully authenticate the user. Each row indicates the first authentication method, and each column indicates the second factor to use.
- Always ask for credentials: if checked (the selected value is Yes), the IdP will always request credentials from users who meet the condition defined in this rule.
- Register OTP when required: if it is checked (selected value is Yes), Soffid will allow registering the OTP to users who meet the condition and do not have one previously.
- Kerberos domain: allows you to pick up a file to configure the Kerberos authentication method. For more information, you can visit the How to enable Kerberos authentication page.
Advanced Authentication
- Allow user to recover password: if it is checked (selected value is Yes), and the password recovery addon is installed, the user will be allowed to execute the password recovery mechanism.
- Register OTP when required: if it is checked (selected value is Yes), Soffid will allow to register the new OTP to the user during the login process.
- Allow user to self-register: if it is checked (selected value is Yes), the user will be allowed to register itself. This option sends an email to the user to verify the email address is correct, and then lets the user to enter a new password.
- Registration process: workflow selected to create the new identity.
- User Type: identifies the password policy that is to be applied. More information on this link User Type.
- Primary Group: select which organization unit this user belongs to.
- Register identities identified by external IdPs: allows Soffid IdP to automatically register a new identity when a user authenticates with a third-party IdP, and this identity does not exist yet in Soffid database. Furthermore, at the third party IdP configuration page, one can tune how this identity is going to be created.
- Store last user name in browser: allows the browser to save the last user name when Yes is selected.
- Enable reCaptcha v3 service: (*) helps to keep save your website. You can enable it by selecting the Yes option. When you select the Yes option, you must fill in the following fields:
- Captcha site key: this key is used to invoke the reCAPTCHA service
- Captcha site secret: the secret key to communicate your web site with reCAPTCHA service. This secret key authorizes the communication.
- Captcha threshold (1 for highest confidence, 0 for low confidence):
Profiles
A profile is a protocol or subset of protocols implemented by the Identity Provider. There are some accepted protocols, those allows a custom config dependent on the selected profile.
You can visit the Profiles chapter for more information about each one.
Look and feel
Soffid allows you to personalize your login page by adding some style elements, as well as header and footer elements.
- Logo: this logo will be displayed for user in Windows desktop.
- CSS Style: allows you to add a CSS style for your login page.
- Html header: allows you to add an Html header.
- Html footer: allows you to add an Html footer.
- Language (2 characters code)
External SAML IdP
Identification
- publicID: unique name to identify the identity provider.
- Name: friendly user name.
- Organization: company name of the external IdP.
- Contact: email address of the external IdP.
Service Configuration
- Metadata: the Metadata for an Identity Provider defines how this Identity Provider delivers its service:
- Which security algorithms does it support.
- The public portion of it's signing and encrypting keys.
- The SAML protocols does it support.
- The URL of each SAML protocol endpoint.
- Contact information.
The Metadata is the information that any application need to use the IdP. That is an XML file that contains the public encryption keys and the services provided
Leave it blank as Soffid IdP will fulfill it for you.
Login Rules
- User regular expression: regular expression to detect users of this identity provider.
- Login hint script: script to help to login. Return the text to help.
- Identity provisioning script: script to bind or register a new identity. Return the user name of the owner identity for the authenticated account.
OpenID-Connect
Service Configuration
- Metadata: there are some required parameters:
|
- oAuth key: is the identificator token generated by the oAuth server.
- oAuth secret: is the secret generated by the oAuth server.
The Metadata is the information that any application need to use the IdP. That is an XML file that contains the public encryption keys and the services provided
Login rules
- User regular expression: regular expression to detect users of this identity provider.
- Login hint script: script to help to login. Return the text to help.
- Identity provisioning script: script to bind or register a new identity. Return the user name of the owner identity for the authenticated account.
|
Identification
- publicID: unique name to identify the identity provider. Soffid will fulfill wint the Facebook URL.
- Name: friendly user name.
- Organization: company name of the external IdP.
- Contact: email address of the external IdP.
Service Configuration
- Click here to obtain a client id and client secret: allows you to get the oAuth key and secret.
- oAuth key: is the identificator token generated by the oAuth server.
- oAuth secret: is the secret generated by the oAuth server.
Login rules
- User regular expression: regular expression to detect users of this identity provider.
- Login hint script: script to help to login. Return the text to help.
- Identity provisioning script: script to bind or register a new identity. Return the user name of the owner identity for the authenticated account.
Identification
- publicID: unique name to identify the identity provider. Soffid will fulfill wint the Google URL.
- Name: friendly user name.
- Organization: company name of the external IdP.
- Contact: email address of the external IdP.
Service Configuration
- Click here to obtain a client id and client secret: allows you to get the oAuth key and secret.
- oAuth key: is the identificator token generated by the oAuth server.
- oAuth secret: is the secret generated by the oAuth server.
Login rules
- User regular expression: regular expression to detect users of this identity provider.
- Login hint script: script to help to login. Return the text to help.
- Identity provisioning script: script to bind or register a new identity. Return the user name of the owner identity for the authenticated account.
Identification
- publicID: unique name to identify the identity provider. Soffid will fulfill wint the Linkedin URL.
- Name: friendly user name.
- Organization: company name of the external IdP.
- Contact: email address of the external IdP.
Service Configuration
- Click here to obtain a client id and client secret: allows you to get the oAuth key and secret.
- oAuth key: is the identificator token generated by the oAuth server.
- oAuth secret: is the secret generated by the oAuth server.
Login rules
- User regular expression: regular expression to detect users of this identity provider.
- Login hint script: script to help to login. Return the text to help.
- Identity provisioning script: script to bind or register a new identity. Return the user name of the owner identity for the authenticated account.
(*) What is CAPTCHA --> https://support.google.com/a/answer/1217728?hl=en
(*) https://www.google.com/recaptcha/about/
Service Provider
Definition
The Service Providers are standard applications that rely on Identity Providers to let the users log in.
Join federation
To join the federation, the service provider management team must deliver its "Metadata". The service provider Metadata describes how the service providers behave:
- Which security algorithms does it support.
- The public portion of its signing and encrypting keys.
- The SAML protocol does it support.
- The URL of each SAML protocol endpoint.
- Contact information.
Standard attributes
The standard attributes depend on the Service provider type.
SAML
To enable External SAML protocol you can visit the Authentication page. Also, on that page you could download the metadata XML file.
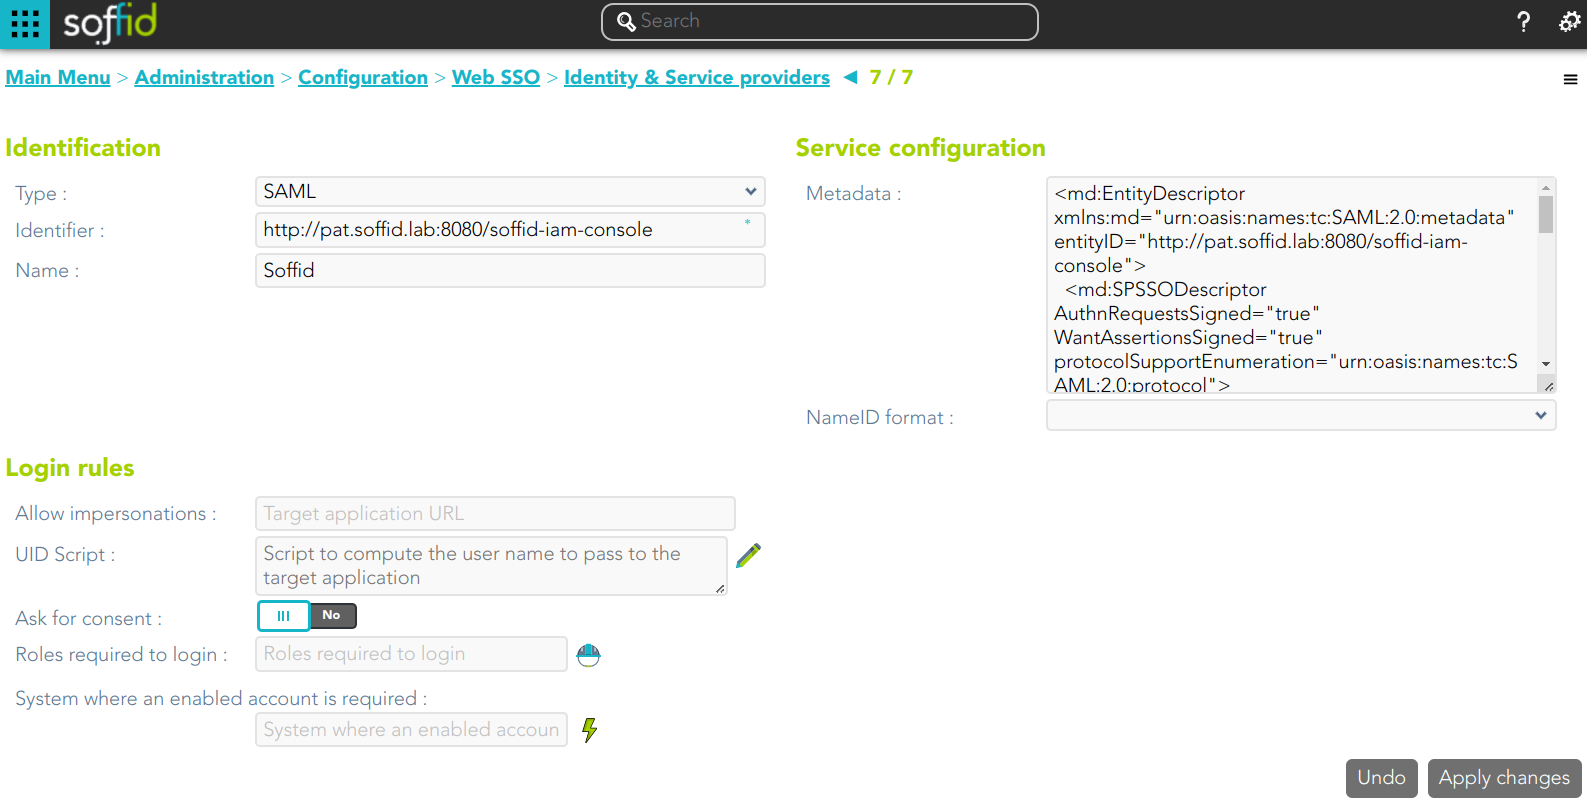
Identification
- Identifier: public name of the service provider. It must be unique
- Name: friendly user name or brief description.
Service configuration
- Metadata: you must provide the identity provider metadata. You can either copy it from the Soffid Identity Provider page, or instruct the service provider to download the federation metadata by itself.
- NameID format:
- Persistent
- Unspecified
- Transient
To publish the federation members' metadata, the main sync server exports the member's metadata at the path /SAML/metadata.xml. Thus, if your sync server is listening at soffid1.your.domain, you can get the whole federation metadata document from:
https://soffid1.your.domain:760/SAML/metadata.xml
After some seconds, up to five minutes, every federation member will notice any change.
Login rules
- Allow impersonations: Soffid allows a service provider to connect to another service provider in a controlled manner. Here you can write the target application URL.
- UID Script: script to compute the user name to pass to the target application
- Ask for consent
- Roles required to login: roles that the user must have to be able to connect to the system
- System where an enabled account is required: System where it will be necessary for the user to have an account in order to log in.
💻 Image
You can visit the Openid-connect to SAML interoperability page for more detailed information.
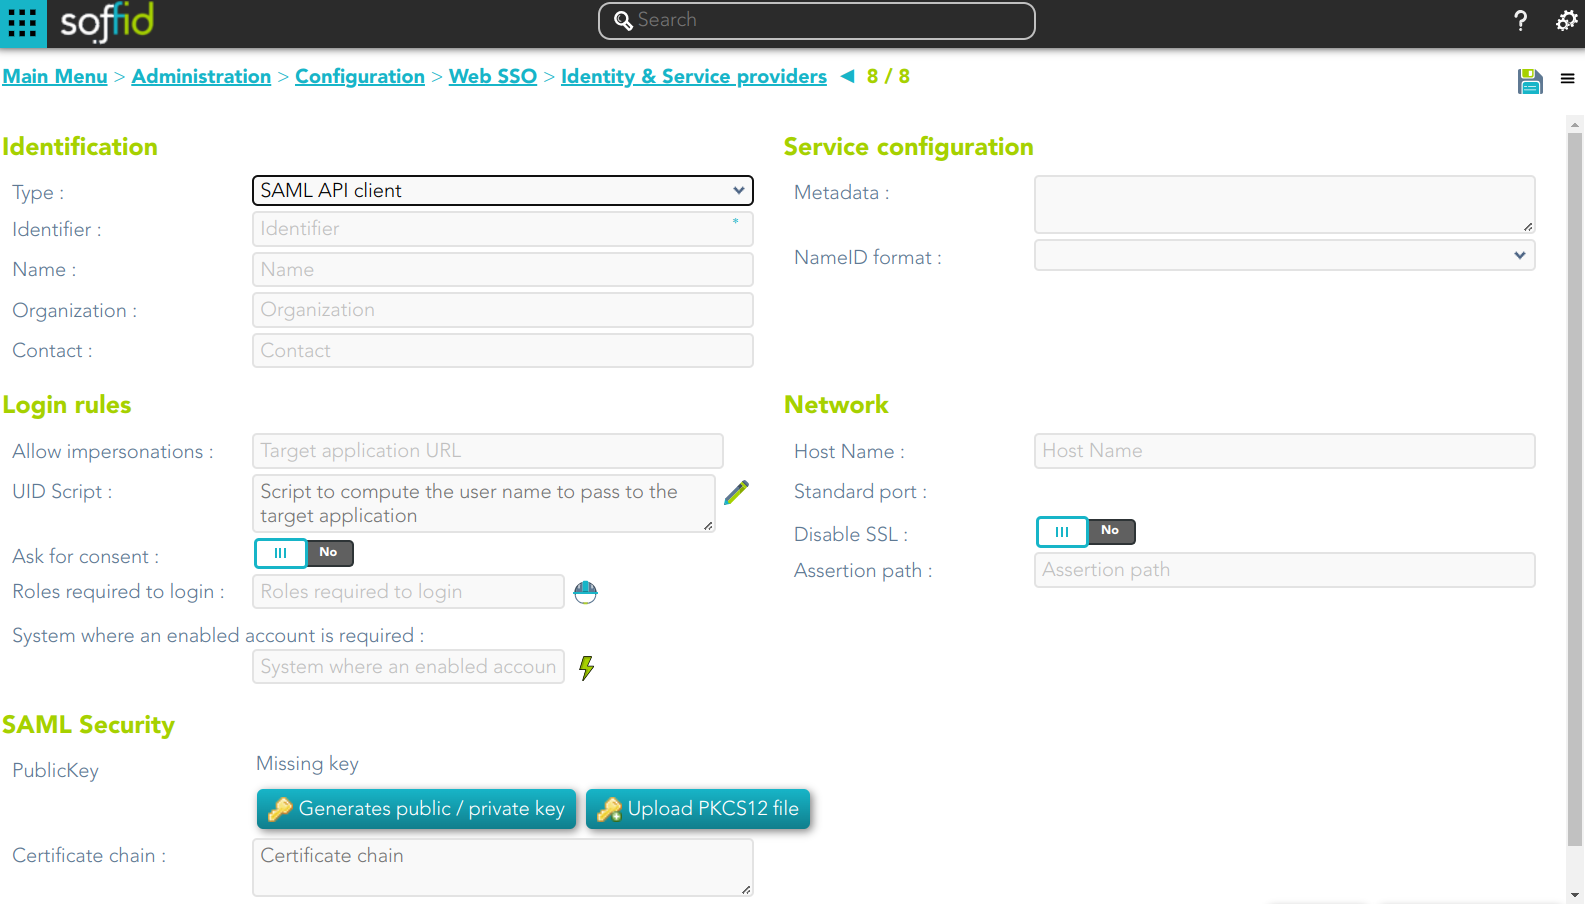
SAML API client
Identification
- Identifier: public name of the service provider. It must be unique
- Name: friendly user name or brief description.
- Organization: company name of the external IdP.
- Contact: email address of the external IdP.
Service configuration
- Metadata
- NameID format:
- Persistent
- Unspecified
- Transient
Leave it blank as Soffid IdP will fulfill it for you.
The metadata will be created when the network data and SAML Security data.
Login rules
- Allow impersonations: Soffid allows a service provider to connect to another service provider in a controlled manner. Here you can write the target application URL.
- UID Script: script to compute the user name to pass to the target application.
- Ask for consent
You can visit the Openid-connect to SAML interoperability page for more detailed information.
Network
- Host name: public application host name that wants to be a service provider. A fully qualified name should be used.
- Standard port: public application port number.
- Disable SSL: check it, selected value Yes, if you want to use plain TCP connections. In another case, it will be needed to comply with additional fields:
- Assertion path: URL to receive the response.
SAML Security
- PublicKey:
- Clicking on the Generates public / private key button, a new private key pair will be generated. Once the private key pair is generated, you could generate a certificate request file, also known as PKC#10 or CSR file. The certificate authority will be able to create a certificate for you using this certificate request. Once you have created the public/private key, you could run other new functions:
- Change public/private key: this allows you to change the public/private key generated previously.
- Delete public/private key: this allows you to delete the public/private key generated previously.
- Generate PKCS10: generates a PKCS10 file (Certification request standard).
- Clicking on the Upload PKCS12 file button it will be able to upload a PKCS#12 file. That file must contain the private and public keys and the server certificate as well. Mind that PKCS#12 file use to be protected by a PIN.
- Clicking on the Generates public / private key button, a new private key pair will be generated. Once the private key pair is generated, you could generate a certificate request file, also known as PKC#10 or CSR file. The certificate authority will be able to create a certificate for you using this certificate request. Once you have created the public/private key, you could run other new functions:
- Certificate chain: text certificate chain created with one of the previous options.
💻 Image
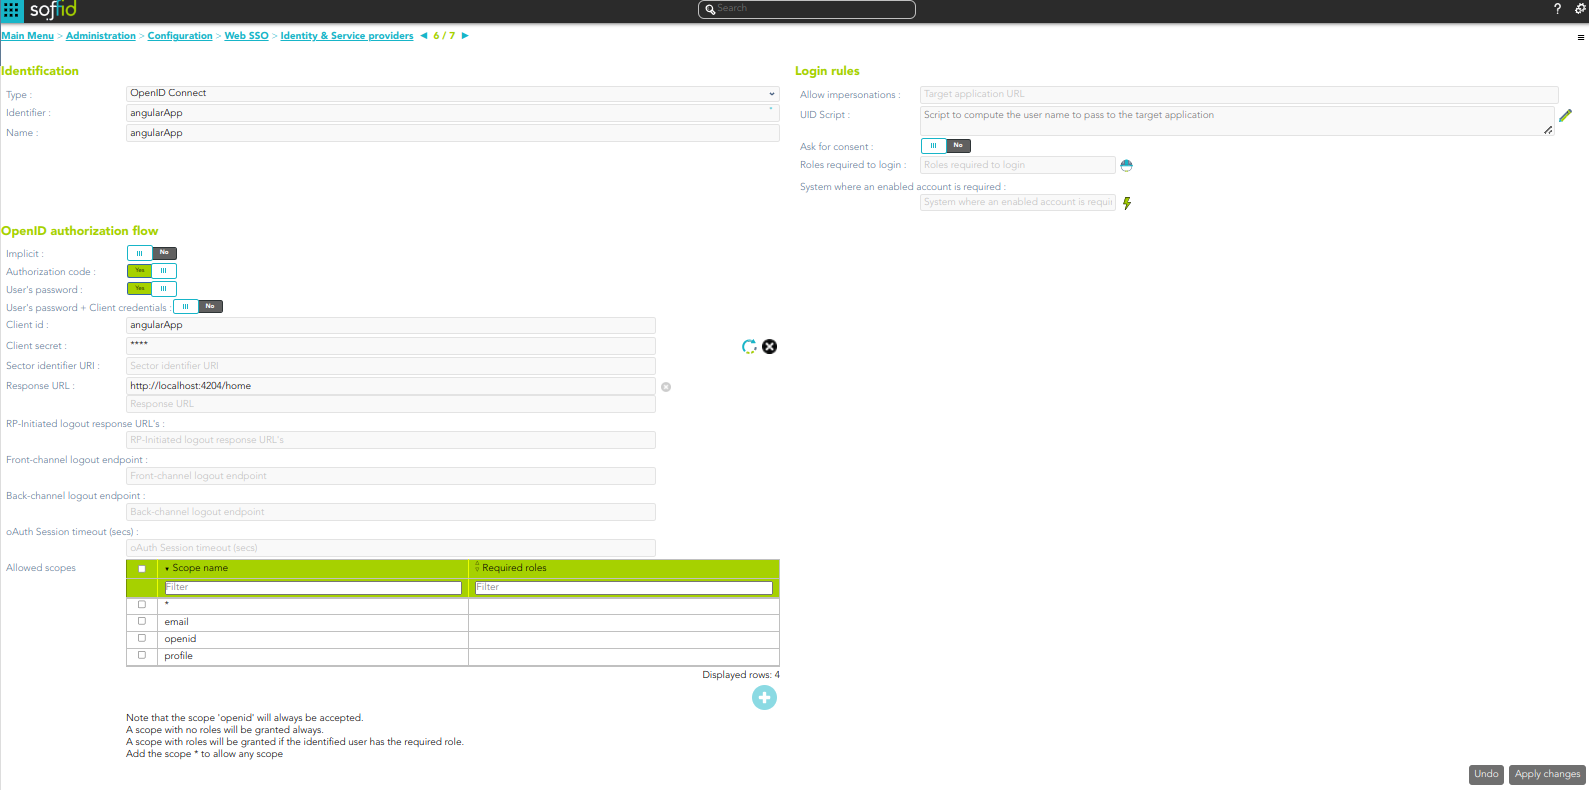
OpenID Connect
Identification
- Identifier: public name of the service provider. It must be unique.
- Name: friendly user name or brief description.
Login rules
- Allow impersonations: Soffid allows a service provider to connect to another service provider in a controlled manner. Here you can write the target application URL.
- UID Script: script to compute the user name to pass to the target application.
- Ask for consent
- Roles required to login: roles that the user must have to be able to connect to the system
- System where an enabled account is required: System where it will be necessary for the user to have an account in order to log in.
You can visit the Openid-connect to SAML interoperability page for more detailed information.
OpenID authorization flow
-
Implicit: application server redirects the end user to the IdP, that in turn, returns the oAuth token along with the OpenID token.
- Authorization code: application server redirects the user to the IdP, which in turn, returns an authorization code that can be used to retrieve the token and the OpenID token from the token endpoint.
- User's password: the server access directly to the token endpoint, sending the username and password, to retrieve the oAuth and OpenID token. This mechanism is highly insecure, as allows unauthenticated clients to impersonate end users
- User's password + Client credential: it is a secure version of the previous one, requiring the client to use its client secret.
- Client id: the identifier used by the application server.
- Client secret: password used by the application server. It is used in the Authorization code flow as well as “User’s password + Client credentials” flow.
- Response URL: set the URL to return the control after authenticating a user.
- RP-Initiated logout response URL's
- Front-channel logout endpoint
- Back-channel logout endpoint
- oAuth Session timeout (secs): time in seconds that will take the oAuth session. The oAuth has its own life cycle, regardless of the session timeout.
- Allowed scopes: you can define a scope list with the proper scopes that users will need to interact with the final system.
- openid: default scope.
- custom scopes: you can add the custom scopes that can be requested by the service provider.
- *: the scope * means that any scope requested by the service provider will be granted.
💻 Image
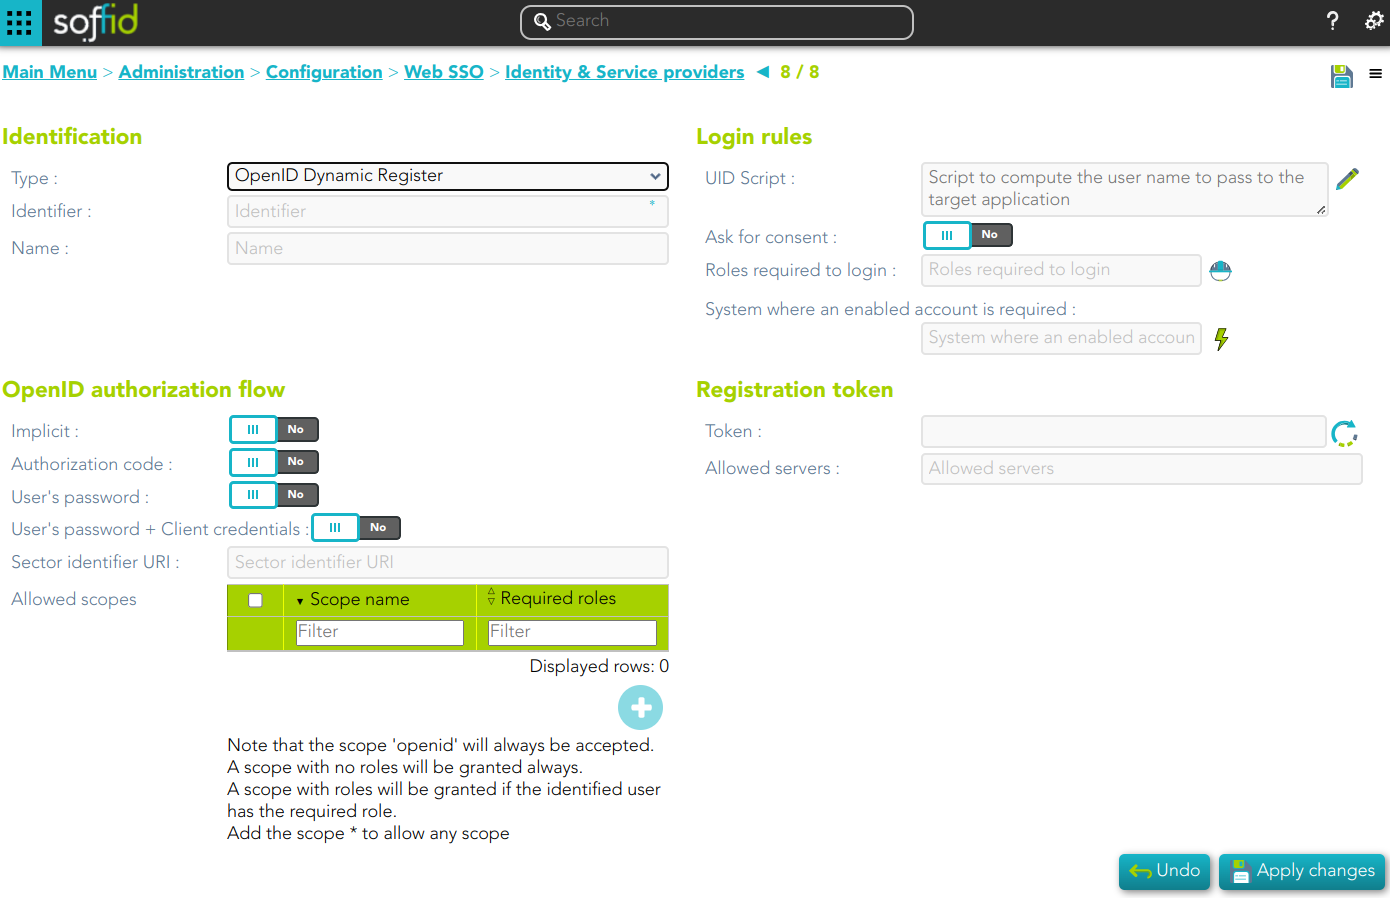
OpenID Connect Dynamic Registration
Identification
- Identifier: public name of the service provider. It must be unique
- Name: friendly user name or brief description.
Login rules
- UID Script: script to compute the user name to pass to the target application.
- Ask for consent
- Roles required to login: roles that the user must have to be able to connect to the system.
- System where an enabled account is required: System where it will be necessary for the user to have an account in order to log in.
OpenID authorization flow
-
Implicit: application server redirects the end user to the IdP, that in turn, returns the oAuth token along with the OpenID token.
- Authorization code: application server redirects the user to the IdP, which in turn, returns an authorization code that can be used to retrieve the token and the OpenID token from the token endpoint.
- User's password: the server access directly to the token endpoint, sending the username and password, to retrieve the oAuth and OpenID token. This mechanism is highly insecure, as allows unauthenticated clients to impersonate end users
- User's password + Client credential: it is a secure version of the previous one, requiring the client to use its client secret.
- Sector identifier URI
- Allowed scopes: you can define a scope list with the proper scopes that users will need to interact with the final system.
- openid: default scope.
- custom scopes: you can add the custom scopes that can be requested by the service provider.
- *: the scope * means that any scope requested by the service provider will be granted.
Registration token
- Token: unique identifier
- Valid until: maximum validity date
- Allowed servers: maximum number of servers that can be registered
💻 Image
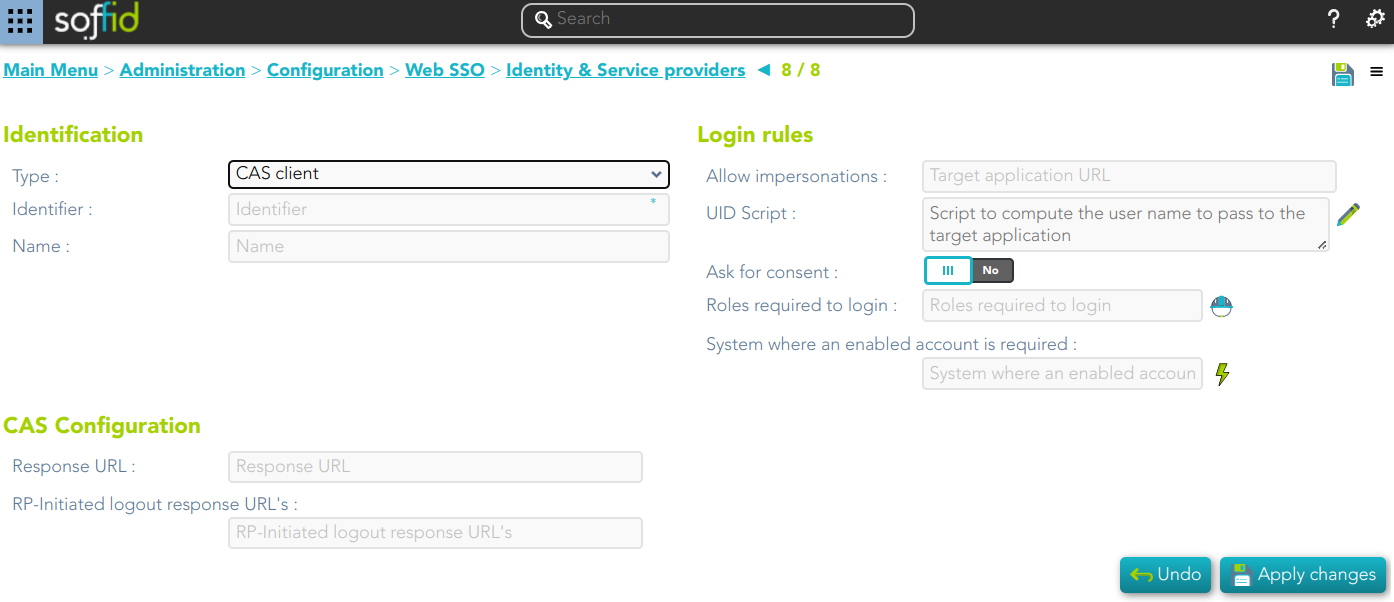
Cas client
Identification
- Identifier: public name of the service provider. It must be unique.
- Name: friendly user name or brief description.
Login rules
- Allow impersonations: Soffid allows a service provider to connect to another service provider in a controlled manner. Here you can write the target application URL.
- UID Script: script to compute the user name to pass to the target application.
- Ask for consent
- Roles required to login: roles that the user must have to be able to connect to the system
- System where an enabled account is required: System where it will be necessary for the user to have an account in order to log in.
CAS configuration
- Response URL
- Logout response URL
💻 Image
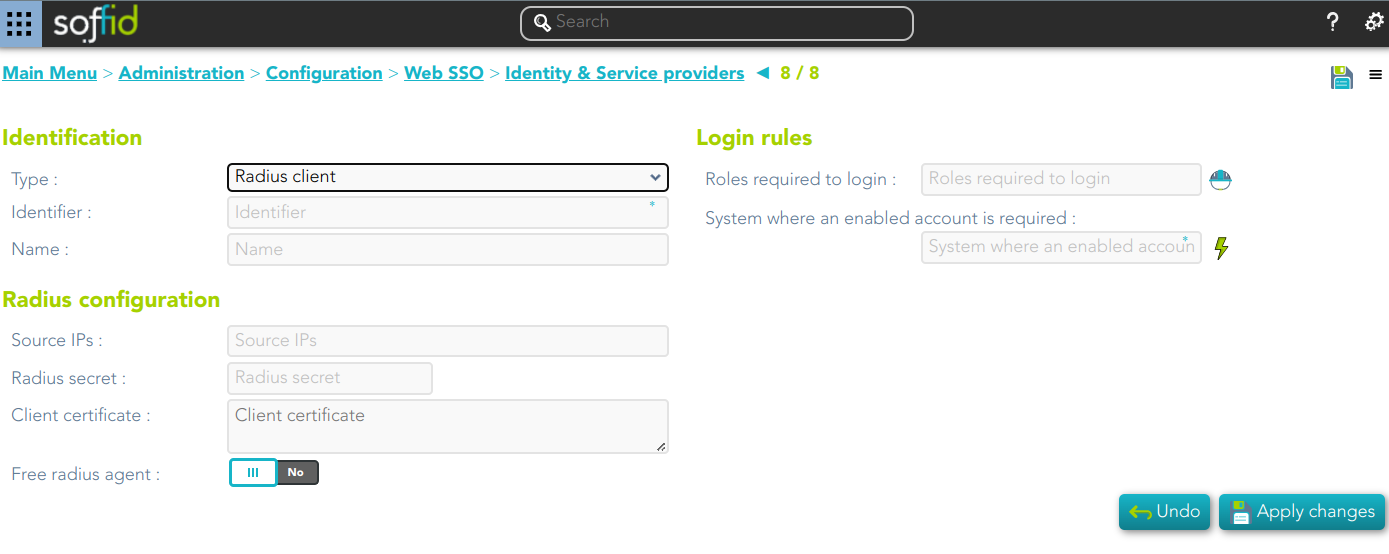
Radius client
Identification
- Identifier: public name of the service provider. It must be unique.
- Name: friendly user name or brief description.
Login rules
- UID Script: script to compute the user name to pass to the target application.
- Roles required to login
- System where an enabled account is required
Radius configuration
- Source IPs: origin IP or origin IP range.
- Radius secret: password
💻 Image
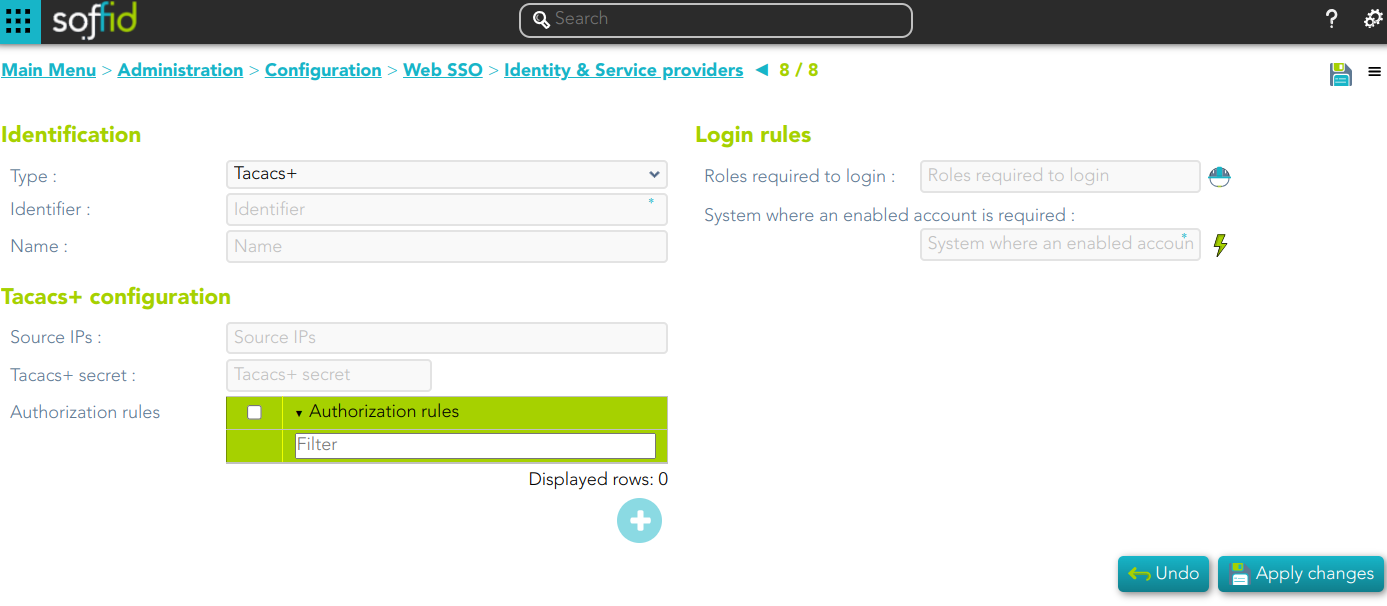
TACACS+
Identification
- Identifier: public name of the service provider. It must be unique.
- Name: friendly user name or brief description.
Login rules
- Roles required to login
- System where an enabled account is required
Tacacs+ configuration
- Source IPs: origin IP or origin IP range.
- Tacacs+ secret: password.
- Authorization rules: allows you to add additional authorization rules to elevate privileges. Available context variables:
- user: remote user name
- priv_level: privilege level
- remote_address: remote address
- port: port
- optionalArguments: modifiable map of optional attributes.
- mandatoryArguments: modifiable map of mandatory attributes.
- return true if the action is authorized.
💻 Image
https://www.rfc-editor.org/rfc/rfc8907.html
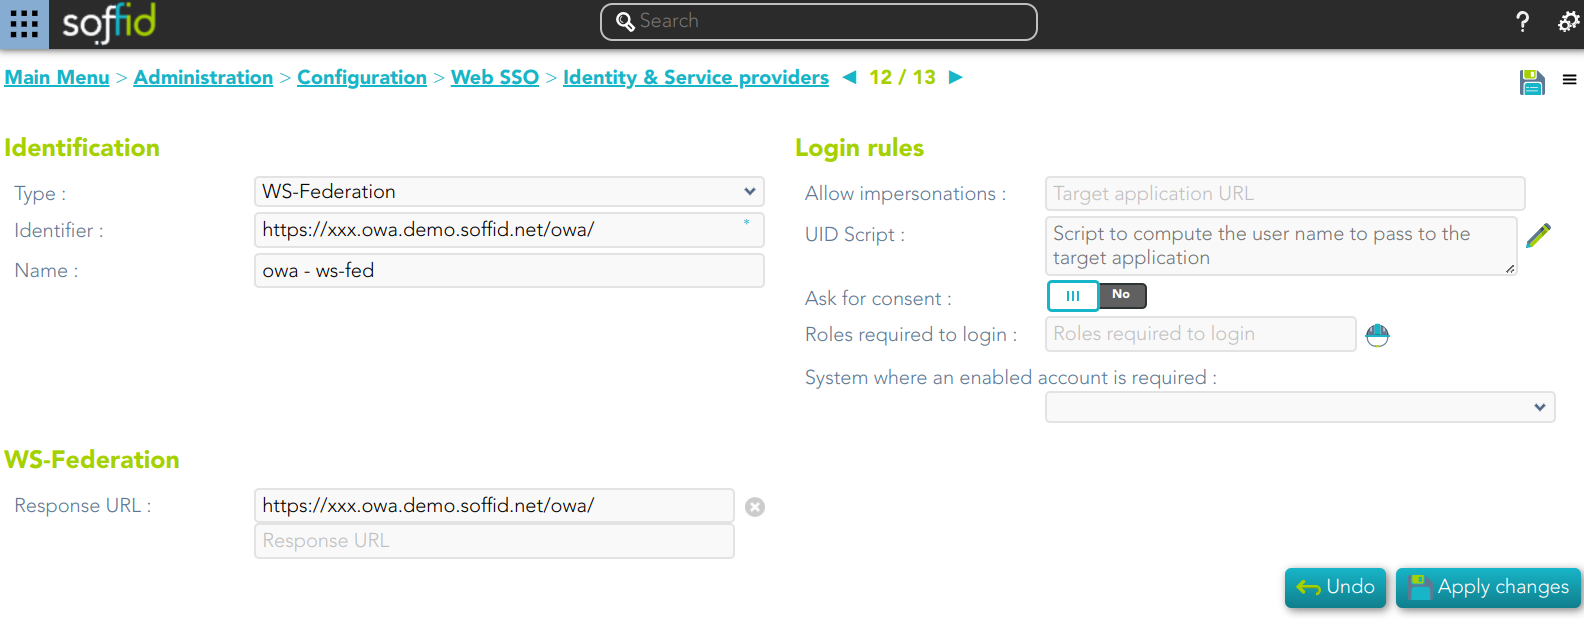
WS-Federation
Identification
- Identifier: public name of the service provider. It must be unique.
- Name: friendly user name or brief description.
Login rules
- Allow impersonations: Soffid allows a service provider to connect to another service provider in a controlled manner. Here you can write the target application URL.
- UID Script: script to compute the user name to pass to the target application.
- Ask for consent
- Roles required to login: roles that the user must have to be able to connect to the system
- System where an enabled account is required: System where it will be necessary for the user to have an account in order to log in.
WS-Federation
- Response URL
Virtual Identity Provider
Definition
A single identity provider usually offers different profiles or service levels to diffeferent service provider. To be able to define this behavior, any Identity Provider can be split into many virtual identity providers. Those identity providers will be served by the same actual identity provider, but they will have different profile configurations.
Standard attributes
Identification
- publicID: unique name to identify the identity provider.
- Name: user friendly name to identify the identity provider.
- Organization: company name of the external IdP.
- Contact: email address of the external IdP.
Service configuration
- Metadata: the Metadata for an Identity Provider defines how this Identity Provider delivers its service:
- Which security algorithms does it support.
- The public portion of it's signing and encrypting keys.
- The SAML protocols does it support.
- The URL of each SAML protocol endpoint.
- Contact information.
Leave it blank as Soffid IdP will fulfill it for you.
SAML Security
- Public key:
- Generate public/private key:
- Delete public/private key: allows you to delete the public/private key generated previously.
- Generate PKCS10: generates a PKCS10 file (Certification request standard)
- Upload PKCS12 file: allows you to upload a PKCS#12 file. That file must contain the private and public kesus and the server certificate as weel. Mind that PKCS#12 file use to be protected by a PIN.
- Generate public/private key:
- Certificate chain: text certificate chain created with one of the previous options.
Authentication
- Authentication methods: matrix to define the authentication methods that will be required to successfully authenticate the user. Each row indicates the first authentication method, and each column indicates the second factor to use.
- Adaptive authentication: that option allows you to add additional authentication matrix which will be run when the condition defined was comply.
- Description: rule description to identify it.
- Condition: script to enable that rule. The result of the rule must be true or false. There are some available vars to create the condition. You can visit the Condition for Adaptive authentication page for more information and some examples.
- Matrix: to define the authentication methods that will be required to successfully authenticate the user. Each row indicates the first authentication method, and each column indicates the second factor to use.
Advances authentication
- Allow user to recover password: if it is checked (selected value is Yes), and the password recovery addon is installed, the user will be allowed to execute the password recovery mechanism.
- Allow user to self-register: if it is checked (selected value is Yes), the user will be allowed to register itself. This option sends an email to the user to verify the email address is correct, and then lets the user to enter a new password.
- Registet identities identified by external IdPs: allows Soffid IdP to automatically register a new identity when a user authenticates with a third-party IdP, and this identity does not exist yet in Soffid database. Furthermore, at the third party IdP configuration page, one can tune how this identity is going to be created.
Profiles
A profile is a protocol implemented by the Identity Provider. There are some accepted protocols, those allows a custom config dependent on the selected profile
- OpenIDProfile
- SAML1ArtifactResolutionProfile
- SAML1AttributeQueryProfile
- SAML2ArtifactResolutionProfile
- SAML2AttributeQueryProfile
- SAML2ECPProfile
- SAML2SSOProfile
You can visit the Profiles chapter for more information about each one.
Service Providers
It will be necessary to bind any service provider to the virtual identity provider. When no such bind exists for a service provider, the actual identity provider profile configuration applies.
Actions
Federation Tree view
|
Add group |
Allows you to create a new Entity group. You can choose that option by clicking on the "Add group" button, then Soffid will display a new window with the fields to fullfil. To add a new Entity group it will be mandatory to fill in the required fields and save or apply changes.. |
|
Add identity provider |
Allows you to add a new Identity Provider. You must click the "Add identity provider" button, under the proper Entity Group and "Identity Provider" label, then Soffid will display a new window with the data to fulfill for new Identity Provider. To add a new Identity provider it will be mandatory to fill in the required fields and save or apply changes.. |
|
Add virtual identity provider |
Allows you to add a Virtual Identity Provider. You must click the "Add virtual identity provider" button, under the proper Identity Provider, which has to be a Soffid IdP, then Soffid will display a new window with the data to fulfill for the new Virtual identity provider. To add a new Virtual identity provider it will be mandatory to fill in the required fields and save or apply changes.. |
Entity goup
List
|
Add new |
You can add a new Entity groups by clicking on the add button (+). Then Soffid will display a new window and you need to fill in the required fields and save or apply changes. |
|
Delete |
Allows you to remove one or more Entity group by selecting one or more records and next clicking the button with the subtraction symbol (-). To perform that action, Soffid will ask you for confirmation, you could confirm or cancel the operation. |
Detail
| Save
|
Allows you to save the data of a new Entity group or to update the data of a specific Entity group. To save the data it will be mandatory to fill in the required fields |
|
Apply changes |
Allows you to save the data of a new Entity group or to update the data of a specific Entity group and quit. To save the data it will be mandatory to fill in the required fields. |
|
Delete |
Allows you to delete the Entity group. To delete a host you can click on the hamburger icon and then click the delete button (trash icon). Soffid will ask you for confirmation to perform that action, you could confirm or cancel the operation. |
|
Undo |
Allows you to quit without applying any changes made. |
Identity Provider
List
|
Add new |
You can add a new Identity provider by clicking on the add button (+). Then Soffid will display a new window and you need to fill in the required fields and save or apply changes. |
|
Delete |
Allows you to remove one or more Identity providers by selecting one or more records and next clicking the button with the subtraction symbol (-). To perform that action, Soffid will ask you for confirmation, you could confirm or cancel the operation. |
Detail
| Save
|
Allows you to save the data of a new Identity provider or to update the data of a specific Identity provider. To save the data it will be mandatory to fill in the required fields |
|
Apply changes |
Allows you to save the data of a new Identity provider or to update the data of a specific Identity provider and quit. To save the data it will be mandatory to fill in the required fields. |
|
Delete |
Allows you to delete the Identity provider. To delete a host you can click on the hamburger icon and then click the delete button (trash icon). Soffid will ask you for confirmation to perform that action, you could confirm or cancel the operation. |
|
Undo |
Allows you to quit without applying any changes made. |
Service Provider
List
|
Add new |
You can add a new Service provider by clicking on the add button (+). Then Soffid will display a new window and you need to fill in the required fields and save or apply changes. |
|
Delete |
Allows you to remove one or more Service providers by selecting one or more records and next clicking the button with the subtraction symbol (-). To perform that action, Soffid will ask you for confirmation, you could confirm or cancel the operation. |
Detail
| Save
|
Allows you to save the data of a new Service provider or to update the data of a specific Service provider. To save the data it will be mandatory to fill in the required fields |
|
Apply changes |
Allows you to save the data of a new Identity provider or to update the data of a specific Service provider and quit. To save the data it will be mandatory to fill in the required fields. |
|
Delete |
Allows you to delete the Service provider. To delete a host you can click on the hamburger icon and then click the delete button (trash icon). Soffid will ask you for confirmation to perform that action, you could confirm or cancel the operation. |
|
Undo |
Allows you to quit without applying any changes made. |
Virtyal Identity Provider
List
|
Add new |
You can add a new Virtual identity provider by clicking on the add button (+). Then Soffid will display a new window and you need to fill in the required fields and save or apply changes. |
|
Delete |
Allows you to remove one or more Virtual identity providers by selecting one or more records and next clicking the button with the subtraction symbol (-). To perform that action, Soffid will ask you for confirmation, you could confirm or cancel the operation. |
Detail
| Save
|
Allows you to save the data of a new Virtual identity provider or to update the data of a specific Virtual identity provider. To save the data it will be mandatory to fill in the required fields |
|
Apply changes |
Allows you to save the data of a new Virtual identity provider or to update the data of a specific Virtual identity provider and quit. To save the data it will be mandatory to fill in the required fields. |
|
Delete |
Allows you to delete the Virtual identity provider. To delete a host you can click on the hamburger icon and then click the delete button (trash icon). Soffid will ask you for confirmation to perform that action, you could confirm or cancel the operation. |
|
Undo |
Allows you to quit without applying any changes made. |
https://en.wikipedia.org/wiki/Federated_identity
https://en.wikipedia.org/wiki/Identity_provider
https://en.wikipedia.org/wiki/Service_provider