ESSO
Enterprise Single Sign On solution
- ⏰ Getting started
- How to install ESSO?
- ESSO Installation Windows (from 3.3.3-enterprise to 3.4.3-enterprise)
- ESSO Installation Windows (+3.5.0-enterprise)
- ESSO Installation Linux
- Startup process
- Enforcing browser addons
- ESSO Configuring Rules for Single Sign On
- Configuring Rules for Single Sign On
- Support and configuration tools
- ESSO Scripting Language
- Configuring terminal emulation SSO
- ESSO Related configuration parameters
- ESSO Manuals
- ESSO Scripting Language
- ESSO Scripting Language
- 1. Global functions
- 1.1. ESSO SendKeys syntax
- 2. secretStore object
- 3. SystemInfo object
- 4. Window class
- 5. Document class
- 6. Element class
- 7. Collection class
- 8. File class
- 9. Directory class
- 10. MailService class
- 11. NetworkResource class
- 12. Registry class
- 13. ServerInfo class
- 14. Hll class (version 1.4.0)
- ESSO Scripting examples
- How to add to ESSO a second factor of authentication?
- How to upgrade ESSO?
⏰ Getting started
Introduction
Soffid ESSO is a full Enterprise Single Sign on solution, with some distinguishing features:
-
Keeps track of users sessions active on the network.
-
Automatically reconfigure user preferences and desktop behaviour according to whether or not it is connected to the corporate network.
-
And of course, as any other ESSO solution, automatically detects user identification prompts, injecting the needed credentials, pressing buttons and more.
As critical success factors the following design principles are governing Soffid ESSO product:
-
It's fully integrated with Soffid IAM console.
-
It's extremely easy to install and configure.
-
It has good management and support tools.
-
It's workload on managed workstations is minimal.
-
It has been designed to minimize system vulnerabilities.
-
It's open-source.
How to install ESSO?
ESSO Installation Windows (from 3.3.3-enterprise to 3.4.3-enterprise)
Introduction
Soffid ESSO is a full Enterprise Single Sign on solution.
Here you can find the details about the ESSO from 3.3.3-enterprise to 3.4.3-enterprise iversions nstallation.
Supported platforms
Soffid ESSO supports Windows XP or later workstations.
Interactive installation
To install Soffid ESSO, you must follow these steps:
- Download the latest available installer version from: Soffid Download Manager.
- Run it as administrator. Once the interactive installation has finished, a message window will notice you:

- Finally, the system will prompt you to configure Soffid ESSO. This prompt will not be shown on updates or silent installations.

- After configuring the system, it's required to reboot the computer.

Interactive configuration
The first task to do at configuration panel is to enter the Soffid synchronization server URL and fetch its digital certificate. To do it, enter its URL on the textbox and press “Retrieve Certificate” button in order to obtain a certificate from the server.

If the URL is correct and the synchronization server is effectively running, the digital certificate will be downloaded and stored at Soffid ESSO directory. Mind that this initial configuration step is highly insecure. Should a man be in the middle, the certificate could be tampered, compromising any further security check.
It is a suitable procedure for testing and quick configuring, but a secure way to install and configure your installation certificate is preferred.
“Users can logout” checkbox enable users to open the Soffid notifier menu and close it's Soffid session. After logging out, the user will be allowed to start a new Soffid session with the same or another user name. If the checkbox is not selected, the user will not be allowed to close Soffid session without closing Windows session.
When “Force login at startup”, checkbox is selected, the Windows session (explorer.exe) won't start until Soffid session is completely verified and set up. Otherwise, the windows session will start regardless Soffid session is not started yet. If there is an error or denied log-on at Soffid ESSO, windows session will go on without any single sign on feature.
“Use Soffid windows logon screen” checkbox is only available on Windows XP. It changes the default (GINA) Windows logon screen, allowing the use of self-registered SmartCard certificates or one-time-password devices. It is not needed on Vista and later.
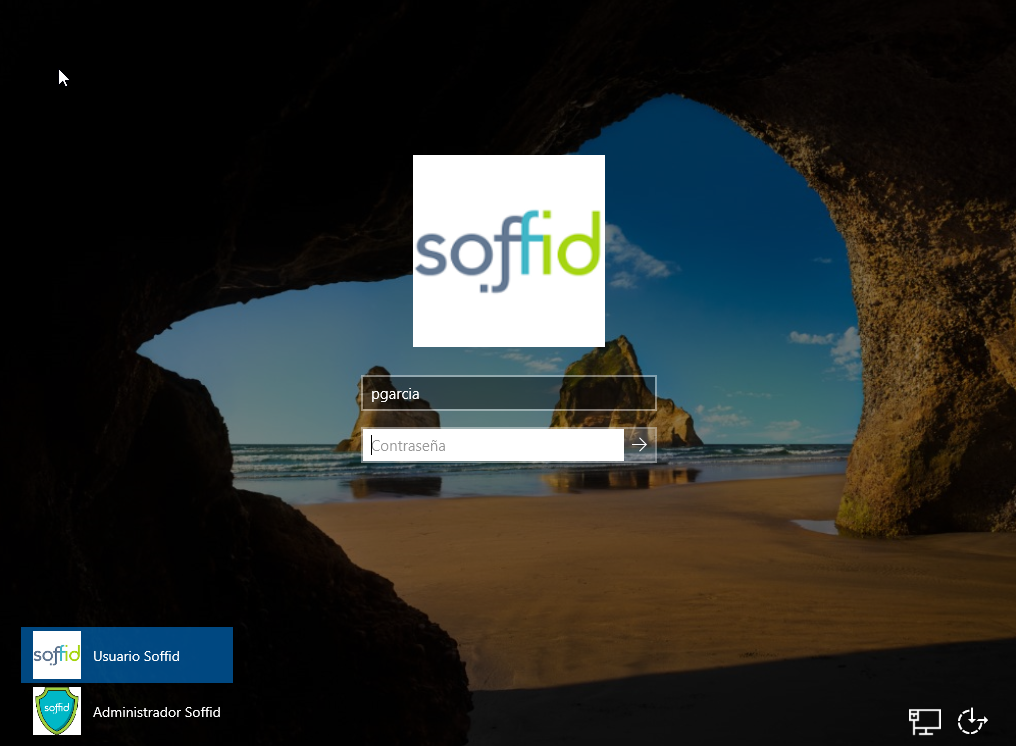
There are three ways to logon to Soffid:
-
Kerberos login will reuse the Windows credential acquired by the operating system. If they belong to a managed Active Directory, the user won't need to enter any user name or password to access Soffid.
-
When manual login is selected, the user must enter a valid user name and password in order to access Soffid.
-
When both is selected, the system will try first a Kerberos login. Whenever it is not possible (the user is not a domain user), a manual login will be prompted to the user.
Silent installation
In order to do a silent installation you can execute the installer from command line with the following parameters:
-q or /q: Quiet installation
-server [url] or /server [url]: to configure the synchronization server URL.
-force or /force: force the installation even if a restart is pending. Not recommended.
-nogina or /nogina: do not modify previos GINA. In this version, this parameter only applies in first installation.
Example:
C:\> soffidesso.exe -q -server https://server.domain.local:760 -force -noginaSmart update
To assist in massive deployment scenarios, smart update swich can be set to prevent Soffid to reinstall componenents when the installer version matches the already installed one. This switch does not affect to new installations.
-smartupdate or /smartupdate: Smart update installation
Example:
C:\> soffidesso.exe -q -server https://server.domain.local:760 -force -nogina -smartupdateMSI Package
MSI Installation is also available for enterprise customers.
To customaize configuration parameters, the PARAM variable can be used:
Example:
C:\> msiexec /i soffidesso.mssi PARAM="-q -server https://server.domain.local:760 -force -nogina -smartupdate"Registry configuration entries
The system stores all its settings in the registry branch HKLM\Software\Soffid\esso. The values used are as follows:
|
Entry |
Default Value |
Description |
|
LogonEntry |
Logon |
After identifying the user, Soffid ESSO will look at the defined application tree for an application with this key, in order to execute it. |
|
OfflineEntry |
Offline |
If synchronization servers are not reachable, an alternative script will be execute. This entry contains the key of the application entry point to execute in such a case. |
|
LocalCardSupport |
2 |
Indicate whether to ask for coordinates card at logon time or not. Four values are allowed. 1 – Coordinates card is required 2 – Coordinates card is required if and only if the user is the owner of one card. 3 – Coordinates card is required if the user is connecting from a not registered device. 4 – Never ask for coordinates card. |
|
RemoteCardSupport |
1 |
Indicate whether to ask for coordinates card when performing a remote logon. Four values are allowed. 1 – Coordinates card is required 2 – Coordinates card is required if and only if the user is the owner of one card. 3 – Coordinates card is required if the user is connecting from a not registered remote device. 4 – Never ask for coordinates card. |
|
LocalOfflineAllowed |
1 |
Specifies whether is it permitted to use the workstation when no Soffid synchronization servers are reachable. 1 – It's permitted. 0 – It's forbidden. |
|
RemoteOfflineAllowed |
0 |
Specifies whether it is permitted to open a terminal server connection against this host when no Soffid synchronization servers are reachable. 1 – It's permitted. 0 – It's forbidden. |
|
CertificateFile |
root.cer |
Specifies the name of the file containing the Certificate Authority certificate used by the synchronization server (X509 DER format) |
|
SSOServer |
stsmlin3.caib.es, sticlin2.caib.es |
Comma-separated list of synchronization server names |
|
seycon.https.port |
760 |
TCP/IP port used for connecting to SEYCON |
|
debuglevel |
|
Indicates the level of detail of the log: 0 = not recorded anything 1 = Basic Information 2 = Detailed Information |
|
ginalogFile |
|
Name of the file which records the actions taken by GINA. Do not enable it unless needed. |
|
ShiroHostName |
|
Do not modify: It contains the name that the host had when it was registered at Soffid server. |
|
startDisabled |
false |
When it contains the value “true”, Soffid ESSO will be started in disabled (or pause) state. Thus, it will not inject any user name or password on user applications. |
|
MazingerVersion |
|
It contains the version number of Soffid ESSO. |
|
sayaka.domain |
|
It contains the Active Directory name the workstations belongs to. |
|
sayaka.pkcs11% |
(reserved) |
Each crypto card used by the user will have a corresponding entry indicating the name of the PKCS#11 DLL that can handle it. Do not modify. |
Startup process
Windows XP GINA logon
Soffid GINA is an optional part of Soffid ESSO. It's features are:
-
Allows users to log on using smart cards. The digital certificates can be auto enrolled as long as there is a method to know which user it belongs to.
-
Allows authorized users to log on with Local Administrator privileges.
Windows Vista Credential Provider
Soffid Credential Provider is an optional part of Soffid ESSO. It's features are:
-
Allows users to log on using smart cards. The digital certificates can be auto enrolled as long as there is a method to know which user it belongs to.
-
Allows authorized users to run with Local Administrator privileges.
Soffid session startup
After being identified by Windows, the Soffid session startup takes place. Either sequentially or in parallel to desktop startup, the Soffid ESSO session manager (named KojiKabuto after the best ever hero) is the responsible for making the following steps.
Update settings
KojiKabuto will contact Soffid servers o update registry entries using the system configuration introduced at Soffid console (LogonEntry, OfflineEntry, SSOServer, seycon.https.port)
Kerberos handshake
If it's enabled by system administrator, Soffid Synchronization server and the user desktop will perform a Kerberos handshake. If the Credential token shown by user desktop is accepted by any managed Active Directory, Soffid will accept that credential as a prove of identity.
In order to do that handshake, Soffid will create an special user named SEYCON_xxxx for each one of the synchronization servers involved in the login process.
Manual login
If it's enabled by system administrator, or Kerberos handshake has failed, the user will have the chance to enter it's user name and passwords. They will be verified by synchronization server against its internal user database.
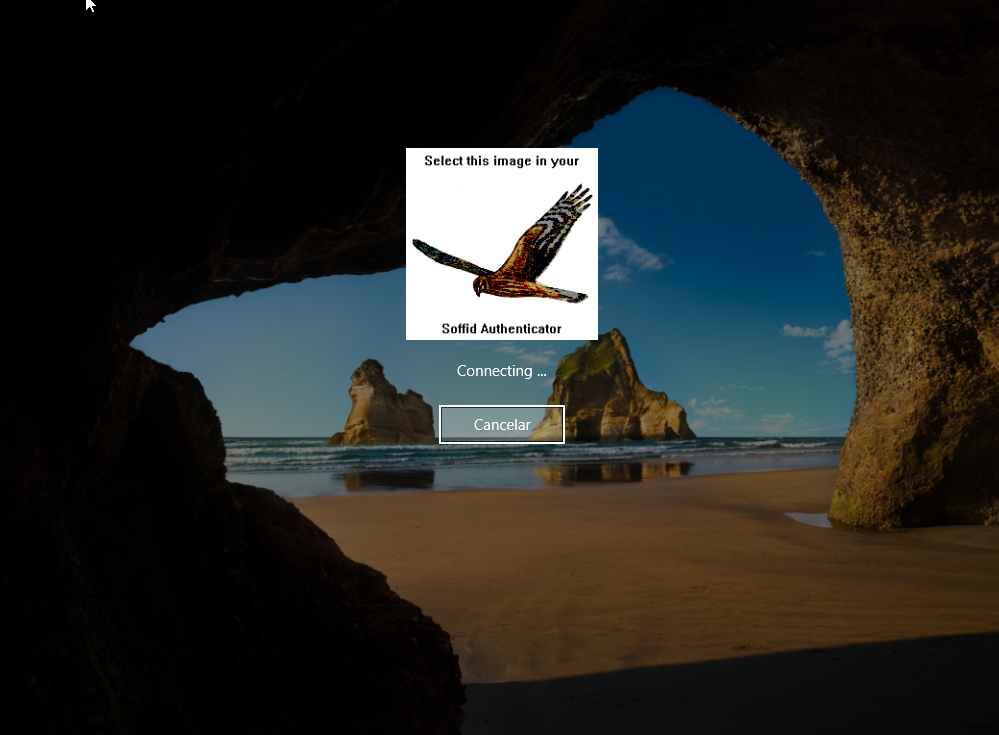
Coordinates card
Once logged in, KojiKabuto requested permission to log. At this time, synchronization server could issue a coordinates card challenge. If the user fails to enter the right value for the coordinates requested, the Soffid session will be canceled.
Multiple sessions prevention
At this phase, Synchronization Server will check if the user has any other, not linked, session. If there is any other active session, and the user has not been granted the capability to open more than one (at Soffid console), the system will notice it to both, the new session and the ancient one.
Finally, the new session will take the decision to close the ancient one or to give up. If the user chooses to close the ancient one, the later will show a prompt, and its user will have 30 seconds to answer if he agrees to close that session. Usually the user has left the ancient session open and no user will be present at the ancient session. So, after 30 seconds the session will be closed and the new one will proceed.
SSO Rules activation
Once the session has been created, the SSO rules present at Soffid Console will be compiled and loaded into the Windows Session. Since this moment, every application launched will have its credentials automatically fullfilled.
Startup script
The workstation connects to Synchronization Server to get the session logon script (LogonEntry registry entry with deafault value "Logon"), and the session offline script (registry entry "OfflineEntry" with default value "offline"), which will be executed at next logon whether no Synchronization server is reachable.
The offline script is stored at %ProgramFiles%\SoffidESSO\Cache\offline.mzn file.
Afterwards, the application menu is populated using the application entries configured at Sofifd Console.
Desktop start
Unless the system configuration enables the user to use the desktop before opening the Soffid Sesion, the Desktop is started right now. Otherwise, the desktop would have been started at the initial steps.
System operation
Once the session is started, Soffid ESSO has two main tasks to do:
First. Timely keeps in touch with Synchronization server to confirm the validity of the soffid session.
Second. Performs injection or user names and password to applications, based on the SSO rules bound to each application entry point the user is authorized to execute.\
Enforcing browser addons
Modern browsers, apply certain restrictions to automatically enable browser addons without user intervention:
Google chrome
Google chrome extension is automatically enabled, but requires internet access, as Chrome is going to download the addon directly from Chrome store rather than using the locally installed version. This addon is compatible with Microsoft Edge.
Mozilla Firefox
There is a Mozilla firefox group policy to automatically enable any extension. Follow this link to get it: https://github.com/mozilla/policy-templates/releases/download/v1.11/policy_templates_v1.11.zip
You can alternatively, add the following registry key:
HKEY_LOCAL_MACHINE\Software\Policies\Mozilla\Firefox\Extensions\Locked\1 = "esso@soffid.com"
Internet Explorer (deprecated)
As well, there is a group policy for Internet Explorer. Please, follow this Microsoft link to get it: https://docs.microsoft.com/es-es/internet-explorer/ie11-deploy-guide/enable-and-disable-add-ons-using-administrative-templates-and-group-policy
The GUUID of Soffid ESSO group policy is {53252A52-D536-11DF-866D-5B82D67A00D1}
ESSO Installation Windows (+3.5.0-enterprise)
Introduction
Soffid ESSO is a full Enterprise Single Sign on solution.
Here you can find the details about the ESSO +3.5.0-enterprise installation.
Supported platforms
Soffid ESSO supports Windows XP or later workstations.
Windows
Interactive installation
To install Soffid ESSO, you must follow these steps:
1. Download the latest available installer version from: Soffid Download Manager.
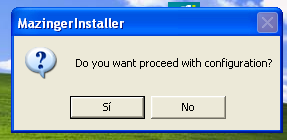
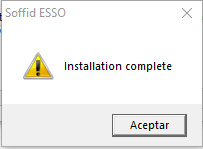
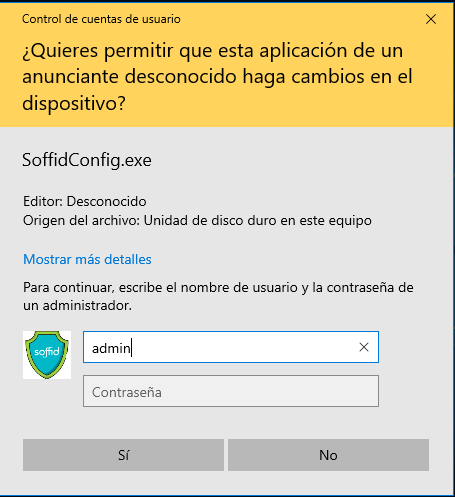
2. Install as administrator. Once the interactive installation has finished, a message window will notice you:
3. Finally, the system will prompt you to configure Soffid ESSO. This prompt will not be shown on updates or silent installations.
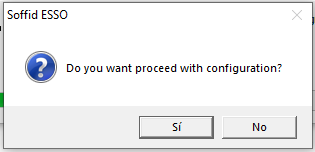
3.1. If you click No, the process finish without configuration
3.2. If you clic Yes, you have to configure the URL of the ESSO server, for which you will have to enter the URL of the Soffid identity provider and obtain its digital certificate.
4. After configuring the system, it's required to reboot the computer.
For more information, you can visit the Windows user acces page and the Windows Administrator access page.
Configure the ESSO Profile
1. Then you need to configure the ESSO profile in your Identity Provider
💻 Image

For more information you can visit the following page: https://bookstack.soffid.com/books/federation/page/esso
2. And finally, you can configure the Adaptive authentication rules
💻 Image

Silent installation
In order to do a silent installation you can execute the installer from command line with the following parameters:
-q or /q: Quiet installation
-server [url] or /server [url]: to configure the synchronization server URL.
-force or /force: force the installation even if a restart is pending. Not recommended.
-nogina or /nogina: do not modify previos GINA. In this version, this parameter only applies in first installation.
-nopm : to avoid installing Password Manager
-forceStartupLogin [true|false]: Enforces or skips Soffid login before displaying the user desktop
-loginType: Specify login type to use:
kerberos: to perform windows SSO
manual: to enter user name and password
both: try kerberos, fallback to manual in case of failure
soffid: use the Soffid credential provider
To assist in massive deployment scenarios, smart update swich can be set to prevent Soffid to reinstall componenents when the installer version matches the already installed one. This switch does not affect to new installations.
-smartupdate or /smartupdate: Smart update installation
Install EXE Package
EXE Installation is also available for enterprise customers.
Example:
C:\> MazingerInstaller-3.5.3-enterprise.exe -q -server https://idp.your-soffid.com:443 -force -nogina -smartupdate -nopmInstall MSI Package
MSI Installation is also available for enterprise customers.
To customaize configuration parameters, the PARAM variable can be used.
Example:
C:\> msiexec /i soffidesso.msi PARAM="-q -server https://idp.your-soffid.com:443 -force -nogina -smartupdate -nopm"Installation problems can be reviewed in the installer log: C:\Windows\SysWOW64\mazinger-install.log
Registry configuration entries
The system stores all its settings in the registry branch HKEY_LOCAL_MACHINE\SOFTWARE\Soffid\esso.
The values used are as follows:
|
Entry |
Default Value |
Description |
|
LogonEntry |
Logon |
After identifying the user, Soffid ESSO will look at the defined application tree for an application with this key, in order to execute it. |
|
OfflineEntry |
Offline |
If synchronization servers are not reachable, an alternative script will be execute. This entry contains the key of the application entry point to execute in such a case. |
|
LocalCardSupport |
2 |
Indicate whether to ask for coordinates card at logon time or not. Four values are allowed. 1 – Coordinates card is required 2 – Coordinates card is required if and only if the user is the owner of one card. 3 – Coordinates card is required if the user is connecting from a not registered device. 4 – Never ask for coordinates card. |
|
RemoteCardSupport |
1 |
Indicate whether to ask for coordinates card when performing a remote logon. Four values are allowed. 1 – Coordinates card is required 2 – Coordinates card is required if and only if the user is the owner of one card. 3 – Coordinates card is required if the user is connecting from a not registered remote device. 4 – Never ask for coordinates card. |
|
LocalOfflineAllowed |
1 |
Specifies whether is it permitted to use the workstation when no Soffid synchronization servers are reachable. 1 – It's permitted. 0 – It's forbidden. |
|
RemoteOfflineAllowed |
0 |
Specifies whether it is permitted to open a terminal server connection against this host when no Soffid synchronization servers are reachable. 1 – It's permitted. 0 – It's forbidden. |
|
CertificateFile |
root.cer |
Specifies the name of the file containing the Certificate Authority certificate used by the synchronization server (X509 DER format) |
|
SSOServer |
stsmlin3.caib.es, sticlin2.caib.es |
Comma-separated list of synchronization server names |
|
seycon.https.port |
760 |
TCP/IP port used for connecting to SEYCON |
|
debuglevel |
|
Indicates the level of detail of the log: 0 = not recorded anything 1 = Basic Information 2 = Detailed Information |
|
ginalogFile |
|
Name of the file which records the actions taken by GINA. Do not enable it unless needed. |
|
ShiroHostName |
|
Do not modify: It contains the name that the host had when it was registered at Soffid server. |
|
startDisabled |
false |
When it contains the value “true”, Soffid ESSO will be started in disabled (or pause) state. Thus, it will not inject any user name or password on user applications. |
|
MazingerVersion |
|
It contains the version number of Soffid ESSO. |
|
sayaka.domain |
|
It contains the Active Directory name the workstations belongs to. |
|
sayaka.pkcs11% |
(reserved) |
Each crypto card used by the user will have a corresponding entry indicating the name of the PKCS#11 DLL that can handle it. Do not modify. |
|
loginType |
|
Values:
|
|
SSOcredentialprovider |
true |
When it contains the value “true”, Soffid ESSO allow to elevate privileges. |
|
legacyESSO |
true |
When it contains the value “true”, it allows Soffid ESSO to inject the credentials in native Windows applications. |
Startup process
Windows XP GINA logon
Soffid GINA is an optional part of Soffid ESSO. It's features are:
-
Allows users to log on using smart cards. The digital certificates can be auto enrolled as long as there is a method to know which user it belongs to.
-
Allows authorized users to log on with Local Administrator privileges.
Windows Vista Credential Provider
Soffid Credential Provider is an optional part of Soffid ESSO. It's features are:
-
Allows users to log on using smart cards. The digital certificates can be auto enrolled as long as there is a method to know which user it belongs to.
-
Allows authorized users to run with Local Administrator privileges.
Soffid session startup
After being identified by Windows, the Soffid session startup takes place. Either sequentially or in parallel to desktop startup, the Soffid ESSO session manager (named KojiKabuto after the best ever hero) is the responsible for making the following steps.
Update settings
KojiKabuto will contact Soffid servers o update registry entries using the system configuration introduced at Soffid console (LogonEntry, OfflineEntry, SSOServer, seycon.https.port)
Kerberos handshake
If it's enabled by system administrator, Soffid Synchronization server and the user desktop will perform a Kerberos handshake. If the Credential token shown by user desktop is accepted by any managed Active Directory, Soffid will accept that credential as a prove of identity.
In order to do that handshake, Soffid will create an special user named SEYCON_xxxx for each one of the synchronization servers involved in the login process.
Manual login
If it's enabled by system administrator, or Kerberos handshake has failed, the user will have the chance to enter it's user name and passwords. They will be verified by synchronization server against its internal user database.
Coordinates card
Once logged in, KojiKabuto requested permission to log. At this time, synchronization server could issue a coordinates card challenge. If the user fails to enter the right value for the coordinates requested, the Soffid session will be canceled.
Multiple sessions prevention
At this phase, Synchronization Server will check if the user has any other, not linked, session. If there is any other active session, and the user has not been granted the capability to open more than one (at Soffid console), the system will notice it to both, the new session and the ancient one.
Finally, the new session will take the decision to close the ancient one or to give up. If the user chooses to close the ancient one, the later will show a prompt, and its user will have 30 seconds to answer if he agrees to close that session. Usually the user has left the ancient session open and no user will be present at the ancient session. So, after 30 seconds the session will be closed and the new one will proceed.
SSO Rules activation
Once the session has been created, the SSO rules present at Soffid Console will be compiled and loaded into the Windows Session. Since this moment, every application launched will have its credentials automatically fullfilled.
Startup script
The workstation connects to Synchronization Server to get the session logon script (LogonEntry registry entry with deafault value "Logon"), and the session offline script (registry entry "OfflineEntry" with default value "offline"), which will be executed at next logon whether no Synchronization server is reachable.
The offline script is stored at %ProgramFiles%\SoffidESSO\Cache\offline.mzn file.
Afterwards, the application menu is populated using the application entries configured at Sofifd Console.
Desktop start
Unless the system configuration enables the user to use the desktop before opening the Soffid Sesion, the Desktop is started right now. Otherwise, the desktop would have been started at the initial steps.
System operation
Once the session is started, Soffid ESSO has two main tasks to do:
First. Timely keeps in touch with Synchronization server to confirm the validity of the soffid session.
Second. Performs injection or user names and password to applications, based on the SSO rules bound to each application entry point the user is authorized to execute.\
Enforcing browser addons
Modern browsers, apply certain restrictions to automatically enable browser addons without user intervention:
Google chrome
Google chrome extension is automatically enabled, but requires internet access, as Chrome is going to download the addon directly from Chrome store rather than using the locally installed version. This addon is compatible with Microsoft Edge.
Mozilla Firefox
There is a Mozilla firefox group policy to automatically enable any extension. Follow this link to get it: https://github.com/mozilla/policy-templates/releases/download/v1.11/policy_templates_v1.11.zip
You can alternatively, add the following registry key:
HKEY_LOCAL_MACHINE\Software\Policies\Mozilla\Firefox\Extensions\Locked\1 = "esso@soffid.com"
Internet Explorer (deprecated)
As well, there is a group policy for Internet Explorer. Please, follow this Microsoft link to get it: https://docs.microsoft.com/es-es/internet-explorer/ie11-deploy-guide/enable-and-disable-add-ons-using-administrative-templates-and-group-policy
The GUUID of Soffid ESSO group policy is {53252A52-D536-11DF-866D-5B82D67A00D1}
ESSO Installation Linux
Introduction
Here you can find the details about the ESSO installation.
Installation
sudo dpkg -i '<your_path>/MazingerInstaller-3.5.2-enterprise.deb'💻 Image
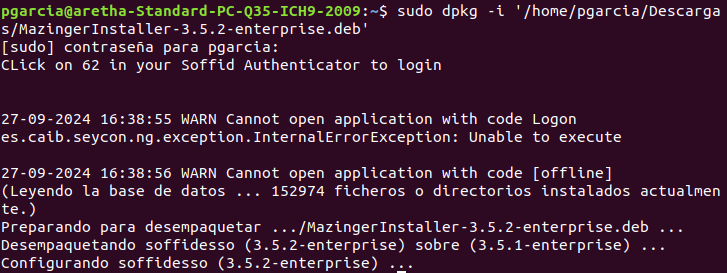
Interactive configuration
1. To configure, you need to run the following command with your Soffid Identity Provider URL.
sudo configure_esso https://<YOUR_IdP_URL>:443💻 Image

2. Then you need to configure the ESSO profile in your Identity Provider
💻 Image
For more information you can visit the following page: https://bookstack.soffid.com/books/federation/page/esso
3. And finally, you can configure the Adaptive authentication rules
💻 Image
For more information, you can visit the Linux Administrator access page and the Linux user acces page.
Enforcing browser addons
Modern browsers, apply certain restrictions to automatically enable browser addons without user intervention:
Google chrome
Google chrome extension is automatically enabled, but requires internet access, as Chrome is going to download the addon directly from Chrome store rather than using the locally installed version. This addon is compatible with Microsoft Edge.
Mozilla Firefox
There is a Mozilla firefox group policy to automatically enable any extension. Follow this link to get it: https://github.com/mozilla/policy-templates/releases/download/v1.11/policy_templates_v1.11.zip
You can alternatively, add the following registry key:
HKEY_LOCAL_MACHINE\Software\Policies\Mozilla\Firefox\Extensions\Locked\1 = "esso@soffid.com"
Internet Explorer (deprecated)
As well, there is a group policy for Internet Explorer. Please, follow this Microsoft link to get it: https://docs.microsoft.com/es-es/internet-explorer/ie11-deploy-guide/enable-and-disable-add-ons-using-administrative-templates-and-group-policy
The GUUID of Soffid ESSO group policy is {53252A52-D536-11DF-866D-5B82D67A00D1}
Startup process
Windows XP GINA logon
Soffid GINA is an optional part of Soffid ESSO. It's features are:
-
Allows users to log on using smart cards. The digital certificates can be auto enrolled as long as there is a method to know which user it belongs to.
-
Allows authorized users to log on with Local Administrator privileges.
Windows Vista Credential Provider
Soffid Credential Provider is an optional part of Soffid ESSO. It's features are:
-
Allows users to log on using smart cards. The digital certificates can be auto enrolled as long as there is a method to know which user it belongs to.
-
Allows authorized users to run with Local Administrator privileges.
Soffid session startup
After being identified by Windows, the Soffid session startup takes place. Either sequentially or in parallel to desktop startup, the Soffid ESSO session manager (named KojiKabuto after the best ever hero) is the responsible for making the following steps.
Update settings
KojiKabuto will contact Soffid servers o update registry entries using the system configuration introduced at Soffid console (LogonEntry, OfflineEntry, SSOServer, seycon.https.port)
Kerberos handshake
If it's enabled by system administrator, Soffid Synchronization server and the user desktop will perform a Kerberos handshake. If the Credential token shown by user desktop is accepted by any managed Active Directory, Soffid will accept that credential as a prove of identity.
In order to do that handshake, Soffid will create an special user named SEYCON_xxxx for each one of the synchronization servers involved in the login process.
Manual login
If it's enabled by system administrator, or Kerberos handshake has failed, the user will have the chance to enter it's user name and passwords. They will be verified by synchronization server against its internal user database.
Coordinates card
Once logged in, KojiKabuto requested permission to log. At this time, synchronization server could issue a coordinates card challenge. If the user fails to enter the right value for the coordinates requested, the Soffid session will be canceled.
Multiple sessions prevention
At this phase, Synchronization Server will check if the user has any other, not linked, session. If there is any other active session, and the user has not been granted the capability to open more than one (at Soffid console), the system will notice it to both, the new session and the ancient one.
Finally, the new session will take the decision to close the ancient one or to give up. If the user chooses to close the ancient one, the later will show a prompt, and its user will have 30 seconds to answer if he agrees to close that session. Usually the user has left the ancient session open and no user will be present at the ancient session. So, after 30 seconds the session will be closed and the new one will proceed.
SSO Rules activation
Once the session has been created, the SSO rules present at Soffid Console will be compiled and loaded into the Windows Session. Since this moment, every application launched will have its credentials automatically fullfilled.
Startup script
The workstation connects to Synchronization Server to get the session logon script (LogonEntry registry entry with deafault value "Logon"), and the session offline script (registry entry "OfflineEntry" with default value "offline"), which will be executed at next logon whether no Synchronization server is reachable.
The offline script is stored at %ProgramFiles%\SoffidESSO\Cache\offline.mzn file.
Afterwards, the application menu is populated using the application entries configured at Sofifd Console.
Desktop start
Unless the system configuration enables the user to use the desktop before opening the Soffid Sesion, the Desktop is started right now. Otherwise, the desktop would have been started at the initial steps.
System operation
Once the session is started, Soffid ESSO has two main tasks to do:
First. Timely keeps in touch with Synchronization server to confirm the validity of the soffid session.
Second. Performs injection or user names and password to applications, based on the SSO rules bound to each application entry point the user is authorized to execute.\
Enforcing browser addons
Modern browsers, apply certain restrictions to automatically enable browser addons without user intervention:
Google chrome
Google chrome extension is automatically enabled, but requires internet access, as Chrome is going to download the addon directly from Chrome store rather than using the locally installed version. This addon is compatible with Microsoft Edge.
Mozilla Firefox
There is a Mozilla firefox group policy to automatically enable any extension. Follow this link to get it: https://github.com/mozilla/policy-templates/releases/download/v1.11/policy_templates_v1.11.zip
You can alternatively, add the following registry key:
HKEY_LOCAL_MACHINE\Software\Policies\Mozilla\Firefox\Extensions\Locked\1 = "esso@soffid.com"
Internet Explorer (deprecated)
As well, there is a group policy for Internet Explorer. Please, follow this Microsoft link to get it: https://docs.microsoft.com/es-es/internet-explorer/ie11-deploy-guide/enable-and-disable-add-ons-using-administrative-templates-and-group-policy
The GUUID of Soffid ESSO group policy is {53252A52-D536-11DF-866D-5B82D67A00D1}
ESSO Configuring Rules for Single Sign On
Configuring Rules for Single Sign On
Configuring Single Sign-on
SSO system is configured based on the detection of administrator defined User Interface patterns. The system currently supports native Windows applications, Java applications and Web applications.
The UI Patterns are expressed with XML files associated with each application entry point. They are composed of:
-
Rules for detecting user interfaces (defined like application attributes or elements).
-
Action to be taken on user interface recognition. (defined with the action element for the application).
Complementary to the rules defined in Sofifd Console, the synchronization server manages a repository of user accounts and passwords, as well as other information generically known as secrets. In general, the system will handle any number of secrets as well as any number of accounts for each managed systems. Anyway, each account for a managed system will have only one password.
All secrets can be used and manipulated using a scripting language fully compatible with ECMA-Script, also known as Javascript.
User interface pattern recognition
The user interface detection for Windows and Java applications is done using the Application tag. This tag will contain one or more Component tagged elements. Each component could have many nested components. Each component could have one or more actions to perform when the user focus is at a selected component.
Next is a sample to inject the secret name “JconsolePassword” into jconsole application:
|
<Mazinger> <Application cmdLine = '.*jconsole$'> <Component class = 'sun.tools.jconsole.JConsole' title = 'Java Monitoring & Management Console' name = 'frame0'> <Component class = 'sun.tools.jconsole.JConsole\$FixedJRootPane'> <Component class = 'javax.swing.JPanel' name = 'null.glassPane' /> <Component class = 'javax.swing.JLayeredPane' name = 'null.layeredPane'> <Component class = 'javax.swing.JPanel' name = 'null.contentPane'> .... <Component class = 'javax.swing.JPasswordField' text ='' ref-as = 'password'> |
Patterns to be match |
|
<Action type='script' event='onFocus'> <! [CDATA [ var account = secretStore.getAccount('soffid'); var password = secretStore.getPassword('soffid', account); debug ('user =' + account); debug ('password =' + password); password.setText (secretStore.getSecret ('password')); ]]> </ Action> |
The action you want to be executed |
| .... |
Thus, when the system detects that the user is within a window that meets the XML specification and the password text box is the focus owner, Soffid will execute the script action that is bound. This one will show the user password in a jconsole application field.
The Application contains in the attribute cmdLine a regular expression that is matched against the process command line. In the example, SSO will only match a running program with a command line that ends with "jconsole". It won't apply to jconsole.exe or “jconsole test”.
The element Application accepts the following attributes:
|
cmdLine |
Regular expression to match the command line. |
The Component element allows the following attributes:
|
class |
Regular expression to validate against the kind of visual component, either a Java class or a window class. |
|
name |
Regular expression to match the name of the component. Applies only to Java components. |
|
text |
Regular expression to match the content of a text component |
|
title |
Regular expression to match the title of a java component. |
|
dlgId |
Regular expression to match window ID dialog on Windows component. |
|
optional |
If the value is true, the presence of the component is not considered critical to trigger actions associated dialogue. |
|
check |
When the check attribute has the value “partial”, the matcher engine considers the user interface component matches the XML pattern even when it has one or more children components that are not declared at the XML pattern. If you specify the value full value or the attribute is missing, the component will not match the pattern if it has children are components not specified in XML descriptor. Thus, the rule will be ignored. |
|
ref-as |
Specifies a name of a ECMA-Script variable that will refer to this component. |
The Action element accepts the following attributes:
|
event |
Name of the event that will trigger the action. In the current version must be set to "onFocus" |
|
type |
Indicates the type of action. Can have the following values: setText: Assigns a text value to the owner component. script. Run the specified script. |
|
text |
Text to assign, for setText actions. |
|
repeat |
If set to true, the action will be executed as many times as necessary. Otherwise, it will only run once per process. |
|
delay |
Time (in seconds) that must be elapsed before the action is executed again. |
Web interfaces pattern recognition
The detection is done using the element WebApplication. This tag is independent of the browser used, and is based solely on the content of web document. Thus, the same rule will work both on Mozilla Firefox, Google Chrome or Internet Explorer.
|
<Mazinger> <WebApplication url = 'https://www.caib.es. *' title = 'Government of the Balearic Islands'> <Form action = "j_security_check"> <Input name="j_username" ref-as="u"/> <Input name="j_password" type="password" ref-as="p"/> <Input type="Submit" ref-as="b" /> |
Patterns to be match |
|
<Action Type='script' event='onLoad'> <! [CDATA [ debug('User =' + secretStore.getAccount ('user')); debug ('password =' + secretStore.getPassword('soffid', account)); u.setAttribute ('value' secretStore.getAccount ('user')); p.setAttribute ('value' secretStore.getPassword('soffid', account)); b.click(); ]]> </Action> |
Action you want to be executed |
|
</Form> </WebApplication> </Mazinger> |
Thus, when the system detects that the browser has loaded a page matching the XML specification (url, title, and components), it will run the actions that have been associated.
Mind that despite the actions being coded in Javascript, it is not the Browser javascript engine. Thus, you cannot use browser variables or functions.
The element WebApplication accepts the following attributes:
|
url |
Regular expression to match the page address |
|
title |
Regular expression to match the title of the page |
|
content |
Regular expression to match the HTML content of the page |
The Form element will search in the HTML document for a form that matches the specified attributes. It can optionally contain one or more input elements that must be present in the HTML document. It accepts the following attributes:
|
id |
Regular expression to match the ID attribute of the element |
|
name |
Regular expression to match the element name |
|
method |
Regular expression to match the form element's method attribute. |
|
action |
Regular expression to match the form element's action attribute. |
|
ref-as |
Specifies a name of a ECMA-Script variable that will refer to this form. |
|
optional |
A value of true indicates that its presence is not necessary for the execution of actions. |
The Input element will search in the HTML document for an input element that matches the specified attributes. Input elements can be located within WebApplication or Form elements. In the first case, you will find there is any input into the document. In the second case, just find the type items included in the input form found.
|
id |
Regular expression to match the ID attribute of the element |
|
name |
Regular expression to match the element name |
|
type |
Regular expression to match the input type |
|
value |
Regular expression to match the input value. |
|
ref-as |
Specifies a name of a ECMA-Script variable that will refer to this form. |
|
optional |
A value of true indicates that its presence is not necessary for the execution of actions. |
The Action element accepts the following attributes:
|
event |
Name of the event that will trigger the action. In the current version must be set to "onFocus" |
|
type |
Indicates the type of action. Can have the following values: setText: Not supported script. Run the specified script. |
|
repeat |
If set to true, the action will be executed as many times as necessary. Otherwise, it will only run once per process. |
|
delay |
Time (in seconds) that must be elapsed before the action is executed again. |
Configuring rules for basic / kerberos authentication
Some web pages are still using basic or kerberos authentication mechanisms. These mechanisms do not present a web page to be filled in by the user. Thus, the ESSO engine cannot detect it using the method described previously.
Instead, starting from Soffid ESSO version 3.0.0, there is a new tag to teach the ESSO which credentials to send in these cases. The rules will be like the next ones:
<Mazinger>
<WebTransport url="https://no-soffid.bubu.lab:4443/" system="OSCM"/>
<WebTransport url="https://no-ad.bubu.lab/" system="ad" domain="AD"/>
</Mazinger>|
Attribute
|
Value
|
|---|---|
| url | The base url to use. Include the protocol and port number when needed. Any BASIC, NTLM or Kerberos authentication requested by that server will be automatically answered with the credentials present in the password vault |
| system | The ESSO will send any credential that the user has in that system. Other credentials will be ignored |
| domain |
This is an optional attribute. It's required when trying to use Kerberos or NTLM authentication if the account name does not contain the domain name part. If the account contains the domain name, this attribute should not be present. |
Due to the different ways that browsers address this kind of authentication, the user interface will be displayed according to the browser settings. For instance, Edge and Internet Explorer will display a UA dialog box.
Support and configuration tools
Introduction
KojiKabuto.exe, the main Soffid ESSO component, picks settings and rules automatically from Soffid synchronization server at login. This configuration can be updated by running the command "KojiKabuto update". Once run, new rules will apply to all new processes. Mind that application processes that where running before the update is done will still use the old rules set.
Additionally, you can drive SSO by yourself for testing purposes. Mazinger.exe is the command line version of Soffid ESSO. It accepts the following commands:
To stop SSO service:
mazinger stopTo start Mazinger services:
mazinger start [-trace] [-debug] [file.mzn]To get a configuration file, you can download from: https://<synchronizationserver>:760/getmazingerconfig?user = .....
The -debug switch allows Mazinger to display all the single sign on events that are produced at users applications.
The -trace switch is only inteded for debugging and support usage.
To view all the single sign on events on a running ESSO instance, you can run:
mazinger debugTo view current SSO service status, run:
mazinger statusMazinger can also dump XML files describing the applications user interface. This XML files can be used to describe SSO rules. To dump this XML descriptors, execute:
mazinger spyMazinger spy and mazinger trace are very useful when you are creating a new ESSO rule in order to see what parameters, components, atributes, ... the application are using.
In order to execute this commands, you must go to the ESSO installation directory. For example, C:\Program Files\SoffidEsso\mazinger.exe trace.
ESSO Scripting Language
Visit the ESSO Scripting Language chapter.
Configuring terminal emulation SSO
Introduction
To configure SSO on terminal emulations, an HLL API bridge has been built. This bridge allows direct communication with the terminal emulator in order to create accurate SSO rules that can be triggered based on the screen display.
Next, you have a sample rule for terminal emulation SSO:
HLL API rule
<Mazinger>
<HllApplication>
<Pattern row="2">.*SOFFID.*</Pattern>
<Pattern row="23">.*ABC.*</Pattern>
<Action type="script" event="onMatch" repeat="true" delay="1">
account = secretStore.getAccount ("390host");
password = secretStore.getPassword ("390host", account);
hll.setCursorLocation (22,3);
hll.sendText ("HELLO "+account);
hll.setCursorLocation (23, 3);
hll.sendText ("YOUR PASSWORD IS "+password);
hll.sendKeys("@E");
</Action>
</HllApplication>
</Mazinger>The rule should contain one or more patterns that will be matched against the specified row. If the screen matches all the specified patterns, the action will be executed as usual.
Nevertheless, HLL applications differ in some way from other application rules as long as the HLL engine (Sewashi) must be started separately from the ESSO engine. To active the HLL rules engine, the sewashi program must be started, specifying the HLL API used to interact with the terminal emulator, and optionally, the sessions to be managed:
%ProgramFiles%\SoffidESSO\Sewashi.exe --dll "%ProgramFiles%\IBM\Personal Communications\PCSHLL32.DLL" --sessions ABCDEFGTo stop the HLL engine, Sewashi --stop can be executed. This program can executed from Soffid login and logout scripts.
ESSO Related configuration parameters
Introduction
There are some configuration parameters that can be tuned on Soffid console.
|
Parameter
|
Value
|
|---|---|
| SSOServer | Comma separated of synchronization servers the ESSO should connect to |
| seycon.https.port | TCP/IP synchronization servers are listening to. By default 760 |
| SSOSoffidAgent |
Name of the agent used to authenticate user accounts. |
| LogonEntry | Application entry point to execute after login. |
| OfflineEntry | Application entry point to execute when the desktop is offline. The script belonging to this application entry point will be stored locally. |
| AutoSSOSystem | Virtual agent name where to store user registered accounts |
| AutoSSOPolicy | Password policy to applyfor user registered accounts |
As stated at Parameter screen documentation, a single parameter can have a global default value and specific values on a subnetwork basis. This mechanism allows the administrator to setup different synchronization servers for each subnet.
ESSO Manuals
Documentation about Windows user access, Linux user access and Admin access
Windows Administrator access
How to access?
For domain member hosts, ESSO will remove all existing local accounts except for those with a dependand service. So, in order to access with administrator privileges, user must use a domain account with local administrator privilege, or either an authorized Soffid user.
There are three different ways to grant this kind of authorization to a user using Soffid console:
- Grant a global authorization (host:support). In this case, user can admin any host.
- Using a network scope authorization. This kind of authorization can be granted on network management screen. Administration authorization can be granted for any host belonging to a network or for a restricted group of them.
- Using a host scope authorization. This kind of authorization can be granted on host management screen for specified time period.
Through a workflow request. User asks for administration approval using "Request to administer a workstation" workflow. Soffid administrator can deny or approve the request. After the specified time period, the permission will be revoked.
In order to acces with administrator privileges user must log on with the soffid user code. It is not possible to do it with another account. Windows user code must match with Soffid user code.
Other operations
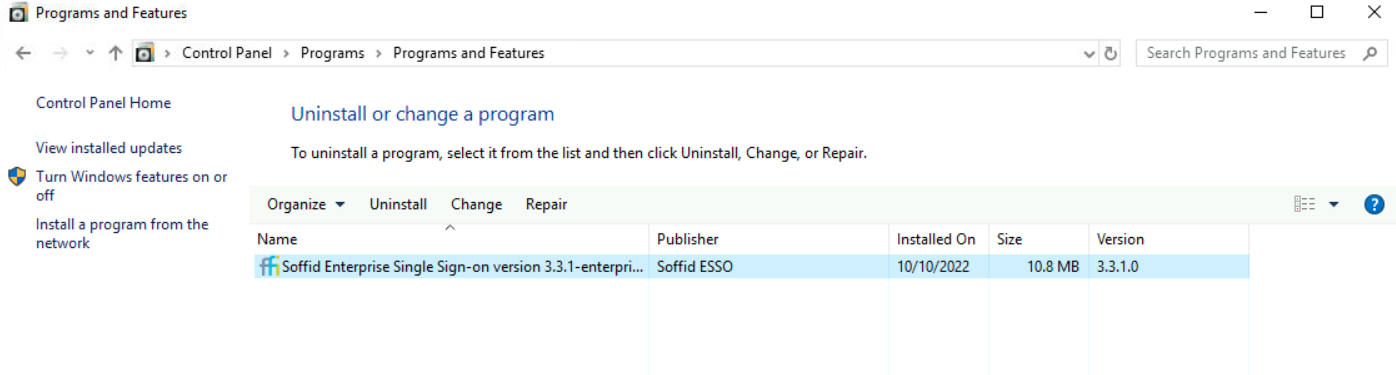
How to know the ESSO version?
Windows Control Panel --> Add/Remove programs
💻 Image
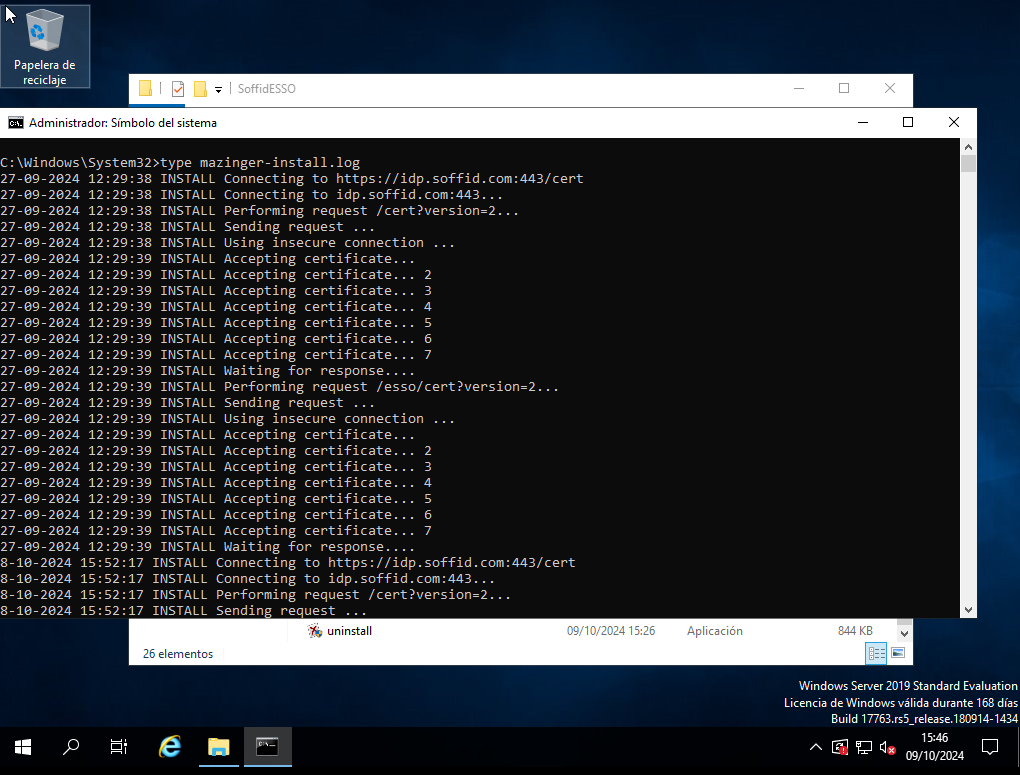
How to check the log?
C:\Windows\System32\type mazinger-install.log💻 Image
How to run the configuration?
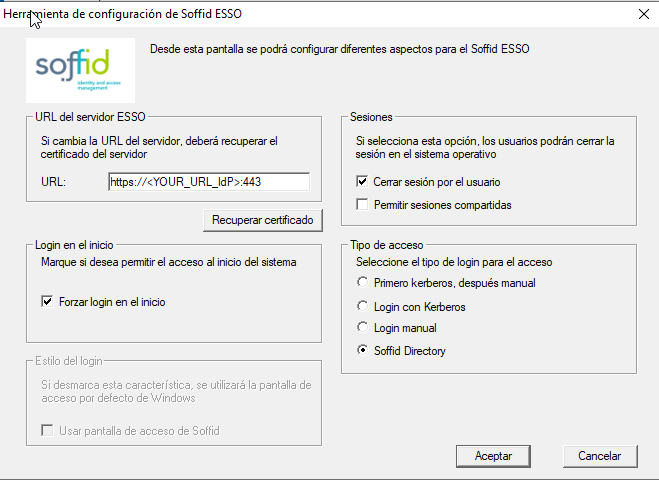
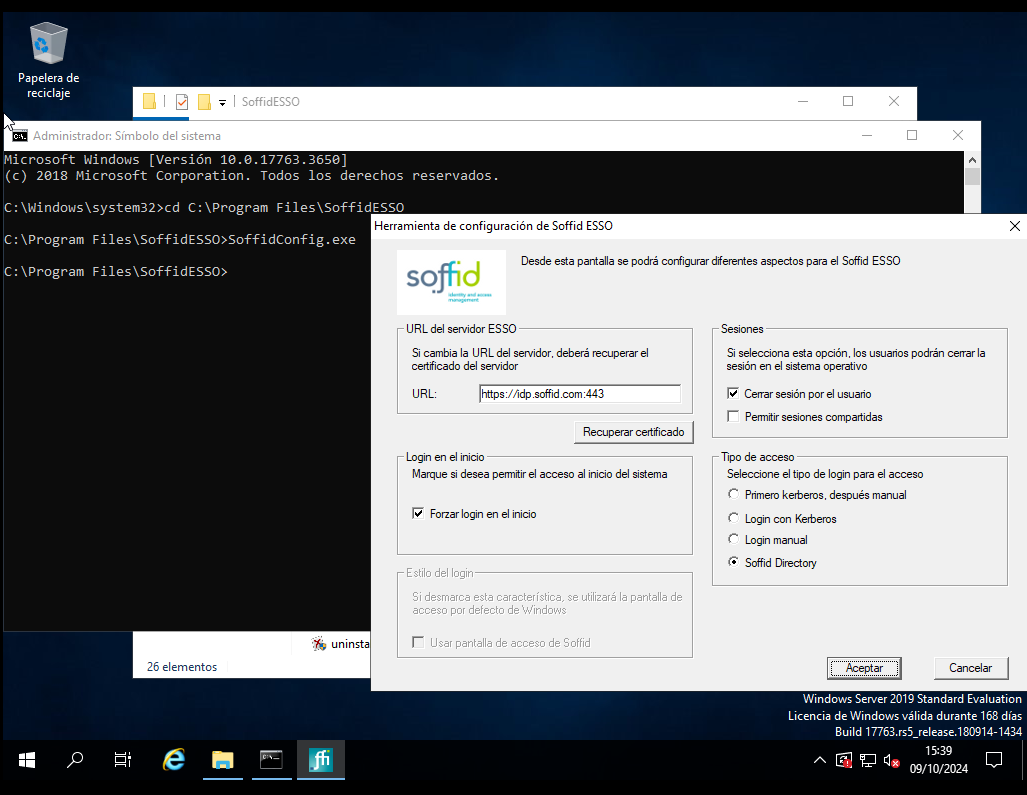
C:\Program Files\SoffidESO\SoffidConfig.exe💻 Image
How to check the status?
C:\Program Files\SoffidESSO>Shirokabuto debug💻 Image

How to stop and start Shirokabuto?
C:\Program Files\SoffidESSO>net stop ShirokabutoC:\Program Files\SoffidESSO>net start ShirokabutoLinux Administrator access
How to access?
For domain member hosts, ESSO will remove all existing local accounts except for those with a dependand service. So, in order to access with administrator privileges, user must use a domain account with local administrator privilege, or either an authorized Soffid user.
There are three different ways to grant this kind of authorization to a user using Soffid console:
- Grant a global authorization (host:support). In this case, user can admin any host.
- Using a network scope authorization. This kind of authorization can be granted on network management screen. Administration authorization can be granted for any host belonging to a network or for a restricted group of them.
- Using a host scope authorization. This kind of authorization can be granted on host management screen for specified time period.
Through a workflow request. User asks for administration approval using "Request to administer a workstation" workflow. Soffid administrator can deny or approve the request. After the specified time period, the permission will be revoked.
In order to acces with administrator privileges user must log on with the soffid user code. It is not possible to do it with another account. Windows user code must match with Soffid user code.
Other operations
How to know the ESSO version?
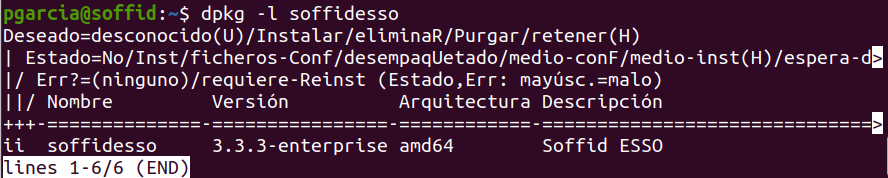
dpkg -l soffidesso💻 Image
How to check the log?
/var/log$ sudo tail syslog/var/log$ sudo cat syslogHow to change debug level?
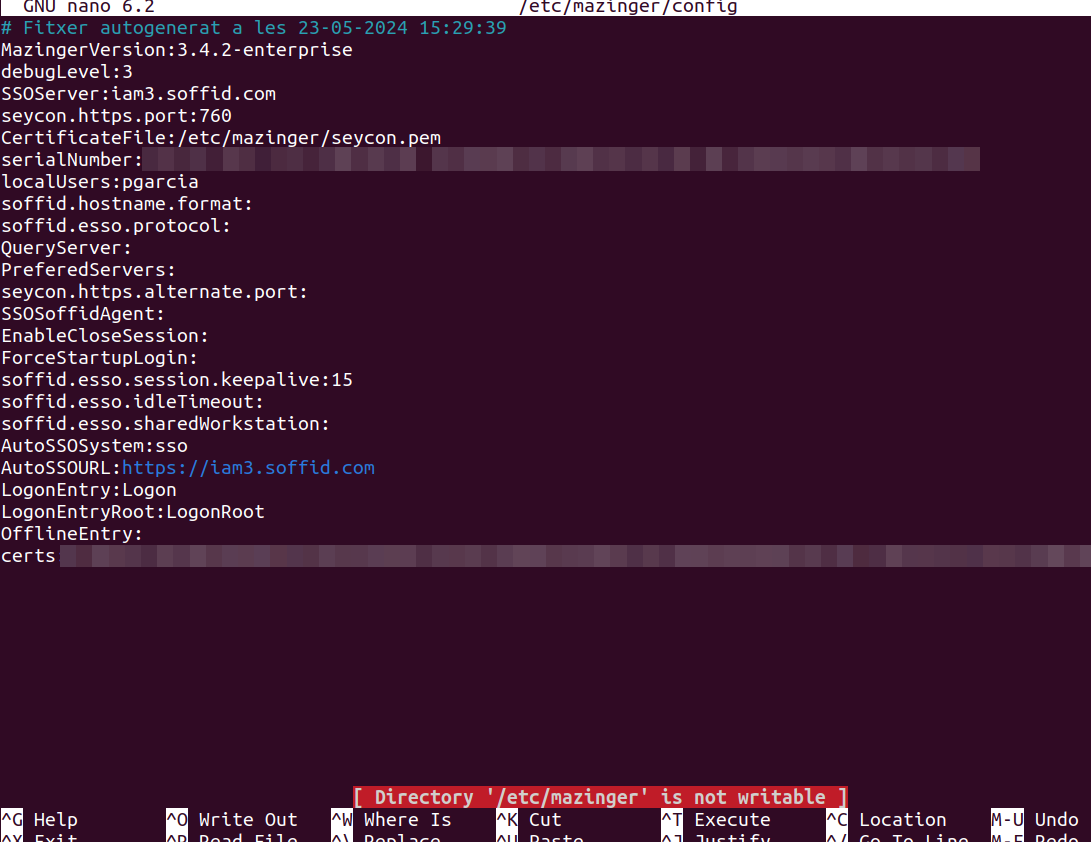
Edit the file /etc/mazinger/config and set debugLevel to 3
nano /etc/mazinger/config💻 Image
How to login using the command line?
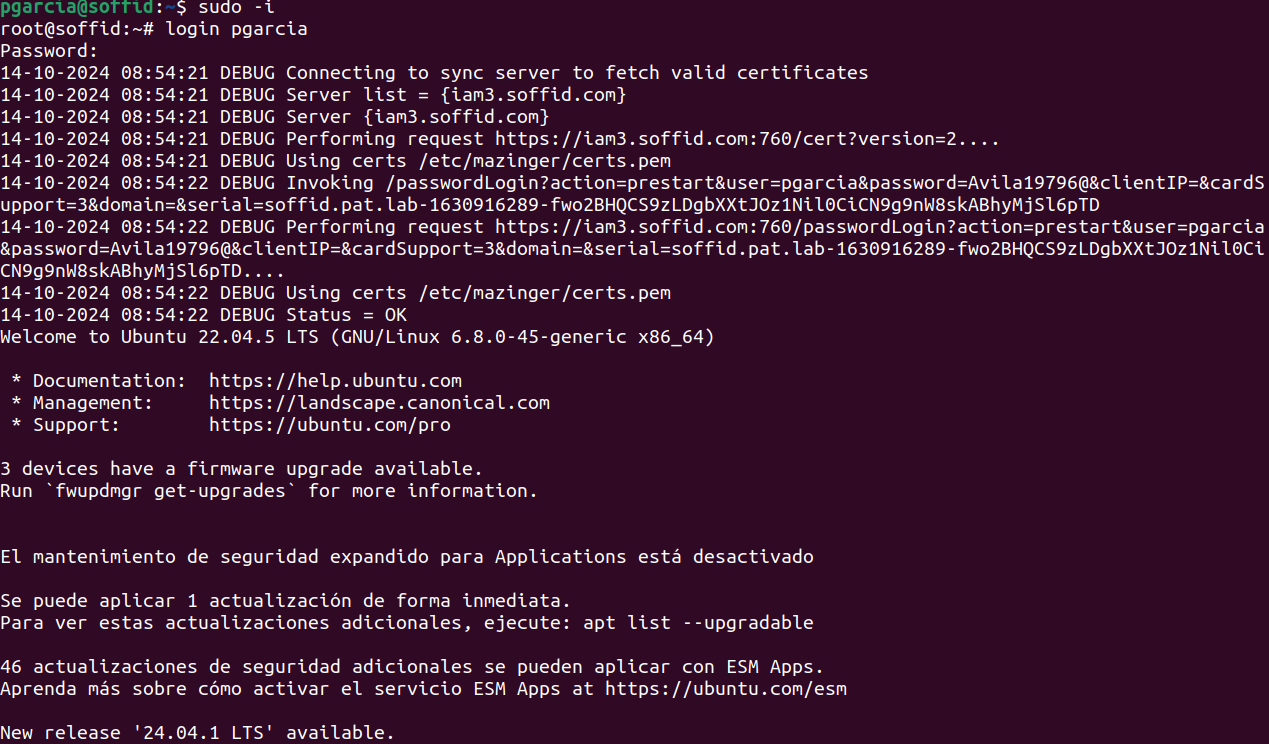
Raise permissions to super users:
sudo -iLogin with your Soffid user
login userName💻 Image
Windows user access
How to access?
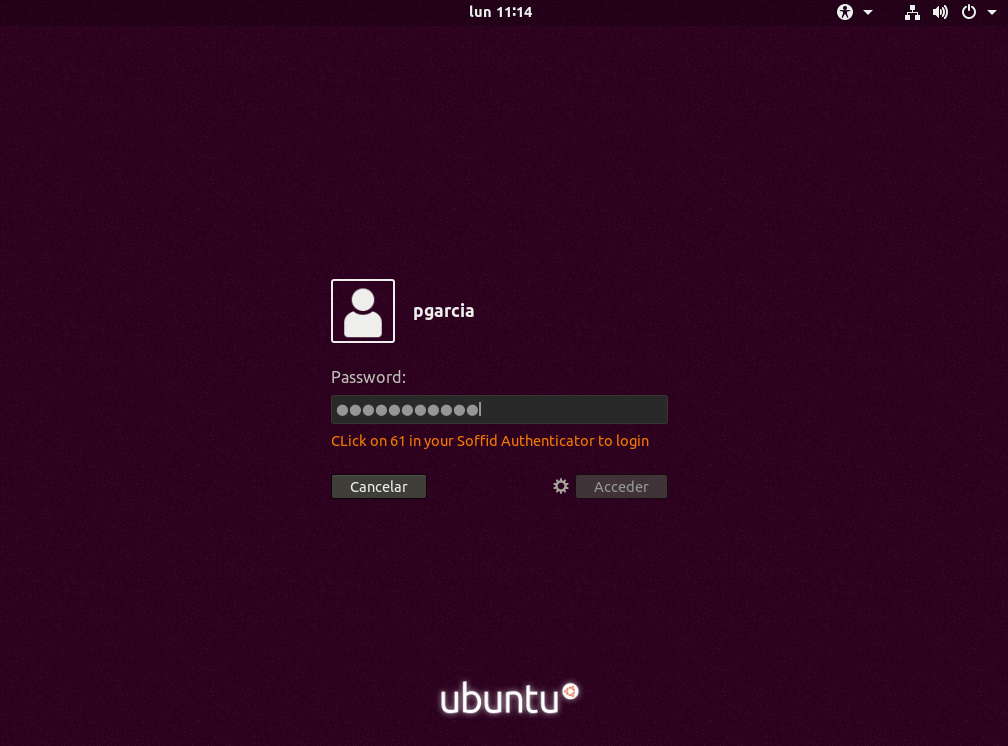
When you try to connecto to a Windows machine by using Soffid ESSO, you need to enter your user and password in the Windows login page.
If the user does not exists in this machine, depending on the attribute "Create local accounts when there is no domain account" in Soffid ESSO configuration, a local user willl be created or not.
- If the network is connected, depending on the Soffid ESSO configuration, a 2FA may be required, or you will be logged in directly.
- If the network is not connected, also, depending on the Soffid ESSO configuration, you connect to the machine. When the network is re-established, Soffid ESSO will ask for your credentials again.
For more information about how to configure Soffid ESSO you can visit the ESSO profile page.
💻 Image
Credentials required
2FA required
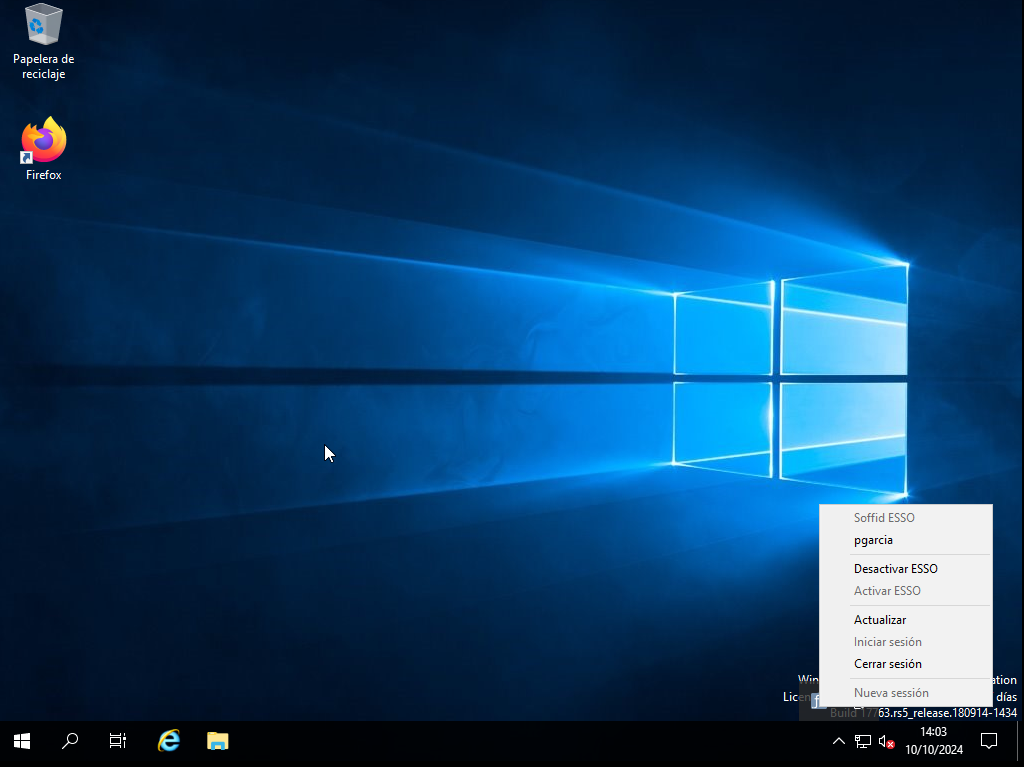
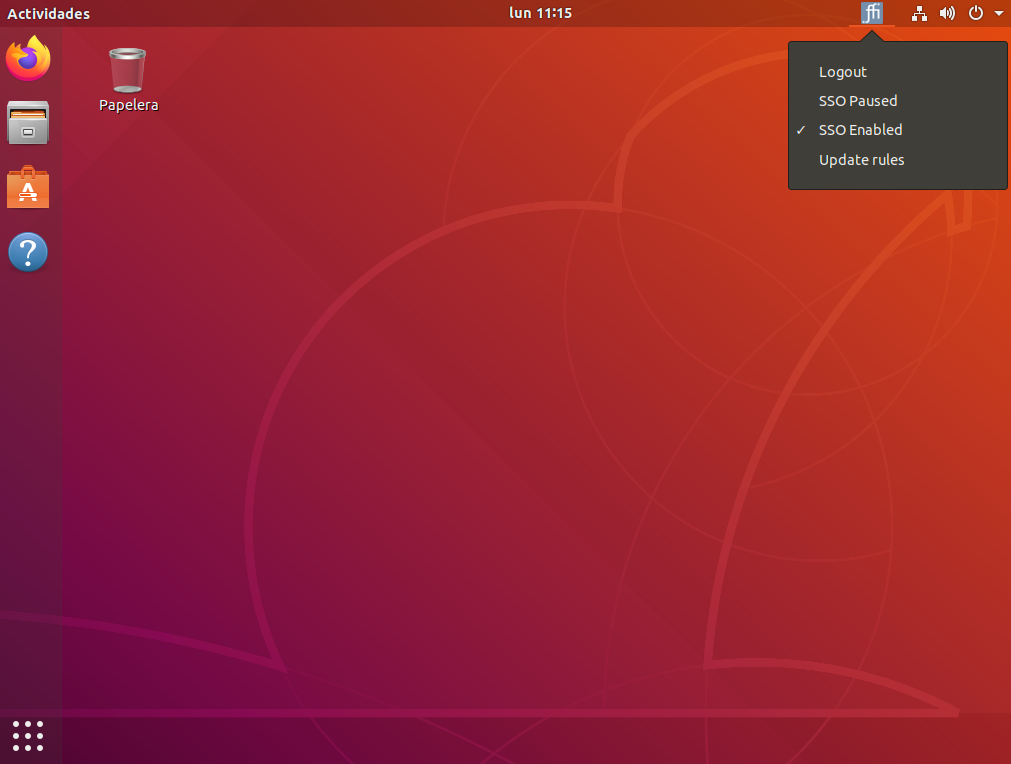
Soffid ESSO options

Esso Options
On a host with ESSO installed an icon with the Soffid Logo will appear on the Windows taskbar.
If the user clicks on the mouse's right button it will be able to do some different actions.
Login
Allows you to open an ESSO session. In order to open an ESSO session, the user must enter user code and password. In order to reopen it, the user must enter user code and password again (unless Kerberos login succeeds)
Logout
Allows you to close an ESSO session. On closing session, any SSO rules will be unloaded, so the user should enter the user and password on applications request.
SSO Paused
If the user disables ESSO, user and password will be required to execute any application, but ESSO session is still open on the server.
SSO Enabled
In order to inject ESSO rules, Soffid ESSO must be enabled.
Update rules
To update ESSO rules for the user account. ESSO will contact Soffid Synchronization server in order to get the Single Sign On rules for this account. Any granted permission or rule change will be applied immediately.
💻 Image
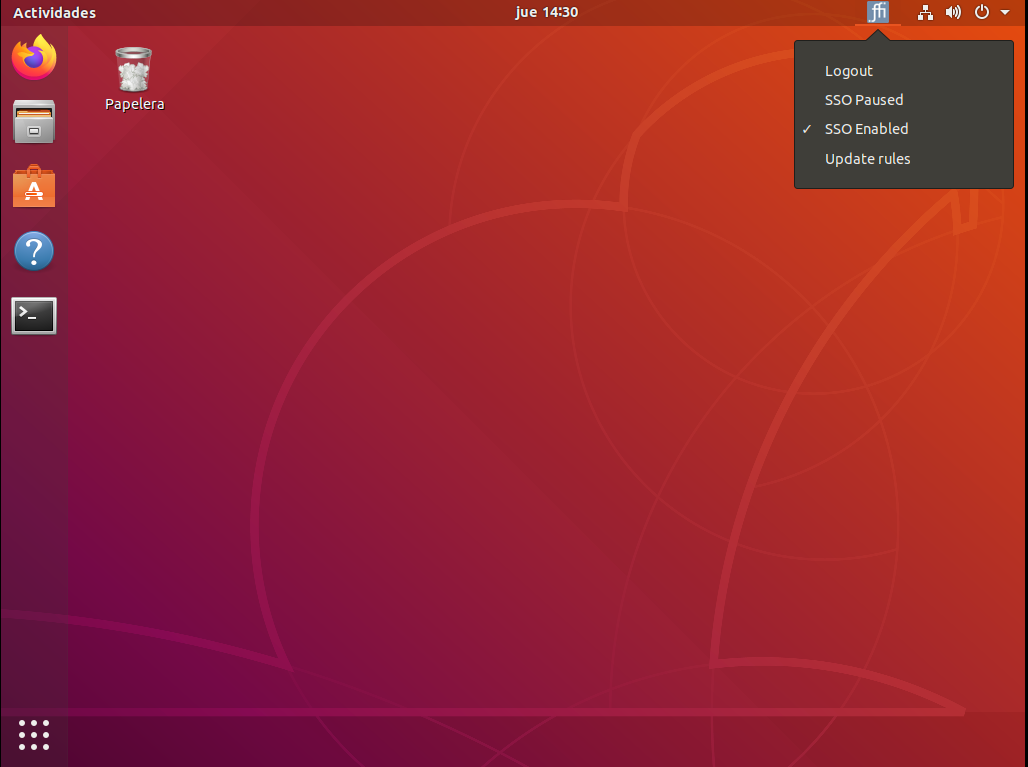
Linux User access
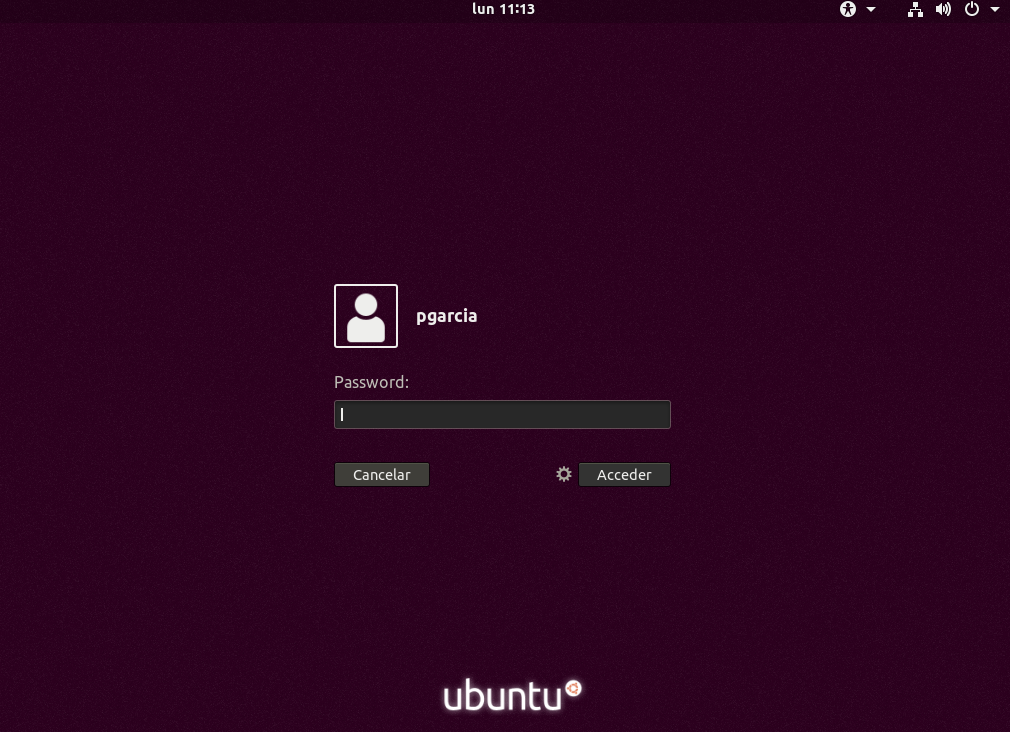
How to access?
When you try to connect to a Linux machine using Soffid ESSO, you will need to enter your username and password on the Linux login page.
If the user does not exists in this machine, depending on the attribute "Create local accounts when there is no domain account" in Soffid ESSO configuration, a local user willl be created or not.
- If the network is connected, depending on the Soffid ESSO configuration, a 2FA may be required, or you will be logged in directly.
- If the network is not connected, also, depending on the Soffid ESSO configuration, you connect to the machine. When the network is re-established, Soffid ESSO will NOT ask for your credentials again in the Linux machine.
For more information about how to configure Soffid ESSO you can visit the ESSO profile page.
💻 Image
Credentials required
2FA required
Soffid ESSO options
Esso Options
On a host with ESSO installed an icon with the Soffid Logo will appear on the Windows taskbar.
If the user clicks on the mouse's right button it will be able to do some different actions.
Login
Allows you to open an ESSO session. In order to open an ESSO session, the user must enter user code and password. In order to reopen it, the user must enter user code and password again (unless Kerberos login succeeds)
Logout
Allows you to close an ESSO session. On closing session, any SSO rules will be unloaded, so the user should enter the user and password on applications request.
SSO Paused
If the user disables ESSO, user and password will be required to execute any application, but ESSO session is still open on the server.
SSO Enabled
In order to inject ESSO rules, Soffid ESSO must be enabled.
Update rules
To update ESSO rules for the user account. ESSO will contact Soffid Synchronization server in order to get the Single Sign On rules for this account. Any granted permission or rule change will be applied immediately.
💻 Image
ESSO Scripting Language
ESSO Scripting Language
Introduction
The scripting language used is a full ECMAScript interpreter. Nevertheless, it's not a Javascript interpreter as it's used on web browsers. It only has the core elements of ECMAScript (Objects, Arrays, String, etc.) and a set of objects and functions specially designed for its purpouse.
When the script is run, the elements matched, either window or HTML components, with a ref-as tag will be declared as global variable. Additionally, in the case of web applications, a global variable named document contains the reference to the full HTML document.
Here are the supported functions and classes:
- Global functions
- secretStore object
- SystemInfo object
- Window class
- Document class
- Element class
- Collection class
- File class
- Directory class
- MailService class
- NetworkResource class
- Registry class
- ServerInfo class
- Hll class (version 1.4.0)
1. Global functions
Global functions can be used in an action element:
|
debug |
text: string |
Sends a message to the debug console. |
|
sleep |
millis: int |
Stops script execution for the specified milliseconds. |
|
env |
text: string returns string |
Gets the value of an environment variable. |
|
exec |
text: string [Dir: string] |
Run an external application. Optionally, you can specify a directory to change to. |
|
execWait |
text: string [Dir: string] |
Executes external application and waits for its completion. Optionally, you can specify a directory to change to. |
|
sendKeys |
text: string |
Simulates the pressing of the keys indicated. You can see more information on the ESSO sendKeys syntax page. |
|
sendText |
text: string |
Simulates keystroke typed text. Unlike the SendKeys function, the text is sent, verbatim, without any interpretation. |
|
alert |
text: string |
Displays a confirmation message to the user. |
|
progress |
text: string |
Displays a progress message without confirmation from the user. |
|
cancelProgress |
|
Hide progress message. |
|
alertNoWait |
text: string |
A message, but does not expect the user confirmation. |
1.1. ESSO SendKeys syntax
SendKeys syntax
The sendKeys function aims to perform as the user pressing keystrokes. Thus, the function SendKeys ("ABC") simulates to press those three letters.
The keystrokes will be done independently of the application that generates them. Thus, it is possible to press keys that change the focused control or even the active application using sendKeys.
To mimic the action of pressing to keys simultaneously, you can make use of modifiers. The available modifiers are listed at the attached table. So, to send the character ':' you can execute sendKeys("+."). This combination will simulate pressing the Shift key along with '.'. In order to allow a simpler syntax, you can use parentheses to specify more than one key affected by modifiers. Thus, the function SendKeys ("+ (hello)") generates the word HELLO in upper case.
|
Modifier |
Key |
|
@ |
WINDOWS |
|
+ |
SHIFT |
|
^ |
CTRL |
|
% |
ALT |
It should be noted that this method can not get accented letters as a parameter, but the combination necessary to generate the desired letter. This method has a big drawback. The combination of keys needed to get a letter can be different depending of the current keyboard layout. So, in order to send arbitrary text characters, it is recommended to use the function sendText.
Additionally, the sendKeys function supports this “virtual keystrokes” that do not correspond to a specific key but an actual action do be done:
|
Tag |
Action taken. |
|
VKEY {X} |
The virtual code key (VKEY) will be sent. It is useful to use non-standard keys. |
|
XY {BEEP} |
A sound with a frequency X during Y time (in milliseconds). |
|
{DELAY X} |
X milliseconds pause. |
|
{DELAY = X} |
Make a dealy of X milliseconds between each simulated keystrokes. |
|
{AppActivate WindowTitle} |
Bring foreground and activates the application with the specified title. |
To send function keys, you can use the following codes:
|
Key |
Tag |
Key |
Tag |
|
Backspace |
{BACKSPACE} or {BS} |
F1 |
{F1} |
|
Break |
{BREAK} |
F2 |
{F2} |
|
CapsLock |
{CAPSLOC} |
F3 |
{F3} |
|
Delete |
{DELETE} or {DEL} |
F4 |
{F4} |
|
Down arrow |
{DOWN} |
F5 |
{F5} |
|
End |
{END} |
F6 |
{F6} |
|
Enter |
{ENTER} or ~ |
F7 |
{F7} |
|
Ex |
{ESC} |
F8 |
{F8} |
|
Help |
{HELP} |
F9 |
{F9} |
|
Home |
{HOME} |
F10 |
{F10} |
|
Lnsert |
{INS} |
F11 |
{F11} |
|
Left arrow |
{LEFT} |
F12 |
{F12} |
|
Num Lock |
{NUMLOCK} |
F13 |
{F13} |
|
Next page |
{PGDN} |
F14 |
{F14} |
|
Previous page |
{PGUP} |
F15 |
{F15} |
|
Print screen |
{PRTSC} |
F16 |
{F16} |
|
Right Arrow |
{RIGHT} |
^ |
{CARET} |
|
Scroll Lock |
{SCROLL} |
~ |
{Tilde} |
|
Tab |
{TAB} |
{ |
{LEFTBRACE} |
|
Up arrow |
{UP} |
} |
{RIGHTBRACE} |
|
+ (Numeric keypad) |
{ADD} |
( |
{LEFTPAREN} |
|
- (Numeric keypad) |
{SUBSTRCT} |
) |
{RIGHTPAREN} |
|
* (Numeric keypad) |
{Multiply} |
windows (left) |
{LWIN} or {RWIN} |
|
/ (Numeric keypad) |
{DIVIDE} |
windows (right) |
{RWIN} |
|
+ |
{PLUS} |
context menu |
{APPS} |
|
@ |
{AT} |
|
|
Here are a few small examples :
|
sendKeys parameter |
Effect |
|
{DELAY=50} |
1. Specifies a pause of 50 milliseconds between keystrokes. |
|
@R |
2. Click Windows + R to invoke the run dialog command. |
|
notepad~ |
3. Enter notepad and pressed enter. |
|
hello world! |
4. Write "Hello world!". |
|
%ua |
5. Click the button to Alt + u, to show the About dialog box ... |
|
{Delay = 100} |
1. Specifies a pause of 100 milliseconds between keystrokes. |
|
{AppActivate Calculator} |
2. Turn the calculator. |
|
{ESC} |
3. Click ESC to clear the contents. |
|
5*7~ |
4. Write 5 * 7 and pressed Enter. |
|
{beep 1000 500} |
5. Makes noise. |
|
^C |
6. Press Control-C to copy the contents. |
|
{appactivate Notepad} |
7. Switch to notepad. |
|
^E |
8. Click to e-control dial all. |
|
{DEL} |
9. Click Delete to delete the contents. |
|
Result of 5 * 7 is: |
10. Writes "The result is 5 * 7". |
|
^V |
11. Click control-v hold the result.. |
|
{DELAY=500}{NUMLOCK}{CAPSLOCK}{SCROLL} |
1. Turn numbers, uppercase and scroll on in order. |
|
{SCROLL}{CAPSLOCK}{NUMLOCK} |
2. Turn them off in the reverse order. |
|
{DELAY=500} |
1. Specifies a pause of 500 milliseconds between keystrokes. |
|
%? |
2. Click Alt-Space. |
|
{DOWN 5} |
3. Click the down arrow five times. |
2. secretStore object
Introduction
This object is always visible from any action, and provides access to the user's passwords and secrets. User passwords are always related to a system account.
This is the object used to retrieve user and password in order to inject credentials into applications.
Methods
|
getSecret |
text: string returns string |
Gets the value of a secret. |
|
getAccounts |
system: string returns string [] |
Gets the list of accounts available for a given systemsecretStore object. |
|
getAccount |
system: string returns string |
Gets the account to use a particular system. If more than one are available, the system will prompt the user for the one to use. If the user cancels the dialog box, an exception will be thrown. If no account is available, the undefined value will be returned. |
|
getPassword |
system: string account: string returns string |
Gets the password bound to the account on the system requested. |
| setPassword |
system: string account: string newPassword: string |
Changes the password at the password vault (version 1.4) |
| setSecret |
name: string value: string |
Sets the value of a secret at the password vault (version 1.4) |
| generatePassword |
system: string account: string returns string |
Generates a random password suitable for the selected account (version 1.4) |
3. SystemInfo object
Introduction
The SystemInfo object is always visible from any action, and provides access to information about the machine.
Attributes
|
os |
string |
Specifies the name of the operating system: Windows / Ubuntu |
|
oSVersion |
string |
Indicates the version of the operating system. |
|
osDistribution |
string |
Distributor operating system: Microsoft / Ubuntu / RedHat / .... |
|
hostName |
string |
Return the team name. |
|
clientHostName |
string |
For remote connections, returns the name of the source host. |
|
fileSeparator |
string |
Separator files depending on the platform: / Linux \ For Windows |
|
username |
string |
Operating system user name. It can be different from Soffid user name. |
4. Window class
Introduction
When an action is bound with a user interface application, it creates an object of class Window for each component at the XML descriptor with a ref-as attribute. Those components have the following methods:
Methods
|
getText |
returns string |
Gets the text value of the component. |
|
setText |
text: string |
Change the text value of a component. |
|
click |
|
Acts as if the user clicks on the component. It's suitable on button components. |
|
setFocus |
|
Move the focus to the component. |
5. Document class
Introduction
When an action is associated with a Web application, it creates a document that identifies the full HTML document. This object assigned to the document variable. Thus, scripts can access the web contents and its DOM tree in runtime. The document object implement a subset of the standard DOM HtmlDocument.
Attributes
|
url |
string |
Full URL of the document. |
|
domain |
string |
Contains the domain of the page. |
|
title |
string |
Title of the document. |
|
cookie |
string |
Contains cookies that are bound to this document. |
|
anchors |
Collection |
Contains elements of type A. |
|
forms |
Collection |
Contains items of type FORM. |
|
images |
Collection |
Contains items from IMG. |
|
links |
Collection |
Contains elements of type A and AREA. |
|
documentElement |
Item |
Contains the root element. |
Methods
|
getElementById |
id: string Element returns |
Find the first element with the specified ID. |
|
getElementsByTagName |
tag: string returns Collection |
Find all elements with the specified tag. |
|
write |
text: string |
Add content to the document. |
|
writeln |
text: string |
Add content and new line to the document. |
| autofill | text: string |
Proceed with smart auto fill engine, allowing end user to select and or save accounts. The mandatory parameter sets the domain where to look for accounts. |
6. Element class
Introduction
The objects of type Element are created for each input element with a ref-as attribute, or are obtained from the Document itself. It implements a subset of the DOM class HtmlElement.
Attributes
|
childNodes |
Collection |
Vector of children elements. |
|
disabled |
bool |
Indicator whether the element is disabled or not. |
|
id |
string |
Id attribute of the element. |
|
tagName |
string |
Element's tag. |
|
parentNode |
Item |
Parent element. |
Methods
|
getAttribute |
name: string returns string |
Gets the attribute value of the element. |
|
setAttribute |
name: string value: string |
Updates the attribute value. |
|
removeAttribute |
name: string |
Removes an attribute. |
|
getElementsByTagName |
tag: string returns Collection |
Find all children with the specified tag. |
|
click |
|
Acts as if the user had clicked on the button. |
|
blur |
|
Remove focus. |
|
focus |
|
Grants focus. |
|
submit |
|
Send form contents. |
7. Collection class
Introduction
The collection object implements a subset of the standard DOM HTMLCollection
Attributes
|
length |
Long |
Number of items in collection. |
Methods
|
item |
id: long returns Element |
Find the element with id order number. The first element is 0. |
|
namedItem |
id: string returns Element |
Search for an item with the given name. First search an element with matching Id attribute. If none is found, search for an element with matching Name attribute. |
8. File class
Introduction
It allows easy manipulation of files using the File class.
Constructor
|
File |
file: string mode: string |
Create an object of type File for the specified file. If mode is “r”, the file will be opened in read mode. If mode is “w”, the file will be opened in write mode. If the mode is “a”, the file will be open in append mode. |
Methods
|
read |
byte int (1000) returns string |
Reads at most the specified number of bytes. When no numer is specified, 1000 bytes will be read at most. |
|
readLine |
returns string |
Reads untill end of line. |
|
write |
text: string |
Writes the specified text. |
|
WriteLine |
text: string |
Writes text with and end of line. |
|
close |
|
Closes the file. |
|
flush |
|
Flush all buffers to disk. |
|
eof |
returns boolean |
Returns true if the end of file has been reached. |
(static) methods and attributes
Additionally, the File object has the following (static) methods and attributes:
|
mkdir |
directory: string |
Creates the specified directory. |
|
stdin |
File |
Attribute that contains a File object associated with standard input. |
|
stdout |
File |
Attribute that contains a File object associated with standard output. |
|
stderr |
File |
Attribute that contains a File object associated with the standard error output. |
|
copy |
source: string target: string |
Copy selected file. This method is not able to copy directories. |
|
delete |
file: string |
Deletes a file or directory. |
|
move |
source: string target: string |
Moves (or renames) a file or directory. |
|
isDirectory |
f: string returns boolean |
Returns true if the specified file is a directory. |
|
canRead |
f: string returns boolean |
Returns true if the file can be read. |
|
canWrite |
f: string returns boolean |
Returns true if the file can be written. |
|
getParent |
f: string returns string |
Returns the parent directory of a file. |
9. Directory class
Introduction
This class is able to look for directories content. A directory object has the following attributes and methods:
Constructor
|
Directory |
file: string |
Creates a directory object bound to the specified path. |
Methods
|
length |
returns int |
Indicates the number of files in the directory. |
|
item |
return string |
Specifies the name of the file content. |
10. MailService class
Introduction
Simple tool to send emails. The MailService object has the following methods.
Constructor
|
MailService |
|
Create an object of type MailServer. |
Methods
|
setServer |
server: string |
Specifies the name of the mail server. |
|
setFrom |
from: String |
Specifies the name of the sender. |
|
Setter |
to: string |
Specifies the name of the recipient. |
|
send |
text: string |
Send the message indicated. |
11. NetworkResource class
Introduction
Connect and disconnect network services (disks and printers).
Constructor
|
NetworkResource |
|
Creates an object of type NetworkResource. |
Methods
|
connectPrinter |
resource: string model: string |
Connects a remote printer to the local spooler. |
|
connectDrive |
localDrive: string resource: string password: string (optional) user: string (optional) |
Connects a network drive. |
|
disconnectAllPrinters |
|
Disconnects all remote printers. |
|
disconnectPrinter |
name: string |
Disconnects a remote Printer. |
|
disconnectDrive |
localName: string |
Disconnects a remote drive. |
12. Registry class
Introduction
Manipulate the windows registry.
Constructor
|
Registry |
path: string |
Create an object of type Registry |
Global objects
|
Registry.HKEY_LOCAL_MACHINE |
Tree Key LOCAL_MACHINE |
|
Registry.HKEY_CURRENT_USER |
Tree CURRENT_USER key |
|
Registry.HKEY_USERS |
Tree Key USERS |
|
Registry.HKEY_CLASSES_ROOT |
Tree Key CLASSES_ROOT |
|
Registry.HKEY_LOCAL_MACHINE32 |
Tree LOCAL_MACHINE 32-bit keys |
|
Registry.HKEY_CURRENT_USER32 |
Tree CURRENT_USER key 32bit |
|
Registry.HKEY_USERS32 |
Tree 32bit key USERS |
|
Registry.HKEY_CLASSES_ROOT32 |
Tree CLASSES_ROOT 32-bit keys |
Methods
|
openKey |
path: string returns Registry |
Opens a registry subkey. |
|
createKey |
path: string returns Registry |
Creates a registry subkey. |
|
getValue |
entryName: string Object returns |
Reads registry value. |
|
setValue |
entryName: string value: Object type: string |
Updates a registry value. Type (optional) can be: - REG_SZ - REG_EXPAND_SZ - REG_BINARY - REG_DWORD - REG_MULTI_SZ |
13. ServerInfo class
Introduction
This helper class allows the script to query information stored at Soffid console.
Constructor
|
ServerInfo |
path: string |
Queried the server returning an object of type ServerInfo. |
Methods
|
length |
returns int |
Returns the number of rows obtained. |
|
row |
n: int object returns |
Returns information about the n-throw from. |
The objects returned depend on the path indicated.
14. Hll class (version 1.4.0)
Introduction
The Hll class gives the script engine access to Hll terminal emulators. When a hll pattern matches the emulator screen, a hll object of class Hll will be crated and can be used by the action script.
Attributes
|
sessionId |
string |
Full URL of the document. |
|
sessionName |
string |
Contains the domain of the page. |
|
columns |
int |
Numer of columns. |
|
rows |
int |
Number of rows. |
Methods
|
getCursorLocation |
returns object with row and column attributes |
Gets the cursor location. |
|
setCursorLocation |
row: integer column: integer |
Changes cursor location. |
|
getContent |
returns String |
Gets the terminal emulator screen content. |
|
sendText |
text: string |
Send text to host. |
| sendKeys | keys:string | Send text, possibly containing escape sequences. |
Escape sequence
The following escape sequence are defined:
|
Mnemonic
|
Meaning
|
3270
|
5250
|
VT
|
|---|---|---|---|---|
| @B | Left Tab | Yes | Yes | No |
| @C | Clear | Yes | Yes | No |
| @D | Delete | Yes | Yes | No |
| @E | Enter | Yes | Yes | No |
| @F | Erase EOF | Yes | Yes | No |
| @H | Help | No | Yes | No |
| @I | Insert | Yes | Yes | No |
| @J | Jump (Set Focus) | Yes | Yes | No |
| @L | Cursor Left | Yes | Yes | Yes |
| @N | New Line | Yes | Yes | Yes |
| @O | Space | Yes | Yes | Yes |
| @P | Yes | Yes | Yes | |
| @R | Reset | Yes | Yes | No |
| @T | Right Tab | Yes | Yes | Yes |
| @U | Cursor Up | Yes | Yes | Yes |
| @V | Cursor Down | Yes | Yes | Yes |
| @X* | DBCS (Reserved) | Yes | Yes | No |
| @Z | Cursor Right | Yes | Yes | Yes |
| @0 | Home | Yes | Yes | No |
| @1 | PF1/F1 | Yes | Yes | No |
| @2 | PF2/F2 | Yes | Yes | No |
| @3 | PF3/F3 | Yes | Yes | No |
| @4 | PF4/F4 | Yes | Yes | No |
| @5 | PF5/F5 | Yes | Yes | No |
| @6 | PF6/F6 | Yes | Yes | Yes |
| @7 | PF7/F7 | Yes | Yes | Yes |
| @8 | PF8/F8 | Yes | Yes | Yes |
| @9 | PF9/F9 | Yes | Yes | Yes |
| @a | PF10/F10 | Yes | Yes | Yes |
| @b | PF11/F11 | Yes | Yes | Yes |
| @c | PF12/F12 | Yes | Yes | Yes |
| @d | PF13 | Yes | Yes | Yes |
| @e | PF14 | Yes | Yes | Yes |
| @f | PF15 | Yes | Yes | Yes |
| @g | PF16 | Yes | Yes | Yes |
| @h | PF17 | Yes | Yes | Yes |
| @i | PF18 | Yes | Yes | Yes |
| @j | PF19 | Yes | Yes | Yes |
| @k | PF20 | Yes | Yes | Yes |
| @l | PF21 | Yes | Yes | No |
| @m | PF22 | Yes | Yes | No |
| @n | PF23 | Yes | Yes | No |
| @o | PF24 | Yes | Yes | No |
| @q | End | Yes | Yes | No |
| @u | Page Up | No | Yes | No |
| @v | Page Down | No | Yes | No |
| @x | PA1 | Yes | Yes | No |
| @y | PA2 | Yes | Yes | No |
| @z | PA3 | Yes | Yes | No |
| @A@C | Test | No | Yes | No |
| @A@D | Word Delete | Yes | Yes | No |
| @A@E | Field Exit | Yes | Yes | No |
| @A@F | Erase Input | Yes | Yes | No |
| @A@H | System Request | Yes | Yes | No |
| @A@I | Insert Toggle | Yes | Yes | No |
| @A@J | Cursor Select | Yes | Yes | No |
| @A@L | Cursor Left Fast | Yes | Yes | No |
| @A@Q | Attention | Yes | Yes | No |
| @A@R | Device Cancel (Cancels Print Presentation Space) | Yes | Yes | No |
| @A@T | Print Presentation Space | Yes | Yes | Yes |
| @A@U | Cursor Up Fast | Yes | Yes | No |
| @A@V | Cursor Down Fast | Yes | Yes | No |
| @A@Z | Cursor Right Fast | Yes | Yes | No |
| @A@9 | Reverse Video | Yes | Yes | No |
| @A@b | Underscore | Yes | No | No |
| @A@c | Reset Reverse Video | Yes | No | No |
| @A@d | Red | Yes | No | No |
| @A@e | Pink | Yes | No | No |
| @A@f | Green | Yes | No | No |
| @A@g | Yellow | Yes | No | No |
| @A@h | Blue | Yes | No | No |
| @A@i | Turquoise | Yes | No | No |
| @A@j | White | Yes | No | No |
| @A@l | Reset Host Colors | Yes | No | No |
| @A@t | Print (Personal Computer) | Yes | Yes | No |
| @A@y | Forward Word Tab | Yes | Yes | No |
| @A@z | Backward Word Tab | Yes | Yes | No |
| @A@- | Field - | No | Yes | No |
| @A@+ | Field + | No | Yes | No |
| @A@< | Record Backspace | No | Yes | No |
| @S@E | Print Presentation Space on Host | No | Yes | No |
| @S@x | Dup | Yes | Yes | No |
| @S@y | Field Mark | Yes | Yes | No |
|
@W@C |
Edit Copy |
Yes |
Yes |
Yes |
|
@W@D |
Edit Clear |
Yes |
Yes |
Yes |
|
@W@E |
Edit Copy Append |
Yes |
Yes |
Yes |
|
@W@L |
Edit Copy Link |
Yes |
Yes |
Yes |
|
@W@N |
Edit Paste Next |
Yes |
Yes |
Yes |
|
@W@V |
Edit Paste |
Yes |
Yes |
Yes |
|
@W@X |
Edit Cut |
Yes |
Yes |
Yes |
|
@W@Z |
Edit Undo |
Yes |
Yes |
Yes |
| @X@1 | Display SO/SI | Yes | Yes | No |
| @X@5 | Generate SO/SI | No | Yes | No |
| @X@6 | Display Attribute | No | Yes | No |
| @X@7 | Forward Character | No | Yes | No |
| @X@c | Split Vertical Bar | No | Yes | No |
| @M@0 | VT Numeric Pad 0 | No | No | Yes |
| @M@1 | VT Numeric Pad 1 | No | No | Yes |
| @M@2 | VT Numeric Pad 2 | No | No | Yes |
| @M@3 | VT Numeric Pad 3 | No | No | Yes |
| @M@4 | VT Numeric Pad 4 | No | No | Yes |
| @M@5 | VT Numeric Pad 5 | No | No | Yes |
| @M@6 | VT Numeric Pad 6 | No | No | Yes |
| @M@7 | VT Numeric Pad 7 | No | No | Yes |
| @M@8 | VT Numeric Pad 8 | No | No | Yes |
| @M@9 | VT Numeric Pad 9 | No | No | Yes |
| @M@- | VT Numeric Pad - | No | No | Yes |
| @M@, | VT Numeric Pad , | No | No | Yes |
| @M@. | VT Numeric Pad . | No | No | Yes |
| @M@e | VT Numeric Pad Enter | No | No | Yes |
| @M@f | VT Edit Find | No | No | Yes |
| @M@i | VT Edit Insert | No | No | Yes |
| @M@r | VT Edit Remove | No | No | Yes |
| @M@s | VT Edit Select | No | No | Yes |
| @M@p | VT Edit Previous Screen | No | No | Yes |
| @M@n | VT Edit Next Screen | No | No | Yes |
| @M@a | VT PF1 | No | No | Yes |
| @M@b | VT PF2 | No | No | Yes |
| @M@c | VT PF3 | No | No | Yes |
| @M@d | VT PF4 | No | No | Yes |
| @M@h | VT HOld Screen | No | No | Yes |
| @M@(space) | Control Code NUL | No | No | Yes |
| @M@A | Control Code SOH | No | No | Yes |
| @M@B | Control Code STX | No | No | Yes |
| @M@C | Control Code ETX | No | No | Yes |
| @M@D | Control Code EOT | No | No | Yes |
| @M@E | Control Code ENQ | No | No | Yes |
| @M@F | Control Code ACK | No | No | Yes |
| @M@G | Control Code BEL | No | No | Yes |
| @M@H | Control Code BS | No | No | Yes |
| @M@I | Control Code HT | No | No | Yes |
| @M@J | Control Code LF | No | No | Yes |
| @M@K | Control Code VT | No | No | Yes |
| @M@L | Control Code FF | No | No | Yes |
| @M@M | Control Code CR | No | No | Yes |
| @M@N | Control Code SO | No | No | Yes |
| @M@O | Control Code SI | No | No | Yes |
| @M@P | Control Code DLE | No | No | Yes |
| @M@Q | Control Code DC1 | No | No | Yes |
| @M@R | Control Code DC2 | No | No | Yes |
| @M@S | Control Code DC3 | No | No | Yes |
| @M@T | Control Code DC4 | No | No | Yes |
| @M@U | Control Code NAK | No | No | Yes |
| @M@V | Control Code SYN | No | No | Yes |
| @M@W | Control Code ETB | No | No | Yes |
| @M@X | Control Code CAN | No | No | Yes |
| @M@Y | Control Code EM | No | No | Yes |
| @M@Z | Control Code SUB | No | No | Yes |
| @M@u | Control Code ESC | No | No | Yes |
| @M@v | Control Code FS | No | No | Yes |
| @M@w | Control Code GS | No | No | Yes |
| @M@x | Control Code RS | No | No | Yes |
| @M@y | Control Code US | No | No | Yes |
| @M@z | Control Code DEL | No | No | Yes |
| @Q@A | VT User Defined Key 6 | No | No | Yes |
| @Q@B | VT User Defined Key 7 | No | No | Yes |
| @Q@C | VT User Defined Key 8 | No | No | Yes |
| @Q@D | VT User Defined Key 9 | No | No | Yes |
| @Q@E | VT User Defined Key 10 | No | No | Yes |
| @Q@F | VT User Defined Key 11 | No | No | Yes |
| @Q@G | VT User Defined Key 12 | No | No | Yes |
| @Q@H | VT User Defined Key 13 | No | No | Yes |
| @Q@I | VT User Defined Key 14 | No | No | Yes |
| @Q@J | VT User Defined Key 15 | No | No | Yes |
| @Q@K | VT User Defined Key 16 | No | No | Yes |
| @Q@L | VT User Defined Key 17 | No | No | Yes |
| @Q@M | VT User Defined Key 18 | No | No | Yes |
| @Q@N | VT User Defined Key 19 | No | No | Yes |
| @Q@0 | VT User Defined Key 20 | No | No | Yes |
| @Q@a | VT Backtab | No | No | Yes |
| @Q@r | VT Clear Page | No | No | Yes |
| @Q@s | VT Edit | No | No | Yes |
| @@ | @ | Yes | Yes | Yes |
| @$ | Alternate Cursor (The Presentation Manager Interface only) | Yes | Yes | Yes |
| @< | Backspace | Yes | Yes | Yes |
| @:@s | Screen Reverse | Yes | Yes | Yes |
| @:@n | Bidi Layer | Yes | Yes | Yes |
| @:@l | Latin Layer | Yes | Yes | Yes |
| @:@F | Field Reverse | Yes | Yes | No |
| @:@p | Push | Yes | No | No |
| @:@e | End Push | Yes | No | No |
| @:@a | Auto Push | Yes | No | No |
| @:@r | Auto Reverse | Yes | No | No |
| @:@d | CSD | Yes | No | No |
| @:@f | Final | Yes | No | No |
| @:@i | Isolated | Yes | No | No |
| @:@m | Middle | Yes | No | No |
| @:@t | Initial | Yes | No | No |
| @:@h | Field Shape | Yes | No | No |
| @:@u | Field Base | Yes | No | No |
| @:@b | Base | No | Yes | No |
| @:@o | Close | No | Yes | No |
| @:@K | Column Heading | No | No | Yes |
| @:@B | Cursor Direction | No | No | Yes |
| @:@D | Encoding Mode | No | No | Yes |
| @:@M | VT Change Display Mode | No | No | Yes (Hebrew only) |
ESSO Scripting examples
1. Run an application like notepad
exec ("notepad.exe");2. Automatic application update
if (SystemInfo.os == "Linux") {
exec ("(mkdir /tmp/google-chrome-updates && " +
" wget -O /tmp/google-chrome-updates/google-chrome-stable_current_amd64.deb " +
" -c https://dl.google.com/linux/direct/google-chrome-stable_current_amd64.deb " +
" && apt-get update && sudo apt-get install libappindicator1 " +
" && sudo dpkg -i /tmp/google-chrome-updates/google-chrome-stable_current_amd64.deb " +
" && sudo apt-get install google-chrome-stable) " +
" </dev/null >>/var/log/google-chrome-stable_current_amd641.log 2>&1 "
);
}3.
<Mazinger>
<WebApplication url="https://jira.soffid.com/.*" >
<Input id="login-form-username" ref-as="u"/>
<Input id="login-form-password" ref-as="p"/>
<Input id="login" ref-as="b"/>
<Action event="onLoad" type="script" repeat="true" delay="5">
account = secretStore.getAccount("soffid.org-ldap");
debug("Account = "+account);
u.setAttribute("value", account);
password = secretStore.getPassword("soffid.org-ldap", account);
debug("Password = "+password);
p.setAttribute("value", password);
sleep(100);
debug("Clicking");
b.click();
debug("Clicked");
</Action>
</WebApplication>
</Mazinger>
How to add to ESSO a second factor of authentication?
Introduction
Soffid allows you to add a second factor of authentication by configuring a parameter in Soffid Console and the Second Factor Authentication (2FA).
Step by step
1. First of all, you need to configure the addon.federation.essoidp parameter. The value must be the Identity Provider Identifier:

2. Then, you need to add the 2FA in the proper Identity Provider:
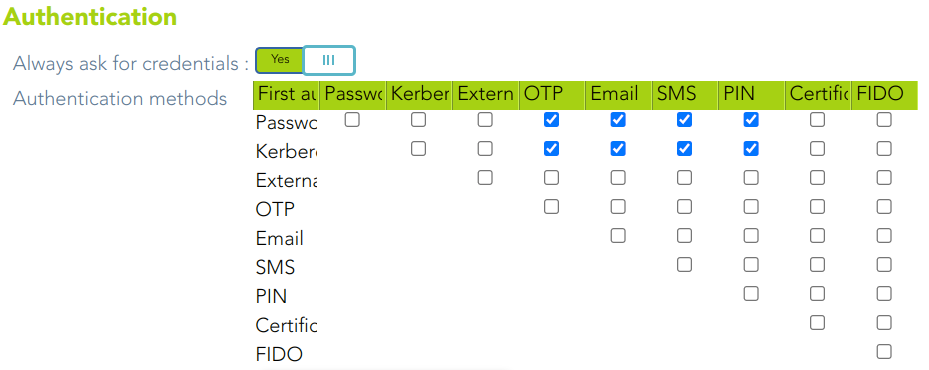
How to upgrade ESSO?
Introduction
Once ESSO is installed, configured and operational, it is very likely that an update will be required at some point.
There are many reasons for updating:
- To keep up to date with the latest versions.
- To adapt to changes in the operating system.
- To resolve bugs or fixes.
- To adapt to new versions of Soffid.
- To include new features.
- How to upgrade ESSO in Linux?
How to upgrade ESSO in Linux?
Installation on Linux or Windows is very simple, you just need to run the new installer again.
This is explained in more detail below.
1. Download the new version of the installer, please go to the Soffid Enterprise downloads page in the Enterprise Single Sign On (ESSO seccion).
Please note that in Linux, the installer depends on the version of Linux.
2. Execute the installer of the new version.
sudo dpkg -i "the-name-of-your-file.deb"3. Now, for the system to apply the changes, you need to log out and then log in again.
4. To veify that you are using the correct version, you can check this information by clicking on the Soffid ESSO component icon in your browser, which will open a popup window displaying the version.
How to upgrade ESSO in Windows?
Installation on Linux or Windows is very simple, you just need to run the new installer again.
This is explained in more detail below.
1. Download the new version of the installer, please go to the Soffid Enterprise downloads page in the Enterprise Single Sign On (ESSO seccion).
2. Execute the installer of the new version.
Please note that administrator permissions are required to run the administrator.
Please follow these steps:
- Go to the directory where the downloaded file is located
- Double click to install
- In the first Windows pop-up, click on "More information" and then "Run anyway".
- In the next popup from the installer, follow the steps, click Next, Accept, Install, OK, Finish, Yes.
3. After the final "Yes", the system wil restart to apply the changes.
4. To veify that you are using the correct version, you can check this information by clicking on the Soffid ESSO component icon in your browser, which will open a popup window displaying the version.
Unable to select a soffid user after the update?
If, after updating, the option to use Soffid users does not appear, it is very likely that you have an old configuration.
Image

You will probably need to update the ESSO configuration so that it points to Soffid's idp instead of Syncserver.
For further information, please refer to the ESSO installation page.
Finally, this will be the correct option.
Image
