Connectors
Synchronization Server Connectors
- ⏰ Getting started
- AWS Connector
- CSV Connector
- Google Apps Connector
- JSON REST Web Services Connector
- JSON REST Web Services Connector
- JSON REST Web Services Connector - Properties
- How to configure the Office 365 agent?
- How to configure the Jira Atlassian agent?
- LDAP Connector
- Oracle Connectors
- SAP Connector
- SCIM Connector
- Shell Connector
- SQL Connector
- Windows Connector
- Windows Connector
- HOWTO SSL access to Active Directory
- Invoker interface for Active Directory
- Active Directory back channel configuration
- AD Integration flows - Update user
- AD Integration flows - Update account
- Zarafa Connector
- SQL Server
- Connectors Examples
⏰ Getting started
Introduction
Soffid provides the connectors needed to provision accounts on the most widely used systems. To set up this connection it is necessary a specific connector addon that you must install and configure in the Soffid console.
First of all, yo must download the specific connector for your system, then install it in the Soffid console, and finally configure an agent in the Soffid console.
Download
The open-source connectors available for Soffid IAM can be found on the project website http://www.soffid.com/download in the Connectors section.
To download enterprise connectors from http://download.soffid.com/download/enterprise/ a Soffid user with authorization is required to access this functionality.
Installation
1. Once the connector is downloaded, please log in to IAM Console.
You need to be an administrator user of the Soffid console or a user with permission to upload addons.
It is recommended to upload the addons to the master, this is the way to maintain updated all, master and tenants if there are.
2. In the Soffid console, please go to:
3. Then, click the add button (+) and pick the file and Soffild will upload the addon file.
4. Finally, when the addon is installed, it will be required to restart the Soffid Sync server.
5. Once the Sync server is restarted, you could check the plugin was uploaded properly on the plugins page:
6. Now, you can set up the connector.
Configure Agent
Once the plugin has been uploaded and installed, the next step will be to set up the agent, this is the step where you establish a relation between Soffid and your managed system.
More information about how to configure agents can be found on the Agents page.
Connector List
Here you will find all the information needed about the available Soffid connectors to integrate external managed systems. If you miss something important, don't mind making suggestions using contact@soffid.com.
- AWS Connector
- CSV Connector
- Google Apps Connector
- JSON REST Web Services Connector
- LDAP Connector
- Oracle Connector
- Oracle EBS Connector
- SAP Connector
- SCIM Connector
- Shell Connector
- SQL Connector
- Windows Connector
- Zarafa Connector
- SQL Server Connector
AWS Connector
AWS Connector
Introduction
Description
AWS Connector allows to manage the Amazon AWS IAM (Identity and Access Management)
Managed Systems
This connector is specific for integration with the Amazon AWS IAM (Identity and Access Management) through the CLI AWS IAM
For more information to check if your system may be synchronized with this connector, do not hesitate to contact us through our Contact form
Prerequisites
It is needed a AWS IAM user with access and privileges to the required operations.
It cannot detect password changes to be propagated to other systems.
Download and install
This addon is located in the Connectors section and its name is AWS plugin.
For more information about the installation process you can visit the Addons Getting started page.
Agent Configuration
Basic
Generic parameters
After the installation of the addon, you may create and configure agent instances.
To configure this AWS connector you must select "Amazon WS" in the attribute "Type" of the generic parameters section in the agents page configuration.
For more information about how you may configure the generic parameters of the agent, see the following link: Agents configuration
Custom parameters
Below there are the specific parameters for this agent implementation:
|
Parameter
|
Description
|
|---|---|
| Access Key | Access key provided by the AWS IAM account |
|
Secret Key
|
Secret key provided by the AWS IAM account |
| AWS Endpoint | AWS endpoint provided by the AWS IAM account |
| Enable debug | Two options: [ Yes / No ]. When it is enabled more log traces are printed in the Synchronization Server log |
Attribute mappings
This connector could manage Users and Roles
Properties
The following properties are defined for each object type:
|
Property
|
Meaning
|
|---|---|
| preventDeletion (optional) |
Two options: [ True / False ]. |
Attributes
You can customize attribute mappings, you only need to select system objects and the Soffid objects related, manage their attributes, and make either inbound and outbound attribute mappings.
Users
The following attributes can be mapped on User objects
|
Attribute
|
Value
|
|---|---|
| userName | User name |
| path | User path |
| arn | AWS arn (read only) |
| createDate | Creation date (read only) |
| passwordLastUsed | Passsword last use (read only) |
| userId | Internal user id |
Groups
The following attributes can be mapped on Role (AWS Group) objects:
|
Attribute
|
Value
|
|---|---|
| groupName | Group name |
| path | Group path |
| arn | AWS arn (read only) |
| createDate | Creation date (read only) |
| groupId | Internal group id |
For more information about how you may configure attribute mapping, see the following link: Soffid Attribute Mapping Reference
Triggers
You can define BeanShell scripts that will be triggered when data is loaded into the target system (outgoing triggers). The trigger result will be a boolean value, true to continue or false to stop.
Triggers can be used to validate or perform a specific action just before performing an operation or just after performing an operation into target objects.
To view some examples, visit the Outgoing triggers examples page.
Load triggers
You can define BeanShell scripts that will be triggered when data is loaded into Soffid (incoming triggers). The trigger result will be a boolean value, true to continue or false to stop.
Triggers can be used to validate or perform a specific action just before performing an operation or just after performing an operation into Soffid objects.
To view some examples, visit the Incoming triggers examples page.
Account metadata
Agents allow you to create additional data, on the "Account metadata" tab, to customize the accounts created for that agent. This additional information will be loaded with the agent's information, or calculated as defined in the mappings.
The additional data can be used in both mappings and triggers.
The attributes which you define here will be shown when you click on the proper account, on the Accounts Tabs at user page.
Operational
Monitoring
After the agent configuration you could check on the monitoring page if the service is running in the Synchronization Server, please go to:
Tasks
Authoritative
If you are checked "Authorized identity source", an automatic task to load identities from the managed system to Soffid is available, please go to:
And you will something like "Import authoritative data from <AGENT_NAME>".
Reconcile
If you are configured the "Attribute Mapping" tab with some of our objects: "user or role", an automatic task to synchronize these objects from the managed system to Soffid is available, please go to:
And you will do something like "Reconcile all accounts from <AGENT_NAME>".
Synchronization
Regarding the synchronization of the objects, there are two possible options:
- If you are checked the generic attribute "Read Only" in the "Basics" tab, only the changes in the managed systems will be updated in Soffid. We recommend these options until the global configuration of Soffid will be tested.
- If you are not checked the generic attribute "Read Only" in the "Basics" tab, all the changes in Soffid or the managed system will be updated in the other. Note that this synchronization must be configured in the "Attribute mapping" tab correctly.
For more information about how you may configure the generic parameters of the agent, see the following link: Agents configuration
CSV Connector
CSV Connector
Introduction
Description
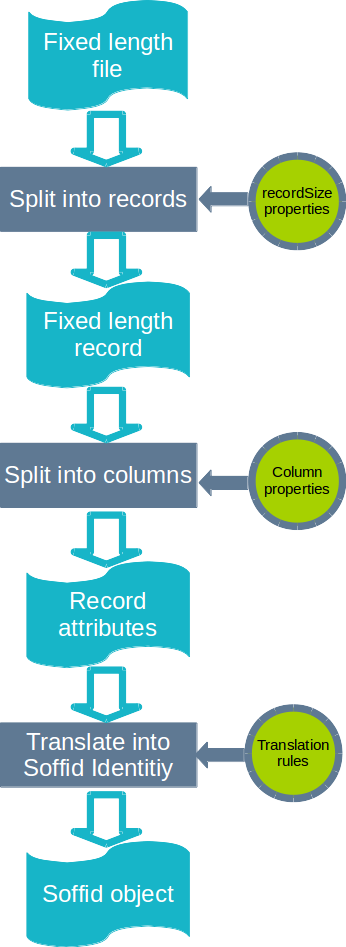
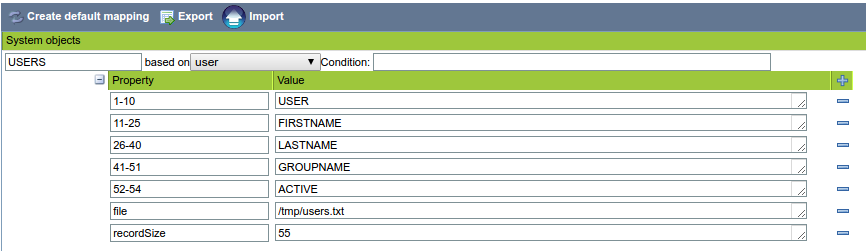
The CSV Connector provides a way to load authoritative data from fixed record size files.
Managed System
This connector has been performed to charge authoritative data from files with CSV format or other format in other extension files.
For more information to check if your system may be synchronized with this connector you do not hesitate to contact us through our Contact form
Prerequisites
The file must be placed in the same Synchronization Server host.
The file must has the correct permissions to be readed for the Synchronization Server.
Download and Install
This addon is located in the Connectors section and its name is Flat file plugin.
For more information about the installation process you can visit the Addons Getting started page.
Agent Configuration
This connector could only be used as an identity source, no output file could be generated yet.
Usually, this connector is used the first time to charge manually the user information of the identities from the HR applications o database.
As example, this is the flow to shows how the "Customizable fixed-columns file v2.0" works.
Basic
Generic parameters
After the installation of the addon, you may create and configure agent instances.
This addon has 5 available types:
- Customizable fixed-columns file v2.0: it is used to charge a table where each column has a fixed number of characters.
- Customizable CSV file: it is used to charge a standard CSV file (comma-separated values), where all the columns are separated by a comma.
- CSV file test agent.
- Dummy password agent.
- Test.
To configure this CSV plugin, you could select one of the previous agent in the attribute "Type" of the generic parameters section in the agents page configuration.
For more information about how you may configure the generic parameters of the agent, see the following link: Agents configuration
Custom parameters
The main parameters for this connectors are:
Customizable fixed-columns file v2.0
|
Parameter
|
Description
|
|---|---|
| Enable debug | Two options: [ Yes / No ]. When it is enabled more log traces are printed in the Synchronization Server log |
|
Character set (utf-8)
|
Charset used to load files. Despite it in uncommon, multi-byte character sets, as UTF-8, are allowed. Nevertheless, single byte character sets as ISO-8859-1 are recommended |
Customizable CSV file
|
Parameter
|
Description
|
|---|---|
| Enable debug | Two options: [ Yes / No ]. When it is enabled more log traces are printed in the Synchronization Server log |
CSV file test agent
|
Parameter
|
Description
|
|---|---|
| User's file | Directory where the CSV file is placed |
Dummy password agent
|
Parameter
|
Description
|
|---|---|
|
Dummy Password
|
Dummy Password |
Test
|
Parameter
|
Description
|
|---|---|
|
CSV file
|
Path of the CSV file |
Attribute mapping
Only the "Customizable fixed-columns file v2.0" and the "Customizable CSV file" agents have this functionality implemented.
Properties
Customizable fixed-columns file v2.0
This agent requires two properties:
|
Property
|
Description
|
|---|---|
| file | Path where the file is placed in the directory system |
| recordSize |
Total number of characters of the rows. This property must have a number value. The file will be split into records of this size in bytes. Mind the record size must include any line terminator character as "carriage return" or "line feed". |
And after that you must specify the number of rows of every row as follow:
|
Property
|
Description
|
|---|---|
| N-M |
Where N is the position of the first character and M the position of the last character, both included. Column numbers start with 1 (not 0). And for instance, if the property is defined as "1-10" with the value "NAME", Soffid will extract characters from columns 1 to 10 (both inclusive) into a field named NAME in Soffid. |
For instance for this file:
abernal Antonio Bernal world YES
jwayne2 John Wayne world YESThese are its properties:
Customizable CSV file
This agent only needs the next properties:
|
Property
|
Description
|
|---|---|
|
file |
Mandatory: Path where the file is placed in the directory system |
|
key |
Mandatory: The field to be used as key |
Attributes
Customizable fixed-columns file v2.0
The mapping in only available for USER object.
Now we could map the system attribute defined as property values agains Soffid attributes, for instance:
|
System attribute
|
Soffid attribute
|
|---|---|
|
USER |
userName |
|
FIRSTNAME |
firstName |
|
LASTNAME |
lastName |
|
GROUPNAME |
primaryGroup |
|
ACTIVE.equals("YES") |
active |
For instance:
For more information about how you may configure attribute mapping, see the following link: Soffid Attribute Mapping Reference
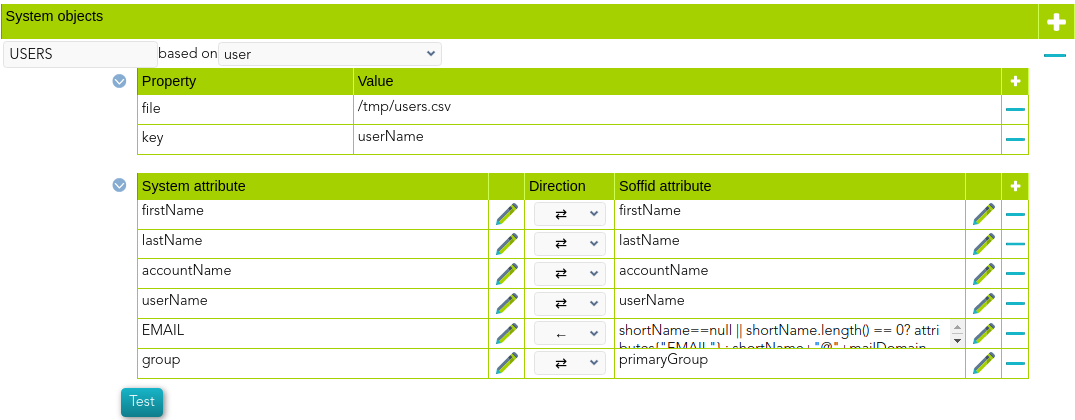
Customizable CSV file
The mapping in only available for USER object.
The first row of the file must include the name of the attribute.
USER,FIRSTNAME,LASTNAME,GROUPNAME,ACTIVE
abernal,Antonio,Bernal,world,YES
jwayne2,John,Wayne, world,YESNow we could map the system attribute (file) with the Soffid attributes, for instance:
|
System attribute
|
Soffid attribute
|
|---|---|
|
USER |
userName |
|
FIRSTNAME |
firstName |
|
LASTNAME |
lastName |
|
GROUPNAME |
primaryGroup |
|
ACTIVE.equals("YES") |
active |
Load Triggers
You can define BeanShell scripts that will be triggered when data is loaded into Soffid (incoming triggers). The trigger result will be a boolean value, true to continue or false to stop.
Triggers can be used to validate or perform a specific action just before performing an operation or just after performing an operation into Soffid objects.
To view some examples, visit the Incoming triggers examples page.
Account metadata
Accounts are default objects in Soffid. Agents allow you to create additional custom data, on the "Account metadata" tab, to customize the accounts created only for that agent.
The attributes which you define here, will be shown when you click on the proper account, on the Accounts Tabs at user page.
At this tab you could add or delete custom attributes. You can visit the Metadata page for more information about the standard attributes.
Operational
Monitoring
After the agent configuration you could check in the monitoring page if the service is running in the Synchronization Server, please go to:
Tasks
Authoritative
If you are checked "Authorized identity source", an automatic task to load identities from the managed system to Soffid is available, please go to
And you will something like "Import authoritative data from <AGENT_NAME>".
Reconcile
If your are configured the "Attribute Mapping" tab with some of our objects: "user", an automatic task to synchronize these objects from the managed system to Soffid is available, please go to:
And you will do something like "Reconcile all accounts from <AGENT_NAME>".
Synchronization
Regarding the synchronization of the objects, there are two possible options:
- If you are checked the generic attribute "Read Only" in the "Basics" tab, only the changes in the managed systems will be updated in Soffid. We recommend these options until the global configuration of Soffid will be tested.
- If you are not checked the generic attribute "Read Only" in the "Basics" tab, all the changes in Soffid or the managed system will be updated in the other. Note that this synchronization must be configured in the "Attribute mapping" tab correctly.
For more information about how you may configure the generic parameters of the agent, see the following link: Agents configuration
Customizable CSV file (CSV Connector type)
Introduction
Description
The CSV connector type allows users to load a collection of data stored into a plain CSV file.
In the following page, the process to complete the CSV connector setup will be explained.
To begin with, address to the quick start section.
Quick start
The core of Customizable CSV file connector is located under the 'Attribute Mapping' tab.
There are two important sections:
Property
File information related configuration.
|
Property
|
Description
|
|---|---|
| file | Mandatory: Path where the file is placed in the directory system |
| key | Mandatory: The field to be used as key |
System attribute
Mapping between CSV fields and Soffid objects.

Taking a look to the configuration used, we can see that:
- System objects is the entity to load (user, account, group, role).
- System attributes fields match the columns defined into the 'file.csv'.
To demonstrate Soffid flexibility in terms of agent customization, notice that:
USERNAME, NAME, LASTNAME fields, correspond to default fields from User object.
NDI is a custom field defined into the User object.
"I" is a 'char' literal that indicates the UserType.
- Soffid attributes match Soffid specification model object.
Example
|
Type
|
File
|
|---|---|
| data (file used in this configuration guide) | |
| attribute-mapping (file used in this configuration guide) |
Useful information
|
System objects
|
|---|
| User |
| Account |
| Group |
| Role |
CSV connector in Soffid 4
Introduction
Description
The "CSV connector" of Soffid 4 includes the “Customisable CSV file” agent.
This agent is used to generate a CSV file as part of the Soffid synchronisation engine.
Managed System
This connector has been designed to interpret a CSV file as if it were an end system.
Prerequisites
Users who need to be created in the CSV file must have an account with that agent.
Please note the location where the file will be created; its configuration will depend on the operating system and the type of Soffid architecture/installation
Download and Install
This plugin is located in the Connectors section and its name is CVS plugin (Test plugin once is installed).
For more information about the installation process you can visit the Addons Getting started page.
Agent Configuration
The "Customisable CSV file" agent is used to synchronice, not for load authoritative o reconcile.
The only object that can be configured is the User object.
Basics tab
It has no custom parameters.
Attribute mapping tab
Use the option "Create default mapping" to create a first version of the mapping.
Adjust the properties and attributes to suit your needs.
Property section
Here, you need to define some configuration parameters.
|
Property
|
Description
|
|---|---|
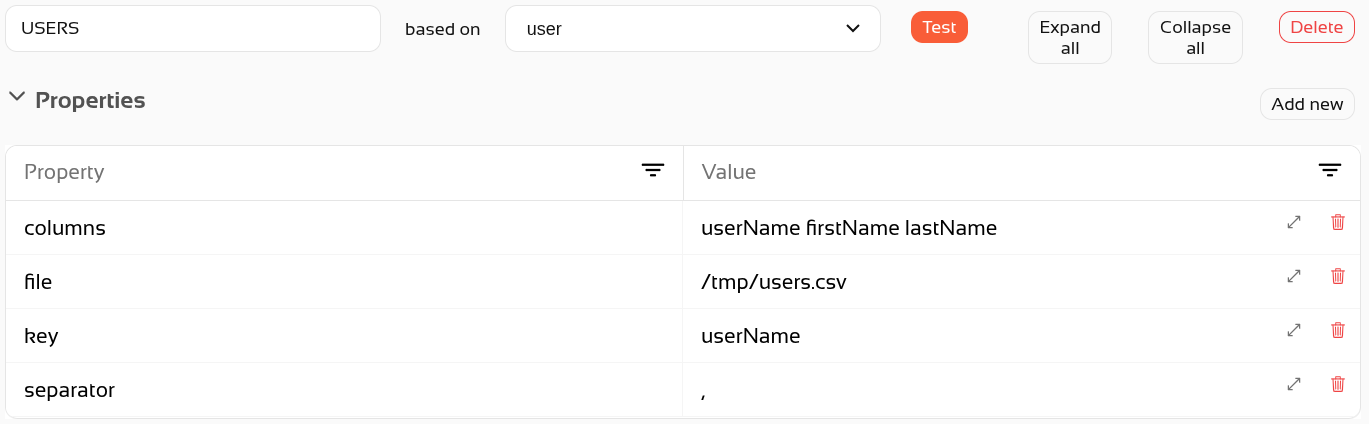
| file | Mandatory: Path where the file is placed in the directory system. |
| key | Mandatory: The field to be used as key. |
| columns | Mandatory: The names of the columns to be created in the file. They must be separated by a space. They correspond to the "system attributes". |
| separator |
Mandatory: The symbol used to separate attributes in the file. It can be anything other than a comma. |
Attributes section
Mapping between CSV fields and Soffid objects.
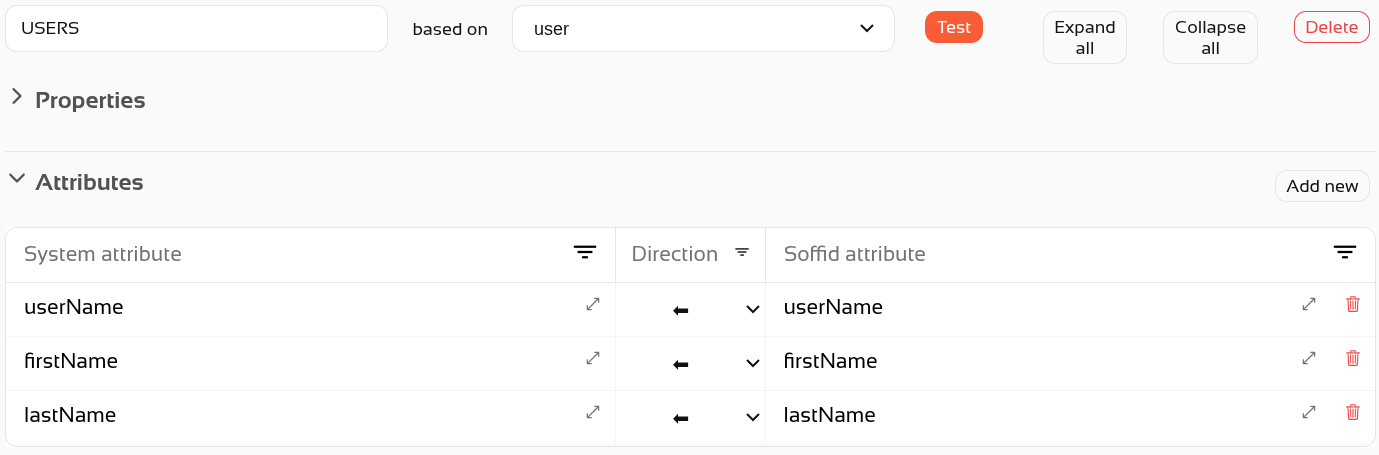
Some tips:
- The system attributes will be the csv columns
- The direction will be to the left
- Check here the Soffid Objects (for agent mappings)
- You can use additional attributes like this: attribute{"CODE"}, you can check de CODE of the attribute in the Metadata page.
Incoming data tab
Nothing to do.
Massive actions tab
We can use the "CSV file: Provision all users on to managed systems." to sinchronise all users.

Account metadata tab
Nothing to do.
Operational
Monitoring
After the agent configuration you could check in the Sync server monitoring page if the agent is active.
Google Apps Connector
Google Apps Connector
Introduction
Description
Google Apps Connector allows you to manage users and groups using the Google Directory API.
Managed System
This connector is specific for integration with the Google domain.
For more information to check if your system may be synchronized with this connector do not hesitate to contact us through our Contact form
Prerequisites
To get a service account and a private key, please follow this link: Creating a service account. You must:
- Register a new project
- Enable AdminSDK API
- Register a new OAuth service account. Store the JSON generated file in a secure place.
Furthermore, you will need to follow this guide to enable the recently created account to use directory API services. The scopes to grant are:
- View and manage the provisioning of groups on your domain: https://www.googleapis.com/auth/admin.directory.group
- View and manage group subscriptions on your domain: https://www.googleapis.com/auth/admin.directory.group.member
- View and manage organization units on your domain: https://www.googleapis.com/auth/admin.directory.orgunit
- View and manage the provisioning of users on your domain: https://www.googleapis.com/auth/admin.directory.user
Download and Install
This addon is located in the Connectors section and its name is Google Apps plugin.
For more information about the installation process you can visit the Addons Getting started page.
Agent Configuration
Basic
Generic parameters
After the installation of the addon, you may create and configure agent instances.
To configure this Google Apps Connector you must select "GoogleApps" in the attribute "Type" of the generic parameters section in the agents page configuration.
For more information about how you may configure the generic parameters of the agent, see the following link: Agents configuration
Custom parameters
Below there are the specific parameters for this agent implementation:
|
Parameter
|
Description
|
|---|---|
|
Admin user |
Administrator account name |
|
Service account client email |
Extract it from generated json file. It is tagged as client_email |
|
Service account private key |
Extract it from generated json file. It is tagged as private_key. As the private key is JSON encoded, mind to replace unicode escape chars by it's ASCII equivalents |
|
Google domain |
Base google domain |
Attribute mapping
This connector could manage users and groups.
Properties
Nothing to configure.
Attributes
Users
|
Attribute
|
Value
|
|---|---|
|
suspended |
"True" if the account is disabled. "False" otherwise |
|
name{"givenName"} |
User given name |
|
name{"familyName"} |
User last name |
|
name{"fullName"} |
User full name |
|
primaryEmail |
Account name |
To get an extensive list of attributes supported by Google, browse to Google User API
Soffid groups can be mapped as OrgUnits.
|
Attribute
|
Value
|
|---|---|
|
name |
Org Unit Name |
Groups
Mails alias will be automatically bound to users without any further configuration.
Roles and Mail Lists will also be created and maintained as Google Apps groups.
For more information about how you may configure attribute mapping, see the following link: Soffid Attribute Mapping Reference
For instance:
Triggers
Nothing to configure. This option is not available to Google apps connector.
Load Triggers
You can define BeanShell scripts that will be triggered when data is loaded into Soffid (incoming triggers). The trigger result will be a boolean value, true to continue or false to stop.
Triggers can be used to validate or perform a specific action just before performing an operation or just after performing an operation into Soffid objects.
To view some examples, visit the Incoming triggers examples page.
Account metadata
Agents allow you to create additional data, on the "Account metadata" tab, to customize the accounts created for that agent. This additional information will be loaded with the agent's information, or calculated as defined in the mappings.
The additional data can be used in both mappings and triggers.
The attributes which you define here will be shown when you click on the proper account, on the Accounts Tabs at user page.
Operational
Monitoring
After the agent configuration you could check in the monitoring page if the service is running in the Synchronization Server, please go to:
Tasks
Authoritative
If you are checked "Authorized identity source", an automatic task to load identities from the managed system to Soffid is available, please go to:
And you will something like "Import authoritative data from <AGENT_NAME>".
Reconcile
If you are configured the "Attribute Mapping" tab with some of our objects: "user or group", an automatic task to synchronize these objects from the managed system to Soffid is available, please go to:
And you will do something like "Reconcile all accounts from <AGENT_NAME>".
Synchronization
Regarding the synchronization of the objects, there are two possible options:
- If you are checked the generic attribute "Read Only" in the "Basics" tab, only the changes in the managed systems will be updated in Soffid. We recommend these options until the global configuration of Soffid will be tested.
- If you are not checked the generic attribute "Read Only" in the "Basics" tab, all the changes in Soffid or the managed system will be updated in the other. Note that this synchronization must be configured in the "Attribute mapping" tab correctly.
For more information about how you may configure the generic parameters of the agent, see the following link: Agents configuration
JSON REST Web Services Connector
JSON REST Web Services Connector
Introduction
Description
This connector allows the integration with any Web Service able to consume and generate JSON documents through REST communication.
Managed System
Every commercial product or custom web application allows REST communication with JSON documents.
There are a lot of products that use this standard, for instance:
- JIRA.
- Oracle Field Service Cloud (OFSC).
- Office 365.
- AWS.
- Google Cloud.
If your system is not in the previous list, it's possible to include it easily!
For more information to check if your system may be synchronized with this connector you do not hesitate to contact us through our Contact form
Prerequisites
It is needed a user with access and permissions to the endpoints and operations required in the scope of the integration.
Also, the documentation, specification, or tutorial of the implementation of the JSON REST Web Service is required to apply the mapping configuration.
Download and Install
This addon is located in the Connectors section and its name is REST (json) plugin.
You can visit the Addons Getting started page for more information about the installation process.
Agent Configuration
Basic
Generic parameters
After the installation of the addon, you may create and configure agent instances.
To configure this JSON REST Web Service Connector you must select "JSON Rest Webservice" in the attribute "Type" of the generic parameters section in the agents' page configuration.
For more information about how you may configure the generic parameters of the agent, see the following link: Agents configuration
Custom parameters
Below there are the specific parameters for this agent implementation:
|
Parameter
|
Description
|
|---|---|
|
Server URL |
URL of the REST web service. Base URL for making calls. |
|
Authentication method |
Available options:
(*) You can find more information in the Authentication method section. |
|
Enable debug |
Two options: "Yes", "No": it enables or not more log traces in the Synchronization Server log |
| Proxy host |
Only when the proxy is needed. |
| Proxy port |
Only when the proxy is needed. |
| XML Templates |
Allows you to add new XML templates with SOAP requests and then configure them at attribute mappings. |
Authentication method
None: no authentication is needed. There are no parameters to configure.

Basic: the username and password are sent with each request.
- User Name: user to authenticate.
- Password: the password of the user to authenticate.
Bearer token (Simple token in Soffid $)
- Bearer token (Token in Soffid 4): this token is provided by the application to which we are going to connect.

Token (Token got from user and password in Soffid 4): calls the authentication URL with the POST method and with the username and password, and the response will be the token. It is no longer used.
- User Name: user to authenticate.
- Password: the password of the user to authenticate.
- Authentication URL: URL to retrieve the token for the server's authentication (for the "Token" method).
Token oAuth Client Credentials
- Authentication URL: URL to retrieve the token for the server's authentication (for the "Token" method).
- Token attr. output: the value is always access_token.
- Request parameters:
- Client ID: it is like the user.
- Client secret: it is the password.
- Scope: it is the permissions.

Token oAuth Password Grant
- User Name: user to authenticate.
- Password: the password of the user to authenticate.
- Authentication URL: URL to retrieve the token for the server's authentication (for the "Token" method).
- Token attr. output: the value is always access_token.
- Request parameters:
- Client ID: it is like the user.
- Client secret: it is the password.
- Scope: it is the permissions.

Attribute mapping
This connector can manage users, accounts, roles, groups, and grants.
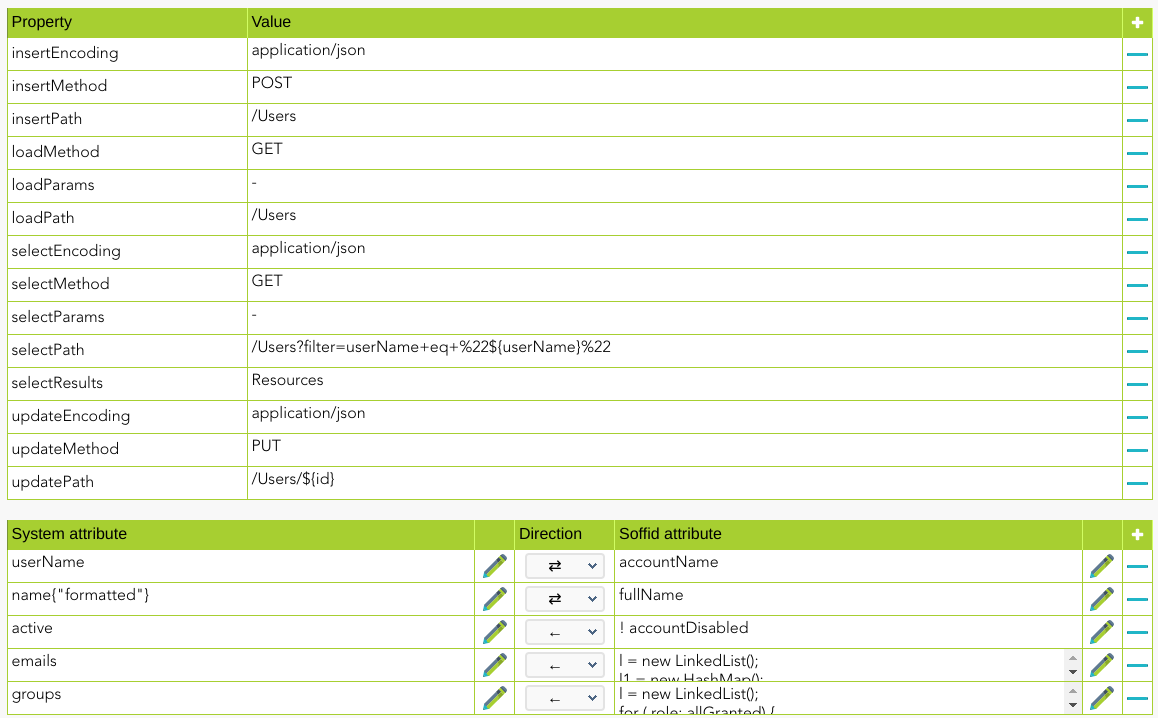
Note that any changes made to the methods will affect the properties and vice versa.
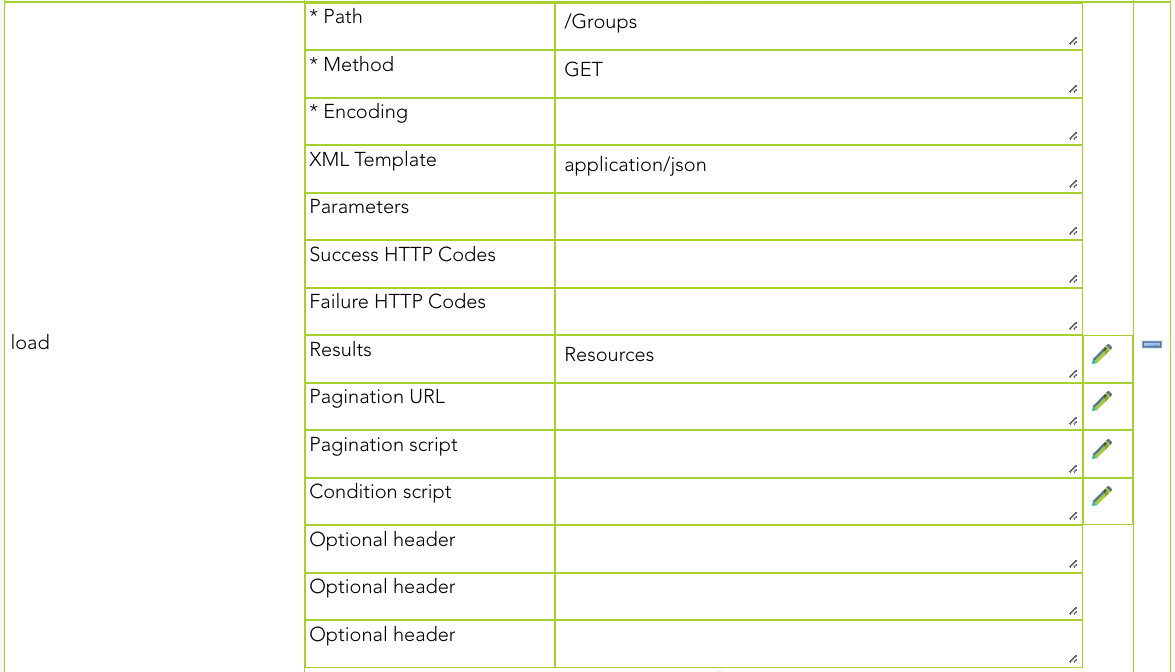
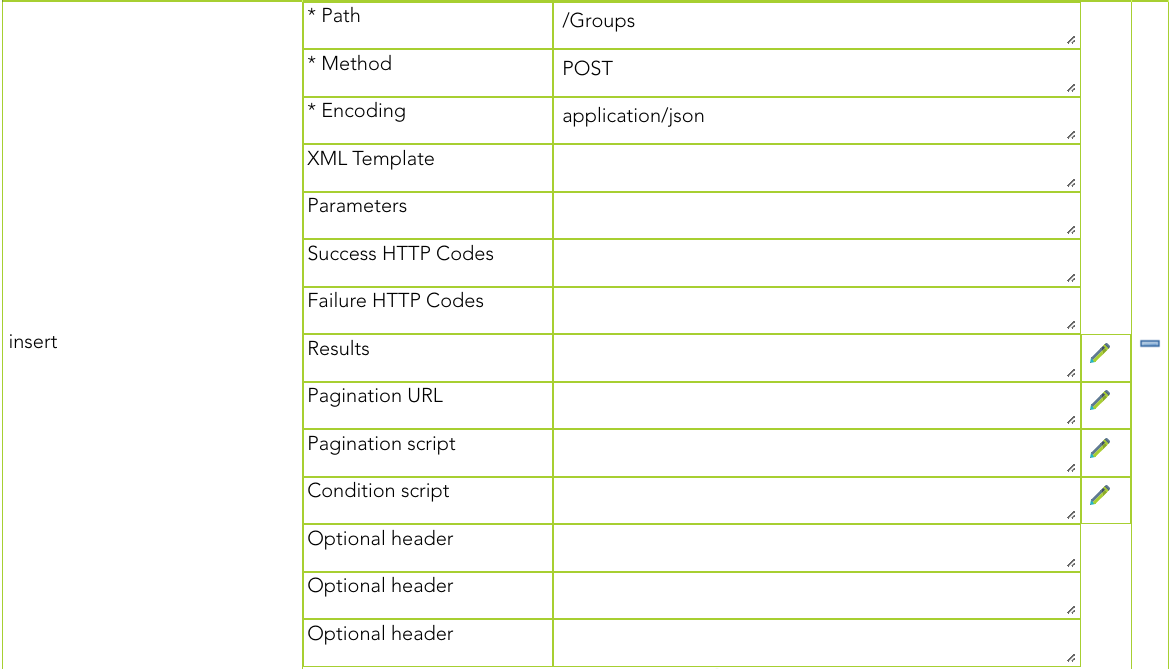
Methods
This agent allows you to define methods to be called using the defined properties. There are some default methods, but you can customize your own methods.
Default methods:
- load
- delete
- update
- insert
- select
For each method, the properties to set up are as follows:
|
Properties
|
Description
|
|---|---|
| Path | A valid URL to call. This path must be the continuation of the Server URL for making calls. |
| Method | Available methods to call a Rest API (GET, POST, PUT, DELETE, PATCH) |
| Encoding |
The specific type of encoded data that will be used. There are three supported types:
|
| XML Template | Applies only if it is text/xml. You need to write the name of the corresponding template defined on the XML Templates. |
| Parameters |
Applies with application/x-www-form-urlencoded and application/json
|
| Success HTTP Codes |
HTTP codes that should be interpreted as OK. If no code is entered, Soffid will take as valid codes the following: 200, 201, 204 and 404. If you type the Success HTTP codes, it will be not necessary to type the Failure HTTP codes. You can use blanks or commas to separate the codes. |
| Failure HTTP Codes |
Soffid will take by default as failure all codes not indicated in Success HTTP Codes. If you type the Failure HTTP codes, it will be not necessary to type the Success HTTP codes. You can use blanks or commas to separate the codes. |
| Results |
Gets the object or object list from the response received. You need to indicate a JSON attribute name to check and get the data. If this element is not present, or empty, the connector will conclude the user does not exist yet. You can type simple attribute names or even complex scripts. |
| Pagination URL |
Often, the response from the API Rest service does not contain all the data because the data is too large. In these cases, you can use the paging options to request the data in blocks. When the response gives us the URL of the next page to fetch, you must type the tag name of this attribute. You have to choose one of the paging methods, using both is not compatible. |
| Pagination script |
Often, the response from the API Rest service does not contain all the data because the data is too large. In these cases, you can use the paging options to request the data in blocks. You can type a complex script to get the next call that has to be done. There are two available objects:
You have to choose one of the paging methods, using both is not compatible. |
| Condition script | Return false if you want to prevent a call. |
| Optional header |
Use this property to send HTTP header(s). |
Load
Select

Insert
Update
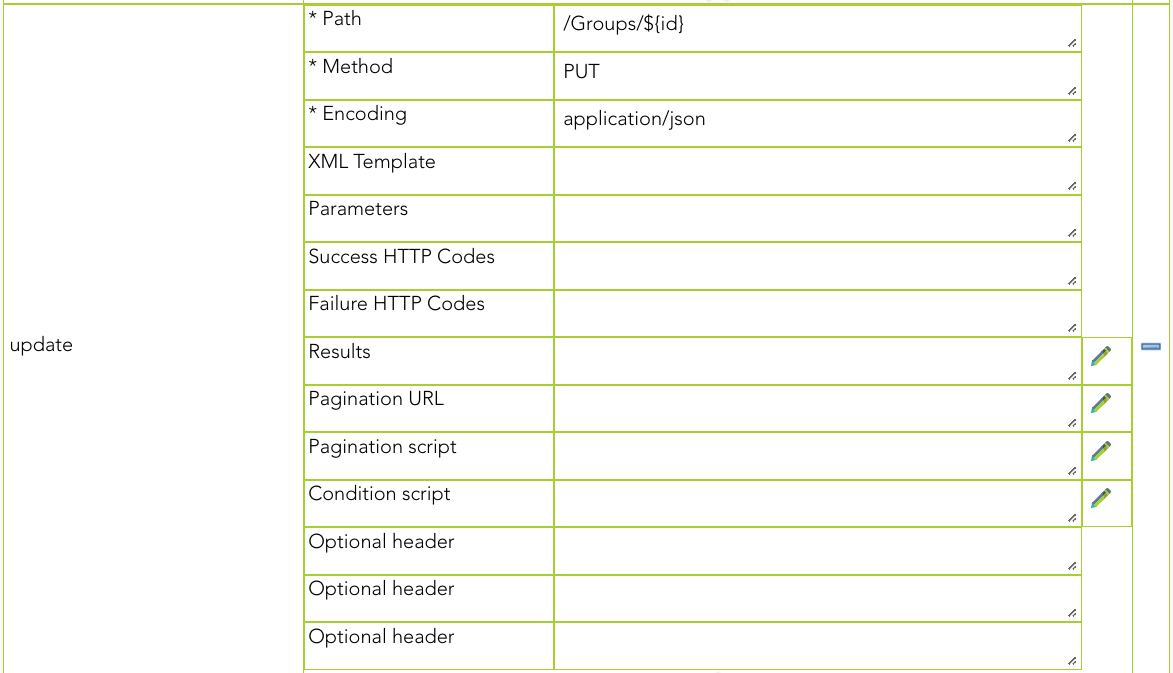
Delete
Properties
In this agent, the configuration of the properties attributes is very important due to they define the functionality of the integration:
This agent has five families of properties:
|
Family
|
Description
|
|---|---|
| Load | Used to retrieve all the objects in the target system |
| Select | Used to retrieve an object in the target system |
| Insert | Used to create an object in the target system |
| Update | Used to update an object in the target system |
| Delete | Used to remove an object in the target system |
These families are involved in the following processes:
|
Process
|
Families
|
|---|---|
| Reconcile automatic task | Load + select |
| Authoritative automatic task | Load + select |
| Sync new object | Select + Insert |
| Sync updated object | Select + Update |
| Sync deleted object | Select + Delete |
These are the pictures of the mechanisms used to synchronize objects:
Sync object

Remove object

You can find more information by visiting the Properties attributes page.
Attributes
You can customize attribute mappings, you only need to select system objects and the Soffid objects related, manage their attributes, and make either inbound and outbound attribute mappings.
You may map the attributes of the target system with the Soffid available attributes.
- For the target system attributes is required to be access to its specification.
- For the Soffid attributes, you may follow the next link.
For more information about how you may configure attribute mapping, see the following link: Soffid Attribute Mapping Reference
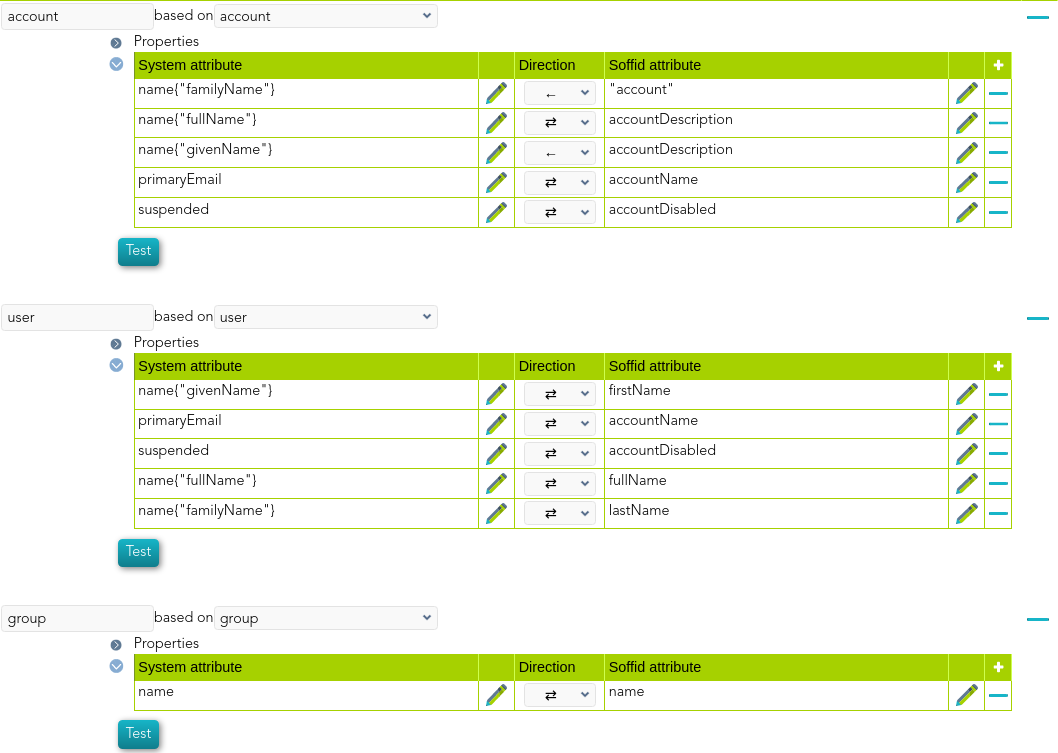
For instance:
As an example, below is how JSON connector will look like in order to manage JIRA accounts:
Triggers
You can define BeanShell scripts that will be triggered when data is loaded into the target system (outgoing triggers). The trigger result will be a boolean value, true to continue or false to stop.
Triggers can be used to validate or perform a specific action just before performing an operation or just after performing an operation on target objects.
To view some examples, visit the Outgoing triggers examples page.
JSON REST Web Services Connector - Properties
In this agent, the configuration of the properties attributes is very important due to they define the functionality of the integration:
This agent has five families of properties:
|
Family
|
Description
|
|---|---|
| Load | Used to retrieve all the objects in the target system |
| Select | Used to retrieve an object in the target system |
| Insert | Used to create an object in the target system |
| Update | Used to update an object in the target system |
| Delete | Used to remove an object in the target system |
These families are involved in the following processes:
|
Process
|
Families
|
|---|---|
| Reconcile automatic task | Load + select |
| Authoritative automatic task | Load + select |
| Sync new object | Select + Insert |
| Sync updated object | Select + Update |
| Sync deleted object | Select + Delete |
These are the properties attributes grouped by family:
Load
|
Property |
Description |
|---|---|
|
loadPath (required) |
Denotes the path (relative to webserver root) where the WebService is located. It can contain variable names in the form of ${variableName}. JSON connector will replace that name for the actual value. Eventually, complex expressions can be written in, but it's discouraged |
|
loadMethod (required) |
Denotes the HTTP method to use: PUT, POST, GET and DELETE are allowed |
|
loadEncoding (required) |
Type of encoded data that will be used. |
|
loadParams (optional) |
Put the character '-' in case you would avoid its value |
|
loadTemplate (optional) |
Name of the corresponding template defined on the XML Templates. |
|
loadResults (optional) |
But highly recommended) denotes the JSON portion that contains current data for the object. If this element is not present, or empty, the connector will conclude the object does not exist yet. This property will contain a simple JSON attribute name, but complex scripts are also allowed. |
|
loadSuccessCodes (optional) |
The HTTP codes to be interpreted as OK. |
|
loadFailureCodes (optional) |
The HTTP codes to be interpreted as Error. |
|
loadNext (optional) |
Next page to fetch. When the response gives us the URL of the next page to fetch, you must type the tag name of this attribute. |
|
loadPagination (optional) |
Complex script to get the next call that has to be done. |
|
loadCondition (optional) |
Script to prevent a call. To prevent the call must return false. |
|
loadHeader (optional) |
Use this property to send HTTP header(s). |
Select
|
Property |
Description |
|---|---|
|
selectPath (required) |
Denotes the path (relative to webserver root) where the WebService is located. It can contain variable names in the form of ${variableName}. JSON connector will replace that name for the actual value. Eventually, complex expressions can be written in, but it's discouraged |
|
selectMethod (required) |
Denotes the HTTP method to use: PUT, POST, GET and DELETE are allowed |
|
selectEncoding (required) |
Denotes the encoding used to send to the target webservice. application/json and application/x-www-form-urlencoded are supported. The first one is used by default to POST and PUT requests. The second one is used by default for GET and DELETE requests |
|
selectParams (optional) |
Put the character '-' in case you would avoid its value |
|
selectTemplate (optional) |
Name of the corresponding template defined on the XML Templates. |
|
selectResults (optional) |
Denotes the JSON portion that contains current data for the object. If this element is not present, or empty, the connector will conclude the object does not exist yet. This property will contain a simple JSON attribute name, but complex scripts are also allowed |
|
selectSuccessCodes (optional) |
The HTTP codes to be interpreted as OK. |
|
selectFailureCodes (optional) |
The HTTP codes to be interpreted as Error. |
|
selectNext (optional) |
Next page to fetch. When the response gives us the URL of the next page to fetch, you must type the tag name of this attribute. |
|
selectPagination (optional) |
Complex script to get the next call that has to be done. |
|
selectCondition (optional) |
Script to prevent a call. To prevent the call must return false. |
|
selectHeader (optional) |
Use this property to send HTTP header(s). |
Insert
|
Property
|
Description
|
|---|---|
|
insertPath (required) |
Denotes the path (relative to webserver root) where the webservice is located. |
|
insertMethod (required) |
Denotes the HTTP method to use: PUT, POST, GET and DELETE are allowed |
|
insertEncoding (required) |
Denotes the encoding used to send to the target webservice. application/json and application/x-www-form-urlencoded are supported. The first one is used by default to POST and PUT requests. The second one is used by default for GET and DELETE requests |
|
insertTemplate (optional) |
Name of the corresponding template defined on the XML Templates. |
|
insertParams (optional) |
Type in the attributes that will be sent to the rest server. If this property is not set, all attributes will be sent. |
|
insertResults (optional) |
Denotes the JSON portion that contains current data for the object. If this element is not present, or empty, the connector will conclude the object does not exist yet. This property will contain a simple JSON attribute name, but complex scripts are also allowed |
|
insertSuccessCodes (optional) |
The HTTP codes to be interpreted as OK. |
|
insertFailureCodes (optional) |
The HTTP codes to be interpreted as Error. |
|
insertCondition (optional) |
Script to prevent a call. To prevent the call must return false. |
|
insertHeader (optional) |
Use this property to send HTTP header(s). |
Update
|
Property
|
Description
|
|---|---|
|
updatePath (required) |
Denotes the path (relative to webserver root) where the webservice is located |
|
updateMethod (required) |
Denotes the HTTP method to use: PUT, POST, GET and DELETE are allowed |
|
updateEncoding (required) |
Denotes the encoding used to send to the target webservice. application/json and application/x-www-form-urlencoded are supported. The first one is used by default to POST and PUT requests. The second one is used by default for GET and DELETE requests |
|
updateParams (optional) |
Type in the attributes that will be sent to the rest server. If this property is not set, all attributes will be sent. |
|
updateResults (optional) |
Denotes the JSON portion that contains current data for the object. If this element is not present, or empty, the connector will conclude the object does not exist yet. This property will contain a simple JSON attribute name, but complex scripts are also allowed |
|
updateSuccessCodes (optional) |
The HTTP codes to be interpreted as OK. |
|
updateFailureCodes (optional) |
The HTTP codes to be interpreted as Error. |
|
updateCondition (optional) |
Script to prevent a call. To prevent the call must return false. |
|
updateHeader (optional) |
Use this property to send HTTP header(s). |
Delete
|
Property
|
Description
|
|---|---|
|
deletePath (required) |
Denotes the path (relative to webserver root) where the webservice is located |
|
deleteMethod (required) |
Denotes the HTTP method to use: PUT, POST, GET and DELETE are allowed |
|
deleteEncoding (required) |
Denotes the encoding used to send to the target webservice. application/json and application/x-www-form-urlencoded are supported. The first one is used by default to POST and PUT requests. The second one is used by default for GET and DELETE requests |
|
deleteParams (optional) |
Type in the attributes that will be sent to the rest server. If this property is not set, all attributes will be sent. |
|
deleteResults (optional) |
Denotes the JSON portion that contains current data for the object. If this element is not present, or empty, the connector will conclude the object does not exist yet. This property will contain a simple JSON attribute name, but complex scripts are also allowed |
|
deleteSuccessCodes (optional) |
The HTTP codes to be interpreted as OK. |
|
deleteFailureCodes (optional) |
The HTTP codes to be interpreted as Error. |
|
deleteCondition (optional) |
Script to prevent a call. To prevent the call must return false. |
|
deleteHeader (optional) |
Use this property to send HTTP header(s). |
How to retrieve data from the response with the *Results properties
a) One level
If the JSON has one level you have to avoid the property
{
"userName" : "soffid"
}b) Two level
If the JSON has two levels you have to create the property *Result and put the name of the parent attribute, for example:
{
"user" : {
"userName" : "soffid"
}
}
And the property must be for example loadResults = userc) More than two levels
If the JSON has more than two levels you have to create the property *Result and put the atributes in the next pattern
*Results = attribure1{"attribute2"}{"attribute3"}...
For example:
{
"data" : {
"user" : {
"userName" : {
"string" : "soffid"
}
}
}
}
And the property must be for example:
loadResults = data{"user"}{"userName"}How to configure the Office 365 agent?
Office 365 integration
Prerequisites
- You need to install the last version of JSON Rest Connector
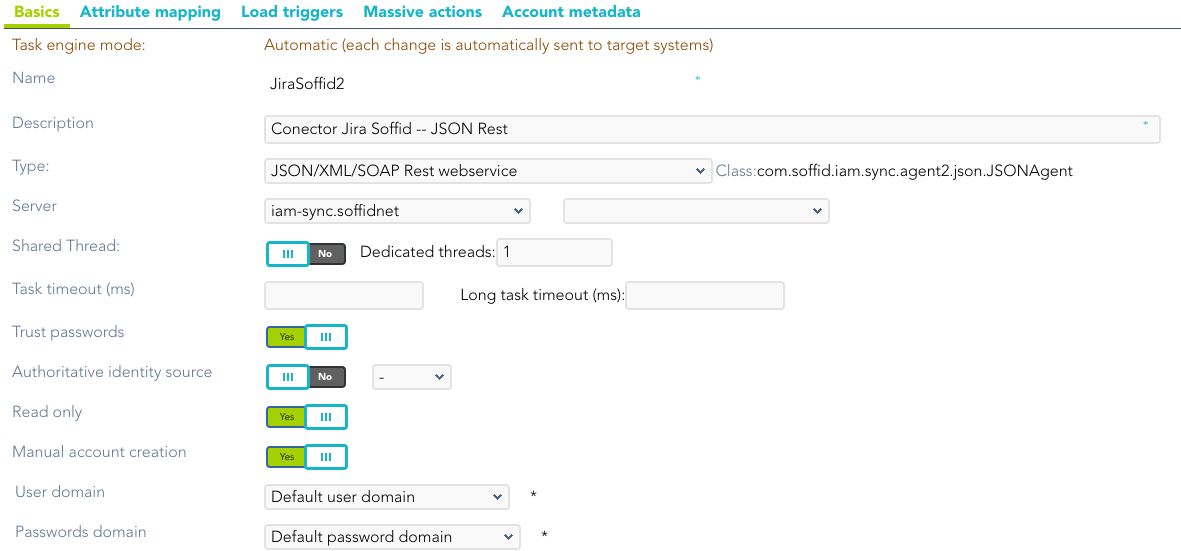
Configuration
Configure the Basic data to establish the connection
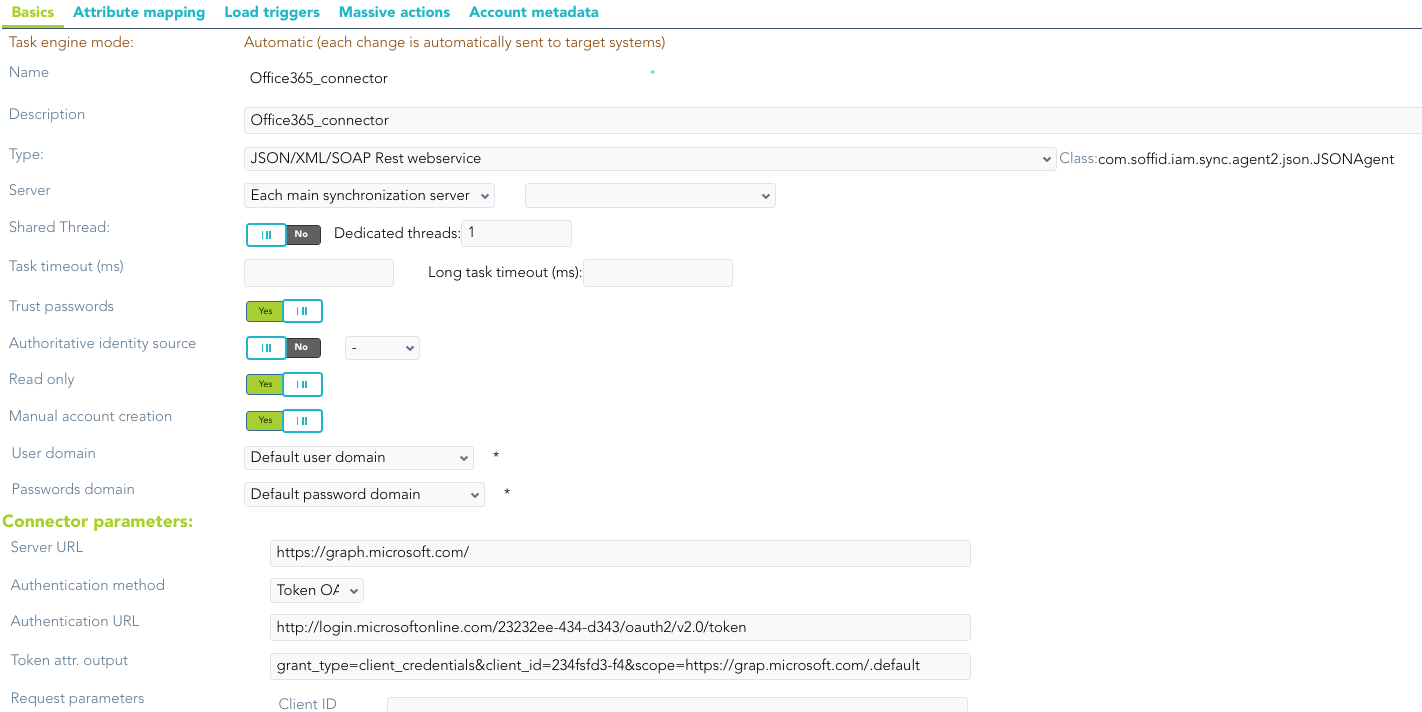
Then, configure the attribute mappings

Soffid provides you versions of the attribute mappings to import into the agent configuration:
- Basic attribute mappings: agent-config-Office365-Basic.xml
- Attribute mappings with immutable ID and Azure groups: agent-config-Office365-MoreComplex.xml
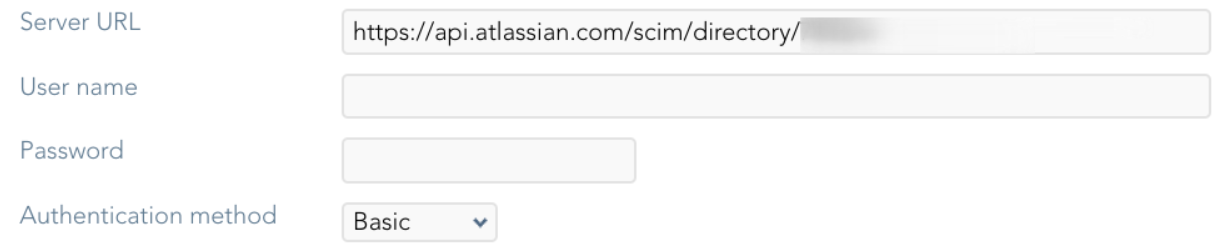
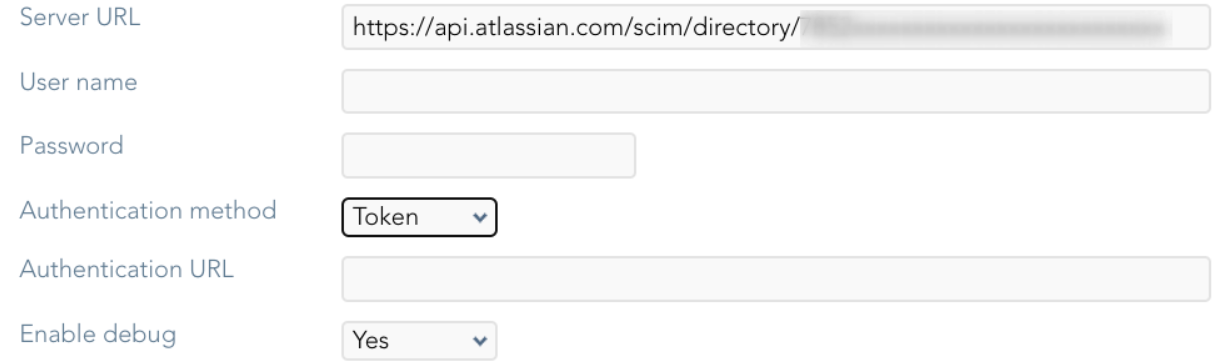
How to configure the Jira Atlassian agent?
Jira integration
Prerequisites
- You need to install the last version of JSON Rest Connector.
Configuration
Configure the Basic data to establish the connection
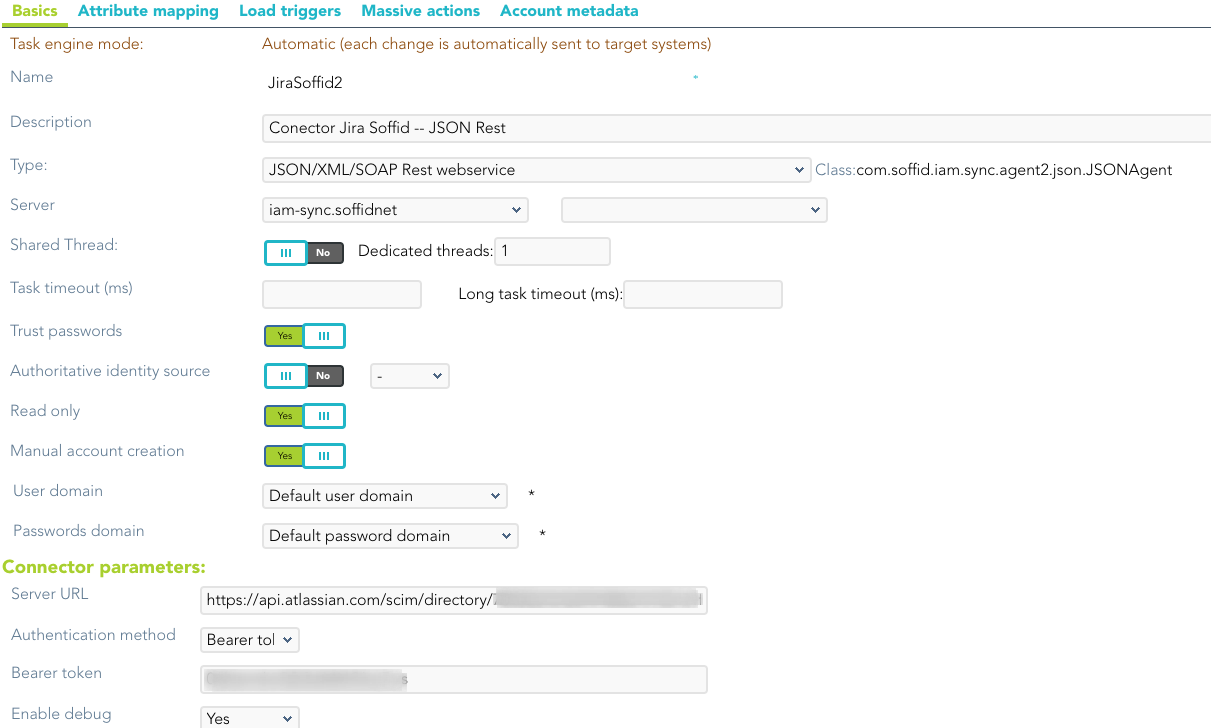
Then, configure the attribute mappings
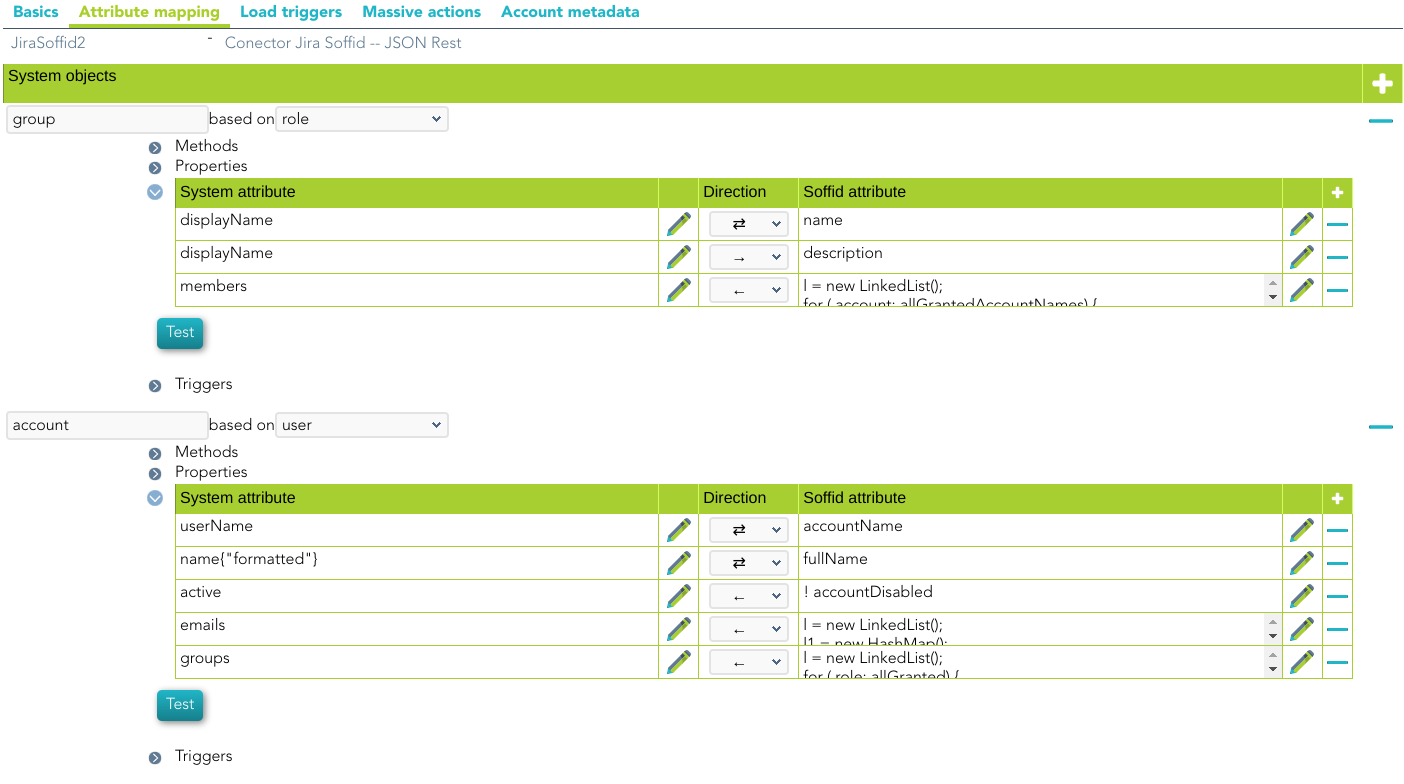
Soffid provides you an XML file with the basic attribute mappings to import into the agent configuration JIRA Soffid agent-config.xml
LDAP Connector
LDAP Connector
Introduction
Description
This connector implements the LDAP standard and it is used to connect the Sync-Server with every server that allows this communication protocol.
Managed System
There are a lot of servers and products that use this standard, for instance, the most known systems are:
-
389 Directory Server.
-
Apache Directory Server.
-
OpenLDAP.
-
OpenDJ.
-
Active Directory.
-
Oracle Directory Server.
For more information: List of LDAP software.
If your system is not in the previous list, it's possible to include it easily!
For more information to check if your system may be synchronized with this connector you do not hesitate to contact us through our Contact form
Prerequisites
It is needed a user with full administrator access.
Download and Install
This addon is located in the Connectors section and its name is LDAP plugin.
For more information about the installation process you can visit the Addons Getting started page.
Agent Configuration
Basic
Generic parameters
After the installation of the addon, you may create and configure agent instances.
To configure this LDAP Connector you must select "LDAP-Custom (with triggers)" in the attribute "Type" of the generic parameters section in the agent's page configuration.
For more information about how you may configure the generic parameters of the agent, see the following link: Agents configuration
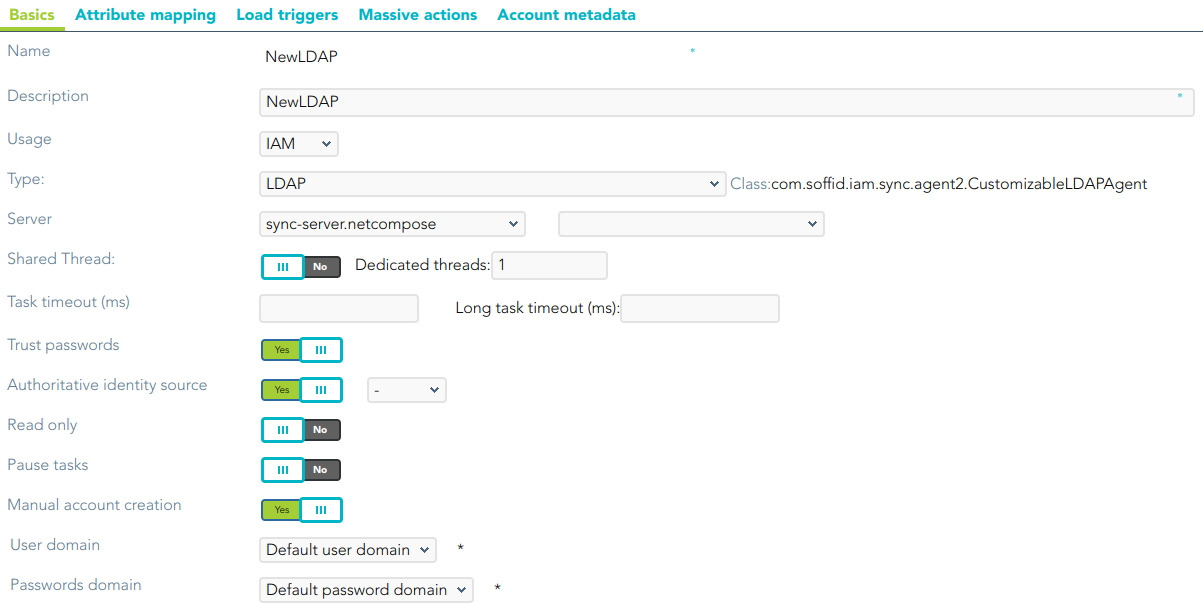
Custom parameters
Below there are the specific parameters for this agent implementation:
|
Parameter |
Description |
|---|---|
|
User name |
User name in DN format, including base name if needed |
|
Password |
Password |
|
Host name |
Host name of the server |
|
Enable SSL |
|
|
Base DN |
LDAP Base name |
|
PasswordAttribute |
|
|
Password hash algorithm |
The algorithm is used to encrypt the password. For instance SHA-1, SHA-256, MD5, etc |
|
Password hash prefix |
|
|
LDAP Query page size |
|
|
Enable debug |
Two options: Yes, No. When it is enabled more log traces are printed in the Synchronization Server log |
Attribute mapping
This connector can manage users, accounts, roles, groups, and grants.
As a limitation, it cannot detect password changes to be propagated to other systems.
Properties
Some agents require to configure some custom attributes, you will use the properties section to do that.
|
Property
|
Value
|
|---|---|
|
rename |
true |
|
key |
LDAP attribute where Soffid account name is stored. If the property is not present, object will be searched by its distinguishedName |
|
modificationTimestamp |
LDAP attribute |
|
removeDisabledAccounts |
Set to true to remove disabled accounts from LDAP server |
If a key value is set, LDAP connector will search for objects based on this LDAP attribute value, rather than its DN. Thus, an index on this attributed is highly recommended.
Renaming
To support object renaming, Soffid needs to store the Soffid account name on a specific LDAP attribute. It's highly recommended to index such a field. To enable it, add the following properties to each object mapping. At any time, object renaming can be disabled by setting the property rename to false.
|
Property
|
Value
|
|---|---|
|
rename |
true |
Attributes
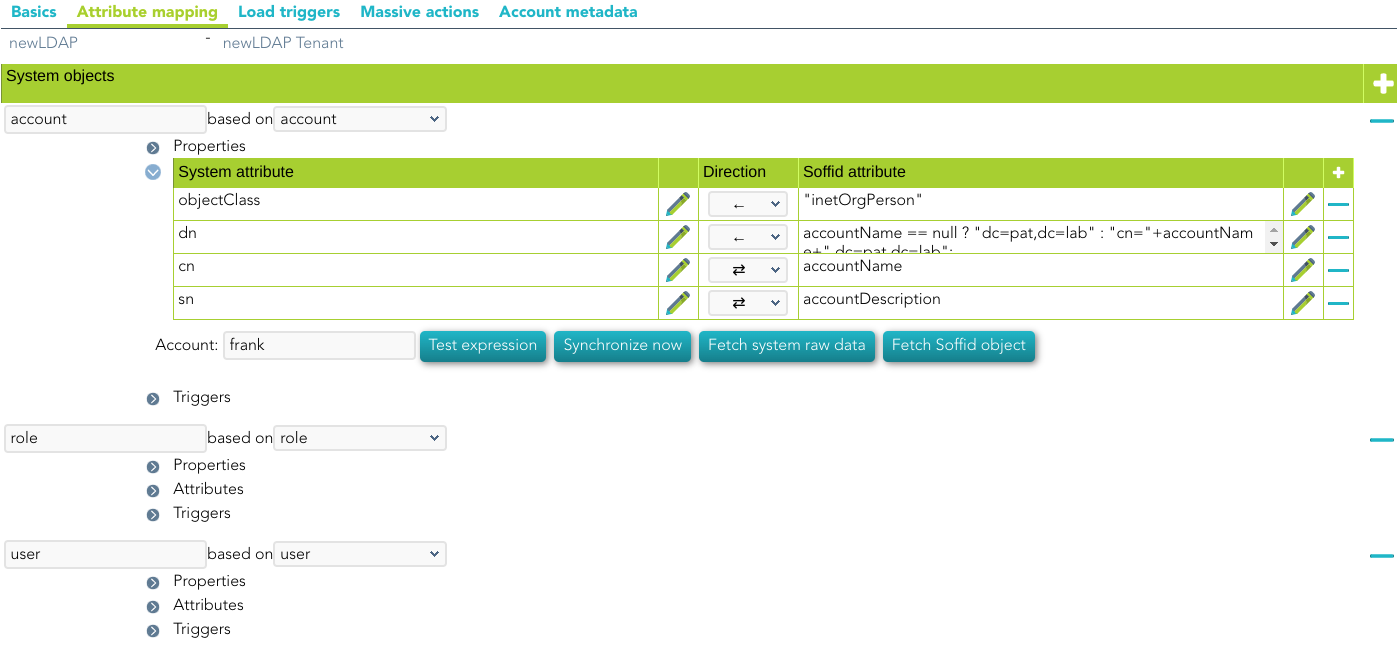
You can customize attribute mappings, you only need to select system objects and the Soffid objects related, manage their attributes, and make either inbound or outbound attribute mappings.
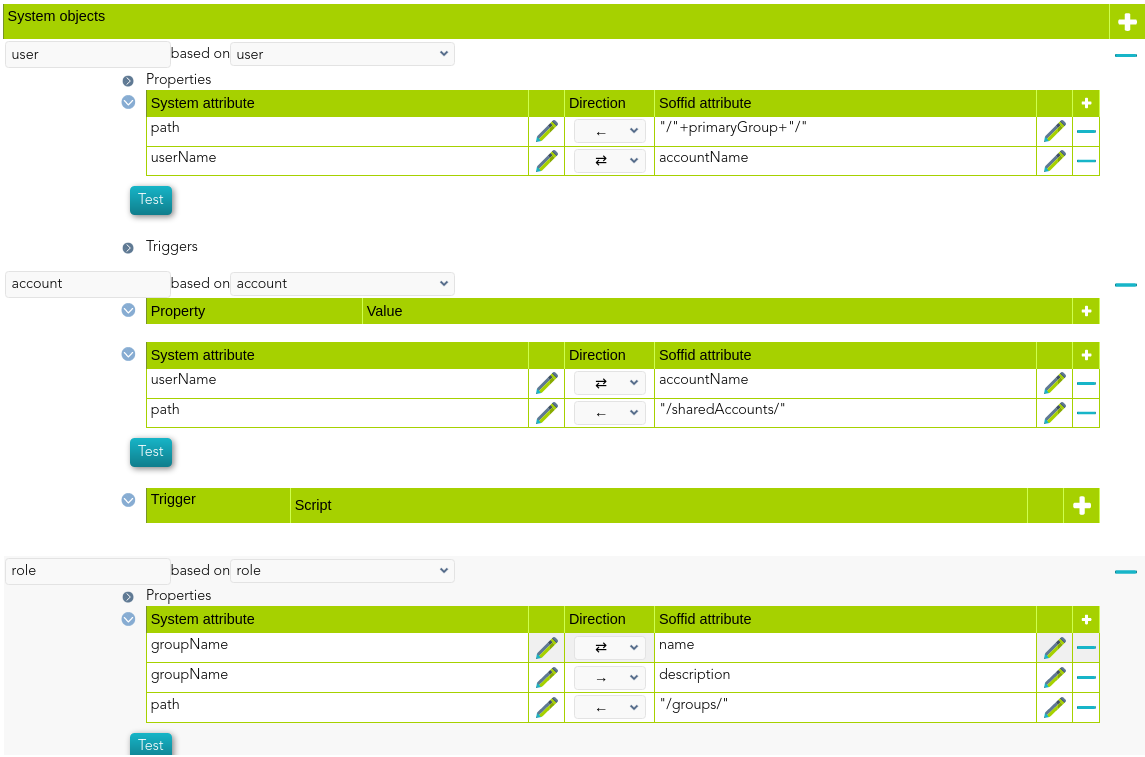
Using a windows connector you can map users, groups, and role objects. Active Directory membership is automatically managed based on user and group mappings.
You can map users, groups, and role objects. User membership must be managed on the role members' attribute expression.
Any object mapping must have the following system attributes:
|
System attribute
|
Value
|
|---|---|
|
objectClass |
LDAP Object Class. It can evaluate to an array of objects |
|
dn |
Full qualified object name |
For more information about how you may configure attribute mapping, see the following link: Soffid Attribute Mapping Reference
For instance:
Triggers
You can define BeanShell scripts that will be triggered when data is loaded into the target system (outgoing triggers). The trigger result will be a boolean value, true to continue or false to stop.
Triggers can be used to validate or perform a specific action just before performing an operation or just after performing an operation on target objects.
To view some examples, visit the Outgoing triggers examples page.
Oracle Connectors
Oracle Connector
Introduction
Description
Oracle Connector could manage an Oracle database.
Soffid's Oracle connector supports Profiles since version 2.2.6.14
Managed System
This connector is specific for integration with an Oracle database, if you want to connect a generic SQL database, please visit the following page: SQL Connector.
For more information to check if your system may be synchronized with this connector you do not hesitate to contact us through our Contact form
Prerequisites
It is needed a user with sysdba access and permissions.
User management
Criteria:
- Any user or account created will be granted the CREATE SESSION privilege.
- Default tablespace for each user will be the USERS tablespace. It won't be changed for existing users.
- Soffid passwords expiration date will be managed by Soffid. So, Oracle won't be notified about when those passwords need to be expired.
- Roles and groups are automatically created when a user belonging to it is updated.
Exceptions:
- Error SQL: ….There was an error executing an SQL statement.
- Contact with the administrator of the database. It may be a problem of user authorizations, administrator password validity, availability of space in the database, or saturation of it.
Download and Install
This addon is located in the Connectors section and its name is Oracle Connector.
For more information about the installation process you can visit the Addons Getting started page.
Agent Configuration
This connector could manage User and Role objects.
Basic
Generic parameters
After the installation of the addon, you may create and configure agent instances.
To configure this Oracle Connector you must select "OracleAgent" in the attribute "Type" of the generic parameters section in the agents' page configuration.
For more information about how you may configure the generic parameters of the agent, see the following link: Agents configuration
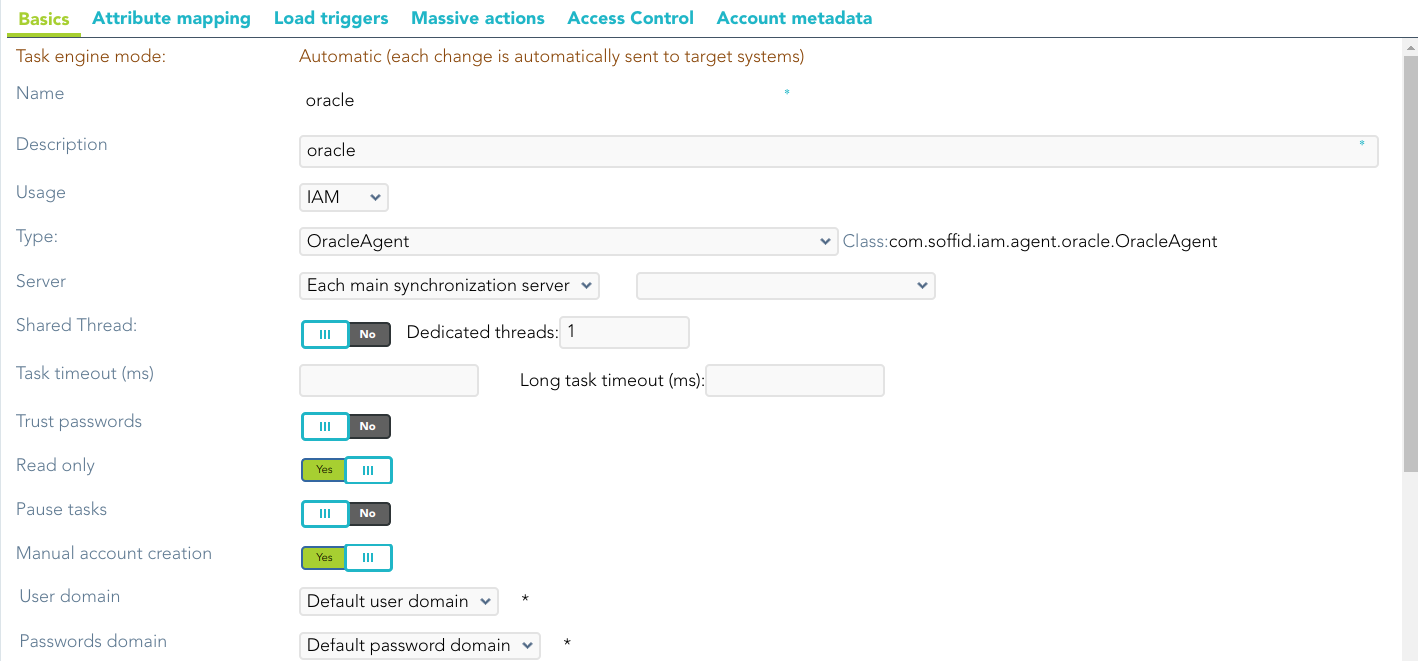
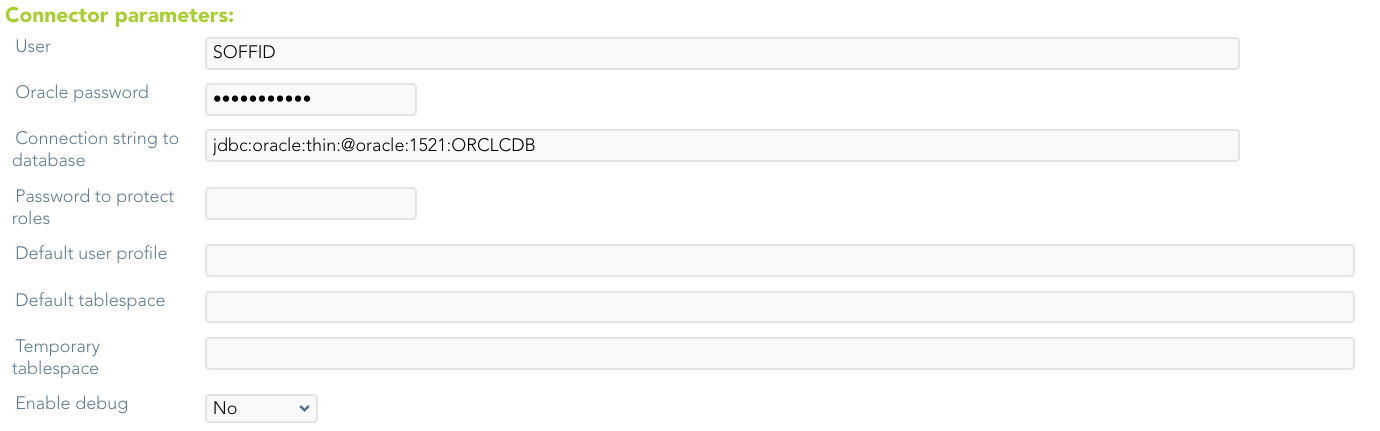
Custom parameters
Below there are the specific parameters for this agent implementation:
|
Parameter |
Description |
|---|---|
|
User |
Sysdba user name to authenticate |
|
Oracle password |
Password of the user to authenticate |
|
Connection string to database |
Database URL. Use something like jdbc:oracle:thin:@host:port:sid |
|
Password to protect roles |
Optional password to use on password protected roles |
|
Default user profile |
Optional profile to set limits on the database resources and the user password |
|
Default tablespace |
Optional tablespace for user creation |
|
Temporary tablespace |
Optional temporary tablespace for user creation |
|
Enable debug |
Two options: [ Yes / No ]. When it is enabled more log traces are printed in the Synchronization Server log |
Load triggers
You can define JavaScript or BeanShell scripts that will be triggered when data is loaded into Soffid (incoming triggers). The trigger result will be a boolean value, true to continue or false to stop.
Triggers can be used to validate or perform a specific action just before performing an operation or just after performing an operation into Soffid objects.
To view some examples, visit the Incoming triggers examples page.
Access Control
Oracle connector can establish an access control for Oracle Users.
If the access control checkbox is enabled, only the users and applications that are listed on the access control page will be allowed to log in. So, you can restrict the IP address and application a user can connect from.
This restriction does not apply to DBA users.
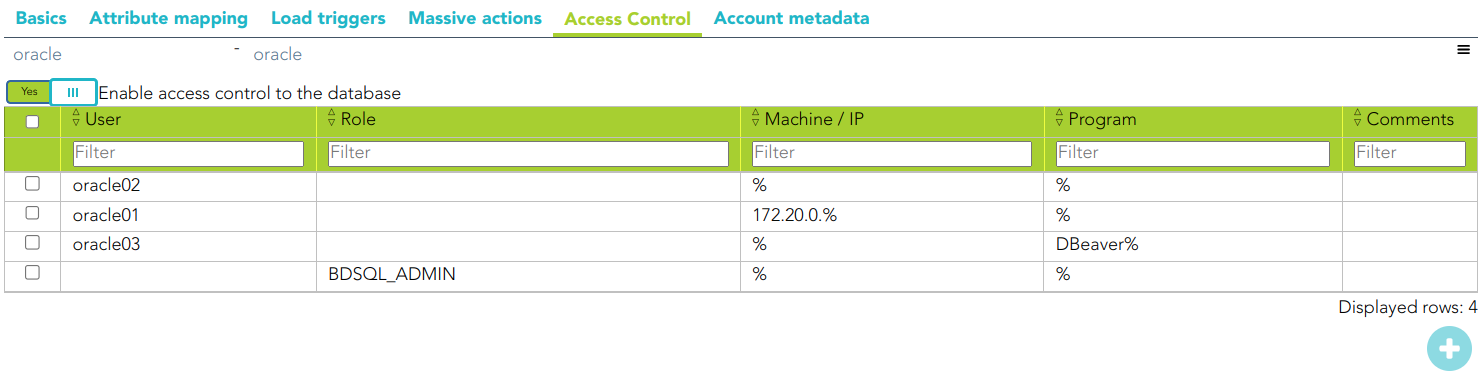
Check that the user/account is not unmanaged.
When the Enable access control to the database check box is checked, the UpdateAccessControl task will be launched. The following tables will be created on the SQL Server:
- SC_OR_ACCLOG: access log
- SC_OR_CONACC: rule access control
- SC_OR_ROLE: user roles.
- SC_OR_VERSION: connector versions.
When you try to connect to SQL Server, the logon_audit_trigger is launched to check if you have access or not.
You can check the Access Logs page for access controls.
Account metadata
Agents allow you to create additional data, on the "Account metadata" tab, to customize the accounts created for that agent. This additional information will be loaded with the agent's information, or calculated as defined in the mappings.
The additional data can be used in both mappings and triggers.
The attributes that you define here will be shown when you click on the proper account, on the Accounts Tabs at user page.
Operational
Monitoring
After the agent configuration you can check on the monitoring page if the service is running in the Synchronization Server, please go to:
Tasks
Authoritative
If you checked "Authorized identity source", an automatic task to load identities from the managed system to Soffid is available, please go to:
And you will do something like "Import authoritative data from <AGENT_NAME>".
Reconcile
To manage an automatic task to synchronize user objects from the managed system to Soffid is available, please go to:
And you will do something like "Reconcile all accounts from <AGENT_NAME>".
Synchronization
Regarding the synchronization of the objects, there are two possible options:
- If you check the generic attribute "Read Only" in the "Basics" tab, only the changes in the managed systems will be updated in Soffid. We recommend these options until the global configuration of Soffid is tested.
- If you do not check the generic attribute "Read Only" in the "Basics" tab, all the changes in Soffid or the managed system will be updated in the other. Note that this synchronization must be configured in the "Attribute mapping" tab correctly.
For more information about how you may configure the generic parameters of the agent, see the following link: Agents configuration
Oracle EBS Connector
Introduction
Description
Oracle Connector could manage an Oracle E-Business Suite.
Managed System
This connector is specific for integration with an Oracle E-Business Suite, if you want to connect a generic SQL database, please visit the following page: SQL Connector.
For more information about the Oracle E-Business Suite, please visit the following page: Oracle E-Business Suite
For more information to check if your system may be synchronized with this connector you do not hesitate to contact us through our Contact form
Prerequisites
It is needed a user with access and permissions to the database.
Download and Install
This addon is located in the Connectors section and its name is Oracle EBS Connector.
For more information about the installation process you can visit the Addons Getting started page.
Agent Configuration
This connector could manage only User objects.
Users created on Soffid will be created on EBS, in the same way disabled users on Soffid will be disabled on EBS.
The responsibilities that exist in EBS can be assigned to the users. They must be created like roles on Soffid System previously, with the same name that the responsibility has on EBS.
For instance: FND_RESP | CSF | CSF_FS_PDA_REP | STANDARD.
Basic
Generic parameters
After the installation of the addon, you may create and configure agent instances.
To configure this Oracle EBS Connector you must select "OracleEBudsinessAgent" in the attribute "Type" of the generic parameters section in the agents' page configuration.
For more information about how you may configure the generic parameters of the agent, see the following link: Agents configuration
Custom parameters
Below there are the specific parameters for this agent implementation:
|
Parameter |
Description |
|---|---|
|
User |
User name to authenticate |
|
Oracle password |
Password of the user to authenticate |
|
Connection string to database |
Database URL. Use something like jdbc:oracle:thin:@host:port:sid |
Load triggers
You can define BeanShell scripts that will be triggered when data is loaded into Soffid (incoming triggers). The trigger result will be a boolean value, true to continue or false to stop.
Triggers can be used to validate or perform a specific action just before performing an operation or just after performing an operation into Soffid objects.
To view some examples, visit the Incoming triggers examples page.
Account metadata
Agents allow you to create additional data, on the "Account metadata" tab, to customize the accounts created for that agent. This additional information will be loaded with the agent's information, or calculated as defined in the mappings.
The additional data can be used in both mappings and triggers.
The attributes which you define here will be shown when you click on the proper account, on the Accounts Tabs at user page.
Operational
Monitoring
After the agent configuration you could check on the monitoring page if the service is running in the Synchronization Server, please go to:
Tasks
Authoritative
If you are checked "Authorized identity source", an automatic task to load identities from the managed system to Soffid is available, please go to:
And you will something like "Import authoritative data from <AGENT_NAME>".
Reconcile
To manage an automatic task to synchronize user objects from the managed system to Soffid is available, please go to:
And you will do something like "Reconcile all accounts from <AGENT_NAME>".
Synchronization
Regarding the synchronization of the objects, there are two possible options:
- If you are checked the generic attribute "Read Only" in the "Basics" tab, only the changes in the managed systems will be updated in Soffid. We recommend these options until the global configuration of Soffid will be tested.
- If you are not checked the generic attribute "Read Only" in the "Basics" tab, all the changes in Soffid or the managed system will be updated in the other. Note that this synchronization must be configured in the "Attribute mapping" tab correctly.
For more information about how you may configure the generic parameters of the agent, see the following link: Agents configuration
SAP Connector
SAP Connector
Introduction
Description
SAP Connector could manage an SAP system.
Managed System
This connector is specific for integration with a SAP system through its interface BAPIs under the RFC standard.
For more information about SAP, please visit the following page: SAP
For more information to check if your system may be synchronized with this connector you do not hesitate to contact us through our Contact form
Prerequisites
- The SAP Java Connector (JCO) must be installed in the host where the syncserver is running.
- A SAP account must be created with permission to execute user administration BAPIs using RFC. Additionally, the attached SAP Role definition Y_SOFFID.SAP can be used to assign permissions to SOFFID RFC user.
- The following transport order should be applied in order to synchronize passwords: K953376.de1 R953376.de1
Download and Install
This addon is located in the Connectors section and its name is SAP Connector.
For more information about the installation process you can visit the Addons Getting started page.
Agent Configuration
This connector could manage User, Account and Role objects.
- All active users included in agent configuration will be added to SAP.
- All inactive users on Soffid will be deleted from SAP.
- Roles granted to a user will be added to ACTIVITY GROUPS on SAP.
Basic
Generic parameters
After the installation of the addon, you may create and configure agent instances.
This addon has2 available agents:
- SAP (Complete)
- SAP (Light)
For more information about how you may configure the generic parameters of the agent, see the following link: Agents configuration
Custom parameters
Below there are the specific parameters for this agent implementation:
|
Parameter |
Description |
|---|---|
|
User Name |
User name to authenticate |
|
Password |
Password of the user to authenticate |
|
Host |
Host of the instance of the SAP |
|
System Type |
- Standar SAP R/3 - Central User Administration (CUA) |
|
Systen Number |
System number of the server |
|
Message server name |
|
|
Message server port |
|
|
Message server logon group |
|
|
Message server system id |
|
|
SAP Router string |
|
|
Client number |
Client number of the server |
|
Language
|
Language of the server |
|
Unlock users
|
Values [ YES | NO ]. If "YES" allows to Soffid to unblock blocked users |
|
Method to set productive passwords
|
- Z_SOFFID_UPDATE_PASSWORD - BAPI_USER_CHANGE - SUSR_USER_CHANGE_PASSWORD_RFC - Z_SOFFID_SET_PWD_CHILD_SYSTEMS (CUA only) |
|
Manage SAP roles |
Values [ YES | NO ]. If "YES" allows to Soffid manage Roles |
|
SAP Payroll to get employee data |
SAP payroll to get employee data |
|
Enable debug |
Values [ YES | NO ]. |
Attribute mappings
The attribute mappings are only available for SAP (Complete) configuration.
Properties
Nothing to configure. There are no properties
Attributes
You can customize attribute mappings, you only need to select system objects and the Soffid objects related, manage their attributes, and make either inbound and outbound attribute mappings.
Using SAP connector you can map users.
For more information about how you may configure attribute mapping, see the following link: Soffid Attribute Mapping Reference
Load triggers
You can define BeanShell scripts that will be triggered when data is loaded into Soffid (incoming triggers). The trigger result will be a boolean value, true to continue or false to stop.
Triggers can be used to validate or perform a specific action just before performing an operation or just after performing an operation into Soffid objects.
To view some examples, visit the Incoming triggers examples page.
Account metadata
Agents allow you to create additional data, on the "Account metadata" tab, to customize the accounts created for that agent. This additional information will be loaded with the agent's information, or calculated as defined in the mappings.
The additional data can be used in both mappings and triggers.
The attributes which you define here will be shown when you click on the proper account, on the Accounts Tabs at user page.
Operational
Monitoring
After the agent configuration you could check in the monitoring page if the service is running in the Synchronization Server, please go to:
Tasks
Authoritative
If you are checked "Authorized identity source", an automatic task to load identities from the managed system to Soffid is available, please go to:
And you will something like "Import authoritative data from <AGENT_NAME>".
Reconcile
If you are configured the "Attribute Mapping" tab with some of our objects: "user, account or role,", an automatic task to synchronize these objects from the managed system to Soffid is available, please go to:
And you will do something like "Reconcile all accounts from <AGENT_NAME>".
Synchronization
Regarding the synchronization of the objects, there are two possible options:
- If you are checked the generic attribute "Read Only" in the "Basics" tab, only the changes in the managed systems will be updated in Soffid. We recommend these options until the global configuration of Soffid will be tested.
- If you are not checked the generic attribute "Read Only" in the "Basics" tab, all the changes in Soffid or the managed system will be updated in the other. Note that this synchronization must be configured in the "Attribute mapping" tab correctly.
For more information about how you may configure the generic parameters of the agent, see the following link: Agents configuration
SCIM Connector
SCIM Connector
Introduction
Description
SCIM connector can manage every target system with a published API that allows the SCIM protocol for communication.
SCIM is basically a REST JSON web service with specific HTTP requests and responses, and also a specific JSON format for attributes and values.
For more information about SCIM protocol you could visit its home page: SCIM protocol, or to visit the introduction page of our SCIM addon: Introduction to SCIM
Managed System
The official web of SCIM shows all the possible target systems that allow SCIM protocol: SCIM implementations
Some of the most popular implementations:
- Soffid IAM
- Active Directory SCIM Provisioning
- Oracle Identity Manager
- WSO2 Charo
- Salesforce
- Trello
- Slack
For more information to check if your system may be synchronized with this connector, you do not hesitate to contact us through our Contact form
Prerequisites
t is needed a user with access and permissions to the endpoints and operations required in the scope of the integration.
Also, the documentation, specification or tutorial of the web service, despite SCIM defining a schema for the objects, most applications or servers use to implement extended or customized versions of it.
Download and Install
This addon is located in the Connectors section and its name is SICM connector.
For more information about the installation process, you can visit the Addons Getting started page.
Agent Configuration
Basic
Generic parameters
After the installation of the addon, you may create and configure agent instances.
To configure this SCIM Connector you must select "SCIM" in the attribute "Type" of the generic parameters section in the agents page configuration.
For more information about how you may configure the generic parameters of the agent, see the following link: Agents configuration
Custom parameters
Below there are the specific parameters for this agent implementation:
|
Parameter |
Description |
|---|---|
|
Server URL |
URL of the SCIM web service. It is used as the basis of the URL mapped to call the operations. |
|
Authentication method |
Options:
|
|
User name |
User to authenticate |
|
Password |
Password of the user to authenticate |
|
Authentication URL |
URL to retrieve the token bearer used to authenticate with the "Server URL" |
|
Enable debug |
Two options: "Yes", "No": it enables or not more log traces in the Synchronization Server log |
Attribute mapping
This connector can manage users and groups.
Properties
The following properties are defined for each object type:
|
Property |
Meaning |
|---|---|
|
path (required) |
Path relative to main service URL where this type of object is to be managed |
|
keyAttribute (required) |
The SCIM attribute is used to find objects on SCIM repository |
|
changeProperty (optional) |
For authoritative identity sources that support delta changes, this property sets the SCIM attribute used to identify the change number of any object |
|
preventDeletion (optional) |
Set to true to prevent Soffid from removing objects |
Attributes
You may map the attributes of the target system with the Soffid available attributes.
- For the target system attributes are required to be access to its specification
- For the Soffid attributes, you may follow the next link
For more information about how you may configure attribute mapping, see the following link: Soffid Attribute Mapping Reference
If you are trying to connect to WSO2IS server, you must enable the WSO2 workaround setting, in order to bypass some WSO2 buggy implementations. You can get default mappings for WSO2IS here: wso2is-config.xml. Download it and import it into the Soffid agent attribute mappings form.
For example:
Triggers
Load triggers
Account metadata
Agents allow you to create additional data, on the "Account metadata" tab, to customize the accounts created for that agent. This additional information will be loaded with the agent's information, or calculated as defined in the mappings.
The additional data can be used in both mappings and triggers.
The attributes which you define here will be shown when you click on the proper account, on the Accounts Tabs on the users' page.
Operational
Monitoring
After the agent configuration you could check on the monitoring page if the service is running in the Synchronization Server, please go to:
Tasks
Authoritative
If you are checked "Authorized identity source", an automatic task to load identities from the managed system to Soffid is available, please go to:
And you will something like "Import authoritative data from <AGENT_NAME>".
Reconcile
If you are configured the "Attribute Mapping" tab with some of our objects: "user, account, role, group or grant", an automatic task to synchronize these objects from the managed system to Soffid is available, please go to:
And you will do something like "Reconcile all accounts from <AGENT_NAME>".
Synchronization
Regarding the synchronization of the objects, there are two possible options:
- If you are checked the generic attribute "Read Only" in the "Basics" tab, only the changes in the managed systems will be updated in Soffid. We recommend these options until the global configuration of Soffid will be tested.
- If you are not checked the generic attribute "Read Only" in the "Basics" tab, all the changes in Soffid or the managed system will be updated in the other. Note that this synchronization must be configured in the "Attribute mapping" tab correctly.
For more information about how you may configure the generic parameters of the agent, see the following link: Agents configuration
Shell Connector
Shell Connector
Introduction
Description
Linux Connector could manage a lot of services running on Linux systems (either 32 or 64 bits).
Managed System
This connector has implemented several ways to communicate with services on Linux, below, the list of those services:
- Shell
- SSH
- Cisco ASA
- Exchange
- Power Shell
If your system is not in the previous list, it's possible to include it easily!
For more information to check if your system may be synchronized with this connector you do not hesitate to contact us through our Contact form
Prerequisites
A Soffid Synchronization Server must be installed on the managed Linux system.
Download and Install
This addon is located in the Connectors section and its name is Shell Connector.
For more information about the installation process you can visit the Addons Getting started page.
Agent Configuration
Basic
Generic parameters
After the installation of the addon, you may create and configure agent instances.
To configure this Shell Connector you could select one agent, from the next list of available agents, in the attribute "Type" of the generic parameters section in the agents' page configuration.
- Shell Agent
- SSH Agent
- Cisco ASA Agent
- Exchange Agent
- Power Shell Agent
For more information about how you may configure the generic parameters of the agent, see the following link: Agents configuration
Custom parameters
Below, there are the specific parameters for each agent implementation.
Shell Agent
|
Parameter |
Description |
|---|---|
|
Shell |
Shell to assign to new users |
|
Persistent |
Two options [ Yes , No ]. |
|
Prompt |
|
|
Password hash algorithm |
For instance SHA1, SHA-256 |
|
Password hash prefix |
For instance SHA |
|
Enable debug |
Two options: [ Yes / No ]. When it is enabled more log traces are printed in the Synchronization Server log |
SSH Agent
|
Parameter |
Description |
|---|---|
|
User name |
User Linux for the SSH connection |
|
SSH Key file (optional) |
|
|
SSH Key (optional) |
|
|
Password |
The password of the user Linux |
|
Server |
Host or IP of the server for the SSH connection |
|
Password hash algorithm |
For instance SHA1, SHA-256 |
|
Password hash prefix |
For instance SHA |
|
Charset |
For instance: UTF-8 |
|
Enable debug |
Two options: [ Yes / No ]. When it is enabled more log traces are printed in the Synchronization Server log |
Cisco ASA Agent
|
Parameter |
Description |
|---|---|
|
User name |
User Linux |
|
Key file (optional) |
|
|
Password |
The password of the user Linux |
|
Privileged password |
|
|
Server |
Host or IP of the server |
|
Charset |
For instance: UTF-8 |
|
Enable debug |
Two options: [ Yes / No ]. When it is enabled more log traces are printed in the Synchronization Server log |
Exchange Agent
|
Parameter |
Description |
|---|---|
|
User name |
Exchange user (with administrator permissions) |
|
Password |
The password of the exchange user |
|
Exchange server PS script (RemoteExchange.ps1 / exshell.psc1) |
For instance "E:\Microsoft\Exchange Server\V15\Bin\exshell.psc1" |
|
Enable debug |
Two options: [ Yes / No ]. When it is enabled more log traces are printed in the Synchronization Server log |
|
Exchange version |
Options: [ 2007 | 2010+ ] |
Power Shell Agent
|
Parameter |
Description |
|---|---|
|
Startup script |
|
|
Password hash algorithm |
For instance SHA1, SHA-256 |
|
Password hash prefix |
For instance SHA |
|
Enable debug |
Two options: [ Yes / No ]. When it is enabled more log traces are printed in the Synchronization Server log |
Attribute mapping
This connector could manage Users, Groups and Roles.
Users
- Any user or account will be created at /etc/passwd file.
- Home directories will be created using default Linux configuration properties.
- If stated, samba users will be mapped for each managed Linux user.
- Soffid passwords expiration date will be managed by Soffid. So, Linux won't be notified about when those passwords need to be expired.
Groups
- Groups will be created and removed as Linux groups.
Roles
- Roles bound to this system will be created as Linux groups.
- Any removed role will trigger the bound Linux group to be removed.
Properties
You can map user, groups and role objects. These are some of the properties to be mapped in those objects:
|
Property |
Description |
|---|---|
|
check |
fgrep $user /etc/passwd |
|
delete |
userdel $user |
|
insert |
useradd $user |
|
selectAll |
cat /etc/passwd |
|
selectAllParse |
([^:]*):[^\n]* |
|
selectByAccountName |
fgrep $user /etc/passwd |
|
selectByAccountNameParse |
([^:]*):[^\n]* |
|
update |
usermod $user |
|
updatePassword |
- |
|
validatePassword |
- |
For the "Cisco ASA Agent" has these attributes:
|
Property |
Description |
|---|---|
|
check |
show run user $user |
|
checkAttributes |
user level |
|
checkParse |
username ([^ ]+) password.*privilege (\d+)\r\n |
|
delete |
no username $user |
|
insert |
username $user password $password encrypted privilege $level |
|
selectAll |
show run user |
|
selectAllAttributes |
user level |
|
selectAllParse |
username ([^ ]+) password.*privilege (\d+)\r\n |
|
selectByAccountName |
show run user |
|
selectByAccountNameParse |
username ([^ ]+) password.*privilege (\d+)\r\n |
|
selectByAccountNamelAttributes |
user level |
|
update |
username $user password $password encrypted privilege $level |
|
updatePassword |
username $user password $password encrypted privilege $level |
The "Exchange Agent" has these attributes:
|
Property |
Description |
|---|---|
|
check |
fgrep $user /etc/passwd |
|
delete |
userdel $user |
|
insert |
New-Mailbox -UserPrincipalName "${UserPrincipalName}" -Name "Shell plugin" -Alias "${Alias}" -Room |
|
selectAll |
Get-Mailbox |
|
selectByAccountName |
Get-Mailbox "Shell plugin" |
|
update |
usermod $user |
|
updatePassword |
- |
|
validatePassword |
- |
Attributes
You can customize attribute mappings, you only need to select system objects and the Soffid objects related, manage their attributes, and make either inbound and outbound attribute mappings.
You can map user, groups and role objects. These are some of the attributes to be mapped in those objects:
|
System attribute |
Description |
|---|---|
|
user |
accountName |
|
this{"1"} |
accountName |
The "Cisco ASA Agent" has these attributes:
|
System attribute |
Description |
|---|---|
|
level |
attributes{"level"} |
|
user |
accountName |
|
password |
password |
For more information about how you may configure attribute mapping, see the following link: Soffid Attribute Mapping Reference
For instance:
Triggers
You can define BeanShell scripts that will be triggered when data is loaded into the target system (outgoing triggers). The trigger result will be a boolean value, true to continue or false to stop.
Triggers can be used to validate or perform a specific action just before performing an operation or just after performing an operation on target objects.
"Cisco ASA Agent" has not implemented this feature.
To view some examples, visit the Outgoing triggers examples page.
Load triggers
You can define BeanShell scripts that will be triggered when data is loaded into Soffid (incoming triggers). The trigger result will be a boolean value, true to continue or false to stop.
Triggers can be used to validate or perform a specific action just before performing an operation or just after performing an operation into Soffid objects.
To view some examples, visit the Incoming triggers examples page.
Account metadata
Agents allow you to create additional data, on the "Account metadata" tab, to customize the accounts created for that agent. This additional information will be loaded with the agent's information, or calculated as defined in the mappings.
The additional data can be used in both mappings and triggers.
The attributes which you define here will be shown when you click on the proper account, on the Accounts Tabs at user page.
Operational
Monitoring
After the agent configuration you could check in the monitoring page if the service is running in the Synchronization Server, please go to:
Tasks
Authoritative
If you are checked "Authorized identity source", an automatic task to load identities from the managed system to Soffid is available, please go to:
And you will something like "Import authoritative data from <AGENT_NAME>".
Reconcile
If you are configured the "Attribute Mapping" tab with some of our objects: "user, account, role, group or grant", an automatic task to synchronize these objects from the managed system to Soffid is available, please go to:
And you will do something like "Reconcile all accounts from <AGENT_NAME>".
Synchronization
Regarding the synchronization of the objects, there are two possible options:
- If you are checked the generic attribute "Read Only" in the "Basics" tab, only the changes in the managed systems will be updated in Soffid. We recommend these options until the global configuration of Soffid will be tested.
- If you are not checked the generic attribute "Read Only" in the "Basics" tab, all the changes in Soffid or the managed system will be updated in the other. Note that this synchronization must be configured in the "Attribute mapping" tab correctly.
For more information about how you may configure the generic parameters of the agent, see the following link: Agents configuration
Invoker interface
Any agent, trigger or mapping can use the invoker method for the ActiveDirectory agent. The invoker method is available in the dispatcherService class as well as the in the serverService.
The invoker method is not specific of the Shell agent. Many other connectors support this method. The expected arguments are:
- Action
- Object name
- Parameters
Here you have an example of a post-update trigger to create the home server for a user:
map = new HashMap();
map.put("user", source{"accountName"});
// Create folder
dispatcherService.invoke("invoke", "mkdir /home/${user}", map);
dispatcherService.invoke("invoke", "mkdir /home/${user}/Desktop", map);There is a chance to execute operation across agents. For instance, if the system has an ActiveDirectory agent and an Exchange agent, here is a post-insert trigger to place in the post-insert trigger of the ActiveDirectory agent to execute a command in the Exchange one.
map = new HashMap();
map.put("user", source{"accountName"});
// Create folder
serverService.invoke("Exchange", "invoke", "EnableMailbox ${user}", map);The list of allowed commands are:
|
Command |
Object name |
Parameters |
Comments |
|---|---|---|---|
|
invoke |
Sentence to execute |
Sentence parameters |
Executes the command and return the results |
SQL Connector
SQL Connector
Introduction
Description
The SQL connector allows an easy way to configure and manage relational databases.
Managed System
There are a lot of relational databases, currently, these are the supported databases.
- MySQL
- MariaDB
- PostgreSQL
- Oracle
- Informix
- IBM DB2/400
- Sybase
- ODBC
For more information: List of relational databases
If your system is not in the previous list, it's possible to include it easily!
For more information to check if your system may be synchronized with this connector you do not hesitate to contact us through our Contact form
Prerequisites
It is needed a user with access and permissions to the schemes and tables required in the scope of the integration.
To configure DB2/400 or Sybase it is mandatory to install the drivers in the lib directory of the Sync Server.
The Java-ODBC bridge is deprecated in Java, and the support will be removed shortly.
Download and Install
The SQL is part of the default connectors, you do not need to install it, but you can upgrade it from the download management section.
You can visit the Connector Getting started page for more information about the installation process.
Agent Configuration
Basic
Generic parameters
After the installation of the addon, you may create and configure agent instances.
To configure this SQL connector you must select "Customizable SQL agent" in the attribute "Type" of the generic parameters section in the agent's page configuration.
For more information about how you may configure the generic parameters of the agent, see the following link: Agents configuration

Custom parameters
Below there are the specific parameters for this agent implementation:
|
Parameter |
Description |
|---|---|
|
User name |
Database user name to authenticate |
|
Password |
The password of the database user |
|
Driver |
Identifies the driver of the relational database to use. Currently, these are the supported databases: MySQL (& MariaDB), PostgreSQL, Oracle, MS SQL Server, Informix, DB2/400, DB2 Universal, Sybase, ODBC |
|
DB URL |
URL that identifies the connection properties. Please refer to the specific database vendor documentation to build this URL. (*) More documentation about the DB URL |
|
SQL Sentence to execute at startup |
Each time the connection to the agent is established, this SQL statement will be executed. |
|
Password hash algorithm |
The algorithm is used to encrypt the password. For instance SHA1, SHA256, MD5, etc |
|
Password hash prefix |
Prefix to add it to the password. |
|
Enable debug |
Two options: Yes, and No. It enables or not more log traces in the Synchronization Server log |
|
Synchronization method |
(**) |

Attribute mapping
This connector can manage users, accounts, roles, groups, and grants.
Properties
Some agents require to configure some custom attributes, you will use the properties section to do that.
Any SQL sentence gets its parameters in three step process:
- The synchronization engine creates the Soffid object.
- The Soffid object is translated into a managed system object, using the attribute translation rules.
- Soffid parser looks for any identifier preceded by a colon (:) symbol. For any symbol found, the symbol is replaced by a parameter whose value is the managed system attribute with the replaced identifier.
Once the SQL sentence has been executed, in the case of SELECT clauses, the column names are used to generate a virtual managed system object. The last step is to apply the attribute translation to generate the Soffid object to be populated.
These are the properties required to map every object of the mapping:
|
Property |
Value |
|---|---|
|
selectAll |
SQL sentence that needs to be executed to retrieve all the objects that currently exist on the database.
You can use this property with the following objects: user, account, role, and authoritative change. |
|
check |
SQL sentence that will return when a single object already exists on the database. You can use this property with all the Soffid objects. |
|
insert |
SQL sentence to create a new object. You can use this property with all the Soffid objects. |
|
update |
SQL sentence to update an existing object. You can use this property with all the Soffid objects. |
|
delete |
SQL sentence to remove (or disable) an existing object. You can use this property with all the Soffid objects. |
|
selectByAccount |
SQL sentence to retrieve all the role grants made to an account (for single account information). You can use this property with the following objects: grant. |
|
selectByName |
SQL sentence to fetch role information based on its name (for single role information). You can use this property with the following objects: role. |
|
updatePassword |
SQL sentence to update the user password. You can use this property with the following objects: user and account. |
|
validatePassword |
SQL sentence to check the user password. You can use this property with the following objects: user and account. |
Attributes
You can customize attribute mappings, you only need to select system objects and the Soffid objects related, manage their attributes, and make either inbound or outbound attribute mappings.
You may map the attributes of the target system with the Soffid available attributes.
- For the target system attributes are required to be accessible to its specification
- For the Soffid attributes, you may follow the next link
For more information about how you may configure attribute mapping, see the following link: Soffid Attribute Mapping Reference
Example for roles:
Example for accounts:
Triggers
You can define BeanShell scripts that will be triggered when data is loaded into the target system (outgoing triggers). The trigger result will be a boolean value, true to continue or false to stop.
Triggers can be used to validate or perform a specific action just before performing an operation or just after performing an operation on target objects.
To view some examples, visit the Outgoing triggers examples page.
Integration flows
Update User
Visit the Integration flows Update user page for more information
Update Account
Visit the Integration flows Update account page for more information
(*)
https://mariadb.com/kb/en/about-mariadb-connector-j/
https://docs.microsoft.com/es-es/sql/connect/jdbc/building-the-connection-url?view=sql-server-ver16
(**) Soffid provides two synchronization types:
- Full synchronization
- Incremental synchronization
The first type, the full synchronization method, persists the changes made in Soffid, regardless of the possible changes made in the target system.
For the second type, the incremental synchronization method, Soffid has developed a synchronization system, using custom internal attributes, to check what changes have been made to the different attributes of an object. Thus, it tries to avoid losing the changes that have been made in the target system. First, Soffid's changes will be propagated to the target system, and then the changes on the target system will be made in the Soffid system. If the changes are in the same attribute, the Soffid value is the one that will persist.
SQL Integration flows - Update user
Update user
Introduction
Soffid provides a workflow to create, modify, and delete a user in the final system. One can see the steps of the process in the following diagram.
This process only applies to account type single users.
Diagram

Step by Step
In this document, we will explain the process that Soffid performs to modify a user for the SQL connector.
1. Initial step
First of all, Soffid checks if the user exists in Soffid and then checks the operation to perform, update or delete.
1.1. If the user does not exist in Soffid, then Soffid asks to delete the user in the target System.
❓ Warning message

1.1.1. Yes: If the answer is Yes, the process follows through the Yes branch, [3. Delete branch].
1.1.2. No: If the answer is Yes, the process finishes [10. End].
1.2. If the user exists in Soffid, the process continues through [2. User to remove?]. to check if the
2. User to remove?
📌 By clicking on the User to remove? step,...
You can configure all the properties related to the user object for this step. 
2.1. If the user is marked for Deletion, Soffid will ask for user consent to continue with the process or to cancel it. If the answer is Yes, the process follows through the Yes branch, [3. Delete branch].
❓ Warning message
2.2. If the user is marked for Update, it continues with the flow following through the No branch, [4. Insert or Update branch].
3. Delete branch
📊 Diagram

3.1. When the operation to perform is to delete a user, first of all, Soffid has to check if the user exists in the target system. To do this, Soffid executes the property check of the User object. This property executes the SQL command to check if the user exists or not.
📌 By clicking on the User exists? step,...
You can configure all the properties related to the user object for this step.

3.1.1. If the user does not exist, there are no actions to perform in the target system, so the process finishes [10. End].
3.1.2. If the user exists, the flow continues executing the pre-delete triggers if there is anyone configured. More than one script can be configured. These scripts are executed just before the main action, user delete, and the result (true or false) determines if the main action will be performed or not.
3.1.2.1. False: if the result is false for one or more of these triggers, the process finishes [10. End].
3.1.2.2.True: if the result is true for all of these triggers, Soffid continues to the next step.
📌 By clicking on the Pre-delete triggers step,...
You can configure all the pre-delete triggers related to the user object for this step.

3.1.3. Soffid removes the user. To do that, Soffid executes the property delete of the User object.
📌 By clicking on the Remove user step,...
You can configure the properties related to the user object for this step.

3.1.3. Then Soffid executes the post-delete triggers if any. These triggers can be used to perform a specific action just after performing the remove user operation on the target object.
📌 By clicking on the Post-delete triggers step,...
You can configure the post-delete triggers related to the user object for this step.

3.1.3. Then the process finishes [10. End].
4. Insert or Update branch
4.1. When the operation to perform is to update a user, first of all, Soffid generates the columns values. That is, Soffid calculates the values of the columns from the original values of Soffid.
📌 By clicking on the generate column values step,...
You can configure the attributes related to the user object for this step.

4.2.Then Soffid asks if the user exists in the target system to decide the action to execute, this action can be an update or an insert. Soffid executes the property check of the User object.
4.2.1. If the user does not exist in the target system, the process continues through [5. Insert user branch].
4.2.2. If the user exists in the target system, the process continues through [6. Update user branch].
📌 By clicking on the User exists? step,...
You can configure the properties related to the user object for this step.

5. Insert user branch
📊 Diagram

5.1. Soffid executes the pre-insert triggers if there is anyone configured. More than one script can be configured. These scripts are executed just before the main action, user create, and the result (true or false) determines if the main action will be performed or not.
5.1.1. False: if the response is false for one or more of these triggers, the process finishes [10. End] and the user is not created.
5.1.2. True: if the response is true for all of these triggers, Soffid continues to the next step.
5.2. Soffid creates the user. To do that, Soffid executes the property insert of the User object.
📌 By clicking on the Create user step,...
You can configure the properties related to the user object for this step.

5.3. Then Soffid executes post-insert triggers if any. These triggers can be used to perform a specific action just after performing the create user operation on the target object.
📌 By clicking on the Post-insert triggers step,...
You can configure the Post-insert triggers related to the user object for this step.

5.4. Then the process continues through [7. Grants].
6. Update user branch
📊 Diagram

6.1. Soffid fetches the current values of the user. Soffid executes the property selectByAccountName of the User object.
&&TODO&& IMAGEN
6.2. Then compute delta changes, if the property Synchronization method selected is Full Synchronization, then Soffid has to keep the columns values of the last update. If there was any change in the target system:
- There is no conflict, then Soffid only updates the values of the attributes that have changed in Soffid.
- There is conflict, Soffid values prevail over the target system values, so, Soffid updates all the attributes that have changed in Soffid.
&&TODO&& IMAGEN
6.3. And finally execute the pre-update triggers if there is anyone configured. More than one script can be configured. These scripts are executed just before the main action, user update, and the result (true or false) determines if the main action will be performed or not.
6.3.1. False: if the response is false for one or more of these triggers, the process finishes [10. End] and the user is not updated
6.3.2. True: if the response is true for all of these triggers, Soffid continues to the next step.
📌 By clicking on the Pre-update triggers step,...
You can configure the Pre-update triggers related to the user object for this step.

6.4. Soffid updates the user. To do that, Soffid executes the property update of the or User object.
📌 By clicking on the update user step,...
You can configure the properties related to the user object for this step.

6.5. Then Soffid executes the post-update triggers if any. These triggers can be used to perform a specific action just after performing the update user operation on the target object.
📌 By clicking on the Post-update triggers step,...
You can configure the Post-update triggers related to the user object for this step.
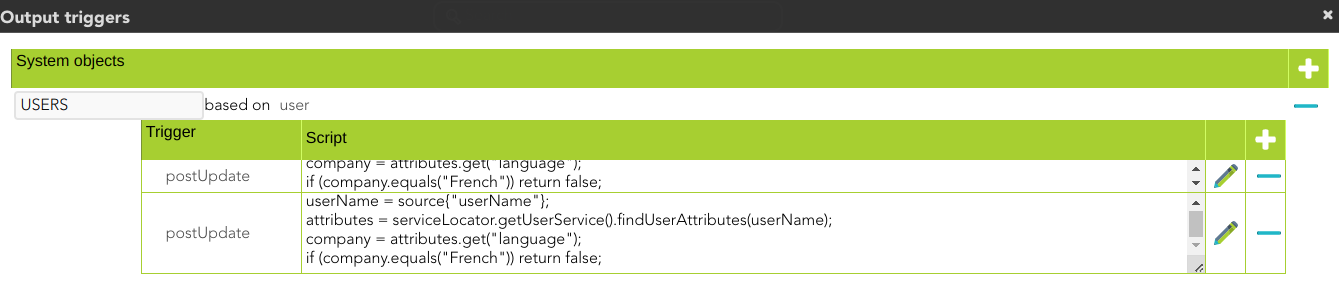
6.6. Then the process continues through [7. Grants].
7. Grants
At this point, soffid runs the actions relative to the grants
7.1. Once the process arrives at this step, Soffid generates account column values. That is, Soffid creates a dummy object with only the account name, this object will be used later.
📌 By clicking on the generates account columns values step,...
You can configure the attribute mappings related to the grant object for this step.
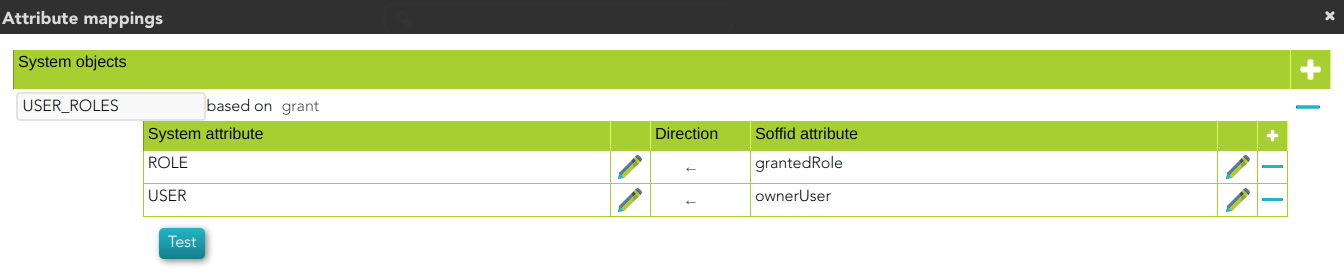
7.2. Then, Soffid fetches the current grants for the user. Soffid executes the property selectByAccount of the grant object with the values of the previous step
📌 By clicking on the fetch current grants step,...
You can configure the properties related to the grant object for this step.

7.3. Finally, Soffid parses grant rows, that is Soffid makes the mappings defined
📌 By clicking on the parse grant rows step,...
You can configure the attribute mappings related to the grant object for this step.

7.3. Then the process continues through [8. Grant to add].
8. Grant to add
This is a loop while there are grants to add. This grants list comes from the previous step [7. Grants].
📊 Diagram

8.1. If there are No grants to add, the process goes to [9. Grant to Remove].
8.2. Yes, there are grants to add:
8.2.1. Soffid generates grant column values and Soffid checks if the grant exists in the target system, Soffid executes the property check of the grant object.
📌 By clicking on the generate grant column values step,...
You can configure the attribute mappings related to the grant object for this step.

8.2.2. Soffid executes the pre-insert triggers if there is anyone configured. More than one script can be configured. These scripts are executed just before the main action, a grant create, and the result (true or false) determines if the main action will be performed or not.
8.2.2.1. False: if the response is false for one or more of these triggers, the process goes to [8. Grant to add] and the grant is not created.
8.2.2.2. True: if the response is true for all of these triggers, Soffid continues to the next step.
📌 By clicking on the Pre-insert triggers step,...
You can configure the Pre-insert triggers related to the grant object for this step.

8.2.3. If the result of the triggers is true, then Soffid creates the grant. To do that, Soffid executes the property insert of the grant object.
📌 By clicking on the create grant step,...
You can configure the properties related to the grant object for this step.

8.2.4. Then Soffid executes the post-insert triggers if any. These triggers can be used to perform a specific action just after performing the create grant operation on the target object.
📌 By clicking on the Post-insert triggers column values step,...
You can configure the Post-Update related to the grant object for this step.

8.2.5. Then the process continues through [8. Grant to add].
9. Grant to remove
📊 Diagram

This is a loop while there are grants to remove. This grants list comes from the previous step [7. Grants].
9.1 No: If there are No grants to add, the process goes to [10. End].
9.2. Yes, there are grants to remove:
9.2.1. Soffid executes the pre-delete triggers if there is anyone configured. More than one script can be configured. These scripts are executed just before the main action, a grant delete, and the result (true or false) determines if the main action will be performed or not.
9.2.1.1. False: if the response is false for one or more of these triggers, the process finishes [10. End] and the grant is not deleted.
9.2.1.2. True: if the response is true for all of these triggers, Soffid continues to the next step.
📌 By clicking on the pre-delete trigger step,...
You can configure the Pre-delete triggers related to the grant object for this step.

9.2.2. If the result of the triggers is true, then Soffid deletes the grant. To do that, Soffid executes the property delete of the grant object. This operation can return a true or false result.
9.2.2.1. False: the delete action could not be performed and the process check for another grant [9. Grant to remove].
9.2.2.2. True: the delete action could be performed properly. Soffid continues to the next step.
📌 By clicking on the delete grant step,...
You can configure the properties related to the grant object for this step.

9.2.3. Then Soffid executes the post-delete triggers if any. These triggers can be used to perform a specific action just after performing the delete grant operation on the target object.
📌 By clicking on the post-delete trigger step,...
You can configure the Post-delete triggers related to the grant object for this step.

9.2.4. Then the process continues through [9. Grant to remove].
10. End
The process finishes and the log is displayed, and you can download it by clicking the Download button.
📑 Log detail

Windows Connector
Windows Connector
Introduction
Description
This connector implements the LDAPS protocol and it is used to connect the Sync-Server with every server that allows this communication protocol.
Managed System
This connector has been performed to connect to the Active Directory system, it's a fork of our LDAP Connector with custom features.
For more information to check if your system may be synchronized with this connector you do not hesitate to contact us through our Contact form
Prerequisites
To enable LDAPS in your Active Directory, please read the following guide: SSL access to Active Directory.
It is needed an Active Directory user with full administrator access.
Download and Install
This addon is located in the Connectors section and its name is Windows (including Active Directory).
For more information about the installation process you can visit the Addons Getting started page.
Agent Configuration
Basic
Generic parameters
After the installation of the addon, you may create and configure agent instances.
This addon has 5 available agents:
- Active Directory
- Active Directory Only Passwords
- Simple Windows Agent
For more information about how you may configure the generic parameters of the agent, see the following link: Agents configuration
Custom parameters
Below there are the specific parameters for this agent implementation, "Active Directory"
- Host name of the domain controller.
- Active Directory distingished name in X500 format. e.g.: dc=soffid,dc=local
- Administrator principal name in X500 format, relative to A.D name. e.g.: cn=Administrator,cn=Users
- Administrator password
|
Parameter |
Description |
|---|---|
|
Hostname |
Host name of the server |
|
LDAP base DN |
LDAP Base name |
|
Principal name |
User name in DN format, including base name if needed |
|
Password |
Password for the user to connect. |
|
Enable debug |
Two options: [ Yes / No ]. When it is enabled more log traces are printed in the Synchronization Server log |
|
Accepted certificates |
Two options: [ Only trusted certificates / Any (insecure) ] |
|
Follow referrals |
Two options: [ Don't / Yes ] If you select the Yes option, Soffid could follow the references to other systems if Soffid has the proper permissions. |
|
Manage child domains |
Two options: [ No / Yes ] If you select the Yes option, Soffid will manage the domain referrals. |
|
Create OUs when needed |
Two options: [ No / Yes ] If you select the Yes option and the OUs do not exist, these OUs will be created in the Active Directory. |
|
Real time load last login attribute |
Two options: [ No / Yes ] |
|
Real time load identity changes |
Two options: [ No / Yes ] You can check this option to synchronize the identities when Soffid is the authoritative data source. You must enable periodic synchronization. |
Attribute mapping
Active Directory connector could manage Users and Groups by using LDAPS protocol.
Properties
Some agents require to configure some custom attributes, you will use the properties section to do that.
To enable it, add the following properties to each object mapping:
|
Property |
Description |
|---|---|
|
rename |
AD agent will always map account and group names to the SAMAccount attribute. BaseDN and cn can be calculated based on user attributes. AD agent is able to move and rename AD objects. If you don't desire users or groups to be renamed or moved, an object property named "rename" with the value "false" can be added to some object mappings. |
|
searchBase |
You can configure it if you want the reconciliation process to search accounts on a directory subtree other than AD root, put a searchBase property with the relative tree to look for. |
|
key |
The AD attribute works as the primary key. Usually, it's the sAMAccountName and can be omitted. |
|
createDisabledAccounts |
Set to true if you want the connector to create disabled accounts in the active directory. By default, disabled accounts are not created until enabled. |
For instance:

Attributes
You can customize attribute mappings, you only need to select system objects and the Soffid objects related, manage their attributes, and make either inbound or outbound attribute mappings.
Using a windows connector you can map users, groups, and role objects. Active Directory membership is automatically managed based on user and group mappings.
Any object mapping must have the following system attributes:
|
System attribute |
Description |
|---|---|
|
objectClass |
Active Directory object class. The following values mostly used "user", "group" or "organizationalUnit" |
|
baseDn |
Active Directory container where user or group should be created. Its value should be absolute, containing Active Directory DC parts |
|
relativeBaseDn |
Active Directory container where user or group should be created. Its value should be relative to Active Directory DC parts. |
|
cn |
Object name |
There is a bunch of AD special attributes that need some special treatment:
|
System attribute |
Description |
|---|---|
|
sAMAccontName |
Is automatically mapped. It is internally mapped to role name or account name, without further customization |
|
accountExpires |
Sets the last date (in nanoseconds since 1600) in which the account will be valid. A common mapping expression is: |
|
samAccountType |
Can be used to identify distribution lists. A value of 268435457 or 268435456 means the AD group is a distribution list group rather than a security group. |
|
lastLogon |
The attribute can be used to get the last time an account was used. Soffid attribute is named lastLogin and the right mapping could be the following one. Mind when you make a reference to lastLogon attribute, every domain controller is queried about this attribute, as its value is not replicated across AD controllers: |
|
userCannotChangePassword |
true/false This is a virtual attribute that can be used to indicate if a user can or cannot change the password. You can't assign this permission by directly modifying the UserAccountControl attribute. |
For more information about how you may configure attribute mapping, see the following link: Soffid Attribute Mapping Reference
For instance:

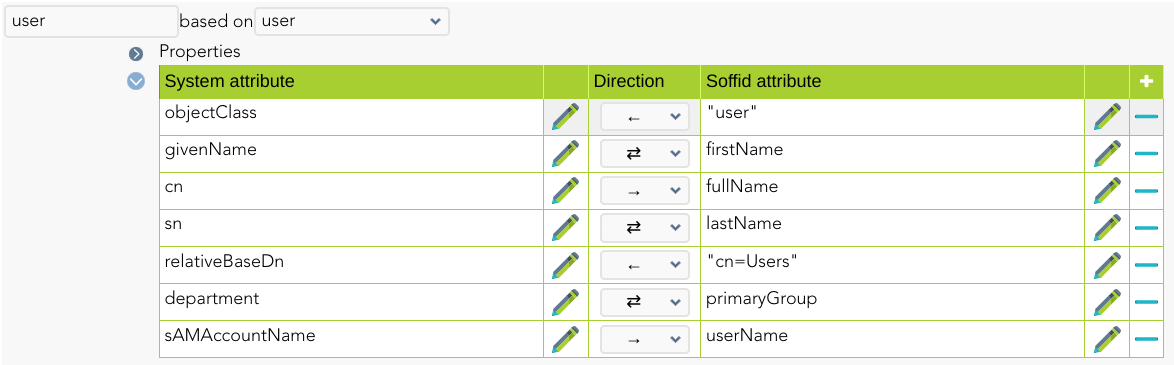
Triggers
You can define BeanShell scripts that will be triggered when data is loaded into the target system (outgoing triggers). The trigger result will be a boolean value, true to continue or false to stop.
Triggers can be used to validate or perform a specific action just before performing an operation or just after performing an operation on target objects.
To view some examples, visit the Outgoing triggers examples page.
Avoid incremental load authoritative
The Customizable Active Directory connector has an incremental load authoritative process.
When this process is executed, it requests the changes to Active Directory after the uSNChanged.
The value of this field is saved in Soffid in the parameter soffid.sync.authoritative.change.NAME_OF_THE_AGENT
If you want to launch a complete load authoritative process, remove this parameter first. At the end of the process, the parameter will be generated automatically.
For more information, go to the Soffid Parameters page.
Password Rotation
When you are configuring password rotation using Windows Connector, it could be necessary to make some changes in the local computar policies.
The Local Computer Policies on the target Windows server mentioned below:
- User Account Control: Admin Approval Mode for Built-in Administrator Account
- User Account Control: Run All Administrator in Admin Approval Mode
Need to be disabled for PAM application to connect target server and reset password of privilege accounts. If the Policies are originally in ‘Enabled’ mode, then after disabling them a system restart may required for the Policies to get applied on target servers properly.
To check the User Access Policies on servers, follow below mentioned path:
Open group policy editor Run > gpedit.msc > Local Computer Policy > Windows Settings > Security Settings > Local Policies > Security Options > select policy ‘User Account Control: Run all administrators in Admin Approval Mode’ and ‘User Account Control: Run All Administrator in Admin Approval Mode’ and select Disabled and apply > OK.
HOWTO SSL access to Active Directory
Table of Contents
- Introduction.
- Installing the Certificate Services.
- Configuring Automatic Certificate Request for Domain Controllers.
- Check for Issued Certificate.
- Import certificate.
Introduction
This howto will show you how to install the Certificate Services in Windows Acive Directory Servers.
Before beginning, make sure the Internet Information Server (IIS) is installed in your server.
Installing the Certificate Services
1. Click Start, select Control Panel and click Add or Remove Programs.
2. In the Add or Remove Programs window, click Add/Remove Windows Components, check the Certificate Services and click Next.
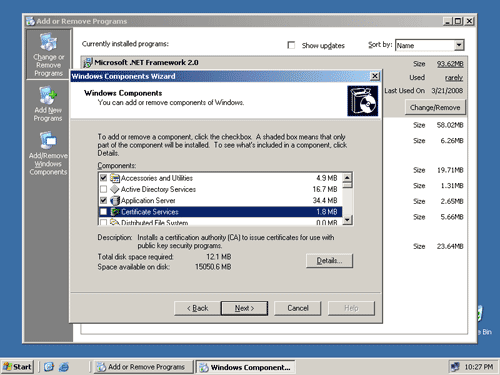
3. Click Next in the CA Type page.
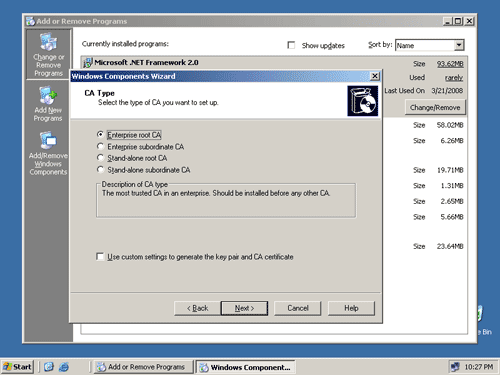
4. Fill up the Common name for this CA and click Next.
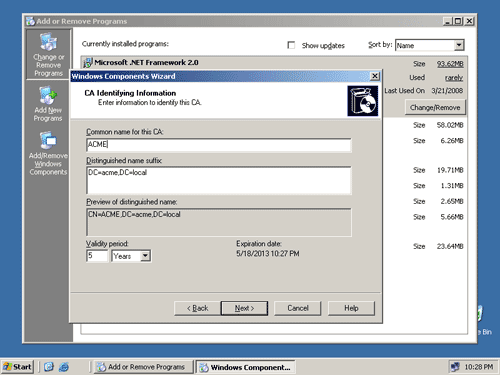
5. Click Next in the Certificate Database Settings page.

6. The Certificate Services will now be installed.
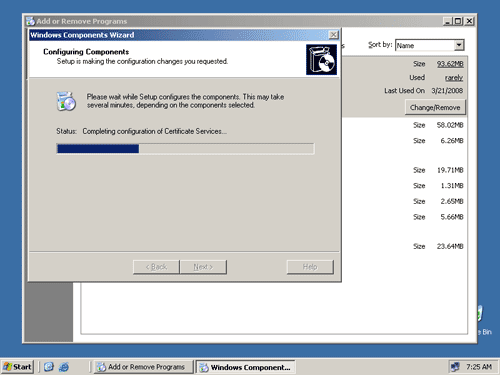
7. Click Finish and restart your server.

Configuring Automatic Certificate Request for Domain Controllers
1. Click Start, select Administrative Tools and click Domain Controller Security Policy.
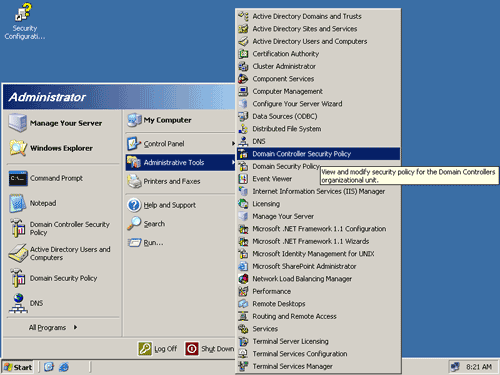
2. In the Default Domain Controller Security Settings window, click the Public Key Policies folder.
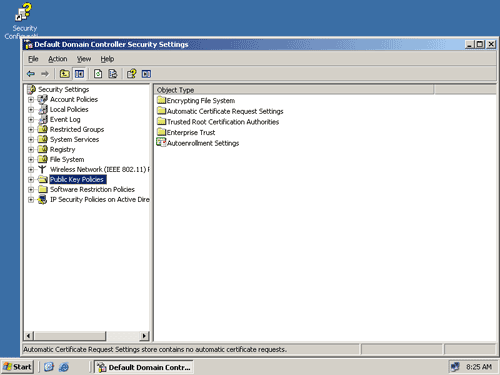
3. Right click Automatic Certificate Request Settings, select New and click Automatic Certificate Request.
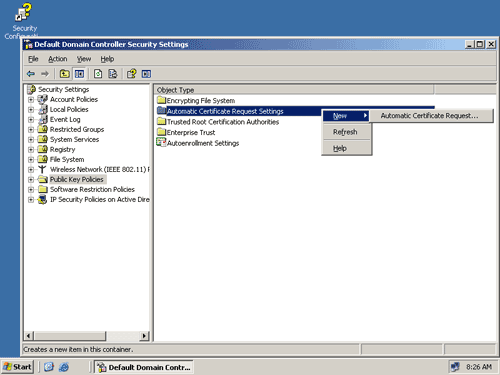
4. Click Next in the Automatic Certificate Request Setup Wizard

5. Select Domain Controller in the Certificate Template page and click Next

6. Click Finish and reboot your server.

Check for Issued Certificate
1. Click Start, select Administrative Tools and click Certification Authority. This will launch the Certification Authority application.

2. In Certification Authority, click the + sign and check the Issued Certificates folder if your server has been issued a certificate.
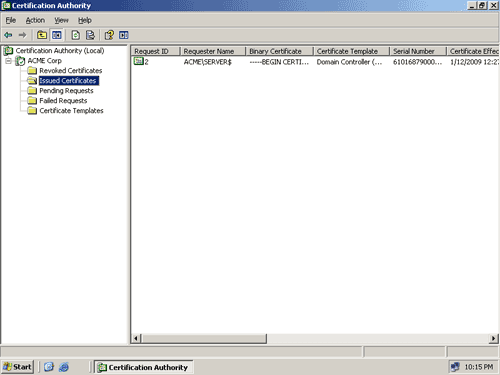
Import certificate
1. Select the certificate and open it. Select the "Certification Path" tab and select the root certificate.
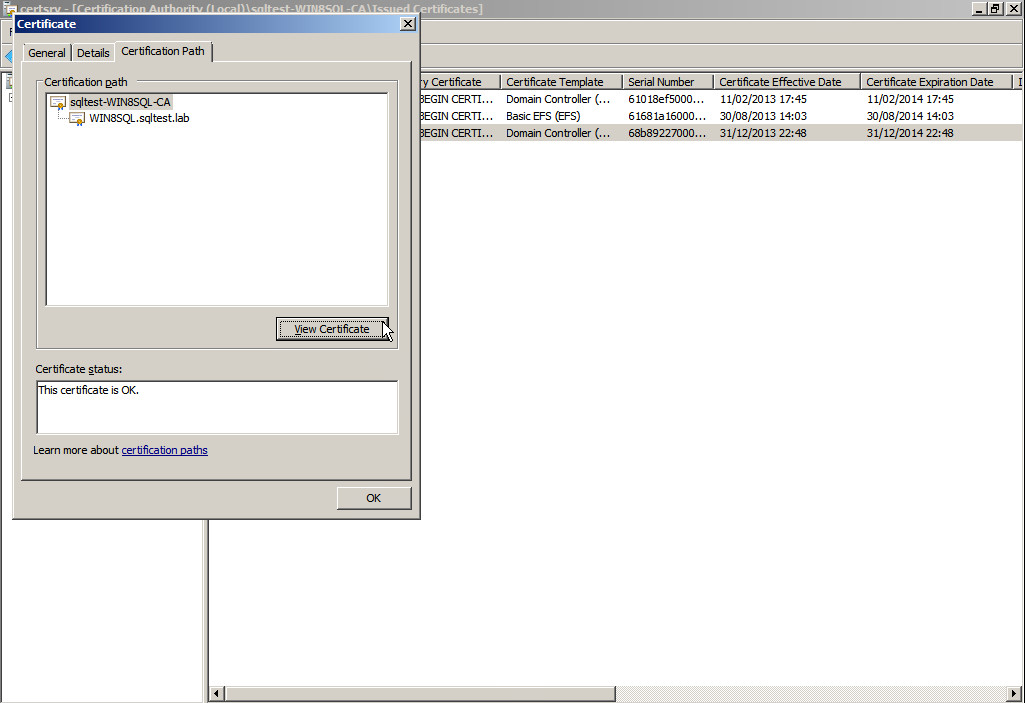
2. Click on "View Certificate" button and navigate to "Details" tab.
3. Click on "Copy to File..." button and follow the export steps to obtain the certificate.
4. Open cmd and go to the soffid-iam-sync instalation directory and execute:
jre\bin\keytool -import -file “file” -keystore conf\cacerts -alias AD_CERTAfterwards, the console will ask you for a password. Type the default password: changeit and press enter.
Invoker interface for Active Directory
Any agent, trigger or mapping can use the invoker method for the ActiveDirectory agent. The invoker method is available in the dispatcherService class.
The invoker method is not specific of the Active Directory agent. Many other connectors support this method. The expected arguments are:
- Action
- Object name
- Parameters
Here you have an example of a post-update trigger to create the home server for a user:
map = new HashMap();
String server = "//"+source{"homeServer"}+"/"+source{"accountName"};
// Create folder
f = dispatcherService.invoke("smb:mkdir", server, map);
// Add administrator ACL
map.put("user", "soffid_admin");
map.put("permission", "GENERIC_ALL");
map.put("flags", "CONTAINER_INHERIT_ACE OBJECT_INHERIT_ACE");
f = dispatcherService.invoke("smb:addacl", path, map);
// Add user ACL
map.put("user", source{"accountName"});
f = dispatcherService.invoke("smb:addacl", path, map);
// Change folder ownership using a domain admin account
map.put("_auth_user", "user1");
map.put("_auth_domain", "domain1");
map.put("_auth_password", "SuperSecret");
f = dispatcherService.invoke("smb:setOwner", path, map);The example above uses the smb:mkdir action to create the folder, the smb:addacl to add a new access control list entry. Other commands allow the query and modification of Active Directory objects like users and groups.
The list of allowed commands are:
|
Command |
Object name |
Parameters |
Comments |
|---|---|---|---|
|
insert |
Object distinguished name |
Object attributes |
Creates a new active directory object |
|
update |
Object distinguished name |
Object attributes |
Modifies an existing active directory object. Only the attributes present in the map will be updated |
|
delete |
Object distinguished name |
- |
Removes an existing active directory object. |
|
select |
Base distinguished name |
Object criteria attribute |
Search for any object with the values specified in the parameters map, starting in the specified base DN. The return value is a list of maps. Each element in the list is an Active Directory object |
|
get |
Object distinguished name |
- |
Returns the object with the specified object DN. The return value is a list containing one or no maps. The map, if exists, contain the object attributes |
|
smb:mkdir |
Shared file |
Optionally:
|
Creates the shared folder. The shared folder name should follow the syntax //server/sharedFolder/Path or \\server\\sharedFolder\Path It is recommended to use the first syntax because the second one requires the script to escape any backslash character, leading to a harder to read script |
|
smb:exist |
Shared file |
Optionally:
|
Returns a list with a single map. The map has the attribute exist with a boolean value indicating whether the file exists or not |
|
smb:rmdir |
Shared file |
Optionally:
|
Removes the full directory and any file or directory within |
|
smb:rm |
Shared file |
Optionally:
|
Removes the file or directory. The command will fail if the directory is not empty. |
|
smb:getacl |
Shared file |
Optionally:
|
Returns a list of maps representing each access control list entry for that file or folder. Each map has three values:
|
|
smb:addacl |
Shared file |
Map with these three values:
And optionally, these ones:
|
Adds an access control list with the specified permission and flags |
|
smb:removeacl |
Shared file |
Map with these three values:
And optionally, these ones:
|
Remove the access control list entry that matches the map. If the permission or flag is missing, the connector will remove any access control list entry for the specified user |
|
smb:setowner |
Shared file |
Map with the value:
And optionally, these ones:
|
Sets the directory owner to the one specified in the map |
By default, actions are performed by the account used to configure the AD connector, but sometimes, another account must be used, mainly when dealing with NAS servers. In order to user custom credentials SMB commands accept three special parameters: _auth_user, _auth_password and _auth_domain. If this parameters are null, the agent user and password is used.
Active Directory back channel configuration
Introduction
Active Directory Back Channel refers to a mechanism that allows Soffid to synchronize user information with an external Active Directory (AD) server in real-time or near real-time (Password synchronizer). This synchronization ensures that both Soffid and AD maintain consistent and up-to-date data.
How it works?
The Password Synchronizer installs a service. This service is responsible for buffering passwords when they cannot be sent because the Sync Server is not available.
If the Sync Server is not available, the passwords are stored in an encrypted local file. When connectivity to the Sync Server is restored, the passwords are sent.
1. The AD sends the password to Soffid to verify that it complies with Soffid policy.
2. If it complies, the password is updated in the AD.
3. The password is sent to Soffid and the PropagatePassword task is created.
4. If the AD agent confirms that the new password has been saved, Soffid synchronizes it with the other systems.
How to install Active Directory back channel?
Download
In order to configure the Active Directory back-channel, you must use the eris command line tool. To do this, please, download the Password Synchronizer from our download portal:
💻 Image

Installation
First of all, you must install the Windows package "Password synchronizer-3.0.x.msi"
Once installed Password Synchronizer on your system, please change to eris or eris64 directory (\ProgramFiles\Soffid\eris64) and execute:
eris-ad-service installConfiguration
Finally, you must configute the Password Synchronizer executing the following command:
eris-ad-service CONFIGURE url-syncserver agent-name- url-syncserver is the master sync server url (http://master.dom.dom:port)
- agent-name is the agent code name configured on Soffid console.
To see more information when configuring use | more.
Example
eris-ad-service CONFIGURE https://sync-server.netcompose:1760/ "AD soffid.pat" | more💻 Image
Mind that, completed this step, the domain controller must be restarted to end the configuration properly.
Configuration test
In order to test configuration, you must use the eris command line tool.
eris-ad-service TEST user passWhere user and pass can be dummy. If you use a real one it will be propagated to the system.
To see more information during test use | more.
Example
eris-ad-service TEST aretha password | more💻 Image
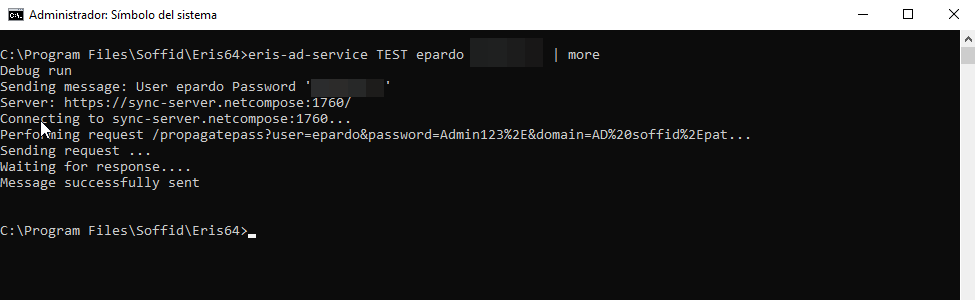
Generated Task in the AD agent
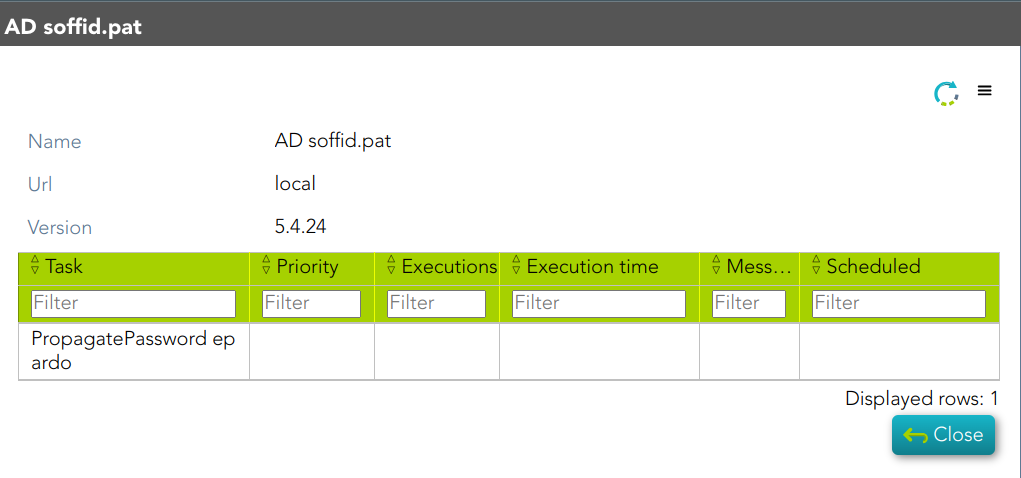
AD Integration flows - Update user
Update
Introduction
Soffid provides a workflow to modify and/or delete a user in the final system. In it, we can see each of the steps of which this process is composed.
Diagram

Step by Step
In this document, we will explain the process that Soffid performs to modify a user for the AD connector.
1. Initial step
First of all, Soffid checks if the user exists in Soffid and then checks the operation to perform, update or delete.
1.1. If the user does not exist in Soffid, then Soffid asks to delete the user in the target System.
❓ Warning message
1.1.1. Yes: If the answer is Yes, the process follows through the Yes branch, [3. Delete branch].
1.1.2. No: If the answer is Yes, the process finishes [10. End].
1.2. If the user exists in Soffid, the process continues through [2. User to remove?]. to check if the
2. User to remove?
📌 By clicking on the User to remove? step,...
You can configure all the properties related to the user object for this step

2.1. If the user is marked for Deletion, Soffid will ask for user consent to continue with the process or to cancel it. If the answer is Yes, the process follows through the Yes branch, [3. Delete branch].
❓ Warning message
2.2. If the user is marked for Update, it continues with the flow following through the No branch, [4. Insert or Update branch].
3. Delete branch
📊 Diagram
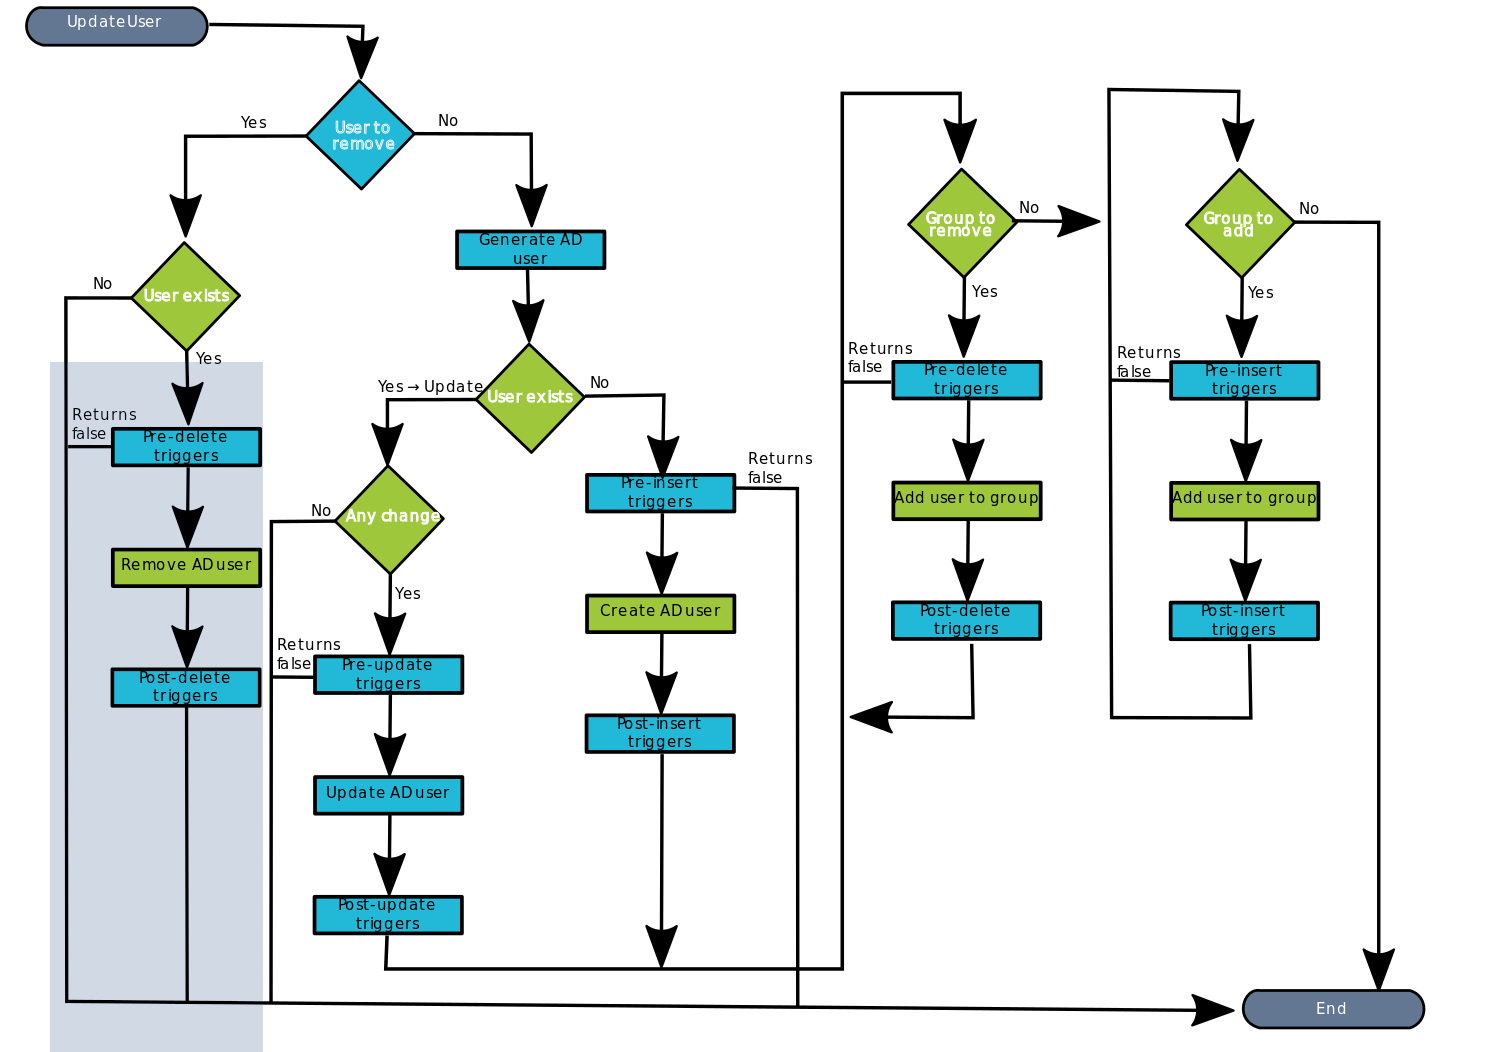
3.1. When the operation to perform is to delete a user, first of all, Soffid has to check if the user exists in the target system.
3.1.1. If the user does not exist, there are no actions to perform in the target system, so the process finishes [10. End].
3.1.2. If the user exists, the flow continues executing the pre-delete triggers if there is anyone configured. More than one script can be configured. These scripts are executed just before the main action, user delete, and the result (true or false) determines if the main action will be performed or not.
3.1.2.1. False: if the result is false for one or more of these triggers, the process finishes [10. End].
3.1.2.2.True: if the result is true for all of these triggers, Soffid continues to the next step.
📌 By clicking on the Pre-delete triggers step,...
You can configure all the pre-delete triggers related to the user object for this step.
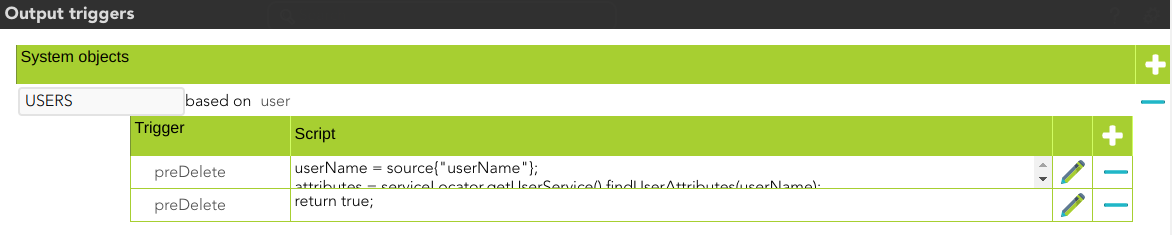
3.1.3. Soffid removes the AD user in the Active directory.
3.1.3. Then Soffid executes the post-delete triggers if any. These triggers can be used to perform a specific action just after performing the remove user operation on the target object.
📌 By clicking on the Post-delete triggers step,...
You can configure the post-delete triggers related to the user object for this step.
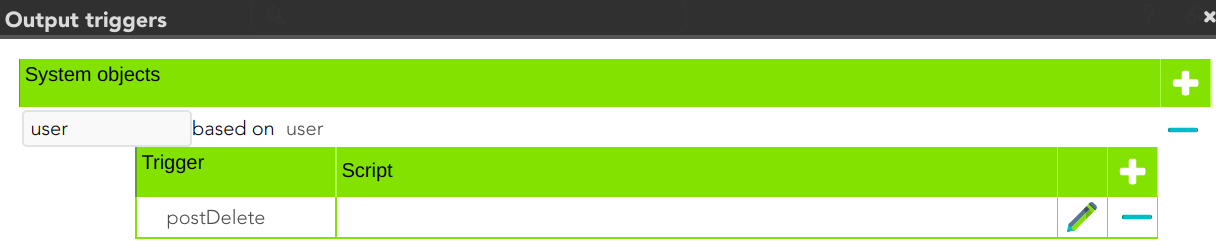
3.1.3. Then the process finishes [10. End].
4. Insert or Update branch
4.1. When the operation to perform is to update a user, first of all, Soffid generates the AD user. That is, Soffid calculates the values of the AD user object from the original values of Soffid.
📌 By clicking on the generate AD user step,...
You can configure the attributes related to the user object for this step.
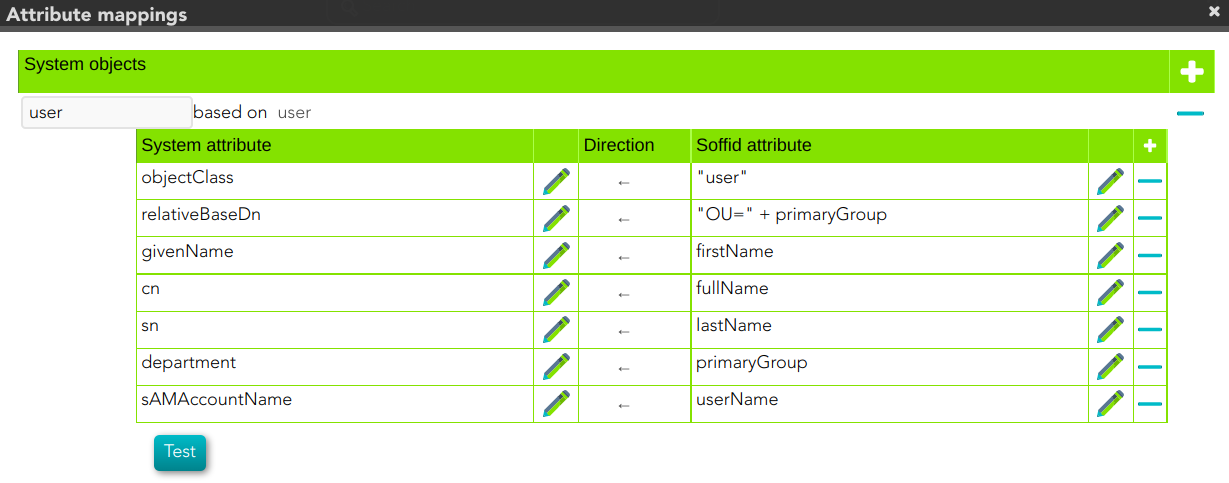
4.2.Then Soffid asks if the user exists in the target system to decide the action to execute, this action can be an update or an insert.
4.2.1. If the user does not exist in the target system, the process continues through [5. Insert user branch].
4.2.2. If the user exists in the target system, the process continues through [6. Update user branch].
5. Insert user branch
📊 Diagram

5.1. Soffid executes the pre-insert triggers if there is anyone configured. More than one script can be configured. These scripts are executed just before the main action, user creates, and the result (true or false) determines if the main action will be performed or not.
5.1.1. False: if the response is false for one or more of these triggers, the process finishes [10. End] and the user is not created in the target system.
5.1.2. True: if the response is true for all of these triggers, Soffid continues to the next step.
5.2. Soffid creates AD user in the Active directory
5.3. Then Soffid executes post-insert triggers if any. These triggers can be used to perform a specific action just after performing the create user operation on the target object.
📌 By clicking on the Post-insert triggers step,...
You can configure the Post-insert triggers related to the user object for this step.
5.4. Then the process continues through [7. Groups].
6. Update user branch
📊 Diagram

6.1. Soffid checks if there are any change between the generated object and the values of the object in the target system.
6.1.1. False: if there are no changes, the process finishes [10. End].
6.1.2. True: if there are changes to update, Soffid continues to the next step.
6.2. Soffid executes the pre-update triggers if there is anyone configured. More than one script can be configured. These scripts are executed just before the main action, user update, and the result (true or false) determines if the main action will be performed or not.
6.2.1. False: if the response is false for one or more of these triggers, the process finishes [10. End] and the user is not updated in the target system
6.2.2. True: if the response is true for all of these triggers, Soffid continues to the next step.
📌 By clicking on the Pre-update triggers step,...
You can configure the Pre-update triggers related to the user object for this step.
6.3. Soffid updates the AD user in the Active directory
📌 By clicking on the update user step,...
You can configure the properties related to the user object for this step.

6.4. Then Soffid executes the post-update triggers if any. These triggers can be used to perform a specific action just after performing the update user operation on the target object.
📌 By clicking on the Post-update triggers step,...
You can configure the Post-update triggers related to the user object for this step.

6.6. Then the process continues through [7. Grants].
7. Grants
At this point, Soffid runs the actions relative to the grants. The operations can be to add the user to one or more groups or to remove the user from existing groups.
8. Group to remove
This is a loop while there are groups to remove.
📊 Diagram
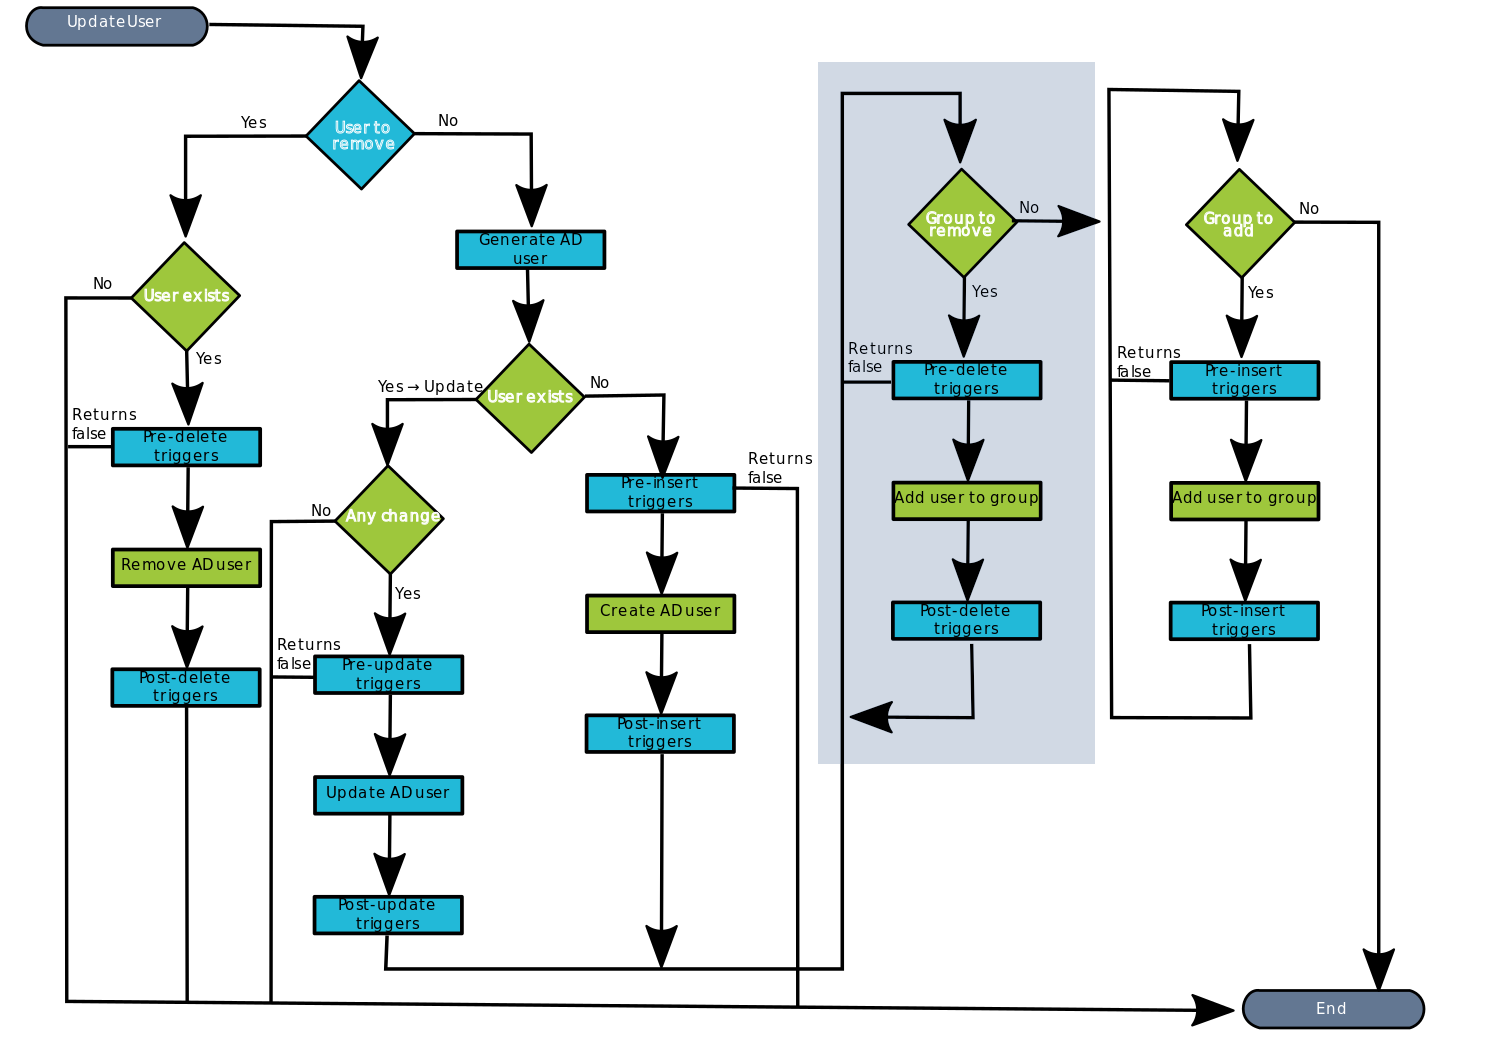
8.1. If there are No groups to remove, the process goes to [9. Group to add].
8.2. Yes, there are groups to remove:
8.2.1. Soffid executes the pre-delete triggers if there is anyone configured. More than one script can be configured. These scripts are executed just before the main action, a Remove user to group, and the result (true or false) determines if the main action will be performed or not.
8.2.1.1. False: if the response is false for one or more of these triggers, the process goes to [8. Group to remove] and the grant is not created.
8.2.1.2. True: if the response is true for all of these triggers, Soffid continues to the next step.
📌 By clicking on the Pre-delete triggers step,...
You can configure the Pre-delete triggers related to the grant object for this step.

8.2.3. If the result of the triggers is true, then Soffid adds the user to a group.
8.2.4. Then Soffid executes the post-insert triggers if any. These triggers can be used to perform a specific action just after performing the create grant operation on the target object.
📌 By clicking on the Post-delete triggers column values step,...
You can configure the Post-Update related to the grant object for this step.

8.2.5. Then the process continues through [8. Grant to add].
9. Group to add
📊 Diagram
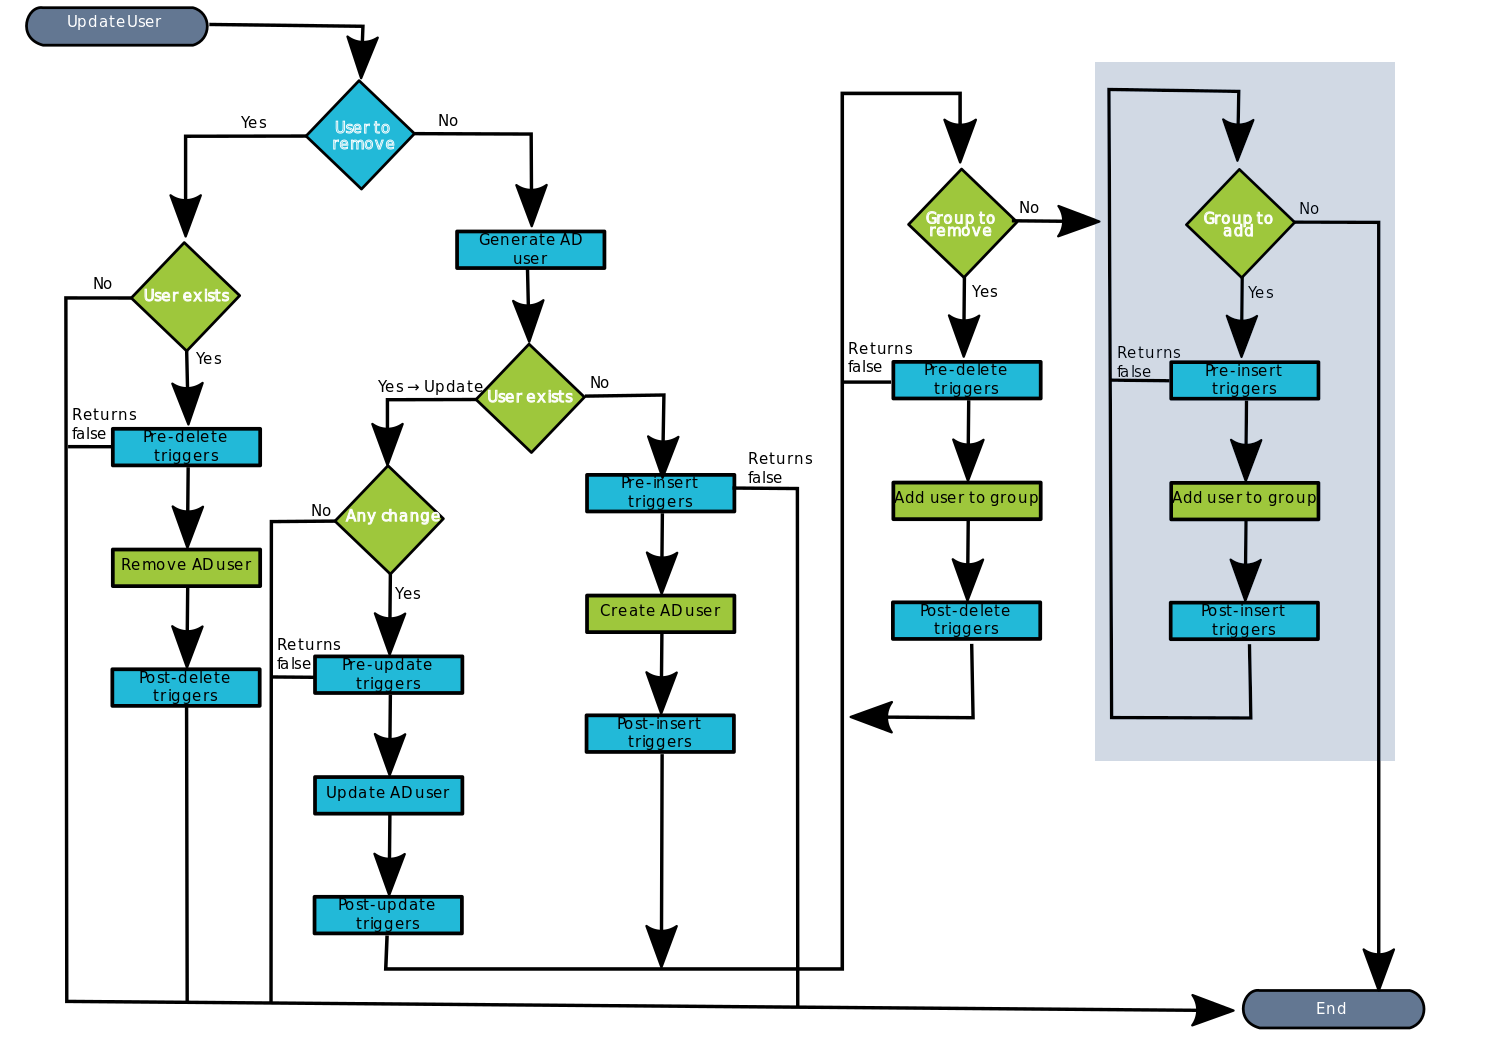
This is a loop while there are grants to remove. This grants list comes from the previous step [7. Grants].
9.1 No: If there are No grants to add, the process goes to [10. End].
9.2. Yes, there are grants to remove:
9.2.1. Soffid executes the pre-insert triggers if there is anyone configured. More than one script can be configured. These scripts are executed just before the main action, Add user to group, and the result (true or false) determines if the main action will be performed or not.
9.2.1.1. False: if the response is false for one or more of these triggers, the process finishes [10. End] and the grant is not deleted.
9.2.1.2. True: if the response is true for all of these triggers, Soffid continues to the next step.
📌 By clicking on the pre-delete trigger step,...
You can configure the Pre-delete triggers related to the grant object for this step.
9.2.2. If the result of the triggers is true, then Soffid adds the user to the group. This operation can return a true or false result.
9.2.2.1. False: the add action could not be performed and the process check for another grant [9. Group to add].
9.2.2.2. True: the add action could be performed properly. Soffid continues to the next step.
9.2.3. Then Soffid executes the post-insert triggers if any. These triggers can be used to perform a specific action just after performing the add grant operation on the target object.
📌 By clicking on the post-insert trigger step,...
You can configure the Post-insert triggers related to the grant object for this step.
9.2.4. Then the process continues through [9. Group to add].
10. End
The process finishes and the log is displayed, and you can download it by clicking the Download button.
📑 Log detail
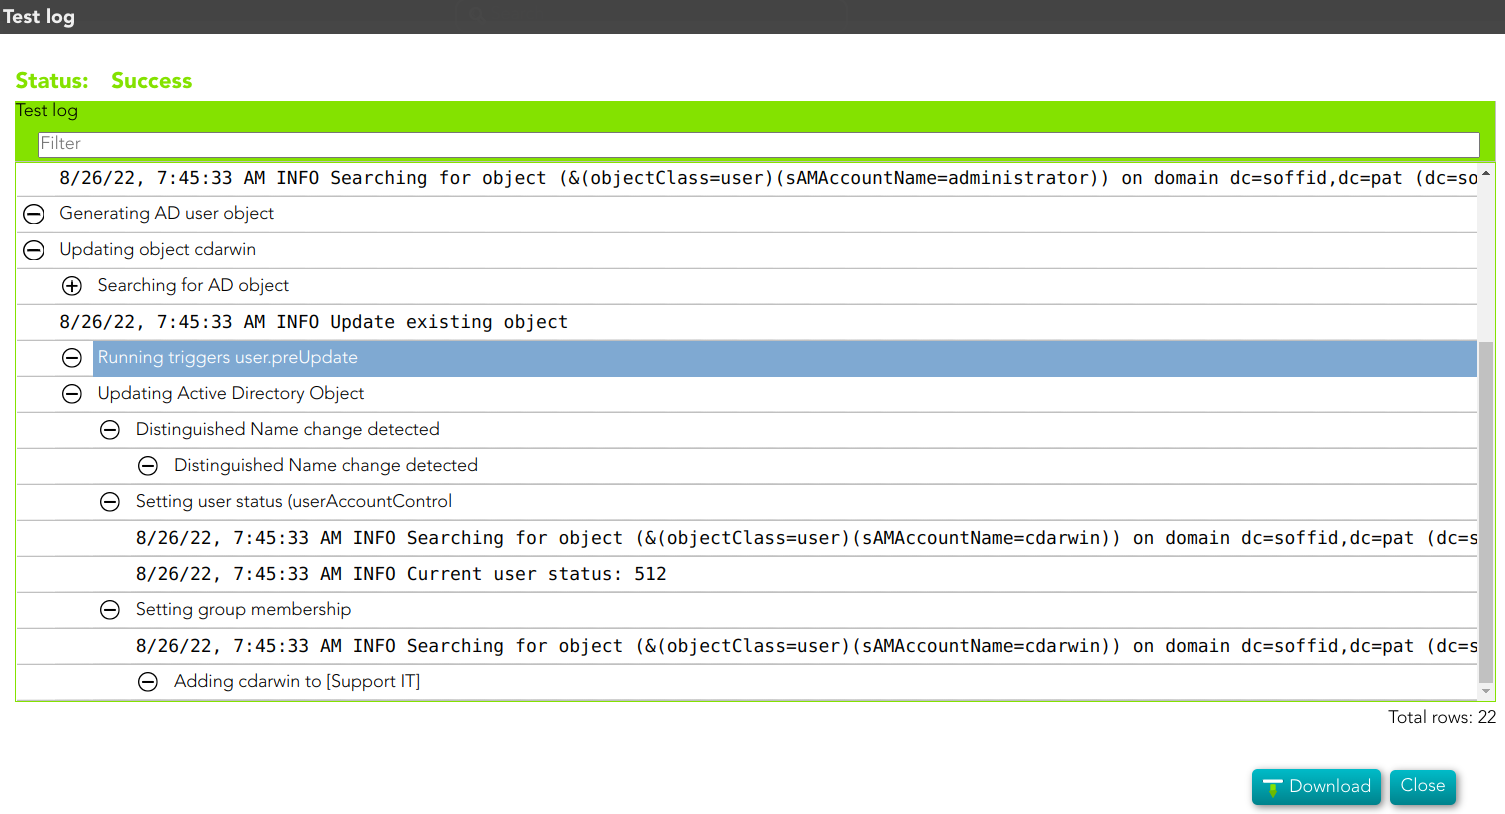
AD Integration flows - Update account
Update
Introduction
Soffid provides a workflow to modify and/or delete an account in the final system. In it, we can see each of the steps of which this process is composed.
Diagram

Step by Step
In this document, we will explain the process that Soffid performs to modify an account for the AD connector.
1. Initial step
First of all, Soffid checks if the account exists in Soffid and then checks the operation to perform, update or delete.
1.1. If the user does not exist in Soffid, then Soffid asks to delete the user in the target System.
❓ Warning message
1.1.1. Yes: If the answer is Yes, the process follows through the Yes branch, [3. Delete branch].
1.1.2. No: If the answer is Yes, the process finishes [10. End].
1.2. If the user exists in Soffid, the process continues through [2. User to remove?]. to check if the
2. Account to remove?
📌 By clicking on the Account to remove? step,...
You can configure all the properties related to the account object for this step

2.1. If the account is marked for Deletion, Soffid will ask for user consent to continue with the process or to cancel it. If the answer is Yes, the process follows through the Yes branch, [3. Delete branch].
❓ Warning message
2.2. If the account is marked for Update, it continues with the flow following through the No branch, [4. Insert or Update branch].
3. Delete branch
📊 Diagram

3.1. When the operation to perform is to delete an account, first of all, Soffid has to check if the account exists in the target system.
3.1.1. If the account does not exist, there are no actions to perform in the target system, so the process finishes [10. End].
3.1.2. If the account exists, the flow continues executing the pre-delete triggers if there is anyone configured. More than one script can be configured. These scripts are executed just before the main action, account delete, and the result (true or false) determines if the main action will be performed or not.
3.1.2.1. False: if the result is false for one or more of these triggers, the process finishes [10. End].
3.1.2.2.True: if the result is true for all of these triggers, Soffid continues to the next step.
📌 By clicking on the Pre-delete triggers step,...
You can configure all the pre-delete triggers related to the user object for this step.
3.1.3. Soffid removes the AD user in the Active directory.
3.1.3. Then Soffid executes the post-delete triggers if any. These triggers can be used to perform a specific action just after performing the remove user operation on the target object.
📌 By clicking on the Post-delete triggers step,...
You can configure the post-delete triggers related to the user object for this step.
3.1.3. Then the process finishes [10. End].
4. Insert or Update branch
4.1. When the operation to perform is to update a user, first of all, Soffid generates the AD user. That is, Soffid calculates the values of the AD user object from the original values of Soffid.
📌 By clicking on the generate AD user step,...
You can configure the attributes related to the user object for this step.
4.2.Then Soffid asks if the user exists in the target system to decide the action to execute, this action can be an update or an insert.
4.2.1. If the user does not exist in the target system, the process continues through [5. Insert user branch].
4.2.2. If the user exists in the target system, the process continues through [6. Update user branch].
5. Insert user branch
📊 Diagram
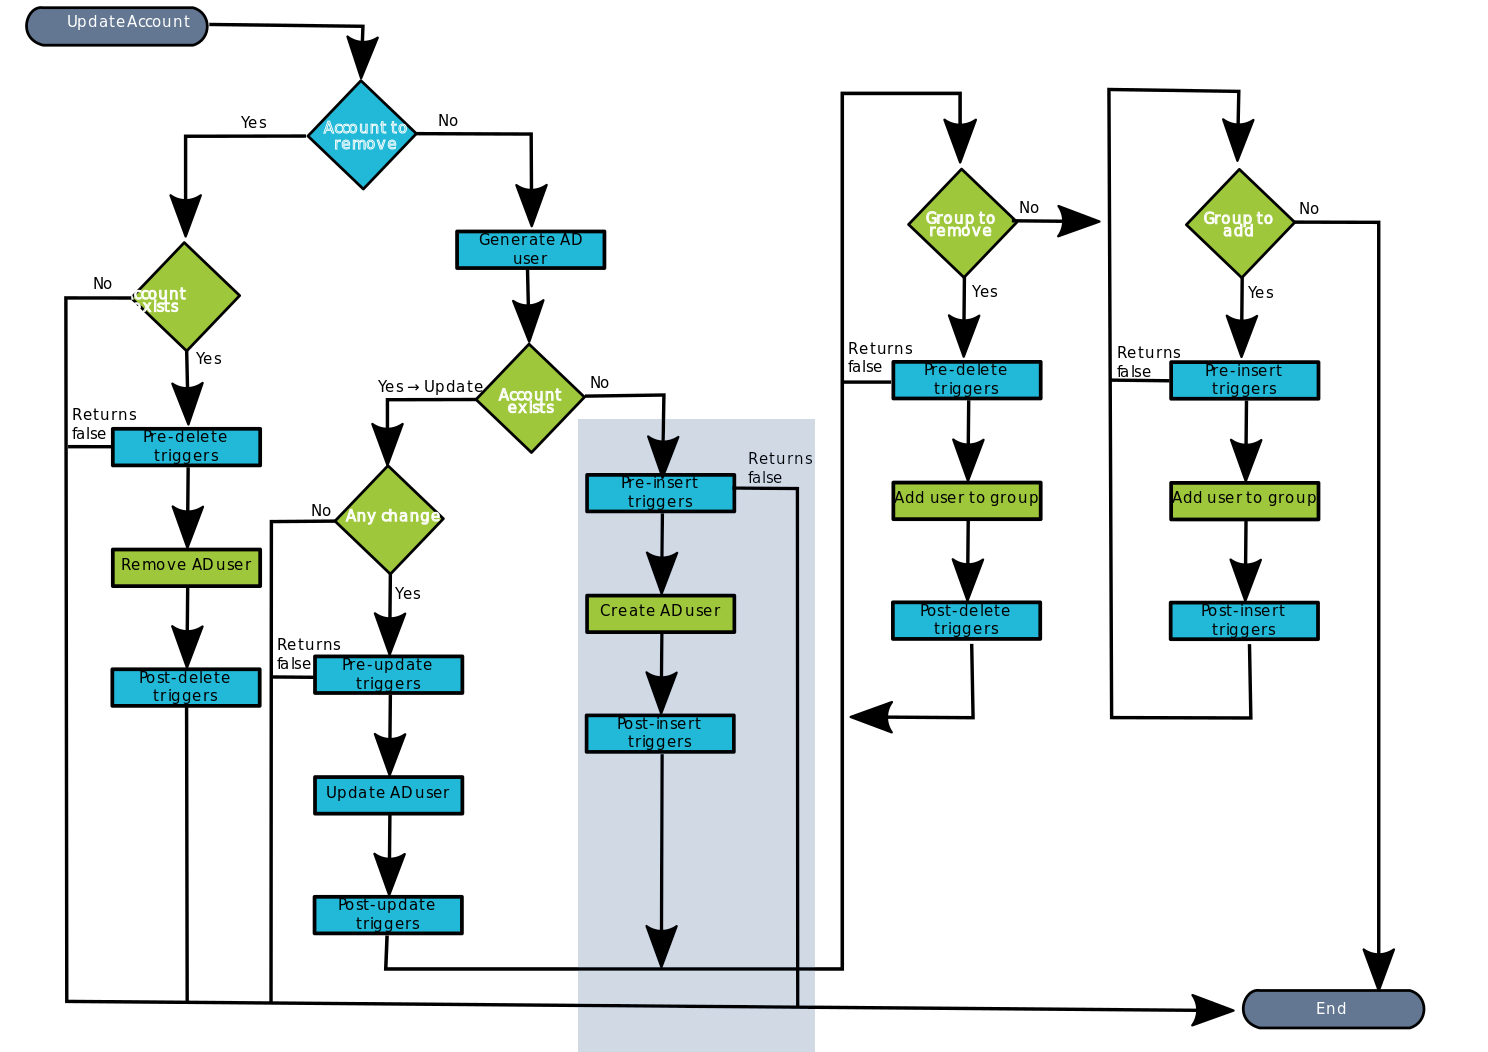
5.1. Soffid executes the pre-insert triggers if there is anyone configured. More than one script can be configured. These scripts are executed just before the main action, user creates, and the result (true or false) determines if the main action will be performed or not.
5.1.1. False: if the response is false for one or more of these triggers, the process finishes [10. End] and the user is not created in the target system.
5.1.2. True: if the response is true for all of these triggers, Soffid continues to the next step.
5.2. Soffid creates AD user in the Active directory
5.3. Then Soffid executes post-insert triggers if any. These triggers can be used to perform a specific action just after performing the create user operation on the target object.
📌 By clicking on the Post-insert triggers step,...
You can configure the Post-insert triggers related to the user object for this step.
5.4. Then the process continues through [7. Groups].
6. Update user branch
📊 Diagram
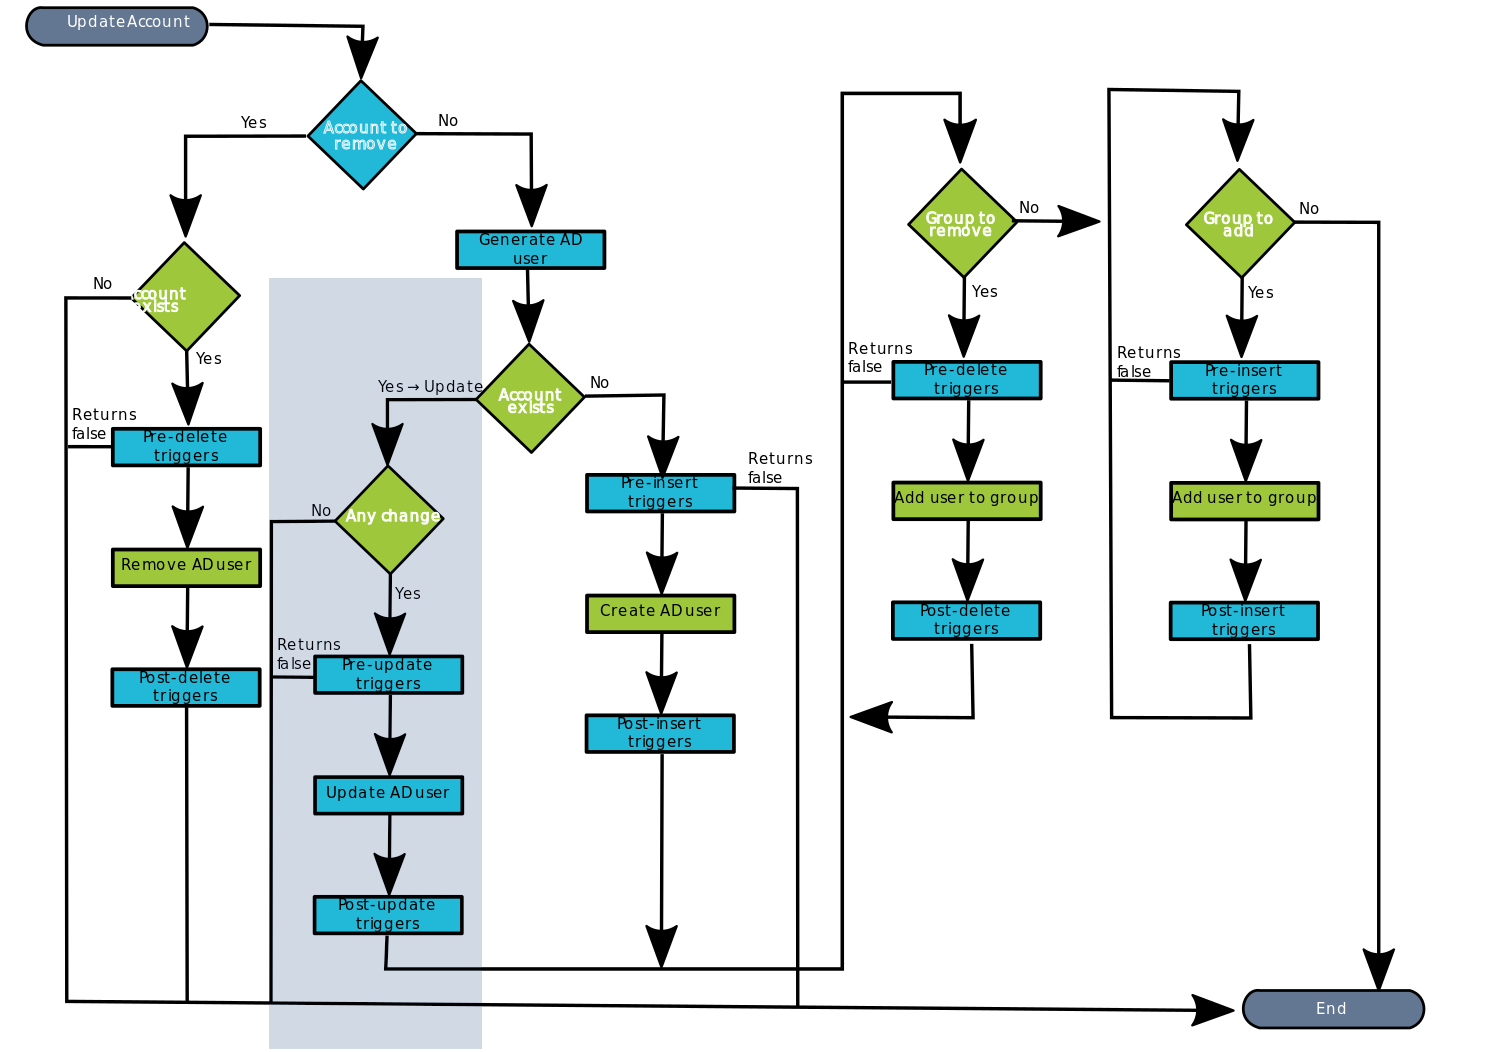
6.1. Soffid checks if there are any change between the generated object and the values of the object in the target system.
6.1.1. False: if there are no changes, the process finishes [10. End].
6.1.2. True: if there are changes to update, Soffid continues to the next step.
6.2. Soffid executes the pre-update triggers if there is anyone configured. More than one script can be configured. These scripts are executed just before the main action, user update, and the result (true or false) determines if the main action will be performed or not.
6.2.1. False: if the response is false for one or more of these triggers, the process finishes [10. End] and the user is not updated in the target system
6.2.2. True: if the response is true for all of these triggers, Soffid continues to the next step.
📌 By clicking on the Pre-update triggers step,...
You can configure the Pre-update triggers related to the user object for this step.
6.3. Soffid updates the AD user in the Active directory
📌 By clicking on the update user step,...
You can configure the properties related to the user object for this step.
6.4. Then Soffid executes the post-update triggers if any. These triggers can be used to perform a specific action just after performing the update user operation on the target object.
📌 By clicking on the Post-update triggers step,...
You can configure the Post-update triggers related to the user object for this step.
6.6. Then the process continues through [7. Grants].
7. Grants
At this point, Soffid runs the actions relative to the grants. The operations can be to add the user to one or more groups or to remove the user from existing groups.
8. Group to remove
This is a loop while there are groups to remove.
📊 Diagram
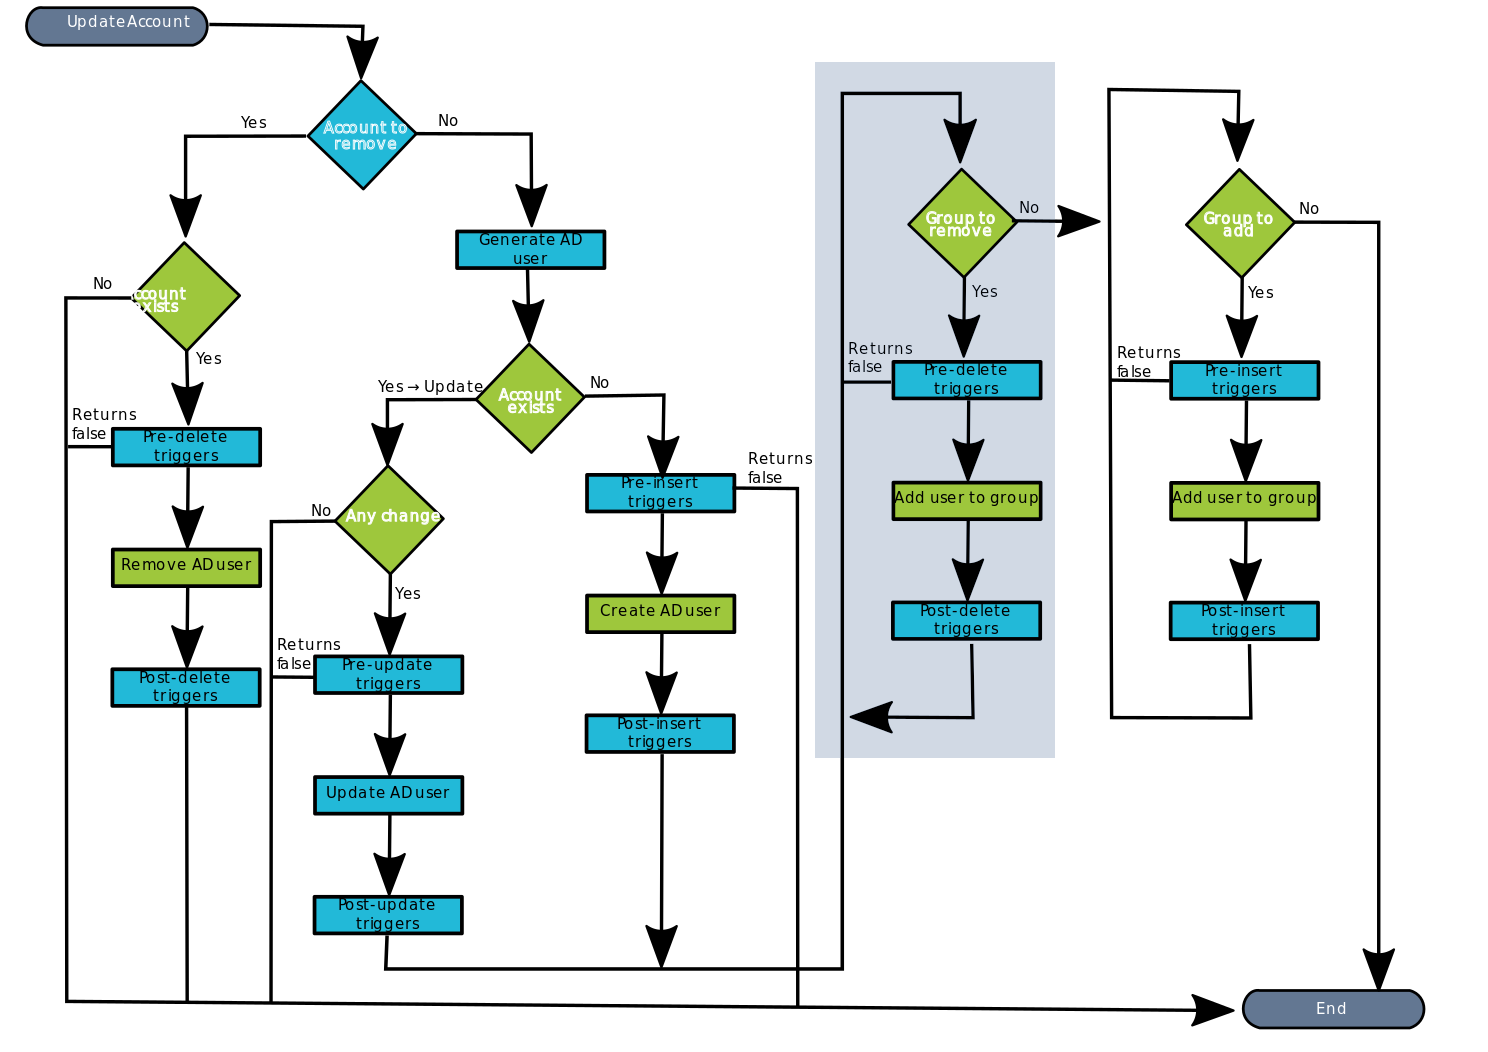
8.1. If there are No groups to remove, the process goes to [9. Group to add].
8.2. Yes, there are groups to remove:
8.2.1. Soffid executes the pre-delete triggers if there is anyone configured. More than one script can be configured. These scripts are executed just before the main action, a Remove user to group, and the result (true or false) determines if the main action will be performed or not.
8.2.1.1. False: if the response is false for one or more of these triggers, the process goes to [8. Group to remove] and the grant is not created.
8.2.1.2. True: if the response is true for all of these triggers, Soffid continues to the next step.
📌 By clicking on the Pre-delete triggers step,...
You can configure the Pre-delete triggers related to the grant object for this step.
8.2.3. If the result of the triggers is true, then Soffid adds the user to a group.
8.2.4. Then Soffid executes the post-insert triggers if any. These triggers can be used to perform a specific action just after performing the create grant operation on the target object.
📌 By clicking on the Post-delete triggers column values step,...
You can configure the Post-Update related to the grant object for this step.
8.2.5. Then the process continues through [8. Grant to add].
9. Group to add
📊 Diagram
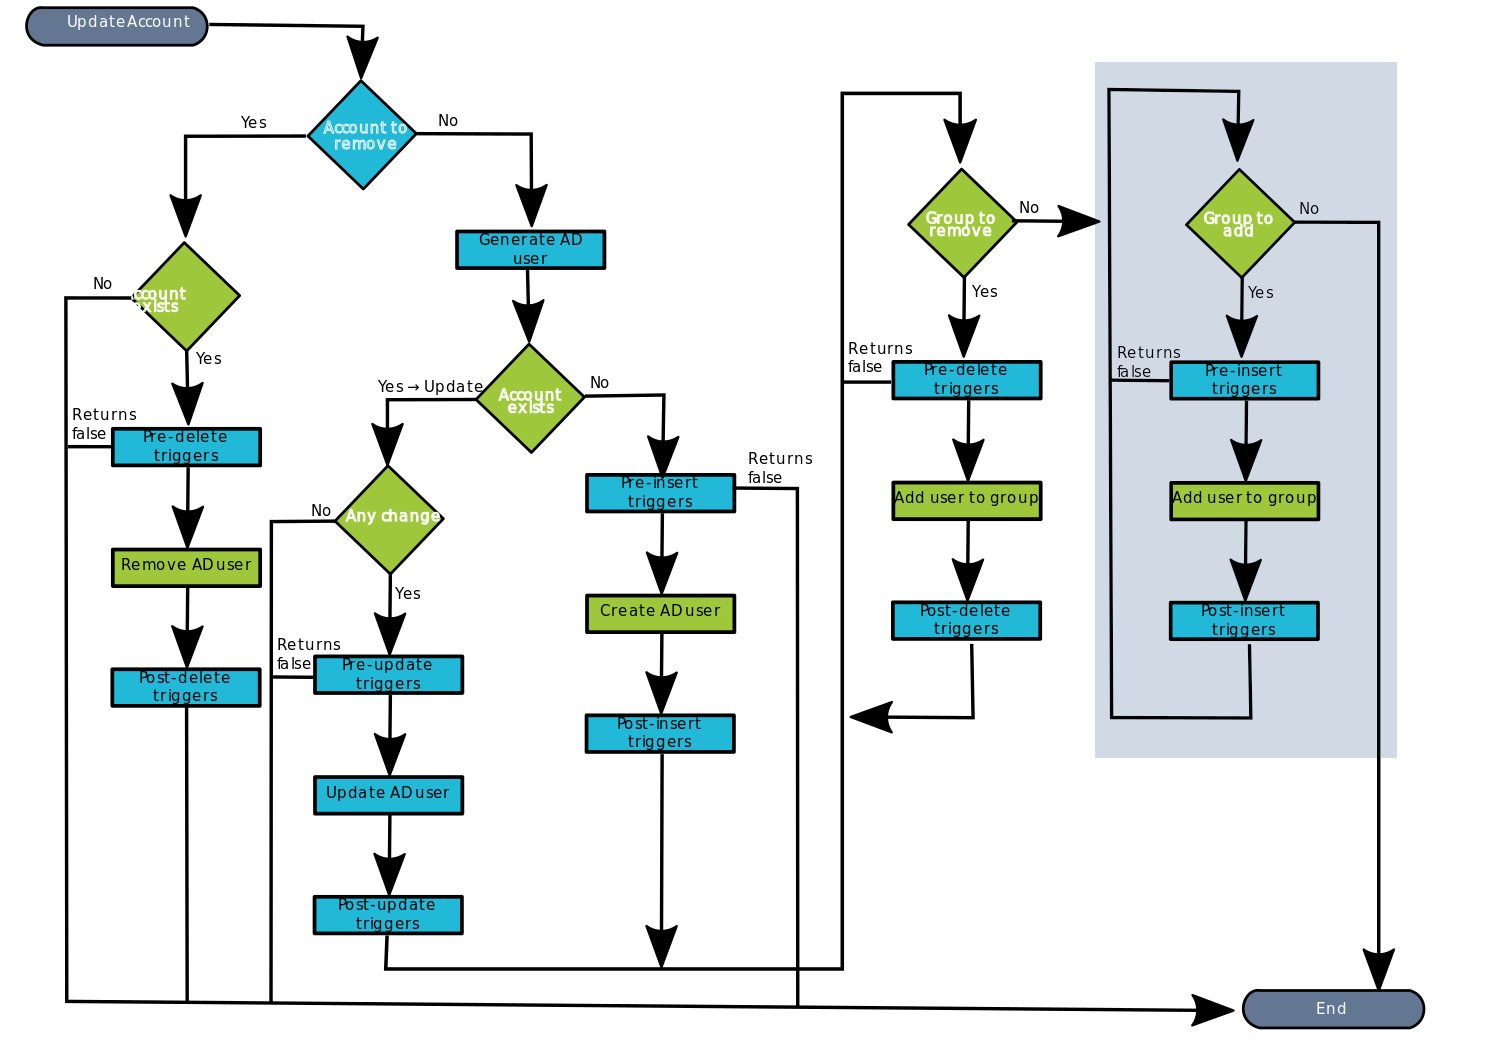
This is a loop while there are grants to remove. This grants list comes from the previous step [7. Grants].
9.1 No: If there are No grants to add, the process goes to [10. End].
9.2. Yes, there are grants to remove:
9.2.1. Soffid executes the pre-insert triggers if there is anyone configured. More than one script can be configured. These scripts are executed just before the main action, Add user to group, and the result (true or false) determines if the main action will be performed or not.
9.2.1.1. False: if the response is false for one or more of these triggers, the process finishes [10. End] and the grant is not deleted.
9.2.1.2. True: if the response is true for all of these triggers, Soffid continues to the next step.
📌 By clicking on the pre-delete trigger step,...
You can configure the Pre-delete triggers related to the grant object for this step.
9.2.2. If the result of the triggers is true, then Soffid adds the user to the group. This operation can return a true or false result.
9.2.2.1. False: the add action could not be performed and the process check for another grant [9. Group to add].
9.2.2.2. True: the add action could be performed properly. Soffid continues to the next step.
9.2.3. Then Soffid executes the post-insert triggers if any. These triggers can be used to perform a specific action just after performing the add grant operation on the target object.
📌 By clicking on the post-insert trigger step,...
You can configure the Post-insert triggers related to the grant object for this step.
9.2.4. Then the process continues through [9. Group to add].
10. End
The process finishes and the log is displayed, and you can download it by clicking the Download button.
📑 Log detail
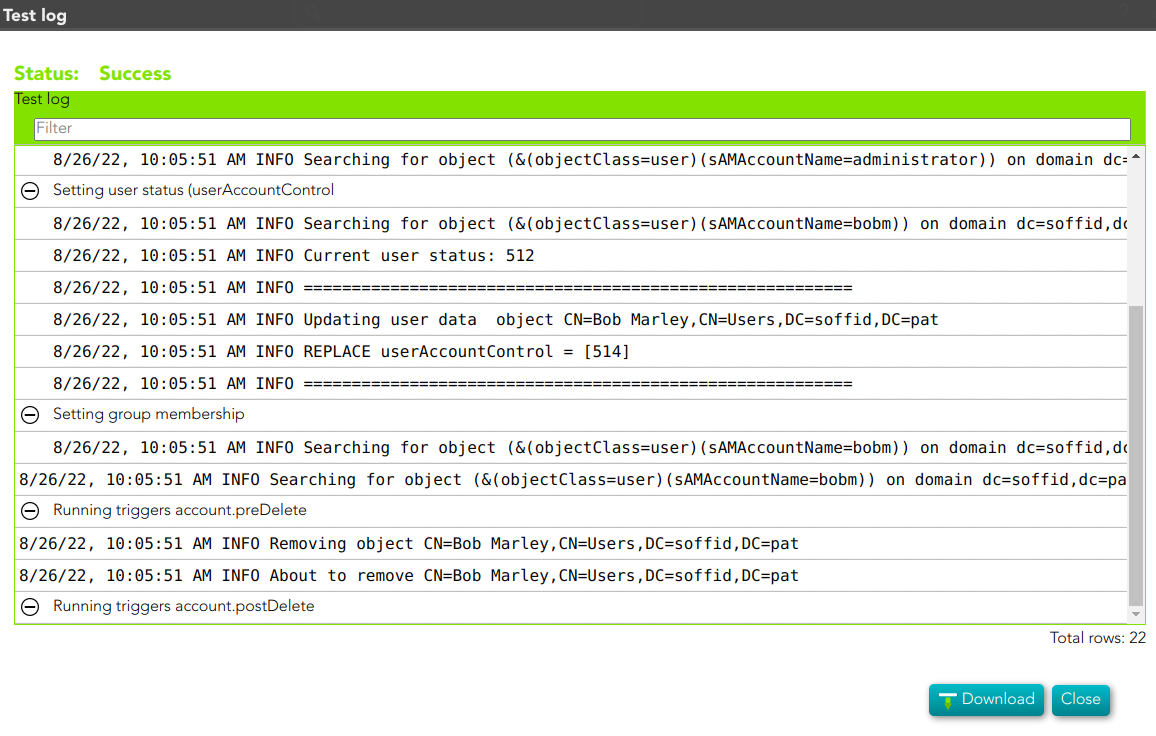
Zarafa Connector
Zarafa Connector
Introduction
Description
Zarafa Connector could manage a Zarafa mail server.
Managed System
This connector is specific for integration with a Zarafa mail server.
For more information about the Zarafa, please visit the following page: Zarafa
For more information to check if your system may be synchronized with this connector you do not hesitate to contact us through our Contact form
Prerequisites
A Soffid Synchronization Server must be installed on the Zarafa server.
Download and Install
This addon is located in the Connectors section and its name is Zarafa Connector.
For more information about the installation process you can visit the Addons Getting started page.
Agent Configuration
Basic
Generic parameters
After the installation of the addon, you may create and configure agent instances.
To configure this Zarafa Connector you could select "Zimbra Agent" or the "Customizable Zimbra Agent" in the attribute "Type" of the generic parameters section in the agent's page configuration.
The difference between both agents is that "Customizable Zimbra Agent" allows "Attribute mapping" and includes "Account metadata".
For more information about how you may configure the generic parameters of the agent, see the following link: Agents configuration
Custom parameters
Below there are the specific parameters for this agent implementation:
|
Parameter |
Description |
|---|---|
|
Zimbra admin tool (zmprov) |
Zarafa command line tool (this uses to be zarafa-admin) |
|
Zimbra mailbox tool (zmmailxbox) |
Existing role in Soffid to be mapped with the Zarafa administrator role. Every user who has this role granted will be created in Zarafa with the administrator flag on |
|
Create alias profile |
Values [ true , false ]. |
|
Fullname expression (only for Zimbra Agent) |
|
|
Delete accounts (only for Customizable Zimbra Agent) |
Values [ true , false ]. If "true" it allows deleting account in Zarafa when the account is deleted in Soffid. |
Attribute mapping
This connector could manage Users, Groups, and Roles.
Users
- Every task is done using zarafa-admin tool. So its behavior depends on Zarafa server availability.
- Zarafa needs every user to have an email address. If a user has no email or short name, their name will be used as mail address.
- Soffid passwords' expiration date will be managed by Soffid. So, Linux won't be notified about when those passwords need to be expired.
Groups
- Groups will be created and removed as Zarafa groups.
- Currently, the group hierarchy is not registered in Zarafa.
Roles
- Roles bound to this system will be created as Zarafa groups.
- Any removed role will trigger the bound Zarafa group to be removed.
The "Attribute Mapping" tab is only accessible for the "Customizable Zimbra Agent".
Properties
No properties are defined for this agent.
Attributes
You can map users, groups, and role objects. These are some of the attributes to be mapped in those objects:
|
System attribute |
Description |
|---|---|
|
zimbraAccountStatus |
accountDisabled ? "closed": "active" |
|
givenName |
firstName |
|
displayName |
fullName |
|
sn |
lastName |
|
zimbraAccount |
accountName |
For more information about how you may configure attribute mapping, see the following link: Soffid Attribute Mapping Reference
For instance:

Triggers
Load triggers
Account metadata
Accounts are default objects in Soffid. Agents allow you to create additional custom data, on the "Account metadata" tab, to customize the accounts created only for that agent.
The attributes which you define here will be shown when you click on the proper account, on the Accounts Tabs on the users' page.
At this tab, you could add or delete custom attributes. You can visit the Metadata page for more information about the standard attributes.
Operational
Monitoring
After the agent configuration you could check on the monitoring page if the service is running in the Synchronization Server, please go to:
Tasks
Authoritative
If you are checked "Authorized identity source", an automatic task to load identities from the managed system to Soffid is available, please go to:
And you will something like "Import authoritative data from <AGENT_NAME>".
Reconcile
If you are configured the "Attribute Mapping" tab with some of our objects: "user, account, role, group or grant", an automatic task to synchronize these objects from the managed system to Soffid is available, please go to:
And you will do something like "Reconcile all accounts from <AGENT_NAME>".
Synchronization
Regarding the synchronization of the objects, there are two possible options:
- If you are checked the generic attribute "Read Only" in the "Basics" tab, only the changes in the managed systems will be updated in Soffid. We recommend these options until the global configuration of Soffid will be tested.
- If you are not checked the generic attribute "Read Only" in the "Basics" tab, all the changes in Soffid or the managed system will be updated in the other. Note that this synchronization must be configured in the "Attribute mapping" tab correctly.
For more information about how you may configure the generic parameters of the agent, see the following link: Agents configuration
SQL Server
SQL Server Connector
Introduction
Description
The SQL Server connector allows an easy way to configure and manage Microsoft SQL Server relational databases.
Managed System
This connector is specific for integration with the Microsoft SQL Server.
For more information to check if your system may be synchronized with this connector, do not hesitate to contact us through our Contact form
We can also manage more relational databases, for more information you can check the List of relational databases.
Prerequisites
It is needed a user with access and permissions to the schemes and tables required in the scope of the integration.
Download and Install
This addon is located in the Connectors section and its name is SQLServer.
For more information about the installation process, you can visit the Addons Getting started page.
Agent Configuration
This connector could manage User and Role objects.
Basic
Generic parameters
After the installation of the addon, you may create and configure agent instances.
To configure this SQL Server connector you must select "SQLServer agent" in the attribute "Type" of the generic parameters section in the agent's page configuration.
For more information about how you may configure the generic parameters of the agent, see the following link: Agents configuration

Custom parameters
Below there are the specific parameters for this agent implementation:
|
Parameter |
Description |
|---|---|
|
User |
Database user name to authenticate |
|
Password |
The password of the database user |
|
Connection string to database |
URL that identifies the connection properties. Please refer to the specific database vendor documentation to build this URL. |
|
Create agents for each database |
Select the Yes value if you want to create an agent for each database found by the Reconcile process. |
| Enable debug |
Two options: Yes, and No. It enables or not more log traces in the Synchronization Server log |
Load triggers
You can define JavaScript or BeanShell scripts that will be triggered when data is loaded into Soffid (incoming triggers). The trigger result will be a boolean value, true to continue or false to stop.
Triggers can be used to validate or perform a specific action just before performing an operation or just after performing an operation into Soffid objects.
To view some examples, visit the Incoming triggers examples page.
Access Control
SQL Server connector can establish an access control for SQL Server Users.
If the access control checkbox is enabled, only the users and applications that are listed on the access control page will be allowed to log in. So, you can restrict the IP address, the user roles, and the applications a user can connect from.
This restriction does not apply to DBA users.
Check that the user/account is not unmanaged.
When the Enable access control to the database check box is checked, the UpdateAccessControl task will be launched. The following tables will be created on the SQL Server:
- SC_OR_ACCLOG: access log
- SC_OR_CONACC: rule access control
- SC_OR_ROLE: user roles.
- SC_OR_VERSION: connector versions.
When you try to connect to SQL Server, the logon_audit_trigger is launched to check if you have access or not.
You can check the Access Logs page for access controls.
Account metadata
Agents allow you to create additional data, on the "Account metadata" tab, to customize the accounts created for that agent. This additional information will be loaded with the agent's information, or calculated as defined in the mappings.
The additional data can be used in both mappings and triggers.
The attributes that you define here will be shown when you click on the proper account, on the Accounts Tabs on the user page.
Operational
Monitoring
After the agent configuration you can check on the monitoring page if the service is running in the Synchronization Server, please go to:
Tasks
Authoritative
If you checked "Authorized identity source", an automatic task to load identities from the managed system to Soffid is available, please go to:
And you will do something like "Import authoritative data from <AGENT_NAME>".
Reconcile
To manage an automatic task to synchronize user objects from the managed system to Soffid is available, please go to:
And you will do something like "Reconcile all accounts from <AGENT_NAME>".
Synchronization
Regarding the synchronization of the objects, there are two possible options:
- If you check the generic attribute "Read Only" in the "Basics" tab, only the changes in the managed systems will be updated in Soffid. We recommend these options until the global configuration of Soffid is tested.
- If you do not check the generic attribute "Read Only" in the "Basics" tab, all the changes in Soffid or the managed system will be updated in the other. Note that this synchronization must be configured in the "Attribute mapping" tab correctly.
For more information about how you may configure the generic parameters of the agent, see the following link: Agents configuration
Connectors Examples
Attribute mappings examples
Attributes
When you are configuring an agent, depending on the connector type, it will be able to define some attributes. The attributes depend on the object that you are configuring, and the objects depend on the connector type.
Get the value of an attribute (a user attribute in that case)
sAMAccountName <= userName
sAMAccountName => userName
sAMAccountName <=> userNameGet the value of a custom attribute
company <= attributes{"company"}
company => attributes{"company"}
company <=> attributes{"company"}Get the value of an account metadata attribute
office <= accountAttributes{"office"}
office => accountAttributes{"office"}
office <=> accountAttributes{"office"}Define a constant on the target system
nameConst <= "valueConst"Assign the result of a script to the soffid attribute
return <SCRIPT> => attributeBe in mind, it is allowed to use bean Shell expression only in the source when the mapping is one-way.
Assign the result of a script to the target attribute
attribute <= return <SCRIPT>Be in mind, it is allowed to use bean Shell expression only in the source when the mapping is one-way.
Be in mind
If the attribute name in the final system is hyphenated, you have to use this expression: THIS{"ATTRIBUTENAME"}, for example THIS{"my-name"}
Outgoing triggers examples
Attribute mapping triggers
When you are configuring an agent and defining the attribute mappings of connectors, depending on the connector type, it will be able to define BeanShell scripts that will be triggered when data is loaded into the target system, outgoing triggers.
Triggers can be used to validate or perform a specific action just before performing an operation or just after performing an operation into target objects.
The trigger result will be a boolean value, true to continue or false to stop.
Use case examples
Example 1
Update or insert a user only when the user is internal (PreInsert User or PreUpdate User)
name = source{"userName"};
user = serviceLocator.getUserService().findUserByUserName(name);
if (user != null) {
if (user.userType.equals("I")) {
return true;
}
}
return false;Example 2
Update or insert a user only when the company is Soffid. Be in mind that company attribute is a custom attribute.
name = source{"userName"};
company = source{"attributes"}{"company"};
user = serviceLocator.getUserService().findUserByUserName(name);
if (user != null) {
if (company != null && company.toUpperCase().equals("SOFFID")) {
return true;
}
}
return false;Example 3
Recover a response and process it.
if (response != null) {
for (o : response.getObjects()) {
if (o != null && o{"result"} != null) {
//TO-DO
}
}
}
return true;Example 4
Send a HTML mail with the response info.
.....
to = newObject{"identity"};
subject = "LinOTP QR";
body = o{"result"};
serviceLocator.getMailService().sendHtmlMailToActors(new String[] {to}, subject, body);
.......Example 5
Update a user with the response info
.......
body = o{"result"};
ac = newObject{"user"};
data = new com.soffid.iam.api.UserData();
data.setAccountName(ac);
data.setSystemName("LinOTP");
data.setAttribute("token");
data.setBlobDataValue(body.getBytes());
serviceLocator.getAccountService().updateAccountAttribute(data);
......Example 6
Call an API and process the response.
.......
userN = accontList.get(0).name;
result = dispatcherService.invoke(
"GET",
"https://" + DOMINIO + "crmRestApi/resources/....?onlyData=true&q=Username=" + userN,
null);
if (result != null && !result.isEmpty()) {
//TO-DO
}
.......Example 7
Pre Update: assign a value to an attribute depending on the value of a group attribute. The user can belong to many groups.
userName = source{"userName"};
attributes = serviceLocator.getUserService().findUserAttributes(userName);
dateChange = attributes.get("dateChange");
if (dateChange == null || dateChange == void ) {
return true;
}
userGroupList = serviceLocator.getGroupService().findUsersGroupByUserName(userName);
contFalse = 0;
contNull = 0;
isFound = false;
for (ug : userGroupList) {
group = serviceLocator.getGroupService().findGroupByGroupName(ug.group);
att = group.attributes.get("indicator");
if (att != void) {
if (att == null) contNull++;
else if (att.equals("0")) contFalse++;
else if (att.equals("1")) {
isFound = true;
break;
}
}
}
if (isFound) {
newObject{"id-indicator"} = "1";
} else {
if (contFalse > 0) {
newObject{"id-indicator"} = "0";
} else if (contNull > 0) {
newObject{"id-indicator"} = null;
}
}
return true;Incoming triggers examples
Load triggers
When you are configuring an agent, depending on the connector type, it will be able to define BeanShell scripts that will be triggered when data is loaded into Soffid, incoming triggers.
Triggers can be used to validate or perform a specific action just before performing an operation or just after performing an operation into Soffid objects.
The trigger result will be a boolean value, true to continue or false to stop.
Use case examples
Example 1
A user can have more than one account on a target system. We want to reconcile only those accounts which have the same name on Soffid and on target system.
name = newObject{"accountName"};
uaList = serviceLocator.getAccountService().findUsersAccounts(name,"agentName");
for(userAccount: uaList) {
if (userAccount.name.equals(name)) {
return true;
} else {
return false;
}
}
return false;Example 2
Update only users who belong to Soffid company.
name = newObject{"accountName"};
user = serviceLocator.getUserService().findUserByUserName(name);
if (user != null) {
attributes = serviceLocator.getUserService().findUserAttributes(name);
company = attributes.get("company");
if (company != null && company.equals("Soffid")) {
return true;
}
return false;
Example 3
Discard to create some accounts (PreInsert account).
log.info("************** Pre Insert Account");
cuentas = new java.util.HashMap();
cuentas.put("admin",null);
account = newObject{"accountName"};
if (cuentas.containsKey(account)) {
log.info("TRIGGER ACCOUNT PREINSERT - Discarded to create the account " + account);
return false;
}
log.info("TRIGGER ACCOUNT PREINSERT - Correct account " + account);
return true;Example 4
If does not exist a mail domain, it wil be created.
mailDomain = newObject{"mailDomain"};
if (mailDomain != void && mailDomain != null) {
existMD = serviceLocator.getMailListsService().findMailDomainByName(mailDomain);
if (existMD == null) {
newMailDomain = new com.soffid.iam.api.MailDomain();
newMailDomain.setName(mailDomain);
newMailDomain.setDescription(mailDomain);
serviceLocator.getMailListsService().create(newMailDomain);
}
}
return true;Example 5
Avoid deleting users (PreDelete user).
return false;Example 6
If throw the exception, the return will be is false. True in other cases.
if (....)
throw new Exception("Exception message....");
return true;Example 7
The new group on the target system will have the same id that the old group.
newObject{"idGroup"} = oldObject{"idGroup"};
.....
Example 8
Get the attribute company option 1:
company = source{"attributes"}{"company"};Get the attribute company option 2
userName = source{"userName"};
attributes = serviceLocator.getUserService().findUserAttributes(userName);
company = attributes.get("company");Example 9
Update the company attribute:
userName = newObject{"userName"};
// Check if the user exists
user = serviceLocator.getUserService().findUserByUserName(userName);
if (user == null) {
return false;
}
log.info("***************** USER Object: " + user);
attributes = serviceLocator.getUserService().findUserAttributes(userName);
if (attributes == null) {
attributes = new HashMap();
}
attributes.put("company", "<COMPANY_NAME>");
serviceLocator.getUserService().updateUserAttributes(userName, attributes);
return true;Example 10
Check user type
userName = newObject{"userName"};
user = serviceLocator.getUserService().findUserByUserName(userName);
if (user.userType.equals("I")){
.....
//TODO
} else {
.....
//TODO
}
return true;Triggers: Script Tips
Triggers: Script Tips
Here we will show you some tips about how to use scripts.
For more information you can visit the official documentation of Soffid
Write into a sync-server log
System.out.println("what you want......");Recover data from a Soffid object when synchronizing
* source only can be used in outgoing triggers. That object will be Soffid format.
* newObject and oldObject can be used in outgoing and incoming triggers. Those objects will be target system format in outgoing triggers and will be Soffid format in incoming triggers.
Recover data from Soffid object to synchronize
Recover user name
name = source{"userName"};Recover a custom attribute
Recover company (company could be a user custom attribute defined on metadata page)
comp = source{"attributes"}{"company"};Recover the attribute value that will be sent
no = newObject{"userName"};
gn = newObject{"givenName"};
....
Recover the attribute value from the select
That info comes from the target system. In a synchronization process, the first thing that Soffid does, is to query if the account exists on the target system.
no = oldObject{"userName"};
gn = oldObject{"givenName"};
....Use existing services
serviceLocator.getUserService().....
serviceLocator.getAccountService().....
serviceLocator.......
Create a new Soffid object
mailDomain = new com.soffid.iam.api.MailDomain();
newUser = new com.soffid.iam.api.User();
newRol = new com.soffid.iam.api.Role();
............
Loop an object list
for(role : roleList){
//TO-DO
out.print(" Role: " + role.roleName + "\n");
}Recover response
if (response!=null) {
for (o : response.getObjects()) {
if (o!=null && o{"result"}!=null) {
//TO-DO
}
}
}Send a text email
serviceLocator.getMailService().sendTextMail("mail@soffid.com", "Subject", "Mail message");Send a HTML mail
serviceLocator.getMailService().sendHtmlMailToActors(<to>, <subject>, <html-body>);