# Windows Connector # Windows Connector ## Introduction ### Description This connector implements the LDAPS protocol and it is used to connect the Sync-Server with every server that allows this communication protocol. ### Managed System This connector has been performed to connect to the Active Directory system, it's a fork of our LDAP Connector with custom features.

For more information to check if your system may be synchronized with this connector you do not hesitate to contact us through our [Contact form](http://www.soffid.com/contactform/)

### Prerequisites To enable LDAPS in your Active Directory, please read the following guide: [SSL access to Active Directory](https://bookstack.soffid.com/books/connectors/page/howto-ssl-access-to-active-directory "HOWTO SSL access to Active Directory"). It is needed an Active Directory user with full administrator access. ## Download and Install This addon is located in the Connectors section and its name is **Windows (including Active Directory)**.

For more information about the installation process you can visit the [Addons Getting started](https://bookstack.soffid.com/books/addons-getting-started/page/getting-started "Addons installation") page.

## Agent Configuration ### Basic #### Generic parameters After the installation of the addon, you may create and configure agent instances. This addon has 5 available agents: - Active Directory - Active Directory Only Passwords - Simple Windows Agent

For more information about how you may configure the generic parameters of the agent, see the following link: [Agents configuration](https://bookstack.soffid.com/books/soffid-3-reference-guide/page/agents "Agents")

#### Custom parameters Below there are the specific parameters for this agent implementation, "Active Directory" - Host name of the domain controller. - Active Directory distingished name in X500 format. e.g.: dc=soffid,dc=local - Administrator principal name in X500 format, relative to A.D name. e.g.: cn=Administrator,cn=Users - Administrator password
**Parameter** **Description**
Hostname Host name of the server
LDAP base DN LDAP Base name
Principal name User name in DN format, including base name if needed
Password Password for the user to connect.
Enable debug Two options: \[ Yes / No \]. When it is enabled more log traces are printed in the Synchronization Server log
Accepted certificates Two options: \[ Only trusted certificates / Any (insecure) \]
Follow referrals Two options: \[ Don't / Yes \] If you select the Yes option, Soffid could follow the references to other systems if Soffid has the proper permissions.
Manage child domains Two options: \[ No / Yes \] If you select the Yes option, Soffid will manage the domain referrals.
Create OUs when needed Two options: \[ No / Yes \] If you select the Yes option and the OUs do not exist, these OUs will be created in the Active Directory.
Real time load last login attribute Two options: \[ No / Yes \]
Real time load identity changes Two options: \[ No / Yes \] You can check this option to synchronize the identities when Soffid is the authoritative data source. You must enable periodic synchronization.
### Attribute mapping Active Directory connector could manage Users and Groups by using LDAPS protocol. #### Properties Some agents require to configure some custom attributes, you will use the properties section to do that. To enable it, add the following properties to each object mapping:
**Property** **Description**
rename AD agent will always map account and group names to the SAMAccount attribute. BaseDN and cn can be calculated based on user attributes. AD agent is able to move and rename AD objects. If you don't desire users or groups to be renamed or moved, an object property named "**rename**" with the value "**false**" can be added to some object mappings.
searchBase You can configure it if you want the reconciliation process to search accounts on a directory subtree other than AD root, put a searchBase property with the relative tree to look for.
key The AD attribute works as the primary key. Usually, it's the sAMAccountName and can be omitted.
createDisabledAccounts Set to true if you want the connector to create disabled accounts in the active directory. By default, disabled accounts are not created until enabled.
For instance: [![image-1654785307110.png](https://bookstack.soffid.com/uploads/images/gallery/2022-06/scaled-1680-/image-1654785307110.png)](https://bookstack.soffid.com/uploads/images/gallery/2022-06/image-1654785307110.png) #### Attributes You can customize attribute mappings, you only need to select system objects and the Soffid objects related, manage their attributes, and make either inbound or outbound attribute mappings. Using a windows connector you can map users, groups, and role objects. Active Directory membership is automatically managed based on user and group mappings. Any object mapping must have the following system attributes:
**System attribute** **Description**
objectClass Active Directory object class. The following values mostly used "user", "group" or "organizationalUnit"
baseDn Active Directory container where user or group should be created. Its value should be absolute, containing Active Directory DC parts
relativeBaseDn Active Directory container where user or group should be created. Its value should be relative to Active Directory DC parts.
cn Object name
There is a bunch of AD special attributes that need some special treatment:
**System attribute** **Description**
sAMAccontName Is automatically mapped. It is internally mapped to role name or account name, without further customization
accountExpires Sets the last date (in nanoseconds since 1600) in which the account will be valid. A common mapping expression is: ```Java if ( attributes {"expirationDate"} == null)    return 9223372036854775807L; else    return attributes{"expirationDate"}.getTime() * 10000L + 116445528000000000L; ```
samAccountType Can be used to identify distribution lists. A value of 268435457 or 268435456 means the AD group is a distribution list group rather than a security group.
lastLogon The attribute can be used to get the last time an account was used. Soffid attribute is named **lastLogin** and the right mapping could be the following one. Mind when you make a reference to lastLogon attribute, every domain controller is queried about this attribute, as its value is not replicated across AD controllers: ```Java if ( lastLogon == null || lastLogon == void) return null; Long v = Long.decode(lastLogon); v = v / 10000000L; v-=11644473600L; return new Date(v*1000); => lastLogin ```
userCannotChangePassword true/false This is a virtual attribute that can be used to indicate if a user can or cannot change the password. You can't assign this permission by directly modifying the UserAccountControl attribute.

For more information about how you may configure attribute mapping, see the following link: [Soffid Attribute Mapping Reference](https://bookstack.soffid.com/link/72#bkmrk-soffid-attributes)

For instance: [![image-1654785419948.png](https://bookstack.soffid.com/uploads/images/gallery/2022-06/scaled-1680-/image-1654785419948.png)
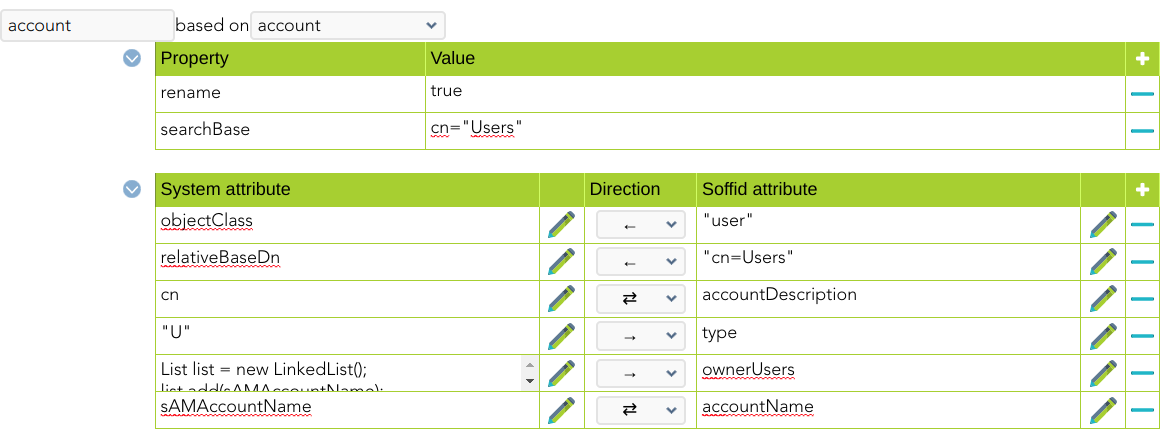
](https://bookstack.soffid.com/uploads/images/gallery/2022-06/image-1654785419948.png) [![image-1654785472665.png](https://bookstack.soffid.com/uploads/images/gallery/2022-06/scaled-1680-/image-1654785472665.png)
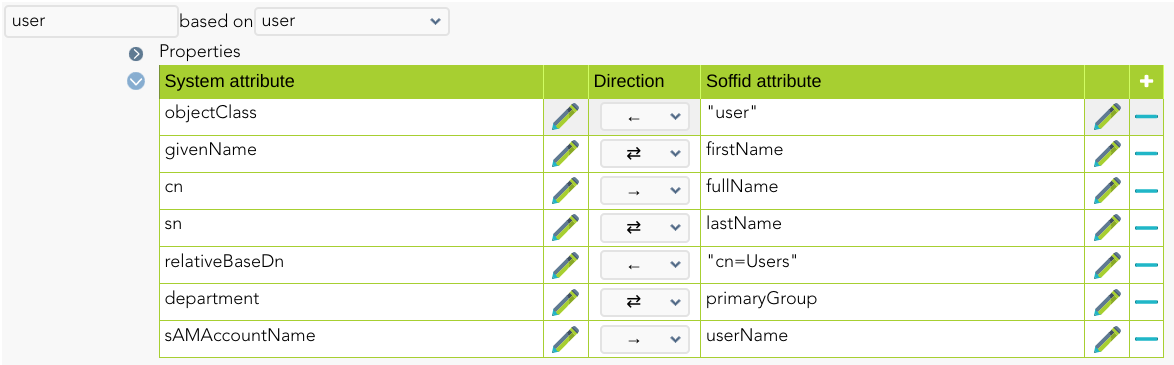
](https://bookstack.soffid.com/uploads/images/gallery/2022-06/image-1654785472665.png) #### Triggers You can define BeanShell scripts that will be triggered when data is loaded into the target system (outgoing triggers). The trigger result will be a boolean value, true to continue or false to stop. Triggers can be used to validate or perform a specific action just before performing an operation or just after performing an operation on target objects.

To view some examples, visit the [Outgoing triggers examples page](https://bookstack.soffid.com/books/connectors/page/outgoing-triggers-examples "Outgoing triggers examples").

## Avoid incremental load authoritative The Customizable Active Directory connector has an incremental load authoritative process. When this process is executed, it requests the changes to Active Directory after the **uSNChanged**. The value of this field is saved in Soffid in the parameter **soffid.sync.authoritative.change.NAME\_OF\_THE\_AGENT**

If you want to launch a complete load authoritative process, remove this parameter first. At the end of the process, the parameter will be generated automatically.

For more information, go to the [Soffid Parameters page](https://bookstack.soffid.com/books/soffid-3-reference-guide/page/soffid-parameters "Soffid parameters"). ## Password Rotation When you are configuring password rotation using Windows Connector, it could be necessary to make some changes in the local computar policies. The Local Computer Policies on the target Windows server mentioned below: - **User Account Control: Admin Approval Mode for Built-in Administrator Account** - **User Account Control: Run All Administrator in Admin Approval Mode** Need to be disabled for PAM application to connect target server and reset password of privilege accounts. If the Policies are originally in ‘Enabled’ mode, then after disabling them a system restart may required for the Policies to get applied on target servers properly. To check the User Access Policies on servers, follow below mentioned path: Open group policy editor **Run > gpedit.msc > Local Computer Policy > Windows Settings > Security Settings > Local Policies > Security Options > select policy ‘User Account Control: Run all administrators in Admin Approval Mode’ and ‘User Account Control: Run All Administrator in Admin Approval Mode’ and select Disabled and apply > OK**. # HOWTO SSL access to Active Directory Table of Contents - [Introduction](#bkmrk-introduction). - [Installing the Certificate Services](#bkmrk-installing-the-certi). - [Configuring Automatic Certificate Request for Domain Controllers.](#bkmrk-configuring-automati) - [Check for Issued Certificate](#bkmrk-check-for-issued-cer). - [Import certificate](#bkmrk-import-certificate). ## Introduction This howto will show you how to install the Certificate Services in Windows Acive Directory Servers. Before beginning, make sure the Internet Information Server (IIS) is installed in your server. ## Installing the Certificate Services 1\. Click Start, select Control Panel and click Add or Remove Programs. [![WIN Connector - Installing 1.png](https://bookstack.soffid.com/uploads/images/gallery/2021-04/scaled-1680-/win-connector-installing-1.png)
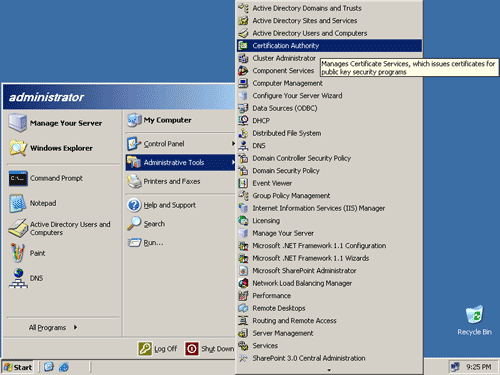
](https://bookstack.soffid.com/uploads/images/gallery/2021-04/win-connector-installing-1.png) 2\. In the Add or Remove Programs window, click Add/Remove Windows Components, check the Certificate Services and click Next. [![WIN Connector - Installing 2.png](https://bookstack.soffid.com/uploads/images/gallery/2021-04/scaled-1680-/win-connector-installing-2.png)
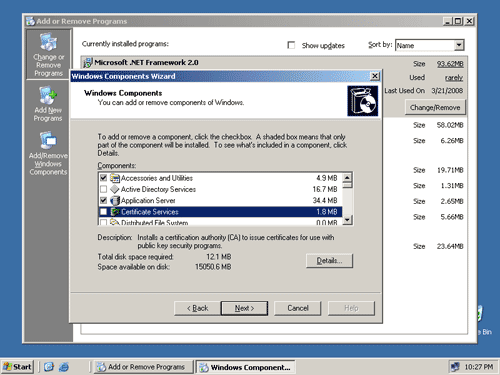
](https://bookstack.soffid.com/uploads/images/gallery/2021-04/win-connector-installing-2.png) 3\. Click Next in the CA Type page. [![WIN Connector - Installing 3.png](https://bookstack.soffid.com/uploads/images/gallery/2021-04/scaled-1680-/win-connector-installing-3.png)
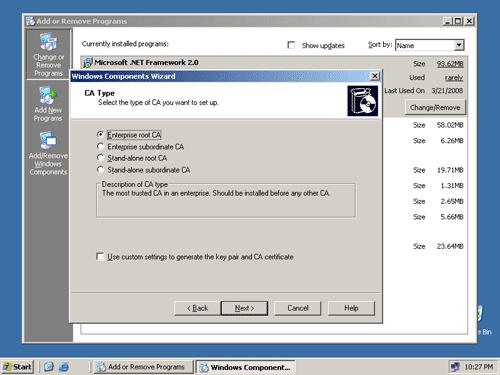
](https://bookstack.soffid.com/uploads/images/gallery/2021-04/win-connector-installing-3.png) 4\. Fill up the Common name for this CA and click Next. [![WIN Connector - Installing 4.png](https://bookstack.soffid.com/uploads/images/gallery/2021-04/scaled-1680-/win-connector-installing-4.png)
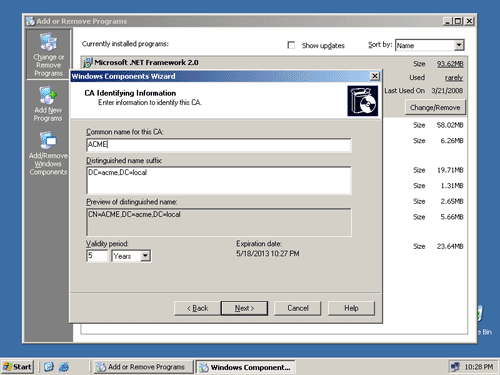
](https://bookstack.soffid.com/uploads/images/gallery/2021-04/win-connector-installing-4.png) 5\. Click Next in the Certificate Database Settings page. [![WIN Connector - Installing 5.png](https://bookstack.soffid.com/uploads/images/gallery/2021-04/scaled-1680-/win-connector-installing-5.png)
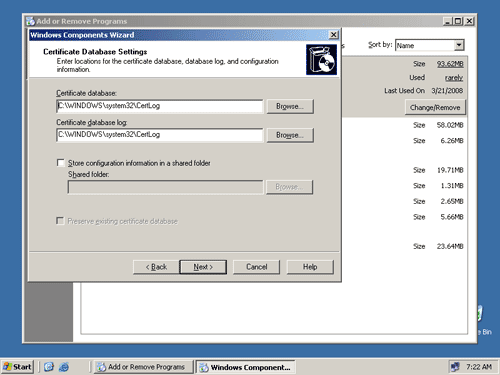
](https://bookstack.soffid.com/uploads/images/gallery/2021-04/win-connector-installing-5.png) 6\. The Certificate Services will now be installed. [![WIN Connector - Installing 6.png](https://bookstack.soffid.com/uploads/images/gallery/2021-04/scaled-1680-/win-connector-installing-6.png)
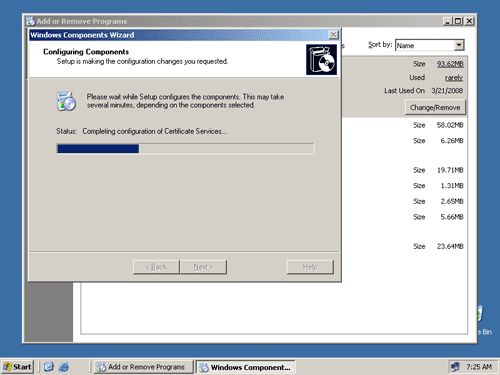
](https://bookstack.soffid.com/uploads/images/gallery/2021-04/win-connector-installing-6.png) 7\. Click Finish and restart your server. [![WIN Connector - Installing 7.png](https://bookstack.soffid.com/uploads/images/gallery/2021-04/scaled-1680-/win-connector-installing-7.png)
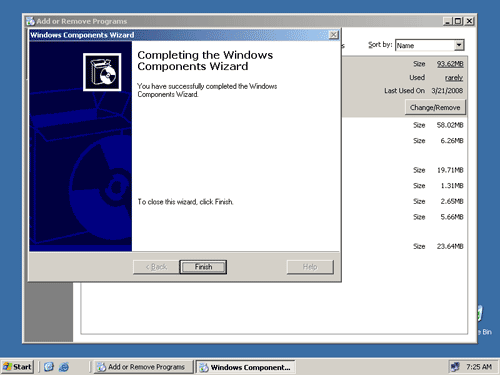
](https://bookstack.soffid.com/uploads/images/gallery/2021-04/win-connector-installing-7.png) ## Configuring Automatic Certificate Request for Domain Controllers 1\. Click Start, select Administrative Tools and click Domain Controller Security Policy. [![WIN Connector - Configuring 1.png](https://bookstack.soffid.com/uploads/images/gallery/2021-04/scaled-1680-/win-connector-configuring-1.png)
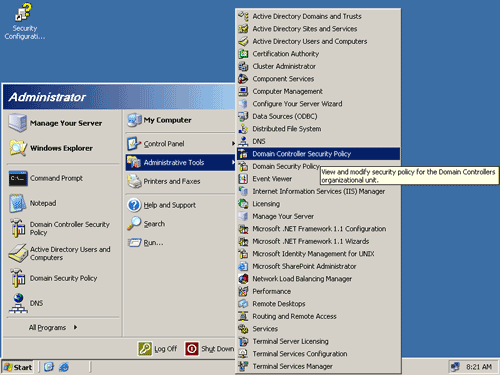
](https://bookstack.soffid.com/uploads/images/gallery/2021-04/win-connector-configuring-1.png) 2\. In the Default Domain Controller Security Settings window, click the Public Key Policies folder. [![WIN Connector - Configuring 2.png](https://bookstack.soffid.com/uploads/images/gallery/2021-04/scaled-1680-/win-connector-configuring-2.png)
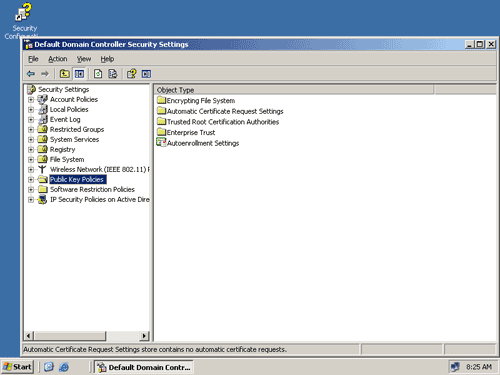
](https://bookstack.soffid.com/uploads/images/gallery/2021-04/win-connector-configuring-2.png) 3\. Right click Automatic Certificate Request Settings, select New and click Automatic Certificate Request. [![WIN Connector - Configuring 3.png](https://bookstack.soffid.com/uploads/images/gallery/2021-04/scaled-1680-/win-connector-configuring-3.png)
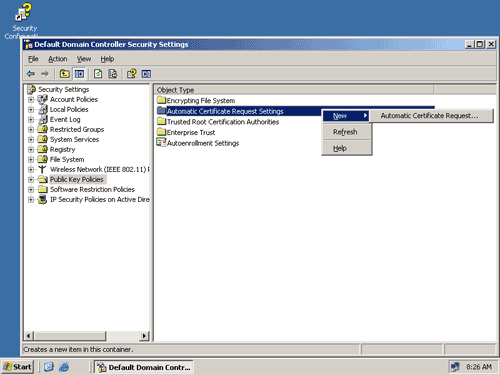
](https://bookstack.soffid.com/uploads/images/gallery/2021-04/win-connector-configuring-3.png) 4\. Click Next in the Automatic Certificate Request Setup Wizard [![WIN Connector - Configuring 4.png](https://bookstack.soffid.com/uploads/images/gallery/2021-04/scaled-1680-/win-connector-configuring-4.png)](https://bookstack.soffid.com/uploads/images/gallery/2021-04/win-connector-configuring-4.png) 5\. Select Domain Controller in the Certificate Template page and click Next [![WIN Connector - Configuring 5.png](https://bookstack.soffid.com/uploads/images/gallery/2021-04/scaled-1680-/win-connector-configuring-5.png)
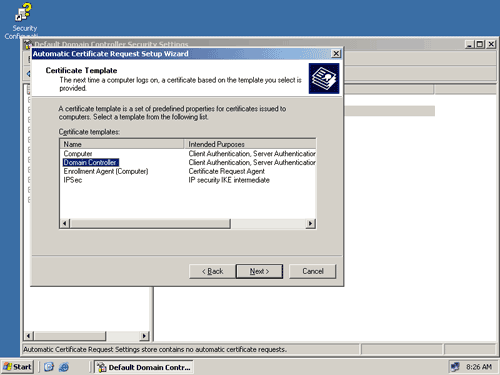
](https://bookstack.soffid.com/uploads/images/gallery/2021-04/win-connector-configuring-5.png) 6\. Click Finish and reboot your server. [![WIN Connector - Configuring 6.png](https://bookstack.soffid.com/uploads/images/gallery/2021-04/scaled-1680-/win-connector-configuring-6.png)
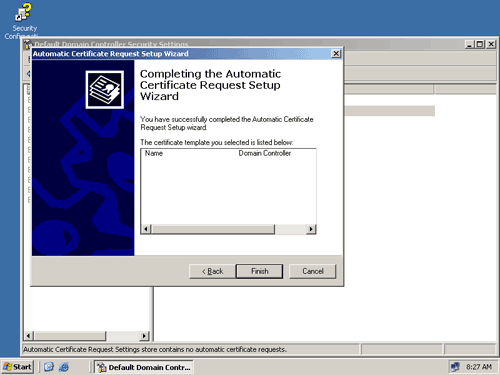
](https://bookstack.soffid.com/uploads/images/gallery/2021-04/win-connector-configuring-6.png) ## Check for Issued Certificate 1\. Click Start, select Administrative Tools and click Certification Authority. This will launch the Certification Authority application. [![WIN Connector - Check 1.png](https://bookstack.soffid.com/uploads/images/gallery/2021-04/scaled-1680-/win-connector-check-1.png)](https://bookstack.soffid.com/uploads/images/gallery/2021-04/win-connector-check-1.png) 2\. In Certification Authority, click the + sign and check the Issued Certificates folder if your server has been issued a certificate. [![WIN Connector - Check 2.png](https://bookstack.soffid.com/uploads/images/gallery/2021-04/scaled-1680-/win-connector-check-2.png)](https://bookstack.soffid.com/uploads/images/gallery/2021-04/win-connector-check-2.png) ## Import certificate 1\. Select the certificate and open it. Select the "Certification Path" tab and select the root certificate. [![WIN Connector - Import 1.png](https://bookstack.soffid.com/uploads/images/gallery/2021-04/scaled-1680-/win-connector-import-1.png)](https://bookstack.soffid.com/uploads/images/gallery/2021-04/win-connector-import-1.png) 2\. Click on "View Certificate" button and navigate to "Details" tab. [![WIN Connector - Import 2.png](https://bookstack.soffid.com/uploads/images/gallery/2021-04/scaled-1680-/win-connector-import-2.png)
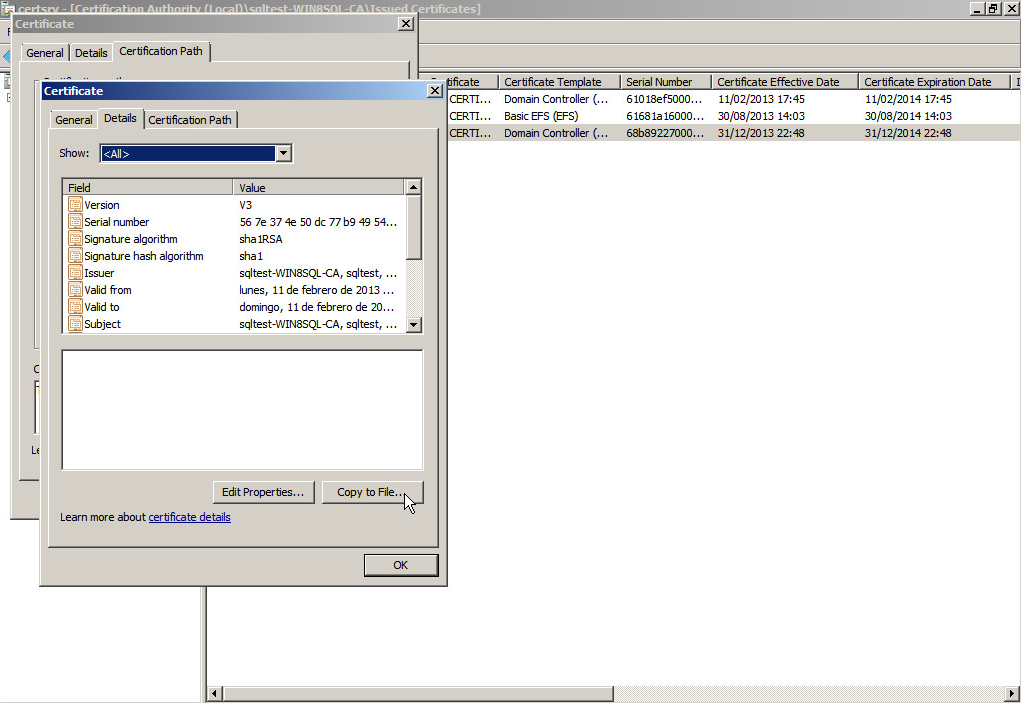
](https://bookstack.soffid.com/uploads/images/gallery/2021-04/win-connector-import-2.png) 3\. Click on "Copy to File..." button and follow the export steps to obtain the certificate. [![WIN Connector - Import 3.png](https://bookstack.soffid.com/uploads/images/gallery/2021-04/scaled-1680-/win-connector-import-3.png)
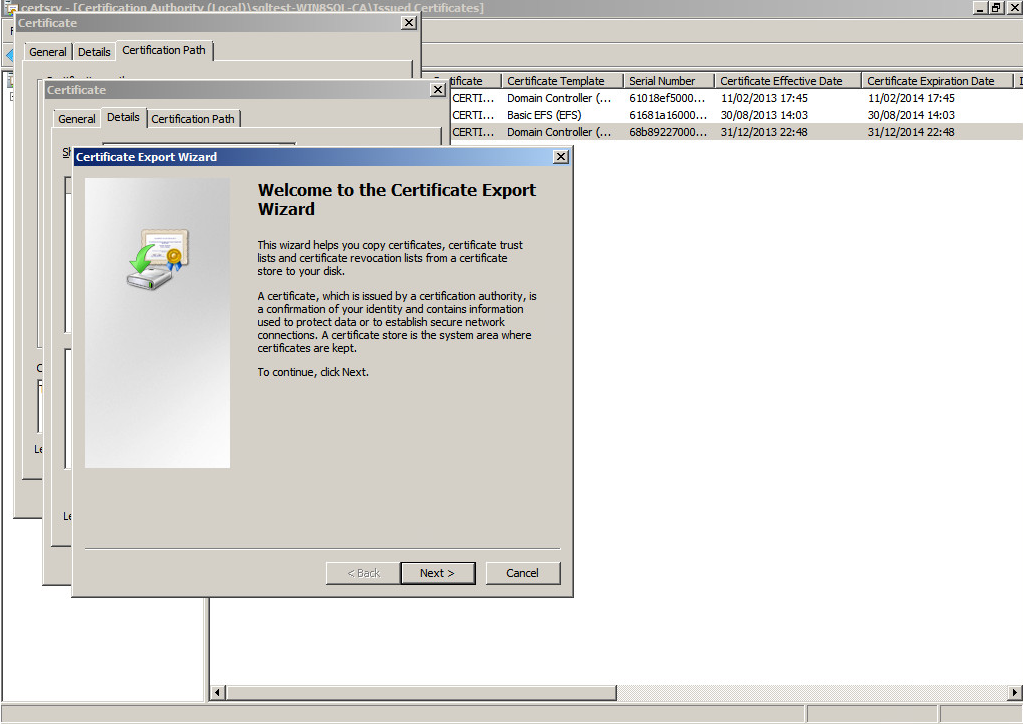
](https://bookstack.soffid.com/uploads/images/gallery/2021-04/win-connector-import-3.png) 4\. Open cmd and go to the soffid-iam-sync instalation directory and execute: ```shell jre\bin\keytool -import -file “file” -keystore conf\cacerts -alias AD_CERT ``` Afterwards, the console will ask you for a password. Type the default password: changeit and press enter. # Invoker interface for Active Directory Any agent, trigger or mapping can use the invoker method for the ActiveDirectory agent. The invoker method is available in the dispatcherService class. The invoker method is not specific of the Active Directory agent. Many other connectors support this method. The expected arguments are: - Action - Object name - Parameters Here you have an example of a post-update trigger to create the home server for a user: ```Java map = new HashMap(); String server = "//"+source{"homeServer"}+"/"+source{"accountName"}; // Create folder f = dispatcherService.invoke("smb:mkdir", server, map); // Add administrator ACL map.put("user", "soffid_admin"); map.put("permission", "GENERIC_ALL"); map.put("flags", "CONTAINER_INHERIT_ACE OBJECT_INHERIT_ACE"); f = dispatcherService.invoke("smb:addacl", path, map); // Add user ACL map.put("user", source{"accountName"}); f = dispatcherService.invoke("smb:addacl", path, map); // Change folder ownership using a domain admin account map.put("_auth_user", "user1"); map.put("_auth_domain", "domain1"); map.put("_auth_password", "SuperSecret"); f = dispatcherService.invoke("smb:setOwner", path, map); ``` The example above uses the smb:mkdir action to create the folder, the smb:addacl to add a new access control list entry. Other commands allow the query and modification of Active Directory objects like users and groups. The list of allowed commands are:
**Command** **Object name** **Parameters** **Comments**
insert Object distinguished name Object attributes Creates a new active directory object
update Object distinguished name Object attributes Modifies an existing active directory object. Only the attributes present in the map will be updated
delete Object distinguished name - Removes an existing active directory object.
select Base distinguished name Object criteria attribute Search for any object with the values specified in the parameters map, starting in the specified base DN. The return value is a list of maps. Each element in the list is an Active Directory object
get Object distinguished name - Returns the object with the specified object DN. The return value is a list containing one or no maps. The map, if exists, contain the object attributes
smb:mkdir Shared file Optionally: - \_auth\_user - \_auth\_password - \_auth\_domain Creates the shared folder. The shared folder name should follow the syntax //server/sharedFolder/Path or \\\\server\\\\sharedFolder\\Path It is recommended to use the first syntax because the second one requires the script to escape any backslash character, leading to a harder to read script
smb:exist Shared file Optionally: - \_auth\_user - \_auth\_password - \_auth\_domain Returns a list with a single map. The map has the attribute exist with a boolean value indicating whether the file exists or not
smb:rmdir Shared file Optionally: - \_auth\_user - \_auth\_password - \_auth\_domain Removes the full directory and any file or directory within
smb:rm Shared file Optionally: - \_auth\_user - \_auth\_password - \_auth\_domain Removes the file or directory. The command will fail if the directory is not empty.
smb:getacl Shared file Optionally: - \_auth\_user - \_auth\_password - \_auth\_domain Returns a list of maps representing each access control list entry for that file or folder. Each map has three values: - user: The user or group name. When the user or group is unknown, the user or group SID is used. - permission: A text string with the permissions granted with that ACE. The string contains one or more of these values concatenated: - FILE\_READ\_DATA - FILE\_WRITE\_DATA - FILE\_APPEND\_DATA - FILE\_EXECUTE - FILE\_LIST\_DIRECTORY - FILE\_ADD\_FILE - FILE\_ADD\_SUBDIRECTORY - FILE\_TRAVERSE - FILE\_DELETE\_CHILD - FILE\_READ\_ATTRIBUTES - FILE\_WRITE\_ATTRIBUTES - FILE\_READ\_EA - FILE\_WRITE\_EA - DELETE - READ\_CONTROL - WRITE\_DAC - WRITE\_OWNER - SYNCHRONIZE - ACCESS\_SYSTEM\_SECURITY - MAXIMUM\_ALLOWED - GENERIC\_ALL - GENERIC\_EXECUTE - GENERIC\_WRITE - GENERIC\_READ - flags: A text string with the inheritance flags for that ACE. The string contains one or more of these values concatenated: - CONTAINER\_INHERIT\_ACE - FAILED\_ACCESS\_ACE\_FLAG - INHERIT\_ONLY\_ACE - INHERITED\_ACE - NO\_PROPAGATE\_INHERIT\_ACE - OBJECT\_INHERIT\_ACE - SUCCESSFUL\_ACCESS\_ACE\_FLAG
smb:addacl Shared file Map with these three values: - user - permission - flags And optionally, these ones: - \_auth\_user - \_auth\_password - \_auth\_domain Adds an access control list with the specified permission and flags
smb:removeacl Shared file Map with these three values: - user - permission - flags And optionally, these ones: - \_auth\_user - \_auth\_password - \_auth\_domain Remove the access control list entry that matches the map. If the permission or flag is missing, the connector will remove any access control list entry for the specified user
smb:setowner Shared file Map with the value: - user And optionally, these ones: - \_auth\_user - \_auth\_password - \_auth\_domain Sets the directory owner to the one specified in the map
By default, actions are performed by the account used to configure the AD connector, but sometimes, another account must be used, mainly when dealing with NAS servers. In order to user custom credentials SMB commands accept three special parameters: \_auth\_user, \_auth\_password and \_auth\_domain. If this parameters are null, the agent user and password is used. # Active Directory back channel configuration ## Introduction **Active Directory Back Channe**l refers to a mechanism that allows Soffid to synchronize user information with an external Active Directory (AD) server in real-time or near real-time (Password synchronizer). This synchronization ensures that both Soffid and AD maintain consistent and up-to-date data. ### How it works? The Password Synchronizer installs a service. This service is responsible for buffering passwords when they cannot be sent because the Sync Server is not available. If the Sync Server is not available, the passwords are stored in an encrypted local file. When connectivity to the Sync Server is restored, the passwords are sent. 1\. The AD sends the password to Soffid to verify that it complies with Soffid policy. 2\. If it complies, the password is updated in the AD. 3\. The password is sent to Soffid and the PropagatePassword task is created. 4\. If the AD agent confirms that the new password has been saved, Soffid synchronizes it with the other systems. ## How to install Active Directory back channel? ### Download In order to configure the Active Directory back-channel, you must use the eris command line tool. To do this, please, download the Password Synchronizer from our [download portal](https://download.soffid.com/download/enterprise/):
💻 Image [![image.png](https://bookstack.soffid.com/uploads/images/gallery/2024-09/scaled-1680-/1yGT7TjizrUrCvmT-image.png)](https://bookstack.soffid.com/uploads/images/gallery/2024-09/1yGT7TjizrUrCvmT-image.png)
### Installation First of all, you must install the Windows package "**Password synchronizer-3.0.x.msi**" Once installed Password Synchronizer on your system, please change to eris or eris64 directory (\\ProgramFiles\\Soffid\\eris64) and execute: ``` eris-ad-service install ``` ### Configuration Finally, you must configute the Password Synchronizer executing the following command: ```shell eris-ad-service CONFIGURE url-syncserver agent-name ``` - **url-syncserver** is the master sync server url (http://master.dom.dom:port) - **agent-name** is the agent code name configured on Soffid console. *To see more information when configuring use | more.* ##### Example ``` eris-ad-service CONFIGURE https://sync-server.netcompose:1760/ "AD soffid.pat" | more ```
💻 Image [![image.png](https://bookstack.soffid.com/uploads/images/gallery/2024-09/scaled-1680-/aclMeSvWytJZzE76-image.png)](https://bookstack.soffid.com/uploads/images/gallery/2024-09/aclMeSvWytJZzE76-image.png)
**Mind that, completed this step, the domain controller must be restarted to end the configuration properly.** ### Configuration test In order to test configuration, you must use the eris command line tool. ```bash eris-ad-service TEST user pass ``` Where user and pass can be **dummy**. If you use a real one it will be propagated to the system. *To see more information during test use | more.* ##### Example ``` eris-ad-service TEST aretha password | more ```
💻 Image [![image.png](https://bookstack.soffid.com/uploads/images/gallery/2024-09/scaled-1680-/gJVyMEX84ypmdODw-image.png)](https://bookstack.soffid.com/uploads/images/gallery/2024-09/gJVyMEX84ypmdODw-image.png) Generated Task in the AD agent [![image.png](https://bookstack.soffid.com/uploads/images/gallery/2024-09/scaled-1680-/6sSpHMs3QIR6QySu-image.png)](https://bookstack.soffid.com/uploads/images/gallery/2024-09/6sSpHMs3QIR6QySu-image.png)
# AD Integration flows - Update user ## Update ### Introduction Soffid provides a workflow to modify and/or delete a user in the final system. In it, we can see each of the steps of which this process is composed. ### Diagram [![image-1661426896997.png](https://bookstack.soffid.com/uploads/images/gallery/2022-08/scaled-1680-/image-1661426896997.png)](https://bookstack.soffid.com/uploads/images/gallery/2022-08/image-1661426896997.png) ### Step by Step In this document, we will explain the process that Soffid performs to modify a user for the AD connector. #### 1. Initial step First of all, Soffid checks if the user exists in Soffid and then checks the operation to perform, update or delete. **1.1.** If the **user does not exist in Soffid**, then Soffid asks to delete the user in the target System.
❓ Warning message ![image-1659534714096.png](https://bookstack.soffid.com/uploads/images/gallery/2022-08/scaled-1680-/image-1659534714096.png)
**1.1.1. Yes**: If the answer is Yes, the process follows through the Yes branch,[ \[3. Delete branch\]](#bkmrk-4.-delete-branch). **1.1.2. No**: If the answer is Yes, the process finishes [\[10. End\]](#bkmrk-x.-end). **1.2.** If the **user exists in Soffid**, the process continues through \[[2. User to remove?\]](#bkmrk-2.-user-to-remove). to check if the #### 2. User to remove?
📌 By clicking on the User to remove? step,... You can configure all the properties related to the user object for this step [![image-1661421084985.png](https://bookstack.soffid.com/uploads/images/gallery/2022-08/scaled-1680-/image-1661421084985.png)](https://bookstack.soffid.com/uploads/images/gallery/2022-08/image-1661421084985.png)
**2.1.** If the user is **marked for Deletion**, Soffid will ask for user consent to continue with the process or to cancel it. If the answer is Yes, the process follows through the Yes branch, [\[3. Delete branch\]](#bkmrk-4.-delete-branch).
❓ Warning message ![image-1659534714096.png](https://bookstack.soffid.com/uploads/images/gallery/2022-08/scaled-1680-/image-1659534714096.png)
**2.2.** If the user is **marked for Update**, it continues with the flow following through the No branch, [\[4. Insert or Update branch\]](#bkmrk--1). #### 3. Delete branch
📊 Diagram [![image-1661440073073.png](https://bookstack.soffid.com/uploads/images/gallery/2022-08/scaled-1680-/image-1661440073073.png)](https://bookstack.soffid.com/uploads/images/gallery/2022-08/image-1661440073073.png)
**3.1.** When the operation to perform is to delete a user, first of all, Soffid has to check if the user exists in the target system. **3.1.1.** If the **user does not exist**, there are no actions to perform in the target system, so the process finishes [\[10. End\]](#bkmrk-x.-end). **3.1.2.** If the **user exists**, the flow continues executing the **pre-delete triggers** if there is anyone configured. More than one script can be configured. These scripts are executed just before the main action, user delete, and the result (true or false) determines if the main action will be performed or not. **3.1.2.1. False**: if the result is false for one or more of these triggers, the process finishes [\[10. End\]](#bkmrk-x.-end). **3.1.2.2.True**: if the result is true for all of these triggers, Soffid continues to the next step.
📌 By clicking on the Pre-delete triggers step,... You can configure all the pre-delete triggers related to the user object for this step. [![image-1661427702845.png](https://bookstack.soffid.com/uploads/images/gallery/2022-08/scaled-1680-/image-1661427702845.png)](https://bookstack.soffid.com/uploads/images/gallery/2022-08/image-1661427702845.png)
**3.1.3.** Soffid **removes the AD user** in the Active directory. **3.1.3.** Then Soffid executes the **post-delete triggers** if any. These triggers can be used to perform a specific action just after performing the remove user operation on the target object.
📌 By clicking on the Post-delete triggers step,... You can configure the post-delete triggers related to the user object for this step. [![image-1661427821300.png](https://bookstack.soffid.com/uploads/images/gallery/2022-08/scaled-1680-/image-1661427821300.png)](https://bookstack.soffid.com/uploads/images/gallery/2022-08/image-1661427821300.png)
**3.1.3.** Then the process finishes [\[10. End\]](#bkmrk-x.-end). #### 4. Insert or Update branch **4.1.** When the operation to perform is to update a user, first of all, Soffid **generates the AD user**. That is, Soffid calculates the values of the AD user object from the original values of Soffid.
📌 By clicking on the generate AD user step,... You can configure the attributes related to the user object for this step. [![image-1661430867005.png](https://bookstack.soffid.com/uploads/images/gallery/2022-08/scaled-1680-/image-1661430867005.png)](https://bookstack.soffid.com/uploads/images/gallery/2022-08/image-1661430867005.png)
**4.2.**Then Soffid asks if the **user exists** in the target system to decide the action to execute, this action can be an update or an insert. **4.2.1.** If the **user does not exist** in the target system, the process continues through [\[5. Insert user branch\]](#bkmrk-5.-insert-user-branc). **4.2.2.** If the **user exists** in the target system, the process continues through [\[](#bkmrk-6.-update-user%C2%A0branc)[6. Update user branch\]](#bkmrk-6.-update-user%C2%A0branc). #### 5. Insert user branch
📊 Diagram [![image-1661440189859.png](https://bookstack.soffid.com/uploads/images/gallery/2022-08/scaled-1680-/image-1661440189859.png)](https://bookstack.soffid.com/uploads/images/gallery/2022-08/image-1661440189859.png)
**5.1.** Soffid executes the **pre-insert triggers** if there is anyone configured. More than one script can be configured. These scripts are executed just before the main action, user creates, and the result (true or false) determines if the main action will be performed or not. **5.1.1. False**: if the response is false for one or more of these triggers, the process finishes [\[10. End\]](#bkmrk-x.-end) and the user is not created in the target system. **5.1.2. True**: if the response is true for all of these triggers, Soffid continues to the next step. **5.2.** Soffid **creates AD** **user** in the Active directory **5.3.** Then Soffid executes **post-insert triggers** if any. These triggers can be used to perform a specific action just after performing the create user operation on the target object.
📌 By clicking on the Post-insert triggers step,... You can configure the Post-insert triggers related to the user object for this step. [![image-1660290613568.png](https://bookstack.soffid.com/uploads/images/gallery/2022-08/scaled-1680-/image-1660290613568.png)](https://bookstack.soffid.com/uploads/images/gallery/2022-08/image-1660290613568.png)
**5.4.** Then the process continues through [\[7. Groups\]](#bkmrk-5.-xxxx). #### 6. Update user branch
📊 Diagram [![image-1661440155417.png](https://bookstack.soffid.com/uploads/images/gallery/2022-08/scaled-1680-/image-1661440155417.png)](https://bookstack.soffid.com/uploads/images/gallery/2022-08/image-1661440155417.png)
**6.1.** Soffid checks if there are **any change** between the generated object and the values of the object in the target system. **6.1.1. False**: if there are no changes, the process finishes [\[10. End\]](#bkmrk-x.-end)**.** **6.1.2. True**: if there are changes to update, Soffid continues to the next step. **6.2.** Soffid executes the **pre-update triggers** if there is anyone configured. More than one script can be configured. These scripts are executed just before the main action, user update, and the result (true or false) determines if the main action will be performed or not. **6.2.1. False**: if the response is false for one or more of these triggers, the process finishes [\[10. End\]](#bkmrk-x.-end) and the user is not updated in the target system **6.2.2. True**: if the response is true for all of these triggers, Soffid continues to the next step.
📌 By clicking on the Pre-update triggers step,... You can configure the Pre-update triggers related to the user object for this step. [![image-1660305125794.png](https://bookstack.soffid.com/uploads/images/gallery/2022-08/scaled-1680-/image-1660305125794.png)](https://bookstack.soffid.com/uploads/images/gallery/2022-08/image-1660305125794.png)
**6.3.** Soffid **updates the AD user** in the Active directory
📌 By clicking on the update user step,... You can configure the properties related to the user object for this step. [![image-1661431455021.png](https://bookstack.soffid.com/uploads/images/gallery/2022-08/scaled-1680-/image-1661431455021.png)](https://bookstack.soffid.com/uploads/images/gallery/2022-08/image-1661431455021.png)
**6.4.** Then Soffid executes the **post-update triggers** if any. These triggers can be used to perform a specific action just after performing the update user operation on the target object.
📌 By clicking on the Post-update triggers step,... You can configure the Post-update triggers related to the user object for this step. [![image-1661500966301.png](https://bookstack.soffid.com/uploads/images/gallery/2022-08/scaled-1680-/image-1661500966301.png)](https://bookstack.soffid.com/uploads/images/gallery/2022-08/image-1661500966301.png)
**6.6.** Then the process continues through [\[7. Grants\]](#bkmrk-5.-xxxx). #### 7. Grants At this point, Soffid runs the actions relative to the grants. The operations can be to add the user to one or more groups or to remove the user from existing groups. #### 8**.** Group to remove This is a loop while there are groups to remove.
📊 Diagram [![image-1661440287892.png](https://bookstack.soffid.com/uploads/images/gallery/2022-08/scaled-1680-/image-1661440287892.png)](https://bookstack.soffid.com/uploads/images/gallery/2022-08/image-1661440287892.png)
**8.1.** If there are **No** groups to remove, the process goes to [\[9. Group to add\]](#bkmrk-9.-grant-to-remove). **8.2. Yes,** there are groups to remove: **8.2.1.** Soffid executes the **pre-delete triggers** if there is anyone configured. More than one script can be configured. These scripts are executed just before the main action, a **Remove user to group**, and the result (true or false) determines if the main action will be performed or not. **8.2.1.1. False**: if the response is false for one or more of these triggers, the process goes to [\[8. Group to remove\]](#bkmrk-6.%C2%A0grant-to-add) and the grant is not created. **8.2.1.2. True**: if the response is true for all of these triggers, Soffid continues to the next step.
📌 By clicking on the Pre-delete triggers step,... You can configure the Pre-delete triggers related to the grant object for this step. [![image-1661497389637.png](https://bookstack.soffid.com/uploads/images/gallery/2022-08/scaled-1680-/image-1661497389637.png)](https://bookstack.soffid.com/uploads/images/gallery/2022-08/image-1661497389637.png)
**8.2.3.** If the result of the triggers is true, then Soffid **adds the user to a group.** **8.2.4.** Then Soffid executes the **post-insert triggers** if any. These triggers can be used to perform a specific action just after performing the create grant operation on the target object.
📌 By clicking on the Post-delete triggers column values step,... You can configure the Post-Update related to the grant object for this step. [![image-1661497647604.png](https://bookstack.soffid.com/uploads/images/gallery/2022-08/scaled-1680-/image-1661497647604.png)](https://bookstack.soffid.com/uploads/images/gallery/2022-08/image-1661497647604.png)
**8.2.5.** Then the process continues through [\[8. Grant to add\]](#bkmrk-6.%C2%A0grant-to-add). #### 9. Group to add
📊 Diagram [![image-1661440333930.png](https://bookstack.soffid.com/uploads/images/gallery/2022-08/scaled-1680-/image-1661440333930.png)](https://bookstack.soffid.com/uploads/images/gallery/2022-08/image-1661440333930.png)
This is a loop while there are grants to remove. This grants list comes from the previous step \[7. Grants\]. **9.1 No**: If there are No grants to add, the process goes to [\[10. End\]](#bkmrk-x.-end). **9.2. Yes,** there are grants to remove: **9.2.1.** Soffid executes the **pre-insert triggers** if there is anyone configured. More than one script can be configured. These scripts are executed just before the main action, **Add user to group**, and the result (true or false) determines if the main action will be performed or not. **9.2.1.1. False**: if the response is false for one or more of these triggers, the process finishes [\[10. End\]](#bkmrk-x.-end) and the grant is not deleted. **9.2.1.2. True**: if the response is true for all of these triggers, Soffid continues to the next step.
📌 By clicking on the pre-delete trigger step,... You can configure the Pre-delete triggers related to the grant object for this step. [![image-1660651495130.png](https://bookstack.soffid.com/uploads/images/gallery/2022-08/scaled-1680-/image-1660651495130.png)](https://bookstack.soffid.com/uploads/images/gallery/2022-08/image-1660651495130.png)
**9.2.2. If the result of the triggers is true, then Soffid **adds the user to the group.** This operation can return a true or false result. **9.2.2.1. False:** the add action could not be performed and the process check for another grant [\[9. Group to add\]](#bkmrk-9.-grant-to-remove). **9.2.2.2. True:** the add action could be performed properly. Soffid continues to the next step. **9.2.3.** Then Soffid executes the **post-insert triggers** if any. These triggers can be used to perform a specific action just after performing the add grant operation on the target object.
📌 By clicking on the post-insert trigger step,... You can configure the Post-insert triggers related to the grant object for this step. [![image-1660661955749.png](https://bookstack.soffid.com/uploads/images/gallery/2022-08/scaled-1680-/image-1660661955749.png)](https://bookstack.soffid.com/uploads/images/gallery/2022-08/image-1660661955749.png)
**9.2.4.** Then the process continues through [\[9. Group to add\]](#bkmrk-9.-grant-to-remove). #### 10. End The process finishes and the log is displayed, and you can download it by clicking the *Download* button.
📑 Log detail [![image-1661500002798.png](https://bookstack.soffid.com/uploads/images/gallery/2022-08/scaled-1680-/image-1661500002798.png)](https://bookstack.soffid.com/uploads/images/gallery/2022-08/image-1661500002798.png)
# AD Integration flows - Update account ## Update ### Introduction Soffid provides a workflow to modify and/or delete an account in the final system. In it, we can see each of the steps of which this process is composed. ### Diagram [![image-1661502094418.png](https://bookstack.soffid.com/uploads/images/gallery/2022-08/scaled-1680-/image-1661502094418.png)](https://bookstack.soffid.com/uploads/images/gallery/2022-08/image-1661502094418.png) ### Step by Step In this document, we will explain the process that Soffid performs to modify an account for the AD connector. #### 1. Initial step First of all, Soffid checks if the account exists in Soffid and then checks the operation to perform, update or delete. **1.1.** If the **user does not exist in Soffid**, then Soffid asks to delete the user in the target System.
❓ Warning message ![image-1659534714096.png](https://bookstack.soffid.com/uploads/images/gallery/2022-08/scaled-1680-/image-1659534714096.png)
**1.1.1. Yes**: If the answer is Yes, the process follows through the Yes branch,[ \[3. Delete branch\]](https://bookstack.soffid.com/books/connectors/page/ad-integration-flows-update-user#bkmrk-4.-delete-branch). **1.1.2. No**: If the answer is Yes, the process finishes [\[10. End\]](https://bookstack.soffid.com/books/connectors/page/ad-integration-flows-update-user#bkmrk-x.-end).
**1.2.** If the **user exists in Soffid**, the process continues through \[[2. User to remove?\]](https://bookstack.soffid.com/books/connectors/page/ad-integration-flows-update-user#bkmrk-2.-user-to-remove). to check if the #### 2. Account to remove?
📌 By clicking on the Account to remove? step,... You can configure all the properties related to the account object for this step [![image-1661507222061.png](https://bookstack.soffid.com/uploads/images/gallery/2022-08/scaled-1680-/image-1661507222061.png)](https://bookstack.soffid.com/uploads/images/gallery/2022-08/image-1661507222061.png)
**2.1.** If the account is **marked for Deletion**, Soffid will ask for user consent to continue with the process or to cancel it. If the answer is Yes, the process follows through the Yes branch, [\[3. Delete branch\]](#bkmrk-4.-delete-branch).
❓ Warning message ![image-1659534714096.png](https://bookstack.soffid.com/uploads/images/gallery/2022-08/scaled-1680-/image-1659534714096.png)
**2.2.** If the account is **marked for Update**, it continues with the flow following through the No branch, [\[4. Insert or Update branch\]](#bkmrk--3). #### 3. Delete branch
📊 Diagram [![image-1661508089980.png](https://bookstack.soffid.com/uploads/images/gallery/2022-08/scaled-1680-/image-1661508089980.png)](https://bookstack.soffid.com/uploads/images/gallery/2022-08/image-1661508089980.png)
**3.1.** When the operation to perform is to delete an account, first of all, Soffid has to check if the account exists in the target system. **3.1.1.** If the **account does not exist**, there are no actions to perform in the target system, so the process finishes [\[10. End\]](#bkmrk-x.-end). **3.1.2.** If the **account exists**, the flow continues executing the **pre-delete triggers** if there is anyone configured. More than one script can be configured. These scripts are executed just before the main action, account delete, and the result (true or false) determines if the main action will be performed or not. **3.1.2.1. False**: if the result is false for one or more of these triggers, the process finishes [\[10. End\]](#bkmrk-x.-end). **3.1.2.2.True**: if the result is true for all of these triggers, Soffid continues to the next step.
📌 By clicking on the Pre-delete triggers step,... You can configure all the pre-delete triggers related to the user object for this step. [![image-1661427702845.png](https://bookstack.soffid.com/uploads/images/gallery/2022-08/scaled-1680-/image-1661427702845.png)](https://bookstack.soffid.com/uploads/images/gallery/2022-08/image-1661427702845.png)
**3.1.3.** Soffid **removes the AD user** in the Active directory. **3.1.3.** Then Soffid executes the **post-delete triggers** if any. These triggers can be used to perform a specific action just after performing the remove user operation on the target object.
📌 By clicking on the Post-delete triggers step,... You can configure the post-delete triggers related to the user object for this step. [![image-1661427821300.png](https://bookstack.soffid.com/uploads/images/gallery/2022-08/scaled-1680-/image-1661427821300.png)](https://bookstack.soffid.com/uploads/images/gallery/2022-08/image-1661427821300.png)
**3.1.3.** Then the process finishes [\[10. End\]](#bkmrk-x.-end). #### 4. Insert or Update branch **4.1.** When the operation to perform is to update a user, first of all, Soffid **generates the AD user**. That is, Soffid calculates the values of the AD user object from the original values of Soffid.
📌 By clicking on the generate AD user step,... You can configure the attributes related to the user object for this step. [![image-1661430867005.png](https://bookstack.soffid.com/uploads/images/gallery/2022-08/scaled-1680-/image-1661430867005.png)](https://bookstack.soffid.com/uploads/images/gallery/2022-08/image-1661430867005.png)
**4.2.**Then Soffid asks if the **user exists** in the target system to decide the action to execute, this action can be an update or an insert. **4.2.1.** If the **user does not exist** in the target system, the process continues through [\[5. Insert user branch\]](#bkmrk-5.-insert-user-branc). **4.2.2.** If the **user exists** in the target system, the process continues through [\[](#bkmrk-6.-update-user%C2%A0branc)[6. Update user branch\]](#bkmrk-6.-update-user%C2%A0branc). #### 5. Insert user branch
📊 Diagram [![image-1661508113071.png](https://bookstack.soffid.com/uploads/images/gallery/2022-08/scaled-1680-/image-1661508113071.png)](https://bookstack.soffid.com/uploads/images/gallery/2022-08/image-1661508113071.png)
**5.1.** Soffid executes the **pre-insert triggers** if there is anyone configured. More than one script can be configured. These scripts are executed just before the main action, user creates, and the result (true or false) determines if the main action will be performed or not. **5.1.1. False**: if the response is false for one or more of these triggers, the process finishes [\[10. End\]](#bkmrk-x.-end) and the user is not created in the target system. **5.1.2. True**: if the response is true for all of these triggers, Soffid continues to the next step. **5.2.** Soffid **creates AD** **user** in the Active directory **5.3.** Then Soffid executes **post-insert triggers** if any. These triggers can be used to perform a specific action just after performing the create user operation on the target object.
📌 By clicking on the Post-insert triggers step,... You can configure the Post-insert triggers related to the user object for this step. [![image-1660290613568.png](https://bookstack.soffid.com/uploads/images/gallery/2022-08/scaled-1680-/image-1660290613568.png)](https://bookstack.soffid.com/uploads/images/gallery/2022-08/image-1660290613568.png)
**5.4.** Then the process continues through [\[7. Groups\]](#bkmrk-5.-xxxx). #### 6. Update user branch
📊 Diagram [![image-1661508149332.png](https://bookstack.soffid.com/uploads/images/gallery/2022-08/scaled-1680-/image-1661508149332.png)](https://bookstack.soffid.com/uploads/images/gallery/2022-08/image-1661508149332.png)
**6.1.** Soffid checks if there are **any change** between the generated object and the values of the object in the target system. **6.1.1. False**: if there are no changes, the process finishes [\[10. End\]](#bkmrk-x.-end)**.** **6.1.2. True**: if there are changes to update, Soffid continues to the next step. **6.2.** Soffid executes the **pre-update triggers** if there is anyone configured. More than one script can be configured. These scripts are executed just before the main action, user update, and the result (true or false) determines if the main action will be performed or not. **6.2.1. False**: if the response is false for one or more of these triggers, the process finishes [\[10. End\]](#bkmrk-x.-end) and the user is not updated in the target system **6.2.2. True**: if the response is true for all of these triggers, Soffid continues to the next step.
📌 By clicking on the Pre-update triggers step,... You can configure the Pre-update triggers related to the user object for this step. [![image-1660305125794.png](https://bookstack.soffid.com/uploads/images/gallery/2022-08/scaled-1680-/image-1660305125794.png)](https://bookstack.soffid.com/uploads/images/gallery/2022-08/image-1660305125794.png)
**6.3.** Soffid **updates the AD user** in the Active directory
📌 By clicking on the update user step,... You can configure the properties related to the user object for this step. [![image-1661431455021.png](https://bookstack.soffid.com/uploads/images/gallery/2022-08/scaled-1680-/image-1661431455021.png)](https://bookstack.soffid.com/uploads/images/gallery/2022-08/image-1661431455021.png)
**6.4.** Then Soffid executes the **post-update triggers** if any. These triggers can be used to perform a specific action just after performing the update user operation on the target object.
📌 By clicking on the Post-update triggers step,... You can configure the Post-update triggers related to the user object for this step. [![image-1661500966301.png](https://bookstack.soffid.com/uploads/images/gallery/2022-08/scaled-1680-/image-1661500966301.png)](https://bookstack.soffid.com/uploads/images/gallery/2022-08/image-1661500966301.png)
**6.6.** Then the process continues through [\[7. Grants\]](#bkmrk-5.-xxxx). #### 7. Grants At this point, Soffid runs the actions relative to the grants. The operations can be to add the user to one or more groups or to remove the user from existing groups. #### 8**.** Group to remove This is a loop while there are groups to remove.
📊 Diagram [![image-1661508169038.png](https://bookstack.soffid.com/uploads/images/gallery/2022-08/scaled-1680-/image-1661508169038.png)](https://bookstack.soffid.com/uploads/images/gallery/2022-08/image-1661508169038.png)
**8.1.** If there are **No** groups to remove, the process goes to [\[9. Group to add\]](#bkmrk-9.-grant-to-remove). **8.2. Yes,** there are groups to remove: **8.2.1.** Soffid executes the **pre-delete triggers** if there is anyone configured. More than one script can be configured. These scripts are executed just before the main action, a **Remove user to group**, and the result (true or false) determines if the main action will be performed or not. **8.2.1.1. False**: if the response is false for one or more of these triggers, the process goes to [\[8. Group to remove\]](#bkmrk-6.%C2%A0grant-to-add) and the grant is not created. **8.2.1.2. True**: if the response is true for all of these triggers, Soffid continues to the next step.
📌 By clicking on the Pre-delete triggers step,... You can configure the Pre-delete triggers related to the grant object for this step. [![image-1661497389637.png](https://bookstack.soffid.com/uploads/images/gallery/2022-08/scaled-1680-/image-1661497389637.png)](https://bookstack.soffid.com/uploads/images/gallery/2022-08/image-1661497389637.png)
**8.2.3.** If the result of the triggers is true, then Soffid **adds the user to a group.** **8.2.4.** Then Soffid executes the **post-insert triggers** if any. These triggers can be used to perform a specific action just after performing the create grant operation on the target object.
📌 By clicking on the Post-delete triggers column values step,... You can configure the Post-Update related to the grant object for this step. [![image-1661497647604.png](https://bookstack.soffid.com/uploads/images/gallery/2022-08/scaled-1680-/image-1661497647604.png)](https://bookstack.soffid.com/uploads/images/gallery/2022-08/image-1661497647604.png)
**8.2.5.** Then the process continues through [\[8. Grant to add\]](#bkmrk-6.%C2%A0grant-to-add). #### 9. Group to add
📊 Diagram [![image-1661508179273.png](https://bookstack.soffid.com/uploads/images/gallery/2022-08/scaled-1680-/image-1661508179273.png)](https://bookstack.soffid.com/uploads/images/gallery/2022-08/image-1661508179273.png)
This is a loop while there are grants to remove. This grants list comes from the previous step \[7. Grants\]. **9.1 No**: If there are No grants to add, the process goes to [\[10. End\]](#bkmrk-x.-end). **9.2. Yes,** there are grants to remove: **9.2.1.** Soffid executes the **pre-insert triggers** if there is anyone configured. More than one script can be configured. These scripts are executed just before the main action, **Add user to group**, and the result (true or false) determines if the main action will be performed or not. **9.2.1.1. False**: if the response is false for one or more of these triggers, the process finishes [\[10. End\]](#bkmrk-x.-end) and the grant is not deleted. **9.2.1.2. True**: if the response is true for all of these triggers, Soffid continues to the next step.
📌 By clicking on the pre-delete trigger step,... You can configure the Pre-delete triggers related to the grant object for this step. [![image-1660651495130.png](https://bookstack.soffid.com/uploads/images/gallery/2022-08/scaled-1680-/image-1660651495130.png)](https://bookstack.soffid.com/uploads/images/gallery/2022-08/image-1660651495130.png)
**9.2.2. If the result of the triggers is true, then Soffid **adds the user to the group.** This operation can return a true or false result. **9.2.2.1. False:** the add action could not be performed and the process check for another grant [\[9. Group to add\]](#bkmrk-9.-grant-to-remove). **9.2.2.2. True:** the add action could be performed properly. Soffid continues to the next step. **9.2.3.** Then Soffid executes the **post-insert triggers** if any. These triggers can be used to perform a specific action just after performing the add grant operation on the target object.
📌 By clicking on the post-insert trigger step,... You can configure the Post-insert triggers related to the grant object for this step. [![image-1660661955749.png](https://bookstack.soffid.com/uploads/images/gallery/2022-08/scaled-1680-/image-1660661955749.png)](https://bookstack.soffid.com/uploads/images/gallery/2022-08/image-1660661955749.png)
**9.2.4.** Then the process continues through [\[9. Group to add\]](#bkmrk-9.-grant-to-remove). #### 10. End The process finishes and the log is displayed, and you can download it by clicking the *Download* button.
📑 Log detail [![image-1661508404245.png](https://bookstack.soffid.com/uploads/images/gallery/2022-08/scaled-1680-/image-1661508404245.png)](https://bookstack.soffid.com/uploads/images/gallery/2022-08/image-1661508404245.png)