Configuration wizard
Configuration wizard
- ⏰ Getting started
- IGA
- Connect Soffid IdaaS to your on-premise network
- Create identities (manually, CSV file or authoritative source)
- Add applications
- Design user life cycle workflows
- IRC
- Create SoD matrix
- Schedule weekly risk report
- Design a recertification campaign
- Create advanced authorization rules
- PAM
- Discover your assets
- Publish accounts in the password vault
- Create monitoring and recording policies
- Create MFA policies
- AM
⏰ Getting started
Introduction
Soffid provides you a 360° perspective of the identities of your organization employees, providers and customers:
- Identity governance to manage the identities life-cycle
- Access management identifies your users accessing applications, including multi-factor authentication
- Privileged access management tracks usage and access of service and system management accounts
- Identity risk and compliance
Screen overview
IGA
Identity Governance Administration
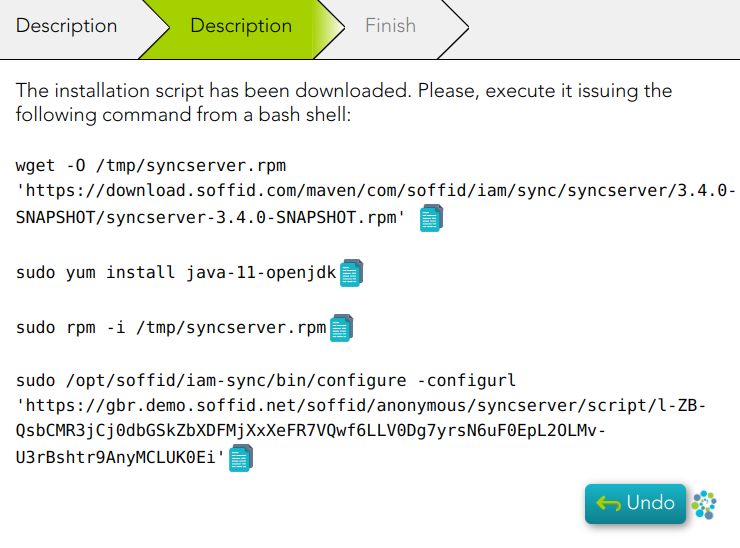
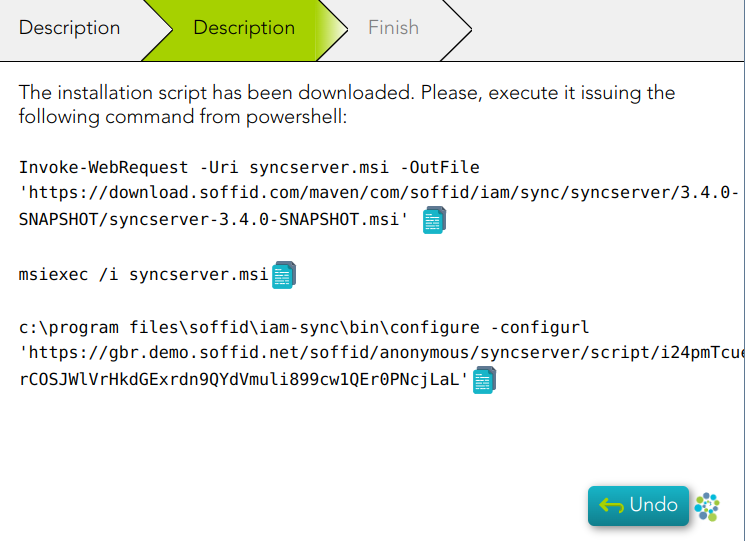
Connect Soffid IdaaS to your on-premise network
Description
In order to manage your information system, a component named Sync Server must be installed along with Soffid Console. You must choose one platform as your Sync Server Soffid host and follow the instructions.
Once you have run the corresponding scripts, Soffid will detect the new Sync server. You could check the new Sync server on the Synchronization servers page.
Step-by-step
1. First, you must select the platform and click the Next button
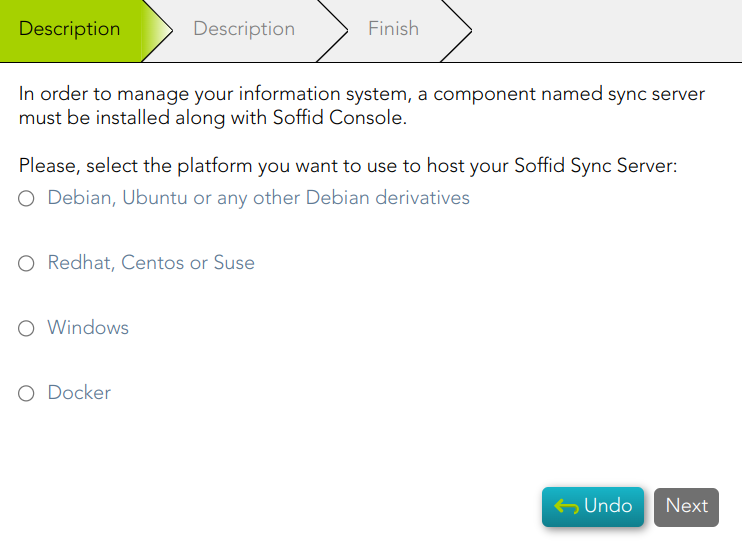
2. You must follow the instructions depending on the previous selection.
2.1. Debian, Ubuntu, or any other Debian derivatives

2.2. Redhat, Centos, or Suse
2.3. Windows
2.4. Docker
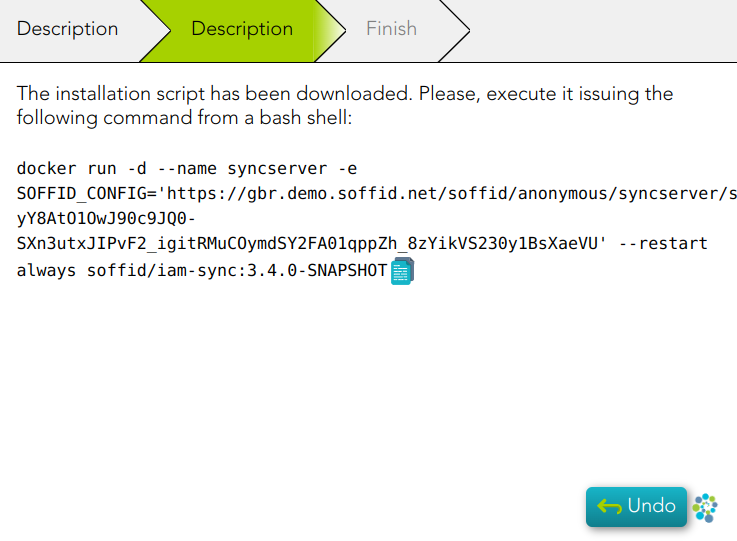
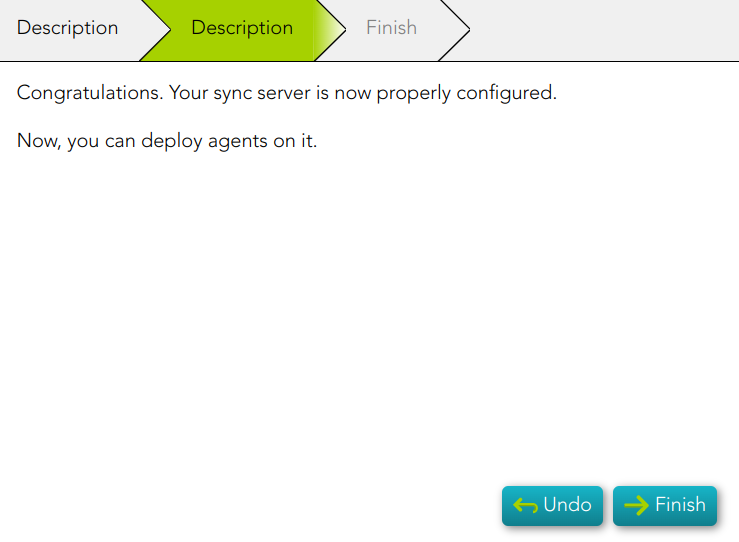
3. Finally, Soffid will detect that the Sync Server has been successfully installed and you can click the Finish button.
Create identities (manually, CSV file or authoritative source)
Description
You need to register the identities to manage and protect them. This wizard allows you to choose the easiest way to do it.
Step-by-step
1. First, you must select one option to register the identities. Soffid allows you three options.
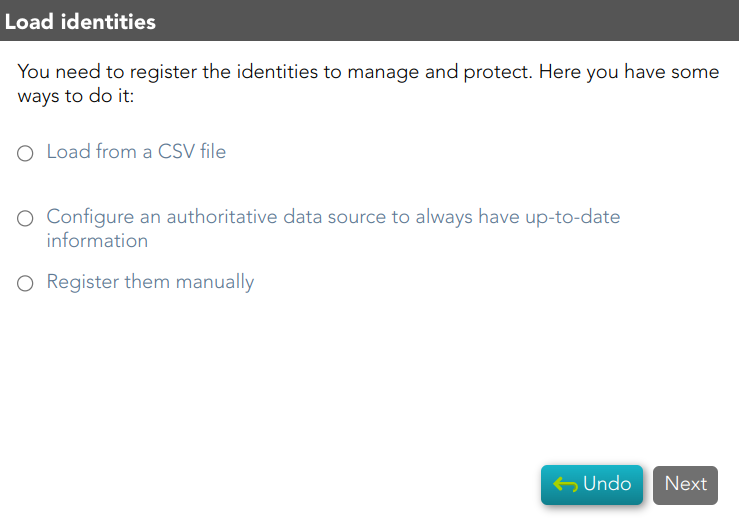
2. You must follow the steps, depending on the selected option:
2.1. Load from a CSV file: this option allows you to load identities from a CSV file.
2.1.1. First of all, you need to pick up the CSV file.

2.1.2. Second, Soffid will display the file data to check contents
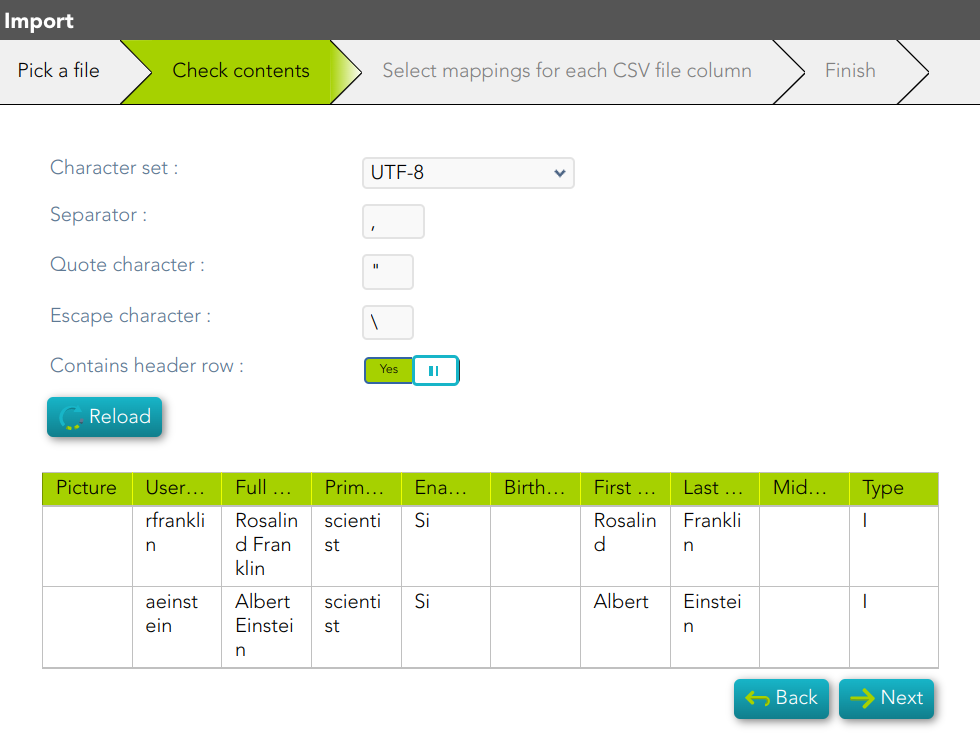
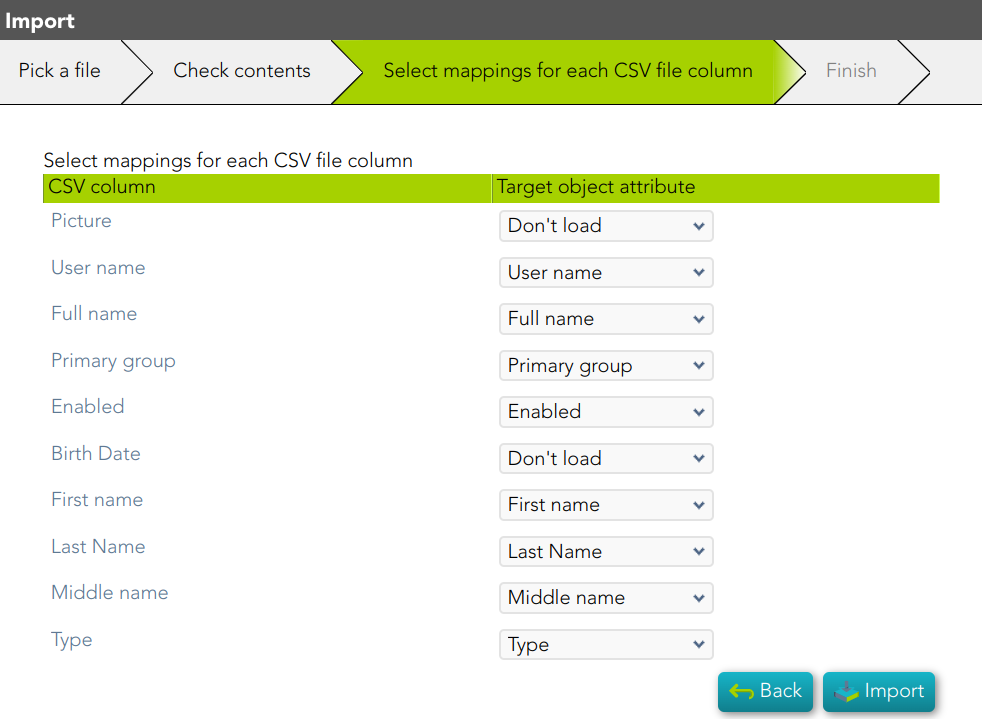
2.1.3. Then you must select the proper mapping for each CSV file column. And finally, click the Import Button and Soffid will add the identities to the platform.
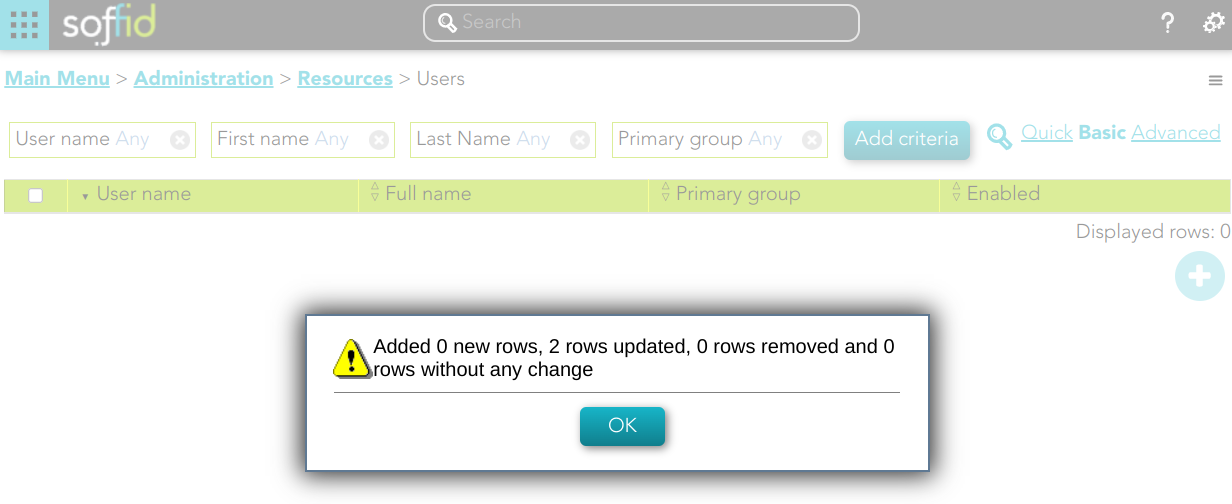
2.1.4. Soffid will display the result of the process.
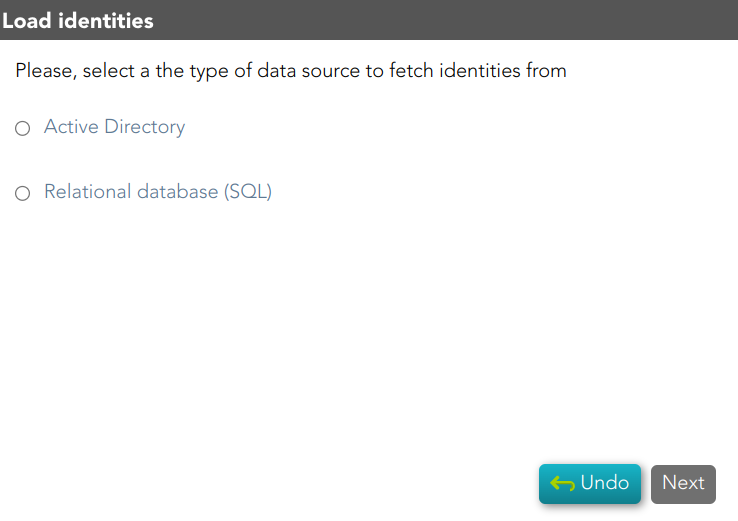
2.2. Configure an authoritative data source to always have up-to-date information: this option allows you to configure an Active Directory agent, or a Relational database agent to load the identities.
Once the process will finish, you could check the new agent on the agent's page Main Menu > Administration > Configuration > Integration engine > Agents
For more information about the agents, you can visit the Agents page.
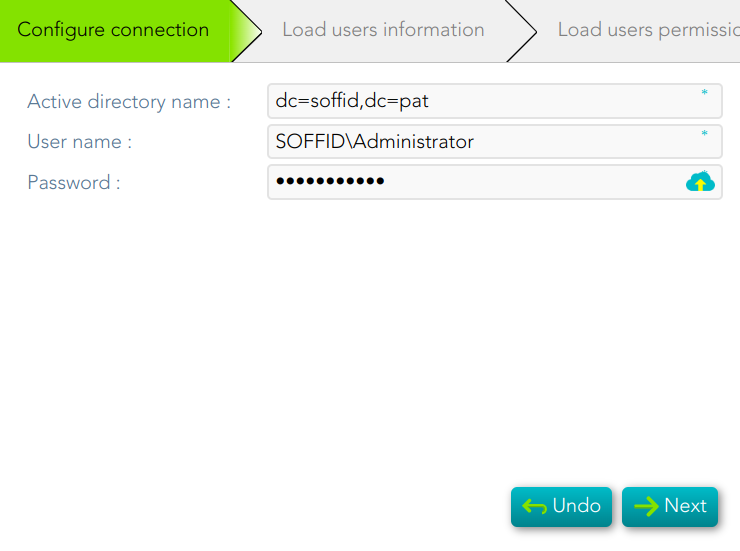
2.2.1. Active Directory
- To configure the AD connection you must fill in the required fields and click the Next button.
- Then Soffid will run the Authoritative load and the Reconcile process
- Finally, you could check the result on the Scheduled tasks page.
2.2.2. Relational database (SQL)
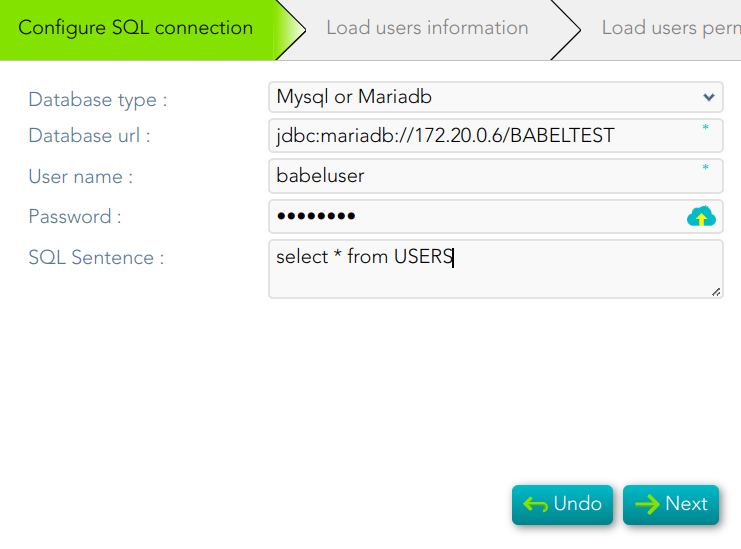
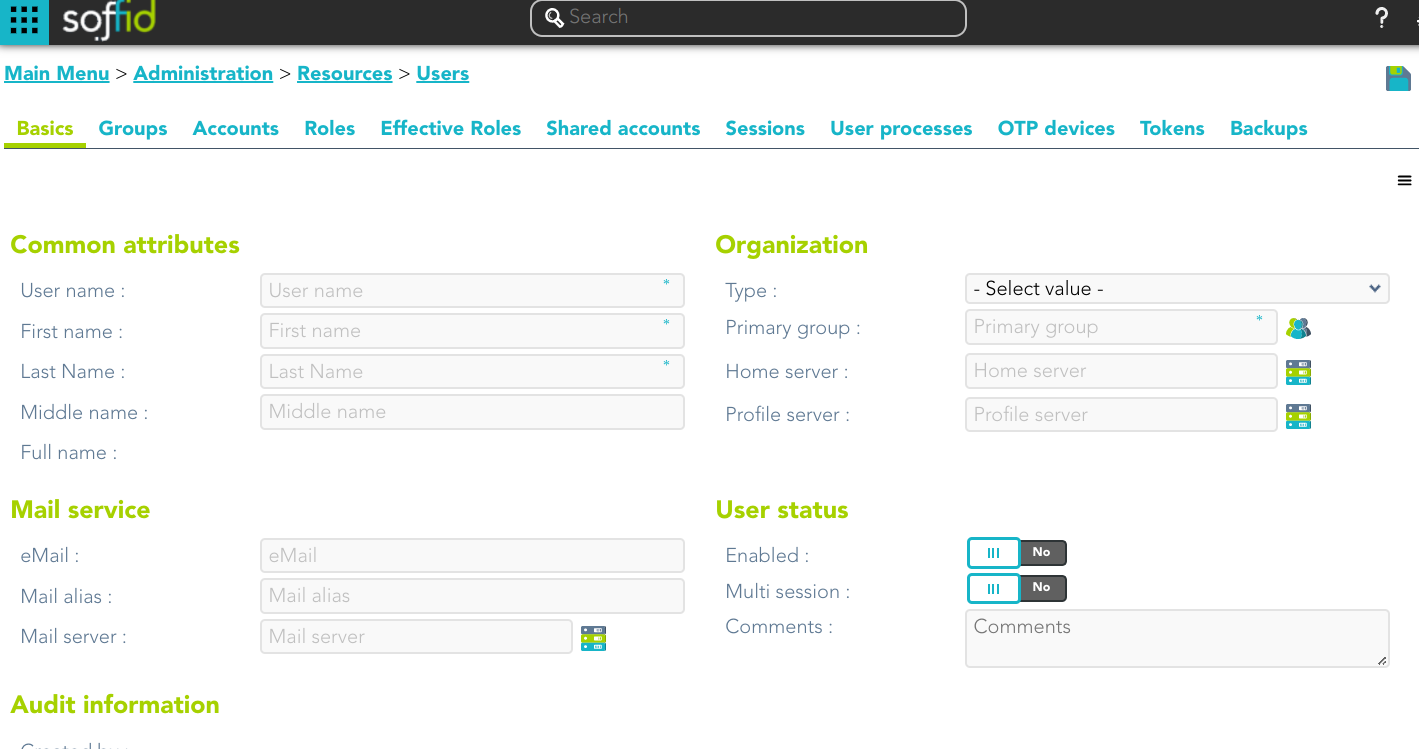
2.3. Register them manually: this option browses to the User page to register the identities manually
Add applications
Description
The wizard allows you to add Applications or Information Systems to Soffid as well. The wizard allows you to choose from an application list. Once you choose one of them, you must fill in the required fields to connect to this application. Then the Reconcile process will be launched.
Step-by-step
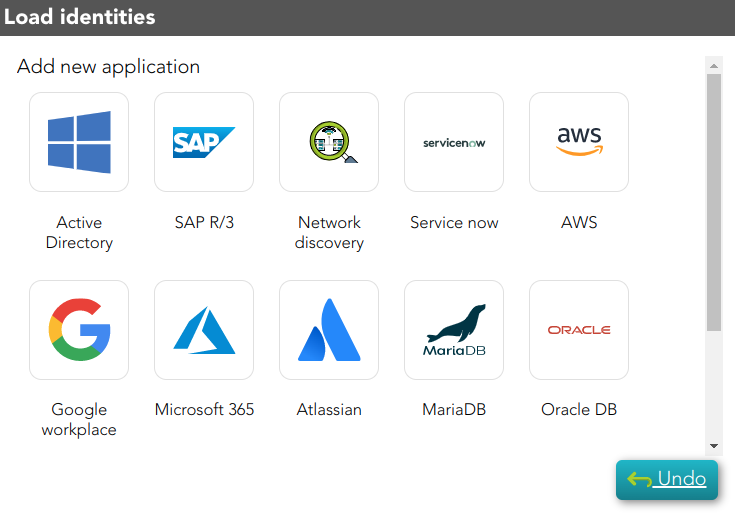
1. First, you need to select the proper application to add. Soffid provides you a huge application list to configure.
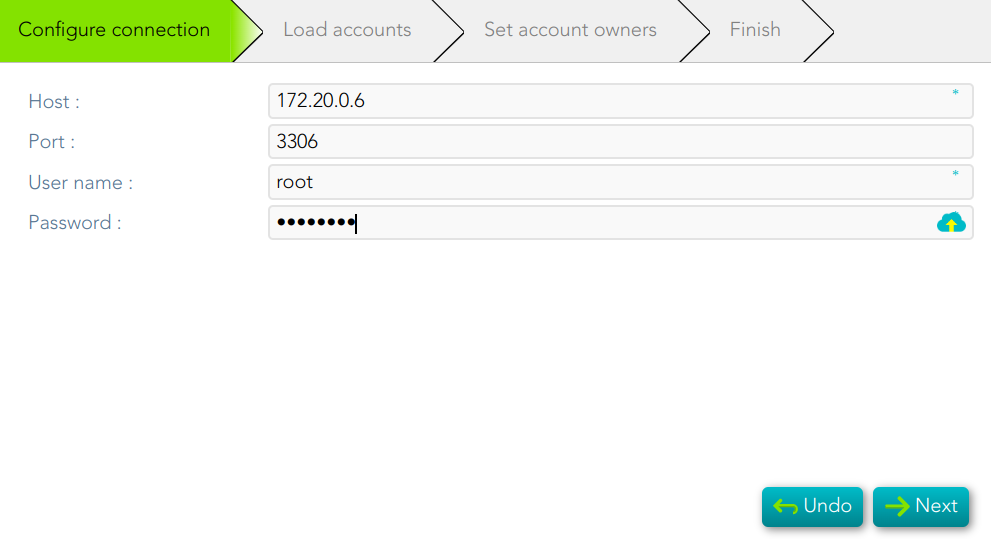
2. Once you select the application, you must configure the connection parameters.
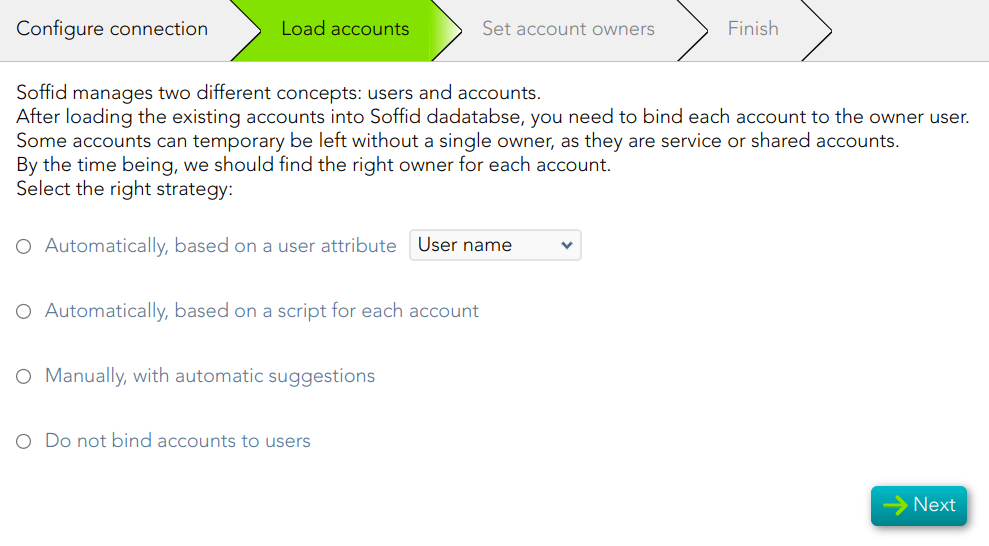
3. Then, Soffid allows you to choose the strategy to load accounts.
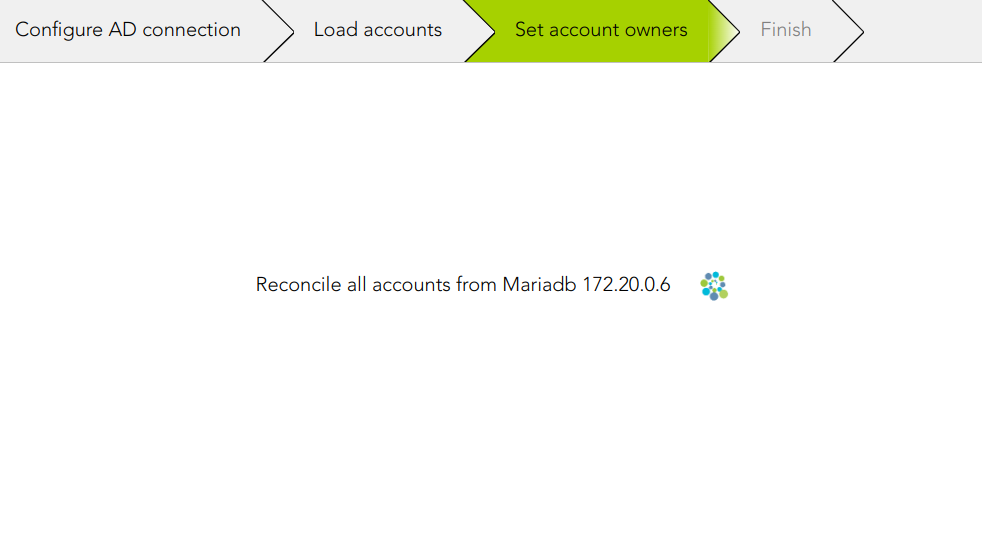
4. Then Soffid will run the reconcile process
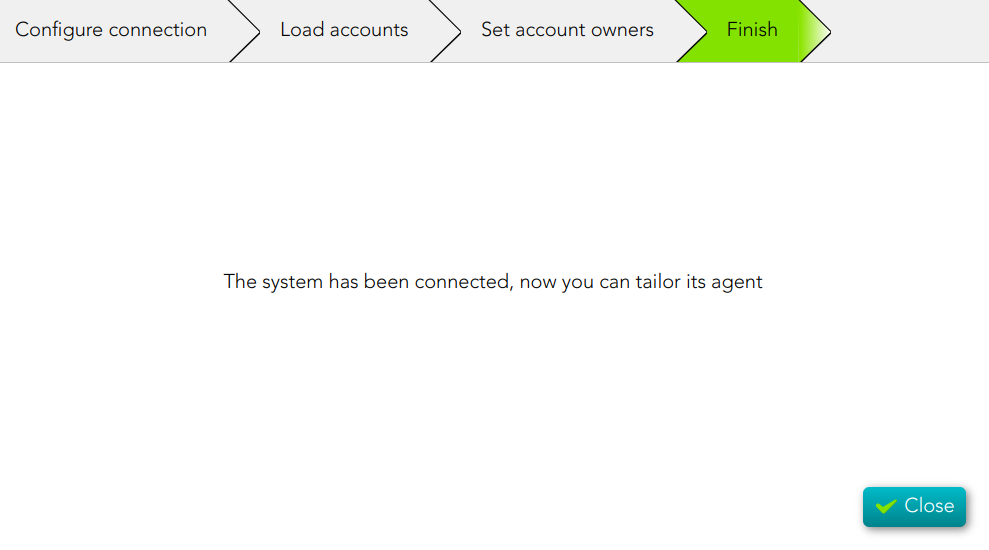
5. Finally, the process ends.
Design user life cycle workflows
Description
When you select the option "Design user life cycle workflows", Soffid will browse to the BPM Editor page, where you could define new workflows or import existing workflows from a file.
For more information, you can visit the BPM Editor book.
Screen overview
IRC
Identity Risk & Compliance
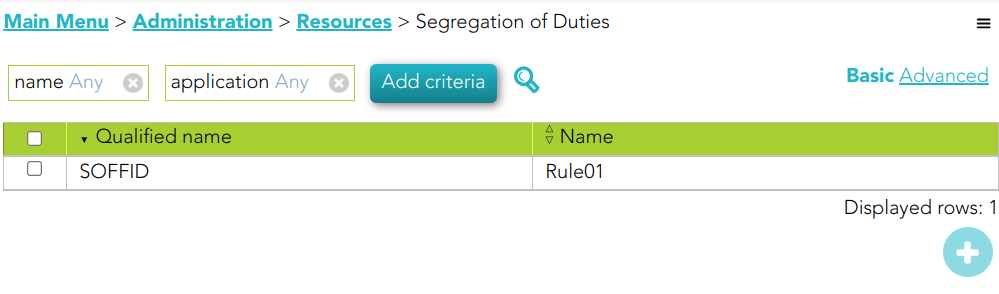
Create SoD matrix
Description
The segregation of duties (SoD) is a fundamental element of internal controls, defined to prevent error and fraud. Segregation of duties ensures that at least two individuals are responsible for the separate parts of any task.
You can find additional information by visiting the Segregation of Duties page.
Step-by-step
1. First, you must select the Create SoD matrix and click the OK button.
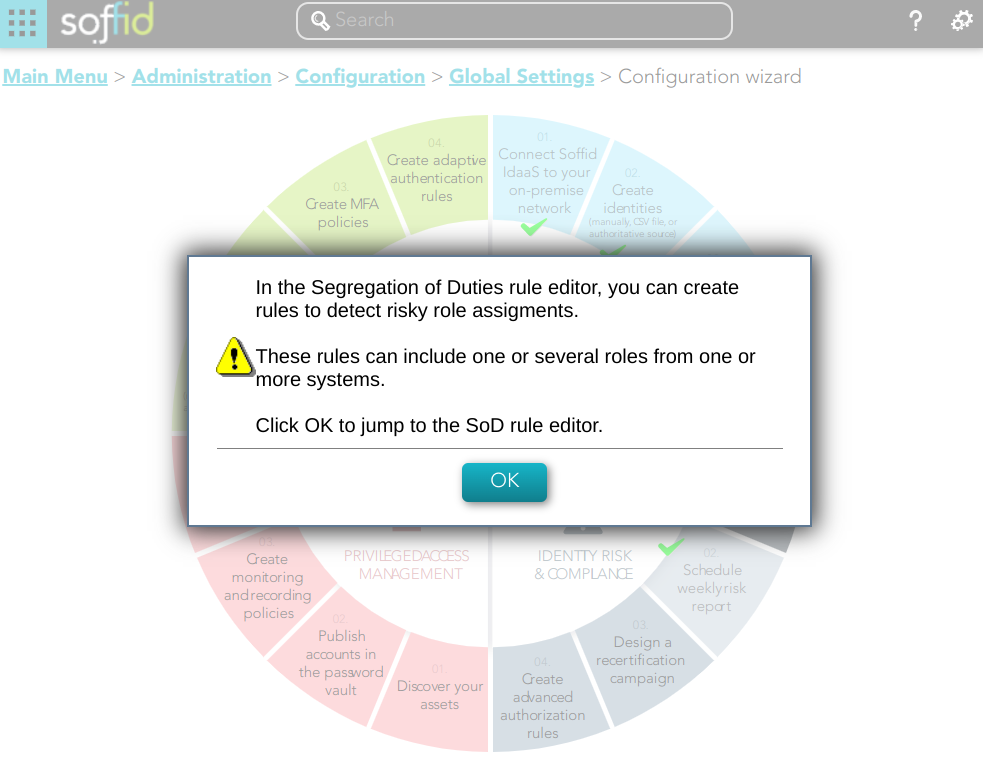
2. Once you click the OK button, Soffid will browse to the Segregation of Duties page in order to add a new SoD
3. Finally you must save or Apply changes to save the SoD.
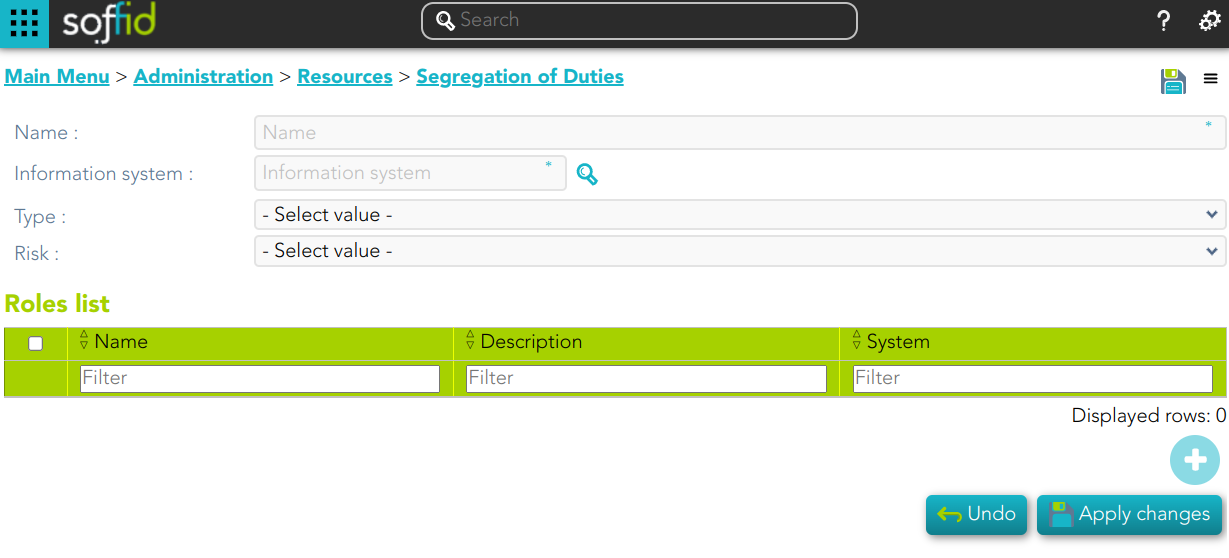
Standard attributes
- Name: name of the segregation separation of duties
- Information System: asset or application, from a functional point of view, on which the permissions are granted or revoked.
- Type: type of segregation
- Trigger on all permissions: no user can be assigned the roles added to the role list.
- Trigger on some permissions: if you select that option, you have to fill in the number of roles that can not match. Soffid will not allow you to assign to a user more than the number indicated of the roles added to the role list.
- Query permissions matrix: Soffid displays a matrix that allows you to select the risk between pairs of roles, those roles are the roles added to the role list.
- Risk: level of risk:
- Low.
- High.
- Forbidden: it is not allowed that one user to have assigned the roles defined on the role list.
- None: there is no risk.
- Role List: list of roles to keep in mind on the segregation of duties.
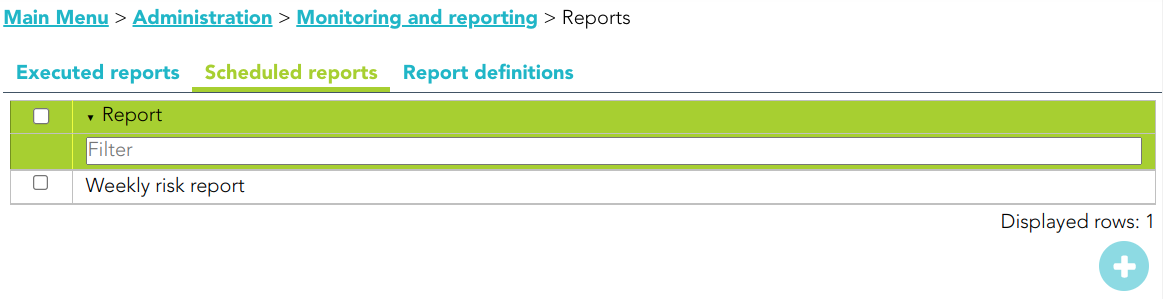
Schedule weekly risk report
Description
The wizard allows you to schedule a new Weekly risk report. It is a document that provides an overview of the potential risks. The information in this document is related to the rules defined in the SoD.
For more information, you can visit the Scheduled reports page.
Step-by-step
1. First, you must select the Schedule weekly risk report and click the OK button.
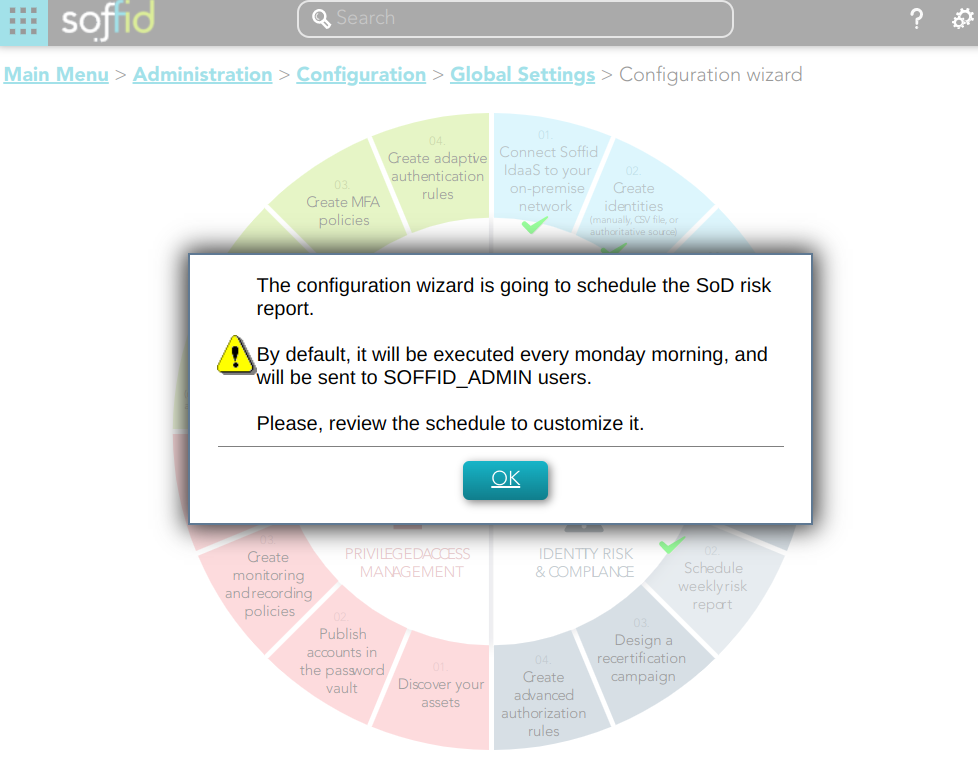
2. Then, Soffid will browse to the configure report page and allows you to configure the Weekly risk report.

3. Finally you must accept the changes, and the report will be displayed on the Scheduled reports page
Standard attributes
- Report: name of the report.
- Schedule name: identified name.
- Month: number of the month (1-12) when the task will be performed.
- Day: number of the day (1-31) when the task will be performed.
- Hour: hour (0-23) when the task will be performed.
- Minute: minute (0-59) when the task will be performed.
- Day of week: number of the day (0-7 where 0 means Sunday) of the week when the task will be performed.
- Access Control List: to prevent unauthorized usage. Will be granted to users, groups or roles.
For each value of month, day, hour, minute, or day of the week:
- * means any month, day, hour, minute, or day of the week. e.g. */5 to schedule every five minutes.
- A single number specifies that unit value: 3
- Some comma separated numbers: 1,3,5,7
- A range of values: 1-5
Design a recertification campaign
Description
The wizard allows you to create a new recertification campaign. To be able to do this, Soffid has created two recertification policies, All permissions and Critical permissions.
For more information, you can visit the Recertification book.
Step-by-step
1. First, you must select the Design a recertification campaign and click the OK button.
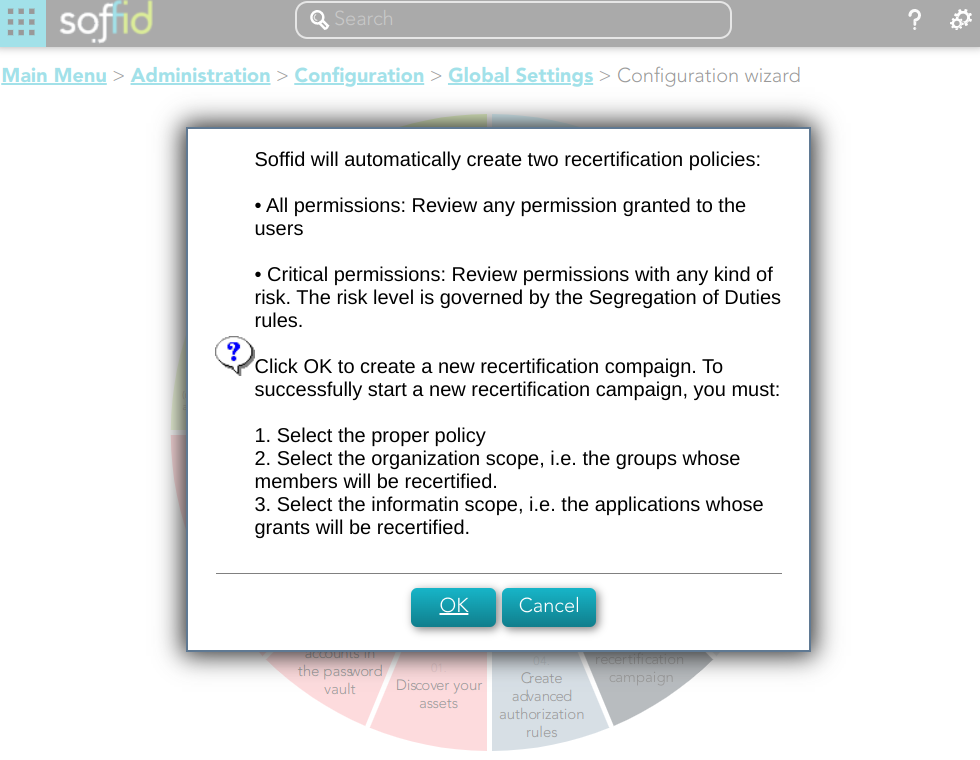
2. Then Soffid will browse the New recertification campaign
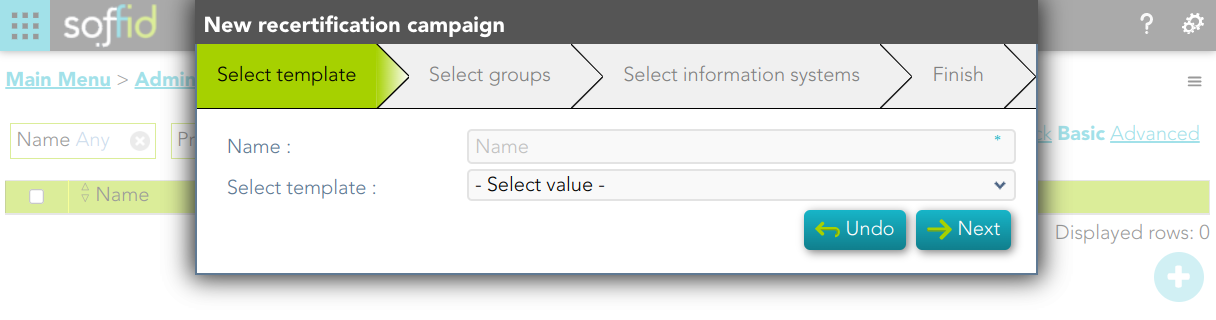
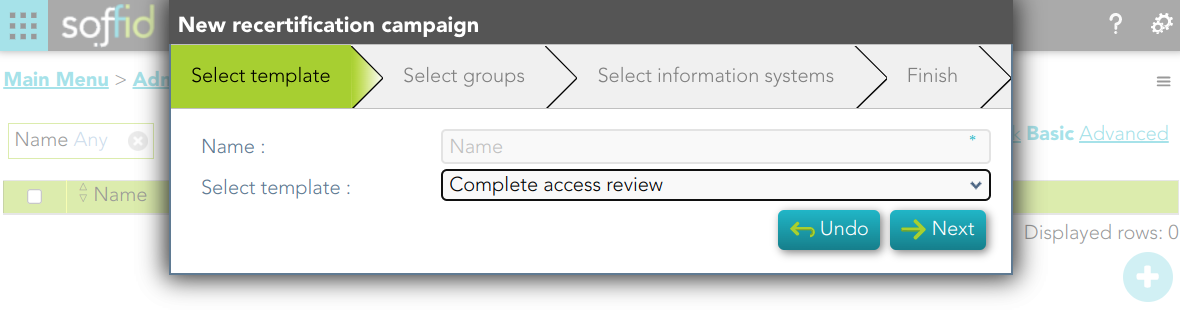
3. In this step you must write a campaign name and select a template.
3.1. Complete access review
3.1.1. Write a name, select the Complete access review, and click the Next button
3.1.2. Select the group or groups to apply the campaign and click the Next button
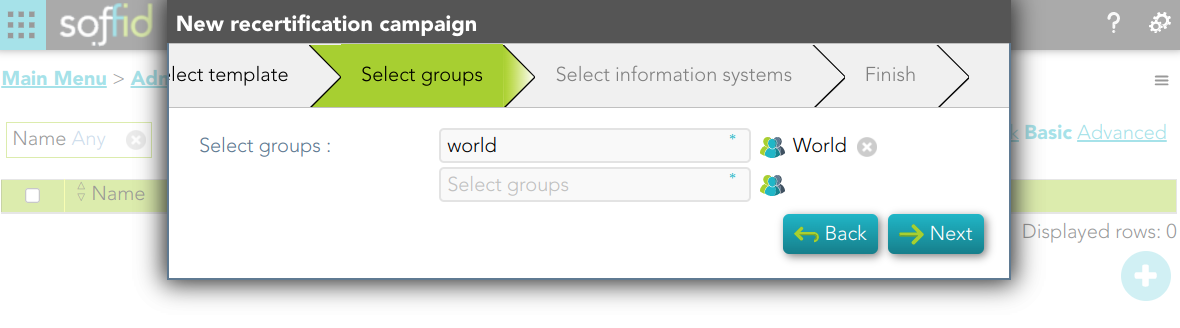
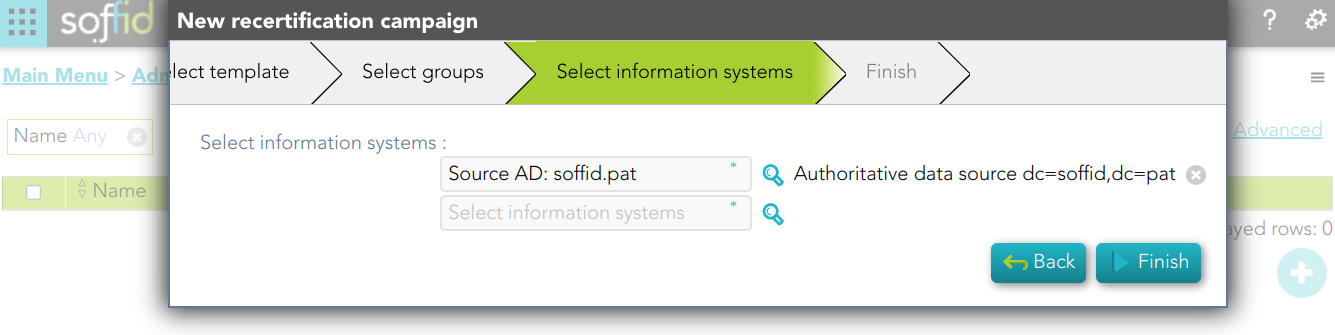
3.1.3. Select the Information systems to apply the campaign and click the Finish button
Standard attributes
- Name: name to identify the campaign.
- Template: select the policy that will be applied. That has to be defined previously on the Recertification policies page.
- Groups: list of user groups where the campaign will be applied. You can choose one or more.
- Information Systems: list of information systems where the campaign will be applied. You can choose one or more.
Create advanced authorization rules
Description
This wizard allows you to browse the XACML Policy Management page to create new policies to add more complex and restricted rules to the authorizations.
For more information, you can visit the XACML page.
Screen overview

Screen overview
Related objects
PAM
Privileged Access Management
Discover your assets
Description
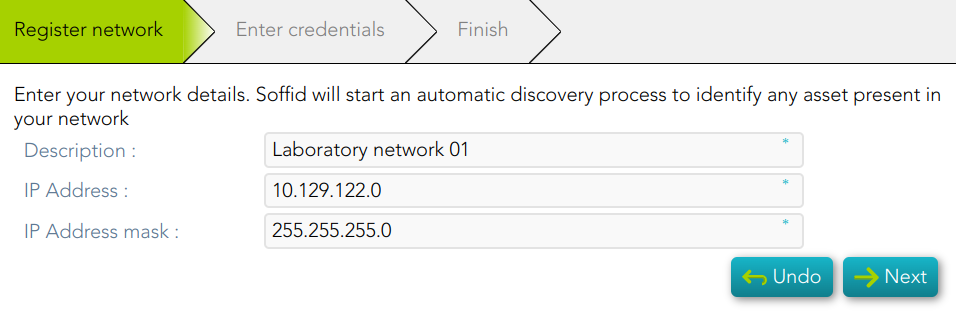
Soffid allows you to configure the network discovery tool in a way to run the process to identify any asset present in your network.
For more information, you can visit the Network discovery page.
Step-by-step
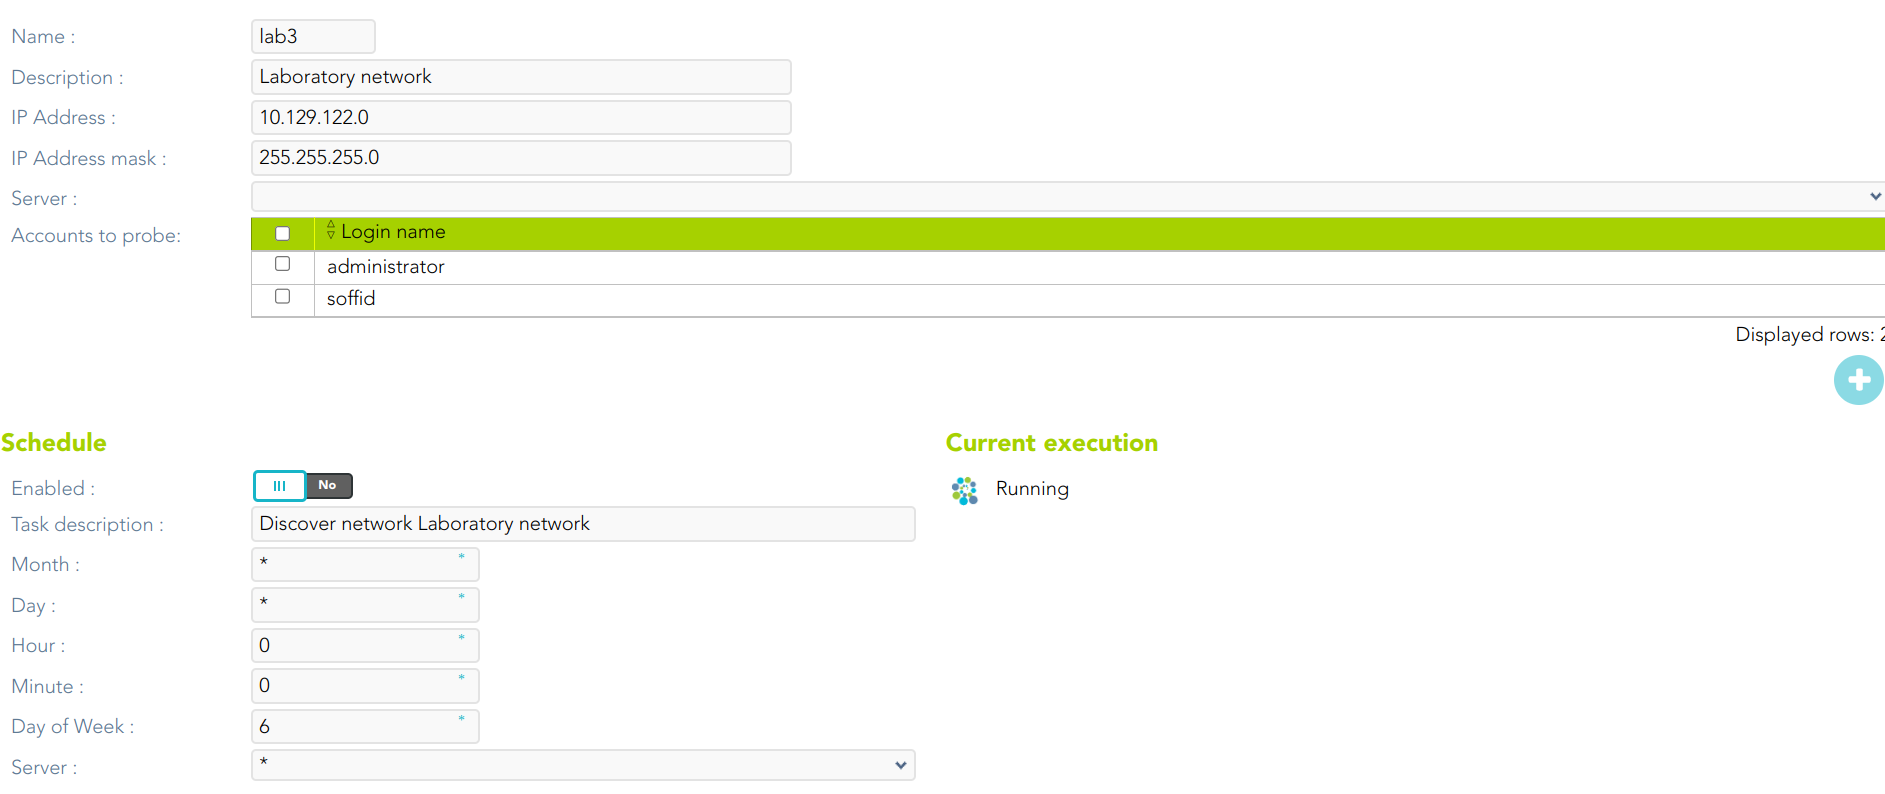
1. Once you select the Discover you assets option, Soffid will display the form to fill in.
2. You need to register your network data and click the Next button.
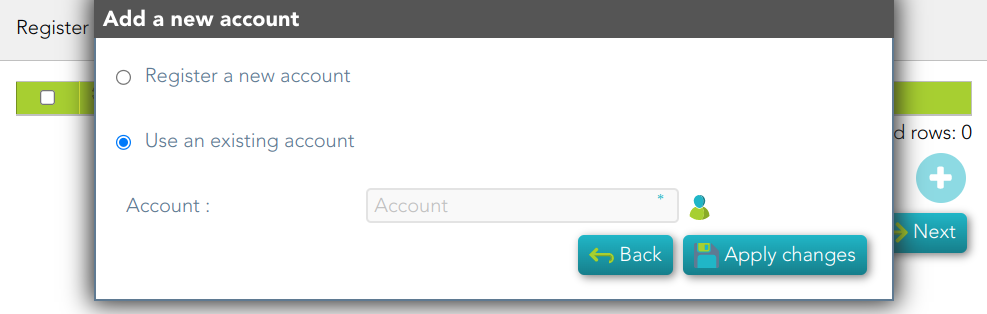
3. You need to register an account. You can choose to register a new one or to use an existing account.
3.1. If you select the Register a new account option, you must fill in the Login name and the password and click the Apply changes button
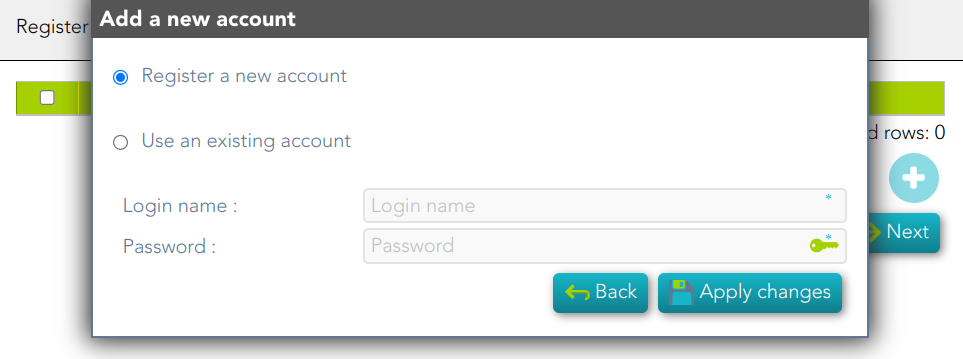
3.2. If you select Use an existing account, you must select an existing account in the system and click the Apply changes button.
4. Soffid display this message to indicate the network discovery is in process
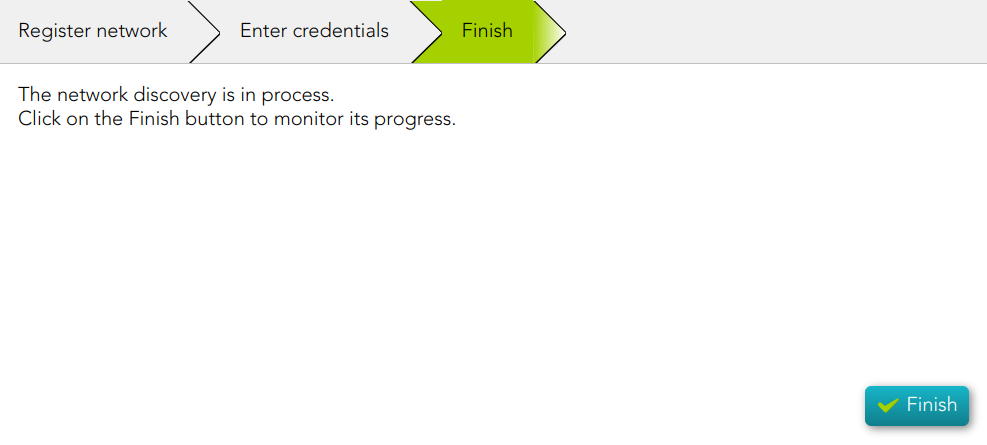
5. If you click the Finish button, Soffid will display the Network discovery monitoring.
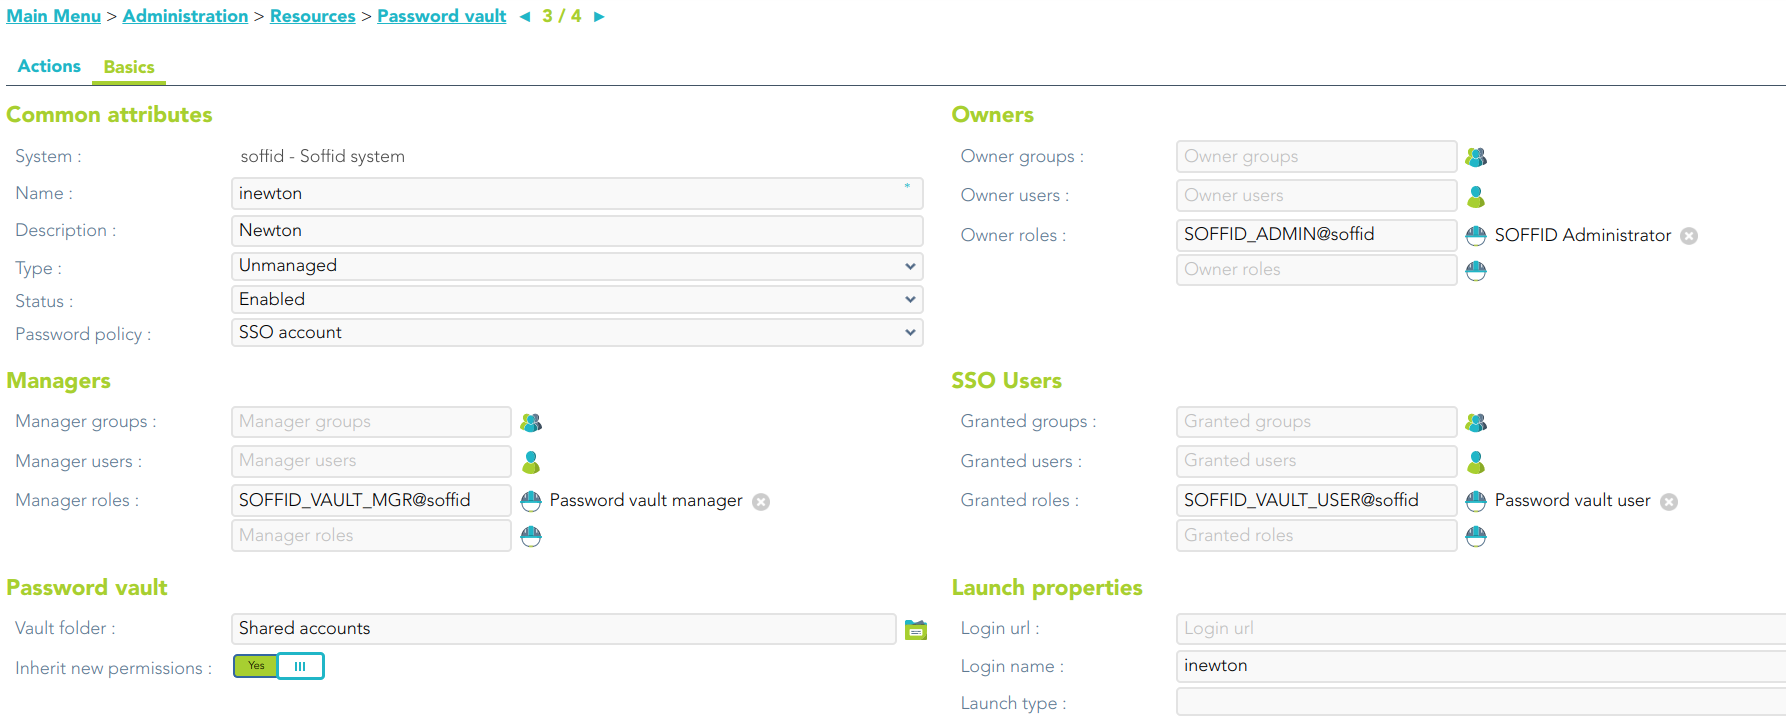
Publish accounts in the password vault
Description
This wizard allows you to publish some accounts in the password vault in order to save and manage these accounts and their password.
For more information, you can visit the Password vault page.
Step-by-step
1. Once you select the Public accounts in the password vault option, Soffid will display the following wizard
2. You must select the accounts you want to publish and click the Next button.

3. Then, Soffid will configure the password vault.

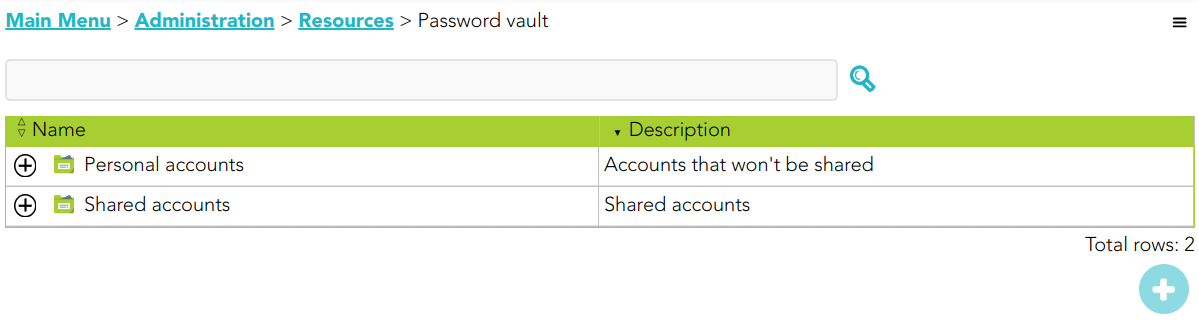
4. When you click the Finish button, Soffid will browse to the Password vault page. On this page, you could check and update the permissions.
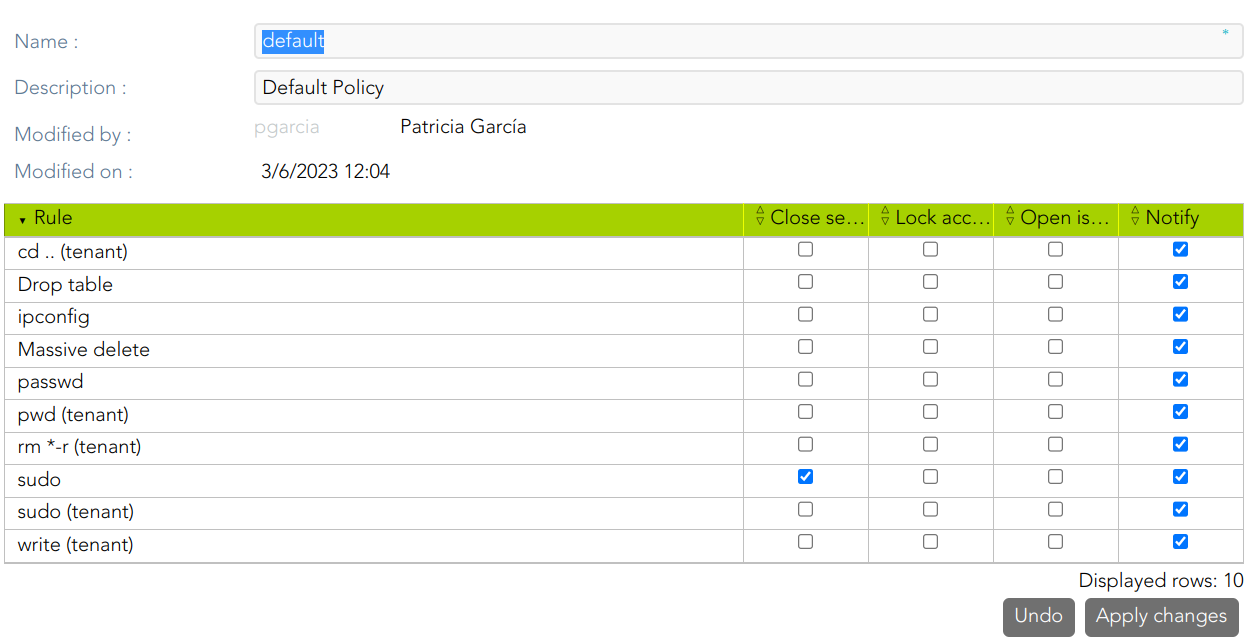
Create monitoring and recording policies
Description
PAM policy is a subset of cybersecurity policies that deal with privileged access. This determines which users can have privileged access to specific systems, when, and for how long.
You can check the policies in the following menu option: Main Menu > Administration > Configuration > Security settings > PAM policies
For more information, you can visit the PAM policies page.
Step-by-step
1. Once you click the Create monitoring and recording policies option, Soffid will create a default policy.
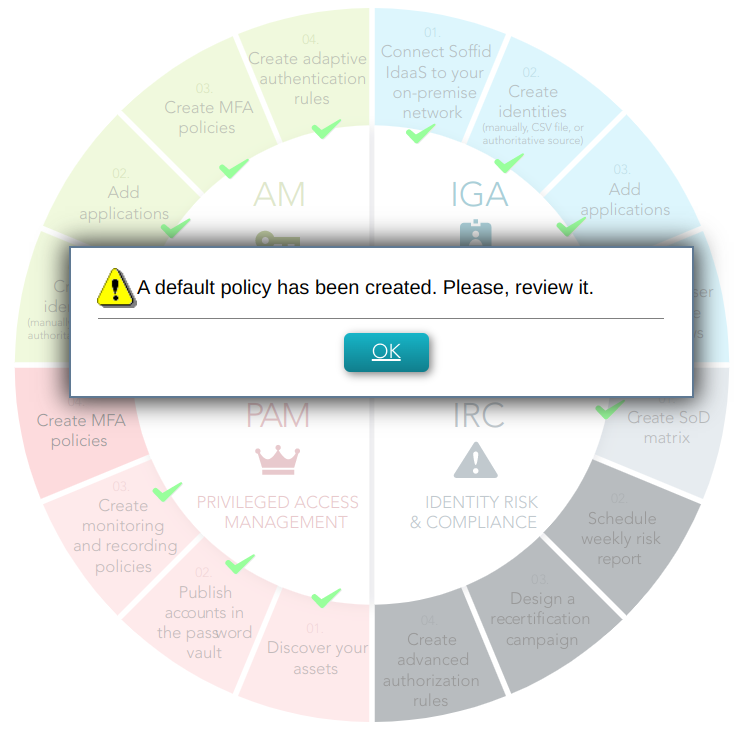
2. When you click the Ok button, Soffid will browse to the created policy and allows you to update the default configuration.
Create MFA policies
Description
This wizard allows you to configure the access control rules for Soffid Console. By default, an OTP will be required to access to the Password vault or application menu.
You can check the configuration in the following menu option: > Administration > Configuration > Security settings > Authentication
For more information, you can visit the Two-factor authentication (2FA) book and the Second Factor Authentication configuration
Step-by-step
1. Once you select the Create monitoring and reporting policies option, Soffid will launch the following wizard

2. If you click the Apply now button, Soffid will browse to the Authentication page, allowing you to configure the Second Factor Authentication.

3. To confirm the changes, you must click the Confirm changes button.
AM
Access Management & SSO
Create identities (manually, CSV file, or authoritative source)
Description
You need to register the identities to manage and protect them. This wizard allows you to choose the easiest way to do it.
Step-by-step
1. First, you must select one option to register the identities. Soffid allows you three options.
2. You must follow the steps, depending on the selected option:
2.1. Load from a CSV file: this option allows you to load identities from a CSV file.
2.1.1. First of all, you need to pick up the CSV file.
2.1.2. Second, Soffid will display the file data to check contents
2.1.3. Then you must select the proper mapping for each CSV file column. And finally, click the Import Button and Soffid will add the identities to the platform.
2.1.4. Soffid will display the result of the process.
2.2. Configure an authoritative data source to always have up-to-date information: this option allows you to configure an Active Directory agent, or a Relational database agent to load the identities.
Once the process will finish, you could check the new agent on the agent's page Main Menu > Administration > Configuration > Integration engine > Agents
For more information about the agents, you can visit the Agents page.
2.2.1. Active Directory
- To configure the AD connection you must fill in the required fields and click the Next button.
- Then Soffid will run the Authoritative load and the Reconcile process
- Finally, you could check the result on the Scheduled tasks page.
2.2.2. Relational database (SQL)
2.3. Register them manually: this option browses to the User page to register the identities manually
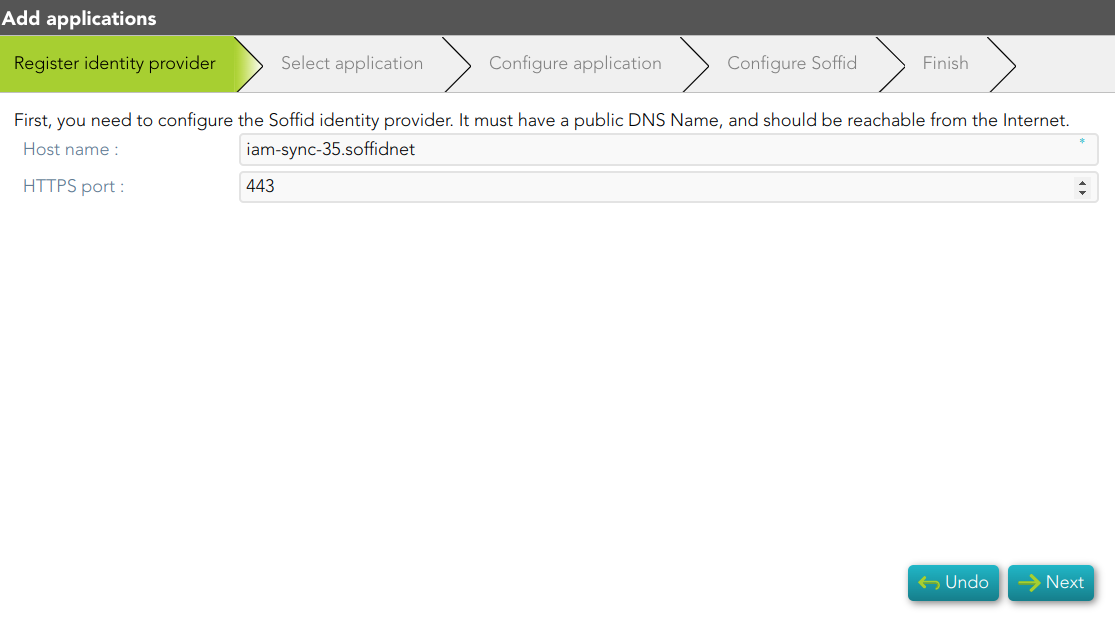
Add applications
Description
This wizard allows you to add a new Service Provider, that is, to configure an application that relies on an Identity Provider (IdP) to authenticate users and provide access to its services.
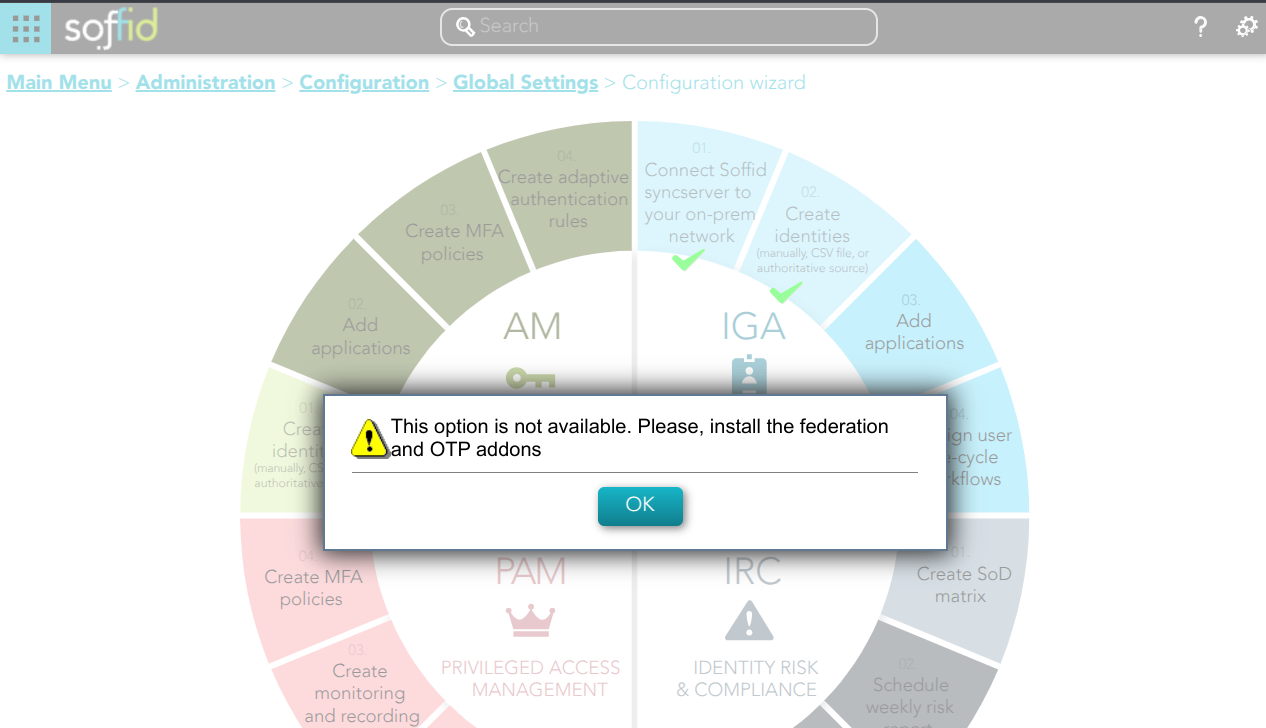
To be able to add new applications (SP), you must install the Federation Addon.
Step-by-step
1. If you have not previously installed the Federation Addon, the first time you select the Add application option, Soffid will require to install the Federation Addon.

When you click the OK button, Soffid will browse to the Soffid Download Area where you can find the Federation Addon. To install Federation Addon you can follow the steps How to install Federation in Soffid?
2. Once you select the Add application option, Soffid will display the wizard to register the Identity Provider, if it does not exist previously.
3. You must select the application you want to add.
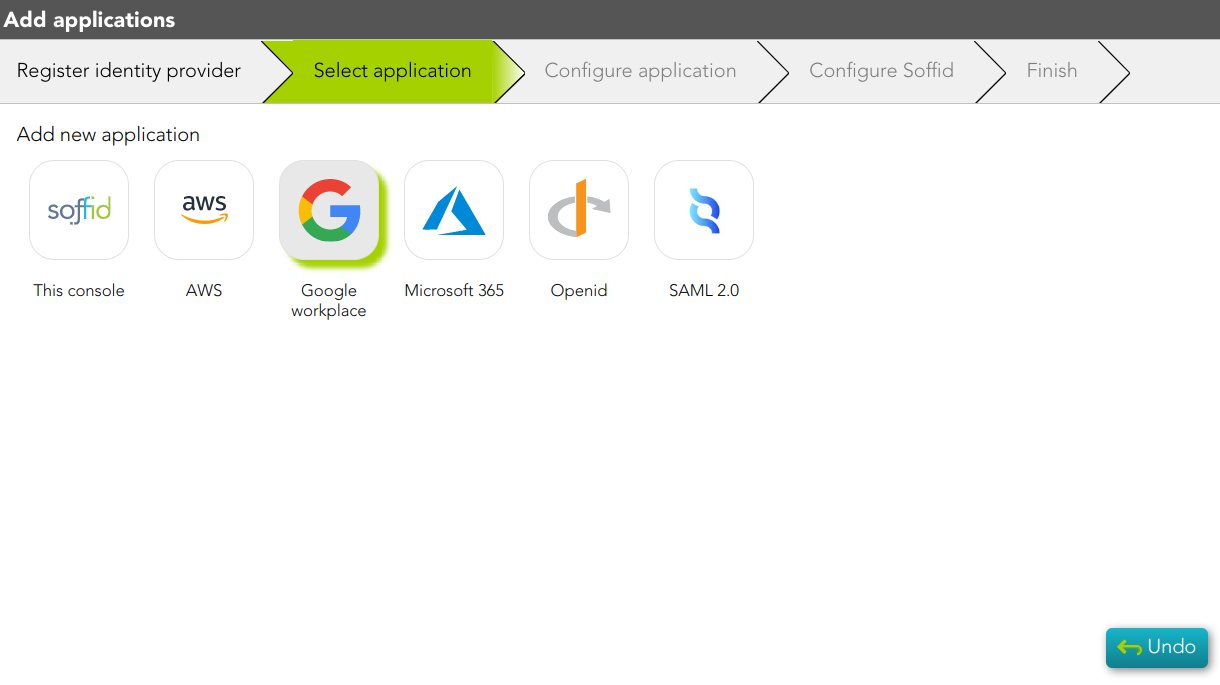
3.1. Soffid app:
3.1.1. The Finish step will be displayed.

3.1.1. If you click the Finish button, Soffid will display the Service Provider page.
3.2. AWS app:
3.2.1 Soffid will download the proper certificate.
3.2.2 Once, you download the certificate, Soffid will display the Configure application step. You must follow the indicated steps at this point and click the Next button.
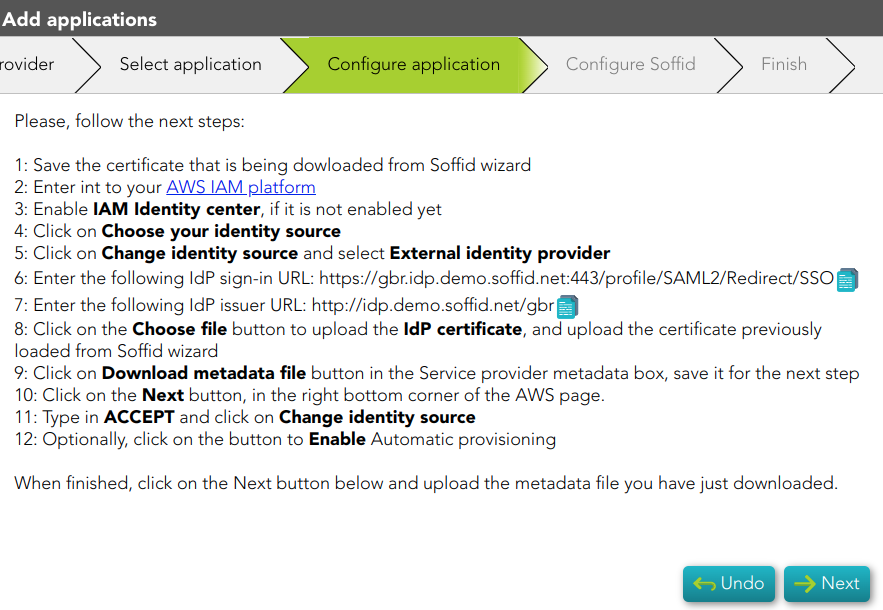
3.2.2 Then, you must upload the metadata of your service provider and click the Finish button.
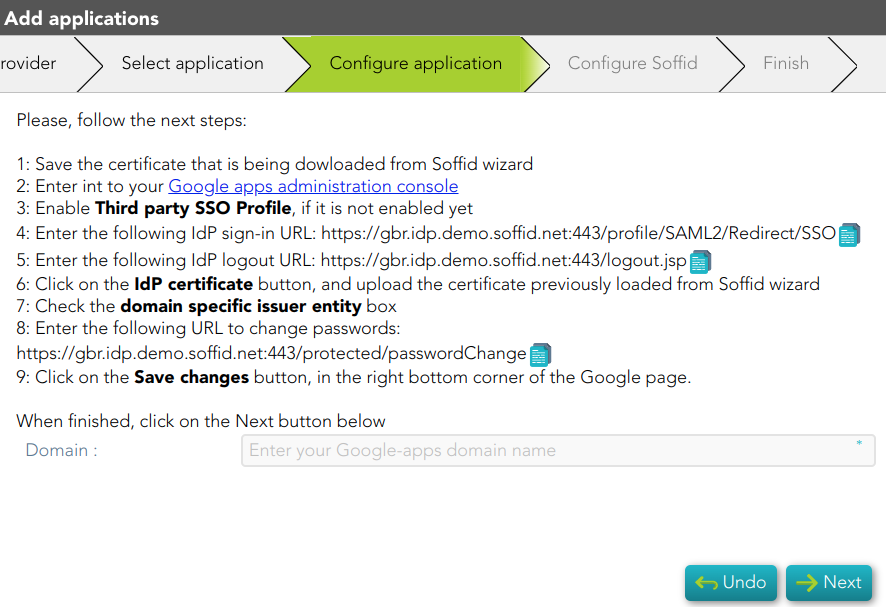
3.3. Google workplace app:
3.3.1 Soffid will download the proper certificate.
3.3.2 Once, you download the certificate, Soffid will display the Configure application step. You must follow the indicated steps at this point, fill in the Domain, and click the Next button.
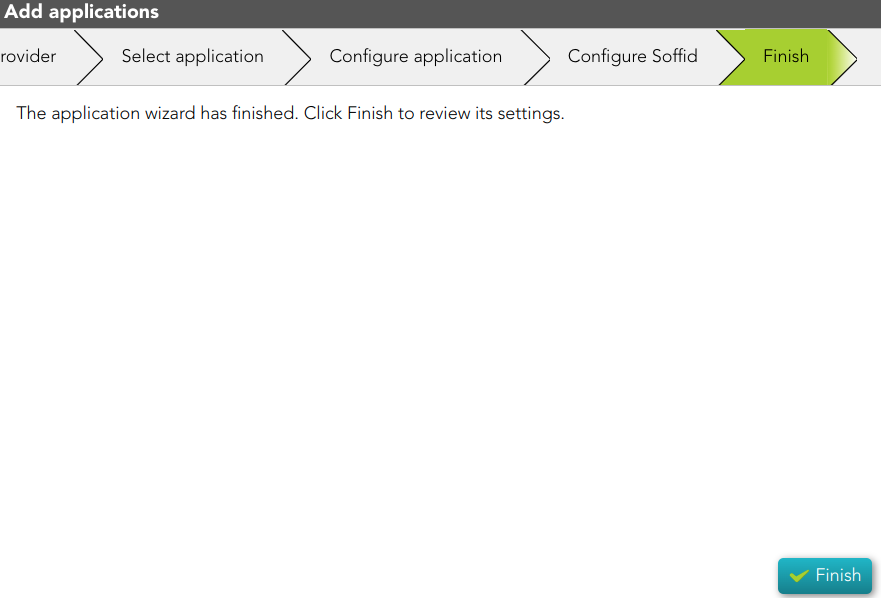
3.3.3 Then, you must click the Finish button.
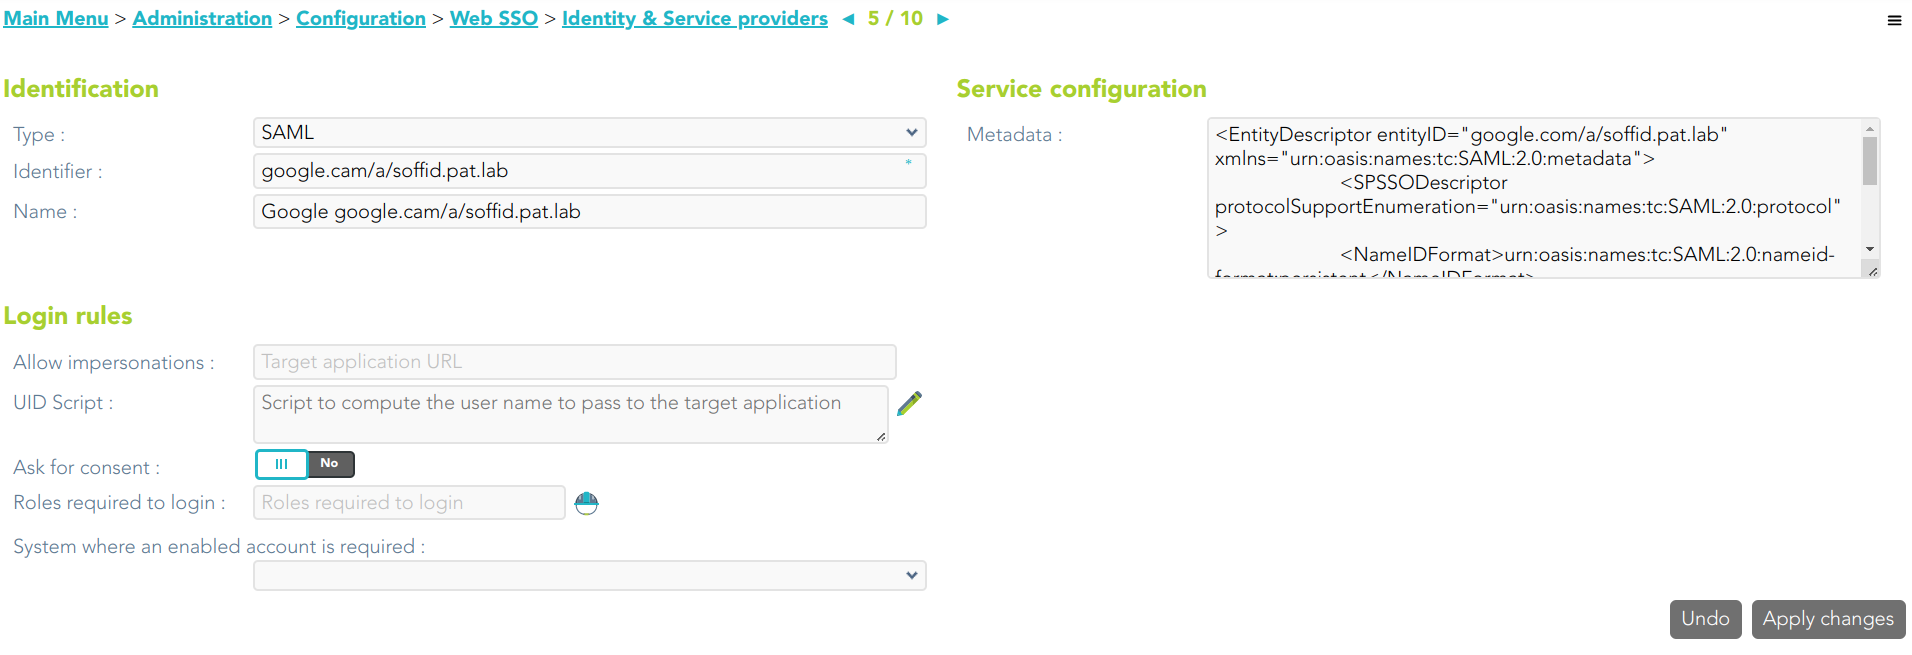
3.3.4 Finally, Soffid will browse to the Service Provider page where you can finish the Service provider configuration.
3.4. Microsoft 365 app:
3.4.1. When you select this option, Soffid will display the Configure application step. You must follow the indicated steps at this point, and click the Next button.
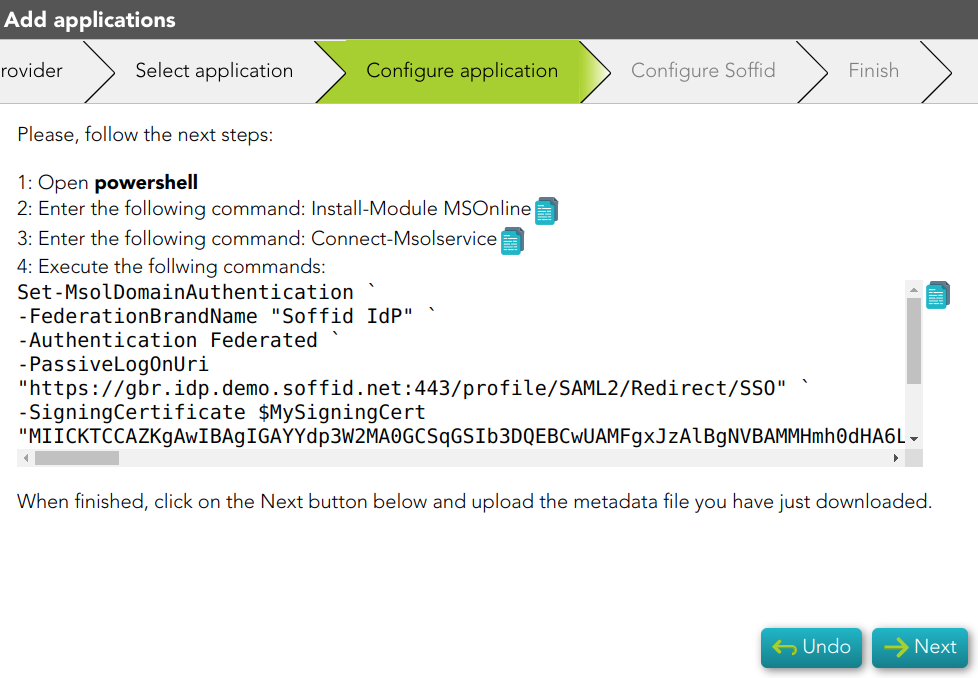
3.4.2 Then, you must click the Finish button.
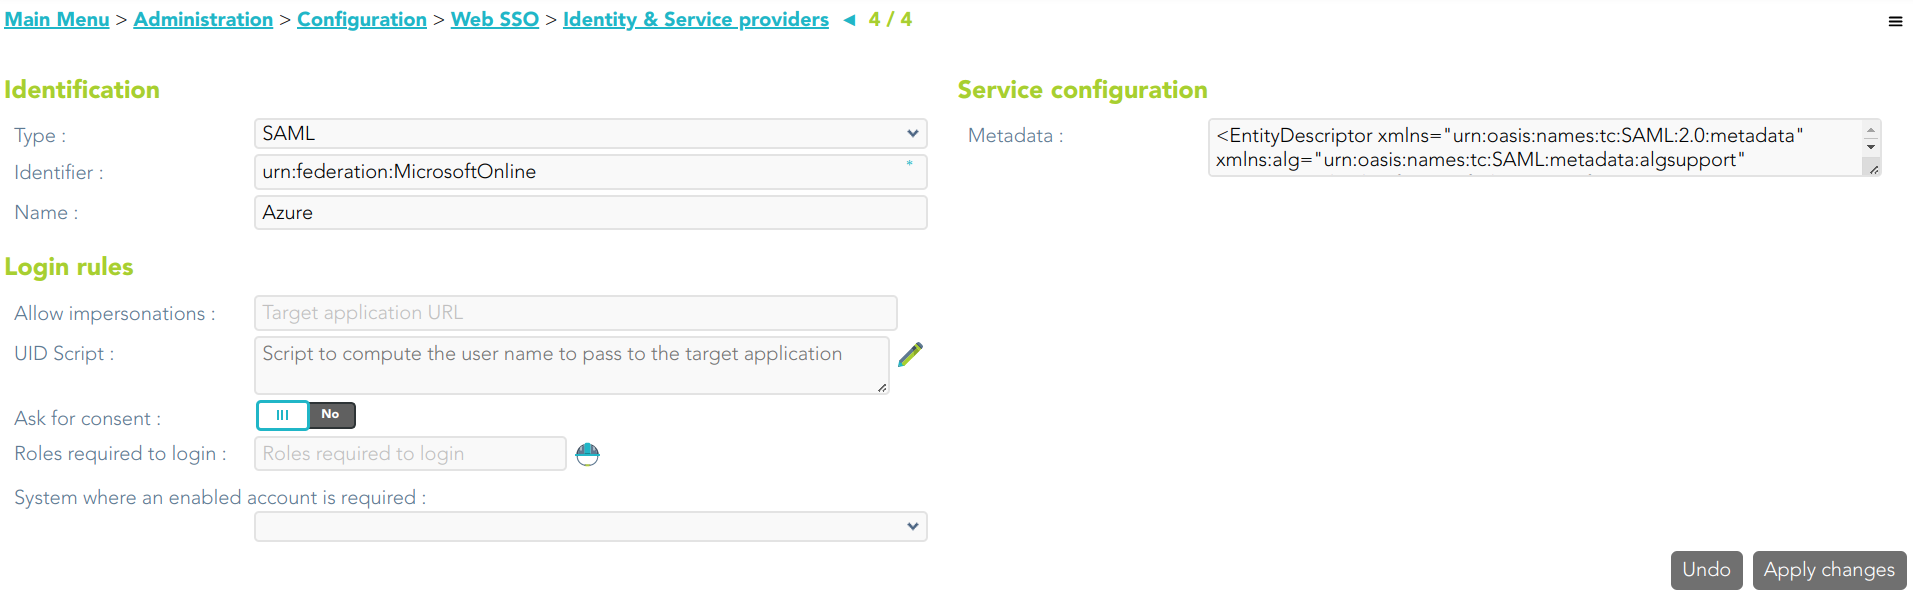
3.4.3 Finally, Soffid will browse to the Service Provider page where you can finish the Service provider configuration.
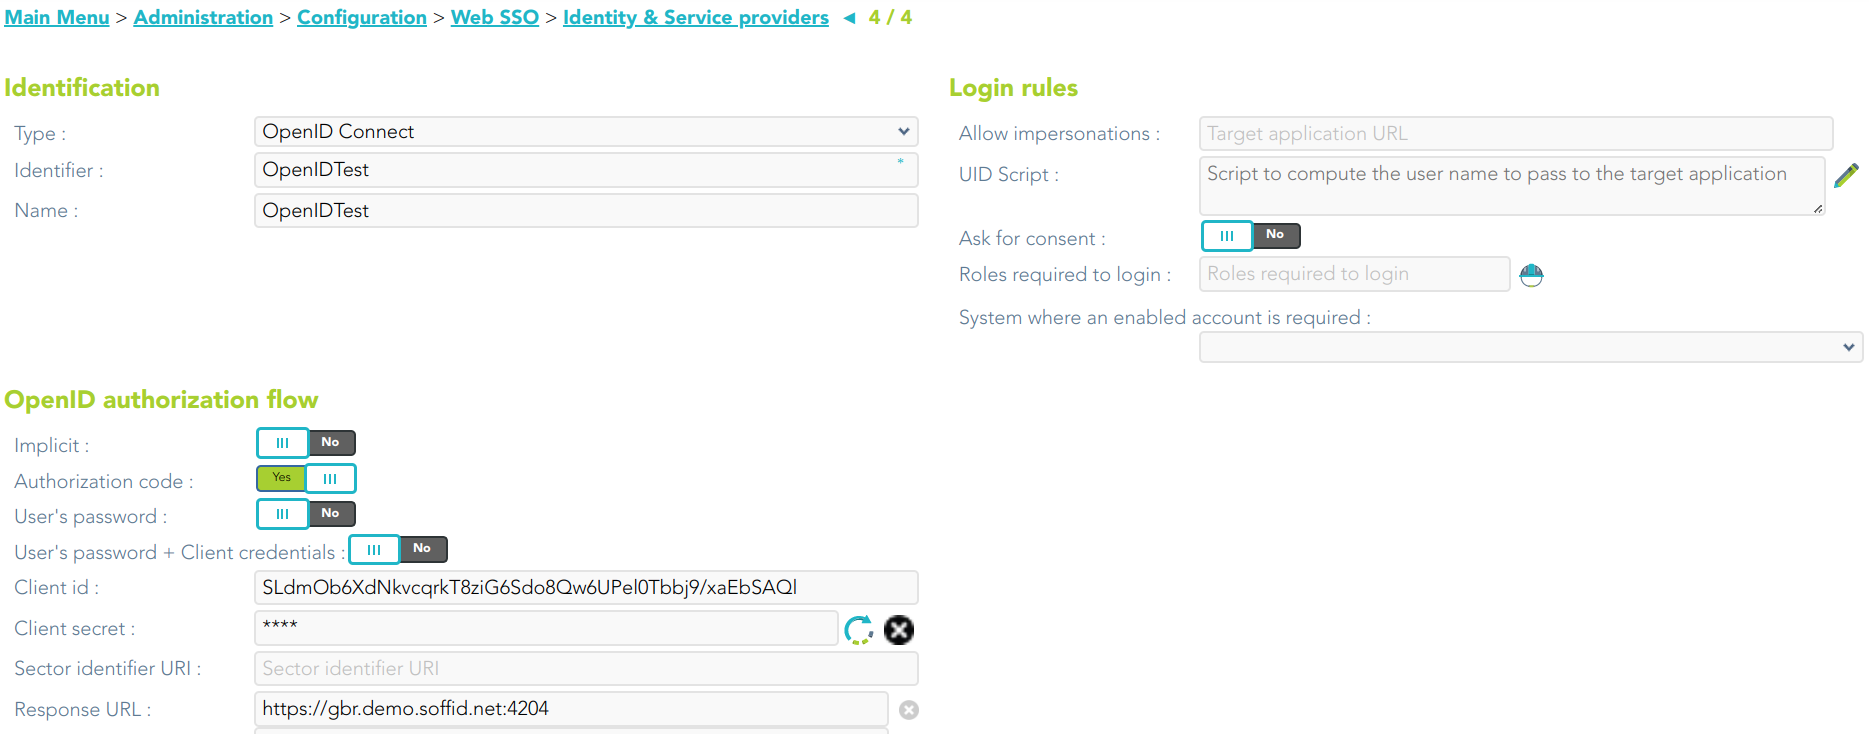
3.5. OpenID app:
3.5.1. When you select this option, Soffid will display the Configure application step. You must configure your Service Provider, and click the Next button.

3.5.2. Then Soffid will return you the Client id and Client secret
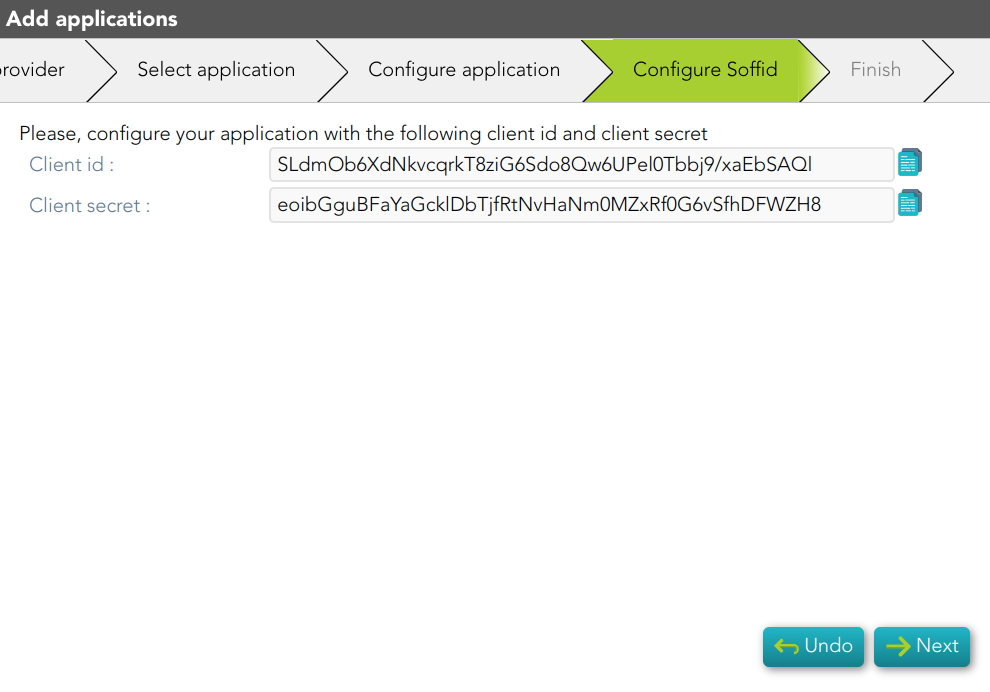
3.5.3 Then, you must click the Finish button.
3.5.4 Finally, Soffid will browse to the Service Provider page where you can finish the Service provider configuration.
3.6. SAML 2.0 app:
3.6.1 Soffid will download the metadata XML file.

3.5.2 Once, you download the metadata file, Soffid will display the steps to follow.
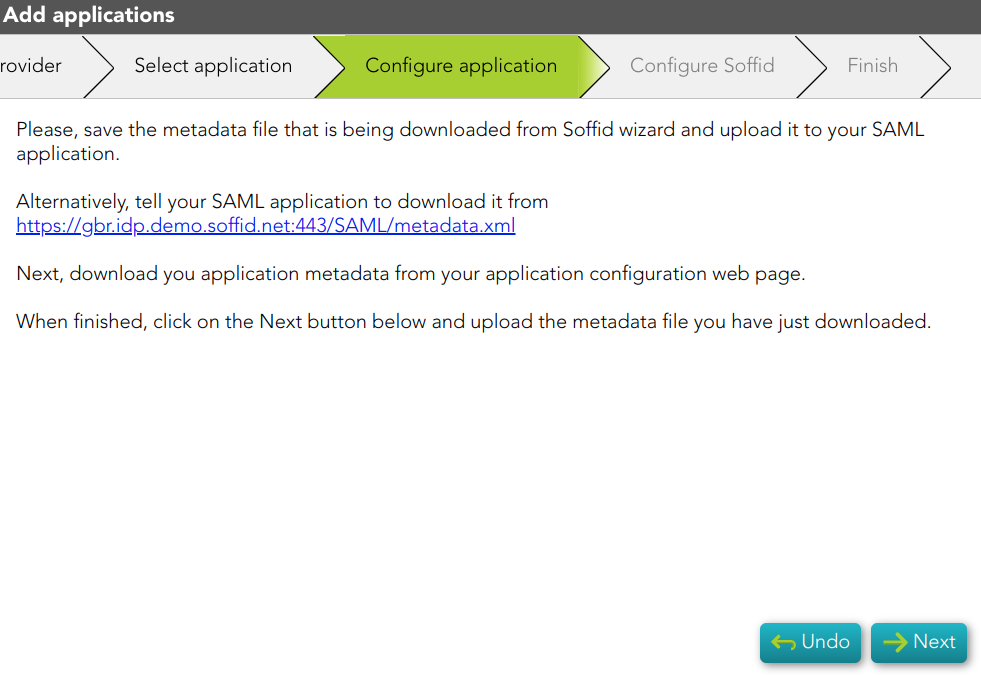
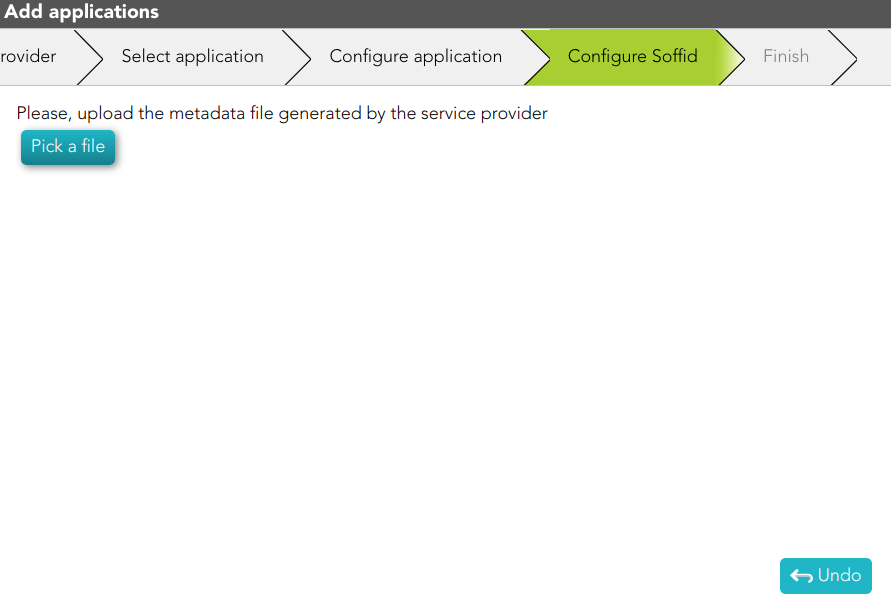
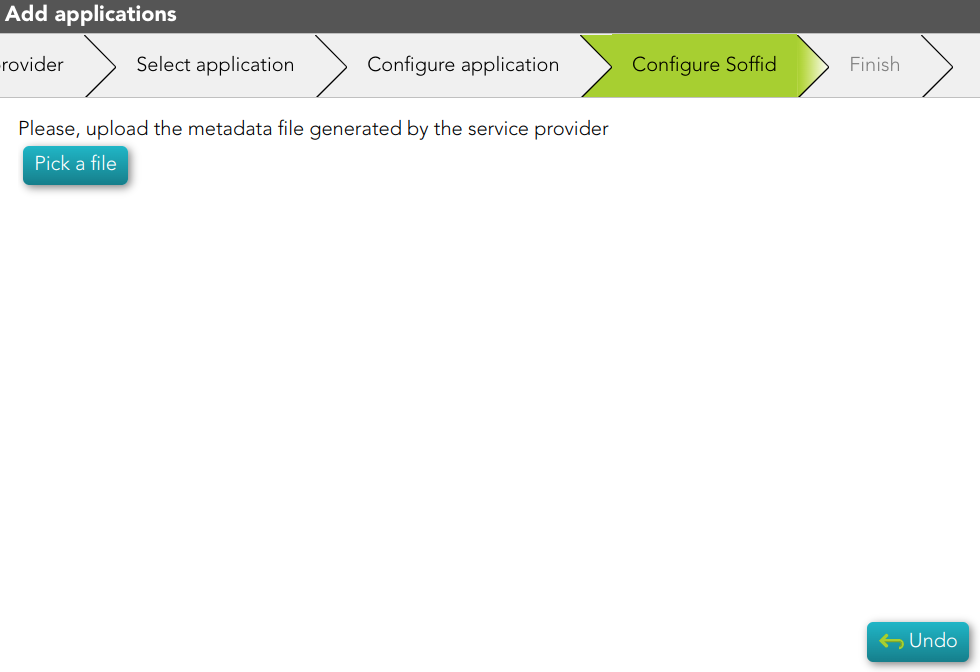
3.5.3 Then, you have to upload the metadata file generated by the Service Provider
Create MFA policies
Description
This wizard will help you to configure multi-factor authentication in order to expand security. This process requires users to provide two or more forms of identification before being granted access to a system or application.
For more information, you can visit the Two-factor authentication (2FA) book.
Step-by-step
1. If you have not previously installed the Federation Addon, the first time you select the Create MFA policies option, Soffid will require to install the Federation and the OTP Addons.
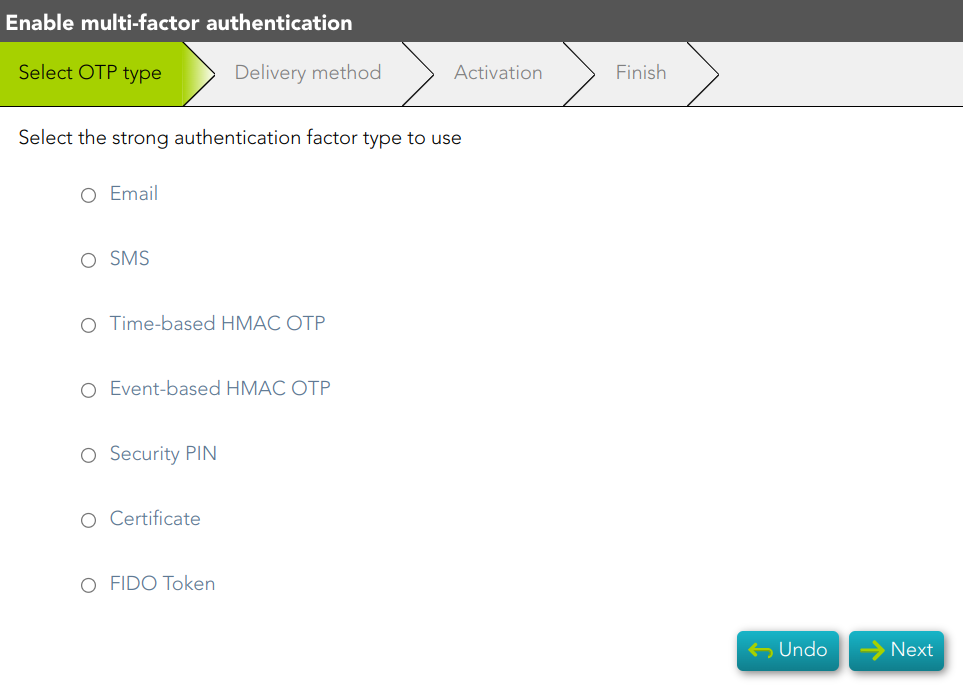
2. Frist, you must select the authentication factor to use
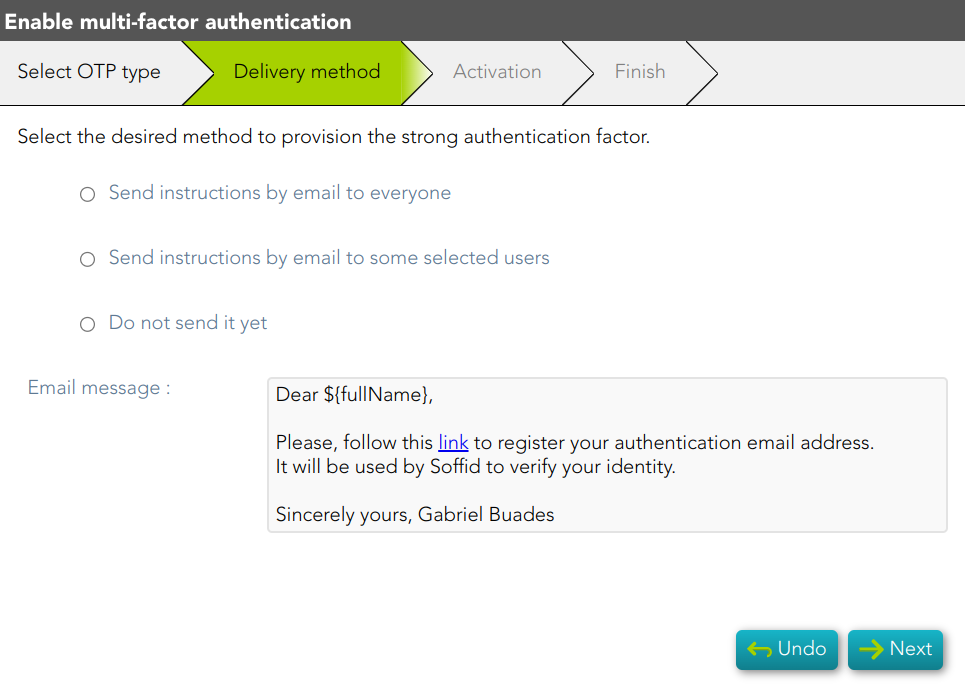
3. Second, you must select the delivery method to use. If you select the second option, you have to select the users to whom the instructions will be sent.
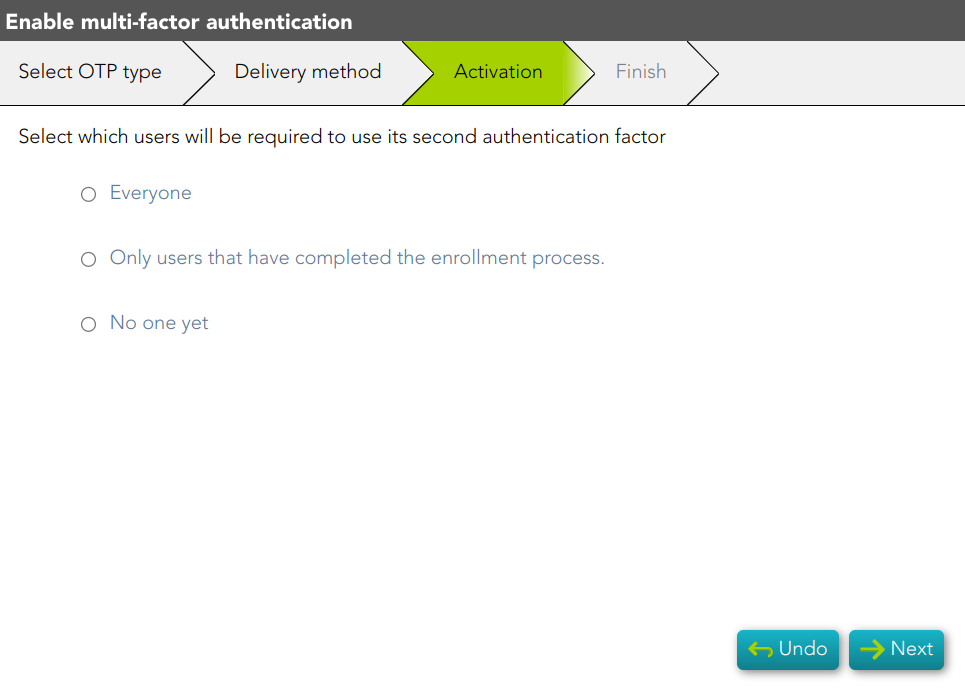
4. Next, you must select which users will have the second authentication factor activated.
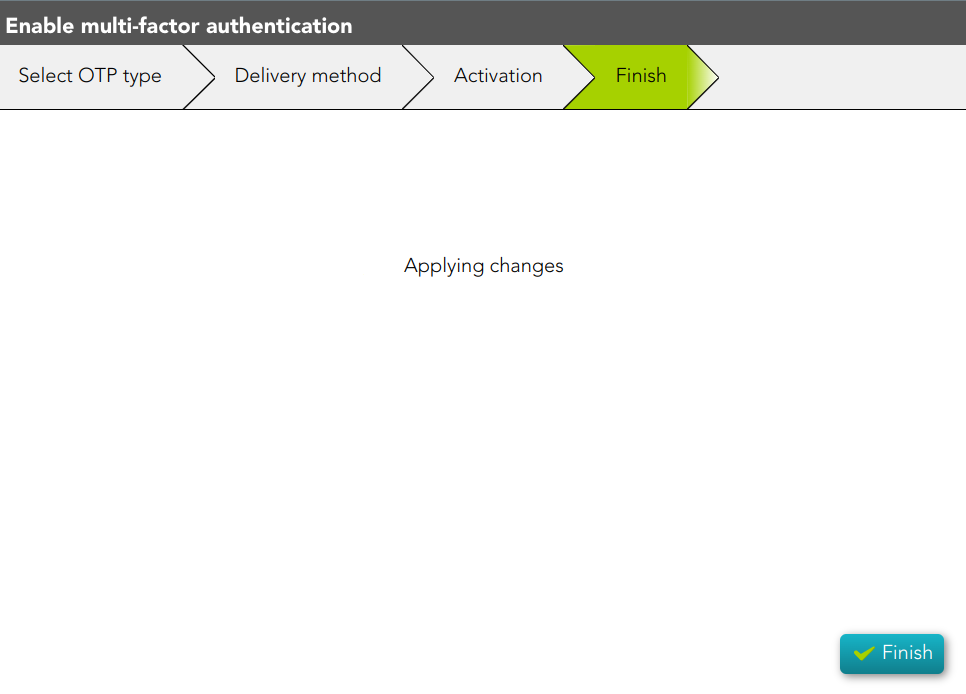
5. Finally, the changes will be applied and the process will be finished.
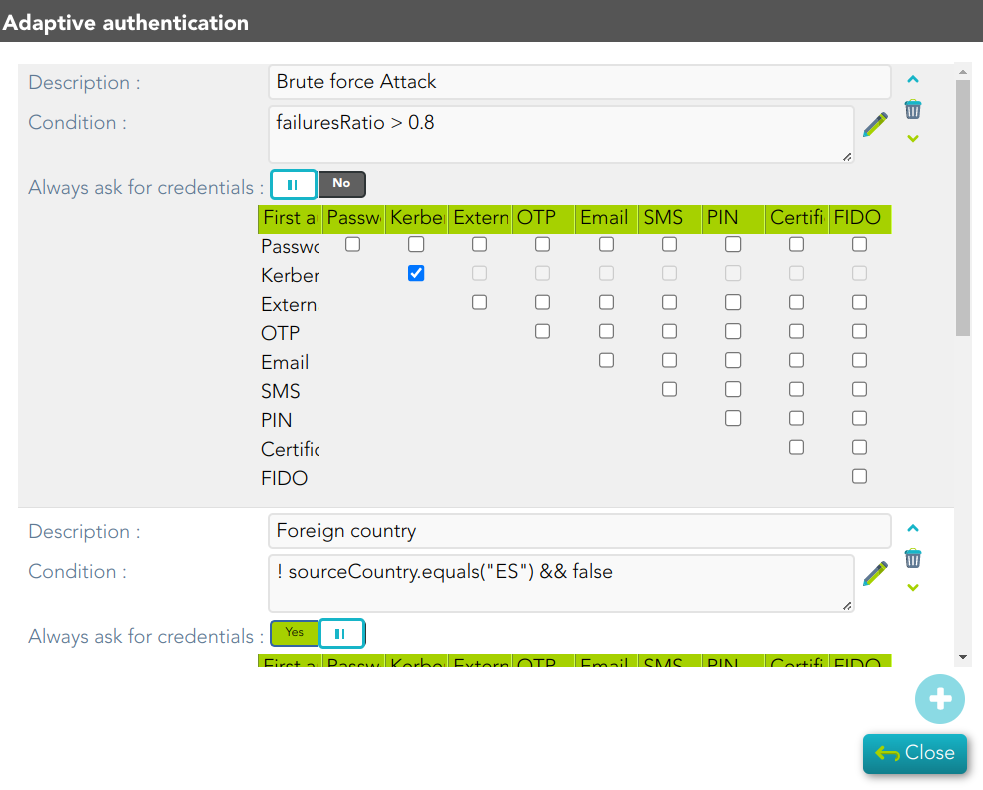
Create adaptive authentication rules
Description
Adaptive authentication rules are a set of security policies and mechanisms that adjust authentication requirements. These rules determine the strength of authentication required for each user, based on factors such as their location, device, past login behavior, and other risk indicators.
For more information, you can visit the Condition for Adaptive authentication page.
Step-by-step
1. If you have not previously installed the Federation Addon, the first time you select the Create MFA policies option, Soffid will require to install the Federation and the OTP Addons.

2. You must select the Create adaptive authentication rules and then click the Ok button.
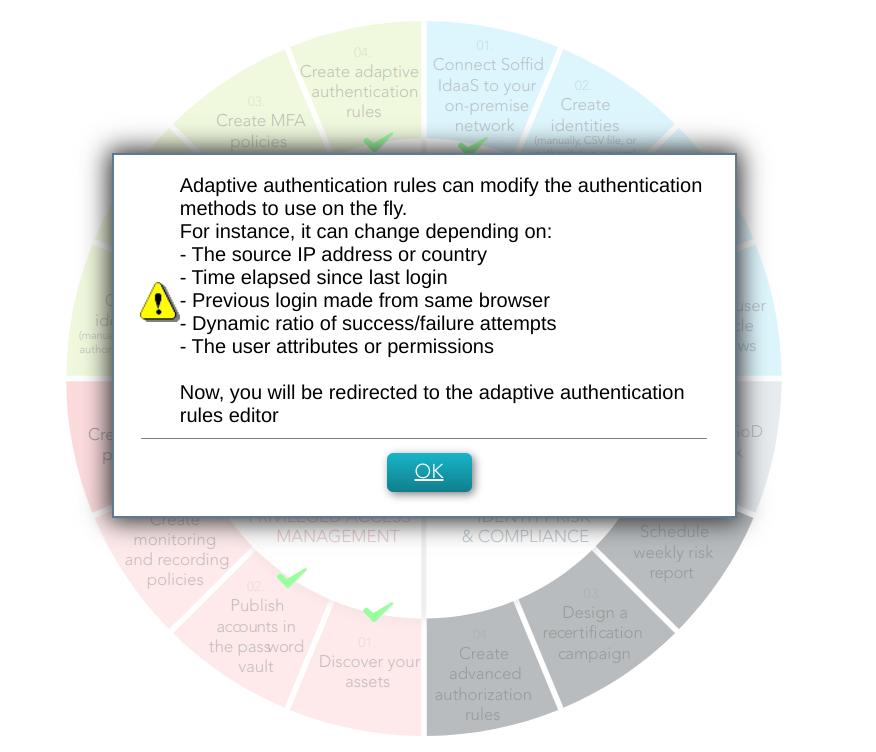
3. Then, Soffid will browse to the Adaptive authentication window, where you could configure it