BPM editor
- What is BPM?
- Introduction to BPM addon
- How to install the BPM Editor addon in Soffid
- Soffid BPM pages
- Process types
- User management steps
- Permissions management steps
- Account reservation steps
- Permissons request steps
- Delegation roles steps
- Examples
What is BPM?
What is BPM?
Business Process Management is a discipline for executing of management methodology to improve an organization’s business processes. That uses a combination of modeling, automation, execution, control, measurement and optimization of business activity flows, spanning systems, employees, customers and partners to achieve the enterprise goals.
Gartner defines business process management as: "the discipline of managing processes (rather than tasks) as the means for improving business performance outcomes and operational agility. Processes span organizational boundaries, linking together people, information flows, systems, and other assets to create and deliver value to customers and constituents".
The main steps in BPM are:
- Analyze
- Re-design and model
- Implement
- Monitor
- Manage
- Automate
Some of the benefits of using BPM include:
- Improved efficiency.
- Increases productivity.
- Reduces costs.
- Facilitates regulatory compliance.
Why BPM?
The main goal of using Business Process Management or BPM is to improve your organization's business processes. By using these workflows you will be able to save time, not only for system administrators but also for managers and coordinators.
System administrators will be able to spend less time on user and access management. Managers and coordinators because will be able to approve and deny requests using the self-service portal or from email, depending on the workflow configuration.
Methodology steps
1. First of all, you need to identify your business needs.
2. Second, you need to analyze the business needs and select those that can be automated by any authorization mechanism.
3. Then you need to design the workflow using the Soffid BPM editor. Soffid provides you different types of processes with their own characteristics, also a lot of steps to define the flow of your process
4. Then you need to design the workflow using the Soffid BPM editor. Soffid provides you different types of processes with their own features, and also provides you different steps to define and customize the flow of your processes.
5. Finally, the workflows can be executed, automatically or by the Soffid users, with the proper permissions.
You will be able to monitor all the status process and perform some operations depending on your assigned permissions.
Introduction to BPM addon
Introduction
The BPM addon allows Soffid administrators to generate and maintain their own workflows directly from the Soffid Console itself.
What is a workflow?
Soffid has implemented a BPM engine that allows Soffid to manage workflows.
Workflows can facilitate, streamline, control, and audit multiple business processes.
There are many examples of possible workflows.
- User registration from HR
- Allow users to update certain data
- Request privileged accounts
- Request roles for oneself
- Allow managers to request a large number of permissions
- Confirm that a manual process is executed and attach evidence
- Request company resources
- Perform scheduled user logouts
Many Soffid screens are involved in the BPM module. We list the most important ones below.
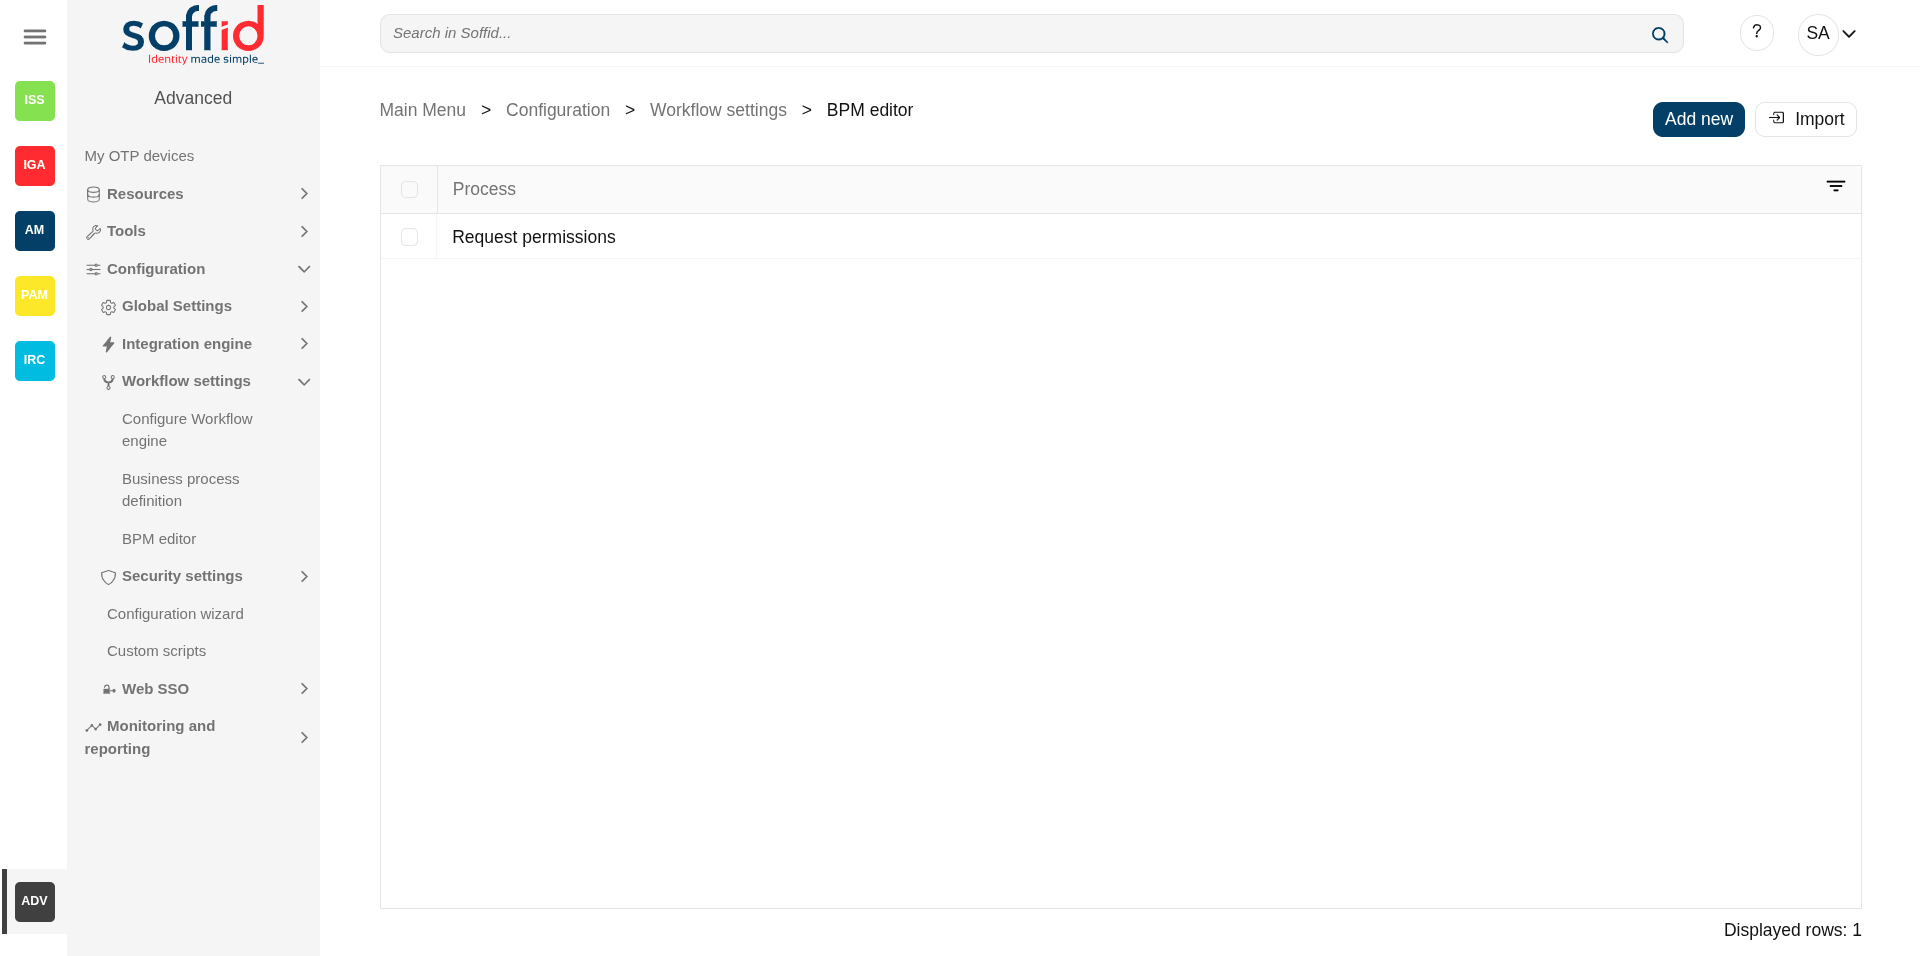
- BPM editor : where to create or modify workflows
- Business process definition : where workflows are published
- Configure Workflow engine : where the workflow engine is configured
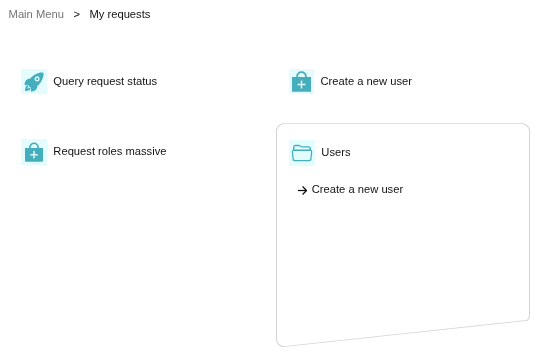
- My tasks : pending workflows where the user has to perform an action in order to continue their workflow.
- My requests : The workflows that the user can initiate are listed here.
-
My requests > Query request status : to search for all processes started by oneself
-
Process Search : to search for all processes
- Metadata : to add attributes to display in the search tables
- Scheduled jobs : shows active workflows pending asynchronous tasks
How to install the BPM Editor addon in Soffid
Installation
Introduction
To use an addon in Soffid, you must download and install it in the Console. There are two ways to do this.
1. The first option is to use the Soffid 4 marketplace. You can download and upload it directly from the Licence and plugin page.
2. The second option is to download the file from the Soffid download page and then upload it to the Console.
Soffid 4 marketplace
Soffid 4 allows you to install and update plugins through the new Addons marketplace feature.
To access the marketplace, you must have a valid token to use Soffid and have configured the Console via https. Please check the License and plugin page.
1. Please log in to IAM Console.
You need to be an administrator user of the Soffid console or a user with permission to upload addons.
It is recommended to upload the addons to the master, this is the way to maintain updated all, master and tenants if there are.
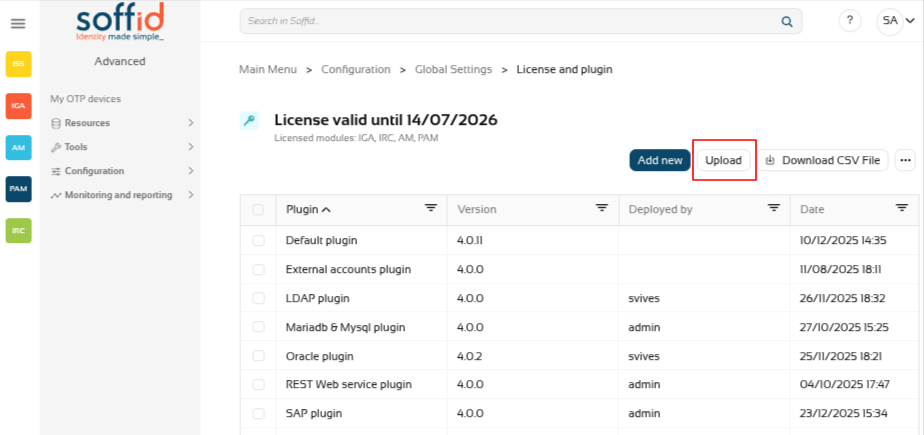
2. In the Soffid console, please go to the License and plugin page.
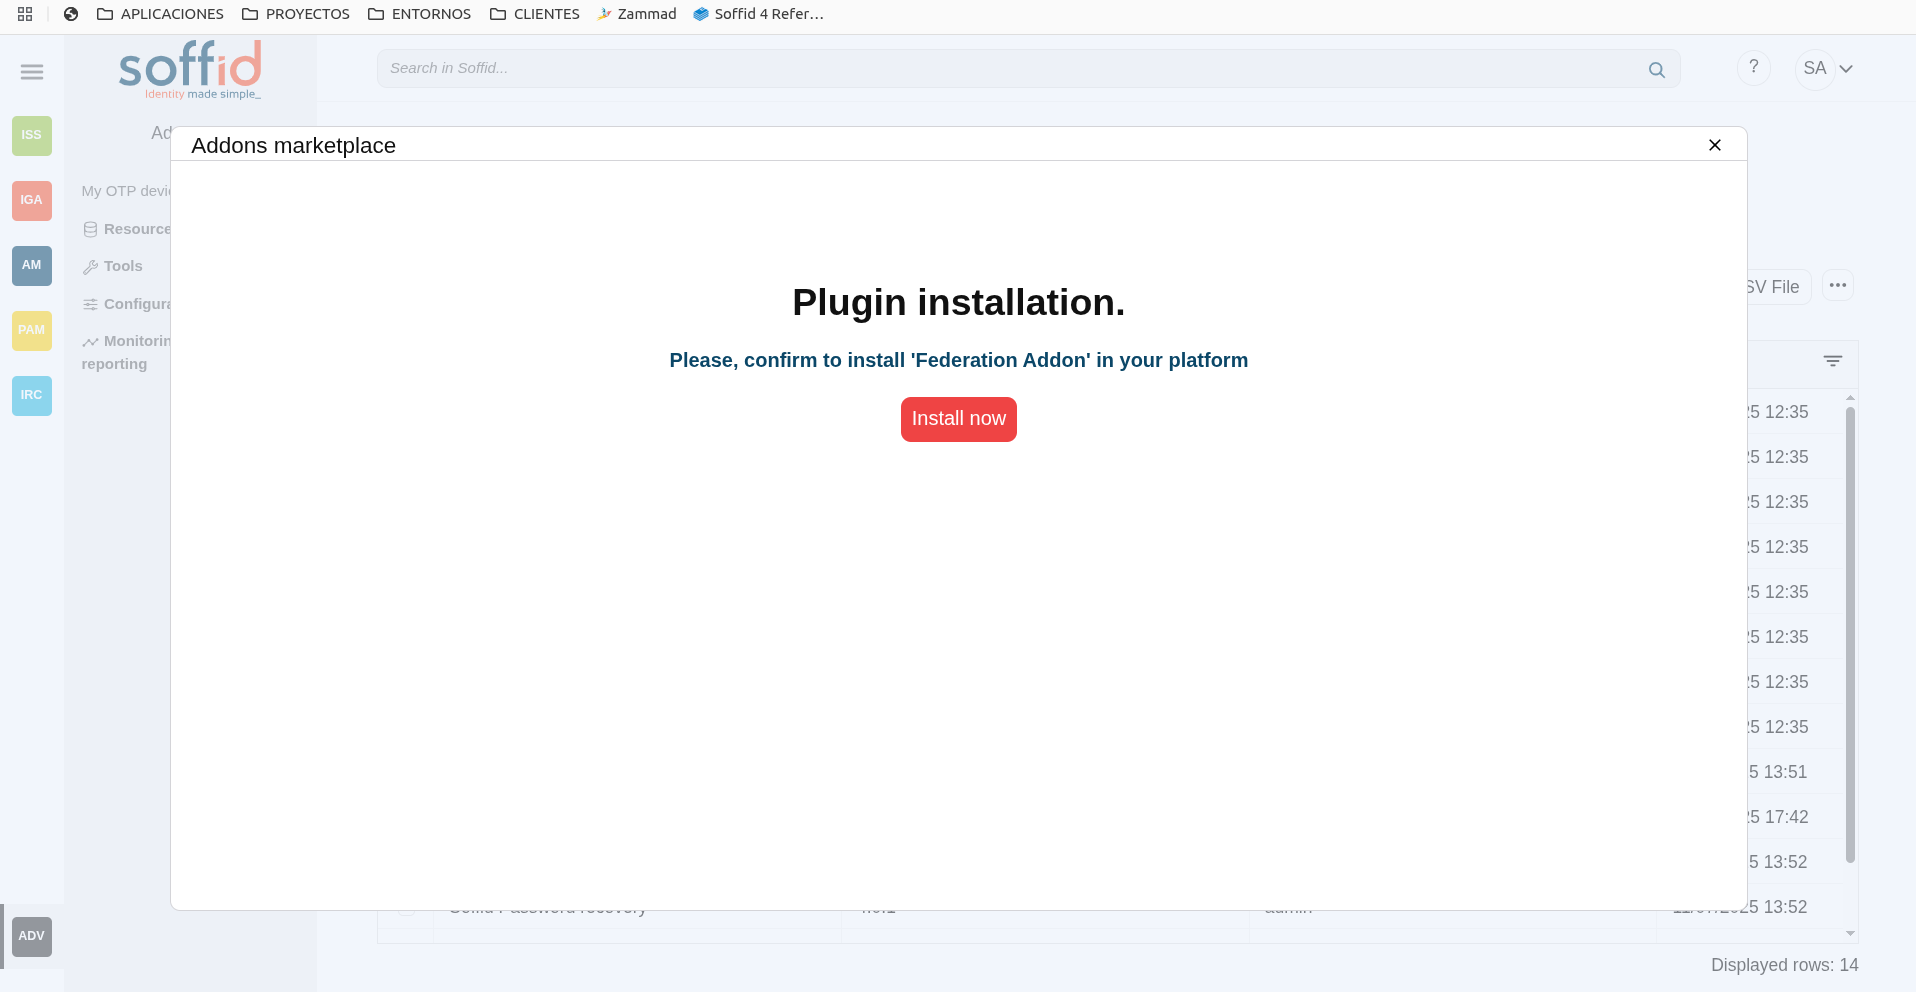
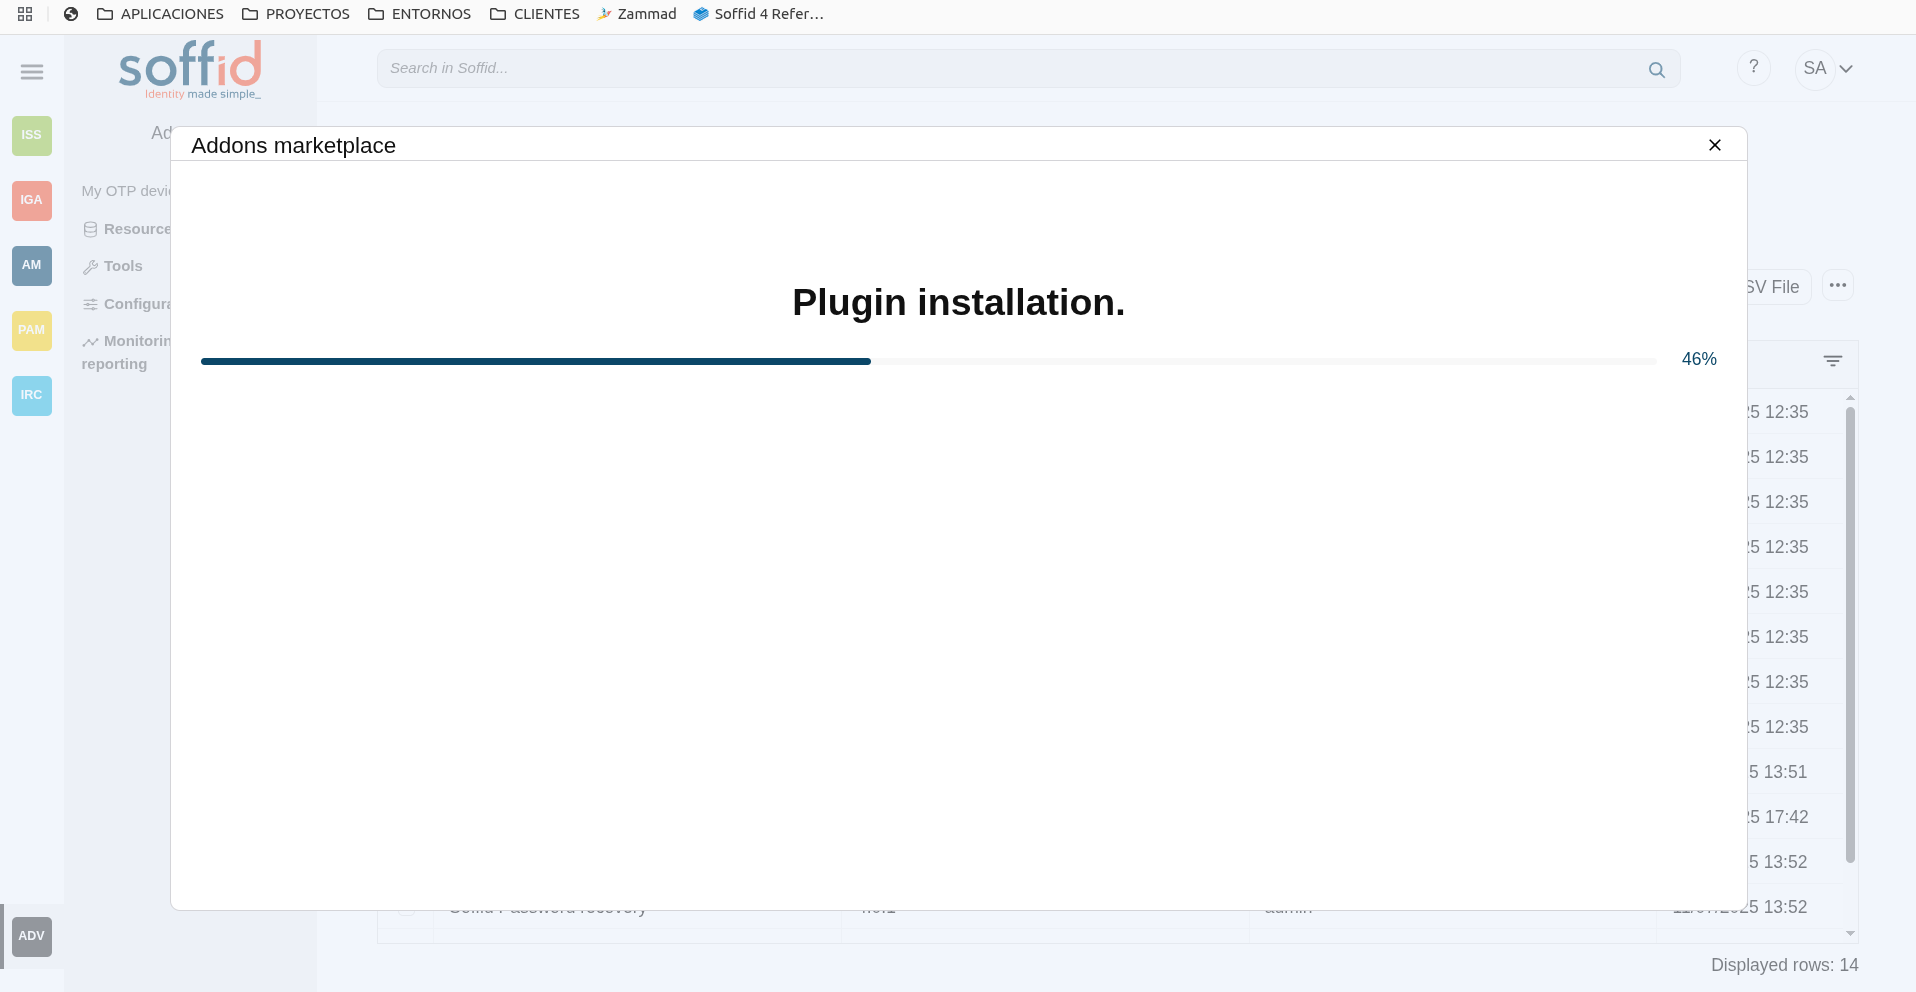
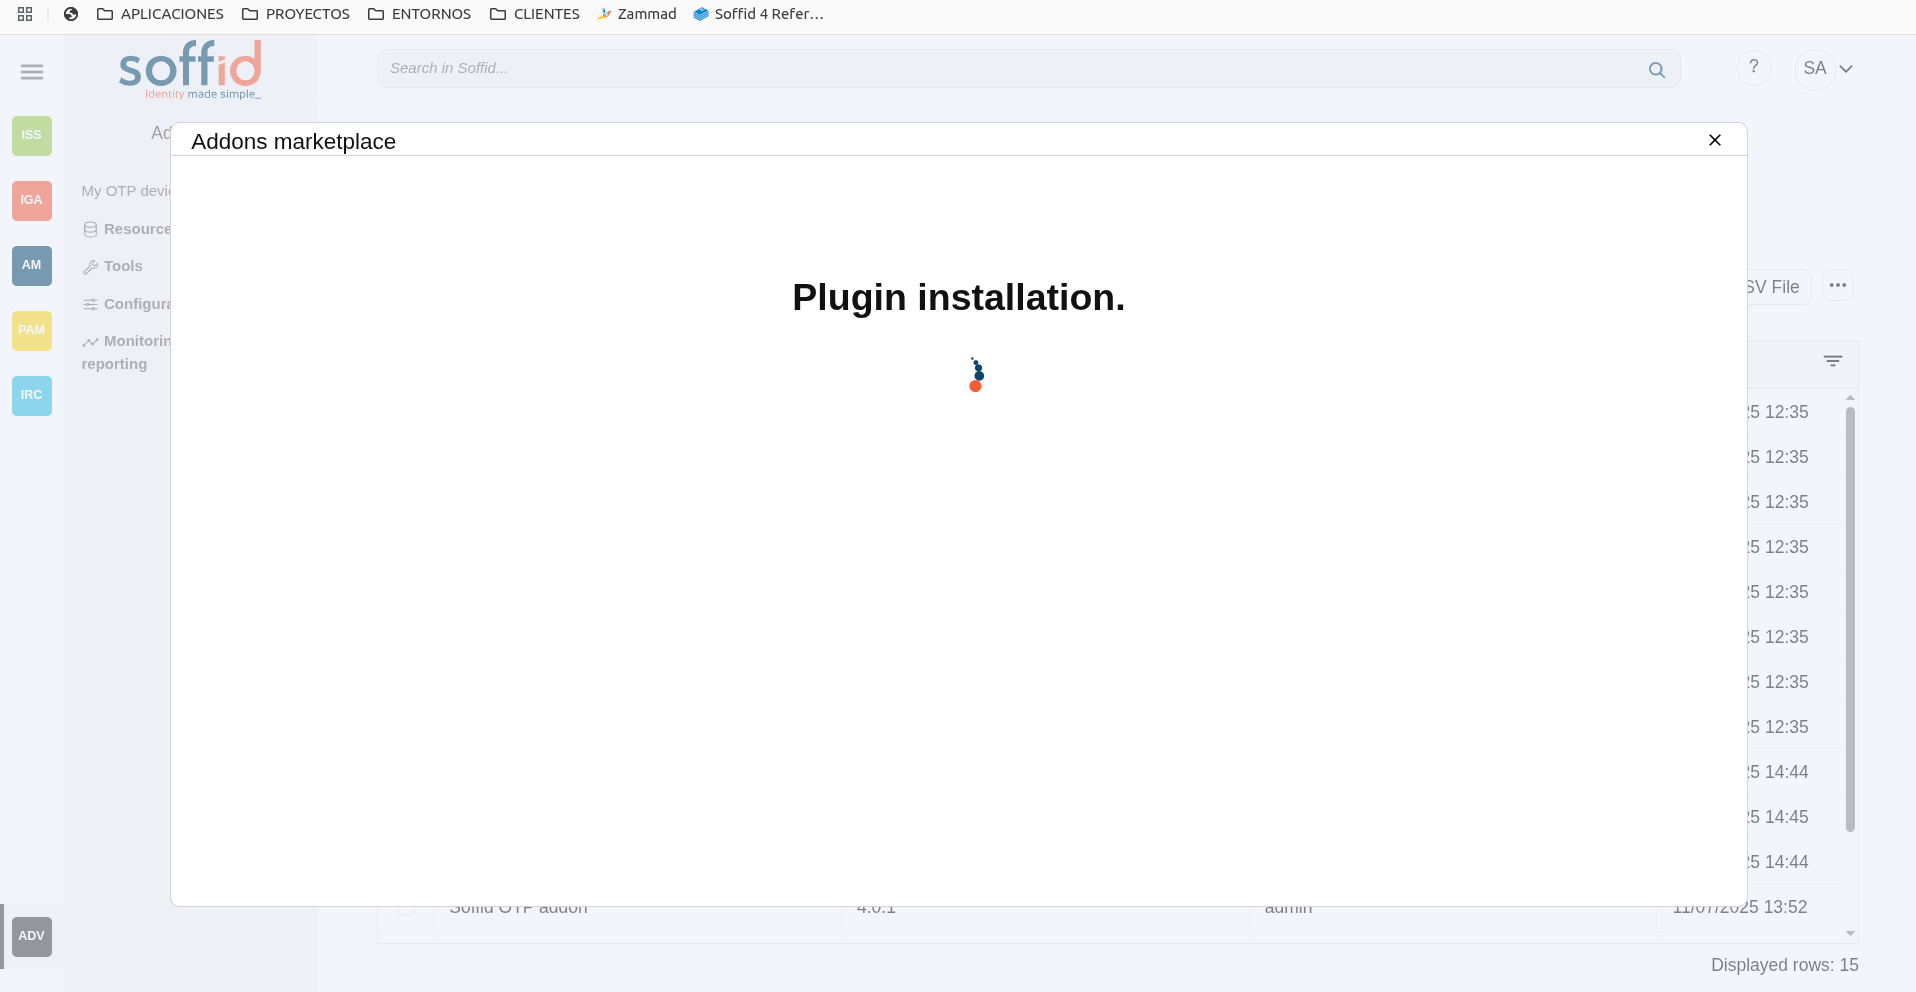
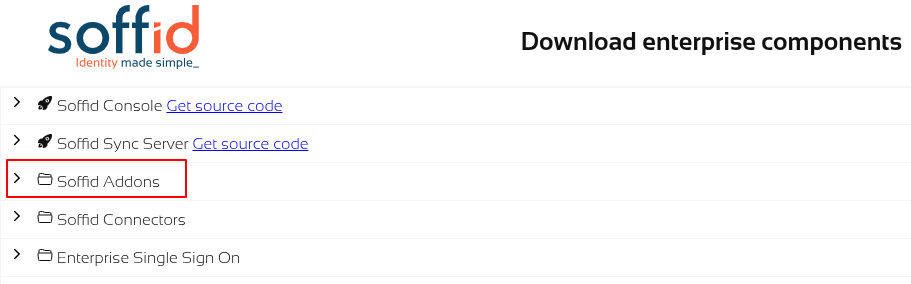
3. Then, click the add button "Add new" button, open the "Soffid Addons" secction and select the "Instlla addon" option, Soffild will upload the addon file.
Image

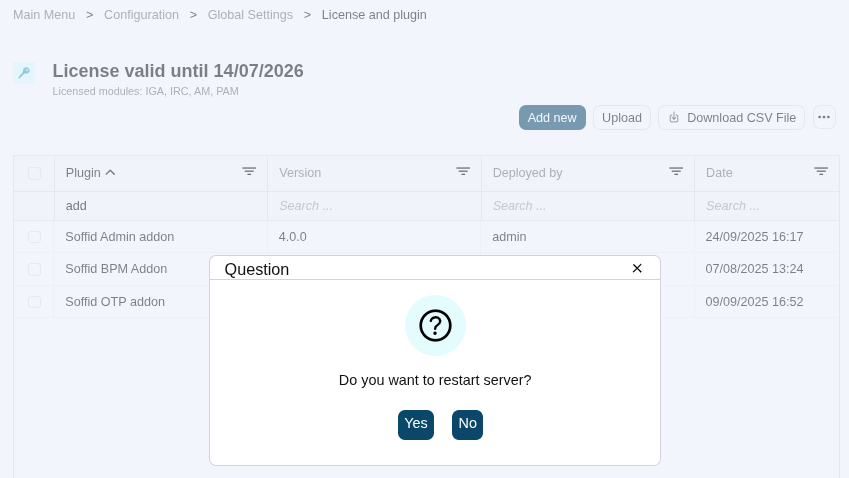
4. Finally, when the addon is installed, the Consola has to be restarted, a popup will be displayed to perform this action, you can choose to do it now or later.
Image
5. Once the Soffid console has restarted, you can check if the plugin was correctly uploaded on the "License and plugins" page.
6. Now, you can configure the addon.
Download an upload
1. You could download the addon at the following link http://www.soffid.com/download/enterprise/ if you have a Soffid user with authorization, or in the following http://download.soffid.com/download/ by registering.
The addons are in the Addon seccion.
Image
2. Once the addon is downloaded, please log in to IAM Console.
You need to be an administrator user of the Soffid console or a user with permission to upload addons.
It is recommended to upload the addons to the master, this is the way to maintain updated all, master and tenants if there are.
3. In the Soffid console, please go to the License and plugin page.
Soffid 3:
Soffid 4:
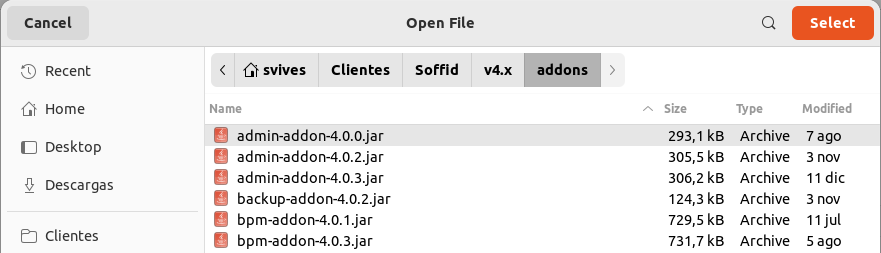
4. Then, click the add button "Upload" and pick the file and click the "Select" button and Soffild will upload the addon file.
Image
5. Finally, when the addon is installed, the Consola has to be restarted, a popup will be displayed to perform this action, you can choose to do it now or later.
Image
6. Once the Soffid console has restarted, you can check if the plugin was correctly uploaded on the "License and plugins" page.
7. Now, you can configure the addon.
Soffid BPM pages
Soffid BPM pages
BPM editor page
Description
BPM is a technology that allows modeling, implementing, and executing processes automatically to enhance efficiency and productivity in support of enterprise goals.
Soffid includes a BMP (Business Process Management) in its Smart Engine to provide useful workflows integrated with the processes and the policies.
The BPM Editor Addon allows you to create, configure and publish business processes very easily for the Soffid administrators.
The BPM Editor addon provides some templates to create new workflows, these templates depend on the process type selected when you are adding a new business process. Nowadays there are the following templates available:
- User management
- Permissions management
- Account reservation
- Permissions request
- Delegate roles
You can find additional information by visiting Process types chapter.
Once a workflow is published with the proper configuration, the users with the correct permissions could start, approve or observe the workflow from the "My Request" option. You can find more información on My Requests page.
When a workflow is deleted in the BPM editor, that workflow continues to be available to be executed. If you do not want that a workflow will be executed, you must disable that process on the "Business process definition" page. If you disable a workflow, processes initiated and pending can be finalized, but no longer than workflow could be started.
A workflow could be updated with a new version. Processes started with the previous version, will be performed with the previous definition (previous version). And the processes those start with the new version will be performed with the new version.
We will use two concepts to explain the process: identity, and end-user. Identity will be the identity or user that will be created, updated, or deleted in Soffid Console. The end-user is referred to an user of Soffid that will request processes using the self-service portal.
Screen overview
Related objects
- Configure Workflow engine : where the workflow engine is configured
- Business process definition : where workflows are published
- BPM editor : where to create or modify workflows
-
My tasks : pending workflows where the user has to perform an action in order to continue their workflow.
-
My requests : The workflows that the user can initiate are listed here.
-
My requests > Query request status : to search for all processes started by oneself
-
Process Search : to search for all processes
- Metadata : to add attributes to display in the search tables
- Scheduled jobs : shows active workflows pending asynchronous tasks
Standard attributes
Processes list
The list of the processes already created or imported.
- Process: identifier name of the workflow
Summary tab
That area of the form displays the general information about the business workflow and the main operations to perform. The actions to perform are defined by flowing that link Process editor actions
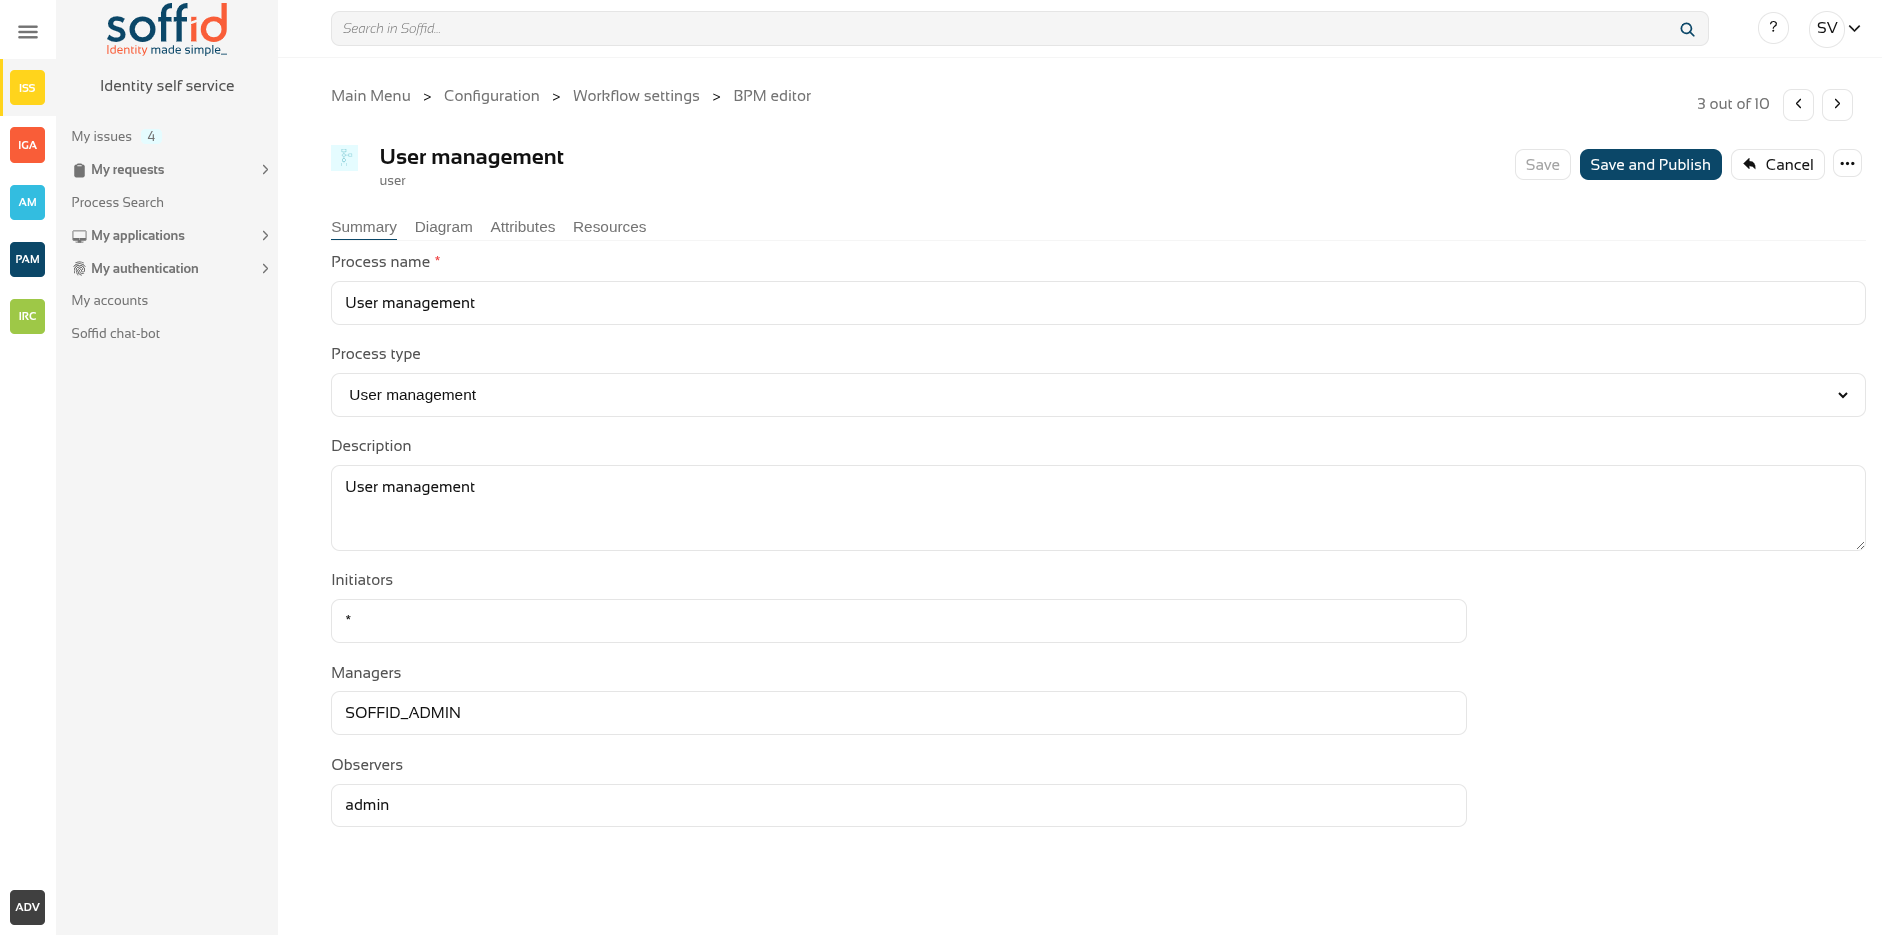
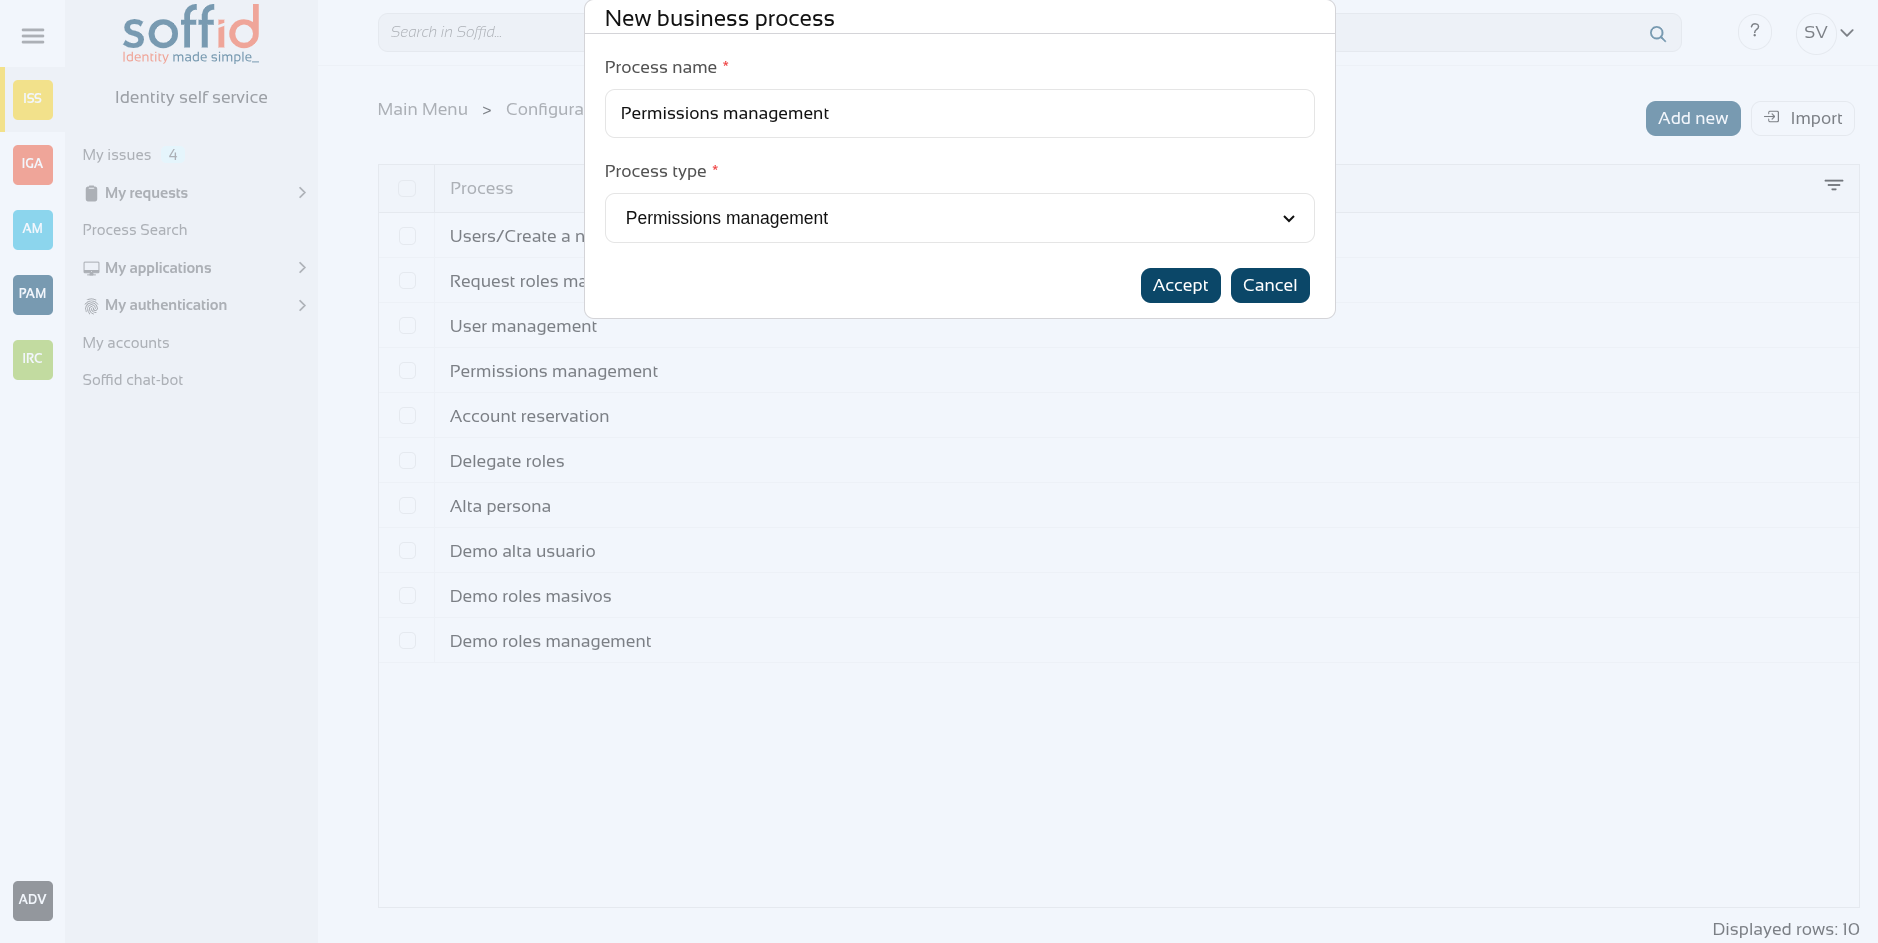
- Process name: identifier name of the workflow. This name will be used to label the workflow for the end-user. BPM editor allows you to manage the process into folders, you can type the folder name following by "/" .
Image
Configuration: folder/name

My request with the Users folder
Users folder with the workflow

- Process type: allows categorizing the process. There are three different types of processes, each one with its own template.
- Use management: used to create and update identities and their attributes.
- Permissions management: used to create, update and remove permissions and account to identities.
- Permissions request: used to request permissions.
- Account reservation: to use privileges account. In this case, initiators must be -nobody-, that is nobody can start the process directly.
- Delegate roles: used to delegate permissions to other user.
- Description: a brief description of the workflow. When an end-user starts a workflow, this text will be displayed in the Actions log tab.
- Initiators: here you could configure the roles or the identities that could start a new workflow from the Console and Selfservice. E.g. "admin" identity, "SOFFID_ADMIN" role, both separated by comma ',' as "admin,SOFFID_ADMIN" or if you want to publish the workflow to everyone, you can use the text "tothom" or the character '*' . When you are configuring an Account reservation process, that value must be -nobody-, that is nobody can start the process directly.
- Managers: here you could configure the roles or the identities that could perform tasks in the workflow as approve permissions or cancel the workflow.
- Observers: here you could configure the roles or the identities that could open the workflows in read-only mode.
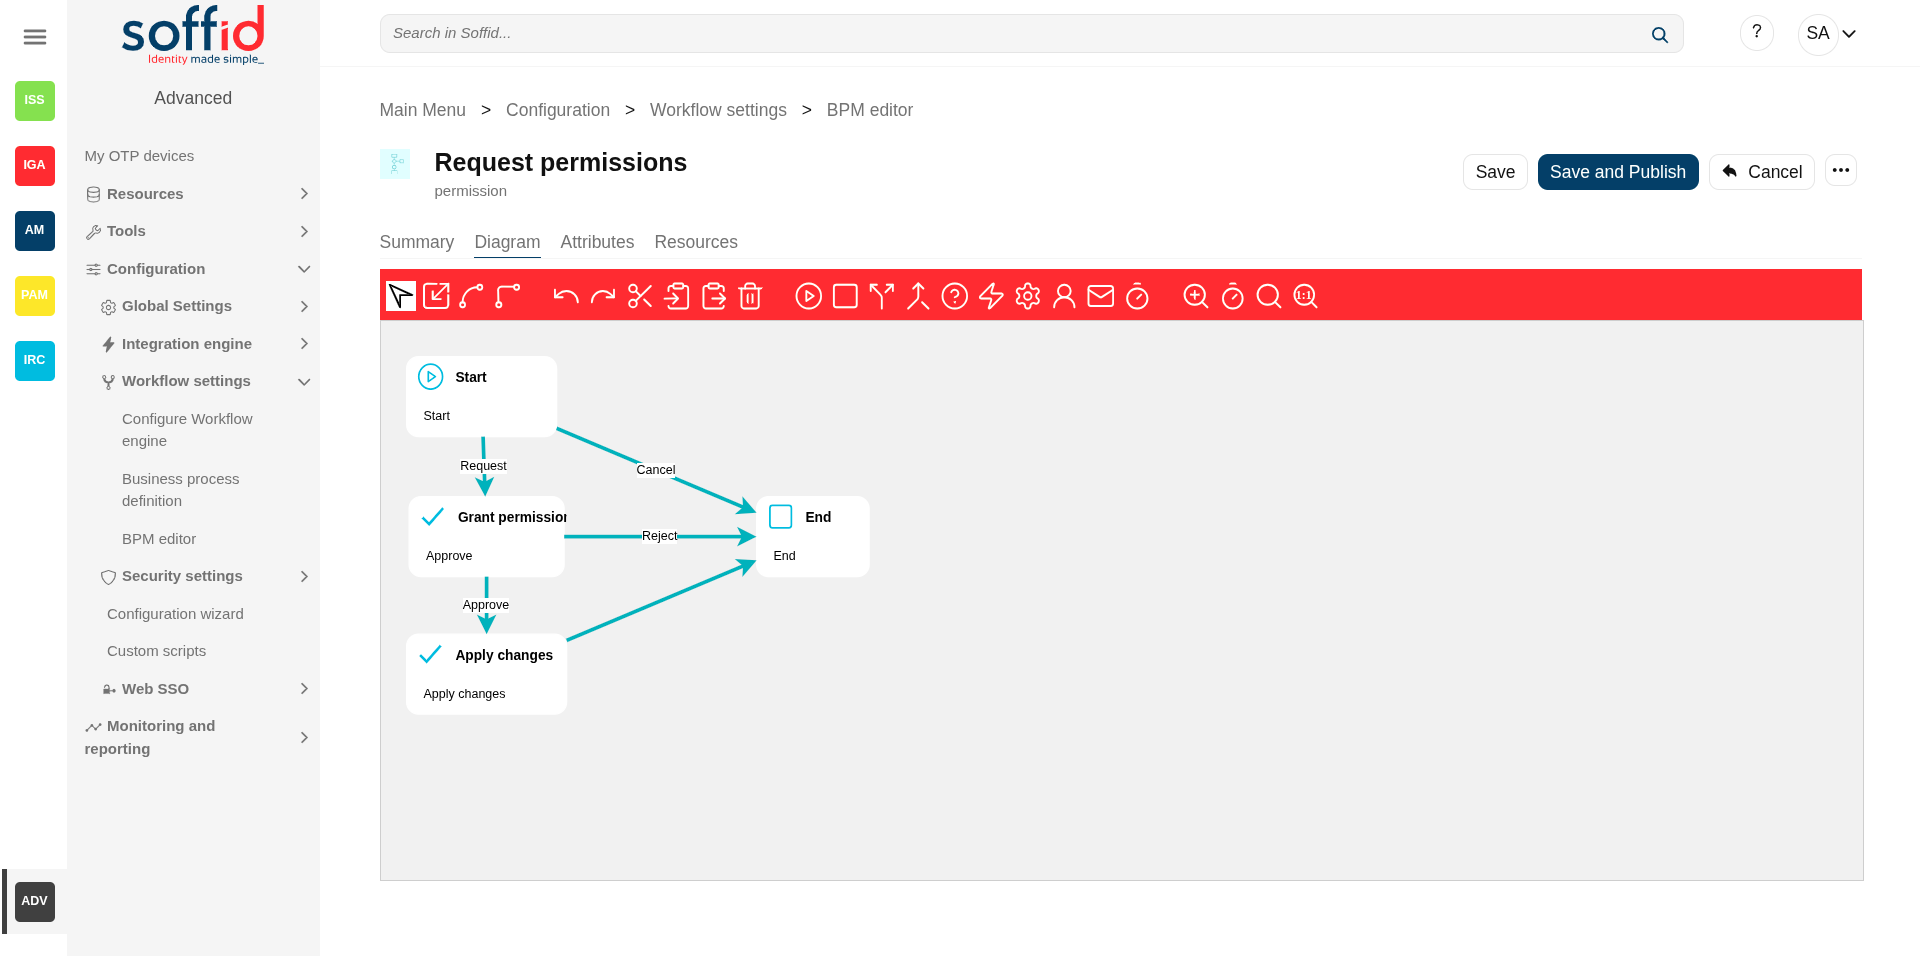
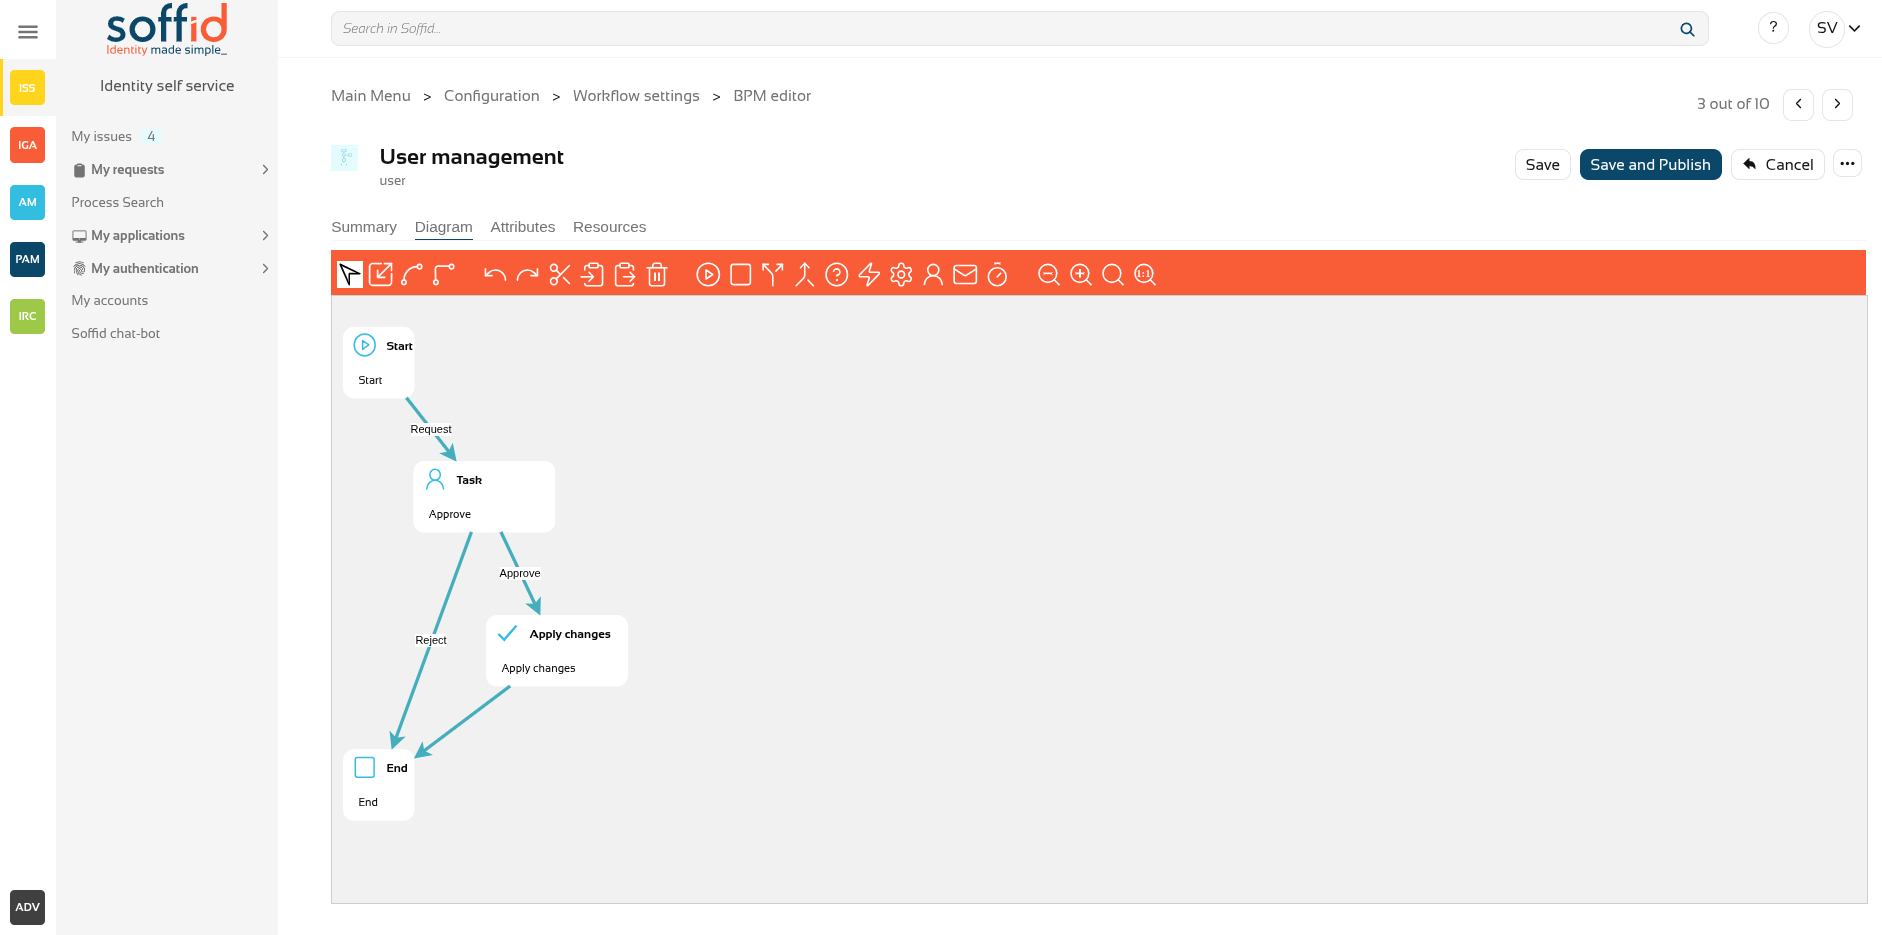
Diagram tab
This tab displays the workflow diagram. The editor allows you to perform many actions as edit a node, edit a transition, add nodes and transitions, or redistribute the diagram.
Steps
There are some available step types to define the properties and behavior of the process. Depending on the selected type, there are common properties to all types and specific properties for each one of them.
The workflows have default steps defined, those steps can be deleted or updated, and other steps can be added. Each step has detail to set up its properties and its behavior. The default steps are below:
| Start |
This step is used to define the beginning of the workflow. 💻 Image
|
| Screen |
This step is used to define a form that must be filled in by the end-user. 💻 Image
|
| Apply changes |
This step is used to show the manager a form with the changes that must be approved. 💻 Image
|
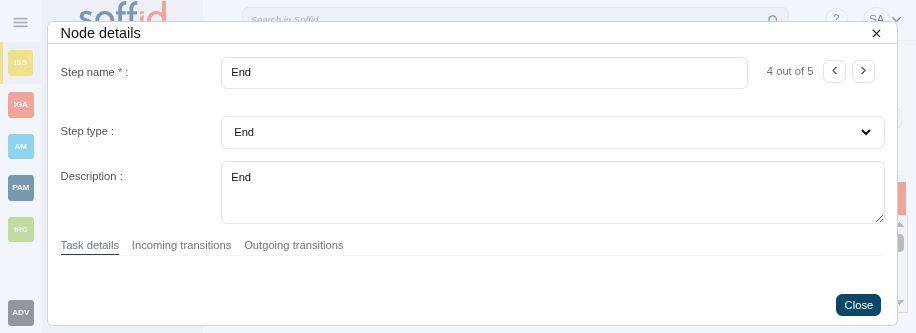
| End |
This step is used to define the finish of the workflow. 💻 Image
|

Other available steps to custom your business process:
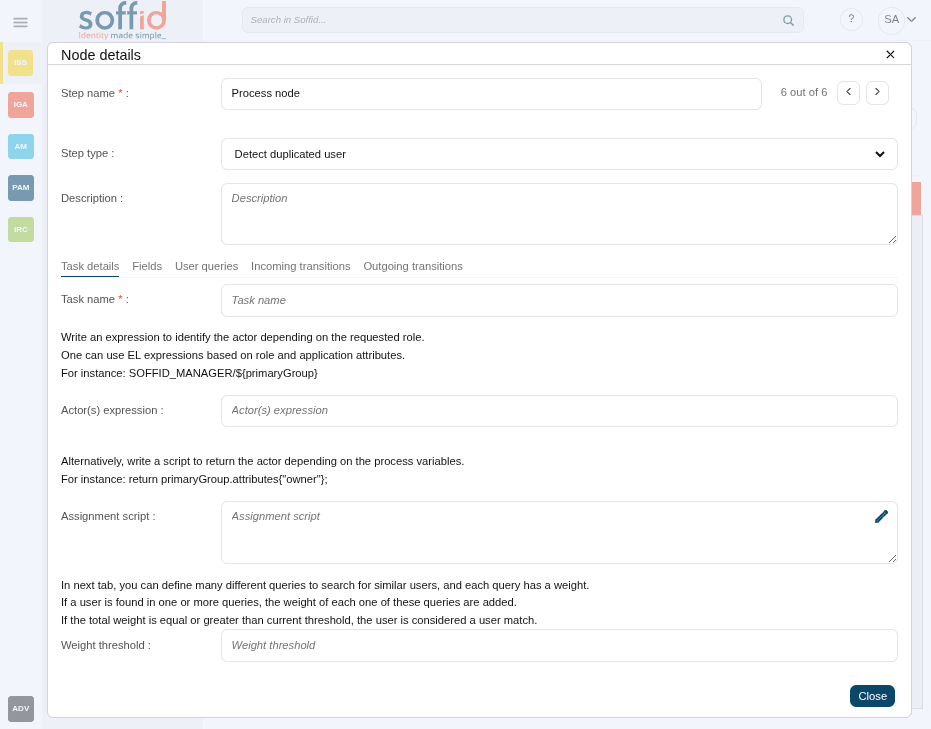
| Detect duplicated user |
This step is used to detect duplicated users. 💻 Image
|
| Grant approval |
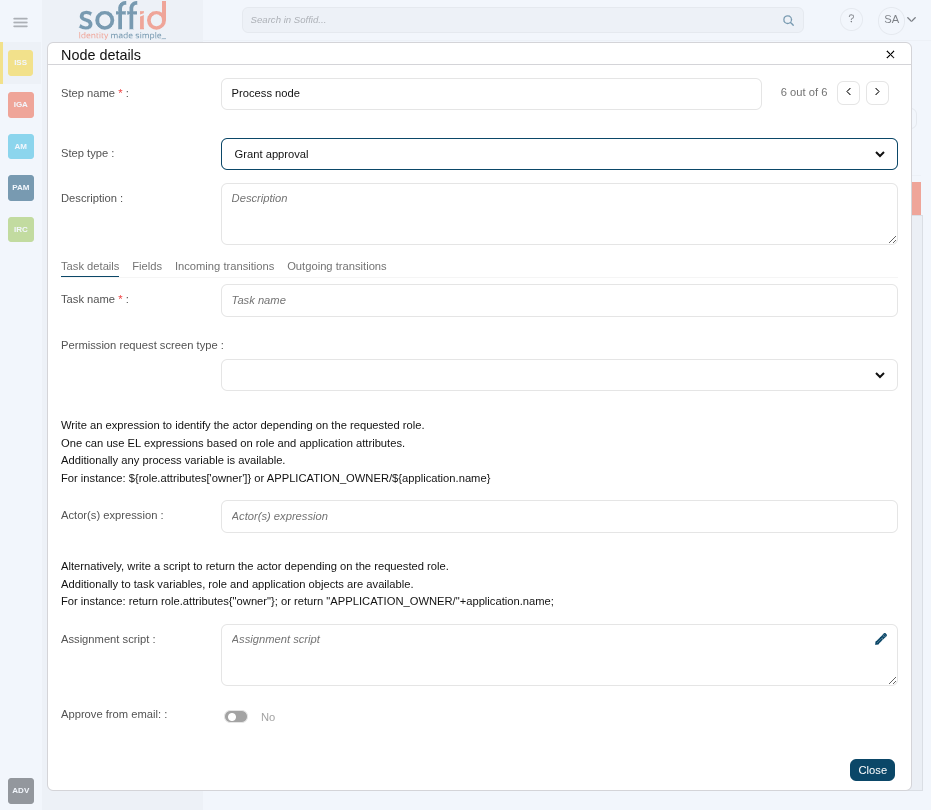
This step is used to show the manager a form with the changes that must be approved. 💻 Image
|
| Script action |
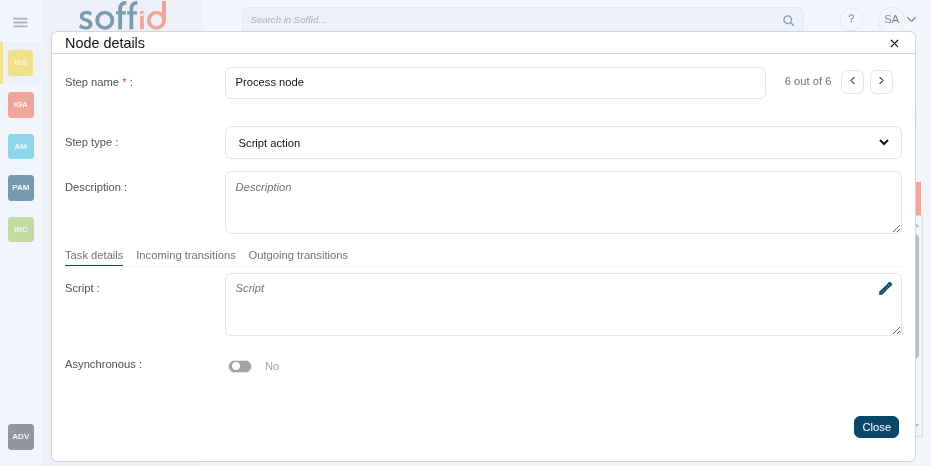
This step allows you to define a script to be executed at this point. This process can be configured as asynchronous. 💻 Image
|
|
This step is used to configure sending mail. 💻 Image
|
|
| Fork |
The process is splited into two or more paths that are run in parallel, allowing multiple activities to run simultaneously. 💻 Image
|
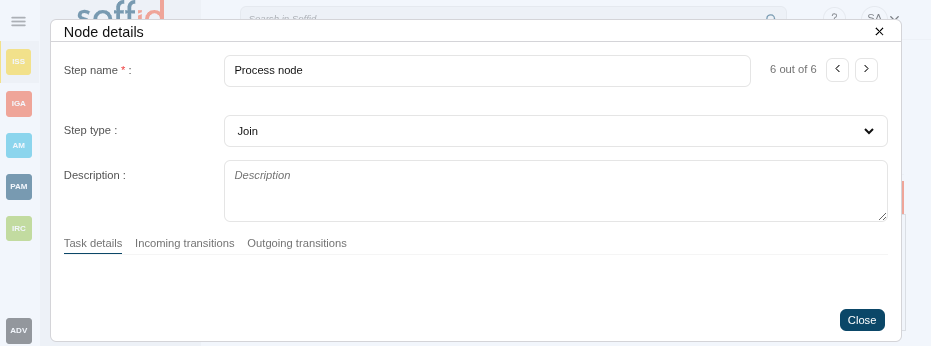
| Join |
Two or more parallel sequence flow paths are combined into one sequence Flow path. 💻 Image
|
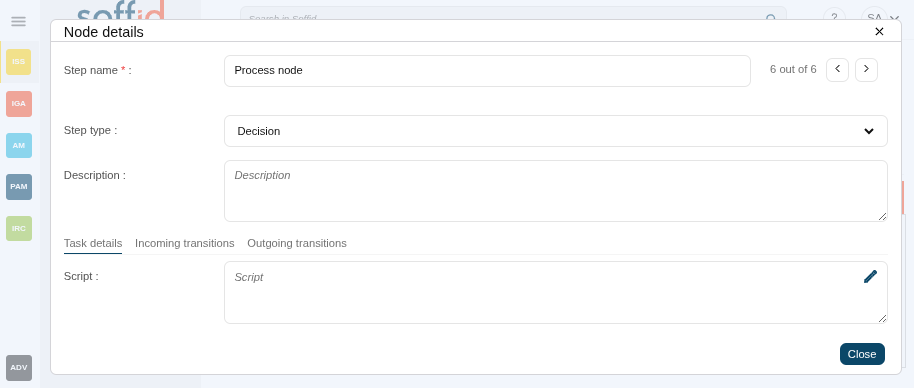
| Decision |
This step allows you to define a script to decide which will be the next step. You must configure the next step by typing the transition name as part of the return command (e.g. return "transitionName"). 💻 Image
|
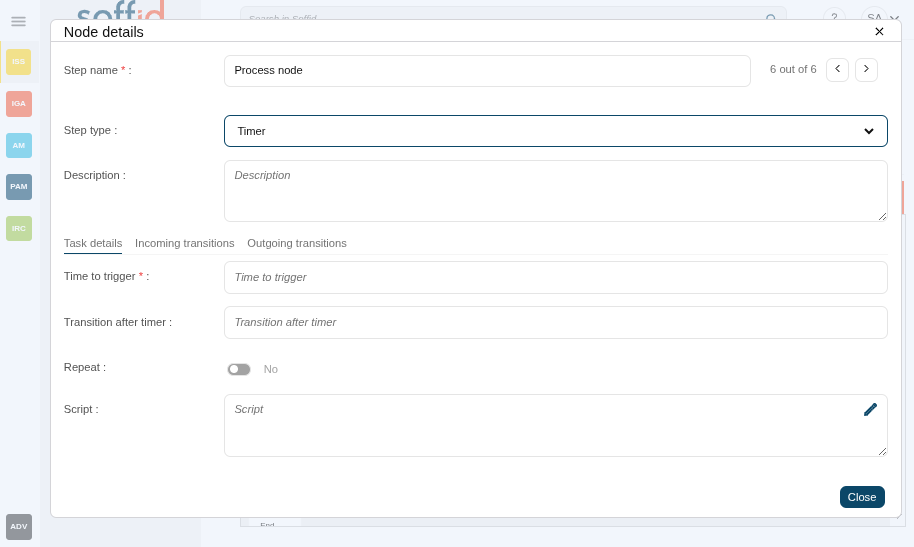
| Timer |
This option can be an independent node or as a part of an existing node. This allows you to determine the time to run the action. For Time to trigger field, the availabe options are hours, minutes, seconds, days, or a date #{fecha} 💻 Image
|
| System call |
This step allows you to set up a call to a specific system. You can find more information about the Invoker for Shell connector and the Invoker for Active directory connector. 💻 Image
|

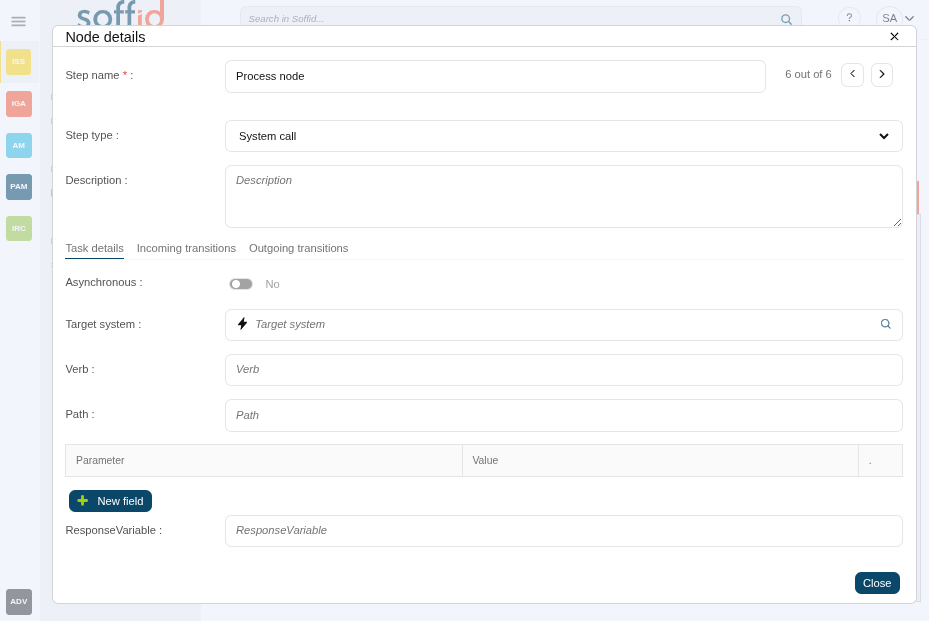
Step details
All steps have some detailed data:
- Step name: identifier name of the step.
- Step type: step to be configured.
- Description: a brief description of the step.
Step tabs
All steps have some tabs for more detailed configuration, the tabs depend on the step type:
- Task details: tab with more custom attributes that depend on the step type
- Fields: objects attributes to be managed in the workflow form
- Triggers: scripts to be executed depending the trigger selected
- User querys: user querys
- Incoming transitions: tab to manage the incomming transitions and algo manage actions
- Outgoing transitions: tab to manage the outcoming transitions and algo manage actions
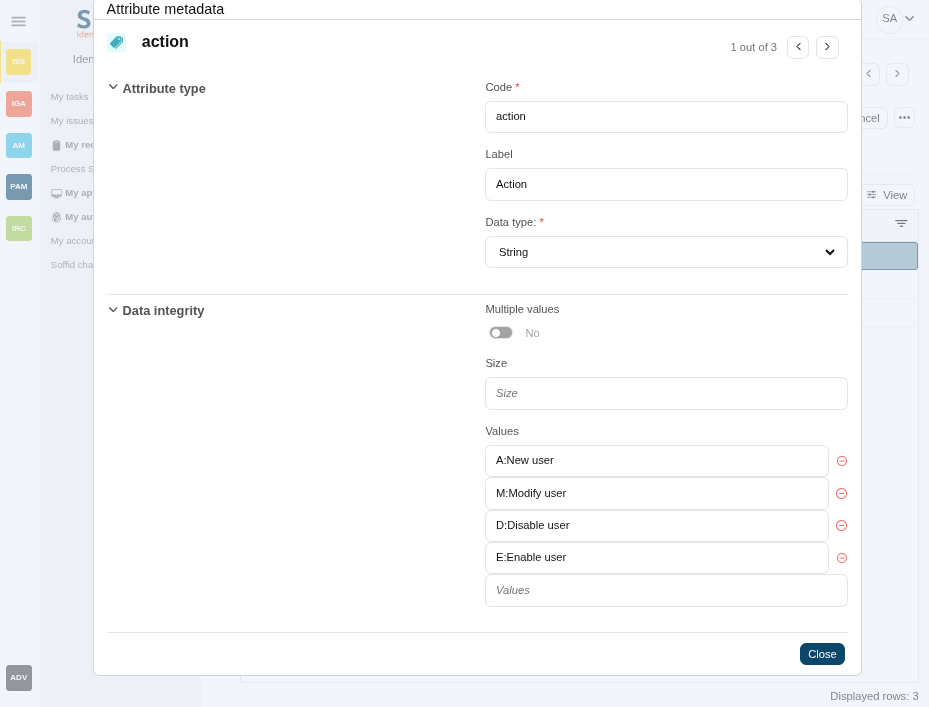
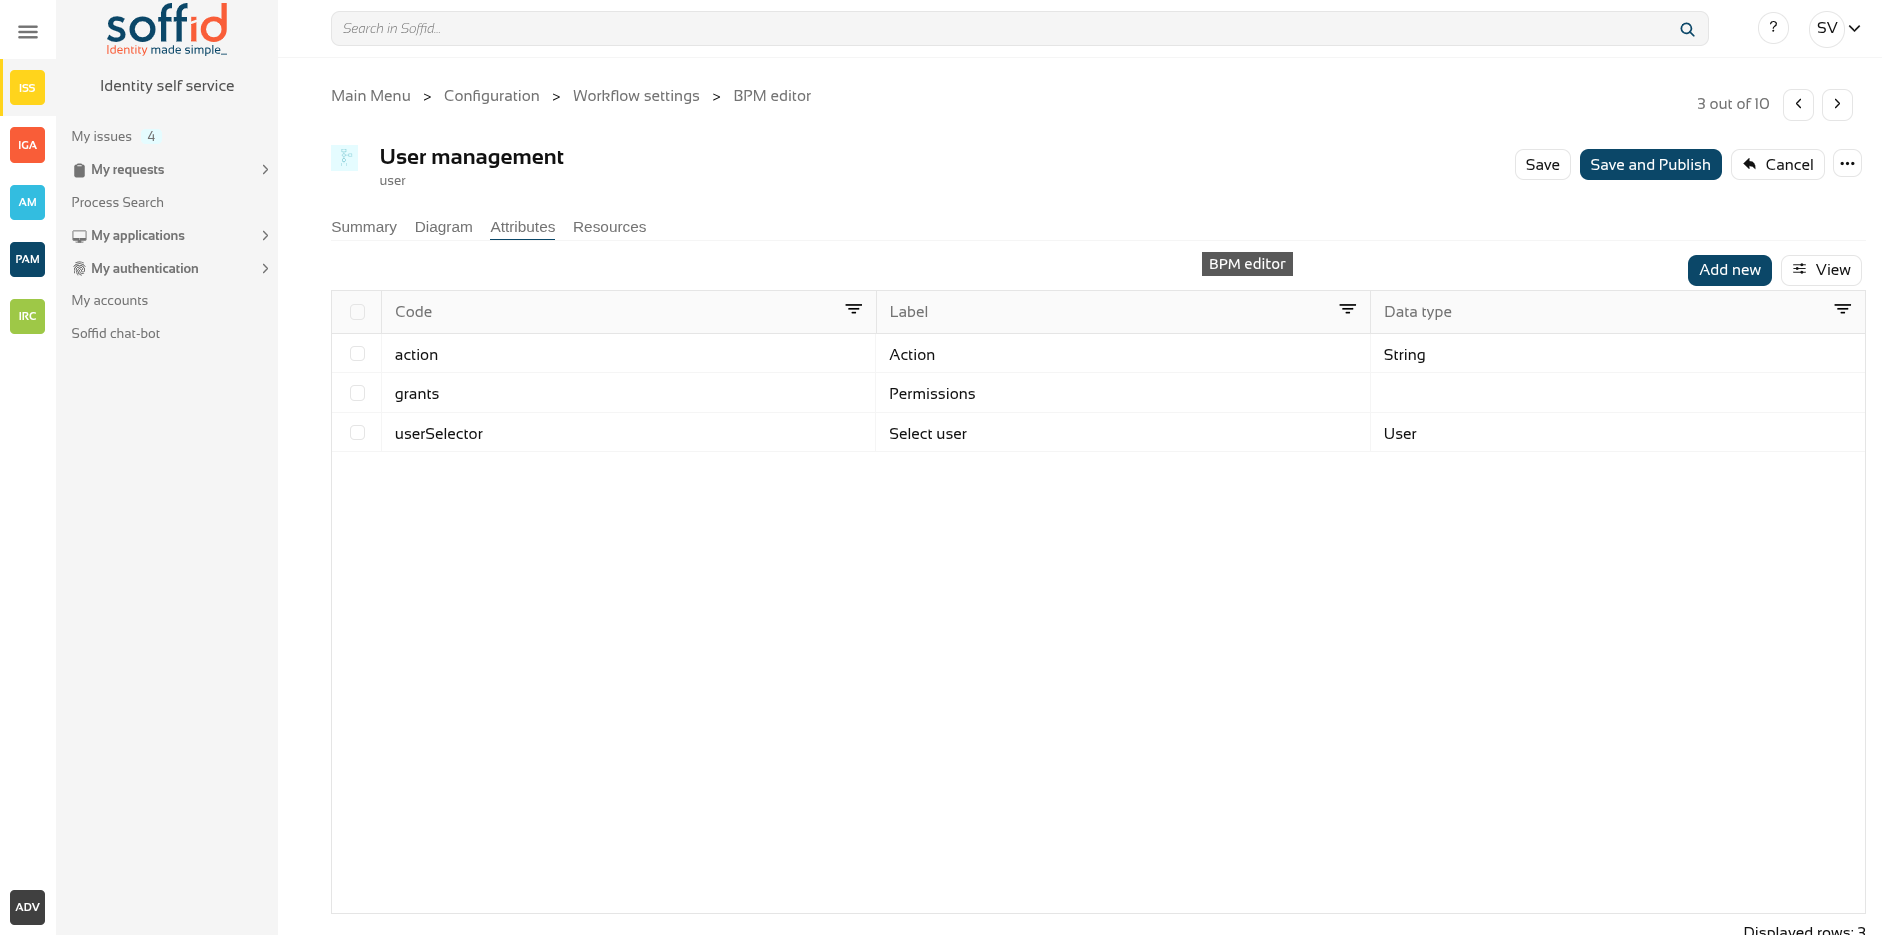
Attributes tab
The Attributes tab is allowed for creating custom attributes to be used to configure the workflow. The defined attributes will be used in the Steps tab to be mapped with the Soffid data.
There are customized templates depending on the Process Type selected, those give you default attributes that you can customize.
- Code: code is used internally as an identifier by the system. Try to create a short one without spaces and with uppercase to separate words.
- Label: label displayed on the web page. This may be a name or a short description.
- Data type: data type of the value of the metadata attribute. The data type includes:
- Basic data types as String or Boolean.
- Extended data types as Photo or E-mail.
- Default Soffid objects as User or Group.
- Your own custom objects are created in Soffid.
- Multiple values: (Optional) If this flag is enabled, the metadata may contain more than one value.
- Size: (Optional) Set the maximum length of the value.
- Values: (Optional) Allows creating a set of values to provide to the user as a list.
💻 Image
Actions
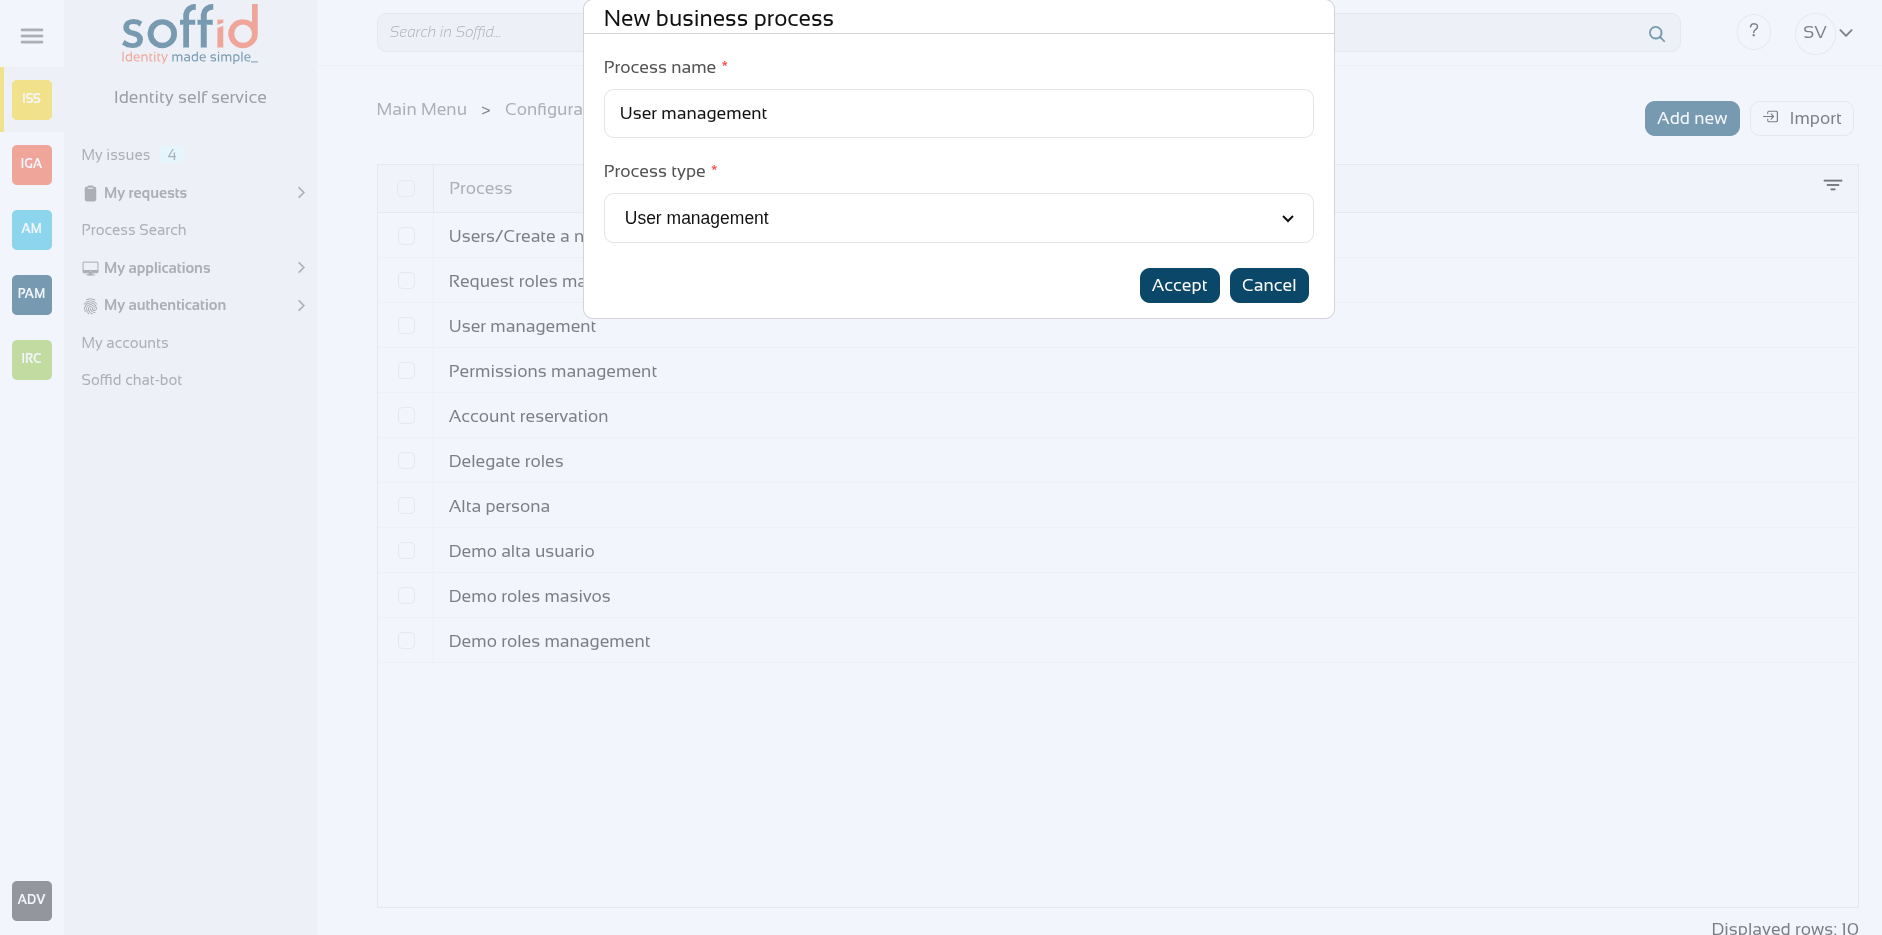
Process list actions
|
Add new |
Allows you to add a new workflow to Soffid. You need to set a name and select the process type and accept. Then Soffid opens the Process editor, which allows you to configure the process. And finally, save the process configuration, or save and publish. If you cancel that operation, Soffid will not save the process definition. 💻 Image
|
|
Import |
Allows you to import a workflow from a .pardef file. That functionality is very useful for next scenarios:
Click the button, pick up a .pardef file, and save the process or save and publish. Soffid will ask you for confirmation, If you confirm, finally, Soffid will import the process definition. If you cancel that operation, Soffid will not upload and save the process definition. Note that with this option you only can load workflows defined by the BPM editor. |
|
"Edit process" |
Allows you to edit a workflow to update it by clicking the process row. Then you can update the process definition and save, or save and publish the updates. |
|
Delete process definition |
Allows you to delete a workflow. Select a process row to enable the delete button. When a process is deleted, that process continues to be available to be executed. If you want that process is not available, you must disable that process on the Business process definition page. |
Summary tab actions
The action that can be performed in the process are detailed below
|
Save |
Allows you to save all changes included in the workflow. That workflow can be a new or an updated workflow. |
|
Save and Publish |
Allows you to save the changes performed in the workflow setup and also publish the workflow to be used in Soffid.
After this action, the last version of the workflow will be available for the end-user (with the proper permissions) in the Soffid Console and Self-service portal on the My requests page.
This latest version has been saved internally on the Business process definition screen. |
|
Cancel |
Allows you to quit the process editor without saving changes. Soffid will ask you for confirmation to exit without saving updates |
|
Export process |
Allows you to export a workflow to a .pardef file. You can choose that option clicking the "three points" icon. Automatically Soffid will download a .pardef file with the process definition. |
Diagram tab actions
|
"Transition icons" |
Allws you to add or update transitions.
Image
|
|
"Edit icons" |
Allows you to delete an existing step. To delete a step you must click "trash" icon, the last of the edit icons.
💻 Image
|
|
"Step icons" |
Allows you to add a new step to the workflow by selecting the action from the tool bar. When a new step is added, it will be mandatory to configure it.
💻 Image
|
|
"Size icons" |
Allows you to change the size view of the diagram.
Image
|


Diagram tab > step node > fields tab actions
|
Add new |
Allows you to add a new attribute on the Attribute tab. You need to click the "New field" button and Soffid will show a new row to fill in. For each new field you may define:
💻 Image
|
|
Delete |
Allows you to delete a field. To delete a field you must click on the subtract icon (-) that is at the end of the same line. |
|
Order (icon) |
Allows you to sort the fields using drag and drop. |
|
Validation (icon) |
Allows you to add a new customized script with validation rules |
|
Visibility (icon) |
Allows you to add a new customized script to determine the visibility of that field. |
| SCIM query (icon) | Allows you to define a SCIM filter to get the data |

Triggers
|
Add new |
Allows you to add a new trigger to perform actions. 💻 Image
|
|
Delete |
Allows you to delete a trigger. |
|
Action (icon) |
Allows you to add a new customized script. |
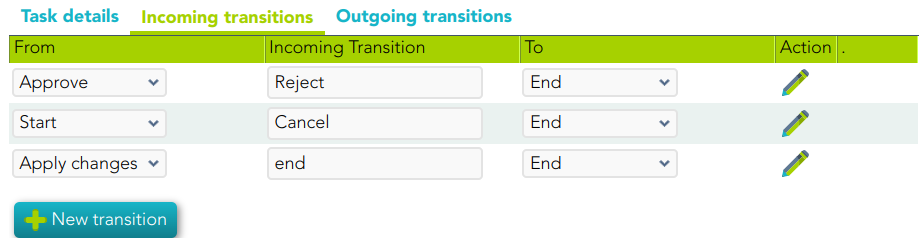
Incoming transition
|
New transition |
Allows you to add a new incoming transition. You need to click the "New transitions" button, then Soffid will show a new row to fill in. For each new incoming transition you may define:
💻 Image
|
|
Delete transition |
Allows you to delete an incoming transition. To delete an incoming transition you must click on the subtract icon (-) that is at the end of the same line. |
|
Action |
Allows you to add a new customized script by clicking the pencil icon. |
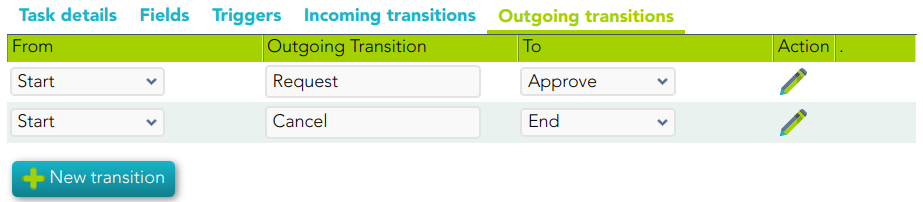
Outgoing transition
|
New transition |
Allows you to add a new outgoing transition. 💻 Image
|
|
Delete transition |
Allows you to delete an outgoing transition. To delete an outgoing transition you must click on the subtract icon (-) that is at the end of the same line. |
|
Action |
Allows you to add a new customized script by clicking the pencil icon. |
Attributes tab actions
| Add new | Allows you to add a new attribute to use to configure the step. |
|
View |
Allows you to show and hide columns in the table. You can also set the order in which the columns will be displayed. |
| Delete | Allows you to delete an attribute. To enable the delete button you must select one attribute. |
| Add value | Allows you to add a new value to the attribute. |
| Delete value | Allows you to delete a value. To delete a value you must click on the subtract icon (-) that is at the end of the same line. |
Resources tab actions
| Upload resources | Allows you to add files in a zip file as externals resources to be used in the scripts |
Others
Workflow to import as examples
- User management --> User.pardef
- Permissions management --> Permissions+request.pardef
- Account reservation --> Account+reservation.pardef
- Permissions request
- Delegate roles
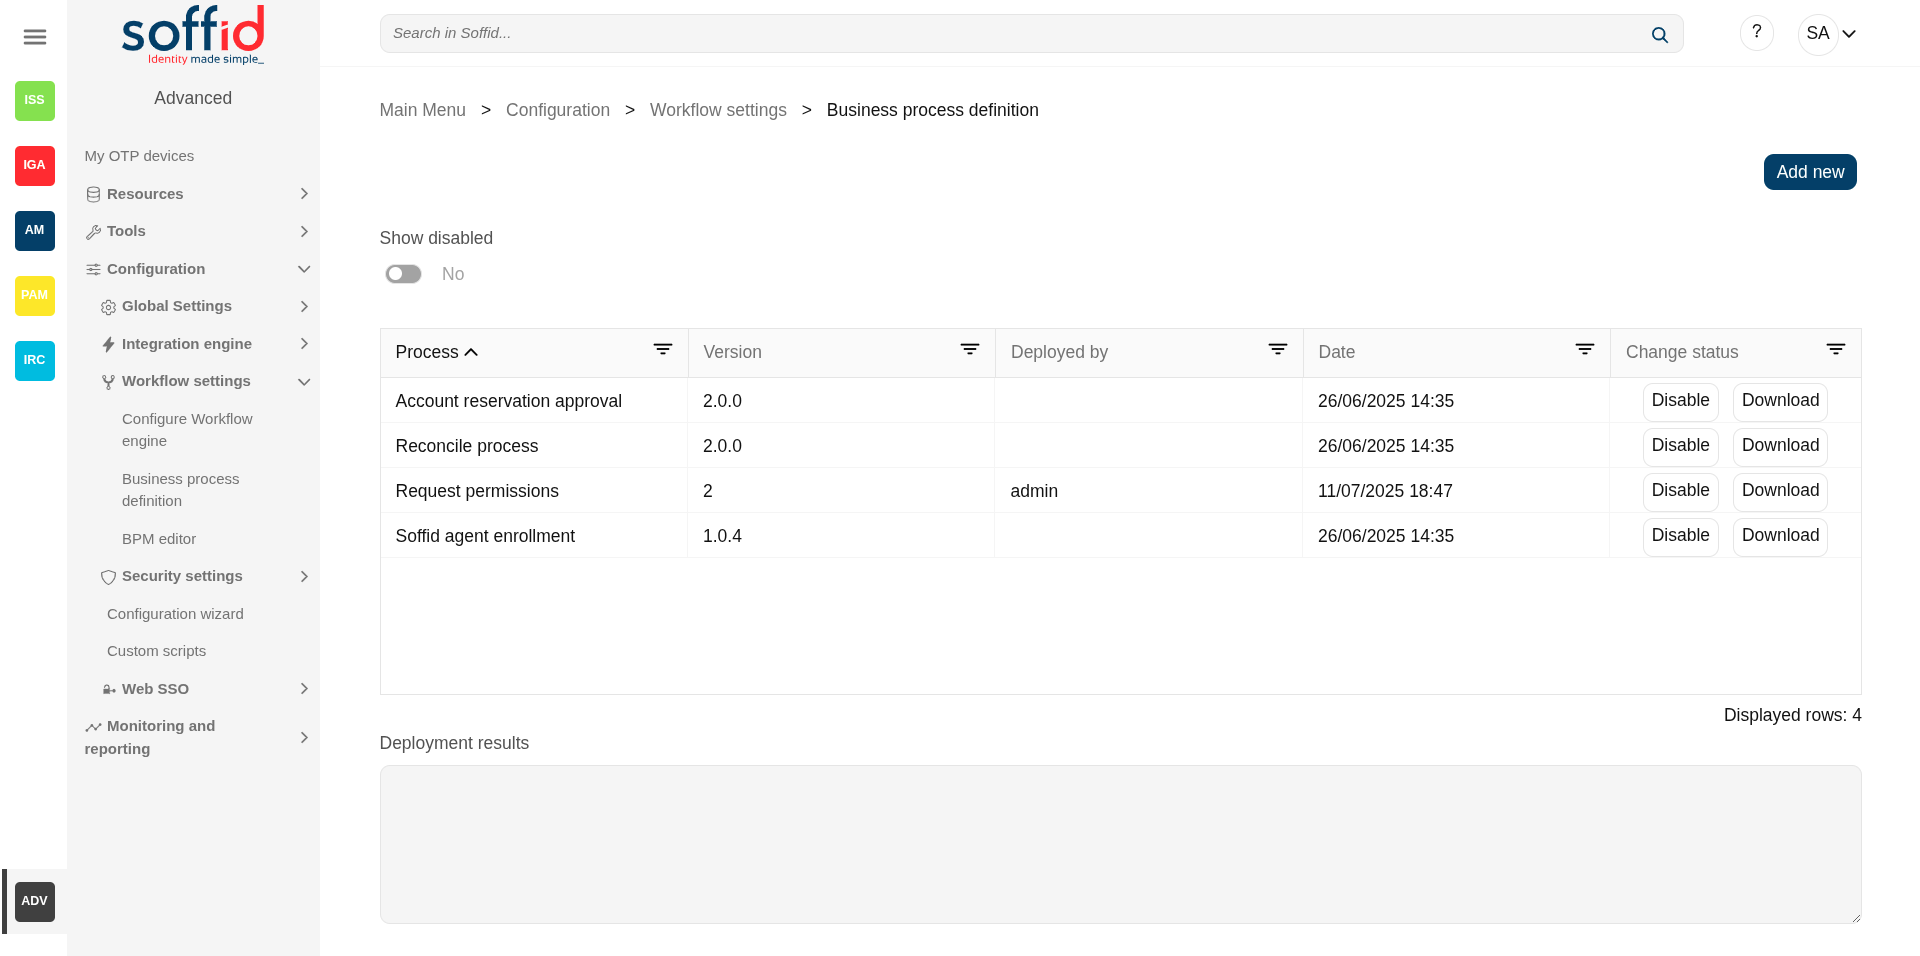
Business process definition page
Description
Soffid includes a BMP (Business Process Management) in its Smart Engine to provide useful workflows integrated with the processes and the policies of the Soffid core.
In order to add extra functionality to the console, you can upload different business processes (a.k.a. Workflows) that can be found in the Soffid download area and enable or disable existing ones. The existing process definition can be updated by uploading a new version.
If a workflow is disabled, processes initiated and pending can be finalized, but no longer that workflow could be started.
Please note that the workflows managed by this page will be provided by Soffid or generated from an external tool. Soffid has a bpm add-on that allows you to create, update, and publish these workflows directly from its editor.
Screen overview
Related objects
- Configure Workflow engine : where the workflow engine is configured
- Business process definition : where workflows are published
- BPM editor : where to create or modify workflows
-
My tasks : pending workflows where the user has to perform an action in order to continue their workflow.
-
My requests : The workflows that the user can initiate are listed here.
-
My requests > Query request status : to search for all processes started by oneself
-
Process Search : to search for all processes
- Metadata : to add attributes to display in the search tables
- Scheduled jobs : shows active workflows pending asynchronous tasks
Standard attributes
- Process: name of the process.
- Version: version of the process.
- Deployed by: user who performed the last workflow upload.
- Date: date and time of the last workflow upload.
- Change status: allows you to change the workflow to enable or disable according to the needs.
- Deployment results: displays the log information when a workflow is upload.
Actions
|
Show disabled |
No by default, If you select Yes, all workflows will be displayed, both enable and disable. |
|
Add new |
Allows you to pick a defined process and upload it for deploying it in Soffid. Then Soffid will upload and deploy the process. This option allows to add new workflows or update existing workflows. You can upload a process defined with the BPM Editor and previously exported (.pardef) or a process defined by code (.par) |
|
Enable / disable |
Allows you to enable or disable a workflow. When a workflows is enabled all users with proper permission could launch the process. When a workflow is disabled no user could start a new instance of this process. |
|
Download |
Allows you to download the workflow. Workflows generated with the bpm add-on must be exported from there. |
Configure Workflow engine
Description
This page groups together several features related to the workflow engine.
Document manager
Soffid can use any document repository to store documents generated by workflows, reporting addon, or any other addon.
The document repository can be either a local directory or a remote one accessed using FTP, SMB, HTTP protocols. Depending on the protocol selected, additional parameters may be needed.
Text index
Soffid console maintains a textual index that allows searching for currently active or finished processes using full text search.
The textual index for searches can be updated from this page. The textual index is not stored in the database but filesystem. From this page, you can set the directory where this textual index will be stored.
Because it is stored in non-transactional storage, it can get occasionally corrupted. In such a case, by pressing the "Rebuild Index" button, the index will be rebuilt from scratch.
Task scheduler
When we are working with workflows, there are parts of the process that need to be managed in the background, and this requires a process that runs regularly. This process executes logic nodes or timers configured to run at a specific time.
Screen overview

Related objects
- Configure Workflow engine : where the workflow engine is configured
- Business process definition : where workflows are published
- BPM editor : where to create or modify workflows
-
My tasks : pending workflows where the user has to perform an action in order to continue their workflow.
-
My requests : The workflows that the user can initiate are listed here.
-
My requests > Query request status : to search for all processes started by oneself
-
Process Search : to search for all processes
- Metadata : to add attributes to display in the search tables
- Scheduled jobs : shows active workflows pending asynchronous tasks
Standard attributes
- Document strategy: these are the possible configurations
- Database: (by default) stored in Soffid's own database
- Local:
- Temporary local file path:
- CIFS: specific implementation of SMB. Its attributes:
- Server: domain of the server
- File path: file path of the server
- Temporary local file path: folder inside the Soffid home directory
- User name: user
- Password: password
- FTP:
- Server: domain of the server
- File path: file path of the server
- Temporary local file path: folder inside the Soffid home directory
- User name: user
- Password: password
- HTTP:
- Server: URL of the service
- Temporary local file path: folder inside the Soffid home directory
- User name: user
- Password: password
- Server: URL of the service
- Text index settings: If you change the directory indexes will require a re-indexing of all global procedures.
- Task scheduler: attributes in query mode:
Status: Started / Stoped
-
- Number of threads: 1 by default
- Wait interval in seconds: every few seconds the process checks whether it has any pending tasks
Actions
View actions
| Expand all | Displays all the attributes of the different blocks. |
| Collapse all | Hide all attributes of the different blocks. |
| "Types of views" | Change the view type: Classic view, Modern view, Compact design. |
Document manager actions
|
Update |
Allows you to save the changes. |
|
Cancel |
Allows you to undo any changes made. |
|
Backup |
Allows you to download a zip file containing all the files. |
|
Restore |
Allows you to upload a zip file to restore all the files. |
Text index actions
| Rebuild index |
Regenerate from scratch the text index on which workflows are searched, as well as the attributes that have this type of search configured.
Please note that depending on the volume of data on your system, this process may take quite some time. |
Task scheduler actions
| Stop / Start | Stop to shut down the service, start to restart it |
Process types
Templates definition of process types
User management
Description
The User Management Process type is used to define business processes to create and update identities and their attributes.
You can use the default template included on Soffid BPM Editor and customize it with your business needs. Also, you can import a .pardef file with the process definition.
That process is defined by default with 4 steps, but you can add new, delete and update steps to customize your business process.
- Start
- Screen
- Apply changes
- End
We will use two concepts to explain that process, identity, and end-user. Identity will be the identity or user that will be created, updated, or deleted in Soffid Console. The end-user will be the Soffid user who requests processes using the self-service portal.
Process editor
- Process name: identifier name of the workflow. This name will be used to label the workflow for the end-user.
- Process type: to use this BPM editor you need to select User management.
- Description: a brief description of the workflow. When an end-user starts a workflow, this text will be displayed in the Actions log tab.
- Initiators: here you could configure the roles or the identities that could start a new workflow from the Console and Selfservice. E.g. "admin" identity, "SOFFID_ADMIN" role, both separated by comma ',' as "admin, SOFFID_ADMIN" or if you want to publish the workflow to everyone, you can use the text "tothom" or the character '*'. The users who are initiators will be able to see and start this process from their identiry self service portal.
- Managers: here you could configure the roles or the identities that could perform tasks in the workflow as approve permissions or cancel the workflow.
- Observers: here you could configure the roles or the identities that could open the workflows in read-only mode.
Process steps
To view the detail of each available step, you can visit the User management steps chapter.
Attributes
You could add new custom attributes in the Attributes tab. The defined attributes will be used in the Steps tab to be mapped with the Soffid data.
There are customized templates depending on the Process Type selected, for the User management type there are three attributes defined:
- action: by default, there are 4 operations defined, but you can customize these options, adding, removing and updating these:
- Add user: this allows you to add a new identity to the systems.
- Enable user: this allows you to enable an identity that is disabled.
- Modify user: this allows you to modify the attributes for an existing identity.
- Disable user: this allows you to disable an identity that is enabled.
- grants: allows you to select an information system and assign or revoke permissions.
- userSelector: allows you to select an existing identity. That component will be available when the action selected will be "Enable user", "Modify user" or "Disable user", in other cases, that component will not be displayed. That component allows to end-user to search identities by writing in an input field o searching with the searching view.
You can customize attributes to adapt the workflow to your business process. You can add new attributes, and update or delete the default attributes. For each new attribute, you need to indicate, at least, the code, the label, and the data type.
Resources
If your workflow requires the use of extra libraries with their own classes and methods, you can upload a jar file so that Soffid can load it and it can be used from the scripts.

Actions
Process actions
|
Save |
Allows you to save all changes included in the workflow. That workflow can be a new or an updated workflow. |
|
Save and Publish |
Allows you to save the changes performed in the workflow setup and also publish the workflow to be used in Soffid. After this action, the last version of the workflow will be available for the end-user (with the proper permissions) in the Soffid Console and Self-service portal. |
|
Cancel |
Allows you to quit the process editor without saving changes. Soffid will ask you for confirmation to exit without saving updates |
|
Export process |
Allows you to export this workflow to a file in .partdef format. This file can be useful as a backup or for migration to another environment. |
Attribute actions
|
Add new |
Allows you to add a new attribute. When you click the button "Add new" Soffid will show the fields to fill in for the new attribute. It is mandatory to fill in the code and data type to save the process. The attribute updates will save when you click the button "Save" or "Save and Publish". If you cancel, the updates will not save. |
|
Delete |
Allows you to delete a defined attribute. First select one or more attributes and the click the "Delete" button. The attribute updates will save when you click the button "Save" or "Save and Publish". If you cancel, the updates will not save. |
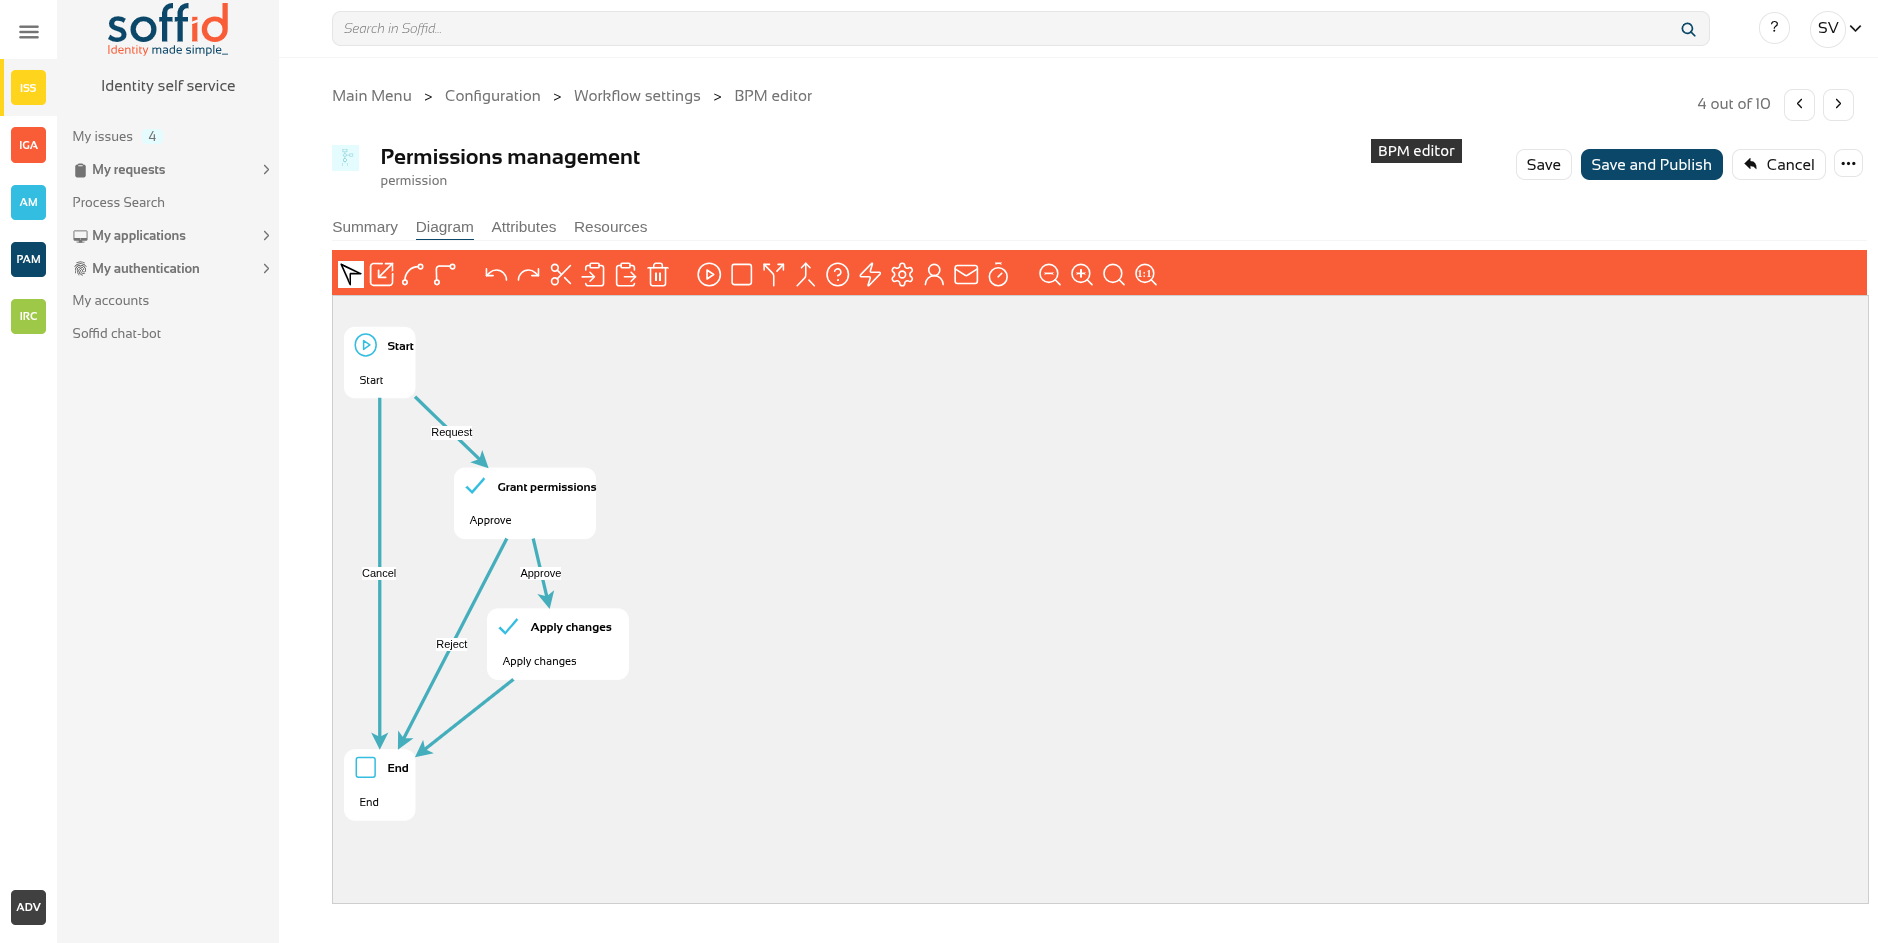
Permissions management
Description
The Permissions Management Process type is used to define processes used to grant or remove permissions to an identity.
You can use the default template Permissions management included on Soffid BPM Editor and customize it with your business needs. Also, you can import a .pardef file with the process definition.
That process is defined by default with 4 steps, but you can add new, delete and update steps to customize your business process.
- Start
- Grant approval
- Apply changes
- End
We will use two concepts to explain that process, identity, and end-user. Identity will be the identity or user that will be created, updated, or deleted in Soffid Console. The end-user will be the Soffid user who requests processes using the self-service portal.
Process editor
- Process name: identifier name of the workflow. This name will be used to label the workflow for the end-user.
- Process type: to use this BPM editor you need to select Use management.
- Description: a brief description of the workflow. When an end-user starts a workflow, this text will be displayed in the Actions log tab.
- Initiators: here you could configure the roles or the identities that could start a new workflow from the Console and Selfservice. E.g. "admin" identity, "SOFFID_ADMIN" role, both separated by comma ',' as "admin, SOFFID_ADMIN" or if you want to publish the workflow to everyone, you can use the text "tothom" or the character '*'. The users who are initiators will be able to request that process from their self-service portal.
- Managers: here you could configure the roles or the identities that could perform tasks in the workflow as approve permissions or cancel the workflow.
- Observers: here you could configure the roles or the identities that could open the workflows in read-only mode.

Process steps
To view the detail of each available step, you can visit the Permissions management steps chapter.
Process steps > Start > views
This process allows for two different types of views. You can configure the one that best suits your workflow in the Start node, in the ‘Permission request screen type’ attribute.
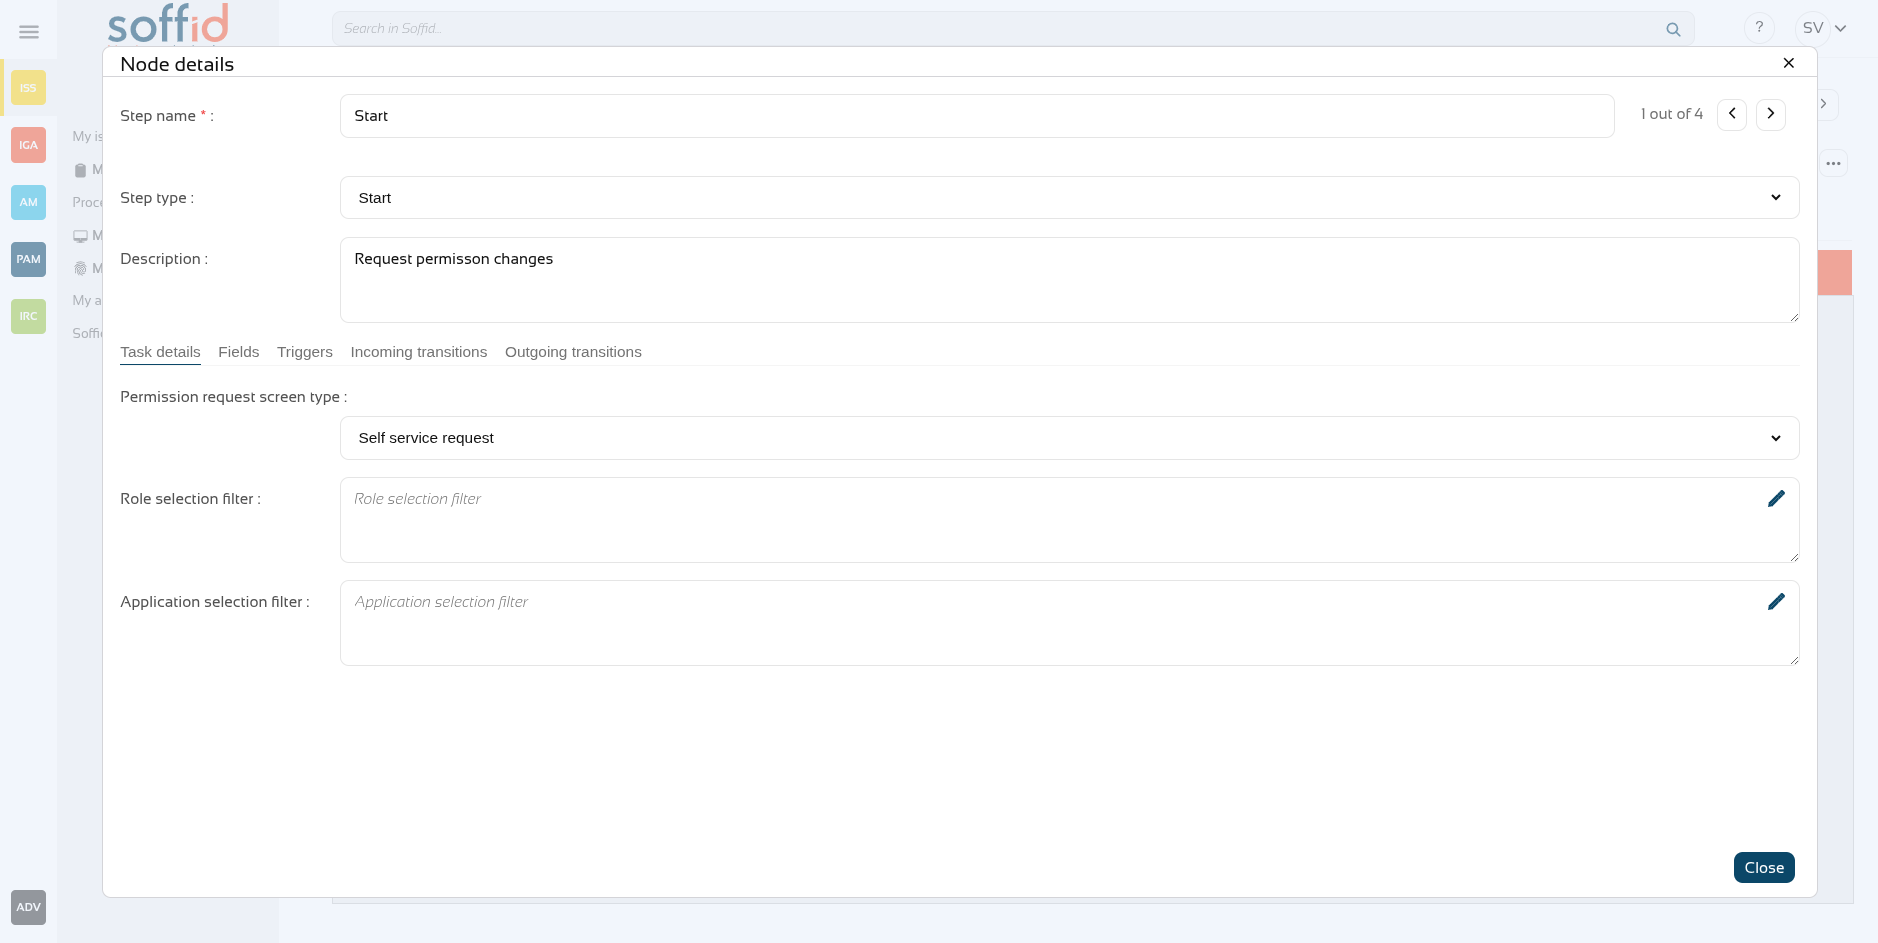
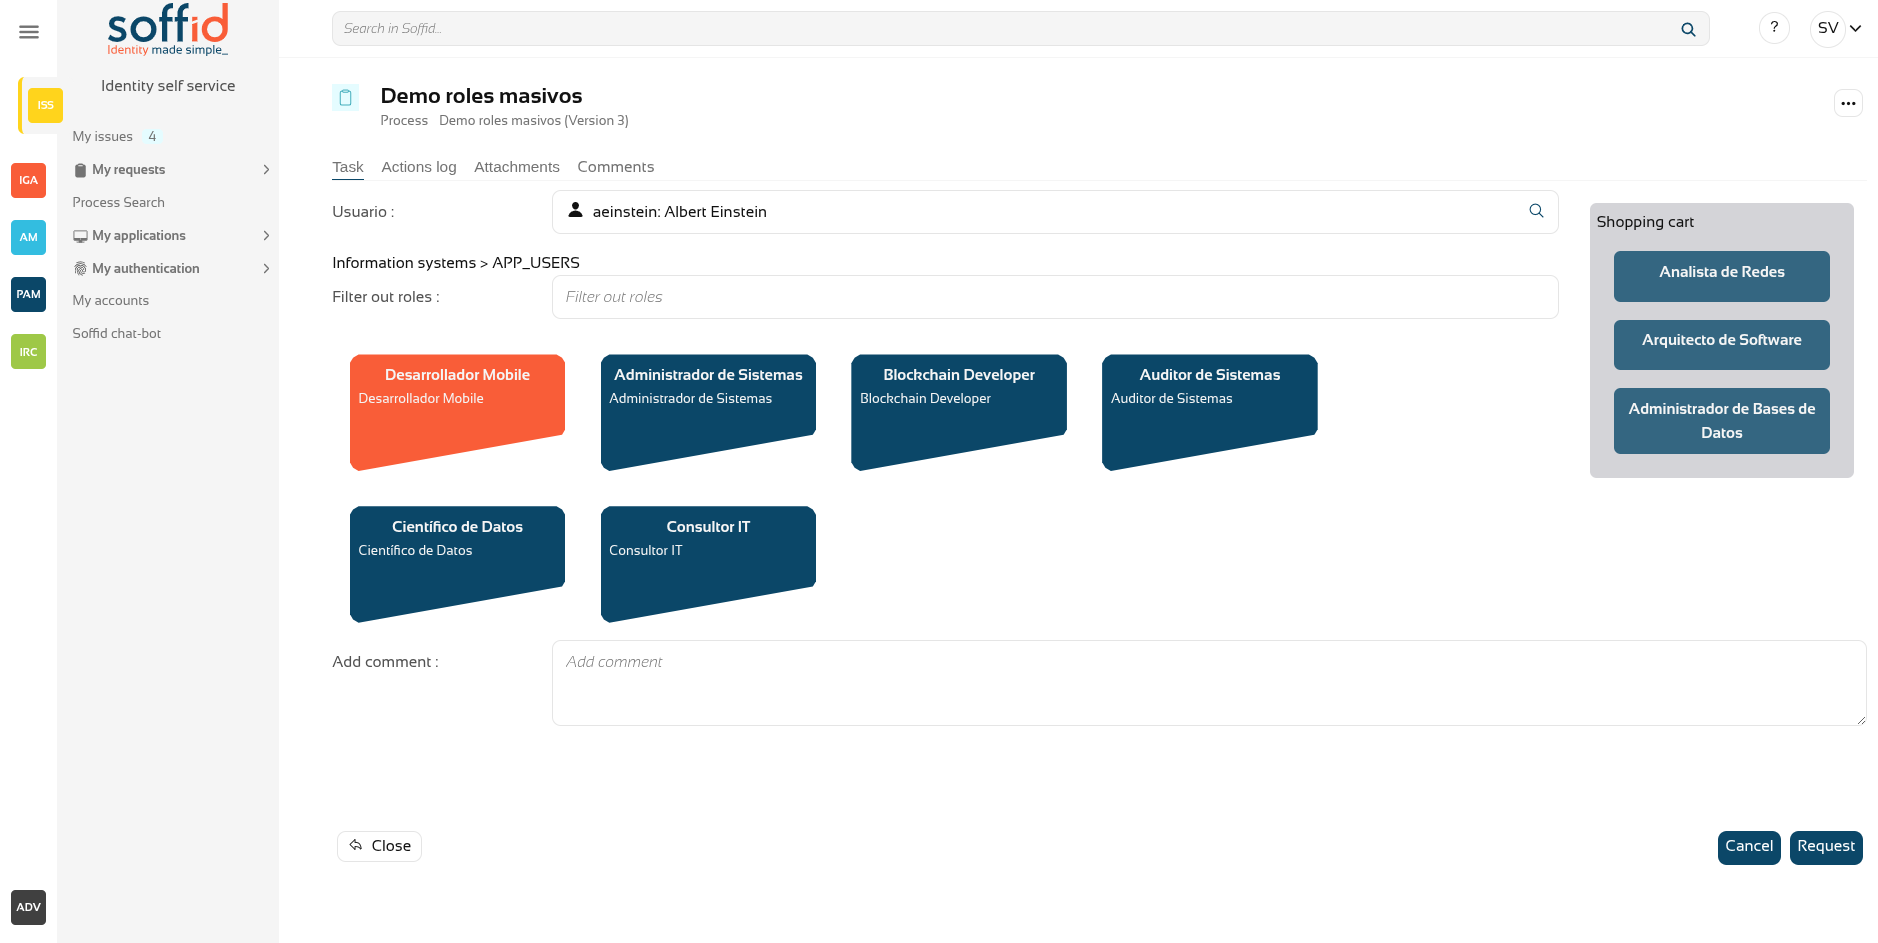
The "Self-service request" option allows you to easily select a large number of roles as if you were filling a shopping basket. This view can be more useful when registering a user or changing their profile.
The "List of permissions" option shows you a user's roles and allows you to revoke them one by one, or add new roles one by one. This view may be more useful for maintaining users who only require minor changes.

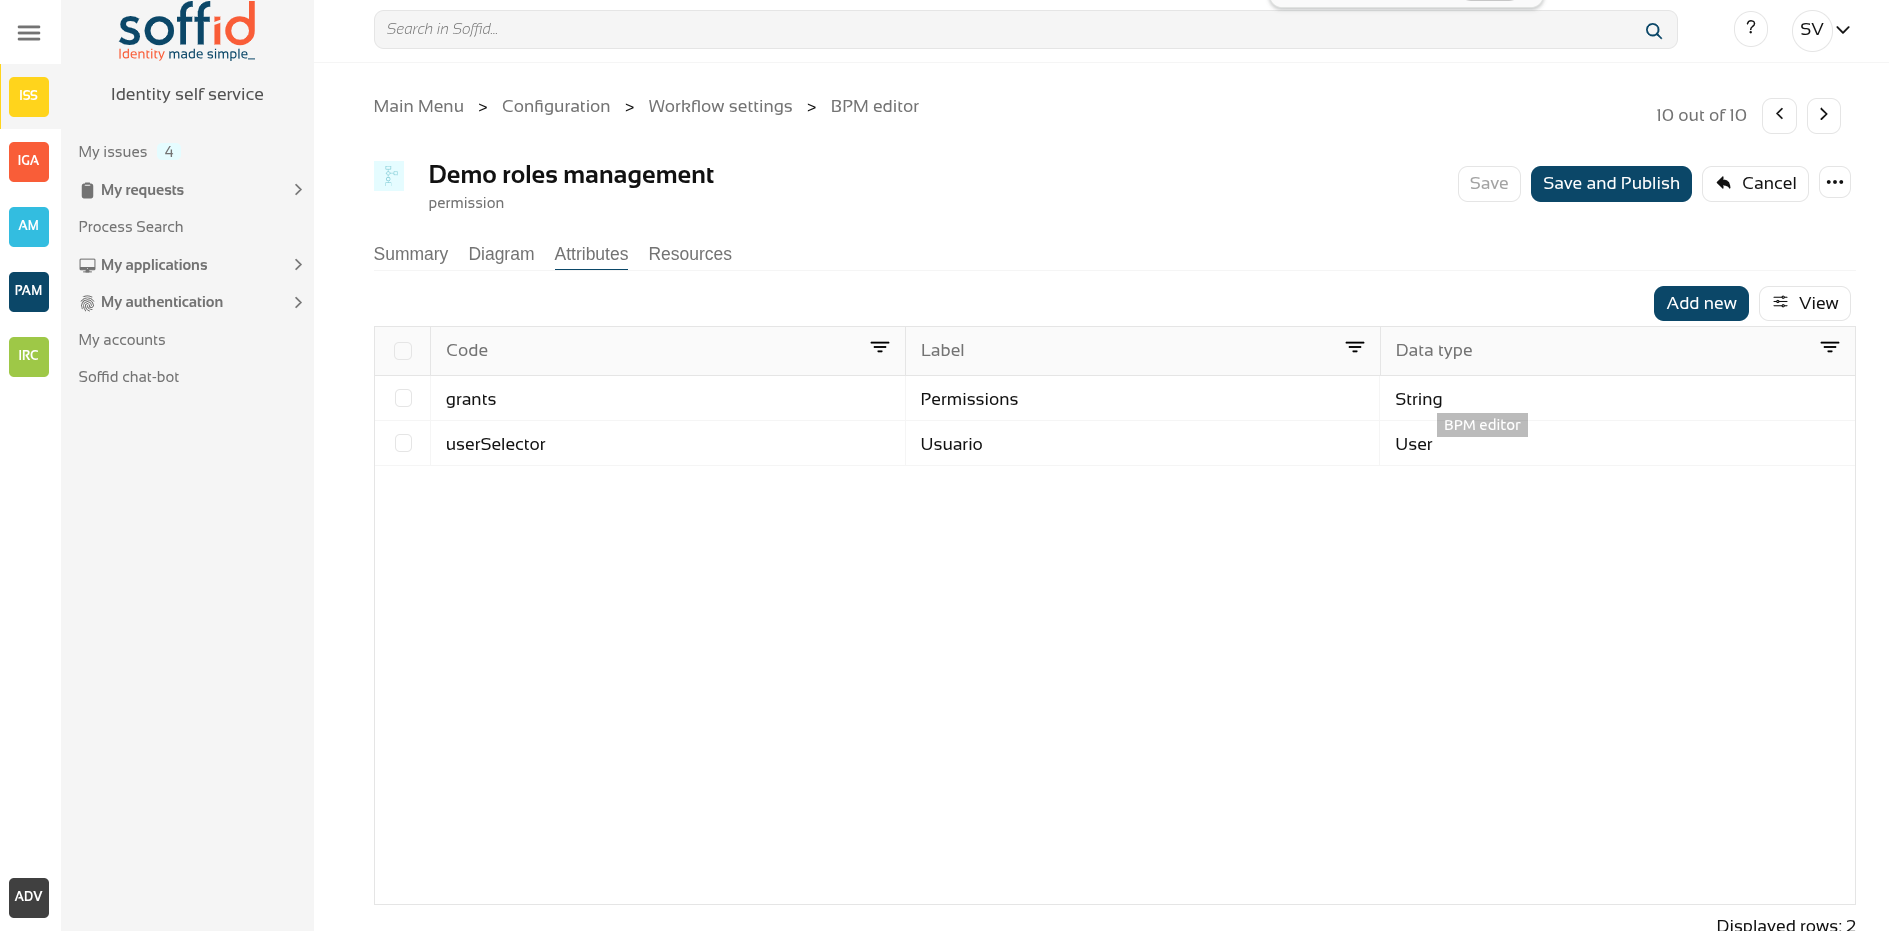
Attributes
You could add new custom attributes in the Attributes tab. The defined attributes will be used in the Steps tab to be mapped with the Soffid data.
There are customized templates depending on the Process Type selected, for the Process management type there is one attribute defined:
- grants: allows you to select an information system and assign or revoke permissions.
You can customize attributes to adapt the workflow to your business process. You can add new attributes, and update or delete the default attributes. For each new attribute, you need to indicate, at least, the code, the label, and the data type.
The default template selects the user themselves. If you want to be able to select other users, you must add the userSelector attribute and then add it in Start > Fields.
Resources
If your workflow requires the use of extra libraries with their own classes and methods, you can upload a jar file so that Soffid can load it and it can be used from the scripts.
Actions
Process actions
|
Save |
Allows you to save all changes included in the workflow. That workflow can be a new or an updated workflow. |
|
Save and Publish |
Allows you to save the changes performed in the workflow setup and also publish the workflow to be used in Soffid. After this action, the last version of the workflow will be available for the end-user (with the proper permissions) in the Soffid Console and Self-service portal. |
|
Cancel |
Allows you to quit the process editor without saving changes. Soffid will ask you for confirmation to exit without saving updates |
|
Export process |
Allows you to export this workflow to a file in .partdef format. This file can be useful as a backup or for migration to another environment. |
Attribute actions
|
Add attribute |
Allows you to add a new attribute. When you click the button "Add attribute" Soffid will show the fields to fill in for the new attribute. It is mandatory to fill in the code to save the process. The attribute updates will save when you click the button "Save" or "Save and Publish". If you cancel, the updates will not save. |
|
Delete attribute |
Allows you to delete a defined attribute. To delete an attribute you need to click the button with the subtraction symbol (-) located next to the label field. The attribute updates will save when you click the button "Save" or "Save and Publish". If you cancel, the updates will not save. |
Account reservation
Description
The Account Reservation Process type is used to configure the use of privileges accounts. That type of process will be launched when the end-users want to connect to a system using a privileged account through the password vault.
Soffid allows you to configure XACML policies management, here you will be able to configure when the account reservation workflows should be launched.
For more information about XACML you can visit the XACML Book.
You can use the default template included on Soffid BPM Editor and customize it with your business needs. Also, you can import a .pardef file with the process definition.
That process is defined by default with 4 steps, but you can add new, delete and update steps to customize your business process.
- Start
- Screen
- Apply changes
- End
We will use two concepts to explain that process, identity, and end-user. Identity will be the identity or user that will be created, updated, or deleted in Soffid Console. The end-user will be the Soffid user who requests processes using the self-service portal.
Process editor
- Process name: identifier name of the workflow. This name will be used to label the workflow for the end-user.
- Process type: to use this BPM editor you need to select Account reservation.
- Description: a brief description of the workflow. When an end-user starts a workflow, this text will be displayed in the Actions log tab.
- Initiators: here you could configure the roles or the identities that could start a new workflow from the Console. E.g. "admin" identity, "SOFFID_ADMIN" role, both separated by comma ',' as "admin, SOFFID_ADMIN" or if you want to publish the workflow to everyone, you can use the text "tothom" or the character '*'. The users who are initiators will be able to request that process from their self-service portal.
- Managers: here you could configure the roles or the identities that could perform tasks in the workflow as approve permissions or cancel the workflow.
- Observers: here you could configure the roles or the identities that could open the workflows in read-only mode.
Process steps
To view the detail of each available step, you can visit the Account reservation steps chapter.
Attributes
You could add new custom attributes in the Attributes tab. The defined attributes will be used in the Steps tab to be mapped with the Soffid data.
There are customized templates depending on the Process Type selected, for the Process management type there are one attribute defined:
- account: user account name.
- systemName: target system to which the account will be connected.
- loginName: login name to connect to the target system.
- server:
- owners: users authorized to use this account.
- until: date until the users are authorized to use the account,
You can customize attributes to adapt the workflow to your business process.
Actions
Process actions
|
Save |
Allows you to save all changes included in the workflow. That workflow can be a new or an updated workflow. |
|
Save and Publish |
Allows you to save the changes performed in the workflow setup and also publish the workflow to be used in Soffid. After this action, the last version of the workflow will be available for the end-user (with the proper permissions) in the Soffid Console and Self-service portal. |
|
Cancel |
Allows you to quit the process editor without saving changes. Soffid will ask you for confirmation to exit without saving updates |
Attribute actions
|
Add attribute |
Allows you to add a new attribute. When you click the button "Add attribute" Soffid will show the fields to fill in for the new attribute. It is mandatory to fill in the code to save the process. The attribute updates will save when you click the button "Save" or "Save and Publish". If you cancel, the updates will not save. |
|
Delete attribute |
Allows you to delete a defined attribute. To delete an attribute you need to click the button with the subtraction symbol (-) located next to the label field. The attribute updates will save when you click the button "Save" or "Save and Publish". If you cancel, the updates will not save. |
|
Add value |
Allows you to add a new value to the attribute. To add a new value you need to click the button with the add symbol (+) located at the end of the "Values" label. The values updates will save when you click the button "Save" or "Save and Publish". If you cancel, the updates will not save. |
|
Delete value |
Allows you to delete a value to the attribute. To delete an attribute you need to click the subtraction symbol (-) located close to the value you want to delete. The values updates will save when you click the button "Save" or "Save and Publish". If you cancel, the updates will not save. |
Permission request
Description
The Permission Request Process type is used to define business processes to request permissions.
That process is defined by default with 4 steps, but you can add new, delete and update steps to customize your business process.
- Start
- Approve
- Apply changes
- End
You could add new steps, delete steps, and custom steps to define your process workflow.
We will use two concepts to explain that process, identity, and end-user. Identity will be the identity or user that will be created, updated, or deleted in Soffid Console. The end-user will be the Soffid user who requests processes using the self-service portal.
Process editor
- Process name: identifier name of the workflow. This name will be used to label the workflow for the end-user.
- Process type: to use this BPM editor you need to select Use management.
- Description: a brief description of the workflow. When an end-user starts a workflow, this text will be displayed in the Actions log tab.
- Initiators: here you could configure the roles or the identities that could start a new workflow from the Console and Selfservice. E.g. "admin" identity, "SOFFID_ADMIN" role, both separated by comma ',' as "admin, SOFFID_ADMIN" or if you want to publish the workflow to everyone, you can use the text "tothom" or the character '*'. The users who are initiators will be able to request that process from their self-service portal.
- Managers: here you could configure the roles or the identities that could perform tasks in the workflow as approve permissions or cancel the workflow.
- Observers: here you could configure the roles or the identities that could open the workflows in read-only mode.
Process steps
To view the detail of each available step, you can visit the Permissions request steps chapter.
Attributes
There are no attributes
Actions
Process actions
|
Save |
Allows you to save all changes included in the workflow. That workflow can be a new or an updated workflow. |
|
Save and Publish |
Allows you to save the changes performed in the workflow setup and also publish the workflow to be used in Soffid. After this action, the last version of the workflow will be available for the end-user (with the proper permissions) in the Soffid Console and Self-service portal. |
|
Cancel |
Allows you to quit the process editor without saving changes. Soffid will ask you for confirmation to exit without saving updates |
Attribute actions
|
Add attribute |
Allows you to add a new attribute. When you click the button "Add attribute" Soffid will show the fields to fill in for the new attribute. It is mandatory to fill in the code to save the process. The attribute updates will save when you click the button "Save" or "Save and Publish". If you cancel, the updates will not save. |
|
Delete attribute |
Allows you to delete a defined attribute. To delete an attribute you need to click the button with the subtraction symbol (-) located next to the label field. The attribute updates will save when you click the button "Save" or "Save and Publish". If you cancel, the updates will not save. |
|
Add value |
Allows you to add a new value to the attribute. To add a new value you need to click the button with the add symbol (+) located at the end of the "Values" label. The values updates will save when you click the button "Save" or "Save and Publish". If you cancel, the updates will not save. |
|
Delete value |
Allows you to delete a value to the attribute. To delete an attribute you need to click the subtraction symbol (-) located close to the value you want to delete. The values updates will save when you click the button "Save" or "Save and Publish". If you cancel, the updates will not save. |
Delegation Roles
Description
The Delegation Roles Process type is used to allow the users to delegate temporary their own permissions.
That process is defined by default with 3 steps, but you can add new, delete and update steps to customize your business process.
- Start
- Apply changes
- End
You could add new steps, delete steps, and custom steps to define your process workflow.
We will use two concepts to explain that process, identity, and end-user. Identity will be the identity or user that will be created, updated, or deleted in Soffid Console. The end-user will be the Soffid user who requests processes using the self-service portal.
Process editor
- Process name: identifier name of the workflow. This name will be used to label the workflow for the end-user.
- Process type: to use this BPM editor you need to select Use management.
- Description: a brief description of the workflow. When an end-user starts a workflow, this text will be displayed in the Actions log tab.
- Initiators: here you could configure the roles or the identities that could start a new workflow from the Console and Selfservice. E.g. "admin" identity, "SOFFID_ADMIN" role, both separated by comma ',' as "admin, SOFFID_ADMIN" or if you want to publish the workflow to everyone, you can use the text "tothom" or the character '*'. The users who are initiators will be able to request that process from their self-service portal.
- Managers: here you could configure the roles or the identities that could perform tasks in the workflow as approve permissions or cancel the workflow.
- Observers: here you could configure the roles or the identities that could open the workflows in read-only mode.
Process steps
To view the detail of each available step, you can visit the Delegation roles steps chapter.
Attributes
You could add new custom attributes in the Attributes tab. The defined attributes will be used in the Steps tab to be mapped with the Soffid data.
There are customized templates depending on the Process Type selected, for the Process management type there is one attribute defined:
- grants: allows you to select an information system and assign or revoke permissions.
- userSelector: allows you to select an existing identity. That component will be available when the action selected will be "Enable user", "Modify user" or "Disable user", in other cases, that component will not be displayed. That component allows to end-user to search identities by writing in an input field o searching with the searching view.
You can customize attributes to adapt the workflow to your business process.
Actions
Process actions
|
Save |
Allows you to save all changes included in the workflow. That workflow can be a new or an updated workflow. |
|
Save and Publish |
Allows you to save the changes performed in the workflow setup and also publish the workflow to be used in Soffid. After this action, the last version of the workflow will be available for the end-user (with the proper permissions) in the Soffid Console and Self-service portal. |
|
Cancel |
Allows you to quit the process editor without saving changes. Soffid will ask you for confirmation to exit without saving updates |
Attribute actions
|
Add attribute |
Allows you to add a new attribute. When you click the button "Add attribute" Soffid will show the fields to fill in for the new attribute. It is mandatory to fill in the code to save the process. The attribute updates will save when you click the button "Save" or "Save and Publish". If you cancel, the updates will not save. |
|
Delete attribute |
Allows you to delete a defined attribute. To delete an attribute you need to click the button with the subtraction symbol (-) located next to the label field. The attribute updates will save when you click the button "Save" or "Save and Publish". If you cancel, the updates will not save. |
|
Add value |
Allows you to add a new value to the attribute. To add a new value you need to click the button with the add symbol (+) located at the end of the "Values" label. The values updates will save when you click the button "Save" or "Save and Publish". If you cancel, the updates will not save. |
|
Delete value |
Allows you to delete a value to the attribute. To delete an attribute you need to click the subtraction symbol (-) located close to the value you want to delete. The values updates will save when you click the button "Save" or "Save and Publish". If you cancel, the updates will not save. |
User management steps
Define the user management steps
Start
Definition
That is the first step of the workflow. At that step, you could define the fields you want to show when the end users will go to make a request.
Steps Tabs
Task details
This process type does not have task details for the start step.
Fields
In this tab, you could choose what fields the process form will show to the end users. You can choose these fields from all identity attributes, and from the attributes defined for the workflow on the Attributes Tab.
By default, all the identity attributes will be shown, and an additional field called Action. You can choose the fields you want to show when the end-users, add new fields, and delete the fields that do not need to generate a task. Also, you can sort the fields, you only need to drag and drop on the Order column.
The Action field is a droplist that will allow end-users to select one of the different options to perform. The available actions, defined by default on the Attributes tab:
- Add user: action uses to generate a task to create a new identity.
- Enable user: action uses to create a task to enable an identity who is disabled.
- Modify user: action uses to create a task to modify identity attributes.
- Disable user: action uses to create a task to disable identity.
To enable, modify or disable an identity, you need to add a field with the name userSelector, defined on the Attributes tab. That field will be available, to end-users, to select an existing identity when selecting one of that options. When you select an identity, Soffid will show all the attributes defined on the form to the end user.
For each field, you may indicate if it is a readOnly field, and you may add a Validation script and Visibility script. The validation script allows you to define rules, the field has to comply with these rules. The visibility script allows you to define the rules to show or hide a field.
Validation examples
if (value == null || value.equals(""))
throw new Exception("The userName is mandatory");
else
return true;It is also allowed in the following manner:
if (value == null || value.equals(""))
return ("The userName is mandatory");
else
return true;Validate that a certain field is not repeated:
userList = serviceLocator.getUserService().findUserByJsonQuery("attributes.field_XX eq \"" + value +"\"");
if (!userList.isEmpty() {
return "the field field_XX is associated to another user";
}
return true;Visibility example
user = serviceLocator.getUserService().getCurrentUser();
if ("admin".equals(user.userName))
return false;SCIM filter example
userType eq "E"Triggers
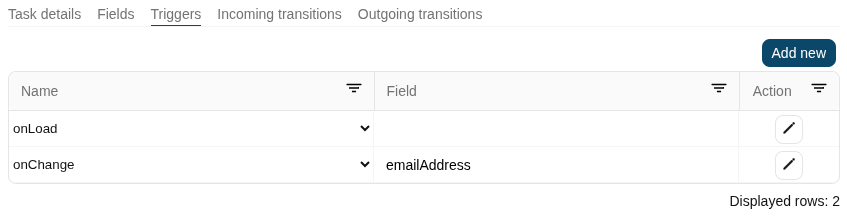
On the trigger tab, you could define different triggers using custom scripts. Those triggers will be launched with the events you will define.
- onLoad: you can use that trigger to perform some actions before the execution of the step.
- on PrepareTransition: you can use that trigger to perform some actions after the execution of the step and before starting a transition to another step.
- onChange: you can use that trigger to perform some actions when the value of the attribute is changed. You could choose the field from a list.
Example
1. Calculate the email when firstName or lastName changes and depending on the userType:
firstName = (inputFields.get("firstName")!=null) ? inputFields.get("firstName").value : null;
lastName = (inputFields.get("lastName")!=null) ? inputFields.get("lastName").value : null;
userType = (inputFields.get("userType")!=null) ? inputFields.get("userType").value : null;
if (firstName!=null && !firstName.trim().isEmpty() &&
lastName!=null && !lastName.trim().isEmpty() &&
userType!=null && !userType.trim().isEmpty()) {
emailAddress = firstName + "." + lastName;
if ("E".equals(userType)) {
emailAddress = emailAddress + ".ext@soffid.com";
} else {
emailAddress = emailAddress + "@soffid.com";
}
inputFields.get("emailAddress").value = emailAddress;
}You can find more information about StandardUserWindow.java on Github.
2. Load the user data into the form.
user = serviceLocator.getUserService().getCurrentUser();
task.getVariables().put("action", "M");
task.getVariables().put("userSelector", user.userName);
workflowWindow.fetchUserAttributes()Incoming transitions
This process type does not have task details for the start step.
Outgoing transitions
The Outcoming transition tab displays the next steps where the flow can go from the current step. When you create a process from a template or from scratch default outcoming transitions are defined. It is allowed to customize the default setup, add new transitions, or delete transitions.
- From: current step.
- Incoming transition: name of the transition.
- To: the next step, where the flow goes.
- Action: allows creating a custom script to perform specific actions.
When you create an outcoming transition, Soffid creates the proper incoming transition.
Example
Check if there are any similar identities:
firstName = executionContext.getVariable("firstName");
birthDate = executionContext.getVariable("birthDate");
df = new java.text.SimpleDateFormat("yyyy-MM-dd");
query = "firstName co \""+firstName+"\" and attributes.birthDate sw \""+df.format(birthDate)+"\"";
users = serviceLocator.getUserService().findUserByJsonQuery(query);
if ( !users.isEmpty()) {
throw new es.caib.bpm.toolkit.exception.UserWorkflowException("Your identity is probably registered. Please, contact your system administrator");
}Screen
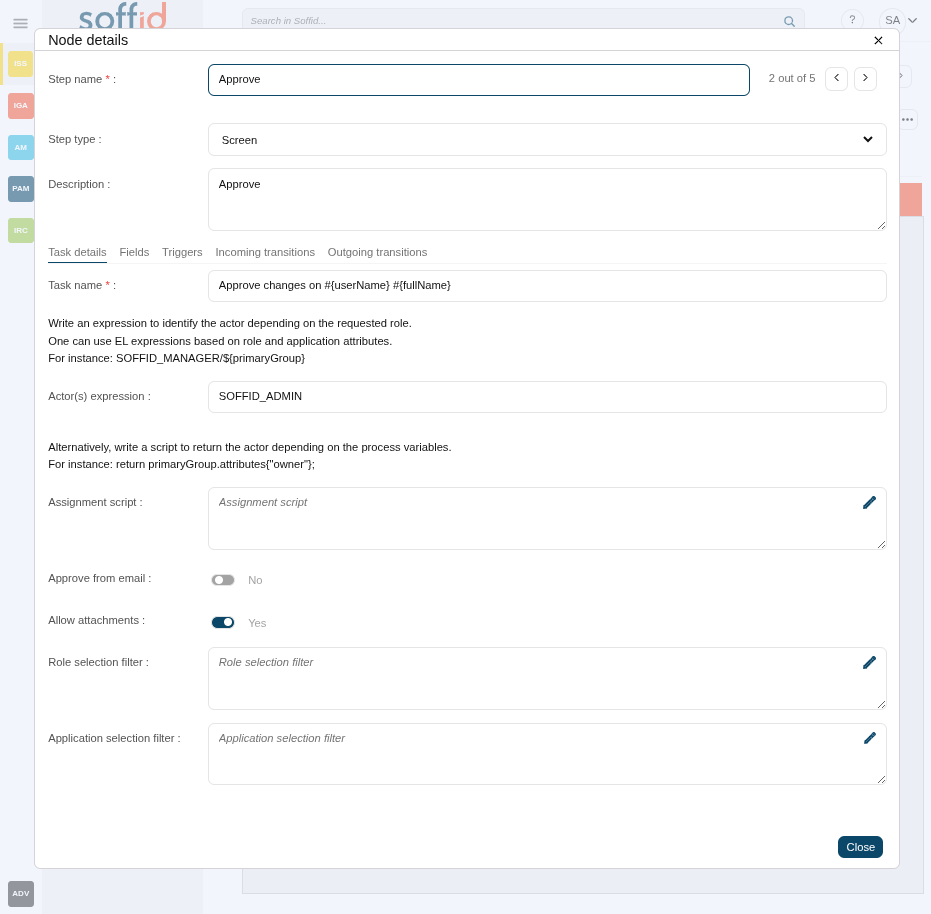
Description
This step is used to define the custom form that will be used by the users who have to approve or to reject the generated task. To configure that step will be necessary to determine the fields that will be show to the users, and the actions that these users could perform.
Steps Tabs
Task details
In this tab you could configure next parameters:
- Task name: identified name for the task that will be created when the workflow is requested.
- Actor(s) expression: allows you to write an expression to identify the actor depending on the requested role. One can use EL expressions (*) based on role and application attributes. For instance: SOFFID_MANAGER/${primaryGroup}
- Assignment script: alternatively, allows you to write a Beanshell script to return the actor depending on the process variables. For instance: return primaryGroup.attributes{"owner"};
- Approve from email: checked it to allow you to send a mail for approval of the task.
Fields
In this tab, you could choose what fields the process form will show to the end users. You can choose these fields from all identity attributes, and from the attributes defined for the workflow on the Attributes Tab. By default, all the identity attributes will be shown. You can choose the fields you want to show, add new fields, and delete the fields that do not need to generate a task. Also, you can sort the fields, you only need to drag and drop on the Order column.
For each field, you may indicate if it is a readOnly field, and you may add a Validation script and Visibility script. The validation script allows you to define rules, the field has to comply with these rules. The visibility script allows you to define the rules to show or hide a field.
Example
if (value == null || value.equals(""))
return ("The NIF is mandatory");
else
return true;Trigger
On the trigger tab, you could define different triggers using custom scripts. Those triggers will be launched with the events you will define.
- onLoad: you can use that trigger to perform some actions before the execution of the step.
- on PrepareTransition: you can use that trigger to perform some actions after the execution of the step and before starting a transition to another step.
- onChange: you can use that trigger to perform some actions when the value of the attribute is changed. You could choose the field from a list.
Example
1. How to set a value depending on a variable (onLoad).
userType = task.getVariables().get("userType");
if ("I".equals(userType)) {
task.getVariables().put("country", "ES");
}2. Validate a field value (onChange)
firstName = (inputFields.get("firstName")!=null) ? inputFields.get("firstName").value : null;
lastName = (inputFields.get("lastName")!=null) ? inputFields.get("lastName").value : null;
country = (inputFields.get("country")!=null) ? inputFields.get("country").value : null;
if (firstName!=null && !firstName.trim().isEmpty() &&
lastName!=null && !lastName.trim().isEmpty() &&
country!=null && !country.trim().isEmpty()) {
emailAddress = firstName + "." + lastName;
if ("ES".equals(country)) {
emailAddress = emailAddress + ".@soffid.es";
} else {
emailAddress = emailAddress + "@soffid.com";
}
inputFields.get("emailAddress").value = emailAddress;
}Incoming transitions
The Incoming transitions tab displays the previous steps where the flow comes from. When you create a process from a template or from scratch default incoming transitions are defined. It is allowed to customize the default setup, add new transitions, or delete transitions.
- From: the previous step, where the flow comes. Allows you to select where the workflow comes from.
- Incoming transition: brief name to identify the transition. That is the name of the action the form will show to the final user.
- To: current step.
- Action: allows creating a custom script to perform specific actions.
Example
The incoming script action is the same outgoing script action of the previous step.
selector = executionContext.getVariable("userSelector");
user = serviceLocator.getUserService().findUserByUserName(selector);
executionContext.setVariable("testName", user.firstName);
executionContext.setVariable("testOperation", "CHECK");Outgoing transitions
The Outcoming transition tab displays the next steps where the flow can go from the current step. When you create a process from a template or from scratch default outcoming transitions are defined. It is allowed to customize the default setup, add new transitions, or delete transitions.
- From: current step.
- Incoming transition: name of the transition.
- To: the next step, where the flow goes.
- Action: allows creating a custom script to perform specific actions.
When you create an outcoming transition, Soffid creates the proper incoming transition.
Example
Update custom attributes defined on metadata
userName = executionContext.getVariable("userName");
attributes = serviceLocator.getUserService().findUserAttributes(userName);
newAttributes = new HashMap();
newAttributes.put("country", "FR");
language = attributes.get("language");
if (language == null) {
language = new LinkedList();
}
language.add("Spanish");
language.add("German");
newAttributes.put ("language", language);
serviceLocator.getUserService().updateUserAttributes(userName, newAttributes);* https://es.wikipedia.org/wiki/Expression_Language
Detect duplicated user
Definition
That step is used to define the proper rules to determine the potential conflicts between the identity for who is the request, and the Soffid existing identities. Whit that definition, Soffid will find the potential conflicts, and the end-user could select the best option to solve those (merge or create a new one).
Steps Tabs
Tasks details
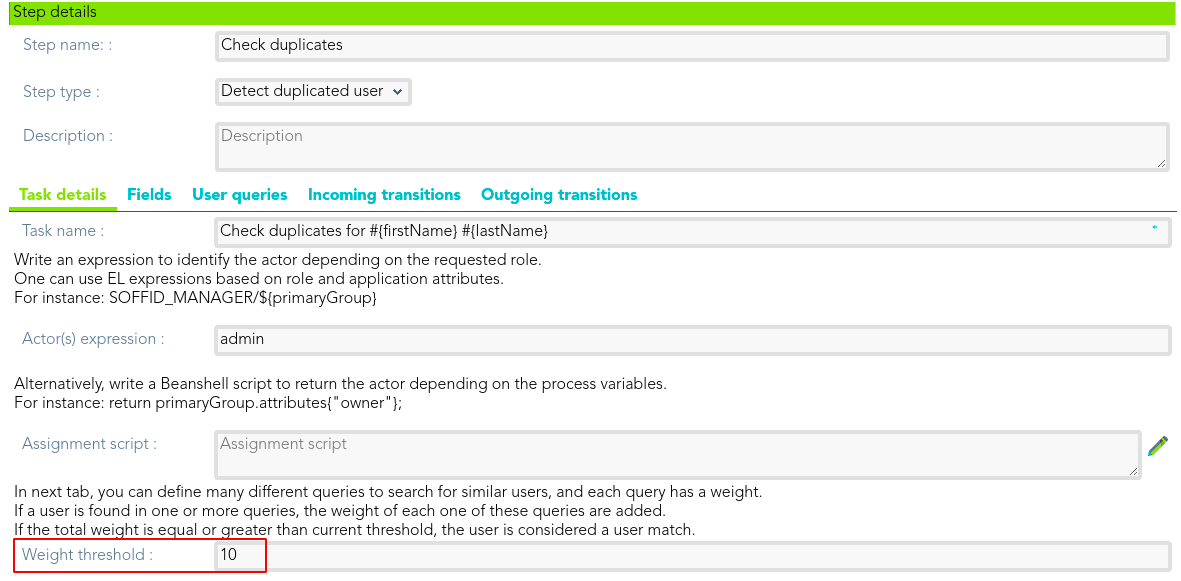
- Task name: identified name for the task that will be created. For instance: Check duplicates for #{firstName} #{lastName}
- Actor(s) expression: write an expression to identify the actor depending on the requested role. One can use EL expressions based on role and application attributes. For instance: SOFFID_MANAGER/${primaryGroup}
- Assignment script: alternatively, write a Beanshell script to return the actor depending on the process variables. For instance: return primaryGroup.attributes{"owner"};
- Weight threshold: in the tab "User queries", you can define many different queries to search for similar users, and each query has a weight. If a user is found in one or more queries, the weight of each one of these queries are added. If the total weight is equal to or greater than the current threshold, the user is considered a user match.
Fields
In this tab, you could choose what fields the process form will show to the end users. You can choose these fields from all identity attributes, and from the attributes defined for the workflow on the Attributes Tab. By default, all the identity attributes will be shown. You can choose the fields you want to show, add new fields, and delete the fields that do not need to generate a task. Also, you can sort the fields, you only need to drag and drop on the Order column.
For each field, you may indicate if it is a readOnly field, and you may add a Validation script and Visibility script. The validation script allows you to define rules, the field has to comply with these rules. The visibility script allows you to define the rules to show or hide a field.
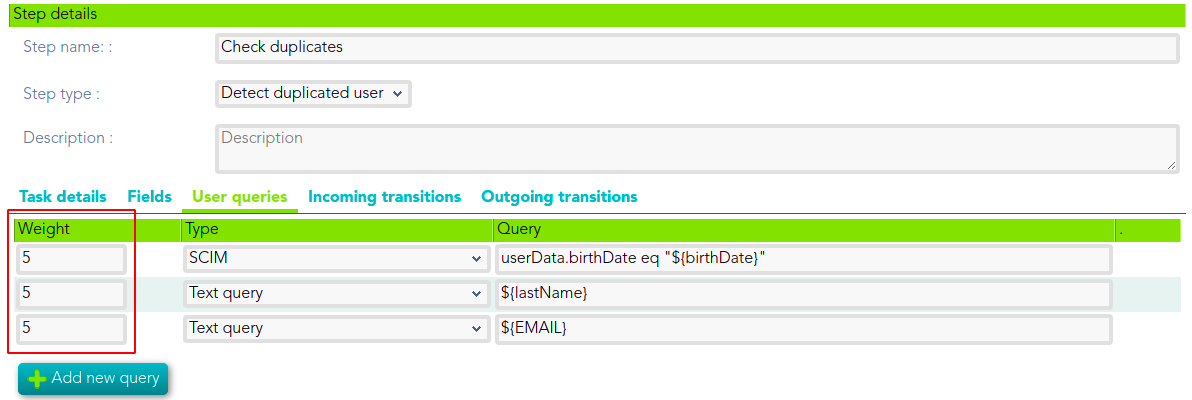
User queries
This tab is only available when one of the below Step types is Detect duplicated user.
User queries allow you to customize a SCIM or Text query to detect duplicated users. You may define a weight for each query. If a user is found in one or more queries, the weight of each one of these queries are added. If the total weight is equal to or greater than the current weight threshold (defined on the Task details tab), the user is considered a user match.
Examples
Text Query
${lastName}SCIM Query
attributes.birthDate eq "${birthDate}"Define the weight threshold on the Task detail tab
Define the weight for each query on the User query tab: A user is considered duplicated when at least two queries are true.
Incoming transitions
The Incoming transitions tab displays the previous steps where the flow comes from. When you create a process from a template or from scratch default incoming transitions are defined. It is allowed to customize the default setup, add new transitions, or delete transitions.
- From: the previous step, where the flow comes. Allows you to select where the workflow comes from.
- Incoming transition: brief name to identify the transition. That is the name of the action the form will show to the final user.
- To: current step.
- Action: allows creating a custom script to perform specific actions.
Example
The incoming script action is the same outgoing script action of the previous step.
selector = executionContext.getVariable("userSelector");
user = serviceLocator.getUserService().findUserByUserName(selector);
executionContext.setVariable("testName", user.firstName);
executionContext.setVariable("testOperation", "CHECK");Outgoing transitions
The Outcoming transition tab displays the next steps where the flow can go from the current step. When you create a process from a template or from scratch default outcoming transitions are defined. It is allowed to customize the default setup, add new transitions, or delete transitions.
- From: current step.
- Incoming transition: name of the transition.
- To: the next step, where the flow goes.
- Action: allows creating a custom script to perform specific actions.
When you create an outcoming transition, Soffid creates the proper incoming transition.
Example
Add comments to the task:
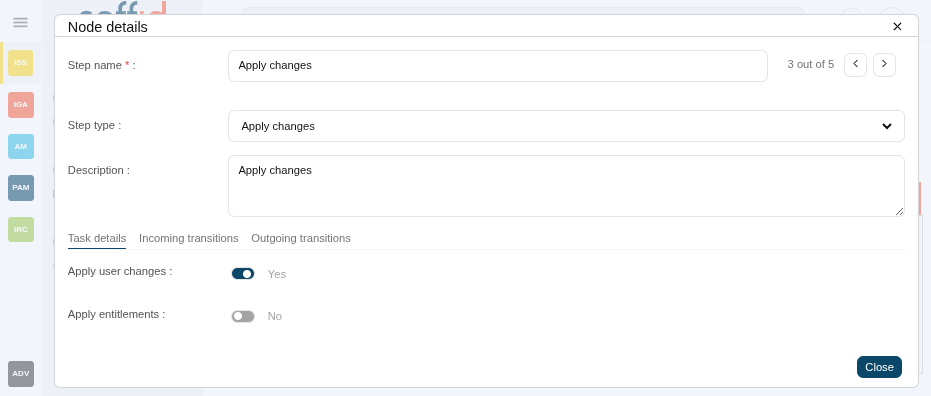
executionContext.getToken().addComment("Automatic comments.......");Apply changes
Definition
This step is used to apply the identity changes to the Soffid repository.
Steps Tabs
Task details
- Apply users changes: check it (select the Yes option) to make changes to users on the Soffid repository.
- Apply entitlements: check it (select the Yes option) to make changes to permissions on the Soffid repository.
The Incoming transitions tab displays the previous steps where the flow comes from. When you create a process from a template or from scratch default incoming transitions are defined. It is allowed to customize the default setup, add new transitions, or delete transitions.
- From: the previous step, where the flow comes. Allows you to select where the workflow comes from.
- Incoming transition: brief name to identify the transition. That is the name of the action the form will show to the final user.
- To: current step.
- Action: allows creating a custom script to perform specific actions.
Example
requester = executionContext.getVariable("requester");
userR = serviceLocator.getUserService().findUserByUserName(requester);
if (userR.primaryGroup.equals("admingroup")) {
//TO-DO
} else {
//TO-DO
}Outgoing transitions
The Outcoming transition tab displays the next steps where the flow can go from the current step. When you create a process from a template or from scratch default outcoming transitions are defined. It is allowed to customize the default setup, add new transitions, or delete transitions.
- From: current step.
- Incoming transition: name of the transition.
- To: the next step, where the flow goes.
- Action: allows creating a custom script to perform specific actions.
When you create an outcoming transition, Soffid creates the proper incoming transition.
Example
userName = executionContext.getVariable("userName");
user = serviceLocator.getUserService().findUserByUserName(userName);
country = user.getAttributes().get("country");
groups = serviceLocator.getGroupService().findUsersGroupByUserName(userName);
if (country.equals("ES")) {
//TO-DO
}Custom
Definition
This step is used to define a custom script that will be executed
Steps Tabs
Task details
All the process types have the same Task details for the Custom step:
- Script: allows you to define a Script this step allows you to add a script to be executed.
Example
comments = executionContext.getToken().getComments();
selector = executionContext.getVariable("userSelector");
if (selector == null || selector.equals("")) {
return ("The userName is mandatory");
}
user = serviceLocator.getUserService().findUserByUserName(selector);
if (user != null) {
subject = "Soffid - Notification";
message = "Automated mail sent ..............";
if (comments != null && !comments.isEmpty()) {
for (comment : comments) {
message += comment.message;
}
}
serviceLocator.getUserService().sendHtmlMailToActors(new String[]{user.userName}, subject, message);
}Incoming transitions
The Incoming transitions tab displays the previous steps where the flow comes from. When you create a process from a template or from scratch default incoming transitions are defined. It is allowed to customize the default setup, add new transitions, or delete transitions.
- From: the previous step, where the flow comes. Allows you to select where the workflow comes from.
- Incoming transition: brief name to identify the transition. That is the name of the action the form will show to the final user.
- To: current step.
- Action: allows creating a custom script to perform specific actions.
Example
userName = executionContext.getVariable("userName");
roleList = serviceLocator.getApplicationService().findRolesByUserName(userName);
for (role:roleList) {
//TO-DO
}
user = serviceLocator.getUserService().findUserByUserName(userName);
roleGrantList = serviceLocator.getApplicationService().findRoleGrantHierarchyByUser(user.id);
for (roleGrant:roleGrantList) {
//TO-DO
}Outgoing transitions
The Outcoming transition tab displays the next steps where the flow can go from the current step. When you create a process from a template or from scratch default outcoming transitions are defined. It is allowed to customize the default setup, add new transitions, or delete transitions.
- From: current step.
- Incoming transition: name of the transition.
- To: the next step, where the flow goes.
- Action: allows creating a custom script to perform specific actions.
When you create an outcoming transition, Soffid creates the proper incoming transition.
Example
Delete additional attribute
userName = executionContext.getVariable("userName");
attribute = serviceLocator.getUserService().findDataByUserAndCode(userName, "country");
if (attribute != null) {
serviceLocator.getAdditionalDataService().delete(attribute);
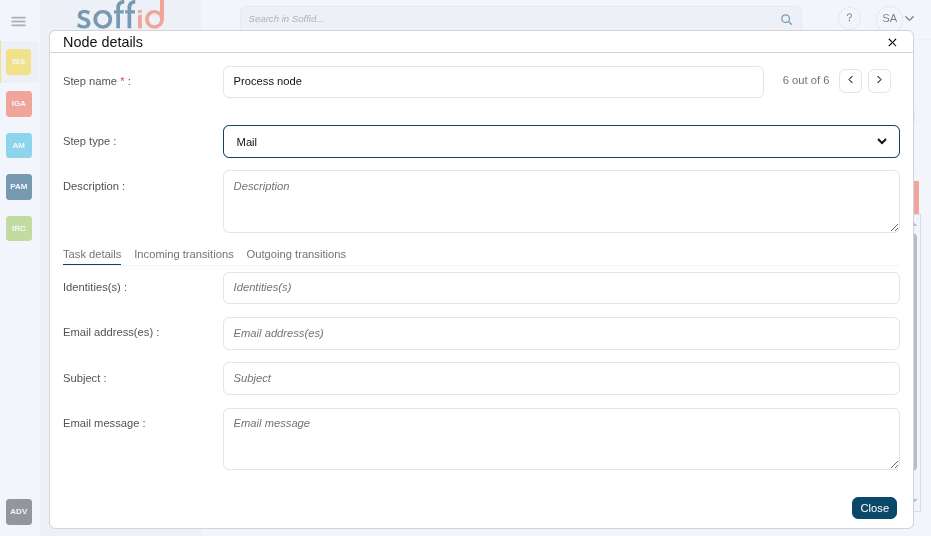
}Definition
This step allows you to configure the necessary parameters to send an email when the flow reaches this point. That mail will be an informative mail, and the receptor could not perform any action from the mail.
To send mail, you will need to configure mail server parameters. You can visit the Soffid parameters page for more information.
Steps Tabs
Task details
When you select the Mail Step type, you could configure the mail information to send and the recipients of that information. To send a mail from Soffid Console is needed to have a mail server configuration.
- Identities(s): User, group, role, or email which is the recipient.
- Email address(es): Set one or more valid email addresses.
- Subject: Subject of the mail.
- Email message: Message of the mail.
Incoming transitions
The Incoming transitions tab displays the previous steps where the flow comes from. When you create a process from a template or from scratch default incoming transitions are defined. It is allowed to customize the default setup, add new transitions, or delete transitions.
- From: the previous step, where the flow comes. Allows you to select where the workflow comes from.
- Incoming transition: brief name to identify the transition. That is the name of the action the form will show to the final user.
- To: current step.
- Action: allows creating a custom script to perform specific actions.
Example
Get the selected user, first name, and operation from the previous step:
selector = executionContext.getVariable("userSelector");
user = serviceLocator.getUserService().findUserByUserName(selector);
executionContext.setVariable("testName", user.firstName);
executionContext.setVariable("testOperation", "CHECK");Outgoing transitions
The Outcoming transition tab displays the next steps where the flow can go from the current step. When you create a process from a template or from scratch default outcoming transitions are defined. It is allowed to customize the default setup, add new transitions, or delete transitions.
- From: current step.
- Incoming transition: name of the transition.
- To: the next step, where the flow goes.
- Action: allows creating a custom script to perform specific actions.
When you create an outcoming transition, Soffid creates the proper incoming transition.
Example
Get the account list associated with a user to perform some actions:
userName = executionContext.getVariable("userName");
accountList = serviceLocator.getAccountService().findAccountByJsonQuery("name eq \"" + userName + "\" AND (type eq \"P\" or type eq \"S\" or type eq \"I\")");
for (account:accountList) {
//TO-DO
} * https://es.wikipedia.org/wiki/Expression_Language
Fork
Definition
This step is used to divide the workflow into two or more paths that will run in parallel, allowing multiple activities to run simultaneously.
/====> path 1 =====\
Fork ==== ==> Join
\====> path 2 =====/
Steps Tabs
Task details
This process type does not have task details for the fork step.
Incoming transitions
The Incoming transitions tab displays the previous steps where the flow comes from. When you create a process from a template or from scratch default incoming transitions are defined. It is allowed to customize the default setup, add new transitions, or delete transitions.
- From: the previous step, where the flow comes. Allows you to select where the workflow comes from.
- Incoming transition: brief name to identify the transition. That is the name of the action the form will show to the final user.
- To: current step.
- Action: allows creating a custom script to perform specific actions.
Example
Update custom attributes defined on metadata
userName = executionContext.getVariable("userName");
attributes = serviceLocator.getUserService().findUserAttributes(userName);
newAttributes = new HashMap();
newAttributes.put("country", "FR");
language = attributes.get("language");
if (language == null) {
language = new LinkedList();
}
language.add("Spanish");
language.add("German");
newAttributes.put ("language", language);
serviceLocator.getUserService().updateUserAttributes(userName, newAttributes);Outgoing transitions
The Outcoming transition tab displays the next steps where the flow can go from the current step. When you create a process from a template or from scratch default outcoming transitions are defined. It is allowed to customize the default setup, add new transitions, or delete transitions.
- From: current step.
- Outgoing transition: name of the transition. It is a required field, you must comply it to the workflow run properly.
- To: the next step, where the flow goes.
- Action: allows creating a custom script to perform specific actions.
When you create an outcoming transition, Soffid creates the proper incoming transition.

Example
Scroll through the list of roles and the list of grant hierarchies to execute some actions.
userName = executionContext.getVariable("userName");
roleList = serviceLocator.getApplicationService().findRolesByUserName(userName);
for (role:roleList) {
//TO-DO
}
user = serviceLocator.getUserService().findUserByUserName(userName);
roleGrantList = serviceLocator.getApplicationService().findRoleGrantHierarchyByUser(user.id);
for (roleGrant:roleGrantList) {
//TO-DO
}Join
Definition
This step is used to combine two or more parallel paths into one path.
Steps Tabs
Task details
This process type does not have task details for the fork step.
Incoming transitions
The Incoming transitions tab displays the previous steps where the flow comes from. When you create a process from a template or from scratch default incoming transitions are defined. It is allowed to customize the default setup, add new transitions, or delete transitions.
To join some paths will be mandatory to add the incoming transitions from those forks.
- From: the previous step, where the flow comes. Allows you to select where the workflow comes from.
- Incoming transition: brief name to identify the transition. That is the name of the action the form will show to the final user.
- To: current step.
- Action: allows creating a custom script to perform specific actions.

Example
Delete additional attribute:
userName = executionContext.getVariable("userName");
attribute = serviceLocator.getUserService().findDataByUserAndCode(userName, "country");
if (attribute != null) {
serviceLocator.getAdditionalDataService().delete(attribute);
}Outgoing transitions
The Outcoming transition tab displays the next steps where the flow can go from the current step. When you create a process from a template or from scratch default outcoming transitions are defined. It is allowed to customize the default setup, add new transitions, or delete transitions.
- From: current step.
- Incoming transition: name of the transition.
- To: the next step, where the flow goes.
- Action: allows creating a custom script to perform specific actions.
When you create an outcoming transition, Soffid creates the proper incoming transition.
Example
Scroll through the list of roles to execute some actions.
userName = executionContext.getVariable("userName");
roleList = serviceLocator.getApplicationService().findRolesByUserName(userName);
for (role:roleList) {
//TO-DO
}End
Description
The end step finalizes the process. It is the last step of the workflow.
Steps Tabs
Task details
This process type does not have task details for the start step.
Incoming transitions
The Incoming transitions tab displays the previous steps where the flow comes from. When you create a process from a template or from scratch default incoming transitions are defined. It is allowed to customize the default setup, add new transitions, or delete transitions.
- From: the previous step, where the flow comes. Allows you to select where the workflow comes from.
- Incoming transition: brief name to identify the transition. That is the name of the action the form will show to the final user.
- To: current step.
- Action: allows creating a custom script to perform specific actions.
Example
If the user country is Spain, it will perform an action for each role.
userName = executionContext.getVariable("userName");
user = serviceLocator.getUserService().findUserByUserName(userName);
country = user.getAttributes().get("country");
if (country != null && country.equals("ES")) {
roleList = serviceLocator.getApplicationService().findRolesByUserName(userName);
for (role : roleList) {
//TO-DO
}Outgoing transitions
This step does not have outgoing transitions. It is the last step of the workflow.
Permissions management steps
Define the Process management steps
Start
Definition
That is the first step of the workflow. At that step, you could define the fields you want to show when the end users will go to make a request.
Steps Tabs
Task details
In this tab you could configure next parameters:
- Task name: identified name for the task that will be created when the workflow is requested.
- Permission request screen type: this allows you to select how the permissions will be displayed on the screen. There are two available options:
- List of permissions: this option needs to configure a user selector on the fields tab. When end-users request a process, first of all, they will select the user and the permissions, and then the permissions, the list of available permissions depends on the selected user.
- Self service request: if you select the self-service request, it will not be mandatory to configure the user selector on the fields tab. That option can be configured to request permission for your own user, or to third users configuring the user selector. When end-users request a process, the available permissions will be displayed to select from the information system for the roles defined. When you select one or more roles, those will be added to the shopping cart to make the request.
- Role selection filter: this allows you to define a Script that returns the available roles to select. At the script window, you could find information about the available context variables.
- Application selection filter: this allows you to define a Script that returns the available applications to select. At the script window, you could find information about the available context variables.
Fields
In this tab, you could choose what fields the process form will show to the end users. You can choose these fields from all identity attributes, and from the attributes defined for the workflow on the Attributes Tab.
By default, only the Permissions field will be shown. That field is defined on the attributes tab. You can choose the fields you want to show when the end-users, add new fields, and delete the fields that do not need to generate a task. Also, you can sort the fields, you only need to drag and drop on the Order column.
For each field, you may indicate if it is a readOnly field, and you may add a Validation script and Visibility script. The validation script allows you to define rules, the field has to comply with these rules. The visibility script allows you to define the rules to show or hide a field.
Validation examples
if (value == null || value.equals(""))
throw new Exception("The userName is mandatory");
else
return true;It is also allowed in the following manner:
if (value == null || value.equals(""))
return ("The userName is mandatory");
else
return true;Validate that a certain field is not repeated:
userList = serviceLocator.getUserService().findUserByJsonQuery("attributes.field_XX eq \"" + value +"\"");
if (!userList.isEmpty() {
return "the field field_XX is associated to another user";
}
return true;Visibility example
user = serviceLocator.getUserService().getCurrentUser();
if ("admin".equals(user.userName))
return false;Triggers
On the trigger tab, you could define different triggers using custom scripts. Those triggers will be launched with the events you will define.
- onLoad: you can use that trigger to perform some actions before the execution of the step.
- on PrepareTransition: you can use that trigger to perform some actions after the execution of the step and before starting a transition to another step.
- onChange: you can use that trigger to perform some actions when the value of the attribute is changed. You could choose the field from a list.
Example
1. Calculate the email when firstName or lastName changes and depending on the userType:
firstName = (inputFields.get("firstName")!=null) ? inputFields.get("firstName").value : null;
lastName = (inputFields.get("lastName")!=null) ? inputFields.get("lastName").value : null;
userType = (inputFields.get("userType")!=null) ? inputFields.get("userType").value : null;
if (firstName!=null && !firstName.trim().isEmpty() &&
lastName!=null && !lastName.trim().isEmpty() &&
userType!=null && !userType.trim().isEmpty()) {
emailAddress = firstName + "." + lastName;
if ("E".equals(userType)) {
emailAddress = emailAddress + ".ext@soffid.com";
} else {
emailAddress = emailAddress + "@soffid.com";
}
inputFields.get("emailAddress").value = emailAddress;
}You can find more information about StandardUserWindow.java on Github.
2. Load the user data into the form.
user = serviceLocator.getUserService().getCurrentUser();
task.getVariables().put("action", "M");
task.getVariables().put("userSelector", user.userName);
workflowWindow.fetchUserAttributes()Incoming transitions
This process type does not have task details for the start step.
Outgoing transitions
The Outcoming transition tab displays the next steps where the flow can go from the current step. When you create a process from a template or from scratch default outcoming transitions are defined. It is allowed to customize the default setup, add new transitions, or delete transitions.
- From: current step.
- Incoming transition: name of the transition.
- To: the next step, where the flow goes.
- Action: allows creating a custom script to perform specific actions.
When you create an outcoming transition, Soffid creates the proper incoming transition.
Example
Validation of mandatory fields:
a = executionContext.getVariable("firstName");
if (a==null || "".equals(a.trim()))
throw new Exception("First name is mandatory");
a = executionContext.getVariable("lastName");
if (a==null || "".equals(a.trim()))
throw new Exception("Last name is mandatory");
a = executionContext.getVariable("primaryGroup");
if (a==null || "".equals(a.trim()))
throw new Exception("Primery group is mandatory");
return true;To request the process is only allowed for Internal users:
userSelector = executionContext.getVariable("userSelector");
user = serviceLocator.getUserService().findUserByUserName(userSelector);
if (user.userType.equals("I") || user.userType.equals("S")) {
throw new Exception ("To request the process is only allowed for Internal users");
}Grant approval
Description
This step is used to define the custom form that will be used by the users who have to approve or reject the generated task. To configure that step will be necessary to determine the fields that will be shown to the users, and the actions that these users could perform.
Steps Tabs
Task details
- Task name: identified name for the task that will be created.
- Permission request screen type: allows selecting the type of screen for permission request.
- List of permissions
- Display approval pending: that is the default option. When you select that option, all the approval pending will be shown to the end user.
- Display all
- Display approved
- Display denied
- Actor(s) expression: write an expression to identify the actor depending on the requested role. One can use EL expressions based on role and application attributes. For instance: SOFFID_MANAGER/${primaryGroup}
- Assignment script: alternatively, write a Beanshell script to return the actor depending on the process variables. For instance: return primaryGroup.attributes{"owner"};
- Approve from email: checked it to allow you to send a mail to approve or deny the task. If you check that option (selected value Yes), you need to fill in the transitions to approve and deny the task, those have to match with the outgoing transitions defined for those step.
- Approval transition: has to match with an outgoing transition.
- Denial transition: has to match with an outgoing transition.
To send mail, you will need to configure mail server parameters. You can visit the Soffid parameters page for more information.

Example Assignment script
If a user belongs to the primary group "World", the manager of that group will be responsible to approve or deny the request. If the primary group is another, the persona who will be responsible to approve or deny will be the manager of the parent group of that group. If there is not primary group, the request will be sent to the admin user.
primaryGroup = executionContext.getVariable("primaryGroup");
if (primaryGroup != null && !primaryGroup.equals("")) {
if (primaryGroup.equals("world")) {
manager = serviceLocator.getGroupService().findGroupByGroupName(primaryGroup).getAttributes().get("manager");
return manager;
} else {
group = serviceLocator.getGroupService().findGroupByGroupName(primaryGroup);
if ( group.parentGroup != null && !group.parentGroup.equals("")) {
manager = serviceLocator.getGroupService().findGroupByGroupName(group.parentGroup).getAttributes().get("manager");
return manager;
}
}
} else {
return "admin";
}Fields
In this tab, you could choose what fields the process form will show to the end users. You can choose these fields from all identity attributes, and from the attributes defined for the workflow on the Attributes Tab. By default, all the identity attributes will be shown. You can choose the fields you want to show, add new fields, and delete the fields that do not need to generate a task. Also, you can sort the fields, you only need to drag and drop on the Order column.
For each field, you may indicate if it is a readOnly field, and you may add a Validation script and Visibility script. The validation script allows you to define rules, the field has to comply with these rules. The visibility script allows you to define the rules to show or hide a field.
Example
if (value == null || value.equals(""))
return ("The user is mandatory");
else
return true;Incoming transitions
The Incoming transitions tab displays the previous steps where the flow comes from. When you create a process from a template or from scratch default incoming transitions are defined. It is allowed to customize the default setup, add new transitions, or delete transitions.
- From: the previous step, where the flow comes. Allows you to select where the workflow comes from.
- Incoming transition: brief name to identify the transition. That is the name of the action the form will show to the final user.
- To: current step.
- Action: allows creating a custom script to perform specific actions.
Example
Validation of mandatory fields:
a = executionContext.getVariable("firstName");
if (a==null || "".equals(a.trim()))
throw new Exception("First name is mandatory");
a = executionContext.getVariable("lastName");
if (a==null || "".equals(a.trim()))
throw new Exception("Last name is mandatory");
a = executionContext.getVariable("primaryGroup");
if (a==null || "".equals(a.trim()))
throw new Exception("Primery group is mandatory");
return true;To request the process is only allowed for Internal users:
userSelector = executionContext.getVariable("userSelector");
user = serviceLocator.getUserService().findUserByUserName(userSelector);
if (user.userType.equals("I") || user.userType.equals("S")) {
throw new Exception ("To request the process is only allowed for Internal users");
}Outgoing transitions
The Outcoming transition tab displays the next steps where the flow can go from the current step. When you create a process from a template or from scratch default outcoming transitions are defined. It is allowed to customize the default setup, add new transitions, or delete transitions.
- From: current step.
- Incoming transition: name of the transition.
- To: the next step, where the flow goes.
- Action: allows creating a custom script to perform specific actions.
When you create an outcoming transition, Soffid creates the proper incoming transition.
Example
To scroll through the list of values to perform some operations.
grants = executionContext.getVariable("grants");
for (roleRequestInfo:grants) {
// TO-DO
}Apply changes
Definition
This step is used to apply the identity changes to the Soffid repository.
Steps Tabs
Task details
- Apply users changes: check it (select the Yes option) to make changes to users on the Soffid repository.
- Apply entitlements: check it (select the Yes option) to make changes to permissions on the Soffid repository.
The Incoming transitions tab displays the previous steps where the flow comes from. When you create a process from a template or from scratch default incoming transitions are defined. It is allowed to customize the default setup, add new transitions, or delete transitions.
- From: the previous step, where the flow comes. Allows you to select where the workflow comes from.
- Incoming transition: brief name to identify the transition. That is the name of the action the form will show to the final user.
- To: current step.
- Action: allows creating a custom script to perform specific actions.
Example
Scroll through the list of values to perform some operations.
grants = executionContext.getVariable("grants");
for (roleRequestInfo:grants) {
// TO-DO
}Outgoing transitions
The Outcoming transition tab displays the next steps where the flow can go from the current step. When you create a process from a template or from scratch default outcoming transitions are defined. It is allowed to customize the default setup, add new transitions, or delete transitions.
- From: current step.
- Incoming transition: name of the transition.
- To: the next step, where the flow goes.
- Action: allows creating a custom script to perform specific actions.
When you create an outcoming transition, Soffid creates the proper incoming transition.
Example
If the user's country is Spain, it will delete all the groups to which the user belongs:
userName = executionContext.getVariable("userName");
user = serviceLocator.getUserService().findUserByUserName(userName);
country = user.getAttributes().get("country");
groups = serviceLocator.getGroupService().findUsersGroupByUserName(userName);
if (country.equals("ES")) {
for (groupUser: groups) {
serviceLocator.getGroupService().removeGroupFormUser(userName, groupUser.group);
}
}Script action
Definition
This step is used to define a custom script that will be executed
Steps Tabs
Task details
All the process types have the same Task details for the Custom step:
- Script: allows you to define a Script this step allows you to add a script to be executed.
Example
comments = executionContext.getToken().getComments();
selector = executionContext.getVariable("userSelector");
if (selector == null || selector.equals("")) {
return ("The userName is mandatory");
}
user = serviceLocator.getUserService().findUserByUserName(selector);
if (user != null) {
subject = "Soffid - Notification";
message = "Automated mail sent ..............";
if (comments != null && !comments.isEmpty()) {
for (comment : comments) {
message += comment.message;
}
}
serviceLocator.getUserService().sendHtmlMailToActors(new String[]{user.userName}, subject, message);
}Incoming transitions
The Incoming transitions tab displays the previous steps where the flow comes from. When you create a process from a template or from scratch default incoming transitions are defined. It is allowed to customize the default setup, add new transitions, or delete transitions.
- From: the previous step, where the flow comes. Allows you to select where the workflow comes from.
- Incoming transition: brief name to identify the transition. That is the name of the action the form will show to the final user.
- To: current step.
- Action: allows creating a custom script to perform specific actions.
Example
Scroll through the list of roles and the list of grant hierarchies to execute some actions.
userName = executionContext.getVariable("userName");
roleList = serviceLocator.getApplicationService().findRolesByUserName(userName);
for (role:roleList) {
//TO-DO
}
user = serviceLocator.getUserService().findUserByUserName(userName);
roleGrantList = serviceLocator.getApplicationService().findRoleGrantHierarchyByUser(user.id);
for (roleGrant:roleGrantList) {
//TO-DO
}Outgoing transitions
The Outcoming transition tab displays the next steps where the flow can go from the current step. When you create a process from a template or from scratch default outcoming transitions are defined. It is allowed to customize the default setup, add new transitions, or delete transitions.
- From: current step.
- Incoming transition: name of the transition.
- To: the next step, where the flow goes.
- Action: allows creating a custom script to perform specific actions.
When you create an outcoming transition, Soffid creates the proper incoming transition.
Example
Delete additional attribute
userName = executionContext.getVariable("userName");
attribute = serviceLocator.getUserService().findDataByUserAndCode(userName, "country");
if (attribute != null) {
serviceLocator.getAdditionalDataService().delete(attribute);
}Definition
This step allows you to configure the necessary parameters to send an email when the flow reaches this point. That mail will be an informative mail, and the receptor could not perform any action from the mail.
To send mail, you will need to configure mail server parameters. You can visit the Soffid parameters page for more information.
Steps Tabs
Task details
When you select the Mail Step type, you could configure the mail information to send and the recipients of that information.
- Identities(s): User, group, role, or email which is the recipient.
- Email address(es): Set one or more valid email addresses.
- Subject: Subject of the mail.
- Email message: Message of the mail.
Incoming transitions
The Incoming transitions tab displays the previous steps where the flow comes from. When you create a process from a template or from scratch default incoming transitions are defined. It is allowed to customize the default setup, add new transitions, or delete transitions.
- From: the previous step, where the flow comes. Allows you to select where the workflow comes from.
- Incoming transition: brief name to identify the transition. That is the name of the action the form will show to the final user.
- To: current step.
- Action: allows creating a custom script to perform specific actions.
Example
Get the selected user, first name, and operation from the previous step:
selector = executionContext.getVariable("userSelector");
user = serviceLocator.getUserService().findUserByUserName(selector);
executionContext.setVariable("testName", user.firstName);
executionContext.setVariable("testOperation", "CHECK");Outgoing transitions
The Outcoming transition tab displays the next steps where the flow can go from the current step. When you create a process from a template or from scratch default outcoming transitions are defined. It is allowed to customize the default setup, add new transitions, or delete transitions.
- From: current step.
- Incoming transition: name of the transition.
- To: the next step, where the flow goes.
- Action: allows creating a custom script to perform specific actions.
When you create an outcoming transition, Soffid creates the proper incoming transition.
Example
Get the account list associated with a user to perform some actions:
userName = executionContext.getVariable("userName");
accountList = serviceLocator.getAccountService().findAccountByJsonQuery("name eq \"" + userName + "\" AND (type eq \"P\" or type eq \"S\" or type eq \"I\")");
for (account:accountList) {
//TO-DO
}
* https://es.wikipedia.org/wiki/Expression_Language
Fork
Definition
This step is used to divide the workflow into two or more paths that will run in parallel, allowing multiple activities to run simultaneously.
/====> path 1 =====\
Fork ==== ==> Join
\====> path 2 =====/
Steps Tabs
Task details
This process type does not have task details for the fork step.
Incoming transitions
The Incoming transitions tab displays the previous steps where the flow comes from. When you create a process from a template or from scratch default incoming transitions are defined. It is allowed to customize the default setup, add new transitions, or delete transitions.
- From: the previous step, where the flow comes. Allows you to select where the workflow comes from.
- Incoming transition: brief name to identify the transition. That is the name of the action the form will show to the final user.
- To: current step.
- Action: allows creating a custom script to perform specific actions.
Example
To scroll through the list of values to perform some operations.
userName = executionContext.getVariable("userName");
requester = executionContext.getVariable("requester");
requesterName = executionContext.getVariable("requesterName");
grants = executionContext.getVariable("grants");
for (roleRequestInfo:grants) {
// TO-DO
}Outgoing transitions
The Outcoming transition tab displays the next steps where the flow can go from the current step. When you create a process from a template or from scratch default outcoming transitions are defined. It is allowed to customize the default setup, add new transitions, or delete transitions.
- From: current step.
- Outgoing transition: name of the transition. It is a required field, you must comply it to the workflow run properly.
- To: the next step, where the flow goes.
- Action: allows creating a custom script to perform specific actions.
When you create an outcoming transition, Soffid creates the proper incoming transition.
Example
Scroll through the list of roles and the list of grant hierarchies to execute some actions.
userName = executionContext.getVariable("userName");
roleList = serviceLocator.getApplicationService().findRolesByUserName(userName);
for (role:roleList) {
//TO-DO
}
user = serviceLocator.getUserService().findUserByUserName(userName);
roleGrantList = serviceLocator.getApplicationService().findRoleGrantHierarchyByUser(user.id);
for (roleGrant:roleGrantList) {
//TO-DO
}Join
Definition
This step is used to combine two or more parallel paths into one path.
Steps Tabs
Task details
This process type does not have task details for the fork step.
Incoming transitions
The Incoming transitions tab displays the previous steps where the flow comes from. When you create a process from a template or from scratch default incoming transitions are defined. It is allowed to customize the default setup, add new transitions, or delete transitions.
To join some paths will be mandatory to add the incoming transitions from those forks.
- From: the previous step, where the flow comes. Allows you to select where the workflow comes from.
- Incoming transition: brief name to identify the transition. That is the name of the action the form will show to the final user.
- To: current step.
- Action: allows creating a custom script to perform specific actions.
Example
Delete additional attribute
userName = executionContext.getVariable("userName");
attribute = serviceLocator.getUserService().findDataByUserAndCode(userName, "country");
if (attribute != null) {
serviceLocator.getAdditionalDataService().delete(attribute);
}Outgoing transitions
The Outcoming transition tab displays the next steps where the flow can go from the current step. When you create a process from a template or from scratch default outcoming transitions are defined. It is allowed to customize the default setup, add new transitions, or delete transitions.
- From: current step.
- Incoming transition: name of the transition.
- To: the next step, where the flow goes.
- Action: allows creating a custom script to perform specific actions.
When you create an outcoming transition, Soffid creates the proper incoming transition.
Example
Scroll through the list of roles to execute some actions.
userName = executionContext.getVariable("userName");
roleList = serviceLocator.getApplicationService().findRolesByUserName(userName);
for (role:roleList) {
//TO-DO
}End
Description
The end step finalizes the process. It is the last step of the workflow.
Steps Tabs
Task details
This process type does not have task details for the start step.
Incoming transitions
The Incoming transitions tab displays the previous steps where the flow comes from. When you create a process from a template or from scratch default incoming transitions are defined. It is allowed to customize the default setup, add new transitions, or delete transitions.
- From: the previous step, where the flow comes. Allows you to select where the workflow comes from.
- Incoming transition: brief name to identify the transition. That is the name of the action the form will show to the final user.
- To: current step.
- Action: allows creating a custom script to perform specific actions.
Example
To scroll through the list of values to perform some operations.
userName = executionContext.getVariable("userName");
requester = executionContext.getVariable("requester");
requesterName = executionContext.getVariable("requesterName");
grants = executionContext.getVariable("grants");
for (roleRequestInfo:grants) {
// TO-DO
}Example
If the user's country is Spain, it will delete all the groups to which the user belongs:
userName = executionContext.getVariable("userName");
user = serviceLocator.getUserService().findUserByUserName(userName);
country = user.getAttributes().get("country");
groups = serviceLocator.getGroupService().findUsersGroupByUserName(userName);
if (country.equals("ES")) {
for (groupUser: groups) {
serviceLocator.getGroupService().removeGroupFormUser(userName, groupUser.group);
}
}Outgoing transitions
This step does not have outgoing transitions. It is the last step of the workflow.
Account reservation steps
Define the account reservation steps
Start
Definition
That is the first step of the workflow. At that step, you could define the fields you want to show when the end users. In that case, the request will be launched automatically when the end users request to use a privileged account to connect to a protected resource.
Administrator users can define on XACML Policy Management page the rules to request the use of some privileged accounts.
Steps Tabs
Task details
This process type does not have task details for the start step.
Fields
In this tab, you could choose what fields the process form will show to the end users. You can choose these fields from all identity attributes, and from the attributes defined for the workflow on the Attributes Tab.
By default, only the fields defined on the attributes tab will be shown. You can choose the fields you want to show when the end-users, add new fields, and delete the fields that do not need to generate a task. Also, you can sort the fields, you only need to drag and drop on the Order column.
For each field, you may indicate if it is a readOnly field, and you may add a Validation script and Visibility script. The validation script allows you to define rules, the field has to comply with these rules. The visibility script allows you to define the rules to show or hide a field.
Validation examples
if (value == null || value.equals(""))
throw new Exception("The userName is mandatory");
else
return true;It is also allowed in the following manner:
if (value == null || value.equals(""))
return ("The userName is mandatory");
else
return true;Validate that a certain field is not repeated:
userList = serviceLocator.getUserService().findUserByJsonQuery("attributes.field_XX eq \"" + value +"\"");
if (!userList.isEmpty() {
return "the field field_XX is associated to another user";
}
return true;Visibility example
user = serviceLocator.getUserService().getCurrentUser();
if ("admin".equals(user.userName))
return false;Triggers
On the trigger tab, you could define different triggers using custom scripts. Those triggers will be launched with the events you will define.
- onLoad: you can use that trigger to perform some actions before the execution of the step.
- on PrepareTransition: you can use that trigger to perform some actions after the execution of the step and before starting a transition to another step.
- onChange: you can use that trigger to perform some actions when the value of the attribute is changed. You could choose the field from a list.
Example
account = (inputFields.get("account")!=null) ? inputFields.get("account").value : null;
systemName = (inputFields.get("systemName")!=null) ? inputFields.get("systemName").value : null;
...........Incoming transitions
This process type does not have task details for the start step.
Outgoing transitions
The Outcoming transition tab displays the next steps where the flow can go from the current step. When you create a process from a template or from scratch default outcoming transitions are defined. It is allowed to customize the default setup, add new transitions, or delete transitions.
- From: current step.
- Incoming transition: name of the transition.
- To: the next step, where the flow goes.
- Action: allows creating a custom script to perform specific actions.
When you create an outcoming transition, Soffid creates the proper incoming transition.
Example
accounts = serviceLocator.getAccountService().findAccountByJsonQuery("name eq \"" + executionContext.getVariable("account") + "\"");
if (!accounts.isEmpty() {
for (account:accounts) {
owners = serviceLocator.getAccountService().getAccountUsers(account);
// TO-DO
}
}Screen
Description
This step is used to define the custom form that will be used by the users who have to approve or to reject the generated task. To configure that step will be necessary to determine the fields that will be show to the users, and the actions that these users could perform.
Steps Tabs
Task details
In this tab you could configure next parameters:
- Task name: identified name for the task that will be created when the workflow is requested.
- Actor(s) expression: allows you to write an expression to identify the actor depending on the requested role. One can use EL expressions (*) based on role and application attributes. For instance: ${owners}
- Assignment script: alternatively, allows you to write a Beanshell script to return the actor depending on the process variables. For instance: return primaryGroup.attributes{"owner"};
- Approve from email: checked it to allow you to send a mail for approval the task.
Fields
In this tab, you could choose what fields the process form will show to the end users. You can choose these fields from all identity attributes, and from the attributes defined for the workflow on the Attributes Tab. By default, all the identity attributes will be shown. You can choose the fields you want to show, add new fields, and delete the fields that do not need to generate a task. Also, you can sort the fields, you only need to drag and drop on the Order column.
For each field, you may indicate if it is a readOnly field, and you may add a Validation script and Visibility script. The validation script allows you to define rules, the field has to comply with these rules. The visibility script allows you to define the rules to show or hide a field.
Example
if (value == null || value.equals(""))
return ("The NIF is mandatory");
else
return true;Trigger
On the trigger tab, you could define different triggers using custom scripts. Those triggers will be launched with the events you will define.
- onLoad: you can use that trigger to perform some actions before the execution of the step.
- on PrepareTransition: you can use that trigger to perform some actions after the execution of the step and before starting a transition to another step.
- onChange: you can use that trigger to perform some actions when the value of the attribute is changed. You could choose the field from a list.
Example
requester = task.getVariables().get("requester");
systemName= task.getVariables().get("systemName");
.......Incoming transitions
The Incoming transitions tab displays the previous steps where the flow comes from. When you create a process from a template or from scratch default incoming transitions are defined. It is allowed to customize the default setup, add new transitions, or delete transitions.
- From: the previous step, where the flow comes. Allows you to select where the workflow comes from.
- Incoming transition: brief name to identify the transition. That is the name of the action the form will show to the final user.
- To: current step.
- Action: allows creating a custom script to perform specific actions.
Example
Get the owners of an account and do something with each one.
accounts = serviceLocator.getAccountService().findAccountByJsonQuery("name eq \"" + executionContext.getVariable("account") + "\"");
if (!accounts.isEmpty() {
for (account:accounts) {
owners = serviceLocator.getAccountService().getAccountUsers(account);
// TO-DO
}
}Outgoing transitions
The Outcoming transition tab displays the next steps where the flow can go from the current step. When you create a process from a template or from scratch default outcoming transitions are defined. It is allowed to customize the default setup, add new transitions, or delete transitions.
- From: current step.
- Incoming transition: name of the transition.
- To: the next step, where the flow goes.
- Action: allows creating a custom script to perform specific actions.
When you create an outcoming transition, Soffid creates the proper incoming transition.
Example
Get the mail of the requester and send a notification.
requester = executionContext.getVariable("requester");
user = serviceLocator.getUserService().findUserByUserName(requester);
serviceLocator.getMailService().sendTextMail(
user.emailAddress,
"Resquest Rejected",
"XXXXXXXXXXXXX");* https://es.wikipedia.org/wiki/Expression_Language
Apply changes
Definition
This step is used to assign permission to a user to access the protected resource.
Steps Tabs
Task details
- Grant account access: check it (option selected Yes ) if you want to give grant account access to the protected resource.
The Incoming transitions tab displays the previous steps where the flow comes from. When you create a process from a template or from scratch default incoming transitions are defined. It is allowed to customize the default setup, add new transitions, or delete transitions.
- From: the previous step, where the flow comes. Allows you to select where the workflow comes from.
- Incoming transition: brief name to identify the transition. That is the name of the action the form will show to the final user.
- To: current step.
- Action: allows creating a custom script to perform specific actions.
Example
Get the mail of the requester and send a notification.
requester = executionContext.getVariable("requester");
user = serviceLocator.getUserService().findUserByUserName(requester);
serviceLocator.getMailService().sendTextMail(
user.emailAddress,
"Resquest Rejected",
"XXXXXXXXXXXXX");Outgoing transitions
The Outcoming transition tab displays the next steps where the flow can go from the current step. When you create a process from a template or from scratch default outcoming transitions are defined. It is allowed to customize the default setup, add new transitions, or delete transitions.
- From: current step.
- Incoming transition: name of the transition.
- To: the next step, where the flow goes.
- Action: allows creating a custom script to perform specific actions.
When you create an outcoming transition, Soffid creates the proper incoming transition.
Example
requester = executionContext.getVariable("requester");
user = serviceLocator.getUserService().findUserByUserName(requester);
.....End
Description
The end step finalizes the process. It is the last step of the workflow.
Steps Tabs
Task details
This process type does not have task details for the start step.
Incoming transitions
The Incoming transitions tab displays the previous steps where the flow comes from. When you create a process from a template or from scratch default incoming transitions are defined. It is allowed to customize the default setup, add new transitions, or delete transitions.
- From: the previous step, where the flow comes. Allows you to select where the workflow comes from.
- Incoming transition: brief name to identify the transition. That is the name of the action the form will show to the final user.
- To: current step.
- Action: allows creating a custom script to perform specific actions.
Example
Get the mail of the requester and send a notification.
requester = executionContext.getVariable("requester");
user = serviceLocator.getUserService().findUserByUserName(requester);
serviceLocator.getMailService().sendTextMail(
user.emailAddress,
"Resquest Rejected",
"XXXXXXXXXXXXX");Outgoing transitions
This step does not have outgoing transitions, it is because is the last step of the workflow.
Permissons request steps
Define the Permissons request steps
Start
Definition
That is the first step of the workflow. At that step, you could define the fields you want to show when the end users. In that case, the request will be launched automatically when the end users request to use a privileged account to connect to a protected resource.
Administrator users can define on XACML Policy Management page the rules to request the use of some privileged accounts.
Steps Tabs
Task details
This process type does not have task details for the start step.
Fields
In this tab, you could choose what fields the process form will show to the end users. You can choose these fields from all identity attributes, and from the attributes defined for the workflow on the Attributes Tab.
By default, only the fields defined on the attributes tab will be shown. You can choose the fields you want to show when the end-users, add new fields, and delete the fields that do not need to generate a task. Also, you can sort the fields, you only need to drag and drop on the Order column.
For each field, you may indicate if it is a readOnly field, and you may add a Validation script and Visibility script. The validation script allows you to define rules, the field has to comply with these rules. The visibility script allows you to define the rules to show or hide a field.
Validation examples
if (value == null || value.equals(""))
throw new Exception("The userName is mandatory");
else
return true;It is also allowed in the following manner:
if (value == null || value.equals(""))
return ("The userName is mandatory");
else
return true;Validate that a certain field is not repeated:
userList = serviceLocator.getUserService().findUserByJsonQuery("attributes.field_XX eq \"" + value +"\"");
if (!userList.isEmpty() {
return "the field field_XX is associated to another user";
}
return true;Visibility example
user = serviceLocator.getUserService().getCurrentUser();
if ("admin".equals(user.userName))
return false;Triggers
On the trigger tab, you could define different triggers using custom scripts. Those triggers will be launched with the events you will define.
- onLoad: you can use that trigger to perform some actions before the execution of the step.
- on PrepareTransition: you can use that trigger to perform some actions after the execution of the step and before starting a transition to another step.
- onChange: you can use that trigger to perform some actions when the value of the attribute is changed. You could choose the field from a list.
Example
account = (inputFields.get("account")!=null) ? inputFields.get("account").value : null;
systemName = (inputFields.get("systemName")!=null) ? inputFields.get("systemName").value : null;
...........Incoming transitions
This process type does not have task details for the start step.
Outgoing transitions
The Outcoming transition tab displays the next steps where the flow can go from the current step. When you create a process from a template or from scratch default outcoming transitions are defined. It is allowed to customize the default setup, add new transitions, or delete transitions.
- From: current step.
- Incoming transition: name of the transition.
- To: the next step, where the flow goes.
- Action: allows creating a custom script to perform specific actions.
When you create an outcoming transition, Soffid creates the proper incoming transition.
Example
accounts = serviceLocator.getAccountService().findAccountByJsonQuery("name eq \"" + executionContext.getVariable("account") + "\"");
if (!accounts.isEmpty() {
for (account:accounts) {
owners = serviceLocator.getAccountService().getAccountUsers(account);
// TO-DO
}
}Grant approval
Description
This step is used to define the custom form that will be used by the users who have to approve or reject the generated task. To configure that step will be necessary to determine the fields that will be shown to the users, and the actions that these users could perform.
Steps Tabs
Task details
- Task name: identified name for the task that will be created.
- Permission request screen type: allows selecting the type of screen for permission request.
- List of permissions
- Display approval pending: that is the default option. When you select that option, all the approval pending will be shown to the end user.
- Display all
- Display approved
- Display denied
- Actor(s) expression: write an expression to identify the actor depending on the requested role. One can use EL expressions based on role and application attributes. For instance: SOFFID_MANAGER/${primaryGroup}
- Assignment script: alternatively, write a Beanshell script to return the actor depending on the process variables. For instance: return primaryGroup.attributes{"owner"};
- Approve from email: checked it to allow you to send a mail to approve or deny the task. If you check that option (selected value Yes), you need to fill in the transitions to approve and deny the task, those have to match with the outgoing transitions defined for those step.
- Approval transition: has to match with an outgoing transition.
- Denial transition: has to match with an outgoing transition.
To send mail, you will need to configure mail server parameters. You can visit the Soffid parameters page for more information.
Example Assignment script
If a user belongs to the primary group "World", the manager of that group will be responsible to approve or deny the request. If the primary group is another, the persona who will be responsible to approve or deny will be the manager of the parent group of that group. If there is not primary group, the request will be sent to the admin user.
primaryGroup = executionContext.getVariable("primaryGroup");
if (primaryGroup != null && !primaryGroup.equals("")) {
if (primaryGroup.equals("world")) {
manager = serviceLocator.getGroupService().findGroupByGroupName(primaryGroup).getAttributes().get("manager");
return manager;
} else {
group = serviceLocator.getGroupService().findGroupByGroupName(primaryGroup);
if ( group.parentGroup != null && !group.parentGroup.equals("")) {
manager = serviceLocator.getGroupService().findGroupByGroupName(group.parentGroup).getAttributes().get("manager");
return manager;
}
}
} else {
return "admin";
}Fields
In this tab, you could choose what fields the process form will show to the end users. You can choose these fields from all identity attributes, and from the attributes defined for the workflow on the Attributes Tab. By default, all the identity attributes will be shown. You can choose the fields you want to show, add new fields, and delete the fields that do not need to generate a task. Also, you can sort the fields, you only need to drag and drop on the Order column.
For each field, you may indicate if it is a readOnly field, and you may add Validation script and Visibility script. The validation script allows you to define rules, the field has to comply with these rules. The visibility script allows you to define the rules to show or hide a field.
Example
if (value == null || value.equals(""))
return ("The user is mandatory");
else
return true;Incoming transitions
The Incoming transitions tab displays the previous steps where the flow comes from. When you create a process from a template or from scratch default incoming transitions are defined. It is allowed to customize the default setup, add new transitions, or delete transitions.
- From: the previous step, where the flow comes. Allows you to select where the workflow comes from.
- Incoming transition: brief name to identify the transition. That is the name of the action the form will show to the final user.
- To: current step.
- Action: allows creating a custom script to perform specific actions.
Example
Validation of mandatory fields:
a = executionContext.getVariable("firstName");
if (a==null || "".equals(a.trim()))
throw new Exception("First name is mandatory");
a = executionContext.getVariable("lastName");
if (a==null || "".equals(a.trim()))
throw new Exception("Last name is mandatory");
a = executionContext.getVariable("primaryGroup");
if (a==null || "".equals(a.trim()))
throw new Exception("Primery group is mandatory");
return true;To request the process is only allowed for Internal users:
userSelector = executionContext.getVariable("userSelector");
user = serviceLocator.getUserService().findUserByUserName(userSelector);
if (user.userType.equals("I") || user.userType.equals("S")) {
throw new Exception ("To request the process is only allowed for Internal users");
}Outgoing transitions
The Outcoming transition tab displays the next steps where the flow can go from the current step. When you create a process from a template or from scratch default outcoming transitions are defined. It is allowed to customize the default setup, add new transitions, or delete transitions.
- From: current step.
- Incoming transition: name of the transition.
- To: the next step, where the flow goes.
- Action: allows creating a custom script to perform specific actions.
When you create an outcoming transition, Soffid creates the proper incoming transition.
Example
Scroll through the list of values to perform some operations.
grants = executionContext.getVariable("grants");
for (roleRequestInfo:grants) {
// TO-DO
}Apply changes
Definition
This step is used to assign permission to a user to access to the protected resource.
Steps Tabs
Task details
- Grant account access: check it (option selected Yes ) if you want to give grant account access to the protected resource.
The Incoming transitions tab displays the previous steps where the flow comes from. When you create a process from a template or from scratch default incoming transitions are defined. It is allowed to customize the default setup, add new transitions, or delete transitions.
- From: the previous step, where the flow comes. Allows you to select where the workflow comes from.
- Incoming transition: brief name to identify the transition. That is the name of the action the form will show to the final user.
- To: current step.
- Action: allows creating a custom script to perform specific actions.
Example
Get the mail of the requester and send a notification.
requester = executionContext.getVariable("requester");
user = serviceLocator.getUserService().findUserByUserName(requester);
serviceLocator.getMailService().sendTextMail(
user.emailAddress,
"Resquest Rejected",
"XXXXXXXXXXXXX");Outgoing transitions
The Outcoming transition tab displays the next steps where the flow can go from the current step. When you create a process from a template or from scratch default outcoming transitions are defined. It is allowed to customize the default setup, add new transitions, or delete transitions.
- From: current step.
- Incoming transition: name of the transition.
- To: the next step, where the flow goes.
- Action: allows creating a custom script to perform specific actions.
When you create an outcoming transition, Soffid creates the proper incoming transition.
Example
requester = executionContext.getVariable("requester");
user = serviceLocator.getUserService().findUserByUserName(requester);
.....End
Description
The end step finalizes the process. It is the last step of the workflow.
Steps Tabs
Task details
This process type does not have task details for the start step.
Incoming transitions
The Incoming transitions tab displays the previous steps where the flow comes from. When you create a process from a template or from scratch default incoming transitions are defined. It is allowed to customize the default setup, add new transitions, or delete transitions.
- From: the previous step, where the flow comes. Allows you to select where the workflow comes from.
- Incoming transition: brief name to identify the transition. That is the name of the action the form will show to the final user.
- To: current step.
- Action: allows creating a custom script to perform specific actions.
Example
Get the mail of the requester and send a notification.
requester = executionContext.getVariable("requester");
user = serviceLocator.getUserService().findUserByUserName(requester);
serviceLocator.getMailService().sendTextMail(
user.emailAddress,
"Resquest Rejected",
"XXXXXXXXXXXXX");Outgoing transitions
This step does not have outgoing transitions. It is the last step of the workflow.
Delegation roles steps
Define the Delegation roles steps
Start
Definition
That is the first step of the workflow. At that step, you could define the fields you want to show when the end users. In that case, the request will be launched automatically when the end users request to use a privileged account to connect to a protected resource.
Administrator users can define on XACML Policy Management page the rules to request the use of some privileged accounts.
Steps Tabs
Task details
This process type does not have task details for the start step.
Fields
In this tab, you could choose what fields the process form will show to the end users. You can choose these fields from all identity attributes, and from the attributes defined for the workflow on the Attributes Tab.
By default, only the Grant field defined on the attributes tab will be shown. You can choose the fields you want to show when the end-users, add new fields, and delete the fields that do not need to generate a task. Also, you can sort the fields, you only need to drag and drop on the Order column.
For each field, you may indicate if it is a readOnly field, and you may add a Validation script and Visibility script. The validation script allows you to define rules, the field has to comply with these rules. The visibility script allows you to define the rules to show or hide a field.
Validation examples
if (value == null || value.equals(""))
throw new Exception("The userName is mandatory");
else
return true;It is also allowed in the following manner:
if (value == null || value.equals(""))
return ("The userName is mandatory");
else
return true;Validate that a certain field is not repeated:
userList = serviceLocator.getUserService().findUserByJsonQuery("attributes.field_XX eq \"" + value +"\"");
if (!userList.isEmpty() {
return "the field field_XX is associated to another user";
}
return true;Visibility example
Triggers
On the trigger tab, you could define different triggers using custom scripts. Those triggers will be launched with the events you will define.
- onLoad: you can use that trigger to perform some actions before the execution of the step.
- on PrepareTransition: you can use that trigger to perform some actions after the execution of the step and before starting a transition to another step.
- onChange: you can use that trigger to perform some actions when the value of the attribute is changed. You could choose the field from a list.
Example
account = (inputFields.get("account")!=null) ? inputFields.get("account").value : null;
systemName = (inputFields.get("systemName")!=null) ? inputFields.get("systemName").value : null;
...........Incoming transitions
This process type does not have task details for the start step.
Outgoing transitions
The Outcoming transition tab displays the next steps where the flow can go from the current step. When you create a process from a template or from scratch default outcoming transitions are defined. It is allowed to customize the default setup, add new transitions, or delete transitions.
- From: current step.
- Incoming transition: name of the transition.
- To: the next step, where the flow goes.
- Action: allows creating a custom script to perform specific actions.
When you create an outcoming transition, Soffid creates the proper incoming transition.
Example
accounts = serviceLocator.getAccountService().findAccountByJsonQuery("name eq \"" + executionContext.getVariable("account") + "\"");
if (!accounts.isEmpty() {
for (account:accounts) {
owners = serviceLocator.getAccountService().getAccountUsers(account);
// TO-DO
}
}Apply changes
Definition
This step is used to assign permission to a user to access the protected resource.
Steps Tabs
Task details
- Apply entitlements: check it (select the Yes option) to make changes to permissions on the Soffid repository
The Incoming transitions tab displays the previous steps where the flow comes from. When you create a process from a template or from scratch default incoming transitions are defined. It is allowed to customize the default setup, add new transitions, or delete transitions.
- From: the previous step, where the flow comes. Allows you to select where the workflow comes from.
- Incoming transition: brief name to identify the transition. That is the name of the action the form will show to the final user.
- To: current step.
- Action: allows creating a custom script to perform specific actions.
Example
Get the mail of the requester and send a notification.
requester = executionContext.getVariable("requester");
user = serviceLocator.getUserService().findUserByUserName(requester);
serviceLocator.getMailService().sendTextMail(
user.emailAddress,
"Resquest Rejected",
"XXXXXXXXXXXXX");Outgoing transitions
The Outcoming transition tab displays the next steps where the flow can go from the current step. When you create a process from a template or from scratch default outcoming transitions are defined. It is allowed to customize the default setup, add new transitions, or delete transitions.
- From: current step.
- Incoming transition: name of the transition.
- To: the next step, where the flow goes.
- Action: allows creating a custom script to perform specific actions.
When you create an outcoming transition, Soffid creates the proper incoming transition.
Example
requester = executionContext.getVariable("requester");
user = serviceLocator.getUserService().findUserByUserName(requester);
.....End
Description
The end step finalizes the process. It is the last step of the workflow.
Steps Tabs
Task details
This process type does not have task details for the start step.
Incoming transitions
The Incoming transitions tab displays the previous steps where the flow comes from. When you create a process from a template or from scratch default incoming transitions are defined. It is allowed to customize the default setup, add new transitions, or delete transitions.
- From: the previous step, where the flow comes. Allows you to select where the workflow comes from.
- Incoming transition: brief name to identify the transition. That is the name of the action the form will show to the final user.
- To: current step.
- Action: allows creating a custom script to perform specific actions.
Example
Get the mail of the requester and send a notification.
requester = executionContext.getVariable("requester");
user = serviceLocator.getUserService().findUserByUserName(requester);
serviceLocator.getMailService().sendTextMail(
user.emailAddress,
"Resquest Rejected",
"XXXXXXXXXXXXX");Outgoing transitions
This step does not have outgoing transitions. It is the last step of the workflow.
Examples
Self service portal examples
Self service portal examples
Introduction
Here we will try to explain some user cases about different types of process to know how that processes work. That processes will be a basic user cases, but you will be able to define process as much complex as your business needs.
For more information about the process definition you can visit the BPM Editor chapter.
The users configured like initiators in a User management process or in a Permission management process will be able to launch those processes. Those operations will be able to be performed from My Requests option.
User management
Update my data
Example
Process used to request to update my user data.
User request
Process uses to request to add, delete, modify or disable any user. That kind of process will be able to launch for users with the proper permissions that will be expecified on the process definition.
Example
Request to update the primary group of a user, and the admin user rejects that request.
Example
Request to update the primary group of a user, and the admin user approves that request.
Example
Request to create a new user. That workflow uses the Detect duplicated user funtionality.
Process management
Permission request
Example
Request to assign permissions to a user.
Example
Users in charge of assigning or denying permissions, could do that from the mail if Soffid is configured in that way. Users will receive an email similar to the following one:
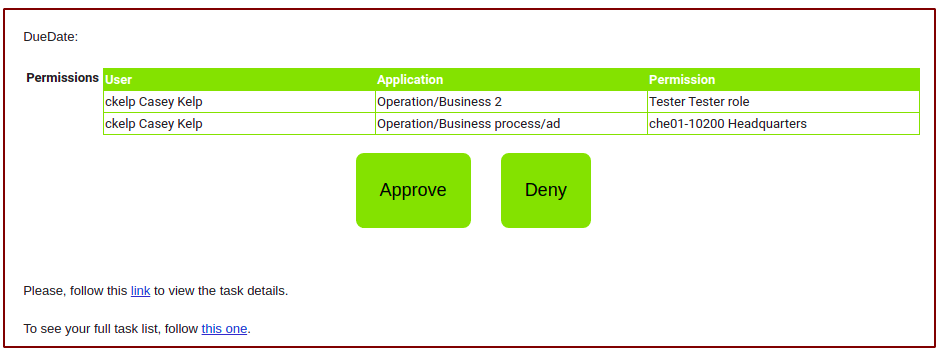
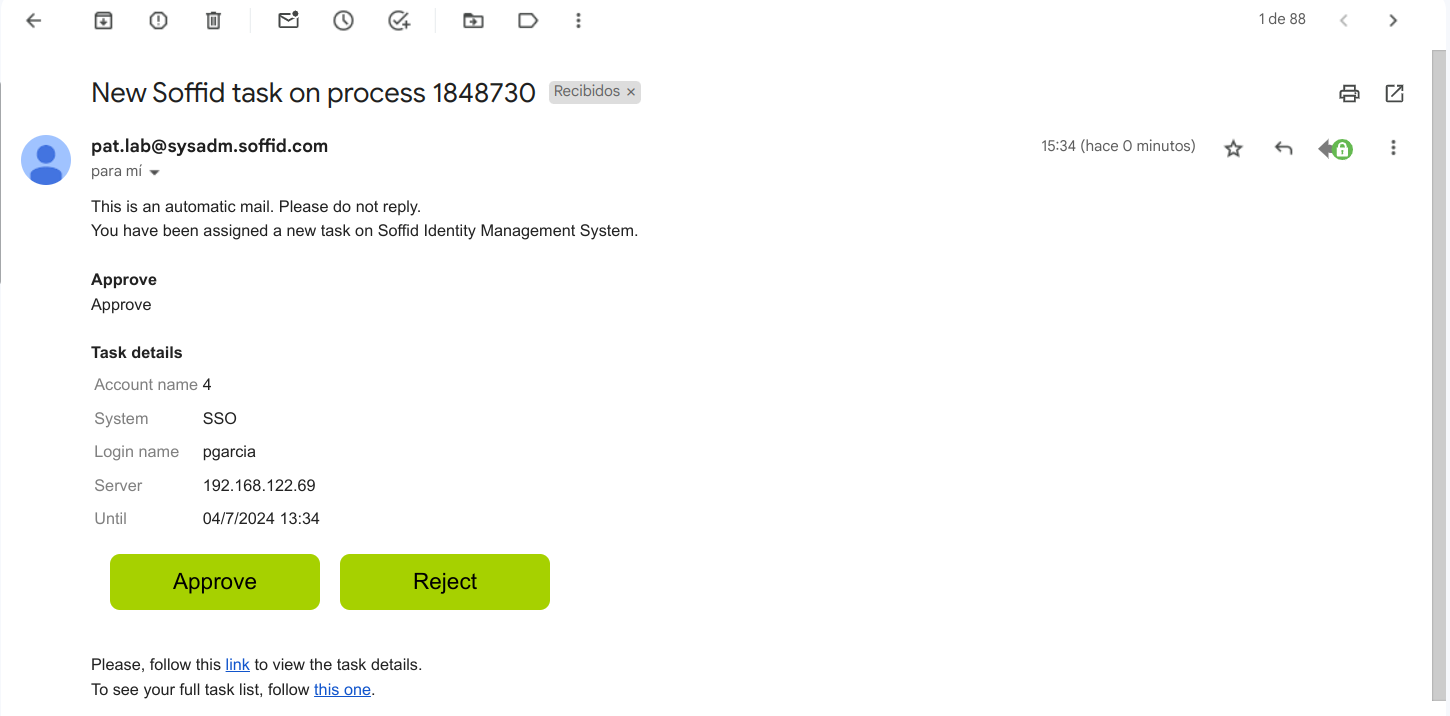
Sample Scripts BPM
Start Step
Validations
a = executionContext.getVariable("firstName");
if (a==null || "".equals(a.trim()))
throw new Exception("First name is mandatory");
a = executionContext.getVariable("lastName");
if (a==null || "".equals(a.trim()))
throw new Exception("Last name is mandatory");
..................
a = executionContext.getVariable("userName");
lu = serviceLocator.getUserService().findUserByJsonQuery("userName eq \""+a+"\" ");
if (!lu.isEmpty())
throw new Exception("The user name is in use, please choose another one");
e = executionContext.getVariable("emailAddress");
lu = serviceLocator.getUserService().findUserByJsonQuery("emailAddress eq \""+e+"\" ");
if (!lu.isEmpty())
throw new Exception("The email is in use, please choose another one");
.................
return true;Trigger onChange
Calculate the email when firstName or lastName changes and depending on the userType:
firstName = (inputFields.get("firstName")!=null) ? inputFields.get("firstName").value : null;
lastName = (inputFields.get("lastName")!=null) ? inputFields.get("lastName").value : null;
userType = (inputFields.get("userType")!=null) ? inputFields.get("userType").value : null;
if (firstName!=null && !firstName.trim().isEmpty() &&
lastName!=null && !lastName.trim().isEmpty() &&
userType!=null && !userType.trim().isEmpty()) {
emailAddress = firstName + "." + lastName;
if ("E".equals(userType)) {
emailAddress = emailAddress + ".ext@soffid.com";
} else {
emailAddress = emailAddress + "@soffid.com";
}
inputFields.get("emailAddress").value = emailAddress;
}Calculate the user name depending on the first and last name
firstName = (inputFields.get("firstName")!=null) ? inputFields.get("firstName").value : null;
lastName = (inputFields.get("lastName")!=null) ? inputFields.get("lastName").value : null;
middleName = (inputFields.get("middleName")!=null) ? inputFields.get("middleName").value : null;
userType = (inputFields.get("userType")!=null) ? inputFields.get("userType").value : null;
primaryGroup = (inputFields.get("primaryGroup")!=null) ? inputFields.get("primaryGroup").value : null;
if (firstName!=null && !firstName.trim().isEmpty() &&
lastName!=null && !lastName.trim().isEmpty()) {
// Erase blanck spaces
while (firstName.contains(" "))
firstName = firstName.replace(" "," ");
fn = firstName.trim().split(" ")[0];
fn = fn.substring(0,1).toUpperCase() + fn.substring(1).toLowerCase();
// Erase blanck spaces
while (lastName.contains(" "))
lastName = lastName.replace(" "," ");
lna = lastName.trim().split(" ");
ln = "";
for (w : lna) {
ln = ln + w.substring(0,1).toUpperCase() + w.substring(1).toLowerCase();
}
un = fn+"."+ln;
// Check, if user exist we will add the first letter of the second name
u = serviceLocator.getUserService().findUserByUserName(un);
if (u!=null && middleName!=null && !middleName.trim().isEmpty()) {
un = un+middleName.substring(0,1).toUpperCase();
}
// Max length 20 characters
if (un.length()>20)
un = un.substring(0,20);
inputFields.get("userName").value = un;
}
Outgoing transitions
Set values to variables that will be available in the next step.
un = executionContext.getVariable("userName");
executionContext.setVariable("userSelector",un);
executionContext.setVariable("action","M");Approve
Outgoing transitions
Remove a previous roles
un = executionContext.getVariable("userName");
t = executionContext.getVariable("title");
lra = serviceLocator.getApplicationService().findUserRolesByUserName(un);
for (ra : lra) {
if (ra.roleName.equals(t)) {
serviceLocator.getApplicationService().delete(ra);
break;
}
}Save new role
p = executionContext.getVariable("newTitle");
if (p==null || "".equals(p.trim()))
throw new Exception("El nuevo puesto de trabajo es obligatorio");
executionContext.setVariable("title", p)End Step
Incoming transition
Add a role to the user in case the role exists and it is the same that the user title.
SYS = "soffid";
un = executionContext.getVariable("userName");
if (un==null)
return true;
t = executionContext.getVariable("title");
if (t==null)
return true;
q = "name eq \""+t+"\" and system eq \""+SYS+"\"";
lr = serviceLocator.getApplicationService().findRoleByJsonQuery(q);
if (lr==null || lr.isEmpty())
return true;
r = lr.get(0);
app = r.informationSystemName;
ra = new com.soffid.iam.api.RoleAccount();
ra.setRoleName(t);
ra.setSystem(SYS);
ra.setInformationSystemName(app);
ra.setUserCode(un);
ra.setDomainValue(new com.soffid.iam.api.DomainValue());
serviceLocator.getApplicationService().create(ra);
return true;