Administration (scripting)
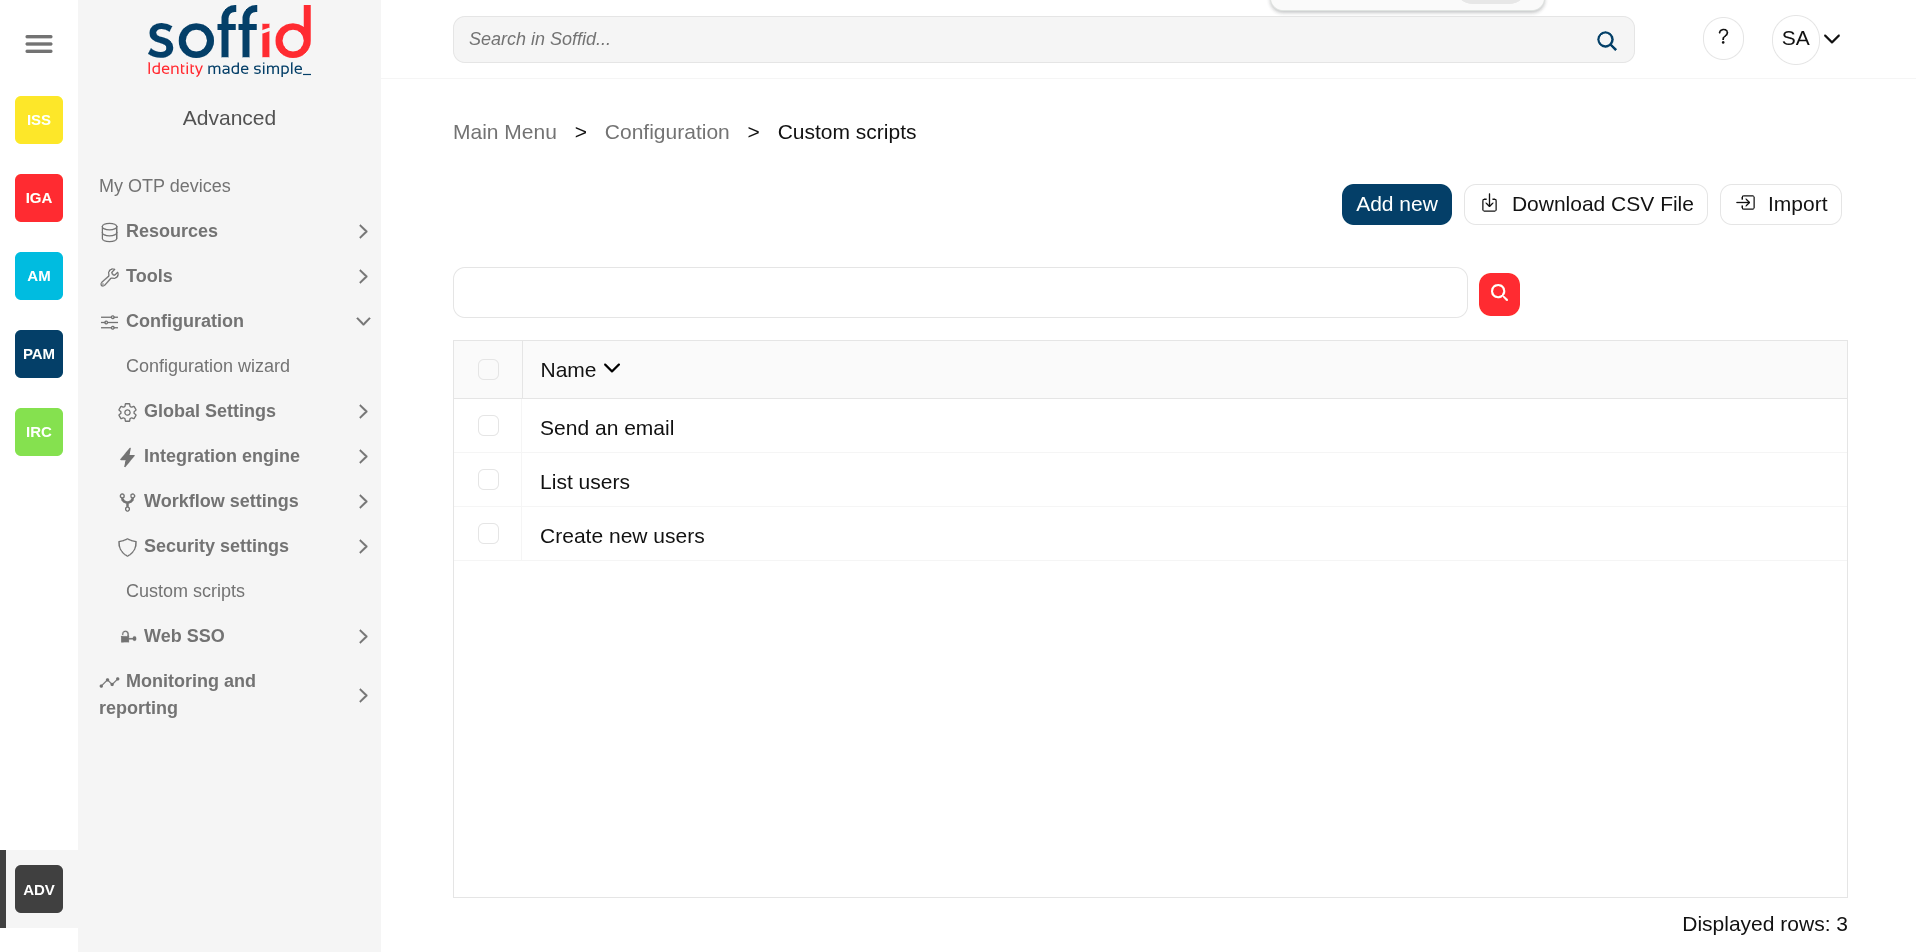
Custom scripts
- Introduction to Administration addon
- How to install the Administration addon in Soffid
- Custom scripts page
- Custom scripts samples
- Export settings and objects page
- Import settings and objects page
Introduction to Administration addon
Introduction
The administration addon includes two very useful features for Soffid administrators.
On the one hand, we have the ability to generate custom scripts and launch them using different mechanisms.
On the other hand, the export and import of Soffid data is enabled
What is custom scripts?
The Administration addon offers the possibility to generate and execute custom scripts to perform any function or process available in the Soffid API.
Soffid 4 has introduced AI that allows administrators to generate scripts much more easily, making this process accessible to all types of users.
Scripts can be run manually, scheduled, or enabled to run after certain user events.
The use of custom scripts depends on the requirements, the most important thing is that it offers the administrator maximum flexibility to execute whatever is needed.
Let's look at some examples of custom scripts.
- List all active accounts on a system with all their roles.
- Planning to deactivate users upon detecting a period of inactivity.
- Send an email to administrators when a specific role is granted or revoked.
- Perform additional actions when a user is deactivated.
- Apply a mass change to user attributes.
- Send a weekly email with the users who have roles with segregation of duties.
What is export import?
The Administration addon includes the ability to export most Soffid objects and also import them.
This utility allows you to manually backup part of Soffid or all of its data, and the import function allows you to select some or all of the exported objects
These backups can be useful for different purposes:
- To restore the same environment
- To populate a new environment
- Or to migrate configurations between environments
How to install the Administration addon in Soffid
Installation
Introduction
To use an addon in Soffid, you must download and install it in the Console. There are two ways to do this.
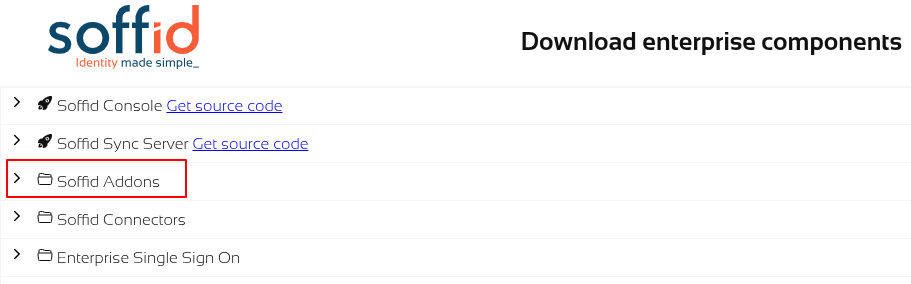
1. The first option is to use the Soffid 4 marketplace. You can download and upload it directly from the Licence and plugin page.
2. The second option is to download the file from the Soffid download page and then upload it to the Console.
Soffid 4 marketplace
Soffid 4 allows you to install and update plugins through the new Addons marketplace feature.
To access the marketplace, you must have a valid token to use Soffid and have configured the Console via https. Please check the License and plugin page.
1. Please log in to IAM Console.
You need to be an administrator user of the Soffid console or a user with permission to upload addons.
It is recommended to upload the addons to the master, this is the way to maintain updated all, master and tenants if there are.
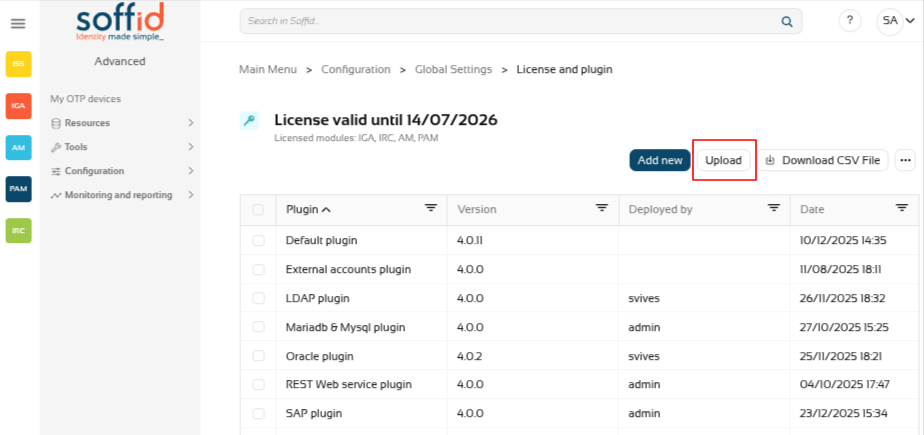
2. In the Soffid console, please go to the License and plugin page.
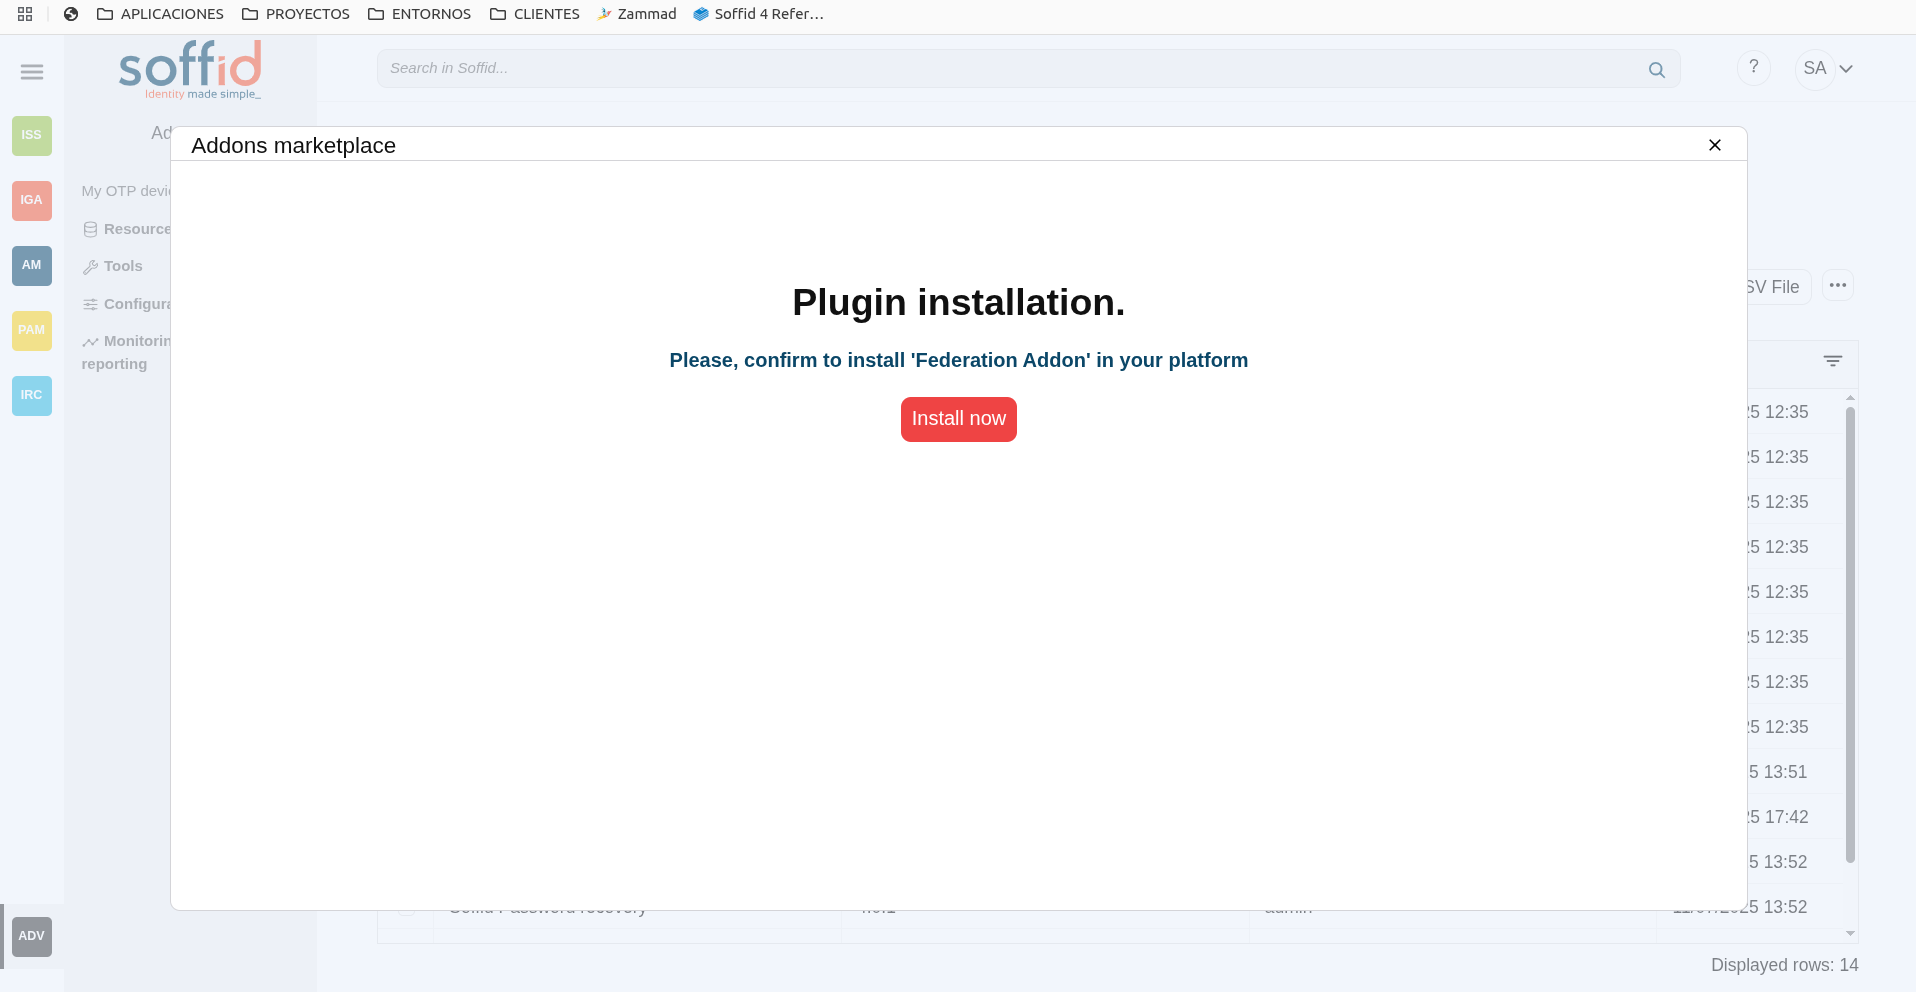
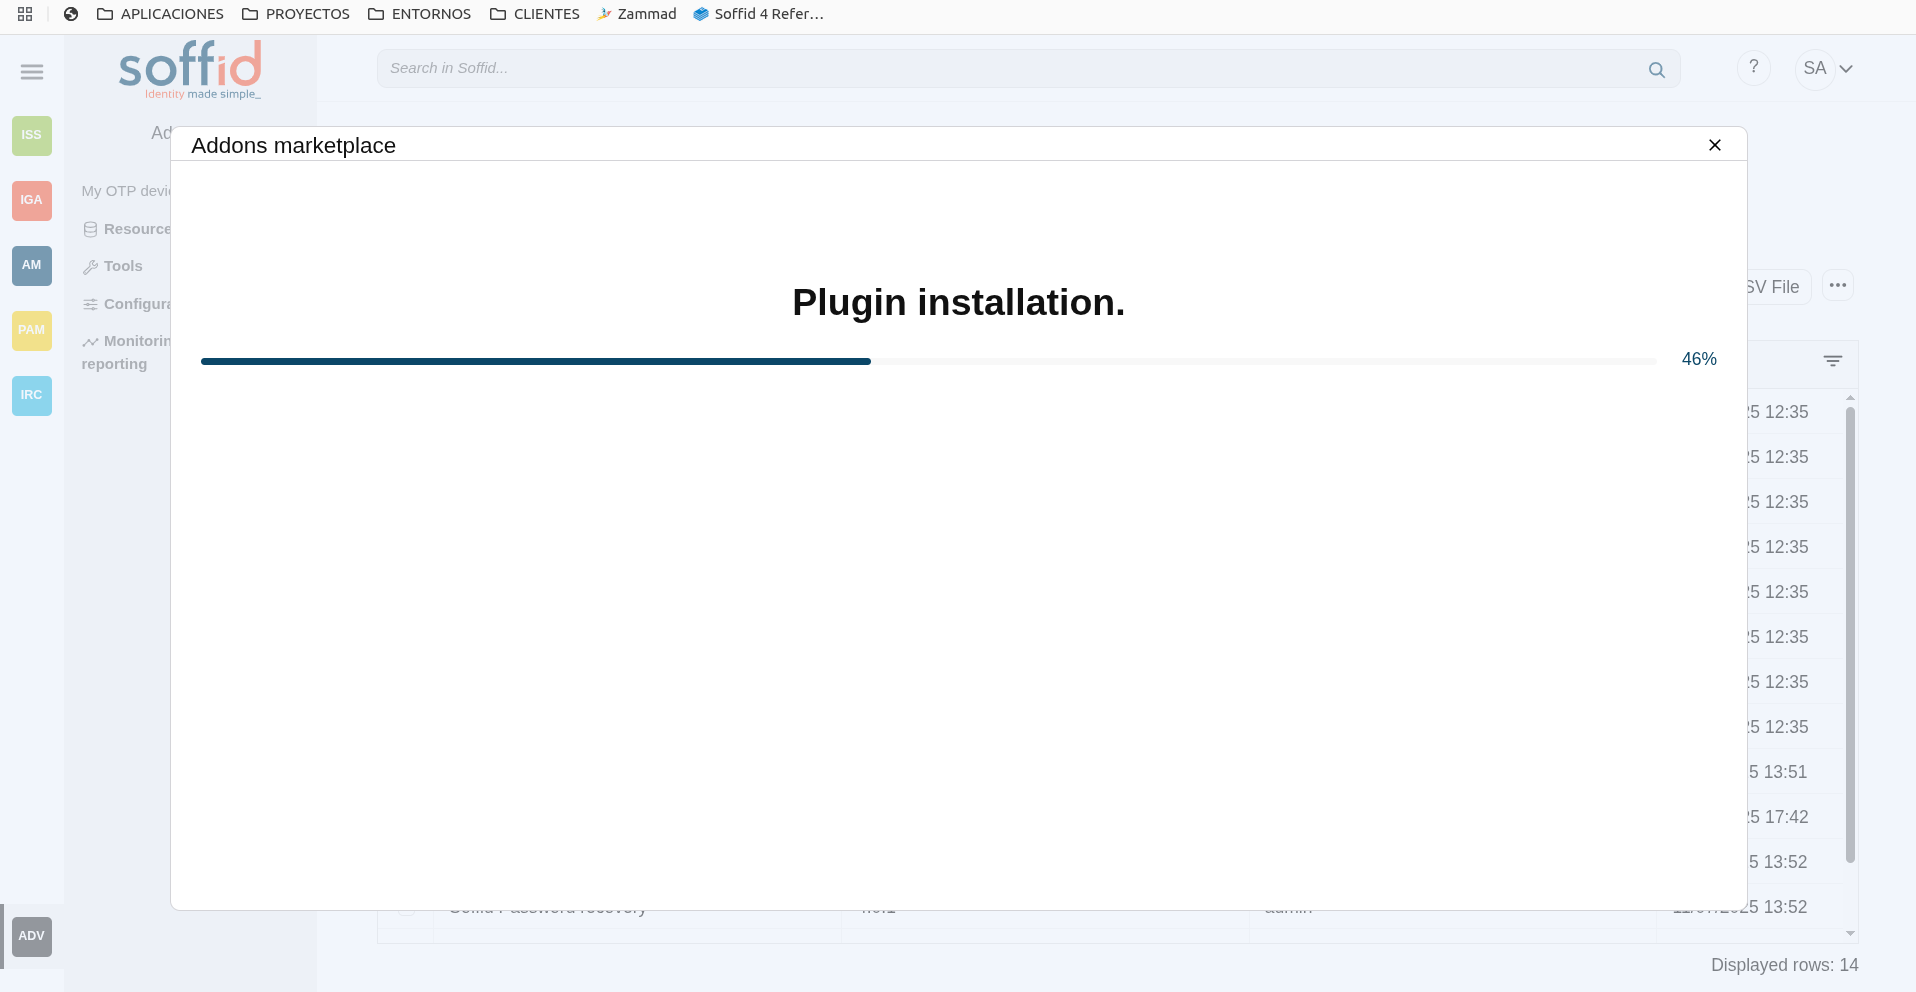
3. Then, click the add button "Add new" button, open the "Soffid Addons" secction and select the "Instlla addon" option, Soffild will upload the addon file.
Image

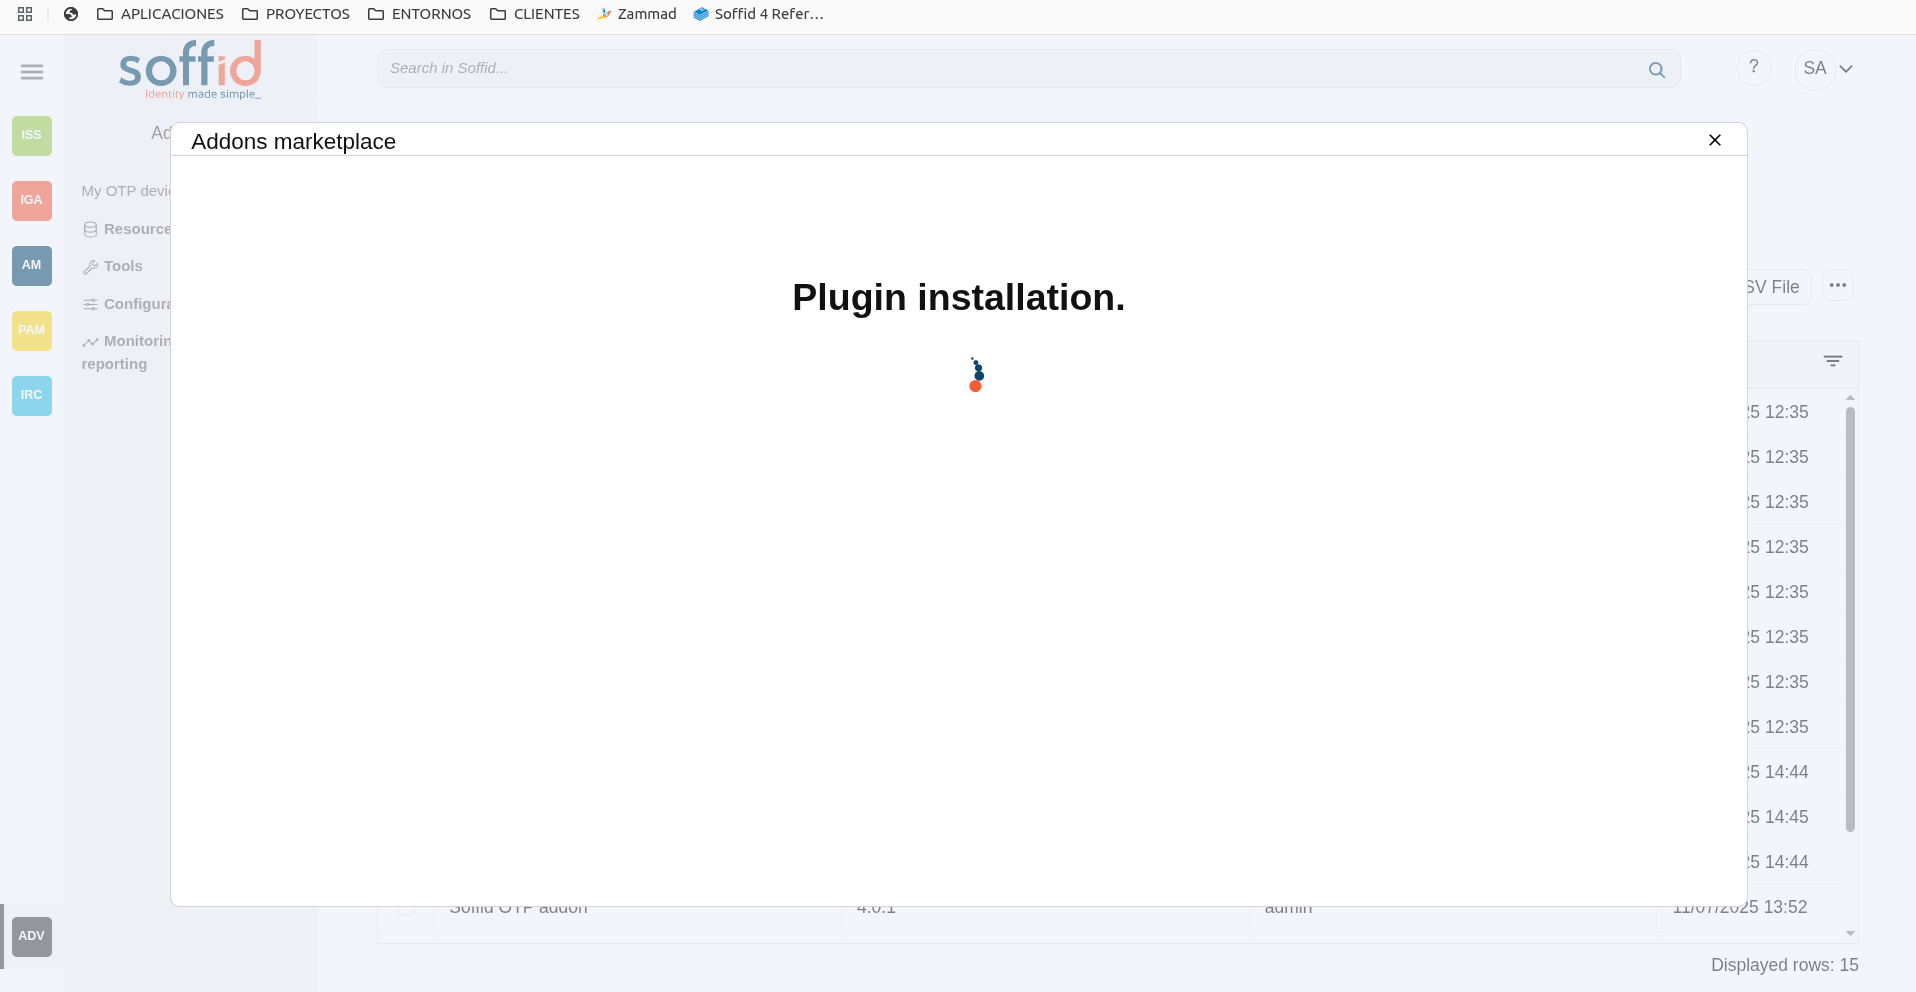
4. Finally, when the addon is installed, the Consola has to be restarted, a popup will be displayed to perform this action, you can choose to do it now or later.
Image
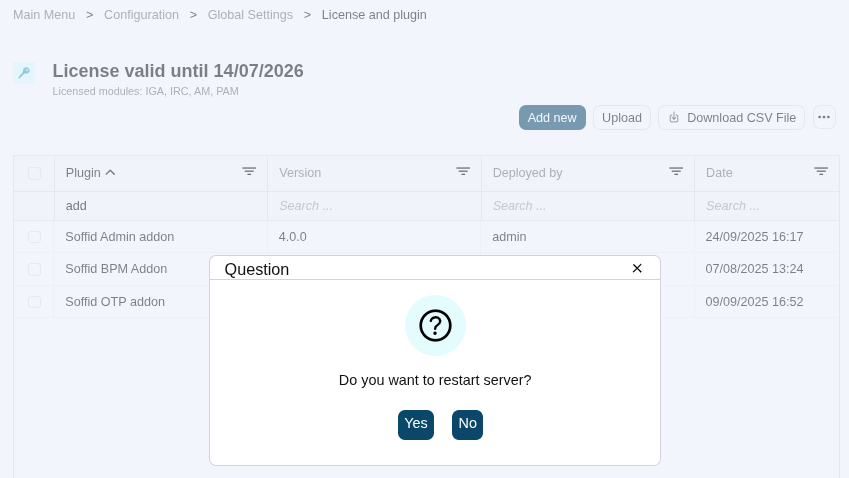
5. Once the Soffid console has restarted, you can check if the plugin was correctly uploaded on the "License and plugins" page.
6. Now, you can configure the addon.
Download an upload
1. You could download the addon at the following link http://www.soffid.com/download/enterprise/ if you have a Soffid user with authorization, or in the following http://download.soffid.com/download/ by registering.
The addons are in the Addon seccion.
Image
2. Once the addon is downloaded, please log in to IAM Console.
You need to be an administrator user of the Soffid console or a user with permission to upload addons.
It is recommended to upload the addons to the master, this is the way to maintain updated all, master and tenants if there are.
3. In the Soffid console, please go to the License and plugin page.
Soffid 3:
Soffid 4:
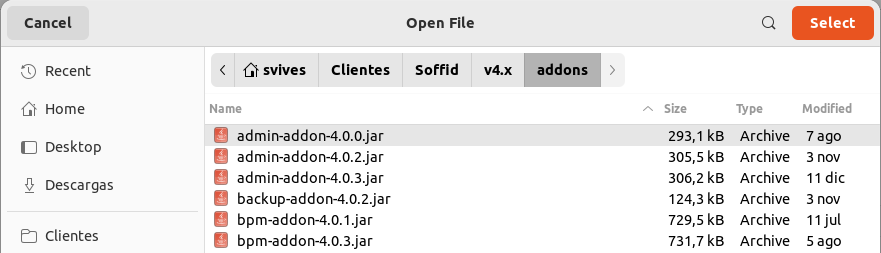
4. Then, click the add button "Upload" and pick the file and click the "Select" button and Soffild will upload the addon file.
Image
5. Finally, when the addon is installed, the Consola has to be restarted, a popup will be displayed to perform this action, you can choose to do it now or later.
Image
6. Once the Soffid console has restarted, you can check if the plugin was correctly uploaded on the "License and plugins" page.
7. Now, you can configure the addon.
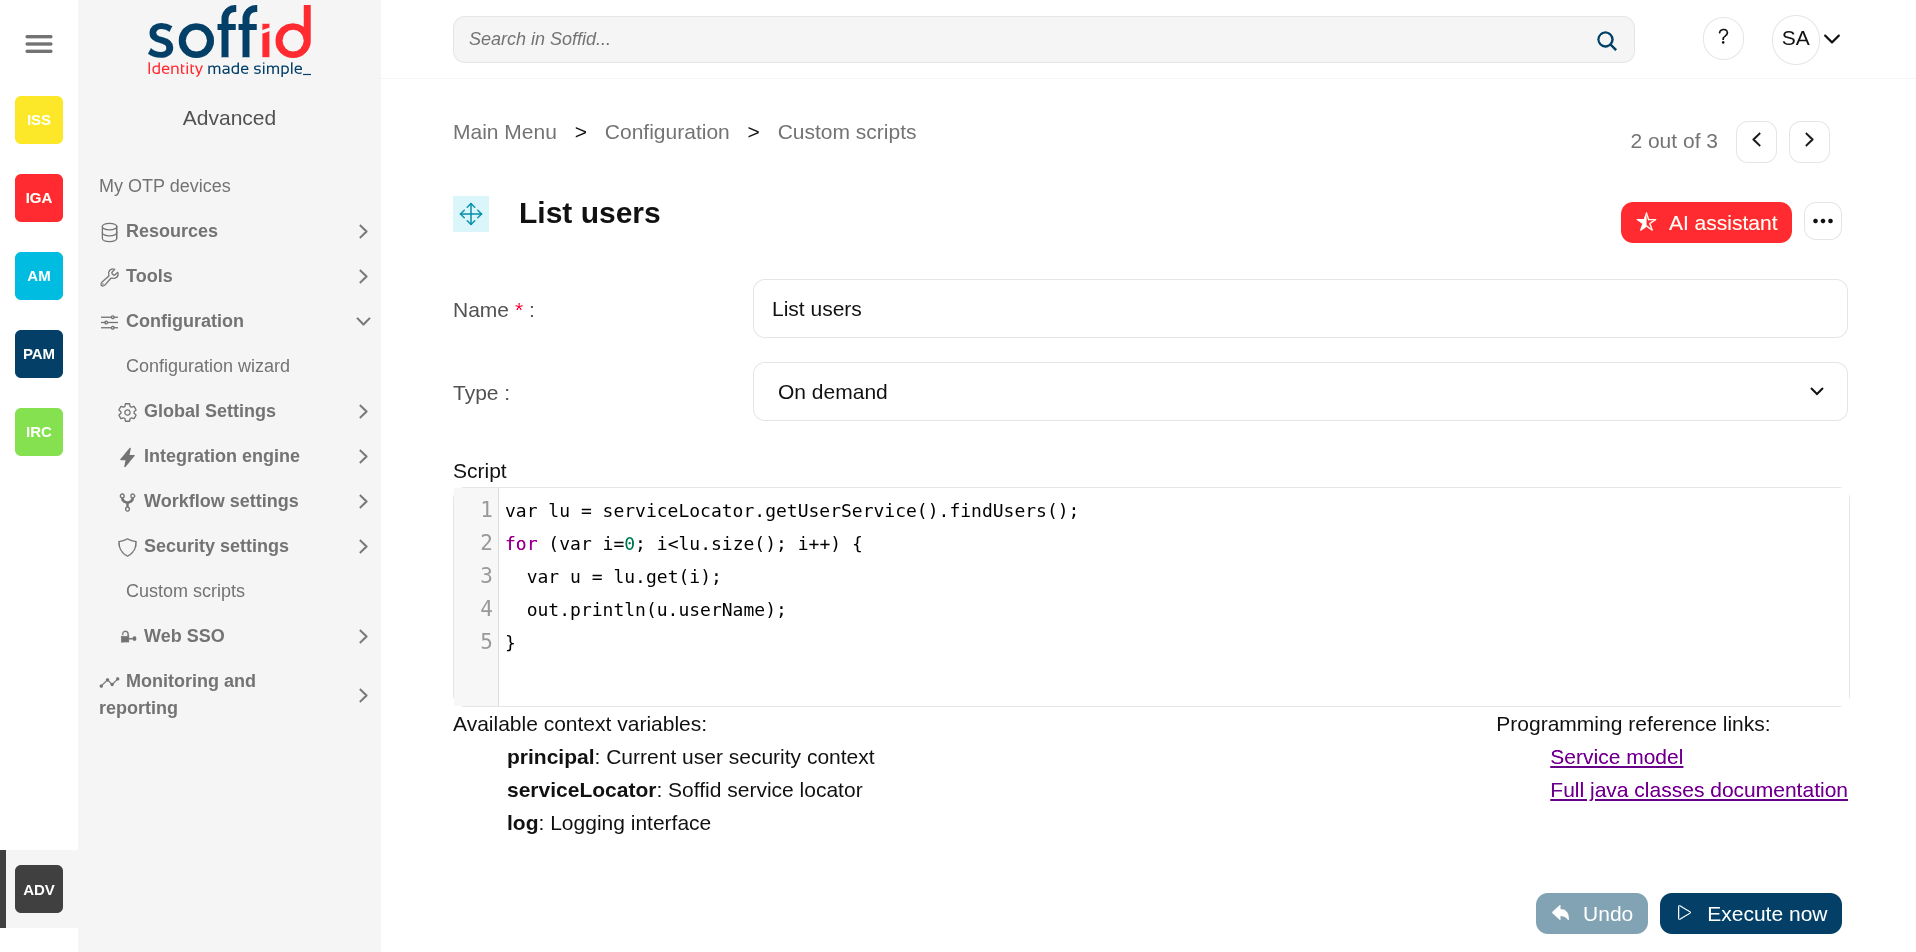
Custom scripts page
Description
The Custom Scrips page provides the capacity to launch custom scripts to perform any functionality or process that the Soffid API has available.
Remember that you can consult the Soffid API at the following linkS: Soffid 4 public API and Data & Service model.
2026-07-08 New feature: geolocation service available by default
Screen overview
Related objects
- Console log : for more details in case an error has been returned if the script type is "On demand".
- Syncserver monitoring : for more details in case an error has been returned if the script type is "Shceduled.
- Scheduled tasks : to manage and execute custom script when the type is "Scheduled".
- Users :
- After a user change, the "On user change" is executed.
- After a grant permission, the "On grant permission" is executed.
- After a revoke permission, the "On revoke permission" is executed.
Standard attributes
- Name : name of the custom script.
- Type : type of the custom sccript.
- Scheduled : the script is executed in a Sync server and can be scheduled as a task to manage it from the Scheduled tasks page.
- On demand : the script is executed in the Console.
- On user change : the script is executed after any user change (except for granting and revoking roles).
- On grant permission : the script is executed after a grant permission.
- On revoke permission : the script is executed after a revoke permission.
Actions
Table actions
| Add new |
Allows you to add a new custom script. To add a new custom script it will be mandatory to fill in the required fields. |
| Delete script |
Allows you to remove one or more custom scripts by selecting one or more records and next clicking the button. To perform that action, Soffid will ask you for confirmation, you could confirm or cancel the operation. |
| Download CSV file | Allows you to download a csv file with the data included in the table. |
Detail action
| AI assistant | Ask our AI for help to generate scripts more quickly and efficiently. |
| Delete script |
Allows you to remove the custom script. To perform that action, Soffid will ask you for confirmation, you could confirm or cancel the operation. |
| Undo | Allows you to quit without applying any changes. |
| Execute now | Run the script. If it is of the ‘On demand’ type, it runs immediately in the Console. If it is of the ‘Scheduled’ type, it must be run from the ‘Scheduled tasks’ screen. |
Others
Soffid APIs
Below you could find a list of helpful links related to the building of custom scripts.
Pubic API for of the classes of Soffid: https://download.soffid.com/doc/console/latest/iam-common/apidocs/allclasses.html
API for the internal classes of Soffid: https://download.soffid.com/doc/console/latest/uml/
Custom utility classes: https://bookstack.soffid.com/books/soffid-3-reference-guide/page/utility-classes
Script examples
Below you will find examples of scripts that will help you understand programming and the possibilities it offers.
Custom scripts samples
Introduction
Note that Soffid supports different scripting languages, you can configure it in the Smart engine settings screen. Soffid 4 configures the smart engine with Javascript scripting language as the default.
Additionally, in the initial configuration of the container, we can configure the SOFFID_TRUSTED_SCRIPTS environment variable to allow the use of insecure classes. You can find this information visiting the Installing IAM Console page.
Custom scripts page
The following examples of custom scripts can be run directly on the Custom script page.
These scripts can also be used in any other Soffid script component.
The scripts have been generated for the Javascript engine.
Identity scripts
Recover a user for userName
var u = serviceLocator.getUserService().findUserByUserName("admin");
out.print("User: " + u.firstName);
Print some attributes
var u = serviceLocator.getUserService().findUserByUserName("test");
out.println("UserName: " + u.userName);
out.println("Name: " + u.firstName);
out.println("LastName: " + u.lastName);
Print by user the email
var u = serviceLocator.getUserService().findUserByUserName("test");
out.print("Email: " + u.shortName + "@" + u.mailDomain);
Print by user some additional data
llistaDadesUsuari = serviceLocator.getUserService().findUserDataByUserName("test");
for (var i=0; i<llistaDadesUsuari.size(); i++) {
  var dadaUsuari = llistaDadesUsuari.get(i);
  out.println("Atributs " + dadaUsuari.attribute + " = " + dadaUsuari.value);
}
Recover users from a json query with AI
/** Print on screen the names of all users whose username contains the letter a
 **/
var userService = serviceLocator.getService("com.soffid.iam.base.service.UserService");
var query = new com.soffid.zkdb.api.Query();
query.setFilter('userName co "a"'); // SCIM filter for username containing 'a'

var pagedResult = userService.findUsers(query);
var users = pagedResult.getResources();

if (users && users.size() > 0) {
  out.println("Users whose username contains 'a':");
  for (var i = 0; i < users.size(); i++) {
    var user = users.get(i);
    out.println(user.userName);
  }
} else {
  out.println("No users found with 'a' in their username.");
}
Create a new identity
var newUser = new com.soffid.iam.base.api.User();

newUser.userName = "jkepler";
newUser.firstName = "Johannes";
newUser.lastName = "Kepler";
newUser.userType = "I";
newUser.primaryGroup = "world";
newUser.active = true;

serviceLocator.getUserService().create(newUser);
out.println("Created "+newUser.userName);
Update an identity
var  u = serviceLocator.getUserService().findUserByUserName("jkepler");
u.userType = "E";
u = serviceLocator.getUserService().update(u);
out.println("Updated "+u.userName);
Delete an identity
var u = serviceLocator.getUserService().findUserByUserName("jkepler");
if (u!=null) {
  serviceLocator.getUserService().delete(u);
  out.println("Deleted "+u.userName);
} else {
  out.println("User not found");
}
Account scripts
Recover accounts of users in Soffid 3
la = serviceLocator.getAccountService().findAccountByJsonQuery("users.user.userName eq \"02\" ");
for(a:la) {
  out.println("Cuenta: " + a.name);
  out.println("ID: " + a.id);
  out.println("System: " + a.system + "\n");
}
Recover accounts of users in Soffid 4 with AI with pagination
/** search all account whose owner's userName contains the letter 'd' and print the name of the account and the system by the screen
 **/
var query = new com.soffid.zkdb.api.Query();
query.filter = "users.user.userName co \"a\"";
query.pageSize = 2;
query.startIndex = 0;

var pagedResult;
do {
    pagedResult = serviceLocator.getAccountService().findAccounts(query);
    var accounts = pagedResult.resources;

    for (var i = 0; i < accounts.size(); i++) {
        var account = accounts.get(i);
        out.println("Account: " + account.name + ", System: " + account.system);
    }

    query.startIndex += query.pageSize;
} while (query.startIndex < pagedResult.totalResults);
Remove attribute values of a metadata in Soffid 3
public void removeUnAttributeValues(String attribute, String system) {
  la = serviceLocator.getAccountService().findAccountByJsonQuery("system eq \""+system+"\"");
  for (a : la) {
    laa = serviceLocator.getAccountService().getAccountAttributes(a);
    for (aa : laa) {
      if (aa.attribute.equals(attribute)) {
        if (aa.value!=null) {
          out.print("accountName: "+accountName+", attribute.value: "+aa.value);
          serviceLocator.getAccountService().removeAccountAttribute(aa);
          out.println(" ---> removed");
        }
      }
    }
  }
}
removeUnAttributeValues("manager","AD");
Remove attribute values of a metadata in Soffid 4
function removeUnAttributeValues(attribute, system) {
  var query = new com.soffid.zkdb.api.Query();
  query.filter = "system eq \"" + system + "\"";

  var pagedResult = serviceLocator.getAccountService().findAccounts(query);
  var la = pagedResult.getResources();

  for (var i = 0; i < la.size(); i++) {
    var a = la.get(i);
    var laa = serviceLocator.getAccountService().getAccountAttributes(a);
    for (var j = 0; j < laa.size(); j++) {
      var aa = laa.get(j);
      if (aa.attribute == attribute) {
        if (aa.value != null) {
          out.print("accountName: " + a.name + ", attribute.value: " + aa.value);
          serviceLocator.getAccountService().removeAccountAttribute(aa);
          out.println(" ---> removed");
        }
      }
    }
  }
}
removeUnAttributeValues("manager", "AD");
Role scripts
Recover roles of a user
user = serviceLocator.getUserService().findUserByUserName("Ivan");
out.println("Usuari: " + user.userName + "\n");
rolsUser = serviceLocator.getUserService().findUserRolesHierachyByUserName(user.userName);
for(listrRolsUser:rolsUser){
  out.println("Nombre: " + listrRolsUser.name);
  out.println("Descripcion: " + listrRolsUser.description);
  out.println();
}
Print the associated roles for each account
var queryUsuaris = new com.soffid.zkdb.api.Query();
queryUsuaris.filter = "userName eq \"david.gomez\"";
var pagedUsuaris = serviceLocator.getUserService().findUsers(queryUsuaris);
var llistaUsuaris = pagedUsuaris.getResources();

for (var i = 0; i < llistaUsuaris.size(); i++) {
  var usuari = llistaUsuaris.get(i);

  var queryComptes = new com.soffid.zkdb.api.Query();
  queryComptes.filter = "users.user.userName eq \"" + usuari.userName + "\"";
  var pagedComptes = serviceLocator.getAccountService().findAccounts(queryComptes);
  var llisstacuentas = pagedComptes.getResources();

  for (var j = 0; j < llisstacuentas.size(); j++) {
    var cuenta = llisstacuentas.get(j);
    out.print("   Cuenta : " + cuenta.name);

    var llistaRole = serviceLocator.getApplicationService().findRoleAccountByAccount(cuenta.id);
    for (var k = 0; k < llistaRole.size(); k++) {
      var role = llistaRole.get(k);
      out.print("      Role: " + role.roleName + "\n");
    }
  }
}
Print for an account the roles and applications for each of them
var queryUsuaris = new com.soffid.zkdb.api.Query();
queryUsuaris.filter = "userName eq \"david.gomez\"";
var pagedUsuaris = serviceLocator.getUserService().findUsers(queryUsuaris);
var llistaUsuaris = pagedUsuaris.getResources();

for (var i = 0; i < llistaUsuaris.size(); i++) {
  var usuari = llistaUsuaris.get(i);

  var queryComptes = new com.soffid.zkdb.api.Query();
  queryComptes.filter = "users.user.userName eq \"" + usuari.userName + "\"";
  var pagedComptes = serviceLocator.getAccountService().findAccounts(queryComptes);
  var llisstacuentas = pagedComptes.getResources();

  for (var j = 0; j < llisstacuentas.size(); j++) {
    var cuenta = llisstacuentas.get(j);
    out.print("   Cuenta : " + cuenta.name);
    out.println("   ID: " + cuenta.id);

    var llistaRole = serviceLocator.getApplicationService().findRoleAccountByAccount(cuenta.id);
    for (var k = 0; k < llistaRole.size(); k++) {
      var role = llistaRole.get(k);
      out.print("      Role: " + role.roleName + "\n");
      out.println("          Aplicacion: " + role.informationSystemName);
    }
  }
}
Print the roles associated with each account
var query = new com.soffid.zkdb.api.Query();
query.filter = "";
var paged = serviceLocator.getUserService().findUsers(query);
var usuCuenta = paged.getResources();

for (var i = 0; i < usuCuenta.size(); i++) {
  var listaUsuCuenta = usuCuenta.get(i);

  out.println("Usuario: " + listaUsuCuenta.userName);
  out.println("Nombre: " + listaUsuCuenta.firstName);

  var rolsUser = serviceLocator.getUserService().findUserRolesHierachyByUserName(listaUsuCuenta.userName);
  for (var j = 0; j < rolsUser.size(); j++) {
    var listaRolsUser = rolsUser.get(j);
    out.println("Nombre del Rol: " + listaRolsUser.name);
    out.println("Descripcion: " + listaRolsUser.description);
    out.println();
  }
}
Create a new role
try {
  var newRol = new com.soffid.iam.iga.api.Role();
  newRol.name = "Rol_New_Script";
  newRol.description = "Rol Script";
  newRol.informationSystemName = "SOFFID";
  newRol.system = "soffid";
  serviceLocator.getApplicationService().create(newRol);
  out.println("Created: " + newRol.name);

} catch(e) {
    out.println("Error: " + e);
}
Update a role
var query = new com.soffid.zkdb.api.Query();
query.filter = "name eq \"Rol editado por script\" and informationSystemName eq \"APPLICATION01\"";

var pagedResult = serviceLocator.getApplicationService().findRoles(query);
var editRole = pagedResult.getResources();

for (var i = 0; i < editRole.size(); i++) {
    var role = editRole.get(i);
    out.println(role.name);
    role.name = "ROL01";
    try {
        role = serviceLocator.getApplicationService().update(role);
        out.println(role.name);
    } catch(e) {
        out.println("Error: " + e.message);
        out.println("Stack: " + e.stack);
    }
}
Delete a role
try {
  var editRole = serviceLocator.getApplicationService().findRoleById(16576);
  serviceLocator.getApplicationService().delete(editRole);
} catch(e) {
    out.println("Error: " + e.message);
}
List the roles of an application
var query = new com.soffid.zkdb.api.Query();
query.filter = "informationSystemName eq \"SOFFID\"";

var pagedResult = serviceLocator.getApplicationService().findRoles(query);
var list = pagedResult.getResources();

for (var i = 0; i < list.size(); i++) {
    var role = list.get(i);
    out.println(role.name);
}
Mail scripts
Send a simple email
serviceLocator.getMailService().sendTextMail("user@domian.com", "Test", "Hello world!");
out.println("Mail sent!");
Send emails with attached files
import javax.mail.BodyPart;
import javax.mail.internet.MimeBodyPart;
import javax.activation.DataHandler;
import javax.activation.FileDataSource;
import java.util.ArrayList;
path = "/tmp/";
name = "file.txt";
BodyPart att = new MimeBodyPart();
att.setDataHandler(new DataHandler(new FileDataSource(path+name)));
att.setFileName(name);
to = "aretha@soffid.com";
cc = "etaylor@soffid.com";
subject = "This is an email with attachment ";
body = "In this email you can see an attachment.";
mimeBodyParts = new ArrayList();
mimeBodyParts.add(att);

serviceLocator.getMailService().sendHtmlMail(to, subject, body, mimeBodyParts);
serviceLocator.getMailService().sendHtmlMail(to, cc, subject, body, mimeBodyParts);
serviceLocator.getMailService().sendTextMailToActors(new String[]{"aretha"}, subject, body, mimeBodyParts);
serviceLocator.getMailService().sendTextMailToActors(new String[]{"aretha"}, cc, subject, body, mimeBodyParts);
out.println("Mails sent!");
Event Sample scripts
On grant permission
Update a user attribute when assigning a specific permission
if (grant.roleName.equals("RS002")) {
  user = serviceLocator.getUserService().findUserByUserName(grant.user);
  if (user != null) {
    attributes = serviceLocator.getUserService().findUserAttributes(user.userName);
    if (attributes == null) {
        attributes = new HashMap();
    }
    attributes.put("language", "Spanish");
    serviceLocator.getUserService().updateUserAttributes(user.userName, attributes);
  }
}
On user change
Run a Python script when the user has assigned an specific role
if (user != null) {
  roleGrantList = serviceLocator.getApplicationService().findEffectiveRoleGrantByUser(user.id);
  for(roleGrant:roleGrantList){
    if (roleGrant.roleName.equals("SOFFID_TEST")) {
      // RUN SCRIPT
      String command = "python3 /opt/soffid/iam-console-3/conf/exampleScript.py > /opt/soffid/iam-console-3/conf/resultscript01.txt";
      Process process = Runtime.getRuntime().exec(command);
      user.comments = "ADD comments";
      user = serviceLocator.getUserService().update(user);
    }
  }
}
Agent scripts
User full name
return firstName + lastName;Create mainDomain if it doesn't exit
var mailDomain = "exampledomain";
if (mailDomain != null && mailDomain.contains("@")) {
    var mailTokens = email.split("@");
    mailDomain = mailTokens[1];
}

var service = serviceLocator.getMailListsService();
var domain = service.findMailDomainByName(mailDomain);

if (domain == null) {
    domain = new com.soffid.iam.iga.api.MailDomain();  // ← iga.api
    domain.setCode(mailDomain);
    domain.setDescription(mailDomain);
    domain.setObsolete(new java.lang.Boolean(false));
    domain = service.create(domain);
}

return mailDomain;
Recover active agents
var llistaAgents = serviceLocator.getDispatcherService().findAllActiveDispatchers();
for (var i = 0; i < llistaAgents.size(); i++) {
    var agent = llistaAgents.get(i);
    out.println("Nom: " + agent.name);
    out.println("Class Name: " + agent.className + "\n");
}
Show by a user the agents that have associates
var queryUsuaris = new com.soffid.zkdb.api.Query();
queryUsuaris.filter = "userName eq \"admin\"";
var pagedUsuaris = serviceLocator.getUserService().findUsers(queryUsuaris);
var llistaUsuaris = pagedUsuaris.getResources();
for (var i = 0; i < llistaUsuaris.size(); i++) {
var usuari = llistaUsuaris.get(i);
out.println("Usuario: " + usuari.userName);
var queryComptes = new com.soffid.zkdb.api.Query();
queryComptes.filter = "users.user.userName eq \"" + usuari.userName + "\"";
var pagedComptes = serviceLocator.getAccountService().findAccounts(queryComptes);
var llisstacuentas = pagedComptes.getResources();
for (var j = 0; j < llisstacuentas.size(); j++) {
var cuenta = llisstacuentas.get(j);
out.print(" Cuenta : " + cuenta.name);
out.println(" ID: " + cuenta.id);
var llistaRole = serviceLocator.getApplicationService().findRoleAccountByAccount(cuenta.id);
for (var k = 0; k < llistaRole.size(); k++) {
var role = llistaRole.get(k);
out.print(" Role: " + role.roleName + "\n");
out.println(" Aplicacion: " + role.informationSystemName);
out.println(" Agente: " + role.system);
}
}
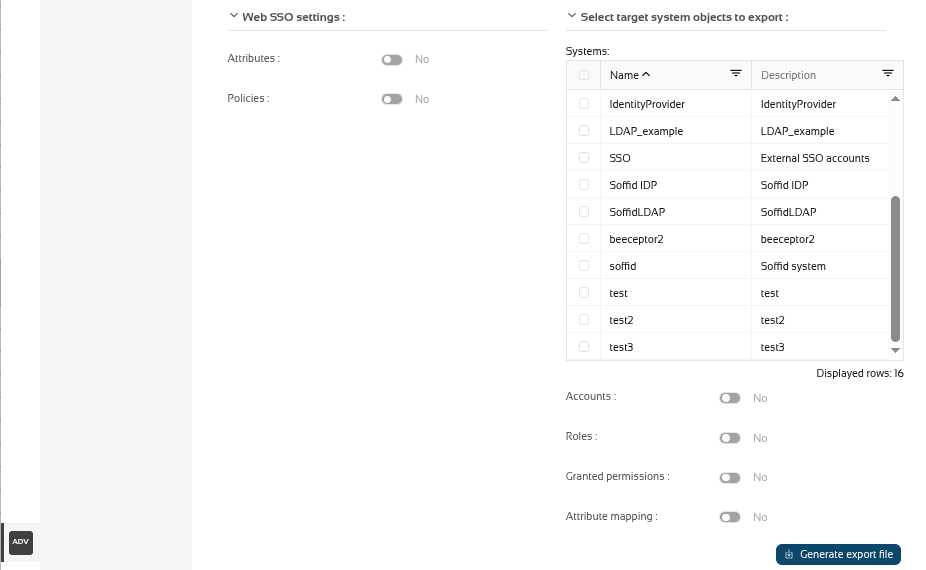
}Export settings and objects page
Description
Soffid has the functionality that allows you to export configuration, Soffid objects, and objects from target systems in a ZIP file.
Every object or configuration will be downloaded into the ZIP in a binary file. This ZIP file could be imported into another Soffid tenant to be used.
For more information, you can visit the Import settings and objects page.
Once you open the Export settings and objects, you must select the configuration, objects, and target system objects you want to export. Then you only need to click the Generate export file button to download the ZIP that will contain all the previous information selected.
It is not allowed to export the basic configuration and configuration parameters of an agent for security reasons. You must create them manually and make sure you put the same names as in the source system if you are going to import accounts.
Screen overview

Related objects
Configuration
- Metadata
- Plugins
- Business process definition
- Custom scripts
- User types
- Group types
- Account naming rules
- Password policies
- Mail domains
- Authorizations
Objects
- Users
- Information systems
- Groups
- Hosts
- Networks
- Mail lists
- Role assignment rules
- Segregation of duties
- Application access tree
- Custom objects : the custom objects created on the Metadata page
Web SSO settings
Target system objects
Actions
| Expand all | Displays all the attributes of the different blocks. |
| Collapse all | Hide all attributes of the different blocks. |
| "Types of views" | Change the view type: Classic view, Modern view, Compact design. |
| Generate export file | By clicking this button, Soffid will generate a ZIP file with the objects and configuration that you have selected and will download it to your computer. |
Others
Exporting and importing
You can export all the components you are using in your Soffid implementation, so you can use them as a backup in case something happens, or to generate a new test environment.
Once the zip file has been generated, you can import it on the Import settings and objects page, but do not worry about the exported objects. On the import screen itself, once the zip file has been uploaded, the screen will allow you to choose the objects you want to update in your Soffid instance.
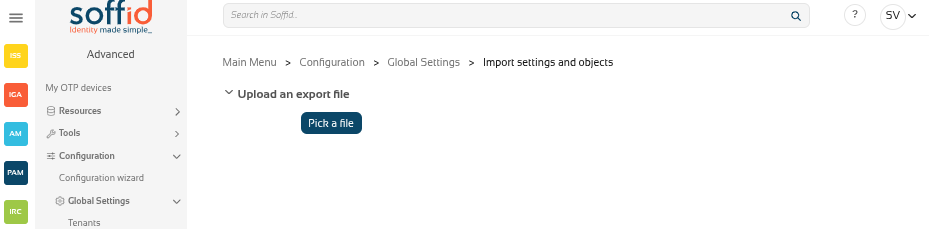
Import settings and objects page
Description
Soffid has the functionality that allows you to import configuration, Soffid objects, and objects from target systems from a ZIP file.
This ZIP file must be generated by the export action from another Soffid tenant.
For more information, you can visit the Export settings and objects page.
Once you pick the file to import, Soffid will display all the objects and configurations that you can load. You must select the proper objects and settings to import or enable the Load everything option. And finally, you must click the Proceed buttons to launch the import process. Once the process is finished, Soffid will display the result and allows you to download the log file.
It is not allowed to import the basic configuration and configuration parameters of an agent for security reasons. You must create them manually and make sure you put the same names as in the source system if you are going to import accounts.
Screen overview
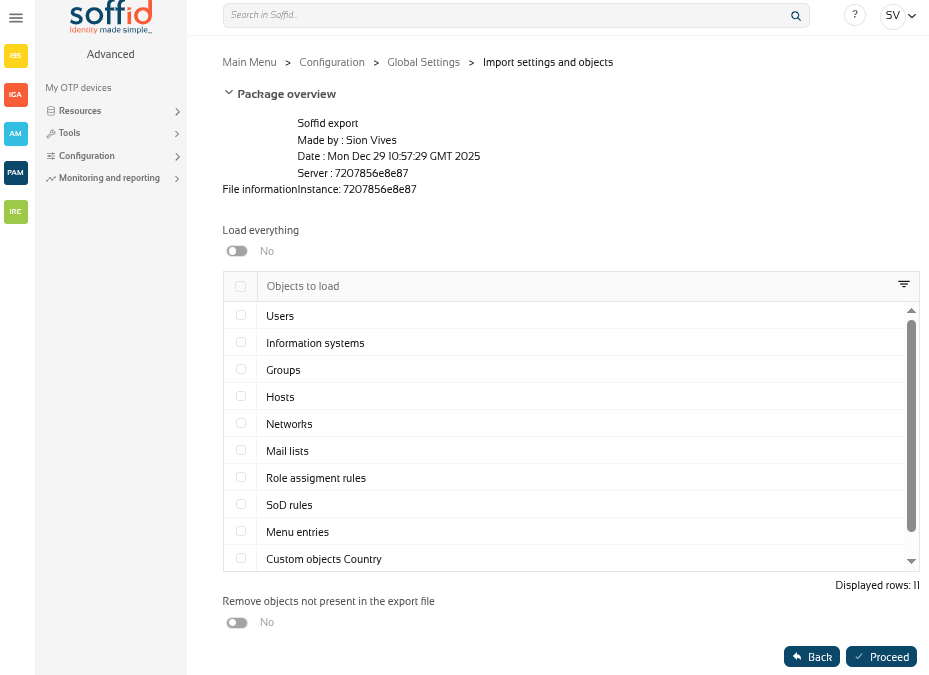

Related objects
Configuration
- Metadata
- Plugins
- Business process definition
- Custom scripts
- User types
- Group types
- Account naming rules
- Password policies
- Mail domains
- Authorizations
Objects
- Users
- Information systems
- Groups
- Hosts
- Networks
- Mail lists
- Role assignment rules
- Segregation of duties
- Application access tree
- Custom objects : the custom objects created on the Metadata page
Web SSO settings
Target system objects
Actions
Pick up page
| Pick a file | Select the backup's file |
Configuration page
| Load eveything | Enable it if you want to load all the backup, disable it if you want to select the object to import |
| Remove objects not present in the export file | Remove the Soffid objects not present in the export file, enable it if you want the exact image of the source system, disable it if you want to keep the object that only exist in this Soffid instance |
| Back | Go back to "Pick a file" |
|
Proceed |
Allows you to start the import process. |
Results page
| Restart | Go back to the configuration page |
| Download log | Allows you to download a log with the details of the importation |